mos gb fighter 1240 031115 - nibe · and maintenance instruction. fighter 1240 is a heat pump...
TRANSCRIPT

INSTALLATION AND MAINTENANCE INSTRUCTIONS
NIBE FIGHTER 1240230 V, 3 x 230 V, 3 x 400 V
MOS GB 0903-6 FIGHTER 1240031115
LEK

LE
K
LE
K
1
2L
EK
LE
K
LE
K
LE
K

Contents 1
FIGHTER 1240
GeneralConcise product description ................................. 2Setting table ........................................................ .. 2
System descriptionPrinciple of operation ............................................ 3
Front panelLayout ................................................................... 4Explanation ........................................................... 4
SettingsGeneral ................................................................. 6Basic setting ......................................................... 6Changing the room temperature ........................... 6Setting with diagrams ............................................ 8Heating curve offset -2 ......................................... 8Heating curve offset 0 .......................................... 8Heating curve offset +2 ........................................ 8Heating ................................................................. 9Hot water ............................................................... 9Standby mode ....................................................... 9Maintenance ......................................................... 9
General information for the installerTransport and storage ......................................... 10Installation ........................................................... 10Guideline values for collectors ............................. 10Inspection of the installation ................................ 10Additional heat only (electric boiler mode) ........... 10Brine pump ........................................................... 10Electric anode (enamel) ...................................... 10
Pipe connectionsGeneral ................................................................ 11Pipe connection (collector) .................................. 11Safety valves ....................................................... 12Pipe connection (heating medium) ...................... 12Pipe connections (water heater) .......................... 12Free cooling ......................................................... 13Ventilation recovery ............................................. 13Pump capacity diagrams, heating medium side .. 14Pump capacity diagrams, collector side .............. 15
Electrical connectionsConnection .......................................................... 16Resetting the temperature limiter ......................... 16Connection on delivery 230 V -5 ......................... 17Tariff connection 230 V -5 .................................... 17Connection on delivery 230 V -8, -12 .................. 18Connection on delivery 3 x 230 V ....................... 18Connection on delivery 3 x 400 V ....................... 19Tariff connection 3 x 400 V ................................. 19Max hot water temperature .................................. 20Max phase current ................................................ 20Centralised load control and load monitor ........... 21External contacts .................................................. 22Connecting the outside temperature sensor ........ 23Alarm/alarm outputs ............................................. 23Soft-start relay ..................................................... 23
Commissioning and adjustingPreparations ........................................................ 24Filling and venting the collector system ............... 24Filling the heating medium system ...................... 24Internal air vent valve, brine ................................ 24Start-up and inspection ....................................... 25Rotation check F1240-12 3x400 V ...................... 25Readjusting, heat medium side ........................... 25Readjusting, collector side .................................. 25Emptying the water heater ................................... 25
ControlGeneral ................................................................. 26Key lock ................................................................ 26Quick movement ................................................... 26Changing parameters ........................................... 27Menu tree ............................................................. 28Main menus .......................................................... 32Hot water temperature .......................................... 33Flow temperature ................................................. 34Flow temperature system 2 ................................. 36Outdoor temperature ............................................ 37Brine in / out temperature ..................................... 37Room temperature / Settings................................ 39Clock ..................................................................... 39Other settings ....................................................... 41
Service menusSettings additional heat ........................................ 43Operating settings ................................................ 43Quick start ............................................................. 46TEST Force driven operation ............................... 46Alarm log .............................................................. 47
Dealing with malfunctionsAlarm indications on the display .......................... 48Low hot water temperature or no hot water ......... 50Low room temperature ........................................ 50High room temperature......................................... 50Draining, heat medium side ................................. 51Draining, collector side ......................................... 51Helping the circulation pump to start ................... 51
Component placementComponent positions ........................................... 52Component positions 230 V -5 ............................. 53Component positions 230 V -8, -12 ...................... 53Component positions 3 x 230 V ........................... 53Component positions 3 x 400 V ............................ 53
List of componentsList of components ............................................... 54
DimensionsDimensions and setting-out coordinates .............. 55
AccessoriesEnclosed kit .......................................................... 56Accessories ......................................................... 57
Technical specificationsTechnical specifications 230 V ............................. 58Technical specifications 3 x 230 V ....................... 59Technical specifications 3 x 400 V ....................... 60

General
FIGHTER 1240
2
In order to get the ultimate benefit from your heat pump FIGHTER 1240 you should read through this Installation and Maintenance Instruction.
FIGHTER 1240 is a heat pump central for the production of heating and domestic hot water in detached and terrace houses. Soil, rock or lakes can be used as the heat source.
FIGHTER 1240 is a Swedish made quality product offer-ing a long life span and safe operation.
Completedby the installer when the heat pump is installed
Installation date
The serial number (95), should always be stated with all correspondence with NIBE.
_ _ _ _ _ _ _ _ _ _ _ _ _ _
FIGHTER 1240- _ _
Installation engineers
The type of brine – Mixing proportion/freezing point
Active drilling depth/collector length
Commissioning checksBrine temperature (in/out) ____ / ____ Pump setting ___
(Nominal temperature diff 2 - 5 °C)
Temperature heat medium (supply/return)____ / ____ Pump setting ___(Nominal temperature diff 5 - 10 °C)
Settings
Date ________ Signed ____________________________
Menu Factory settings
1.4 Start time.HW ............. 47
1.5 Stop temp.HW .............. 54
1.6 Stop Temp. XHW ............. 60
1.8 Interval XHW .............. 14
2.1 Curve coefficient ........... 9
2.2 Offset heating curve ..... 5
2.3 Flow temp./MIN .............. 15
2.4 Flow temp./MAX .............. 55
2.7 Return temp./MAX ......... 53
Position Factory settings
100 Fuse ........ 20
101 Max electr. output ...... C
102 Max boiler temp ....... C (65)
Anti-corrosion Enamel Stainless steel Copper

FIGHTER 1240 consists of a heat pump, water heater, electrical module, circulation pumps and a control sys-tem. FIGHTER 1240 is connected to the collector and heating medium circuits.
The heat from the heat source (rock, soil, lake) is taken up via a closed collector system in which a mixture of water and antifreeze circulates. Groundwater can also be used as a heat source, but this requires an inter-vening heat exchanger.
The brine emits its heat to the refrigerant in the heat pump’s evaporator. It then vaporises and is com-pressed in the compressor. The refrigerant, the tem-perature of which has now been raised, is passed to the condenser where it gives off its energy to the heat-ing medium circuit and, if necessary, to the water heat-er. After the condenser there is a built-in electrical module which cuts in if there is a high demand.
System description 3
FIGHTER 1240
Principle of operation
Heating mediumpump
Immersion heater
Three-way valve
Heating medium (VB), flow
Heating medium (VB), return
Evaporator
Cooling medium pump
CompressorCondenser
HW CW
Hot water circulation
Expansion valveRefrigerating module
Double jacket
Cooling medium (KB) in
Cooling medium (KB) out
Water heater
Heating return
Heatingflow
The heating medium side and the hot water side must be fit-ted with the necessary safety equipment in accordance with the applicable regulations.

A BI II III I II
5 0 . 0 ° CVa r m v a t t e n t e m p e r a t u r
13.431.0 P
A
Front panel
FIGHTER 1240
4
Switchwith three positions 1 - 0 - :1 Normal mode. All control functions connect-
ed. 0 Boiler completely switched off. Standby. Only the circulation pump and
immersion heater step 2 are operational.
The switch must not be turned to 1 or “ ” before filling the boiler with water.
Display
Switch
Left keypad
Heating curve offset
Display First row:
Compressor symbolIndicates when the compressor is opera-tional.
Supplement symbolIndicates when immersion heater is con-nected. The line indicates which power step/steps are currently connected.
I Step 1 is connected.II Step 2 is connected.I II Steps 1+2 are connected.
Layout
B
A
D
E
Right keypad
Hot water symbolTap is shown when the heat pump charges the hot water. A is shown when a temperature increase is
in progress. B is shown when a time based temperature
increase is in progress, for example, peri-odic.
Circulation pump symbol I Shown when the circulation pump is
operational.II Shown when circulation pump 2 is oper-
ational (the accessory ESV 21 is required).
Heating system symbols Shown when house heating is in progress.
Second row: Value of the current parameter.
Third row: Description of current display parame-ter. Hot water temp is normally shown.
F
B
Explanation
A
I II III
A B
I IIA
Status lampC

Front panel 5
FIGHTER 1240
Fourth row: Shows menu numbers, key lock, clock symbol and time
Left keypad
Right keypad
Offset heating curveE
D
F
Operating mode This button is used to set the required operating mode with regard to permit-ting/blocking the circulation pump and additional energy. The change does not need to be confirmed with the enter but-ton.
The different operating modes are:Auto mode: FIGHTER 1240 automatically selects the operating mode by taking the outdoor temperature into account. The circulation pump and the immersion heater are permitted to run as needed.Summer mode: Only production of hot water using FIGHTER 1240. The circulation pump and immersion heater are blocked. However, when Extra hot water is activated the immersion heater is connected.Spring/Autumn mode: Production of heating and hot water using FIGHTER 1240. The circulation pump is operational. The immersion heater is disabled. How-ever, when Extra hot water is activated the immersion heater is connected.Only additional heat: Compressor and brine pump blocked. The function can be activated/deactivated by pressing the “operating mode button” for 7 seconds.
The current operating mode is shown on the display when the button is pressed and the mode changes when you continue to press the button. The display returns to the normal display mode once the enter but-ton is pressed.In alarm mode the operating mode changes to winter mode and additional heat engages.
Extra hot water The Extra hot water function is activated using this button. The change does not need to be confirmed with the enter but-ton.
A: Means that the hot water temperature is increased to 60 °C (adjustable). The temperature then returns to the normal value.When A comes on the function is activated.When A goes out the function is deactivated.Press once to give extra hot water for 3 hours.Press twice to give extra hot water for 6 hours.Press three times to give extra hot water for 12 hours.Press four times to give extra hot water for 24 hours.Press five times to deactivate the function.
Plus buttonThis button is used to scroll through the menu system (forwards) or increase the value of the selected parameter.
See the section Control — General.
Minus buttonThis button is used to scroll through the menu system (backwards) or lower the value of the selected parameter.
See the section Control — General.
Enter buttonThis button is used to select a lower menu in the menu system, to activate a parameter change as well as confirm a parameter change.
See the section Control — General.
This knob is used to change the heating curve's parallel offset and in doing so the room temperature. Turning clock-wise increases the room temperature. When the knob is turned menu 2.0 is shown on the display and the value for the calculated flow temperature chang-es.
No function.
B
A key lock can be activated in the main menus by simultaneously pressing the plus and the minus buttons. The key symbol will then be shown on the display. The same procedure is used to deacti-vate the key lock.
The symbol becomes visible when a tim-er function is selected, for example, peri-odic lowering of the flow or time setting for extra hot water.
The symbol becomes visible when pool heating is in progress.P
Status lampC
During normal operation, the status lamp lights green. In the event of an alarm, it lights red.

Settings
FIGHTER 1240
6
The indoor temperature depends on several factors. Sunlight and heat emissions from people and house-hold machines are normally sufficient to keep the house warm during the warmer parts of the year. When it gets colder outside, the heating system must be started. The colder it is outside, the warmer radiators and floor heating system must be.The heat pump is controlled by built-in sensors for flow and return brine temperatures (collector). Brine return temperatures can, if so required, be limited to a mini-mum (e.g. for ground water systems).Heat production is usually controlled using the floating condensing principle. This means that the temperature level needed for heating at a given outside tempera-ture is produced on the basis of values taken from sensors for outside temperature and flow temperature. As an option, room sensors can also be used to com-pensate for deviations in room temperature, see menu 6.1 Room compensation. However, the correct basic settings must be made on the boiler first, see the section Settings — Basic set-ting.
The basic heating is set using menu 2.1 and with the Offset heating curve knob.
If the required room temperature is not obtained, read-justment may be necessary.
NOTE! Wait one day between settings so that the tem-peratures have time to stabilise.
Readjustment of basic settings. Cold weather conditions When the room temperature is too low, the Curve
coefficient value is increased in menu 2.1 by one increment.
When the room temperature is too high, the Curve coefficient value is lowered in menu 2.1 by one increment.
Warm weather conditions If the room temperature is low, increase the heating
curve offset setting by one step.
If the room temperature is high, reduce the heating curve offset setting by one step.
Basic setting
Heating curve offset
General
Menu 2.1 Curve coefficient
9C u r v e c o e f f i c i e n t2 . 1

Settings 7
FIGHTER 1240
Changing the room temperature manually.
If you want to temporarily or permanently lower or raise the indoor temperature relative to the previously set temperature, turn the Heating curve offset knob anticlockwise or clockwise. One scale marking corres-ponds to a change of about one degree in the room temperature.
NOTE! An increase in the room temperature may be inhibited by the radiator or floor heating thermostats, if so these must be turned up.
Changing the room temperature
A BI II III I II I IIA B
5 0 . 0 ° CVa r m v a t t e n t e m p e r a t u r
13.431.0 P
Heating curve offset

Settings
FIGHTER 1240
8
The heating control system of the FIGHTER 1240 is controlled by the outside temperature. This means the supply temperature is regulated in relation to the cur-rent outdoor temperature.
The relationship between the outside temperature and the flow temperature is set using the control system, also see section Settings — Basic setting.
The diagram is based on the dimensioned outdoor temperature in the area and the dimensioned supply temperature of the heating system. When these two values meet, the heating control’s curve slope can be read. This is set under menu 2.1, Curve coefficient.
Offset heating curve -2Setting using diagrams
30
40
50
60
70°C
FR
AM
LED
NIN
GS
TE
MP
ER
AT
UR
- 40 °C
UTETEMPERATUR
- 10010 - 20 - 30
15 14 13 12 11 10 9
8
7
6
5
4
3
2
1
VÄRMEKURVA
- 5
+ 5
FÖRSKJUTNINGVÄRMEKURVA (0)
15 14 13 12 11 10
9
8
7
6
5
4
3
2
1
- 40 °C
UTETEMPERATUR
- 10010
- 5
+ 5
30
40
50
60
70°C
FR
AM
LED
NIN
GS
TE
MP
ER
AT
UR
- 20 - 30
FÖRSKJUTNINGVÄRMEKURVA (-2)
VÄRMEKURVA
1514 13 12 11 108
7
6
5
4
3
2
1
- 40 °C
UTETEMPERATUR
- 10010
- 5
+ 5
30
40
50
60
70°C
FR
AM
LED
NIN
GS
TE
MP
ER
AT
UR
- 20 - 30
FÖRSKJUTNINGVÄRMEKURVA (+2)
9
VÄRMEKURVA
Offset heating curve 0
Offset heating curve +2
A BI II III I II I IIA B
5 0 . 0 ° CVa r m v a t t e n t e m p e r a t u r
13.431.0 P
Heating curve offset
Menu 2.1 Curve coefficient
9C u r v e c o e f f i c i e n t2 . 1
The Offset heating curve knob is then set. A suitable value for floor heating is -1 and for radiator systems -2.
HEATING CURVE
OFFSET HEATING CURVE
SUPP
LY T
EMPE
RAT
UR
E
OUTSIDE TEMPERATURE
HEATING CURVE
OFFSET HEATING CURVE
SUPP
LY T
EMPE
RAT
UR
E
OUTSIDE TEMPERATURE
HEATING CURVE
OFFSET HEATING CURVE
SUPP
LY T
EMPE
RAT
UR
E
OUTSIDE TEMPERATURE

Settings / Maintenance 9
FIGHTER 1240
To be able to produce heat when the collector circuit is disconnected, or during servicing, the heat pump can be set to standby mode, in which case heating is pro-duced only by the immersion heater. Hot water is not produced in standby mode. The compressor and col-lector system are then shutoff and only the heat medi-um pump and the immersion heater are active. The temperature is controlled by the thermostat (3). To select standby mode, set the switch (8) to “ ”.
Electrical step 2 is connected in standby mode.
Standby mode
When there is a demand for hot water, the heat pump gives this priority and devotes its entire output to water heating. No room heat is produced in this mode. Maxi-mum time for hot water charging is adjustable using menu 1.3. Heating is then produced for the remainder of the time, which is adjustable from menu 1.2, before any further hot water charging can take place.
If the electrical module is connected for heat produc-tion before hot water charging, one electrical stage remains operative during hot water operation. Hot water charging starts when the hot water sensor has fallen to the set start temperature (25 — 55 °C), adjustable on menu 1.4. Hot water charging stops when the water temperature on the hot water sensor (88) has reached (30 — 60 °C), adjustable on menu 1.5. Charging is also possible when the heat pump has reached its stop level for heating mode at the same time as less than 2 °C remains to the hot water start. The purpose of this is to minimise the number of starts.
For occasional higher demand for hot water, the Extra hot water function can be used to raise the tempera-ture to about 70 °C for 3 – 24 hours (press the Extra hot water button once). When the electrical module is connected for extra hot water the compressor stops. The value when the compressor stops and the immer-sion heater kicks in is adjustable between 50 – 60 °C in menu 1.7.
The supply of heat to the house is regulated in accord-ance with the chosen setting of the regulating curve (curve slope and offset). After adjustment, the correct amount of heat for the outside temperature is supplied. The heat pump’s flow temperature (menu 2.0) will hov-er around the theoretical required value (the value in brackets on the display). For subnormal temperatures the control system calculates a heating deficit in the form of degree-minutes, which means that heating production is accelerated. The larger the subnormal temperature, the greater the heat production.
There are four stages to heat production, one for the heat pump and three for the electrical module.
Heating
Hot water
3
8
Safety valves■ The safety valves for the heating system and hot
water heater may release a small amount of water in the event of temperature changes.
■ The overflow water pipes from the safety valves must be uninhibited and be visible.
■ The safety valves must be inspected regularly to prevent clogging. This is normally done by tur-ning the safety valve knob anti-clockwise. The water should then flow through the safety valve. The safety valve must be replaced if this does not happen.
The appearance and location of the safety valves dif-fer between different installations. Contact your instal-ler for information.
Maintenance

General information for the installer
FIGHTER 1240
10
Current regulations require the heating installation to be inspected before it is commissioned. The inspec-tion must be carried out by a suitably qualified person and should be documented. The above applies to closed heating systems. If the heat pump is replaced, the installation must be inspected again.
FIGHTER 1240 is placed on a firm base, preferably a concrete floor or foundation. Install FIGHTER 1240 with its back to an outside wall, ideally in a room where noise does not matter. If this is not possible, avoid plac-ing it against a wall behind a bedroom or other room where noise may be a problem. Any wall that backs on to a bedroom should be fitted with sound insulation. Route pipes so they are not fixed to an internal wall that backs on to a bedroom or living room.
Installation
Guideline values for collectors
Inspection of the installation
For use with 40 x 2.4 PN 6.3 PEM hose.
The length of the collector hose varies depending on the rock /soil conditions and on the heating sys-tem, i.e. radiators or floor heating.Max length per collector should not exceed 400 m.
Where there is more than one collector, they must be connected in parallel, with a means of adjusting the flow.
For surface soil heat, the hose should be buried at a depth of about 1 metre and the distance between the hoses should be at least 1 metres.
For several bore holes, the distance between the holes must be at least 15m.
FIGHTER 1240 can be used with only additional heat (electric boiler) to produce heating and hot water, for example, before the collector installation is complete. See menu 9.2.4. NOTE! Select Off to deactivate only additional heat and select the required oper-ating mode using the operating mode button.
The brine pump normally follows the operation of the heat pump. There is a special operating mode for con-tinuous operation for 10 days, followed by return to normal mode (this may be used before stable circula-tion has been established). See Settings, menu. 9.2.12.
Additional heat only (electric boiler mode)
Brine pump
+ 2 0 - 2
1
R
0
H M f l o w 4 9 ( 5 0 ) ° C H o t w a t e r 5 1 ° C
+ 2
0 - 2
1 R 0
H M
f l o w 4
9 ( 5
0 ) ° C
H o t
w a t
e r 5
1 ° C
FIGHTER 1240 is equipped with an electric anode to protect the enamelled hot water heater. The electric anode works automatically when FIGHTER 1240 is switched on and is positioned behind the lower, serv-ice cover.
■ A green LED on the transformer indicates that the electric anode is operational.
■ When the LED is not lit the anode is not receiving power; call the installer when this can not be recti-fied.
■ When the LED flashes red, contact the installer.
Electric anode (enamel)
The FIGHTER 1240 must be transported and stored upright and dry. The FIGHTER 1240 may however be carefully laid on its back when being moved into a building.
Transport and storage
Type Surface soil heat, recommended col-
lector length
Rock heat, recom mended active drilling depth
5 200 – 300 m 70 – 90 m
6 250 – 400 m 90 – 110 m
8 325 – 2x250 m 120 – 140 m
10 400 – 2x300 m 140 – 170 m
12 2x250 – 2x350 m 160 – 190 m

Pipe connections 11
FIGHTER 1240
Factors to be taken into account when designing the collector layout are geographical position, type of rock/soil and cover factor of the heat pump.
When installing the collector hose ensure it rises con-stantly towards the heat pump to avoid air pockets. If this is not possible, install high points to vent the air.
All collector pipes in heated rooms must be insulated against condensation. The level vessel (NK) must be installed as the highest point in the collector system and on the incoming pipe before the brine pump. Note that condensation may drip from the level vessel. Posi-tion the vessel so that this does not harm other equip-ment.
As the temperature of the collector system can fall below 0 °C it must be protected against freezing down to -15 °C. One litre of ready mixed brine per meter of collector hose (applies when using PEM-hose 40 x 2.4 PN 6.3) is used as a guide value when making the volume calculation.
Details of the antifreeze used must be shown on the level vessel.
Pipe installation must be carried out in accordance with current norms and directives. The heat pump can operate up to a return temperature of about 58* °C and an outgoing temperature of about 70* °C from the heat pump. The compressor produces up to 65* °C, the rest is obtained using additional heating.
* Applies to 5 kW 1-phase, 6–12 kW 3-phase 3 x 400 V.
The other heat pumps has a max return temperature of approximately 50 °C and an outgoing max tempera-ture from the heat pump of approximately 60 °C.
Since the FIGHTER 1240 is not fitted with shut-off valves, these must be fitted outside of the heat pump to make future servicing easier.
During assembly of FLM the pipes for the heat medi-um and water heater and possibly hot water circulation are routed backwards. The distance between FIGHT-ER 1240 and the wall ought to be 50 mm.
General
NOTE!The pipe system needs to be flushed
out before the heat pump is connected so that debris cannot damage
component parts.
Shut-off valves should be installed as close to the heat pump as possible. Fit the supplied particle filter on the incoming pipe.
In the case of connection to an open groundwater sys-tem, an intermediate frost-protected circuit must be provided, because of the risk of dirt and freezing in the evaporator. This requires an additional heat exchang-er.
Pipe connections (collector)
LEK
The enclosed cover plates are fitted on the side panel, see figure
The collector circuit may be connected from the left or from the right. The lower side panels are swapped over to suit the chosen connection option. The enclosed connecting pipes for the brine are secured using the clips in the punched tabs that are folded down on the side in question.
VV
KV
KBin
KBut
EXP
SF
NK
AVSÄV
P
BK/JK SF
Pipe connections
FIGHTER 1240
12
Pipe connections for the heat medium side are made at the top. All required safety devices, shut-off valves (as close to the heat pump as possible), and particle filter (supplied) are fitted.
When connecting to a system with thermostats on all radiators, a relief valve must be fitted, or some of the thermostats must be removed to ensure sufficient flow.
Pipe connections (heating medium)
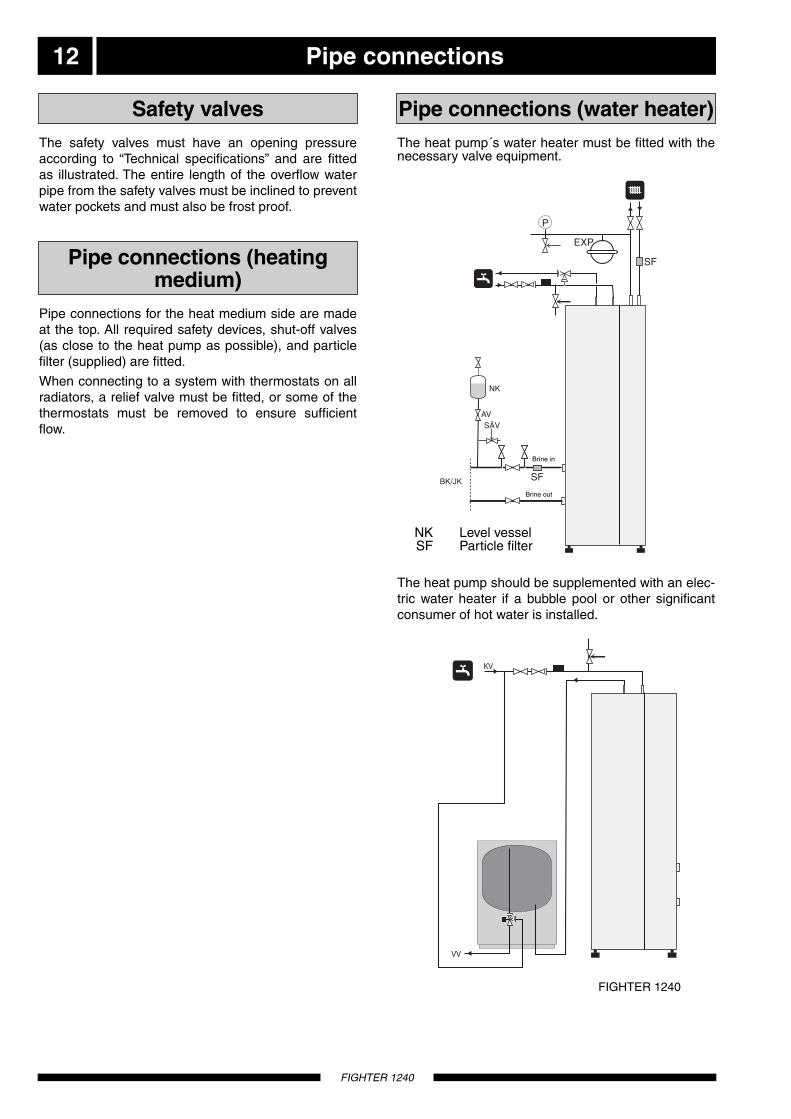
The heat pump´s water heater must be fitted with the necessary valve equipment.
Pipe connections (water heater)
NK Level vessel SF Particle filter
FIGHTER 1240
Brine in
Brine out
The heat pump should be supplemented with an elec-tric water heater if a bubble pool or other significant consumer of hot water is installed.
The safety valves must have an opening pressure according to “Technical specifications” and are fitted as illustrated. The entire length of the overflow water pipe from the safety valves must be inclined to prevent water pockets and must also be frost proof.
Safety valves

SF
KBin
KBut
SÄV
EXP
BV
P
Fläktkonvektor
KBin
KBut
SF
SÄV
FLM 30
Frånluft Ø 160
Avluft Ø 160
EXP
BV
RV
P
Pipe connections 13
FIGHTER 1240
The installation can be supplemented with the exhaust air module FLM to provide ventilation recovery.
Pipes and other cold surfaces must be insulated with diffusion-proof material to prevent condensation.The collector circuit should be fitted with a pressure expansion vessel. If there is a level vessel, this should be replaced.
The equipment can be supplemented with a fan coil unit to make the connection of ambient cooling possi-ble.
To avoid condensation, all pipes and other cold surfaces must be isolated with diffusion-proof material.
Where the cooling demand is high, fan convectors with drip trays and drain connection are needed.The collector circuit should be fitted with a pressure expansion vessel. If there is a level vessel, this should be replaced.
Free cooling Ventilation recovery
Brine in
Fan convectors
Brine out
Brine in
Extract airØ 160
Exhaust airØ 160
Brine out

Pipe connections
FIGHTER 1240
14
Pump capacity diagrams, heating medium side
LEK
GR
UN
DFO
STyp
eU
PS
25 -
60
130
P/N
:59526447
230V
-
HE
JS
AN
PC
;0017N
IBD
K50H
z
IP 44
TF
110
Cla
ss
HM
ax. 1
0bar
2.5
uF
45
0.2
065
0.3
090
0.4
0
1m(A
)P,
(W)
The pump is adjust-able to adjust the flow: 1, 2, or 3.
0,2 0,4 0,6 0,8 1,0 1,20
Flöde
l/s0
10
20
30
40
50
60
70
80
90
1 2 3
kPaTillgängligt tryck
Flow
Available pressure FIGHTER 1240 12
0
kPa
0,1 l/s 0,2
Tillgängligt tryck
Flöde
0,3 0,4
20
40
60
10
30
50
70
00,70,60,5
FIGHTER 1225 5
1 2 3
20
40
60
10
30
50
70kPa
0
Tillgängligt tryck
Flöde
FIGHTER 1225 8
0 l/s 0,1 0,2 0,3 0,4 0,7 0,8 0,90,60,5
1 2 3
20
40
60
10
30
50
70kPa
0
Tillgängligt tryck
Flöde
FIGHTER 1225 10
0 l/s 0,1 0,2 0,3 0,4 0,7 0,8 1,00,90,60,5
1 2 3
20
40
60
10
30
50
70kPa
0
Tillgängligt tryck
Flöde
FIGHTER 1225 10
0 l/s 0,1 0,2 0,3 0,4 0,7 0,8 1,00,90,60,5
1 2 3
FIGHTER 1240 5
FIGHTER 1240 8
FIGHTER 1240 10
FIGHTER 1240 6 (3 x 230V 8kW)
Available pressure
Flow
Available pressure
FlowFlow
20
40
60
10
30
50
70kPa
0
Tillgängligt tryck
Flöde
0,1 0,2 0,3 0,4 0,7 0,80,60,5
FIGHTER 1225 6
0 l/s
1 2 3
FIGHTER 1240, 3 x 230V 6kWAvailable pressure
Flow
Flow
Available pressure
Available pressure

Pipe connections 15
FIGHTER 1240
Pump capacity diagrams, collector side
The pump is adjust-able to adjust the flow: 1, 2, or 3 (4).
LEK
1
2
LEK
GR
UN
DFO
STyp
eU
PS
25 -
60
130
P/N
:59526447
230V
-
HE
JS
AN
PC
;0017N
IBD
K50H
z
IP 44
TF
110
Cla
ss
HM
ax. 1
0bar
2.5
uF
45
0.2
065
0.3
090
0.4
0
1m(A
)P,
(W)
FIGHTER 1240 12 kWFIGHTER 1240 5–10 kW
Flöde0 0,1 0,2 0,3 l/s0,4 0,5 0,6 0,7 10,90,8
kPa
30
40
110
70
Tillgängligt tryck
90
50
60
80
100
12
34
FIGHTER 1240 12
Available pressure
Flow
FIGHTER 1235 5 kPa
0
10
80
40
Tillgängligt tryck
Flöde
60
0 0,1 0,2 0,3 l/s 0,4 0,5 0,6 0,7 0,8
1 2 3
20
30
50
70
FIGHTER 1240 5
FIGHTER 1135/1235 10kPa
0
10
80
40
Tillgängligt tryck
Flöde
60
0 0,1 0,2 0,3 l/s 0,4 0,5 0,6 0,7 1 0,9 0,8
1 2 3
20
30
50
70
FIGHTER 1240 10
Available pressure
Available pressure
Flow
Flow
1 2 3
FIGHTER 1225 6 kPa
0
10
80
40
Tillgängligt tryck
Flöde
60
0 0,1 0,2 0,3 l/s0,4 0,5 0,6 0,7 0,8
20
30
50
70
FIGHTER 1235 8kPa
0
10
80
40
Tillgängligt tryck
Flöde
60
0 0,1 0,2 0,3 l/s 0,4 0,5 0,6 0,7 1 0,9 0,8
1 2 320
30
50
70
FIGHTER 1240, 3 x 230 V 6kW
FIGHTER 1240 8 (3 x 230V 10kW)
Available pressure
Available pressure
Flow
FIGHTER 1235 6kPa
0
10
80
40
Tillgängligt tryck
Flöde
60
0 0,1 0,2 0,3 l/s 0,4 0,5 0,6 0,7 1 0,9 0,8
1 2 320
30
50
70
FIGHTER 1240 6 (3 x 230V 8kW)
Available pressure
Flow Flow

Electrical connection
FIGHTER 1240
16
FIGHTER 1240 must be installed via an isolator switch with a minimum breaking gap of 3 mm.
Incoming electricity connected to terminal block -X9 via cable gland (99)
Other electrical equipment, except the outdoor sensor and the current transformers, is connected at the factory. ■ Disconnect the heat pump before insulation testing
the house wiring. ■ The heat pump is not reconnectable between
1-phase and 3-phase; neither can it be reconnec-ted between 3 x 230 V and 3 x 400 V.
■ If a miniature circuit breaker is used this should have motor characteristic “D” (compressor opera-tion). For fuse ratings, see technical specifications.
■ Check that motor protection (26) is set to “auto-mode” and that the operating current has been set correctly, see technical specifications, “Max. opera-ting current, compressor”.
■ When the building is equipped with an earth-fault breaker the heat pump should be equipped with a separate one.
■ Connection must not be carried out without the permission of the electricity supplier and must be carried out under the supervision of a qualified electrician.
Electrical connectionsThe automatic heating control system, circulation pumps and their wiring, are internally fuse protected with a miniature circuit breaker (1).
Connection
NOTE!Reset the temperature limiter, it may
have tripped during transport.
NOTE! The switch (8) must not be turned to 1
or “ ” until the boiler has been filled with water. Otherwise the
temperature limiter, thermostat, compressor or the immersion heater
can be damaged.
NOTE! Electrical installation and service must be carried out under the supervision of a qualified electrician in accordance
with the stipulations in force.
Temperature limiterThe temperature limiter (25) cuts off the supply to the immersion heater if the temperature rises to between 90 and 100°C; it can be manually reset by pressing the button on the temperature limiter.ResettingThe temperature limiter (25) is accessible behind the cover for right-hand electrical connection. The tempe-rature limiter is reset by firmly pressing in its button.
LEK
LEK
-X9
-X9
25
1
99
8
26
LE
K
1 mm
5,5 mm

Electrical connection 17
FIGHTER 1240
Connection on delivery
230 V: The heat pump is connected on terminal block -X9 to 230 V + PE via the junction box with fus-es.
Connection on delivery 230 V -5
N L PE
-X9
Connection on delivery
230 V: The heat pump is connected on terminal block -X9 to 230 V + PE via the junction box with fus-es.
Connection on delivery 230 V -8, -12N L PE
-X9

Electrical connection
FIGHTER 1240
18
Connection on delivery
The heat pump is connected on terminal block -X9 to 3 x 400V + N + PE via the junction box with fuses.
Connection on delivery 3 x 400 V + N + PE
Connection on delivery
3 x 230 V: The heat pump is connected on terminal block -X9 to 3 x 230 V + PE via the junction box with fuses.
Connection on delivery 3 x 230 V (only applies to Norway)
L1 L2 L3 PE
-X9
L1N L2 L3 PE
-X9

Electrical connection 19
FIGHTER 1240
When a separate supply to the compressor, immer-sion heater and the control system is required, to give them separate tariff control, the following should be done:■ Remove the 3 cables (with zero number 059, 061
and 063) between terminal block -X9 and the com-pressor's contact (69). Connect the supply directly to the contactor.
■ Remove the 2 bridges on terminal block -X9 and connect control voltage to the terminals marked L and N.
Tariff connection 3 x 400 V + N + PE
L10LN L2 L3 PEL1 L2 L3 PE
Tariff connection
69
Imm
ersi
on h
eate
r co
nnec
tion
Con
trol
sys
tem
con
nect
ion
Com
pres
sor
conn
ectio
n
-X9
Strappings

Electrical connection
FIGHTER 1240
20
Max hot water temperature
The setting of the different maximum hot water tem-peratures is done using the knob (102) on the load monitor card (2). The setting can be checked in the menu 9.2.1.
*Factory setting.
65 C*
75 E
50 A
Boiler temperature Knob position
55 B
70 D
80 F
Max phase current
The setting of the different max outputs is done using the knob (101) on the load monitor card (2). The set-ting can be checked in the menu 8.3.5.
*Factory setting.
9 6 C* 14,4 15,7 16,6 18,1
9 0 A 5,8 7,2 8,0 9,5
Max electrical Immersion heater, Knob Max phase (A) Max phase (A) Max phase (A) Max phase (A)
output output (kW) position FIGHTER 1240 -6 FIGHTER 1240 -8 FIGHTER 1240 -10 FIGHTER 1240 -12
9 3 B 10,1 11,5 12,3 13,8
9 9 D 18,8 20,2 21,0 22,5
6 4 C* 26,8 34,2 40,7
6 0 A 9,6 17,0 23,5
Max electrical Immersion heater, Knob position Max phase (A) Max phase (A) Max phase (A) output output (kW) FIGHTER 1240-5 FIGHTER 1240 -8 FIGHTER 1240 -12
6 2 B 18,2 25,6 32,1
6 6 D 35,6 43,0 49,5
6 4 C* 21,9 24,3 26,6 32,3
6 0 A 9,5 12,0 14,3 20,0
Max electrical Immersion heater, Knob Max phase (A) Max phase (A) Max phase (A) Max phase (A)
output output (kW) position FIGHTER 1240 -6 FIGHTER 1240 -8 FIGHTER 1240 -10 FIGHTER 1240-12
6 2 B 15,7 18,2 20,5 26,2
6 6 D 28,2 30,7 33,0 38,7
3 x 230 V
230 V
3 x 400 V
LEK
101
102
2

Electrical connection 21
FIGHTER 1240
Centralised load control/TariffIn those cases centralised load control or tariff control is used this can be connected to the terminal block X1 on the load monitor card (2), which is positioned behind the upper service cover.
Tariff A, the immersion heater is disconnected. Connect a potential free contact function to terminals X1:5 and X1:7.
Tariff B, the compressor is disconnected. Connect a potential free contact function to terminals X1:6 and X1:7.
Tariff A and Tariff B can be combined.
A made contact results in the electrical output being disconnected.
Load monitorNOTE! No function in a 1-phase installation.When many power consumers are connected in the property at the same time as the electric element is operating, there is a risk of the property's main fuse tripping. The heat pump is equipped with an integrated load monitor that controls the electrical steps on the electric element.
When the phase current is so high that there is a risk of the main fuses tripping, the load monitor reduces the electric element output until the risk of the main fuses tripping has passed. When the general power consumption drops, the electric element will be con-nected again.
A current transformer should be installed on each incoming phase conductor in to the distribution box to measure the current. The distribution box is an appro-priate installation point.
Connect the current transformers to a multi-core cable in an enclosure next to the distribution box. Use unscreened multi-core cable of at least 0.50 mm2, from the enclosure to the heat pump.
The cable is connected in the heat pump to the EBV-card on terminals X1:8 - X1:11. X1:11 is the common terminal block for the three current transformers.
The size of the property's main fuse is set using the knob (100) on the EBV-card. The setting can be checked in the menu 8.3.4.
Centralised load control and load monitor
LPEN 1 L2 L3
Incoming electricityElectrical distribution unit
To heat pump
Pressure/level sw
itchbrine
External com
pensation 2
Pool tem
perature
Current transform
er L3
Current transform
er L2
Current transform
er L1
External com
pensation 1
Outdoor tem
perature sensor
Tariff B
Tariff A
LEK
2100
X1

Electrical connection
FIGHTER 1240
22
RG 10, sensor for changing the room temperatureAn external sensor can be connected to FIGHTER 1240 to change the flow temperature and with that set the room temperature, for example, a room sensor (RG 10, accessory). The sensor is connected on terminals X1:3, X1:4 and X1:14 on the load monitor card (2).
Activated in menu 9.2.18The difference between the room temperature and the set room temperature affects the flow temperature. The required room temperature is set using the knob on RG 10 and is shown in menu 6.0.
Contact for changing the room temperature An external contact function can be connected to FIGHTER 1240 to change the flow temperature and in doing so change the room temperature, for example, a room thermostat (accessory) or a timer. The contactor should be potential free and momentary and is con-nected to terminals X1:3 and X1:4 on the load monitor card (2).When the contact is made, the heating curve offset is changed by the number of steps shown here. The val-ue is adjustable between -10 and +10. The value for the change is set on menu 2.5, External adjustment.
Contact for activation of Extra hot waterAn external contact function can be connected to FIGHT-ER 1240 for activation of the Temporary extra hot water function. The contactor should be potential free and momentary and is connected to terminals X4:3 and X4:4 on the load monitor card (2).When the contact makes for at least one second, the Temporary Extra hot water function is activated. An auto-matic return to the previously set function occurs after 24 hours.
NV 10, pressure/level/flow monitor brine When a level monitor NV 10 (accessory) is required for the brine installation, this can be connected to termi-nals X1:16 and X1:17. In order for this to be active you must change menu 9.2.11, brine pressostat, to On.The contact shall be made during normal operating conditions.
External contactsP
ressure/level switch
brine
External com
pensation 2
Pool tem
perature
Current transform
er L3
Current transform
er L2
Current transform
er L1
External com
pensation 1
Outdoor tem
perature sensor
Tariff B
Tariff AE
xtra hot water
Hot w
ater, jacket
Hot w
ater, top
Return sensor 1
Flow
sensor 1
Flow
sensor 2
Return sensor 2
2
X1
X4

Electrical connection 23
FIGHTER 1240
Install the outside temperature sensor in the shade on a wall facing north or north-west, so it is unaffected by the morning sun. The sensor is connected to terminals X1:1 and X1:2 on the EBV-card (2). Use a two-wire cable of at least 0.5 mm2.
If the outside temperature sensor cable runs close to power cables, screened cable should be used.
All conduits should be sealed to avoid condensation in the sensor capsule.
AlarmA common alarm is given in the following instances:High pressure switch (HP) has tripped. Indicated as HP alarm.LP pressure switch (LP) has tripped. Indicated as an LP alarm.The motor cut-out (MP) has tripped, indicated by an MP alarm.Pressure/level monitor brine (accessory) indicated as pressure/level brine.Brine temp. low, indicates a low brine temperature. Not indicated when menu 5.2 is set to automatic return On. Flow sensor fault is indicated by a Sensor alarm. Hot water sensor fault is indicated by a Sensor alarm.External indication of common alarms is possible through the relay function on the load monitor card (2), terminals X2:1—3. The picture shows the relay in the alarm position.
When switch (8) is in the 0 or “ ” position the relay is in the alarm position.
Alarm/alarm outputs
Connecting the outside temperature sensor
Outdoor tem
perature sensor
Alarm output,common alarm
FIGHTER 1240 is equipped with a soft-start relay (97), which limits the inrush current, see section Technical specifications.The compressor must not be forced to start with peri-ods shorter that 1 start per 15 minutes.
Soft-start relay*
*Applies to 3 x 400 V and 1 x 230 V -8 and -12
X2
LEK
2
X1

Commissioning and adjusting
FIGHTER 1240
24
The heating medium system is filled with water until the required pressure is reached and then vented.
Before starting up the system, check that the heating, collector and hot water circuits are full and thoroughly vented. Check the pipe system for leakage.
Filling the heating medium system
Internal air vent valve, brine
Preparations
AVT Draining SÄV Safety valve KV Cold water NK Level vessel
SF Particle filter BK Rock collector JK Soil collector VV Hot water
VV KV
Värmeretur
Värmefram
AVT
Stängs
BK / JK
NK
SÄV
SF
Köldbärare (KB) in
Köldbärare (KB) ut
AV
When filling the brine system mix the water with anti-freeze in an open container. The mixture should be protected against freezing down to about -15 °C. The brine is filled by connecting a filling pump.
1. Check the brine system for leakage.
2. Connect the filling pump and return line on the brine's system's service connections as shown in figure.
3. Close the valve under the level vessel.
4. Close the valve between the service connections.
5. Open the valves on the service connections.
6. Start the filling pump, and fill until there is fluid in the return pipe.
7. Turn the heat pump's switch (8) to 1.
8. Select Service in menu 8.1.1.
9. Select On in menu 9.2.4.
10. Select Continuous in menu 9.2.12. The filling pump and the heat pump's brine pump are now opera-tional. The fluid should circulate via the mixing container until it emerges from the return hose without being mixed with air.
11. Select Intermittent in menu 9.2.12.
12. Stop the filling pump and clean the particle filter.
13. Start the filling pump, open the valve between the service connections.
14. Close the valve on the service connection's return line. Now pressurise the system (to max 3 bar) with the filling pump.
15. Close the valve on the service connection closest to the level vessel.
16. Stop the filling pump.
17. Fill the level vessel with liquid up to around 2/3.
18. Open the valve below the level vessel.
19. Select Off in menu 9.2.4.
20. Select the auto operating mode using the operating mode button.
Filling and venting the collector system
77
Heating flow
Heating return
Brine (KB) in
Brine (KB) out
Closes

Commissioning and adjusting 25
FIGHTER 1240
Air is initially released from the hot water and venting may be necessary. If bubbling sounds can be heard from the heat pump, the entire system requires further venting. When the system has stabilised (correct pres-sure and all the air removed) the heating controls can be set at the required values.
Check the fluid level in the level vessel (85). If the level has dropped, close the valve under the vessel. You can then fill through the connection at the top of the vessel. After filling, open the valve again. To raise the pressure, close the valve on the incoming main pipe when the brine pump (KBP) is running and the level vessel (NK) is open, so that water is drawn in from the vessel.
The siphon principle is used to empty the water heater. This can be done either via the drain valve on the incoming cold water pipe or by inserting a hose into the cold water connection.
Readjusting, collector side
Readjusting, heat medium side
The compressor in FIGHTER 1240-12 is of the scroll type. It can only operate in one direction of rotation. Operating in the wrong direction can damage the compressor.To check that the direction of rotation is correct, carry out the following:■ Set the switch to 1.■ Check the hot gas temperature in menu 5.11. The
temperature should increase by 15 °C within 30 seconds from compressor start.
■ If the temperature, on the other hand, remains the same, the direction of rotation is incorrect. The noi-se produced is also different when rotating in the incorrect direction.
– Set the switch to 0 and cut the main power supply.
– Swap the two incoming phases on the terminal block for incoming electricity, -X9.
– Set the switch to 1 and repeat the rotation check.
Rotation check F1240-12 3x400 V
1. Check that the temperature limiter (25) has not tripped.
2. Set the switch (8) to 1.
3. Adjust the Offset heating curve knob so there is no heating requirement.
4. Select Service in menu 8.1.1.
5. Select On in menu 9.2.4.
6. Select 10 days. cont in menu 9.2.12. The brine pump runs continuously for 10 days, and then returns to normal operations.
7. Check that the brine and heat medium systems are vented.
8. Check that brine and heat medium pumps are operational. If necessary help the pumps to start.
9. Check that the Brine temperatures in menu 5.0 correspond with the ground/rock temperature, which indicate brine flow.
10. Select Off in menu 9.2.4.
11. Select the spring/autumn operating mode with the operating mode button.
12. Adjust the Offset heating curve knob so there is a heating requirement. The compressor will start.
13. If the heat pump is a FIGHTER 1240-12 3x400 V, check the direction of rotation at start-up of the compressor. See section “Rotation check F1240-12 3x400 V”.
14. Read the brine temperatures in menu 5.0. The dif-ference between these two temperatures should be 2—5 °C when the system has come into bal-ance. Adjust the flow with the knob on the brine pump (35). A high difference indicates a low brine flow. A low difference indicates a high brine flow.
The pump is adjust-able to adjust brine flow.
2/3
LE
K
16. Set the date and time in menu 7.1 and 7.2.
17. Fill in the commissioning report on page 2.
18. Select the auto operating mode using the operating mode button.
19. Set the control system according to the needs of the property. See section Settings - Heating.
15. Check the flow temperature on menu 2.0 and return temperature on menu 2.7. The difference between these two temperatures, with floating condensing, should be 5 — 10 °C when the house is being heated without additional heat. Adjust the flow with the knob on the heating medium pump (16). A high difference could depend on a low heat medium flow. A low difference indicates a high heat medium flow.
Start-up and inspection
NOTE! The compressor must not be forced to start
with periods shorter that 1 start per 15 minutes.
LEK
GR
UN
DFO
STyp
eU
PS
25 -
60
130
P/N
:59526447
230V
-
HE
JS
AN
PC
;0017N
IBD
K50H
z
IP 44
TF
110
Cla
ss
HM
ax. 1
0bar
2.5
uF
45
0.2
065
0.3
090
0.4
0
1m(A
)P,
(W)
The pump is adjust-able to adjust heat medium flow.
Emptying the water heater
LEK
1
2
LEK
GR
UN
DFO
SType
UP
S25 -
60
130
P/N
:59526447
230V
-
HE
JS
AN
PC
;0017N
IBD
K50H
z
IP 44
TF
110
Cla
ss H
Max. 1
0bar
2.5
uF
45
0.2
065
0.3
090
0.4
0
1m(A
)P,
(W)

Control
FIGHTER 1240
26
A BI II III I II I IIA B
5 0 . 0 ° CVa r m v a t t e n t e m p e r a t u r
13.431.0 P
The menu tree shows all the menus. Three different menu types can be chosen.
Normal, covers the normal user's needs.
Extended, shows all menus except the service menus.
Service, shows all menus, returns to the previous menu level 30 minutes after the last button was pressed.
Changing of menu type is done from menu 8.1.1
Information is presented on the display about the status of the heat pump and the electric boiler. Menu 1.0 is nor-mally shown on the display. The plus and minus buttons and the enter button are used to scroll through the menu system as well as to change the set value in some men-us.
The plus button is used to move forward to the next menu on the current menu level and to increase the value of the parameter in menus where this is pos-sible.
The minus button is used to move back to the previous menu on the current menu level and to decrease value of the parameter in menus where this is pos-sible.
The enter button is used to select sub-menus of the current menu, to permit parameters to be changed and confirm any changes to parameters. When the menu number ends with a zero this indicates there is a sub-menu.
General
Menu number Menu nameKey lock
ClockSymbols Value of the current parameter
To quickly return to the main menu from sub-menus press the following:
1. Operating mode button
2. Enter button
Quick movement
NOTE! Ensure the operating mode is not changed during quick movement
A key lock can be activated in the main men-us by simultaneously pressing the plus and the minus buttons. The key symbol will then be shown on the display. The same proce-dure is used to deactivate the key lock.
Key lock
N
U
S

Control 27
FIGHTER 1240
Changing a parameter (value):
■ Access the required menu.
■ Press the enter button, the numerical value starts to flash.
■ Increase or decrease the value with the Plus/Minus buttons.
■ Confirm by pressing the enter button.
■ Menu 1.0 is automatically displayed again 30 min-utes after pressing the last button.
ExampleChanging the Menu type/Service mode menu 8.1.1. ■ The starting point is menu 1.0.
■ Press the plus button to move to menu 8.0.
■ Press the enter button to move to menu 8.1.0
■ Press the enter button to move to menu 8.1.1
■ Press the enter button to allow the value to be changed.
■ Change the value using the plus or minus button.
■ Confirm the chosen value by pressing the enter but-ton.
■ Press the minus button to move to menu 8.1.5
■ Press the enter button to move to menu 8.1.0
■ Press the minus button to move to menu 8.4
■ Press the enter button to move to menu 8.0
■ Press the plus button to move to menu 1.0
Changing parameters
8.1.1Operation mode types
8.1.2Language
8.1.3Contrast
8.1.4Light intensity
8.1.5Return to 8.1.0
Other settings8.0
8.1.0Display settings
8.2.0Operating mode
8.3.0Current limiter
8.4.0Pool adjustments
8.5Return to 8.0 ↵
↵
↵
↵
U
U
N
N
N
N
N
N
Normal menus Expanded menus Service menusSUN

Control28
FIGHTER 1240
2.6.1Flow temp.at +20°C
2.6.2Flow temp.at -20°C
2.6.3Set temperature
2.6.4Flow temp at set
2.6.5Return to 2.6.0
1.1Periodtime HW/TotalTime Heating/Set.Time HW/Set.
1.2Time period
1.3MAX-time HW-period
1.4HW-temp/Starttemp.HW
1.5HW-temp/Stoptemp.HW
1.6Stop Temp. XHW
1.7Stop compressor XHW
1.8Interval XHW
1.9Next XHW action
1.10HW running time
1.11Return to 1.0
Hotwatertemperature1.0
2.1Curve coefficient
2.2Offset heating curve
2.3Flow Temp./MIN
2.4Flow Temp./MAX
2.5External adjustment
2.6.0Own curve definition
2.7Return temp./MAX
2.8Degree minutes
2.9.0Cooling settings
2.10Return to 2.0
Flow temperature2.0
2.9.1Cooling curve
2.9.2Offset cold curve
2.9.3Starttemp. cooling
2.9.4Diff Passive/Active
2.9.5Cooling
2.9.5Return to 2.9.0
A BI II III I II I IIA B
5 0 . 0 ° CVa r m v a t t e n t e m p e r a t u r
13.431.0 P
Normal menus Expanded menus Service menusSUN
↵
↵
↵
↵
↵
↵↵
U
U
U
U
U
U
U
U
U
U
U
U
U
U
U
U
↵U
U
UU
U
U
U
U
N
N
N
N
N
N
N
N
N
N

Control 29
FIGHTER 1240
4.1Outdoor avg. temp.
4.2Return to 4.0
Outdoor temperature4.0
5.1Autoreset brinealarm
5.2Auto restart. brine alarm
5.3Time between starts
5.4Compr. starts at
5.5Time to startStatus
5.6Number of starts
5.9Comp. acc. run time
5.11Hot gas temp.
5.12Liquide line temp.
5.13Bulb temperature
5.14Condensor out temp.
5.22Max temp cond. flow
5.23Return temp max
5.24Return to 5.0
Brine in-/out- temp.5.0
3.6.1Flow temp.at +20°C
3.6.2Flow temp.at -20°C
3.6.3Set temperature 2
3.6.4Flow at set 2
3.6.5Return to 3.6.0
3.1Curve coefficient 2
3.2Offs.heating curve 2
3.3Flow temp2./MIN
3.4Flow temp2./MAX
3.5External adjustment 2
3.6.0Own curve def. 2
3.7Return temp.2/MAX
3.8Return to 3.0
Flow temp. system 23.0*
A BI II III I II I IIA B
5 0 . 0 ° CVa r m v a t t e n t e m p e r a t u r
13.431.0 P
Room temp./Settings6.0**
* Only shown when On is selected in menu 9.2.5. for shunt group 2 (accessory ESV 21 required).
** Shown when the accessory RG 10 is installed.
Normal menus Expanded menus Service menusSUN
↵↵↵
↵
↵
↵
↵
↵
↵
U
U
U
U
U
U
U
U
U
U
U
U
U
U
U
U
U
U
U
U
U
U
U
N
N N N
N
N
N
N
N
N
6.1Room compensation
6.2Heating system
6.3Set room temp.
6.4Room diff. cooling
6.5Return to 6.0 ↵
U
U
U
U
N

Control
FIGHTER 1240
30
8.1.0Display settings
8.2.0Operating mode
8.3.0Current limiter
8.4.0Pool adjustments
8.5Return to 8.0
7.1Date
7.2Time
7.3.0Temp set back time 1
7.4.0Temp set back time 2
7.5.0Timer XHW
7.6Reset timers
7.7Return to 7.0
7.3.1Heating sys per. 1
7.3.2Set back temp. +/-
7.3.3 - 7.3.9Set time Mon Sun
7.3.10Return to 7.3.0
8.1.1Operation mode types
8.1.2Language
8.1.3Contrast
8.1.4Light intensity
8.1.5Return to 8.1.0
8.2.1Summer mode temp.
8.2.2Winter mode temp.
8.2.3Return to 8.2.0
7.4.1Heating sys per. 2
7.4.2Set back temp. +/-
7.4.3 - 7.4.9Set time Mon Sun
7.4.10Return to 7.4.0
7.5.1Timer Extra HW
7.5.2 Extra HW Mon Sun
7.5.9Return to 7.5.0
Clock7.0
Other settings8.0
8.3.1Current phase 1
8.3.2Current phase 2
8.3.3Current phase 3
8.3.4Fuse size
8.3.5Max. add heat
8.3.6EBV value
8.3.7Return to 8.3.0
A BI II III I II I IIA B
5 0 . 0 ° CVa r m v a t t e n t e m p e r a t u r
13.431.0 P
Normal menus Expanded menus Service menusSUN
↵
↵
↵
↵
U
U
↵
↵
↵
UU
U
U
U
U
U
U
U
U
U
U
U
N
N
N
N
↵N
NN
N
↵
↵
↵
↵
↵
U
U
U
U
↵
U
U
↵U
U
U
U
U
U
U
U
N
↵N
N
8.4.1Pooltemp./Setting
8.4.2Diff. Pool
8.4.3Pool Time
8.4.4Pool heating
8.4.5Return to 8.4.0 ↵
U
U
U
U
U

Control 31
FIGHTER 1240
9.1.0Add. heat settings
9.2.0Operating mode set
9.3Quick start
9.4.0TEST/Forced operat.
9.5.0 - 9.8.0Log 1—4
9.9Reset alarm
9.10Return to 9.0
9.1.1Start BIN 3 step
9.1.2Diff. BIN 3 step
9.1.3Add heat run time
9.1.4Return to 9.1.0
Service menus9.0
9.2.1Max HW temp
9.2.2Flow diff HP
9.2.3Diff HP Add
9.2.4Add heat only
9.2.5System 2 Present
9.2.6Room disp Present
9.2.7Circ. pump 1
9.2.8Circ. pump 2
9.2.9.0Floor drying set
9.2.10Pool control
9.2.11Brine pressostat
9.2.12Brinepump 10 days
9.2.14Factory setting
9.2.15RCU Present
9.2.16Cooling system
9.2.17TB-alarm activated
9.2.18Roomsensor type
9.2.20Phase fault Alarm
9.2.21Return to 9.2.0
9.2.9.1Floor drying
9.2.9.2Numb. of days per. 1
9.2.9.3Temp. period 1
9.2.9.4Numb. of days per. 2
9.2.9.5Temp. period 2
9.2.9.6Return to 9.2.9.0
A BI II III I II I IIA B
5 0 . 0 ° CVa r m v a t t e n t e m p e r a t u r
13.431.0 P
Normal menus Expanded menus Service menusSUN
↵
↵
↵
↵
↵
↵
↵
↵
S
SS
S
S
S
S
S
S
S
S
S
S
S
S
S
S
S
S
S
S
S
S
S
S
S
S
S
S
S
S
S
S
S
S
S
S

Control
FIGHTER 1240
32
Main menus
Menu 1.0 HotwatertemperatureThe current water temperature (142) in the upper part of the hot water cylinder is shown here.
Menu 2.0 Flow temperatureThe current supply temperature (89) for the heating system is shown here with the calculated flow temper-ature in brackets.
Shown alternately with hot water charging, HW charg-ing.
Menu 4.0 Outdoor temperatureThe current outdoor temperature is shown here.
Menu 5.0 Brine in-/out- temp.Readings regarding the temperatures and compressor are made from the sub-menus to this menu.
Menu 8.0 Other settingsSettings regarding the menu type, language, operat-ing mode settings and load monitor reading are made in the sub-menus to this menu.
Menu 9.0 Service menusThis menu and its submenus are only shown on the display screen when access has been selected in menu 8.1.1.
Values can be read and various settings can be made from these submenus. NOTE! These settings should only be made by persons with the necessary exper-tise.
5 7 . 1 ° CH o t w a t e r t e m p e r a t u r e1 . 0
31.7 (28.0)°CF l o w t e m p e r a t u r e2 . 0
1 0 . 3 ° CO u t d o o r t e m p e r a t u r e4 . 0
Menu 7.0 ClockSettings regarding the date and time are made in the sub-menus of this menu. Also different temperature reductions and increases at selected times are set from this menu.
C l o c k7 . 0
O t h e r s e t t i n g s8 . 0
S e r v i c e m e n u s9 . 0
N
N
N
N
N
N N
N
N
U
S
S
Normal, covers the normal user's needs.
Extended, shows all menus except the service menus.
Service, shows all menus, returns to the previous menu level 30 minutes after the last button was pressed.
1 . 0 - 2 . 0 ° CB r i n e i n - / o u t - t e m p .5 . 0
Menu 3.0 Flow temp. system 2*The current flow temperature (FG2) for the heating system is shown here with the calculated flow temper-ature in brackets.
Activated in menu 9.2.5. Note! The flow line tempera-ture in heating system 2 cannot be greater than in heating system 1 when heat is shunted in from heat-ing system 1.
27.7 (24.0)°CF l o w t e m p . s y s t e m 23 . 0
* Accessories
Menu 6.0 Room temp./Settings*The room temperature is shown here and the set room temperature in brackets. Settings concerning the fac-tor for the room sensor or room unit and which system the sensor should control are made on the submenus to this menu. The accessory RG 10 is activated in menu 6.0.
2 1 . 3 ( 2 1 . 0 ) ° CR o o m t e m p . / S e t t i n g s6 . 0

Control 33
FIGHTER 1240
Menu 1.1 Periodtime HW/TotalThe time of the hot water period and the time for the whole period are shown here. Shown for both hot water charging and heat when necessary:
Time HW-charge/Max when hot water charging is in progress. Time heating/Max when heating is in progress.
Menu 1.3 MAX-time HW-periodHere you select how much time of the period time (menu 1.1) is to be used to heat the hot water when there is a need of both heating and hot water. The val-ue is adjustable between 5 and 60 minutes.
Hotwatertemperature
Menu 1.4 HW-temp/Starttemp.HWThe temperature when the heat pump starts to work with the hot water heater is set here. When brackets with a minus are shown, this means the high pressure pressostat has tripped during hot water charging and FIGHTER 1240 has automatically lowered the set temperature with the value in brackets. The reduction is removed when the value is changed. The value is adjustable between 25 and 55 °C.
Menu 1.5 HW-temp/Stoptemp.HWThe temperature when the heat pump/immersion heater should stop heating the water is set here. When brackets with a minus are shown, this means the high pressure pressostat has tripped during hot water charg-ing and FIGHTER 1240 has automatically lowered the set temperature with the value in brackets. The reduc-tion is removed when the value is changed. The value is adjustable between 30 and 60 °C.
Menu 1.8 Interval XHWHow often the hot water temperature is increased from the normal level to the extra hot water level is shown here. The time is adjustable between 0 and 90 days. Extra hot water is shutoff when 0 is set. Extra hot water starts when the value has been confirmed.
Menu 1.9 Next XHW actionFuture increases to the extra hot water level are shown here.
Menu 1.10 HW running timeHow long hot water heating has been in progress is shown here (accumulated).
2 0 ( 6 0 ) m i nP e r i o d t i m e H W / To t a l1 . 1
1 4 d ay sI n t e r v a l X H W1 . 8
9 0 h 1 0 m i nH W r u n n i n g t i m e1 . 1 0
2 0 m i nM A X - t i m e H W- p e r i o d1 . 3
5 0 . 0 ( 4 7 ) ° CHW-temp/Star t temp.HW1 . 4
5 0 . 0 ( 5 4 ) ° CH W- t e m p / S t o p t e m p . H W1 . 5
Menu 1.6 Stop Temp. XHWThe desired stop temperature for extra hot water is set here. The value is adjustable between 40 and 70 °C.
5 0 . 0 ( 6 0 ) ° CS t o p Te m p . X H W1 . 6
1 0 - 2 6 1 0 : 3 1N e x t X H W a c t i o n1 . 9
N
N
N
N
Menu 1.2 Time period The length of time is set here. The value is adjustable between 5 and 60 minutes.
6 0 m i nT i m e p e r i o d1 . 2
N
U
U
Menu 1.7 Stop compressor XHWThe temperature to stop the compressor for extra hot water is set here. The value is adjustable between 50 and 60 °C.
5 0 . 0 ( 5 5 ) ° CS t o p c o m p r e s s o r X H W1 . 7
U
U
U
Menu 1.11 ReturnPressing the enter button returns you to menu 1.0
R e t u r n1 . 1 1

Control
FIGHTER 1240
34
Menu 2.4 Flow Temp./MAXThe set maximum level for the supply temperature to the heating system is shown here. The value is adjust-able between 10 and 80 °C
The calculated flow temperature never exceeds the set level irrespective of the outdoor temperature, curve slope or offset heating curve.
Menu 2.1 Curve coefficientThe selected curve slope (heating curve) is shown here. The Own curve function is activated at value 0, see menu 2.6.0. The value can be set between curve 0 and 15.
Menu 2.2 Offset heating curveThe selected heating curve offset is shown here. The value is adjustable between -10 and +10. NOTE! The value is changed using the Offset heating curve knob.
Menu 2.3 Flow Temp./MINThe set minimum level for the supply temperature to the heating system is shown here. The value is adjust-able between 2 and 80 °C.
The calculated flow temperature never drops below the set level irrespective of the outdoor temperature, curve slope or offset heating curve.
3 5 . 5 ( 5 5 ) ° CF l o w Te m p . / M A X2 . 4
9C u r v e c o e f f i c i e n t2 . 1
- 1O f f s e t h e a t i n g c u r v e2 . 2
3 5 . 5 ( 1 5 ) ° CF l o w Te m p . / M I N2 . 3
U
U
N
N
Flow temperature
Menu 2.5 External adjustmentConnecting an external contact, see Electrical con-nections - External contacts, for example a room ther-mostat (accessory) or a timer, allows you to temporar-ily or periodically raise or lower the room temperature. When the external contact is made, the heating curve offset is changed by the number of steps shown here. The value is adjustable between -10 and +10.
Menu 2.6.0 Own curve definitionYour own curve definition is chosen here. This is an individual linear curve with one break point. You select a break point and the associated temperatures.NOTE! The Curve slope in menu 2.1 must be set to 0 to activate this function.
Menu 2.6.1 Flow temp.at +20°CThe flow temperature at an outside temperature of +20 °C is chosen here. The value is adjustable between 0 and 60 °C.
Menu 2.6.2 Flow temp.at -20°CThe flow temperature at an outside temperature of -20 °C is chosen here. The value is adjustable between 0 and 60 °C.
Menu 2.6.3 Set temperatureHere you select at what outside temperature the break point shall occur. The value is adjustable between -15 and +15 °C.
1E x t e r n a l a d j u s t m e n t2 . 5
1 5 ° CF l o w t e m p . a t + 2 0 ° C2 . 6 . 1
3 5 ° CF l o w t e m p . a t - 2 0 ° C2 . 6 . 2
0 ° CS e t t e m p e r a t u r e2 . 6 . 3
O w n c u r v e d e f i n i t i o n2 . 6 . 0
U
U
U
U
U

Control 35
FIGHTER 1240
Flow temperature
Menu 2.7 Return temp./MAXHere the maximum return flow temperature is set for compressor operation.
The value is adjustable between 40 and 58 °C.
Menu 2.6.5 ReturnPressing the enter button returns you to menu 2.6.
Menu 2.6.4 Flow temp at setYou set the required flow temperature for the break point here. The value is adjustable between 0 and 60 °C.
2 0 ° CF l o w t e m p a t s e t2 . 6 . 4
Menu 2.8 Degree minutesCurrent value for number of degree-minutes. For example, this value can be changed to accelerate the start of heating production. The value can be set between 100 and -800.
0 D e g r e e m i n u t e s2 . 8
R e t u r n2 . 6 . 5
25.0 (53)°CR e t u r n t e m p . / M A X2 . 7
U
U
Menu 2.9.0 Cooling settingsThe cooling system settings are made here. Only shown when HPAC or PKM is selected in menu 9.2.16. Lower the value on menu 2.3 for the cooling function to work.
C o o l i n g s e t t i n g s2 . 9 . 0
U
U
Menu 2.9.1 Cooling curve The selected cooling curve (curve slope) is shown here. The value can be set between curve 1 and 3.
2C o o l i n g c u r v e2 . 9 . 1
U
Menu 2.10 ReturnPressing the enter button returns you to menu 2.0.
*only applies with HPAC accessory
R e t u r n2 . 1 0
Menu 2.9.6 ReturnPressing the enter button returns you to menu 2.9.0
R e t u r n2 . 9 . 6
Menu 2.9.2 Offset cold curveThe selected cooling curve offset is shown here. The value is adjustable between -10 and +10.
0O f f s e t c o l d c u r v e2 . 9 . 2
U
Menu 2.9.3 Start temp. coolingThe outdoor temperature when cooling is activated is shown here. The value is adjustable between -20 and 35 °C.
2 5S t a r t t e m p . c o o l i n g2 . 9 . 3
U
Menu 2.9.4 Diff Passive/Active*If the flow temperature exceeds the calculated flow temperature + this value the system switches to active cooling. The value can be set between curve 1 and 9.
4D i f f P a s s i v e / A c t i v e2 . 9 . 4
U
Menu 2.9.5 CoolingThe cooling function can be activated or deactivated here.
O f fC o o l i n g2 . 9 . 4
U

Control
FIGHTER 1240
36
Flow temperature system 2
Menu 3.4 Flow temp 2./MAXThe set maximum level for the supply temperature to the heating system is shown here. The value is adjust-able between 10 and 80 °C.
The calculated flow temperature never exceeds the set level irrespective of the outdoor temperature, curve slope or offset heating curve.
Menu 3.1 Curve coefficient 2The selected curve slope (heating curve) is shown here. The Own curve function is activated at value 0, see menu 3.6.0. The value can be set between curve 0 and 15.
Menu 3.2 Offs.heating curve 2The selected heating curve offset is shown here. The value is adjustable between -10 and +10.
Menu 3.3 Flow temp2./MINThe set minimum level for the supply temperature to the heating system is shown here. The value is adjust-able between 10 and 80 °C.
The calculated flow temperature never drops below the set level irrespective of the outdoor temperature, curve slope or offset heating curve.
3 5 . 5 ( 4 5 ) ° CF l o w t e m p 2 . / M A X3 . 4
9C u r v e c o e f f i c i e n t 23 . 1
- 1O f f s . h e a t i n g c u r v e 23 . 2
3 5 . 5 ( 1 5 ) ° CF l o w t e m p 2 . / M I N3 . 3
U
U
N
N
Menu 3.5 External adjustment 2Connecting an external contact, see Electrical con-nections - External contacts, for example, a room ther-mostat (accessory) or a timer allows you to temporarily or periodically raise or lower the room temperature. When the external contact is made, the heating curve offset is changed by the number of steps shown here. The value is adjustable between -10 and +10.
Menu 3.6.0 Own curve def. 2Your own curve definition is chosen here. This is an individual linear curve with one break point. You select a break point and the associated temperatures.NOTE! The Curve slope in menu 3.1 must be set to 0 to activate this function.
Menu 3.6.1 Flow temp.at +20°CThe flow temperature at an outside temperature of +20 °C is chosen here. The value is adjustable between 0 and 60 °C.
Menu 3.6.2 Flow temp.at -20°CThe flow temperature at an outside temperature of -20 °C is chosen here. The value is adjustable between 0 and 60 °C.
Menu 3.6.3 Set temperature 2Here you select at what outside temperature the break point shall occur. The value is adjustable between -15 and +15 °C.
1E x t e r n a l a d j u s t m e n t 23 . 5
1 5 ° CF l o w t e m p . a t + 2 0 ° C3 . 6 . 1
3 5 ° CF l o w t e m p . a t - 2 0 ° C3 . 6 . 2
0 ° CS e t t e m p e r a t u r e 23 . 6 . 3
O w n c u r v e d e f . 23 . 6 . 0
U
U
U
U
U

Control 37
FIGHTER 1240
Flow temperature system 2
Menu 3.7 Return temp. 2The return temperature for shunt group 2 is shown here.
Menu 3.6.5 ReturnPressing the enter button returns you to menu 3.6.
Menu 3.6.4 Flow at set 2You set the required flow temperature for the break point here. The value is adjustable between 0 and 60 °C.
2 0 ° CF l o w a t s e t 23 . 6 . 4
Menu 3.8 ReturnPressing the enter button returns you to menu 3.0.
R e t u r n3 . 8
R e t u r n3 . 6 . 5
3 3 . 0 ° CR e t u r n t e m p . 23 . 7
U
U
Outdoor temperature
Menu 4.2 ReturnPressing the enter button returns you to menu 4.0.
Menu 4.1 Outdoor avg. temp.Average outdoor temperature during the last 24 hours.
R e t u r n4 . 2
O u t d o o r a v g . t e m p .4 . 1
U
Brine in/out temperature
Menu 5.3 Time between startsTime between compressor starts is set here. The val-ue is adjustable between 10 and 60 minutes.
2 0 m i nT i m e b e t w e e n s t a r t s5 . 3
N
Menu 5.1 Brine ret. temp/MINThe lowest brine temperature is set here. The value is adjustable between 12 and -11 °C. OFF is shown when a lower temperature is selected, this means the heat pump never gives an alarm for a low brine tempera-ture.
- 4 . 0 ( - 8 ) ° CB r i n e r e t . t e m p / M I N5 . 1
N
Menu 5.2 Autoreset brinealarmAutomatic restart after a BR alarm, when the tempera-ture rises 3 °C above the selected alarm level (menu 5.1) for the brine return is selected here. The value is adjustable On or Off.
O f fA u t o r e s e t b r i n e a l a r m5 . 2
N

Control
FIGHTER 1240
38
Brine in/out temperature
Menu 5.5 Status compressorShows the compressor status for the heat pump.
Start in XX minutes, means the compressor will start as soon as the time condition permits.
Compr. OFF means that the compressor is not opera-tional.
Compr. ON means that the compressor is operational.
Brine pump On means the brine pump is running.
S t a r t i n 5 m i nS t a t u s5 . 5
N
Menu 5.4 Compr. starts atHow low the degree-minutes may drop before the compressor start can take place is set here. The value is adjustable between -5 and -250.
- 6 0C o m p r. s t a r t s a t 5 . 4
N
Menu 5.6 Number of startsThe accumulated number of starts with the compres-sor is shown here.
8 2N u m b e r o f s t a r t s 5 . 6
U
Menu 5.9 Comp. acc. run timeThe accumulated time that the compressor has been in operation is shown here.
1 1 2 hC o m p . a c c . r u n t i m e5 . 9
U
Menu 5.11 Hot gas temp.The hot gas temperature is shown in this menu.
1 0 4 ° CH o t g a s t e m p . 5 . 1 1
U
Menu 5.12 Liquide line Temp.The fluid line temperature is shown in this menu.
4 8 . 2 ° CL i q u i d e l i n e t e m p . 5 . 1 2
U
Brine in/out temperature
Menu 5.13 Bulb temperatureThe suction gas temperature is shown in this menu.
5 . 0 ° CB u l b t e m p e r a t u r e5 . 1 3
U
Menu 5.22 Max temp cond. flowThis menu shows the max permitted temperature for condenser flow line.
6 5 ° CM a x t e m p c o n d . f l o w5 . 2 2
U
Menu 5.23 Return temp maxThis menu displays the max permitted return line tem-perature.
5 3 ° CR e t u r n t e m p m a x5 . 2 3
U
Menu 5.14 Condensor out temp.The heat medium temperature after the condensor is shown here.
C o n d e n s o r o u t t e m p .5 . 1 4
U
Menu 5.24 ReturnPressing the enter button returns you to menu 5.0.
R e t u r n5 . 2 4

Control 39
FIGHTER 1240
Menu 7.1 DateThe current date is set.
Menu 7.3.0 Temp set back time 1Settings, e.g. for night reduction can be selected in the sub-menus to this menu.
2 0 0 3 - 0 9 - 2 4D a t e7 . 1
Te m p s e t b a ck t i m e 17 . 3 . 0
Menu 7.3.1 Heating sys per. 1The shunt system to be affected by day change period 1 is selected here. When shunt group 2 is installed both Shunt 1 and 2 can be selected.
O f f H e a t i n g s y s p e r. 17 . 3 . 1
Menu 7.3.2 Set back temp. +/-Changes to the room temperature with a day change, e.g. the night reduction is set here. The value is adjust-able between -10 and +10.
0S e t b a c k t e m p . + / -7 . 3 . 2
Menu 7.2 TimeHere the current time is set.
1 3 : 3 9T i m e7 . 2
Clock
U
U
Menu 7.3.3 — 7.3.9 Set Time Monday — SundayThe time for the day change, e.g. night reduction is chosen here.
S e t T i m e M o n d a y7 . 3 . 3
U
N
N
U
U
Menu 6.1 Room compensationA factor is selected here that determines how much flow temperature is affected by the difference between the room temperature and the set room temperature. A higher value gives a greater change. The value is adjustable between 0.2 and 3.0.
1 , 0R o o m c o m p e n s a t i o n6 . 1
Room temp./Settings
Menu 6.3 Set room temp.Only shown when accesory RG05 is selected in menu 9.2.18.
The value is adjustable between 5 and 40°C.
Factory setting: 20°C
2 0S e t r o o m t e m p .6 . 3
U
Menu 6.5 ReturnPressing the enter button returns you to menu 6.0.
R e t u r n6 . 5
Menu 6.4 Room diff. coolingIf the room temperature exceeds the desired room tem-perature by the selected value on the excess tempera-ture, the cooling function activates. The cooling function deactivates when the room temperature drops by half the selected excess temperature.
The value is adjustable between 1 and 9 °C excess tem-perature.
The factory setting is 2.
2R o o m d i f f . c o o l i n g6 . 4
U
U
Menu 6.2 Heating systemYou select here whether the room sensor should acti-vate system 1 (menu 2.0) or system 2 (menu 3.0).
Factory setting: Off
O f fH e a t i n g s y s t e m6 . 2

Control
FIGHTER 1240
40
Menu 7.3.10 ReturnPressing the enter button returns you to menu 7.3.0
R e t u r n7 . 3 . 1 0
Clock
Menu 7.4.0 Temp set back time 2Settings, e.g. for night reduction can be selected in the sub-menus to this menu.
Te m p s e t b a ck t i m e 27 . 4 . 0
Menu 7.4.1 Heating sys per. 2The shunt system to be affected by day change period 2 is selected here. When shunt group 2 is installed, both Shunt 1 and 2 can be selected.
H e a t i n g s y s p e r. 27 . 4 . 1
Menu 7.4.2 Set back temp. +/-Changes to the room temperature with a day change, e.g. the night reduction is set here. The value is adjust-able between -10 and +10.
0S e t b a c k t e m p . + / -7 . 4 . 2
Menu 7.4.10 ReturnPressing the enter button returns you to menu 7.4.0
R e t u r n7 . 4 . 1 0
U
U
Menu 7.4.3 — 7.4.9 Set Time Monday — SundayThe time for the day change, e.g. night reduction is chosen here.
S e t T i m e M o n d a y7 . 4 . 3
U
U
Menu 7.5.0 Timer XHWSettings are made in the sub-menus of this menu when extra hot water is required on a specific day.
T i m e r X H W7 . 5 . 0
Menu 7.5.2 — 7.5.8 Extra HW Monday — SundayHere you select the period for respective days when extra hot water should be activated. Hours and min-utes for both start and stop are shown. Equal values or the stop time before the start time mean that extra hot water is not activated.
0 3 : 3 0 – 0 6 : 1 5E x t r a H W M o n d a y7 . 5 . 2
Menu 7.5.9 ReturnPressing the enter button returns you to menu 7.4.0
R e t u r n7 . 5 . 9
Menu 7.7 ReturnPressing the enter button returns you to menu 7.0.
R e t u r n7 . 7
U
U
Menu 7.5.1 Timer Extra HWYou choose here whether the time setting should be On or Off.
O f fT i m e r E x t r a H W7 . 5 . 1
U
Menu 7.6 Reset timersYou can choose here to reset the time settings. Auto-matic return to Off after one minute.
O f fR e s e t t i m e r s7 . 6
U

Control 41
FIGHTER 1240
Other settings
Menu 8.2.0 Operating modeSettings regarding auto mode can be made in the sub-menus to this menu.
O p e r a t i n g m o d e8 . 2 . 0
Menu 8.2.2 Winter mode temp.Here you select the average temperature when the heat pump, in auto mode, shall switch to winter mode. The circulation pump and immersion heater are acti-vated. The value is adjustable between 0 and 30 °C.
2 0 ° CW i n t e r m o d e t e m p .8 . 2 . 2
Menu 8.2.1 Summer mode temp.The average temperature when the heat pump in auto mode shall switch to summer mode is chosen here. In summer mode the circulation pump and immersion heater are blocked, only hot water is produced. The value is adjustable between 0 and 30 °C.
2 5 ° CS u m m e r m o d e t e m p .8 . 2 . 1
U
U
U
Menu 8.1.0 Display settingsSettings concerning language and menu type are set in the sub-menus to this menu.
D i s p l a y s e t t i n g s8 . 1 . 0
Menu 8.1.1 Operation mode typesThe menu type is chosen here: Normal, extended or service.
Normal, covers the normal user's needs.
Extended, shows all menus except the service menus.
Service, shows all menus, returns to the previous menu level 30 minutes after the last button was pressed.
N o r m a lOperation mode types8 . 1 . 1
Menu 8.1.5 ReturnPressing the enter button returns you to menu 8.1.0
R e t u r n8 . 1 . 5
Menu 8.1.2 LanguageLanguage settings are made here.
E n g l i s hL a n g u a g e8 . 1 . 2
Menu 8.1.4 Light intensityThe light intensity in idle mode is set here. The value is adjustable between 0 and 2. Idle mode occurs 30 min-utes after the last button was pressed.
0=shutoff, 1=low, 2=average.
2L i g h t i n t e n s i t y8 . 1 . 4
Menu 8.1.3 ContrastThe display's contrast is set here. The value is adjust-able between 0 and 31.
1 5C o n t r a s t8 . 1 . 3
N
U
N
N
U
N
U
S
Menu 8.2.3 ReturnPressing the enter button returns you to menu 8.2.0
R e t u r n8 . 2 . 3

Control
FIGHTER 1240
42
Menu 8.3.0 Current limiterSettings and readings regarding the load monitor are set in the sub-menus to this menu. NOTE! No function in a 1-phase installation.
C u r r e n t l i m i t e r8 . 3 . 0
Menu 8.3.5 Max. add heatThe setting selected on the EBV card (2) knob (101) is shown here.
2M a x . a d d h e a t8 . 3 . 5
Menu 8.3.7 ReturnPressing the enter button returns you to menu 8.3.0.
R e t u r n8 . 3 . 7
Menu 8.3.4 Fuse sizeThe setting selected on the EBV card (2) knob (100) is shown here.
1 6 AF u s e s i z e8 . 3 . 4
Menu 8.3.1 Current phase 1Shows the measured current from phase 1. If the val-ue falls below 2.0 A low is shown.
3 . 5 AC u r r e n t p h a s e 18 . 3 . 1
Menu 8.3.2 Current phase 2Shows the measured current from phase 2. If the val-ue falls below 2.0 A low is shown.
3 . 3 AC u r r e n t p h a s e 28 . 3 . 2
Menu 8.3.3 Current phase 3Shows the measured current from phase 3. If the val-ue falls below 2.0 A low is shown.
3 . 3 AC u r r e n t p h a s e 38 . 3 . 3
Menu 8.3.6 EBV valueThe transfer value must be defined depending on the current transformers used for the EBV card. The value is adjustable between 100 and 900 in increments of 10. The setting 300 applies for the supplied current transformers.
3 0 0E B V v a l u e8 . 3 . 6
U
U
U
U
U
U
U
Other settings
Menu 8.4.1 Pooltemp./SettingThe temperature when pool heating is stopped is stat-ed here.
The value is adjustable between 5 and 55 °C.
1 9 . 0 ( 2 0 ) ° CPo o l t e m p . / S e t t i n g8 . 4 . 1
Menu 8.4.2 Diff. Pool/min-temp The difference from the value in menu 8.4.1 when pool heating starts is stated here.
The value is adjustable between 0.5 and 9.5 °C.
1 . 5 ° CD i f f . Po o l / m i n - t e m p 8 . 4 . 2
U
U
Menu 8.4.0 Pool adjustmentsPool settings are made in the submenus to this menu.
Po o l a d j u s t m e n t s8 . 4 . 0U

Service menus 43
FIGHTER 1240
Menu 8.5 ReturnPressing the enter button returns you to menu 8.0.
R e t u r n8 . 5
Menu 9.1.4 ReturnPressing the enter button returns you to menu 9.1.0.
R e t u r n9 . 1 . 4
Settings additional heatOther settings
Menu 9.1.1 Start BIN 3 step Degree minute deficiency before additional heat is engaged. When the power step has reduced the degree minutes deficiency by 100 in relation to the set start value it is disengaged. The value is adjustable between -30 and -500.
- 4 0 0S t a r t B I N 3 s t e p9 . 1 . 1
Menu 9.1.3 Add heat run timeThe accumulated running time for the electric module since the first start is shown.
1 8A d d h e a t r u n t i m e9 . 1 . 3
S
S
Menu 9.1.2 Diff. BIN 3 stepDifference between engaging and disengaging the electric steps. The value is adjustable between 0 and -100.
- 1 0 0D i f f . B I N 3 s t e p9 . 1 . 2
S
Menu 9.1.0 Add. heat settingsSettings regarding supplementary heat in the heat pump are made from the sub-menus in this menu.
A d d . h e a t s e t t i n g s9 . 1 . 0
S
Menu 8.4.5 ReturnPressing the enter button returns you to menu 8.4.0
R e t u r n8 . 4 . 5
Menu 8.4.3 Pool TimeThe maximum time that pool heating can run is stated here. The value is adjustable between 5 and 60 min-utes.
2 0 m i nPo o l T i m e8 . 4 . 3
U
Menu 8.4.5 Pool heatingThe pool heating function can be activated or deacti-vated here.
O f fPo o l h e a t i n g8 . 4 . 5
U

Service menus
FIGHTER 1240
44
Operating settings
Menu 9.2.5 System 2 Present This menu is used to select On or Off depending on whether you have shunt group 2 (accessory ESV 21 needed).
O f fS y s t e m 2 P r e s e n t 9 . 2 . 5
Menu 9.2.6 Room disp PresentSelect here whether the Room control unit is to be activated or not. The value is adjustable “On” or “Off”. Changes to “Off” with a restart.
O f fR o o m d i s p P r e s e n t9 . 2 . 6
S
S
Menu 9.2.4 Add heat only Only additional heat is activated when On is shown on the display, otherwise Off is shown. When only addi-tional heat is activated, the immersion heater respec-tive circulation pump cannot be blocked with the oper-ating mode button. NOTE! Select Off to deactivate only additional heat and select the required oper-ating mode using the operating mode button.
O f f A d d h e a t o n l y9 . 2 . 4
S
Menu 9.2.7 Circ. pump 1Here you set whether heat medium pump should run constantly in Summer mode. The value can be set On or Off. Changes to Off with a restart.
O f fC i r c . p u m p 19 . 2 . 7
S
Menu 9.2.8 Circ. pump 2Here you set whether heat medium pump 2 should run constantly in Summer mode. The value can be set On or Off. Changes to Off with a restart.
O f fC i r c . p u m p 29 . 2 . 8
S
Menu 9.2.9.0 Floor drying setSettings for the floor drying program are made in the sub-menus to this menu.
F l o o r d r y i n g s e t9 . 2 . 9 . 0
S
Menu 9.2.0 Operating mode setSettings regarding supplementary heat, floor drying and a return to the factory settings can be made on the sub-menus in this menu.
O p e r a t i n g m o d e s e t9 . 2 . 0
Menu 9.2.1 Max HW tempHere the maximum boiler temperature is shown. The value is selected on the load monitor card using knob (102).
6 5 ° C M a x H W t e m p9 . 2 . 1
S
S
Menu 9.2.2 Flow diff HPWhen the current flow temperature deviates from the set value compared to that calculated, the heat pump is forced to stop/start irrespective of the degree minute figure.
When the current flow temperature exceeds the cal-culated flow by the set value the degree-minute figure is set to 1. The compressor stops when there is only a heating requirement.
When current flow temperature falls below the calcu-lated flow by the set value the degree-minute figure is set to -60. This means the compressor will start. When the value also falls below menu 9.2.3, the degree-minute figure can be set to -400. The value is adjusta-ble between 3 and 25 °C.
1 3 ° CF l o w d i f f H P9 . 2 . 2
S
Menu 9.2.3 Diff HP AddWhen the current flow temperature drops below that cal-culated by the set value plus the value from menu 9.2.2 the degree-minute value is set to -400. This means that the additional heat can be engaged directly. The value is adjustable between 1 and 8 °C.
3 ° CD i f f H P A d d9 . 2 . 3
S

Service menus 45
FIGHTER 1240
Menu 9.2.9.1 Floor dryingThe floor drying program is chosen from this submenu. The options are Prog 1 On, Prog 2 On or Off The heat pump must be in Winter mode, selected with the oper-ating mode button. Electric boiler mode, Menu 9.2.4 can be used together with floor drying, for example, when the heat source is not installed.
In Prog 1 On, menus 9.2.9.2 — 9.2.9.5 are shown. After time period 1 switching to time period 2 then Return to normal settings.
In Prog 2 On, a fixed program over 11 days is followed. The flow temperature is increased from 20°C to 45°C for 4 days, it then remains constant for 3 days. The temperature then steps down to 25°C for 4 days, and then returns to the normal settings.
O f fF l o o r d r y i n g9 . 2 . 9 . 1
Menu 9.2.9.2 Numb. of days per. 1Selection of the number of days in period 1.
The value is adjustable between 1 to 5.
3 N u m b . o f d a y s p e r. 19 . 2 . 9 . 2
Menu 9.2.9.3 Temp. period 1Selection of the flow temperature in period 1.
The value is adjustable between 15 and 50 °C.
2 5 ° C Te m p . p e r i o d 19 . 2 . 9 . 3
S
S
S
Menu 9.2.9.4 Numb. of days per. 2Selection of the number of days in period 2.
The value is adjustable between 1 to 5.
1 N u m b . o f d a y s p e r. 29 . 2 . 9 . 4
Menu 9.2.9.5 Temp. period 2Selection of the flow temperature in period 2.
The value is adjustable between 15 and 50 °C.
4 0 ° C Te m p . p e r i o d 29 . 2 . 9 . 5
S
S
Menu 9.2.10 Pool controlSettings whether pool control should be On or Off. Basic setting is Off.
O f fPo o l c o n t r o l 9 . 2 . 1 0
S
Operating settings
Menu 9.2.9.6 ReturnPressing the enter button returns you to menu 9.2.9.0
R e t u r n9 . 2 . 9 . 6
S
Menu 9.2.11 Brine pressostatYou set here whether an external an brine pressostat/load monitor is connected to the load monitor card.
O f f B r i n e p r e s s o s t a t9 . 2 . 1 1
S
Menu 9.2.12 Oper. mode brinepumpThe operating mode for the brine pump is set here. Selectable options are:
Intermittent: The brine pump starts 20 seconds before and stops 20 seconds after the compressor.
Continuous: Continuous operation.
10 days. cont: Continuous operation for 10 days. Then the pump shifts to intermittent mode.
I n t e r m i t t e n tOper. mode brinepump9 . 2 . 1 2
S

Service menus
FIGHTER 1240
46
Quick start
Menu 9.4.1.26 ReturnPressing the enter button returns you to menu 9.4.0.
R e t u r n9 . 4 . 1 . 2 6
Menu 9.3 Quick startWhen Yes is selected, the heat pump starts within 5 minutes. Returns automatically to No, which indicates that quick start is activated.
N oQ u i c k s t a r t9 . 3
S
TEST Force driven operation
Menu 9.4.0 TEST/Forced operat.Test of outputs, automatic return after 30 minutes. Only for service personnel.
T E S T / F o r c e d o p e r a t .9 . 4 . 0S
Menu 9.4.1.0 Forced operationSelectable between On or Off.
O f fF o r c e d o p e r a t i o n9 . 4 . 1 . 0
S
Menu 9.4.1.1 — 9.4.1.25 Manual test of relays, opto and AD.
R E 19 . 4 . 1 . 1
S
Menu 9.2.15 RCU PresentHere you select whether RCU is installed.
O f fR C U P r e s e n t9 . 2 . 1 5
S
Menu 9.2.14 Factory settingReturn to the factory settings in FIGHTER 1240, Yes or No. When returning to the factory settings the lan-guage switches to English.
N oF a c t o r y s e t t i n g9 . 2 . 1 4
S
Menu 9.2.16 Cooling systemHere you select whether HPAC, PKM, PKI or PK4 is installed.
O f fC o o l i n g s y s t e m9 . 2 . 1 6
S
Menu 9.2.17 TB-alarm activatedHere the temperature limiter alarm can be selected to be activated or not.
O f fT B - a l a r m a c t i v a t e d9 . 2 . 1 7
S
Menu 9.2.18 Roomsensor type"Type of room control to be activated can be selected here. Options are “Off”, “RG05”, “RG10” and “RE10”.
O f fR o o m s e n s o r t y p e9 . 2 . 1 8
S
Operating settings
Menu 9.2.21 ReturnPressing the enter button returns you to menu 9.2.0
R e t u r n9 . 2 . 2 1
Menu 9.2.20 Phase fault AlarmSelect here whether the phase sequence alarm is to be active or not.
Note! Incorrect phase sequence can seriously dam-age the compressor.
O f fP h a s e f a u l t A l a r m9 . 2 . 2 0
S

Service menus 47
FIGHTER 1240
Alarm log
Menu 9.5.0 — 9.8.0 Alarm log 1 — 4The alarm logs are shown in the sub-menus of this menu. Log 1 is the last alarm, log 2 the next last, etc.
L o g 1 .9 . 5 . 0
Menu 9.10 ReturnPressing the enter button returns you to menu 9.0.
R e t u r n9 . 5 . 1 7
Menu 9.5.17 ReturnPressing the enter button returns you to menu 9.5.
R e t u r n9 . 1 0
Menu 9.9 Reset alarmAlarms are reset in this menu.
R e s e t a l a r m9 . 9
S
Menu 9.5.1 Time Menu 9.5.2 Alarm type Alarm type Cause
1 HP alarm
2 LP alarm
3 MS alarm
4 High Hotgas
5 Incorrect phase sequence
6 TB alarm
7 Low KB alarm
8 Ext KB alarm
9 High VBF1
10 Sensor fault VBF2
11 Sensor fault VBF1
12 Sensor fault VVM
13 High VVM
14 High VBR1
15 Sensor fault PNN
16 Sensor fault KBut
17 Sensor fault HG
18 Sensor fault VBR2
19 Sensor fault UG
20 Sensor fault VBR1
21 Sensor fault KF
22 High KF
23 High Hotgas
24 Sensor fault Pool
Menu 9.5.3 Charging type
Menu 9.5.4 Brine In
Menu 9.5.5 Brine Out
Menu 9.5.6 Outdoor temp.
Menu 9.5.7 Flow temp.
Menu 9.5.8 Return temp.
Menu 9.5.9 Hot water temp.
Menu 9.5.10 Hot gas temp.
Menu 9.5.11 Compr. time
Menu 9.5.12 Electric b. time
Menu 9.5.13 Relay register 1
Menu 9.5.14 Relay register 2
Menu 9.5.15 External input
Menu 9.5.16 Reset log

Dealing with malfunctions
FIGHTER 1240
48
Alarm LPThis information is shown when the low pressure switch in FIGHTER 1240 has tripped. The compressor is blocked and FIGHTER 1240 switches to winter mode, only additional heat without hot water.
This may be due to: ■ Bad circulation in collector system due to inferior
venting/low pressure or ice (if ice has formed the brine pump (35) will be warm).
■ Brine pump (35) malfunction.■ Iced evaporator due to too low antifreeze concen-
tration.■ Leakage in the collector circuit.
Alarm TLThis information is shown when the temperature limiter in the FIGHTER 1240 has tripped. The compressor is blocked and the FIGHTER 1240 switches to winter mode, addition only with no hot water.
This may be due to: ■ No flow through the immersion heater.
The background lighting on the display flashes with an alarm and the following information is shown depend-ing on the fault. An alarm log is created with each alarm containing a number of temperatures, times and the status of outputs. The four alarms are saved on menu 9.5.0 — 9.8.0. The following alarms block hot water charging to draw attention to the alarm. The operating mode switches to winter mode and additional heat engages.Alarm HP Alarm LP Alarm MP Alarm BRAlarm flow 2 Alarm HWBrine levelWhen the alarm cannot be reset using the switch (8), the operating mode, Only additional heat, can be acti-vated in menu 9.2.4 to have access to hot water gain.
- - A L A R M * * - -1 . 0
Alarm HPThis information is shown when the high pressure switch in FIGHTER 1240 has tripped. The compressor is blocked and FIGHTER 1240 switches to winter mode, only additional heat without hot water.
This may be due to:■ No or low flow on the heating medium pump (16).■ Closed thermostat valves.■ Too high value in menu 1.5 and/or menu 1.7 for the
stop temperature. The alarm temperature varies with the heat pump's operating conditions.Brine level (accessory)
Shows that the level or pressure in the collector circuit is low. The compressor is blocked and FIGHTER 1240 switches to winter mode, only additional heat without hot water.
This may be due to:■ Leakage in the collector circuit.
- B R I N E L E V E L -1 . 0
Alarm MP Shows when the motor cut-out on the compressor has tripped. The compressor is blocked and FIGHTER 1240 switches to winter mode, only additional heat without hot water.
This may be due to: ■ Dropped phase due to tripped fuses ■ Incorrect setting on the motor cut-out.
Alarm BR
Shows when the brine's return temperature is lower
than the set value in menu 5.1. Factory setting -8. Not
indicated when menu 5.2 is set to automatic return
YES. The compressor is blocked and FIGHTER 1240
switches to winter mode, only additional heat without
hot water.
This may be due to: ■ Too low flow on the brine.■ Temperature sensor damaged/missing.
If the operating disturbance cannot be rectified by means of the above, an installation engineer should be called.
The following alarms stop the compressor and brine pump. The alarms can only be acknowledged by switching off the heat pump for a few seconds and then started again. This is done using switch (8).
Alarm phase sequence
This information is displayed if the compressor's direc-tion of rotation is incorrect.
A L A R M P H A S E S E Q .1 . 0
Alarm indications on the display

Dealing with malfunctions 49
FIGHTER 1240
Alarm HWThis information is shown when a fault on the hot water temperature sensor has been registered. FIGHT-ER 1240 is force-run solely for heating water charging and automatic mode is engaged. The alarm may be due to: ■ Defective sensor or broken sensor cable.
- - A L A R M H W- -1 . 0
Alarm condThis information is shown when the measured value on the fluid line sensor is missing.■ Broken cable to the fluid line sensor.
- - A L A R M C O N D - -1 . 0
Condensor Out SensorThis information is shown when there is a fault on the sensor (141) between the condensor and immersion heater.
CONDOUTSENSOR1 . 0
Alarm FlowThis information is shown when the measured value on the flow line sensor is missing.■ Broken cable to the flow line sensor.
- A L A R M F L OW-1 . 0
Outdoor sensorThis information is shown when the outside sensor is not connected.■ Broken cable, no connected or defective sensor.
O U T D O O R S E N S O R1 . 0
Return sensorThis information is shown when the Return sensor is not connected.■ Broken cable, no connected or defective sensor.
R E T U R N S E N S O R1 . 0
Pool sensorThis information is shown when Pool control in menu 9.2.10 is set to On and no sensor is connected.■ Broken cable, no connected or defective sensor.
- P O O L S E N S O R -1 . 0
Alarm Flow 2This information is shown when the measured value on the flow line sensor 2 is missing.■ Broken cable to the flow line sensor 2 (shunt group
2).
- A L A R M F L OW 2 -1 . 0
If the operating disturbance cannot be rectified by means of the above, an installation engineer should be called.
The following sensor alarms remove their control func-tion. Rectify the fault and acknowledged the alarm by switching off the heat pump for a few seconds and then started again.
Alarm indications on the display

Dealing with malfunctions
FIGHTER 1240
50
Cause: Incorrect setting of Curve slope and/or Offset heating curve
Action: Adjust the setting.
Cause: Large amounts of hot water were used.
Action: Wait until the water heater reheats.
Cause: Compressor and/or immersion heater does not heat up.
Action: Check and replace blown circuit and main fuses.
Cause: Too low start temperature setting on the control system.
Action: Adjust the start temperature setting, in menu 1.4
Cause: Possible earth circuit-breaker tripped.
Action: Reset the earth circuit-breaker, if the earth circuit-breaker trips repeatedly, call an electrician.
Cause: Compressor and electric module do not heat.
Action: Check and replace blown circuit and main fuses.
Cause: The compressor does not run because of a too low set value on the heating curve.
Action: Check and possibly raise the Offset heating curve (knob on the front panel) or Curve slope.
Cause: The compressor standstills due to the internal overheating protection tripping.
Action: Automatic resetting after cooling for a few hours.
Cause: Possible earth circuit-breaker tripped.Action: Reset the earth circuit-breaker, if the earth
circuit-breaker trips repeatedly, call an electrician.
Low hot water temperature or no hot water
In the event of malfunction or operating disturbances first check the points below:
High room temperature
Low room temperature
If the operating disturbance cannot be rectified by means of the above, installation engineer should be called.
Max condensor flow tempThis information is displayed when the flow tempera-ture between the condensor and immersion heater reaches 65 °C or more.
M A X C O N D F LT E M P1 . 0
H I G H R E T U R N T E M P.1 . 0
High return temp.This information is shown when the return sensor on the heating medium measures a higher value than that set in menu 2.7. or higher than 58 °C on the return pipe when hot water charging.
The following alarms are automatically reset when the temperature has increased/reduced by 2 °C
High hotgasThis information is displayed when hot gas in the heat pump exceeds 135°C.This may be due to:
■ Defective/incorrect setting on the expansion valveThe alarm is reset when the temperature drops below 90 °C. Becomes continuous after three repetitions within 240 minutes.
HIGH HOTGAS 1 . 0

Dealing with malfunctions 51
FIGHTER 1240
Close the shut-off valves in heating medium system. Now open the drain valve (76). A small amount of water runs out, however, to fully empty the heating medium side requires the connector that joins the heating medium side and the connection on the heat pump VB-flow to be loosened a little to allow air to enter so the remaining water can run out. When the heating medium is empty the requisite service can be carried out.
When replacing the brine pump or drive side or when cleaning the pump, the shut-off valves in the collector system should be closed. The hose between the top of the evaporator and the brine pump is loosened on the evaporator. The loose hose end can now be bent down and emptied in a small bowl. Now loosen the connec-tion to KB-f a little to allow air to enter so the heat pump’s collector side is emptied completely. When the circuit is empty the requisite service can be carried out.
Draining, heat medium side
Draining, collector side
NOTE! The product's serial number should
always be stated with all correspondence with NIBE. _ _ _ _ _ _ _ _ _ _ _ _ _ _
■ Shut down FIGHTER 1240 by turning the switch (8) to 0.
■ Open the front cover.■ Loosen the venting screw with a screwdriver. Hold
a cloth around the screwdriver blade as a certain amount of water may run out.
■ Insert a screwdriver and turn the pump rotor.■ Screw in the venting screw.■ Start FIGHTER 1240 and check whether the circu-
lation pump runs.It is usually easier to start the circulation pump with FIGHTER 1240 running, switch (8) set to 1. If helping the circulation pump to start is performed with FIGHT-ER 1240 running, be prepared for the screwdriver to jerk when the pump starts.
Helping the circulation pump to start
Luftningsskruv
16
LE
K
GR
UN
DFO
SType
UP
S25 -
60
130
P/N
:59526447
230V
-
HE
JS
AN
PC
;0017N
IBD
K50H
z
IP 44
TF
110
Cla
ss H
Max. 1
0bar
2.5
uF
45
0.2
065
0.3
090
0.4
0
1m(A
)P,
(W)
If the operating disturbance cannot be rectified by means of the above, an installation engineer should be called.
Venting screw

Component placement
FIGHTER 1240
52
LEK
142
115
32
8
25
1
3
116
88
LEK
4118
17
111
110
27
65
7
48
112
42
33
153
LEK
73
70
99
71
58
75 95 72 74
LEK
16
94
76
87
24
35
96
19
4 86 8914177
7170
5
41
18
LEK
111
112
33
17
27
42
7
48
65
153
110FIGHTER 1240-12 3x400 V
2
34
100
101
102
LEK
65
17
112
27
7
42
48
110
111
4118
33
FIGHTER 1240 -8, 12 kW 1x230 V

Component placement 53
FIGHTER 1240
230 V -5 230 V -8, -12
LEK
9
61
69
26
29
6
11
14
68
12
222
67
10
LEK
9
61
69
26
29
67
10
68
222
6
LEK
9
61
69
26
60
29
6
67
10
97
222
LEK
9
61
69
26
29
6
11
67
10
97
222
3 x 400 V3 x 230 V (only applies to Norway)

List of components
FIGHTER 1240
54
1 Miniature circuit-breaker
2 EBV-card, Load monitor card
3 Thermostat, standby mode
4 Collector, brine in (f)
5 Collector, brine out (r)
6 Terminal block, pumps, shuttle valve
7 Service connection, high pressure
8 Switch, 1—0 –
9 Terminal block, incoming electricity, -X9
10 Contactor, immersion heater step 1
11 Starting capacitor, compressor
12 Start relay
14 Operating condenser, compressor
15 * Outdoor temperature sensor
16 Heating medium pump
17 Evaporator
18 Condenser
19 Reversing valve, heating system/water heater
24 Electric element
25 Temperature limiter
26 Motor protection
27 Compressor
29 Relay card with power supply unit
32 Display unit
33 High pressure pressostat
34 CPU-unit, control system
35 Brine pump
41 Low pressure pressostat
42 Service connection, low pressure
48 Expansion valve
52 * Safety valve, collector side
58 Anode cover (enamel)
60 EMC-filter
61 Suppression capacitor
63 * Particle filter (KB) R25 female
65 Drying filter
67 Contactor, immersion heater step 2
68 Contactor
69 Contactor
70 Connection, heating flow ø 22 mm o.d.
71 Connection, heating return ø 22 mm o.d.
72 Hot water circulation (VVC)
Enamel: G 20
Stainless steel: Ø 15 mm o.d.
73 Cold water
Copper: Ø 22 mm o.d.
Stainless steel: Ø 22 mm o.d.
Enamel: G 20
74 Hot water
Copper: Ø 22 mm o.d.
Stainless steel: Ø 22 mm o.d.
Enamel: G 20
75 Venting valve, double jacket
76 Drainage for heating system
77 Venting valve, collector system
81 * Particle filter (VB) R20 female.
85 * Level vessel, connection to system, R25 male
86 Temperature sensor, KB-f, brine in
87 Temperature sensor, KB-r, brine out
88 Temperature sensor, hot water jacket
89 Temperature sensor, VB-Flow, flow
94 Temperature sensor, VB-r, return
95 Type plate/serial number
96 Type plate, cooling section
97 Soft-start relay
99 Cable gland, incoming electricity
100 Knob, setting Fuse
101 Knob, setting Max electrical output
102 Knob, setting Max boiler temperature
110 Temperature sensor, hot gas
111 Temperature sensor, fluid pipe
112 Temperature sensor, suction gas
115 Electric anode (enamel)
116 Power unit, electric anode (enamel)
141 Temperature sensor, condensor heat medium
142 Temperature sensor, upper part of the hot water heater
153 ** Compressorheater
222 Terminal block X222 for compressor heater
* Enclosed** Only FIGHTER 1240-10, -12 3x400 V
The component list refers to all types of the heat pump, see respective component placement pictures for information.

Dimensions 55
FIGHTER 1240
A BI II III I II
5 0 . 0 CVa r m v a t t e n t e m p e r a t u r
13.431.0 P
A
525180
400600
455
145
140
50
45 100
245
640
1750
6563
025
-50
Dimensions and setting-out coordinates
Leave space free to the right of the heat pump for servic-ing.An area of 800 mm is required in front of FIGHTER 1240 for service work.When FLM is fitted on FIGHTER 1240 the distance to the wall should be 50 mm.

Enclosed kit56
FIGHTER 1240
Clips for connecting pipes brinePart no. 016 240, two
LEK
LEK
NIBE AB
Utetemperatur givare
Outdoor temperature sensor
Aussentemperatur fühler
Artikel 01876415
Cover plates, brinePart no. 619 638
Outside sensorPart no. 018 764
LEK
Conex connectorsPart no. 024 036, two Part no. 024 035, two
LEK
LEK
LEK
Current transformersPart no. 018 569, three
LEK
LEK
Level vessel Part no. (85) 024 413
Safety valvePart no. (52) 024 684
Particle filterPart no. 424 043 (R20), onePart no. 024 076 (R25), one
63
8152
LEK
Connecting brine, with insulation
4
5
Part no. 024 607Part no. 025 168
Part no. 034 724
85

Accessories 57
FIGHTER 1240
LEK
Exhaust air module FLM 30Part no. 067 020
Bracket pack FLM 30Part no. 089 304
Pipe set FLM 30/FIGHTER 1240Copper/Stainless: Part no. 089 318
Enamel Part no. 089 319
LE
K
Room sensor RG 10
Part no. 018 433
LEK
Level monitor NV 10Part no. 089 315
LEK
Passive cooling module PKMPKM 10 (intended for 5 — 8 kW)
Part no. 089 397PKM 20 (intended for 10 — 17 kW)
Part no. 089 398
LEK
10
15 20
2530°C
Room thermostat RT 10
Part no. 418 366
Filling set KB R25/R32including insulation
Part no. 089 368 (max 12 kW)Part no. 089 971 (max 30 kW)
LEK
POOL 11Art nr 089 435
Extra shunt ESV 21 Art nr 067 012
LEK
LEK
GR
UN
DFO
SType
UP
S25 -
60
130
P/N
:59526447
230V
-
HE
JS
AN
PC
;0017N
IBD
K50H
z
IP 44
TF
110
Cla
ss H
Max. 1
0bar
2.5
uF
45
0.2
065
0.3
090
0.4
0
1m(A
)P,
(W)
LEK
Room unit RE 10Part No 067 004
LEK
Communication unit RCU 11
Part no. 067 006

Technical specifications58
FIGHTER 1240
Technical specifications 230 V
* Compressor output only.** Refers to the brine flow temperature/heat medium flow temperature in accordance with EN 255.*** With feet and connections dismantled the height is 1890 mm.**** The compressor produces up to 65 °C, the rest is obtained using additional heating.***** Refers to the brine flow temperature/heat medium flow temperature in accordance with EN 14511.
Type 5 8 12
Operational voltage (V) 230 V + PE
Max operational current, compressor (A) 7.6 15.0 21.5
Max operating curr. incl. immersion heater 6 kW (A) 35.6 43.0 49.5
Output, heat medium pump (W) 75 75 170
Connection heating medium, o.d. ø (mm) 22
Max pressure in storage heater (MPa) 0.9 (9 bar)
Refrigerant quantity (R407C) (kg) 1.4 2.0 2.2
Pressure drop, evaporator (kPa) 9 14 15
Max pressure collector system (bar) 3
Heating medium flow (l/s) 0.10 0.19 0.31
Max temp. (flow/return circuit) (°C) 70****/58 60/50 60/50
IP 21
Volume, water heater (litres) 160
Starting current, compressor (A) 39 24 33
Max operating curr. incl. immersion heater 4 kW (A) 26.8 34.2 40.7
Output, brine pump (W) 130 170 250
Connection brine o.d. ø (mm) 28
Volume, double-shelled (litres) 45
Max pressure in double jacket volume (MPa) 0.25 (2.5 bar)
Brine flow (l/s) 0.25 0.53 0.65
Available pressure, collector system (kPa) 62 52 65
Operating temperature collector system (°C) -5 +20
Cut-out value pressostat HP (bar) 29 27 27
Difference pressostat HP (bar) -7
Cut-out value pressostat LP (bar) 1.5
Enclosure class IP 21
Difference pressostat LP (bar) +1.5
Net weight (kg) 280 300 310
Part no. Stainless steel 665 090 665 110 665 111
Delivered/Supplied power* at 0/35 °C ** 4.8/1.05 8.3/1.8 11.5/2.5 Delivered/Supplied power * at 0/50 °C ** 3.8/1.2 7.8/2.5 10.7/3.6 Delivered/Supplied power* at 0/35 °C ***** 4.63/1.1 7.89/1.87 10.94/2.74
Required ceiling height (mm) 1950 ***
Pressure drop, condenser (kPa) 2.7 2.4 3.1
Part no. Enamel — — —
Part no. Copper 665 070 665 120 665 121

Technical specifications 59
FIGHTER 1240
* Compressor output only.** Refers to the brine flow temperature/heat medium flow temperature in accordance with EN 255.*** With feet and connections dismantled the height is 1890 mm.
Type 6 8 10 12
Operational voltage (V) 3 x 230 V + N + PE 50 Hz
Max operating current, compressor (A) 7,5 10,0 12,3 18,0
Max operating curr. incl. immersion heater 6 kW (A) 28,2 30,7 33,0 38,7
Output, HC pump (W) 75 75 75 170
Connection heating medium, o.d. ø (mm) 22
Max pressure in storage heater (MPa) 0.9 (9 bar)
Refrigerant quantity (R407C) (kg) 1,7 2,2 2,4 2,4
Pressure drop, evaporator (kPa) 11 12 11 15
Max pressure collector system (bar) 3
Heating medium flow (l/s) 0,13 0,18 0,22 0,26
Max temp. (flow/return circuit) (°C) 60/50
IP 21
Volume, water heater (litres) 160
Starting current, compressor (A) 60 115 138 145
Max operating curr. incl. immersion heater 4 kW (A) 21,9 24,3 26,6 32,3
Output, brine pump (W) 130 170 170 250
Connection brine o.d. Ø (mm) 28
Volume, double-shelled (litres) 45
Max pressure in double jacket volume (MPa) 0.25 (2.5 bar)
Brine flow (l/s) 0,35 0,48 0,58 0,65
Available pressure, collector system (kPa) 55 51 48 65
Operating temperature collector system (°C) -5 +20
Cut-out value pressostat HP (bar) 27
Difference pressostat HP (bar) -7
Cut-out value pressostat LP (bar) 1,5
Enclosure class IP 21
Difference pressostat LP (bar) +1,5
Net weight (kg) 285 300 305 310
Delivered/supplied power* at 0/35 °C ** 6,0/1,3 8,8/1,9 10,3/2,2 11,7/2,5
Delivered/Supplied power * at 0/50 °C ** 4.8/1.5 7,1/2,2 8,5/2,5 9,9/2,9
Required ceiling height (mm) 1950 ***
Pressure drop, condenser (kPa) 2,6 3,4 3,2 4,4
Technical specifications 3 x 230 V
Part no. Enamel — — — –
Part no. Stainless steel 665 100 665 101 665 102 665 103
Part no. Copper — — — —

Technical specifications
FIGHTER 1240
60
IP 21
Technical specifications 3 x 400 V
Part no. Stainless steel 665 091 665 092 665 093 665 094
Type 6 8 10 12
Operational voltage (V) 3 x 400 V + N + PE 50 Hz
Max operating current, compressor (A) 3,8 5,2 6,0 7,5
Max operating curr. incl. immersion heater 9 kW (A) 18,8 20,2 21,7 22,9
Output, HC pump (W) 75 75 75 170
Connection heating medium, o.d. ø (mm) 22
Max pressure in storage heater (MPa) 0.9 (9 bar)
Refrigerant quantity (R407C) (kg) 1.7 2.2 2.4 2.1
Pressure drop, evaporator (kPa) 6.8 7.9 8.1 15
Max pressure collector system (bar) 3
Heating medium flow (l/s) 0.13 0.18 0.22 0.27
Max temp. (flow/return circuit)5) (°C) 70/58
Volume, water heater (litres) 160
Starting current, compressor (A) 21 23 30 22
Max operating curr. incl. immersion heater 6 kW (A) 14,4 15,7 16,6 18,1
Output, brine pump (W) 130 170 170 250
Connection brine o.d. Ø (mm) 28
Volume, double-shelled (litres) 45
Max pressure in double jacket volume (MPa) 0.25 (2.5 bar)
Brine flow (l/s) 0.35 0.48 0.58 0.65
Available pressure, collector system (kPa) 60 55 52 65
Operating temperature collector system (°C) -5 — +20
Cut-out value pressostat HP (bar) 29
Difference pressostat HP (bar) -7
Cut-out value pressostat LP (bar) 1.5
Enclosure class IP 21
Difference pressostat LP (bar) +1.5
Net weight (kg) 285 300 305 310
Delivered/Supplied power1) at 0/35 °C 2) (kW) 6.43/1.30 8.22/1.66 9.98/1.98 11.6/2.4
Delivered/Supplied power1) at 0/50 °C 2) (kW) 5.22/1.49 6.97/1.93 8.66/2.37 10.8/3.1
Delivered/Supplied power1) at 0/45 °C 3) (kW) 10.5/3.0
Required ceiling height (mm) 1950 4)
Pressure drop, condenser (kPa) 2.6 3.4 3.2 2.4
Part no. Copper 665 071 665 072 665 073 665 074
Part no. Enamel 665 080 665 081 665 082 665 083
1) Compressor output only.2) Refers to the brine in temperature/heat medium flow temperature in accordance with EN 255.3) Refers to the brine in temperature/heat medium flow temperature in accordance with EN 14511.4) With feet and connections dismantled the height is 1890 mm.5) The compressor produces up to 65 °C, the rest is obtained using additional heating.


PL
NO
NL
FI
DK
DE
CZ
NIBE – Haato OY, Valimotie 27, 01510 Vantaa
3C Broom Business Park, Bridge Way, Chesterfield S41 9QG
Puh: 09-274 697 0 Fax: 09-274 697 40 E-mail: [email protected] www.haato.fi
NIBE-BIAWAR Sp. z o. o. Aleja Jana Pawła II 57, 15-703 BIAŁYSTOKTel: 085 662 84 90 Fax: 085 662 84 14 E-mail: [email protected] www.biawar.com.pl
NIBE AB, Jerikoveien 20, 1067 OsloTel: 22 90 66 00 Fax: 22 90 66 09 E-mail: [email protected] www.nibe-villavarme.no
NIBE Energietechniek B.V., Postbus 2, NL-4797 ZG WILLEMSTAD (NB)Tel: 0168 477722 Fax: 0168 476998 E-mail: [email protected] www.nibenl.nl
Vølund Varmeteknik, Filial af NIBE AB, Brogårdsvej 7, 6920 VidebækTel: 97 17 20 33 Fax: 97 17 29 33 E-mail: [email protected] www.volundvt.dk
NIBE Systemtechnik GmbH, Am Reiherpfahl 3, 29223 CelleTel: 05141/7546-0 Fax: 05141/7546-99 E-mail: [email protected] www.nibe.de
CHNIBE Wärmetechnik AG, Winterthurerstrasse 710, CH-8247 FlurlingenTel: (52) 647 00 30 Fax: (52) 647 00 31 E-mail: [email protected] www.nibe.ch
ATKNV Energietechnik GmbH, Gahberggasse 11, 4861 SchörflingTel: +43 (0)7662 8963-0 Fax: +43 (0)7662 8963-44 E-mail: [email protected] www.knv.at
NIBE AB Sweden, Box 14, Järnvägsgatan 40, SE-285 21 MarkarydTel: +46-(0)433-73 000 Fax: +46-(0)433-73 190 E-mail: [email protected] www.nibe.eu
GBNIBE Energy Systems Ltd,Tel: 0845 095 1200 Fax: 0845 095 1201 E-mail: [email protected] www.nibe.co.uk
Druzstevni zavody Drazice s.r.o, Drazice 69, CZ - 294 71 Benatky nad JizerouTel: +420 326 373 801 Fax: +420 326 373 803 E-mail: [email protected] www.nibe.cz