moodle guide
TRANSCRIPT

Moodle Basics 1. Accessing Moodle
Type http://moodle.st-andrews.surrey.sch.uk in your web browser ad-dress bar
2. Logging in Use your normal school username and password to login.
3. The Homepage Clicking on your name
gives access to the information stored in your profile
My Courses This section shows you a list of the courses you belong to.
Calendar Days with events are highlighted in colour, green for whole school events, blue for personal events, red for course events and yellow for group events.
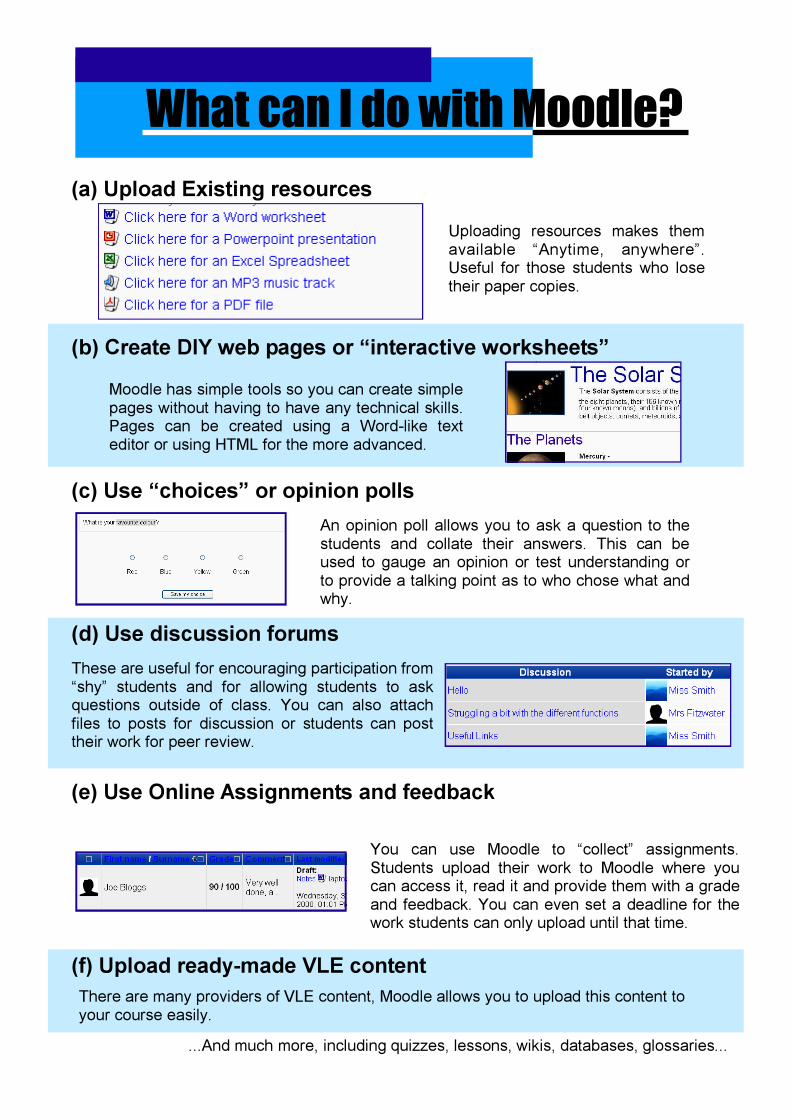
What can I do with Moodle? (a) Upload Existing resources
(b) Create DIY web pages or “interactive worksheets”
(c) Use “choices” or opinion polls
(d) Use discussion forums
(e) Use Online Assignments and feedback
(f) Upload ready-made VLE content
Uploading resources makes them available “Anytime, anywhere”. Useful for those students who lose their paper copies.
Moodle has simple tools so you can create simple pages without having to have any technical skills. Pages can be created using a Word-like text editor or using HTML for the more advanced.
An opinion poll allows you to ask a question to the students and collate their answers. This can be used to gauge an opinion or test understanding or to provide a talking point as to who chose what and why.
These are useful for encouraging participation from “shy” students and for allowing students to ask questions outside of class. You can also attach files to posts for discussion or students can post their work for peer review.
You can use Moodle to “collect” assignments. Students upload their work to Moodle where you can access it, read it and provide them with a grade and feedback. You can even set a deadline for the work students can only upload until that time.
There are many providers of VLE content, Moodle allows you to upload this content to your course easily.
...And much more, including quizzes, lessons, wikis, databases, glossaries...

Setting up a course
Click on the category in which you want to create your course
Click Add a new course
Decide the format of your course - divide by weeks or topics or have the course as a discussion area (social format).
Set the number of weeks/topics you wish to have (you can change this later) and the date the course starts (it will hide the course from students until this date).
Moodle allows a great deal of flexibility in setting up a course, however this does result in a lot of options so this guide only covers the most often used options, to help you set up a course easily. A lot of the settings can be left as the default option. More detailed information describing all the options is available in the Moodle instructions booklet.
If you don’t want students to be able to enrol themselves on your course set enrollable to no. Enrolment duration is the amount of time after which students will be unenrolled.
Course Availability sets whether you want students to be able to access your course yet. You can provide an enrolment key here which students will be required to provide before they can self enrol in your course. You can also set the level of guest access. We recommend you don’t allow guests without a key as this opens your course and content up to anybody on the web.
Click Save Changes
You will be taken to the assign roles page where you can assign other members of staff to teacher roles and manually enrol students if you wish.
Give your course a Full name, a short name and write a summary for your course (this will appear next to your course in the course listings)
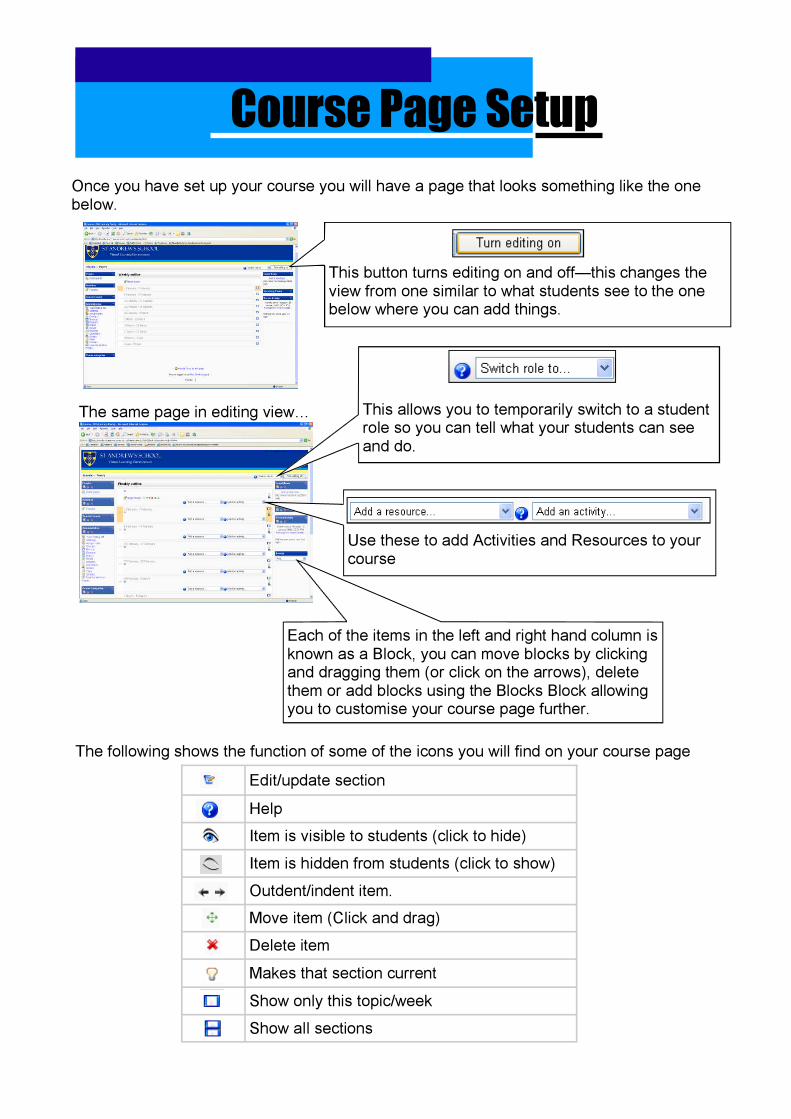
Course Page Setup
This button turns editing on and off—this changes the view from one similar to what students see to the one below where you can add things.
Once you have set up your course you will have a page that looks something like the one below.
The same page in editing view…
Use these to add Activities and Resources to your course
Edit/update section Help Item is visible to students (click to hide) Item is hidden from students (click to show) Outdent/indent item. Move item (Click and drag) Delete item Makes that section current Show only this topic/week Show all sections
The following shows the function of some of the icons you will find on your course page
Each of the items in the left and right hand column is known as a Block, you can move blocks by clicking and dragging them (or click on the arrows), delete them or add blocks using the Blocks Block allowing you to customise your course page further.
This allows you to temporarily switch to a student role so you can tell what your students can see and do.

Adding information to a course
To add things to courses you must first turn editing on.
Resources
Activities
• To insert information and titles into the topic sections on your course page use a label.
• For uploading word documents and other single files use Link to a file or website.
• If you have lots of files you want students to be able to access, e.g. lots of photographs, use display a directory.
• If you want to create a page with formatted text and pictures and tables use compose a web page.
• If you just want a page to display plain text then use compose a text page.
• If you want to provide a place where students can upload work and you can grade it add an assignment.
• If you want to create a set of pages that students must navigate in a certain order add a Lesson.
• If you have VLE content provided by a company add SCORM/AICC
• If you wish to create a searchable directory of entries about a topic (could be images/files/Web Addresses/text) use a Database.
• If you wish to create a quiz containing different question types that can be marked automatically add a quiz.
The Survey activity allows you to choose between a number of predefined surveys about E-learning, to set your own survey question use the Choice activity.
To get a description of all the activities and resources available click on the help symbol next to the drop down box.
Here are a few things you can do with the activities and resources available, these are just a selection, much more is possible!
REMEMBER:

HTML editor A html editor is often provided for you to enter text into. This allows you to format the text similarly to as you would in word. Each of the icons tells you what it does if you hover over it.
Font
Horizontal Rule
Insert Link
Insert picture Enlarge Editor into a window of it’s own (provides additional table options)
Switch to pure html view
Insert table
Insert Smileys
Font Text colour
You can use this to create attractive looking pages and in the labels on your main course page to make it attractive. The example below was created using the HTML editor.

Organising your course Your course is broken down into weeks/topics, it is a good idea to use these sections to help organise your course. Provide a short summary for each topic maybe detailing a bit about the resources and activities included with the topic and then have the links to the resources and activities. Try to keep each section fairly short so it is easy for the students to see all the resources and activities without having to scroll past lots of text, create new web pages/text pages for long sections of text.
If you have lots of files for a topic e.g. lots of photos you can link to a directory and store all the files in the directory rather than linking each one to the course page.
You can organise your course files (i.e. the files you upload) by creating folders within your course files directory and placing files in the relevant folders - this needs to be done before you use the files anywhere as moving them after they’ve been linked to breaks the link.
Existing documentation such as your lesson plans or the course syllabus can be used to organise your course and decide whether you want to set up your course in weeks format - to fit with your lesson plans or topics format - to fit with the course syllabus.

Course Administration Turn editing on allows you to add information, resources and activities to your course page. Settings lets you update/amend information you entered when the course was created. E.g. you can change the course description or name here, change the number of topics/weeks your course page has or update your enrolment key. Assign roles allows you to set manually enrol people in your course or give teacher rights to a person. Groups enables you to set up groups for the course. Backup creates a backup of your course incase you need to restore it, transfer your course material or wish to have a fresh copy to load next time you run your course.
Restore allows you to restore information to a course using a Moodle backup. You can use backups to transfer courses and import courses created on other installations of Moodle, e.g. the Open University’s Open Learn site allows many of it’s courses to be downloaded in Moodle Format which you can upload on to our Moodle site. Import allows ways of transferring data in from other courses that you have editing rights on. Reset allows you to strip a course of all user data while retaining all the activities and resources. You have the choice of removing all postings in forums and all quiz attempts and setting a new course start date. Removing user data in this way will cause it to be lost forever so create a backup including user data if you think you might ever need to refer to any of the user data again. Reports these show you the activity that has been going on in your course, you can get logs based on the whole course, users, dates, activities, you can watch live logs from the past hour or see a page which tells you how many times each of your activities/resources have been viewed. These are very useful if you set an activity for homework to tell you who has looked at the activity and when. Questions this shows you the bank of questions you have created for quiz activities. Scales here you can set custom scales for grading assignments or rating posts. Files shows you the files you have uploaded to your course. Grades shows you a list of your students with the grades they have achieved for any graded activities you have set, grades can also be downloaded in to formats such as an excel spreadsheet. If you have set groups up for any activity you will need to make sure the course page settings doesn’t have group mode set to No else you will be shown one of your groups and not have a dropdown box to change to the other groups grades. Unenrol me from … This unenrols you from the course - best not to do if you are the one teaching it!

Setting up a Group Moodle allows a teacher to assign teachers and students to specific groups. People can be members of more than one group. Groups can be set at course level, where the groups by default apply to all activities, or for individual activities. There are three group modes: • No groups. There are no sub groups, everyone is part of one big community. • Separate groups. Each group can only see their own group, others are invisible. • Visible groups. Each group works in their own group, but can also see other groups. You can create groups by manually placing students into the desired groups or you can use different enrolment keys to have students automatically moved into groups when they join your course. This would be useful if you had two classes you were teaching the same material to - you can give the classes different enrolment keys, set them to be two separate groups and then students will only be able to see and interact with others in their class.
In the Administration menu click Groups
Click the Create Group button
Enter a name for your group and a group description. You can also enter a picture for the group if you wish or hide the picture.
If you wish to have people automatically enrolled in certain groups when they enrol in the course set an enrolment key for the group. You must have set an enrolment key for the course, although this will not be used, the first letter of the course enrolment key is given if the key is entered wrong, so it is a good idea to start your course enrolment key and your group enrolment keys with the same letter
Click create group. Your group should appear in the left hand box of the groups page. Click on your group and press the add/remove users button.
You now have two columns, the one on the left is the list of people assigned to that group while the one on the right is everybody not assigned to that group who is enrolled in your course. People can be assigned to more than one group so even if they are members of another group people will appear here.
To add people to your group highlight them in the right hand list and press the left arrow to move them into the group. You can highlight more than one person at a time by holding ctrl while you click on the names or you can highlight everyone between two names by clicking on the first name then holding down shift and clicking on the name between which you want everybody to be highlighted.
Once you are done click on back to groups to get back to the list of groups
Repeat these steps until you have setup all your groups

Activities

Setting up a Choice Choices are small one question surveys/polls that allow you to pose a question to your students and track the response. They offer lots of different options including: • Deciding if/when you want students to be able to see the results; there are
options to let them see the current standings before they’ve selected an option, after they’ve submitted their choice, after the choice closes or not at all.
• Whether you want the results to be anonymous to students or not (you will still be able to see who has chosen what)
• Whether you want students to be able to change their minds and re-select their choice.
• Whether you want to limit the number of people who can choose a certain option. You can also download the result in formats such as an excel spreadsheet.
Turn editing on > Add an Activity > Choice
Write a name for your choice, and then fill in the body of your question in the choice text section.
If you wish to limit the number of people who can respond to your choices set limit to enable.
Enter your choice options in the boxes Choice 1, Choice 2, Choice 3 etc. If you set the limit to enabled you need to set the limit you want to allow for each choice. If you wish to have more than 5 options click the Add 3 fields to Form button to add three more.
If you wish to make everyone respond within a certain time frame tick the box next to “restrict answering to this time period” and set the dates and times you wish the choice to be available from and to.
Set the display mode to display the options either horizontally or vertically—if you only have a few options horizontally is probably best, if you have lots of options then it may be better to do it vertically.
You can then set the options for whether you want to publish the results for students, and if you do whether you want them to be anonymous, whether you want your students to be able to update their choice and if you want to be shown a list of students enrolled in your course who have yet to choose.
You can then set the group settings if you wish.
Click Save settings and your choice is setup!

Setting up a Forum Forums allow online discussions to take place asynchronously i.e. a message is posted and then is available for people to read and respond to as and when they can. Moodle provides 4 different types of forum templates:
• A single simple discussion - this is one topic all on one page, for short focussed discussions
• A standard forum - anyone can start a topic at any time - many topics co-exist. This is the best general purpose forum.
• Each person posts one discussion - each person may post exactly one new discussion which everyone can respond to.
• Q and A Forum - This forum requires students to post a response to a question before they can see other people’s responses.
Turn editing on > Add an Activity > Forum
Enter a name for your forum, select which type of forum you want (see descriptions above) and write an introduction for your forum e.g. on the types of topics to be covered.
Choose whether you want to force everyone to be subscribed (will send email copies of posts) and whether you want read tracking for the forum (will show whether you have read a message or not), set the attachment size if necessary.
Set whether you want to allow posts to be rated. And if you do choose the rating scale and whether you want it to be date restricted.
If you wish to restrict the number of messages a student can post in a given time set the “time period for blocking” within which to count the number of postings and then set the post threshold for blocking to the desired number and the post threshold for warn-ing at which they will be warned. These can be changed later if you feel a few students are dominating the discussions.
Set the group mode if you wish to have forums for your separate groups.
Click save changes and your forum will be set up.
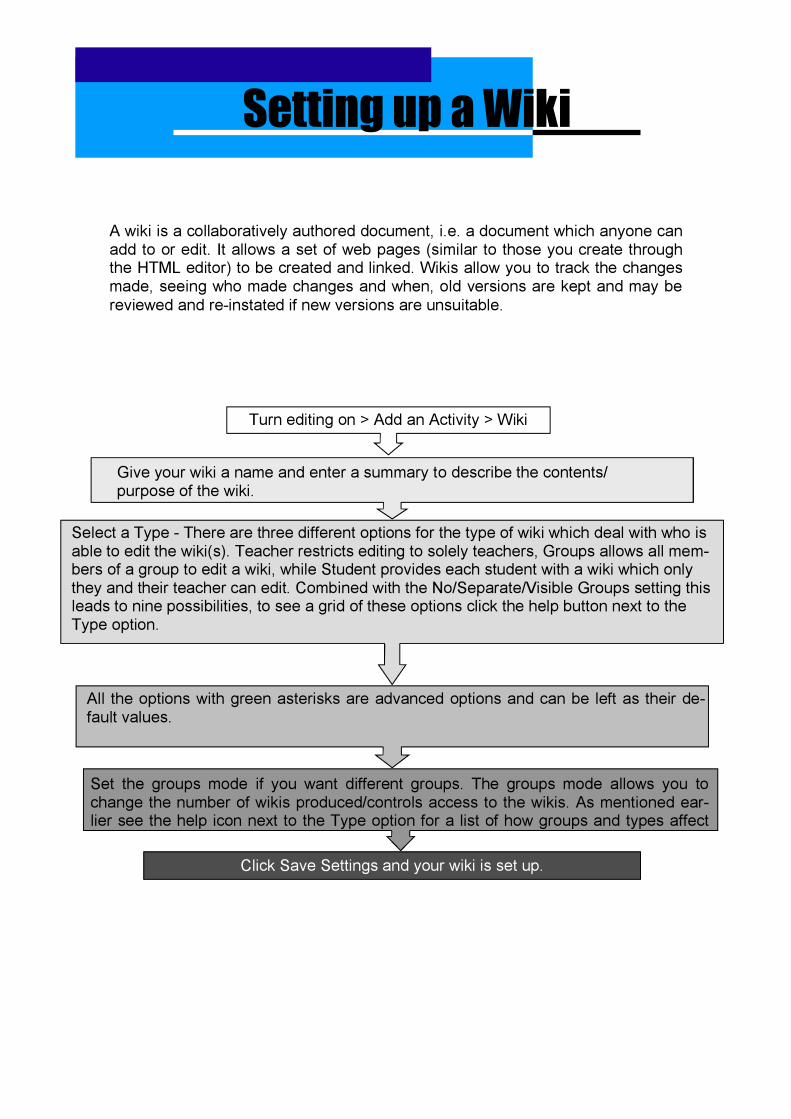
Setting up a Wiki A wiki is a collaboratively authored document, i.e. a document which anyone can add to or edit. It allows a set of web pages (similar to those you create through the HTML editor) to be created and linked. Wikis allow you to track the changes made, seeing who made changes and when, old versions are kept and may be reviewed and re-instated if new versions are unsuitable.
Turn editing on > Add an Activity > Wiki
Give your wiki a name and enter a summary to describe the contents/purpose of the wiki.
All the options with green asterisks are advanced options and can be left as their de-fault values.
Set the groups mode if you want different groups. The groups mode allows you to change the number of wikis produced/controls access to the wikis. As mentioned ear-lier see the help icon next to the Type option for a list of how groups and types affect
Click Save Settings and your wiki is set up.
Select a Type - There are three different options for the type of wiki which deal with who is able to edit the wiki(s). Teacher restricts editing to solely teachers, Groups allows all mem-bers of a group to edit a wiki, while Student provides each student with a wiki which only they and their teacher can edit. Combined with the No/Separate/Visible Groups setting this leads to nine possibilities, to see a grid of these options click the help button next to the Type option.

Using a Wiki Once you have set up your Wiki it will take you to the first page to start editing it. You will see a HTML editor which you can use to write and format your page. Once you are done you can push the preview button to preview your page and the save button to save your page and update the wiki. This will then become the first page of the wiki.
Editing an existing page To edit an existing page click on the Edit button above the page you want to edit. This will then show the page in the HTML editor where you can add information/make amendments.
Adding a new page To create a link to a new page enclose the text you would like to be the link in square brackets i.e. [new page] when you then save the page the link will be displayed in bold with a question mark next to it - this is now considered as a wanted page. Click on this question mark to start editing the new page, once the new page has been edited and saved the link becomes active and points to the page you have just created.
Viewing the history of a page Wikis allow you to keep track of the different versions of the page and who has edited the page. To see this information click on the History tab above the page. It will then show you a list of version with the person responsible for that version. You can click on the version num-ber or browse to see that version, fetch-back allows you to edit the page from that particular version and diff shows what was added/deleted in that version’s revision.
Wiki Administration Options Set page flags - this allows you to set permissions for individual pages, e.g. if you wanted to make a certain page Read Only (RO). Strip pages - As the wiki automatically keeps all versions of a page after a while you might wish to delete some of the older versions, strip pages will allow you to do this. Revert Mass Changes - this allows you to undo any changes someone may have made - i.e. if a user makes a mess of many pages in the wiki.

Setting up a Quiz The quiz module allows you to set quizzes for your students using multiple question types, such as multiple choice, matching, essay questions or true or false. Questions are stored in a question banks and can be used multiple times between quizzes. You can allow students to have more than on attempt at a quiz and you can set the quiz to adaptive mode, where the student is given a chance to re-answer any wrongly answer questions usually incurring penalties for each wrong answer they give. Creating a quiz happens in different parts, first you setup the quiz specifying how the student will interact with the quiz, whether they’ll be able to make multiple attempts, and what feedback they’ll get, then you add questions to your quiz, creating these questions if you haven’t already.
Question Types Moodle has the following different question types:
• Calculated - this allows individual numerical questions to be created through the use of wildcards that are substituted with individual values when the quiz is taken.
• Description - This is not actually a question it simple prints some text, and possibly graphics without requiring an answer. This can be used to provide some information to be used by a following group of questions for example.
• Essay - the student answers a question in Essay style - these are not marked automatically by Moodle - the teacher must grade these.
• Matching - A list of sub-questions is provided along with a list of answers, the students must pick the right answer from the list.
• Embedded Answers (Cloze) - These questions consist of a passage of text that has various answers embedded within it, including multiple choice, short answers and numerical answers.
• Multiple Choice - the answer is selected from different options, there can be one answer or multiple answers.
• Short Answer - the student has to enter a word or phrase - there can be several different answers with different grades.
• Numerical - These are similar to short answer questions from the students perspective but they are allowed to have an accepted error.
• Random Short-answer Matching - these are matching questions where the questions and answers are drawn randomly from Short Answer questions in the current category.
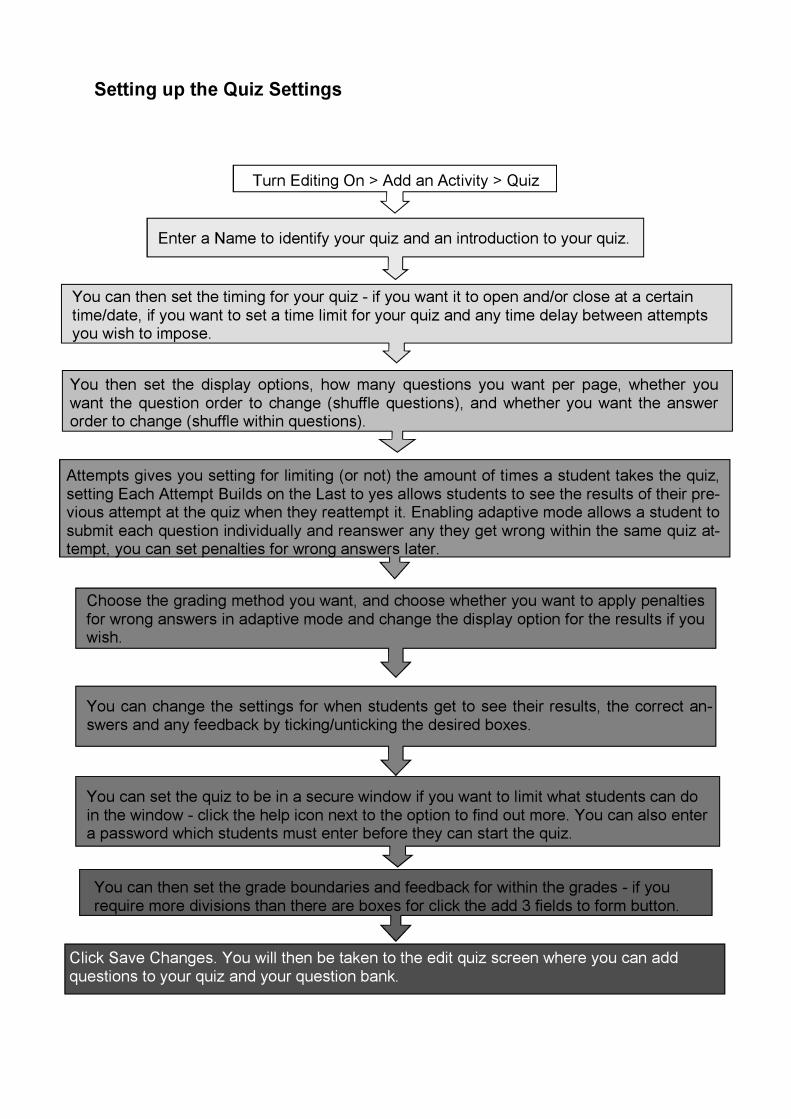
Turn Editing On > Add an Activity > Quiz
Enter a Name to identify your quiz and an introduction to your quiz.
You can then set the timing for your quiz - if you want it to open and/or close at a certain time/date, if you want to set a time limit for your quiz and any time delay between attempts you wish to impose.
You then set the display options, how many questions you want per page, whether you want the question order to change (shuffle questions), and whether you want the answer order to change (shuffle within questions).
Attempts gives you setting for limiting (or not) the amount of times a student takes the quiz, setting Each Attempt Builds on the Last to yes allows students to see the results of their pre-vious attempt at the quiz when they reattempt it. Enabling adaptive mode allows a student to submit each question individually and reanswer any they get wrong within the same quiz at-tempt, you can set penalties for wrong answers later.
Choose the grading method you want, and choose whether you want to apply penalties for wrong answers in adaptive mode and change the display option for the results if you wish.
You can change the settings for when students get to see their results, the correct an-swers and any feedback by ticking/unticking the desired boxes.
You can set the quiz to be in a secure window if you want to limit what students can do in the window - click the help icon next to the option to find out more. You can also enter a password which students must enter before they can start the quiz.
Click Save Changes. You will then be taken to the edit quiz screen where you can add questions to your quiz and your question bank.
You can then set the grade boundaries and feedback for within the grades - if you require more divisions than there are boxes for click the add 3 fields to form button.
Setting up the Quiz Settings

You will automatically be taken to the quiz editing page after you have set your Quiz set-tings. Alternatively you can access it by clicking on the quiz link from the course page and then clicking on the edit tab.
You should now see 2 boxes, the right hand box is the question bank which lists all the questions you have in your course, the left hand box is the questions you have in that quiz.
To add questions to your quiz you select them in the right hand box by ticking the box next to them then click the double left hand arrow to move them to your quiz.
Once you are done you can click on the Preview tab to see how your quiz will look when it is run.
Adding Questions to your Quiz from the Question Bank
You can then assign the questions grades or reorder them by clicking on the up and down arrows (if you have set shuffle questions to yes then there is no need to order your ques-tions)
Adding Questions to the Question Bank
Once you are done, save your question and it should appear in the question bank ready for you to add to quizzes.
You can access the question bank either when you are editing a quiz (appears as right hand block) or through the administration menu - click the Questions link.
Choose the category you want to add the questions to - or create a new one by click-ing on the Edit Categories button.
Choose the type of question you want to create from the drop down list.
You can then fill in the add question page for whichever type of question you picked. Click the blue question mark help icon next to the “Editing a … Question” for more help on the type of question you have chosen.

Cloze Questions Cloze Questions have a special format that they have to be written in. This can seem complicated at first. Cloze questions are usually embedded in a paragraph of text, there are three different question types that you can choose from to embed, Multiple choice, short answer and numerical questions. An example is given below:
The capital of France is {2:MULTICHOICE:Nice#Wrong~Marseille#No, that is France’s Second biggest city~=Paris#Correct~%50%paris#A capital letter should always be used for the beginning of Place names}
This displays as: • The question must be enclosed between curly brackets. • The number after the brackets is the weighting of the question. • The question type is then enclosed in colons and must be in capitals i.e.
:MULTIPLECHOICE: or :SHORTANSWER: or :NUMERICAL: • You can then enclose answers and feedback for each answer in the form an-
swer#feedback (feedback is optional) • Separate answers with ~ • You can specify the answers that get marks by preceding them with percentages if
they are partially correct or = if they give full marks. E.g. %50%Answer gives the user 50% of the full marks for that question, =Answer is equivalent to %100%Answer
• You can specify an acceptable error range for numerical questions e.g. =23.8:0.2 will give full marks for anything from 23.6-24. You can also provide different marks for different ranges e.g. =23.8:0.2#Correct, you get full marks~%50%23.8:0.5#Close, half marks
• Short answer and numerical question answers are matched in the order you have given, so if you wish to provide feedback for anything that doesn’t match any an-swer you have specified you can use * to catch any other wrong answer and give feedback for it so a numerical answer with a weighting of 2 could be written as:
{2:NUMERICAL:=10.5:0.1#Correct~%50%10.5:0.9#Close enough for half marks~*#Incorrect}

Setting up a Glossary Glossaries act as dictionaries for the course, teachers/students can add words and their meanings to the glossary. These entries can be searched or browsed in different formats and set so that words in the glossary are automatically highlighted and linked to when used in other parts of the course. Glossaries can also be imported and exported to and from other courses.
Turn editing on > Add an activity > Glossary
Enter a name and description for your glossary and enter how many entries to display per page.
You can then set whether you want it to be the main glossary (which only the teacher can add to) or a secondary glossary (which students can edit then the entries be im-ported to a main glossary).
You can then choose whether you want to allow duplicated entries, print view, whether you want your glossary entries to be autolinked and whether you want students entries to appear in the glossary immediately or whether you want to approve all entries before they become visible to other course members.
You have a choice as to how your glossary is displayed, this is set using the Display Format option. For definitions of all the types click on the help icon next to display for-mat.
You then have the option to allow glossary entries to be related, either by the teacher or the students, you can also pick the scale that is used to rate entries (this can be a predefined one or one you have set using the scales option in the Administration block)
Click Save and your glossary will be set up - now you or your students can start adding entries to it.
You can now add a new entry by clicking on the “Add a new entry” button. You can create categories for your new entries to come under by clicking on the “Browse by Category” tab and clicking the “Edit Categories” button.

Setting up an Assignment The assignment activity allows you to set students assignments and then record the grades they get for those assignments. There are different assignment options, you can set assignments where students can get students to submit text within Moodle (online text), upload one or more files (upload a single file/advanced uploading of files) or you can set an offline assignment (offline activity) - where the assignment and the grade can be recorded on Moodle but the assignment is handed in/done offline.
Turn editing on > Add an Activity > Pick whichever assignment activity best suits your needs.
Give your assignment a name and then fill in the description box with the details of the assignment you wish the students to complete.
The grade option then denotes what scale you will use to grade the assignment, e.g. you can choose the satisfactory scale, 100 if you want the grade to show as a per-centage or choose the number of marks available e.g. 10).
You can then choose between which dates the submission period for the assignment is and whether you want to prevent people from submitting work after this period has ended.
The next group of settings are specific to the type of assignment you have chosen, most are fairly self-explanatory, for further help with any of them click the blue help icon next to the option.
Click Save and your assignment is setup.
Set the group mode if you wish.