module 2 - kennard-dale high school
TRANSCRIPT
Module 2NSCA Flight Manual 1
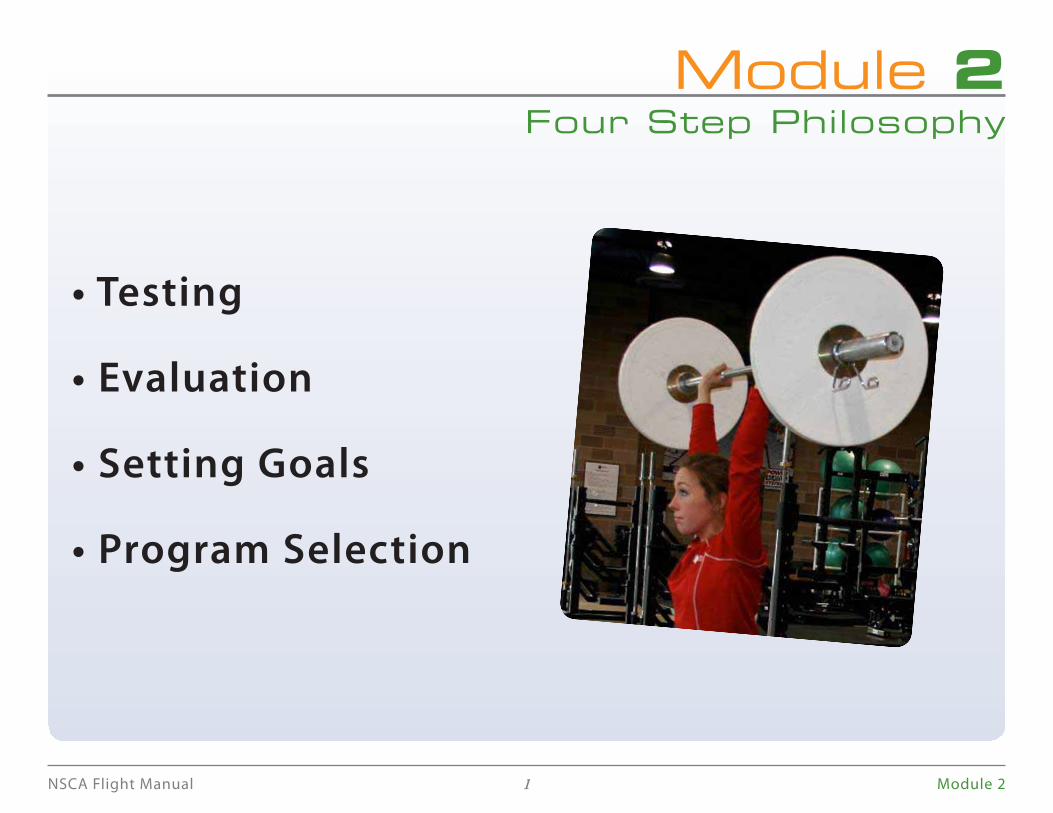
• Testing
• Evaluation
• Setting Goals
• Program Selection
Module 2Four Step Philosophy
Module 2NSCA Flight Manual 2
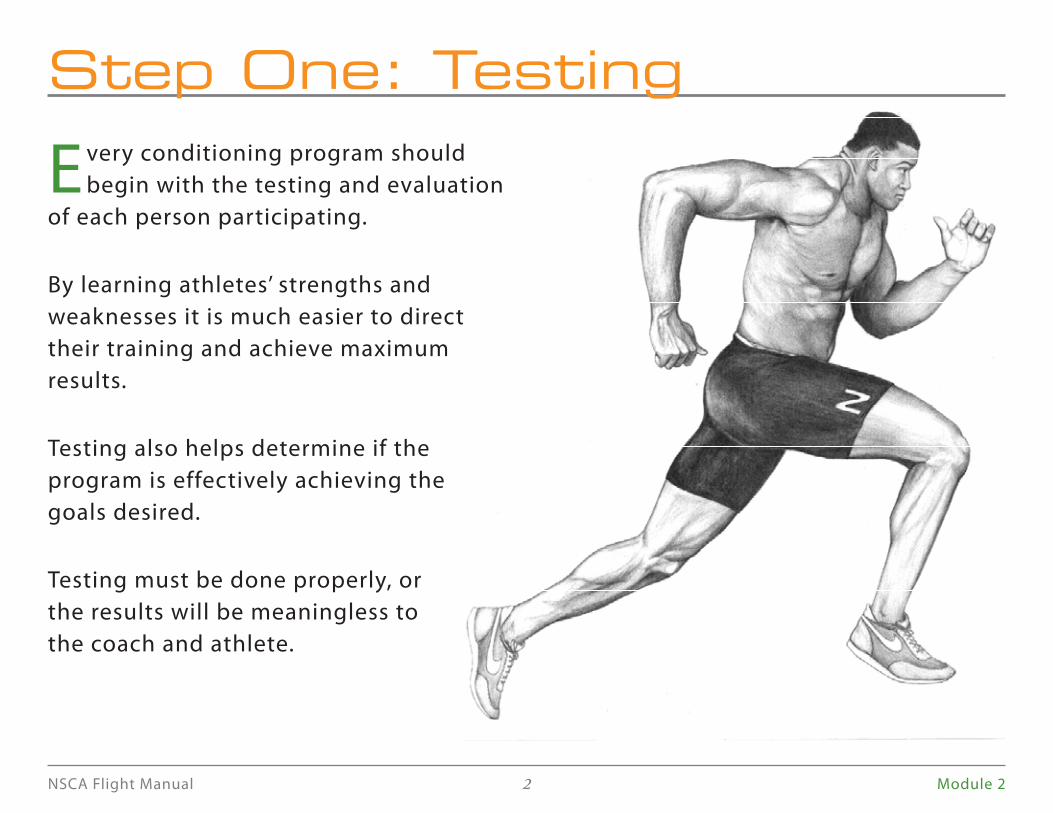
Every conditioning program should
begin with the testing and evaluation
of each person participating.
By learning athletes’ strengths and
weaknesses it is much easier to direct
their training and achieve maximum
results.
Testing also helps determine if the
program is effectively achieving the
goals desired.
Testing must be done properly, or
the results will be meaningless to
the coach and athlete.
Step One: Testing

Module 2NSCA Flight Manual 3
ReliabilityReliability is dependent upon the coach
keeping testing conditions and results
consistent each time. The testing results
will be different if testing is done outside
on the grass one time, then inside on
the basketball court another time. The
condition of the field, the time of day,
wind, rain, temperature, etc. all have an
effect on the testing results.
The order the tests are given will affect
the results. The testing order and
equipment needs to be the same each
and every time.
ObjectivityHave the same coaches administer the
same test each time, if possible. This will
insure more consistent scoring.
If different coaches are used, be sure
the tests are administered in exactly the
same way and in the same order to end
up with the same results.
Testing

Module 2NSCA Flight Manual 4
The combination of testing periods
form an “Annual Test Cycle.”
These should generally be held during
the week before the conditioning period
starts.
Testing establishes initial performance
levels, and determines the level of
progress attained during the previous
conditioning period.
For a fall sport, the annual performance
test cycle may be scheduled as follows:
Test # 1 When athletes report in August
Test # 2 When season is over in
November or December
Test # 3 At the start of the Post-Season
Test # 4 After the Off-Season strength
program
Annual Test Cycle

Module 2NSCA Flight Manual 5
Athletes move from one testing station to another carrying
the Test Data Card. The coach serving as judge records
test data on the card until all tests have been completed.
Equipment and materials needed:Device to measure height or flat wall against which the athlete •
stands.
Measuring tape or marked area on wall.•
Device to place on the head of the athlete that forms a right angle •
with the wall.
Procedure:
Athlete must take shoes off.1.
Athlete must stand with heels, buttocks, back and head against the 2.
wall.
Place device on athlete’s head so that a right angle is formed with 3.
the wall. Measure to the nearest 1/2” and record height.
Test #1: Height

Module 2NSCA Flight Manual 6
Equipment and materials needed:
Certified• Scale
Procedure:
Athlete must weigh-in with only t-shirt, shorts, and socks 1.
(no shoes, sweats or equipment).
Athlete should weigh prior to any activity to avoid 2.
fluctuations due to dehydration.
Round body weight to the nearest whole pound.3.
Test #2: Bodyweight

Module 2NSCA Flight Manual 7
Equipment and materials needed:Vertical jump device•
Vertec•
Tape measure•
Adjustment rod•
The vertical jump device is used at the World
Competition.
The tape measure taped to the wall and Vertec will be
accepted for qualification of the World Competition.
Test #3: Vertical Jump

Module 2NSCA Flight Manual 8
Procedures for the World Competition:
Athlete stands with side to the unit.1.
Make sure feet and hips are next to the unit.2.
Athlete then reaches as high as possible 3.
keeping the feet flat on the floor.
The height reached becomes zero for the 4.
device.
The athlete then position feet flat.5.
With the feet flat the athlete jumps, 6.
touching the highest vane possible. No
steps or shuffling the feet are allowed.
The jump is recorded and display to the 7.
nearest ½ ”.
Record the better of two trials.8.
Procedure for the Wall Jump:
Tape a tape measure on the wall starting 1.
from the floor to eleven feet high.
Athlete stands with side to the wall.2.
Make sure feet and hips are next to the wall.3.
Athlete then reaches as high as possible 4.
keeping the feet flat on the floor.
Record the height reached to the nearest ½ ”.5.
The athlete then positions feet flat.6.
The athlete then jump7. s, hitting the highest
point possible. No steps or shuffling the
feet are allowed before the jump.
Record the height jumped to the nearest 8. ½ ”.
Then subtract the height reached from the 9.
height jumped.
Record the better of two trials.10.

Module 2NSCA Flight Manual 9
Procedure for the Vertec:
Tape a tape measure on the wall starting 1.
from the floor to eleven feet high.
Athlete stands with side to the wall.2.
Make sure feet and hips are next to the wall.3.
Athlete then reaches as high as possible 4.
keeping the feet flat on the floor.
Record the height reached to the nearest ½ ”.5.
The athlete then positions feet flat.6.
The athlete then jumps, hitting the highest 7.
possible vane. No steps or shuffling the feet
are allowed before the jump.
Record the height jumped to the nearest ½ ”.8.
Then subtract the height reached from the 9.
height jumped.
Record the better of two trials.10.
Causes for Disqualification for All Procedures:
Not having feet and hips next to the wall or 1.
unit when reaching.
Standing on tiptoes when reaching.2.
Taking a step or shuttle before the jump.3.
Example:
Height jumped (124”) and Height reached
(94”) equals a Vertical Jump of 30“. Record
the total number of inches the athlete
jumped on the test card. Record the
difference between the height reached and
the height jumped to the nearest half inch.
Refer to www.nsca-lift.org. Enter weight
and number of inches jumped to calculate
vertical jump index points.

Module 2NSCA Flight Manual 10
Equipment and materials needed:Twenty or more yards of flat running surface.•
Portable Electronic time with built in delay.•
Two stop watches.•
If hand held stopwatches are used calculate the average •
time from two coaches timing the same run on the test
data card.
Procedure:Stretching and warming up properly is of 1.
extreme importance.
Start in a two point stance straddling the center 2.
line.
Athlete starts when he/she is ready. The timer 3.
starts automatically when the athlete leaves
the beam; the two coaches start time on the
athlete’s first movement.
Always start sprinting to the right first for five 4.
yards.
Touch the line with the right hand then sprint 5.
back across the center line ten yards to the left
line and touch it with the left hand.
Sprint back to the right five yards finishing 6.
through the center line.
Sprint 5 yards to the right and touch the line 7.
with right hand; sprint 10 yards to the left and
touch the line with left hand; sprint back 5
yards to finish through the center line. The total
distance run is 20 yards.
Test #4: Pro Agility Run
5 yards
Straddle LineFacing
Run to the right 5 yards – touch with right hand then run to the left 10 yards and touch with left hand then return to center line.
5 yards
3
2
1
5 yards
Straddle LineFacing
Run to the right 5 yards – touch with right hand then run to the left 10 yards and touch with left hand then return to center line.
5 yards
3
2
1

Module 2NSCA Flight Manual 11
Equipment and materials needed:Portable Electronic timer.•
Thirty or more yards of flat running surface.•
Procedure:
Stretching and warming up properly is of extreme 1.
importance.
Athlete places one hand on starting line.2.
Athlete starts when he/she is ready. The timer starts 3.
automatically when the athlete’s hand leaves the start switch.
Sprint trough the 10 yard mark.4.
Record the best time.5.
Without electronic timing the 10 yard time will not be accurate
enough to record. Many schools will want to include the 40 yard
dash to measure speed. Record the 10 and 40 times during the
same runs.
Test #5: 10 Yard Dash

Module 2NSCA Flight Manual 12
Equipment and materials needed:
A platform or rubber floor with a 30” x 36” box on it.•
An Olympic bay, rubber plates, and clips.•
Starting Position To begin, approach the bar resting on the floor or 1.
platform so the shins make contact with it.
Place the feet hip-width apart and the toes pointed 2.
straight ahead.
Keeping the back flat and shoulder blades pulled 3.
together, squat down until the hands grasp the bar.
Grasp the bar with an overhand grip slightly wider 4.
than shoulder-width with arms straight and the
elbows pointed out.
The head is held in a neutral position with the eyes 5.
looking forward throughout the entire lift. (Position 1)
Slowly extend the hips and knees, elevating the bar 6.
to just above the knees. Keep the bar in close to the
body.
As the bar passes the knees, extend the hips.7.
Stand erect with the shoulders, hips, and knees in 8.
alignment and the bar held at arm’s length touching
the top part of the thigh. (Position 2)
Test #6: Hang Clean
Position 1 Position 2
Module 2NSCA Flight Manual 13
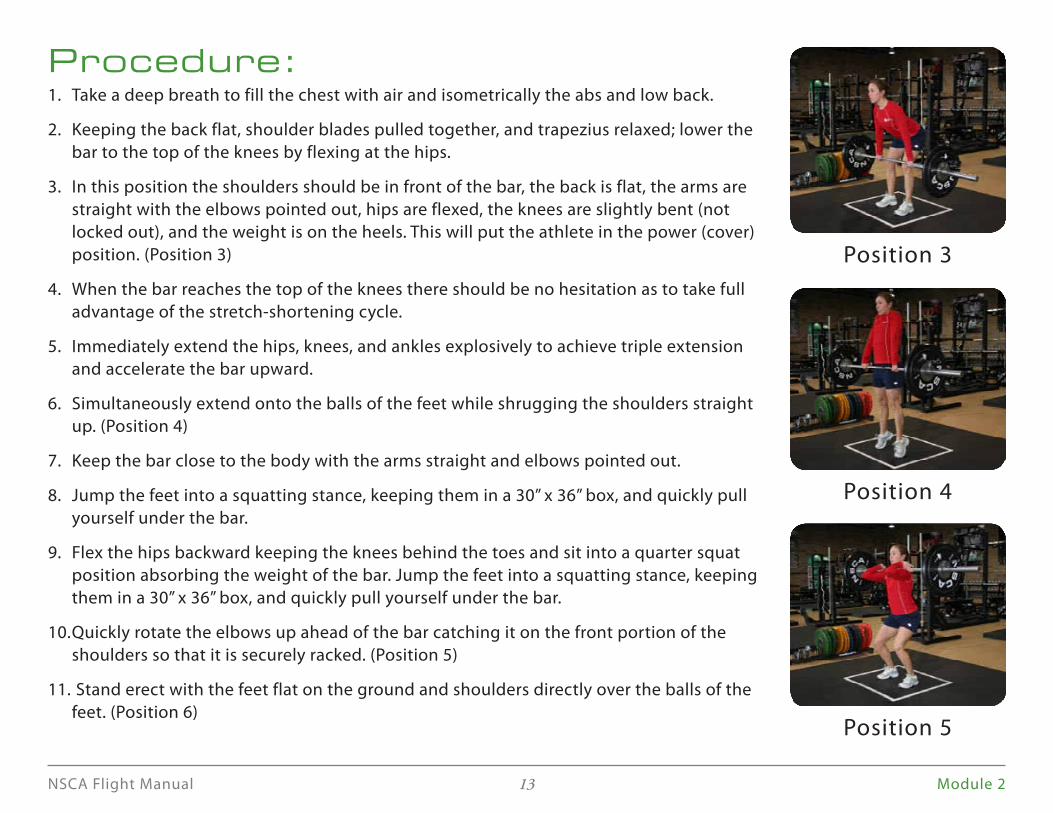
Procedure:Take a deep breath to fill the chest with air and isometrically the abs and low back.1.
Keeping the back flat, shoulder blades pulled together, and trapezius relaxed; lower the 2.
bar to the top of the knees by flexing at the hips.
In this position the shoulders should be in front of the bar, the back is flat, the arms are 3.
straight with the elbows pointed out, hips are flexed, the knees are slightly bent (not
locked out), and the weight is on the heels. This will put the athlete in the power (cover)
position. (Position 3)
When the bar reaches the top of the knees there should be no hesitation as to take full 4.
advantage of the stretch-shortening cycle.
Immediately extend the hips, knees, and ankles explosively to achieve triple extension 5.
and accelerate the bar upward.
Simultaneously extend onto the balls of the feet while shrugging the shoulders straight 6.
up. (Position 4)
Keep the bar close to the body with the arms straight and elbows pointed out.7.
Jump the feet into a squatting stance, keeping them in a 30” x 36” box, and quickly pull 8.
yourself under the bar.
Flex the hips backward keeping the knees behind the toes and sit into a quarter squat 9.
position absorbing the weight of the bar. Jump the feet into a squatting stance, keeping
them in a 30” x 36” box, and quickly pull yourself under the bar.
Quickly rotate the elbows up ahead of the bar catching it on the front portion of the 10.
shoulders so that it is securely racked. (Position 5)
Stand erect with the feet flat on the ground and shoulders directly over the balls of the 11.
feet. (Position 6)
Position 3
Position 4
Position 5
Module 2NSCA Flight Manual 14
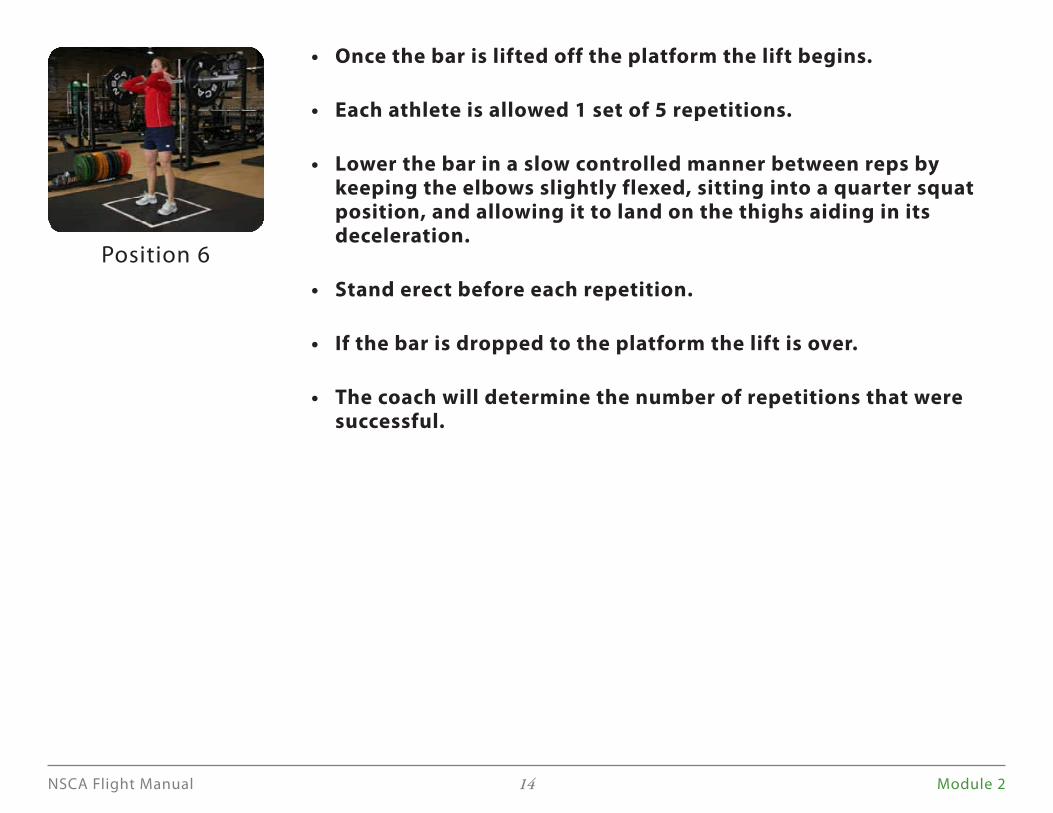
Once the bar is lifted off the platform the lift begins.•
Each athlete is allowed 1 set of 5 repetitions.•
Lower the bar in a slow controlled manner between reps by • keeping the elbows slightly flexed, sitting into a quarter squat position, and allowing it to land on the thighs aiding in its deceleration.
Stand erect before each repetition.•
If the bar is dropped to the platform the lift is over.•
The coach will determine the number of repetitions that were • successful.
Position 6

Module 2NSCA Flight Manual 15
Coaching Points: Avoid pulling with the arms (bending the elbows) before the hips are •
completely extended.
Catch the bar with your knees behind the toes, hips back, elbows high, and •
eyes up.
The scooping action or re-bend of the legs can be compromised by bending •
the elbows before the hips can be fully extended to the triple extension
(Position 4) OR by swinging the bar away from the body.
With the younger and or less experienced athletes, have them pause and hold •
the bar at the top of the knees so the coach can make sure they are in the
correct power position before making the explosive movement.
Position 1 Position 2 Position 3 Position 4
Position 5
Position 6

Module 2NSCA Flight Manual 16
Some programs may want to include
other tests even though the Vertical
Jump, Pro Agility Run, 10 Yard Dash, and
Hang Clean make up the NSCA Index
that is used to qualify for the NSCA Index
Championships.
The additional tests are:40 Yard Dash1.
Bench Press2.
– Bench Press with 185 lbs. for reps
– Bench Press with 225 lbs. for reps
Incline Press3.
Squat4.
Broad/Long Jump5.
Additional Tests

Module 2NSCA Flight Manual 17
1. 40 Yard DashEquipment & materials needed:
Portable Electronic timer.•
Sixty or more yards of flat running surface.•
Procedure:Stretching and warming up properly is of 1.
extreme importance.
Athlete places one hand on starting line.2.
Athlete starts when he/she is ready. 3.
The timer starts automatically when the
athlete’s hand leaves the start switch.
Record the best time. Record the 10 and 40 4.
times during the same runs.
2. Bench PressEquipment & materials needed:
Flat bench and Olympic set.•
Procedure:The bench press is performed on a flat 1.
bench with a spotter. The barbell is grasped
wider than shoulder width, with a pronated,
closed grip. Both feet should be flat on the
floor, and the back flat on the bench.
With the assistance of the spotter, the bar 2.
is un-racked and brought over the lifter’s
shoulders. The bar is then lowered to the
chest. The athlete should not bounce, or
drop the weight.
Keeping the feet on the floor and the back 3.
flat on the bench, the athlete pushes the
bar back up, and slightly toward the head.
When the arms are fully extended, the
bar should be above the shoulders. Some
schools choose a fixed poundage of 185 lbs.
or 225 lbs. for repetitions.

Module 2NSCA Flight Manual 18
3. Incline PressEquipment & materials needed:
45 degree bench and Olympic set.•
Procedure:The incline press is performed in a supine 1.
position on an incline bench. The athlete
grasps the barbell with a slightly wider than
shoulder width grip.
To begin the exercise, the weight is 2.
un-racked and set above the shoulders.
While maintaining the normal curves of the 3.
back, the athlete lowers the weight to their
chest. The athlete should avoid bouncing
the weight off their chest, instead push
the weight strait back up using the chest
muscles. The prime mover for this exercise is
the pectoralis major.
The spotter should be positioned behind 4.
the lifter, where they can assist in racking
and un-racking the weight, along with
spotting the exercise for missed repetitions.
4. Neutral SquatTo develop the quadriceps, thigh adductors,
gluteus maximus, and hamstrings. When done
correctly, full squats strengthen the muscles,
ligaments, and tendons surrounding the knee.
The core muscles are developed to a large
degree by keeping the torso erect. The squat is
the best exercise to develop lean body mass.

Module 2NSCA Flight Manual 19
W e have all heard the phrase, “squatting is bad for your knees,” from coaches,
players, parents, and doctors. The data that has been collected, however, indicates
that squatting (even deep squatting) is quite safe for the knees and may actually
improve knee stability (Kreighbaum, 1996). The other problem associated with
squatting is lower back injury or disk herniation. Research indicates that trunk
flexion and rounding of the back influenced spinal compression the most (Fleck,
1986). The greatest compression occurs during the transition from descending to
ascending during the squat. To correct or avoid this problem, a technique called
“blocking” is used to help avoid rounding the back (or flexing the spine) (Huberti,
1984).
Teaching the Mechanics of the Squatby Mike Arthur

Module 2NSCA Flight Manual 20
The three blocking techniques are as follows:Stick your chest out by taking a deep breath and filling your lungs with air like a 1.
balloon. This will cause you to stiffen your rib cage and prevent your upper torso
from bending forward.
Contract all the abdominal muscles to increase intra-abdominal pressure so your 2.
shoulders are pulled back when you are in the top position of the squat.
Finally, contract the lower back muscles in order to arch your lower back and extend 3.
the bottom of the spine.
The bottom line is that if you attempt to do any exercise without a solid foundation or
proper technique, you are setting yourself up for minor or permanent injury.
Other areas to take into consideration when training athletes:
• Length of Femur • Hip Flexibility
• Torso Length • Injury History
• Torso Strength • Shoulder Flexibility
• Ankle Flexion

Module 2NSCA Flight Manual 21
Approach, Back-Out, and Set-Up:1.
Bar should be placed across the center of A.
the shoulders.
Make sure the entire body is under the bar.B.
Both feet must be under the bar and C.
parallel.
Prior to lifting the bar out of the racks, D.
inhale – expanding the lungs – and hold
until you have set up.
Stand erect with the chest filled with air.E.
Take one or two steps backward to set up.F.
Common mistakes:
Not placing the body in center of the bar•
Not placing the entire body under the bar•
Not filling the body with air and holding•
Taking more than two steps to set up.•
Gripping the Bar (Hand Placement): 2.
Based on the Size or Height of the Athlete
All athletes should use a pronated grip and A.
grip the bar tightly.
A closer grip helps bunch the muscles in the B.
back
Taller athletes’ grip will vary from medium C.
to wide
Shorter athletes’ grip will vary from close to D.
medium
Common mistakes:
Athletes gripping the plates and not the bar•
Athletes taking their hands off the bar •
during the ascending phase
Athletes not gripping the bar with a firm •
grip
Module 2NSCA Flight Manual 22
Bar Placement: No Significant Difference in Muscle Development Between High-Bar and 3.
Low-Bar Squatting:
High Bar Squat: The bar sits on top of the trapezius muscle near the base of the neck. Increases A.
force at the knees.
Low Bar Squat: The bar sits 1 to 2 inches below the deltoids. Increases force at the hips.B.
Common mistakes:
High-Bar: Leaning forward or rounding the back•
Low-Bar: Bar rolling down•
Head and Eye Position:4.
Head and eyes should be focused straight ahead. This is a natural position; keeping the A.
cervical spine in line with the body helps maintain body weight distribution throughout the
squat. Balance is one of the key elements of squatting. When the neck is placed in an improper
or unnatural position, the back is rounded, placing unwanted stress or strain on the neck.
Common mistakes:
Titling the head forward (looking down), the weight can shift to the balls of the feet, placing •
excess stress on the body and causing the athlete to round his/her back.
Tilting the head backward (looking upward), can cause the weight to shift to the heel of the •
foot, which can cause an improper curvature of the spine and place unwanted stress on the
neck and back.

Module 2NSCA Flight Manual 23
Breathing: Inhale Deeply to Maintain 5.
Intra-thoracic Pressure and Prevent
Bending Forward, Arching the Back, and
Passing Out
Helps maintain tightness throughout the A.
squat
Inhale and hold prior to descending in the B.
squat
Exhale once you are near or at the top of C.
the squat
Inhale and exhale at the top of the squat D.
between repetitions
Common mistakes:
Holding your breath during repetitions•
Exhaling at the bottom of the squat•
Torso-Trunk:6.
Stabilize your torso-trunk by isometrically A.
contracting the abdominals and back.
The torso-trunk should be held between 35 B.
and 45 degree angles.
Less than 35 degrees, you are too straight C.
upward
More than 45 degrees, you are too far D.
forward
The torso should be kept flat and straight E.
(the axis of flexion runs through the hip
thigh joint.)
Common mistakes:
Allowing the torso-trunk to lean forward •
too much
Keeping the torso-trunk too upright•
Not squatting with a rigid torso.•
Module 2NSCA Flight Manual 24
Descending:7.
Push hips backA.
Simultaneously flex at the knee and push B.
the hips back and down.
Maintain torso position.C.
Distribute body weight from balls of the D.
feet to the heels
Maintain a slow and controlled manner E.
during descent, not letting the knees
extend past the balls of the feet.
Keep the shins as vertical as possible.F.
At the bottom, do not bounce, jerk, or stop G.
the squat
Common mistakes:
Going straight down in the squats.•
Allowing the knees to go past the balls of •
the feet.
Shins not vertical •
Dropping down too quickly into the squat•
Note: To obtain optimal results in core
flexibility, muscular development, and
strength of the lower body, observe the
following:
When performing the back squat, the •
proper depth has been achieved when
the mid-thigh is parallel to the floor,
while still maintaining the proper back
squat form.
Squatting to additional depth—while •
still maintaining the proper back
squat form—will result in greater core
flexibility, muscular development, and
strength of the lower body than the
mid-thigh position.

Module 2NSCA Flight Manual 25
Ascending:8.
Drive the feet through the floorA.
Simultaneously raise the hips and shouldersB.
Push your shoulders slightly back into C.
the bar so that your chest remains facing
outward
Rotate the hips under the barD.
Maintain proper head and eye positionE.
Stand erect and tall, back into the starting F.
position.
Common mistakes:
Attempting to bounce out of the bottom of •
the squat
Allowing the hips to raise too quickly out of •
the bottom of the squat
Allowing the weight to shift to the toes•
Foot Position:9.
Narrow stance: works the quadriceps, some A.
gluteus
Medium Stance: works the quadriceps, some B.
adductor work
Wide Stance: works the adductor, gluteus, C.
and outer quadriceps
Keep heels on the floorD.
Toes should be pointed out slightly from E.
neutral to 30 degrees.
The angle of the foot position makes no F.
difference as long as you are comfortable
with the stance.
Common mistakes:
Not finding what stance works for you•
Turning or pointing the toes inward.•
Module 2NSCA Flight Manual 26
Abdominals: 10.
Strong abdominal muscles help maintain A.
torso stability and intra-thoracic pressure
throughout the squat
The obliques are an important muscle group B.
when performing the squat as they help to
maintain torso stability.
Common Mistakes:
Not including abdominal work as part of the •
regular strength training routine
Working only one section of the abdominal •
area (either upper or lower, or just the
obliques)
Not using a variety of abdominal/oblique •
exercises
Too much hip flexion during abdominal •
exercises
Summary:
Without question, the squat is the single
most effective leg exercise. This strength
training exercise involves a large part of the
muscular system. As strength coaches, we must
remember that athletes’ squats will vary based
on differences in their body types, length of the
legs, and flexibility of the ankles. Technique will
vary based on differences in foot stance widths,
the use of heel pieces, and the positioning of the
bar—high or low—on the back.
To utilize higher weight or to help an athlete
achieve proper depth in the squat, lower the
bar and widen the stance. Coach and teach your
athletes to stabilize their torso by isometrically
contracting the abdominals and back. Never flex
the spine during a squat.
Overall, the key to performing the squat is to do
it correctly and carefully. Never let the weight
control you. You control the weight. Squats are
not “bad for your knees.” The fact is that if you
have healthy knees, they are quite capable of
handling even the heaviest weight that your
body can tolerate.
Module 2NSCA Flight Manual 27
4. Broad Jump or Long JumpEquipment & materials needed:
Non slip surface, good shoes and a tape measure.•
Procedure:Stand with both feet on the starting line. 1.
Bend the knees and jump forward landing on both feet.2.
Record the distance to the nearest half inch from the starting line to the back of the heel that 3.
is closest to the starting line.

Module 2NSCA Flight Manual 28
Team ProfileLooking at team averages for each
category on a Team Index Profile will
enable the coach to see how the athletes
performed as a team during a particular
period.
Comparing the present testing averages
with past team averages tells how
effective the sports conditioning
program is by detecting strengths and
weaknesses in the program.
Step Two: EvaluationCollecting index data enables the coach to evaluate how their team is progressing and
also how each individual is progressing.
The NSCA Index
Additional tests can be included. Points from the
additional tests can be added to the NSCA index
to create an your own index however the NSCA
index is used to qualify athletes for the NSCA
Index Championships.

Module 2NSCA Flight Manual 29
The Individual Profile
The Index scores from one test period
alone don’t tell the entire story. A
history of each athlete’s testing should
be kept. This allows the coach to evaluate
the type of progress the athlete is
making from one year to the next.
The athlete will show the most
progress in the first year of
training. Each succeeding year
less progress is made as he
nears his athletic potential.
The key is to continue to show
progress in the areas in which
the athlete has weaknesses.
The Individual Profile is
particularly useful for one-on-
one conferences with athletes.
World ranking, national
ranking, and ranking by
sports.
Module 2NSCA Flight Manual 30
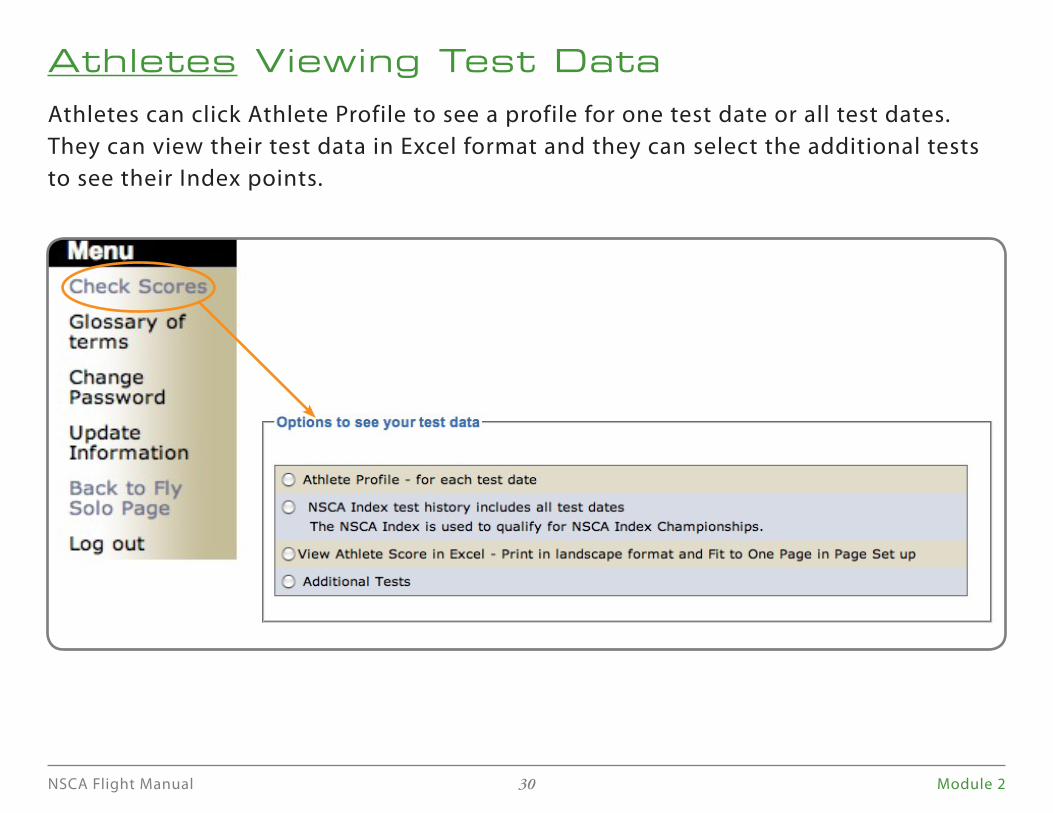
Athletes Viewing Test DataAthletes can click Athlete Profile to see a profile for one test date or all test dates.
They can view their test data in Excel format and they can select the additional tests
to see their Index points.

Module 2NSCA Flight Manual 31
Athlete Profile: ALL Test DatesThe athlete can see all his test scores and his best ever on each of the Index tests.
A coach can also print out all athletes tested.

Module 2NSCA Flight Manual 32
Example of Individual History

Module 2NSCA Flight Manual 33
Establishing goals is an essential
element of any sports conditioning
program. Without goals, a coach cannot
develop workouts that give direction and
progressively increase intensity. Set goals
for yourself as a coach, for the team, and
for each individual athlete.
It is unfortunate how many coaches
have their athletes go into the weight
room without first setting goals. Athletes
will make more progress if they know
beforehand what they are trying to
achieve.
To set goals that are challenging yet
realistic, it is best to compare data with
past testing results.
Step Three: Goal Setting

Module 2NSCA Flight Manual 34
Set Goals With the AthletesThe athlete should have most of the
input when setting goals. This will
make them feel more dedicated toward
achieving the goal.
The role of the coach is not to let
them set goals that are too high or
too low. Point out their strengths and
their weaknesses. Let them know how
dedicated the workouts will need to be
to achieve the goals.
Goals need to be realistic. If goals are
unattainable the athlete will become
discouraged and will not be motivated to
work to their maximum potential. If the
athlete is not serious about reaching the
goal, they won’t.
Long and Short Range GoalsThe long range goal should be what the
athlete wants to achieve for the year.
Once the long range goal has been
determined, a short range goal can also
be set for each conditioning period
during the year.
Be flexible and allow adjustments in the
goal setting process. The goals aren’t set
in concrete. The
athlete may reach
their long range
goal sooner then
expected and
need to reset the
long range goal.

Module 2NSCA Flight Manual 35
A progressive and methodical
application of overload in an
athlete’s program over time provides
the stimulus and the needed recovery to
produce the best results.
This means drills and exercises must be
combined systematically to improve the
strength, conditioning, speed and agility
necessary to play at a championship
level.
Exercises and drills must be organized
into a plan on a yearly basis to peak
athletes as they go into the season.
Post-TestingAfter working through the four-step
process it’s time to measure if your
program worked.
If the athletes trained hard their progress
and the program’s effectiveness can be
measured by post-testing.
If desired progress was not made an
adjustment in the program may be
necessary.
Step Four: Program Design

Module 2NSCA Flight Manual 36
Big Picture
The first step in program design is to
look at a calendar and determine
what months athletes should train.
Depending on the sport, divide thee
year into four seasons, (post season, off-
season, pre-season, and in-season) in a
building block procedure. Each season
lays the foundation for the next more
intense season
Immediately after the competitive season
is over athletes need rest. They need to
recuperate physically and psychologically
after a stressful season.
If the athletes don’t get some rest
following the competitive season, they
will get stale and lose their enthusiasm
to reach the intensity necessary to bring
about a conditioning response.
The most important time to take rest
is right after the season. Encourage
athletes to use the active rest concept; it
is crucial to their physical development
to higher levels. Sometimes the athletes
will want to show what a hard worker
they are and train right through the
active rest period. This will diminish their
long range gains. Teach them to train
smarter not harder. Active Rest is a time
to have fun but be active enough to get a
conditioning effect.
Control eating habits during the active
rest and work on developing great lifting
technique.

Module 2NSCA Flight Manual 37
Post Season
This is a time to reflect, re-evaluate
and set goals and build a foundation
base of strength.
It is also a time to recover and get away
from structure. Start with a period of
active rest with low-intensity and low-
volume training.
Choose conditioning activities that
are fun and involve agility, reaction,
and coordination. Activities such as
basketball, racquetball, and tennis are
excellent choices to develop these
components during the post-season.
During this period of active rest, you
should also focus on lifting technique,
especially the platform lifts.

Module 2NSCA Flight Manual 38
Off-Season
The off-season program is similar to
the post-season except it is more
intense. The objective is to achieve
maximum gains by building on the
strength established in the post-season
program.
This is the time to get strong. The
athletes can continue to participate in
athletic activities such as racquetball.
Higher volume is done away from the
season, which means supplemental
exercises are included during the
base and development phases but are
normally dropped during the peak and
maintenance phases.
The normal four week training period
calls for backing off intensity in the third
week with a strength level check in the
fourth week.
The “Unload” or “back off ” can be
achieved by reducing the percentage
of weight used. Unloading also means
doing two sets on supplemental
exercises in place of three sets.
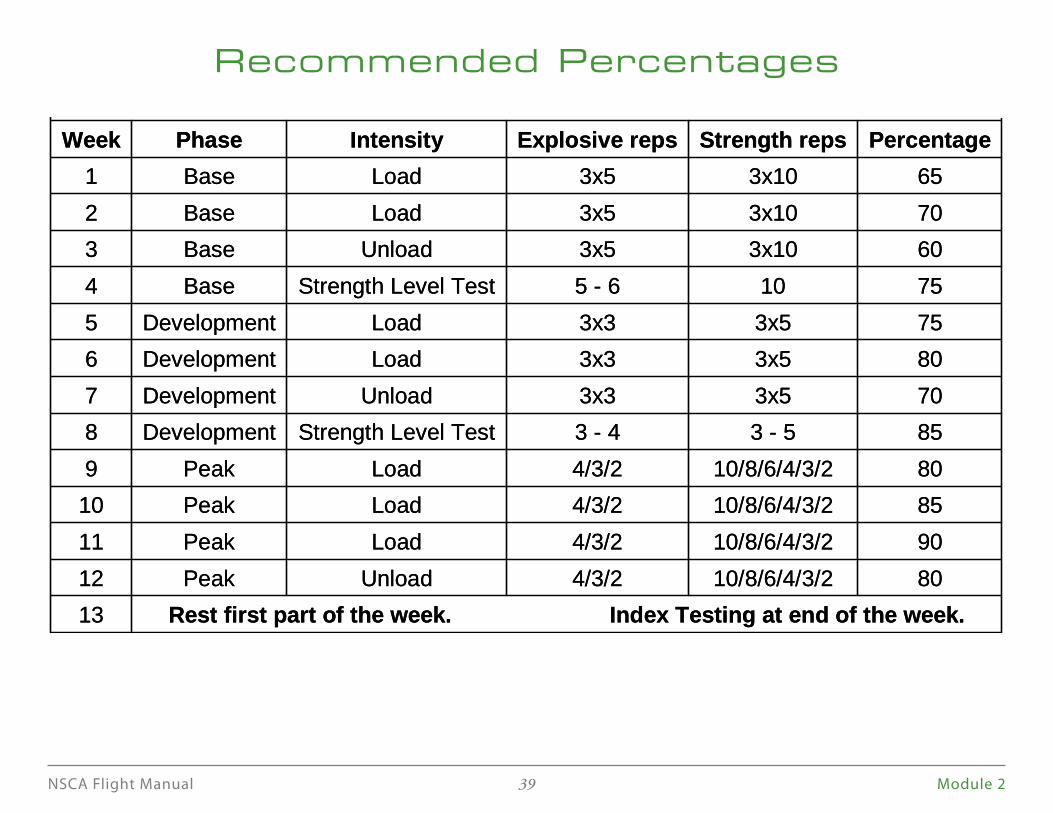
Module 2NSCA Flight Manual 39
Recommended Percentages
Rest first part of the week. Performance Index Testing at end of the week.13
8010/8/6/4/3/24/3/2UnloadPeak12
9010/8/6/4/3/24/3/2LoadPeak11
8510/8/6/4/3/24/3/2LoadPeak10
8010/8/6/4/3/24/3/2LoadPeak9
853 - 53 - 4Strength Level TestDevelopment8
703x53x3UnloadDevelopment7
803x53x3LoadDevelopment6
753x53x3LoadDevelopment5
75105 - 6Strength Level TestBase4
603x103x5UnloadBase3
703x103x5LoadBase2
653x103x5LoadBase1
PercentageStrength repsExplosive repsIntensityPhaseWeek

Module 2NSCA Flight Manual 40
Graph of Recommended Percentages
100
60504030
1020
0
908070
1 2 3 4 5 6 7 8 9 10 11 12
%
Week
65 70
60
75 7580
70
85
8085
90100
60504030
1020
0
908070
1 2 3 4 5 6 7 8 9 10 11 12
%
Week
65 70
60
75 7580
70
85
8085
90
Module 2NSCA Flight Manual 41
The objective is to peak the athletes for the season.
Pre-season is the period twelve weeks prior to start of in-season practices.
Workout program is very similar to the off-season program; four weeks in base phase,
four weeks in development phase, four weeks in peak phase.
You also need to follow the recommended percentages for these workouts.
Drop assistance exercises and concentrate on the core or major exercises.
Increase the intensity and lower the volume.
Begin speed drills on week 5 and agility drills on week 7 as the season nears.
Pre-Season

Module 2NSCA Flight Manual 42
The NSCA poundage chart (refer to NSCA
Poundage Chart on 1RM Calculator
page) is designed to make it very simple
to choose poundages during a workout.
To begin using the chart, refer to the
following explanation as a guide.
The numbers going across the very top
of the chart represent workout routines
that are used in the NSCA recommended
program. They include 3x10, 3x5, 3x3,
10/8/6/4/3/2, and 4/3/2.
The numbers in the far left column titled
“1RM” (one rep maximum) represents
the projected maximum that an athlete
is capable of for a major exercise. The
horizontal row next to the 1RM shows
the required poundages for the workout
depending on the number of reps and sets
that are chosen.
For example, on Monday the first exercise
is the Rack Clean and calls for three sets of
five reps (3x5). Go to the poundage chart
and find the three rows under the fives
column. Look down the columns until
you find the poundages you think you can
accomplish (example 95, 105, & 110). For
the first set of five you would do 95 lbs, the
second set would be 105 lbs., and third set
would be 110 lbs. Using these poundages
for three sets of five would give a predicted
1RM of 130 pounds.
NSCA Poundage Chart

Module 2NSCA Flight Manual 43
Example Poundage Chart
NSCA Poundage Chart3 3 3 5 5 5
10 10 10 10 8 6 4 3 2 4 3 2
45 50 50 35 40 50 55 60 65 50 55 60 65
50 50 55 35 45 50 60 65 65 55 60 65 65
50 55 60 40 50 55 65 70 70 60 65 70 70
55 60 65 40 50 60 70 70 75 65 70 70 75
60 65 65 45 55 65 70 75 80 65 70 75 80
60 65 70 45 55 65 75 80 85 70 75 80 85
65 70 75 50 60 70 80 85 90 75 80 85 90
70 75 80 50 65 75 85 90 95 80 85 90 95
70 75 80 55 65 75 90 95 100 80 90 95 100
75 80 85 55 70 80 90 95 105 85 90 95 105
80 85 90 60 70 85 95 100 110 90 95 100 110
80 85 95 60 75 85 100 105 110 95 100 105 110
85 90 95 65 80 90 105 110 115 95 105 110 115
85 95 100 65 80 95 110 115 120 100 110 115 120
90 100 105 70 85 100 110 120 125 105 110 120 125
135
140
115
120
125
130
85
90
1RM
70
110
105
95
100
75
80
Str
ength
Lev
el
9 10111055 1110555 111051301301 0130
5 5 5
Module 2NSCA Flight Manual 44
Record the 1RM in the space
to the right of the Rack
Clean and under Week 1 on the
workout card. If the poundages
are too easy, increase the 1RM
the next workout. This means
the coach should watch the
third set, initial the card, and
determine whether the 1RM
needs to increase, decrease,
or stay the same. Write the
1RM for the next week’s heavy
day workout on the card. For
the light day, the 1RM should
normally be reduced by 10 to 25
pounds. Concentrate on good
technique first and do not try
to increase the poundage too
fast. If the poundages were
difficult and did not allow good
technique, reduce the 1RM the
next workout. The same steps
should be taken for all the major
lifts.
Monday (heavy)Hruska Activators1. Para-Spinal Release2. Single Leg RDL's3. Knee to Knee's4. Internal Rotations1a. Warm-up-Rack Shrug
1RM Sets 1RM Sets* 1a. Rack Clean 130 3x5 95 105 115 5 5 5 140 3x5* 2a. Standing Press 3x5 3x53b. Power Jumps with or without Dumbbells^ 4. Pulling Choice5. Bicep Choice6. AB Choice
Thursday (light)Hruska Activators1. Para-Spinal Release2. Single Leg RDL's3. Knee to Knee's4. Internal Rotations1a. Warm-up-Rack Shrug
1RM Sets 1RM Sets* 1a. Rack Clean 115 3x5 85 90 95 3x5* 2a. Standing Press 3x5 3x53b. Power Jumps with or without Dumbbells^ 4. Pulling Choice5. Bicep Choice6. AB Choice
1x5
1x5
3x5 3x5
3x5
1x10sec each leg
1x10 each side
1x10sec each leg
1x10 each side
Lbs. Reps. Lbs. Reps.
Week 1 - 65% Week 2 - 70%Load Load
10 on Left - 5 on Right 10 on Left - 5 on Right
1x10 each side 1x10 each side1x5
3x5
3x10 3x103x10 3x10
Week 1 Week 2
1x10sec each leg10 on Left - 5 on Right 10 on Left - 5 on Right
1x10sec each leg
1x10 each side1x10 each side 1x10 each side
Lbs. Reps. Lbs. Reps.1x5
1x10 each side
3x10 3x103x10 3x10
Example Workout Card

Module 2NSCA Flight Manual 45
The objective for most programs
during the season is to maintain
strength levels acquired through the
previous three training periods.
However, some sports such as track
and swimming, may want to revisit the
Strength phase and Peak phase during
the season to bring about a peak toward
the end of the season when the bigger
meets are held.
For football do the “Heavy Day” workout
earlier in the week since competition
is at the end of the week. Maintaining
strength levels during the season will
make athletes less vulnerable to injuries
and help recovery in the event of an
injury.
Multi-sport athletes in high school are
always in a competitive season and
never get the opportunity to advance
through the other three training periods
that make up the annual program. As a
result they can’t be expected to develop
maximum strength and power.
In-Season

Module 2NSCA Flight Manual 46
Boyden, Gareth, Joanna Kingman, Rosemary Dyson A., Comparison of quadriceps Electromyographic Activity with
the position of the foot during the parallel squat. Journal of Strength and Conditioning Research, 2000, 14 (4), 379
– 382.
Delavier, Frederic, Strength Training Anatomy, editions vigot, 23 rue de l’Ecole de medicine 75006 Paris, France.,
80 – 83.
Fleck, S.J. and Falkel, J.E. Valve of Resistance Training For the Reduction of Sports Injuries. Sports Medicine, 3 ,
61 – 68. 1986.
Fry, Andrew C., J. Chadwick Smith, Brian K. Schilling. Effect of knee position on hip and knee torque during the
barbell squat. Journal of Strength and Conditioning Research, 2003, 17 (4), 629 – 633.
Huberti and Hayes, Journal of Bone Joint Surgery, 1984: 715 – 724.
McCaw, Steven T., Donald R. Melrose. Stance width and bar load effects on leg muscles activity during the parallel
squat. Medicine and Science in Sport and Exercise, 1996, 428 – 235.
Kreighbaum, E., Katharine, B.M. (1996). Biomechanics; A Qualitative Approach For Studying Human Movement, Allyn
and Bacon, 4, 203 – 204.
McLaughlin, Thomas M., Charles J. Dillman, Thomas J. Lardner. A kinematic model of performance in the parallel
squat by champion powerlifting. Medicine and Science in Sport, 1977, 9 (2), 128 – 133.
The Essential Role of the Pelvis, Churchill Livingstone, Chapter 14, Pg. 204.
Wretenberg, Per, Yi Feng, ULF P. Arboreluis. High- and low-bar squatting technique during weight training.
Medicine and Science in Sports Exercise, 1996, 218 – 224.
References