models cbs170 cfs2140 - internationalcatering.com.au... upright freezers installation, operating and...
TRANSCRIPT

UPRIGHT FREEZERS INSTALLATION, OPERATING AND MAINTENANCE INSTRUCTIONS
Version: E17102014CKeng
Models CBS170 CFS2140

2
______

3
Chapter TABLE OF CONTENTS Page
1 Introduction 5
2 Recycling the appliance 5
3 Transportation – Positioning – Installation 5
4 Starting up 7
5 Instructions for correct operation 8
6 Temperature regulation 9
7 Defrosting 9
8 Fault codes on the display 10
9 Cleaning 11
10 Turning the appliance off for long periods of time 13
11 Saving energy advices 13
12 Maintenance 13
13 Temperature sensor cover removal 14
14 Thermostat KIOUR-RSP Controller Instructions manual 14
15 Electric diagram for upright freezers 19
16 Troubleshooting 20

4
5
1 Introduction
Thank you for purchasing this device. Selecting this device, you have chosen all the advantages of refrigeration technology that can guarantee you quality, durability and reliability. To familiarize yourself with all the features of your new appliance, please read carefully this manual. We hope you will be satisfied with your new appliance. Please retain this manual for use and installation. In case the device is sold to another owner, please accompany it with this manual.
2 RECYCLING OF THE APPLIANCE
This appliance is in compliance with the 2002/95/EC, 2003/108/EC (RoHS) and 2002/96/EC (WEEE) directives and all their following amendments.
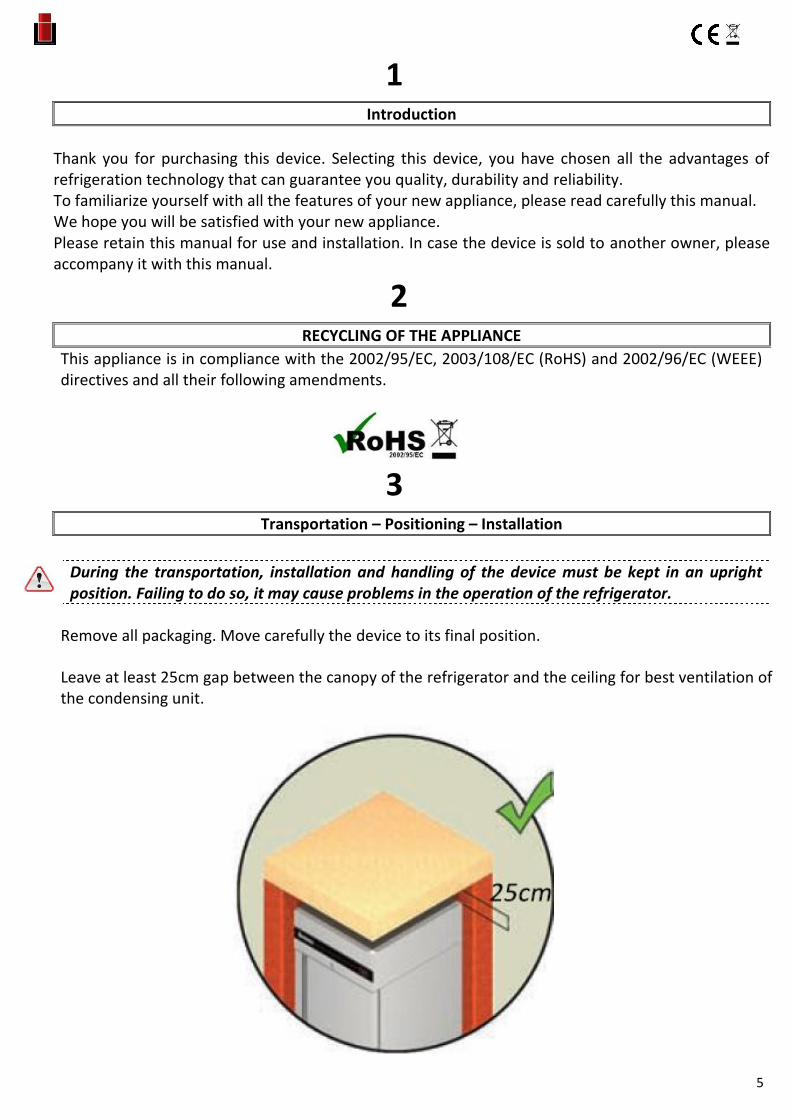
3 Transportation – Positioning – Installation
During the transportation, installation and handling of the device must be kept in an upright position. Failing to do so, it may cause problems in the operation of the refrigerator.
Remove all packaging. Move carefully the device to its final position.
Leave at least 25cm gap between the canopy of the refrigerator and the ceiling for best ventilation of the condensing unit.

6
Adjust the legs so that the front side is approximately 1cm higher from the back to ensure that the doors are closing.
To ensure efficient operation do not place the device near heat sources. The appliance is designed to operate in an ambient temperature of up to 43 °C.
+1cm

7
4 Starting Up
The appliance is supplied with a power plug. The power plug is stored in the back side of the appliance, inside the condensing unit. Remove it and connect it to the power socket.
The power socket that your appliance will be connected must be provided with ground.
The thermostat will perform a self check for 4 seconds and will display “oFF”. Do not touch the display during self test.
Press the on/off switch on the thermostat continuously. The figure that will appear in the display shows the temperature in the cabinet. The compressor starts after 2 minutes.

8
Do not store products in the appliance until the appliance reaches the regulated temperature (pag. 9, ch. 6). Do not load your appliance with big quantities of products at once.
5
Instructions for correct operation
To ensure the correct function of your appliance, please follow the instructions below.
Store all products in such way, to avoid blocking the air circulation. Do not store products outside the margins of the shelves.
Do not store hot food or hot drinks in your appliance.
Cover the food with a plastic wrapper before storing it into the appliance and seal properly products containing or are based on vinegar, lemon, onions or have other acidic fumes.

9
6
Temperature regulation
Unlock the Thermostat (page 14). Press [ ] and then[ ] to see the temperature setting. If
you wish to change, press the arrows [ ] or [ ] accordingly. To save the new value press
again [ ].
7 Defrosting
Defrosting is automatically performed every 6 hours so ice is not accumulated on the evaporator. It can also be performed manually by pressing the key
[ ] until “dFr” appears on the display. If the refrigerator is on heavy load conditions (frequent door opening) manual defrosting may become necessary.
The water from the defrosts evaporated automatically.
1
2
3
4

10
8 Fault codes on the display
In all alarms, the alarm code alternating with temperature.
[LF1] or [LF2]: Room sensor [LF1] or evaporator sensor failure [LF2]. Technical assistance should be requested. [LF1] If the room sensor fails, the compressor remains on for 4 minutes and off for 4 minutes.
[dor] : Door alarm. Close the door.
[AHi ] : High temperature alarm.
[ALo] : Low temperature alarm.

11
9 Cleaning
Before cleaning, always disconnect the plug from the electrical supply.
For correct operation and protection of your appliance, frequent cleaning is recommended.
Do not use sharp or other similar objects which may damage your appliance.
Clean the inside and outside surfaces with a mild soap solution.
Do not use detergents or substances based on chlorine or acid solvents. These may cause corrosion of stainless steel surfaces or and the copper pipes of the evaporator.
For easier cleaning of the interior of the device, you can remove the shelves, the removable guides and removable support bars.

12
To clean the drain hose, remove it as shown below. Be careful not to damage the flexible resistance.
Below you can see the components of the drain pipe.

13
10 Turning the appliance off for long periods of time
In case turning the appliance off for long periods of time is required:
Turn the appliance off.
Disconnect from the electrical supply.
Empty the appliance and clean it as indicated above.
Keep the doors open in order to prevent the formation of unpleasant odors.
11 Saving energy advices
Open the appliance’s doors according to your needs. Avoid unnecessary use.
Do not place your appliance near heat sources such as radiators, ovens or under direct sunlight.
Do not fill at once your appliance with big quantities of products, because this will increase energy consumption.
12 Maintenance
Before maintenance, always disconnect the plug from the electrical supply.
After the first year of service, maintenance should be performed by a qualified technician, who will recommend the maintenance frequency according to the working environment of your appliance.

14
13 TEMPERATURE SENSOR COVER REMOVAL
Pull the sensor out of the cover and turn the cover counter clockwise.
14 Thermostat KIOUR-RSP - Controller Instructions manual
To unlock the thermostat, use only one finger to press the 3 buttons sequentially in the order
shown below. After each button press, a corresponding dash will appear in the display. After all 3
dashes are displayed the message "unL" will be displayed. The thermostat will lock again after 50
seconds of no activity.
1 Press [ ]. The first parameter (SPo) shows up. Scroll the parameter list by pressing key
[ ] or [ ].
To change the parameter value press [ ].
2 To exit the parameter menu press [ ].
3 On/off switch: Press [ ] continuously to switch the device off.
4 Mute [ ]: In case of temperature alarm situation, press to deactivate.
5 Defrost: Press key [ ] continuously to start a manual defrost cycle.
1
3
2

15
6 To see the evaporator temperature press [ ].
THERMOSTAT INDICATIONS
The refrigerator is in standby mode.
The compressor is running.
The evaporator fan is running.

16
The refrigerator is defrosting.
Room sensor failure. Technical assistance should be requested.
Evaporator sensor failure. Technical assistance should be requested.
Thermostat locked.
Door Alarm (occurs after 2 minutes)
(flashing) High temperature Alarm

17
(flashing) Low temperature Alarm
Condensate water resistance is on.
Memory fault.
Press buttons [ ] + [ ] simultaneously. Set the thermostat’s parameters as described in the parameters table.
In case of temperature alarm, press the [ ] button. The buzzer will mute but the alarm message will continue flashing.
PARAMETERS TABLE
Code Description Max. Min. Set.
1 SPo Temperature setpoint LSP . . .HSP -18.0
2 ALo Low alarm threshold -45 . . . 20 0C -25.0
3 AHI High alarm threshold 0 . . . 60 0C 0.0
4 Dr1 Defrost repetition time 1 . . . 100 h 6
5 Cod Access code 22
6 DiF Thermostat delay 1 . . . 20 0C 2
7 dd2 Defrost time out 0 . . . 100 min 30
8 dP3 Dripping time 0 . . . 15 min 2
9 dY4 Defrost display control -1 . . . 40 min (-1: Displays Dfr while t>Spo+dif) -1
10 dE5 Defrost end temperature 1 . . . 70 0C 30
11 Dt6 Defrost type 0= ELE / 1=GAS 0
12 AF1 Alarm setting 0=Auto, 1=Manual 0
13 At2 Temperature alarm delay -1 . . . 120 min (-1: alarm disabled) 60
14 Fo1 Fan restart temperature -50 . . . 50 0C -2
15 Ft2 Evaporator fan control -1: Continuous function 0: Parallel with compressor
0-15 min: time fan stops after compressor
-1

18
16 Fd3 Ventilation in defrost 0: off 1: Starts when t2<Fo1 2: on 0
17 Co1 Compressor minimum on time 0 . . . 15 min 2
18 Cp2 Compressor minimum off time 0 . . . 15 min 2
19 CF3 Compressor control for T1 fault -1: compressor off 0: compressor on 1-150 min:
compressor on time
3
20 CF4 Compressor off time for T1 fault 1-150 min 3
21 SE1 Probe T1 offset -20 . . . 20 0C
22 SE2 Probe T2 offset -20 . . . 20 0C
23 SEr - 0
24 LSP Minimum temperature setting -50 . . . 100 0C -21
25 HSP Maximum temperature setting -50 . . . 100 0C -10
26 CF Alter temperature measurement unit
(changing the unit will not affect setpoint
and limit values – these values must be
changed manually)
0 = 0°C, 1 = 0°F 0
27 Br Baud Rate (9600) 1…….10 1
28 tr Response time on network (mSec) 5 . . .20 msec 20
29 Ad Network address 0 . . .255 2
19
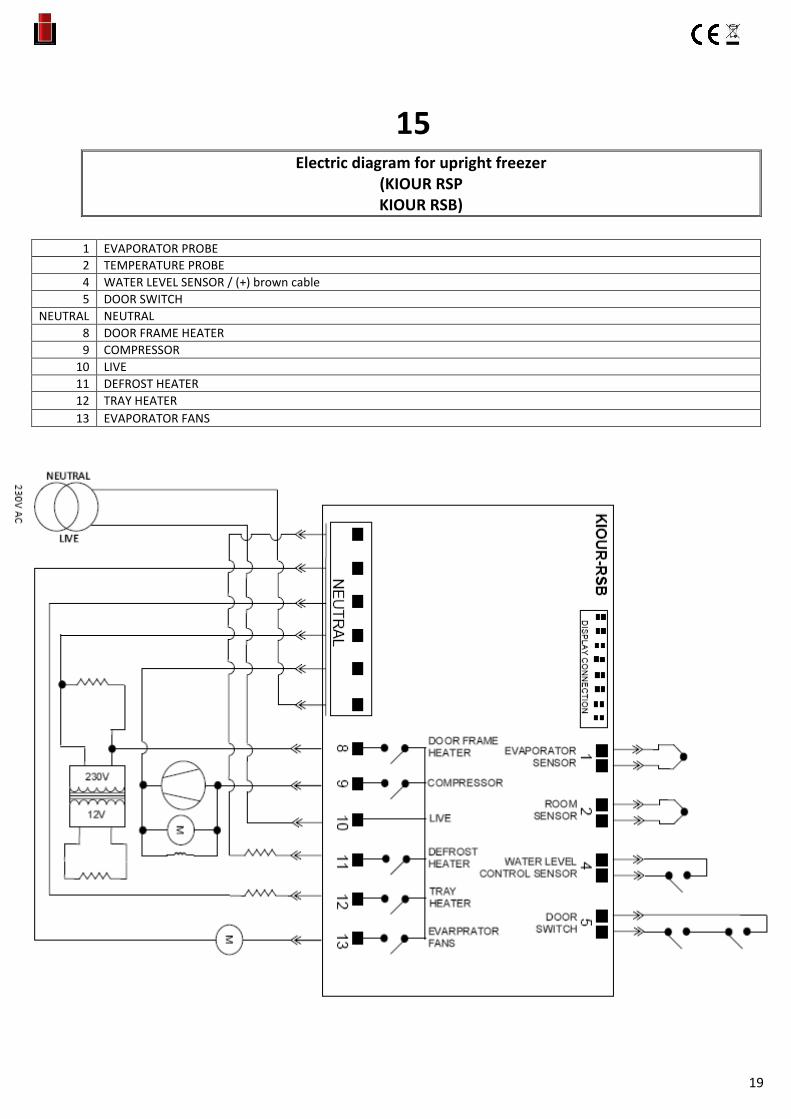
15 Electric diagram for upright freezer
(KIOUR RSP KIOUR RSB)
1 EVAPORATOR PROBE
2 TEMPERATURE PROBE
4 WATER LEVEL SENSOR / (+) brown cable
5 DOOR SWITCH
NEUTRAL NEUTRAL
8 DOOR FRAME HEATER
9 COMPRESSOR
10 LIVE
11 DEFROST HEATER
12 TRAY HEATER
13 EVAPORATOR FANS

20
16 Troubleshooting
Troubleshooting
Malfunction Possible cause Solution
The appliance does not cool
There is ice accumulation in the evaporator.
See “Ice in the evaporator” below.
The stocked products are obstructing the air flow.
Remove the products which obstruct the air flow of the evaporator.
The ambient temperature is very high.
Improve the temperature condition of the room.
Ice in the evaporator High humidity environment. Improve the environment condition. Increase the defrost frequency.
Humid products have been placed in the refrigerator (ex. Vegetables).
Cover the food with a plastic film before storing it in the refrigerator. Increase the defrost frequency and duration.
The doors are opened frequently and for a long time.
Minimize the time the doors remain open
Water in the appliance The drainage pipe is blocked. Clean the drainage pipe and the drain siphon funnel.
In case of malfunction, contact the distributor of our company describing the problem, denoting the model and the serial number (S/N) of your appliance.
The identification tag bearing the technical characteristics of the device is located on the right wall, inside the refrigerator chamber.

21