model system ii meal delivery system
TRANSCRIPT

This manual provides information for:
OPERATOR MANUAL/USER GUIDEIMPORTANT INFORMATION, KEEP FOR OPERATOR
PART NUMBER SYSII REV A (08/11)
MODEL SYSTEM IIMEAL DELIVERY SYSTEM· Hot Side, flexible to cold foods
· Cold Side
· Conduction heating with adjustable heat intensities
· Available Capacity: 20 trays
Information contained in this document is known to be current and accurate at the time of printing/creation. Unified Brands recommends referencing our product line websites, unifiedbrands.net, for the most updated product information and specifications.
1055 Mendell Davis Drive Jackson, MS 39272
888-994-7636, fax 888-864-7636unifiedbrands.net
THIS MANUAL MUST BE RETAINED FOR FUTURE REFERENCE. READ, UNDERSTAND AND FOLLOW THE INSTRUCTIONS AND WARNINGS CONTAINED IN THIS MANUAL.
NOTIFY CARRIER OF DAMAGE AT ONCEIt is the responsibility of the consignee to inspect the container upon receipt of same and to determine the possibility of any damage, including concealed dam-age. Unified Brands suggests that if you are suspicious of damage to make a notation on the delivery receipt. It will be the responsibility of the consignee to file a claim with the carrier. We recommend that you do so at once.
Manufacture Service/Questions 888-994-7636.

2 OM-SYSTEMII
SECTION 1: Product Information
Product Description ...................................................................... page 3Components & Accessories ....................................................... page 3-5System II Cart Specification Sheet ............................................ page 6-7System II Controller/Chiller Specification Sheet ......................... page 8-9
SECTION 2: Overview & Operating Instructions
Menu Planning ............................................................................. page 10Plating Guidelines ................................................................... page 10-11Plating Principles & Diagrams ............................................... page 11-16Tray Presentation/Placement of Dishware ................................... page 17Tray Presentation Diagrams .................................................... page 18-20Display Panel Instructions ...................................................... page 21-26• Overview of Display Panel ...................................................... page 21• Normal Chiller Operation and Sequence of Events ............. page 22• Using Manual Retherm & Hold Cycles ................................... page 23• Using “Options” Menu for Programming, Reading Error Log, & Setting Password .......................................................................... page 24-26Instructional Postings ............................................................ page 27-32• Cart Loader Checklist ............................................................ page 27• Dock Cart to Chiller ............................................................... page 28• Undock Cart from Chiller ........................................................ page 29• Cart Cleaning ......................................................................... page 30• Dishware Care – China ............................................................ page 31• Dishware Care – Plastic .......................................................... page 32Cleaning Agents .......................................................................... page 33
SECTION 3: Troubleshooting Guide
Faults & Errors ........................................................................ page 34-35Maintenance Log ........................................................................ page 36
Table of Contents

OM-SYSTEMII3
PRODUCT DESCRIPTION System II Retherm Cart PN 98000-1; Controller/Chiller PN 98004-1
• System II uniquely uses a conduction heating method for rethermalizing hot foods. The intensity of the conduction heating is adjustable, unlike any other conduction retherm system on the market.
• Food is plated cold and completed trays are placed inside the retherm cart and docked to a controller/chiller unit to hold foods in a refrigerated state, until an automatic or manual retherm cycle is started.
• Conduction heaters are used for the entrée, and soup or hot side dish that can be adjusted for heat intensity, in an approximate 38 minute heating cycle.
• Chilled air circulates throughout the entire cart, and the cart is thermostatically controlled at 36° - 39° F. during the chill, retherm, and hold modes to keep cold foods cold.
• The tray is 14” x 18” and is constructed with a ridge near the center that horizontally divides the hot side from the cold side. The retherm cart holds 20 trays.
• Standard `A la Cart dishware is used on the hot side of the tray; any type or brand of dishware can be used on the cold side of the tray in addition to or in place of `A la Cart dishware.
• System II utilizes advanced retherm technology and programming features, whereby the heater intensity per meal can be customized, a self-diagnostic check of heaters and refrigeration is conducted with each use, and a security password can be set, as outlined in the System II Display Panel Instructions found in Section 2.
• System II is ready to use with the optional `A la Cart Central Management Control System (CMCS).
Product Information
COMPONENTS & ACCESSORIESITEM PART NO. ITEM DESCRIPTION
System II Cart 98000-1 51.25” H x 21.5” W x 41.375” L
System II Controller/Chiller 98004-1 Holds 20 trays
Menu Minder Card 91144-1 60.7” H x 26” W x 24” D
Central Management Control System (CMCS)
97603-1Requires 208 VAC,
3 ph., 5 wire; 30 amp

4 OM-SYSTEMII
Product Information
COMPONENTS & ACCESSORIES Continued
IMAGE PART NO. ITEM DESCRIPTION
NO.
PER
CASE
CHINA TABLEWARE
90682-2Entrée Plate, oval, 8 3/8“L, 6 1/2”W, 7/8”H
36
90687-2 Entrée Dish Cradle, dark gray plastic 36
90689-2
Insulated Entrée Cover, oval, tinted polysulphone, 9”L x 6 1/2”W x 2”H, 2 1/2” food clearance (polysulphone, 1-year warranty)
48
90658-2Insulated Entrée Cover, oval, clear, 6 1/2”W x 2”H, 2 1/2” food clearance (polycarbonate, 90-day warranty)
48
90684-2Soup Bowl, 10 oz., 4 11/16“ diameter, 1 7/8“H,1 5/8” inner wall height, white
24
90688-2 Soup Bowl Cradle, dark gray plastic 24
90662-3 Soup Bowl Lid, opaque, disposable 1K
90662-4 Soup Bowl Lid, high heat, disposable 2K
90685-2Bread Plate, 5 1/4” diameter, 13/16”H
48
90686-2Dessert Cup, 4 11/16” diameter, 15/16”H
48
PLASTIC TABLEWARE
90682-1Entrée Dish, rectangular, divided, 8 1/2“L x6”W, 1 3/8”H
45
90689-3Insulated Entrée Cover, tinted (polysulphone, 1year warranty)
48
90658-3Insulated Entrée Cover, clear (polycarbonate, 90-day warranty)
48
90658-1Non-insulated Entrée Cover, tinted, 8 7/8”L x 6 3/8”W x 1 7/8”H, 2 1/2” food clearance
70
90684-1Soup Bowl, 10 oz., 5 ½” L x 4”W x 1 7/8”H, inner wall height 1 3/8”
56
90662-1 Soup Bowl Lid, clear, disposable 500
Items can be purchased separately. All dishware and trays come with a standard
90-day warranty except where noted.

OM-SYSTEMII5
Product Information
COMPONENTS & ACCESSORIES Continued
IMAGE PART NO. ITEM DESCRIPTION
NO.
PER
CASE
PLASTIC TABLEWARE CONTINUED
90683-1Side Dish, 5 ½”H x 4”W x 1 3/8”H, inner wall height 15/16”
80
90659-1Side Dish Cover, 6 15/16”L x 4 7/16”W x 1 7/8”H, 2 ½” food clearance
56
DISPOSABLE DISHWARE
90811-1
Entrée Dish, 9” oval, white(requires Entrée Plate Cradle and Entrée Cover listed under China Tableware)
500
90812-1Soup Bowl, 10 oz. round, white(requires Soup Bowl Cradle listed under China Tableware)
500
90662-4 Soup Bowl Lid, disposable, high heat 2K
TRAYS
90709-5 Grey Tray, 14” x 18” 20
90709-7 Speckled Almond Tray, 14” x 18” 20
TRAY MATS
90664-1 Moon Rise Tray Mat, fits 14” x 18” tray 1K
90666-1 Flower Tray Mat, fits 14” x 18” tray 1K
90667-1Southwestern Tray Mat, fits 14” x 18” tray
1K
90668-1 Patriotic Tray Mat, fits 14” x 18” tray 1K
90669-1 Fall Tray Mat, fits 14” x 18” tray 1K
90665-2Season’s Greetings Tray Mat, fits 14” x 18” tray
1K
Items can be purchased separately. All dishware and trays come with a standard
90-day warranty except where noted.

6 OM-SYSTEMII
Product InformationSPECIFICATION SHEET/CART
1055 Mendell Davis Drive, Jackson, MS 39272888-994-7636, unifiedbrands.netPlease reference our website for the most updated product information and specifications.
System II Cart model 98000-1
Model Numbers 20-Tray Model 98000-1
DescriptionThe System II Cart is both a meal storage unit (prior to rethermalization) and a meal delivery and tray retrieval unit. The design offers the optimum in operational simplicity and reliability.
SpecificationsCABINET EXTERIOR: High-impact molded polyethylene and stainless steel construction. CABINET BASE/INTERIOR: The cabinet interior and base are formed, welded and riveted stainless steel.
DOORS: Two stainless steel and molded polyethylene doors; swing 270 degrees; held open via magnets.
MOBILITY: 4 swivel casters; 2 locking and 2 nonlocking.
REFRIGERATION SYSTEM: Cooling provided by a cold air supply from a companion Controller Chiller Unit. Refrigerant is R404.
HEATING: Individual conduction heaters slide between the tray surface and the underside of the dishware. Rethermalization controlled by the processor in the Controller Chiller Unit.
ELECTRICAL: Plugs into Controller Chiller Unit and receives all commands and heating power from that unit.
Standard Features• Narrow width for all standard door openings• Cold rethermalizing environment – trays and covers remain cool
to the touch• “Gentle” heating during rethermalization – preserves food quality
Dimensions (WxLxH)• 21.5” x 41.375” x 51.25 ”• Weight: 231 lbs
Accessories - Dishware 90682-2 Oval China Entrée Dish 90658-2 China Entrée Cover 90687-2 Cradle Oval China Entree 90689-2 China Insulated Entrée Cover 90682-1 Plastic Entrée Dish 90658-3 Plastic Entrée Cover 90689-3 Plastic Insulated Entrée Cover
Accessories - Dishware Continued 90684-1 Plastic Soup Bowl 90684-2 China Soup Bowl 90688-2 Cradle China Soup Bowl 90685-2 China Dessert Cup 90686-2 China Bread Plate 90662-3 China Soup Bowl Lid 90662-1 Plastic Soup Bowl Lid 90664-1 Moonrise Tray Mat 90665-2 Seasons Greetings Tray Mat 90666-1 Flower Tray Mat 90667-1 Southwestern Tray Mat 90668-1 Patriotic Tray Mat 90669-1 Fall Tray Mat 90709-5 Gray Tray 90709-7 Speckled Almond Tray 90811-1 Disposable Entrée Dish 90812-1 Disposable Soup Bowl
Accessories - Support Equipment G101099 Enclosed Tray Transport Cart 98003-1 A la Cart Transport Cart 207304 Open Rack for 32 Trays BR229004 Mobile Basket Rack DC501-5-480 Side Dish Cart DC501-7-240 Entree Dish Cart 95008-1 Tray Storage Rack 97603-1 CMCS
A la Cart, Page 4SYSIIC 157327 Rev. A
Created 05/11

OM-SYSTEMII7
Product InformationSPECIFICATION SHEET/CART
1055 Mendell Davis Drive, Jackson, MS 39272, 888-994-7636, unifiedbrands.net© 2011 Unified Brands. All Rights Reserved. Unified Brands is a wholly-owned subsidiary of Dover Corporation.
Model 98000-1

8 OM-SYSTEMII
Product InformationSPECIFICATION SHEET/CONTROLLER/CHILLER
1055 Mendell Davis Drive, Jackson, MS 39272888-994-7636, unifiedbrands.netPlease reference our website for the most updated product information and specifications.
System II Controller/Chiller model 98004-1
Model Numbers Model 98004-1
DescriptionThe A la Cart Controller/Chiller is the companion unit to the System II Cart. It is typically located in the pantry on the patient floor of a hospital, and in a central kitchen or any other location dedicated for storage and holding of loaded carts before delivery to the patient floor.
Controller/Chiller units easily accommodate centralized or decentralized holding and rethermalization plans.
The Controller/Chiller provides a chilling function to the trays during the initial loading and holding phase and then maintains chilling for dishes that are served cold, during rethrermalization of dishes that are served hot. The processor in the Controller/Chiller unit initiates the rethermalization sequence inside the System II Cart by turning on electrical power to the conduction heaters.
SpecificationsCABINET EXTERIOR: Heavy Gauge aluminum with a textured powder-coat. Front fascia and top are formed from a high impact, flame retardant plastic (UL approved).
REFRIGERATION SYSTEM: 208 Vac, single phase (internally fused) compressor with R404A refrigerant.
ELECTRICAL REQUIREMENTS: 208 Vac, 30 Amps, 3 phase WYE, 60 Hz, 5-wire grounded, Plug configuration: NEMA L-2130-P
TEMPERATURE STATEMENT: The chiller thermostatically maintains a System II cart at 38 degrees.
MOBILITY: The Chiller/Controller unit can be easily moved using a two wheel hand truck. This facilitates installation and allows for easy chiller relocation during renovation or hospital growth.
CONTROL: programmable electronic controller; self diagnostics for Chiller and System II cart; unsafe temperature display for HACCP monitoring.
MANAGEMENT: An A la Cart Central Management Control System (CMCS) can be added to any System II operation. It can program, monitor and control all units – on every floor, in remote buildings – right from a computer in an office or central kitchen. On-screen indicators provide real time information regarding the status of every Controller/Chiller unit, so you can track cart arrival and meal delivery times, as well as faults. CMCS generates temperature logs that document food safety compliance and produces management reports for HACCP control.
Dimensions (WxLxH)• 24” x 26” x 60.7”• Weight: 242 lbs
A la Cart, Page 5SYSIICC 157329 Rev. A
Created 05/11

OM-SYSTEMII9
Product InformationSPECIFICATION SHEET/CONTROLLER/CHILLER
1055 Mendell Davis Drive, Jackson, MS 39272, 888-994-7636, unifiedbrands.net© 2011 Unified Brands. All Rights Reserved. Unified Brands is a wholly-owned subsidiary of Dover Corporation.
Model 98004-1

10 OM-SYSTEMII
Overview & Operating Instructions
MENU PLANNING With System II any menu format can be utilized, depending on your patients or clientele, length of stay, budget, and other factors. System II provides maximum flexibility with the type of food items to include in your menu that will result in excellent end point quality, due to the ability to customize heat intensity settings for the entrée and soup/side heaters separately for each mealtime. This allows for having a combination of different density foods on the same tray that retherm together with excellent results. You can confidently plan to include a variety of menu items of various density, thickness, texture, and moistness. All foods are prepared according to cook/chill standards, methods, and procedures, prior to plating.
PLATING GUIDELINESMany factors determine how hot foods are plated in System II which, in turn, affects the end result of rethermalization. These major factors include:• food density• thickness• texture • input temperatures • food item’s tolerance to heat • type of dishware (plastic vs. china)
With System II you have the flexibility of setting the power intensity that is applied to the heaters during the retherm and hold cycles. This allows you to establish the appropriate end point temperatures for the rethermed plate quality you desire. It is done by setting “duty cycle values” for each meal on the entrée and side heaters. The duty cycle value is equal to the number of seconds per minute that a heater remains on during the retherm and hold cycles. Refer to the “Display Panel Instructions” in this manual for instructions on how to set the duty cycles. In general, meals that contain delicate more “easy-to-heat” items require a lower duty cycle value, such as breakfast items like scrambled eggs and French Toast. Meals that contain thick meats require a higher duty cycle value. The table below shows the standard duty cycles.
Standard Duty Cycle Values
RETHERM CYCLE
TOTAL MINS
BREAKFEASTENTRÉESEC/MIN
BREAKFAST SIDE
SEC/MIN
LUNCH/DINNERENTRÉESEC/MIN
LUNCH/DINNER
SIDESEC/MIN
Factory Setting 38 60 60 60 60
China Dishware 38 45 55 55 55
Plastic Dishware 40 36 45 45 45

OM-SYSTEMII11
Plating procedures are the most critical for the hot foods, or hot side of the tray, and will be addressed in this section. For cold foods, placement of items on the tray is important to ensure that the cold foods are set away from the heat, near the outer most edge of the cold side of the tray.
China dishware conducts heat differently than plastic dishware. It gets hotter more quickly and stays hotter for a longer period of time than plastic. China also distributes heat a little more evenly than plastic, although the center of the dish is always the hottest spot for both. Plastic dishware takes longer to heat, therefore the retherm time is generally longer than it is for china. Plating procedures need to be individualized for each facility based on their menu items, food consistency and the type of dishware used.
To simplify plating techniques all food items can be classified as easy or hard to heat. “Easy to heat” food items are low to the plate, moist, and have maximum plate contact. “Hard to heat” food items rest high on the plate, are dry, and very dense. Easy to heat items are made hard to heat by either placing away from the center of the dish, using a buffer under the product, placing on plate frozen (breakfast items only) and/or reducing heat time. Hard to heat items are made easier to heat by either placing in center of the dish, adding moisture to product, increasing plate surface contact, and/or increasing heat times. Ideal plating combinations are one hard to heat item with two easy to heat items. These points are illustrated in the Plating Principles below.
PLATING PRINCIPLESTYPE OF HEAT: CONDUCTION HEAT • Heat transfers from heating element -----> to dishware -----> to food• Center of the plate is the hottest spot; heat transfers out to the edges
EASY TO HEAT• Fish• Eggs, Omelets• Pancakes, French Toast• Sliced Meats• Sausage Patty• Casseroles• “Low” products• Breakfast breads
TO MAKE HEATING “HARDER”• place to side of dish• use a buffer underneath (fruit slices, melba toast, etc.)• place in high heat cup (i.e. eggs)• plate partially frozen (breakfast items only)• reduce heat time
Overview & Operating Instructions
HARD TO HEAT• Baked Potatoes• Whole Potatoes• Bread Dressing• Thick/dense meats• Meats with bone• Sausage links (rounded)• “High” products (i.e. hot
sandwiches)• Hard Cooked Eggs (rounded)
TO MAKE HEATING “EASIER”• place in center of dish• add moisture• add sauce• increase plate surface area• increase heat time

12 OM-SYSTEMII
Overview & Operating Instructions
It is highly recommended that food product testing be conducted on all menu items that will be rethermed to determine the proper plating of food items, and verify that the desired food consistency, quality, flavor and end temperature are met after rethermalization. When testing product, a complete entrée plate is to be tested. Ideally 6 to 10 trays of food are tested at a time. The emphasis in food product testing is evaluating food placement on the plate. A variety of plating options exist for some menu items, depending on what is desired as the end product. Each facility must decide on what is most acceptable to them in terms of presentation and food temperatures.
From the food product testing, plating diagrams can be developed to illustrate proper plating of menu items for your specific menu. See the sample plating diagrams below:
Breakfast Examples (All Easy to Heat Items)1. Hard Cooked Eggs: Place in
high heat cup in center of dish.
2. Bacon or Sausage Patty: Place on side of the plate.
3. Breakfast Breads: Place on a doily on edge of plate.
1. Scrambled Eggs or Omelete or Breakfast Burrito: Burrito can be frozen.
2. Breakfast Potatoes: Place in center of entree plate.
3. English Muffin or Bagel: Toast and place toast side down on plate.
Note: Breakfast burrito to be wrapped in foil.
1. French Toast or Pancakes: Place pancakes or french toast to edge of plate.
2. Breakfast Meats: Place on side of the plate.
Bacon or Sausage Patty
Breakfast Breads
(Muffins)Eggs
OmeleteBagel or English Muffin
Breakfast Potatoes
Pancakes or French Toast
Breakfast Meats (Bacon, Sausage Patty)

OM-SYSTEMII13
Overview & Operating Instructions
Lunch or Dinner Examples (One Hard to Heat, Two Easy to Heat)Dense Meat (Meatloaf, Chicken Breast, Ham, Pork) Starch/ Vegetable
1. Served meat in center of entree plate. Top with glaze or gravy.
2. Serve vegetable and starch to each side of the meat.
Casserole / Vegetable
1. Lasagna is served in center of entree plate with tomato sauce on top. Layers not to exceed three. Lasagna to be fully baked and chilled prior to serving.
2. Vegetables to side of dish.
3. Bread, if used, serve across top of plate.
Note: Meat casseroles or enchiladas to be served on top of rice. Beef stew can be served in bowl or on plate.
Sliced and Delicate Meat (thin sliced meat, steak, fish) Baked Potato / Vegetable
1. Roll sliced meat and place rolled and delicate meat to the side of the entree plate. Top with gravy or sauce.
2. Serve baked potato in center of the entree plate. Cut thin strip from the bottom of the potato prior to serving to improve the plate contact.
3. Serve vegetable to side of the plate.
Hot Open Faced Sandwich
1. Place bread on entree plate to the side of the dish.
2. Cover bread completely with meat. Top with one ounce of gravy.
3. Serve vegetable to the bottom side of plate.
4. Serve the mashed potatoes to the top side of the plate and back scoop.
Starch Vegetable
MeatloafChicken BreastThick Cut HamThick Cut Pork
Lasagna with Tomato Sauce, Casserole
Over Starch
Sandwich
Bread/Meat/Gravy
Mashed Potato
Vegetable
Fish FiletSteak
Rolled Meat
Vegetable
Baked Potato(slice strip from
bottom of potato)Sweet Potato
Whole Potatoes
Vegetable

14 OM-SYSTEMII
Overview & Operating Instructions
Lunch and Dinner Sandwich Examples (Challenging Plating Styles)Grilled Sandwich / Fries
1. Grilled sandwiches should be buttered on both sides, grilled on one side and served ungrilled side down to the entree plate.
2. Grilled sandwiches should NOT be cut prior to serving.
3. Steak fries for dry vegetable to be served to side of the plate.
Hot Sandwich (Hamburgers, Chicken Breast Filet, Cheese Burger)
Option 1
1. Serve hamburger patty in center of entree plate. Serve bun on top of patty.
2. Serve steak cut fries or tater tots to the side of the entree plate.
Option 2
1. Assemble sandwich, wrap in foil and put in center of entree plate.
2. Serve steak cut fries or tater tots to the side of the entree plate.
Ground or Pureed Meat Entree / Vegetable / Mashed Potatoes
Option 1
1. Serve pureed meat and gravy in center of the entree plate.
2. Mashed potatoes and vegetables in egg cup served to each side of the meat. Back scoop potatoes.
Option 2
1. Serve pureed meat in center of back scooped mashed potatoes with gravy placed at the top of the plate.
2. Serve vegetables to the side of the plate in a high heat cup.
Option 3
1. Serve formed, frozen purees with meat in the center of the entree plate.
2. The mashed potatoes and vegetables are served to the side of the dish. Back scoop the potatoes and place gravy (1 oz) in center.
You can develop your own plating diagrams using the forms on the following pages.
GrilledSandwich Fries
HamburgerOption1: Meat/Bun/Bun
Option 2: Assembled Sandwich Wrapped in Foil
Vegetable
Fries or Tater Tots
Pureed Meat
MashedPotato

OM-SYSTEMII15
Overview & Operating Instructions
Plating Diagram Form: China Dishware

16 OM-SYSTEMII
Overview & Operating Instructions
Plating Diagram Form: Plastic Dishware

OM-SYSTEMII17
Overview & Operating Instructions
TRAY PRESENTATION Tray presentation for System II allows for a main plate hot entrée and soup or hot side dish on the hot side of the tray. It also allows for a cold plate entrée on the hot side of the tray, allowing maximum use of the tray space. This is accomplished by setting a “Menu Minder” card that controls the individual shelf heaters when the tray is loaded into the cart. The Menu Minder is set for each shelf heater to heat or not to heat, according to what food items are placed on the hot side of the tray.
The cold side of the tray accommodates all cold menu items such as entrée cold plates, salads, desserts, condiments, and cold beverages. Frozen desserts are added to the tray at the time of meal service. The cold items are chilled by super-cold circulating air throughout the cart.
PLACEMENT OF DISHWAREThe same principles of dishware placement on the tray apply to both plastic and china. The only difference is that when setting up a tray with china, a “cradle” is utilized to hold the entrée plate and soup bowl in place over the heaters.
The following are basic rules for placement of dishware on the hot side of the tray, with the hot side closest to you:
1. The entrée plate is ALWAYS placed to the right. This is also the correct placement for a main dish cold plate. The Menu Minder card is set according to hot or cold entree.
2. The soup/side dish is ALWAYS placed to the left when used alone or in combination with an entrée plate.
3. Two soup/side dishes alone are ALWAYS placed to the right. The entrée slide is set
to hot on the Menu Minder card. Note: recommended for plastic soup bowls only.
4. Three soup/side dishes alone are ALWAYS placed together on both the right and left sides, in a row. Note: recommended for plastic soup bowls only.
The tray presentation diagrams on the following pages illustrate the correct placement of dishware and food items on the tray. Correct dishware placement is important so that the dishware rests on top of the large or small heating elements, allowing proper heating.

18 OM-SYSTEMII
Overview & Operating Instructions
Tray Presentation: China Dishware

OM-SYSTEMII19
Overview & Operating Instructions
Tray Presentation: Plastic Dishware

20 OM-SYSTEMII
Overview & Operating Instructions
Tray Presentation: Plastic Dishware

OM-SYSTEMII21
Overview & Operating Instructions
DISPLAY PANEL INSTRUCTIONSThe 4-Line LCD Display Screen
Top 3 lines: Displays Docking status, Meal Start Times, Operator Messages, and information to setup parameters
Bottom Line: Displays Time, Date, Return Air (RET) and Input Air (INPUT) temperatures, Error Messages
RETHERM Button Starts/Stops a manual Retherm cycle
HOLD Button Starts/Stops a manual Hold cycle
BACKLIGHT Button Turns the display backlight ON/OFF OPTIONS Button Accesses the Options menus and saves displayed parameters during parameter setup
ENTER Button Used to select options and set parameters, and moves cursor horizontally on the screen
UP/DOWN Buttons Used to navigate vertically through the Options menus
Chill Light (Blue) Illuminates when a cart has been docked
Retherm Light (Red) Illuminates when a Retherm cycle is in process and flashes during the automatic heater check
Ready Light (Green) Illuminates when a Hold cycle is in process
Fault Light (Yellow) Illuminates when a fault has been detected

22 OM-SYSTEMII
Overview & Operating Instructions
Normal Operation & Sequence of Events:STATUS/ACTIVITY
DISPLAY SHOWS COMMENTS
Cart Undocked (Idle)
MENU MINDER: NOCART DOCKED: NOCART PLUGGED: NO
-
Cart Docking Completed
MENU MINDER: YESCART DOCKED: YESCART PLUGGED IN: YES
Chiller beeps during docking until all steps are completed and “yes” is displayed by each. When all docking steps are completed the display shows retherm start times.
Automatic Heater Check
Red Light flashes when heater check is completed.
Yellow Light is ON if fault/error is detected.
Error messages appear on bottom display line at 5 second intervals.
Heater check is automatically performed each time cart is docked; takes 20 seconds.
Error message includes the specific entrée or side heater that is disabled (Example: SIDE 1 OPEN CKT); all other heaters work; error messages are automatically stored in the Error Log in Options menu.
Cart Docked (Chilling)
BRKFST START 7:00 AMLUNCH START 11:30 AMDINNER START 5:00 PM
Blue Light is ON
Automatic retherm start times for each meal appear on display as programmed; if no times are preset, times will read as “Not Set”.
Cart Docked (Retherming)
RETHERM IN PROCESSTIME LEFT: 38 MIN
Red Light is ON
Chiller automatically starts retherm at the programmed time or manually when retherm button is pressed; display shows number of minutes left in retherm cycle until completed.
Cart Docked (Holding)
HOLD IN PROCESSTIME ELAPSED: 3 MIN
Green Light is ON
Hold cycle automatically begins at the end of retherm or manually when hold button is pressed; display shows number of minutes cart has been in hold cycle; hold cycle will automatically stop when maximum hold time is reached (default is 60 min.).
Cart Undocking Completed
CART NOT PLUGGED INSTOP CYCLE: 5 MINHOLD = FORCE STOP
Once undocking is completed screen appears for 5 minutes then returns to idle screen, or pressing Hold returns it to idle.

OM-SYSTEMII23
Overview & Operating Instructions
Using Manual Retherm & Hold Cycles:ACTIVITY STEPS/DISPLAY SHOWS COMMENTS
START Manual Retherm Cycle
1. Press Retherm button: START RETHERM CYCLE? HIT ENTER TO CONFIRM2. Press Enter button: WHICH DUTY CYCLE? OPTIONS = BREAKFAST ENTER = LUNCH/DINNER3. Press either Options button for Breakfast, OR Enter button for Lunch or Dinner: RETHERM IN PROCESS TIME LEFT: 38 MIN
Red Light will be ON.
Manual Heating parameter must be set to “ON” to start a manual retherm cycle. This parameter is found under the OPTIONS menu in Factory Parameters.
STOP Manual Retherm Cycle
1. Press Retherm button: RETHERM IN PROCESS STOP RETHERM? HIT ENTER TO CONFIRM 2. Press Enter button: BRKFST START Time AM LUNCH START Time AM DINNER START Time PM Blue Light will be ON until cart is undocked.
Once ENTER is pressed the screen will return to the meal start time display and chilling will continue until cart is undocked.
START Manual Hold Cycle
1. Press Hold button: START HOLD CYCLE? HIT ENTER TO CONFIRM2. Press Enter button: HOLD IN PROCESS TIME ELAPSED: 0 MIN
Green Light will be ON.
Hold cycle will automatically stop when maximum hold time is reached (default is 60 min.). Elapsed time will go to 60 and return to chill mode if cart is still docked.
STOP Manual Hold Cycle
1. Press Hold button: HOLD IN PROCESS STOP HOLD? HIT ENTER TO CONFIRM 2. Press Enter button: BRKFST START Time AM LUNCH START Time AM DINNER START Time PM
Blue Light will be ON until cart is undocked.
Once Enter is pressed the screen will return to the meal start time display and chilling will continue until cart is undocked.

24 OM-SYSTEMII
Overview & Operating Instructions
Using “OPTIONS” Menu, Reading Error Log, & Setting Password:ACTIVITY STEPS/DISPLAY SHOWS COMMENTS
Access OPTIONS Menu(No Password Set)
(OPTIONS menu contains all equipment parameter settings)
1. Press Options button: >MEAL PARAMETERS HEATER PARAMETERS FACTORY PARAMETERS ENTER = EDIT, OPTIONS = QUIT
See the following pages for the parameter settings included within each group of parameters.
Access OPTIONS Menu(Password Already Set)
(OPTIONS menu contains all equipment parameter settings)
1. Press Options button: ENTER PASSWORD 000 ^^2. Enter password using the Enter button to move the (^^) across on setting and the up or down keys to change values.
3. Press Options button when correct values are displayed:
Screen First Shows: PASSWORD ACCEPTED
Screen Then Shows: >MEAL PARAMETERS HEATER PARAMETERS FACTORY PARAMETERS ENTER = EDIT, OPTIONS = QUIT
The password is a 3-digit numeric setting. Holding down the up or down key while pressing allows quick scrolling.
If the password is entered incorrectly the display will show: PASSWORD REJECTED
See the following pages for the parameter settings included within each group of parameters.
View/Change Meal Parameters 1. Complete steps under “Access OPTIONS menu”.
2. With Meal Parameters already selected press the Enter button to go to parameters list.
3. Use the up or down keys to scroll through parameters list to select a setting.
4. Press Enter button to edit or change the selected setting.
5. Use the Enter button to move the (^^) horizontally on the setting and the up or down keys to change values of the setting:
Example Screen: BREAKFAST TIME 07:00 AM ^^ ENTER = EDIT, OPTIONS = QUIT
6. Press Options button to save changes and return to previous screen.
Meal Parameter Settings:Breakfast Time (sets retherm start time)Lunch Time (sets retherm start time)Dinner Time (sets retherm start time)Retherm Time (sets retherm time in minutes)Hold Time (sets hold time in minutes)Current Time (sets current time/chiller clock)Current Date (sets current date)Daylight Savings (turns on/off daylight savings mode)
It is important that AM/PM designation is correct when setting meal start times.
OM-SYSTEMII25
Overview & Operating Instructions
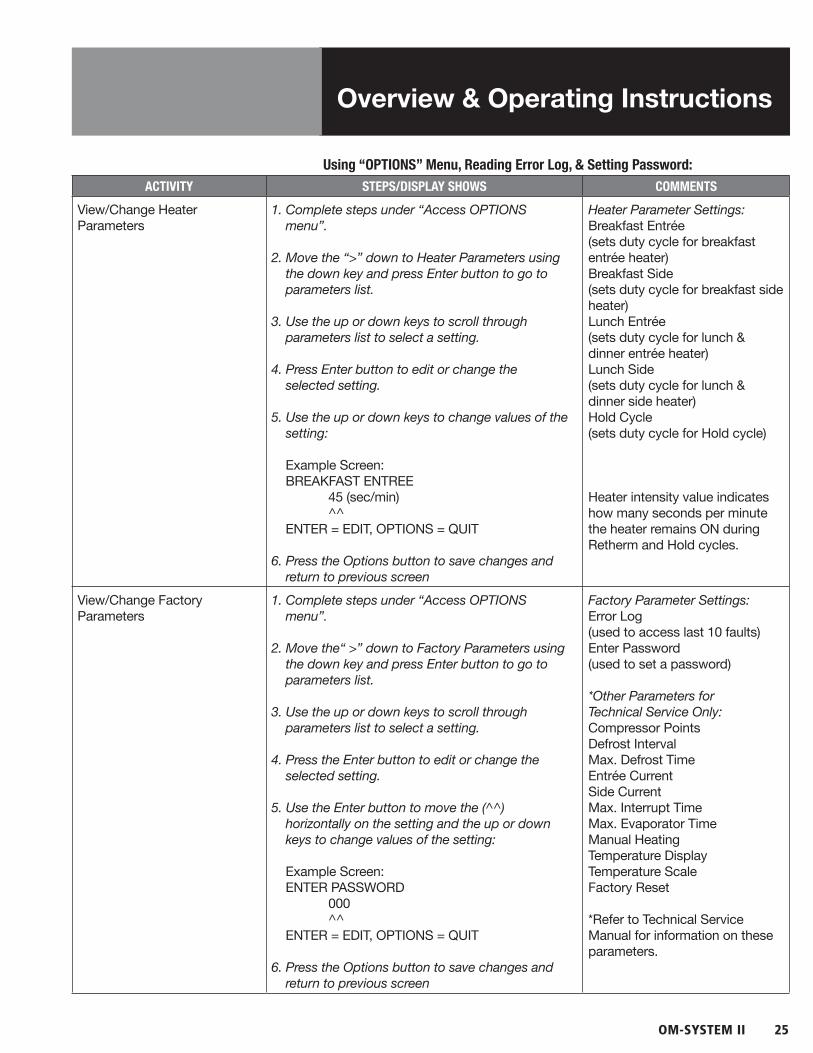
Using “OPTIONS” Menu, Reading Error Log, & Setting Password:ACTIVITY STEPS/DISPLAY SHOWS COMMENTS
View/Change Heater Parameters
1. Complete steps under “Access OPTIONS menu”.
2. Move the “>” down to Heater Parameters using the down key and press Enter button to go to parameters list.
3. Use the up or down keys to scroll through parameters list to select a setting.
4. Press Enter button to edit or change the selected setting.
5. Use the up or down keys to change values of the setting:
Example Screen: BREAKFAST ENTREE 45 (sec/min) ^^ ENTER = EDIT, OPTIONS = QUIT
6. Press the Options button to save changes and return to previous screen
Heater Parameter Settings:Breakfast Entrée(sets duty cycle for breakfast entrée heater)Breakfast Side(sets duty cycle for breakfast side heater)Lunch Entrée(sets duty cycle for lunch & dinner entrée heater)Lunch Side(sets duty cycle for lunch & dinner side heater)Hold Cycle(sets duty cycle for Hold cycle)
Heater intensity value indicates how many seconds per minute the heater remains ON during Retherm and Hold cycles.
View/Change Factory Parameters
1. Complete steps under “Access OPTIONS menu”.
2. Move the“ >” down to Factory Parameters using the down key and press Enter button to go to parameters list.
3. Use the up or down keys to scroll through parameters list to select a setting.
4. Press the Enter button to edit or change the selected setting.
5. Use the Enter button to move the (^^) horizontally on the setting and the up or down keys to change values of the setting:
Example Screen: ENTER PASSWORD 000 ^^ ENTER = EDIT, OPTIONS = QUIT
6. Press the Options button to save changes and return to previous screen
Factory Parameter Settings:Error Log (used to access last 10 faults)Enter Password (used to set a password)
*Other Parameters for Technical Service Only:Compressor PointsDefrost IntervalMax. Defrost TimeEntrée CurrentSide CurrentMax. Interrupt TimeMax. Evaporator TimeManual HeatingTemperature DisplayTemperature ScaleFactory Reset
*Refer to Technical Service Manual for information on these parameters.

26 OM-SYSTEMII
Overview & Operating Instructions
Using “OPTIONS” Menu, Reading Error Log, & Setting Password:ACTIVITY STEPS/DISPLAY SHOWS COMMENTS
Access/Read Error Log 1. Complete steps under “Access OPTIONS menu”.
2. Move the “>” down to Factory Parameters using the down key and press Enter button to go to parameters list.
3. Position the “>” in front of Error Log. Press Enter button to access the Error Log.
4. Any faults stored in the ERROR LOG will be displayed on the screen:
Example Screen: SIDE 1 OPEN CKT DATE: 07/07/07 TIME: 10:30 AM ENTER NEXT, OPTIONS = QUIT
5. Press Enter button to view the next fault. If there are no other faults the display shows: ERROR LOG EMPTY OPTIONS = QUIT Yellow Light is OFF
6. If no cart is docked press the Options button until the cart status screen is displayed OR, if a cart is docked, continue to press Options until the meal start time screen is displayed.
The Error Log cannot be accessed if the unit is in the Retherm or Hold cycles.
The Error Log stores up to the TEN most current faults recorded.
Set Chiller Password 1. Complete steps under “Access OPTIONS menu”.
2. Move the “>” down to Factory Parameters using the down key and press Enter button to go to parameters list.
3. Position the “>” in front of Enter Password. Press Enter button: ENTER PASSWORD 000 ^^
4. Enter password using the Enter button to move the (^^) across on setting and the up or down keys to change values.
5. Press Enter button when correct values are displayed: OPTIONS = QUIT
6. Press Options button to save changes and return to idle or previous screen.
The password can be any 3-digit numeric setting.
Holding down the up or down key while pressing allows quick scrolling.
Once the password is set, if it is forgotten in the future the password can be bypassed by using a Julian calendar to enter the Julian equivalent for the current date as the password:
Example password per Julian calendar: If current date is February 15 the Julian calendar date = 046 (has to be 3 digits). January 1 to February 15 = 46 days.

OM-SYSTEMII27
Overview & Operating Instructions
CART LOADER CHECKLIST
• Menu Minder switches MATCH each tray for heater settings and shelf number.
• Entree Plates are covered.
• Soup/Cereal lids are on tight.
• Cradles’ “feet” are in ridge of tray.
• Tray slides UNDER heater.
• Tray drops behind lip edge of shelf.
• Trays are loaded from top down.
• Patient’s name and room number are visible.

28 OM-SYSTEMII
REMEMBER:DOCK IT – LOCK IT – SOCKET
– PULL FROM POCKET
Overview & Operating Instructions
REMEMBER:STOP – LOOK – LISTEN
DOCK CART TO CHILLER
Dock it, lock it, socket, and pull from pocket:
• Open back door of cart.
• Dock cart to chiller. BLUE light is on. Chiller starts beeping.
• Lock wheel brakes.
• Plug Cable Connector into socket. Turn connector to right until it clicks and yellow dots line up.
• Place Menu Minder in chiller pocket. Chiller stops beeping.
Stop, look, and listen:
• Stop - wait for red flashing light on display board to turn off.
• Look - check display for any fault messages, and that the blue light is on.
• Listen - make sure the chiller is not beeping.

OM-SYSTEMII29
Overview & Operating Instructions
UNDOCK CART FROM CHILLER
Release socket, unlock it, undock it, and pull from pocket:
• When GREEN ready light is on turn Cable Connector to left until it releases from socket.
• Unlock wheel brakes on cart. Pull cart away from chiller.
• Pull Menu Minder from chiller pocket.
• Place Menu Minder in back door of cart and shut door.
• Display shows:
- Cart Not Plugged in.
- Stop cycle: 5 min.
- Hold = Force Stop.
This display will remain for 5 min.
REMEMBER:RELEASE SOCKET –
UNLOCK IT – UNDOCK IT– PULL FROM POCKET

30 OM-SYSTEMII
Overview & Operating Instructions
CART CLEANING
• Open cart doors and remove all items from cart.
• Remove Menu Minder. Close all switches. Run it through dish machine ONLY if soiled.
• Spray heater shelves and inside of cart with approved cleaner (Oasis 146, Mikro-Quat, Render II or D10). Let set 5 minutes. Wipe with clean damp cloth.
• For heavy food soil only: Spray heater shelves with approved degreaser* Grease Cutter NC or Grease Beast or D3 or Grease Relief. Let set 5 minutes. Scrub off soil with approved white nylon pad. Rinse with water; wipe dry.
• Cover electrical outlet with cap. Spray outside of cart with approved cleaner. Wipe with clean damp cloth.
* Degreaser is NOT necessary for heaters with nonstick dark protective coating (PN 97492-1 & 2).

OM-SYSTEMII31
DISHWARE CARE - CHINA
• SEPARATE and place entree and side cradles in flat rack. Scrape and SORT dishware.
• Load sorted dishes into dish machine and wash.
Detergent/rinse agent: Solid Power/Polydry (High Temp Washing-Ecolab) Ultraklene Plus/Ultra Dry (Low Temp Washing-Ecolab)
• Wash and rinse water temperature not to exceed 180º F.
• SOAK dishes that do not come clean. Use an approved light duty nylon scrubber to remove tough soil. Run through dish machine again.
• STORE clean dishware in carts or racks:
Cradles in Basket Rack (separated)
Trays on Tray Drying Rack (rimmed edge down)
Entree dishes in Entree Dish Cart
Soup & side dishes in Side Dish Cart
Domes in Entrée Cover Rack (right side up)
Overview & Operating Instructions

32 OM-SYSTEMII
Overview & Operating Instructions
DISHWARE CARE - PLASTIC
• Scrape and SORT dishware. SOAK entree plates and soup bowls in hot water for 15 minutes in one of the following:
Bleach (1cup to 20 gallons hot water)
Silver Power–Solid or Soilmaster (water at least 120º F. - Ecolab)
K2 (water at least 120º F. – Johnson Diversey)
• Load sorted dishes into dish machine and wash.
Detergent/rinse agent: Solid Power/Polydry (High Temp Washing-Ecolab) Ultraklene Plus/Ultra Dry (Low Temp Washing-Ecolab)
• Wash and rinse water temperature not to exceed 180º F.
• SCRUB dishes that do not come clean with an approved light duty nylon scrubber. Run through dish machine again.
• STORE clean dishware in carts or racks:
Trays on Tray Drying Rack (rimmed edge down)
Entree dishes in Entree Dish Cart
Soup & side dishes in Side Dish Cart
Domes in Entrée Cover Cart

OM-SYSTEMII33
Overview & Operating Instructions
APPROVED CLEANING AGENTS FOR USE WITH `A LA CART EQUIPMENT
USESPRODUCT NAME/ MANUFACTURER
PRODUCT TYPE
DILUTION FACTOR/COM-MENTS
Cart cleaning MicroQuat or Oasis 146 Ecolab
Sanitizer Standard dilution; Oasis 146 is automatically diluted in dispenser,
Cart cleaning Render II or D10 Johnson Diversey
All purpose cleaner and sanitizer
200 ppm (1/4 oz per gal of water)
Cart cleaning – for stainless steel
EcoShineEcolab
Cleaner/Polisher
Ready to use.
Cart cleaning – for stainless steel
Deep GlossJohnson Diversey
Cleaner/Polisher
Ready to use.
Removal of baked on spills on heater elements.
Grease Cutter NC or Oasis 133 Ecolab
Cleaner/Degreaser
Less than 6% final concentration (3/4 cup per gal water)
Removal of baked on spills on heater elements
Grease Beast or D3 Johnson Diversey
Degreaser Less than 6% final concentration (3/4 cup per gal water)
Presoaking plastic dishware
Bleach Bleacher 1 cup per 20 gal of water.
Presoaking plastic dishware
Soilmaster or Silver Power-Solid Ecolab
Enzyme presoak
Use in water at 120°F. or hotter.
Presoaking plastic dishware
MikroClorEcolab
Bleacher, sanitizer
Follow manufacturer’s instructions to dilute.
Presoaking plastic dishware
K2 Johnson Diversey
Oxygen presoak
Use in water at 120°F. or hotter.
Dishwashing Detergent
Solid PowerUltra Klene Plus (low temp)EcolabSuma Super L1Low Energy – LEDJohnson Diversey
Wash Agent -
Dishwashing Rinse Agent
Poly DryUltra Dry (low temp)EcolabSuma Select A7Johnson Diversey
Rinse Agent -
Product Information:Ecolab 1 (800) 352-5326
Johnson Diversey 1 (800) 626-5015

34 OM-SYSTEMII
Troubleshooting Guide
FAULTS & ERRORSERROR MESSAGE WHAT IT MEANS RECOMMENDED ACTION
SOFT FAULT - NON FATAL ERROR
Entrée Heater Failure Open CktError message includes shelf #
Cart and chiller cannot communicate regarding a specified heater component (side or entrée) on a specified shelf because there is no electrical current flow. This can be a blown fuse in the chiller, a failed heater component in the cart, bad connector pin or cable assembly wire.
Undock cart and clear fault from chiller, recording them on the Cart Chiller Maintenance Log. Dock cart to another chiller and see if fault message recurs. If so, the cart is the source of the problem. Otherwise, dock a good cart to the same chiller and see if the fault recurs. If so, the chiller is the source of the problem. If the fault does not recur at all, then it was likely a docking error. Re-dock the cart to it’s designated chiller, and finally, move the affected tray to a heater shelf that is working, and reset the menu minder. System is operational, but service is required.
Side Heater Failure Open CktError message includes shelf #
Entrée Heater Short CktError message includes shelf #
When cart and chiller try to communicate electrically, the current flow is out of range (too high) regarding a specified heater component (side or entrée) on a specified shelf because this is usually a bad heater, and may cause a fuse in the chiller to blow.
Side Heater Short CktError message includes shelf #
Menu Minder Entrée Failure LEDError message includes shelf #
The system cannot read the menu minder for the specified entrée or side component of the heater on the specified shelf. System still operational, but shelf may not heat properly. It may not heat even when programmed hot, and it may heat even if programmed cold. Service required to repair if recurs.
Move the affected tray to a heater shelf that is working, and reset the menu minder. System is operational, but service is required.
Menu Minder Side Failure LEDError message includes shelf #
Menu Minder Locator Failure LEDMessage specifies #1 or #2
There are 2 locator devices that read the menu minder. One or both of them (1 and/or 2) has failed and cannot read the menu minder. If both fail, it cannot be used. If one fails, and the idle screen changes to menu minder “yes” when docking, it will retherm. If it keeps beeping and remains “menu minder no” after docking is complete, it will not retherm.
If one locater is faulting and it is reading the menu minder when you dock the cart, it is operational, but service is still required.
Defrost Failure The maximum defrost cycle is 10 minutes. A failure may mean the defrost termination switch failed.
You may continue to use the system, but if the fault recurs, call for service.
Cart Undocked FaultRemove Cart, ENTER to continue
The cart has come undocked during the chill cycle, but the menu minder is still in and the cable is connected. 90 minutes after the cart comes off the docking switches, this message appears. Human intervention is required.
The food has not been actively refrigerated for over 90 minutes. Check food temperature with probe. If food has not been out of temperature range for too long, re-dock the cart and press ENTER and the cart will resume chilling. If you judge the food to be compromised, than discard and replace food. The fault does not have to be cleared from CMCS or Error log.
Power Fail(ed) Messages will vary depending on which cycle the chiller is in: Chill, Retherm or Hold.
There was a power failure that exceeded the “interrupt time.” The interrupt time is 90 minutes if chilling, 5 minutes if retherming or holding. Messages will read as “Power failed during chill more than 90 ms, Food may be ruined,” “Power Fail exceeded Int. time in retherm, Food may be ruined” or “Power failed while holding, the Food may be ruined”
Cart must be undocked for screen to clear. Then, cart can either be re-docked (if it was chilling and is found to be safe;) Served if it was holding and is found to be hot enough; or put back into the retherm cycle and undocked when trays are hot enough. Human intervention is required to continue operation, but the fault does not have to be cleared from CMCS or Error log.

OM-SYSTEMII35
Troubleshooting Guide
FAULTS & ERRORSERROR MESSAGE WHAT IT MEANS RECOMMENDED ACTION
HARD FAULT - FATAL ERROR
Return Air Temperature FailureChiller will beep and display “Fatal Error Service Required” message
Return air (air circulating from cart into chiller) does not achieve 55˚ temperature within 90 minutes of docking the cart. Usually environment e.g. high room temperature >80˚, poor docking seal, blocked chiller vents.
Check environment and correct issue. Undock cart, turn chiller off and back on, allowing the LED display panel to reboot until idle screen appears. Re-dock cart to chiller and continue to operate. If problem does not recur, or environmental factor is not evident, call for service.
Input Air Temperature FailureChiller will beep and display “Fatal Error Service Required” message
Input air (air circulating from chiller into cart) does not drop below 35˚ within 15 minutes of docking the cart. Service required. Usually equipment refrigeration issues, not safe to operate, service required.
Take unit out of service, unless very obvious environmental factor is evident (eg. cart door open for 15 min.) If environment, correct issue, power chiller off and on, reboot LED display to idle screen. Re-dock and see if problem recurs. If so, service required.
Water Pressure Fail(water cooled units)
Water pressure required to run refrigeration was not achieved.
Undock the cart and power the chiller off and then back on. Take chiller out of service until water pressure issue is corrected. Service is required.

36 OM-SYSTEMII
Troubleshooting Guide
MAINTENANCE LOG:
DATE CHILLER # CHILLER SERIAL# CART # CART
SERIAL# UNIT MEAL ERROR MESSAGE CHECKED BY/DATE
NOTE: When calling Unified Brands for technical service have serial # of unit available: 1-888-994-7636.

OM-SYSTEMII37

38 OM-SYSTEMII

OM-SYSTEMII39

PART NUMBER SYSII REV A (08/11)
1055 Mendell Davis Drive • Jackson MS 39272888-994-7636 • 601-372-3903 • Fax 888-864-7636
unifiedbrands.net
© 2011 Unified Brands. All Rights Reserved. Unified Brands is a wholly-owned subsidiary of Dover Corporation.