model rph-50,000 2 speed w/air tensioner industrial planetary winch€¦ · air cylinder is...
TRANSCRIPT

OPERATING, SERVICE, AND MAINTENANCE MANUAL
MODEL RPH-50,000
2 SPEED W/AIR TENSIONER
INDUSTRIAL PLANETARY WINCH
CAUTION: READ AND UNDERSTAND THIS MANUAL BEFORE INSTALLATION AND OPERATION OF WINCH. SEE WARNINGS!
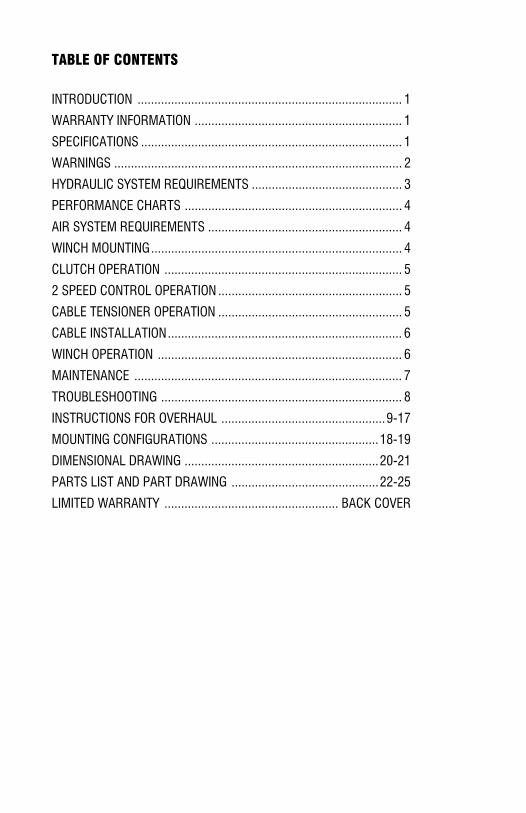
TABLE OF CONTENTS INTRODUCTION ............................................................................... 1
WARRANTY INFORMATION .............................................................. 1
SPECIFICATIONS .............................................................................. 1
WARNINGS ...................................................................................... 2
HYDRAULIC SYSTEM REQUIREMENTS ............................................. 3
PERFORMANCE CHARTS ................................................................. 4
AIR SYSTEM REQUIREMENTS .......................................................... 4
WINCH MOUNTING........................................................................... 4
CLUTCH OPERATION ....................................................................... 5
2 SPEED CONTROL OPERATION ....................................................... 5
CABLE TENSIONER OPERATION ....................................................... 5
CABLE INSTALLATION...................................................................... 6
WINCH OPERATION ......................................................................... 6
MAINTENANCE ................................................................................ 7
TROUBLESHOOTING ........................................................................ 8
INSTRUCTIONS FOR OVERHAUL .................................................9-17
MOUNTING CONFIGURATIONS ..................................................18-19
DIMENSIONAL DRAWING ..........................................................20-21
PARTS LIST AND PART DRAWING ............................................22-25
LIMITED WARRANTY .................................................... BACK COVER

RAMSEY HYDRAULIC PLANETARY WINCH MODEL RPH 50,000
PLEASE READ THIS MANUAL CAREFULLY This manual contains useful ideas in obtaining the most efficient operation from your Ramsey Winch, and safety procedures one needs to know before operating a Ramsey Winch. Do not operate this winch until you have carefully read and understand the "WARNINGS" and "OPERATION" sections of this man-ual. WARRANTY INFORMATION Ramsey Winches are designed and built to exacting specifications. Great care and skill go into every winch we make. If the need should arise, warranty pro-cedure is outlined on the back of your self-addressed postage paid warranty card. Please read and fill out the enclosed warranty card and send it to Ram-sey Winch Company. If you have any problems with our winch, please follow instructions for prompt service on all warranty claims. Refer to back page for limited warranty. SPECIFICATIONS* LOW SPEED MODE
NOTE: The rated line pulls shown are for the winch only. Consult the wire rope manufacturer for wire rope ratings.
Rated Line Pull (lbs.) 50,000(Kg.) 22,670
Gear Reduction 51.35:1
Weight (without cable)1 2 3 4 5 6
lbs. 50,000 41,800 36,000 31,600 28,100 25,400Kg. 22,680 18,960 16,320 14,330 12,740 11,520ft. 25 55 95 135 185 235m 7 16 28 41 56 71FPM 23 27 31 35 39 43MPM 6.9 8.2 9.4 10.6 11.8 13
*Line Speed (at 25 GPM)* These specifications are based on recommended wire rope of .75 inch dia. extra improved plow steel or equivalent
700 LBS. (318 Kg)……………………………………………
………………………………………………………………………………………………………………
……………………………………………………………
LAYER OF CABLE*Rated line pull per layer*Cable Capacity

2
WARNINGS: CLUTCH MUST BE TOTALLY ENGAGED BEFORE STARTING THE WINCHING OPERATION.
DO NOT START WINCH MOTOR BEFORE ENGAGING CLUTCH
DO NOT DISENGAGE CLUTCH UNDER LOAD.
STAY OUT FROM UNDER AND AWAY FROM RAISED LOADS.
STAND CLEAR OF CABLE WHILE PULLING. DO NOT TRY TO GUIDE CABLE.
DO NOT EXCEED MAXIMUM LINE PULL RATINGS SHOWN IN TABLE.
DO NOT USE WINCH TO LIFT, SUPPORT, OR OTHERWISE TRANSPORT PEOPLE.
A MINIMUM OF 5 WRAPS OF CABLE AROUND THE DRUM BARREL IS NECESSARY TO HOLD THE LOAD. CABLE ANCHOR IS NOT DESIGNED TO HOLD LOAD.

3
HYDRAULIC SYSTEM REQUIREMENTS Refer to the performance charts, below, to properly match your hydraulic sys-tem to RPH 50000 winch performance. The charts consist of : (1) Line pull (lb.) first layer vs. working pressure (PSI) and (2) Line speed, first layer (FPM) vs. Flow (GPM). Performance based on a
motor displacement of 9.6 cubic inches with 25 GPM maximum flow rate.
CAUTION: SYSTEM BACK PRESSURE MUST NO EXCEED 50 PSI OR BRAKE SHAFT FAILURE CAN OCCUR. IF BACK PRESSURE EXCEEDS 50 PSI, AND CANNOT BE REDUCED, AN EXTERNAL CASE DRAIN SHOULD BE RUN FROM THE MOTOR CASE DRAIN PORT (SEE PAGES 20-21) TO TANK OR A LINE/CONNECTION THAT HAS A PRESSURE BELOW 50 PSI. THE DRAIN LINE MUST BE ROUTED SO
CARTRIDGEALTERNATE
(A ROTATION SHOWN)
FOR B ROTATIONLOCATION
MOTORBRAKEPORT
B
TYPICAL LAYOUTWITH BRAKE RELEASE SHUTTLESINGLE (A OR B) PORT CONTROL
3 POSITION4 WAY VALVE
(MOTOR SPOOL)
SYSTEMRELIEF
PUMP
EXTERNALOPTIONAL
LINECASE DRAIN

4
PERFORMANCE CHARTS (BASED ON 9.6 CU.IN./REV MOTOR)
AIR SYSTEM REQUIREMENTS The cable tensioner requires an independent, adjustable regulated air supply of between 50 and 90 PSI.
CAUTION: DO NOT EXCEED 100 PSI AIR PRESSURE TO THE AC-TUATORS. THIS COULD CAUSE DAMAGE TO THE ACTUATORS.
The clutch release cylinder requires an air supply of between 100 and 120 PSI. WINCH FRAME MOUNTING Use (8) 5/8 inch diameter grade 5 or better bolts to attach mounting frame to wrecker. Before operating winch for the first time, remove the cover from the breather vent at the back of the air cylinder and the relief fitting on top of the clutch housing.
10000
15000
20000
25000
30000
35000
40000
45000
50000
0 1000 2000 3000
Pressure (PSI)
Line
Pul
l (Lb
s.)
LOW SPEEDHIGH SPEED
0
5
10
15
20
25
30
35
40
45
50
0 5 10 15 20 25Flow (GPM)
Line
Spe
ed (F
t/Min
)

5
CLUTCH OPERATION To engage clutch: 1. Move the clutch control valve to the "clutch-engaged" position. 2. Anytime the temperature is below freezing, run motor in the "cable out"
direction only until the drum starts to turn. In extreme cold temperatures (below 0° F/ -18° C), pull out on the cable by hand only until the drum starts to turn.
3. Wait at least 3 seconds for the clutch to fully engage, after which the winch is ready to winch in the cable. WARNING: Do not attempt to engage the clutch by first run-ning the winch motor and then moving the clutch control valve to the "clutch engaged" position while the motor is run-ning. Do not start picking up the load at the same time the clutch is being engaged.
To disengage clutch: 1. Run the winch in the "cable out" direction until the load is off the cable. 2. Move the clutch control valve to the "clutch-disengaged" position. 3. The cable may now be pulled off by hand 2 SPEED CONTROL OPERATION Your winch is equipped with a 2-speed hydraulic motor. It is controlled by the application of 12 vDC to the Motor Control Valve solenoid. Do not change motor speed while winch is in operation. Loss of load control and/or damage to your winch could result. CABLE TENSIONER OPERATION If you remove the cable entirely from the winch or this is a new instal-lation: The cable tensioner is not intended to be energized on a bare drum. Before applying air to the cable tensioner, install the cable. To adjust the free spool effort of the cable tensioner: Disengage the winch clutch and free spool some cable off the drum. Adjust the air pressure to the cable tensioner to achieve the desired free spool effort that also prevents “bird-nesting” of the cable.
CAUTION: DO NOT EXCEED 100 PSI AIR PRESSURE TO THE AC-TUATORS. THIS COULD CAUSE DAMAGE TO THE ACTUATORS.

6
CABLE INSTALLATION 1. Unwind cable by rolling it out along the ground to prevent kinking. Se-
curely wrap end of wire rope, opposite hook, with plastic or similar tape to prevent fraying.
2. Insert the end of the cable opposite the hook end into the hole in the drum barrel. Secure cable to drum barrel using setscrew furnished with winch. TIGHTEN SETSCREW SECURELY.
3. Carefully run winch in the "reel-in" direction. Keeping tension on end of cable, spool all the cable onto the cable drum, taking care to form neatly wrapped layers.
4. Apply air to the cable tensioner. Wind about 5 wraps of cable onto the drum and stop. Using a hammer tap these five wraps of cable over against the cable anchor flange side of the cable drum.
5. Finish spooling all the cable onto the cable drum, taking care to form neatly wrapped layers.
The wire rope can easily be removed from the drum by loosening the setscrew. WINCH OPERATION The best way to get acquainted with how your winch operates is to make test runs before you actually use it. Plan your test in advance. Remember, you hear your winch as well as see it operate. Get to recognize the sounds of a light steady pull, a heavy pull, and sounds caused by load jerking or shifting. Gain confidence in operating your winch and its use will become second nature with you. The uneven spooling of cable, while pulling a load, is not a problem, unless there is a cable pileup on one end of drum. If this happens reverse the winch to relieve the load and move your anchor point further to the center of the vehicle. After the job is done you can unspool and rewind for a neat lay of the cable.

7
MAINTENANCE Adhering to the following maintenance schedule will keep your winch in top condition and performing as it should with a minimum of repair. A. WEEKLY 1. Check the oil level and maintain it to the oil level plug. If oil is leaking out,
determine location and repair. 2. Check the pressure relief plug in top of the gear housing. Be sure that it is
not plugged. 3. Lubricate cable with light oil. B. MONTHLY 1. Check the winch mounting bolts. If any are missing, replace them and
securely tighten any that are loose. Use grade 5 or better bolts. 2. Inspect the cable. If the cable has become frayed with broken strands,
replace immediately. C. ANNUALLY 1. Drain the oil from the winch annually or more often if winch is used fre-
quently. 2. Fill the winch to the oil level plug with clean kerosene. Run the winch a
few seconds with no load in the reel in direction. Drain the kerosene from the winch.
3. Refill the winch to the oil level plug with all purpose SAE 80W-140 gear oil.
4. Inspect tiebars and surrounding structure for cracks or deformation.

8
TROUBLESHOOTING GUIDE
CONDITION POSSIBLE CAUSE CORRECTION
OIL LEAKS FROM WINCH
Seals damaged or worn Replace seal.
Too much oil Drain excess oil. Refer to IN-STRUCTIONS FOR OVERHAUL, pg. 16.
Damaged gasket Replace gasket.
Damaged brake shaft seal
Replace brake, check back pressure to motor. If back pressure is more than 50 PSI, reduce back pressure or add external case drain line.
WINCH RUNS TOO SLOW
Low flow rate Check flow rate. Refer to Hy-draulic Systems Performance, page 4.
Hydraulic motor worn out Replace motor.
Clutch not disengaged
Check air pressure to clutch cylinder 100 PSI minimum required. Refer to drawing page 20-21 for more informa-tion.
Excessive air pressure to cable tensioner
Reduce air pressure to ten-sioner.
BRAKE WILL NOT RELEASE
Brake line disconnected or blocked
Check brake function. Refer to page 16
LOAD LOWERS TOO FAST
Hydraulic lines to counter-balance valve incorrectly installed and/or cartridge plug position incorrect for drum rota-tion direction to reel cable in.
Refer to pages 20-21 for cor-rect installation.
CABLE DRUM WILL NOT FREESPOOL
9
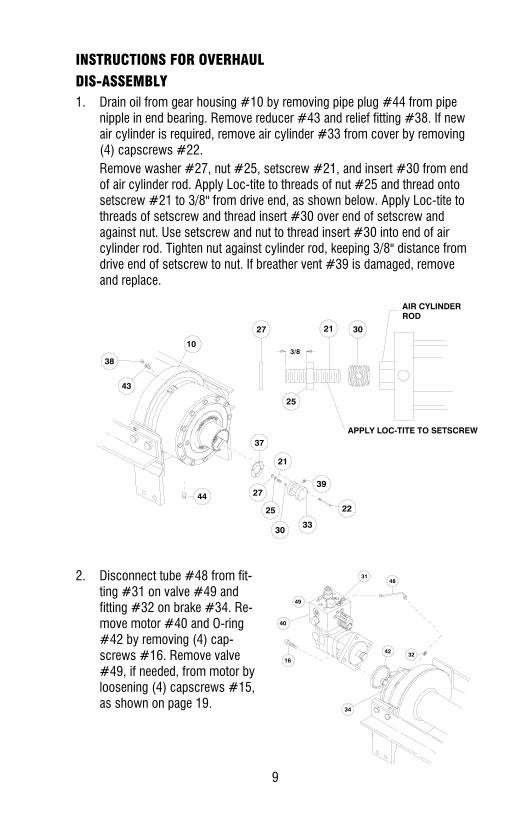
INSTRUCTIONS FOR OVERHAUL DIS-ASSEMBLY 1. Drain oil from gear housing #10 by removing pipe plug #44 from pipe
nipple in end bearing. Remove reducer #43 and relief fitting #38. If new air cylinder is required, remove air cylinder #33 from cover by removing (4) capscrews #22.
Remove washer #27, nut #25, setscrew #21, and insert #30 from end of air cylinder rod. Apply Loc-tite to threads of nut #25 and thread onto setscrew #21 to 3/8" from drive end, as shown below. Apply Loc-tite to threads of setscrew and thread insert #30 over end of setscrew and against nut. Use setscrew and nut to thread insert #30 into end of air cylinder rod. Tighten nut against cylinder rod, keeping 3/8" distance from drive end of setscrew to nut. If breather vent #39 is damaged, remove and replace.
2. Disconnect tube #48 from fit-ting #31 on valve #49 and fitting #32 on brake #34. Re-move motor #40 and O-ring #42 by removing (4) cap-screws #16. Remove valve #49, if needed, from motor by loosening (4) capscrews #15, as shown on page 19.
22
21
25
3/8
27
30
25
33
38
30
AIR CYLINDERROD
APPLY LOC-TITE TO SETSCREW
44
10
43
3927
21
37
42
40
16
49
3148
32
34

10
3. Remove brake mounting screws #19 from brake #34 to remove brake from end bearing #9. Take note of mounting configuration for proper mounting of parts during reassembly.
Remove coupling #7 and gasket
#36 from end bearing. Take note of mounting configuration for proper mounting of parts during re-assembly.
4. Remove winch from tie bars #2 and #3 by removing (8) capscrews
#18, (8) lockwashers #23, and (4) shoulder bolts #28. Pull motor end bearing #9 from drum assembly #1.
34
9
3
36
19
7
18
CAPSCREWOUTER-MOST
18 23
CAPSCREWSINNER-MOST
28 2
OUTER-MOSTCAPSCREW
18 23
28
10
1
9
23
3 28
28

11
5. Pull drum assembly #1 upward from end bearing #10. Remove quad-rings #41 from grooves in drum bushings. Remove input shaft #11, clutch springs #46 & #47 and washers #24 & #26 from end bearing. Examine splined ends of input shaft for signs of wear, replace if damaged.
Examine drum assembly #1 for signs of wear. If splines inside of drum driver (332148) are damaged, drum driver must be replaced. Remove drum driver by unscrewing (8) capscrews (414978). If bushings show signs of wear, replace by pressing old bushings from drum and removing o-rings from grooves in drum and drum driver. Place well-oiled O-rings (462043) into grooves in drum and drum driver. Press new bushing (412078) into end of drum opposite drum driver and press bushing (412079) into drum driver until flange of bushings are flush against drum and driver.
6. Remove output coupling #6 and coupling shaft #8 from end bearing #10. Examine bearings #13 pressed in output coupling for signs of wear. Replace bearings, if neces-sary, by pressing old bearings from coupling and press new bearings into each end of output coupling. Place coupling shaft into bearings.
10
24
11
41
ASSEMBLYDRUM BUSHING
41 412078
46
47
26
BUSHING
1
GROOVE
412079BUSHING
462043O-RING
DRUM DRIVER
462043O-RING
1
1310
6
13
8

12
7. Remove (12) capscrews #17 to pull gear housing cover and gasket from ring gear. Remove input thrust washer, sun gear and carrier assemblies from inside of ring gear. Remove ring gear #4 and gasket #35 from end bearing #10. Examine shifter shaft #12 for signs of wear, replace if necessary. Ex-amine bushing #14 for signs of wear. Re-place bushing, if necessary, by pressing old bushing from housing and pressing new bushing into place.
RE-ASSEMBLY NOTE: DETERMINE MOUNTING CONFIGURATION OF WINCH (R.H. OR L.H. MOUNTED) BEFORE ATTACHING TIE BARS TO WINCH. TO ASSURE PARTS ARE MOUNTED TO PROPER SIDE, REFER TO WINCH MOUNTING CONFIGU-RATIONS ON PAGE 17. 8. Seat well-oiled quad-ring #41 into groove of bushing in each end of drum
assembly #1. Carefully set drum assembly down over motor end bearing #9. Lift gear-housing end bearing #10 and set into place on drum as-sembly. Attach tie bars #2 and #3 using (8) capscrews #18 and lock-washers #23. Install (4) shoulder bolts #28 and hand tighten. Tighten (4) innermost capscrews securely, check rotation of cable drum. Tighten (4) outer-most capscrews securely, check rotation of cable drum. Torque capscrews, in innermost then outer-most pattern shown below, to 430 ft-lbs. each. Torque shoulder bolts to 30 ft-lbs. each.
Check rotation of cable drum assembly. It must rotate freely with no tight spots.
23
28
18
41
1
9
28
41
10
CAPSCREWOUTER-MOST
18 23
28
28
INNER-MOSTCAPSCREWS
OUTER-MOSTCAPSCREW
18 23
14
17
10
12
51
35
4
50
35

13
9. Place end (with longest splines) of output coupling assembly #6 through end bearing bushing #13 and mesh coupling spline with spline inside of drum. Slide clutch spacer #29 over end and against shoulder of shifter shaft #12. Place shifter shaft through washer #24 and into shaft coupling #6, meshing splines of shifter shaft with splines in shaft coupling.
10. Set gasket #35 into place on gear housing end bearing #10. Place ring gear onto end bearing, aligning holes in ring gear with holes in gasket and gear housing end bearing. Use (2) capscrews to temporarily secure ring gear to end bearing. Place (2) gear carrier assemblies into ring gear meshing carrier gears with ring gear. Slide input sun gear over shifter shaft #12 and mesh with teeth of input carrier. Apply grease to input thrust washer and place into slots of gearbox cover. Place gasket #35
into position on gearbox cover with sealer. Re-move (2) temporary capscrews and attach cover
and gasket to ring gear end bearing. Use (12) capscrews #17 to secure gearbox
to gear housing end bearing. Torque capscrews to
87 ft-lbs. each, in a crisscross pattern.
14
10
12
24
29
8
LONGEST SPLINES
6
50
35
4
51
12
15
14
10
35

14
11. Pull rod from air cylinder as far as possible. Slide washer #25 over set-screw #20 and against nut attached to air cylinder rod. Place setscrew into hole of shifter shaft #12 and attach air cylinder to gear box cover using (4) capscrews #22. Apply Loc-tite PST thread sealer to threads of capscrews. Torque capscrews to 5 ft-lbs. each, in crisscross pattern.
12
21
2725
39
33
37
30
22

15
12. Liberally apply grease to shoulder of input shaft. Place 1-3/4 OD washer #26 over end of shaft and against shoulder of shaft. Place spring #46 inside of spring #47 and place both springs over shaft and against washer #26. Slide 2-3/8” OD clutch washer #24 over splined end of shaft and against springs. Use grease to hold springs and washers in place on shaft. Place end of shaft through drum. Mesh spline of input shaft with internal spline of coupling shaft inside of drum.
With pin #45 installed in coupling, mesh spline of input shaft with internal spline of coupling #7 below. Slide coupling over end of shaft #11. Place gasket #36 into position on motor mounting surface of end bearing #9. Insert brake shaft with spline into coupling. Use (2) screws #19 to attach brake assembly to motor end bearing. Torque capscrews to 85 ft-lbs. each.
11
34
19
7
19
45
36
26
47
46
24
9

16
13. Attach motor #40 with well-oiled O-ring #42 to brake #34. Use (4) capscrews #16 and torque to 74 ft-lbs. each. Securely connect tube #48 to elbow #31, on valve #48, and fit-ting #32 on brake #34.
14. Apply Permatex to thread
of plug #44. Thread plug into tapped hole in bot-tom of gear housing end bearing #10. Pour ap-proximately 4.75 pints of SAE 80W-140 oil into end bearing.
Check oil level by remov-ing oil level plug noted below. Insert relief fitting #38 and thread reducer #43 into end bearing at oil fill hole. Be sure breather vent #39 and relief fitting #38 are not damaged and in good operating condition. Re-place if necessary.
Install winch and connect pressure lines. Apply at least 230 PSI pressure to release brake and verify that brake releases, by observing that the winch drum rotates.
15. Check proper operation of clutch by applying air pressure to clutch air cylinder to disengage clutch. Verify that winch freespools. Re-engage clutch. A loud noise should be heard when the clutch engages. Winch drum should not freespool.
16. Operate winch forward and reverse to verify that drum rotates.
42
3148
32
40
16
49
34
OIL LEVEL PLUG44
38
43
39
10

17
CHANNELSIDE
WINCH MOUNTING CONFIGURATIONS
R. H. MOUNTINGCONFIGURATION
L. H. MOUNTINGCONFIGURATION
ANGLE SIDE
CHANNEL SIDE
ANGLE SIDE

18
Cable Tensioner Overhaul Note: Your winch will come in either an overwound or underwound version. The disassembly and reassembly is the same for either, but the appear-ance and mounting of the cable ten-sioner will be different (see figures at right and below). If you are not certain which version the winch you are work-ing on is, refer to pages 19 and 20. 1. Disconnect the air supply from
the cable tensioner at the “T” fitting (item #12).
2. Remove nuts (item #8) from
actuators (item #14) that hold the actuators to the tensioner plate (item #1). Remove pin (item #3) by removing cotter pin (item #11) and washer (item #10) on both sides.
3. Remove the tensioner plate and
inspect the actuators for damage. 4. Remove and replace any dam-
aged parts. Tighten capscrews (item #6) that attach tensioner bar to tensioner plate to 20-25 ft-lbs. torque.
UNDERWOUND
OVERWOUND
19
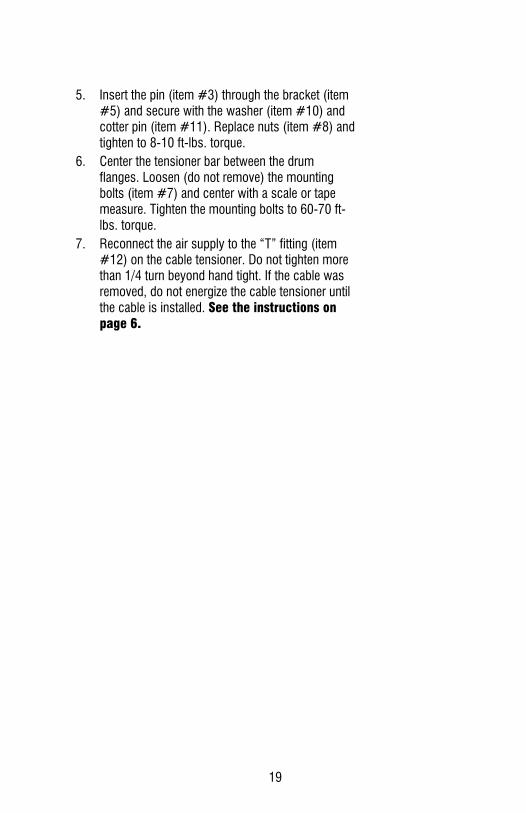
5. Insert the pin (item #3) through the bracket (item #5) and secure with the washer (item #10) and cotter pin (item #11). Replace nuts (item #8) and tighten to 8-10 ft-lbs. torque.
6. Center the tensioner bar between the drum flanges. Loosen (do not remove) the mounting bolts (item #7) and center with a scale or tape measure. Tighten the mounting bolts to 60-70 ft-lbs. torque.
7. Reconnect the air supply to the “T” fitting (item #12) on the cable tensioner. Do not tighten more than 1/4 turn beyond hand tight. If the cable was removed, do not energize the cable tensioner until the cable is installed. See the instructions on page 6.
20
2-S
PE
ED
BE
AR
ING
LES
S M
OTO
RR
.H. M
OU
NTI
NG
CO
NFI
GU
RA
TIO
N
OV
ER
WO
UN
D A
IR T
EN
SIO
NE
R
Ø
2.50
63,5
8.67
DR
UM
7.00
177,
8 17.3
42.
5063
,5
433,
317
.06
Ø
2.63
66,8
38.4
297
5,8
10.9
5
DR
UM
STA
TIC
LO
AD
5.47
HO
LDIN
G B
RA
KE
17.4
644
3,4
19.3
249
0,7
1/4"
SP
AD
E12
V F
OR
HIG
H S
PE
ED
/LO
W T
OR
QU
E M
OD
E17
.14
DIM
EN
SIO
NS
SH
OW
N A
RE
INC
HE
S O
VE
R M
ILLI
ME
TER
S
446,
017
.56
PO
RT
LOC
AT
ION
(4-P
LAC
ES
EA
CH
SID
E)
.81
(20,
6 m
m)
DIA
. TH
RU
PN
EU
MA
TIC3.
1279
,2
4.09
103,
8
39,6
1.56
8.78
223,
0
2-P
LAC
ES
1/8-
27N
PT
PO
RT
22°
30'
.29
7,4
14.6
137
1,0
1/8-
27N
PT
PR
ES
SU
RE
PO
RT
(100
TO
120
PS
I)F
OR
DIS
EN
GA
GIN
G C
LUT
CH
.(C
LUT
CH
IS S
PR
ING
EN
GA
GE
D.)
SE
E E
ND
OR
IEN
TA
TIO
N O
F P
OR
T.
VIE
W F
OR
TR
UE
9.65
245,
1
2.41
61,2
2.91
73,9
1 1/
16 S
AE
STR
AIG
HT
THR
EA
D O
-RIN
G P
OR
T(2
-PLA
CE
S O
PP
OS
ITE
SID
ES
)
7.94
201,
6
440,
4
220,
2
435,
3
138,
9278,
1
19.0
948
4,8
12.2
531
1,1
26,9
1.06
20.7
852
7,8
CA
BLE
IN
RO
TA
TIO
N
RP
H 5
0,00
0S
HO
RT
DR
UM
WIT
H L
AR
GE
FLA
NG
ES
"B"
RO
TATI
ON
SH
OW
N
ØA
NC
HO
R23
,0C
AB
LE.9
06
DR
UM
FLA
NG
E
9.37
238,
1
(DIM
EN
SIO
N O
VE
R B
OLT
HE
AD
)
(DIM
EN
SIO
N O
VE
R T
IE B
AR
)
9/16
-18
O-R
ING
CA
SE
DR
AIN
PO
RT

21
SH
OR
T D
RU
M W
ITH
LA
RG
E F
LAN
GE
S
RP
H 5
0,00
0
UN
DE
R W
OU
ND
AIR
TE
NS
ION
ER
R.H
. MO
UN
TIN
G C
ON
FIG
UR
ATI
ON
2-S
PE
ED
BE
AR
ING
LES
S M
OTO
R
7.94
201,
62.
4161
,2
2.91
73,9
(2-P
LAC
ES
OP
PO
SIT
E S
IDE
S)
THR
EA
D O
-RIN
G P
OR
T1
1/16
SA
E S
TRA
IGH
T66,8
2.63
19.0
948
4,8
VIE
W F
OR
TR
UE
19.3
249
0,7
OR
IEN
TATI
ON
OF
PO
RT.
DIM
EN
SIO
NS
SH
OW
N A
RE
INC
HE
S O
VE
R M
ILLI
ME
TER
S
433,
3D
RU
M
63,5
2.50
220,
28.
67
440,
417
.34F
LAN
GE
DR
UM
.81
(20,
6 m
m)
DIA
. TH
RU
(4-P
LAC
ES
EA
CH
SID
E)
PO
RT
LO
CA
TIO
N
63,5
2.50
PN
EU
MA
TIC
1.56
39,6
177,
87.
00Ø
Ø17
.06
138,
95.
47H
OLD
ING
BR
AK
E
17.4
644
3,4
STA
TIC
LO
AD
10.9
527
8,1
1.75
44,4
7,4
.29
.906
Ø23
,0C
AB
LEA
NC
HO
R
311,
1
446,
0
223,
08.
78
17.5
6
22°
30'
2-P
LAC
ES
1/8-
27N
PT
PO
RT
26,9
1.06
12.9
132
7,9
371,
014
.61
20.7
8
12.2
5
527,
8
EN
GA
GE
D.)
SE
E E
ND
(CLU
TCH
IS S
PR
ING
FO
R D
ISE
NG
AG
ING
CLU
TCH
.P
OR
T (
100
TO 1
20 P
SI)
1/8-
27N
PT
PR
ES
SU
RE
1/4"
SP
AD
E12
V F
OR
HIG
H S
PE
ED
/LO
W T
OR
QU
E M
OD
E
435,
317
.14
38.4
297
5,8
CA
BLE
IN
RO
TAT
ION
"A"
RO
TATI
ON
SH
OW
N
(DIM
EN
SIO
N O
VE
R T
IE B
AR
)
(DIM
EN
SIO
N O
VE
R B
OLT
HE
AD
)
238,
19.
37
9.65
245,
1
9/16
-18
O-R
ING
CA
SE
DR
AIN
PO
RT

22
22
3912
21
26
37
1727
33
30
29
50
4
35
51
34
S
EE
FO
LLO
WIN
G P
AG
ES
FO
R A
IR T
EN
SIO
NE
R*
UN
DE
RW
OU
ND
AIR
TE
NS
ION
ER
SH
OW
N.
RP
H 5
0,00
0 W
INC
H
AS
SE
MB
LIE
S.
5*
18
28
23
9
45
4049
42
32
36
7
LON
GE
ST
SP
LIN
ES
26
13
48
15 16
31
2
3
41
11
24
47
46
4414
1
41
20
10
26
13
6
388
43
35
19
23
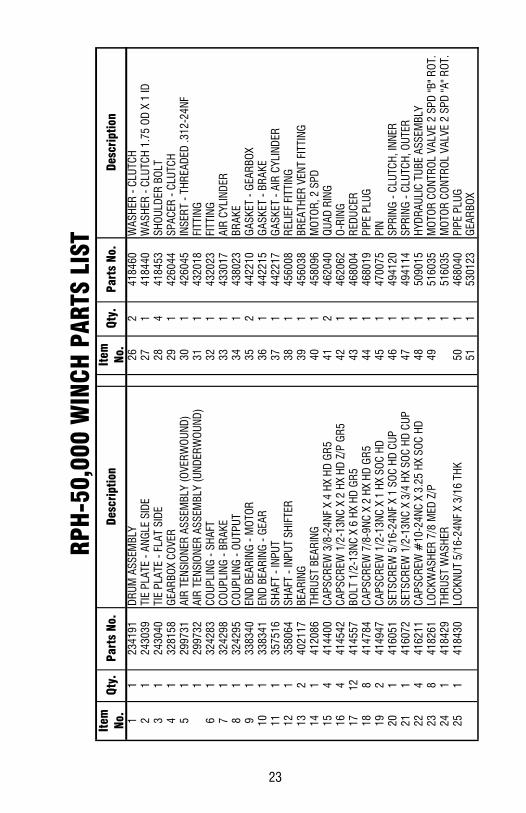
Item
No
.Qt
y.Pa
rts
No.
Desc
ript
ion
Item
No
.Qt
y.Pa
rts
No.
Desc
ript
ion
11
2341
91DR
UM A
SSEM
BLY
262
4184
60W
ASHE
R - C
LUTC
H2
124
3039
TIE
PLAT
E - A
NGLE
SID
E27
141
8440
WAS
HER
- CLU
TCH
1.75
OD
X 1
ID3
124
3040
TIE
PLAT
E - F
LAT
SIDE
284
4184
53SH
OULD
ER B
OLT
41
3281
58G
EARB
OX C
OVER
291
4260
44SP
ACER
- CL
UTCH
51
2997
31AI
R TE
NSIO
NER
ASSE
MBL
Y (O
VERW
OUND
)30
142
6045
INSE
RT -
THRE
ADED
.312
-24N
F1
2997
32AI
R TE
NSIO
NER
ASSE
MBL
Y (U
NDER
WOU
ND)
311
4320
18FI
TTIN
G
61
3242
83CO
UPLI
NG -
SHAF
T32
143
2023
FITT
ING
7
132
4298
COUP
LING
- BR
AKE
331
4330
17AI
R CY
LIND
ER8
132
4295
COUP
LING
- OU
TPUT
341
4380
23BR
AKE
91
3383
40EN
D BE
ARIN
G -
MOT
OR35
244
2210
GAS
KET
- GEA
RBOX
101
3383
41EN
D BE
ARIN
G -
GEAR
361
4422
15G
ASKE
T - B
RAKE
111
3575
16SH
AFT
- INP
UT37
144
2217
GAS
KET
- AIR
CYL
INDE
R12
135
8064
SHAF
T - I
NPUT
SHI
FTER
381
4560
08RE
LIEF
FIT
TING
132
4021
17BE
ARIN
G39
145
6038
BREA
THER
VEN
T FI
TTIN
G14
141
2086
THRU
ST B
EARI
NG40
145
8096
MOT
OR, 2
SPD
154
4144
00CA
PSCR
EW 3
/8-2
4NF
X 4
HX H
D GR
541
246
2040
QUAD
RIN
G16
441
4542
CAPS
CREW
1/2
-13N
C X
2 HX
HD
Z/P
GR5
421
4620
62O-
RING
1712
4145
57BO
LT 1
/2-1
3NC
X 6
HX H
D G
R543
146
8004
REDU
CER
188
4147
84CA
PSCR
EW 7
/8-9
NC X
2 H
X HD
GR5
441
4680
19PI
PE P
LUG
192
4149
47CA
PSCR
EW 1
/2-1
3NC
X 1
HX S
OC H
D45
147
0075
PIN
201
4160
51SE
TSCR
EW 5
/16-
24NF
X 1
SOC
HD
CUP
461
4941
20SP
RING
- CL
UTCH
, INN
ER21
141
6072
SETS
CREW
1/2
-13N
C X
3/4
HX S
OC H
D CU
P47
149
4114
SPRI
NG -
CLUT
CH, O
UTER
224
4162
11CA
PSCR
EW #
10-2
4NC
X 3.
25 H
X SO
C HD
481
5090
15HY
DRAU
LIC
TUBE
ASS
EMBL
Y23
841
8261
LOCK
WAS
HER
7/8
MED
Z/P
491
5160
35M
OTOR
CON
TROL
VAL
VE 2
SPD
"B" R
OT.
241
4184
29TH
RUST
WAS
HER
151
6035
MOT
OR C
ONTR
OL V
ALVE
2 S
PD "A
" ROT
.25
141
8430
LOCK
NUT
5/16
-24N
F X
3/16
THK
501
4680
40PI
PE P
LUG
511
5301
23G
EARB
OX
RPH
-50,
000
WIN
CH P
ARTS
LIS
T

24
CABLE TENSIONER (OVERWOUND) - 299704Item No.
Qty. Parts No. Description
1 1 265019 TENSIONER PLATE ASSY2 1 304167 TENSIONER BAR3 1 346046 PIN4 1 365038 TUBE, 1/4" DIA5 1 408226 BRACKET ASSEMBLY6 2 414278 CAPSCREW 3/8-16NC X 4 HX HD Z/P GR57 2 414948 CAPSCREW 1/2-13NC X 1-1/4 SOCKET HD8 4 418080 NUT 5/8-11NC REG HEX Z/P9 2 418069 NUT 1/2-13NC HEX REG Z/P
10 2 418223 WASHER 1/2 USS A FLAT Z/P11 2 424005 COTTER PIN 1/8 X 112 1 432032 FITTING13 1 432033 FITTING14 2 433022 AIR ACTUATOR15 2 468016 PIPE PLUG

25
CABLE TENSIONER (UNDERWOUND) - 299732Item No.
Qty. Parts No. Description
1 1 265019 TENSIONER PLATE ASSEMBLY2 1 304174 TENSIONER BAR3 1 346046 PIN4 1 365038 TUBE, 1/4" DIA5 1 408226 BRACKET ASSEMBLY6 2 414278 CAPSCREW 3/8-16NC X 4 HX HD Z/P GR57 2 414948 CAPSCREW 1/2-13NC X 1-1/4 SOCKET HD8 4 418080 NUT 5/8-11NC REG HEX Z/P9 2 418069 NUT 1/2-13NC HEX REG Z/P
10 2 418223 WASHER 1/2 USS A FLAT Z/P11 2 424005 COTTER PIN 1/8 X 112 1 432032 FITTING13 1 432033 FITTING14 2 433022 AIR ACTUATOR15 2 468016 PIPE PLUG

26
RAMSEY WINCH COMPANY
P.O. BOX 581510 • Tulsa, OK 74158-1510 • http://www.ramsey.com Telephone: (918) 438-2760 • FAX: (918) 438-6688
914112-0407-J