model name model no. - the popcorn machine · popcorn in flexi mode, ... troubleshooting . long...
TRANSCRIPT
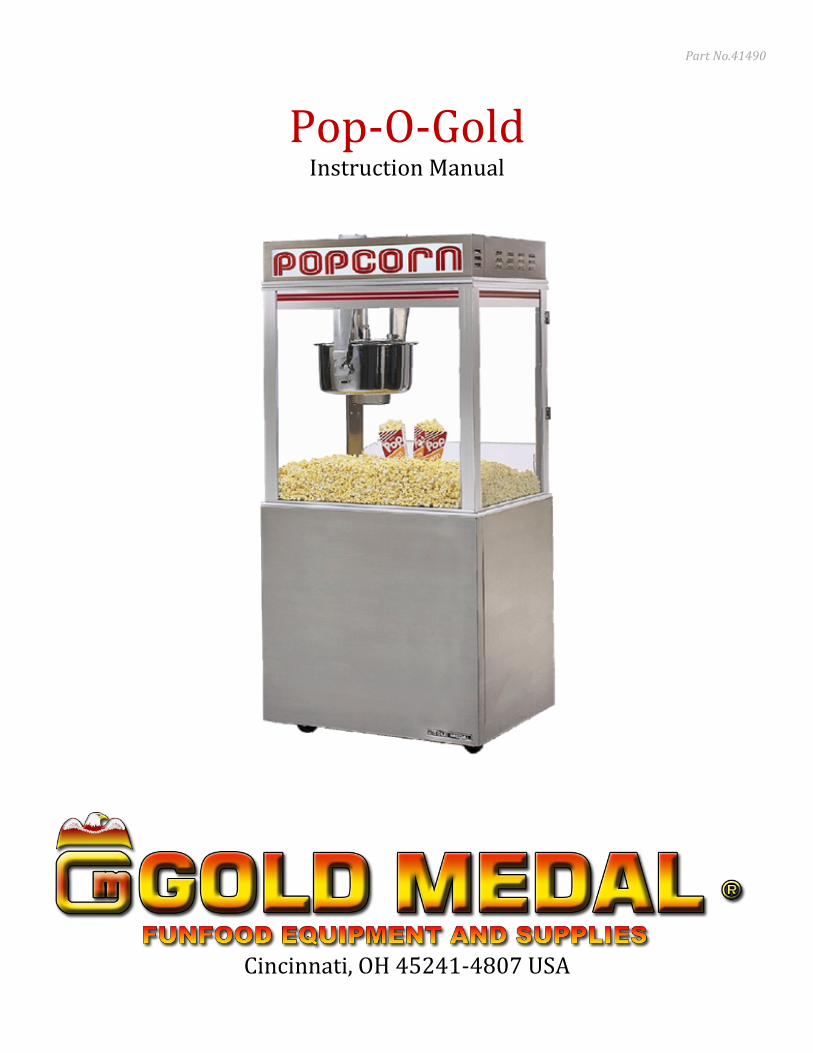
Part No.41490
Pop-O-Gold Instruction Manual
Cincinnati, OH 45241-4807 USA

Pop-O-Gold
http://www.gmpopcorn.com Page 2
SAFETY PRECAUTIONS

Pop-O-Gold
http://www.gmpopcorn.com Page 3
INSTALLATION INSTRUCTIONS
INSPECTION OF SHIPMENT Unpack all cartons and check thoroughly for any damage that may have occurred during transit. Damage claims should be filed immediately with the transportation company. ELECTRICAL REQUIREMENTS DOMESTIC MODELS ONLY: 120V – 208V or 120V – 240V, 60 Hz. A 30 amp 4 wire wall receptacle is shipped with each machine. This receptacle will accept the attachment plug on the popper and must be used. Your electrician must furnish sufficient current for proper operation of your machine. We recommend this popper be on a dedicated and circuit protected line. Note: The Pop-O-Gold uses both hot to neutral legs, 120V. The machine does not use the 208V or 240V hot-to-hot connection.
FIRE SUPPRESION MODELS If equipped, fire suppression components are in accordance with ANSUL R-102 specifications. The fire suppression system is shipped empty; the machine will not operate until the system is charged and inspected by a local ANSUL representative. System charging is not performed by Gold Medal® Products. Contact Gold Medal® Products Technical Support with any questions regarding the fire suppression system. Service and maintenance of the fire suppression system must be performed by an ANSUL certified technician.
FINAL PREPERATIONS The popcorn machine was adjusted, inspected, and tested before it left the factory. After the machine has been installed, mount the kettle assembly in the hanger arms and plug in the kettle lead-in cord. Tighten the ring on the kettle lead-in plug.
Connect the clear oil line from the pump to the aluminum line from the popper with the supplied hose clamp. Connect the 6 pin connector from the popper to the receptacle on the oil pump. Both Bucket pump (2114E) and Bag-in-a-Box pump (2257) have the same receptacle. (See B.I.B manual)
The Bag-in-Box oil pumps are pre-calibrated before leaving the factory, however, should the oil setting need to be adjusted, see the manual for your specific model.
To check for proper amount of oil, and assure oil is liquid; dispense a shot into the measuring cup that is provided with the machine.
Pop-O-Gold
http://www.gmpopcorn.com Page 4
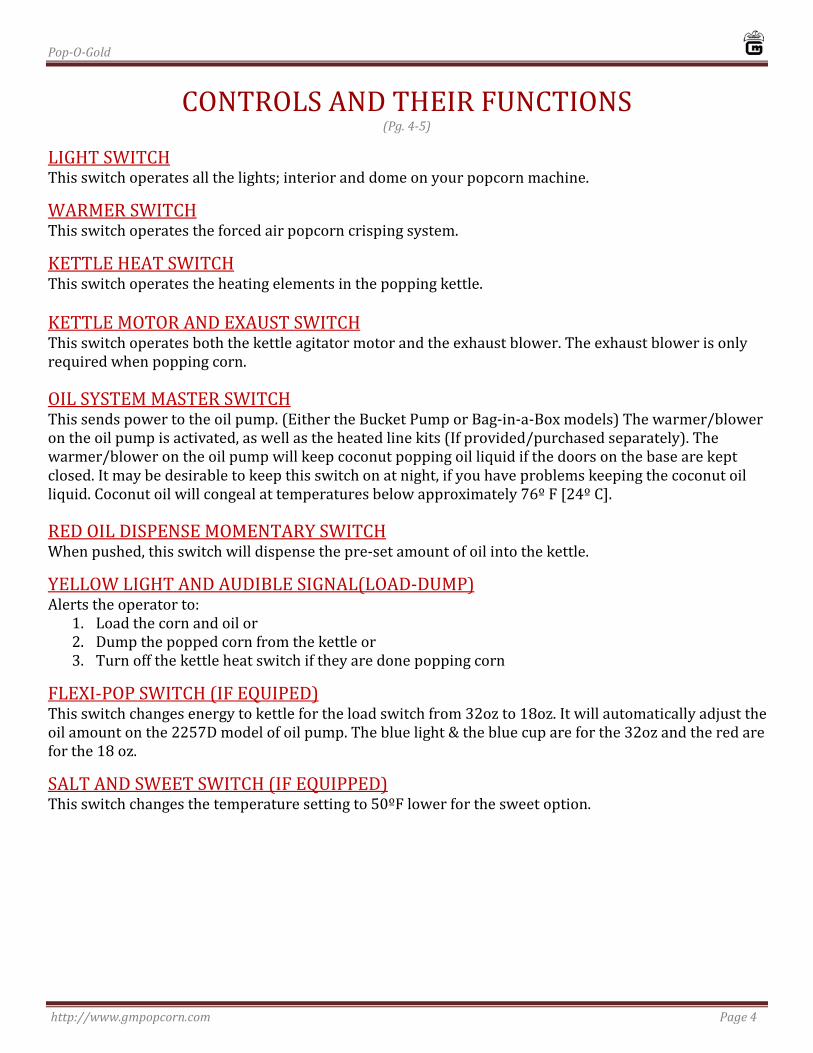
CONTROLS AND THEIR FUNCTIONS (Pg. 4-5)
LIGHT SWITCH This switch operates all the lights; interior and dome on your popcorn machine.
WARMER SWITCH This switch operates the forced air popcorn crisping system.
KETTLE HEAT SWITCH This switch operates the heating elements in the popping kettle. KETTLE MOTOR AND EXAUST SWITCH This switch operates both the kettle agitator motor and the exhaust blower. The exhaust blower is only required when popping corn.
OIL SYSTEM MASTER SWITCH This sends power to the oil pump. (Either the Bucket Pump or Bag-in-a-Box models) The warmer/blower on the oil pump is activated, as well as the heated line kits (If provided/purchased separately). The warmer/blower on the oil pump will keep coconut popping oil liquid if the doors on the base are kept closed. It may be desirable to keep this switch on at night, if you have problems keeping the coconut oil liquid. Coconut oil will congeal at temperatures below approximately 76º F [24º C].
RED OIL DISPENSE MOMENTARY SWITCH When pushed, this switch will dispense the pre-set amount of oil into the kettle.
YELLOW LIGHT AND AUDIBLE SIGNAL(LOAD-DUMP) Alerts the operator to:
1. Load the corn and oil or 2. Dump the popped corn from the kettle or 3. Turn off the kettle heat switch if they are done popping corn
FLEXI-POP SWITCH (IF EQUIPED) This switch changes energy to kettle for the load switch from 32oz to 18oz. It will automatically adjust the oil amount on the 2257D model of oil pump. The blue light & the blue cup are for the 32oz and the red are for the 18 oz.
SALT AND SWEET SWITCH (IF EQUIPPED) This switch changes the temperature setting to 50ºF lower for the sweet option.

Pop-O-Gold
http://www.gmpopcorn.com Page 5
ITEM PART NO. PART NAME
1 55440 Salt Sweet Switch
2 48786 Switch Cover - For Salt Sweet Switch only
3 41031 Oil Momentary
4 48660 Green Pilot Light
5 42798 Lighted Rocker Switch
6 55039 Load Dump Pilot Light - Amber
7 39410 3 Position Rocker Switch - Flexi-Pop Models Only
8 55050 Switch, Rocker SPDT - Salt Sweet Only
CONTROLS AND THEIR FUNCTIONS (Continued)

Pop-O-Gold
http://www.gmpopcorn.com Page 6
POPPING CORN INSTRUCTIONS
STANDARD POPPING INSTRUCTIONS 1. Turn on all Switches. 2. When popping with coconut oil, be sure the oil is liquid. Dispense oil into a measuring cup first
then use that oil for the first popping cycle. 3. When the kettle is ready (About 5-8 minutes), the light and audible signal will turn on. Lift the
kettle lid and pour in 32 oz. of corn (Use the supplied corn cup) and 8 teaspoons of Flavacol. Close lid.
4. Press the RED oil pump button. The proper amount of oil is pumped into the kettle. The light and signal will turn off.
5. When the popcorn has completed popping, the light and signal will turn on. Dump the popcorn. 6. On the final kettle of corn, turn the Kettle Heat switch off just as the lids are forced open by the
popping corn. This saves electricity and helps eliminate smoke and odor after you have stopped popping.
POPPING INSTRUCTIONS SWEET (IF EQUIPPED) 1. Use the switch to select sweet mode. 2. When the kettle is ready (About 5-8 minutes), the yellow light and audible signal will turn on. Lift
the kettle lid and pour in 32 oz of corn and close the lid. Wait approximately 30-45 seconds, and then add 16 oz. of glaze pop or sugar. When using sugar, we recommend the use of Compound S (Part No. 2320) to help keep the kettle clean.
3. Press the Red oil pump button. The proper amount of oil is pumped into the kettle. The light and signal will turn off.
4. When the popcorn has completed popping, the light and signal will turn on. Dump the popcorn. 5. On the final kettle of corn, turn the Kettle Heat switch off just as the lids are forced open by the
popping corn. This saves electricity, and helps eliminate smoke and odor after you have stopped popping.
NOTE: If your machine is equipped with Salt-Sweet and Flexi-Pop options, and you wish to pop sweet popcorn in flexi mode, follow the instructions for popping sweet corn and turn on the Flexi-Pop switch. The amounts of corn and oil will be roughly half of the standard amount in flexi mode. Pop a few test batches until you have achieved the best results, adjusting the amounts to until you reach your desired quality of popcorn.
POPPING INSTRUCTIONS FLEXI-POP (IF EQUIPPED) 1. Use load selector switch to select 32 oz or 16 oz of corn to pop. Proper amount of oil will be
dispensed based on selection. 2. Follow remaining steps from popping instructions above.
NOTE: If the Kettle Heat switch is turned on and the signal is sounding one of the following actions should be taken:
1. Load the corn and oil 2. Dump the popped corn from the kettle 3. Turn off the kettle heat switch if you are done popping corn
When you are finished popping, make sure KETTLE MOTOR and KETTLE HEAT switches are turned “OFF”. NEVER LEAVE THE HEAT ON WHEN YOU ARE NOT POPPING!

Pop-O-Gold
http://www.gmpopcorn.com Page 7
MAINTENANCE INSTRUCTIONS

Pop-O-Gold
http://www.gmpopcorn.com Page 8
CLEANING INSTRUCTIONS (Pg. 8-9)
DAILY KETTLE CLEANING
1. As you pop corn, wipe the kettle with a clean cloth. It is easy to keep the outside clean when the kettle is warm and the oil is not baked on. CAUTION: The hot kettle will cause burns if you touch it with your hand.
2. Every night, mix a gallon of Heat’n Kleen solution (Gold Medal® Part No. 2095) 2 tablespoons
per gallon of water. Add enough solution to fill the kettle ½” deep. Turn on the kettle heat. When the water starts to boil, turn off the heat and let it work overnight.
3. The next morning, dump the solution in a bucket and wipe the inside of the kettle with a cloth. 4. A Clean-In-Place hook is located behind the operator side kettle support arm. With the lids and
crossbar assembly removed, just tilt the kettle to the dump position, and swing the hook into position to hold the kettle in the dumped position. This feature will help you clean the kettle.
CLEAN THE POPCORN MACHINE
1. Wipe the stainless steel parts with a clean cloth and cleaner designed for stainless steel. DO NOT use oven cleaners, as they will damage parts of the machine.
2. Ammonia cleaners will damage the plastic doors. Use only non-ammonia cleaners, such as Gold Medal® Watchdog Glass Cleaner (Item No. 2588).
Clean-N-Place Hook

Pop-O-Gold
http://www.gmpopcorn.com Page 9
CLEANING INSTRUCTIONS (Continued)
WEEKLY FILTER CLEANING
1. Loosen the 2 screws on the filter cover plate on the ceiling inside the popper. Remove the cover, the bag and mesh filters. Clean the bag filter and the mesh filters in warm soapy water. Let dry overnight and reinstall. CAUTION: Keeping the filters clean is important to let the exhaust system do its’ job.
2. Check the condition of the clear oil lines and tighten or replace as required.
ITEM NO PART NO DESCRIPTION____________________________________________________ 1 41250 Metal mesh filter 2 41169 Oil Mist Bag Filter 3 82015 Filter Pack (Includes all three filters)
Metal Mesh Filter Part No. 41250 Quantity: 2
Oil Mist Bag Filter Part No. 41169 Quantity: 1

Pop-O-Gold
http://www.gmpopcorn.com Page 10
TROUBLESHOOTING
LONG POPPING CYCLES If your pop cycle is longer than 4 minutes, it can be the result of several things: HEATING ELEMENT - One of the heating elements in the kettle may be burned out. This would result in the kettle never reaching the proper operating temperature. LOW VOLTAGE - If the machine is operated on low voltage, this could cause the kettle not to reach the proper operating temperature. Voltage for each leg, with kettle turned on, must be at least 110v. INADEQUATE SUPPLY LINES - Inadequately sized electrical supply lines, in addition to being a fire hazard, would also prevent the kettle from reaching the proper operating temperature. Check with a qualified electrician. INFERIOR CORN - Inferior quality corn would result in longer popping cycles. Use only top quality hybrid popcorn from reputable suppliers. Even then, if you let your corn pick up moisture or dry out, your popping cycles will be slow.
KETTLE DOES NOT HEAT Before you go any further, make sure the kettle lead-in cord is plugged in and the Kettle shunt trip breaker is not tripped. The shunt trip beaker may trip during transit, if the breaker is reset then trips again; contact a service technician for inspection/repair before going any further. KETTLE HEAT SWITCH - Check the voltage to and from the Kettle Heat switch, and if the switch is defective replace it. CONTROL - A defective thermocouple lead will cause the kettle not to heat. Check for good connections from the kettle to the control. KETTLE AGITATOR - If the kettle agitator shaft is not rotating DO NOT Pop corn. Adjust the clearance between the kettle bottom and the stir blade to 1/32” (use a dime). Loosen the set screw in the collars above and below the crossbar and adjust the agitator shaft as necessary. Then re-tighten the set screws in the collars.
OIL PUMP DOES NOT DELIVER OIL TO KETTLE If the pump is operating but oil is not dispensed, the oil may be solid in the oil lines. If the pump is not operating, it may be necessary to replace it.
REPLACING BROKEN GLASS If you accidentally break a panel of glass, it can be replaced very easily without disassembling the popper. Gold Medal® Products does not ship glass. Obtain from local glass shop and always purchase double strength type glass.
1. Remove all loose pieces of glass. 2. Remove all rigid glass channels from around the glass to be replaced. Set it aside as it must be
reused. 3. Carefully remove the rest of broken glass. 4. Apply decals to the new glass panel. 5. Slide rigid glass channels over the exposed sides and bottom. Front and side glass slide under
top and is then lowered into bottom channel.

Pop-O-Gold
http://www.gmpopcorn.com Page 11
TEMPERATURE CONTROL
The Odyssey has an electronic kettle control with 2 thermocouples, one for control and one for limit. There are no mechanical thermostats in this kettle. There are (4) factory adjustments on the control:
• Control Temperature – DO NOT adjust this one • Signal To Dump – If you want the signal to dump to be a little sooner or later you can adjust the
potentiometer marked Kettle Dump. CW is sooner, CCW is later. • The patented overshoot circuit is tuned for the kettle, DO NOT adjust this potentiometer. • The audible signal to dump has three options; full volume, half volume and no sound (just the
yellow light). Adjustments are by jumper positions. This is set to full volume from the factory.
Temperature Control Part No. 41001
It will not matter which TC goes to A or B. It does matter that the yellow leads go to the positive terminals.
Remove this jumper for no sound
Remove this jumper for lower volume
Factory set DO NOT ADJUST
Factory Set DO NOT ADJUST
This is the Kettle Dump adjustment and is factory set to signal when the kettle is ready to dump. Turning CW will signal sooner, CCW will signal later. If you need to adjust, make very small adjustments.
Hot Lead is at L1, Neutral lead at L2.

Pop-O-Gold
http://www.gmpopcorn.com Page 12
ORDERING SPARE PARTS
1. Identify the worn or broken part by checking it with the illustrations and parts list. 2. When ordering parts, include part number, part name, and quantity required. 3. Include your model name and machine serial number (found on nameplate) with your order. 4. Address orders to:
Parts Department Gold Medal® Products Co. 10700 Medallion Drive Cincinnati, Ohio 45241-4807 Or place orders at: (800) 543-0862 (513) 769-7676 Fax: (513) 769-8500 E-mail: [email protected] www.gmpopcorn.com

Pop-O-Gold
http://www.gmpopcorn.com Page 13
ITEM PART NO. PART NAME
1 41020 Light Tube Holder
2 41506 Sign Glass With Graphics
3 41509 Light Ballast
4 41508 FS-25 Starter
5 41021 Light Tube Holder For Starter
6 47726 Molded Plug
DOME BREAKDOWN (Fluorescent Lighting)

Pop-O-Gold
http://www.gmpopcorn.com Page 14
ITEM PART NO. PART NAME
1 47726 Molded Plug
2 55231 12 Volt Power Supply
3 55233 Power Supply Bracket Assy
4 67418 Clear Sign Cover (included with 67524)
5 67524 LED Sign Assembly
6 67488 Sign Brackets (x2)
DOME BREAKDOWN (Neon Lighting)

Pop-O-Gold
http://www.gmpopcorn.com Page 15
ITEM PART NO. PART NAME
1 82473 Popcorn Sign w/Graphics
2 55350 24V/25W Power Supply
3 47726 Molded Plug
4 55379 LED Strip (x3)
DOME BREAKDOWN (LED Lighting)

Pop-O-Gold
http://www.gmpopcorn.com Page 16
ITEM PART NO. PART NAME
1 41285 Corn Pan
2 61126 Plexiglas Drop Panel
3 40276 Old Maid Pan
4 41499 Wire Harness for Oil Pump
5 41689 Corn Bin
6 37513 Swivel Caster (x2)
7 16050 Power Supply Cord
8 37514 NSF Swivel Caster w/Lock (x2)
9 61129 Plexiglas Doors (x2)
10 47055 Complete Door Hardware Kit
CABINET BREAKDOWN

Pop-O-Gold
http://www.gmpopcorn.com Page 17
ITEM PART NO. PART NAME
1 46512 LH Cabinet Drawer Slide
2 46511 RH Cabinet Drawer Slide
3 41661 Corn Bin Retainer
CABINET BREAKDOWN

Pop-O-Gold
http://www.gmpopcorn.com Page 18
ITEM PART NO. PART NAME
1 61139 Diffuser Cover
2 63634 Filter Retainer
3 63633 Filter (Pack of 5 Filters)
4 62158 Blower Cover
5 61128 800 Watt Tubular Element*
6 55500 Thermostat Mounting Bracket
7 55496 Thermostat
8 61123 Blower Motor, 115V 50/60
CABINET BREAKDOWN
* NOTE: This Element will be covered. For proper operation, you MUST remove the cover and clean underneath the element every 3 – 4 months. Be surethe machine is off and the power is disconnected before cleaning.

Pop-O-Gold
http://www.gmpopcorn.com Page 19
ITEM PART NO. PART NAME
1 47561 Magnetic Catch
2 49505 Hanger Arm Assy w/Clean-In-Place Latch
3 41742 Set Screw 10-32 x 3/16 (x2)
4 41380 Spur Gear
5 41432 Gear Block Assy
6 41941 Hanger Arm Assy
7 41979 75 Watt Halogen Lamp (x2)
8 41169 Oil Mist Filter *
9 41250 5-Layer Grease Filter (x2) *
10 55165 Kettle Receptacle Assy
11 41934 Filter Cover Assy
ITEM PART NO. PART NAME
12 12319 Knob
13 41448 Set Screw 10-32 x 1"
14 43426 Kettle Retainer
15 41618 Clean-In-Place Latch
16 41833 Shock Absorber Pin (Not Shown)
17 86009 Spring (Not Shown)
CABINET BREAKDOWN
*All three parts are available as a Filter Pack set (Part No. 82015)
Pop-O-Gold
http://www.gmpopcorn.com Page 20
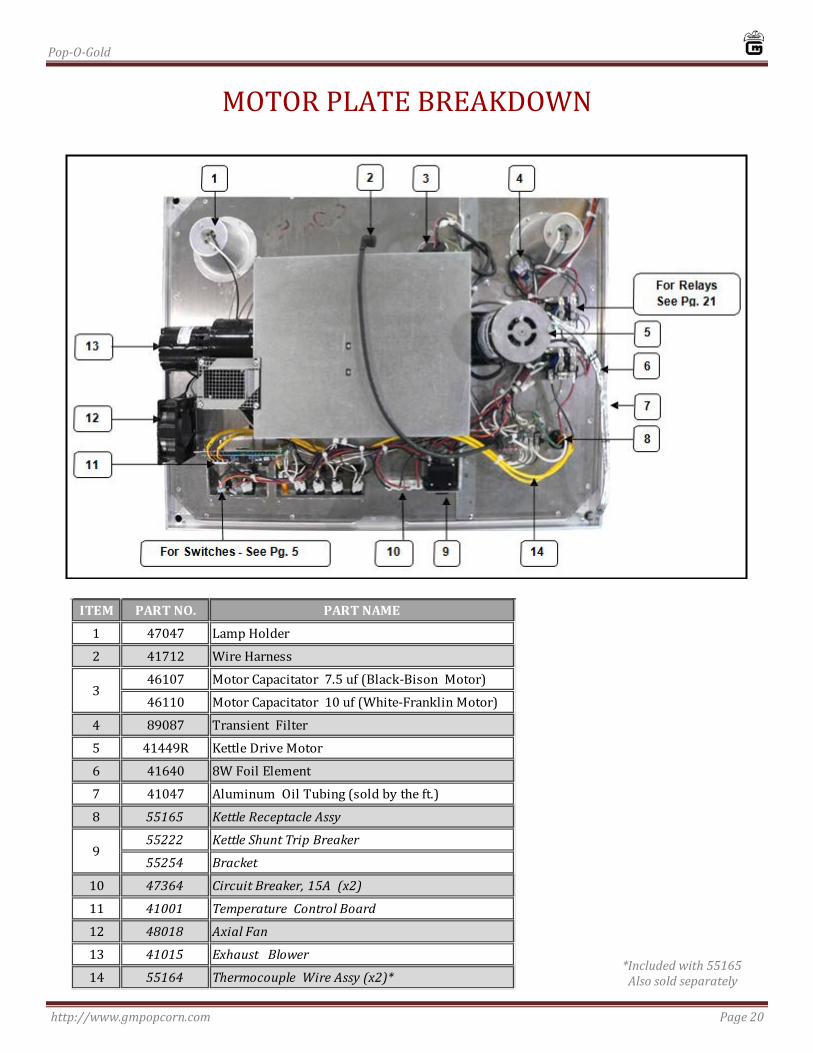
ITEM PART NO. PART NAME
1 47047 Lamp Holder
2 41712 Wire Harness
46107 Motor Capacitator 7.5 uf (Black-Bison Motor)
46110 Motor Capacitator 10 uf (White-Franklin Motor)
4 89087 Transient Filter
5 41449R Kettle Drive Motor
6 41640 8W Foil Element
7 41047 Aluminum Oil Tubing (sold by the ft.)
8 55165 Kettle Receptacle Assy
55222 Kettle Shunt Trip Breaker
55254 Bracket
10 47364 Circuit Breaker, 15A (x2)
11 41001 Temperature Control Board
12 48018 Axial Fan
13 41015 Exhaust Blower
14 55164 Thermocouple Wire Assy (x2)*
9
3
MOTOR PLATE BREAKDOWN
*Included with 55165 Also sold separately

Pop-O-Gold
http://www.gmpopcorn.com Page 21
ITEM PART NO. PART NAME
1 55157 Timer
2 89085 Relay Socket
3 79141 8 Pin Timer Socket
4 55036 Relay
RELAY BREAKDOWN
Ventilation Control Components – “V” Models Only

Pop-O-Gold
http://www.gmpopcorn.com Page 22
ITEM PART NO. PART NAME
1 41239 Oil Tube w/Funnel
2 41380 Spur Gear
3 41742 Set Screw (x2)
4 12611 Button Head Screw 5/16-18x½ LH
5 41730 Woodruff Key
6 67925 Magnet Holder Assy
7 67901 Top Hat Block (x2)
8 47976 Crossbar Fastener w/Shoulder
9 47977 Crossbar Fastener
10 67918 Fixed Rear Lid
11 68068 Front Lid Assy
12 47326 Set Collar (x2)
13 47751 Set Screw
14 41940 Agitator Assy
15 41772HT Crossbar Assy
16 48977 Crossbar Bushings (x2)
TOP HAT KETTLE BREAKDOWN
Pop-O-Gold
http://www.gmpopcorn.com Page 23
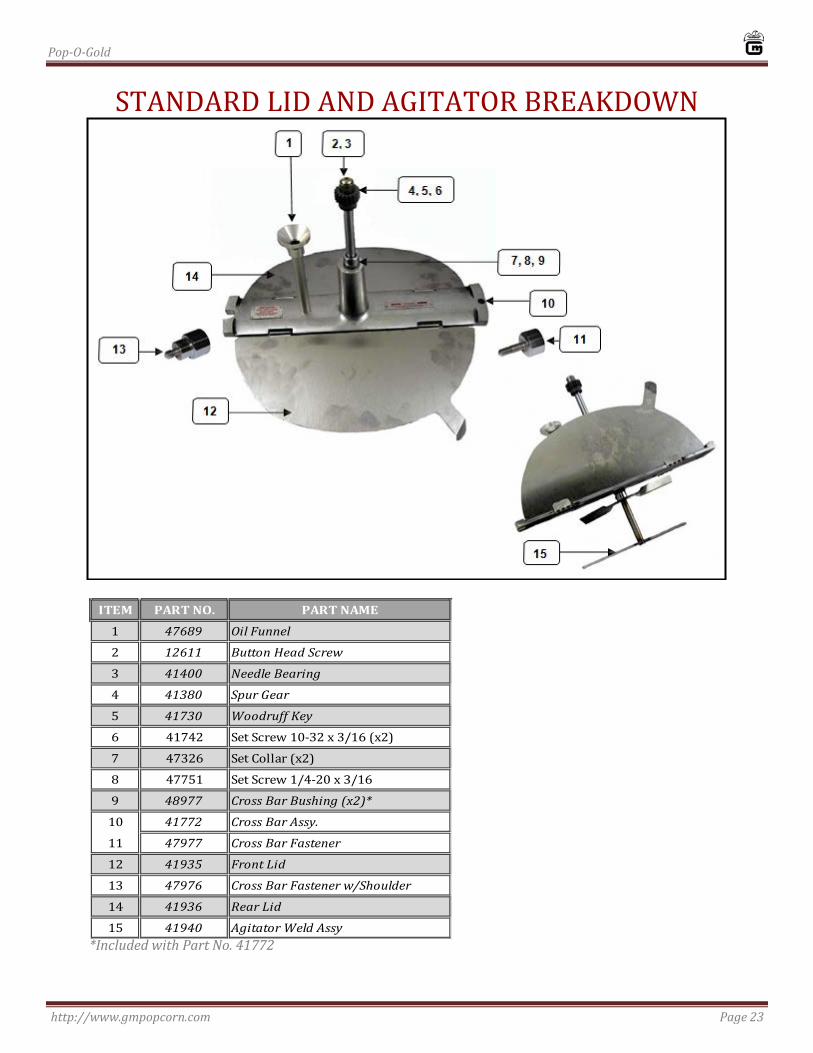
ITEM PART NO. PART NAME
1 47689 Oil Funnel
2 12611 Button Head Screw
3 41400 Needle Bearing
4 41380 Spur Gear
5 41730 Woodruff Key
6 41742 Set Screw 10-32 x 3/16 (x2)
7 47326 Set Collar (x2)
8 47751 Set Screw 1/4-20 x 3/16
9 48977 Cross Bar Bushing (x2)*
10 41772 Cross Bar Assy.
11 47977 Cross Bar Fastener
12 41935 Front Lid
13 47976 Cross Bar Fastener w/Shoulder
14 41936 Rear Lid
15 41940 Agitator Weld Assy
STANDARD LID AND AGITATOR BREAKDOWN
*Included with Part No. 41772

Pop-O-Gold
http://www.gmpopcorn.com Page 24
ITEM PART NO. PART NAME
1 55140 Kettle Lead In Assembly
2 69815 ½" Split Collar (x2)
3 41528 Kettle Shell - RH Dump - Single Kettle
4 41528L Kettle Shell - LH Dump - LH on Dual
5 40963 Junction Box Gasket w/Cutout
6 61084 Junction Box Assy
7 41129 Ceramic Terminal Block
8 40965 Junction Box Gasket w/o Cutout
9 41296 Junction Box Cover
10 41139 Plastic Dump Handle
KETTLE BREAKDOWN
1
3-4
6
5-8 9
7
10
2

Pop-O-Gold
http://www.gmpopcorn.com Page 25
ITEM PART NO. PART NAME
1 50190 Nut Retainer
2 41451 1/4 - 20 Hex Jam Nut
3 41491 Element Clamp
4 41534 Heat Transfer Plate
5 41597 Kettle Gasket
6 41536 120V - 1000W Heat Element
7 48651 120V - 1050W Heat Element
8 48650 120V - 1800W Heat Element
KETTLE BOTTOM BREAKDOWN
WIRING DIAGRAM
NOTE: A Wiring Diagram is supplied with each popper. Please reference the wiring diagram enclosed with the popper.

Pop-O-Gold
http://www.gmpopcorn.com Page 26
WARRANTY
WE WARRANT to the original purchaser the Gold Medal equipment sold by us to be free from defects in material or workmanship under normal use and service. Our obligation under this warranty shall be limited to the repair or replacement of any defective part for a period of six (6) months from the date of sale to the Original Purchaser with regard to labor and two (2) years with regard to parts and does not cover damage to the equipment caused by accident, alteration, improper use, voltage, abuse, or failure to follow instructions. THIS WARRANTY IS IN LIEU OF ALL OTHER WARRANTIES EXPRESSED OR IMPLIED, AND OF ALL OTHER OBLIGATIONS OR LIABILITIES ON OUR PART, INCLUDING THE IMPLIED WARRANTY OF MERCHANTIBILITY. THERE ARE NO WARRANTIES WHICH EXTEND BEYOND THE DESCRIPTION ON THE FACE HEREOF. We neither assume, nor authorize any other person to assume for us, any other obligation or liability in connection with the sale of said GOLD MEDAL equipment or any part thereof. The term “Original Purchaser” as used in this warranty shall be deemed to mean that person, firm, association, or corporation who was billed by the GOLD MEDAL PRODUCTS COMPANY, or their authorized distributor for the equipment. THIS WARRANTY HAS NO EFFECT AND IS VOID UNLESS THE ORIGINAL PURCHASER FIRST CALLS GOLD MEDAL PRODUCTS COMPANY AT 1-800- 543-0862 TO DISCUSS WITH OUR SERVICE REPRESENTATIVE THE EQUIPMENT PROBLEM, AND, IF NECESSARY, FOR INSTRUCTIONS CONCERNING THE REPAIR OR REPLACEMENT OF PARTS. NOTE: This equipment is manufactured and sold for commercial use only.
GOLD MEDAL PRODUCTS COMPANY 10700 Medallion Drive Cincinnati, Ohio 45241-4807 USA