model maker installation and user guide - inpm · model maker installation and user guide. ......
TRANSCRIPT

IBM Tivoli Netcool Performance ManagerModel Maker 1.2.0Document Revision R2E1
Model Maker Installation and UserGuide
���

NoteBefore using this information and the product it supports, read the information in “Notices” on page 119.
© Copyright IBM Corporation 2011, 2012.US Government Users Restricted Rights – Use, duplication or disclosure restricted by GSA ADP Schedule Contractwith IBM Corp.

Contents
About this information . . . . . . . . viiIntended audience . . . . . . . . . . . . vii
Chapter 1. Introduction . . . . . . . . 1About this information . . . . . . . . . . . 2Planning for your data requirements . . . . . . 3
Chapter 2. Software requirements andprerequisite software . . . . . . . . . 5Supported Tivoli Netcool Performance Managerconfigurations . . . . . . . . . . . . . . 5Prerequisites for installing the Common Pack Serviceon the server . . . . . . . . . . . . . . 5
Required user names . . . . . . . . . . 5Prerequisites for installing Model Maker tools on theWindow computer . . . . . . . . . . . . 6
Chapter 3. Installing and configuring theCommon Pack Service . . . . . . . . 9Configuring the prerequisite software on the server . 9
Configuring Tivoli Common Reporting for Oracleconnections . . . . . . . . . . . . . . 9Configuring the Tivoli Common Reporting datasource . . . . . . . . . . . . . . . 12Adding Oracle sessions settings . . . . . . 12Creating the required table spaces on the wirelinedatabase . . . . . . . . . . . . . . 13
Configuring the prerequisite software on theWindows computer. . . . . . . . . . . . 13
Configuring Framework Manager connections . . 14Verifying the Java version and PATH . . . . . 14
Preinstallation tasks . . . . . . . . . . . 14Transferring installation files by using the FTPprotocol . . . . . . . . . . . . . . 14Changing permissions on the executable file . . 15Creating the bicontrol user . . . . . . . . 15
Running the installer . . . . . . . . . . . 17Post-installation tasks . . . . . . . . . . . 21
Restarting the Tivoli Common Reporting server 22Assigning the SystemPackAdmin andCustomPackAdmin roles . . . . . . . . . 22Creating a logins file with the appropriatepasswords . . . . . . . . . . . . . . 22Setting the database connection profile . . . . 24
Verifying the Common Pack Service installation . . 24Troubleshooting the installation. . . . . . . . 24Uninstalling the Common Pack Service . . . . . 26
Running the uninstaller . . . . . . . . . 26Uninstalling Resource Metric Viewer UIcomponents . . . . . . . . . . . . . 28
Chapter 4. Installing and configuringModel Maker Manager . . . . . . . . 29Installing Model Maker Manager . . . . . . . 29
Configuring Model Maker Manager . . . . . . 29Opening Model Maker Manager . . . . . . 29Configuring the Common Pack Servicepreferences . . . . . . . . . . . . . 30Configuring the wireless database preferences . . 30Configuring the wireline database preferences . . 31Configuring automatic updates and notifications 32Configuring the software update site . . . . . 32Configuring the Cognos preferences . . . . . 33
Chapter 5. The Base Common PackSuite . . . . . . . . . . . . . . . 35
Chapter 6. Installing and configuringModel Maker Generator (Wireless only). 37Installing Model Maker Generator . . . . . . . 37Updating the global properties file . . . . . . 37
The global properties file . . . . . . . . . 38
Chapter 7. Installing and configuringModel Maker Extractor (Wireless only) . 41Installing Model Maker Extractor . . . . . . . 41Configuring Model Maker Extractor . . . . . . 41
Opening Model Maker Extractor . . . . . . 41Configuring the JDBC driver . . . . . . . 42
Chapter 8. Upgrading Model Maker . . 43
Chapter 9. Creating common packs(Wireless only) . . . . . . . . . . . 45Overview of creating common packs for Wirelesspack modelers . . . . . . . . . . . . . 45Model Maker Generator . . . . . . . . . . 46
Creating a model properties file . . . . . . 46Generating the common pack contents . . . . 47Creating a common pack . . . . . . . . . 49
Data model filtering . . . . . . . . . . . 49Creating a common pack containing a raw datamodel . . . . . . . . . . . . . . . . 50Creating a common pack containing a summarydefinitions model . . . . . . . . . . . . 51Creating a common pack containing a busy hourdefinitions model . . . . . . . . . . . . 52Creating a common pack containing a VendorSpecific resources model . . . . . . . . . . 54Filtering metrics from a model in an existing CIFfile . . . . . . . . . . . . . . . . . 54
Identifying metric groups for a filter file . . . . 55Filtering intervals from existing CIF files . . . . 57
Filtering an existing summary model . . . . . 57Filtering an existing busy hour model . . . . 58
© Copyright IBM Corp. 2011, 2012 iii

Chapter 10. Updating and extendingcommon packs (Wireless only) . . . . 59Updating common packs . . . . . . . . . . 59
Creating a new version of a common pack . . . 59Considerations when modifying models . . . . 60Decomposing composite common packs foraddition to the repository. . . . . . . . . 60
Combining multiple common packs . . . . . . 61Combining common pack models . . . . . . 61
Adding reports to a common pack . . . . . . 62
Chapter 11. Installing common packs 65Overview of installing common packs for packadministrators . . . . . . . . . . . . . 65Creating a logins file with the appropriatepasswords . . . . . . . . . . . . . . . 66Adding a common pack to the repository . . . . 67
Adding multiple common packs to the repository 68Adding common packs by using the CLI . . . 69
Activating common packs in the repository. . . . 69Activating common packs by using the CLI . . 70
Populating the calender schema table for TCR Time 70Wireless Component only: Populating the databaseschema tables. . . . . . . . . . . . . . 71Downloading common packs . . . . . . . . 72Publishing a common pack . . . . . . . . . 72Listing common packs in the repository . . . . . 73Uninstalling common packs . . . . . . . . . 73
Removing common packs from the repository . . 73Removing downloaded common packs from theWindows computer. . . . . . . . . . . 74
Chapter 12. Resource Metric Viewer(wireless only) . . . . . . . . . . . 75Resource Metric Viewer setup . . . . . . . . 75
Adding the calendar indexes . . . . . . . 76Create the rmv folder . . . . . . . . . . 76List packs . . . . . . . . . . . . . . 77Active Event List . . . . . . . . . . . 77Enabling the Resource Metric Viewer withexisting packs . . . . . . . . . . . . 78
Using the Resource Metric Viewer . . . . . . . 79Constructing a report by selecting a subset ofresources and metrics . . . . . . . . . . 79Constructing a report by selecting an event in theActive Event List . . . . . . . . . . . 82
Resource Metric Viewer administration . . . . . 83Modify the Resource Metric Viewer template . . 83
Chapter 13. Troubleshooting ModelMaker and Common Reporting . . . . 85Data modeling and Model Maker issues . . . . . 85
Always use the HTTP protocol for the updatesite . . . . . . . . . . . . . . . . 85Slow download of common packs . . . . . . 85CTGTRR1104E Cannot open an administrativedatabase connection . . . . . . . . . . 86Updating earlier pre-GA common packs . . . . 86Resolving Cognos connection errors . . . . . 87
Supporting help buttons in Model MakerExtractor . . . . . . . . . . . . . . 88HTML pack documentation slow to open inInternet Explorer . . . . . . . . . . . 88(Wireless) Combining models might hang on"Creating new Framework Manager project" . . 88(Wireless) Missing formulae in metrics groupsafter generating the CIF file . . . . . . . . 89(Wireless) Do not use special characters in themodel name when creating Summary and BusyHour models . . . . . . . . . . . . . 89(Wireline) Issue when extending a model byusing the pm.inventory.getResources DAL query . 89Label alarms that may not be handled properlyby the Resource Metric Viewer . . . . . . . 90
Reporting issues . . . . . . . . . . . . . 91Intermittent problems logging on to TivoliCommon Reporting . . . . . . . . . . 91Logging in when your session times out. . . . 91Problems running reports if you have logged into multiple sessions. . . . . . . . . . . 91Page number is not shown at the bottom of aHTML report . . . . . . . . . . . . . 92Problems with Report Studio in Internet Explorer8 . . . . . . . . . . . . . . . . . 92Customizing reports in Report Studio usingInternet Explorer . . . . . . . . . . . 92Cannot resize the Common Reporting window inInternet Explorer 8 . . . . . . . . . . . 93Infinitely expanding resources in the ReportStudio hierarchy . . . . . . . . . . . . 93CSV export is not supported for reportscontaining multiple tables . . . . . . . . 93The CSV file extension is .xls instead of .csv . . 93Common Reporting page resets when you selectanother task . . . . . . . . . . . . . 94Limitations on formatting charts in MicrosoftExcel . . . . . . . . . . . . . . . 94Unreadable text error message in Excel 2007 . . 94Delays when running scheduled reports . . . . 95Data from wireless and wireline databases inreports is not linked . . . . . . . . . . 95Null aggregation is not supported in CommonReporting . . . . . . . . . . . . . . 95PDS-PPE-0104 error message . . . . . . . 95(Wireless) Null aggregation is not supported inCommon Reporting - Wireless implications . . . 95(Wireless) KPIs that are stored in IP format in thedatabase are displayed incorrectly in reports . . 96(Wireline) PRS-CSE-1258 error message . . . . 96(Wireline) Report titles and labels are displayedin ASCII format . . . . . . . . . . . . 97(Wireline) Differentiating duplicate resourceswith the same resourceAlias. . . . . . . . 97(Wireline) Table cells with no data are blank . . 98(Wireline) Modifying timestamps in customcharts to round up to minutes instead ofmilliseconds . . . . . . . . . . . . . 98(Wireline) Raw data is not returned for a KPIwhen all resources for a non-leaf group areselected. . . . . . . . . . . . . . . 98
iv IBM Tivoli Netcool Performance Manager: Model Maker 1.2.0 Installation and User Guide

(Wireline) Bar graph in microchart does notfollow the sequence of KPIs in the summarytable, as per the graph in HTML or PDF format . 99(Wireline) Exporting a PDF returns an errorwhen the report has no data charts . . . . . 99
Appendix A. Configuringcommunications between theCommon Pack Service and theCommon Pack Service Client . . . . 101Configuring nonsecure communications . . . . 101Configuring secure communication with thetrusting option . . . . . . . . . . . . . 101Configuring secure communication with the strictoption . . . . . . . . . . . . . . . . 102
Exporting the Tivoli Common Reporting digitalcertificate . . . . . . . . . . . . . . 103Importing the digital certificate to the clientruntime truststore . . . . . . . . . . . 105
Appendix B. Command reference . . . 107The pack_admin command . . . . . . . . . 107
The password file . . . . . . . . . . . 107pack_admin -activate . . . . . . . . . . 108pack_admin -add . . . . . . . . . . . 109pack_admin -execute . . . . . . . . . . 110pack_admin -list . . . . . . . . . . . 111pack_admin -passwordfile . . . . . . . . 112pack_admin -remove . . . . . . . . . . 113pack_admin -reset . . . . . . . . . . . 114pack_admin -set . . . . . . . . . . . 115pack_admin -rmv . . . . . . . . . . . 116
The generator command . . . . . . . . . 117The model properties file . . . . . . . . 117
Notices . . . . . . . . . . . . . . 119Trademarks . . . . . . . . . . . . . . 121
Index . . . . . . . . . . . . . . . 123
Contents v

vi IBM Tivoli Netcool Performance Manager: Model Maker 1.2.0 Installation and User Guide

About this information
The IBM Tivoli Netcool Performance Manager: Model Maker Installation and User Guidedescribes how to install Model Maker on a Tivoli Netcool Performance Managersystem.
Intended audienceThis publication is intended for:v Users who want to install and administer common packs on a Tivoli Netcool
Performance Manager system. Common packs enable Common Reporting forTivoli Netcool Performance Manager .
v Modelers who want to create and publish data models for Common Reportingin Tivoli Netcool Performance Manager .
Readers must be familiar with the following topics:v Tivoli Netcool Performance Manager reporting concepts.v IBM Tivoli Common Reporting or IBM Cognos reporting.v IBM Cognos Framework Manager.
© Copyright IBM Corp. 2011, 2012 vii

viii IBM Tivoli Netcool Performance Manager: Model Maker 1.2.0 Installation and User Guide

Chapter 1. Introduction
Common packs extend technology pack data models and Summary and BusyHour data models to Tivoli Common Reporting on Tivoli Netcool PerformanceManager. After you install a technology pack, you install the correspondingcommon pack to enable Tivoli Common Reporting. Common packs can bedelivered in the COTS program with the corresponding technology packs, orcreated and customized by customers and business partners.
Model Maker consists of the following components:v Model Maker Manager.v Model Maker Extractor (supports wireless only in this release).v Model Maker Generator (supports wireless only in this release).v The Common Pack Service.v The Base Common Pack Suite. From September 2011, the Base Common Pack
Suite is available as a separate download from IBM Fix Centralhttp://www.ibm.com/support/fixcentral/.
v A set of Wireless CIF files.
Currently, Model Maker automates the creation of wireless data models, and theirinclusion in common packs. Wireline data models can be manually created, andthen packaged in common packs using Model Maker Manager.
The Common Pack ServiceA mandatory server-side component that is installed on the TivoliCommon Reporting server and provides a host service for managingcommon packs for Common Reporting functionality on the Tivoli NetcoolPerformance Manager system.
You can install and manage common packs by using the Model MakerManager GUI on a Windows computer, and the Common Pack Service CLIon the Tivoli Common Reporting Server.
You can download common packs from the Common Pack Service to aWindows computer for modification or for publishing to the TivoliCommon Reporting Content Store.
Model Maker Manager
A mandatory common pack administrator and modeler tool, Model MakerManager is an Eclipse-based Client GUI for the Common Pack Service. Youuse Model Maker Manager to perform the following tasks:v Install and manage wireless and wireline common packs on Tivoli
Netcool Performance Manager systems.v Create and publish wireless and wireline common pack report packages
to the Tivoli Common Reporting Content Store for report authoring.v Create common packs from the wireless common pack contents
generated by Model Maker Generator.v Combine common pack data models and extend common packs.
Model Maker Extractor (Wireless only in this release)A optional common pack modeler tool required if you need to create yourown Tivoli Netcool Performance Manager common packs. Common pack
© Copyright IBM Corp. 2011, 2012 1

modelers can use Model Maker Extractor to browse a technology pack andextract the technology pack definition metadata, or browse a live TivoliNetcool Performance Manager system and extract raw, summary or busyhour metadata. The metadata extracted is converted into a CommonIntermediate Format (CIF) file (.tnpmmodel) for later processing into a datamodel.
Model Maker Generator (Wireless only in this release)An optional common pack modeler tool required if you need to createyour own Tivoli Netcool Performance Manager common packs. Commonpack modelers use Model Maker Generator to build or update Cognosmodels for inclusion in common packs. Model Maker Generator processesthe Common Intermediate Format (CIF) file (.tnpmmodel) generated byModel Maker Extractor.
The Base Common Pack Suite
The Base Common Pack Suite is a set of Base Common Packs (BCPs). BaseCommon Packs (BCPs) are common packs that can be used as buildingblocks for other Tivoli Netcool Performance Manager common packs. BCPstypically contains items such as time dimensions, such as the TCR TimeBase Common Pack, or network resources related to specific technologies.v The TCR Time BCP is a dependent pack for all common packs, both for
the Tivoli Netcool Performance Manager Wireless and WirelineComponents.
v The Wireline Common BCP is a dependent pack for all wireline commonpacks.
v Typically, a number of Wireless BCPs are dependent packs for a wirelesscommon pack. Wireless BCPs support a number of Global Object Model(GOM) and GOMlet technology packs. Refer to individual wirelesscommon pack release notes to see the list of dependent packs for aparticular pack.
About this informationRead this summary information to help you find the information you need.v Chapter 1: Chapter 1, “Introduction,” on page 1
For all users, this chapter describes the Model Maker tooling and how to usethis information.
v Chapter 2: Chapter 2, “Software requirements and prerequisite software,” onpage 5For all users, this chapter describes the Model Maker software requirements andprerequisite software.
v Chapter 3: Chapter 3, “Installing and configuring the Common Pack Service,” onpage 9For all users, this chapter describes how to install and configure the CommonPack Service on the Tivoli Common Reporting server.
v Chapter 4: Chapter 4, “Installing and configuring Model Maker Manager,” onpage 29For all users, this chapter describes how to install and configure Model MakerManager on a Windows computer.
v Chapter 5: Chapter 6, “Installing and configuring Model Maker Generator(Wireless only),” on page 37
2 IBM Tivoli Netcool Performance Manager: Model Maker 1.2.0 Installation and User Guide

For wireless users only, this chapter describes how to install and configureModel Maker Generator on a Windows computer.
v Chapter 6: Chapter 7, “Installing and configuring Model Maker Extractor(Wireless only),” on page 41For wireless users only, this chapter describes how to install and configureModel Maker Extractor on a Windows computer.
v Chapter 7: Chapter 8, “Upgrading Model Maker,” on page 43For all users, this chapter describes upgrade consideration for Model Makercomponents.
v Chapter 8: Chapter 9, “Creating common packs (Wireless only),” on page 45For wireless users only, this chapter describes how to create a common packcontaining Cognos data models.
v Chapter 9: Chapter 10, “Updating and extending common packs (Wirelessonly),” on page 59For wireless users only, this chapter describes how to update and extendcommon packs.
v Chapter 10: Chapter 11, “Installing common packs,” on page 65For all users, this chapter describes how to install a common pack on a TivoliNetcool Performance Manager wireline or wireless system.
v Chapter 11: Appendix B, “Command reference,” on page 107For all users, this chapter provides a command reference for Model Makercommands.
v Chapter 12: Chapter 13, “Troubleshooting Model Maker and CommonReporting,” on page 85For all users, this chapter describes known issues you might encounter whenusing Model Maker Edition.
v Chapter 13: GlossaryFor all users, this chapter includes Model Maker terms and definitions.
Planning for your data requirementsBefore installing the Common Pack Service, you must decide if you need to accesswireless data, wireline data, or both wireless and wireline data.
The installation steps are different depending on which of the followinginstallation options you chose:
Wireless dataFor wireless data, you use the wireless database. You modify thetnsnames.ora file as directed when configuring Tivoli Common Reportingfor Oracle connections. Then you install the Common Pack Service on theTivoli Common Reporting server in your wireless installation. Point to thewireless database when prompted for a database during installation.
Wireline dataFor wireline data, you use the wireline database. You create the requiredtable spaces on the wireline database. Then you install the Common PackService on the Tivoli Common Reporting server (DataView server) in yourwireline installation. Point to the wireline database when prompted for adatabase during installation.
Wireless and wireline dataFor both wireless and wireline data, you use the wireless database. You
Chapter 1. Introduction 3

modify the tnsnames.ora file as directed when configuring Tivoli CommonReporting for Oracle connections. Then you install the Common PackService on the Tivoli Common Reporting server (DataView server) in yourwireline installation. Point to the wireless database when prompted for adatabase during installation.
4 IBM Tivoli Netcool Performance Manager: Model Maker 1.2.0 Installation and User Guide

Chapter 2. Software requirements and prerequisite software
Ensure that your system meets the minimum software requirements and that allprerequisite software is installed and configured before starting the installation.
Supported Tivoli Netcool Performance Manager configurationsEnsure that you have one of the following Tivoli Netcool Performance Managerconfigurations with the correct patch levels before starting the installation.
Table 1. Supported Tivoli Netcool Performance Manager environments
Tivoli Netcool Performance Managerversion Supported Tivoli Integrated Portal versions
1 1.3.2 - Wireless Component Tivoli Integrated Portal 2.2 or 2.1
2 1.3.2 - Wireline Component Tivoli Integrated Portal 2.2 or 2.1
3 1.3.2 - Wireline Component
and
1.3.2 - Wireless Component
Tivoli Integrated Portal 2.2 or 2.1
Prerequisites for installing the Common Pack Service on the serverEnsure that the system is ready and you have all the required information beforestarting the Common Pack Service installation on the Tivoli Common Reportingserver.
The Oracle client must be installed and running on the Tivoli Common Reportingserver where you want to install the Common Pack Service.
The Tivoli Common Reporting server must be running before you starting theinstallation.
Ensure that you have the following information before starting the installation:v The login details of the Tivoli Common Reporting installation user. You must
install the Common Pack Service as the same user that installed Tivoli CommonReporting, typically the root user.
v The connection details for the appropriate Tivoli Netcool Performance Managerdatabase.
Required user namesThe common pack service installation creates a number of required users with theappropriate needed permissions.
Database users
The common pack service installation creates a number of required database userswith the appropriate needed permissions.
The following database users are created during the installation:
© Copyright IBM Corp. 2011, 2012 5

v tcraccess
v bicontrol
v birefresh
Prerequisites for installing Model Maker tools on the Windowcomputer
Ensure that you fulfill these prerequisites before installing and configuring ModelMaker on a Microsoft Windows computer. The Common Pack Service must beinstalled and running on the Tivoli Common Reporting server before you start theinstallation.
Microsoft Windows computer hardware
A minimum of 4GB ram with a 2GHz processor.
Microsoft Windows operating system
Model Maker must be installed on a Microsoft Windows computer. ModelMaker Manager has been tested on Microsoft Windows XP Professional,x86-32, Win32.
IBM Cognos Framework Manager
You must have IBM Cognos Framework Manager installed and configuredto communicate with the Tivoli Common Reporting server. You can get theinstallation files from the following download images on PassportAdvantage:
Note: The previous version of Framework Manager (TCR13-win32-200911260632) provided with Tivoli Common Reporting 1.3 is notsupported. Ensure that you install the version of Framework Manager(TCR21-win32-201012061942) provided with Tivoli Common Reporting 2.1.To identify which version is installed, look in the Help > About IBMCognos 8 Framework Manager option in Framework Manager. Theunsupported version TCR13-win32-200911260632 shows version IBMCognos Framework Manager 8.4.27.78, while the supported versionTCR21-win32-201012061942 shows IBM Cognos Framework Manager 8.4.1.v IBM Tivoli Common Reporting V2.1 Windows Multilingual (CZQ7ZML). If
you have installed the Windows version of Tivoli Common ReportingVersion 2.1, the files are already available in the installation directories.
v Cognos Framework Manager for IBM Tivoli Common Reporting Version 2.1Window Multilingual (CZUR5ML).
To install Framework Manager, you must first install Framework Managerfrom the CognosModeling directory, and then install the security patch fromthe CognosModelingFix directory.
For more information, see the Tivoli Common Reporting documentation athttp://publib.boulder.ibm.com/infocenter/tivihelp/v3r1/topic/com.ibm.tivoli.tcr.doc_21/ttcr_installing_fm.html.
Oracle Client
Framework Manager requires an ODBC connection to import and use anOracle data source.
For Oracle ODBC the Oracle Client with the ODBC add-on is required.
6 IBM Tivoli Netcool Performance Manager: Model Maker 1.2.0 Installation and User Guide

Java Runtime EnvironmentThe correct JRE is bundled with each of the Model Maker Manager andModel Maker Generator components. For Model Maker Extractor, youmust ensure that Java 1.6 is installed on the PC.
Chapter 2. Software requirements and prerequisite software 7

8 IBM Tivoli Netcool Performance Manager: Model Maker 1.2.0 Installation and User Guide

Chapter 3. Installing and configuring the Common PackService
Complete the following tasks to install and configure the Common Pack Service.
Before you begin
Please note that if you have an existing version of Resource Metric Viewer on yoursystem, you must uninstall the Resource Metric Viewer UI component beforeinstalling a new version of the Common Pack Service. For more information onuninstalling the Resource Metric Viewer UI component, see “Uninstalling ResourceMetric Viewer UI components” on page 28.
Configuring the prerequisite software on the serverEnsure that all necessary configuration steps are completed for the prerequisitesoftware on the server.
Configuring Tivoli Common Reporting for Oracle connectionsYou must configure Tivoli Common Reporting for Oracle database connections byexporting the TNS_ADMIN environment variable. Depending on your configuration,you might also have to add tcraccess details to the tnsnames.ora file.
Before you begin
Check if the $ORACLE_HOME/network/admin/sqlnet.ora file on the Tivoli CommonReporting server contains the NAMES.DEFAULT_DOMAIN=WORLD entry. If so, in thefollowing procedure, you must append .WORLD to the tcraccess entry in thetnsnames.ora file, giving tcraccess.WORLD =.
About this task
The configuration steps are different depending on what data you need to access;wireless data, wireline data, or wireless and wireline data. For more information,see “Planning for your data requirements” on page 3.
Procedure1. Log on to the Tivoli Common Reporting server.2. Wireless data only: Complete this step if you need wireless data only and are
installing in a Tivoli Netcool Performance Manager Wireless Componentenvironment.Edit the tnsnames.ora file.a. Add the following lines to the file.
tcraccess =(DESCRIPTION =(ADDRESS_LIST =(ADDRESS = (PROTOCOL = TCP)(HOST = TNPM_WIRELESS_DATABASE_HOST)(PORT = 1521))
)(CONNECT_DATA =(SERVICE_NAME = vtdb)
))
© Copyright IBM Corp. 2011, 2012 9
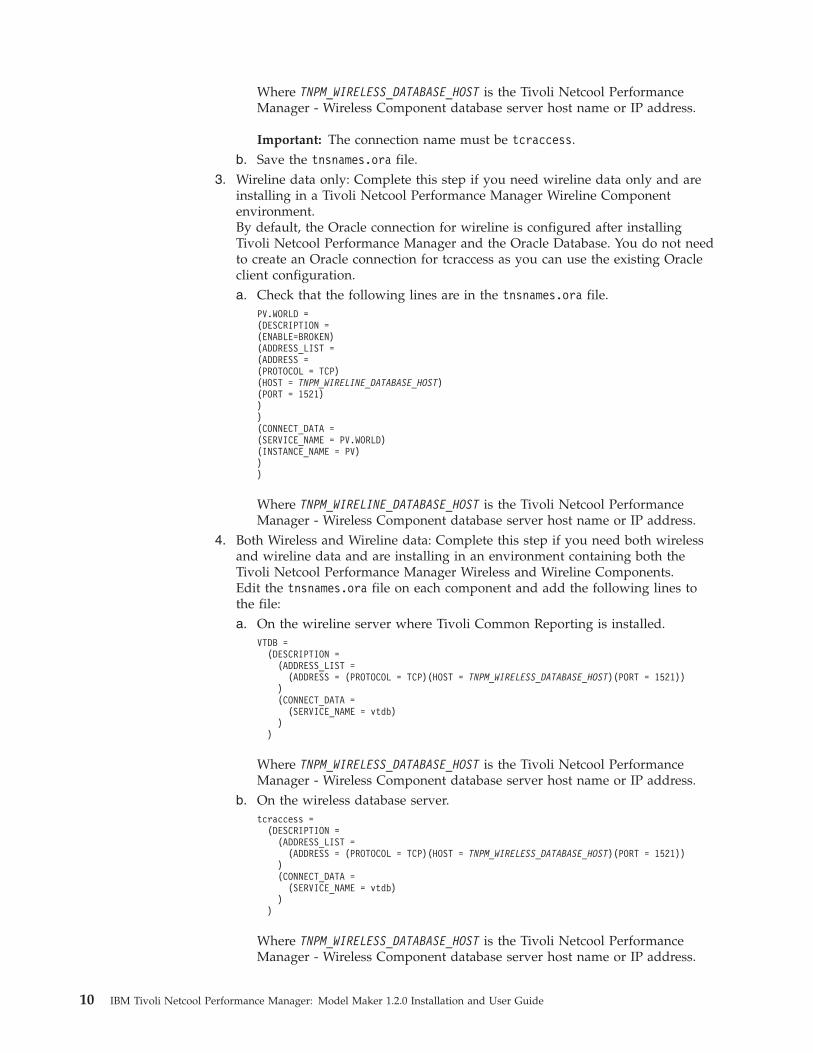
Where TNPM_WIRELESS_DATABASE_HOST is the Tivoli Netcool PerformanceManager - Wireless Component database server host name or IP address.
Important: The connection name must be tcraccess.b. Save the tnsnames.ora file.
3. Wireline data only: Complete this step if you need wireline data only and areinstalling in a Tivoli Netcool Performance Manager Wireline Componentenvironment.By default, the Oracle connection for wireline is configured after installingTivoli Netcool Performance Manager and the Oracle Database. You do not needto create an Oracle connection for tcraccess as you can use the existing Oracleclient configuration.a. Check that the following lines are in the tnsnames.ora file.
PV.WORLD =(DESCRIPTION =(ENABLE=BROKEN)(ADDRESS_LIST =(ADDRESS =(PROTOCOL = TCP)(HOST = TNPM_WIRELINE_DATABASE_HOST)(PORT = 1521)))(CONNECT_DATA =(SERVICE_NAME = PV.WORLD)(INSTANCE_NAME = PV)))
Where TNPM_WIRELINE_DATABASE_HOST is the Tivoli Netcool PerformanceManager - Wireless Component database server host name or IP address.
4. Both Wireless and Wireline data: Complete this step if you need both wirelessand wireline data and are installing in an environment containing both theTivoli Netcool Performance Manager Wireless and Wireline Components.Edit the tnsnames.ora file on each component and add the following lines tothe file:a. On the wireline server where Tivoli Common Reporting is installed.
VTDB =(DESCRIPTION =(ADDRESS_LIST =(ADDRESS = (PROTOCOL = TCP)(HOST = TNPM_WIRELESS_DATABASE_HOST)(PORT = 1521))
)(CONNECT_DATA =(SERVICE_NAME = vtdb)
))
Where TNPM_WIRELESS_DATABASE_HOST is the Tivoli Netcool PerformanceManager - Wireless Component database server host name or IP address.
b. On the wireless database server.tcraccess =(DESCRIPTION =(ADDRESS_LIST =(ADDRESS = (PROTOCOL = TCP)(HOST = TNPM_WIRELESS_DATABASE_HOST)(PORT = 1521))
)(CONNECT_DATA =(SERVICE_NAME = vtdb)
))
Where TNPM_WIRELESS_DATABASE_HOST is the Tivoli Netcool PerformanceManager - Wireless Component database server host name or IP address.
10 IBM Tivoli Netcool Performance Manager: Model Maker 1.2.0 Installation and User Guide

5. After updating the tnsnames.ora file, go to the $ORACLE_HOME/bin directory andrun the tnsping command to check for a successful database connection.According to your configuration, enter the appropriate command:v Wireless data only: # ./tnsping tcraccess
v Wireline data only: # ./tnsping pv.world
v Both Wireless and Wireline data: # ./tnsping vtdb# ./tnsping tcraccess
TNS Ping Utility for Linux: Version 10.2.0.4.0 - Production on 01-JUN-2011 14:26:50
Copyright (c) 1997, 2007, Oracle. All rights reserved.
Used parameter files:/appl/oracle/product/11.2.0/network/admin/sqlnet.ora
Used TNSNAMES adapter to resolve the aliasAttempting to contact (DESCRIPTION = (ADDRESS_LIST = (ADDRESS =(PROTOCOL = TCP)(HOST = 2.3.121.100)(PORT = 1521))) (CONNECT_DATA = (SERVICE_NAME = vtdb)))OK (0 msec)
An OK message at the end shows that the connection is working.6. Edit the startTCRserver.sh script. For example, by using the vi editor, enter:
$vi TIP_COMPONENTS_LOCATION/TCRComponent/bin/startTCRserver.sh
Where TIP_COMPONENTS_LOCATION is the location where the Tivoli IntegratedPortal Components were installed. By default, /opt/IBM/tivoli/tipv2Components for wireless and /opt/IBM/tivoli/tip21Components forwireline.
7. Add the following lines to the start of the script, depending on the serveroperating system.
Note: The LIBPATH and LD_LIBRARY_PATH values depend on your Oracleinstallation and the values shown reflect those of a default Oracle installation.
ORACLE_HOME=ORACLE_HOMEexport ORACLE_HOMETNS_ADMIN="$ORACLE_HOME/network/admin/tnsnames.ora"export TNS_ADMINLIBPATH=$ORACLE_HOME/lib32:$LIBPATHexport LIBPATH
ORACLE_HOME=ORACLE_HOMEexport ORACLE_HOMETNS_ADMIN="$ORACLE_HOME/network/admin/tnsnames.ora"export TNS_ADMINLD_LIBRARY_PATH=$ORACLE_HOME/lib32:$LD_LIBRARY_PATHexport LD_LIBRARY_PATH
ORACLE_HOME=ORACLE_HOMEexport ORACLE_HOMETNS_ADMIN="$ORACLE_HOME/network/admin/tnsnames.ora"export TNS_ADMINLD_LIBRARY_PATH=$ORACLE_HOME/lib32:$LD_LIBRARY_PATHexport LD_LIBRARY_PATH
Where ORACLE_HOME is the location where the Oracle client is installed.
Chapter 3. Installing and configuring the Common Pack Service 11

For example, the path is /appl/oracle/product/11.2.0/db_1 for Oracle 11g ifyou are installing on Tivoli Netcool Performance Manager Wireless 1.3.2For example, the path is /opt/oracle/product/11.2.0-client32/ for Oracle 11gif you are installing on Tivoli Netcool Performance Manager Wireline 1.3.2
Note: When installing on Tivoli Netcool Performance Manager Wireline 1.3.2the LD_LIBRARY_PATH= will refer to $ORACLE_HOME/lib and not$ORACLE_HOME/lib32 as it does for wireless.
8. Restart the Tivoli Common Reporting server:a. Stop the server by entering the following command on one line:
$TIP_COMPONENTS_LOCATION/TCRComponent/bin/stopTCRserver.sh tipadmin tipadmin_password
b. Start the server by entering the following command on one line:$TIP_COMPONENTS_LOCATION/TCRComponent/bin/startTCRserver.sh tipadmin tipadmin_password
Configuring the Tivoli Common Reporting data sourceYou must configure a Tivoli Common Reporting data source connection to connectto an Oracle database containing Tivoli Netcool Performance Manager data.
Procedure1. In Common Reporting, click Launch, and select Administration.2. On the Configuration tab, add a new data source by clicking the New Data
Source button.3. Follow the New Data Source wizard as required noting the following steps:
a. Enter tcraccess in the name field and click Next.b. In the Type list, select Oracle and click Next.c. In the SQL*Net connect string field, enter PV for wireline data only, enter
tcraccess for wireless data only, or enter tcraccess for wireless andwireline data.
d. In the Signon section, enter tcraccess/tcraccess for the User ID andpassword, and then click Finish.
e. Test the new data source.
Adding Oracle sessions settingsComplete the following steps in the appropriate Tivoli Integrated Portal instancefor your system.
About this task
For more information about open session command blocks, seehttp://publib.boulder.ibm.com/infocenter/c8bi/v8r4m0/index.jsp?topic=/com.ibm.swg.im.cognos.ug_cra.8.4.1.doc/ug_cra_i_CommandBlockExamples.html
Procedure1. Log in to Tivoli Integrated Portal as the Tivoli Integrated Portal administration
user, tipadmin.2. Expand Reporting and select the Common Reporting tab.3. Click Launch > Administration
4. Select the Configuration tab and then Data Source Connections.
12 IBM Tivoli Netcool Performance Manager: Model Maker 1.2.0 Installation and User Guide

5. Find tcraccess in the list and click it. It drills down to yet another tcraccess.Click the tcraccess again, which displays another tcraccess. Click the Setproperties tcraccess button on the top right.
6. In the Set properties page, click the Connection tab.7. Find and expand Open session commands in the list and click the Set
parameter button.8. Enter the following SQL:
<commandBlock><commands><sqlCommand><sql> ALTER SESSION SET "_optimizer_native_full_outer_join"=FORCE</sql></sqlCommand><sqlCommand><sql> alter session set star_transformation_enabled=TRUE</sql></sqlCommand></commands></commandBlock>
9. Click OK. In the connection tab, Click OK.
Creating the required table spaces on the wireline databaseIf you are using the wireline database, you must create the wm_flexpm and temptable spaces on the wireline database. This task is only required if you areplanning to use the wireline database when installing the Common Pack Service.
Procedure1. Log in to the server as the oracle user.2. Log on as the oracle user without connecting to the database by entering the
following command:sqlplus /nolog
3. Connect to the wireline database as the sysdba user by entering the followingcommand:sqlplus "/ as sysdba"
Where password is the appropriate password.4. Create the wm_flexpm table space by entering the following command on one
line:CREATE TABLESPACE wm_flexpm DATAFILE ’/raid_3/oradata/PV/wm_flexpm.dbf’SIZE 200M AUTOEXTEND ON MAXSIZE UNLIMITED;where /raid_3/oradata/ is a mount point for Oracle data.
5. Create the temp table space by entering the following command on one line:CREATE TEMPORARY TABLESPACE temp TEMPFILE ’/raid_3/oradata/PV/temp.dbf’SIZE 50M AUTOEXTEND ON MAXSIZE UNLIMITED;
Configuring the prerequisite software on the Windows computerWireless users who intend to create their own Cognos models and common packsmust ensure that all necessary configuration steps are completed on theprerequisite software. These steps do not apply to Wireless or Wirelineadministrators who only require Model Maker Manager to install and managepacks.
Chapter 3. Installing and configuring the Common Pack Service 13

Configuring Framework Manager connectionsYou must configure the required Framework Manager connections.
Configure Framework Manager connection
You configure Framework Manager to point to the server on which you publishyour content. If you want to publish content to another server, you must changethese settings to point to the new server.
For information about configuring Framework Manager connections, seehttp://publib.boulder.ibm.com/infocenter/tivihelp/v3r1/topic/com.ibm.tivoli.tcr.doc_21/ttcr_configure_frameworkmgr.html.
Configure Framework Manager Oracle connection
To configure the Framework Manager Oracle connection:v Add Oracle to your Windows path. For example, C:\oracle\product\11.2.0\
client_1\bin .v Wireless users must add tcraccess to the tnsnames.ora file. Edit the
tnsnames.ora file and add the following lines to the file:tcraccess =
(DESCRIPTION =(ADDRESS_LIST =
(ADDRESS = (PROTOCOL = TCP)(HOST = TNPM_VIRTUO_DATABASE_HOST)(PORT = 1521)))(CONNECT_DATA =
(SERVICE_NAME = vtdb))
)
Where TNPM_VIRTUO_DATABASE_HOST is the Tivoli Netcool Performance Manager -Wireless Component database server host name or IP address.
Verifying the Java version and PATHModel Maker Extractor requires that the correct version of Java is included in thePATH on your Windows PC.v Ensure that you have Java 1.6 or later.v Ensure that Java 1.6 is present on the path of your Windows computer.
Preinstallation tasksPerform the following preinstallation tasks before installing the software.
Transferring installation files by using the FTP protocolIf you are transferring the Common Pack Service installation files from the ModelMaker package to the Tivoli Common Reporting Server by using the FTP protocol,transfer the files in binary format to avoid errors during installation.
14 IBM Tivoli Netcool Performance Manager: Model Maker 1.2.0 Installation and User Guide

Changing permissions on the executable fileChange the permissions on the platform-specific executable file before running theinstaller.
Procedure1. Change to the directory containing the executable file.
2. Run the appropriate command for your operating system:chmod +x CommonPackServiceInstall-<version>_sol.sh
chmod +x CommonPackServiceInstall-<version>_aix.sh
chmod +x CommonPackServiceInstall-<version>_lin.sh
Creating the bicontrol userThe bicontrol user is a user that must be created in the target database. Thebicontrol user is responsible for creating users and for assigning access to thevarious common packs.
Before you begin
You must have database administrator privileges to perform this task.
About this task
If the bicontrol user does not exist, a database administrator must create thebicontrol user on the target database before installing the Common Pack Service.
The installer prompts for a JDBC connection string during installation; thebicontrol user is validated against this connection.
The installer prompts for a JDBC URL twice during the installation, you can pointto the same computer each time.
Procedure1. To check if the bicontrol user exists, run the following SQL as the database
administrator.
SELECT * FROM all_users WHERE username = ’BICONTROL’;
2. If the bicontrol user is not present, run the following SQL as the databaseadministrator.
Chapter 3. Installing and configuring the Common Pack Service 15

CREATE USER bicontrol IDENTIFIED BY bicontrol DEFAULT TABLESPACE wm_flexpmTEMPORARY TABLESPACE temp;
Grant Alter Session,Create User,Alter User,Drop User,Grant Any Role,Grant Any Privilege,Analyze Any,Create Any Table,Alter Any Table,Drop Any Table,Select Any Table,Insert Any Table,Update Any Table,Delete Any Table,Create Any Index,Create Any View,Drop Any View,Create Any Synonym,Drop Any Synonym,Create Trigger,Create Sequence,Create Public Synonym,Drop Public Synonym,Create Session,Create Procedure,Create Library,Create Synonym,Create Table,Create Role,Create Type,Create View,Alter Any Trigger,Create Any Trigger,Drop Any Trigger,Alter Any Index,Drop Any Index,Lock Any Table,Comment Any Table,Alter Any Role,Drop Any Role,Alter Any Type,Create Any Type,Drop Any Type,Execute Any Type,Alter Any Sequence,Create Any Sequence,Drop Any Sequence,Select Any Sequence,Unlimited Tablespace,Create Any Procedure,Drop Any Procedure,Execute Any Procedure,Alter Any Procedure,Grant Any Object Privilege,Resumable,Execute Any Program,Execute Any Class,Create Job,Create Any Job,Create External Job,Analyze Any Dictionary,Select Any Dictionary,Select Any Transaction
To bicontrol;
16 IBM Tivoli Netcool Performance Manager: Model Maker 1.2.0 Installation and User Guide

Running the installerExplains how to run the installer and select the appropriate installation options.
Before you begin
You must have decided what configuration you are going to install and completedthe required prerequisite tasks. For more information, see “Planning for your datarequirements” on page 3.
You cannot complete the installation without entering valid details at each of theprompts. Before beginning, read the procedure and ensure that you have all therequired details.
In particular, ensure that have the login details of the Tivoli Common Reportinginstallation user, typically the root user.
About this task
The administrative database acts as a repository for the common packs. The targetdatabase is where the common pack contents are installed. You can use the samedatabase for both.
Procedure1. Log in to the target server as the Tivoli Common Reporting installation user.2. Go to the directory containing the platform-specific installation file.3. Run the installer by entering the appropriate command for your operating
system:
v ./CommonPackServiceInstall-<version>_sol.sh
v ./CommonPackServiceInstall-<version>_aix.sh
v ./CommonPackServiceInstall-<version>_lin.sh
The installer starts and the license agreement is displayed.
Chapter 3. Installing and configuring the Common Pack Service 17

Preparing to install...Extracting the installation resources from the installer archive...Configuring the installer for this system’s environment...
Launching installer...
Warning: Cannot convert string"-monotype-arial-regular-r-normal--*-140-*-*-p-*-iso8859-1" to type FontStruct===============================================================================Common Pack Service (created with InstallAnywhere)-------------------------------------------------------------------------------Preparing CONSOLE Mode Installation...===============================================================================License Agreement-----------------Installation and Use of Common Pack Service Requires Acceptance of the FollowingLicense Agreement:International Program License AgreementPart 1 - General TermsBY DOWNLOADING, INSTALLING, COPYING, ACCESSING, OR USING THE PROGRAM YOU AGREETO THE TERMS OF THIS AGREEMENT. IF YOU ARE ACCEPTING THESE TERMS ON BEHALF OFANOTHER PERSON OR A COMPANY OR OTHER LEGAL ENTITY, YOU REPRESENT AND WARRANTTHAT YOU HAVE FULL AUTHORITY TO BIND THAT PERSON, COMPANY, OR LEGAL ENTITY TOTHESE TERMS. IF YOU DO NOT AGREE TO THESE TERMS,- DO NOT DOWNLOAD, INSTALL, COPY, ACCESS, OR USE THE PROGRAM; AND- PROMPTLY RETURN THE PROGRAM AND PROOF OF ENTITLEMENT TO THE PARTY FROM WHOMYOU ACQUIRED IT TO OBTAIN A REFUND OF THE AMOUNT YOU PAID. IF YOU DOWNLOADEDTHE PROGRAM, CONTACT THE PARTY FROM WHOM YOU ACQUIRED IT."IBM" is International Business Machines Corporation or one of itssubsidiaries."License Information" ("LI") is a document that provides information specificto a Program. The Program's LI is available at http://www.ibm.com/software/sla/. The LI may also be found in a file in the Program's directory, by the use ofa system command, or as a booklet which accompanies the Program.PRESS <ENTER< TO CONTINUE
4. Press Enter on each page of the agreement to continue and on the last page,enter Y to accept.
DO YOU ACCEPT THE TERMS OF THIS LICENSE AGREEMENT? (Y/N):
5. Enter the Tivoli Integrated Portal installation directory. By default,/opt/IBM/tivoli/tipv2 for wireless and /opt/IBM/tivoli/tip21 for wireline.
6. Enter a Tivoli Integrated Portal administrator user name. By default, tipadmin.7. Enter a Tivoli Integrated Portal administrator user password.
----TIP Information----TIP Installation Directory: /opt/IBM/tivoli/tipv2TIP Administrator User Name (DEFAULT: tipadmin):TIP Administrator Password:*********
8. Enter the directory where the Tivoli Integrated Portal components areinstalled. By default, /opt/IBM/tivoli/tipv2Components for wireless and/opt/IBM/tivoli/tip21Components for wireline.
TIP Components Installation Directory:
The Common Pack Service is installed at $TIP_COMPONENTS_LOCATION/TCRComponent/commonpackservice.
9. Enter the directory where the Oracle client is installed. For example,/appl/oracle/product/11.2.0/db_1.
18 IBM Tivoli Netcool Performance Manager: Model Maker 1.2.0 Installation and User Guide

----Database Connection----Database Client Directory: /opt/oracle/product/11.2.0/db_1
10. Enter the JDBC URL for the administrative database. Due to an Oraclelimitation, the host name cannot exceed 60 characters. If the host nameexceeds 60 characters, use the IP address instead.
----Database Connection----Database Client Directory: /opt/oracle/product/11.2.0/db_1Database JDBC URL ( jdbc:oracle:thin:@hostname:1521:vtdb ):
For Oracle, the URL format is: jdbc:oracle:thin:@hostname:port:sidFor example:
Wireless Componentjdbc:oracle:thin:@server.ibm.com:1521:vtdb
jdbc:oracle:thin:@127.0.0.1:1521:vtdb
Wireline Componentjdbc:oracle:thin:@server.ibm.com:1521:PV
jdbc:oracle:thin:@127.0.0.1:1521:PV
Wireline and Wireline Componentjdbc:oracle:thin:@server.ibm.com:1521:vtdb
jdbc:oracle:thin:@127.0.0.1:1521:vtdb
11. Enter the name of the administrative database user bicontrol.12. Enter the password of the administrative database user bicontrol.
For example, the password, bicontrol.
----Database Connection----Database Client Directory: /opt/oracle/product/11.2.0/db_1Administrative Database JDBC URL ( jdbc:oracle:thin:@hostname:1521:vtdb ):jdbc:oracle:thin:@[email protected]:1521:vtdbAdministrative Database BICONTROL User Name (DEFAULT: bicontrol): bicontrolAdministrative Database BICONTROL User Password:
The installer attempts to connect to the database by using the given URL, username, and password. You must enter valid details or the installation cannotcontinue.
13. Enter the JDBC URL for the target database. You must enter valid details orthe installation cannot continue. You can choose to specify the same URL asthe administrative database.
14. Enter the name of the administrative database objects table space. By default,wm_flexpm.
----Database Connection----Database Client Directory: /opt/oracle/product/11.2.0/db_1Administrative Database JDBC URL ( jdbc:oracle:thin:@hostname:1521:vtdb ):jdbc:oracle:thin:@server.ibm.com:1521:vtdbAdministrative Database BICONTROL User Name (DEFAULT: bicontrol): bicontrolAdministrative Database BICONTROL User Password:Target Database JDBC URL ( jdbc:oracle:thin:@hostname:1521:vtdb ):jdbc:oracle:thin:@server.ibm.com:1521:vtdbAdministrative Database Objects TableSpace Name (DEFAULT: wm_flexpm):
15. Enter "Y" to install the Resource Metric Viewer, otherwise enter "N". This canbe installed for the wireless component only.
Chapter 3. Installing and configuring the Common Pack Service 19

----Resource Metric Viewer Installation----Do you wish to install the Resource Metric Viewer (Wireless Component only)?
(Y/N): Y
On successful connection to the database, the Preinstallation Summary isdisplayed as follows assuming a wireless installation.
===============================================================================Preinstallation Summary-----------------------
Please Review the Following Before Continuing:
Product Name:Common Pack Service
Installation Folder/opt/IBM/tivoli/tipv2Components/TCRComponent
TIP Installation Directory/opt/IBM/tivoli/tipv2
TIP Version Installed2.1.0.0
TIP Administrator User Nametipadmin
Database Client Directory/opt/oracle/product/11.2.0/db_1
Administrative Database JDBC URLjdbc:oracle:thin:@[email protected]:1521:vtdb
Administrative Database BICONTROL User Namebicontrol
Administrative Database Objects TableSpace Namewm_flexpm
Target Database JDBC URLjdbc:oracle:thin:@[email protected]:1521:vtdb
Disk Space Information (for Installation Target):Required: 8,418,696 bytesAvailable: 6,824,201,216 bytes
16. Review the Preinstallation Summary and press Enter to continue. Once youhave started the installation, do not terminate the process.The installer verifies that the Tivoli Integrated Portal server is at version 2.1and that the server is running. The installation starts and the installationprogress bar is displayed.
===============================================================================Installing...-------------
[==================|==================|==================|==================][--Custom code execution Started...----------------|------------------|---Custom code execution Completed...---------------]
v The Installation Complete screen is displayed when the installation isfinished. The Common Pack Service is now installed.
20 IBM Tivoli Netcool Performance Manager: Model Maker 1.2.0 Installation and User Guide

===============================================================================Installation Complete---------------------
Congratulations. The Common Pack Service has been successfully installed in thefollowing location:
/opt/IBM/tivoli/tipv2Components/TCRComponent
PRESS <ENTER> TO EXIT THE INSTALLER:
v If there is a problem during installation, the changes made to the system areundone and you are prompted to exit the installer.
===============================================================================Installing...-------------
[==================|==================|==================|==================][--Custom code execution Started...
Fatal error occurred during installation, Rolling back the installation.....
...*****************************************************************************************************...******************************************************************************************************The installation of Common Pack Service has been rolled back.
Please see the installation log for details.
PRESS <ENTER> TO EXIT THE INSTALLER:
17. Press Enter to exit the installer.
What to do next
Perform the post-installation tasks to complete the installation.
If the installation was unsuccessful, see the Troubleshooting the installation topic.
Post-installation tasksComplete the following post-installation tasks in this sequence to complete theinstallation.
Procedure1. Restart the Tivoli Common Reporting server, see “Restarting the Tivoli
Common Reporting server” on page 22.2. Assign the SystemPackAdmin and CustomPackAdmin roles, see “Assigning the
SystemPackAdmin and CustomPackAdmin roles” on page 22.3. Setting the database connection profile, see “Setting the database connection
profile” on page 24.
Chapter 3. Installing and configuring the Common Pack Service 21

Restarting the Tivoli Common Reporting serverPerform this task on the server where Tivoli Common Reporting is installed.
Procedure
Restart the Tivoli Common Reporting server by entering the following commands:$TIP_COMPONENTS_LOCATION/TCRComponent/bin/stopTCRserver.sh tipadmin tipadmin_password$TIP_COMPONENTS_LOCATION/TCRComponent/bin/startTCRserver.sh tipadmin tipadmin_password
Where TIP_COMPONENTS_LOCATION is the location where the Tivoli IntegratedPortal Components are installed. By default, /opt/IBM/tivoli/tipv2Components forwireless and /opt/IBM/tivoli/tip21Components for wireline.
Assigning the SystemPackAdmin and CustomPackAdminroles
You must assign the SystemPackAdmin and CustomPackAdmin roles to the TivoliCommon Reporting administrative user, tipadmin.
Procedure1. Log in to the Tivoli Integrated Portal console as the Tivoli Integrated Portal
administration user tipadmin.2. Click Users and Groups > User Roles.3. On the User Roles page, click Search and locate the tipadmin user in the list of
users.4. Click tipadmin to see the roles currently assigned to the Tivoli Integrated
Portal administration user.5. To assign additional roles, select the check box next to the SystemPackAdmin
and CustomPackAdmin roles. You might need to scroll to see all of the roles.6. Click Save.
Creating a logins file with the appropriate passwordsYou must create a logins file containing certain passwords that are required by thepack_admin command and Model Maker Manager for authentication purposes. Foryour security, please change the default passwords provided during installation. Ifyou update any of the passwords, ensure that you update the credentials file, orthe tcraccess data source, as appropriate.
Before you begin
The following passwords are required:
tipadminThe default Tivoli Integrated Portal administrator user.
bicontrolA control user that you must create on the database before running theinstaller.
birefreshThe birefresh user is created by the Common Pack Service Installer andhas a default password of birefresh.
22 IBM Tivoli Netcool Performance Manager: Model Maker 1.2.0 Installation and User Guide

About this task
The pack_admin command automatically encrypts the passwords when creating thelogins file.
For instructions on changing Oracle user or schema passwords, seehttp://www.orafaq.com/wiki/Oracle_database_Security_FAQ#How_does_one_change_an_Oracle_user.27s_password.3F.
If you change the Oracle tcraccess user password, then you must also change theCognos tcraccess data source.
If you change the Oracle bicontrol or birefresh user passwords, or the TivoliIntegrated Portal tipadmin user password, you must recreate the logins file withthe new credentials. The old logins file is no longer valid.
Procedure1. On the Tivoli Common Reporting server, change to the
$TIP_COMPONENTS_LOCATION/TCRComponent/commonpackservice/bin directory.Where TIP_COMPONENTS_LOCATION is the location where the Tivoli IntegratedPortal Components were installed. By default, /opt/IBM/tivoli/tip21Components for wireline and /opt/IBM/tivoli/tipv2Components forwireless.
2. Enter the following command on one line and provide the passwords whenprompted:# ./pack_admin.sh -passwordfile ./logins.txt -tipuser tipadmin-dbusers tnpm:bicontrol tnpm:birefresh
BI Service Service is processing request.Please enter the password for user bicontrol:
bicontrol#]Please re-enter the password for user bicontrol:
bicontrolPlease re-enter the password for user bicontrol:
bicontrolPlease enter the password for user birefresh:
birefreshPlease re-enter the password for user birefresh:
birefreshPlease enter the password for user tipadmin:
tipadminPlease re-enter the password for user tipadmin:
tipadminThe following file was created: logins.txtCTGTRR205I The operation createLoginsFile successfully performed.
3. Optional: To see the contents of the logins.txt file, enter the followingcommand:# cat logins.txtTARGET tnpm bicontrol 6439448205275568047254553497058697800TARGET tnpm birefresh 22726015774105630813618842664095311722TIPUSER - tipadmin -89496516100624695361961177712212346580
The passwords have been encrypted for security.
Chapter 3. Installing and configuring the Common Pack Service 23

Setting the database connection profileYou must update the database connection profile to use the values that youspecified during installation. These values were stored in the profile.propertiesfile.
Procedure1. As the Tivoli Common Reporting installation user, typically the root user, log
in to the computer where Tivoli Integrated Portal is installed.2. Run the following command:
./pack_admin.sh -set -profile ../conf/profile.properties -logins ../conf/logins
3. Restart the Tivoli Common Reporting server. For more information, see“Restarting the Tivoli Common Reporting server” on page 22.
Verifying the Common Pack Service installationComplete the following steps to verify the Common Pack Service installation.
Procedure
Open your browser and enter the URL of the update site, http://<hostname>:<port>/ibm/commonservice/site. Use the host name and port that youuse to log on to the Tivoli Common Reporting console in your system. The portnumber can vary depending on your installation.For example, http://server.ibm.com:16310/ibm/commonservice/siteA page similar to the following page is displayed, depending on your browser.
Troubleshooting the installationTivoli Integrated Portal logs might help you identify the problem if the installationfails.
Before you begin
Known issues are documented in the Known issues with Model Maker IBM CognosEdition and Common Reporting on Tivoli Netcool Performance Manager 1.3.1 technote inthe Support knowledge base at https://www-304.ibm.com/support/docview.wss?uid=swg21498980.
This technote contains known issues with Model Maker and Common Reportingon Tivoli Netcool Performance Manager, including Model Maker installation anduser issues, and Common Reporting issues.
About this task
Check each of the following logs if you encounter a problem.
24 IBM Tivoli Netcool Performance Manager: Model Maker 1.2.0 Installation and User Guide

Procedure1. Check the last lines of the Tivoli Integrated Portal server output log file.
<tip_location>/profiles/TIPProfile/logs/server1/SystemOut.logWhere <tip_location> is the Tivoli Integrated Portal installation directory. Bydefault, /opt/IBM/tivoli/tipv2 for wireless and /opt/IBM/tivoli/tip21 forwireline.
2. Check the following file for errors that might be caused by the Common PackService WAR file deployment failing:<tip_location>/profiles/TIPProfile/logs/wsadmin.traceout.
3. Look for exceptions in the Tivoli Integrated Portal server exception log file.<tip_location>/profiles/TIPProfile/logs/ffdc/server1_exception.log
Example
In this extract from a server1_exception.log file, you can see that the installationfailed because the Tivoli Integrated Portal administrator password was incorrect.PasswordCheckFailedException com.ibm.ws.security.ltpa.LTPAServerObject.authenticate ...
Chapter 3. Installing and configuring the Common Pack Service 25

Uninstalling the Common Pack ServiceComplete the following tasks to uninstall the Common Pack Service.
Running the uninstallerRun the uninstaller to remove the Common Pack Service. Files that were createdafter the installation are not removed.
Procedure1. Log in to the target server as the root user.2. Go to the $TIP_COMPONENTS_LOCATION/TCRComponent directory.
Where:
TIP_COMPONENTS_LOCATIONIs the location where the Tivoli Integrated Portal components areinstalled. By default, /opt/IBM/tivoli/tipv2Components for wirelessand /opt/IBM/tivoli/tip21Components for wireline.
3. Change permissions on the uninstallation files by entering the command:chmod +x ./commonpackservice/uninstall/uninstall
4. Run the Uninstaller script by entering the command:./commonpackservice/uninstall/uninstall
The Uninstall Common Pack Service screen is displayed.
===============================================================================Common Pack Service (created with InstallAnywhere)-------------------------------------------------------------------------------
Preparing CONSOLE Mode Uninstallation...
===============================================================================Uninstall Common Pack Service-------------------------
Ready to uninstall...
Common Pack Service
The installation removes the features installed by InstallAnywhere only. Theinstallation does not remove any files or folders created after installation.
PRESS <ENTER> TO CONTINUE:
5. Press Enter to continue the uninstallation. The Uninstall Complete screen isdisplayed.
26 IBM Tivoli Netcool Performance Manager: Model Maker 1.2.0 Installation and User Guide

===============================================================================Uninstall Common Pack Service-------------------------
Ready to uninstall...
Common Pack Service
The installation removes the features installed by InstallAnywhere only. Theinstallation does not remove any files or folders created after installation.
PRESS <ENTER> TO CONTINUE:
===============================================================================Uninstalling...---------------
...*
drop user tcrtime--> completed..drop user cdmnet--> completeduninstall all database tablesuninstall all database tables --> completeduninstall commonserviceuninstall commonservice --> completed****************************************************************************************************...******************************************************************************************************
===============================================================================Uninstall Complete------------------
All items were successfully uninstalled.
SHUTDOWN REQUESTED(X) commiting registry(X) shutting down service manager(X) cleaning up temporary directoriescleanUp()calling cleanUpUNIX()
Results
The Common Pack Service is uninstalled. Files created by users or created by usingUNIX shell scripts are not removed.
What to do next
If you do not need any of the files in the repository, you can remove the$TIP_COMPONENTS_LOCATION/TCRComponent/commonpackservice folder.
Chapter 3. Installing and configuring the Common Pack Service 27

Uninstalling Resource Metric Viewer UI componentsHow to uninstalling Resource Metric Viewer UI components.
About this task
This task should only be completed if the Resource Metric Viewer is installed inthe current version of the Common Pack Service.
Procedure
Uninstall the Resource Metric Viewer UI component as follows:cd <TCRcomponent_dir>/commonpackservice/rmv/scripts./uninstall_rmv.sh <TIP install dir> <Tip user> <Tip password>
28 IBM Tivoli Netcool Performance Manager: Model Maker 1.2.0 Installation and User Guide

Chapter 4. Installing and configuring Model Maker Manager
Model Maker Manager is a mandatory tool for Tivoli Common Reportingenablement, as it is needed during the common pack installation process. TivoliNetcool Performance Manager administrators use Manager to manage commonpacks and publish common packs to the Content Store. Common pack modelersuse Manager to create common packs or to modify common pack contents.
Installing Model Maker ManagerModel Maker Manager is based on Eclipse and is installed by downloading andextracting the archived files to a location of your choice.
Procedure1. Download the Model Maker Manager compressed file Manager-
version_number-win32.win32.x86.zip.2. Extract the compressed file in a location of your choice. To avoid Java conflicts,
do not choose the same directory as the Model Maker Generator installation.
Note: Do not extract the compressed file into a folder path that containsspaces, for example, C:/Program Files/ModelMaker.
3. Assuming an extraction location of C:\Manager-version_number-win32.win32.x86, the Model Maker Manager executable file is now available atC:\Manager-version_number-win32.win32.x86\Manager\manager.exe.
Configuring Model Maker ManagerComplete the following tasks to configure Model Maker Manager.
Opening Model Maker ManagerYou open Model Maker Manager by running a Windows executable file.
About this task
This procedure assumes that the files are in the C:\Manager folder. Duringinstallation, you can extract Model Maker Manager files to a location of yourchoice.
Procedure1. Navigate to the C:\Manager folder.2. Double-click the manager.exe file. The Model Maker Manager opens showing
the Common Pack Models tab, where downloaded packs are displayed.
© Copyright IBM Corp. 2011, 2012 29

Configuring the Common Pack Service preferencesConfigure the Common Pack Service preferences by using the Common PackService preference page. You need to specify only the service host and the serviceport, the other fields can be left at their default values.
Procedure1. Select Window > Preferences.2. In the Preferences window, select Common Pack Services.
The Common Pack Service preferences window opens.3. Enter the host server and the port details and click Apply to accept the
remaining default values.4. Click OK. The Preferences window closes.
Configuring the wireless database preferencesConfigure the wireless database preferences to allow connections to the wirelessdatabase.
Procedure1. Select Window > Preferences.2. In the Preferences window, select Database and configure the JDBC driver
path.
Option Description
JDBC Driver Path The full path to the database driverimplementation used to connect to thedatabase instance. For example,C:\oracle\instantclient_11_2\ojdbc6.jar.
3. Click Apply.4. Expand Database and select Wireless Database.
The Wireless Database window opens.
30 IBM Tivoli Netcool Performance Manager: Model Maker 1.2.0 Installation and User Guide

5. Enter the required details and click Apply.
Option Description
Host The hostname or IP address of the computerwhere the database instance is running.
Port The port used to connect to the databaseinstance, typically 1521.
Database Name The name of the database instance, typicallyvtdb.
User A database user, typically the virtuo user.
6. Click OK. The Preferences window closes.
Configuring the wireline database preferencesConfigure the wireline database preferences to allow connections to the wirelinedatabase.
Procedure1. Select Window > Preferences.2. In the Preferences window, select Database and configure the JDBC driver
path.
Option Description
JDBC Driver Path The full path to the database driverimplementation used to connect to thedatabase instance. For example,C:\oracle\instantclient_11_2\ojdbc6.jar.
3. Click Apply.4. Expand Database and select Wireline Database.
The Wireline Database window opens.5. Enter the required details and click Apply.
Option Description
Host The hostname or IP address of the computerwhere the database instance is running.
Port The port used to connect to the databaseinstance, typically 1521.
Database Name The name of the database instance, typicallypv.
User A database user, typically the pv_admin user.
6. Click OK. The Preferences window closes.
Chapter 4. Installing and configuring Model Maker Manager 31

Configuring automatic updates and notificationsYou can configure Model Maker Manager for automatic updates and to be notifiedwhen updates are available.
Procedure1. Select Window > Preferences.2. In the Preferences window, expand Install/Update, and select Automatic
Updates.3. Select the check box next to the Automatically find new updates and notify
me option.4. Select the appropriate preferences and click Apply.5. Click OK. The Preferences window closes.
Configuring the software update siteYou must configure the location of the Common Pack Service update site to installupdates and to work with common packs in the repository.
About this task
The Common Pack Service update site is located on the Tivoli Common Reportingserver with the URL:http://<host>:<port>/ibm/commonservice/site
where:
<host> is the server where Tivoli Common Reporting is installed.
<port> is the HTTP port of the Tivoli Common Reporting installation.
Note: Because of known issues with the Eclipse Update Manager, do not use theHTTPS protocol.
Note: When you have multiple software sites in the list, a check box is supposedto enable you to perform actions, such as Remove, on multiple entries. However,this functionality is not currently supported.
Procedure1. Select Window > Preferences.2. In the Preferences window, expand Install/Update, and select Available
Software Sites.3. Click Add.4. On the Add Site window, enter a name and the URL of the site and click OK.
Ensure that you use the HTTP protocol (http://) rather than secure HTTP(https://) for the update site. The Eclipse Update Manager does not work wellwith the HTTPS protocol.
5. Click OK. The Preferences window closes.
32 IBM Tivoli Netcool Performance Manager: Model Maker 1.2.0 Installation and User Guide

Configuring the Cognos preferencesConfigure the Cognos preferences. You must configure the BMT Script Playerlocation before you can combine common pack models or publish common packs.
About this task
Note: The Cognos Dispatcher URI field is automatically populated from IBMCognos Configuration when you navigate to the executable file in theBmtScriptPlayer Executable Path field. However, to pick up subsequent changesto the Reporting Engine URL made in IBM Cognos Configuration, you must returnto this Cognos Preferences page and navigate to the executable file again.
Procedure1. Select Window > Preferences.2. Enter the following details and click Apply.
Option Description
BmtScriptPlayer Executable Path Browse to the location of theBmtScriptPlayer.exe file in your CognosFramework Manager installation. ForCognos 8.4.1, the default location isC:\Program Files\cognos\c8\bin\BmtScriptPlayer.exe.
Cognos Dispatcher URI A read-only value read from the DispatcherURI for external applications value in IBMCognos Configuration. This value shows theserver where Framework Manager publishescontent, for example, http://server:port/tarf/servlet/dispatch/ext. You cannotmodify this value here. If you want topublish content to a different server, youmust configure Framework Manager topoint to the new server using IBM CognosConfiguration.
Username Tivoli Common Reporting user name, forexample tipadmin.
Password Tivoli Common Reporting user password.
Namespace The namespace is defined in the Securitysection of IBM Cognos Configuration, bydefault VMMProvider.
3. Click OK. The Preferences window closes.
Chapter 4. Installing and configuring Model Maker Manager 33

34 IBM Tivoli Netcool Performance Manager: Model Maker 1.2.0 Installation and User Guide

Chapter 5. The Base Common Pack Suite
The Base Common Pack Suite is a set of generic Base Common Packs (BCPs), someof which are mandatory requirements for working with common packs. Allcommon packs have a dependency on at least one BCP, the TCR Time BCP. ForWireless users, BCPs provide the cross-vendor technology support provided byGOMs and GOMlets for technology packs.
The Base Common Pack Suite is updated periodically with the latest versions ofthe BCPs. Before you install or create common packs, you must download thelatest version of the Base Common Pack Suite, and install the BCPs you require.
The Base Common Pack Suite consists of an archive file containing a set ofcommon pack JAR files, which you must download and extract before installing.v The TCR Time BCP is a mandatory dependent pack for all wireless and wireline
common packs, and provides a common time dimension for reporting. It mustbe installed before you can work with any common packs.
v The Wireline Common BCP is a mandatory dependent pack for all wirelinecommon packs. It must be installed before you can work with wireline commonpacks.
v Typically, a number of Wireless BCPs are dependent packs for a wirelesscommon pack. Wireless BCPs support a number of Global Object Model (GOM)and GOMlet technology packs. Refer to individual wireless common packrelease notes to see the list of dependent packs for a particular pack.
For current version information about the Base Common Pack Suite, see the Knownissues with Tivoli Netcool Performance Manager 1.3.2 technote in the Supportknowledge base.
For instructions on installing Base Common Packs, see Chapter 11, “Installingcommon packs,” on page 65.
© Copyright IBM Corp. 2011, 2012 35

36 IBM Tivoli Netcool Performance Manager: Model Maker 1.2.0 Installation and User Guide

Chapter 6. Installing and configuring Model Maker Generator(Wireless only)
Generator is an optional tool that common pack modelers use to build or updateCognos models for inclusion in common packs. Generator processes the CommonIntermediate Format (CIF) file (.tnpmmodel) generated by Model Maker Extractor.
Installing Model Maker GeneratorModel Maker Generator is installed by extracting the Generator archive file andthe Common Intermediate Format (CIF) archive file (.tnpmmodel) to a location ofyour choice on your computer.
Procedure1. Download the Generator archive file Generator_version.zip.2. Extract the Generator_version.zip file to a location of your choice. For
example, C:\Generator_version. To avoid Java conflicts, do not choose thesame directory as the Model Maker Manager installation.
3. Download the CIF files archive file, cifs_version.zip.4. Extract the cifs_version.zip file to a location of your choice. For example,
C:\cifs_version. The DEPENDENT_CIF_DIRECTORY property must be set to thisvalue during configuration.
Results
The Model Maker Generator command is now available at C:\Generatorversion\Generator\bin\generator.bat.
Updating the global properties fileBefore using Generator, you must update the global.properties file with thecorrect property values for your installation.
Procedure1. Open the global.properties file contained in the C:\Generator_version\
Generator\conf\properties directory and change the following properties tosuit your installation:v COGNOS_DIR Set to the directory that contains your Framework Manager
installation. When run, the application appends \bin\BmtScriptPlayer.exe tothis directory and verifies that the BmtScriptPlayer.exe file exists.
v MANAGER_INSTALL_DIR Set to the Model Maker Manager installation directory.When you download Base Common Packs from the Common Pack Service toManager, they are placed here. If you declare a pack dependency in themodel.properties file, you must use Manager to download the pack to thislocation or an error results.
v DEPENDENT_CIF_DIRECTORY Set to the directory that contains the Base CommonPack CIF (.tnpmmodel) files. On installation, you must manually copy thesefiles into the directory.
© Copyright IBM Corp. 2011, 2012 37

v OUTPUT_DIR Set to the directory where you want the project to be created.Ensure that the directory that you select does not contain special characters,such as spaces. For example, do not use a path like C:\\Documents andSettings.
Note: Use the shortest path you can for the output directory. There is a limitof 142 characters for the total length of OUTPUT_DIR and PACK_SYMBOLIC_NAME.Exceeding this limit causes generation to fail.
Backslash characters (\) must be escaped with another backslash character.Note the double backslash (\) characters in these examples.
#Location of the Cognos directory, the application tests this value by appending#\bin\BmtScriptPlayer.exe to the path below and ensuring the executable existsCOGNOS_DIR=C:\\Program Files\\cognos\\c8#File location for the BCP mapping file belowMANAGER_INSTALL_DIR=C:\\ManagerDEPENDENT_CIF_DIRECTORY=C:\\CIFsOUTPUT_DIR=C:\\Out
2. Review the settings for each of the other properties.3. Save the global.properties file and exit.
The global properties fileThe global.properties file contains all the main properties. After installation, youmust configure certain properties specifically for your environment. Backslashcharacters (\) must be escaped with another backslash character.
The following properties are contained in the global.properties file.
Property Description Example
PACK_VENDOR The common pack vendor.Modify as appropriate.
IBM
PACK_TYPE The type of pack beinggenerated, do not modify.
product
PUBLISH_METHOD Details how this model isupgraded. This value is typicallystateless for generated models,do not modify.
stateless
DISPOSITION The type of model beinggenerated, do not modify.
component
CONNECTION_PROFILE Internal tag that identifies thedatabase connection to whichpacks are deployed, do notmodify.
Consolidation
DATASOURCE_CM_DATASOURCE The name of the associated datasource defined in Cognos,typically tcraccess, do notmodify.
tcraccess
PRODUCT_NAME The long name of the product,do not modify.
Tivoli Netcool Performance Manager (TNPM)
PRODUCT_SHORT_NAME The short name of the product,do not modify.
TNPM
TECHPACK_TECHNOLOGIES Comma separated list of thevarious technology packtechnology types, do not modify.
TECHPACK_TECHNOLOGIES=GSM,GPRS,UMTS,LTE,CDMA
38 IBM Tivoli Netcool Performance Manager: Model Maker 1.2.0 Installation and User Guide

COGNOS_DIR Set to the path to whereFramework Manager is installed.The installation appends\bin\BmtSciptPlayer.exe to thispath.
C:\\Program Files\\cognos\\fm
MANAGER_INSTALL_DIR Set to the Model Maker Managerinstallation directory. When youdownload Base Common Packsfrom the Common Pack Serviceto Manager, they are placed here.If you declare a packdependency in themodel.properties file, you mustuse Manager to download thepack to this location or an errorresults.
C:\\Manager
DEPENDENT_CIF_DIRECTORY Set to the location of a directorywhere any required CommonIntermediate Format (CIF) files(.tnpmmodel) are placed beforerunning Generator. Duringmodel generation, Generatorneeds to be able to determine thevarious configuration items on aresource/entity. For example, formodeling cell traffic, Generatormust be able to locate thedefinition of the Cell entity, andfind the table name (NC_CELL)and primary key (cell_id), and soon. This information can comeonly from the CIF file generatedfrom the GOM files.
DEPENDENT_CIF_DIRECTORY=c:\\CIFs
ID_COLUMN_LENGTH The maximum length of the IDcolumns in the system, bydefault 70. If the ID columns onthe target system exceed thislength, increase this valueaccordingly.
70
OUTPUT_DIR Set to the directory where youwant the project to be created.Ensure that the directory thatyou select does not containspecial characters, such asspaces. For example, do not usea path like C:\\Documents andSettings.Note: Use the shortest path youcan for the output directory.There is a limit of 142 charactersfor the total length of OUTPUT_DIRand PACK_SYMBOLIC_NAME.Exceeding this limit causesgeneration to fail.
C:\\Out
Chapter 6. Installing and configuring Model Maker Generator (Wireless only) 39
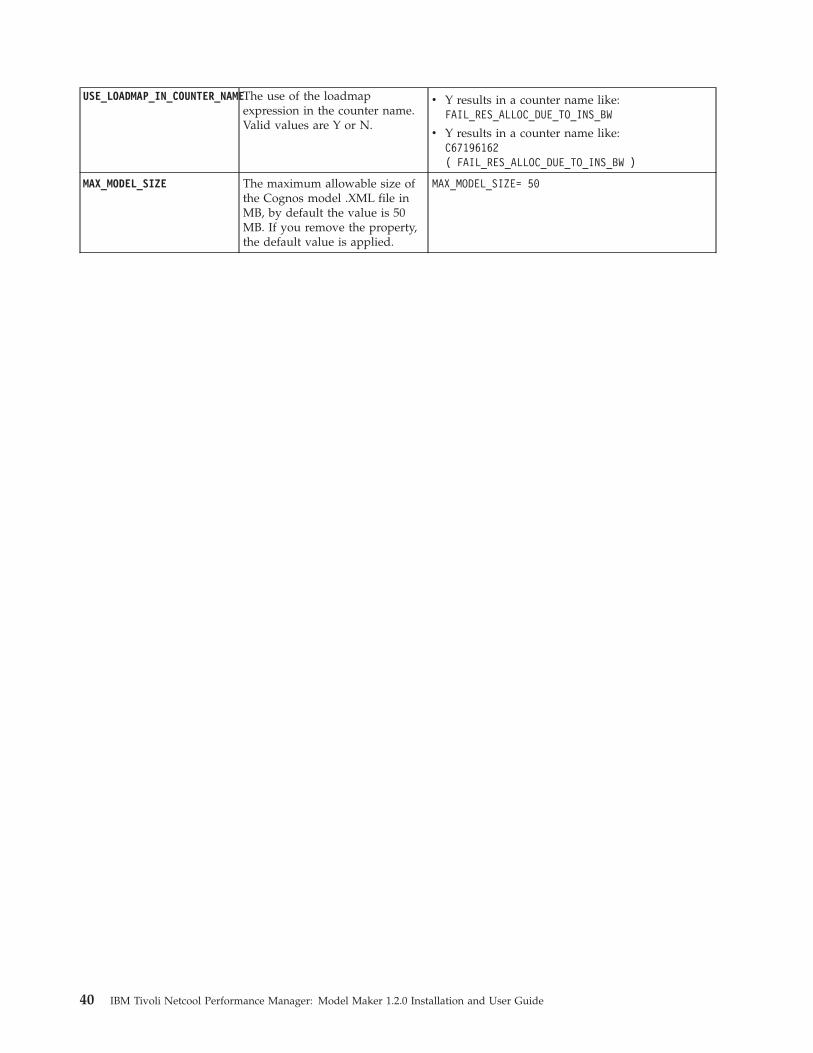
USE_LOADMAP_IN_COUNTER_NAMEThe use of the loadmapexpression in the counter name.Valid values are Y or N.
v Y results in a counter name like:FAIL_RES_ALLOC_DUE_TO_INS_BW
v Y results in a counter name like:C67196162( FAIL_RES_ALLOC_DUE_TO_INS_BW )
MAX_MODEL_SIZE The maximum allowable size ofthe Cognos model .XML file inMB, by default the value is 50MB. If you remove the property,the default value is applied.
MAX_MODEL_SIZE= 50
40 IBM Tivoli Netcool Performance Manager: Model Maker 1.2.0 Installation and User Guide

Chapter 7. Installing and configuring Model Maker Extractor(Wireless only)
Extractor is an optional tool that common pack modelers can use to browse atechnology pack and extract the technology pack definition metadata, or browse alive Tivoli Netcool Performance Manager system and extract the summary or busyhour metadata. The metadata extracted is converted into a Common IntermediateFormat (CIF) file (.tnpmmodel) for later processing into a data model.
Installing Model Maker ExtractorModel Maker Extractor is installed by extracting an archive file to a location ofyour choice.
Procedure1. Download the Model Maker Extractor archive file Extractor_version-
win32.win32.x86.zip.2. Extract the Extractor_version-win32.win32.x86.zip file to a location of your
choice. For example, C:\Extractor_version-win32.win32.x86.
Results
The Model Maker Extractor executable file is now available atExtractor_version-win32.win32.x86\Extractor_version\launcher.exe.
Configuring Model Maker ExtractorComplete the following tasks to configure Model Maker Extractor.
Opening Model Maker ExtractorYou open Model Maker Extractor by running a Windows executable file.
Before you begin
This procedure assumes that the Model Maker Extractor files are in theExtractor_version-win32.win32.x86.zip\Extractor_version folder. Duringinstallation, you can extract Model Maker Extractor files to a location of yourchoice.
Procedure1. Go to the folder where Model Maker Extractor executable file is located, for
example Extractor_version-win32.win32.x86.zip\Extractor_version\launcher.exe.
2. Double-click launcher.exe. Model Maker Extractor opens showing the Resourceperspective.
3. In the Workspace Launcher window, accept the default locationC:\Extractor_version-win32.win32.x86.zip\Extractor_version\workspace, orbrowse to a location of your choice for the workspace where your ModelMaker Extractor projects and files are stored. You can modify this location laterif required.
© Copyright IBM Corp. 2011, 2012 41

Configuring the JDBC driverYou must configure the JDBC driver before you can connect to a database.
Procedure1. Select Window > Preferences.2. In the Preferences window, select TNPM Preferences > Database
Configuration.3. Browse to the location of the JDBC driver library file. For example,
C:\oracle\client\instant\ojdbc6.jar for Oracle 11g.4. Click OK.
42 IBM Tivoli Netcool Performance Manager: Model Maker 1.2.0 Installation and User Guide

Chapter 8. Upgrading Model Maker
Model Maker is upgraded by installing the newer versions of each of the ModelMaker components that you are using.
To upgrade Model Maker components, install the newer versions and configurethem by following the instructions in the IBM Tivoli Netcool Performance Manager:Model Maker Installation and User Guide.
Model Maker Manager
For Model Maker Manager, you must also download each of your activated packsto the new Model Maker Manager installation.
Populating wireless data after upgrade
To populate the wireless data, wireless users must run the commands specified in“Wireless Component only: Populating the database schema tables” on page 71before proceeding.
© Copyright IBM Corp. 2011, 2012 43

44 IBM Tivoli Netcool Performance Manager: Model Maker 1.2.0 Installation and User Guide

Chapter 9. Creating common packs (Wireless only)
Creating a common pack for Common Reporting on Tivoli Netcool PerformanceManager requires all Model Maker components.
You use Model Maker Extractor to extract the required metadata from a technologypack or from the Tivoli Netcool Performance Manager database.. Extractor outputsthe metadata in a Common Intermediate Format (CIF) file (.tnpmmodel) thatserves as the input for Model Maker Generator.
You then use Model Maker Generator to generate a Cognos model built from themetadata in the CIF file, and all remaining artifacts in the required directorystructure for common pack contents.
Finally, you use Model Maker Manager to browse to the common pack contentsand create a common pack JAR file that is ready to add to the Common PackRepository in the Tivoli Common Reporting component of the Tivoli NetcoolPerformance Manager system.
Overview of creating common packs for Wireless pack modelersWireless pack modelers can follow these steps to create common packs or toextend existing common packs. Each step points to other topics for more detailedinformation.
About this task
These steps assume that you have a fully operational Tivoli Netcool PerformanceManager system with all of the Model Maker components installed.
Before you can begin to create common packs, you must install a number of BaseCommon Packs (BCPs) from the Base Common Pack Suite. Base Common Packs(BCPs) are themselves common packs and you install them exactly as you installany other common packs.
Procedure1. Download and extract the Base Common Pack Suite to a location of your
choice. See Chapter 5, “The Base Common Pack Suite,” on page 35.2. Install the TCR Time BCP. See Chapter 11, “Installing common packs,” on page
65.3. You can model the raw data from a technology pack or directly from the Tivoli
Netcool Performance Managersystem. See “Creating a common pack containinga raw data model” on page 50.
4. You can extract and model Summary data from the Tivoli Netcool PerformanceManager system. See “Creating a common pack containing a summarydefinitions model” on page 51.
5. You can extract and model busy hour data from the Tivoli Netcool PerformanceManager system. See “Creating a common pack containing a busy hourdefinitions model” on page 52.
6. To reduce the size of your date model, you can filter out metrics to includeonly those metrics that you want to report on. for more information, see “Data
© Copyright IBM Corp. 2011, 2012 45

model filtering” on page 49 and for the procedure, see“Filtering metrics from amodel in an existing CIF file” on page 54.
Model Maker GeneratorUsing Model Maker Generator, you can create a Cognos model and other requiredartifacts for common pack contents. Model generation requires a CommonIntermediate Format file and a model properties file. The model properties filedescribes the various links that the model needs to be generated correctly, and thenames of the various namespaces that you have control over.
Creating a model properties fileYou can create a model properties file from the sample files provided or createyour own file. Name the new model properties file according to your model andupdate the values in the file as appropriate.
Before you begin
Working from a model properties file sample is recommended but if a sample fileis not available, create a file containing the following properties and save it withan appropriate filename.
Note: If you are using a text editor that has word wrap functionality, ensure that itis turned off.
About this task
Each common pack that you create or generate must have a unique schema name.In Oracle, a schema is equivalent to a user, when you create a user it creates aschema. Every pack uses its own schema, so the original VIRTUO or PV schema isuntouched. Typically, the schema name is set to align with the common pack nameand version. For example, for Nokia UTRAN R20, you could use something likeNOKUTRANR20 as the schema name so the name does not conflict with an existingpack. You can also prefix your company name to allow you to deploy an IBMcommon pack together with a common pack generated by your team so it couldbecome something like CO_NOKUTRANR20.
Procedure1. Edit a new file or an existing model properties file. Save the file with the
filename model_name_model.properties.where model_name is the name of the model that the model properties filedescribes.
2. Update the file with the properties shown in this table. Do not put a spacebetween the property and the value, for example PACK_VERSION=1.0.0.
Property Description Example
DATASOURCE_SCHEMA The database schema associated with thedata source.Important: The value you provide must bein uppercase characters.
HUALTEUTRAN
PACK_SYMBOLIC_NAME The customer facing name for the commonpack, it must be unique for each commonpack.
ibm.tnpm.net.mobile.lte.hua.eutran
PACK_VERSION The common pack version. 1.0.0
46 IBM Tivoli Netcool Performance Manager: Model Maker 1.2.0 Installation and User Guide

DEPENDENT_MODELS This property is optional, depending on thetype of model you are generating.This property is required for a Busy Hourmodel or a Summary model. Uncommentthe property and update it to the full path tothe raw tnpmmodel that the Busy Hour orSummary depends on.
DEPENDENT_MODELS=C:/1.1.5/wireless/gsm/huawei/raw/huawei_gsm_bss_v900-2.0.1.tnpmmodel
DEPENDENT_PACKS This property is deprecated, but supportedfor backward compatibility.The list of dependent common packs neededto generate this model correctly. Put acomma between each common pack nameand ensure that there are no spaces in thelist. Use the backslash character (\) to escapea character, such as a line break. If thedependent packs list has multiple lines, adda backslash to the end of each line break.
ibm.tcr.time,ibm.cdm.sys,\ibm.cdm.net,ibm.cdm.net.mobile,\ibm.cdm.net.mobile.lte,\ibm.tnpm.net,ibm.tnpm.net.mobile,\ibm.tnpm.net.mobile.lte,\ibm.tnpm.net.mobile.lte.hua.eutran,\
3. Save the new model properties file.
Generating the common pack contentsGenerate the common pack contents by running the generator.bat command on amodel properties file, a Common Intermediate Format (CIF) file (.tnpmmodel), andthe appropriate dependent common packs.
Before you begin
To generate a model, you need a model properties file, a Common IntermediateFormat (CIF) file, and all dependent packs including the Base Common Packs.Before you run Generator, each of the dependent packs must be downloaded intoModel Maker Manager to make them available.
About this task
If the path to the CIF file (.tnpmmodel), or the model properties file, containsspecial characters such as spaces, you must enclose the path in quotation marks.
This task assumes the following file locations:v The Generator is installed in the C:\Generator_version\Generator directory.v A CIF file and a model properties file are stored in the C:\temp\Models directory.
For more information about the Generator command, see “The generatorcommand” on page 117.
Procedure1. From the command line, go to the bin directory by entering the following
command:cd C:\Generator_version\Generator\bin
2. Enter the following command on a single line:.\generator.bat -generate -model C:\temp\Models\cif_file –propertiesC:\temp\Models\model_name_model.properties -overwrite
where:cif_file is the name of the CIF file (.tnpmmodel).model_name is the name of the model that the model properties file describes.
Chapter 9. Creating common packs (Wireless only) 47

If the paths contain special characters, such as spaces, you must enclose thepath in quotation marks.
3. The common pack contents are generated and placed in OUTPUT_DIR\PACK_SYMBOLIC_NAME_PACK_VERSION
where:OUTPUT_DIR maps to the OUTPUT_DIR property in the global.properties file.PACK_SYMBOLIC_NAME maps to the PACK_SYMBOLIC_NAME property in themodel.properties file.PACK_VERSION maps to the PACK_VERSION property in the model.propertiesfile.
Identifying the appropriate dependent packsUse these guidelines to help you choose the appropriate dependent packs.
Wireless
You can use the following table to map wireless Global Object Model (GOM) andGOMlet technology packs to base common packs. You can then include theappropriate base common packs as dependents for your common pack.
Additionally, if you want to include resources from specific Vendor Specific packs,you must list these packs as dependents for your common pack.
GOMs and GOMlets Base Common Packs
vallent-vt-Neutral_Core_GOM-1.0.tar.gz ibm.cdm.net
ibm.tnpm.net
vallent-vt-Neutral_GSM_BSS_NSS_GOM-1.0.tar.gz ibm.cdm.net.mobile
ibm.tnpm.net.mobile
vallent-vt-Neutral_GPRS_BSS_GOM-1.0.tar.gz ibm.cdm.net.mobile.gsm
ibm.tnpm.net.mobile.gsm
vallent-vt-Neutral_GPRS_UMTS_CN_GOM-1.0.tar.gz ibm.cdm.net.mobile.gprs
ibm.tnpm.net.mobile.gprs
vallent-vt-Neutral_UMTS_UTRAN_GOM-1.0.tar.gz* ibm.cdm.net.mobile.umts
ibm.tnm.net.mobile.umts
vallent-vt-Neutral_LTE_EPS_GOM-2.0.tar.gz ibm.cdm.net.mobile.lte
ibm.tnpm.net.mobile.lte
vallent-vt-HUA_GOMlet-2.4.tar.gz ibm.cdm.net.mobile.huawei
ibm.tnpm.net.mobile.huawei
vallent-vt-NOK_GOMlet-2.1.tar.gz ibm.cdm.net.mobile.nokia
ibm.tnpm.net.mobile.nokia
vallent-vt-VNL_GOMlet-2.4.tar.gz ibm.cdm.net.mobile.neutral
ibm.tnpm.net.mobile.neutral
vallent-vt-PGM_GOMlet-2.0.tar.gz ibm.cdm.net.mobile.pgm
ibm.tnpm.net.mobile.pgm
48 IBM Tivoli Netcool Performance Manager: Model Maker 1.2.0 Installation and User Guide

GOMs and GOMlets Base Common Packs
vallent-vt-ERI_GOMlet-2.5.tar.gz ibm.cdm.net.mobile.ericsson
ibm.tnpm.net.mobile.ericsson
* Pack extensions, such as Neutral UMTS UTRAN Ext GOM 1.0, can be ignoredwhen setting up the dependent packs.
Creating a common packCreate a common pack by using the Common Pack Wizard to package thecommon pack contents (Model Maker Generator output) in a JAR file.
About this task
You can create a single common pack, or multiple common packs. To createmultiple common packs, you can select a common pack directory. The CommonPack Wizard searches that directory for all valid sets of common pack contents asdefined by a bipack.xml file, and displays them for selection.
Procedure1. In Model Maker Manager, click the New Common Pack button ( ). The
Common Pack Wizard is displayed2. In the Common Pack Directory field, click Browse to navigate to a directory
containing the generated common pack contents. This directory is typically thedirectory specified in OUTPUT_DIR property in the global.properties file. Allavailable sets of common pack contents in the directory are displayed.
3. In the Output Directory field, click Browse to navigate to a folder where youwant the JAR files to be created. The folder must exist, create a folder inWindows Explorer if required.
4. Select one or more common packs and click Finish. A JAR file is created foreach common pack selected.
What to do next
You can upload the common pack JAR files to the Common Pack Service by usingthe Common Pack Wizard.
Data model filteringBy default, all of the performance metrics and summary and busy hour intervalsfor a particular technology pack are available to be included in a data model forreporting. When creating a common pack, it is recommended to filter these metricsto ensure that only metrics that you need to be report on are deployed.
Large data models take longer to generate, merge and deploy and have a largermanagement overhead than smaller data models. It also requires much morememory to manage a larger data model. The maximum recommended size of amanageable data model is 50MB, this equates to approximately 40000 metrics. Inaddition, the larger the data model, the more difficult it is to find metrics in thedata model.
Filtering the metrics that are included in each data model by metric group canoffer much improved performance, and a targeted set of metrics for particular
Chapter 9. Creating common packs (Wireless only) 49

reporting requirements. If required, you can add additional metric groups byupdating the filter and regenerating the data model for inclusion in a new orupdated common pack.
You can also reduce the model size by filtering out unwanted intervals from yoursummary and busy hour models.
You work from the CIF file that contains the required raw metrics, busy hours, orsummaries from a technology pack or Tivoli Netcool Performance Manager system.Import the CIF file and apply the required filter.
Creating a common pack containing a raw data modelYou can extract raw data counters from a technology pack. You can then create acommon pack containing a model that report authors can use to create reports byusing those raw data counters.
Procedure1. In Model Maker Extractor, select File > New > Project.2. Enter the project name. Typically, you use the name of the technology pack.3. Click Next.4. In the Project Explorer, right-click the new project and select Import. The
Import wizard opens.5. On the Select page of the Import wizard, expand TNPM Pack Modeling and
select Import a Wireless Pack Archive.6. Click Next.7. On the Select Datasource page, select from one of the following sources:
v Import from ZIP or TAR.GZ archive: Import from a downloaded packagefrom Extreme Leverage.
v Import from expanded folder: Import a technology pack copied from aninstalled Tivoli Netcool Performance Manager system.
8. Click Next.9. Browse to a folder containing a technology pack and click Open. The contents
of the technology pack are imported and inspected.10. Click Next.11. On the Select Entities page, you can see the vendor and all the entities that are
associated with the pack. Select the required entities and click Next.12. On the Save As page, a name for the Common Intermediate Format (CIF) file
(.tnpmmodel) is generated based on the name of the technology pack. Selectyour project folder, and then click Finish.
13. In the Project Explorer, select the CIF file to see the contents and browsethrough the resource set and the metric group set to check your data.
14. If you want to reduce the size of the CIF file by only including specificmetrics for particular resources, filter the CIF file as described in “Filteringmetrics from a model in an existing CIF file” on page 54.
15. If you are satisfied with the CIF file contents, update the model properties fileas described in “Creating a model properties file” on page 46. If you are usingresources that are contained in Vendor Specific packs, ensure that you followthe additional steps as described in “Creating a common pack containing aVendor Specific resources model” on page 54.
50 IBM Tivoli Netcool Performance Manager: Model Maker 1.2.0 Installation and User Guide

16. Generate the common pack contents as described in “Generating the commonpack contents” on page 47.
17. Create a common pack as described in “Creating a common pack” on page 49.
Creating a common pack containing a summary definitions modelOn Tivoli Netcool Performance Manager - Wireless component, you can extract thesummary definitions associated with a particular technology pack from the TivoliNetcool Performance Manager database. You can then create a common packcontaining a model that report authors can use to create reports by using thosesummary definitions.
Before you begin
Ensure that you have configured the JDBC driver in Model Maker Extractorpreferences so that you can connect to the database to extract the summarydefinitions.
Procedure1. In Model Maker Extractor, select File > New > Project.2. Enter the project name. Typically, you use the name of the technology pack.3. Click Next.4. In the Project Explorer, right-click the new project and select Import.5. On the Select page of the Import wizard, expand TNPM Pack Modeling and
select Import Summaries.6. Click Next.7. On the Database detail page, specify the database details.
v Host: The host server name, for example, server.ibm.com.v Username: The database user name, for example, virtuo.v Password: The database password.
8. Click Get Summaries. The database connection is tested.9. Click Next.
10. On the Select Installed Packs page, select one or more technology packs froma list of the installed technology packs on the system.
11. Click Next. The Select Summaries page opens, showing all of the summariesthat are associated with the selected technology packs.
12. Select the required summaries by vendor, entity, or summary name.13. Optional: By default, summaries for all intervals are selected. Select the
appropriate check box to filter the selected summaries by raw, hourly, daily,weekly, or monthly intervals. Clearing the All summaries check box clearsyour selection so you can select again.
14. Click Next.15. On the Model Details page, specify the following information:
Option Description
Name The model name.Important: You must not use specialcharacters in the model name.
Version The model version.
Vendor The vendor name.
Chapter 9. Creating common packs (Wireless only) 51

Option Description
Technology The model technology.Important: You must specify the correcttechnology for the model to be generatedcorrectly.
16. On the Save As page, verify the name for the Common Intermediate Format(CIF) file (.tnpmmodel), select your project folder, and then click Finish.
17. In the Project Explorer, select the CIF file to see the contents.18. Expand the Summary Definition Set to see the summary definitions in the
model.19. Select Window > Show View > View Properties to see the constituent
metrics.20. If you are satisfied with the CIF file contents, update the model properties file
as described in “Creating a model properties file” on page 46. If you are usingsummary definitions that depend on Vendor Specific packs, ensure that youfollow the additional steps as described in “Creating a common packcontaining a Vendor Specific resources model” on page 54.
21. Generate a common pack as described in “Generating the common packcontents” on page 47.
22. Create a common pack as described in “Creating a common pack” on page 49.
Creating a common pack containing a busy hour definitions modelOn Tivoli Netcool Performance Manager - Wireless component, you can extract thebusy hour definitions associated with a particular technology pack from the TivoliNetcool Performance Manager database. You can then create a common packcontaining a model that report authors can use to create reports by using thosebusy hour definitions.
Before you begin
Ensure that you have configured the JDBC driver in Model Maker Extractor toensure that you can connect to the database to extract the busy hour definitions
About this task
If you want to be able to build drill down views for a particular technology pack,Model Maker Generator needs to know how to navigate from a child to a parent.These relationships are set in the Global Object Model (GOM) technology packsand are made available to Generator in the corresponding CIF files (.tnpmmodel)located in the CIF file directory specified in the global.properties file.
Note: Currently cross-GOM relationships are not supported. That means that if abusy hour requires network and cell entities, but there is no GOM that containsboth of these entities, then Model Maker Generator is unable to determine therelationship between them.
Procedure1. In Model Maker Extractor, select File > New > Project.2. Enter the project name. Typically, you use the name of the technology pack.3. Click Next.4. In the Project Explorer, right-click the new project and select Import.
52 IBM Tivoli Netcool Performance Manager: Model Maker 1.2.0 Installation and User Guide

5. On the Select page of the Import wizard, expand TNPM Pack Modeling andselect Import Busy Hours.
6. Click Next.7. On the Database detail page, specify the database details.
v Host: The host server name, for example, server.ibm.com.v Username: The database user name, for example, virtuo.v Password: The database password.
8. Click Get Busy Hours. The database connection is tested.9. Click Next.
10. On the Select Installed Packs page, select one or more technology packs froma list of the installed technology packs on the system.
11. Click Next. The Select Busy Hours page opens, showing all of the busy hoursthat are associated with the selected technology packs organized by focalentity.
12. Select the required busy hours by vendor, entity, or busy hour name.13. Click Next.14. On the Model Details page, specify the following information:
Option Description
Name The model name.Important: You must not use specialcharacters in the model name.
Version The model version.
Vendor The vendor name.
Technology The model technology.Important: You must specify the correcttechnology for the model to be generatedcorrectly.
15. On the Save As page, verify the name for the Common Intermediate Format(CIF) file, select your project folder, and then click Finish.
16. In the Project Explorer, select the CIF file to see the contents.17. Expand the Busy Hour Definition Set to see the busy hour definitions in the
model.18. Select Window > Show View > View Properties to see the constituent
metrics.19. If you are satisfied with the CIF file contents, update the model properties file
as described in “Creating a model properties file” on page 46. If you are usingbusy hour definitions that depend on Vendor Specific packs, ensure that youfollow the additional steps as described in “Creating a common packcontaining a Vendor Specific resources model” on page 54.
20. Generate the common pack contents as described in “Generating the commonpack contents” on page 47.
21. Create a common pack as described in “Creating a common pack” on page 49.
Chapter 9. Creating common packs (Wireless only) 53

Creating a common pack containing a Vendor Specific resourcesmodel
You must complete some additional tasks if you want to create a common packcontaining resources that are not available in a Base Common Pack, but areavailable in a Vendor Specific technology pack.
Each Vendor Specific resource is defined in a particular Vendor Specific technologypack. Each Vendor Specific Busy Hour or Summary becomes dependent on thattechnology pack, as the model generator needs the information from the CIF file todetermine the primary keys, table names, and so on. The models are linked in thesame way as the current BCP is linked to the Raw models.
If you create a common pack containing Vendor Specific resources, you mustcomplete the following additional steps:v Create a CIF file (.tnpmmodel) from the Raw Vendor Specific technology pack.v Copy the CIF file corresponding to the Raw Vendor Specific technology pack
into the DEPENDENT_CIF_DIRECTORY.v Create a common pack from the Raw Vendor Specific CIF file and add it to the
common pack repository.v Download the Vendor Specific common pack to make it available to Generator.v Add the name of the Vendor Specific common pack as a dependency in the
model.properties file.
Generator then processes all the files to resolve the primary keys and table names.
Filtering metrics from a model in an existing CIF fileBefore generating a common pack data model, it is recommended that you filtereach of your CIF files (.tnpmmodel) to include only the metrics that you need toreport on.
Before you begin
You must have a filter file containing a list of the metric groups that contain themetrics that you want to include in your reports. The input file format is a simpleflat file in which you specify the metric groups you want in your Cognos model.This filter file is applied to the full CIF file to give a filtered CIF file.
You must have generated the CIF files for each of the raw counters, summaries, orbusy hours that you plan to include in your model.
Procedure1. In Model Maker Extractor, select File > Import. The Import wizard opens.2. On the Select page of the Import wizard, expand TNPM Pack Modeling and
select Filter an existing Wireless model.3. Select the filter to apply.4. Select the tnpmmodel file that you want to filter. For example,
huawei-gsm-bss-raw.tnpmmodel.5. Click Finish.
54 IBM Tivoli Netcool Performance Manager: Model Maker 1.2.0 Installation and User Guide

Results
A filtered tnpmmodel file is created. For example, huawei-gsm-bss-raw-filtered.tnpmmodel.
The console displays the number of metrics and metric groups in the filtered datamodel.
Identifying metric groups for a filter fileTo create a filter file, you need to identify the metric groups that contain themetrics you want to include.
You can use one of the following methods to map individual metrics to metricgroups.
Identifying metric groups from a CSV fileGiven a list of the required metrics in a CSV file, you can use the CSV file as afilter to identify the associated metric groups.
Before you begin
This task requires a CSV file listing the required metrics, typically provided by thecustomer or user community.
About this task
In Tivoli Netcool Performance Manager - Wireless Component, metric (counter)expressions are typically the loadmap expression.
This procedure assumes a CSV file called LTE_CounterFilter.csv, with the counterIDs in column E as shown.
You load this file into a temporary database table to use as a filter.
Procedure1. Log in to the wireless database.2. Create a table to store the filtered counters by entering the following command:
create table counter_list (counter_id varchar(50));
3. Copy the CSV file to the wireless server.4. Cut the counter IDs from the CSV file and copy them to another file, for
example counterid.list.
Chapter 9. Creating common packs (Wireless only) 55

cut -d’,’ -f5 LTE_CounterFilter.csv > counterid.list
5. Load the counter list into the counter_list table using the sqlloader. Edit theload.ctl file to create the loader instructionsload data infile ’counterid.list’into table counter_listfields terminated by ","(counter_id)
6. Load the counter list.sqlldr virtuo/Virtuo01@vtdb control=load.ctl
7. Run the following SQL query to get all metric groups for the counters loaded.The query below maps into the wireless dictionary and selects all metric groupsthat include the counter IDs that were loaded.select metric_group from (select e.entity_name || ’.’ || substr(f2.field_name,0,INSTR(f2.field_name,’.’,-1,1)-1) METRIC_GROUPfromwmd_dict_table d, wmd_dict_field f, wmd_dict_field f2, wmd_col_def c, lc_loadmap lm,lc_ruleset lr, lc_datasource ld, wmd_dict_field_depend dep,wmn_entity ewhere f.table_id = d.table_idand f2.entity_id = e.entity_idand dep.child_field_id = f.field_idand dep.parent_field_id = f2.field_idand f.field_id = c.field_idand upper(lm.colname) = c.col_nameand upper(lm.tabname) = d.table_nameand lm.ruleset_id = lr.ruleset_idand ld.datasource_id = lr.datasource_idAND lm.expression in (select ’C’ || counter_id from counter_list)) Metric_Filtergroup by metric_grouporder by 1
Results
The query returns the list of metric groups, which you can use as a filter file inModel Maker Extractor. For example,CPU_Device.Huawei.CPU_Of_BoardENodeBFunction.Huawei.BBUENodeBFunction.Huawei.ENodeBEUtranCell.Huawei.CQIEUtranCell.Huawei.Cell_AlgorithmEUtranCell.Huawei.DRB......PMU_Device.Huawei.PMURRU_Device.Huawei.RRU
Identifying resource groups from the model documentationModel Maker Extractor supports the generation of a HTML document representingthe contents of the tech pack. A user can take the unfiltered model and generatethe HTML document. In any HTML browser, using this html representation of thepack contents the user can search for the counter ID.
Before you begin
You must have a list of the counter IDs or descriptions.
Procedure1. In Model Maker Manager, select File > Export. The Export wizard opens.2. On the Select page of the Export wizard, expand TNPM Pack Modeling and
select Export HTML Documentation.3. Click Next.
56 IBM Tivoli Netcool Performance Manager: Model Maker 1.2.0 Installation and User Guide

4. Open the HTML document in a browser.5. Search for each counter ID for description to identify the metric group.
Identify metric groups by using a SQL queryYou can use a query on the wireless database to identify the mapping between thecounter ID and the metric group.
Before you begin
You must have a list of the counter IDs.
Procedure1. Log in to the wireless database.2. Enter the following command:
select e.entity_name || ’.’ || substr(f2.field_name,0,INSTR(f2.field_name,’.’,-1,1)-1) METRIC_GROUPfromwmd_dict_table d, wmd_dict_field f, wmd_dict_field f2, wmd_col_def c, lc_loadmap lm,lc_ruleset lr, lc_datasource ld, wmd_dict_field_depend dep,wmn_entity ewhere f.table_id = d.table_idand f2.entity_id = e.entity_idand dep.child_field_id = f.field_idand dep.parent_field_id = f2.field_idand f.field_id = c.field_idand upper(lm.colname) = c.col_nameand upper(lm.tabname) = d.table_nameand lm.ruleset_id = lr.ruleset_idand ld.datasource_id = lr.datasource_idAND lm.expression in (’C1278071421’, ’C1278072439’, ’C1278072520’)
Results
A list of metric groups is returned, for example:METRIC_GROUP------------------------------------Cell.Huawei.Call_drop_overviewCell.Huawei.Short_messageCell.Huawei.Call_drop_due_to_conn_fail
Filtering intervals from existing CIF filesAfter using a particular model, you can decide that there are summary or busyhour intervals that you do not need. You can import the CIF files and filter outthese unwanted intervals at any time.
Filtering an existing summary modelYou can filter a summary model by removing raw, hourly, daily, weekly ormonthly summary intervals from the appropriate CIF file.
About this task
You must have a summary CIF file before you begin.
Procedure1. In the Project Explorer, right-click the new project and select Import. The
Import wizard opens.2. On the Select page of the Import wizard, expand TNPM Pack Modeling and
select Filter an existing Summary Wireless model.3. Click Next.
Chapter 9. Creating common packs (Wireless only) 57

4. Select the summary intervals that you want to keep in the model.5. Click Next.6. Select the summary CIF file that you want to filter.7. Click Finish. A new CIF file is created containing only the summary intervals s
that you specified.
Filtering an existing busy hour modelYou can filter a busy hour model by removing daily, weekly or monthly busy hourintervals from the appropriate CIF file.
About this task
You must have a busy hour CIF file before you begin.
Procedure1. In the Project Explorer, right-click the new project and select Import. The
Import wizard opens.2. On the Select page of the Import wizard, expand TNPM Pack Modeling and
select Filter an existing Busy Hour Wireless model.3. Click Next.4. Select the busy hour intervals that you want to keep in the model.5. Click Next.6. Select the busy hour CIF file that you want to filter.7. Click Finish. A new CIF file is created containing only the busy hour intervals
that you specified.
58 IBM Tivoli Netcool Performance Manager: Model Maker 1.2.0 Installation and User Guide

Chapter 10. Updating and extending common packs (Wirelessonly)
Use the following information to update and extend common packs in thecommon pack repository and to work with common packs on your computer.
Updating common packsYou can update the version of a common pack by creating another version of thecommon pack and updating the version number. You can update the Cognosmodel, the database schema, or the reports in a common pack. You update acommon pack in the repository by deploying a new version of that common pack.
Updating a common pack on the repository requires the following steps:v Use Model Maker Manager to create a composite version of the pack by using
the combining pack option.v Using Framework Manager, or by manual changes, update the composite pack
contents. For example, you can update the database schema, the Cognos modelor reports. Common pack developers are responsible for verifying any changesmade to a common pack.
v Use Model Maker Manager to decompose the updated composite pack into aJAR file for deployment.
v In Model Maker Manager, deploy the updated common pack to the CommonPack Repository by using the Common Pack Service Wizard.
Creating a new version of a common packTo update a common pack to a new version, create a composite common pack witha new version number.
Before you begin
If the Cognos Framework Manager BMT Script Player has not already beenconfigured in Model Maker Manager, you must configure it during this task.
Procedure1. In the Common Pack Models view, select the check box next to the common
pack that you want to update. The Combine Models button ( ) becomesavailable.
2. Click the Combine Models button. The Composite Model Output windowopens.If the BMT Script Player location was not previously configured, the Cognospreferences window opens for you to enter the required details.For the configuration options, see “Configuring the Cognos preferences” onpage 33.
3. Enter an output directory.4. Enter the new version number. There is a certain range of acceptable version
numbers and you must increment the number. For example, for a version
© Copyright IBM Corp. 2011, 2012 59

number 1.0.0, you must choose a number from 1.0.1 up to and including 2.0.0.For a version number of 2.1.2, you must choose a number from 2.1.3 up to andincluding 3.0.0.
5. Click OK. A progress bar is displayed. On completion, the resulting modeloutput directory is displayed.
Considerations when modifying modelsPack developers can update a common pack model by adding custom extensionsto model certain aspects of the database not already captured in the current packversion. You can update common pack models by using Framework Manager.v Any new namespaces added to the model must not clash with existing common
pack namespaces. You must follow these conventions when adding newnamespaces:– Namespace names must end with (Database), (Consolidation), (Dimensional)
or (Presentation).– Do not change model content belonging to other common packs. Any changes
to model content that is part of another common pack is lost during thedecompose operation.
– New namespaces must be placed in the appropriate parent namespace:Model, Database Views, Consolidation Views or Dimensional Views.
– Any new package created must not have the same name as the common pack.This name is reserved for the Default Package name created by Model MakerManager at run time.
v Any new Query Subjects must be in the database being modeled, and newdatabase schema must be added to the common pack if required. A manual stepis required to update the bipack.xml file for any database schema added to thecommon pack.
v You must export any reports required in the common pack from Report Studio.A manual step is required to update the bipack.xml file for any new reportsadded to the common pack.
After creating a composite pack, as outlined above, a user might extend the modelby adding custom namespaces. These namespaces must follow the common packmodel convention.
Decomposing composite common packs for addition to therepository
To add a composite common pack to the repository, you must first decompose thecommon pack to separate the composite model into its individual constituentmodels.
About this task
To support version control for common pack models, the integrity of each modelmust be maintained. Decomposing a composite pack separates the compositemodel into the correct versions of its constituent models. Individual models canthen be updated to new versions as normal, which would not be possible if themodel was added as a composite model.
When you select a composite pack in the Common Pack Wizard, the default actionis to decompose the composite pack. Decomposing a composite pack creates a JARfile that you can deploy to the repository by using the Common Pack Wizard.
60 IBM Tivoli Netcool Performance Manager: Model Maker 1.2.0 Installation and User Guide
Procedure1. In Model Maker Manager, click the New common pack button ( ). The
Common Pack Wizard is displayed.2. In the Common Pack Directory field, click Browse to go to a folder containing
the composite common pack. All common packs in the folder are displayed.3. In the Output Directory field, click Browse to go to a folder where you want
the JAR files to be created. The folder must exist, create a folder in WindowsExplorer if required.
4. Select the composite common pack and click Finish. A JAR file is created forthe selected common pack.
What to do next
You can deploy (add and activate) the composite common pack to the commonpack repository by using the Common Pack Service Wizard to select the JAR file.
Combining multiple common packsYou can extend the scope of available data by combining a number of commonpacks that contain required resources. If you have installed the Common PackService appropriately in an environment containing both the wireless and wirelinecomponents, you can combine wireless and wireline common packs.
Procedure1. In Model Maker Manager, identify the common packs that contain the
resources you need.2. Combine the common pack models as described in “Combining common pack
models.”3. To enable the composite pack to be added to the common pack repository,
decompose the composite pack as described in “Decomposing compositecommon packs for addition to the repository” on page 60.
Combining common pack modelsYou can combine a number of common pack models into a composite model. Thiscomposite model is then converted to a single package when you publish acommon pack. In Common Reporting, you cannot report across multiple packages.By creating a package containing objects from multiple common packs, you caneffectively report across multiple packages in Tivoli Netcool Performance Manager.
Before you begin
You must configure the Cognos Framework Manager BMT Script Player in ModelMaker Manager preferences. If the BMT Script Player has not already beenconfigured in preferences, you must configure it during this task.
Procedure1. In the Common Pack Models view, select the check box next to two or more
models that you want to combine. The Combine Models button ( ) becomesavailable.
2. Click the Combine Models button. The Composite Model Output windowopens.If the BMT Script Player location was not previously configured in Model
Chapter 10. Updating and extending common packs (Wireless only) 61

Maker Manager preferences, the Cognos preferences window opens for you toenter the required details.For the configuration options, see “Configuring the Cognos preferences” onpage 33.
3. Enter an output directory.4. Enter the common pack definition:
Option Description
Name A project name.
Symbolic Name A unique name for the common pack.
Version A version number of the formatmajor.minor.service, for example 1.0.0.
Vendor Enter your company name.
5. Choose whether to create a default package for the model or not. The defaultpackage displays all Presentation Views that are part of the model. The packageis given the same name as the name you enter for the project name.
6. Click OK. A progress bar is displayed. On completion, the resulting modeloutput directory is displayed.
7. Open the new model in Framework Manager and validate that the contents areas expected.
What to do next
Before you can deploy the composite pack, you must decompose the compositepack as described in “Decomposing composite common packs for addition to therepository” on page 60.
Adding reports to a common packYou can add reports created in Report Studio to a common pack to be publishedfor Common Reporting users.
About this taskv A common pack directory containing reports must contain the directories
localization and report.v The localization directory must contain a .properties file to support
globalization for report names, and so on. This file is currently unused.v The report directory contains the report definition .XML files exported from
Report Studio.
Procedure1. Publish a common pack.2. Create a report from the published common pack.3. In Report Studio, export the report definition XML by clicking Tools > Copy
Report to Clipboard and saving the report as a .XML file.4. Add the report specification .XML file directly to the report directory of the
common pack. The report directory does not support nested directories5. Update the bipack.xml file for the common pack by referring to the following
example:
62 IBM Tivoli Netcool Performance Manager: Model Maker 1.2.0 Installation and User Guide

<?xml version="1.0" encoding="UTF-8"?><bipack>
. . .<reports>
<translation file="localization" prefix="trans"/><report>
<name>Device Raw Report</name><file>report/Device_Raw_Report.xml</file>
</report><report>
<name>Interface Raw Report</name><file>report/Interface_Raw_Report.xml</file>
</report><report>
<name>MIB2 Summary Report</name><file>report/rfc_mib2_Summary_Report.xml</file>
</report></reports>
</bipack>
v The reports section in the bipack.xml file lists the reports in the commonpack.
v The file attribute of the translation element points to the common packlocalization directory.
v The prefix attribute of the translation element is the name of the.properties file in the localization directory.
v Each report has a name and a file element.6. Create an updated version of the common pack.
Chapter 10. Updating and extending common packs (Wireless only) 63

64 IBM Tivoli Netcool Performance Manager: Model Maker 1.2.0 Installation and User Guide

Chapter 11. Installing common packs
You must install each common pack, and its dependent common packs, on theTivoli Common Reporting component of the Tivoli Netcool Performance Managersystem. After you have installed the common pack for a particular technology, thecommon pack contents are available in the Common Reporting user interface.
Report authors can then access the common pack contents, such as data models orreports, from the Common Reporting user interface in the Tivoli Integrated Portal.
Overview of installing common packs for pack administratorsWireline and Wireless Pack Administrators can follow these steps to install existingcommon packs. Each step points to other topics for more detailed information.
About this task
This procedure assumes that you have a fully operational Tivoli NetcoolPerformance Manager system with the Common Pack Service and Model MakerManager installed.
As part of the procedure, you install a number of Base Common Packs (BCPs)from the Base Common Pack Suite. Base Common Packs (BCPs) are themselvescommon packs and you install them exactly as you install any other commonpacks.
This general procedure illustrates the separate steps involved in installing acommon pack, so is not necessarily the most efficient procedure. For example, youcan add the common pack and all its dependent packs in one step. When you getmore familiar with Model Maker, try these other options.
Procedure1. Download and extract the Base Common Pack Suite to a location of your
choice. See Chapter 5, “The Base Common Pack Suite,” on page 35.2. Locate the required dependent common packs for the pack you are installing:
v The TCR Time BCP is a dependent pack for all common packs; wireless orwireline.
v The Wireline Common BCP is the dependent pack for all wireline commonpacks.
v Typically, a number of wireless BCPs are dependent packs for wirelesscommon packs. See the release notes for the common pack you areinstalling for a list of dependent packs.
3. Create a logins file. See “Creating a logins file with the appropriatepasswords” on page 22.
4. Add the TCR Time BCP. See “Adding a common pack to the repository” onpage 67.
5. Activate the TCR Time BCP. See “Activating common packs in the repository”on page 69.
© Copyright IBM Corp. 2011, 2012 65

6. Populate the database calender schema table for the TCR Time base commonpack by using the Common Pack Service pack_admin calendar-refill action.See “Populating the calender schema table for TCR Time” on page 70.
7. Add and activate any dependent packs. If there are multiple dependent packs,you must activate them in a particular sequence as directed in the packdocumentation.
8. Add and activate the common pack.9. Wireless Component only: Populate the database schema tables by using the
Common Pack Service pack_admin data-refill action. See “WirelessComponent only: Populating the database schema tables” on page 71.
10. Download the activated common pack into Model Maker Manager. See“Downloading common packs” on page 72.
11. Publish the common pack by using Model Maker Manager to a ReportPackage available for reporting. The contents of the common pack arepublished as a report package to the Content Store on the Tivoli CommonReporting server. See “Publishing a common pack” on page 72.
Creating a logins file with the appropriate passwordsYou must create a logins file containing certain passwords that are required by thepack_admin command and Model Maker Manager for authentication purposes. Foryour security, please change the default passwords provided during installation. Ifyou update any of the passwords, ensure that you update the credentials file, orthe tcraccess data source, as appropriate.
Before you begin
The following passwords are required:
tipadminThe default Tivoli Integrated Portal administrator user.
bicontrolA control user that you must create on the database before running theinstaller.
birefreshThe birefresh user is created by the Common Pack Service Installer andhas a default password of birefresh.
About this task
The pack_admin command automatically encrypts the passwords when creating thelogins file.
For instructions on changing Oracle user or schema passwords, seehttp://www.orafaq.com/wiki/Oracle_database_Security_FAQ#How_does_one_change_an_Oracle_user.27s_password.3F.
If you change the Oracle tcraccess user password, then you must also change theCognos tcraccess data source.
If you change the Oracle bicontrol or birefresh user passwords, or the TivoliIntegrated Portal tipadmin user password, you must recreate the logins file withthe new credentials. The old logins file is no longer valid.
66 IBM Tivoli Netcool Performance Manager: Model Maker 1.2.0 Installation and User Guide

Procedure1. On the Tivoli Common Reporting server, change to the
$TIP_COMPONENTS_LOCATION/TCRComponent/commonpackservice/bin directory.Where TIP_COMPONENTS_LOCATION is the location where the Tivoli IntegratedPortal Components were installed. By default, /opt/IBM/tivoli/tip21Components for wireline and /opt/IBM/tivoli/tipv2Components forwireless.
2. Enter the following command on one line and provide the passwords whenprompted:# ./pack_admin.sh -passwordfile ./logins.txt -tipuser tipadmin-dbusers tnpm:bicontrol tnpm:birefresh
BI Service Service is processing request.Please enter the password for user bicontrol:
bicontrol#]Please re-enter the password for user bicontrol:
bicontrolPlease re-enter the password for user bicontrol:
bicontrolPlease enter the password for user birefresh:
birefreshPlease re-enter the password for user birefresh:
birefreshPlease enter the password for user tipadmin:
tipadminPlease re-enter the password for user tipadmin:
tipadminThe following file was created: logins.txtCTGTRR205I The operation createLoginsFile successfully performed.
3. Optional: To see the contents of the logins.txt file, enter the followingcommand:# cat logins.txtTARGET tnpm bicontrol 6439448205275568047254553497058697800TARGET tnpm birefresh 22726015774105630813618842664095311722TIPUSER - tipadmin -89496516100624695361961177712212346580
The passwords have been encrypted for security.
Adding a common pack to the repositoryYou can add a common pack to the common pack repository by using the AddCommon Packs command. Adding a common pack adds the common pack to theadministrative database and registers that version of the common pack with thesystem. That version of the common pack shows on the common pack list of thesystem, but that version is not used until it is activated.
Before you begin
You need a logins file for this procedure. If a logins file does not exist, you cancreate a logins file on the server by using the pack_admin command. Copy the fileback to your PC before starting this procedure.
Chapter 11. Installing common packs 67

About this task
To ensure that you see the latest common packs on the system after addingcommon packs, always refresh your view by restarting Model Maker Manager.
Procedure1. In Model Maker Manager, click the Common Pack Service button ( ) on the
toolbar. The Common Pack Service Selection Wizard opens.2. Select Add Common Packs from the list of commands.3. Click Next. The Add Common Packs Wizard opens.4. On the Login page, browse to a logins file.5. Click Next.6. On the Add Common Packs page, browse to a directory containing common
pack JAR files.7. Select the required JAR files and click Open. The selected common packs are
listed in the wizard.8. Click Finish. If the operation is successful, the wizard closes. If the operation
fails, a message is displayed.
Adding multiple common packs to the repositoryYou can add multiple common packs to the repository by using the Add CommonPacks from a Directory command. This service loads all common packs found inthe directory to the repository.
About this task
To ensure that you see the packs on the system after adding packs, always refreshyour view by restarting Model Maker Manager.
Procedure1. In Model Maker Manager, click the Common Pack Service button ( ) on the
toolbar. The Common Pack Service Selection Wizard opens.2. Select Add Common Packs from a Directory from the list of commands.3. Click Next. The Add Common Packs from a Directory Wizard opens.4. On the Login page, browse to a logins file.5. Click Next.6. On the Add Common Packs page, browse to the location of the common pack
JAR files.7. Click OK.8. Click Finish. If the operation is successful, the wizard closes. If the operation
fails, a message is displayed.
68 IBM Tivoli Netcool Performance Manager: Model Maker 1.2.0 Installation and User Guide

Adding common packs by using the CLIYou can also use the pack_admin command to add common packs to the commonpack repository.
Procedure
Add a common pack or multiple common packs by completing the followingsteps:1. Add a common pack. For example, add the ibm.tcr.time common pack by
entering the following command:./pack_admin.sh -add -pack ibm.tcr.time.1.0.0.jar -logins ./logins.txt
CTGTRR232I The operation add successfully performed.
2. Optional: Add multiple common packs from a directory by entering thefollowing command. The packs are automatically added in the correctsequence../pack_admin.sh -add -dir /demo/commonpacks -logins ./logins.txt
CTGTRR232I The operation add successfully performed.
Activating common packs in the repositoryYou can activate a common pack or composite common pack in the repository byusing the Activate Common Packs command. Database schemas are installed andthe active version of the common pack is updated. If the pack was previouslyactivated, the database schemas are updated.
Before you begin
You need a logins file for this procedure. If a logins file does not exist, you cancreate a logins file on the server by using the pack_admin command. Copy the fileback to your Windows computer before starting this procedure.
Procedure1. In Model Maker Manager, click the Common Pack Service button ( ) on the
toolbar. The Common Pack Service Selection Wizard opens.2. Select Activate common pack from the list of commands.3. Click Next. The Activate Common Packs Wizard opens.4. On the Login page, browse to a logins file.5. Click Next. The Activate common pack page displays a list of installed packs.6. Select a common pack to activate.7. Click Finish to activate the pack in the repository. If the operation is successful,
the wizard closes. If the operation fails, a message is displayed.
Chapter 11. Installing common packs 69

Activating common packs by using the CLIYou can also use the pack_admin command to activate common packs to update thedatabase schemas.
Procedure
Activate the common pack to create the associated database schema. For example,activate the ibm.tcr.time common pack by entering the following command:./pack_admin.sh -activate -pack ibm.tcr.time -version 1.0.1 -logins./logins.txt
CTGTRR231I The operation activate successfully performed.
Populating the calender schema table for TCR TimeYou must populate the database calender schema table for the TCR Time basecommon pack by using the Common Pack Service pack_admin command.
Before you begin
The TCR Time base common pack must have been added to the repository andactivated before you begin this procedure.
When a parameter includes spaces, enclose the complete parameter in doublequotation marks or escape the parameter.
About this task
You use the following actions to populate the database calender schema table.
Actions defined in the tcr.time common pack.populate adds past and future dates to the calendar schema table withoutclearing existing entries. Typically, you run this action each night to addthe data for the day after the next day. For example, you can run thepopulate action on Monday to create entries for Wednesday. This exampleenables reporting through the midnight hour, since we have thetimestamps in the calendar for the data arriving.
calendar-refill clears the calendar schema table and repopulates it withpast and future dates. Typically, a frequency of once a month is adequateto run the calendar-refill action. The main purpose of thecalendar-refill action is to remove old timestamps.
Procedure1. Log in to the Tivoli Common Reporting server.2. Change to the following directory:
$TIP_COMPONENTS_LOCATION/TCRComponent/commonpackservice/bin
Where:TIP_COMPONENTS_LOCATION is the location where the Tivoli IntegratedPortal Components are installed, by default, /opt/IBM/tivoli/tip21Componentsfor wireline and /opt/IBM/tivoli/tipv2Components for wireless.
3. Set properties for the population of the calender table. For example, you canpopulate the time dimension with 366 days of 15 minute timestamps (past andfuture) by entering the following command:./pack_admin.sh -set -property retention:366, buffer:366, granularity:15-pack ibm.tcr.time -logins ./logins.txt
70 IBM Tivoli Netcool Performance Manager: Model Maker 1.2.0 Installation and User Guide

where:v retention:366 populates the calendar table with intervals 366 days before
the current date.v buffer:366 populates the calendar table with intervals 366 days from the
current date.v granularity:15 specifies that the lowest interval in the calendar table is 15
minute intervals.v logins.txt is the logins file that you created in a previous task, see
“Creating a logins file with the appropriate passwords” on page 224. Populate calender schema tables for the ibm.tcr.time common pack by
entering the following command:./pack_admin.sh -execute -action calendar-refill -logins ./logins.txt
Common Pack Service is processing request.CTGTRQ005I The operation executeAction successfully performed.
When you issue the command to execute an action, it executes the action on allcommon packs that define that action. The calendar-refill action is defined inthe tcr.time common pack only.
Wireless Component only: Populating the database schema tablesWireless users must populate the database schema tables by using the CommonPack Service pack_admin command.
Before you begin
When a parameter includes spaces, enclose the complete parameter in doublequotation marks or escape the parameter.
About this task
Typically, the data-refill action is run once when you deploy a pack. You use thedata-refill action to populate the database schema tables. The data-refill actionis defined in all common packs except tcr.time. The data-refill action populatesthe hierarchy tables on which the Cognos data models depend. The data-refillaction cleans out and fully populates the DM tables.
Procedure1. Log in to the Tivoli Common Reporting server.2. Change to the following directory:
$TIP_COMPONENTS_LOCATION/TCRComponent/commonpackservice/bin
Where:TIP_COMPONENTS_LOCATION is the location where the Tivoli Integrated PortalComponents are installed. By default, /opt/IBM/tivoli/tipv2Components.
3. Populate schema tables in all Base Common Pack (BCP) and Vendor-Specificcommon packs by entering the following command:./pack_admin.sh -execute -action data-refill -logins ./logins.txt
Where:logins.txt is the logins file that you created in a previous task, see “Creating alogins file with the appropriate passwords” on page 22Common Pack Service is processing request.CTGTRQ005I The operation executeAction successfully performed.
Chapter 11. Installing common packs 71

The data-refill action is defined in all Base Common Pack (BCP) andvendor-specific common packs.
Downloading common packsTo publish common packs, or to allow the Generator tool to access dependantcommon packs, you must download the common pack models from the CommonPack Service to your local instance of the Model Maker Manager.
About this task
When publishing common packs, download each pack from the Common PackService before publishing to ensure that only the correctly activated common packsare published.
Note: You must not try to uninstall common packs by using Model MakerManager Help > Install New Software option. This generic Eclipse uninstallationoption is not supported in Model Maker Manager. Using this option just deletes acommon pack artifact maintained by Model Maker Manager and does not uninstalla common pack from the Common Pack Service.
Procedure1. Select Help > Install New Software.2. Select a site or enter the location of a site.3. Select common packs to download. When you select a common pack to
download, its dependent packs are automatically downloaded.4. Click Next.5. The downloaded common packs are listed in the Common Pack Models pane.
Publishing a common packYou must publish a common pack to the Tivoli Common Reporting server to makea Report Package available for reporting. Any data sources defined in the commonpack are also made available in Tivoli Common Reporting.
Before you begin
Download each pack from the Common Pack Service before publishing.
If the Cognos Framework Manager BMT Script Player has not already beenconfigured, you must configure it during this task.
For wireless users, if the wireless database has not already been configured, youmust configure it during this task. As part of the publish operation, the timerelationships of the common pack model must be updated with the correct loadinterval from the wireless database.
Procedure1. Select one or more common packs from the Common Pack Models tab.2. Right-click on your selection.3. From the menu, select the Publish to default package option.
If the BMT Script Player was not previously configured, the Preferenceswindow opens for you to enter the required details.
72 IBM Tivoli Netcool Performance Manager: Model Maker 1.2.0 Installation and User Guide

4. When prompted, enter the database user password.A window is displayed showing that the pack is being published.If the wireless database was not previously configured, the Preferences windowopens for you to enter the required details.
5. A Report Package is created and published to the Tivoli Common Reportingserver. On completion, a summary window is displayed with a completionmessage and the number of artifacts published, if any.
6. Optional: Log on to the Tivoli Common Reporting server to see your publishedmodel and reports.
Results
The package is now available on the Tivoli Common Reporting server andaccessible from the Common Reporting UI. Any data sources defined in thecommon pack are also available in Tivoli Common Reporting.
Listing common packs in the repositoryYou can list the common packs in the repository by using the List Common Packscommand.
Before you begin
You need a logins file for this procedure. If a logins file does not exist, you cancreate a logins file on the server by using the pack_admin command. Copy the fileback to your Windows computer before starting this procedure.
Procedure1. In Model Maker Manager, click the Common Pack Service button ( ) on the
toolbar. The Common Pack Service Selection Wizard opens.2. Select List Common Packs from the list of commands.3. Click Next. The List Common Packs Wizard opens.4. On the Login page, browse to a logins file.5. Click Next. The common packs in the repository are listed.
Uninstalling common packsTo uninstall a common pack from the Tivoli Netcool Performance Manager system,you remove it by using Model Maker Manager or the pack_admin command. Toremove a common pack from Model Maker Manager, you must currently uninstalland reinstall Manager.
Removing common packs from the repositoryIn Model Maker Manager, you remove a common pack from the common packrepository with the Remove Common Packs command.
Before you begin
You need a logins file for this procedure. If a logins file does not exist, you cancreate a logins file on the server by using the pack_admin command. Copy the fileback to your Windows computer before starting this procedure.
Chapter 11. Installing common packs 73

About this task
To ensure that you only see the packs that are on the system after removing packs,always refresh your view by restarting Model Maker Manager.
Procedure1. In Model Maker Manager, click the Common Pack Service button ( ) on the
toolbar. The Common Pack Service Selection Wizard opens.2. Select Remove Common Packs from the list of commands.3. Click Next. The Remove Common Packs Wizard opens.4. On the Login page, browse to a logins file.5. Click Next. The Installed Common Packs page displays a list of installed packs.6. Select a common pack to remove.7. Click Finish to delete the pack from the repository. If the operation is
successful, the wizard closes. If the operation fails, a message is displayed.
Removing downloaded common packs from the Windowscomputer
Downloaded common packs are stored on the Windows computer and managedby Model Maker Manager. To remove common packs from Manager and yourcomputer, you must uninstall and reinstall Manager, and download the packsagain.
About this task
Note: You must not try to uninstall common packs by using Model MakerManager Help > Install New Software option. This generic Eclipse uninstallationoption is not supported in Model Maker Manager.
Procedure1. Make a note of the common packs you have installed.2. Uninstall Manager by deleting the folder containing the Manager files.3. Reinstall Manager.4. Download each of the common packs you need.
74 IBM Tivoli Netcool Performance Manager: Model Maker 1.2.0 Installation and User Guide

Chapter 12. Resource Metric Viewer (wireless only)
The Resource Metric Viewer allows users to dynamically create reports.
The Resource Metric Viewer enables users to quickly create time seriesperformance reports.
The Resource Metric Viewer allows you to select an available model and from thismodel it allows you to select:v Resources: The set of resources to be included within the report.v Metrics: The set of metrics to be included in the report.v Time Interval: The time interval the report is to cover.v Granularty: The time granularity of the data being displayed.
Alternatively the Resource Metric Viewer allows you to create a report based on anevent from the Active Event List. The Resource Metric Viewer constructs the reportcharting the performance of the entity causing the event.
Resource Metric Viewer is available for Tivoli Netcool Performance ManagerWireless only.
Models that work with the Resource Metric Viewer
Raw, SBH, Summary, and combined models work with the Resource MetricViewer.
The Resource Metric Viewer can process both simple and composite models.
User roles
Resource Metric Viewer access is restricted to the following roles:v administrator,v biServiceUser,v chartAdministrator,v chartCreator andv chartViewer
Resource Metric Viewer setupThis section covers the basic tasks required to setup the Resource Metric Viewer.
Installation of the Resource Metric Viewer is performed when installing theCommon Pack Service.
The Common Pack Service installation is covered in the section “Running theinstaller” on page 17.
© Copyright IBM Corp. 2011, 2012 75

Adding the calendar indexesAs part of the set up for the Resource Metric Viewer you must add the calendarindexes.
Before you begin
Confirm that you have tcr.time installed:1. Run the command:
./pack_admin.sh -list -packs -logins logins.txt
Note: Replace logins.txt with the name of your logins file.2. Check that the output corresponds to the following:
Name:ibm.tcr.timeSymbolic name:ibm.tcr.timeVersion:1.0.7Creation date:3/20/12 8:56 AMActive?:true
Procedure1. Navigate to the directory containing the Model Maker package.2. FTP the add_times_indexes.sql script to a temporary directory on the target
server (for example, /tmp/).3. Telnet to the target server.4. Navigate the directory into which you saved the script.5. Run the script using the following command:
sqlplus tcrtime/tcrtime@vtdb @add_times_indexes.sql
Create the rmv folderIn common reporting section of Tivoli Integrated Portal a folder named “rmv”must be created before Resource Metric Viewer is enabled for packs.
About this task
To create this folder:
Procedure1. Log into Tivoli Integrated Portal as the administrator.
For example:https://<host>:16311/ibm/console/logon.jsp
2. In the left pane, click Reporting > Common Reporting.3. Click on the new folder button, and name the new folder rmv.
76 IBM Tivoli Netcool Performance Manager: Model Maker 1.2.0 Installation and User Guide

List packsThe pack_admin -list command must be run once after installation of theResource Metric Viewer.
Procedure
Run the pack_admin -list command.For example:pack_admin.sh -list -packs -logins logins_file
Note: For more information on the pack_admin.sh -list command, see“pack_admin -list” on page 111
Active Event ListA context menu script is required to launch from the Active Event List into theResource Metric Viewer User Interface.
This script must be added to the WebGUI to support launching into the ResourceMetric Viewer User Interface.
Note: If you have a model with both RNC and BSC, and there are RNC or BSCalarms defined, and those alarms are forwarded to Omnibus, these alarms may notdisplay correctly in the Resource Metric viewer. It is recommended that you labelsuch alarms. For information on labelling these alarms, see “Label alarms that maynot be handled properly by the Resource Metric Viewer” on page 90.
Adding the Active Event List scriptAdding a context menu script to launch the Resource Metric Viewer UI from theActive Event List.
Before you begin
You must create a configuration script before following the steps in this procedure.
A WebGUI context menu script, AelLaunchScript.script, can be found in thedirectory <TIP_COMPONENTS_LOCATION>/TCRComponent/commonpackservice/rmv/scripts, for example, /opt/IBM/tivoli/tipv2Components/TCRComponent/commonpackservice/rmv/scripts.
Integration with systems other than WebGUI will require similar scripts. ContactIBM® Services if integration with other IBM products is required.
Procedure1. Log into Tivoli Integrated Portal as the administrator.
For example:https://<host>:16311/ibm/console/logon.jsp
2. Click Administration > Event management Tools > Tool Creation.3. Click Create Tool.4. Enter the name for the script in the Name field.
For example, “RMV”.5. Select script in the type field.6. Copy the contents of the configuration script into the Script Commands
section
Chapter 12. Resource Metric Viewer (wireless only) 77

7. Under Access Criteria move the Netcool_OMNIbus_Admin andNetcool_OMNIbus_User options into the Selected field.
8. Click Save.9. Click Administration > Event management Tools > Menu Configuration.
10. Select alerts and click Modify.11. Move the script you created from the left side to the right and position it in
your preferred location.12. Click Save.
Note: If the Active Event List is already open, you will have to close andreopen it to see the new context menu option.
Results
When you right click on an entry on the Active Event List you will see the scriptas a selectable option in the context menu.
Enabling the Resource Metric Viewer with existing packsUsing the Resource Metric Viewer with legacy technology packs.
Before you begin
Resource Metric Viewer can only be enabled on Cognos Models that have beenpublished. For more information on how to publish the pack, see “Publishing acommon pack” on page 72
About this task
This procedure uses the pack_admin.sh command, which can be found in<TIP_COMPONENTS_LOCATION>/TCRComponent/commonpackservice/bin
Where <TIP_COMPONENTS_LOCATION> is the location where the Tivoli IntegratedPortal components are installed. By default, for the wireless component this is:/opt/IBM/tivoli/tipv2Components.
To create or update an Resource Metric Viewer report for a model, do thefollowing:
Procedurev To enable Resource Metric Viewer reports for a specified pack or for all available
packs, run the following command:pack_admin.sh -rmv -create [ -pack pack_filename | -all ] -logins password_file
For example:./pack_admin.sh -rmv -create -pack <pack_filename> -logins ../conf/logins
You can run the pack_admin.sh -rmv command for all packs by using the -allflag.
v To update Resource Metric Viewer reports based on a change to the model, runthe following command:pack_admin.sh -rmv -update_metrics [ -pack pack_filename | -all ] -logins password_file
For example:./pack_admin.sh -rmv -update_metrics -pack <pack_filename> -logins ../conf/logins
78 IBM Tivoli Netcool Performance Manager: Model Maker 1.2.0 Installation and User Guide

You can run the pack_admin.sh -rmv command for all packs by using the -allflag.
Note: For more information on the pack_admin.sh -rmv command, see“pack_admin -rmv” on page 116.
Using the Resource Metric ViewerThe Resource Metric Viewer allows you to create dynamic reports.
About this task
You can create dynamic reports using the Resource Metric Viewer in two ways:v By selecting an event from the Active Event List, which will create a report
based on the performance of the relevant entity.v By selecting a subset of resources and metrics available within a model.
Constructing a report by selecting a subset of resources andmetrics
The Resource Metric Viewer allows you to create dynamic reports by distilling theresource and metric set available for a specific model.
Procedure1. Log in to Tivoli Integrated Portal as the Resource Metric Viewer user, user.2. Click Performance > Resource Metric Viewer to open the Resource Metric
Viewer tab in the Tivoli Integrated Portal.
3. Select a model from the Models drop-down menu.4. Click the Direct Parents Only check box if you would like the following
Parent Entity and GrandParent Entity drop-down menus auto-populated withthe direct parents of the selected entity. If you select this, skip to step 8.
Note: If the situation occurs that there are multiple direct parents, you willneed to choose from the available parent entities by following steps 5 to 7.
Chapter 12. Resource Metric Viewer (wireless only) 79

5. Select a focal entity from the Focal Entity drop-down menu. This is the mainentity from which we want to view metrics.
6. Select a parent entity from the Parent Entity drop-down list.
Note: The inclusion of a Parent Entity or GrandParent Entity selection is toallow filtering on the main entity you are reporting against. For example, ifyou wanted to report on all cells for a particular geographical area, then youwould select that region and that would filter out all Cells that are not part ofthat region.
7. Select a grandparent entity from the GrandParent Entity drop-down list.8. Click Open in TIP or Open in New Window to display the results of your
selection. The Open in New Window option is present so your results aredisplayed in a new window, and, therefore, able to use all space available in abrowser window. The Resource Metric View Prompt Page is displayed, whichallows you to further distill the set of metrics to be included in your report byselecting individual resources and metrics.
9. In the Entity Selection section of the Resource Metric View Prompt Page,choose from the set of resources made available through your GrandParentEntity, Parent Entity and Entity selection in the initial Resource MetricViewer Selection pane.The Entity Selection section displays two Choice fields followed by a Resultsfield. The possible contents of each successive field is updated by the selectionin the previous fields.To correctly distill the list of resources to those you require:a. For each entity, use the Keywords field to filter the set of results.
Use the '%' symbol, which acts as a wildcard, plus any character string toconstruct the filter.Click Search to implement the filter.
b. Select those resources that are relevant within the Choice field.Click Finish to update the possible selections for the following entity.
c. Select the resources you require from the Results field and use the Insertand Remove buttons to set the final selection of resources.
If a user wants to find the children for one parent entity, they can select thatparent entity on the left and then and click search on the child entity searchbutton on the right.
80 IBM Tivoli Netcool Performance Manager: Model Maker 1.2.0 Installation and User Guide

So if you want the Region-HUA-1 children displayed in the Choice field on theright, select it with mouse and click on Search button under ENodeBFunction.
10. In the Metric Selection section of the Resource Metric View Prompt Page,choose from the set of metrics available.a. Filter the set of metrics using the Keywords field.
Use the '%' symbol, which acts as a wildcard, plus any character string toconstruct the filter.Click Search to implement the filter.
b. Select the metrics you require from the Results field and use the Insertand Remove buttons to set the final selection of metrics.
c. Click Finish.11. Set the granularity of the time series using the Time Granularity drop-down
list.12. Set the time frame of the report using the Date Range drop-down list, or
select a date range using the From and To calendar fields.13. Set the display format of the output using the Options section.
The Options section allows you, amongst other things, to choose between aLinear and Logarithmic chart. The Logarithmic option should be chosen ifyou are plotting metric sets that contain massively disparate values; forexample, one metric set might cover values between 0 and 1, and another setmay cover values between 0 and 1000.
14. Click Finish.
Figure 1. Entity search
Chapter 12. Resource Metric Viewer (wireless only) 81

Constructing a report by selecting an event in the ActiveEvent List
The Resource Metric Viewer allows you to select an event in the Active Event Listand create a report based on the performance of the relevant entity.
Procedure1. Log into your event management system (for example, Omnibus) that is in the
same Tivoli Integrated Portal instance as your Tivoli Netcool PerformanceManager user interface.
2. Select the Active Event List.This will display the list of detected anomalies.
3. Right-click on the event you would like to examine and select the name youassigned to the Resource Metric Viewer script within the Active Event Listmenu, for example, RMV.
Note: When an RMV report is opened up from the AEL, an error may bedisplayed.
This may occur when opening the RMV report for the first time. The error iscaused by Tivoli Integrated Portal launching the AEL event before the ResourceMetric Viewer page has been compiled and initialized. A reload of the page(open from AEL) will resolve this problem.The Resource Metric View AEL Prompt Page is displayed, which displaysdetails of the entity you selected within the Active Event List.
4. Set the granularity of the time series using the Time Granularity drop-downlist.
5. Set the time frame of the report using the Date Range drop-down list, or selecta date range using the From and To calendar fields.
6. Set the display format of the output using the Options section.The Options section allows you, amongst other things, to choose between aLinear and Logarithmic chart. The Logarithmic option should be chosen if youare plotting metric sets that contain massively disparate values; for example,one metric set might cover values between 0 and 1, and another set may covervalues between 0 and 1000.
7. Click Finish.
82 IBM Tivoli Netcool Performance Manager: Model Maker 1.2.0 Installation and User Guide

Resource Metric Viewer administrationThis section covers the administration tasks you may perform post setup of theResource Metric Viewer.
Modify the Resource Metric Viewer templateThe Resource Metric Viewer uses an XML Cognos report template. You can modifythis report if you wish in report studio to change the prompts, Images, andoperation of the Resource Metric Viewer.
About this task
The resource metric viewer template is located in <TIP_COMPONENTS_LOCATION>/TCRComponent/commonpackservice/rmv/templates
Where <TIP_COMPONENTS_LOCATION> is the location where the Tivoli IntegratedPortal components are installed. By default, for the wireless component this is:/opt/IBM/tivoli/tipv2Components.
The default Resource Metric Viewer report is designed so that no more than 9resources or metrics will be shown in the chart legend.
To update the model and refresh all Resource Metric Viewer reports, do either ofthe following, that is, use either the XML process or the Report Studio process:
Procedurev Using XML:
1. Navigate to <TIP_COMPONENTS_LOCATION>/TCRComponent/commonpackservice/rmv/templates.
2. Open and update the existing template.3. Make sure to update the model path by editing the following XML:
<modelPath>/content/package[@name=’gsm.sbh.3’]/model[@name=’2012-03-06T16:19:19.587Z’]</modelPath>
so that the modified report has the following XML:<modelPath>/content/package[@name=’[BIPACKNAME]’]</modelPath>
4. The name of the Resource Metric Viewer template must bermv_template.xml, the name of the Active Event List template must beael_template.xml
5. To update RMV reports, run the following command:pack_admin.sh -rmv -update_reports [ -pack pack_filename | -all ] -logins password_file
For example:./pack_admin.sh -rmv -update_reports -pack <pack_filename> -logins ../conf/logins
You can run the pack_admin.sh -rmv command for all packs by using the-all flag.
v Using Report Studio:After Resource Metric Viewer has been enabled for at least one pack, thetemplate will be available in common reporting in a folder named rmv.1. Open Resource Metric Viewer or Activate Event List template in report
studio and save under a new name.2. Update the report.3. Using Tools > Show Specifications copy XML into new file.
Chapter 12. Resource Metric Viewer (wireless only) 83

4. Modify <modelPath> file to the following:<modelPath>/content/package[@name='[BIPACKNAME]']</modelPath>
5. Replace report in <TIP_COMPONENTS_LOCATION>/TCRComponent/commonpackservice/rmv/templates with updated report template.
6. To update RMV reports, run the following command:pack_admin.sh -rmv -update_reports [ -pack pack_filename | -all ] -logins password_file
For example:./pack_admin.sh -rmv -update_reports -pack <pack_filename> -logins ../conf/logins
You can run the pack_admin.sh -rmv command for all packs by using the-all flag.
Note: For more information on the pack_admin.sh -rmv command, see“pack_admin -rmv” on page 116.
84 IBM Tivoli Netcool Performance Manager: Model Maker 1.2.0 Installation and User Guide
Chapter 13. Troubleshooting Model Maker and CommonReporting
When you encounter a problem with using Model Maker components, the firstthing to do is to check the detailed log files for that component. Most issues can besolved by referring to the log files.
Known issues are documented in the Known issues with Tivoli Netcool PerformanceManager 1.3.2 technote in the Support knowledge base.
You can also check the following links in the Tivoli Common Reportingdocumentation for known issues with Tivoli Common Reporting and IBM Cognos:v http://publib.boulder.ibm.com/infocenter/tivihelp/v3r1/topic/
com.ibm.tivoli.tcr.doc_21/ctcr_troubleshooting.htmlv http://publib.boulder.ibm.com/infocenter/tivihelp/v3r1/topic/
com.ibm.tivoli.tcr_cog.doc/ctcr_cog_knownlimitations.html
Data modeling and Model Maker issuesRead the following known issues if you are experiencing problems when creating,updating, or installing Tivoli Netcool Performance Manager common packs.
Always use the HTTP protocol for the update siteAlways use the HTTP protocol for the update site as the Eclipse update Managerdoes not perform effectively with the HTTPS protocol.
Symptoms
You get an error during a common pack download or update.
Diagnosing the problem
User response: Check for the following issues:v Check that you are using http:// and not https:// for the update site.v Check that you are using the correct port number for the protocol.
Resolving the problem
Ensure that you are using http:// and not https:// and the correct port numberfor the update site.
Slow download of common packsSymptoms
When downloading common packs by using the Help > Install New Softwareoption, an error similar to the following is displayed:Unable to read repository at http://host.ibm.com:16310/ibm/commonservice/site/site.xml
You can directly access the common service site mentioned, but it is slow torespond.
© Copyright IBM Corp. 2011, 2012 85

Resolving the problem
User response:
If you encounter this problem:1. Navigate to the /<tip_install_dir>/products/tcr/bin/ directory.2. Restart Tivoli Common Reporting by running the following scripts:
v stopTCRserver.sh <username> <password>
v startTCRserver.sh
CTGTRR1104E Cannot open an administrative databaseconnection
pack_admin commands fails with an error.
Symptoms
When using the pack_admin commands, you see an error like the following error:CTGTRR1104E Cannot open an administrative database connection.Check the database details and connectivity and try again.
Causes
This issue can caused by an unresponsive Tivoli Common Reporting installation.
Diagnosing the problem
Try to log in to Tivoli Common Reporting to see if the Tivoli Common Reportinghome page loads in your browser. If the home page fails to load, then TivoliCommon Reporting is unresponsive.
Resolving the problem
Restart the Tivoli Common Reporting server by going tothe$TIP_COMPONENTS_LOCATION/TCRComponent/bin directory and entering thecommands:./stopTCRserver.sh <username> <password>./startTCRserver.shWhere TIP_COMPONENTS_LOCATION is the location where the Tivoli Integrated PortalComponents are installed, by default /opt/IBM/tivoli/tipv2Components forwireless and /opt/IBM/tivoli/tip21Components for wireline.
Updating earlier pre-GA common packsDue to known issues in Eclipse, earlier IBM generated common packs specifiedexact versions of their dependent packs, whereas current common packs specify aversion range. Some common packs need to be updated to make them compliantwith the latest versions of common packs and the GA version of the Common PackService, which accepts a version range.
About this task
There are two ways of specifying the version information of dependent packs in acommon pack:
86 IBM Tivoli Netcool Performance Manager: Model Maker 1.2.0 Installation and User Guide
v A simple version string – the common pack will only install if that exact versionof the dependent common pack is installed. For example, the version set to 1.0.1means that this common pack requires version 1.0.1 of the dependent pack.
v A version range – The common pack will install if the version of the dependentcommon pack that is installed is in a defined range. The minimum version is setto the minimum required level, such as 1.0.1, while the maximum version is setto a very large constant value meaning that the maximum value is notimportant, allowing for updates.
The following procedure shows how to update all dependent common packreferences from exact versions to a version range, and how to recreate the pack.
Procedure1. Extract the common pack jar file to a folder of your choice.2. Open the bipack.xml file in any text editor.3. Change each instance of the <version> markup to the <version-range> markup.
For example, change<pack>
<pack-symbolic-name>ibm.tcr.time</pack-symbolic-name><version>1.0.1</version>
</pack>
to<pack>
<pack-symbolic-name>ibm.tcr.time</pack-symbolic-name><version-range>
<min-version>1.0.1</min-version><include-min>true</include-min><max-version>2147483647.0.0</max-version><include-max>false</include-max>
</version-range></pack>
4. Save the bipack.xml file.5. Recreate the common pack by using Model Maker Manager.
Resolving Cognos connection errorsYou might encounter messages like the following messages when using or creatingan Oracle connection from Tivoli Common Reporting or within FrameworkManager.
Symptoms
In a Windows Environment:QE-DEF-0285 Logon failure.
QE-DEF-0068 Unable to connect to at least one database during a multi-databaseattach to 1 database(s) in:testDataSourceConnection
UDA-SQL-0432 Unable to locate the gateway "cogudaor".
In a UNIX environment:QE-DEF-0285 Logon failure.
QE-DEF-0068 Unable to connect to at least one database during a multi-databaseattach to 1 database(s) in:testDataSourceConnection
UDA-SQL-0432 Unable to locate the gateway "libcogudaor"
Chapter 13. Troubleshooting Model Maker and Common Reporting 87

Causes
Incomplete configuration of the Oracle client.
Resolving the problem
Ensure that you have configured your Oracle library environment variablecorrectly, as described in the topic “Configuring Tivoli Common Reporting forOracle connections” on page 9.
If that does not solve the problem, see the following IBM technote for furthertroubleshooting steps, http://www-01.ibm.com/support/docview.wss?uid=swg21341734.
Supporting help buttons in Model Maker ExtractorModel Maker Extractor is based on Eclipse and supports most, but not all, of thedefault Eclipse functionality visible in the user interface. In this release, the defaultEclipse help buttons found at the lower left of wizard pages are not supported.
Symptoms
HTML pack documentation slow to open in Internet ExplorerIssue when opening pack documentation provide in HTML format in InternetExplorer.
Symptoms
The following error is displayed:Stop running this script? A script on this page is causing InternetExplorer to run-slowly. If it continues to run, your computer might becomeunresponsive.
Causes
The error occurs because the files can contain many resources.
Resolving the problem
You can ignore the error and continue. The HTML document will open after aperiod of time.
(Wireless) Combining models might hang on "Creating newFramework Manager project"
Model Maker Manager can sometimes hang when combining models.
Symptoms
When using the Combine Models option, Model Maker Manager hangs on theCreating new Framework Manager project step.
Causes
This issue is caused by an unresponsive Tivoli Common Reporting Version 2.1installation. The Framework Manager BmtScriptPlayer attempts to communicate
88 IBM Tivoli Netcool Performance Manager: Model Maker 1.2.0 Installation and User Guide

with Tivoli Common Reporting through the BmtScriptPlayer.exe -c projectPathcommand, which hangs when it receives no response.
Environment
The Model Maker Manager and a server running Tivoli Common ReportingVersion 2.1.
Diagnosing the problem
Try to log in to Tivoli Common Reporting to see if the Tivoli Common Reportinghome page loads in your browser. If the home page fails to load, then TivoliCommon Reporting is unresponsive.
Resolving the problem
Restart the Tivoli Common Reporting server by going tothe$TIP_COMPONENTS_LOCATION/TCRComponent/bin directory and entering thecommands:./stopTCRserver.sh server1 -user <username> -password <password>./startTCRserver.sh server1 -user <username> -password <password>Where TIP_COMPONENTS_LOCATION is the location where the Tivoli Integrated PortalComponents are installed, by default /opt/IBM/tivoli/tipv2Components forwireless and /opt/IBM/tivoli/tip21Components for wireline.
(Wireless) Missing formulae in metrics groups after generatingthe CIF file
There are missing formulae in the metrics groups after generating the CommonIntermediate Format (CIF) file using the expanded folder option for GSM andUMTS technology packs.
(Wireless) Do not use special characters in the model namewhen creating Summary and Busy Hour models
In Model Maker Extractor, do not use special characters when entering a name forthe model on the Model Details page of the Import Summaries or Import BusyHours wizards.
(Wireline) Issue when extending a model by using thepm.inventory.getResources DAL query
If you create or modify a data source with the pm.inventory.getResources DALquery and want to import this data source into Framework Manager, you need tomanually modify the data source to avoid an error.
Symptoms
If you do not manually modify the data source, the database objects cannot becreated in Framework Manager when importing the modified data sources. Anerror like the following error is displayed:RQP-DEF-0177 An error occurred when performing operation ’sqlScrollBulkFetch’status - ’-121’ UDA-SQL-0528The XML parser returned the following message:’An exception occurred! ’...Could not open file: http://...
Causes
Chapter 13. Troubleshooting Model Maker and Common Reporting 89

The ??group?? parameter cannot be understood when obtaining databaseinformation needed to create the model objects.
Environment
This issue applies if you are adding a custom model extension to a wireline datamodel that retrieves Resource Attributes (Properties) by using thepm.inventory.getResources DAL query.
Resolving the problem
When creating the model objects, create or modify data sources for loading intoFramework Manager to create the database objects. The new or modified datasources must be manually configured in Tivoli Common Reporting to change thegroup ID to a static group ID instead of the default ??group?? parameter.
User response:
1. Log on to Tivoli Integrated Portal.2. Expand Reporting -> Common Reporting.3. On the toolbar, click Launch -> Administration.4. Navigate to the Configuration tab and click data source Connection.5. Left-click on a data source and click the Set Properties button.6. In the Set Properties window, navigate to the Connection tab and click the edit
the connection string icon to configure the data source.7. Locate ??group?? in the connection string and change the group to
'+dq(prompt('enter%20group%20id','integer','<group id>'))+'
Where <group id> is the path to the NOC Reporting group where list ofresources are grouped.Example
The default data source installed in Tivoli Common Reporting is:http://9.127.96.62:16710/ibm/tnpm/dal/cognos#’?camid=’+CAMPassport()+’&query={call%20pm.inventory.getResources("??group??",[??resources??],["location","IPDevice"],??endTime??)}’#
This data source has had the group ID changed so that the data source can beloaded in Framework Manager to create new database objects:http://9.127.96.62:16710/ibm/tnpm/dal/cognos#’?camid=’+CAMPassport()+’&query={call%20pm.inventory.getResources(’+dq(prompt(’enter%20group%20id’,’integer’,’10557’))+’,[??resources??],["location","IPDevice"],??endTime??)}’#
Label alarms that may not be handled properly by theResource Metric Viewer
As part of setup for the Resource Metric Viewer it is recommended that you labelthose alarms that may not display properly in the Resource Metric Viewer.
About this task
If you have a model with both RNC and BSC in it, and there are RNC or BSCalarms defined, and those alarms are forwarded to Omnibus, perform thefollowing step:
90 IBM Tivoli Netcool Performance Manager: Model Maker 1.2.0 Installation and User Guide

Procedure
Add to the RNC/BSC alarm Description "Do not open this in RMV from AEL".Where:v RMV is the Resource Metric Viewer.v AEL is the Active Event List.
Note: For information on how to change the description of an alarm, see thesection "Update an Alarm Definition" in chapter 14 of the Tivoli Netcool PerformanceManager: User Guide - Wireless
Reporting issuesRead the following known issues if you are experiencing problems with CommonReporting on Tivoli Netcool Performance Manager.
Intermittent problems logging on to Tivoli Common ReportingYou can experience problems intermittently when logging in to Tivoli CommonReporting.
Symptoms
You get a message like this message: The user or password you provided is notvalid. Provide valid credentials.
Causes
This is a known issue in Tivoli Common Reporting.
Resolving the problem
If you are sure that you have the correct credentials, restart the browser. If thatdoes not work, clear the cache and try again.
Logging in when your session times outThis is a known problem with logins on Tivoli Common Reporting.
Symptoms
If your login session times out, you get a message requesting you to log in again.If you click Logout and try to log in again, the login fails.
Resolving the problem
Close the browser and open a new browser session before logging in again.
Problems running reports if you have logged in to multiplesessions
Multiple login sessions to Tivoli Common Reporting are not supported.
Symptoms
You cannot run reports if you have previously logged in to another TivoliCommon Reporting environment within the same browser session.
Chapter 13. Troubleshooting Model Maker and Common Reporting 91

Causes
The issue is a known issue and is documented in the following IBM supporttechnote:https://www-304.ibm.com/support/docview.wss?uid=swg21498980
Page number is not shown at the bottom of a HTML reportIn HTML reports pages are not counted and the final page number shows as aquestion mark (?).
Symptoms
The final page number shows as a question mark (?).
Causes
When Report Studio renders a page as HTML, it renders each page only whenrequired. This makes a HTML report quicker to render than a PDF report.However, this means that the pages are not counted and that the final pagenumber shows as a question mark (?).
Resolving the problem
To see the number of pages in your report, you have two options:v In an HTML report, go to each page sequentially; the total number of pages is
then shown.v Render the report in PDF. The complete dataset always renders for the PDF
option, and the total number of pages shown.
Problems with Report Studio in Internet Explorer 8If you have problems opening Report Studio in Internet Explorer 8, refer to thefollowing Tivoli Common Reporting known issue.
Symptoms
You see delays or an error message when opening Report Studio.
Resolving the problem
http://publib.boulder.ibm.com/infocenter/tivihelp/v3r1/index.jsp?topic=%2Fcom.ibm.tivoli.tcr.doc_21%2Ftstcr_report_studio.html
Customizing reports in Report Studio using Internet ExplorerReport Studio in Firefox has some limitations with dragging and dropping objectsinto templates.
Symptoms
Some drag and drop operations do not succeed.
Resolving the problem
Always use Internet Explorer when creating or editing custom reports in ReportStudio.
92 IBM Tivoli Netcool Performance Manager: Model Maker 1.2.0 Installation and User Guide

Cannot resize the Common Reporting window in InternetExplorer 8
Symptoms
When using Internet Explorer 8, resizing the browser window does not resize theCommon Reporting window.
Causes
The issue is caused by a known issue with Internet Explorer 8 in Tivoli CommonReporting.
Resolving the problem
If you need to resize the Common Reporting window, consider using MozillaFirefox.
Infinitely expanding resources in the Report Studio hierarchyUnder certain conditions, resources in the hierarchy dimension can be expandedinfinitely in the Report Studio presentation view. Expanding resources in theReport Studio presentation view does not affect the use of the dimension inreports.
Symptoms
If the hierarchy is not populated correctly, drill ups and drill downs do not work.
Causes
The error is caused by the default behavior of Cognos dimensions. If there is nodata for certain objects, then an infinite loop is displayed in Report Studio.
CSV export is not supported for reports containing multipletables
When there is more than one tabular chart in a report, the CSV exported onlycontains the data from the first tabular chart. The data for the other tabular chartsis not exported to CSV.
The CSV file extension is .xls instead of .csvThe default file extension for a report exported to CSV format report is .xls insteadof .csv.
Symptoms
When you export a report, the file extension is not .csv as expected and you geterrors when opening the file.
Causes
The .xls file extension is default behavior for Tivoli Common Reporting.
Resolving the problem
Chapter 13. Troubleshooting Model Maker and Common Reporting 93
Manually change the file extension to avoid errors when opening the file.
Common Reporting page resets when you select another task
Symptoms
The Common Reporting page, including any reports you are viewing, resets to itsdefault values if you switch to another task in the Tivoli Integrated Portal.
Causes
The issue is a known issue with Tivoli Common Reporting.
Resolving the problem
This behavior can be modified by changing the page persistence settings for theCommon Reporting portlet.
Limitations on formatting charts in Microsoft ExcelFor best results when exporting reports to Excel, always select Microsoft Excel2007. Due to formatting limitations in older versions of Excel, exporting in versionssuch as 2000 or 2002 can produce incompatible charts.
Symptoms
In Microsoft Excel 2007, wireline users can still experience some formattingproblems with charts that have a decimal number on the y-axis.
Causes
Again, this is due to formatting limitations in Microsoft Excel.
Resolving the problem
If this problem occurs, use Report Studio to modify the chart and change the dataformat property of the y-axis to the Number with 2 decimal places option.
Unreadable text error message in Excel 2007Problem when running a report.
Symptoms
You might encounter an unreadable text error message when running a report inExcel 2007 format.
Resolving the problem
User response: The issue is a known issue. For more details and the workaround,see https://www-304.ibm.com/support/docview.wss?uid=swg21498980.
94 IBM Tivoli Netcool Performance Manager: Model Maker 1.2.0 Installation and User Guide

Delays when running scheduled reports
Symptoms
You find that scheduled reports take longer to run than interactive reports.
Causes
This is because a scheduled report generates the whole report before displaying thereport, while an interactive report responds with the first page as soon as it iscomplete. Therefore, when scheduling reports with large numbers of resources, beaware that the run time will be longer than that of the equivalent interactivereport.
Diagnosing the problem
When scheduling reports with large numbers of resources, be aware that the runtime is longer than the equivalent interactive report.
Data from wireless and wireline databases in reports is notlinked
You can install the Common Pack Service so that you can include data from boththe wireless and wireline databases in reports. While you can include both wirelessand wireline data in the same report, there is currently no relationship between thedata.
Null aggregation is not supported in Common ReportingNull aggregation is not supported in Common Reporting on Tivoli NetcoolPerformance Manager.
PDS-PPE-0104 error messageYou might encounter the following message while running reports containingcharts.
SymptomsPDS-PPE-0104 - A record was rejected. An arithmetic overflow occurred.PDS-PPE-0104 A record was rejected. An arithmetic overflow occurred. (Data)
Resolving the problem
For more information, see the IBM technote at https://www-304.ibm.com/support/docview.wss?uid=swg1PM04840.
(Wireless) Null aggregation is not supported in CommonReporting - Wireless implications
Tivoli Netcool Performance Manager KPIs with Null aggregation have theiraggregation set to SUM in Common Reporting. In Common Reporting, this is mostnoticeable in ranking reports.
Symptoms
In ranking reports where drilling up (aggregating) the values of KPIs is used,ranked values are summed and not ranked. For Stored Busy Hours with a RANK
Chapter 13. Troubleshooting Model Maker and Common Reporting 95

measure, the rank value is summed when it is drilled up to its parent entity. Thisalso happens for values rolled up over time. For example:
Time Rank Value
Day1 13:00 1 50
Day1 14:00 2 20
Day1 22:00 3 10
Day1 03:00 1 50
Day1 11:00 2 20
Day1 14:00 3 10
On a roll up to a week, the values appear as:
Time Rank Value
Week 1 12 160
Causes
Busy hour ranking is a type of null aggregator. It is recommended that the BHRANK measure is not used in rolled up reports.
Resolving the problem
. When you are defining a summary, you can set the aggregation of a summaryKPI to null. This means when this KPI is rolled up, the value after the rollup isnull. Common Reporting is unable to roll up by null so attempts to sum theresults, thus giving a different value than Tivoli Netcool Performance Manager -Wireless Component would give for the same KPI summary.
(Wireless) KPIs that are stored in IP format in the database aredisplayed incorrectly in reports
This issue occurs when you work with reports that have some KPIs stored in IPformat (for example, 192.168.60.150) in the wireless database.
Symptoms
The values for those KPIs are displayed incorrectly in the rendered report.
Resolving the problem
To work around this issue, set the aggregate function in the column properties ofthe KPI to None instead of Automatic, since the default aggregator in a technologypack is always Null.
(Wireline) PRS-CSE-1258 error messageYou might encounter an error message while running reports.
Symptoms
The following error message is displayed: PRS-CSE-1258 - Problem encounteredduring verification of session capability information
96 IBM Tivoli Netcool Performance Manager: Model Maker 1.2.0 Installation and User Guide

com.cognos.accman.jcam.crypto.CAMCryptoException :CAM-CRP-1346 Failed to get the HMAC value to verify the package capabilitytrust token. Invalid digest of the common symmetric key.Unable to find an appropriate common symmetric key to decrypt the data.
Causes
See the following IBM technote for further information:https://www-304.ibm.com/support/docview.wss?uid=swg21498980
(Wireline) Report titles and labels are displayed in ASCIIformat
Certain technology packs do not automatically convert the resourceAlias attributefrom ASCII format to text.
Symptoms
If you are working with reports on one of these packs, titles and labels aredisplayed as a long ASCII string.
Resolving the problem
If the error occurs, open Report Studio and modify the affected titles or labels touse resourceName instead of resourceAlias.
(Wireline) Differentiating duplicate resources with the sameresourceAlias.
You must add the resourceId into lists and crosstabs to differentiate duplicateresources having the same resourceAlias.
Symptoms
You can get incorrect data if a number of resources use the same resourceAlias.This scenario is unusual but can occur in some situations.
Causes
In Common Reporting, metrics are aggregated based on the uniqueness of resourceattributes such as the resourceId, resourceName, and resourceAlias. For example,consider five resources each with a different resourceId, but sharing the sameresourceAlias. By default, when the report is process, only one row is returnedbecause the aggregation and grouping are based on resourceAlias.
Resolving the problem
When designing reports that contain resources that share the same resourceAlias,you must add extra data items to lists, crosstabs, or charts. Adding the resourceIdcan differentiate different resources having the same resourceAlias. Set theresourceId to hidden so that it is not displayed in the report.
User response: Procedure for list (table)
1. From the Insertable Objects pane, drag a resourceId data item into the list.2. Select the resourceId column.3. In the Properties pane, under Box, set Box Type to None.
Chapter 13. Troubleshooting Model Maker and Common Reporting 97

User response: Procedure for crosstab
1. From the Insertable Objects pane, drag a resourceId data item into thecrosstab.
2. In the Properties pane, under Miscellaneous, remove the Crosstab member cellclass.
3. Unlock the report by using the lock icon on the toolbar.4. In the crosstab, click each of the resourceId text items and delete them.
User response: Procedure for chart
1. Click the repeater object that contains the chart.2. In the Properties pane, to modify the Repeater properties click Data -> Group
& Sorting. The Group & Sorting window opens.3. Insert resourceId data items into Groups.4. Insert ResourceAlias data items into Sort List under resourceId.
(Wireline) Table cells with no data are blankUsers of previous wireline versions expect to see a dash (-) in table cells wherethere is no data. However, to conform to the Cognos reporting guidelines, tablecells with no data are left blank.
(Wireline) Modifying timestamps in custom charts to round upto minutes instead of milliseconds
By default, timestamps in reports created by using the wireline data models arerounded up to milliseconds.
Symptoms
Certain reports are difficult to read.
Resolving the problem
Change the report to round the timestamps up to minutes instead.
User response: This procedure assumes that time data item found on the Source isinserted into the chart or table in Report Studio as shown. Repeat these steps asrequired while creating custom charts or tables.1. Double-click the time data items. The Data Item Expression window opens.2. In the Expression Definition window, enter the following expression. This
expression removes seconds and milliseconds, resulting in the display ofyear-month-day hour:minute only.substring(cast( data_item_path,varchar(30)),1,16) where ata_item_paths the path of the selected data item.
3. Save the expression by clicking OK.
(Wireline) Raw data is not returned for a KPI when allresources for a non-leaf group are selected
Raw data only returns if you select all resources for a leaf report group, or select asubset of resources for a non-leaf group.
Symptoms
98 IBM Tivoli Netcool Performance Manager: Model Maker 1.2.0 Installation and User Guide

A raw KPI (time-series) returns empty data when all resources for a non-leaf groupare selected in the prompt pages for the report. The same report returns data whena subset of the available resources is selected.
Causes
For Common Reporting reports, there is a design limitation on how the DALhandles all resources being selected for a non-leaf group.
Environment
Diagnosing the problem
User response: .
Resolving the problem
User response: If you have selected a non-leaf report group and require raw data,do not select all resources for the group.v Examples of non-leaf groups:
–- NOC Reporting- NOC Reporting~Devices- NOC Reporting~Devices~Interfaces
Example of a leaf group:– NOC Reporting~Devices~Interfaces~10.127.97.97
(Wireline) Bar graph in microchart does not follow thesequence of KPIs in the summary table, as per the graph inHTML or PDF format
The sequence of the KPIs in the bar graph in the microchart in some reports, forexample Cisco CBQoS reports, does not follow the sequence of the KPIs in thesummary table column. The graph is displayed correctly in HTML or PDF format.
Symptoms
The bar graph in a microchart can be different that you expect.
Resolving the problem
Be aware of this discrepancy when deciding the appropriate format to share yourreports.
(Wireline) Exporting a PDF returns an error when the reporthas no data charts
Symptoms
When a report has no data charts, the export PDF will fail and return an error.
Resolving the problem
Chapter 13. Troubleshooting Model Maker and Common Reporting 99

Be aware of this issue when generating your PDF reports.
100 IBM Tivoli Netcool Performance Manager: Model Maker 1.2.0 Installation and User Guide
Appendix A. Configuring communications between theCommon Pack Service and the Common Pack Service Client
The Common Pack Service supports secure communication over the HTTP protocolbetween the Common Pack Service and the Common Pack Service Client. Ifneeded, you can optionally configure secure communications.
This release of the Common Pack Service Client Secure Communication supportsMicrosoft Windows and UNIX.
The CLI client for the Common Pack Service has three options for communicationbetween the Common Pack Service and the Common Pack Service Client:v Nonsecure communications.v Secure communications with the trusting option.v Secure communications with the strict option.
Configuring nonsecure communicationsYou can configure the client to use a nonsecure communication channel (HTTP)protocol between the Common Pack Service and the Client.
Procedure1. On the computer where Tivoli Common Reporting is installed, go to the
$TIP_COMPONENTS_LOCATION/TCRComponent/commonpackservice/conf directory.Where:
TIP_COMPONENTS_LOCATIONIs the location where the Tivoli Integrated Portal components areinstalled. By default, /opt/IBM/tivoli/tipv2Components for wirelessand /opt/IBM/tivoli/tip21Components for wireline.
2. Open the biserviceclient.properties file in edit mode.3. Ensure that the bi.pack.service.ssl property is set to false as shown:
bi.pack.service.ssl=false
4. Ensure that the port value property in the biserviceclient.properties fileuses the HTTP port and not the HTTPS port.
5. Save the biserviceclient.properties file.
Results
The client and the service now communicate over a nonsecure connection.
Configuring secure communication with the trusting optionYou can configure the client to use secure communication channel SSL over theHTTP protocol with the trusting option between the Common Pack Service and theClient. This option must be used with a self-signed digital certificate, and youmust trust the certificate used by Tivoli Common Reporting.
© Copyright IBM Corp. 2011, 2012 101

Procedure1. On the computer where Tivoli Common Reporting is installed, go to the
$TIP_COMPONENTS_LOCATION/TCRComponent/commonpackservice/conf directory.Where:
TIP_COMPONENTS_LOCATIONIs the location where the Tivoli Integrated Portal components areinstalled. By default, /opt/IBM/tivoli/tipv2Components for wirelessand /opt/IBM/tivoli/tip21Components for wireline.
2. Open the biserviceclient.properties file in edit mode.3. Ensure that the bi.pack.service.ssl property is set to true as shown:
bi.pack.service.ssl=true
4. Ensure that the bi.pack.service.ssl.mode property is set to trusting asshown:bi.pack.service.ssl.mode=trusting
5. Ensure that the port value uses the HTTPS port and not the HTTP port.6. Ensure that the host value matches the same value as “Common Name” CN on
the Certificate.7. Save the biserviceclient.properties file.
Results
The client and the service now communicate over a secure connection with thetrusting option.
Configuring secure communication with the strict optionYou can configure the client to use secure communication channel SSL over theHTTP protocol with the strict option between the Common Pack Service and theClient. The Tivoli Common Reporting Digital Certificate is imported to the clientruntime truststore. This option is the most secure.
Procedure1. On the computer where Tivoli Common Reporting is installed, go to the
$TIP_COMPONENTS_LOCATION/TCRComponent/commonpackservice/conf directory.Where:
TIP_COMPONENTS_LOCATIONIs the location where the Tivoli Integrated Portal components areinstalled By default, /opt/IBM/tivoli/tipv2Components for wireless and/opt/IBM/tivoli/tip21Components for wireline.
2. Open the biserviceclient.properties file in edit mode.3. Ensure that the bi.pack.service.ssl property is set to true as shown:
bi.pack.service.ssl=true
4. Ensure that the bi.pack.service.ssl.mode is set to strict as shown:bi.pack.service.ssl.mode=strict
5. Ensure that the port value property uses the HTTPS port rather than the HTTPport.
6. Save the biserviceclient.properties file.
102 IBM Tivoli Netcool Performance Manager: Model Maker 1.2.0 Installation and User Guide

What to do next
You must export the digital certificate from Tivoli Common Reporting and importit into the Common Pack Service Client JVM runtime truststore.
Exporting the Tivoli Common Reporting digital certificateYou can export the Tivoli Common Reporting digital certificate.
Procedure1. Log in to the Tivoli Integrated Portal.2. In the Tivoli Integrated Portal, expand Settings > WebSphere Administrative
Console.3. Select Launch WebSphere Administrative Console.4. Log in to the Administrative Console.5. Expand Security and select SSL certificate and key management.6. Under the Configuration settings section select Manage endpoint security
configurations link.7. Select the SSL certificate as shown.
8. Select Manage Certificates as shown.
Appendix A. Configuring communications between the Common Pack Service and the Common Pack Service Client 103

9. Select the certificate you want to manage and then extract it, as shown.
10. Enter the name of the file for the certificate. Usually the file name extension iscer. For example server_id.cer. Then click OK as shown. For example, theextracted certificate can be found in the following folder: /appl/IBM/ivoli/tipv2/profiles/TIPProfile/etc/ for wireless and /appl/IBM/ivoli/tip21/profiles/TIPProfile/etc/
104 IBM Tivoli Netcool Performance Manager: Model Maker 1.2.0 Installation and User Guide

Importing the digital certificate to the client runtime truststoreYou can import the Tivoli Common Reporting certificate to the Common PackService Client JVM runtime truststore.
Procedure1. Go to <java-home>/jre/bin to verify which JVM you are using.2. Use the ikeycmd tool to import the digital certificate. The following command
imports the aquila_cert that was already exported from the Tivoli CommonReporting server:For the Wireless Component, enter the following command on one line:ikeycmd -cert -add -db /appl/IBM/tivoli/tipv2/java/jre/lib/security/cacerts-file /appl/IBM/tivoli/tipv2/profiles/TIPProfile/etc/server_id.cer -type jks-label server_id_label
For Wireline Component, enter the following command on one line:ikeycmd -cert -add -db /appl/IBM/tivoli/tip21/java/jre/lib/security/cacerts-file /appl/IBM/tivoli/tip21/profiles/TIPProfile/etc/server_id.cer -type jks-label server_id_label
3. Enter the password for cacerts keystore database. .4. Once the certificate is imported, the client can communicate securely with the
service.
Appendix A. Configuring communications between the Common Pack Service and the Common Pack Service Client 105

106 IBM Tivoli Netcool Performance Manager: Model Maker 1.2.0 Installation and User Guide

Appendix B. Command reference
A list of commands available for common pack administrators and modelers.
The following commands are available:v “The pack_admin command”v “The generator command” on page 117
The pack_admin commandUse the Common Pack Service pack_admin command to work with common packsand the common pack repository from the command line. For example, you candisplay the contents of the repository and add, activate, and remove commonpacks in the repository.
Location
$TIP_COMPONENTS_LOCATION/TCRComponent/commonpackservice/bin
Where TIP_COMPONENTS_LOCATION is the location where the Tivoli IntegratedPortal Components are installed, by default:
Wireless Component/opt/IBM/tivoli/tipv2Components
Wireline Component/opt/IBM/tivoli/tip21Components
The password fileA password file is used to pass encrypted Tivoli Common Reporting and targetdatabase credentials to the pack_admin commands.
The pack_admin -passwordfile option generates the encrypted logins file. Thelogins file is then passed into pack_admin commands and actions by using the-logins option.
The password file must contain credentials for the Tivoli Integrated Portal, and forthe target database user accounts, bicontrol, and birefresh. These "accounts"represent users on the target database with a known minimum set of privileges.They do not literally have to be users named bicontrol, and birefresh.
Each account is used to perform different tasks, and the actions themselves areconfigured to look for a particular account they must use to perform theiroperation. Each action looks up the user name of the account they need to use, asdefined in the connection profile specified for the pack, and compares this name tothe user names they receive in the password file.
© Copyright IBM Corp. 2011, 2012 107

Example
Here is an example password file.
TARGET tnpm bicontrol 6439448205275568054409870151339790687TARGET tnpm birefresh 22726015774105630813618842664095311722TIPUSER - tipadmin -89496516100624695361961177712212346580
pack_admin -activateThe -activate command flag for the pack_admin command activates a commonpack in the Pack Repository by applying the specified version of a pack to thesystem. Database schemas are installed (upon first-time activation of a given pack)or upgraded (upon activation of subsequent versions of the pack) and the activeversion of the pack is updated.
Location
$TIP_COMPONENTS_LOCATION/TCRComponent/commonpackservice/bin
Where TIP_COMPONENTS_LOCATION is the location where the Tivoli IntegratedPortal Components are installed, by default:
Wireless Component/opt/IBM/tivoli/tipv2Components
Wireline Component/opt/IBM/tivoli/tip21Components
Syntax
pack_admin.sh -activate -pack pack_name -version version_number -logins logins_file
Parameters
When a parameter includes spaces, enclose the complete parameter in doublequotation marks or escape the parameter.
pack_nameThe name of a common pack in the Pack Repository.
version_numberThe version number of the common pack.
logins_fileAn encrypted credentials file containing a Tivoli Integrated Portaladministrative user name and password, and database user names andpasswords. The logins file must contain the username of the bicontrol accountfor the connection profile.
108 IBM Tivoli Netcool Performance Manager: Model Maker 1.2.0 Installation and User Guide

pack_admin -addThe -add command flag for the pack_admin command adds the specified commonpacks to the common pack repository by registering pack versions with the system.The version of the pack appears on the pack list of the repository, but that versionis not used until it is activated.
Location
$TIP_COMPONENTS_LOCATION/TCRComponent/commonpackservice/bin
Where TIP_COMPONENTS_LOCATION is the location where the Tivoli IntegratedPortal Components are installed:
Wireless Component/opt/IBM/tivoli/tipv2Components
Wireline Component/opt/IBM/tivoli/tip21Components
Syntax
pack_admin.sh -add [ -pack pack_filename | -dir directory_path ] -logins logins_file
Use this syntax to add a specified pack to the repository. This pack must be a newpack that does not exist in the repository.
pack_admin.sh -add -pack pack_filename -logins logins_file
Use this syntax to add all the packs in the specified directory to the repository.Useful for adding a particular pack and its set of dependent packs in onecommand. The directory is searched and the list of files found is passed to theCommon Pack Service for processing. The Common Pack Service determines thecorrect dependencies and adds the files in the correct order.
pack_admin.sh -add -dir directory_path -logins logins_file
Parameters
When a parameter includes spaces, enclose the complete parameter in doublequotation marks or escape the parameter.
pack_filenameThe file name and full path to one or more pack JAR files.
directory_pathThe path to a directory containing pack JAR files.
logins_fileAn encrypted credentials file containing a Tivoli Integrated Portaladministrative user name and password, and database user names andpasswords.
Appendix B. Command reference 109

pack_admin -executeThe -execute command flag for the pack_admin command runs a particular actionassociated with a pack. The success or failure of the action is displayed after thecommand runs.
Location
$TIP_COMPONENTS_LOCATION/TCRComponent/commonpackservice/bin
Where TIP_COMPONENTS_LOCATION is the location where the Tivoli IntegratedPortal Components are installed, by default:
Wireless Component/opt/IBM/tivoli/tipv2Components
Wireline Component/opt/IBM/tivoli/tip21Components
Syntax
pack_admin.sh -execute -action action_name -logins logins_file
Parameters
When a parameter includes spaces, enclose the complete parameter in doublequotation marks or escape the parameter.
action_name
The name of an action that can be performed on a common pack in the PackRepository. When you issue the command to execute an action, it executes theaction on all common packs that define that action.
Actions defined in all common packs except tcr.timedata-refill populates the hierarchy tables on which the CognosModels depend. The data-refill option cleans out and fully populatesthe DM tables. Typically, the data-refill option is run once when youdeploy a pack.
Actions defined in the tcr.time common pack.populate adds past and future dates to the calendar schema tablewithout clearing existing entries. Typically, you run this action eachnight to add the data for the day after the next day. For example, youcan run the populate option on Monday to create entries forWednesday. This example enables reporting through the midnighthour, since we have the timestamps in the calendar for the dataarriving.
calendar-refill clears the calendar schema table and repopulates itwith past and future dates. Typically, a frequency of once a month isadequate to run the calendar-refill option, as the main purpose ofthe command is to clear out the old timestamps.
logins_fileA credentials file containing a Tivoli Integrated Portal administrative username and password, and a database user name and password. The passwordfile must contain the username of the birefresh account for the connectionprofile
110 IBM Tivoli Netcool Performance Manager: Model Maker 1.2.0 Installation and User Guide

pack_admin -listThe -list command flag for the pack_admin command lists actions, pack actions,packs, pack properties, variables, and pack variables for common packs installedon the system.
Location
$TIP_COMPONENTS_LOCATION/TCRComponent/commonpackservice/bin
Where TIP_COMPONENTS_LOCATION is the location where the Tivoli IntegratedPortal Components are installed, by default:
Wireless Component/opt/IBM/tivoli/tipv2Components
Wireline Component/opt/IBM/tivoli/tip21Components
Syntax
Use this syntax to list the actions for all packs currently installed on the system.
pack_admin.sh -list -actions -all -logins logins_file
Use this syntax to list the actions for a specified pack.
pack_admin.sh -list -actions -pack pack_name -logins logins_file
Use this syntax to list the packs currently installed on the system, with details suchas the pack name, the pack version, and the pack installation time.
pack_admin.sh -list -packs -logins logins_file
Use this syntax to list the properties for all packs currently installed on the system.
pack_admin.sh -list -property -all -logins logins_file
Use this syntax to list the properties and their values for a specified pack.
pack_admin.sh -list -pack pack_name -property -all -logins logins_file
Use this syntax to list the values of particular properties in a pack.
pack_admin.sh -list -pack pack_name -property <property_name> ...<property_nameN> -logins logins_file
Use this syntax to list the variables and their values for a specified pack.
pack_admin.sh -list -pack pack_name -variables -all -logins logins_file
Use this syntax to list the values of particular variables in a pack.
pack_admin.sh -list -pack pack_name -variable <variable_name> ... <variable_nameN>-logins logins_file
Appendix B. Command reference 111

Parameters
When a parameter includes spaces, enclose the complete parameter in doublequotation marks or escape the parameter.
pack_nameThe name of a common pack in the Pack Repository. When listing multiplepacks leave a space between each pack name.
logins_fileAn encrypted credentials file containing a Tivoli Integrated Portaladministrative user name and password, and database user names andpasswords.
property_nameA common pack property.
variable_nameA common pack variable.
variable_valueA common pack variable value.
pack_admin -passwordfileThe -passwordfile command flag for the pack_admin command updates thecommon pack password file.
Location
$TIP_COMPONENTS_LOCATION/TCRComponent/commonpackservice/bin
Where TIP_COMPONENTS_LOCATION is the location where the Tivoli IntegratedPortal Components are installed, by default:
Wireless Component/opt/IBM/tivoli/tipv2Components
Wireline Component/opt/IBM/tivoli/tip21Components
Syntax
Use this syntax to add a Tivoli Integrated Portal user to the password file.
pack_admin.sh -passwordfile logins_file -tipuser tip_user_name
Use this syntax to add database users to a particular profile in the database file.
pack_admin.sh -passwordfile logins_file -tipuser tip_user_name -dbusersprofile_name:database_user_name1 ... profile_name:database_user_nameN
Use this syntax to add a Tivoli Integrated Portal user and to add database users toa particular profile in the database file.
pack_admin.sh -passwordfile logins_file -tipuser tip_user_name -dbusersprofile_name:database_user_name1 ... profile_name:database_user_nameN
112 IBM Tivoli Netcool Performance Manager: Model Maker 1.2.0 Installation and User Guide

Parameters
logins_fileAn encrypted credentials file containing a Tivoli Integrated Portaladministrative user name and password, and database user names andpasswords.
tip_user_nameThe name of a valid Tivoli Integrated Portal user with all required permissions.
profile_nameA valid profile.
database_user_nameThe name of a valid database user with all required permissions.
pack_admin -removeThe -remove command flag for the pack_admin command removes a specified packfrom the common pack repository. You can remove only a common pack that hasno dependencies for other packs.
Location
$TIP_COMPONENTS_LOCATION/TCRComponent/commonpackservice/bin
Where TIP_COMPONENTS_LOCATION is the location where the Tivoli IntegratedPortal Components are installed, by default:
Wireless Component/opt/IBM/tivoli/tipv2Components
Wireline Component/opt/IBM/tivoli/tip21Components
Syntax
If you want to uninstall a common pack that acts as a dependency for anotherpack, then you must first uninstall the dependent common pack.
pack_admin.sh -remove -pack pack_name -logins logins_file
Parameters
When a parameter includes spaces, enclose the complete parameter in doublequotation marks or escape the parameter.
pack_nameThe name of a common pack in the Pack Repository.
logins_fileAn encrypted credentials file containing a Tivoli Integrated Portaladministrative user name and password, and database user names andpasswords. The password file must contain the username of the bicontrolaccount for the connection profile.
Appendix B. Command reference 113

pack_admin -resetThe -reset command flag for the pack_admin command resets the user-definedoverride values of common pack properties and variables to the default valuesfrom the common pack.
Location
$TIP_COMPONENTS_LOCATION/TCRComponent/commonpackservice/bin
Where TIP_COMPONENTS_LOCATION is the location where the Tivoli IntegratedPortal Components are installed, by default:
Wireless Component/opt/IBM/tivoli/tipv2Components
Wireline Component/opt/IBM/tivoli/tip21Components
Syntax
Use this syntax to reset user-defined override values of common pack properties tothe default values from the common pack.
pack_admin.sh -reset -pack pack_name -property [property_name1 ... property_nameN| -all ] -logins logins_file
Use this syntax to reset user-defined override values of common pack variables tothe default values from the common pack.
pack_admin.sh -reset -pack pack_name -variable [variable_name1 ... variable_nameN |-all ] -logins logins_file
Parameters
When a parameter includes spaces, enclose the complete parameter in doublequotation marks or escape the parameter.
pack_nameThe name of a common pack in the Pack Repository. When listing multiplepacks leave a space between each pack name.
logins_fileAn encrypted credentials file containing a Tivoli Integrated Portaladministrative user name and password, and database user names andpasswords.
property_nameA common pack property.
variable_nameA common pack variable.
114 IBM Tivoli Netcool Performance Manager: Model Maker 1.2.0 Installation and User Guide

pack_admin -setThe -set command flag for the pack_admin command sets properties, variables,schemas, schema logins, and connection profiles.
Location
$TIP_COMPONENTS_LOCATION/TCRComponent/commonpackservice/bin
Where TIP_COMPONENTS_LOCATION is the location where the Tivoli IntegratedPortal Components are installed, by default:
Wireless Component/opt/IBM/tivoli/tipv2Components
Wireline Component/opt/IBM/tivoli/tip21Components
Syntax
Use this syntax to set pack properties.
pack_admin.sh -set -pack pack_name -property property_name1:property_value1, ...,property_nameN:property_valueN -logins logins_file
Use this syntax to set pack variables.
pack_admin.sh -set -pack pack_name -variable variable_name1:variable_value1, ...,variable_nameN:variable_valueN -logins logins_file
Use this syntax to set the connection profile.
pack_admin.sh -set -profile profile_name -logins logins_file
Use this syntax to set the stored encrypted password for a specific databaseschema, with an interactive prompt for the password. Include the -app flag toindicate that the supplied schema credentials are for an application schema.
pack_admin.sh -set -schema schema_name -profile profile_name [ -app ] -loginslogins_file
Parameters
When a parameter includes spaces, enclose the complete parameter in doublequotation marks or escape the parameter.
pack_nameThe name of a common pack in the Pack Repository. When listing multiplepacks leave a space between each pack name.
logins_fileAn encrypted credentials file containing a Tivoli Integrated Portaladministrative user name and password, and database user names andpasswords.
property_nameA common pack property.
Appendix B. Command reference 115

variable_nameA common pack variable.
variable_valueA common pack variable value.
profile_nameThe name of a specific profile.
schema_nameThe name of a specific schema. The password file must contain the usernameof the schema_name account for the connection profile.
pack_admin -rmvUse the -rmv command flag with the pack_admin command to create and refreshresource metric viewer reports.
Location
$TIP_COMPONENTS_LOCATION/TCRComponent/commonpackservice/bin
Where TIP_COMPONENTS_LOCATION is the location where the Tivoli IntegratedPortal Components are installed, by default:
Wireless Component/opt/IBM/tivoli/tipv2Components
Wireline Component/opt/IBM/tivoli/tip21Components
Syntax
Use this syntax to create Resource Metric Viewer reports for a specified pack or forall available packs. The pack has to be published before a Resource Metric Viewerreport can be created.
pack_admin.sh -rmv -create [ -pack pack_filename | -all ] -logins password_file
Use this syntax to refresh Resource Metric Viewer reports following a change inthe underlying model, for example when new model version deployed to theserver.
pack_admin.sh -rmv -update_metrics [ -pack pack_filename | -all ] -loginspassword_file
Use this syntax to refresh Resource Metric Viewer reports following a change inthe model templates, for example to create custom Resource Metric Viewer reporttemplates.
pack_admin.sh -rmv -update_reports [ -pack pack_filename | -all ] -loginspassword_file
Use this syntax to remove all obsolete Resource Metric Viewer reports from thesystem.
pack_admin.sh -rmv -cleanup
116 IBM Tivoli Netcool Performance Manager: Model Maker 1.2.0 Installation and User Guide

Parameters
When a parameter includes spaces, enclose the complete parameter in doublequotation marks or escape the parameter.
pack_nameThe name of a common pack in the Pack Repository. When listing multiplepacks leave a space between each pack name.
password_fileAn encrypted credentials file containing a Tivoli Integrated Portaladministrative user name and password, and database user names andpasswords.
The generator commandUse the generator command to generate a Cognos model from a CommonIntermediate Format (CIF) file (.tnpmmodel) generated by Model Maker Extractor.
Location
C:\Generator_version\Generator\bin
Assuming that you have extracted Generator directly on to the C: drive.
Syntax
.\generator.bat -generate -model path_to_cif_file -propertiesmodel_name_model.properties -overwrite
Parameters
Option Description
-model path_to_cif_file The full path to the CIF file (.tnpmmodel)generated by Model Maker Extractor.
-properties model_name_model.properties The full path to the properties file for themodel.
-overwrite A mandatory command flag. Deletes all filesin the destination folder for the generatedmodel before generating the model. Thedestination folder is specified in themodel_name_model.properties file.
The model properties fileModel generation requires a Common Intermediate Format file and a modelproperties file. The model properties file describes the various links that the modelneeds to be generated correctly, and the names of the various namespaces that youhave control over. After you have created a model, you can modify it further byusing Model Maker Manager.
Note: If you are using a text editor that has word wrap functionality, ensure thatword wrap is turned off.
The properties model properties file are listed in this table.
Appendix B. Command reference 117
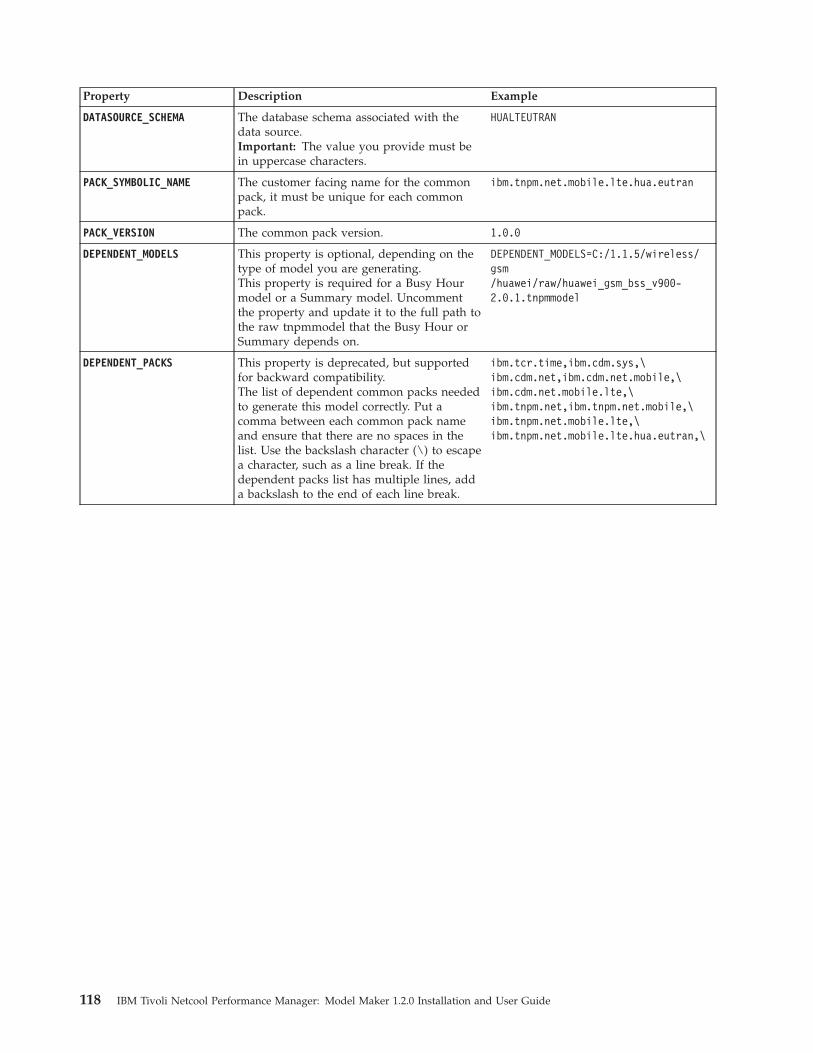
Property Description Example
DATASOURCE_SCHEMA The database schema associated with thedata source.Important: The value you provide must bein uppercase characters.
HUALTEUTRAN
PACK_SYMBOLIC_NAME The customer facing name for the commonpack, it must be unique for each commonpack.
ibm.tnpm.net.mobile.lte.hua.eutran
PACK_VERSION The common pack version. 1.0.0
DEPENDENT_MODELS This property is optional, depending on thetype of model you are generating.This property is required for a Busy Hourmodel or a Summary model. Uncommentthe property and update it to the full path tothe raw tnpmmodel that the Busy Hour orSummary depends on.
DEPENDENT_MODELS=C:/1.1.5/wireless/gsm/huawei/raw/huawei_gsm_bss_v900-2.0.1.tnpmmodel
DEPENDENT_PACKS This property is deprecated, but supportedfor backward compatibility.The list of dependent common packs neededto generate this model correctly. Put acomma between each common pack nameand ensure that there are no spaces in thelist. Use the backslash character (\) to escapea character, such as a line break. If thedependent packs list has multiple lines, adda backslash to the end of each line break.
ibm.tcr.time,ibm.cdm.sys,\ibm.cdm.net,ibm.cdm.net.mobile,\ibm.cdm.net.mobile.lte,\ibm.tnpm.net,ibm.tnpm.net.mobile,\ibm.tnpm.net.mobile.lte,\ibm.tnpm.net.mobile.lte.hua.eutran,\
118 IBM Tivoli Netcool Performance Manager: Model Maker 1.2.0 Installation and User Guide

Notices
This information was developed for products and services offered in the U.S.A.IBM may not offer the products, services, or features discussed in this document inother countries. Consult your local IBM representative for information on theproducts and services currently available in your area. Any reference to an IBMproduct, program, or service is not intended to state or imply that only that IBMproduct, program, or service may be used. Any functionally equivalent product,program, or service that does not infringe any IBM intellectual property right maybe used instead. However, it is the user's responsibility to evaluate and verify theoperation of any non-IBM product, program, or service.
IBM may have patents or pending patent applications covering subject matterdescribed in this document. The furnishing of this document does not give youany license to these patents. You can send license inquiries, in writing, to:
IBM Director of LicensingIBM CorporationNorth Castle DriveArmonk, NY 10504-1785 U.S.A.
For license inquiries regarding double-byte (DBCS) information, contact the IBMIntellectual Property Department in your country or send inquiries, in writing, to:
Intellectual Property LicensingLegal and Intellectual Property LawIBM Japan, Ltd.1623-14, Shimotsuruma, Yamato-shiKanagawa 242-8502 Japan
The following paragraph does not apply to the United Kingdom or any othercountry where such provisions are inconsistent with local law:
INTERNATIONAL BUSINESS MACHINES CORPORATION PROVIDES THISPUBLICATION "AS IS" WITHOUT WARRANTY OF ANY KIND, EITHEREXPRESS OR IMPLIED, INCLUDING, BUT NOT LIMITED TO, THE IMPLIEDWARRANTIES OF NON-INFRINGEMENT, MERCHANTABILITY OR FITNESSFOR A PARTICULAR PURPOSE.
Some states do not allow disclaimer of express or implied warranties in certaintransactions, therefore, this statement might not apply to you.
This information could include technical inaccuracies or typographical errors.Changes are periodically made to the information herein; these changes will beincorporated in new editions of the publication. IBM may make improvementsand/or changes in the product(s) and/or the program(s) described in thispublication at any time without notice.
Any references in this information to non-IBM Web sites are provided forconvenience only and do not in any manner serve as an endorsement of those Websites. The materials at those Web sites are not part of the materials for this IBMproduct and use of those Web sites is at your own risk.
© Copyright IBM Corp. 2011, 2012 119

IBM may use or distribute any of the information you supply in any way itbelieves appropriate without incurring any obligation to you.
Licensees of this program who wish to have information about it for the purposeof enabling: (i) the exchange of information between independently createdprograms and other programs (including this one) and (ii) the mutual use of theinformation which has been exchanged, should contact:
IBM Corporation2Z4A/10111400 Burnet RoadAustin, TX 78758 U.S.A.
Such information may be available, subject to appropriate terms and conditions,including in some cases payment of a fee.
The licensed program described in this document and all licensed materialavailable for it are provided by IBM under terms of the IBM Customer Agreement,IBM International Program License Agreement or any equivalent agreementbetween us.
Any performance data contained herein was determined in a controlledenvironment. Therefore, the results obtained in other operating environments mayvary significantly. Some measurements may have been made on development-levelsystems and there is no guarantee that these measurements will be the same ongenerally available systems. Furthermore, some measurement may have beenestimated through extrapolation. Actual results may vary. Users of this documentshould verify the applicable data for their specific environment.
Information concerning non-IBM products was obtained from the suppliers ofthose products, their published announcements or other publicly available sources.IBM has not tested those products and cannot confirm the accuracy ofperformance, compatibility or any other claims related to non-IBM products.Questions on the capabilities of non-IBM products should be addressed to thesuppliers of those products.
This information contains examples of data and reports used in daily businessoperations. To illustrate them as completely as possible, the examples include thenames of individuals, companies, brands, and products. All of these names arefictitious and any similarity to the names and addresses used by an actual businessenterprise is entirely coincidental.
COPYRIGHT LICENSE:
This information contains sample application programs in source language, whichillustrate programming techniques on various operating platforms. You may copy,modify, and distribute these sample programs in any form without payment toIBM, for the purposes of developing, using, marketing or distributing applicationprograms conforming to the application programming interface for the operatingplatform for which the sample programs are written. These examples have notbeen thoroughly tested under all conditions. IBM, therefore, cannot guarantee orimply reliability, serviceability, or function of these programs. You may copy,modify, and distribute these sample programs in any form without payment toIBM for the purposes of developing, using, marketing, or distributing applicationprograms conforming to IBM‘s application programming interfaces.
120 IBM Tivoli Netcool Performance Manager: Model Maker 1.2.0 Installation and User Guide
If you are viewing this information in softcopy form, the photographs and colorillustrations might not be displayed.
TrademarksIBM, the IBM logo, and ibm.com are trademarks or registered trademarks ofInternational Business Machines Corp., registered in many jurisdictions worldwide.Other product and service names might be trademarks of IBM or other companies.A current list of IBM trademarks is available on the Web at “Copyright andtrademark information” at http://www.ibm.com/legal/copytrade.shtml.
Adobe, the Adobe logo, PostScript, and the PostScript logo are either registeredtrademarks or trademarks of Adobe Systems Incorporated in the United States,and/or other countries.
Intel, Intel logo, Intel Inside, Intel Inside logo, Intel Centrino, Intel Centrino logo,Celeron, Intel Xeon, Intel SpeedStep, Itanium, and Pentium are trademarks orregistered trademarks of Intel Corporation or its subsidiaries in the United Statesand other countries.
Linux is a registered trademark of Linus Torvalds in the United States, othercountries, or both.
Microsoft and Windows are trademarks of Microsoft Corporation in the UnitedStates, other countries, or both.
UNIX is a registered trademark of The Open Group in the United States and othercountries.
Java and all Java-based trademarks and logos are trademarks or registeredtrademarks of Oracle and/or its affiliates.
Other company, product, and service names may be trademarks or service marksof others.
Notices 121

122 IBM Tivoli Netcool Performance Manager: Model Maker 1.2.0 Installation and User Guide
Index
AAppropriate dependent packs 48Artifacts 72Automatic updates and notifications
configuring 32
BBackslash characters 38Birefresh 22, 66BMT Script Player
configuring 33executable path 61
Busy hours definitionscommon pack 50
CCognos Framework Manager 59Cognos model
create 46Cognos preferences 33Command 117Command reference 107common pack
updating 86Common pack 49
adding 67creating 52creating new version 59directory 60generating contents 47model convention 60publishing 72removing from respository 45uninstalling 73
Common Packrespository 45
Common pack modelscombining 61
Common Pack Servicewizard 59
Common Pack Service Client 101Common Pack Service preferences
configuring 30common packs
installing 65Common packs
downloading 72extending 59listing 73listing in the repository 73updating 59
Componentwireless 6wireline 6
Composite pack 60CSV file 55
identifying metric groups 55
DData model
filter files 54filtering 49
Databaseschema 70
Database schema 70Database view
consolidation 60dimensional 60presentational 60
Decomposing composite common packsadding to the repository 60
Default Package 60dependent packs
references 86versions 86
EEclipse update manager 32Encrypt 23, 66Extreme leverage 50
FFilter metrics 45Framework Manager 6
GGlobal properties file 37
identifying 38updating 37
Iinstall
common packs 65
JJava
verifying the version and path 14JDBC driver
configuring 42
LLogins file
creating 22, 66password 22, 66
MMetric groups 57
identifying 55
Model Makertroubleshooting 85
Model Maker Cognos model 45Model Maker extractor
configuring 41installing 41opening 41
Model Maker generatorcreating common pack 46installing 37
Model Maker managerconfiguring 29installing 45opening 29
Model properties file 117creating 46
Modifying models 60Multiple common packs 61
combining 61
NNamespace 60
defined 33
OOracle client 6Oracle schema password 22, 66
Ppack _admin
activate 108add 109execute 110list 111remove 113reset 114set 115, 116Tivoli Integrated password 113
Pack _admincommand 107
Pack_admin 112password file 107
parameter 109Password
database 51tivoli common reporting 33tivoli integrated portal
administrative 112Password file 112
pack admin commands 107Performance metrics 49Populating the calender schema table
Tivoli common reporting time 70Populating the database schema tables
wireless component only 71Portal administrator, Tivoli
Integrated 22, 66
© Copyright IBM Corp. 2011, 2012 123
PrerequisiteODBC connection 6security patch 6software 6
RReports
adding 62Repository
removing common packs 73removing from windows 73
Resource groups 56
SSoftware update site
configuring 32SQL query
using 57Summary definitions
common pack 51Syntax 114
TTivoli Integrated Portal
administrator 22, 66components 22, 66
UUsername
tivoli common reporting 33
VVendor Specific packs
creating a common pack 50Vendor specific resources
common pack 54
WWireless
global object model 48Wireless Component 14Wireless database preferences
configuring 30Wireline 6Wireline database preferences
configuring 31Wizard
create 49
124 IBM Tivoli Netcool Performance Manager: Model Maker 1.2.0 Installation and User Guide


����
Printed in USA