model dr/2500 laboratory spectrophotometer
TRANSCRIPT

59000-18
Model DR/2500Laboratory
Spectrophotometer
© Hach Company, 2001–2004. All rights reserved. Printed in the U.S.A. te/dk 04/04 4ed

Page 2 5900018Title.fm

Table of Contents
Safety Information...............................................................................................................................................7Specifications .........................................................................................................................................................9
Installation .............................................................................................................................................................. 11
Section 1 Getting Started...............................................................................................................................131.1 Unpacking Your Instrument.........................................................................................................................131.2 Operating Environment ................................................................................................................................131.3 Cable Connections .........................................................................................................................................13
1.3.1 Power Connections ...............................................................................................................................141.3.2 Serial Printer and PC Connections .....................................................................................................141.3.3 Parallel Printer Connections................................................................................................................141.3.4 pH Connections.....................................................................................................................................14
1.4 Battery Backup ...............................................................................................................................................141.5 Using the Instrument Keys...........................................................................................................................15
1.5.1 Turning the Power On and Off ...........................................................................................................151.5.2 Turning On the Backlight.....................................................................................................................151.5.3 Adjusting the Display Contrast ..........................................................................................................151.5.4 Getting into pH Mode ..........................................................................................................................15
1.6 Tips for Using the Touch Screen ..................................................................................................................161.7 The DR/2500 Spectrophotometer Main Menu..........................................................................................161.8 Using the DR/Check™ Absorbance Standards ........................................................................................17
1.8.1 How to Use the Standards ...................................................................................................................17
Operation .................................................................................................................................................................19
Section 2 General Instrument Operation ..............................................................................................212.1 Selecting a Language .....................................................................................................................................212.2 Instrument Setup Menu ................................................................................................................................21
2.2.1 Setting the Time and Date....................................................................................................................212.2.2 Setting Sound Preferences....................................................................................................................212.2.3 Setting the Operator ID ........................................................................................................................222.2.4 Setting the Sample ID ...........................................................................................................................222.2.5 Right- or Left-Handed Screen Option................................................................................................222.2.6 Communications with a Printer or Computer..................................................................................23
2.3 Using the Alphanumeric Keypad................................................................................................................242.4 Display Lock ..................................................................................................................................................242.5 Working with HachLink™ ...........................................................................................................................252.6 Sample Cell Holders ......................................................................................................................................25
2.6.1 Round Cell Holder................................................................................................................................252.6.2 Rectangular Cell Holder ......................................................................................................................252.6.3 1-inch Square Cell Holder....................................................................................................................26
2.7 Inserting and Removing Samples................................................................................................................262.8 Using the Optional Pour-Thru Cell .............................................................................................................272.9 Assembling the Pour-Thru Cell ...................................................................................................................282.10 Installing and Installing the Pour-Thru Cell ............................................................................................292.11 Using the Pour-Thru Cell ............................................................................................................................30
2.11.1 Cleaning the Pour-Thru Cell..............................................................................................................312.12 Using the General-Purpose Timer .............................................................................................................31
Table of Contents5900018TOC.fm Page 3

Table of Contents
Section 3 Hach Programs—Simplified Analysis...............................................................................333.1 Selecting a Hach Program.............................................................................................................................333.2 Running a Hach Program .............................................................................................................................333.3 Using Program Timers ..................................................................................................................................333.4 Taking a Reading............................................................................................................................................343.5 Hach Program Options .................................................................................................................................34
3.5.1 Running a Reagent Blank.....................................................................................................................343.5.2 Creating a User Program Based on a Hach Program.......................................................................353.5.3 Correcting for a Diluted Sample .........................................................................................................353.5.4 Changing the Chemical Form .............................................................................................................353.5.5 Running a Standard Adjust .................................................................................................................363.5.6 Performing Standard Additions .........................................................................................................36
3.6 Adding a Hach Program to Your “Favorite Programs” List....................................................................36
Section 4 Working with Your Data ...........................................................................................................374.1 The Datalog.....................................................................................................................................................37
4.1.1 Storing Data to the Datalog .................................................................................................................374.1.2 Recalling, Sending, and Erasing Data from the Datalog .................................................................37
4.2 Data from Time Course and Wavelength Scan Analyses (Advanced Software Only) ...........................................................................................................................384.2.1 Storing Time Course and Wavelength Scan Data.............................................................................384.2.2 Recalling and Sending Time Course and Wavelength Scan Graph Data......................................38
Section 5 User Programs—Customized Analysis .............................................................................395.1 Creating and Saving a New User Program ................................................................................................39
5.1.1 Entering a Calibration Formula Directly ...........................................................................................405.1.2 Creating a Calibration Table ................................................................................................................41
5.2 Recalling a User Program .............................................................................................................................415.3 Editing an Existing User Program...............................................................................................................425.4 Erasing a User Program ................................................................................................................................425.5 Adding User Programs to the “Favorite Programs” List .........................................................................42
Section 6 Standard Additions .....................................................................................................................436.1 Checking Results with Standard Additions...............................................................................................436.2 Using the Standard Additions Option........................................................................................................446.3 Estimating Concentration Using Standard Additions..............................................................................45
Section 7 Measuring pH.................................................................................................................................477.1 pH Options......................................................................................................................................................47
7.1.1 Selecting pH Measurement Resolution..............................................................................................477.1.2 Selecting Temperature Units for pH Measurement .........................................................................477.1.3 Selecting the Mid-range Buffer ...........................................................................................................47
7.2 Calibrating the Meter Using pH 4, 7 (or 6.86), and 10 Buffers ................................................................477.2.1 Reviewing the Calibration ...................................................................................................................487.2.2 pH Calibration Error Messages...........................................................................................................48
7.3 Measuring Samples........................................................................................................................................487.4 Recalling Stored pH Data .............................................................................................................................48
Section 8 Single Wavelength Mode .........................................................................................................498.1 Setting Up Single Wavelength Mode ..........................................................................................................498.2 Taking Single Wavelength Measurements .................................................................................................49
Table of ContentsPage 4 5900018TOC.fm

Table of Contents
Section 9 Multiple Wavelength Mode ....................................................................................................519.1 Setting Multiple Wavelength Measurement Options. ..............................................................................519.2 Taking Multiple Wavelength Measurements .............................................................................................52
Section 10 Wavelength Scan Mode...........................................................................................................5310.1 Setting Wavelength Scan Options..............................................................................................................5310.2 Taking Wavelength Scan Measurements ..................................................................................................5310.3 Navigating the Wavelength Scan Graph ..................................................................................................5410.4 Data Handling ..............................................................................................................................................54
Section 11 Time Course Measurement Mode ......................................................................................5511.1 Setting Time Course Analysis Options .....................................................................................................5511.2 Taking Time Course Measurements ..........................................................................................................5511.3 Navigating the Time Course Analysis Graph..........................................................................................5611.4 Data Handling ..............................................................................................................................................56
Maintenance ...........................................................................................................................................................57
Section 12 Maintenance .................................................................................................................................5912.1 Caring for Your Instrument ........................................................................................................................5912.2 Cleaning the Instrument .............................................................................................................................5912.3 Replacing the Illuminator Module ............................................................................................................5912.4 Sample Cell Maintenance ...........................................................................................................................5912.5 Pour-thru Cell Maintenance .......................................................................................................................5912.6 Recertification Interval ................................................................................................................................60
Section 13 Upgrading the Instrument Software ................................................................................6113.1 System Requirements ..................................................................................................................................6113.2 Installing the Upgrade Software on the PC..............................................................................................61
13.2.1 Installing from Floppy Disk...............................................................................................................6113.2.2 Installing from CD-ROM ...................................................................................................................61
13.3 Connecting the Instrument to the Computer...........................................................................................6113.4 Starting the Upgrade Utility.......................................................................................................................6213.5 Setting the Communication Link...............................................................................................................6213.6 Programming the Instrument.....................................................................................................................6213.7 Uninstalling the Upgrade Software...........................................................................................................62
Section 14 Troubleshooting and FAQs ...................................................................................................6314.1 Troubleshooting............................................................................................................................................63
14.1.1 Instrument Information......................................................................................................................6314.1.2 Wavelength Check ..............................................................................................................................63
14.2 Frequently Asked Questions ......................................................................................................................63
General Information ..........................................................................................................................................65Replacement Parts and Accessories ..........................................................................................................67Certification..........................................................................................................................................................69How To Order .....................................................................................................................................................71Repair Service......................................................................................................................................................72Warranty ................................................................................................................................................................73Index........................................................................................................................................................................75
Table of Contents5900018TOC.fm Page 5

Page 6 5900018TOC.fm

Safety Information
Please read this entire manual before unpacking, setting up, or operating this instrument. Pay particular attention to all danger and caution statements. Failure to do so could result in serious injury to the operator or damage to the equipment.
To ensure that the protection provided by this equipment is not impaired, do not use or install this equipment in any manner other than that which is specified in this manual.
Hazard InformationIf multiple hazards exist, this manual will use the signal word (Danger, Caution, Note) corresponding to the greatest hazard.
DANGERIndicates a potentially or imminently hazardous situation which, if not avoided, could result in death or serious injury.
CAUTIONIndicates a potentially hazardous situation that may result in minor or moderate injury.
NOTEInformation that requires special emphasis.
Precautionary LabelsRead all labels and tags attached to the instrument. Personal injury or damage to the instrument could occur if not observed.
This symbol, if noted on the instrument, references this instruction manual for operational and/or safety information.
Section 2.6 Sample Cell Holders on page 25
Section 2.7 Inserting and Removing Samples on page 26
Section 2.8 Using the Optional Pour-Thru Cell on page 27
!
!
!
!
Safety Information5900018Safety.fm Page 7

Page 8 5900018Safety.fm

Specifications
Wavelength Range 365 to 880 nm
Bandwidth 4 nm ± 1 nm
Wavelength Accuracy ± 1 nm
Wavelength Resolution 1 nm
Wavelength Selection Automatic, based on method selection
Optical System Concentric Spectrometer for multi-channel spectroscopy
Wavelength Calibration Automatic, via emission line
Photometric Range ±0.001 to 3.2 Abs
Photometric Accuracy ±0.005 Abs from 0.0 to 0.5 Abs; ±1% from 0.5 to 2.0 Abs.
Recommended Recertification Interval One year (See Section 12.6 for details)
Stray Light >2.5 A, <0.3%T @ 400 nm
Operational Modes Selectable: momentary (Display Lock on), or constant (Display Lock off)
Readout ModesTransmittance, absorbance, concentration, and pH, plus wavelength scan and time course graphs
pH Input sension™ 5-pin connector
RS232 Serial Port Standard 9-pin bi-directional
Parallel Printer Port Standard 25-pin
Line Power 9 Vdc @ 1 amp; 95 to 240 Vac; 50/60 Hz; Automatic Selection
Battery Backup Automatically rechargeable for 15-minute backup operation
Sample Compartment andCell Compatibility
Note: For Hach Programs, be sure to use the cell type specified for that program in the DR/2500 Procedures Manual.
Round Cell Holder9-mm to 25.4-mm round cells/vials, including AccuVac®, immunoassay, and COD/Test ‘N Tube™ vials
Metric Rectangular Cell Holder (optional) 1-cm, 2-cm, and 5-cm rectangular cells
1-Inch Square Cell Holder (optional) Pour-Thru cell, 1-inch square cell
Interface Graphic user interface 320 x 240 pixel graphic display with touchscreen
Data Storage1000 data points (date, time, results, sample ID, user ID), 10 wavelength scan graphs, 10 time course graphs, 50 user calibrations
Dimensions 19 x 38 x 13.5 cm nominal
Weight 1.95 kg
Keypad 5 keys for power on/off, backlight on/off, contrast down, contrast up, and pH
Printer External serial or parallel (optional)
Pour-Thru Cell 1-inch (optional)
Report GenerationDownload stored information in a standard report format. Meets GLP guidelines, including a minimum of: date, time, sample identification tag, analyst initials (3), results, and instrument serial number.
Real-time Clock Yes
Real-time Calendar Yes
Operating Environment 10 to 40 °C (50 to 104 °F); 90% relative humidity, non-condensing
Storage Environment –10 to 60 °C (14 to 140 °F); 85% relative humidity, non-condensing
pH Range − 2.00 to 19.99
Specifications5900018Spec.fm Page 9
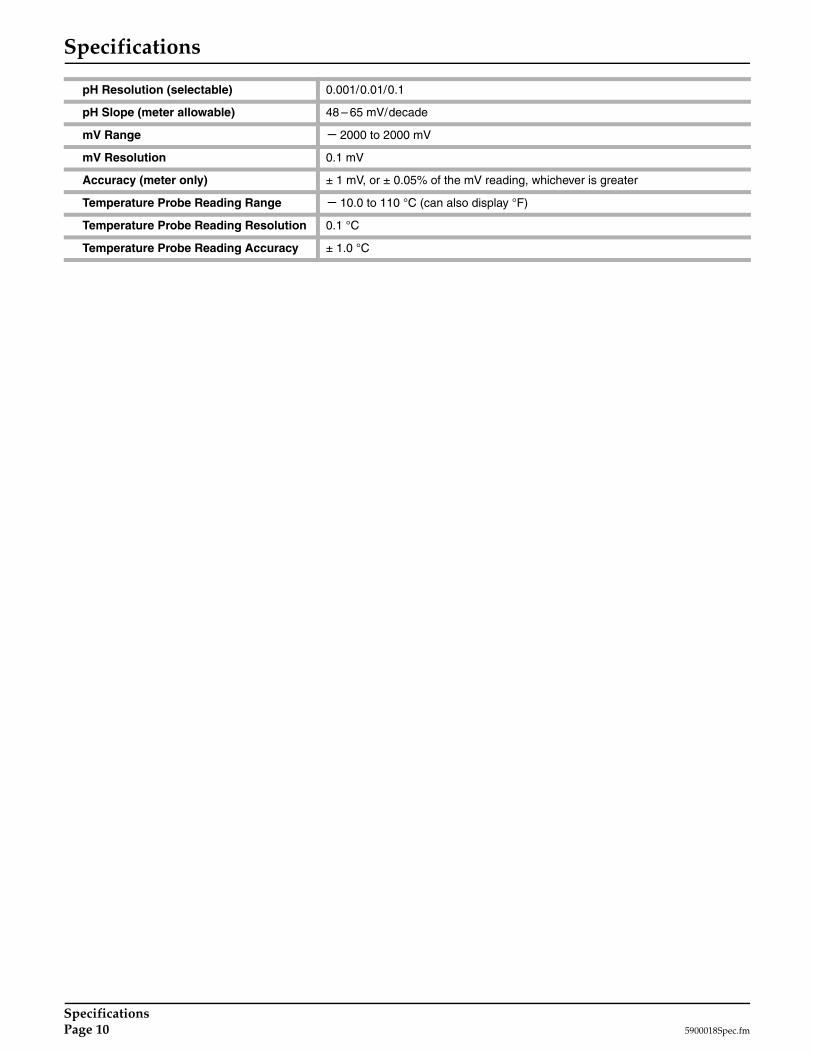
Specifications
pH Resolution (selectable) 0.001/0.01/0.1
pH Slope (meter allowable) 48 – 65 mV/decade
mV Range − 2000 to 2000 mV
mV Resolution 0.1 mV
Accuracy (meter only) ± 1 mV, or ± 0.05% of the mV reading, whichever is greater
Temperature Probe Reading Range − 10.0 to 110 °C (can also display °F)
Temperature Probe Reading Resolution 0.1 °C
Temperature Probe Reading Accuracy ± 1.0 °C
SpecificationsPage 10 5900018Spec.fm
Installation
Some of the following manual sections contain information in the form of warnings, cautions and notes that require special attention. Read and follow these instructions carefully to avoid personal injury and damage to the instrument. Only personnel qualified to do so, should conduct the installation/maintenance tasks described in this portion of the manual.
Certains des chapitres suivants de ce mode d’emploi contiennent des informations sous la forme d’avertissements, messages de prudence et notes qui demandent une attention particulière. Lire et suivre ces instructions attentivement pour éviter les risques de blessures des personnes et de détérioration de l’appareil. Les tâches d’installation et d’entretien décrites dans cette partie du mode d’emploi doivent être seulement effectuées par le personnel qualifié pour le faire.
Algunos de los capítulos del manual que presentamos contienen información muy importante en forma de alertas, notas y precauciones a tomar. Lea y siga cuidadosamente estas instrucciones a fin de evitar accidentes personales y daños al instrumento. Las tareas de instalación y mantenimiento descritas en la presente sección deberán ser efectuadas únicamente por personas debidamente cualificadas.
Einige der folgenden Abschnitte dieses Handbuchs enthalten Informationen in Form von Warnungen, Vorsichtsmaßnahmen oder Anmerkungen, die besonders beachtet werden müssen. Lesen und befolgen Sie diese Instruktionen aufmerksam, um Verletzungen von Personen oder Schäden am Gerät zu vermeiden. In diesem Abschnitt beschriebene Installations- und Wartungsaufgaben dürfen nur von qualifiziertem Personal durchgeführt werden.
Alcune parti di questo manuale contengono informazioni sotto forma d’avvertimenti, di precauzioni e di osservazioni le quali richiedono una particolare attenzione. La preghiamo di leggere attentivamente e di rispettare quelle istruzioni per evitare ogni ferita corporale e danneggiamento della macchina. Solo gli operatori qualificati per l’uso di questa macchina sono autorizzati ad effettuare le operazioni di manutenzione descritte in questa parte del manuale.
5900018InstStop.fm Page 11

Page 12 5900018InstStop.fm
Section 1 Getting Started
1.1 Unpacking Your InstrumentThe DR/2500 Spectrophotometer comes packaged with one each of the following items:
• Instrument• Power cord• Power supply• Round sample cell holder assembly• Procedure Manual with binder• Instrument Manual• CD/ROM containing the Procedure and Instrument Manuals• Set of DR/Check Absorbance Standards• Set of 6 sample cells, 10-mL
If any of these items are missing or damaged, please contact Hach Company or your sales representative immediately.
Note: Retain the original packaging material. Instruments returned for recertification or service should be shipped in the original packaging material to protect against damage during transportation. See Section 12.6 Recertification Interval for more information.
1.2 Operating EnvironmentMaintain an ambient temperature of 10 to 40 °C (50 to 104 °F) for proper instrument operation. The relative humidity should be less than 90%; moisture should not condense on the instrument.
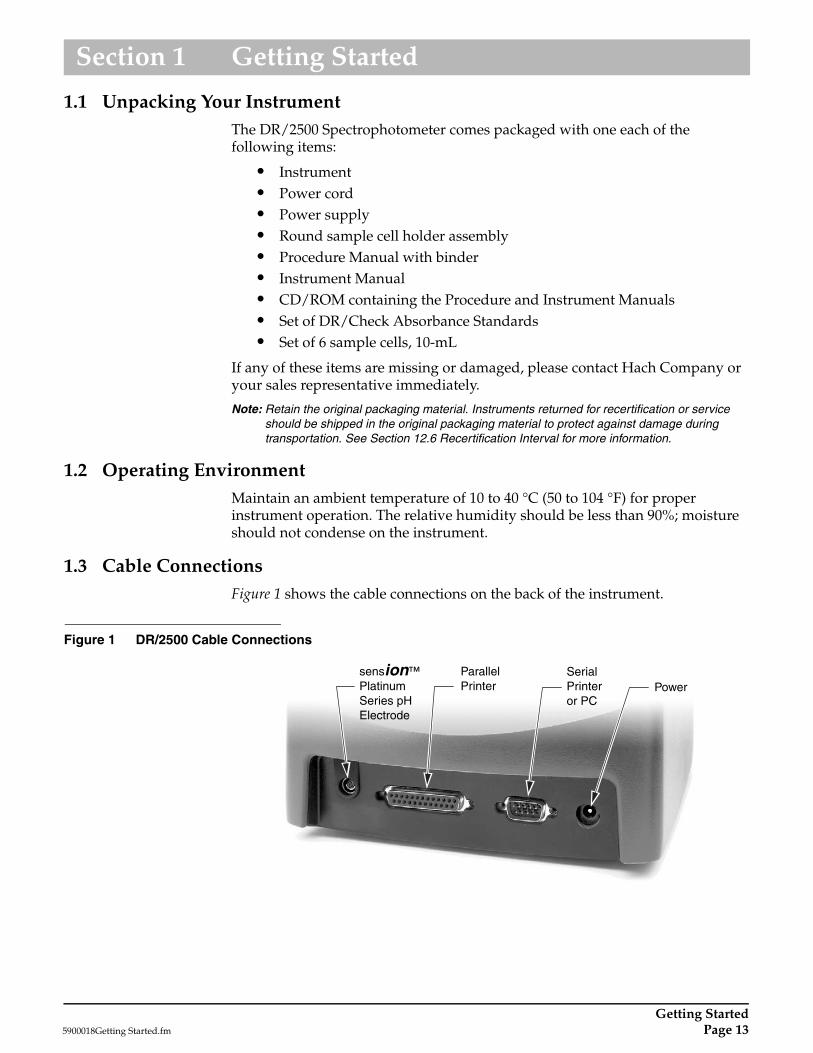
1.3 Cable ConnectionsFigure 1 shows the cable connections on the back of the instrument.
Figure 1 DR/2500 Cable Connections
PowerSerial Printeror PC
ParallelPrinter
sension™PlatinumSeries pH Electrode
Getting Started5900018Getting Started.fm Page 13

Getting Started
1.3.1 Power Connections
A UL/CSA-approved 115-VAC power cord with a NEMA 5-15P style plug is supplied with the North American DR/2500 models (Cat. No. 18010-00). A 230-VAC harmonized power cord with a Continental European plug is supplied with the European DR/2500 models (Cat. No. 46836-00).
If you want to power the North American DR/2500 models with 230-VAC, you must replace the supplied 115 VAC power cord with a UL/CSA approved 230-VAC power cord with a NEMA 6-15P style plug.
Plug the power cord into the back panel of the instrument. Connect the power cord to the proper outlet and press the power key. (See Figure 2.)
1.3.2 Serial Printer and PC Connections
Note: Use of the specified cable or an equivalent shielded cable is mandatory for proper immunity to electromagnetic interferences.
Connect the DR/2500 Spectrophotometer to a personal computer (PC) by using the computer interface cable (Cat. No. 48129-00). The cable provides a direct connection between the DR/2500 Spectrophotometer and the 9-pin D connector used for the serial port on most personal computers. If your computer has a 25-pin D connector, use a 9-pin to 25-pin adapter (available at many computer supply stores).
For proper data transfer, the communication parameters of the DR/2500 and the computer must match. Refer to Section 2.2.6 Communications with a Printer or Computer for selecting DR/2500 printer and computer settings.
Once the communication link is established, touch the Send to Printer or Send to Computer icon to send data to the printer or computer.
1.3.3 Parallel Printer Connections
To connect a parallel printer to the instrument, use the parallel port (25-pin) on the back of the instrument (see Figure 1).
See Section Section 2.2.6 Communications with a Printer or Computer on page 23 for more information.
1.3.4 pH Connections
The DR/2500 Spectrophotometer was designed for use with Hach Platinum pH Electrodes. Hach Platinum pH electrodes have the temperature sensing unit included in the electrode probe.
Attach electrodes with 5-pin connectors to the sensor input by lining the pins up with the holes in the meter port (see Figure 1). Insert the plug into the meter port to connect the electrode.
1.4 Battery BackupThe DR/2500 Spectrophotometer is equipped with an internal backup battery to provide a short period of temporary power if the normal power supply is lost. The battery backup is not intended to be used as the main power source, and you cannot turn on the instrument unless it is connected to line power.
Getting StartedPage 14 5900018Getting Started.fm
Getting Started
The battery can supply the instrument with enough power to remain on for up to 15 minutes after losing line power. In most cases, this allows you to finish a test in progress when the power goes out. If a power outage occurs, save your data as soon as possible and turn off power to the instrument until the electricity is restored.
The backup battery is not user replaceable.
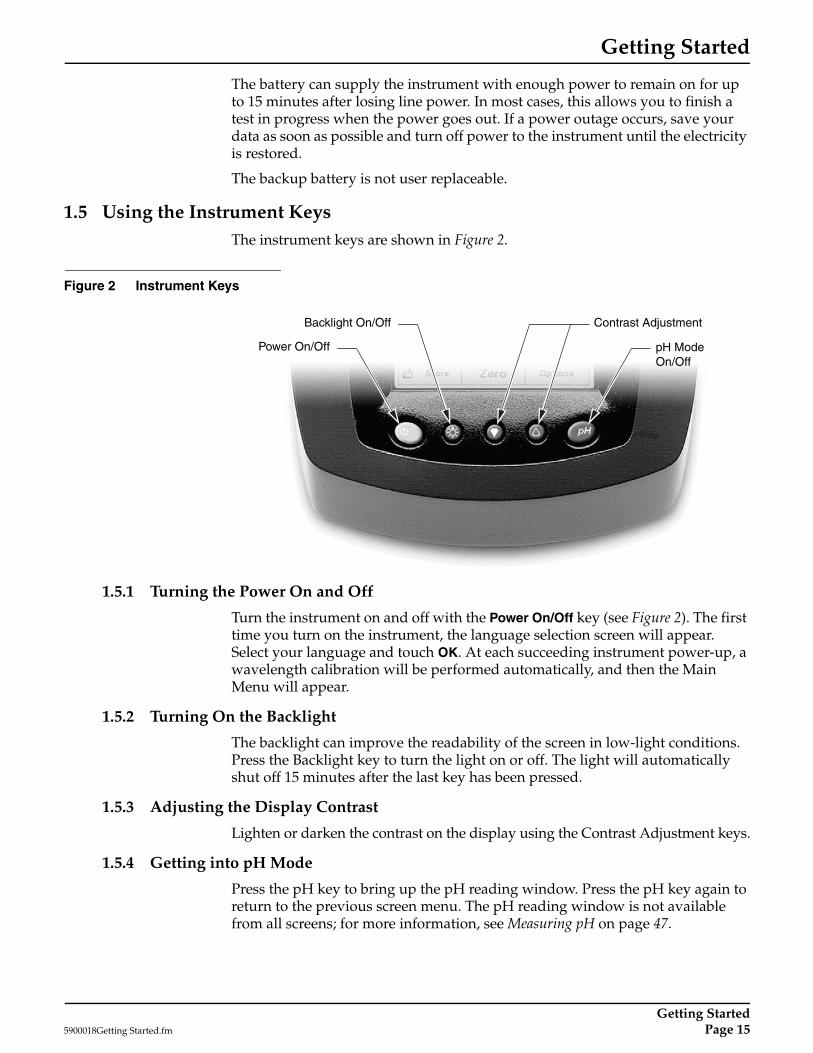
1.5 Using the Instrument KeysThe instrument keys are shown in Figure 2.
Figure 2 Instrument Keys
1.5.1 Turning the Power On and Off
Turn the instrument on and off with the Power On/Off key (see Figure 2). The first time you turn on the instrument, the language selection screen will appear. Select your language and touch OK. At each succeeding instrument power-up, a wavelength calibration will be performed automatically, and then the Main Menu will appear.
1.5.2 Turning On the Backlight
The backlight can improve the readability of the screen in low-light conditions. Press the Backlight key to turn the light on or off. The light will automatically shut off 15 minutes after the last key has been pressed.
1.5.3 Adjusting the Display Contrast
Lighten or darken the contrast on the display using the Contrast Adjustment keys.
1.5.4 Getting into pH Mode
Press the pH key to bring up the pH reading window. Press the pH key again to return to the previous screen menu. The pH reading window is not available from all screens; for more information, see Measuring pH on page 47.
pH Mode On/Off
Power On/Off
Backlight On/Off Contrast Adjustment
Getting Started5900018Getting Started.fm Page 15
Getting Started
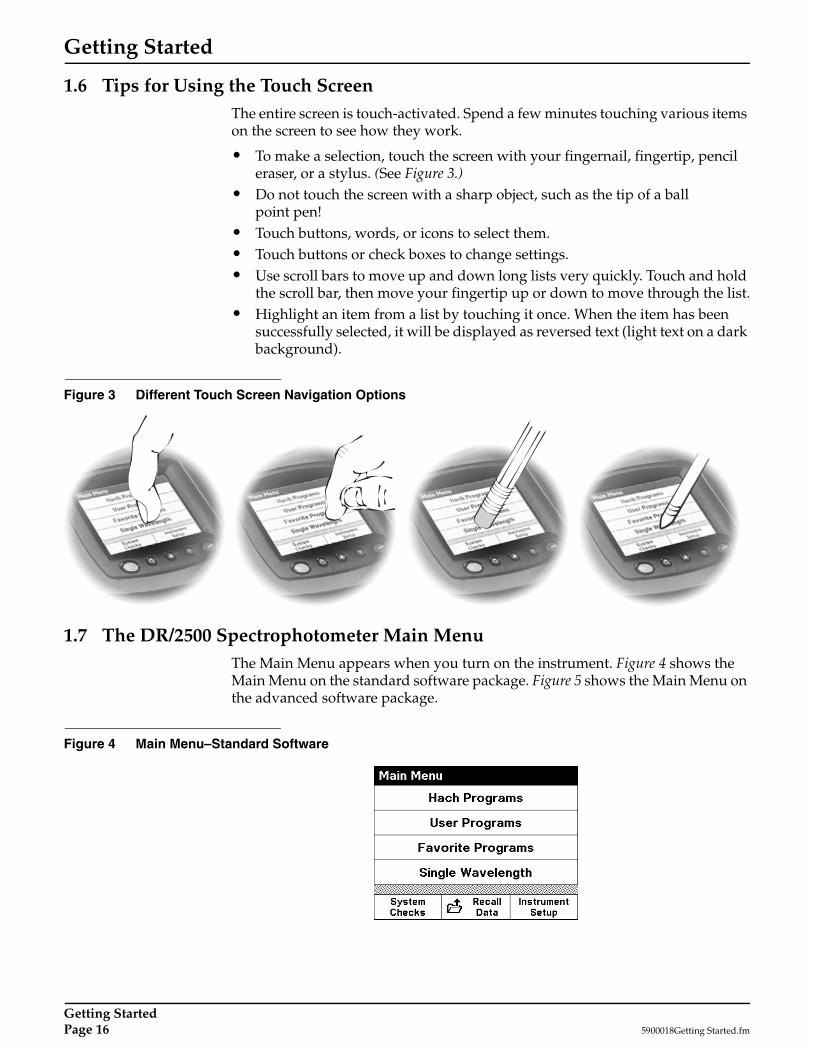
1.6 Tips for Using the Touch ScreenThe entire screen is touch-activated. Spend a few minutes touching various items on the screen to see how they work.
• To make a selection, touch the screen with your fingernail, fingertip, pencil eraser, or a stylus. (See Figure 3.)
• Do not touch the screen with a sharp object, such as the tip of a ball point pen!
• Touch buttons, words, or icons to select them.• Touch buttons or check boxes to change settings.• Use scroll bars to move up and down long lists very quickly. Touch and hold
the scroll bar, then move your fingertip up or down to move through the list.• Highlight an item from a list by touching it once. When the item has been
successfully selected, it will be displayed as reversed text (light text on a dark background).
Figure 3 Different Touch Screen Navigation Options
1.7 The DR/2500 Spectrophotometer Main MenuThe Main Menu appears when you turn on the instrument. Figure 4 shows the Main Menu on the standard software package. Figure 5 shows the Main Menu on the advanced software package.
Figure 4 Main Menu–Standard Software
Getting StartedPage 16 5900018Getting Started.fm

Getting Started
Figure 5 Main Menu–Advanced Software
1.8 Using the DR/Check™ Absorbance Standards Hach’s DR/Check Absorbance standards are used in instrument performance verification on both the DR/2500 and DR/800 Series instruments. The set consists of three standards plus a blank. Each of the standards is certified to give a known absorbance value at a particular wavelength. The standards can be used to verify that the instrument is performing in a consistent manner on a routine basis.
1.8.1 How to Use the StandardsNote: Be sure to follow the cell alignment steps found on the product box.
The DR/Check Standards are used to verify instrument performance by measuring a specific absorbance at each of the following wavelengths:
• 420• 520• 560• 610
1. From the Main Menu screen, touch Single Wavelength.
2. From the Single Wavelength screen, touch λ.
3. Key in 420 nm.
4. Insert the blank in to the instrument so that it is properly aligned with the light source. Touch Zero.
Note: For best results, wipe all the cells with a clean tissue and silicone oil before use
5. Place Standard #1 in the instrument so that it is properly aligned. Read the absorbance.
6. Record the initial instrument reading in the blank table provided with the standards. The initial value should be within the tolerance limits of the certified absorbance specified on the Certificate of Analysis for the DR/Check Standards.
Note: If values are not within specified tolerance limits, contact Hach Technical Support. See Repair Service on page 72 for contact information.
7. Repeat steps 2 through 6 for the other two standards, using the correct wavelength in step 3.
Note: To continuously monitor instrument performance, repeat all steps and compare readings to the recorded values.
Getting Started5900018Getting Started.fm Page 17

Getting Started
Verification of Photometric AccuracyA verification of photometric accuracy can be performed on the DR/2500 using Hach DR/Check (Cat. No. 27639-00), NIST SRM 930 neutral density glass, or NIST SRM 2031 metal-on-quartz standard reference materials.
To verify the photometric performance of the DR/2500 with standards, the instrument zero should be performed on a “like” standard to obtain the maximum performance capability of the instrument. Using the DR/Check, a blank is performed on the blank provided with the DR/Check set and values of standards are read directly. When using NIST standards or equivalent glass standards, a blank is performed on the non-absorbing reference standard provided with the set. If the stated values for the standards include the reflection loss, then the stated value of the non-absorbing standard is subtracted from each of the absorbance standards to obtain an adjusted true value for the reference standards. It is these adjusted values that are used to compare the photometric accuracy of the DR/2500 when the instrument is blanked on material other than air. The following example provides a method for checking photometric accuracy using glass standards with the DR/2500 that most closely matches the performance obtained when a blank is used in Hach water analysis methods.
Example:
1. Turn the DR/2500 on and set the appropriate wavelength (see How to Use the Standards on page 17 for setting the wavelength). The wavelength should be set to the stated value of the reference standard being used.
2. Set the instrument to read in the same units as the reference standards (usually “Abs” units).
3. Insert the blank or non-absorbing reference standard into the DR/2500 and zero the instrument. The display should read 0.000 Abs.
4. Remove the blank and insert a reference standard, such as the 0.250 Abs reference standard.
5. Touch Read to get the value for the reference standard. This is the “read” value for the reference standard. An average of ten readings should be used to obtain the “read” value.
6. Calculate an adjusted value for the 0.250 Abs standard by subtracting the stated value of the non-absorbing reference standard from the stated value of the 0.250 Abs standard. If the stated value for the non-absorbing standard is 0.0374 and the stated value for the 0.250 Abs standard is 0.2529, then the adjusted value for the 0.250 Abs standard is:
0.2529 - 0.0374 = 0.2155 Abs.
7. Compare the “read” values to the adjusted values for the standard.
8. The standard deviation of the ten “read” values is the precision of the DR/2500.
9. Report the difference between the “read” value and “adjusted” value plus or minus the standard deviation.
Repeat steps 4 through 9 for reference standards of other values or wavelengths.
Getting StartedPage 18 5900018Getting Started.fm
Operation
DANGERHandling chemical samples, standards, and reagents can be dangerous. Review the necessary Material Safety Data Sheets and become familiar with all safety procedures before handling any chemicals.
DANGERLa manipulation des échantillons chimiques, étalons et réactifs peut être dangereuse. Lire les Fiches de Données de Sécurité des Produits (FDSP) et se familiariser avec toutes les procédures de sécurité avant de manipuler tous les produits chimiques.
PELIGROLa manipulación de muestras químicas, estándares y reactivos puede ser peligrosa. Revise las fichas de seguridad de materiales y familiarícese con los procedimientos de seguridad antes de manipular productos químicos.
GEFAHRDas Arbeiten mit chemischen Proben, Standards und Reagenzien ist mit Gefahren verbunden. Es wird dem Benutzer dieser Produkte empfohlen, sich vor der Arbeit mit sicheren Verfahrensweisen und dem richtigen Gebrauch der Chemikalien vertraut zu machen und alle entsprechenden Materialsicherheitsdatenblätter aufmerksam zu lesen.
PERICOLOLa manipolazione di campioni, standard e reattivi chimici può essere pericolosa. La preghiamo di prendere conoscenza delle Schede Techniche necessarie legate alla Sicurezza dei Materiali e di abituarsi con tutte le procedure di sicurezza prima di manipolare ogni prodotto chimico.
5900018OpStop.fm Page 19

Page 20 5900018OpStop.fm
Section 2 General Instrument Operation
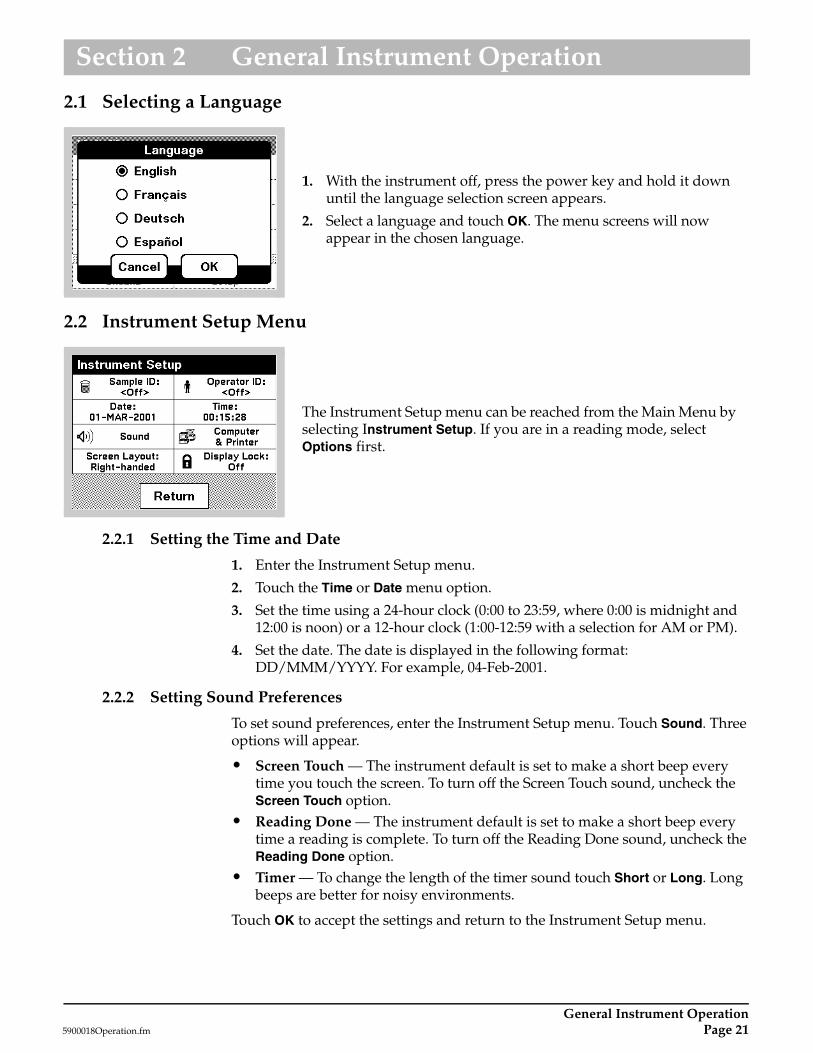
2.1 Selecting a Language
2.2 Instrument Setup Menu
2.2.1 Setting the Time and Date
1. Enter the Instrument Setup menu.
2. Touch the Time or Date menu option.
3. Set the time using a 24-hour clock (0:00 to 23:59, where 0:00 is midnight and 12:00 is noon) or a 12-hour clock (1:00-12:59 with a selection for AM or PM).
4. Set the date. The date is displayed in the following format: DD/MMM/YYYY. For example, 04-Feb-2001.
2.2.2 Setting Sound Preferences
To set sound preferences, enter the Instrument Setup menu. Touch Sound. Three options will appear.
• Screen Touch — The instrument default is set to make a short beep every time you touch the screen. To turn off the Screen Touch sound, uncheck the Screen Touch option.
• Reading Done — The instrument default is set to make a short beep every time a reading is complete. To turn off the Reading Done sound, uncheck the Reading Done option.
• Timer — To change the length of the timer sound touch Short or Long. Long beeps are better for noisy environments.
Touch OK to accept the settings and return to the Instrument Setup menu.
1. With the instrument off, press the power key and hold it down until the language selection screen appears.
2. Select a language and touch OK. The menu screens will now appear in the chosen language.
The Instrument Setup menu can be reached from the Main Menu by selecting Instrument Setup. If you are in a reading mode, select Options first.
General Instrument Operation5900018Operation.fm Page 21
General Instrument Operation
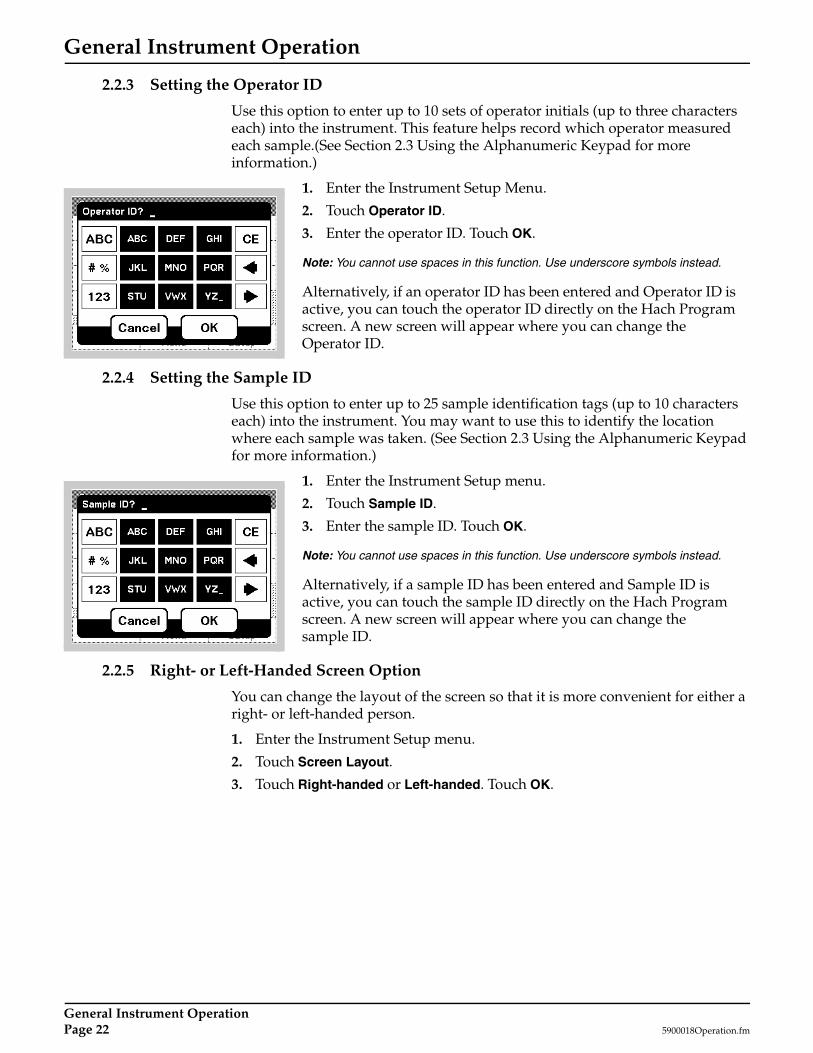
2.2.3 Setting the Operator ID
Use this option to enter up to 10 sets of operator initials (up to three characters each) into the instrument. This feature helps record which operator measured each sample.(See Section 2.3 Using the Alphanumeric Keypad for more information.)
2.2.4 Setting the Sample ID
Use this option to enter up to 25 sample identification tags (up to 10 characters each) into the instrument. You may want to use this to identify the location where each sample was taken. (See Section 2.3 Using the Alphanumeric Keypad for more information.)
2.2.5 Right- or Left-Handed Screen Option
You can change the layout of the screen so that it is more convenient for either a right- or left-handed person.
1. Enter the Instrument Setup menu.
2. Touch Screen Layout.
3. Touch Right-handed or Left-handed. Touch OK.
1. Enter the Instrument Setup Menu.
2. Touch Operator ID.
3. Enter the operator ID. Touch OK.
Note: You cannot use spaces in this function. Use underscore symbols instead.
Alternatively, if an operator ID has been entered and Operator ID is active, you can touch the operator ID directly on the Hach Program screen. A new screen will appear where you can change the Operator ID.
1. Enter the Instrument Setup menu.
2. Touch Sample ID.
3. Enter the sample ID. Touch OK.
Note: You cannot use spaces in this function. Use underscore symbols instead.
Alternatively, if a sample ID has been entered and Sample ID is active, you can touch the sample ID directly on the Hach Program screen. A new screen will appear where you can change the sample ID.
General Instrument OperationPage 22 5900018Operation.fm
General Instrument Operation
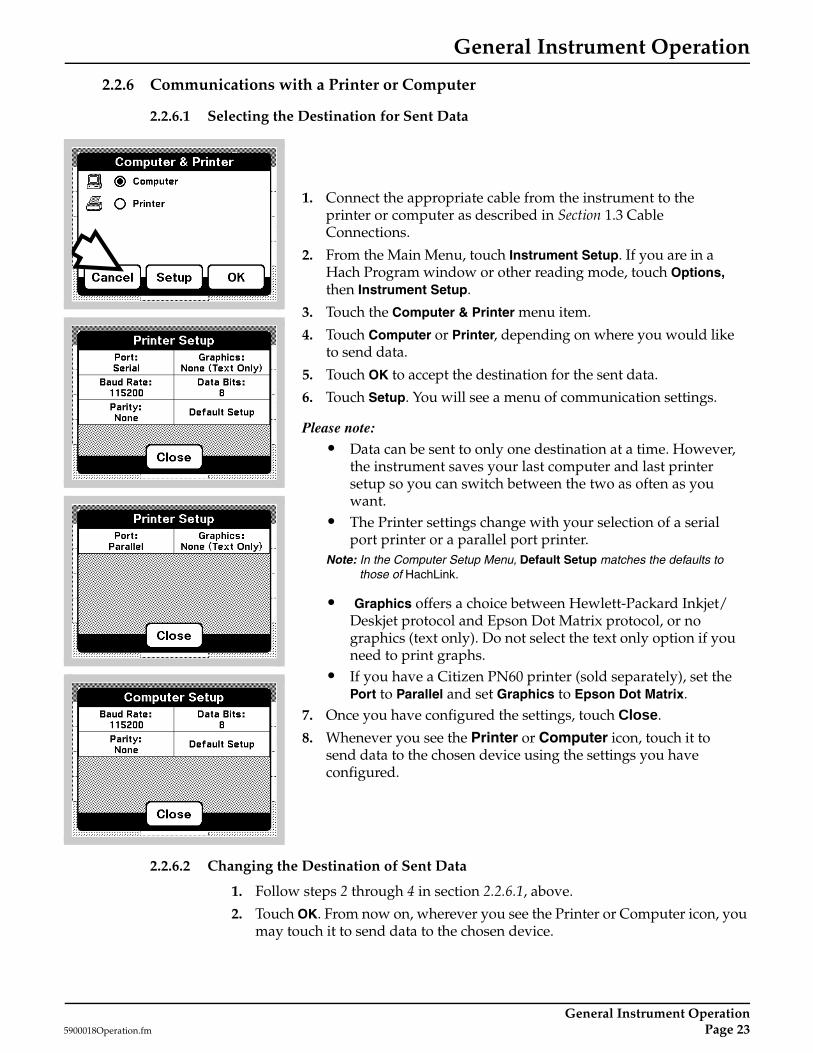
2.2.6 Communications with a Printer or Computer
2.2.6.1 Selecting the Destination for Sent Data
2.2.6.2 Changing the Destination of Sent Data
1. Follow steps 2 through 4 in section 2.2.6.1, above.
2. Touch OK. From now on, wherever you see the Printer or Computer icon, you may touch it to send data to the chosen device.
1. Connect the appropriate cable from the instrument to the printer or computer as described in Section 1.3 Cable Connections.
2. From the Main Menu, touch Instrument Setup. If you are in a Hach Program window or other reading mode, touch Options, then Instrument Setup.
3. Touch the Computer & Printer menu item.
4. Touch Computer or Printer, depending on where you would like to send data.
5. Touch OK to accept the destination for the sent data.
6. Touch Setup. You will see a menu of communication settings.
Please note:
• Data can be sent to only one destination at a time. However, the instrument saves your last computer and last printer setup so you can switch between the two as often as you want.
• The Printer settings change with your selection of a serial port printer or a parallel port printer.
Note: In the Computer Setup Menu, Default Setup matches the defaults to those of HachLink.
• Graphics offers a choice between Hewlett-Packard Inkjet/Deskjet protocol and Epson Dot Matrix protocol, or no graphics (text only). Do not select the text only option if you need to print graphs.
• If you have a Citizen PN60 printer (sold separately), set the Port to Parallel and set Graphics to Epson Dot Matrix.
7. Once you have configured the settings, touch Close.
8. Whenever you see the Printer or Computer icon, touch it to send data to the chosen device using the settings you have configured.
General Instrument Operation5900018Operation.fm Page 23
General Instrument Operation
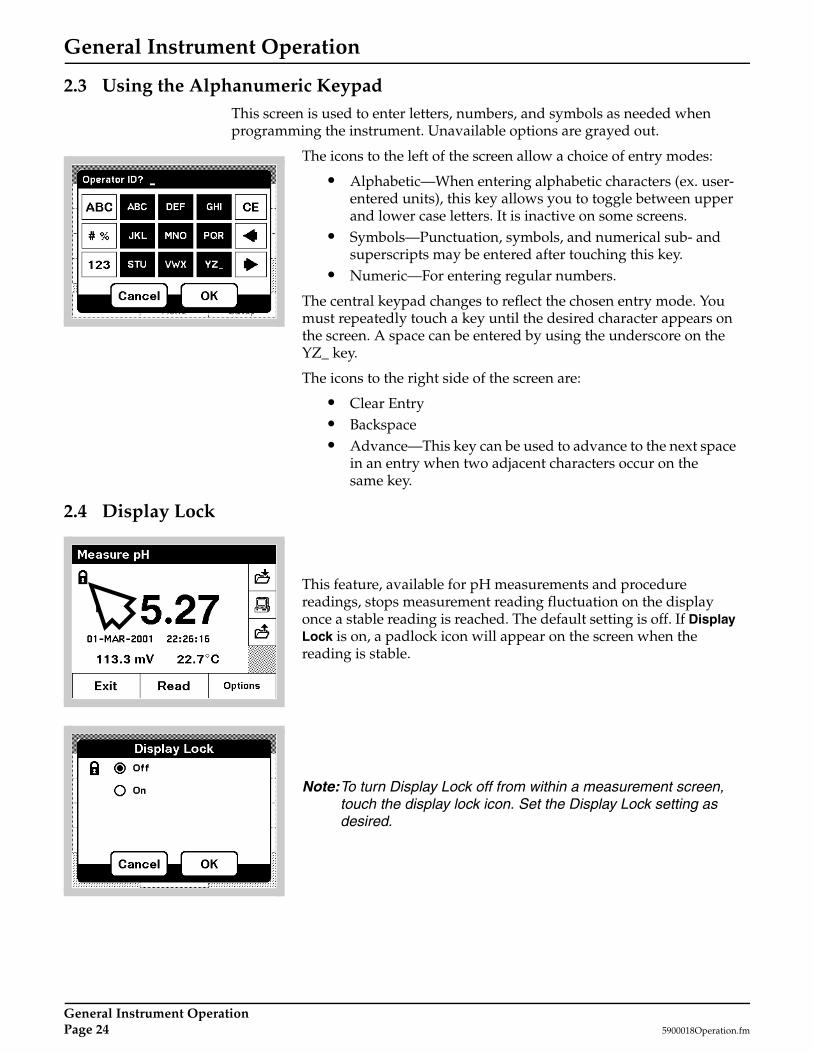
2.3 Using the Alphanumeric KeypadThis screen is used to enter letters, numbers, and symbols as needed when programming the instrument. Unavailable options are grayed out.
2.4 Display Lock
The icons to the left of the screen allow a choice of entry modes:
• Alphabetic—When entering alphabetic characters (ex. user-entered units), this key allows you to toggle between upper and lower case letters. It is inactive on some screens.
• Symbols—Punctuation, symbols, and numerical sub- and superscripts may be entered after touching this key.
• Numeric—For entering regular numbers.
The central keypad changes to reflect the chosen entry mode. You must repeatedly touch a key until the desired character appears on the screen. A space can be entered by using the underscore on the YZ_ key.
The icons to the right side of the screen are:
• Clear Entry• Backspace• Advance—This key can be used to advance to the next space
in an entry when two adjacent characters occur on the same key.
Note:To turn Display Lock off from within a measurement screen, touch the display lock icon. Set the Display Lock setting as desired.
This feature, available for pH measurements and procedure readings, stops measurement reading fluctuation on the display once a stable reading is reached. The default setting is off. If Display Lock is on, a padlock icon will appear on the screen when the reading is stable.
General Instrument OperationPage 24 5900018Operation.fm
General Instrument Operation
2.5 Working with HachLink™HachLink 2000 software, version 2.0 or higher, may be used with an DR/2500 Spectrophotometer that is set up to communicate with a computer (see Section Communications with a Printer or Computer). Earlier versions of HachLink do not recognize the DR/2500.
To ensure accurate data transfer, make sure that the serial port settings on the DR/2500 match the settings in HachLink. Select Instrument Setup, Computer & Printer, Computer then Setup. Selecting Default Setup will match the DR/2500 defaults to those of HachLink.
2.6 Sample Cell Holders
CAUTION Do not place vials that are hotter than 100 °C (212 °F) into any of the sample cell holders.
ATENCIÓN: No colocar cubetas cuya temperatura sea superior a 100 °C (212 °F) sobre los soportes de muestra.
VORSICHT: Die Küvettentemperatur darf beim Einsetzen in die Küvettenhalter nicht mehr als 100°C (212 °F) betragen.
PRUDENCE: Ne placez pas de cuve de plus de 100°C (212°F) dans un des porte-cuves d'échantillon.
2.6.1 Round Cell Holder
The DR/2500 Spectrophotometer comes equipped with a round cell holder that self-adjusts to hold round sample cells up to 1 inch (25.4 mm) in diameter. See Figure 6.
Place the cell adapter into the instrument. Place the sample cell into the cell adapter. The orientation of the holder does not matter. For best results, use only the sample cells recommended in the Hach procedures.
2.6.2 Rectangular Cell Holder
Use the Metric Rectangular cell holder (Cat. No. 59065-00) for 1 x 1 cm, 1 x 2 cm, and 1 x 5 cm cells. When using the Metric Rectangular cell holder, orient the cell holder so that the depression for grasping the 1-cm square cell is located on the left side of the instrument, toward the back. See Figure 6.
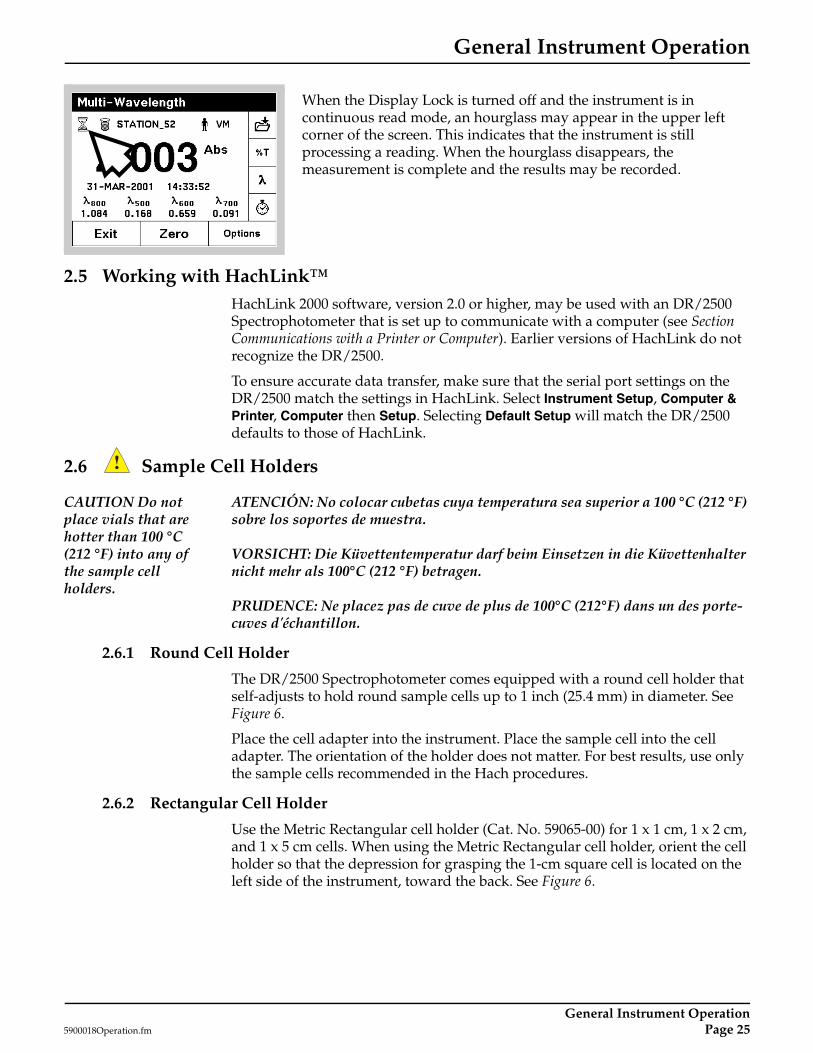
When the Display Lock is turned off and the instrument is in continuous read mode, an hourglass may appear in the upper left corner of the screen. This indicates that the instrument is still processing a reading. When the hourglass disappears, the measurement is complete and the results may be recorded.
!
General Instrument Operation5900018Operation.fm Page 25

General Instrument Operation
2.6.3 1-inch Square Cell Holder
Use the 1-inch square cell holder (Cat. No. 59062-00) for 1 x 1 in. glass and plastic cells. The orientation of this cell holder does not matter. See Figure 6. However, the orientation of the cell within the cell holder can affect readings, since the light path is from the left rear to the right front of the instrument.
Note: The 1-Inch Square Cell is not compatible with most Hach Programs, but may be incorporated into User Programs.
Figure 6 Cell Holders
2.7 Inserting and Removing Samples
DANGERThis instrument is not intended for use with flammable samples or those containing hydrocarbons, except as required for specific Hach Programs
DANGERCet instrument n'est pas conçu pour une utilisation avec des échantillons inflammables ou des échantillons contenant des hydrocarbures, sauf exigence contraire des programmes Hach.
PELIGROEste instrumento no está destinado para uso con muestras inflamables o que contengan hidrocarburos, con excepción de lo requerido para los Programas de Hach.
GEFAHRDieses Gerät darf nicht mit brennbaren oder kohlenwasserstoffhaltigen Proben verwendet werden, es sei denn, dies würde im Rahmen von HACH-Programmen ausdrücklich verlangt.
PERICOLOQuesto strumento non prevede l'utilizzo con campioni infiammabili o contenenti idrocarburi, ad eccezione di quanto richiesto dalle metodiche Hach.
When inserting and removing samples, place the cell into the cell holder as described in the Hach procedure. For best results, wipe the samples to remove fingerprints or other marks before placing the samples into the cell holder.
Round 1-cm Square
Cat. No. 59106-00 Cat. No. 59065-00 Cat. No. 59062-00
1-Inch Square
!
General Instrument OperationPage 26 5900018Operation.fm

General Instrument Operation
2.8 Using the Optional Pour-Thru Cell
CAUTIONDo not use the Pour-Thru Cell in tests that call for the use of organic solvents such as toluene, chloroform, trichloroethane or cyclohexanone. These solvents may not be compatible with the plastic components of the Pour-Thru Cell creating the potential for equipment damage and chemical exposure for the analyst.
ATTENTIONNe pas utiliser la cuve à circulation dans les techniques d'analyses qui utilisent des solvants organiques tels que le toluène, le chloroforme, le trichloroéthane ou la cyclohexanone. Les solvants organiques peuvent ne pas être compatibles avec les composants en plastique de la cuve à circulation et endommager l'équipement en créant un risque chimique pour l'opérateur.
ADVERTENCIANo utilice la Célula de Flujo Continuo para pruebas que requieran el uso de solventes orgánicos tales como tolueno, cloroformo, tircloretano o ciclohexanona. Es posible que estos solventes sean incompatibles con los componenetes de material plástico de la Célula de Flujo Continuo y existe el riesgo de daños al equipo y exposición del analista a las substancias químicas.
WARNHINWEISDie "Pour-Thru-Zelle" darf nicht in Tests verwendet werden, die organische Lösungsmittel wie Toluol, Chloroform, Trichlorethan oder Cyclohexanon erfordern. Die Möglichkeit besteht, daß diese Lösungsmittel nicht mit den Kunstoffkomponenten der "Pour-Thru-Zelle" kompatibel sind und somit Geräteschaden verursachen und eine Chemikaliengefahr für den Untersuchungschemiker darstellen können.
CUIDADONão use a Cubeta de Fluxo em testes que exigem o uso de solventes orgânicos como tolueno, clorofórmio, tricloroetano ou ciclohexanona. Estes solventes podem não ser compatíveis com os componentes plásticos da Cubeta de Fluxo, havendo a possibilidade de danos ao equipamento e exposição do analista a substâncias químicas.
Use the optional Pour-thru Cell (Cat. No. 59122-00) with the Square Cell Holder to save time when you are analyzing the same parameter in many samples. Because the same optical characteristics exist for both zeroing and measuring, or when comparing measurements of different samples, any error that would have resulted from optical differences between individual sample cells is eliminated. Rapid Liquid methods speed analysis and require use of the Pour-Thru Cell (see the Procedure Manual for these programs).
When using the Pour-thru Cell, keep the instrument lid open. The light cover on the cell will ensure accurate readings. See the instructions for the Pour-thru Cell for more information. Use at least 25 mL of sample to completely flush the cell.
!
General Instrument Operation5900018Operation.fm Page 27

General Instrument Operation
2.9 Assembling the Pour-Thru Cell The Pour-Thru Cell Assembly must be assembled and installed before use. Figure 7 illustrates the assembled unit.
Figure 7 Pour-Thru Cell Assembly
Stand Pipe
Drain Tube
Stand Assembly
Glass Funnel
5 cm (2 inches)
Pour-Thru Cell
The kit includes:• Pour-Thru Cell • Cell Holder Assembly• Stand Assembly• Glass Funnel
• Stand Pipe• 1/8” ID plastic tubing (6 ft.)• 1/4” ID rubber tubing (12 ft.)• Instruction Sheet
General Instrument OperationPage 28 5900018Operation.fm

General Instrument Operation
2.10 Installing and Installing the Pour-Thru Cell
Install the Pour-Thru cell in the spectrophotometer as follows:
1. Examine the glass windows in the Pour-Thru cell. If they are dirty or smudged, clean them with a soft, lint-free cloth or optical tissue.
2. Insert the Pour-Thru cell into the square cell holder with its windows aligned with the windows in the cell holder (see Figure 7 and Figure 8). Be sure the Pour-Thru cell is fully inserted to prevent any light leakage when the holder is in the cell compartment. The cell compartment cover can remain open when using this accessory.
3. To ensure proper drainage for the funnel, adjust the relative heights of the stand pipe and funnel as shown in Figure 7. Adjust the stand pipe so that the inlet is 5 cm (2 inches) below the tip of the funnel, so that the funnel drains completely.
4. Pour 25 to 50 mL of deionized water into the funnel and allow the funnel to drain. If necessary, move the stand pipe up or down until the funnel drains smoothly and stops draining at the correct level.
Figure 8 Installing the Pour-Thru Cell
General Instrument Operation5900018Operation.fm Page 29
General Instrument Operation
Note: The Pour-thru Cell cannot be used directly with Hach programs unless it is specified in the procedure. Using the Pour-thru Cell with other Hach programs requires a standard adjust.
The drain tube attached to the stand pipe must drain freely. It should always remain below the outlet of the stand pipe, and should run horizontally. Preferably, the entire tube should be as short as possible with the outlet end inserted into a drain (or suitable collecting vessel, if treatment is necessary before discharge).
The 10-mL procedures cannot be used with the Pour-Thru Cell as 10 mL is not enough to completely flush out the previous sample. Procedures with 10 mL as the final volume can be used with optional 25-mL reagents so that the Pour-Thru Cell can be used where procedures allow it.
2.11 Using the Pour-Thru CellMost of the DR/2500 Hach Programs specify the use of round cells. To use the Pour-Thru Cell with a Hach Program that uses round cells, a dilution factor of 0.95 must be entered or a standard adjust must be performed. The dilution factor and standard adjust are not saved once a program is exited. To save the dilution factor or standard adjust, the program must be stored as a user program. Entering a dilution factor or standard adjust is not necessary if the Hach Program specifies the use of the Pour-Thru Cell.
Note: For more information, see Correcting for a Diluted Sample, Running a Standard Adjust and Creating a User Program Based on a Hach Program in the DR/2500 Spectrophotometer Instrument Manual.
The Pour-Thru cell can be used with Hach chemistries provided a 25 mL sample is analyzed. Exceptions are noted in Table 1.
The Pour-Thru cell can be used with the following Hach chemistries, but special care must be taken to rinse the cell with deionized water between samples.
The Pour-Thru cell can also be used to run Nitrogen, Ammonia, Nessler Method and TKN chemistries. Clean the cell by pouring a few sodium thiosulfate pentahydrate crystals into the cell. Rinse out the crystals with deionized water.
Table 1 Hach chemistries that cannot be used with the Pour-Thru cell
Aluminum ECR Arsenic Barium Boron, Carmine
Cyanuric Acid Fluoride Formaldehyde Lead, LeadTrak
Mercury Nickel, Heptoxime Nitrite, HR PCB
Phenols Potassium Selenium Silver
Suspended Solids Sulfate TPH Volatile Acids
Zinc Surfactants, Anionic (Detergents)
Table 2 Hach chemistries that need extra rinsing with the Pour-Thru cell
Aluminum, Aluminon Chlorine Dioxide, LR Cobalt, PAN
Copper, Porphyrin Hardness, Calmagite Manganese, LR, PAN
Nickel, PAN Nitrate, MR Nitrate, HR
General Instrument OperationPage 30 5900018Operation.fm

General Instrument Operation
2.11.1 Cleaning the Pour-Thru Cell
Check the cell occasionally for an accumulation of film on the windows. If the windows appear dirty or hazy, or if bubbles form in the cell, pour 50mL of a detergent solution into the cell. Let it soak for several minutes. Rinse thoroughly with deionized water. The Pour-Thru Cell can be disassembled for cleaning if necessary. Use a soft cloth to clean the sample cell windows. Paper towels and other paper products may scratch the windows.
Note: Do not use solvents (e.g. acetone) to clean the Pour-Thru Cell. A dilute acid solution can be used for cleaning. Rinse thoroughly with deionized water.
2.12 Using the General-Purpose Timer
In addition to pre-programmed timers, many programs have a general purpose timer available. Touch the timer icon to access the timer system.
If the current procedure includes pre-programmed timers, select General Timer and touch OK. If no pre-programmed timers are available, the timer entry screen displays directly.
Enter the length of the timed interval in minutes and seconds. For more information, see Section Using Program Timers on page 33.
General Instrument Operation5900018Operation.fm Page 31

Page 32 5900018Operation.fm

Section 3 Hach Programs—Simplified Analysis
The DR/2500 Spectrophotometer contains more than 120 programmed procedures that you can access through the Hach Programs menu.
3.1 Selecting a Hach Program
3.2 Running a Hach ProgramAfter a program is selected, the screen for that parameter will appear. You do not need to select the wavelength.
Follow the chemical procedures described in the DR/2500 Procedures Manual.
3.3 Using Program TimersSome Hach procedures do not require the use of timers. Other Hach procedures require several timers.
By default, the timer displays large numbers as it counts down. If you want to view the Hach Program screen while the timer is running, touch Close.
A general purpose timer is also available in many programs. Whenever you see the timer icon, you may touch it and select General Timer. A new screen will appear that allows you to enter the length of the timed interval.
• To see an alphabetical list of Hach programs with program numbers, touch Hach Programs in the Main Menu. The Hach Programs list will appear.
• If you know the Hach program number you want, you may select it by touching Select by Number. Enter the program number (listed in the procedures manual) and touch OK.
• To move quickly through the list, use the scroll bar to move up or down. When your selection is highlighted, touch Start.
Touch the timer icon when prompted by the Procedures Manual. Choose the appropriate timer from the Timers screen and touch OK. The timer will count down on the screen. If necessary, you can also cancel the timer midway through the countdown by touching Cancel.
Hach Programs—Simplified Analysis5900018HachPrograms.fm Page 33

Hach Programs—Simplified Analysis
3.4 Taking a ReadingWhen you have finished preparing and zeroing your samples according to the Procedures Manual, place the sample cell into the instrument. Close the cover. Touch Read if necessary.
• If you have set your instrument so that Display Lock is off, the instrument will take readings continuously after you have zeroed the instrument.
• If Display Lock is on, you have to touch Read before each reading will appear.
3.5 Hach Program Options
3.5.1 Running a Reagent Blank
You may use an actual reading to set the reagent blank, or you may enter a value manually.
3.5.1.1 Using an Actual Reading
3.5.1.2 Entering a Value Manually
1. Touch Options, then Reagent Blank.
2. If Reagent Blank is set to off, turn it on.
3. Touch the button on the left that contains the last concentration that you read.
4. Enter a reagent blank value and touch OK.
5. Touch Adjust to enable the reagent blank. The Reagent Blank icon will appear.Note: When the reagent blank option is in use, the Reagent Blank icon will appear on the
reading screen.
Note: The adjustment must be within the limits specified for the program.
In some Hach Programs, the Reagent Blank option allows you to read or enter a specific value that should be subtracted from subsequent measurements. Using a reagent blank shifts the entire calibration curve along the y-axis, without altering the shape or slope of the curve. The effect is equivalent to adding a y-intercept value to the calibration line. In other words:
Concentration = [(Concentration Factor) *Abs] – (Reagent Blank)
1. Follow the entire Hach procedure (as described in the DR/2500 Procedures Manual) substituting deionized water in place of the sample.
2. After reading the concentration, touch Options, then Reagent Blank.
3. If Reagent Blank is set to off, turn it on.
4. The concentration that you just read will appear in the box on the left of the screen.
5. Touch Adjust to enable the reagent blank.
Hach Programs—Simplified AnalysisPage 34 5900018HachPrograms.fm
Hach Programs—Simplified Analysis
3.5.2 Creating a User Program Based on a Hach Program
To save your settings for Reagent Blank, Dilution Factor, Units & Form, and Standard Adjust from an existing Hach Program, you can create a User Program based on the Hach Program. These settings will then be available every time you open the User Program. However, User Programs based on Hach Programs cannot be edited like those you program yourself.
To save Hach Program settings as a User Program, touch Options, then Save as User Program. You will be asked to assign a number and a name to the program. Then the program will be listed in your list of User Programs until you decide to remove or replace it.
3.5.3 Correcting for a Diluted Sample
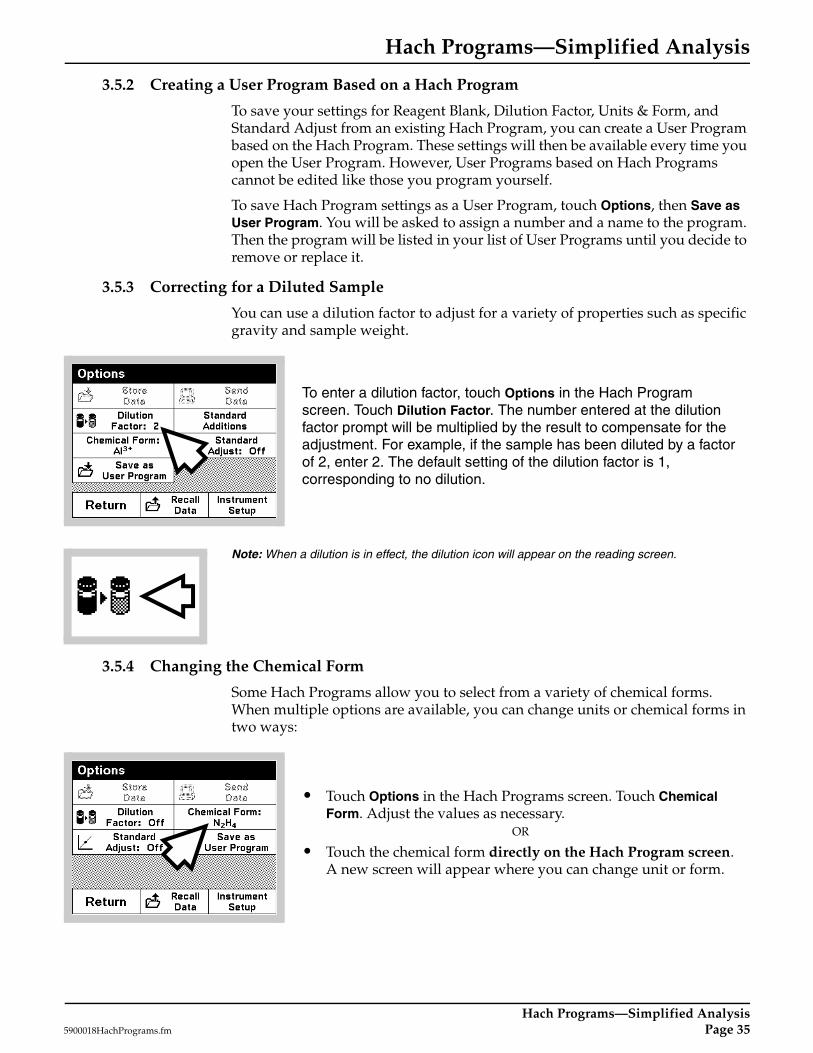
You can use a dilution factor to adjust for a variety of properties such as specific gravity and sample weight.
Note: When a dilution is in effect, the dilution icon will appear on the reading screen.
3.5.4 Changing the Chemical Form
Some Hach Programs allow you to select from a variety of chemical forms. When multiple options are available, you can change units or chemical forms in two ways:
To enter a dilution factor, touch Options in the Hach Program screen. Touch Dilution Factor. The number entered at the dilution factor prompt will be multiplied by the result to compensate for the adjustment. For example, if the sample has been diluted by a factor of 2, enter 2. The default setting of the dilution factor is 1, corresponding to no dilution.
• Touch Options in the Hach Programs screen. Touch Chemical Form. Adjust the values as necessary.
OR
• Touch the chemical form directly on the Hach Program screen. A new screen will appear where you can change unit or form.
Hach Programs—Simplified Analysis5900018HachPrograms.fm Page 35

Hach Programs—Simplified Analysis
3.5.5 Running a Standard Adjust
The DR/2500 Procedures Manual indicates which procedures can use the Standard Adjust and provides instructions for performing a Standard Adjust. The general procedure is explained here.
You must read a standard before setting Standard Adjust to on.
5. Touch Adjust to enable the Standard Adjust. The Standard Adjust icon will appear. Note: The adjustment must be within certain limits, which vary with each program.
Note: When a Standard Adjust is in effect, the Standard Adjust icon will appear on the reading screen.
3.5.6 Performing Standard Additions
Running standard additions helps to confirm the accuracy of your measurements. The DR/2500 Procedures Manual and Standard Additions on page 43 describe in detail how to use this function.
3.6 Adding a Hach Program to Your “Favorite Programs” ListYou may have a few programs that you run frequently. If you would like to add a Hach program to the “Favorites” list that contains your most frequently used programs:
1. Touch Hach Programs in the Main Menu.
2. Scroll through the list of programs and highlight the program that you want to add, or touch Select By Number if you know the program number.
3. Touch Add to Favorites.
4. Touch OK.
5. Afterward, you will be able to choose the program from your list of Favorite Programs on the Main Menu.
1. Follow the entire Hach procedure (as described in the DR/2500 Procedures Manual), using a known standard for your sample.
2. After reading the concentration, touch Options, then Standard Adjust.
3. If Standard Adjust is set to off, turn it on.
4. The concentration that you just read will appear at the left of the screen. The box on the right will show the default standard value for the test, as mentioned in the procedure. If you would like to enter a different standard value, touch the box on the right and enter the value.
Hach Programs—Simplified AnalysisPage 36 5900018HachPrograms.fm

Section 4 Working with Your Data
4.1 The DatalogThis section describes how to work with data from the following reading modes: Hach Programs, Single-wavelength, Multi-wavelength, pH, and User Programs.
4.1.1 Storing Data to the Datalog
The DR/2500 datalog will store up to 1000 data points. A complete record of the analysis is stored, including the date, time, results, sample ID, and operator ID.
4.1.2 Recalling, Sending, and Erasing Data from the Datalog
To recall data from the Datalog:
Touch On to turn on the filters. Touch the checkbox next to each filter type that you want to apply. Change the criteria for each type of filter by selecting it and entering your desired settings. Touch OK. You will now only see the data that match your criteria.
To store data, touch the Store Data icon on any reading screen, or from within any Options Menu.
1. Touch the Recall Data icon.
2. If necessary, touch Datalog.
3. Touching any data point on the Datalog screen causes it to be highlighted.
Note: You may also touch Options from one of the modes listed in Section 4.1, and then Recall Data.
Details
Touch View Details on the Recall Data screen to view all the information about the highlighted data point.
Filters
To select data by
• sample ID, • operator ID, • parameter,• date,
or any combination of the four, touch Filters on the Recall Data screen.
Working with Your Data5900018Data.fm Page 37
Working with Your Data
To see all the data again, return to this screen and turn filters Off.
Options
Touch Options on the Recall Data screen if you want to send or erase data from the datalog. You have the option of sending or erasing either a single point, all data or just filtered data, provided that filters have been applied.
4.2 Data from Time Course and Wavelength Scan Analyses (Advanced Software Only)
Data may be stored, recalled, and exported from the Time Course and Wavelength Scan reading modes.
4.2.1 Storing Time Course and Wavelength Scan Data
You may store up to 10 graphs of each of these two types. To store a graph:
1. Touch the Store Data icon.
2. Select the number under which the graph should be stored, and touch OK.
3. If there is already a graph in that location, you will be asked whether or not to overwrite the existing data.
4.2.2 Recalling and Sending Time Course and Wavelength Scan Graph Data
To recall data from these modes, start from the reading mode of the type of data you want to recall. Then:
1. Touch Options.
2. Touch Recall Data.
3. Select the graph you would like to recall and touch OK.
4. The Graph screen will appear.
For information about how to review the data within the graph, see Navigating the Wavelength Scan Graph on page 54 (for Wavelength Scan) or Navigating the Time Course Analysis Graph on page 56 (for Time Course).
Sending Graph Data
To send graph data, touch the Send to Printer icon or the Send to Computer icon, whichever is available. If you have configured the DR/2500 to send data to a graphics-capable printer, you will be asked to select whether you want to send the data in graph form or table form. Select your choice and touch OK.
Working with Your DataPage 38 5900018Data.fm

Section 5 User Programs—Customized Analysis
User Programs allow the addition of custom analyses to the DR/2500. Once you input the calibration curve and the other necessary information, the DR/2500 will remember your custom program and allow you to run it anytime you like. User Programs are helpful when there is no Hach Program for your test, or when you would like to use a different sample cell than the one specified in the Hach Procedures manual for a particular test.
5.1 Creating and Saving a New User Program
Note: If you do not have the Advanced Software package, you new user program will be based on a single wavelength analysis.
4. The Edit User Program screen will appear. To edit an item shown on the screen, highlight it by scrolling, then touch Edit. You must enter the following information:
1. From the Main Menu, touch User Programs, then Program Options, then New Program.
2. You will be prompted to enter a new program number from 950 to 999. The lowest available number will appear on the screen automatically. To accept it, touch OK. Note: If you select a number that is already in use for another User program,
the instrument will ask whether you want to replace the existing program. If you touch Yes, the previous program will be overwritten.
3. If you have the Advanced Software package, you will see two choices:
• Single Wavelength—This option allows you to manually enter all of the information necessary for creating a new single wavelength program.
• Multi-Wavelength (Advanced Software only)—This option allows you to manually enter all of the information necessary for creating a new multi-wavelength program.
Touch your selection and OK.
Highlighted User Programs Component
What Happens When You Touch “Edit”
NameYou may enter a program name that works for you. The name may be from 11 to 19 characters long, depending on the width of the characters you choose.
Units Select from a list of 21 types of units.
Chemical Form 1Brings up a screen where you may enter your own description of the chemical form. Subscripts and superscripts are available for chemical notation
Wavelength (Single Wavelength User Programs)
Allows you to enter a numeric value for the wavelength. The wavelength must be between 365nm and 880nm.
User Programs—Customized Analysis5900018UserPrograms.fm Page 39

User Programs—Customized Analysis
5. After entering the Program Name, you can save the program by touching Save Program. Once you have entered the rest of the data in the table above, touch Save Program again, then touch Done. The program will now be listed in the list of User Programs, ready for you to use.
5.1.1 Entering a Calibration Formula Directly
1. If you know the calibration formula and coefficients that you want to use, scroll to Calibration and touch Edit.
Abs (Multiple Wavelength User Programs - Advanced Software Only)
Allows you to create a formula for translating readings at multiple wavelengths into one overall absorbance reading, which will be used by the Calibration setting that follows. The formula selection field at the top lets you select how many wavelengths should be used, and how the readings should be combined. The next row of fields allows you to enter wavelengths for these readings, and the third row of fields allows you to enter values for the constants you would like to use in the formula.
Calibration
You can define a calibration curve by either • Entering a calibration table with known values (See Section 5.1.1), or • Reading a series of standards and letting the DR/2500 create the curve (See Section 5.1.2).Make sure to select the correct units for the program before you edit the Calibration.
Resolution Select the maximum number of digits to display after the decimal point.
Upper limitIf desired, enter the maximum value that you would like the program to read. If you have entered a value but now would like to turn the limit off, touch Edit, then CE, then OK.
Lower limitIf desired, enter the minimum value that you would like the program to read. The setting can be turned off again in the same way as the Upper limit.
Timer 1Timer 2Timer 3Timer 4
If desired, you may assign labels and durations for up to four timers. Highlight one of the timers and touch Edit to begin. The check boxes on the left of the screen enable and disable the timers. The next column of fields allows you to select from a list of 7 timer labels. The third column allows you to enter the time duration for each active timer.
Chemical Form 2Chemical Form 3Chemical Form 4
If you have enabled Chemical Form 1, you may enter up to three alternate forms here. Highlight a form and touch Edit. For each alternate form, use the check box on the left to enable or disable the form. Then touch the field in the next column to enter a form. Finally, for the alternate forms, touch the third column to enter a Factor. The DR/2500 will multiply the results of Chemical Form 1 by the factor you enter, to arrive at a concentration for the alternate form.
Highlighted User Programs Component
What Happens When You Touch “Edit”
2. Touch and edit each of the coefficients to complete the formula. The coefficients determine the complexity of the formula. For example, a simple linear relationship would have coefficients of zero for c and d.
The Calibration screen shows the formula that will be used to calculate concentration. This formula is shown at the top of the screen. “C” stands for the calculated concentration. The “A” corresponds to the absorbance reading, and the lowercase characters “a”, “b”, “c”, and “d” correspond to the coefficients in the formula.
User Programs—Customized AnalysisPage 40 5900018UserPrograms.fm

User Programs—Customized Analysis
5.1.2 Creating a Calibration Table
The Curve Fit screen allows you to enter concentration values and read corresponding absorbance values. Once the table is created, you may fit a curve to those values. After you select the curve type, the instrument will calculate the coefficients of the formula for you, based on the points in the table.
6. When the first calibration standard is ready to read, insert it in the sample compartment. Touch Read to read the absorbance. Now you have the first point on the calibration curve.
7. Touch the Add Point icon again.
8. Enter the second calibration point concentration. Touch OK.
9. Insert the second calibration standard. Touch Read to read the absorbance.
10. Continue this process until you have read all your standards (up to a maximum of 16 points.)
13. To accept the curve, touch Done.
14. The Calibration screen will appear. Touch OK to accept the calibrations.
15. The Edit User Program screen will appear. Touch Save Program to save all the changes.
16. Once a calibration curve is saved, you may review the graph by following steps 1, 2 and 11 above.
5.2 Recalling a User ProgramTo see an alphabetical list of user programs with program numbers, touch User Programs in the Main Menu. The list of User Programs will appear.
If you know the program number that you want, touch Select by Number. Enter the program number and touch OK. Then touch Start Program to run it.
1. On the Edit User Program screen, highlight Calibration and touch Edit.
2. On the Calibration screen, touch Curve Fit.
3. Touch the Add Point icon (shown at the left).
4. Enter the first Standard Concentration value. Touch OK.
5. Insert a blank sample (not the first standard) and touch Zero.
11. After you have entered all points, touch Graph. The Curve Fit graph screen will appear.
12. Touch Next Formula to scroll through options for a type of curve to fit. To force the curve to go through (0, 0) touch Force 0.
User Programs—Customized Analysis5900018UserPrograms.fm Page 41

User Programs—Customized Analysis
If you need to scroll through the list, use the scroll bar on the right side of the screen to move up or down through the list. When your selection is highlighted, touch Start Program.
5.3 Editing an Existing User Program1. To edit an existing user program, highlight the user program from the list.
Note: If the user program was derived from a Hach Program, you will not be able to edit it.
2. Touch Program Options, then Edit Program.
3. Edit the program as necessary.
5.4 Erasing a User Program1. Touch User Programs in the Main Menu. The User Programs list will appear.
2. To delete a user program, select the program by number or by scrolling through the list.
3. Touch Program Options.
4. Touch Delete Program.
5.5 Adding User Programs to the “Favorite Programs” ListYou can add a User Program to the “Favorites” list that contains your most frequently used programs:
1. Touch User Programs in the Main Menu. The list of User Programs will appear.
2. Scroll through the list of programs and highlight the program that you want to add, or touch Select by Number to select the program using the numeric keypad.
3. Touch Program Options, then Add to Favorites.
4. Afterward, you will be able to choose your User Program from the Favorite Programs option on the Main Menu.
User Programs—Customized AnalysisPage 42 5900018UserPrograms.fm
Section 6 Standard Additions
6.1 Checking Results with Standard AdditionsBoth the accuracy (the nearness of a test result to the true value) and the precision (how closely repeated measurements agree with each other) of a procedure can be improved by using standard additions. Standard additions is a common technique for checking interferences, bad reagents, faulty instruments, and incorrect procedures. This technique is also referred to as “spiking” and “known additions.”
Perform Standard Additions by adding a known amount of a standard solution to your sample and repeating the test. Use the same reagents, equipment, and technique. You should get close to 100% recovery. If not, you have an identifiable problem.
If using standard additions works for your test, a Standard Additions Method section will be in the procedure under Accuracy Check. Follow the detailed instructions given there.
If you get about 100% recovery for each addition, your results are likely correct. You can verify results by running a standard solution through the test. If you don’t get about 100% recovery for each addition, a problem exists. You can tell if you have an interference in your sample. Repeat the standard additions using deionized water as your sample to check the reagents, instrument, and technique. If you now get about 100% recovery for each addition, you have an interference in your sample. See Section 6.3 Estimating Concentration Using Standard Additions.
If you didn’t get good recoveries with the deionized water, use the following checklist to find the problem:
1. Check to see that you are following the procedure exactly:
a. Are you using the proper reagents in the proper order?b. Are you waiting the necessary time for color to develop?c. Are you using the correct glassware?d. Is the glassware clean?e. Does the test need a specific sample temperature?f. Is the sample’s pH in the correct range?Consult the written procedure in the DR/2500 Procedure Manual to answer these questions.
2. Check the performance of your instrument. Follow the instructions in the Section 14 Troubleshooting and FAQs.
3. Check your reagents. Repeat the standard additions using fresh reagents. If your results are good, the original reagents were bad.
4. If nothing else is wrong, the standard is almost certainly bad. Repeat the standard additions with a new standard.
5. If you still cannot identify the problem, you may need some extra help. Please call our Technical Support Group at 800-227-4224 (U.S.A.) or 970-669-3050. A representative will be happy to help you.
Standard Additions5900018StdAdd.fm Page 43

Standard Additions
6.2 Using the Standard Additions OptionStandard additions involves adding small volumes of a known standard to a specific volume of sample. This “spiked” sample is then analyzed for the additional standard. The process includes three important items: (1) standard concentration; (2) standard additions volumes; and (3) sample volume.
The sample volume is not necessarily the volume analyzed in the procedure; it is the original volume of sample to which the standard is added. For example, in Hach Program 320, standard is added to 30 mL of sample, but only 10 mL of the solution is actually analyzed in the procedure. It is important to note that the volume of sample tested in the method does not change.
Not all Hach Programs include the Standard Additions option.
Hach Programs that have the Standard Additions option are usually pre-programmed for the three items listed above. These values are the same as those outlined in the Accuracy Check instructions at the back of the procedure. For alternative spiking schemes, the default values can be overridden. The values entered into the DR/2500, however, must be the same as those used to spike the samples.
Note: Standard additions uses the units and chemical form currently in effect. Make certain that subsequent entries are made in the correct units.
Select a measurement mode from the Main Menu. Modes with the Standard Additions option include most Hach programs and user programs that are derived from Hach programs.
Example: (using Hach Program 10)
1. From the Main Menu, touch Hach Programs. Touch Select by Number and enter 10. Touch OK. Touch Start Program.
2. Analyze an unspiked sample per the instructions in the Procedures Manual. Leave the sample in the cell holder after taking a reading.
3. From the Hach Programs menu, touch Options, then Standard Additions. A summary of the standard additions procedure will appear.
4. Touch OK to accept the default values for standard concentration, sample volume, and spike volumes. Touch Edit to change these values. After values are accepted, the unspiked sample reading will appear in the top row.
Standard AdditionsPage 44 5900018StdAdd.fm
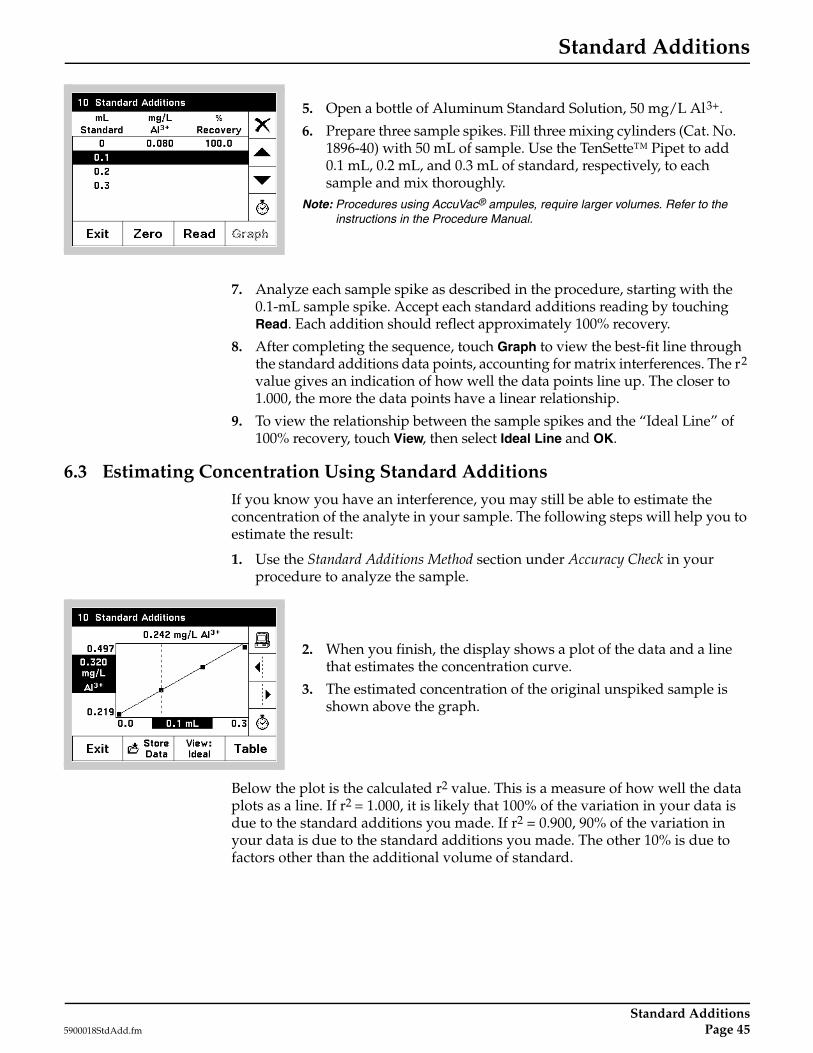
Standard Additions
7. Analyze each sample spike as described in the procedure, starting with the 0.1-mL sample spike. Accept each standard additions reading by touching Read. Each addition should reflect approximately 100% recovery.
8. After completing the sequence, touch Graph to view the best-fit line through the standard additions data points, accounting for matrix interferences. The r2 value gives an indication of how well the data points line up. The closer to 1.000, the more the data points have a linear relationship.
9. To view the relationship between the sample spikes and the “Ideal Line” of 100% recovery, touch View, then select Ideal Line and OK.
6.3 Estimating Concentration Using Standard AdditionsIf you know you have an interference, you may still be able to estimate the concentration of the analyte in your sample. The following steps will help you to estimate the result:
1. Use the Standard Additions Method section under Accuracy Check in your procedure to analyze the sample.
Below the plot is the calculated r2 value. This is a measure of how well the data plots as a line. If r2 = 1.000, it is likely that 100% of the variation in your data is due to the standard additions you made. If r2 = 0.900, 90% of the variation in your data is due to the standard additions you made. The other 10% is due to factors other than the additional volume of standard.
5. Open a bottle of Aluminum Standard Solution, 50 mg/L Al3+.
6. Prepare three sample spikes. Fill three mixing cylinders (Cat. No. 1896-40) with 50 mL of sample. Use the TenSette™ Pipet to add 0.1 mL, 0.2 mL, and 0.3 mL of standard, respectively, to each sample and mix thoroughly.
Note: Procedures using AccuVac® ampules, require larger volumes. Refer to the instructions in the Procedure Manual.
2. When you finish, the display shows a plot of the data and a line that estimates the concentration curve.
3. The estimated concentration of the original unspiked sample is shown above the graph.
Standard Additions5900018StdAdd.fm Page 45

Page 46 5900018StdAdd.fm

Section 7 Measuring pH
A Hach Platinum Series electrode is required to read pH. Connect the 5-pin connector of the electrode to the instrument as described in Section pH Connections on page 14.
To enter pH/mV reading mode, press the pH key on the front of the instrument. Press the pH key again to return to the mode that you were using.
7.1 pH Options
7.1.1 Selecting pH Measurement Resolution
Choose how many decimal places will appear on the display (x.x, x.xx, or x.xxx). The default setting is 2 decimal places.
7.1.2 Selecting Temperature Units for pH Measurement
Choose between °F and °C. The default setting is °C.
7.1.3 Selecting the Mid-range Buffer
Choose between 7.00 and 6.86. The default setting is 7.00.
7.2 Calibrating the Meter Using pH 4, 7 (or 6.86), and 10 BuffersBefore an acceptable calibration is performed, only mV and temperature will appear on the screen. The screen will state, “pH Calibration Required.”
1. Prepare up to three pH buffers, 4.01, 7.00 (or 6.86), and 10.01, according to the electrode instruction manual.
Note: The pH values for the buffers are given for 25 °C. If the sample temperature is not 25 °C, the pH values displayed for the buffers will reflect the correct pH value for the sample temperature.
2. Touch Options, then Calibrate.
3. Rinse the probe with deionized water. Shake off excess water or blot with a soft tissue. Place the electrode into Buffer 1. Touch OK. Wait for the measurement to stabilize.
4. If a calibration curve has already been entered, you may touch Done to adjust the offset of the existing curve. If this is the first calibration, or for greater accuracy, follow the steps below. A two- or three-point calibration is recommended in most cases.
5. Rinse the probe again with deionized water. Shake off excess water or blot with a soft tissue. Place the electrode into Buffer 2. Touch OK.
6. If you are doing a two-point calibration, touch Done after the measurement stabilizes. If you are doing a three-point calibration, rinse the probe. Shake
To view pH Options, press the pH key to get into pH mode. Touch Options. Change the options described in Section Selecting pH Measurement Resolution through Selecting the Mid-range Buffer, as desired.
Measuring pH5900018pH.fm Page 47
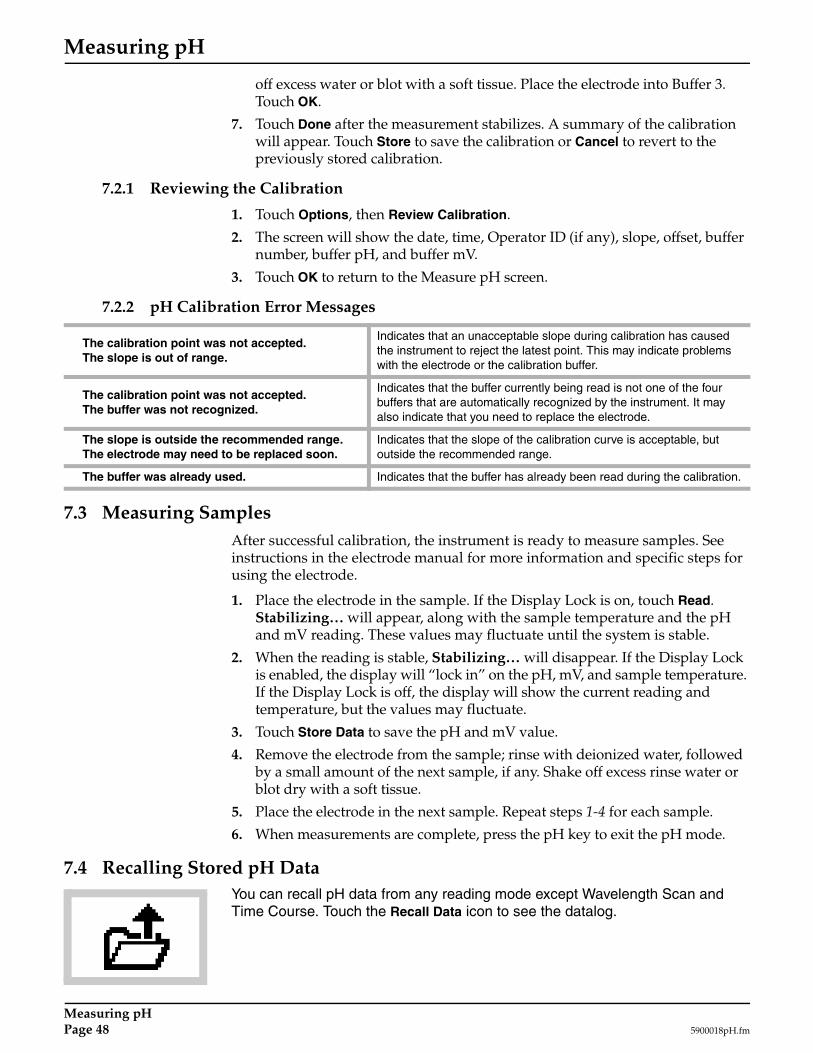
Measuring pH
off excess water or blot with a soft tissue. Place the electrode into Buffer 3. Touch OK.
7. Touch Done after the measurement stabilizes. A summary of the calibration will appear. Touch Store to save the calibration or Cancel to revert to the previously stored calibration.
7.2.1 Reviewing the Calibration
1. Touch Options, then Review Calibration.
2. The screen will show the date, time, Operator ID (if any), slope, offset, buffer number, buffer pH, and buffer mV.
3. Touch OK to return to the Measure pH screen.
7.2.2 pH Calibration Error Messages
7.3 Measuring SamplesAfter successful calibration, the instrument is ready to measure samples. See instructions in the electrode manual for more information and specific steps for using the electrode.
1. Place the electrode in the sample. If the Display Lock is on, touch Read. Stabilizing… will appear, along with the sample temperature and the pH and mV reading. These values may fluctuate until the system is stable.
2. When the reading is stable, Stabilizing… will disappear. If the Display Lock is enabled, the display will “lock in” on the pH, mV, and sample temperature. If the Display Lock is off, the display will show the current reading and temperature, but the values may fluctuate.
3. Touch Store Data to save the pH and mV value.
4. Remove the electrode from the sample; rinse with deionized water, followed by a small amount of the next sample, if any. Shake off excess rinse water or blot dry with a soft tissue.
5. Place the electrode in the next sample. Repeat steps 1-4 for each sample.
6. When measurements are complete, press the pH key to exit the pH mode.
7.4 Recalling Stored pH DataYou can recall pH data from any reading mode except Wavelength Scan and Time Course. Touch the Recall Data icon to see the datalog.
The calibration point was not accepted. The slope is out of range.
Indicates that an unacceptable slope during calibration has caused the instrument to reject the latest point. This may indicate problems with the electrode or the calibration buffer.
The calibration point was not accepted. The buffer was not recognized.
Indicates that the buffer currently being read is not one of the four buffers that are automatically recognized by the instrument. It may also indicate that you need to replace the electrode.
The slope is outside the recommended range. The electrode may need to be replaced soon.
Indicates that the slope of the calibration curve is acceptable, but outside the recommended range.
The buffer was already used. Indicates that the buffer has already been read during the calibration.
Measuring pHPage 48 5900018pH.fm
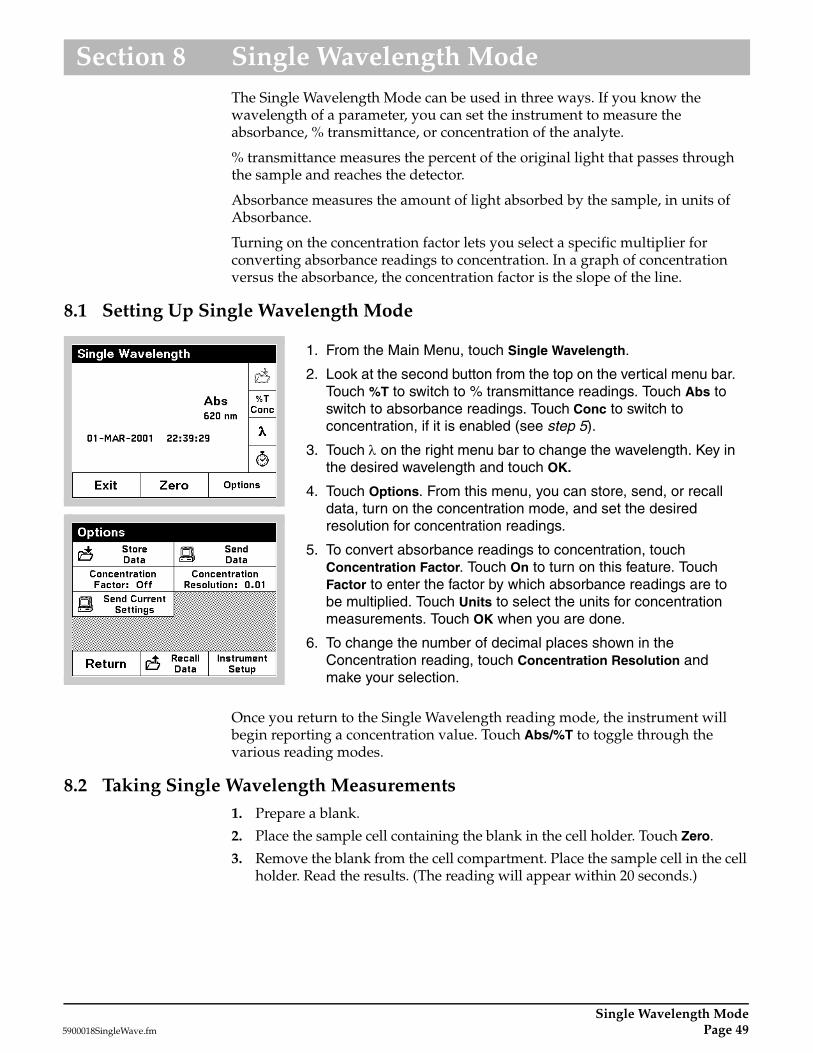
Section 8 Single Wavelength ModeThe Single Wavelength Mode can be used in three ways. If you know the wavelength of a parameter, you can set the instrument to measure the absorbance, % transmittance, or concentration of the analyte.
% transmittance measures the percent of the original light that passes through the sample and reaches the detector.
Absorbance measures the amount of light absorbed by the sample, in units of Absorbance.
Turning on the concentration factor lets you select a specific multiplier for converting absorbance readings to concentration. In a graph of concentration versus the absorbance, the concentration factor is the slope of the line.
8.1 Setting Up Single Wavelength Mode
Once you return to the Single Wavelength reading mode, the instrument will begin reporting a concentration value. Touch Abs/%T to toggle through the various reading modes.
8.2 Taking Single Wavelength Measurements1. Prepare a blank.
2. Place the sample cell containing the blank in the cell holder. Touch Zero.
3. Remove the blank from the cell compartment. Place the sample cell in the cell holder. Read the results. (The reading will appear within 20 seconds.)
1. From the Main Menu, touch Single Wavelength.
2. Look at the second button from the top on the vertical menu bar. Touch %T to switch to % transmittance readings. Touch Abs to switch to absorbance readings. Touch Conc to switch to concentration, if it is enabled (see step 5).
3. Touch λ on the right menu bar to change the wavelength. Key in the desired wavelength and touch OK.
4. Touch Options. From this menu, you can store, send, or recall data, turn on the concentration mode, and set the desired resolution for concentration readings.
5. To convert absorbance readings to concentration, touch Concentration Factor. Touch On to turn on this feature. Touch Factor to enter the factor by which absorbance readings are to be multiplied. Touch Units to select the units for concentration measurements. Touch OK when you are done.
6. To change the number of decimal places shown in the Concentration reading, touch Concentration Resolution and make your selection.
Single Wavelength Mode5900018SingleWave.fm Page 49

Page 50 5900018SingleWave.fm

Section 9 Multiple Wavelength Mode
(Advanced Software Only)The multiple wavelength mode of the DR/2500 Spectrophotometer provides a way to take measurements requiring the sum, difference, or ratio of absorbances at up to four wavelengths.
9.1 Setting Multiple Wavelength Measurement Options.
Note: For wavelengths of 410 nm and below, turning on the display lock will reduce the time for the measurement to complete and simplify reading the final result. See Section Display Lock.
1. From the Main Menu, touch Multi-Wavelength.
2. Look at the second button from the top on the vertical menu bar. Touch %T to switch to % transmittance readings. Touch Abs to switch to absorbance readings. Touch Conc to switch to concentration, if it is enabled (see step 5).
3. Touch λ on the right menu bar to change the wavelengths. Key in the desired wavelengths and touch OK.
4. Touch Options. From this menu, you can store, send, and recall data; turn on the concentration mode; or set the absorbance formula.
a. Store Data — Use to save the most recent reading to the datalog.
b. Send Data — Use to send the most recent reading to the datalog.
c. Concentration Factor — Use to convert absorbance readings to concentration. You may also enter a conversion value and units here. Touch On to turn on this feature. Touch Factor to enter the factor by which absorbance readings are to be multiplied. Touch Units to select the units for concentration measurements. Touch OK when you are done.
d. Concentration Resolution — Use to set the number of decimal places for concentration readings.
e. Absorbance Formula — The absorbance formula defines how the multiple wavelength reading will be calculated. To select a formula, touch the formula button near the top of the display.
The following formulas are available:
A = K1A1 + K2A2
A = K1A1 + K2A2 + K3A3
A = K1A1 + K2A2 + K3A3 + K4A4
A = K1A1 / K2A2
A = (K1A1 + K2A2) / K3A3
A = (K1A1 + K2A2) / (K3A3 + K4A4)
A1 refers to the absorbance at wavelength 1, A2 refers to the absorbance at wavelength 2, etc. K1 refers to the coefficient at wavelength 1, K2 refers to the coefficient at wavelength 2, etc. Coefficients can be set negative where subtraction is required.
Multiple Wavelength Mode5900018MultiWave.fm Page 51

Multiple Wavelength Mode
4. Once you return to the Multi-Wavelength reading mode, the instrument will begin reporting readings. Touch Abs/%T/Conc to toggle through the various reading modes.
9.2 Taking Multiple Wavelength Measurements1. Prepare a blank.
2. Place the sample cell containing the blank in the cell holder. Touch Zero.
3. Remove the blank from the cell compartment. Place the sample cell in the cell holder. The reading at each wavelength will appear one by one. When the last reading is done, the instrument will calculate the combined absorbance value based on the formula selected.
This screen also includes settings for the wavelengths and the constants used in the formula. Touch any of these buttons to edit their settings.
f. Send Current Settings — Use to send your multi-wavelength analysis settings to the printer to document your procedure.
Formula
Wavelengths
Coefficients
Multiple Wavelength ModePage 52 5900018MultiWave.fm
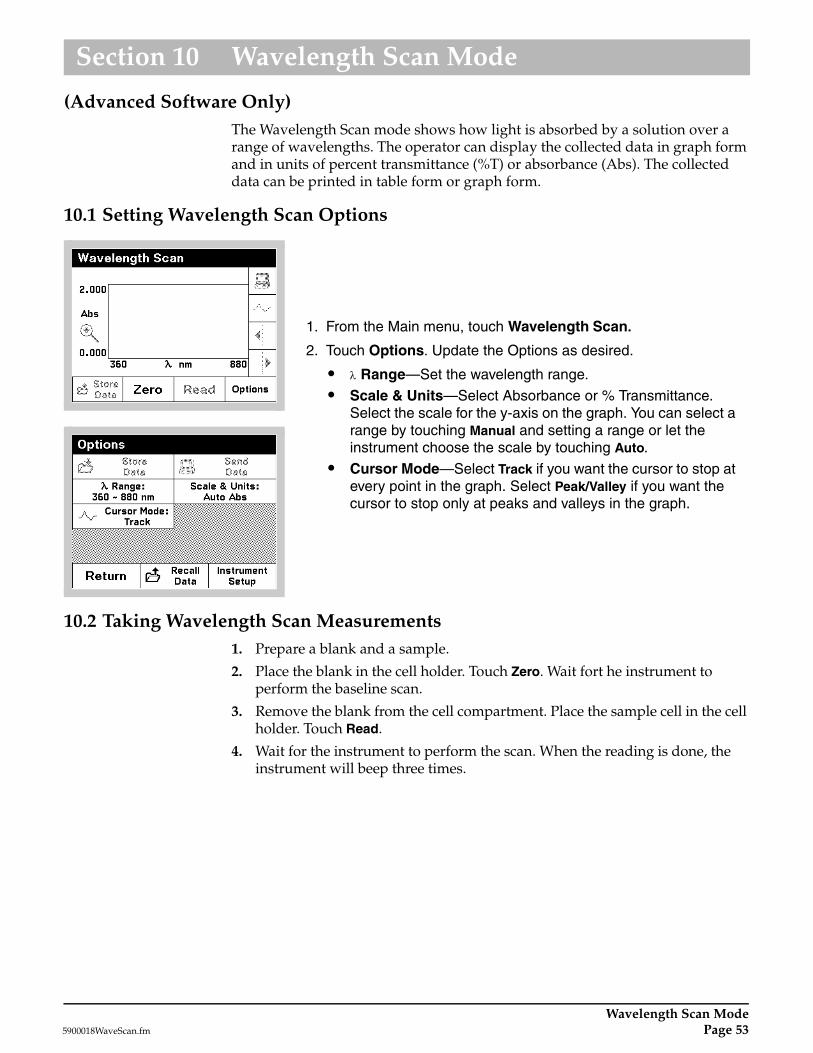
Section 10 Wavelength Scan Mode
(Advanced Software Only)The Wavelength Scan mode shows how light is absorbed by a solution over a range of wavelengths. The operator can display the collected data in graph form and in units of percent transmittance (%T) or absorbance (Abs). The collected data can be printed in table form or graph form.
10.1 Setting Wavelength Scan Options
10.2 Taking Wavelength Scan Measurements1. Prepare a blank and a sample.
2. Place the blank in the cell holder. Touch Zero. Wait fort he instrument to perform the baseline scan.
3. Remove the blank from the cell compartment. Place the sample cell in the cell holder. Touch Read.
4. Wait for the instrument to perform the scan. When the reading is done, the instrument will beep three times.
1. From the Main menu, touch Wavelength Scan.
2. Touch Options. Update the Options as desired.
• λ Range—Set the wavelength range.
• Scale & Units—Select Absorbance or % Transmittance. Select the scale for the y-axis on the graph. You can select a range by touching Manual and setting a range or let the instrument choose the scale by touching Auto.
• Cursor Mode—Select Track if you want the cursor to stop at every point in the graph. Select Peak/Valley if you want the cursor to stop only at peaks and valleys in the graph.
Wavelength Scan Mode5900018WaveScan.fm Page 53
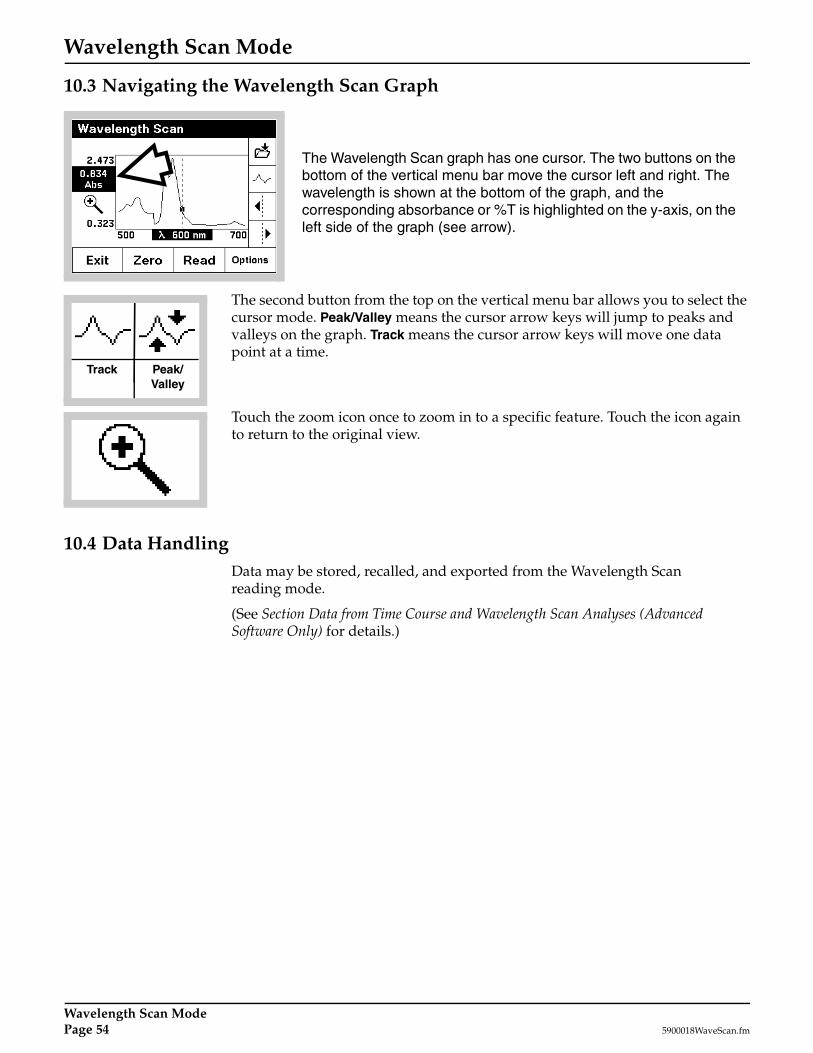
Wavelength Scan Mode
10.3 Navigating the Wavelength Scan Graph
The second button from the top on the vertical menu bar allows you to select the cursor mode. Peak/Valley means the cursor arrow keys will jump to peaks and valleys on the graph. Track means the cursor arrow keys will move one data point at a time.
Touch the zoom icon once to zoom in to a specific feature. Touch the icon again to return to the original view.
10.4 Data HandlingData may be stored, recalled, and exported from the Wavelength Scan reading mode.
(See Section Data from Time Course and Wavelength Scan Analyses (Advanced Software Only) for details.)
The Wavelength Scan graph has one cursor. The two buttons on the bottom of the vertical menu bar move the cursor left and right. The wavelength is shown at the bottom of the graph, and the corresponding absorbance or %T is highlighted on the y-axis, on the left side of the graph (see arrow).
Track Peak/Valley
Wavelength Scan ModePage 54 5900018WaveScan.fm

Section 11 Time Course Measurement Mode
(Advanced Software Only)The time course measurement mode provides a way to evaluate reactions by taking readings at one wavelength over time. For example, you can determine how quickly color develops in a sample, how stable it is, and how soon it decays.
11.1 Setting Time Course Analysis Options
11.2 Taking Time Course Measurements1. Prepare a blank.2. Place the blank in the cell holder. Touch Zero. The instrument will then be
ready to start the Time Course measurement.3. Remove the blank from the cell compartment. Prepare a sample. Place the
sample in the cell holder. When you would like the instrument to start reading, touch Start.
4. Wait for the instrument to take the measurements. To stop the procedure at any time, touch Stop. If you would like to mark a particular spot in the graph during the procedure, touch Mark.
5. Throughout the procedure, the instrument will show when the next reading will be taken.
1. From the Main Menu, touch Time Course.
2. The Time Course screen will appear.
3. Touch Options. Update the Options as desired.
• Wavelength—Set the wavelength.
• Scale & Units—Select Absorbance or % Transmittance. Select the scale for the y-axis on the graph. You can select a range by touching Manual and setting a range or let the instrument choose the scale by touching Auto.
• Total Time—Period sets the length of time for the entire scan. To change the unit of time, touch the displayed unit and select a new unit on the menu that appears.
• Read Interval sets the amount of time between readings.
• Cursor Mode — Select Elapsed (t) or Delta (∆ t). See Section Navigating the Time Course Analysis Graph
Time Course Measurement Mode5900018TimeCourse.fm Page 55

Time Course Measurement Mode
11.3 Navigating the Time Course Analysis GraphOnce a Time Course reading has been completed, a graph of absorbance vs. time will appear. There will be one cursor shown on the graph. This is the Elapsed (t) (elapsed time) cursor mode.
• The elapsed time at the cursor will be highlighted at the bottom of the graph.• The corresponding absorbance will be highlighted at the left side of
the graph.• To move the cursor right and left, touch the cursor right/left buttons on the
vertical menu bar.• Touch the zoom icon once to zoom in to a specific feature. Touch the icon
again to return to the original view.
The second button from the top on the vertical menu bar allows you to turn on a second cursor. This is Delta (∆ t) mode.
• When the second cursor is turned on, the difference in time between the two cursors is highlighted at the bottom of the graph.
• The absorbance at the second cursor will be highlighted on the left side of the graph.
• The slope of a line between the two points where the cursors intersect the graph will be shown above the graph, along with a corresponding r2 value.
To move the second cursor right and left, touch the cursor right/left buttons on the vertical menu bar.
To return to the Elapsed Time cursor mode, touch the second button from the top again.
11.4 Data HandlingData may be stored, recalled, and exported from the Time Course reading mode.
See Section Data from Time Course and Wavelength Scan Analyses (Advanced Software Only) for details.
Time Course Measurement ModePage 56 5900018TimeCourse.fm
Maintenance
Some of the following manual sections contain information in the form of warnings, cautions and notes that require special attention. Read and follow these instructions carefully to avoid personal injury and damage to the instrument. Only personnel qualified to do so, should conduct the installation/maintenance tasks described in this portion of the manual.
Certains des chapitres suivants de ce mode d’emploi contiennent des informations sous la forme d’avertissements, messages de prudence et notes qui demandent une attention particulière. Lire et suivre ces instructions attentivement pour éviter les risques de blessures des personnes et de détérioration de l’appareil. Les tâches d’installation et d’entretien décrites dans cette partie du mode d’emploi doivent être seulement effectuées par le personnel qualifié pour le faire.
Algunos de los capítulos del manual que presentamos contienen información muy importante en forma de alertas, notas y precauciones a tomar. Lea y siga cuidadosamente estas instrucciones a fin de evitar accidentes personales y daños al instrumento. Las tareas de instalación y mantenimiento descritas en la presente sección deberán ser efectuadas únicamente por personas debidamente cualificadas.
Einige der folgenden Abschnitte dieses Handbuchs enthalten Informationen in Form von Warnungen, Vorsichtsmaßnahmen oder Anmerkungen, die besonders beachtet werden müssen. Lesen und befolgen Sie diese Instruktionen aufmerksam, um Verletzungen von Personen oder Schäden am Gerät zu vermeiden. In diesem Abschnitt beschriebene Installations- und Wartungsaufgaben dürfen nur von qualifiziertem Personal durchgeführt werden.
Alcune parti di questo manuale contengono informazioni sotto forma d’avvertimenti, di precauzioni e di osservazioni le quali richiedono una particolare attenzione. La preghiamo di leggere attentivamente e di rispettare quelle istruzioni per evitare ogni ferita corporale e danneggiamento della macchina. Solo gli operatori qualificati per l’uso di questa macchina sono autorizzati ad effettuare le operazioni di manutenzione descritte in questa parte del manuale.
5900018MaintStop.fm Page 57

Page 58 5900018MaintStop.fm

Section 12 Maintenance
12.1 Caring for Your Instrument• Do not scratch the touchscreen. Never use a pen, pencil, or other sharp object
on the surface of the touchscreen.• The touchscreen is water-resistant, but should not be exposed to direct rain
or moisture. In general, treat the instrument as you would other electronic instruments.
• The touchscreen contains a glass element. Protect the touchscreen against a strong impact.
• Protect the instrument from temperature extremes, including heaters, direct sunlight, and other heat sources.
• Do not store or use the instrument in any location that is extremely dusty, damp, or wet.
12.2 Cleaning the InstrumentUse a soft, damp cotton cloth to wipe the instrument and the touchscreen. If the surface of the touchscreen becomes soiled, you may clean it with a soft cloth and diluted window cleaning solution. Do not use strong solvents.
12.3 Replacing the Illuminator ModuleThe light sources in the DR/2500 were designed to provide years of reliable use. In the event that the Illuminator Module becomes damaged or burnt out, a replacement unit may be ordered (Cat. No. 59059-00). Installation instructions are included with the replacement module.
To determine whether the module needs replacing, or to get help replacing it, contact the Hach Service Department. In the United States, call 1-800-227-4224. Outside the United States, contact the Hach office or dealer serving you. See Repair Service on page 72 for more contact information.
12.4 Sample Cell MaintenanceGlass — Clean glass cells with detergent and water. Rinse the cells several times with tap water, and then rinse thoroughly with deionized water. Rinse sample cells containing organic solvents (chloroform, benzene, toluene, etc.) with acetone before the detergent wash, and again as a final rinse before drying.
Note: Some cells may require acid washing or other special cleaning procedures.
Polystyrene — Wash polystyrene sample cells with soap and water and rinse thoroughly with tap water. Do not use organic solvents to clean polystyrene sample cells.
12.5 Pour-thru Cell MaintenanceSee Section Cleaning the Pour-Thru Cell.
!
Maintenance5900018Maintain.fm Page 59
Maintenance
12.6 Recertification IntervalHach recommends annual recertification of your instrument to maintain accuracy in measurement. Qualified Hach technicians will make sure your instrument meets Hach specifications, and return the instrument to you with a certificate of specification compliance.
Pack the instrument carefully, preferably in its original packaging material, to assure a safe shipment. Secure the sliding door in a closed position with strong tape before packing the instrument. Hach Company cannot be responsible for damage caused during shipment.
Contact Hach Service to arrange for recertification or other service. See Repair Service on page 72 for contact information.
MaintenancePage 60 5900018Maintain.fm

Section 13 Upgrading the Instrument Software
The DR/2500 Software Upgrade Utility is a Microsoft Windows* application that allows use of a personal computer to load the latest version of instrument software into the DR/2500 Spectrophotometer. The upgrade utility will only upgrade instruments — it will not program instruments that are already up-to-date or that contain newer software.
Note: This software is copyrighted; however, it is not copy protected. This software may be used to upgrade all DR/2500 Spectrophotometers in the facility, and can be installed on more than one computer if necessary.
13.1 System RequirementsThe following are the minimum requirementa for successful installation and operation of the DR/2500 Softwre Upgrade Utility:
• PC with a 486/100 MHz or higher processor• Windows 95, 98, 2000, or NT 4.0 operating systems• 32 MB RAM• Hard drive with 20 MB or more free space• 3½ in. floppy disk drive or CD-ROM drive• VGA graphics with 640 ∞ 480 or higher resolution, 256 colors• Mouse or other pointing device• 9-pin serial port (or 25-pin serial port with 9-pin adapter) with a computer
interface cable (Cat. No. 48129-00 or equivalent).
13.2 Installing the Upgrade Software on the PCUse the following procedure to install the Software Upgrade Utility on the hard drive. Do not attempt to copy files directly from the setup disk to the hard drive because many of the files are compressed and will not function until properly installed.
13.2.1 Installing from Floppy Disk1. Insert Disk 1 into the floppy drive.
2. Click the Start button and select Run from the menu.
3. Type a:\setup.exe (where a:\ is the disk drive) in the Run dialog and click OK.
4. Follow the instructions as they appear on the screen.
13.2.2 Installing from CD-ROM1. Insert the CD into the CD-ROM drive. The CD will automatically run.
2. Follow the instructions as they appear on the screen.
13.3 Connecting the Instrument to the Computer1. Connect one end of the computer interface cable to the serial port connector
on the back of the instrument.
2. Connect the other end of the cable to a serial port connector on the back of the computer. If there is more than one serial port on the computer, note the port number used (port 1 is usually labeled as COM-1 or 1010-1, port 2 as COM-2 or 1010-2, etc.).
3. Turn on the DR/2500 Spectrophotometer.
*. Microsoft and Windows are either registered trademarks or trademarks of Microsoft in the United States and/or other countries.
Upgrading the Instrument Software5900018Upgrade.fm Page 61

Upgrading the Instrument Software
13.4 Starting the Upgrade UtilityOn the computer, click Start, Programs, Hach Utilities, DR/2500 Software Upgrade Utility.
The upgrade information window will appear. It displays information about the upgrade utility. Any last minute changes made to the utility that might not be included in this manual will be displayed here. Use the scroll bar to the right of the window to view additional information.
13.5 Setting the Communication LinkIn order for the upgrade utility to program a DR/2500 Spectrophotometer, it must be able to establish a communication link with the instrument through one of the computer’s serial ports. Using the serial port selection box in the DR/2500 DR/2500 Upgrade software, choose the serial port used to connect the computer to the instrument. Click on the down arrow to view a list of the available serial ports, then click on the appropriate port selection.
The DR/2500 Spectrophotometer must be set up as described in Communications with a Printer or Computer on page 23.
13.6 Programming the InstrumentOnce the instrument is connected to the computer and the communication settings are made, programming can begin. Click on the Program button to start the programming sequence.
1. When the upgrade utility completes its system checks, a confirmation prompt will appear. The estimated time to program the instrument is also displayed.
2. Click on Yes to upgrade the instrument, click on No or Cancel to cancel the programming sequence.
After selecting Yes, the instrument switches to the programming mode and the upgrade begins. Do not disconnect or turn off the instrument or computer while programming. The status bar indicates the progress of the programming sequence.
3. A dialog box is displayed when programming is complete. Click on the OK button to return to the utility form.
4. At this time another instrument can be programmed, or click on the Close button to exit the upgrade utility.
13.7 Uninstalling the Upgrade SoftwareFuture releases of the DR/2500 Spectrophotometer Upgrade Utility will automatically replace an older version on the hard drive, so uninstalling this version is not required. To remove the upgrade utility, use the following procedure.
From Windows Explorer, click on the DR/2500 Software Upgrade Utility icon to highlight it - do not double-click on it. Select the File menu and choose the Delete option. Choose Yes in the dialog box to confirm the deletion.
Upgrading the Instrument SoftwarePage 62 5900018Upgrade.fm

Section 14 Troubleshooting and FAQs14.1 Troubleshooting (See http://www.hach.com for the latest information.)
14.1.1 Instrument Information
To see the serial number and software version number:
1. Touch System Checks on the Main Menu.
2. Touch Instrument Information. The serial number and software version number will appear.
14.1.2 Wavelength Check
To perform a wavelength check:
1. Touch System Checks on the mail menu.
2. Touch Wavelength Check.
3. Touch Read.
The instrument will perform a wavelength check. The displayed wavelength should read 404.66 ± 1 nm.
Note: If the displayed wavelength is outside of this range, turn the instrument off then on. Allow it to run through the automatic wavelength calibration. Repeat steps 1–3. If the displayed wavelength is still outside the expected range, contact Hach technical support. See Repair Service on page 72 for contact information.
14.2 Frequently Asked QuestionsDoes the DR/2500 Spectrophotometer factor in sample dilutions? Yes, this is available in the options menu. See Section 3.5.3 Correcting for a Diluted Sample.
What is the scanning range for the DR/2500 with the Advanced Software package? The scanning range is selectable within the range of 365 to 880 nm.
I have large fingers. Can I still use the touchscreen? Yes, you can still use the touch screen very easily. You may want to use the tip of your fingernail, the non-writing end of a pen, or a stylus instead of your fingertip.
Is the Hach RS232 cable necessary for downloading information to a computer or can I purchase a generic 9-pin/9-pin cable from an electronics store? The Hach cable is specifically configured for the DR/2500 instrument. However, you may substitute a 9-pin/9-pin, null-modem cable with female connectors on both ends.
Can I measure ISE with the DR/2500? No. Only pH, and only with Hach Platinum Series 5-pin electrodes.
What does it mean when something is “highlighted”? When selecting an item from a list, whether it is a program, a data point, or a setup option, there is always one item that is shown in light text on a dark background. the is the “highlighted” item. When you move the scroll bar or press the up and down arrow keys, the highlight moves. Also, in graph views, highlighted text corresponds to data at the cursor location. (See Sections 10 and 11 for details.)
What is meant by the term “reading modes”? The DR/2500 software includes the following types of measurements, which are all reading modes: Hach Programs, User Programs, and Single Wavelength analysis. The advanced software adds Multiple Wavelength analysis, Wavelength Scan, and Time Course measurement.
Troubleshooting and FAQs5900018Troubleshoot.fm Page 63

Page 64 5900018Troubleshoot.fm

General Information
At Hach Company, customer service is an important part of every product we make.With that in mind, we have compiled the following information for your convenience.
5900018GenInfo.fm Page 65

Page 66 5900018GenInfo.fm
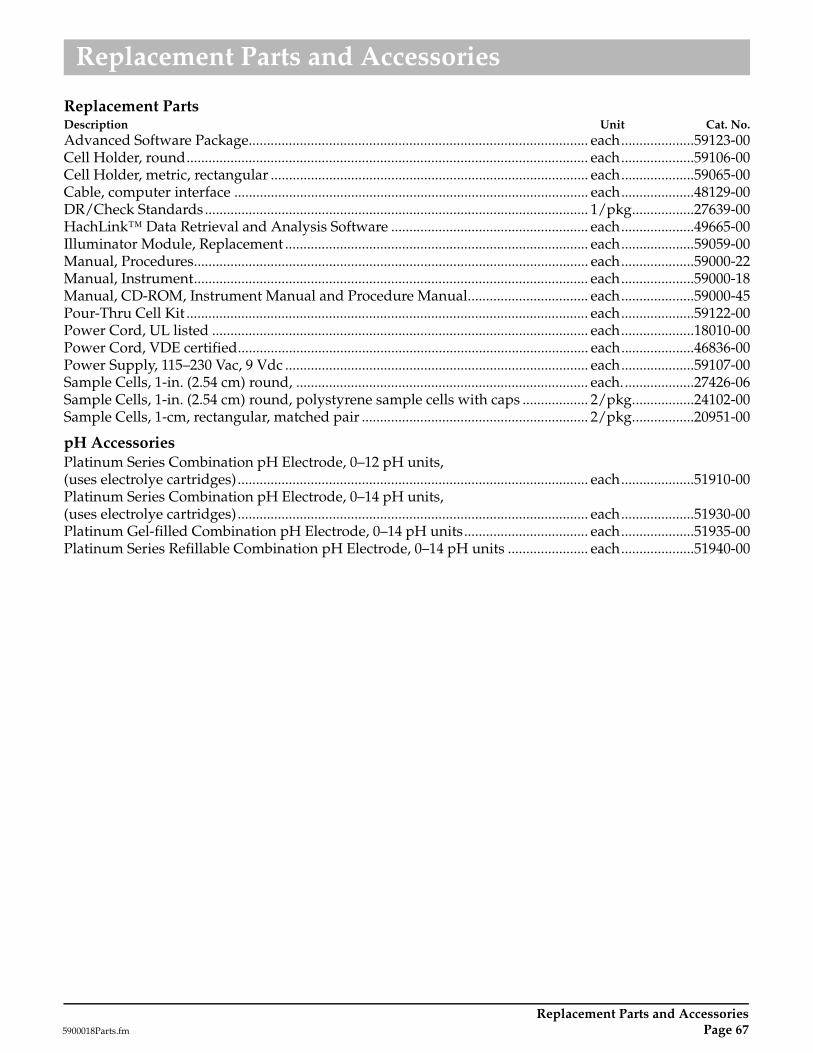
Replacement Parts and Accessories
Replacement PartsDescription Unit Cat. No.Advanced Software Package............................................................................................. each....................59123-00Cell Holder, round.............................................................................................................. each....................59106-00Cell Holder, metric, rectangular ....................................................................................... each....................59065-00Cable, computer interface ................................................................................................. each....................48129-00DR/Check Standards......................................................................................................... 1/pkg.................27639-00HachLink™ Data Retrieval and Analysis Software ...................................................... each....................49665-00Illuminator Module, Replacement ................................................................................... each....................59059-00Manual, Procedures............................................................................................................ each....................59000-22Manual, Instrument............................................................................................................ each....................59000-18Manual, CD-ROM, Instrument Manual and Procedure Manual................................. each....................59000-45Pour-Thru Cell Kit .............................................................................................................. each....................59122-00Power Cord, UL listed ....................................................................................................... each....................18010-00Power Cord, VDE certified................................................................................................ each....................46836-00Power Supply, 115–230 Vac, 9 Vdc ................................................................................... each....................59107-00Sample Cells, 1-in. (2.54 cm) round, ................................................................................ each....................27426-06Sample Cells, 1-in. (2.54 cm) round, polystyrene sample cells with caps .................. 2/pkg.................24102-00Sample Cells, 1-cm, rectangular, matched pair .............................................................. 2/pkg.................20951-00
pH AccessoriesPlatinum Series Combination pH Electrode, 0–12 pH units, (uses electrolye cartridges)................................................................................................ each....................51910-00Platinum Series Combination pH Electrode, 0–14 pH units, (uses electrolye cartridges)................................................................................................ each....................51930-00Platinum Gel-filled Combination pH Electrode, 0–14 pH units.................................. each....................51935-00Platinum Series Refillable Combination pH Electrode, 0–14 pH units ...................... each....................51940-00
Replacement Parts and Accessories5900018Parts.fm Page 67

Page 68 5900018Parts.fm
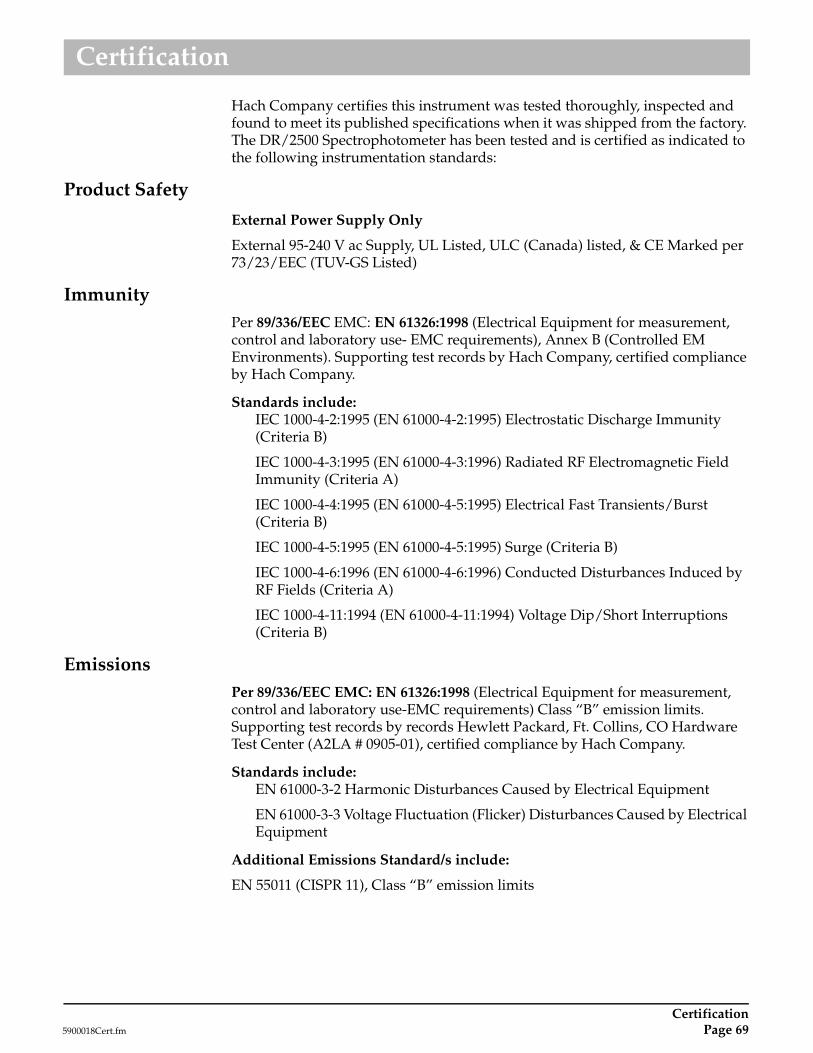
Certification
Hach Company certifies this instrument was tested thoroughly, inspected and found to meet its published specifications when it was shipped from the factory. The DR/2500 Spectrophotometer has been tested and is certified as indicated to the following instrumentation standards:
Product Safety
External Power Supply Only
External 95-240 V ac Supply, UL Listed, ULC (Canada) listed, & CE Marked per 73/23/EEC (TUV-GS Listed)
ImmunityPer 89/336/EEC EMC: EN 61326:1998 (Electrical Equipment for measurement, control and laboratory use- EMC requirements), Annex B (Controlled EM Environments). Supporting test records by Hach Company, certified compliance by Hach Company.
Standards include:IEC 1000-4-2:1995 (EN 61000-4-2:1995) Electrostatic Discharge Immunity (Criteria B)
IEC 1000-4-3:1995 (EN 61000-4-3:1996) Radiated RF Electromagnetic Field Immunity (Criteria A)
IEC 1000-4-4:1995 (EN 61000-4-5:1995) Electrical Fast Transients/Burst (Criteria B)
IEC 1000-4-5:1995 (EN 61000-4-5:1995) Surge (Criteria B)
IEC 1000-4-6:1996 (EN 61000-4-6:1996) Conducted Disturbances Induced by RF Fields (Criteria A)
IEC 1000-4-11:1994 (EN 61000-4-11:1994) Voltage Dip/Short Interruptions (Criteria B)
EmissionsPer 89/336/EEC EMC: EN 61326:1998 (Electrical Equipment for measurement, control and laboratory use-EMC requirements) Class “B” emission limits. Supporting test records by records Hewlett Packard, Ft. Collins, CO Hardware Test Center (A2LA # 0905-01), certified compliance by Hach Company.
Standards include:EN 61000-3-2 Harmonic Disturbances Caused by Electrical Equipment
EN 61000-3-3 Voltage Fluctuation (Flicker) Disturbances Caused by Electrical Equipment
Additional Emissions Standard/s include:
EN 55011 (CISPR 11), Class “B” emission limits
Certification5900018Cert.fm Page 69

Certification
Canadian Interference-causing Equipment Regulation, IECS-003, Class ASupporting test records by records Hewlett Packard, Ft. Collins, CO Hardware Test Center (A2LA # 0905-01), certified compliance by Hach Company.
This Class A digital apparatus meets all requirements of the Canadian Interference- Causing Equipment Regulations.
Cet appareil numérique de la classe A respecte toutes les exigences du Règlement sur le matériel brouilleur du Canada.
FCC PART 15, Class “A” LimitsSupporting test records Hewlett Packard, Ft. Collins, CO Hardware Test Center (A2LA # 0905-01), certified compliance by Hach Company.
This device complies with Part 15 of the FCC Rules. Operation is subject to the following two conditions:
(1) this device may not cause harmful interference, and (2) this device must accept any interference received, including interference that may cause undesired operation.
Changes or modifications to this unit not expressly approved by the party responsible for compliance could void the user's authority to operate the equipment.
This equipment has been tested and found to comply with the limits for a Class A digital device, pursuant to Part 15 of the FCC Rules. These limits are designed to provide reasonable protection against harmful interference when the equipment is operated in a commercial environment. This equipment generates, uses, and can radiate radio frequency energy and, if not installed and used in accordance with the instruction manual, may cause harmful interference to radio communications. Operation of this equipment in a residential area is likely to cause harmful interference, in which case the user will be required to correct the interference at his own expense. The following techniques of reducing the interference problems are applied easily.
1. Disconnect the external power supply from the instrument to verify that the meter is or is not the source of the interference.
2. Move the instrument and its power supply away from the device receiving the interference.
3. Reposition the receiving antenna or the device receiving the interference.
4. Try combinations of the above.
CertificationPage 70 5900018Cert.fm

How To Order
Information Required
Technical and Customer Service (U.S.A. only)Hach Technical and Customer Service Department personnel are eager to answer questions about our products and their use. Specialists in analytical methods, they are happy to put their talents to work for you.Call 1-800-227-4224 or E-mail [email protected].
International CustomersHach maintains a worldwide network of dealers and distributors. To locate the representative nearest you, send E-mail to intl@hach. com or contact:
In Canada, Latin America, Africa, Asia, Pacific Rim:
Telephone: (970) 669-3050; FAX: (970) 669-2932
In Europe, the Middle East, or Mediterranean Africa:HACH Company, c/oDr. Bruno Lange GmbHWillstätterstr. 11D-40549 DüsseldorfGermanyTelephone: +49/[0]211.52.88.0Fax: +49/[0]211.52.88.231
By Telephone: By Mail:
6:30 a.m. to 5:00 p.m. MSTMonday through Friday(800) 227-HACH(800-227-4224)By FAX: (970) 669-2932
Hach CompanyP.O. Box 389Loveland, CO 80539-0389U.S.A.
Ordering information by E-mail: [email protected]
• Hach account number (if available) • Billing address
• Your name and phone number • Shipping address
• Purchase order number • Catalog number
• Brief description or model number • Quantity
How To Order5900018End.fm Page 71

Repair Service
Authorization must be obtained from Hach Company before sending any items for repair. Please contact the HACH Service Center serving your location.
In the United States:Hach Company100 Dayton AvenueAmes, Iowa 50010(800) 227-4224 (U.S.A. only)Telephone: (515) 232-2533FAX: (515) 232-1276
In Canada:Hach Sales & Service Canada Ltd.1313 Border Street, Unit 34Winnipeg, ManitobaR3H 0X4(800) 665-7635 (Canada only)Telephone: (204) 632-5598FAX: (204) 694-5134E-mail: [email protected]
In Latin America, the Caribbean, the Far East, theIndian Subcontinent, Africa, Europe, or the Middle East:Hach Company World HeadquartersP.O. Box 389Loveland, Colorado, 80539-0389U.S.A.Telephone: (970) 669-3050FAX: (970) 669-2932E-mail: [email protected]
Repair ServicePage 72 5900018End.fm

Warranty
Hach Company warrants this product to the original purchaser against any defects that are due to faulty material or workmanship for a period of one year from date of shipment. In the event that a defect is discovered during the warranty period, Hach Company agrees that, at its option, it will repair or replace the defective product or refund the purchase price, excluding original shipping and handling charges. Any product repaired or replaced under this warranty will be warranted only for the remainder of the original product warranty period. This warranty does not apply to consumable products such as chemical reagents; or consumable components of a product, such as, but not limited to, lamps and tubing. Contact Hach Company or your distributor to initiate warranty support. Products may not be returned without authorization from Hach Company.
LimitationsThis warranty does not cover:• damage caused by acts of God, natural disaster, labor unrest, acts of war
(declared or undeclared), terrorism, civil strife or acts of any governmental jurisdiction
• damage caused by misuse, neglect, accident or improper application or installation
• damage caused by any repair or attempted repair not authorized by Hach Company
• any product not used in accordance with the instructions furnished by Hach Company
• freight charges to return merchandise to Hach Company• freight charges on expedited or express shipment of warranted parts
or product• travel fees associated with on-site warranty repairThis warranty contains the sole express warranty made by Hach Company in connection with its products. All implied warranties, including without limitation, the warranties of merchantability and fitness for a particular purpose, are expressly disclaimed.Some states within the United States do not allow the disclaimer of implied warranties and if this is true in your state the above limitation may not apply to you. This warranty gives you specific rights, and you may also have other rights that vary from state to state.This warranty constitutes the final, complete, and exclusive statement of warranty terms and no person is authorized to make any other warranties or representations on behalf of Hach Company.
Limitation of RemediesThe remedies of repair, replacement or refund of purchase price as stated above are the exclusive remedies for the breach of this warranty. On the basis of strict liability or under any other legal theory, in no event shall Hach Company be liable for any incidental or consequential damages of any kind for breach of warranty or negligence.
Warranty5900018End.fm Page 73

Page 74 5900018End.fm
Index
Aadvanced softwaredata handling, 38multiple wavelength mode, 51time course measurement
mode, 55wavelength scanning mode, 53
alphanumeric keypad, 24
Bbacklight, 15bandwidth, 9battery backup, 9, 14
Ccalendar, 9calibration
wavelength, 9calibration formulas, entering, 40calibration table, creating, 41cell holders 25cell holders, 9cells
compatibility, 9inserting and removing, 26Pour-thru, 9, 27
maintenance, 59chemical form, 35clocks and timers
real-time, 9timer, general purpose, 31
computersconnecting to, 14
connectionsto a computer, 14
for software upgrade, 61to a printer, 14to pH probe, 14to power, 14
Ddata
graphicrecalling, 38sending, 38storing, 38
recallingfrom datalog, 37
storage, 9storing
to datalog, 37datalog
(See also data)using, 37
date, setting, 21dilution factor, correcting for, 35display lock, 24, 34DR/2500
certification, 69dimensions, 9FAQs, 63interface, 9keypad, 9maintenance, 59sample compartment, 9troubleshooting, 63weight, 9
Eenvironment
operating, 9, 13storage, 9
Ffavorite programs,
adding a Hach program, 36forms, chemical, 35
Ggeneration of reports, 9
HHach Programs
running a program, 33running a reagent blank, 34selecting, 33taking a reading, 34using the timers, 33
holders, sample cellrectangular, 9, 25round, 9, 25square 26square, 9
hourglass icon, 25
IID
operator, 22sample, 22
illuminator module replacement, 59
Kkeypad, alphanumeric, 24keys, instrument 15
backlight on/off, 15display contrast, 15pH mode, 15power on/off, 15
Llanguage
selecting, 21
Mmaintenance
cleaning, 59general care, 59illuminator module,
replacing, 59sample cell, 59
menusHach Program, 33Instrument Setup, 21Main, advanced software, 17Main, standard software, 16
mode(See also listings under each
mode)multiple wavelength, 51multiple-wavelength, 51pH, 47single-wavelength, 49time course measurement, 55wavelength scan, 53
modesoperational, 9readout, 9
multiple wavelength modeoptions
absorbance formula, 51concentration factor, 51concentration resolution, 51send data, 51send settings, 52store data, 51
taking measurements, 52multi-wavelength mode
(See multiple wavelength mode)
Ooutput
RS232, 9
Pparts and accessories, 67pH
accessories, 67input 9measuring samples, 48meter
calibration, 47error messages, 48review, 48
options
Index5900018IX.fm Page 75

Index
measurement resolution, 47selecting mid-range buffer,
47temperature units, 47
recalling stored data, 48photometry
accuracy, 9range, 9
powerbattery backup, 9connecting to, 14line, 9
printersconnecting to, 14external, 9parallel, 9
probeconnecting to, 14
programs, user (See User Programs)
Rreagent blanks, 34
entering values by hand, 34using an actual reading, 34
reportsgeneration, 9
Ssafety
hazards, 7precautions, 7
sample cell maintenance, 59screen, layout, 22settings
date, 21operator ID, 22sample ID, 22time, 21
single-wavelength modeset-up, 49taking measurements, 49
softwareuninstalling the upgrade, 62upgrading, 61
standard additions, 36, 43checking results with, 43estimating concentration, 45using, 44
standard adjust, 36
Ttime course measurement mode
navigating the graph, 56options
reading rate, 55scale and units, 55wavelength, 55
taking measurements, 55time, setting, 21touch screen
tips for using, 16troubleshooting, 63
UUser Programs
adding to favorites, 42calibration formula, 40calibration table creation, 41creating new, 39editing an existing, 42erasing, 42recalling, 41
Wwavelength
accuracy, 9calibration, 9range, 9resolution, 9
wavelength scan modenavigating the graph, 54options
cursor mode, 53scale and units, 53wavelength range, 53
IndexPage 76 5900018IX.fm