model 5212 loopback - signalcrafterssignalcrafters.com/files/5212 manual.pdf · lists for all...
TRANSCRIPT

USER’S MANUAL
MODEL 5212
LOOPBACK MODULE(Formerly Model 2212)
SIGNALCRAFTERS TECH, INC.57 Eagle Rock Avenue
East Hanover, NJ 07936-3144(800) 523-5815
or(973) 781-0880
www.signalcrafters.com
0998

MODEL 5212 LOOPBACK
This user’s manual is for both the Signalcrafters Model 2212 and 5212 Loopback Module.
There is no functional or operational difference between the Model 2212 or the Model 5212. The only difference is the front panel.
Any place “Model 2212” appears in this manual can also be read “Model 5212”.
2

MODEL 5212 LOOPBACK RECEIVER
Contents:
Section Title Page
1 General, Tutorial 1 2 Circuit Description 5 3 Inspection 7 4 Mounting 7 5 Installer Connections 7 6 Options 10 7 Programming 11 8 Testing 16 9 Warranty 16
10 Specifications 17 11 Parts List 19 12 Accessory Items 22 13 Outline Drawing 23 14 Assemblies 24 15 Schematics 31 16 Appendix – Measurement Card 35
1. GENERAL
1.1 This practice provides circuit description, installation instructions, testing procedures and parts lists for all variations of the Model 5212 Loopback Receiver. Unless otherwise specified, the following description of Loopback functions covers the Model 5212-2000X, with dipswitch 3 (only) to the left. Refer to 7.14, 7.15 and 7.16 for other settings.
1.2 The Model 5212 is a Wescom 400/Tellabs Type 10 compatible plug-in pc card which uses a single slot. Relay Expanders are optional accessories and use additional slots adjacent to the 5212 Loopback.
1.3 TUTORIAL: The 5212 Loopback Receiver allows you to remotely test and diagnose telecommunications networks. You can test leased telephone lines and microwave paths, measuring signal strength, loss, noise level and sinad. The tutorial which follows describes how the Loopback is used to determine whether a particular problem is in user-owned equipment or in the leased (or shared) facilities.
The 5212 provides a method for measuring the frequency response of both outbound and inbound paths from 404 to 2804 Hz. Correct levels in the communication link can sometimes be achieved by methods which cause distortion. The 5212 provides an easy method to detect clipping distortion, rather than depend on methods which only measure level.
The DTMF addressability of the Signalcrafters Loopback Receiver allows much more complex communication networks to be analyzed; that complexity can be more easily handled by the 5212’s DTMF response code, identifying it’s address and function. The 5212 addressing is further enhanced by “Wild Card” addressing for simultaneous functions by groups.
A front panel keyboard allows local control of all functions. A seven-segment LED indicates the function in progress.

Loopback gain dipswitches can be prescription set to each dB from –31 to +24 dB. This wide range accommodates telco and/or microwave systems.
1.4 LOOPBACK RECEIVER TEST FUNCITONS: The following description summarizes the functions of a Model 5212-2XXXX, with dipswitch 4 to the right. To cause operation, you must dial the address, followed by the two-digit function code. The “repeat address” requirement may be done with a manual DTMF keyboard, but it is more easily accomplished using a Ledex Model 2106 or 2107 Base Master.
01: Loopback mode for measuring rout-trip impairments.
02: DTMF indification of the remote’s address and selected function.
03: Generate a tone sequence from 404 to 2804 Hz (every 200 Hz except 2604) at “reference level” – for inbound frequency response measurements.
04: Generate 1004 Hz, the “0 dB reference level” for mid-band loss.
05: Generate 1004 Hz at “reference level –13 dB” – to detect compression.
06: “Amputate” provides a way to silence an offending remote.
07: “Quiet Termination” mode facilitates noise measurements.
08: Generate a tone sequence from 404 to 2804 Hz (every 200 Hz except 2604) at “reference level –13 dB” – to detect level compression versus frequency.
09: Generate 2804 Hz at “reference level” – for high frequency loss.
0A: Un-timed Loopback mode for long term round-trip measurement.
0B: Causes 5212M to measure outbound loss versus frequency.
0C: Simultaneous 857 and 863 Hz for intermodulation measurement.
*9/#9: Controls an uncommitted SPDT contact from K2 (a magnetically latching relay) to be used for digital loopback or other trouble shooting functions by substitution.
*n/#n: Optional relay expander boards provide 8 DTMF controlled relays in adjacent rack spaces with the standard Model 5212-2000X program – and up to 64 DTMF controlled relays with units delivered after November 6, 1987.
1.5 TO TEST THE REMOTE END OF A 4-WIRE LEASED LINE: Let us first consider the way a Model 5212 Loopback Receiver is used to test the simplest system: a single 4-wire leased line.
TELCO TO RTU
2

For a first approximation, consider a leased line to be two 600 ohm balanced lines containing –16 dB amplifiers (call them attunators if you wish). Both the base equipment and the remote terminal unit work best when their receive level is –16 dBm. They transmit at a 0 dBm output. If the telephone company has installed your leased line correctly, there is a net 16 dB loss in the line; and both ends have ideal levels at their inputs.
1.6 TEST RESULTS IF THERE IS NO CIRCUIT IMPAIRMENT: If there is no impairment in the circuit, when we control the 5212 into loopback mode (DTMF function 01), the returning signal will be 16 dB below the transmitted signal, indicating 16 dB loop loss (-16 dB due to the outbound line +16 dB loopback gain –16 dB in the inbound line). Variations indicate circuit problems in either the outbound or inbound paths.
In 1004 Hz Reference Tone Mode (DTMF function 04), the returning signal should be –16 dBm. Variations indicate inbound path gain problems. In 2804 Hz Test Tone (DTMF function 09), and in 404 to 2804 Hz Stepped Tone (DTMF function 03), the returning signal should be –16 dBm. Variations indicate inbound reactance (inductor or capacitor) gain problems.
In 1004 Hz –13 dB Tone Mode (DTMF function 05), and in 404 to 2804 Hz –13 dB Stepped Tone (DTMF function 08), the returning signals should all measure –29 dBm. Higher level indicates level compression in the inbound path.
In “Quiet Termination” Mode (DTMF function 07) and “Amputate” Mode (DTMF function 06), you will be measuring the inbound path noise level, usually as low as 20 dBrnc (-70 dBm).
Actual readings may vary from this ideal situation. Normal readings should be established while things are running well. This will establish a reference to be used to blame or to absolve the leased line when communications get bad.
1.7 MEASUREABLE IMPAIRMENTS Excess Loss In The Inbound Path: Let us suppose there has been a transistor failure in the inbound amplifier, resulting in an additional 24 dB loss. When we put the loopback receiver into loopback mode (DTMF function 01), we measure a 40 dB loop loss … 24 dB more than normal; but we have not determined which path has the excess loss.
In 1004 Hz Reference Tone Mode (DTMF function 04), the returning signal measures –40 dBm, indicating the inbound path.
Excess Loss In The Outbound Path: Suppose a transistor failed in the outbound amplifier instead, resulting in 24 dB additional loss. There is now a –40 dBm input signal to the loopback receiver; but the 5212 can still be controlled. We put it into loopback mode (DTMF function 01) and measure a 40 dB loop loss … still 24 dB more than normal; again, we have not determined which path has the excess loss.
In 1004 Hz Reference Tone Mode (DTMF function 04), the returning signal measures –16 dBm, absolving the inbound path, and indicating the outbound path by default.
Compression In Either Path: If amplifiers in the circuit are being driven into clipping, the levels may look fine on the preceding tests. When testing in loopback mode (DTMF function 01), a more thorough test would reduce the outbound test level and re-measure the return level. A –10 dBm outbound signal should return –26 dBm, maintaining a 16 dB loop loss. This implies that the entire loop is running linearly. If, however, the returned signal measures –24 dBm, there is 2 dB compression in the loop circuit, probably due to overdriving an amplifier. Again, we don’t yet know which path is impaired.
3

In 1004 Hz –13 dB Tone Mode (DTMF function 05), if the returning signals measure the normal –29 dBm, the loopback compression must be in the outbound path. A –27 dBm measurement indicates 2dB level compression in the inbound path.
Attenuation Distortion In Either Path: Attenuation distortion, frequency response, and slope all mean the variation in the transmission loss with frequency. The loop frequency response is measured when the loopback receiver is in loopback mode (DTMF function 01). The returning signals should be –16 dBm. Any variations are due to reactance (inductor or capacitor) effects in the loop circuit, and should be compared to the specification: C2 conditioned lines are limited to +1 – dB from 500 to 2800 Hz; C5 is limited to +0.5 -1.5 dB over the same range.
In 404 to 2804 Hz Stepped Tone (DTMF function 03), the returning signals should all be –16 dBm. Variations indicate inbound only path reactance problems, and are subtracted from loop variations to determine outbound attenuation distortion.
High Noise Level: With the loopback receiver in “Quiet Termination” Mode (DTMF function 07), you can measure the background noise level of the inbound circuit. This is usually 20 to 40 dBrnc. Voice circuits without at least 20 dBrnc (-70 dBm) noise can be mistaken for a “dead line”. Low level speech can be masked by noises higher than 40 dBrnc (-50 dBm). “Amputate” (DTMF function 06) is an un-timed “Quiet Termination”, used to remove a noisy remote from the circuit until it can be serviced.
High Bit Error Rate: With the appropriate loopback receiver in “Un-timed Loopback” (DTMF function 0A), the loopback receiver will not time out. Of course, you can still stop the tests by commanding another function. Send a message long enough to establish the error rate. Measure the returned signal for errors. Even at 9600 bps, it takes 28.9 hours to accumulate 109 bits; and 17.4 minutes to accumulate only 107.
1.8 MICROWAVE TO LEASED LINES, WITH VOICE
-7+7 +7
+16 +23
+70
LOOPBACK GAINTONE TX LEVEL
+16
0
+7 +7
-16 -16-16
23
-23
-16
-7 0
-16 0
0 0
The figure above shows a typical installation involving a microwave to leased line for voice communication. Notice that a 7 dB attenuator in the inbound path is needed to compensate for the +7 dBm microwave receiver output. A loopback receiver may be placed on either side of the 7 dB pad. If it is placed on the telco side, the settings will be +16 dB loopback gain and 0 dBm transmit level (the same as when we test a leased line). If we placed the loopback on the microwave side, it will need 23 dB loopback gain and a +7 dBm output level for reference level test tones.
4

In a typical installation with an RTU installed on the same microwave with voice circuit. Note that 16 dB more attenuation is needed in each leg. In this case, there is a lot of difference in opinion where the loopback receiver should be installed. Note that the loopback gains (-23, -7, 0, or +16 dB) and transmit levels (-16 or 0 dBm) depend on the demarcation lines.
1.9 MICROWAVE TO LEASED LINES, WITH DATA The 5212 loopback receiver’s –13 dB compression test mode has been confused with the 13 dB lower levels that are traditional on microwave links carrying data. Test tone on the leased line remains 0 dBm, whether for voice or data. However, in the microwave link, that tone is set 13 dB lower than for voice – at “data level”. The –13 dB compression test modes are to provide a second level to verify that the circuit is not clipping. It could have been designed for another level and still provide the same test information.
+7
+16 +23
+70
LOOPBACK GAINTONE TX LEVEL
+16
0
+7 -6
-16 -29-29
10
-23
-29
+6 -13
-29 0
0 0
-6
+10 +29
0
-13
+6-6
-29
The figure above shows a typical installation involving an interface between a microwave and a leased line for DATA communication. Notice that there is now a 12 dB attenuator in the outbound path, and a +6 dB amplifier is needed in the inbound path to change the signal from “data level”.
Again, there is a lot of difference in opinion where the loopback receiver should be installed. Each partitioning results in a corresponding loopback gain (+16, +10, +29 or +23 dB) and transmit level (0 or –6 dBm).
The next figure shows a typical installation with an RTU installed on the same microwave with Data circuit. Note that the loopback gains (-23, +6, -13, or +16 dB) and transmit levels (-29 or 0 dBm) again depend on the demarcation lines. 2. CIRCUIT DESCRIPTION
This description covers both CMOS and NMOS versions
2.1 The Model 5212 Loopback Receiver is divided into two printed circuit boards. The top board contains the microprocessor; the bottom board contains the input/output circuitry including the DTMF receiver, output amplifier, relays and regulator. The following information describes the DTMF Tone Interface Board, circuit D17555 (bottom board).
2.2 POWER SUPPLY: 5 volt power is provided by U8, a NEGATIVE 5 volt regulator. The digital circuitry is powered by U8. The analog circuitry uses the –5 volt output of U8 as an “analog ground”; the + common is the analog positive supply; and the –2 volt (input or regulator U9’s output) is the analog negative supply.
5

2.3 DTMF RECEIVER: The 3.58 mHz clock on the microprocessor board feeds U1/15. U1/14 in turn feeds U2/2. U1/5 provides a pseudo-ground reference voltage, which is buffered by U3b for U3 and U4. The received DTMF tone comes through a program wire, either from external input (pin 14), or from the receive line through T1 and U6b to U1, a DTMF band splitter and dial tone reject filter. The DTMF high tone component from U1/11 is amplified by U3c and wave-shaped by U4b before being amplified by U3a and wave-shaped by U4a before being applied to the DTMF Decoder U2/13. The output from U2 is a hexadecimal representation of the DTMF input as follows:
DTMF U2 Pin Number DTMF U2 Pin Number Character 8 7 6 5 Character 8 7 6 5
1 0 0 0 1 9 1 0 0 1 2 0 0 1 0 0 1 0 1 0 3 0 0 1 1 * 1 0 1 1 4 0 1 0 0 # 1 1 0 0 5 0 1 0 1 A 1 1 0 1 6 0 1 1 0 B 1 1 1 0 7 0 1 1 1 C 1 1 1 1 8 1 0 0 0 D 0 0 0 0
2.4 Address program Wire/Dipswitch Selector: The microprocessor selects 8 different inputs to U102 via U5, a 4028, used as a 1 of 8 selector. The microprocessor causes U5 to select either the DTMF receiver, the address program wires, or the program mode DIP switches according to this table:
U102B output U102B input PB6 PB5 PB4 PB7, PB3, PB2, PB1, PB0
0 0 0 DTMF Receiver 0 0 1 Address 1 0 1 0 Address 2 0 1 1 Address 3 1 0 0 Address 4 1 0 1 Timer Duration 1 1 0 Joker Digit 1 1 1 DIP Switches SW1-1 to SW!-4
2.5 TRANSMIT OUTPUT: The microprocessor uses Q1 to select either a loopback signal through U7a or the microprocessor generated tone through U7c. U6d is an analog inverter of U6c. U6c and U6d drive transformer T2 in push-pull fashion to produce a low distortion output, which is impedance selected by the “ZE” program wire to either 600 or 900 ohms.
2.6 LOOPBACK ATTENUATOR/GAIN SWITCHES: R20 through R30 and SW2-1 through SW3-2 are precision 1, 2, 4, 8 and 16 dB attenuators. R31, R32 and SW3-3 coupled with U7b are a precision 0 or +24 dB feedback path around U6c.
2.7 SYNTHESIZER FILTER: R19, C10-12 and T3 are a low pass filter (with 3 poles and one zero) designed to remove the upper frequency components of the synthesized tones.
2.8 Relays K1 and K2 are controlled by the microprocessor on the top board. Relay K1 is “set” by all test modes (NOT relay control), and “reset” by return to normal. K2 either follows K1, or is a semi-independent remote control relay. For the various K2 operations, refer to 7.15 and 7.16.
6

NOTE: The following information describes the microprocessor board circuit D17556-X000X (top board).
2.9 The top board contains the microprocessor unit (MPU) U101 the peripheral interface adapters (PIA) U102, U103; the programmable read only memory (PROM) U104; the crystal oscillator, U105; the watchdog timer, U106; power clear comparator, U107; D/A converter U108; and the seven segment LED drivers, U109.
2.10 CRYSTAL OSCILLATOR: Y101, U105a, along with R123, R124, C109 and C110 are a 3.58 mHz crystal clock oscillator. U105b distributes the clock to the top board, and U105c to the bottom board.
2.11 PERIPHERAL INTERFACE ADAPTERS: U102 interfaces the MPU to the keyboard contacts, Q1, DTMF receiver, address program wires, program DIP switches and watchdog timer. U103 interfaces the MPU to the D/A converter, tone generator, relays and LED display driver.
2.12 WATCHDOG TIMER/POWER CLEAR: U107 provides a power clear reset when power is applied and when negative transient power supply spikes occur. U106 monitors pin 39 of U102. If there is more than one second between triggers of U106b, a 10 millisecond power on clear is provided to the microprocessor via CR101.
2.13 MICROPROCESSOR: U101 is the MPU which controls the operation of the Loopback Receiver. It reads commands from the PROM U104 and issues corresponding controls to PIA U102 and PIA U103 to do input/output functions.
3. INSPECTIONS: Inspect the equipment thoroughly as soon as possible after delivery. Damages, if any, should be reported immediately to the shipping carrier.
4. MOUNTING 4.1 The Model 5212 Loopback Receiver is designed for plug-in compatibility with Wescom 400 series and Tellabs Type 10 mounting shelves. It should be noted that some apparatus cases require a low profile extraction handle be installed on the Loopback card for clearance. If this is true, specify the low profile handle kit, part number A02905-00001, or order the 5212-X1XXX.
4.2 The Model 5212R Relay Expander Cardis designed to mount in a second Wescom/Tellabs compatible slot adjacent to the 5212 Loopback which drives it. The low profile handle (A02905-00001) may be specified for it if necessary.
5. INSTALLER CONNECTIONS 5.1 This section provides installer connection information for the Loopback Receiver and Relay Card. These cards plug into standard 56 pin connectors normally used in Wescom 400 series and Tellabs Type 10 mounting facilities.
5.2 Refer to the Alignment Section for programming and adjustments required before placing 5212 unit in continuous service.
5.3 POWER SUPPLY: The CMOS microprocessor version of the 5212 is available to work on 12 VDC, 24 VDC or 48VDC (positive, negative or floating) systems. The B02983-00001 may be powered by 12 VDC ONLY. Wescom Model 8431 is a 400 Series 48 VDC positive ground converter – capable of powering 5 Signalcrafters B02983-00001 Model 5212 NMOS Loopback Receivers.
5.4 The tables which follow illustrate the appropriate hook-up information for all variations of Loopback applications.
7

CAUTION: THERE ARE SIGNIFICANT DIFFERENCES BETWEEN THE NMOS AND CMOS UNIT. FOLLOW THE INSTRUCTIONS CAREFULLY WITH REGARD TO DC POWER INPUT.
8
HI-Z
DTM
F R
EC
EIV
ER
LO
OPB
AC
K PA
THTO
NE
GE
NE
RA
TO
RTX
LIN
E T
ER
MIN
ATIO
N
MO
DE
L 2
212
RX
IN
21
22
28
27
TX
K1
-4
K1
-5
18
19 RX
OU
TR
XR
XCUSTOMER REMOTETX
TXCUSTOMERBASERX
DTM
F E
NC
AU
DIO
DE
M
K1-3
K1
-2
K1-1
1511
TX IN
TX
RX
TX O
UT
139
ME
TE
RF
IXE
DC
OU
NTE
R

5.5 The optional Relay Expander Cards draw power from the associated 5212 Loopback. They may be programmed to operate with 12, 24 or 48 VDC Loopback.
5.6 4-WIRE Applications:
Wire COLOR FUNCTION ZA Brown 4W only ZB Red 600 or 900 only ZC Orange 600 or 900 (top set only) ZD Yellow 600 or 900 (bottom set only) ZE Green 600 or 900
DTMF Blue RX or EXT** (DTMF tone input to pin 14)
TERMINAL TERMINAL NUMBER CONNECTION NUMBER CONNECTION
1 Tone out, un-switched 3 Auxiliary Transmit Capacitor 4 (shorted to 3) 5 Auxiliary Transmit Capacitor 6 (shorted to 5) 7 Tone out, un-switched 9 Transmit out ring
11 Transmit in ring 13 Transmit out tip 14 External DTMF input ** 15 Transmit in tip 17 + of 24 or 48 VDC units 18 Receive out tip 19 Receive out ring 21 Receive in tip (shorted to 22) 22 Receive in tip 23 Auxiliary Receive capacitor 24 (shorted to 23) 25 Auxiliary Receive capacitor 26 (shorted to 25) 27 Receive in ring (shorted to 28) 28 Receive in ring 29 K2 Common 31 K2 Normally Closed 33 K2 Normally Open 35 - of 24 or 48 VDC units 36 + Battery 37 K2 Normally Closed – switched to + 39 K2 Normally Open – switched to + 41 + source for relay/41 & 5212M/41 & + for 12 VDC units 43 - source for relay/43 & 5212M/43 & - for 12 VDC units 45 -5 VDC output; to relay/45 & 5212M/45 47 48 To 5212M/39 49 50 To 5212M/53 51 53 To relay/53 & 5212M/55 55 To relay/55 & 5212M/51
5.5 2-WIRE Applications:
Wire COLOR FUNCTION ZA Brown 600 or 900 ZB Red EXT ZC Orange 2W ZD Yellow 600 or 900 (top set only) ZE Green 600 or 900
DTMF Blue RX
For 2-Wire installation, cut W1 and W2. Program Address wire A5 (green) to “1”. External 10 ohm resistor required from 4 to 14. External jumpers are required from 1 to 23, 7 to 9, 21 to 22, 25 to 27. Connect a 2-microfarad non-polar capacitor from 4 to 26.
9
Connect a phantom line build-out balance circuit from 5 to 28. Line connection is 7 ring, 21 tip. Load connection is 11 ring, 18 tip.
TERMINAL TERMINAL NUMBER CONNECTION NUMBER CONNECTION
1 To 23 3 Auxiliary Capacitor 4 (shorted to 3) 5 Line Buildout (Phantom) 6 (shorted to 5) 7 Line Ring 9 To 7
11 Load Ring 13 14 10 ohm resistor to 4 15 17 + of 24 or 48 VDC units 18 Load tip 19 21 Line tip 22 Line tip 23 To 1 24 (shorted to 23) 25 Auxiliary Capacitor 26 (shorted to 25) 27 To 25 28 Line Buildout (Phantom) 29 K2 Common 31 K2 Normally Closed 33 K2 Normally Open 35 - of 24 or 48 VDC units 36 + Battery 37 K2 Normally Closed – switched to + 39 K2 Normally Open – switched to + 41 + source for relay/41 & 5212M/41 & + for 12 VDC units 43 - source for relay/43 & 5212M/43 & - for 12 VDC units 45 -5 VDC output; to relay/45 & 5212M/45 47 48 To 5212M/39 49 50 To 5212M/53 51 53 To relay/53 & 5212M/55 55 To relay/55 & 5212M/51
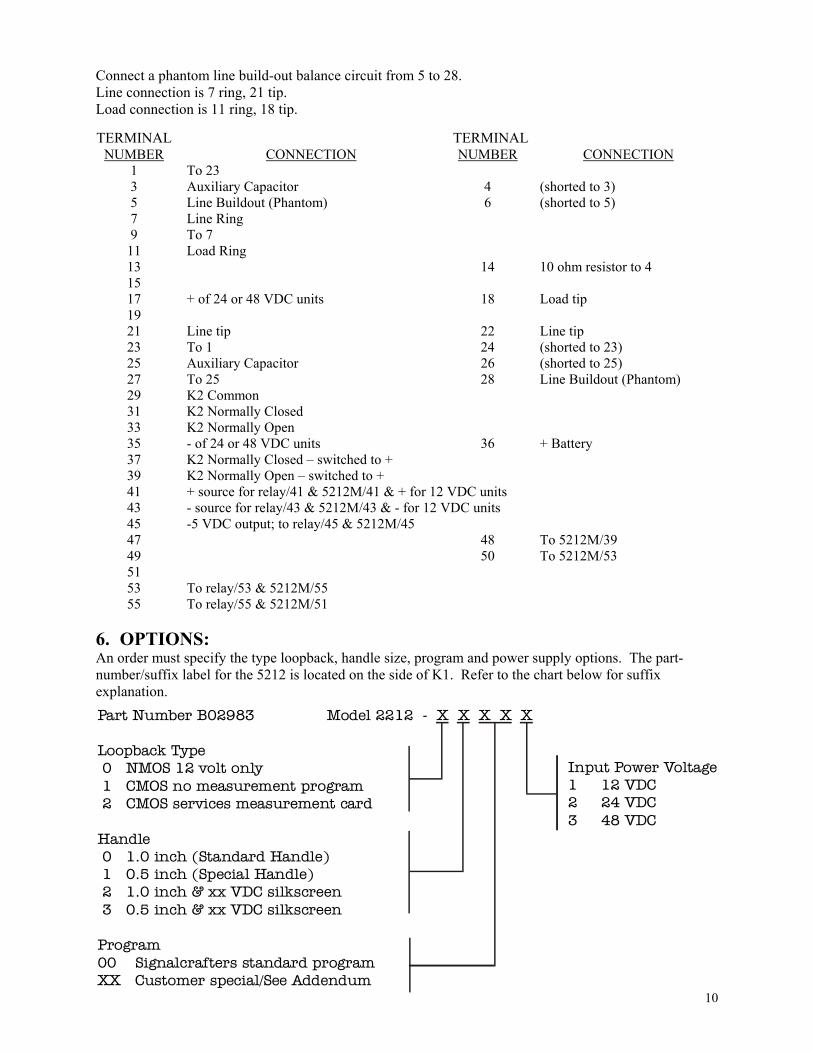
6. OPTIONS: An order must specify the type loopback, handle size, program and power supply options. The part-number/suffix label for the 5212 is located on the side of K1. Refer to the chart below for suffix explanation.
10
Model 2212 - X X X X X
Input Power Voltage1 12 VDC2 24 VDC3 48 VDC
Part Number B02983
Loopback Type 0 NMOS 12 volt only 1 CMOS no measurement program 2 CMOS services measurement card
Handle 0 1.0 inch (Standard Handle) 1 0.5 inch (Special Handle) 2 1.0 inch & xx VDC silkscreen 3 0.5 inch & xx VDC silkscreen
Program00 Signalcrafters standard programXX Customer special/See Addendum

7. PROGRAMMING 7.1 WHEN SHIPPED, THE LOOPBACK IS PROGRAMMED AS FOLLOWS:
1. Address “1590.” 2. Black wire to 5 3. Test function duration of 4 minutes 4. Joker on its own parking post. 5. 600 ohms/ 4-wire 6. +24 dB and –8 dB switches on 7. Dipswitch 1 to right 8. Dipswitch 2 to right 9. Dipswitch 3 to left 10. Dipswitch 4 to right
7.2 If you wish to change the factory settings, the following functions and variables must be
programmed before placing the Loopback in continuous service:
7.3 It is easier to change the following programming wires if the pc boards have been separated. CAUTION, with top board removed avoid static electricity.
1. “Last digit” 0-5; one more than number of address digits (black wire). NOTE: If less than 5, the last
digit must be sustained 100 mSec. 2. “A1 to A4”, Address wires selected from any of 16 DTMF possibilities. 3. “A5” function duration from 1-9 HALF minutes (green wire). 4. “AJ” wild card character (blue wire). 5. “ZA-ZE” 600/900 ohms and 2-wire/4-wire. First, remove the three screws, which hold the microprocessor board to the interface board beneath it. Then, gently unplug the top board. This will allow easier access to all programming on the interface board. 7.4 ADDRESS LENGTH: Program the “last digit” program wire (BLACK) to one more than the number of address digits; for four address digits, program the BLACK wire to “5” – even if you use the 2-digit module. NOTE: If less than 5, the last digit must be sustained 100 mSec.
7.5 ADDRESS: The address programming area is located in the top right corner of the interface board. The program wires are EIA color-coded. Address digits may be selected from any of the 16 DTMF possibilities. Using four digits provides maximum security.
7.6 Program the BROWN program wire (A1) to the desired first character, the RED program wire (A2) to second address character, the ORANGE (A3) to the third, and the YELLOW to desired fourth character. If a character pin is already used and repeat digits are needed, use the associated repeat pin. If fewer than four digits are used, store the unused wires on it’s own repeat pin.
7.7 The GREEN program wire in the “address” programming area has been assigned a special function not related to address. Use the GREEN wire to select the number of half minutes desired for all functions. 1, 4, 5 and 7. The unit is shipped programmed for 4 minutes (“8” half minutes). If 2 minutes is desired, program this program wire to character “4”. If the GREEN wire is placed on its own parking post, functions 1, 3, 4, 5, 7 and 9 will not time out.
7.8 ALL CALL/GROUP CALL (“Joker” digit substitution): Some system applications require that several or all Loopback perform a function simultaneously, such as a master reset. The joker program wire (AJ) (BLUE) is used to achieve this. Program AJ to desired substitution character selected from any
11

of the 16 DTMF possibilities. The joker character may be used to replace any or all of the programmed address digits in any address position as in these examples. If you do not wish to use this feature, leave the blue program wire “AJ” programmed to it’s own parking post.
Joker Programmed to character “D”. If dipswitch 4 is to the left, you must pause 3 seconds between functions to avoid multiple meaning in your controls.
Dipswitch 4 Resulting Action To Left To right 1590 * 1590 *9 Latch K2 at address 1590 1590 # 1590 #9 Unlatch K2 at address 1590 15D0 * 15D0 *9 Latch K2 at all addresses 15?0 15D0 # 15D0 #9 Unlatch K2 at all addresses 15?0
DDDD * DDDD *9 Latch K2 at all addresses DDDD # DDDD #9 Unlatch K2 at all addresses
7.9 LINE LOADING AND 2-WIRE/4-WIRE: These variables are programmed using the EIA color coded wires located on the interface board near the large relay. Refer to page 10 to connect a 4-wire interface and set the 600 or 900 ohm line loading: use page 11 for a 2-wire interface.
7.10 The controlling DTMF can be moved from the RX line to “external”.
7.11 At this point, verify your programming steps to confirm that they are correct. You can now reinstall the microprocessor board onto the interface card assembly.
The following programming can be accomplished without separating the pc boards:
7.12 AMPLIFIER/ATTENUATOR: The built-in amplifier/attenuator may be adjusted using the DIP switches located on the interface board to the left of the large relay. The desired gain or loss may be adjusted in 1 dB increments from –31 dB to +24 dB using these switches. These switches (SW2 and SW3) are labeled left to right as follows: -1, -2, -4, -8, -16 and +24. Combinations of switch settings can be used to achieve the desired gain or loss.
7.13 Set the switches to add algebraically to the loopback gain or loss desired. That is, “GAIN” = (Receiver’s Transmit Output) minus (Receivers Receive Input). See the application examples below:
A. Remote modems designed for 0 dBm transmit and –16 dBm receive. G = (0 dBm) – (-16 dBm) = +16 dB. Switch +24 dB and –8 dB switches to “in”.
B. Remote leased line interfaces with +7 dBm transmit and –16 dBm receive. G = (+7 dBm) – (-16 dBm) = +23 dB. Switch +24 and –1 dB switches to “in”.
C. Local MUX interface to leased line with –16 dBm transmit and +7 dBm receive. For this application, the MUX +7 transmit is connected to the Loopback Receiver receive line and the MUX receive line is connected to the Loopback Receiver transmit line. G = (-16 dBm) – (+7 dBm) = -23 dB. Switch –16 dB, -4 dB, -2 dB and –1 dB switches to the “in” position. While the Loopback Receiver is in function 04, adjust R17 for a –16 dBm output level.
7.14 MODE DIP SWITCHES: The next area to program is the mode DIP switches which are accessible through the front panel slot. The table below shows the evolution of dipswitch functions – depending on the type product and of the EPROM revision. 1986 – and to 7.16 to control 64 relays from one Model 5212.
Model 5212-00001 NMOS units with B17556-00001 Revision E ( and earlier) Model 5212-1000X CMOS units with B17707-X0001 Revision C (and earlier)
12

Dipswitch ON (to left) OPEN (to right) 1 Digit counting Wrong character reset 2 ID Function 2 ID all Functions 3 Skip 2700 Hz Send 2700 Hz 4 Display function only Display function & DTMF 0 to 9 Model 5212-00001 NMOS units with B17556-00001 Revision F (and later) Model 5212-1000X CMOS units with B17707-X0001 Revision D (and later) Dipswitch ON (to left) OPEN (to right) 1 Digit counting Wrong character reset 2 ID Function 2 ID all Functions 3 Keyboard changes functions Keyboard sends DTMF 4 One digit function Two digit function Dial function only Repeat address to change function DTMF 7 to stop loopback Repeat address to change function Display function & DTMF 0-9 Display function only No auxiliary relays Auxiliary relays: set *n; reset #n K2 Independent of K1 K2 follows K1 7.15 The information in this section covers the 5212 units shipped since November 24, 1986. The Model 5212-2X00X differs from the 5212-1X00X as follows:
Hardware Difference: There are two wires from the card edge fingers to accommodate the Model 5212M measurement Card: The audio is coupled from transformer T1 pin 1 through pin 48. The measurement card gain is controlled from J1-18 through pin 50. The following wires are to be connected between the 5212 and the 5212M: 5212 41 43 45 48 50 53 55 5212M 41 43 45 39 53 55 51
Software Difference: B17707-00002 is the program in an A14739-02732 for B02983-2X001 and B02983-2X002 B17707-10002 is the same program installed into a A14739-27C32 for B02983-2X004 DTMF response tones are 40-millisecond duration. DTMF function B is the measurement function. The tones in functions 3 and 8 are the telephone company standard frequencies: 404, 604, …. 2404, (no 2604), 2804, and last only 1.5 seconds each. Similarly function 9 is 1.5 seconds of 2804 Hz. The operation of the relay card shut-off control is slightly enhanced: The normal shut-off command (1590#n) causes relay n to pulse on for 100 milliseconds (followed by the DTMF identification according to dipswitch 2) and then latch off. This does not change the ON/OFF command structure, but allows momentary operation of selected relays. The relay card Momentary/Latch program wire is ignored.
13

The onboard relay K2 has been made semi-independent. With dipswitch 4 to the right, K2 follows K1. But by commanding “relay 9” to operate, you tell the loopback that its K2 is now a ninth INDEPENDENT relay. The dipswitches for the B17707-X0002 revision 0 and later operate identically to B17707-00001 Rev. D and later. Dipswitch ON (to left) OPEN (to right) 1 Digit counting Wrong character reset 2 ID Function 2 ID all Functions 3 Keyboard changes functions Keyboard sends DTMF 4 One digit function Two digit function module Dial function only Repeat address to change function DTMF 7 to stop loopback Repeat address to change function Display function & DTMF 0-9 Display function only No auxiliary relays Auxiliary relays: set *n; reset #n K2 Independent of K1 K2 follows K1 BUT: Address *9 makes K2 independent of K1 Address *d returns K2 to follow K1 7.16 CONTROLLING 64 RELAYS FROM ONE MODEL 5212 Units shipped after November 6, 1987, contain EPROM B17707-X0002 revision B, which adds a routine to control up to 64 external relays on Model 2450, 2451 and 2452 relay cards. To control more than one relay card, program the fourth (yellow) address wire to DTMF *, the last digit (black) program wire to 5, and set dipswitch 4 to the right (OPEN). The multi-relay DTMF control sequence is 6 digits only, and works as if there were 8 consecutive Model 5212 loopback receivers (virtual address abc1 through abc8), each connected to a bank of 8 relays. DTMF * in the fifth digit causes the corresponding relay to latch ON. DTMF # in the same digit causes the corresponding relay to pulse ON, then latch OFF. There is only one 5212 K2, which works as if it were relay 9 in bank 1 – as a SEMI-independent control.
abcd*e sets relay e in bank d at address abc abcd#e pulses relay e in bank d at address abc 1591*2 sets relay 2 in bank 1 at address 159 1593*6 sets relay 6 in bank 3 at address 159 1597#3 pulses relay 3 in bank 7 at address 159 1593*A sets all relays in bank 3 at address 159 1595#A pulses all relays in bank 5 at address 159 1591*9 sets relay 2 in 5212 at address 159
The program wires on the Model 2450, 2451 and 2452 relay cards determine the relay bank address. “CARD” refers to a set of 4 relays – either K1-4 or K5-8. There are 16 CARDs, (0 through 15). The green wire sets the CARD address of K1-4. The yellow wire adds either 0 or 8 to the address. The blue wire sets the address of K5-8. The yellow wire also adds 0 or 8 to that address. Use the following table to configure the yellow, green, and blue program wires.
Relays 1 – 4 Relays 5 - 8 DTMF Message Yellow Green Blue
1591#n 0 2 3 1592#n 0 4 5 1593#n 0 6 7 1594#n 8 0 1 1595#n 8 2 3 1596#n 8 4 5 1597#n 8 6 7 1598#n 0 0 1
14

To access the loopback functions (of the type abcd0e), the 5212 tolerates all reasonable addresses. You can use the natural address, abc*0e – or any of the virtual addresses, abc10e through abc80e; and there is no difference in the resulting function. 7.17 Dipswitch 1, Anti-Falsing Technique: The Loopback Receiver is programmable for two different types of anti-falsing techniques: Wrong Character Reset and Digit Counting. Front panel mode DIP switch “1” is used to select the desired technique. When programmed for Wrong Character Reset, any wrong character in the DTMF sequence causes the 5212 to reset – and look for its first digit. Since this biases the 5212 toward response, it works more easily through noise. When programmed for Digit Counting, any wrong character in the DTMF sequence causes the 5212 to disable any output, but it continues counting digits. This is more secure against falsing, and works well on microwave and leased lines.
7.18 Dipswitch “2” Identification: The second mode DIP switch determines whether the Loopback card will send its programmed address when function “2” is received or before each selected test function is performed. With the DIP switch ON (left) the identification burst will only occur on function “2”. If the DIP switch is OFF (right), the identification burst will occur prior to performing any selected test function.
7.19 Level: The tone output level may be adjusted by using the front panel accessible potentiometer (R17). This may be adjusted using an adjustment tool. R17 simultaneously adjusts the 1004Hz Test Tone (0 dB and –13 dB) and the sweep tone levels. It has no effect on “loopback” gain. A simple way to adjust R17 is to push keyboard switch 4 and then adjust the test tone level.
7.20 Power: The Loopback is normally installed in Tellabs or Wescom mounting facilities. The NMOS version is powered by 12 VDC only. The CMOS version is available in 12, 24 and 48 VDC variations.
7.21 If you plan to use the NMOS version on a 48 VDC system, a Wescom 8431 48 to 12 VDC converter may be used to power up to 5 NMOS 5212’s. The 8431 has a floating output voltage which must be grounded to minimize its switching transients; either positive or negative ground will suppress its noise.
8. TESTING
8.1 The following equipment is required to perform some of the following test procedures.
1. Oscilloscope with a 1 Megohm or higher impedance.
2. Multimeter with 10 Megohm impedance. A multimeter with 20 Kohm per volt impedance may be substituted, but resulting readings may be lower.
3. DTMF Encoder or tone telephone.
4. Audio amplifier.
8.2 Connect a simple audio amplifier to the transmit output terminals, (card edge fingers 1 and 5), with all dipswitches to the left, press front panel keyboard switch 2 and verify that the mode LED displays “2”. Relay K1 should operate and a brief DTMF identification sequence should be sent corresponding to the programmed address. Hold keyboard switch 2 in for several seconds. The DTMF identification sequence should repeat about once every two seconds.
15

8.3 If these functions occur, virtually the entire unit has been verified. Integrated circuits U101-U109 and U5-U7 are all functioning properly. The only significant circuits not yet verified are the DTMF receiver chips U1-4 and the regulator U8.
8.4 If this sequence does not occur, check for proper functioning of U8, which is a NEGATIVE 5 volt DC regulator. U8 provides the “derived ground” for the microprocessor and the “analog ground” for the audio circuits.
8.5 Continue the test and verification sequence by pushing the different function keys on the keyboard to put the Loopback Receiver into each of its various modes.
8.6 To verify DTMF receiver operation, connect a DTMF generator to the receive input terminals (card edge 22 and 25 will work for all configurations). With all dipswitches to the left, observe the LED display following DTMF inputs 0-9. Push the keyboard front panel switch 7. The LED should display a 7 and the audio amplifier should be mute. Now dial DTMF 4 on the DTMF generator. The LED display should indicate 4, and you should hear the 1004Hz tone.
8.7 Next, dial these other DTMF characters: 2, 3, 4, 5, 7, *, # (avoid 6, the “amputate” function). Verify that the unit responds to each of these codes with the corresponding test mode. Dial a DTMF 6. This will select the “amputate” function (permanent quiet termination) and “un-address” the DTMF receiver. A complete address and function code will now be required for the receiver to respond from the DTMF input. Loopback (1) can only be ended by “7”, timer-out or, local keyboard selection.
8.8 With dipswitch 4 to the right, check the companion Relay Card. Send the following DTMF sequence: 1590*1, 1590*2, …, 1590*8. All LED’s should now be on. Send 1590#1, 1590#2, …, 1590#8. All LED’s should now be off. 1590*A will turn on relays 1 through 8; 1590#A will pulse them all off.
9. WARRANTY The equipment herin described is warranted for a period of one year from date of shipment. Signalcrafters, Inc., will repair or replace any unit which fails during this period due to defective material or workmanship. Unless specifically authorized by Signalcrafters, all in-warranty repairs will be made at the factory. Unauthorized field modification of the equipment will void the warranty. For repair information, contact Signalcrafters at 800-523-5815 or 973-781-0880.
10. SPECIFICATIONS CONTROLS & INDICATORS: 12 button keypad for local mode select with numerical LED display to indicate selection. Four DIP switches to select features.
POWER SUPPLY: 12, 24 or 48 VDC Current Drain: B02983 DC Voltage Idle Activated -00001 (11 to 16.5) 250 mA 400 mA -1XXX1 (11 to 16.5) 100 mA 200 mA -1XXX2 (21 to 28) 100 mA 150 mA -1XXX4 (42 to 56) 40 mA 100 mA Additional current due to 5212M measurement card: 25 mA
16

Additional current due to each Relay expansion card: 12 VDC 24 VDC 48 VDC
LED annunciator power Switch ON +24 mA +13 mA +13 mA LED annunciator power Switch Off +1 mA +1 mA +1 mA Relay card without LED’s +1 mA +1 mA +1 mA
TEMPERATURE RANGE: -30°C to +70°C operating; -55°C to +85°C storage DIMENSIONS: Height 5.58” (14.17 cm); Width 1.42” (3.61 cm); depth 5.53” (14 cm)
Control and ID Tone Format: DTMF 2 of 8 DTMF Character Low Tone (Hz) High Tone (Hz) Decoder Hex Code 1 697 1209 1 2 697 1336 2 3 697 1477 3 4 770 1209 4 5 770 1336 5 6 770 1477 6 7 852 1209 7 8 852 1336 8 9 852 1477 9 0 941 1336 A * 941 1209 B # 941 1477 C A 697 1633 D B 770 1633 E C 852 1633 F D 941 1633 0 ADDRESS CODING: Up to 4 digits, field programmable SIGNALING SPEED: Each character must be minimum 40 ms in duration; maximum 2 seconds between characters. ANTI-FALSING TECHNIQUES: Digit counting or wrong character reset; dipswitch programmable. LOOPBACK MODE Timed (function 01) and Un-timed (function 0A): Loopback Gain: Dipswitch programmable in 1 dB increments from –31 to +24 dB Loopback frequency response: ±0.3 dB from 0.3 to 4 kHz Loopback distortion: 0.25% maximum THD (total harmonic distortion)
ENCODER SPEDIFICATIONS OUTPUT IMPEDANCE: In normal mode, the customer’s equipment – connected between pins 11 and 15 – terminates the line at pins 9 and 13. During test modes, the 5212 is 600 or 900 ohms – balanced and transformer isolated. FREQUENCY ACCURACY: 1004 Hz test tone of all units: +0-2 Hz, phase continuous Step tones of –0XXXX and –1XXXX 300, 500, …., 2900 Hz: +0-0.2% Step tones of -2XXXX 404, 604, …., 2804 Hz: ±0.02% DTMF of –0XXXX and –1XXXX: ±0.8% DTMF of –2XXXX: ±0.02% ENCODER DISTORTION Distortion (function 04): 0.5% maximum THD. Distortion other modes: 1% maximum THD.
17

TONE OUTPUT LEVEL: R17 is accessible through the front panel and adjusts the 1004 Hz (function 04) tone output level from –16 to +7 dBm into 600 ohms (0.35 to 4.9 VPP, and 0.12 to 1.7 VRMS composite – the same voltage into 900 ohms). The output level of all other functions is referred to this “0 dB Reference”. DTMF ID OUTPUT LEVEL: Peak to peak amplitude equal to a 0 dB reference tone. DTMF Tone Twist: ±0.2 dB maximum difference between low and high tone. Stepped Sweep (function 03) output level: 0 db reference ±0.25 dB. SWEEP (functions 03 and 08): Sweep rate for –0XXXX and –1XXXX: 300, 500, … Each tone present for 5 seconds with a 1 second pause between tones. Sequence takes about 90 seconds. Sweep rate for –2XXXX: 404, 606, …. Each tone present for 1.5 seconds with a 1 second pause between tones. Sequence takes about 30 seconds. HIGH TONE (function 09): 2804 Hz (2700, 2900) @ 0 dB reference ±0.2 dB. Function 05 is the same as 04, but @ 0 dB reference –13 ±0.2 dB. Function 09 is the same sequence as 03, but @ 0 dB reference –13 ±0.2 dB. QUIET MODE (function 07) noise level ≥55 dB below 0 dB reference. AMPUTATE MODE (function 06): Un-timed quiet mode.
DECODER SPECIFICATIONS INPUT TONE LEVEL RANGE: 0.02 to 2.0 VRMS, each DTMF component tone (NOT composite level). If DTMF components are equal, this corresponds to a composite signal from 0.0283 to 2.83 VRMS, 0.113 to 11.3 VPP, and –28.75 to +11.25 dBm. With 15 dB twist, the composite signal is 0.375 to 6.66 VPP. INPUT IMPEDANCE: When in normal mode, the DTMF receiver provides 5 Kohm, in parallel with the customer’s equipment – connected between pins 18 and 19 – to terminate the line at pins 21 and 27. During test modes: 600 or 900 ohms -- Balanced and transformer isolated. CTCSS REJECTION: The decoding process will not be inhibited by any tone from 67 to 440 Hz and no more than 6 dB above the weaker DTMF component tone. SINAD: 16 dB or better signal. TONE TWIST TOLERANCE: Accepts ±15 dB tone twist. Each DTMF component must be within ±1.8% of nominal frequency and from 0.02 to 2.0 VRMS. SIGNALING SPEED: Each character 40 milliseconds minimum on and off times. INTERDIGIT TIMING: 2.4 seconds. CONTROL MODE (*9 Set/#9 Reset) RELAY OUTPUT: K2: 2 form-C contacts, rated 2 amps 30 VDC, or 0.6 amps at 120 VAC. 11. PARTS LIST 11.1 The following components are located on the Loopback DTMF Tone Interface pc board (bottom board).
18

Tighter tolerance components as well as higher voltage capacitors and higher wattage resistors may be substituted for the parts in this list – provided that they are small enough to fit. If not specified, ±5% ¼ watt resistors, and ±10% 50 VDC capacitors may be used as replacement parts.
Component Description Part number Quantity
Semiconductors CR1-45 1N4148 Diode A11514-00001 45 CR46 LED A16422-00001 1 CR47, 48, 49 1N4004 Diode A10279-00001 3 Q1 2N3702 Transistor A10844-00001 1 U1 8865 DTMF Filter A14739-08865 1 U2 8860 DTMF Decoder A14739-08860 1 U3, 6 3403 Quad Op Amp A14814-03403 2 U4 3302 Quad Comparator A14814-03302 1 U5 4028 BCD/Decimal Dec. A14739-04028 1 U7 4016 Transmission Gate A14739-04016 1 U8 7905 –5 Volt Regulator A14902-07905 1 Non-semiconductors C1 .01 uF Mylar B13093-10310 1 C2, 3, 4 .001 uF Ceramic A12108-10210 3 C5, 6 33 pF Ceramic A12108-33010 2 C7, 8 .003 uF Mylar B13093-33310 2 C9 1 uF Tantalum B13006-10535 1 C10 1800 pF 5% Polypropyl. B13635-18203 1 C11 220 pF 3% Polypropyl. B13635-22103 1 C12 4300 pF 3% Polypropyl. B13635-43203 1 C13 100 uF 35V Aluminum B16787-10735 1 C14 33 uF 16V Tantalum B13006-33616 1 C15, 16 .01 uF Ceramic A00256-00100 2 C17 47 uF 6V Tantalum B13006-47606 1 J1 28 Contact Connector A17559-10028 1 J5 7 Contact Connector A17560-00007 1 K2 2 form-C Latch ‘g Relay A17435-01201 1 R1 2.2 Megohm A16923-22006 1 R2 1 Kohm A16923-10003 1 R3, 4 120 Kohm A16923-12005 2 R5, 6 1.5 Megohm A16923-15006 2 R7, 8 47 Kohm A16923-47004 2 R9, 10 15 Kohm A16923-15004 2 R11, 12 1 Megohm A16923-10006 2 R13, 14, 18, 47 100 Kohm A16923-10005 4 R15 330 Kohm A16923-33005 1 R17 10 Kohm Pot A13371-10004 1 R19 11.3 Kohm 1/8W ±1% A13112-11304 1 R20 82.5 Kohm 1/8W ±1% A13112-82504 1 R21 1.10 Kohm 1/8W ±1% A13112-11003 1 R22 38.3 Kohm 1/8W ±1% A13112-38304 1 R23 2.05 Kohm 1/8W ±1% A13112-20503 1 R24 16.9 Kohm 1/8W ±1% A13112-16904 1 R25 3.65 Kohm 1/8W ±1% A13112-36503 1 R26 6.65 Kohm 1/8W ±1% A13112-66503 1 R27 6.04 Kohm 1/8W ±1% A13112-60403 1 R28 1.87 Kohm 1/8W ±1% A13112-18703 1
19

Component Description Part number Quantity R29 8.45 Kohm 1/8W ±1% A13112-84503 1 R30, 33, 34 10.0 Kohm 1/8W ±1% A13112-10004 3 R31 9.76 Kohm 1/8W ±1% A13112-97603 1 R32 147 Kohm 1/8W ±1% A13112-14705 1 R35 150 ohm 1/8W ±1% A13112-15002 1 R36 232 ohm 1/8W ±1% A13112-23202 1 R37 24.3 Kohm 1/8W ±1% A13112-24304 1 R38 23.7 Kohm 1/8W ±1% A13112-23704 1 R39, 44, 46 301 ohm 1/8W ±1% A13112-30102 3 R40 158 ohm 1/8W ±1% A13112-15802 1 R41 340 ohm 1/8W ±1% A13112-34002 1 R42 634 ohm 1/8W ±1% A13112-63402 1 R43, 45 604 ohm 1/8W ±1% A13112-60402 2 R48, 49, 50 10 Kohm A16923-10004 3 SW1 4 form-A dipswitch A17483-00004 1 SW2, 3 3 form-C dipswitch A14910-00203 2 T1, 2 Hybrid Transformer A13938-00001 2 T3 Filter Transformer A12323-00001 1
The following parts vary with the power supply option:
Component Description Part number Quantity
Semiconductors CR50 (24 or 48V) IN4004 Diode A10279-00001 1 CR51 (12V after 5/88 Transzorb A17354-A0200 1 CR51 (24 or 48V) Transzorb A17354-A0360 1 CR52 (48V) 5 Watt Zener B17762-A0240 1 U9 (24 or 48V) 7912-12 Volt Regulator A14903-07912 1 Non-semiconductors C19 (24 or 48V) 33 uF 16V Tantalum B13006-33616 1 K1 (12V) 6 pole relay, 12 VDC A16991-00001 1 K1 (24V) 6 pole relay, 24 VDC A16991-00002 1 K1 (48V) 6 pole relay, 48 VDC A16991-00004 1 R16 (12V) 2.2 Kohm A16923-22003 1 R16 (24V) 4.7 Kohm A16923-47003 1 R16 (48V) 10 Kohm A16923-1004 1
11.2 The following components are located on the Loopback Microprocessor pc board (top board).
Component Description Part number Quantity
Semiconductors CR101-103 IN4148 Diode A11514-00001 3 CR104 7 Segment LED A17561-00001 1 U105 74c00 NAND A14739-74C00 1 U106 .4538 Dual Timer A14739-14538 1 U107 356 Op Amp A14296-00356 1 U108 DAC08 8 Bit D/A A17486-00001 1 U109 BCD to 7 segment Dec. A14739-14511 1 Non-semiconductors C101 .1 uF Mylar B13093-10410 1 C102-104 1 uF Tantalum B13006-10535 3 20

Component Description Part number Quantity C105-107, 111 .01 uF Ceramic A00256-00100 4 C108, 112, 113 47 uF 6V Tantalum B13006-47606 3 C109 10 pF ±5% Ceramic A12198-01005 1 C110 15 pF ±5% Ceramic A12198-01505 1 P1 28 pin connector A17487-10028 1 24 pin IC Socket A13018-00024 1 40 pin IC Socket A13018-00040 3 R101, 103, 104 100 Kohm A16923-10005 3 R102, 106 1 Megohm A16923-10006 2 R105, 118 10 Kohm A16923-10004 2 R107 1 Kohm A16923-10003 1 R108, 114, 115, 119, 121, 122, 133, 134 33 Kohm A16923-33004 8
R109, 110, 111 5.6 Kohm A16923-56003 3 R112 33 Kohm ±2% 8pin sip B17315-33174 1 R123 10 Megohm A16923-10007 1 R124 1.5 Kohm A16923-15003 1 R125, 127 10 Kohm 1/8W ±1% A13112-1004 2 R126 15 Kohm A16923-15004 1 R128 100 Kohm ±2% 8pin sip B17315-10175 1 R129, 130 560 ohm ±2% 8pin sip B17315-56042 2 Y101 3.58 mHz Crystal A16123-00001 1
The following components are located on the Loopback Microprocessor pc board (top board) and are common to all CMOS units: B02983-1XXXX, or B02983-2XXXX.
Component Description Part number Quantity
Q101-103 PN2907A Transistor A17812-00001 3 U101 63A03 MPU A14739-63A03 1 U102, 103 63A21 PIA A14739-63A21 2
U104 in CMOS units with measurement card routine: B02983-20001 2732 EPROM B17707-00002 1 B02983-20002 2732 EPROM B17707-00002 1 B02983-2004 27C32 EPROM B17707-10002 1
U104 in CMOS units NOT capable of handling the measurement card: B02983-10001 2732 EPROM B17707-00001 1 B02983-10002 2732 EPROM B17707-00001 1 B02983-10004 27C32 EPROM B17707-10001 1
The following components are located on the Loopback Microprocessor pc board (top board) and apply only to 12 VDC NMOS units: B02983-0XXX1
Component Description Part number Quantity
Semiconductors Q101-103 2N3702 Transistor A10844-00001 3 U101 6802 MPU A14739-06802 1 U102, 103 6821 PIA A14739-06821 2 U104 2532 EPROM B17566-00001 1
21

Non-semiconductors R116, 117 33 Kohm A16923-33004 2
12. ACCESSORY ITEMS
The following accessories are available for the 5212:
Model 2450, 2451 and 2452 Relay Expanders are controlled by either Model 5212 or 2109 microprocessor cards. These Relay Expanders are “addressable” – Up to 8 Relay Cards may be driven by one 5212 or 2109 card.
Model 2450 Relay Expander Card B02957 4x4 form-C 4 ampere relay contacts Model 2451 Relay Expander Card B02958 8x2 form-C Model 2452 Relay Expander Card B02959 8x1 form-C with LED annuciator. Model 2452 is a pinout compatible and programmable replacement for the Model 5212R. Like the 5212R, it uses each relay’s second contact to drive an LED. B02937-00001 Model 5212M tone level measurement card. A02905-00001 Low Profile Handle Kit. B02910-00001 Mounting Bar & Hardware for 19” racks. B02911-000XX Mounting Shelf Assembly (Wescom 400 Series). B02912-00001 Extender Card (Wescom 400 Series). B02919-00001 Apparatus Case (Wescom 10A). B02920-X0005 Wall Mount Power Supply (Ault 7000 Series).
22