mobicents eclipslee plugin user guide -...
TRANSCRIPT

Mobicents EclipSLEE Plugin User Guide
by Alexandre Mendonça

iii
Preface ............................................................................................................................. v
1. Document Conventions .......................................................................................... v
1.1. Typographic Conventions ............................................................................ v
1.2. Pull-quote Conventions .............................................................................. vii
1.3. Notes and Warnings .................................................................................. vii
2. Provide feedback to the authors! .......................................................................... viii
1. Introduction to Mobicents JAIN SLEE Eclipse ............................................................. 1
2. Installing Mobicents JAIN SLEE .................................................................................. 3
2.1. Pre-Install Requirements and Prerequisites .......................................................... 3
2.1.1. Hardware Requirements ........................................................................... 3
2.1.2. Software Prerequisites .............................................................................. 3
2.2. Install Alternatives ............................................................................................... 3
2.2.1. Update Site ............................................................................................. 3
2.2.2. Manually .................................................................................................. 4
2.2.3. Nightly Builds Update Site ........................................................................ 4
2.3. Uninstall Mobicents EclipSLEE ............................................................................ 4
3. Creating and Managing a JAIN SLEE Project .............................................................. 7
3.1. Creating a JAIN SLEE Project ............................................................................. 7
3.2. Managing Project Modules ................................................................................ 11
3.2.1. Adding New Modules ............................................................................. 11
3.2.2. Editing Existing Modules ......................................................................... 13
3.2.3. Removing Existing Modules .................................................................... 15
3.3. Managing Project Dependencies ........................................................................ 17
3.3.1. Adding a New Maven Dependency .......................................................... 17
3.3.2. Removing a Maven Dependency ............................................................. 20
4. Building JAIN SLEE Events ....................................................................................... 23
4.1. Creating a JAIN SLEE Event ............................................................................. 23
4.2. Editing a JAIN SLEE Event ............................................................................... 29
4.2.1. Edit Event Identity .................................................................................. 31
4.3. Deleting a JAIN SLEE Event ............................................................................. 32
5. Building JAIN SLEE Profile Specifications ................................................................ 35
5.1. Creating a JAIN SLEE Profile Specification ........................................................ 35
5.2. Editing a JAIN SLEE Profile Specification ........................................................... 42
5.3. Deleting a JAIN SLEE Profile Specification ......................................................... 42
6. Building JAIN SLEE Service Building Block (SBBs) .................................................. 43
6.1. Creating a JAIN SLEE Service Building Block (SBB) ........................................... 43
6.2. Editing a JAIN SLEE Service Building Block (SBB) ............................................. 62
6.2.1. Edit SBB Identity .................................................................................... 64
6.2.2. Edit SBB Classes ................................................................................... 65
6.2.3. Edit SBB CMP Fields ............................................................................. 66
6.2.4. Edit SBB Usage Parameters ................................................................... 67
6.2.5. Edit SBB Events .................................................................................... 68
6.2.6. Edit SBB Profile Specifications ................................................................ 69
6.2.7. Edit SBB Child Relations ........................................................................ 70
Mobicents EclipSLEE Plugin Us...
iv
6.2.8. Edit SBB Resource Adaptor Type Bindings .............................................. 71
6.2.9. Edit SBB Environment Entries ................................................................. 72
6.3. Deleting a JAIN SLEE Service Building Block (SBB) ........................................... 73
7. Building JAIN SLEE Services .................................................................................... 75
7.1. Creating a JAIN SLEE Service .......................................................................... 75
7.2. Editing a JAIN SLEE Service ............................................................................. 80
7.2.1. Edit Service Identity ............................................................................... 81
7.2.2. Edit Service Root SBB ........................................................................... 82
7.3. Deleting a JAIN SLEE Service ........................................................................... 83
8. Building JAIN SLEE Resource Adaptor Types ........................................................... 85
8.1. Creating a JAIN SLEE Resource Adaptor Type .................................................. 85
8.2. Editing a JAIN SLEE Resource Adaptor Type ..................................................... 93
8.2.1. Edit RA Type Identity ............................................................................. 95
8.2.2. Edit RA Type Events .............................................................................. 96
8.2.3. Edit RA Type Activity Types ................................................................... 97
8.3. Deleting a JAIN SLEE Resource Adaptor Type ................................................... 98
9. Building JAIN SLEE Resource Adaptors ................................................................. 101
9.1. Creating a JAIN SLEE Resource Adaptor ......................................................... 101
9.2. Editing a JAIN SLEE Resource Adaptor ........................................................... 109
9.2.1. Edit RA Identity .................................................................................... 111
9.2.2. Edit RA Resource Adaptor Types .......................................................... 112
9.2.3. Edit RA Config Properties ..................................................................... 113
9.3. Deleting a JAIN SLEE Resource Adaptor ......................................................... 114
10. Creating a JAIN SLEE Deployable Unit .................................................................. 117
11. Configuring Mobicents ElipSLEE ........................................................................... 119
11.1. General Configuration .................................................................................... 119
11.2. Component Templates Configuration .............................................................. 119
11.2.1. Add a New Component Template ........................................................ 119
11.2.2. Editing a Component Template ........................................................... 120
11.2.3. Removing a Component Template ....................................................... 120
A. Java Development Kit (JDK): Installing, Configuring and Running ................................. 121
B. Setting the JBOSS_HOME Environment Variable ........................................................ 125
C. Revision History ........................................................................................................ 129
Index ............................................................................................................................. 131
v
Preface
1. Document Conventions
This manual uses several conventions to highlight certain words and phrases and draw attention
to specific pieces of information.
In PDF and paper editions, this manual uses typefaces drawn from the Liberation Fonts [https://
fedorahosted.org/liberation-fonts/] set. The Liberation Fonts set is also used in HTML editions if
the set is installed on your system. If not, alternative but equivalent typefaces are displayed. Note:
Red Hat Enterprise Linux 5 and later includes the Liberation Fonts set by default.
1.1. Typographic Conventions
Four typographic conventions are used to call attention to specific words and phrases. These
conventions, and the circumstances they apply to, are as follows.
Mono-spaced Bold
Used to highlight system input, including shell commands, file names and paths. Also used to
highlight key caps and key-combinations. For example:
To see the contents of the file my_next_bestselling_novel in your current
working directory, enter the cat my_next_bestselling_novel command at the
shell prompt and press Enter to execute the command.
The above includes a file name, a shell command and a key cap, all presented in Mono-spaced
Bold and all distinguishable thanks to context.
Key-combinations can be distinguished from key caps by the hyphen connecting each part of a
key-combination. For example:
Press Enter to execute the command.
Press Ctrl+Alt+F1 to switch to the first virtual terminal. Press Ctrl+Alt+F7 to
return to your X-Windows session.
The first sentence highlights the particular key cap to press. The second highlights two sets of
three key caps, each set pressed simultaneously.
If source code is discussed, class names, methods, functions, variable names and returned values
mentioned within a paragraph will be presented as above, in Mono-spaced Bold. For example:
File-related classes include filesystem for file systems, file for files, and dir
for directories. Each class has its own associated set of permissions.
Proportional Bold
This denotes words or phrases encountered on a system, including application names; dialogue
box text; labelled buttons; check-box and radio button labels; menu titles and sub-menu titles.
For example:
Preface
vi
Choose System > Preferences > Mouse from the main menu bar to launch
Mouse Preferences. In the Buttons tab, click the Left-handed mouse check
box and click Close to switch the primary mouse button from the left to the right
(making the mouse suitable for use in the left hand).
To insert a special character into a gedit file, choose Applications >
Accessories > Character Map from the main menu bar. Next, choose Search
> Find from the Character Map menu bar, type the name of the character in the
Search field and click Next. The character you sought will be highlighted in the
Character Table. Double-click this highlighted character to place it in the Text
to copy field and then click the Copy button. Now switch back to your document
and choose Edit > Paste from the gedit menu bar.
The above text includes application names; system-wide menu names and items; application-
specific menu names; and buttons and text found within a GUI interface, all presented in
Proportional Bold and all distinguishable by context.
Note the > shorthand used to indicate traversal through a menu and its sub-menus. This is to
avoid the difficult-to-follow 'Select Mouse from the Preferences sub-menu in the System menu
of the main menu bar' approach.
Mono-spaced Bold Italic or Proportional Bold Italic
Whether Mono-spaced Bold or Proportional Bold, the addition of Italics indicates replaceable or
variable text. Italics denotes text you do not input literally or displayed text that changes depending
on circumstance. For example:
To connect to a remote machine using ssh, type ssh [email protected]
at a shell prompt. If the remote machine is example.com and your username on
that machine is john, type ssh [email protected].
The mount -o remount file-system command remounts the named file
system. For example, to remount the /home file system, the command is mount
-o remount /home.
To see the version of a currently installed package, use the rpm -q package
command. It will return a result as follows: package-version-release.
Note the words in bold italics above username, domain.name, file-system, package, version and
release. Each word is a placeholder, either for text you enter when issuing a command or for text
displayed by the system.
Aside from standard usage for presenting the title of a work, italics denotes the first use of a new
and important term. For example:
When the Apache HTTP Server accepts requests, it dispatches child processes
or threads to handle them. This group of child processes or threads is known as
Pull-quote Conventions
vii
a server-pool. Under Apache HTTP Server 2.0, the responsibility for creating and
maintaining these server-pools has been abstracted to a group of modules called
Multi-Processing Modules (MPMs). Unlike other modules, only one module from
the MPM group can be loaded by the Apache HTTP Server.
1.2. Pull-quote Conventions
Two, commonly multi-line, data types are set off visually from the surrounding text.
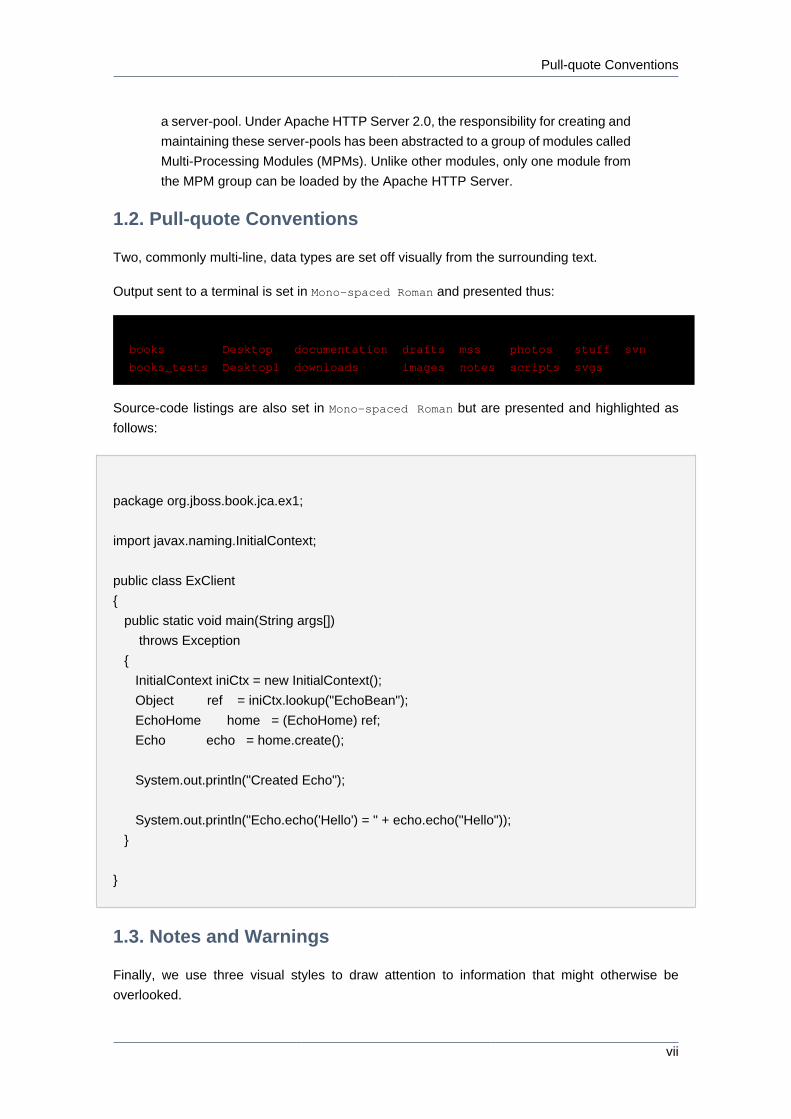
Output sent to a terminal is set in Mono-spaced Roman and presented thus:
books Desktop documentation drafts mss photos stuff svn
books_tests Desktop1 downloads images notes scripts svgs
Source-code listings are also set in Mono-spaced Roman but are presented and highlighted as
follows:
package org.jboss.book.jca.ex1;
import javax.naming.InitialContext;
public class ExClient
public static void main(String args[])
throws Exception
InitialContext iniCtx = new InitialContext();
Object ref = iniCtx.lookup("EchoBean");
EchoHome home = (EchoHome) ref;
Echo echo = home.create();
System.out.println("Created Echo");
System.out.println("Echo.echo('Hello') = " + echo.echo("Hello"));
1.3. Notes and Warnings
Finally, we use three visual styles to draw attention to information that might otherwise be
overlooked.
Preface
viii
Note
A note is a tip or shortcut or alternative approach to the task at hand. Ignoring a
note should have no negative consequences, but you might miss out on a trick that
makes your life easier.
Important
Important boxes detail things that are easily missed: configuration changes that
only apply to the current session, or services that need restarting before an update
will apply. Ignoring Important boxes won't cause data loss but may cause irritation
and frustration.
Warning
A Warning should not be ignored. Ignoring warnings will most likely cause data
loss.
2. Provide feedback to the authors!
If you find a typographical error in this manual, or if you have thought of a way to make this
manual better, we would love to hear from you! Please submit a report in the Issue Tracker
[$THIS.ISSUE_TRACKER_URL], against the product Mobicents JAIN SLEE, or contact the
authors.
When submitting a bug report, be sure to mention the manual's identifier:
JAIN_SLEE_User_Guide
If you have a suggestion for improving the documentation, try to be as specific as possible when
describing it. If you have found an error, please include the section number and some of the
surrounding text so we can find it easily.
Chapter 1.
1
Introduction to Mobicents JAIN
SLEE EclipseThe JAIN SLEE Eclipse Plug-in, EclipSLEE, is designed to help in the creation of the following
JAIN SLEE components:
• Events
• Service Building Blocks (SBBs)
• Profile Specifications
• Resource Adaptor Types
• Resource Adaptors
• Service XML Descriptors
• Deployable Units
With this plug-in developers can construct complete services easily and quickly. The plug-in takes
care of generating the correct Maven 2 project structure, ensuring that XML descriptors are correct,
as well as creating skeleton Java classes for developers to add service logic to.

2
Chapter 2.
3
Installing Mobicents JAIN SLEE
2.1. Pre-Install Requirements and Prerequisites
Ensure that the following requirements have been met before continuing with the install.
2.1.1. Hardware Requirements
Anything Eclipse 3.x Itself Will Run On
The Mobicents EclipSLEE plugin will run inside Eclipse, having the same requirements.
2.1.2. Software Prerequisites
JDK 5 or Higher
A working installation of the Java Development Kit (JDK) version 5 or higher is required in
order to run the Mobicents EclipSLEE Plugin.
For instructions on how to install the JDK, refer to Appendix A, Java Development Kit (JDK):
Installing, Configuring and Running.
Eclipse 3.7+
A working installation of the Eclipse platform version 3.7 (Indigo) or higher is required in order
to run the Mobicents EclipSLEE plugin.
For instructions on how to install Eclipse, refer to Where do I get and install Eclipse? [http://
wiki.eclipse.org/FAQ_Where_do_I_get_and_install_Eclipse%3F].
M2Eclipse Plugin
For performing maven actions, an installation of the Maven Integration for Eclipse plugin (m2e)
version 1.0.0 or higher is required by the Mobicents EclipSLEE plugin.
For instructions on how to install m2e, refer to Installing m2e [http://marketplace.eclipse.org/
content/maven-integration-eclipse].
2.2. Install Alternatives
Using Update Site
The plugin can be easily installed and updated by using the Mobicents EclipSLEE Update Site.
Manually
As an alternative to the update site, it is possible to download the plugin and install it manually.
2.2.1. Update Site
Set up the Update Site following these steps:
Chapter 2. Installing Mobicen...
4
1. Open Eclipse
2. Go to Help → Install New Software...
3. Click Add... and enter name EclipSLEE and URL http://mobicents.googlecode.com/svn/
downloads/eclipse-update-site/
4. Select the appropriate EclipSLEE version, click Next and follow the instructions in the Eclipse
Wizard
5. Allow Eclipse to restart
2.2.2. Manually
1. Download the latest EclipSLEE JAR file from here [http://mobicents.googlecode.com/svn/
downloads/eclipse-update-site/plugins/]
2. Copy the JAR file to ECLIPSE_HOME/plugins
3. (Re)Start Eclipse
2.2.3. Nightly Builds Update Site
We provide nightly builds for the early adopters. Set up the Update Site following these steps:
1. Open Eclipse
2. Go to Help → Install New Software...
3. Click Add... and enter name EclipSLEE and URL http://hudson.jboss.org/hudson/view/
Mobicents/job/Mobicents-EclipSLEE/lastSuccessfulBuild/artifact/
4. Select the appropriate EclipSLEE version, click Next and follow the instructions in the Eclipse
Wizard
5. Allow Eclipse to restart
2.3. Uninstall Mobicents EclipSLEE
To uninstall follow these steps:
1. Open Eclipse
2. Go to Help → Install New Software...
3. Click on What's already installed
4. Locate EclipSLEE plugin and click Uninstall

Uninstall Mobicents EclipSLEE
5
5. Restart Eclipse

6
Chapter 3.
7
Creating and Managing a JAIN SLEE
Project
3.1. Creating a JAIN SLEE Project
It is necessary to create a JAIN SLEE project before JAIN SLEE components may be created.
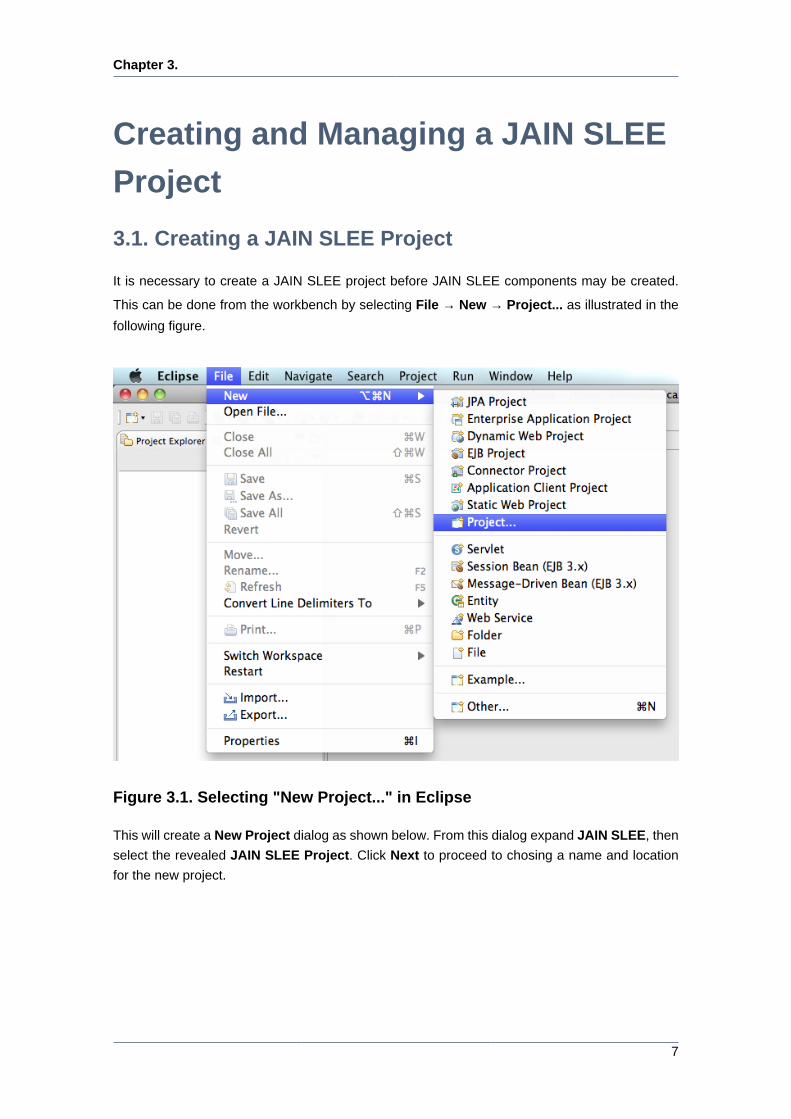
This can be done from the workbench by selecting File → New → Project... as illustrated in the
following figure.
Figure 3.1. Selecting "New Project..." in Eclipse
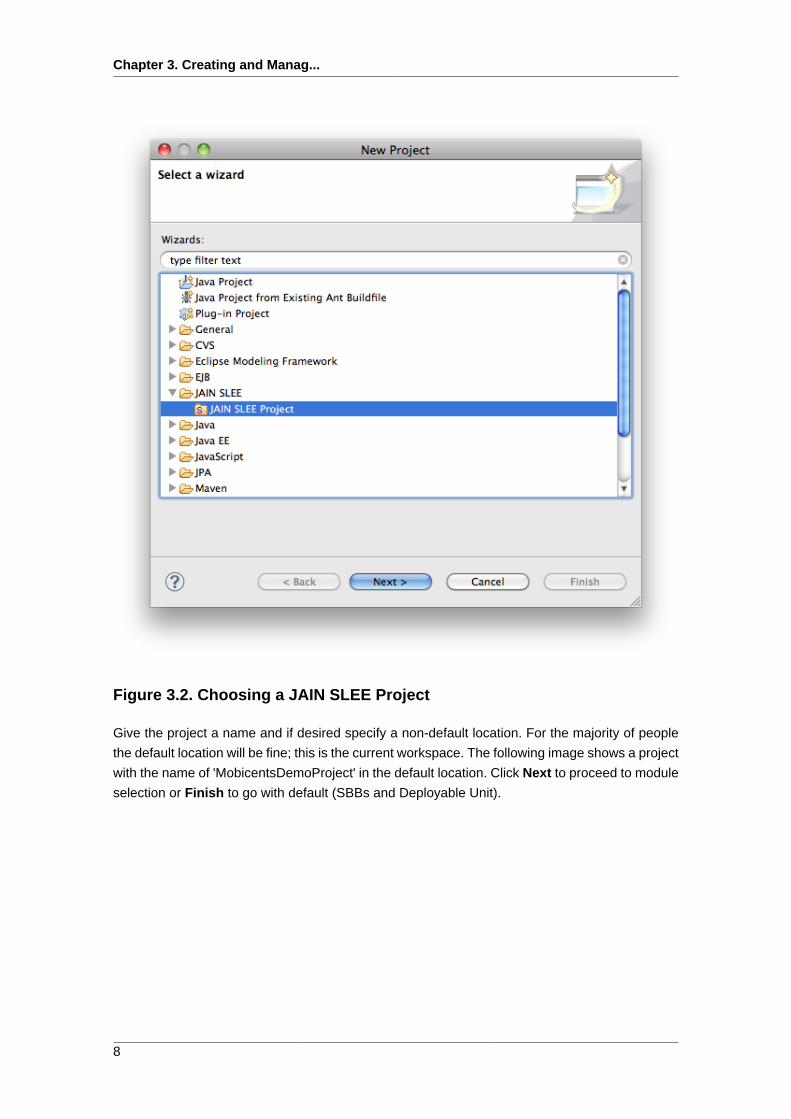
This will create a New Project dialog as shown below. From this dialog expand JAIN SLEE, then
select the revealed JAIN SLEE Project. Click Next to proceed to chosing a name and location
for the new project.
Chapter 3. Creating and Manag...
8
Figure 3.2. Choosing a JAIN SLEE Project
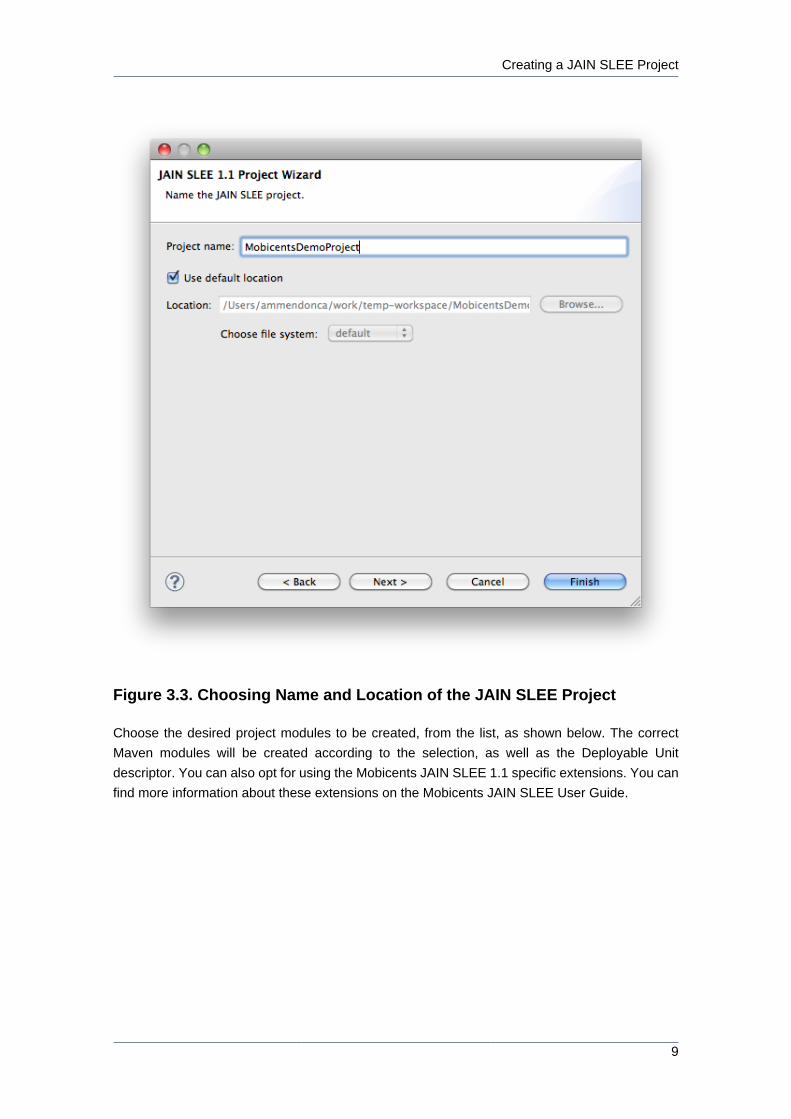
Give the project a name and if desired specify a non-default location. For the majority of people
the default location will be fine; this is the current workspace. The following image shows a project
with the name of 'MobicentsDemoProject' in the default location. Click Next to proceed to module
selection or Finish to go with default (SBBs and Deployable Unit).
Creating a JAIN SLEE Project
9
Figure 3.3. Choosing Name and Location of the JAIN SLEE Project
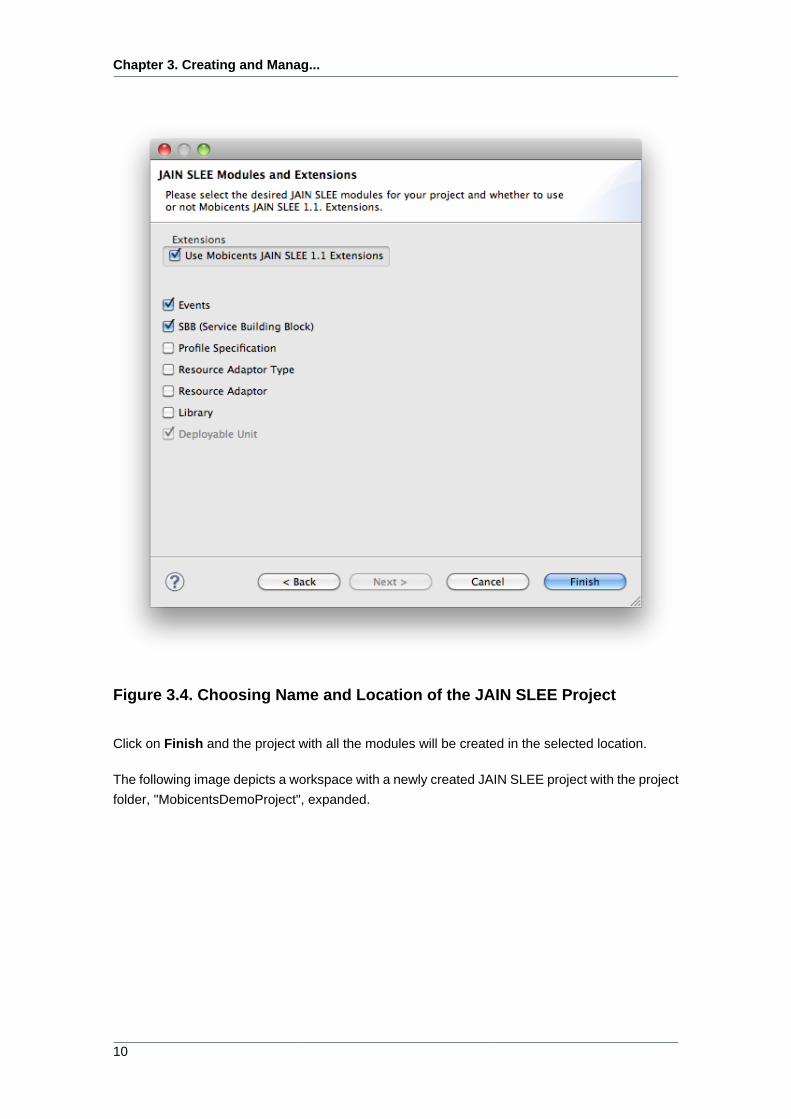
Choose the desired project modules to be created, from the list, as shown below. The correct
Maven modules will be created according to the selection, as well as the Deployable Unit
descriptor. You can also opt for using the Mobicents JAIN SLEE 1.1 specific extensions. You can
find more information about these extensions on the Mobicents JAIN SLEE User Guide.
Chapter 3. Creating and Manag...
10
Figure 3.4. Choosing Name and Location of the JAIN SLEE Project
Click on Finish and the project with all the modules will be created in the selected location.
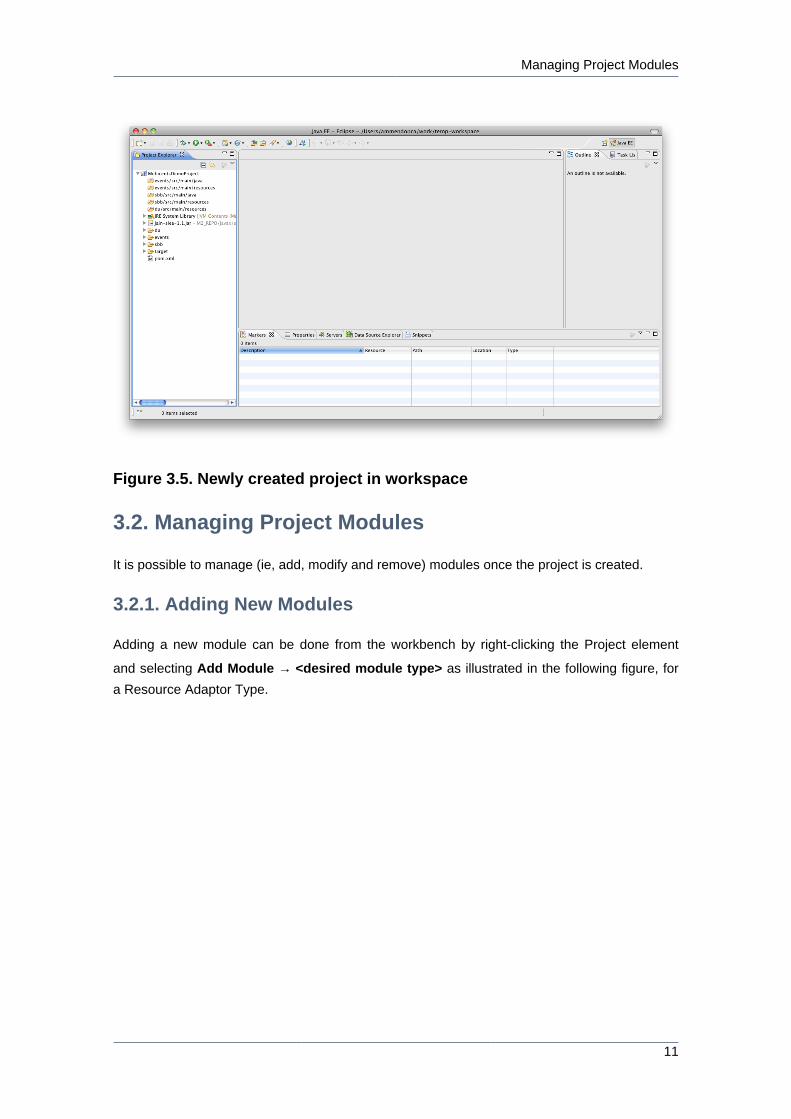
The following image depicts a workspace with a newly created JAIN SLEE project with the project
folder, "MobicentsDemoProject", expanded.
Managing Project Modules
11
Figure 3.5. Newly created project in workspace
3.2. Managing Project Modules
It is possible to manage (ie, add, modify and remove) modules once the project is created.
3.2.1. Adding New Modules
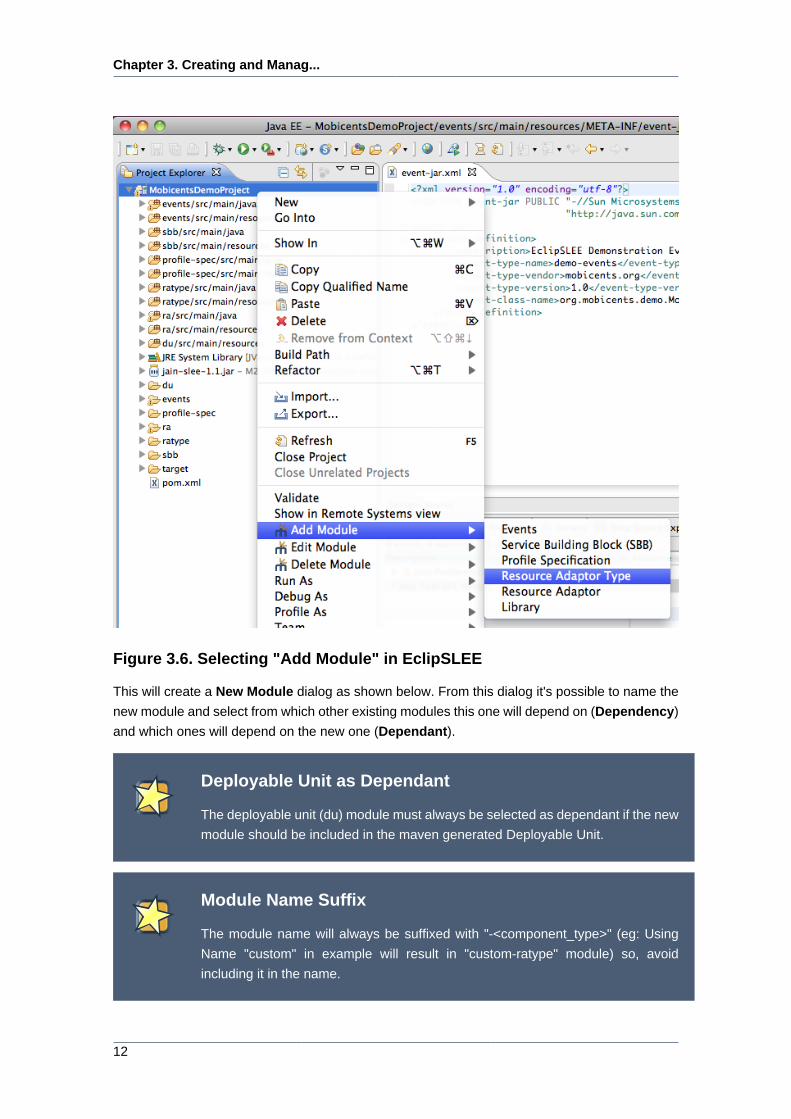
Adding a new module can be done from the workbench by right-clicking the Project element
and selecting Add Module → <desired module type> as illustrated in the following figure, for
a Resource Adaptor Type.
Chapter 3. Creating and Manag...
12
Figure 3.6. Selecting "Add Module" in EclipSLEE
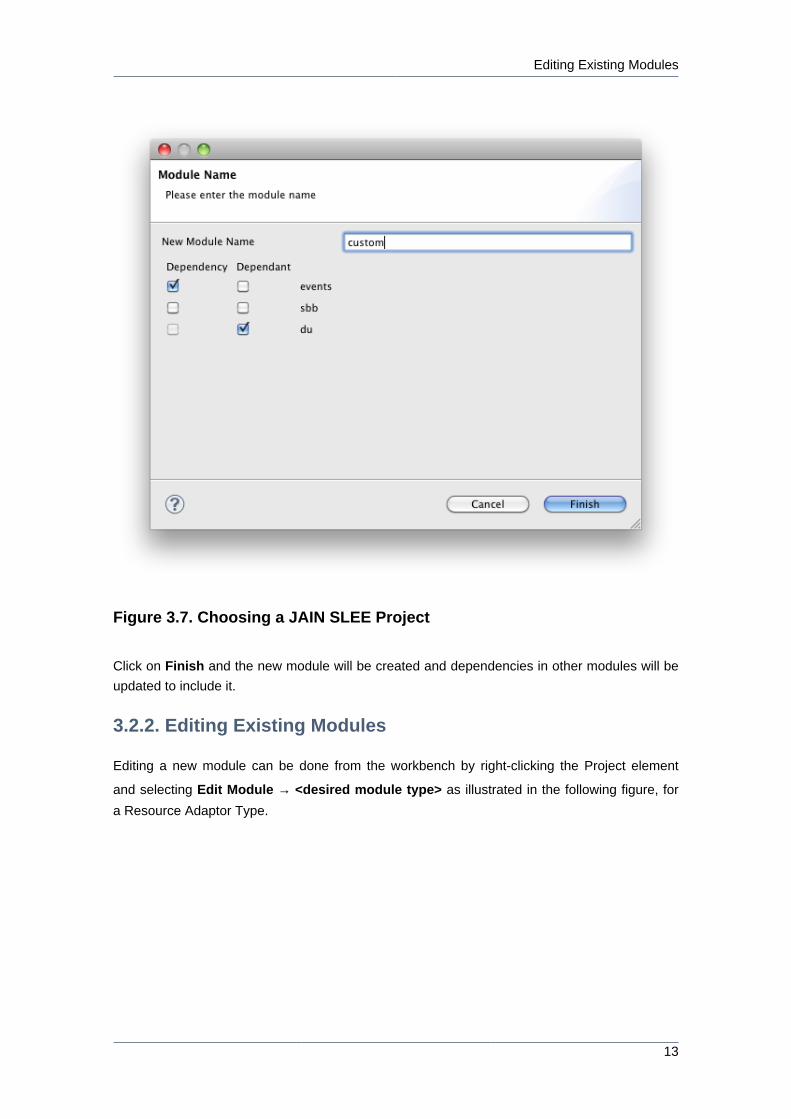
This will create a New Module dialog as shown below. From this dialog it's possible to name the
new module and select from which other existing modules this one will depend on (Dependency)
and which ones will depend on the new one (Dependant).
Deployable Unit as Dependant
The deployable unit (du) module must always be selected as dependant if the new
module should be included in the maven generated Deployable Unit.
Module Name Suffix
The module name will always be suffixed with "-<component_type>" (eg: Using
Name "custom" in example will result in "custom-ratype" module) so, avoid
including it in the name.
Editing Existing Modules
13
Figure 3.7. Choosing a JAIN SLEE Project
Click on Finish and the new module will be created and dependencies in other modules will be
updated to include it.
3.2.2. Editing Existing Modules
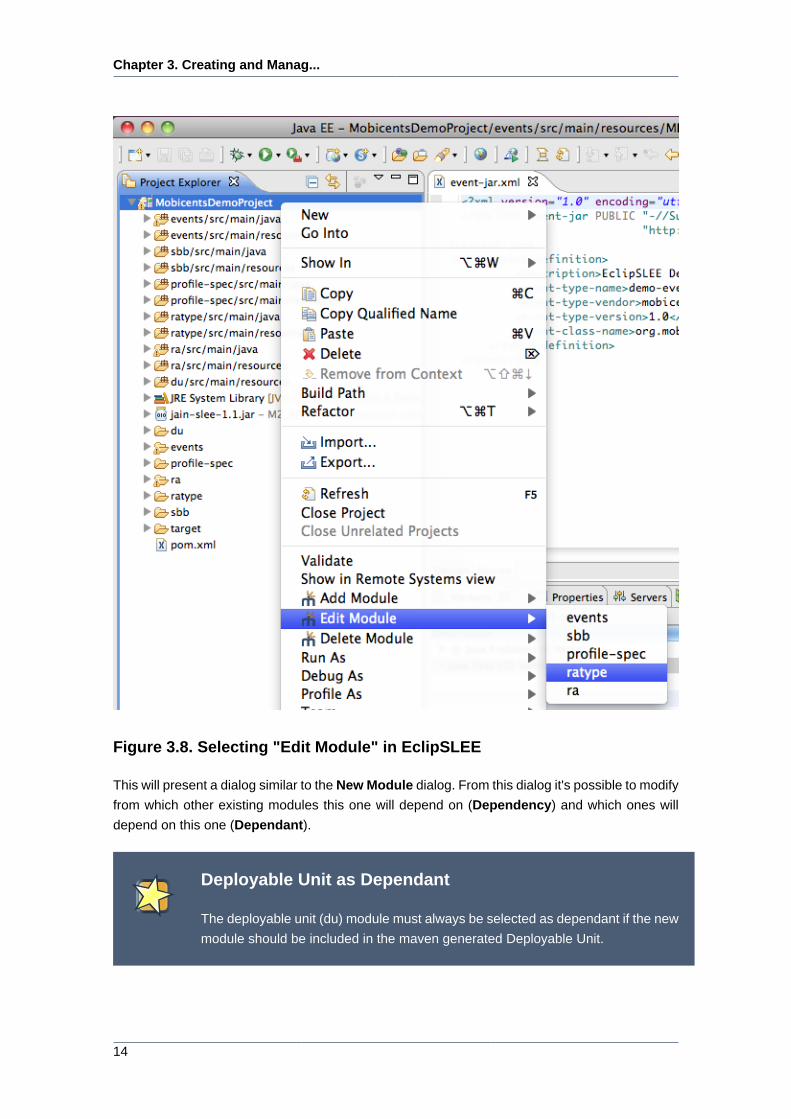
Editing a new module can be done from the workbench by right-clicking the Project element
and selecting Edit Module → <desired module type> as illustrated in the following figure, for
a Resource Adaptor Type.
Chapter 3. Creating and Manag...
14
Figure 3.8. Selecting "Edit Module" in EclipSLEE
This will present a dialog similar to the New Module dialog. From this dialog it's possible to modify
from which other existing modules this one will depend on (Dependency) and which ones will
depend on this one (Dependant).
Deployable Unit as Dependant
The deployable unit (du) module must always be selected as dependant if the new
module should be included in the maven generated Deployable Unit.
Removing Existing Modules
15
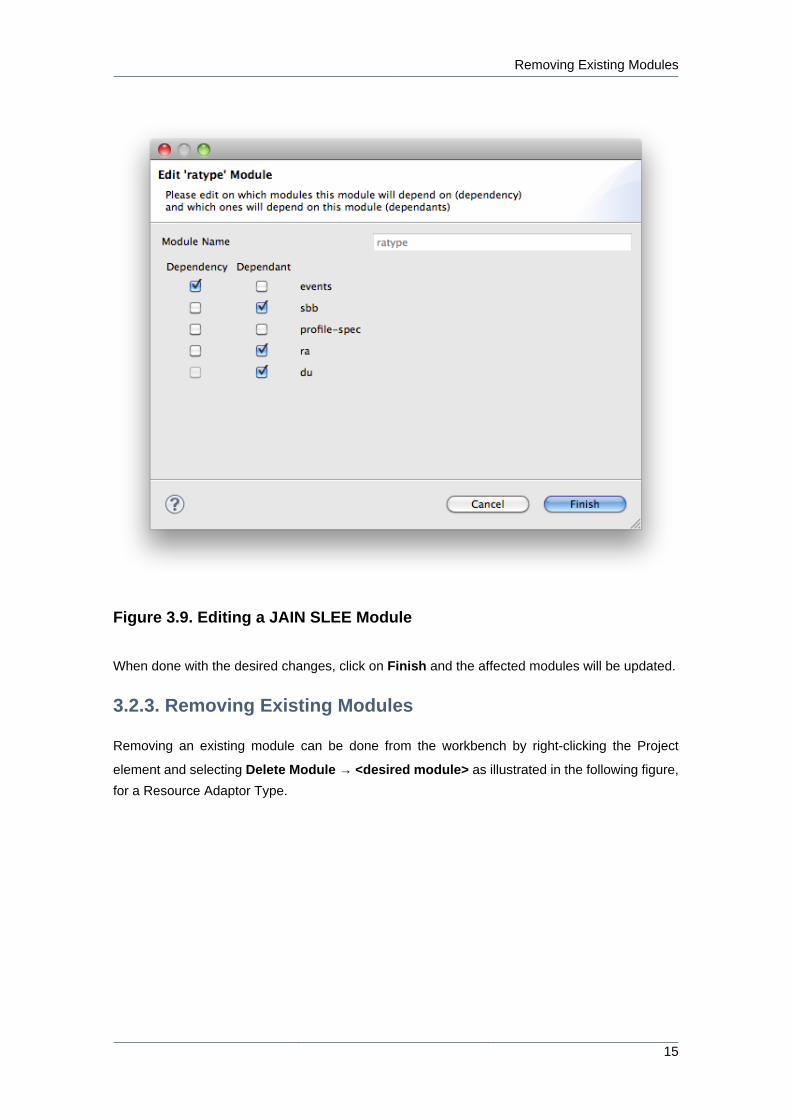
Figure 3.9. Editing a JAIN SLEE Module
When done with the desired changes, click on Finish and the affected modules will be updated.
3.2.3. Removing Existing Modules
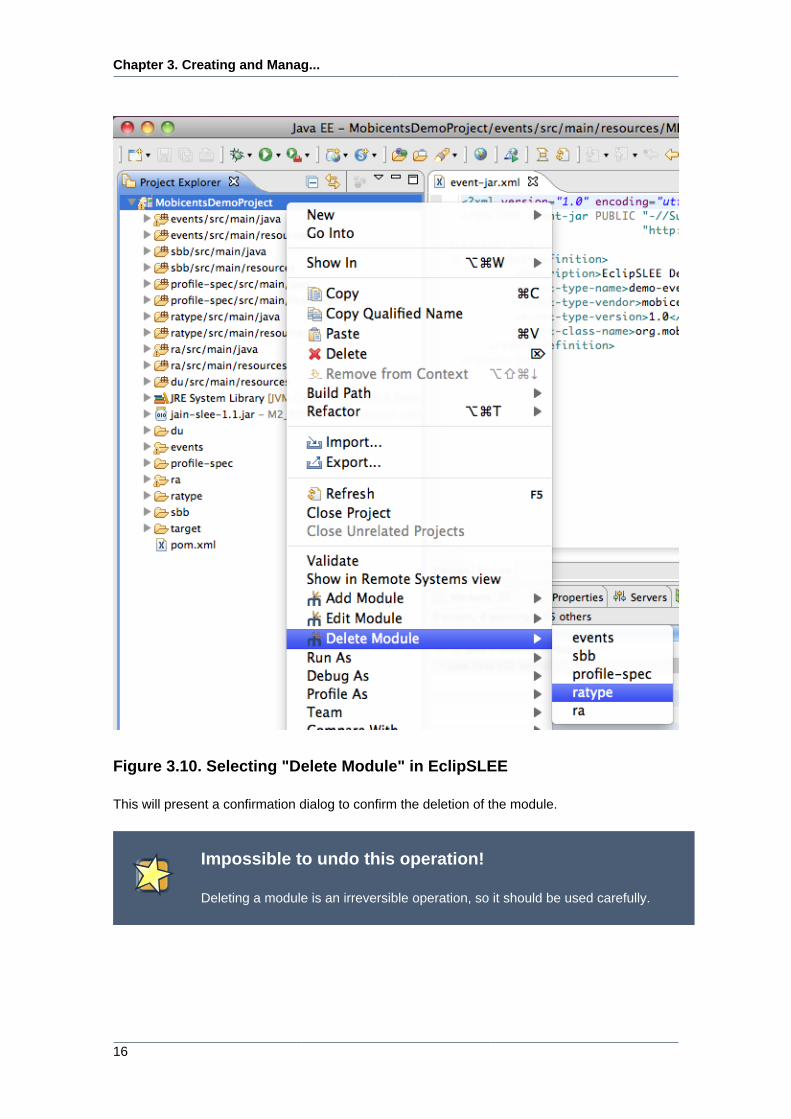
Removing an existing module can be done from the workbench by right-clicking the Project
element and selecting Delete Module → <desired module> as illustrated in the following figure,
for a Resource Adaptor Type.
Chapter 3. Creating and Manag...
16
Figure 3.10. Selecting "Delete Module" in EclipSLEE
This will present a confirmation dialog to confirm the deletion of the module.
Impossible to undo this operation!
Deleting a module is an irreversible operation, so it should be used carefully.
Managing Project Dependencies
17
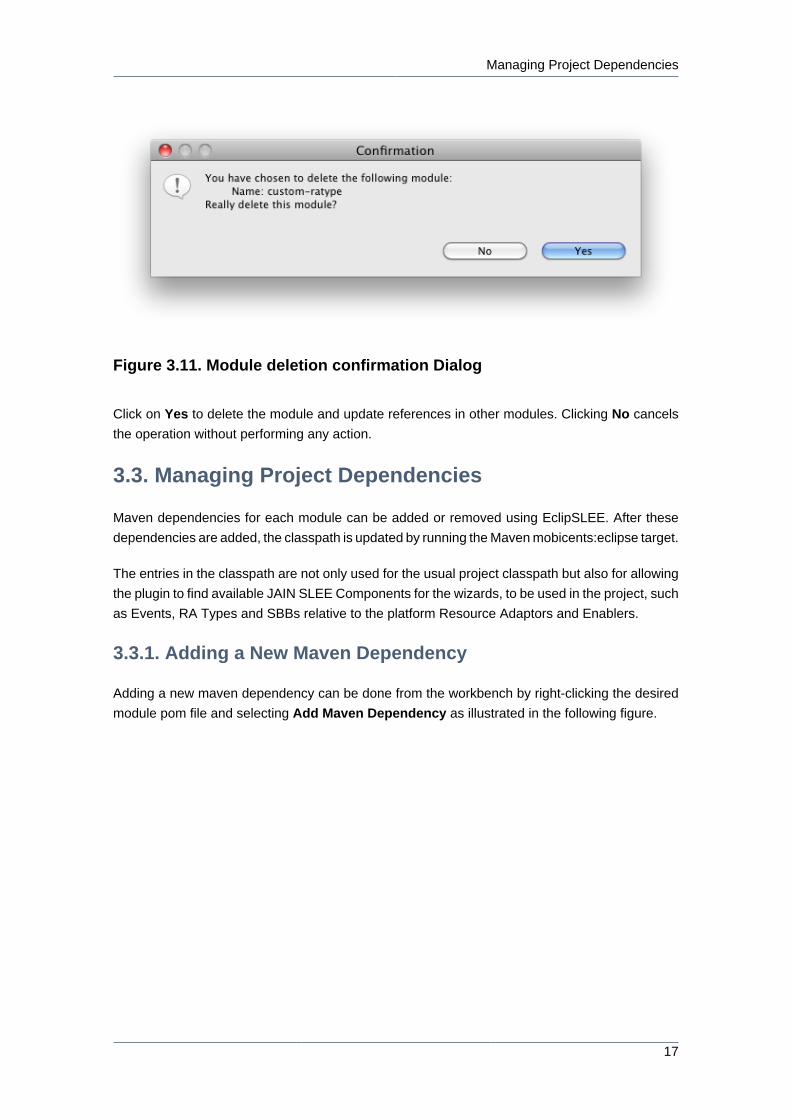
Figure 3.11. Module deletion confirmation Dialog
Click on Yes to delete the module and update references in other modules. Clicking No cancels
the operation without performing any action.
3.3. Managing Project Dependencies
Maven dependencies for each module can be added or removed using EclipSLEE. After these
dependencies are added, the classpath is updated by running the Maven mobicents:eclipse target.
The entries in the classpath are not only used for the usual project classpath but also for allowing
the plugin to find available JAIN SLEE Components for the wizards, to be used in the project, such
as Events, RA Types and SBBs relative to the platform Resource Adaptors and Enablers.
3.3.1. Adding a New Maven Dependency
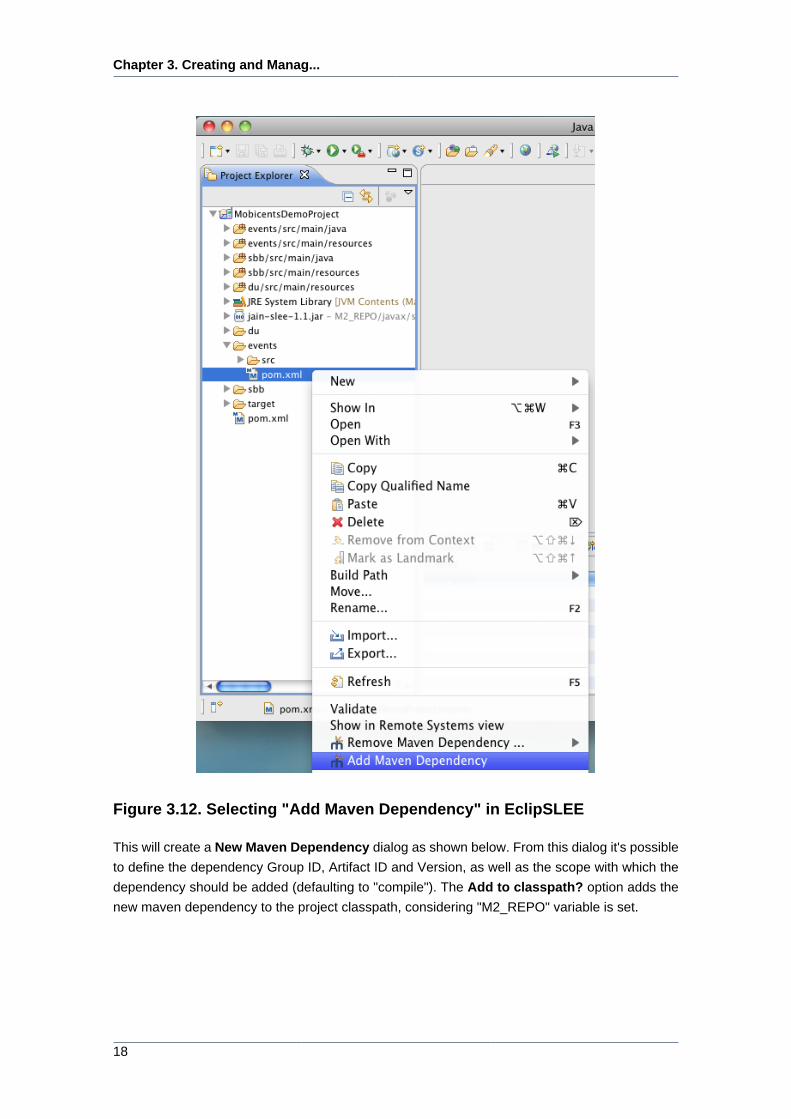
Adding a new maven dependency can be done from the workbench by right-clicking the desired
module pom file and selecting Add Maven Dependency as illustrated in the following figure.
Chapter 3. Creating and Manag...
18
Figure 3.12. Selecting "Add Maven Dependency" in EclipSLEE
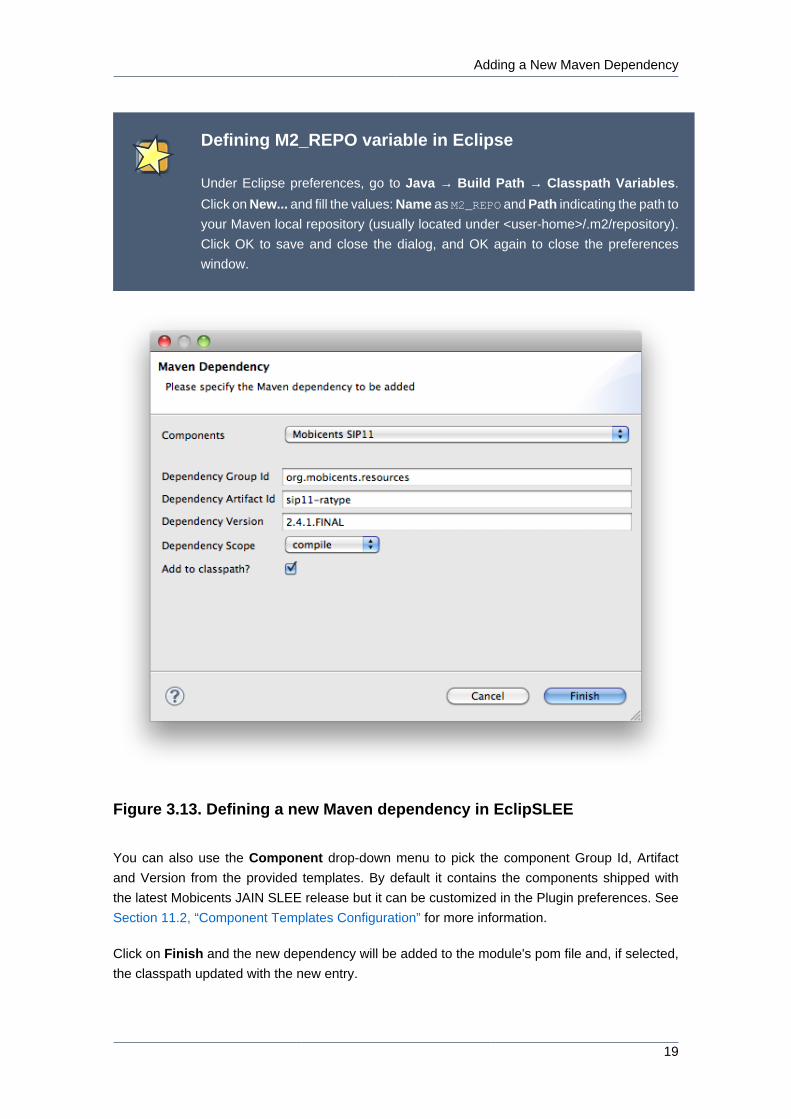
This will create a New Maven Dependency dialog as shown below. From this dialog it's possible
to define the dependency Group ID, Artifact ID and Version, as well as the scope with which the
dependency should be added (defaulting to "compile"). The Add to classpath? option adds the
new maven dependency to the project classpath, considering "M2_REPO" variable is set.
Adding a New Maven Dependency
19
Defining M2_REPO variable in Eclipse
Under Eclipse preferences, go to Java → Build Path → Classpath Variables.
Click on New... and fill the values: Name as M2_REPO and Path indicating the path to
your Maven local repository (usually located under <user-home>/.m2/repository).
Click OK to save and close the dialog, and OK again to close the preferences
window.
Figure 3.13. Defining a new Maven dependency in EclipSLEE
You can also use the Component drop-down menu to pick the component Group Id, Artifact
and Version from the provided templates. By default it contains the components shipped with
the latest Mobicents JAIN SLEE release but it can be customized in the Plugin preferences. See
Section 11.2, “Component Templates Configuration” for more information.
Click on Finish and the new dependency will be added to the module's pom file and, if selected,
the classpath updated with the new entry.
Chapter 3. Creating and Manag...
20
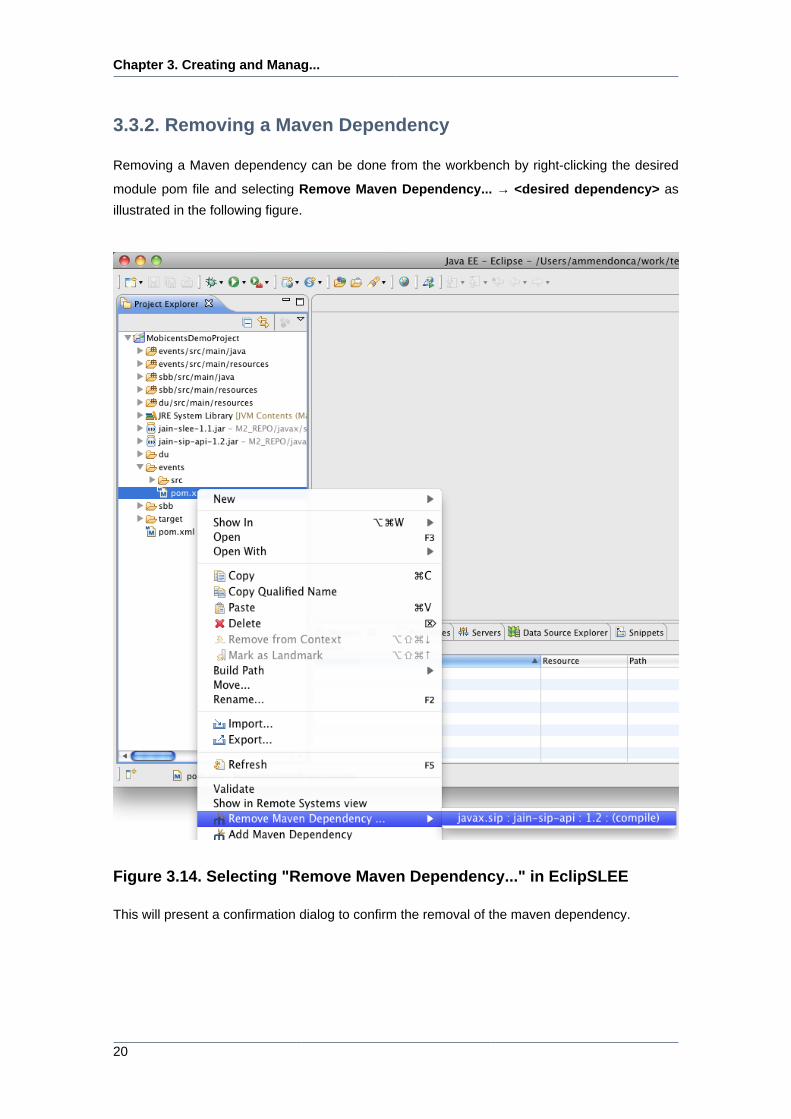
3.3.2. Removing a Maven Dependency
Removing a Maven dependency can be done from the workbench by right-clicking the desired
module pom file and selecting Remove Maven Dependency... → <desired dependency> as
illustrated in the following figure.
Figure 3.14. Selecting "Remove Maven Dependency..." in EclipSLEE
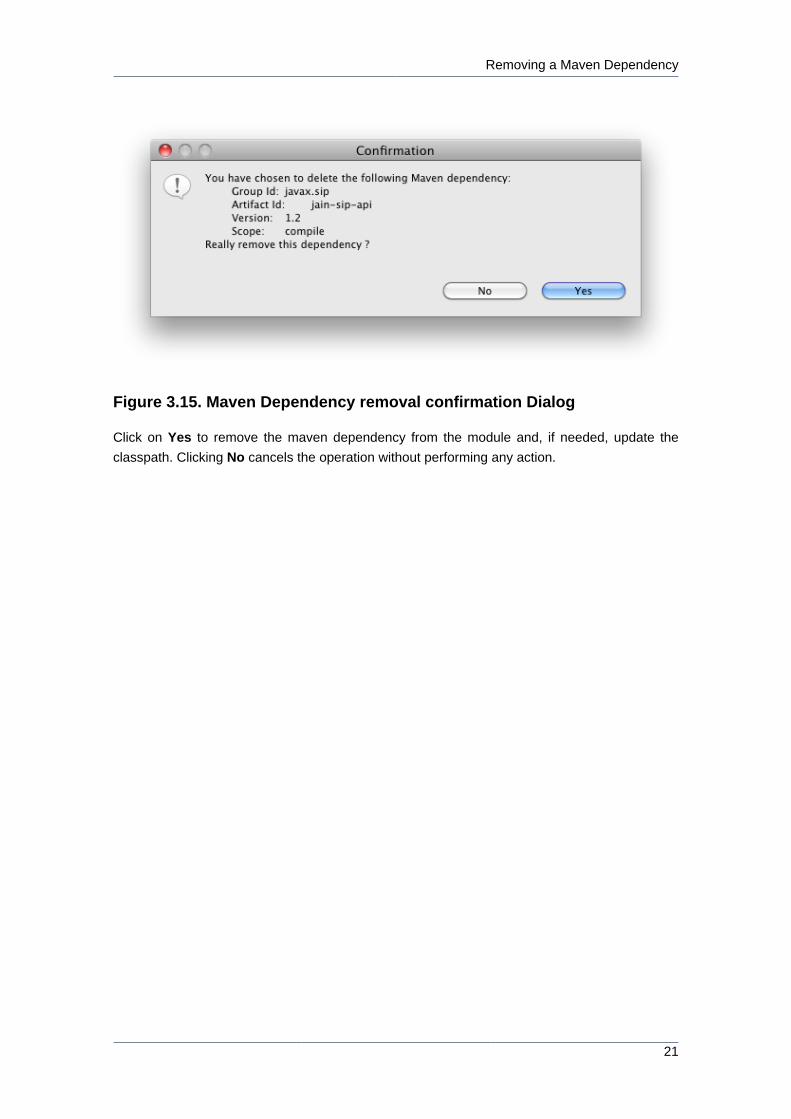
This will present a confirmation dialog to confirm the removal of the maven dependency.
Removing a Maven Dependency
21
Figure 3.15. Maven Dependency removal confirmation Dialog
Click on Yes to remove the maven dependency from the module and, if needed, update the
classpath. Clicking No cancels the operation without performing any action.

22
Chapter 4.
23
Building JAIN SLEE EventsEclipSLEE provides means to create, edit and delete JAIN SLEE Events.
4.1. Creating a JAIN SLEE Event
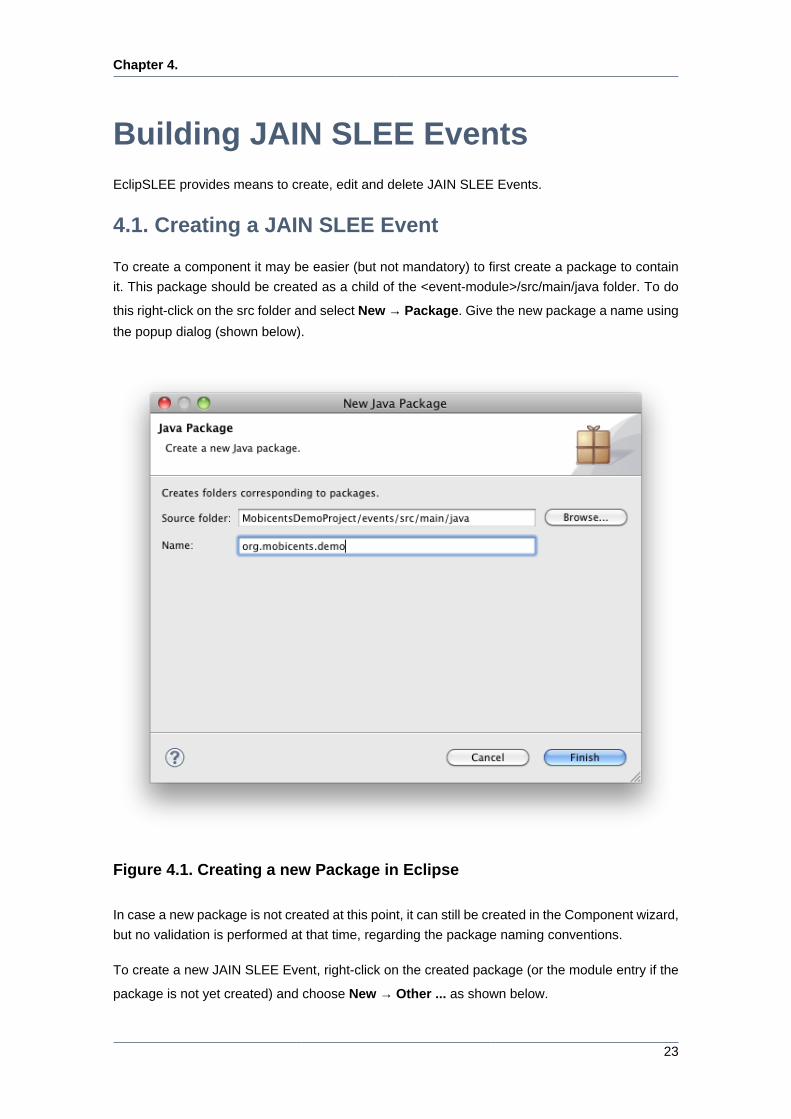
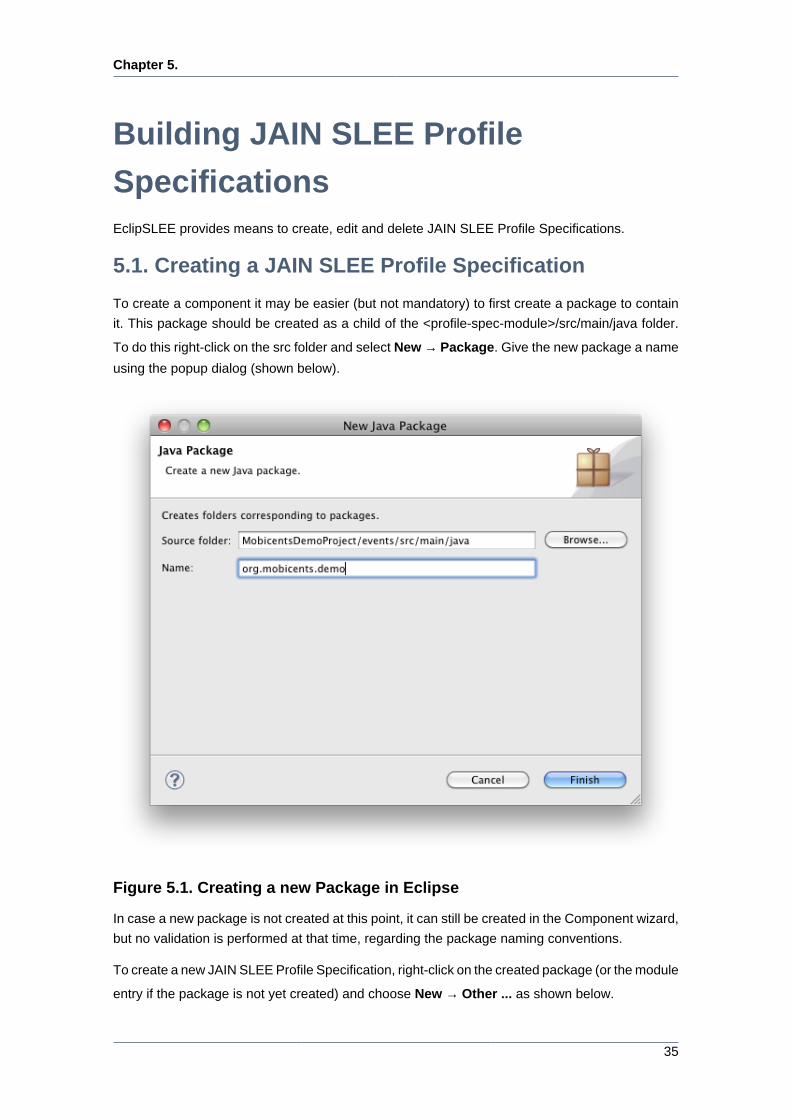
To create a component it may be easier (but not mandatory) to first create a package to contain
it. This package should be created as a child of the <event-module>/src/main/java folder. To do
this right-click on the src folder and select New → Package. Give the new package a name using
the popup dialog (shown below).
Figure 4.1. Creating a new Package in Eclipse
In case a new package is not created at this point, it can still be created in the Component wizard,
but no validation is performed at that time, regarding the package naming conventions.
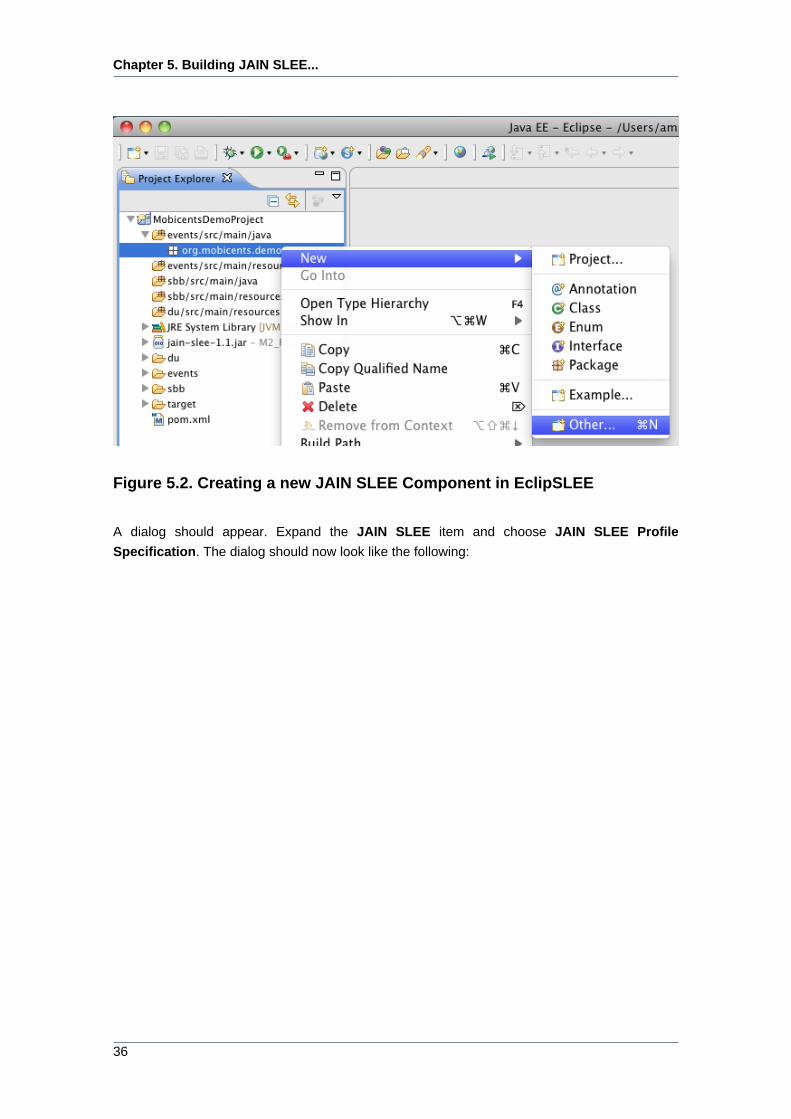
To create a new JAIN SLEE Event, right-click on the created package (or the module entry if the
package is not yet created) and choose New → Other ... as shown below.

Chapter 4. Building JAIN SLEE...
24
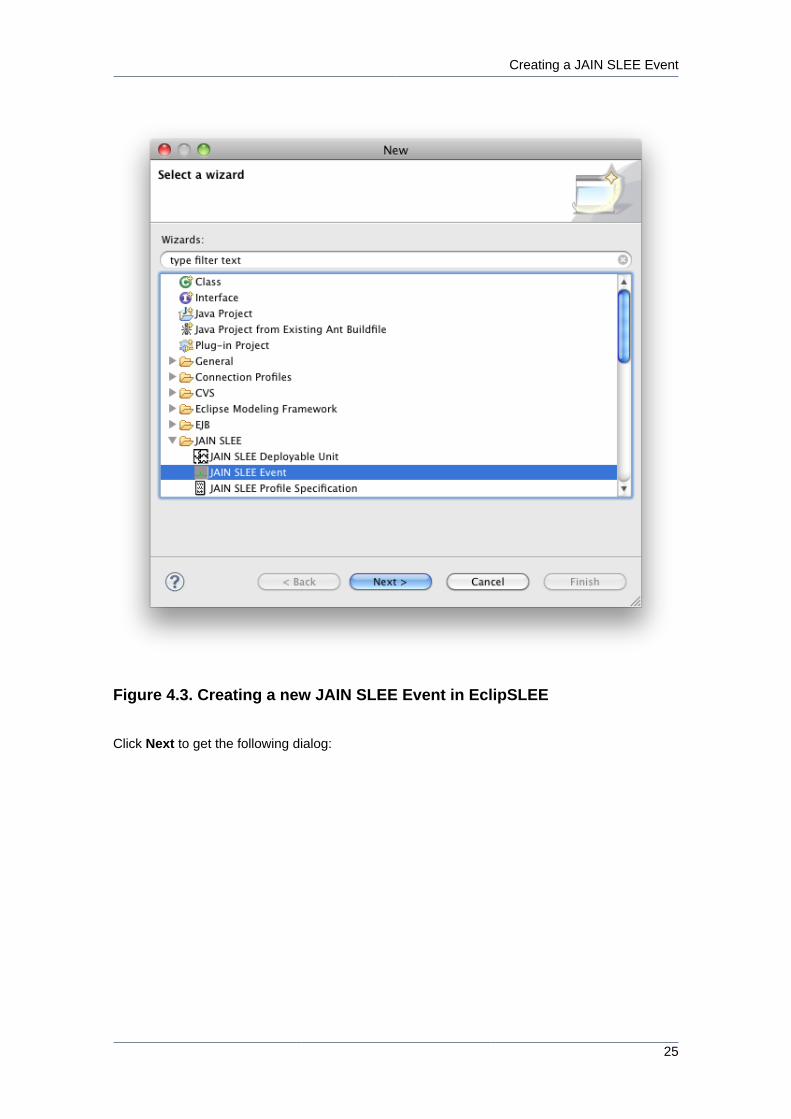
Figure 4.2. Creating a new JAIN SLEE Component in EclipSLEE
A dialog should appear. Expand the JAIN SLEE item and choose JAIN SLEE Event. The dialog
should now look like the following:
Creating a JAIN SLEE Event
25
Figure 4.3. Creating a new JAIN SLEE Event in EclipSLEE
Click Next to get the following dialog:
Chapter 4. Building JAIN SLEE...
26
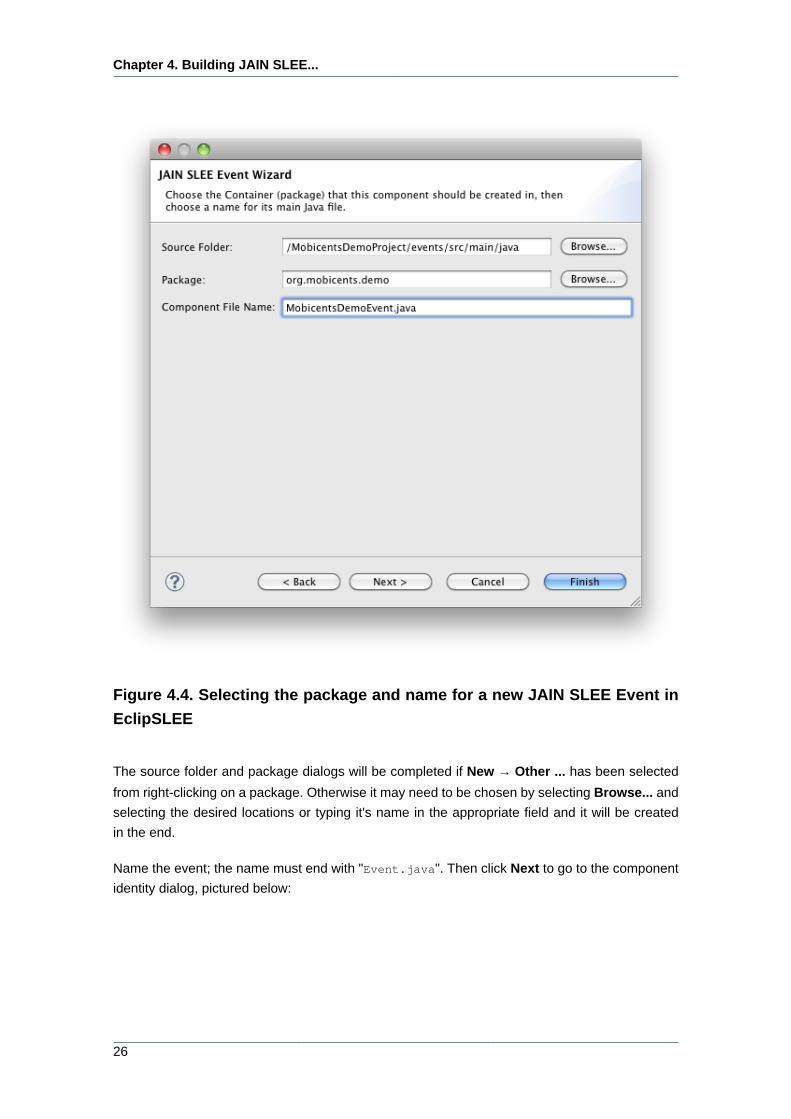
Figure 4.4. Selecting the package and name for a new JAIN SLEE Event in
EclipSLEE
The source folder and package dialogs will be completed if New → Other ... has been selected
from right-clicking on a package. Otherwise it may need to be chosen by selecting Browse... and
selecting the desired locations or typing it's name in the appropriate field and it will be created
in the end.
Name the event; the name must end with "Event.java". Then click Next to go to the component
identity dialog, pictured below:
Creating a JAIN SLEE Event
27
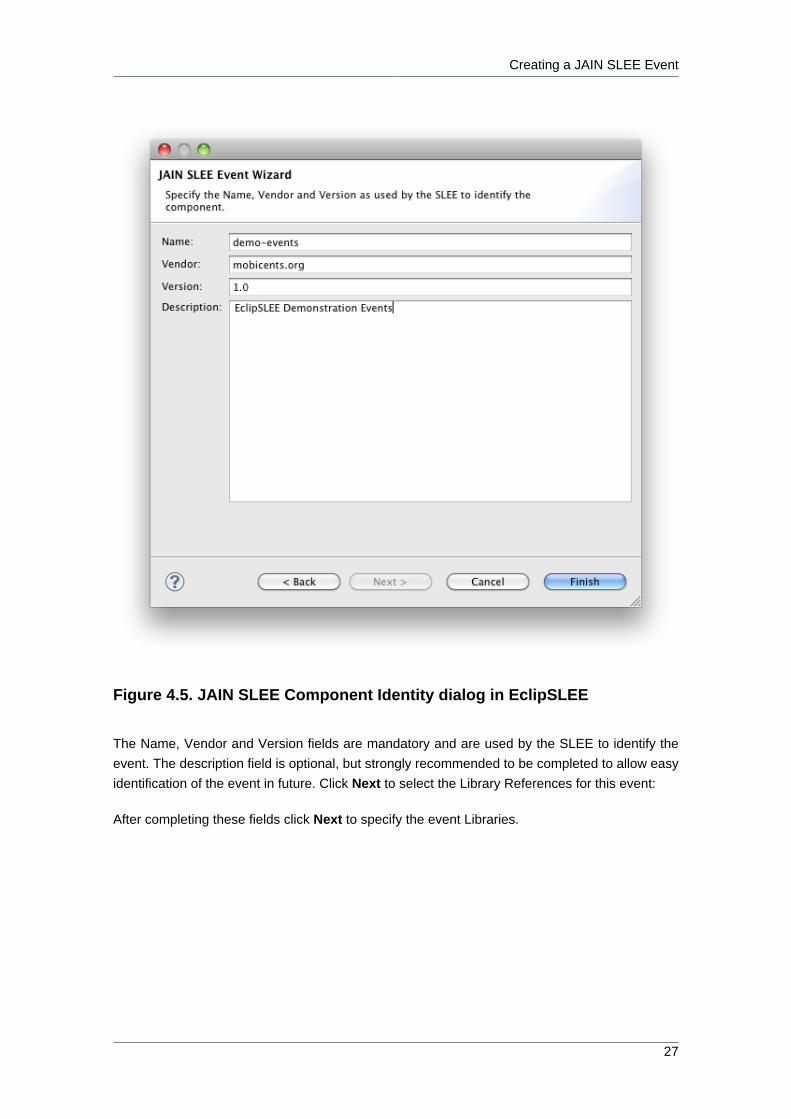
Figure 4.5. JAIN SLEE Component Identity dialog in EclipSLEE
The Name, Vendor and Version fields are mandatory and are used by the SLEE to identify the
event. The description field is optional, but strongly recommended to be completed to allow easy
identification of the event in future. Click Next to select the Library References for this event:
After completing these fields click Next to specify the event Libraries.
Chapter 4. Building JAIN SLEE...
28
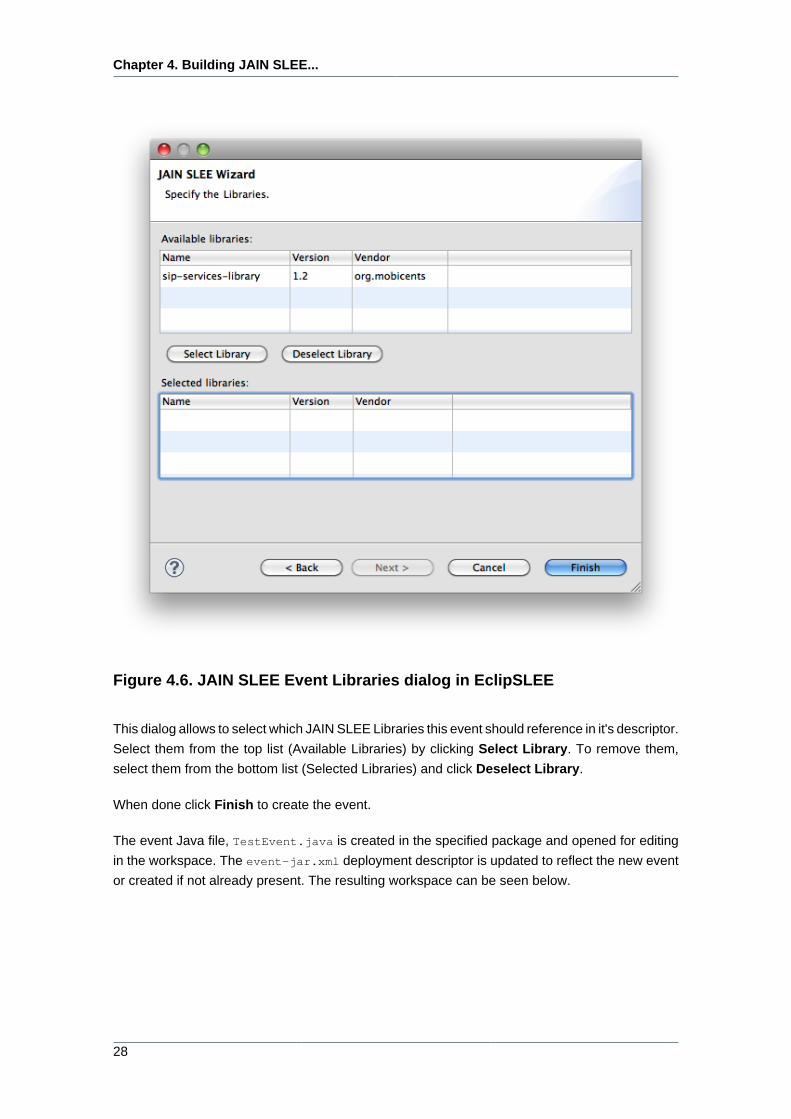
Figure 4.6. JAIN SLEE Event Libraries dialog in EclipSLEE
This dialog allows to select which JAIN SLEE Libraries this event should reference in it's descriptor.
Select them from the top list (Available Libraries) by clicking Select Library. To remove them,
select them from the bottom list (Selected Libraries) and click Deselect Library.
When done click Finish to create the event.
The event Java file, TestEvent.java is created in the specified package and opened for editing
in the workspace. The event-jar.xml deployment descriptor is updated to reflect the new event
or created if not already present. The resulting workspace can be seen below.
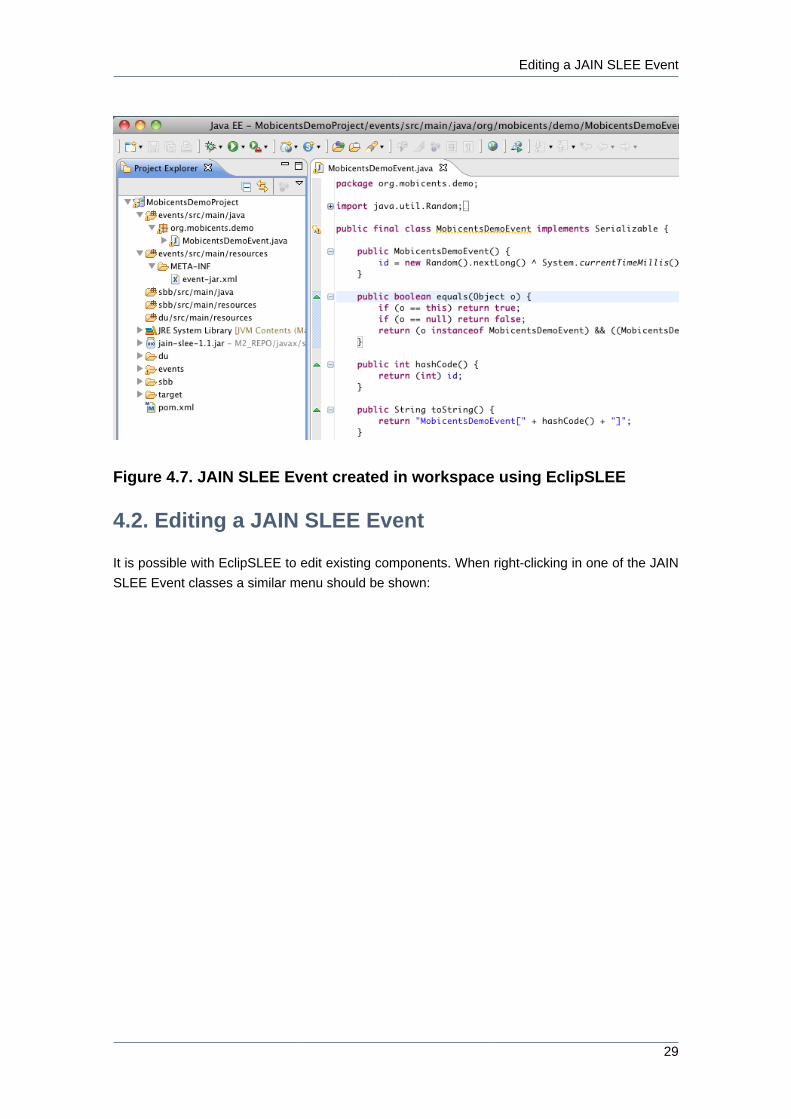
Editing a JAIN SLEE Event
29
Figure 4.7. JAIN SLEE Event created in workspace using EclipSLEE
4.2. Editing a JAIN SLEE Event
It is possible with EclipSLEE to edit existing components. When right-clicking in one of the JAIN
SLEE Event classes a similar menu should be shown:

Chapter 4. Building JAIN SLEE...
30
Figure 4.8. Editing a JAIN SLEE Event through class file
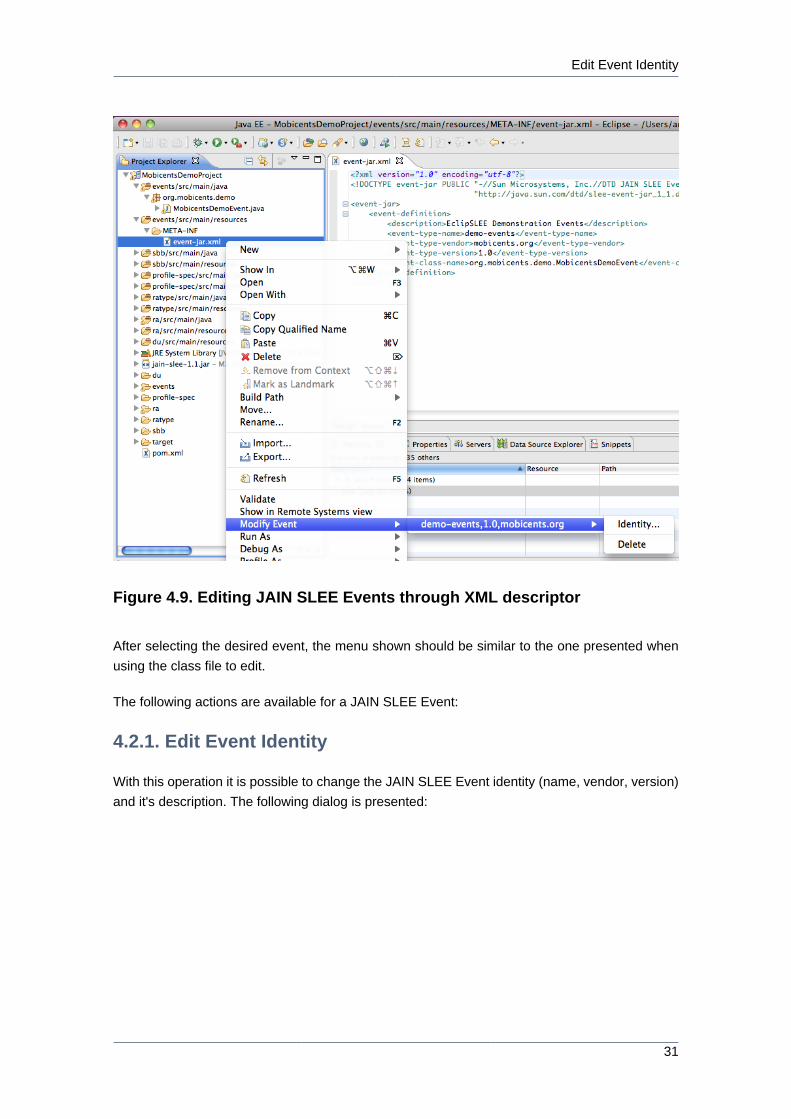
It is also possible to edit by right-clicking on the event-jar.xml descriptor. In that case a sub-menu
allowing to pick which Event to edit is shown:
Edit Event Identity
31
Figure 4.9. Editing JAIN SLEE Events through XML descriptor
After selecting the desired event, the menu shown should be similar to the one presented when
using the class file to edit.
The following actions are available for a JAIN SLEE Event:
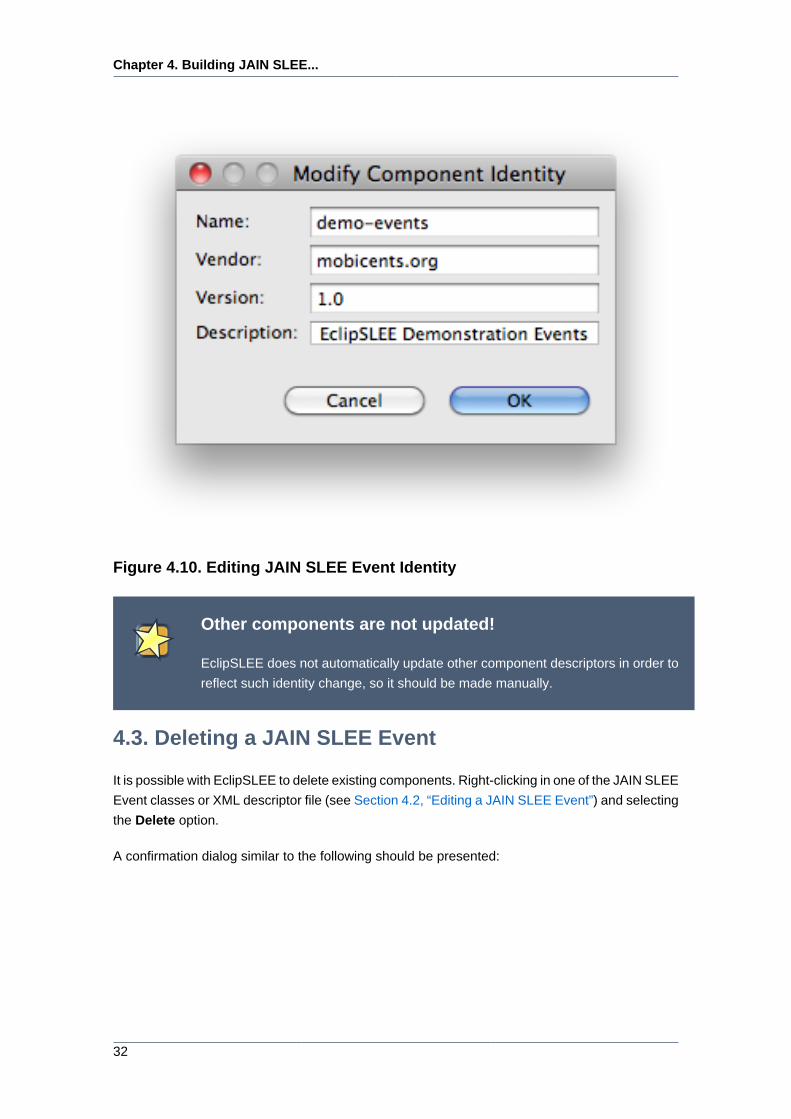
4.2.1. Edit Event Identity
With this operation it is possible to change the JAIN SLEE Event identity (name, vendor, version)
and it's description. The following dialog is presented:
Chapter 4. Building JAIN SLEE...
32
Figure 4.10. Editing JAIN SLEE Event Identity
Other components are not updated!
EclipSLEE does not automatically update other component descriptors in order to
reflect such identity change, so it should be made manually.
4.3. Deleting a JAIN SLEE Event
It is possible with EclipSLEE to delete existing components. Right-clicking in one of the JAIN SLEE
Event classes or XML descriptor file (see Section 4.2, “Editing a JAIN SLEE Event”) and selecting
the Delete option.
A confirmation dialog similar to the following should be presented:
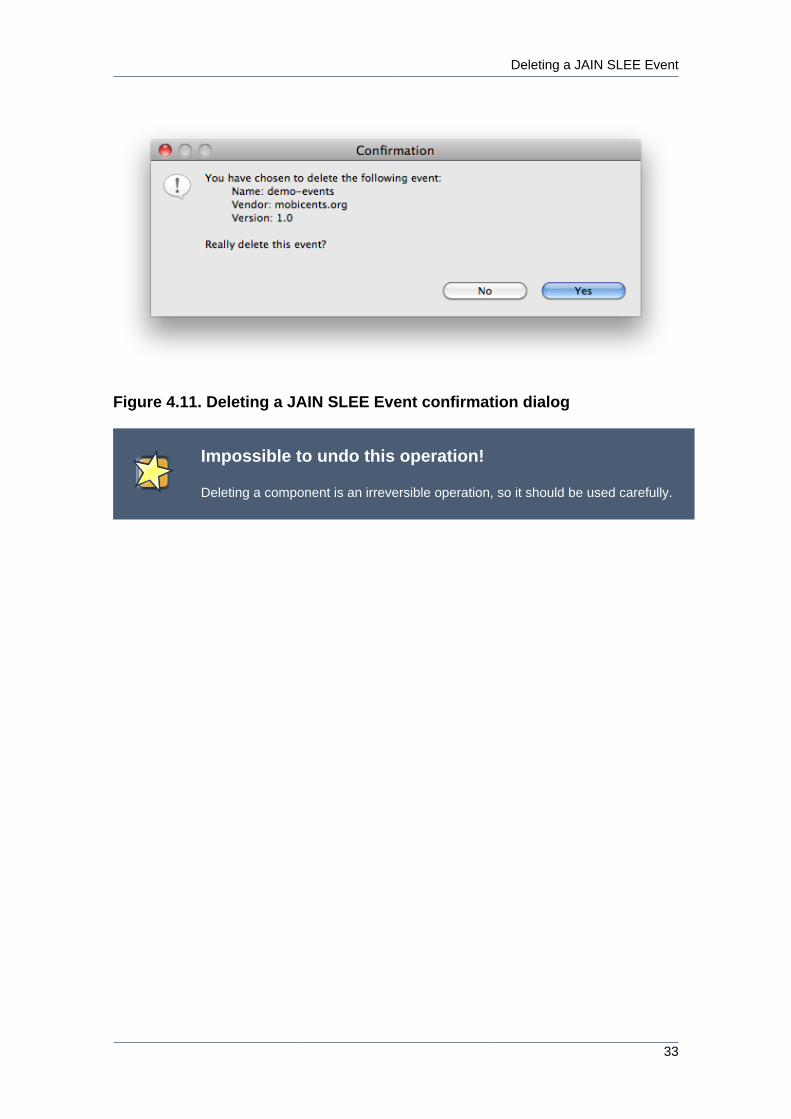
Deleting a JAIN SLEE Event
33
Figure 4.11. Deleting a JAIN SLEE Event confirmation dialog
Impossible to undo this operation!
Deleting a component is an irreversible operation, so it should be used carefully.

34
Chapter 5.
35
Building JAIN SLEE Profile
SpecificationsEclipSLEE provides means to create, edit and delete JAIN SLEE Profile Specifications.
5.1. Creating a JAIN SLEE Profile Specification
To create a component it may be easier (but not mandatory) to first create a package to contain
it. This package should be created as a child of the <profile-spec-module>/src/main/java folder.
To do this right-click on the src folder and select New → Package. Give the new package a name
using the popup dialog (shown below).
Figure 5.1. Creating a new Package in Eclipse
In case a new package is not created at this point, it can still be created in the Component wizard,
but no validation is performed at that time, regarding the package naming conventions.
To create a new JAIN SLEE Profile Specification, right-click on the created package (or the module
entry if the package is not yet created) and choose New → Other ... as shown below.
Chapter 5. Building JAIN SLEE...
36
Figure 5.2. Creating a new JAIN SLEE Component in EclipSLEE
A dialog should appear. Expand the JAIN SLEE item and choose JAIN SLEE Profile
Specification. The dialog should now look like the following:
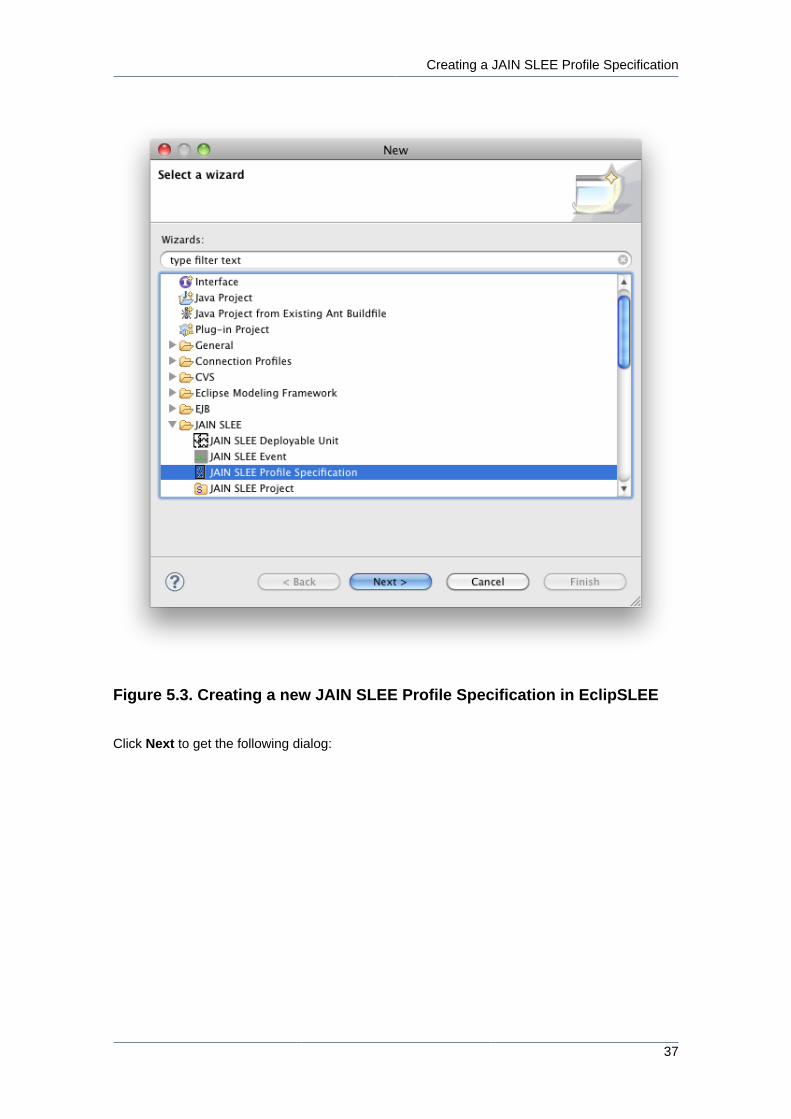
Creating a JAIN SLEE Profile Specification
37
Figure 5.3. Creating a new JAIN SLEE Profile Specification in EclipSLEE
Click Next to get the following dialog:
Chapter 5. Building JAIN SLEE...
38
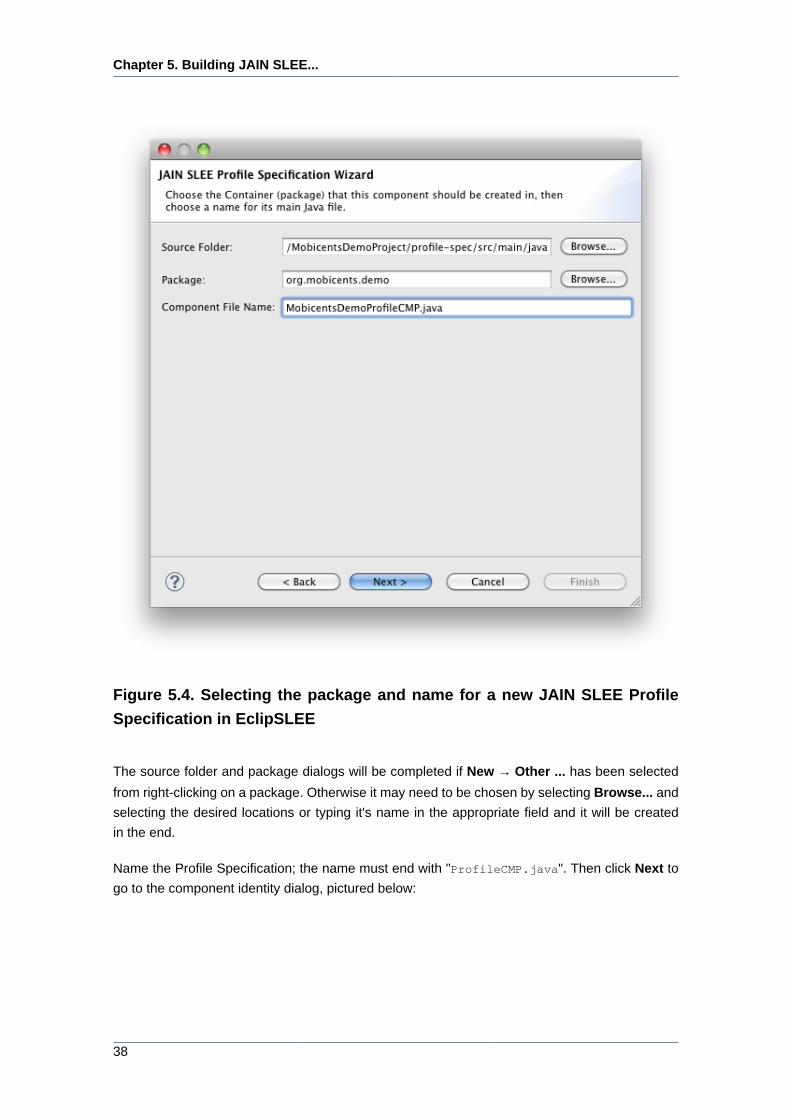
Figure 5.4. Selecting the package and name for a new JAIN SLEE Profile
Specification in EclipSLEE
The source folder and package dialogs will be completed if New → Other ... has been selected
from right-clicking on a package. Otherwise it may need to be chosen by selecting Browse... and
selecting the desired locations or typing it's name in the appropriate field and it will be created
in the end.
Name the Profile Specification; the name must end with "ProfileCMP.java". Then click Next to
go to the component identity dialog, pictured below:
Creating a JAIN SLEE Profile Specification
39
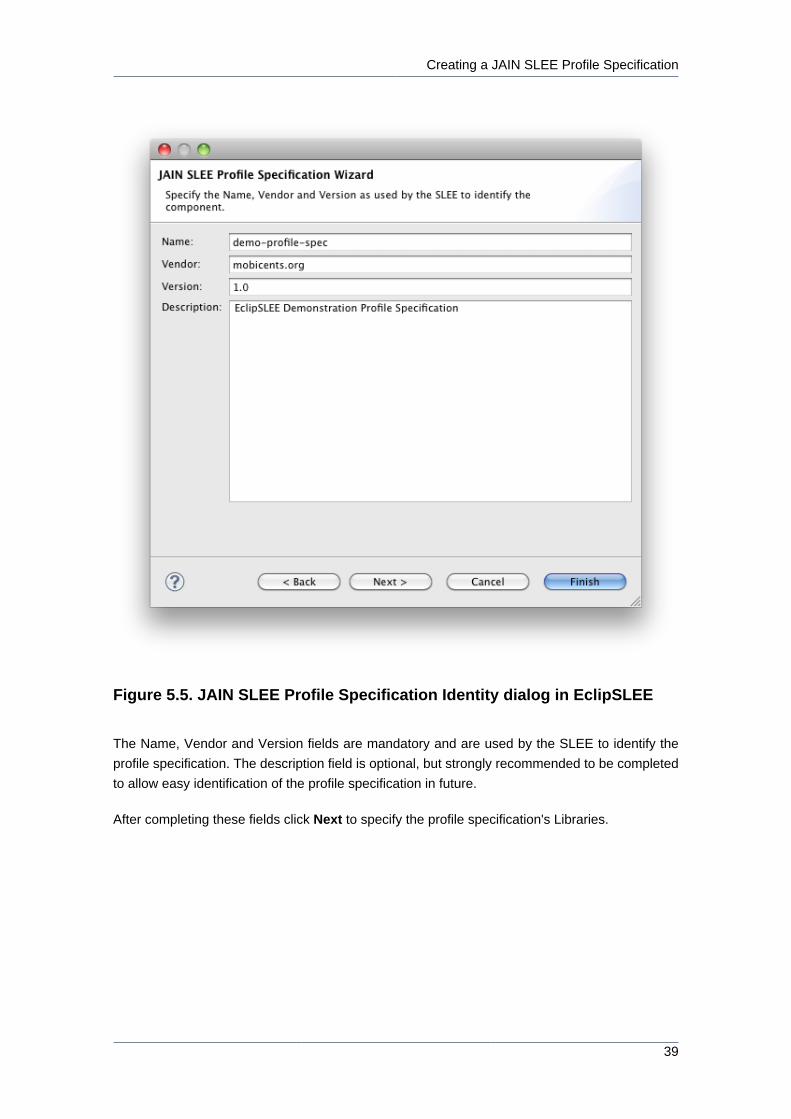
Figure 5.5. JAIN SLEE Profile Specification Identity dialog in EclipSLEE
The Name, Vendor and Version fields are mandatory and are used by the SLEE to identify the
profile specification. The description field is optional, but strongly recommended to be completed
to allow easy identification of the profile specification in future.
After completing these fields click Next to specify the profile specification's Libraries.

Chapter 5. Building JAIN SLEE...
40
Figure 5.6. JAIN SLEE Profile Spec Libraries dialog in EclipSLEE
This dialog allows to select which JAIN SLEE Libraries this profile specification should reference
in it's descriptor. Select them from the top list (Available Libraries) by clicking Select Library. To
remove them, select them from the bottom list (Selected Libraries) and click Deselect Library.
When done click Next to define the profile specification's CMP fields.
Creating a JAIN SLEE Profile Specification
41
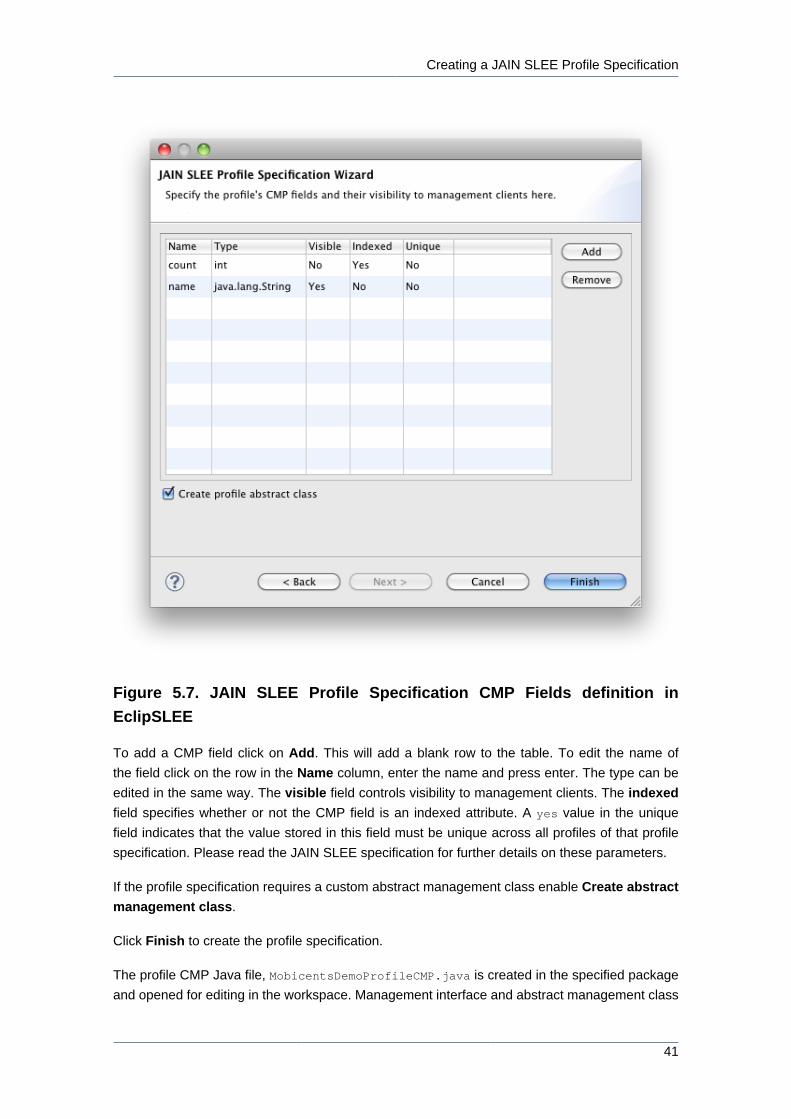
Figure 5.7. JAIN SLEE Profile Specification CMP Fields definition in
EclipSLEE
To add a CMP field click on Add. This will add a blank row to the table. To edit the name of
the field click on the row in the Name column, enter the name and press enter. The type can be
edited in the same way. The visible field controls visibility to management clients. The indexed
field specifies whether or not the CMP field is an indexed attribute. A yes value in the unique
field indicates that the value stored in this field must be unique across all profiles of that profile
specification. Please read the JAIN SLEE specification for further details on these parameters.
If the profile specification requires a custom abstract management class enable Create abstract
management class.
Click Finish to create the profile specification.
The profile CMP Java file, MobicentsDemoProfileCMP.java is created in the specified package
and opened for editing in the workspace. Management interface and abstract management class
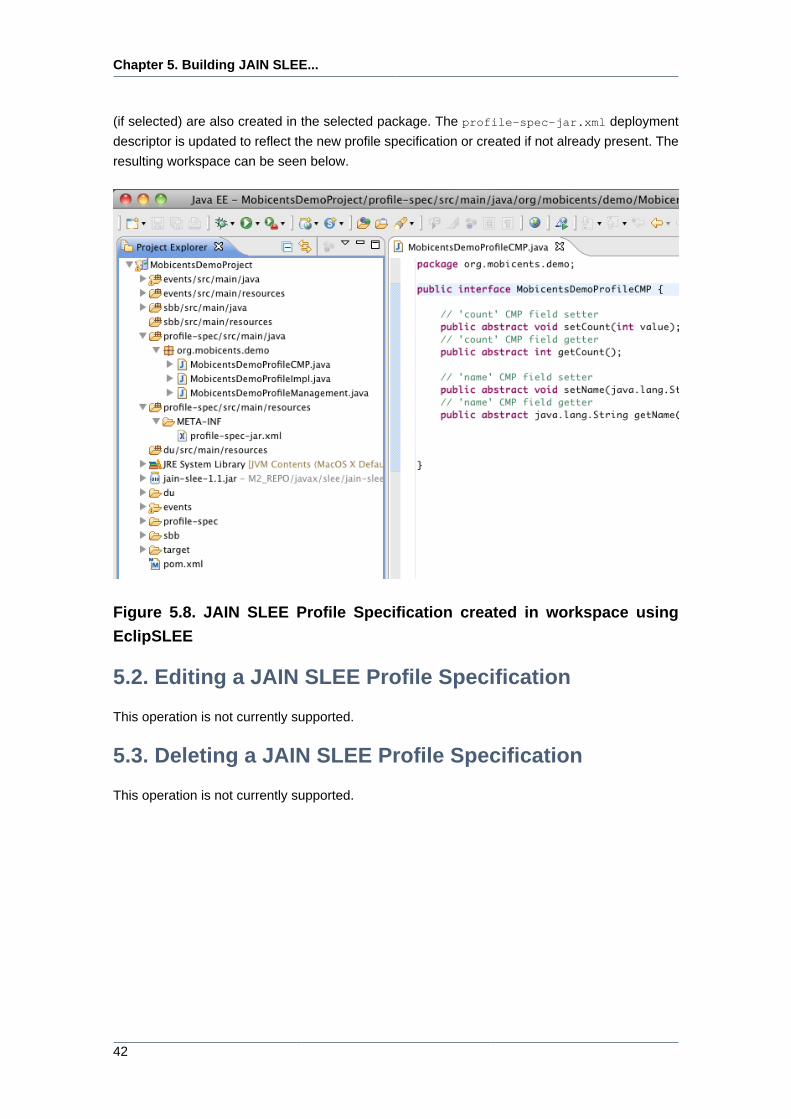
Chapter 5. Building JAIN SLEE...
42
(if selected) are also created in the selected package. The profile-spec-jar.xml deployment
descriptor is updated to reflect the new profile specification or created if not already present. The
resulting workspace can be seen below.
Figure 5.8. JAIN SLEE Profile Specification created in workspace using
EclipSLEE
5.2. Editing a JAIN SLEE Profile Specification
This operation is not currently supported.
5.3. Deleting a JAIN SLEE Profile Specification
This operation is not currently supported.
Chapter 6.
43
Building JAIN SLEE Service Building
Block (SBBs)EclipSLEE provides means to create, edit and delete JAIN SLEE Service Building Blocks.
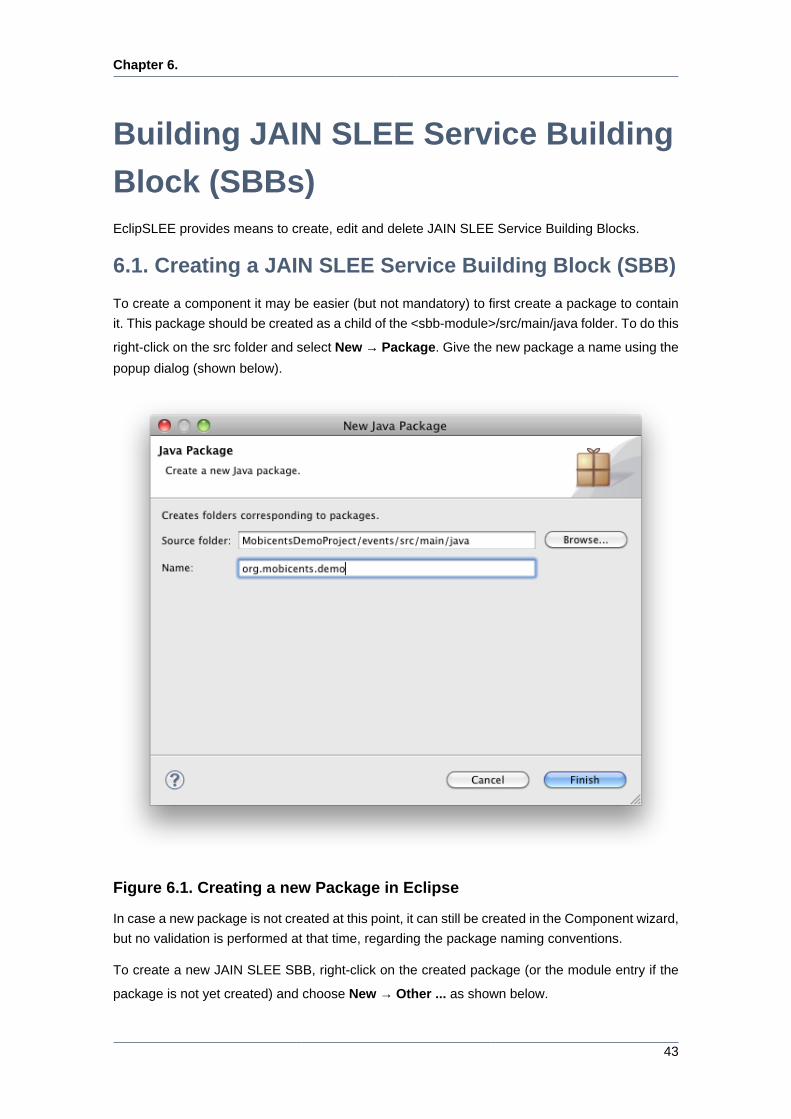
6.1. Creating a JAIN SLEE Service Building Block (SBB)
To create a component it may be easier (but not mandatory) to first create a package to contain
it. This package should be created as a child of the <sbb-module>/src/main/java folder. To do this
right-click on the src folder and select New → Package. Give the new package a name using the
popup dialog (shown below).
Figure 6.1. Creating a new Package in Eclipse
In case a new package is not created at this point, it can still be created in the Component wizard,
but no validation is performed at that time, regarding the package naming conventions.
To create a new JAIN SLEE SBB, right-click on the created package (or the module entry if the
package is not yet created) and choose New → Other ... as shown below.
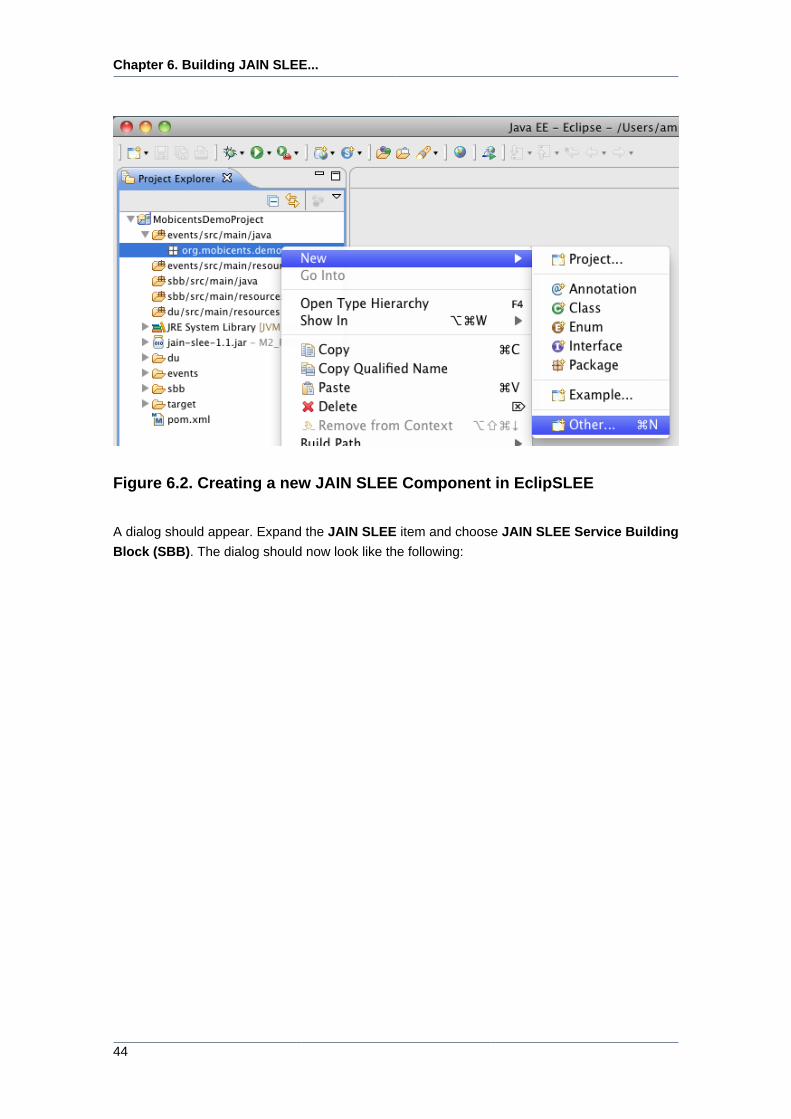
Chapter 6. Building JAIN SLEE...
44
Figure 6.2. Creating a new JAIN SLEE Component in EclipSLEE
A dialog should appear. Expand the JAIN SLEE item and choose JAIN SLEE Service Building
Block (SBB). The dialog should now look like the following:
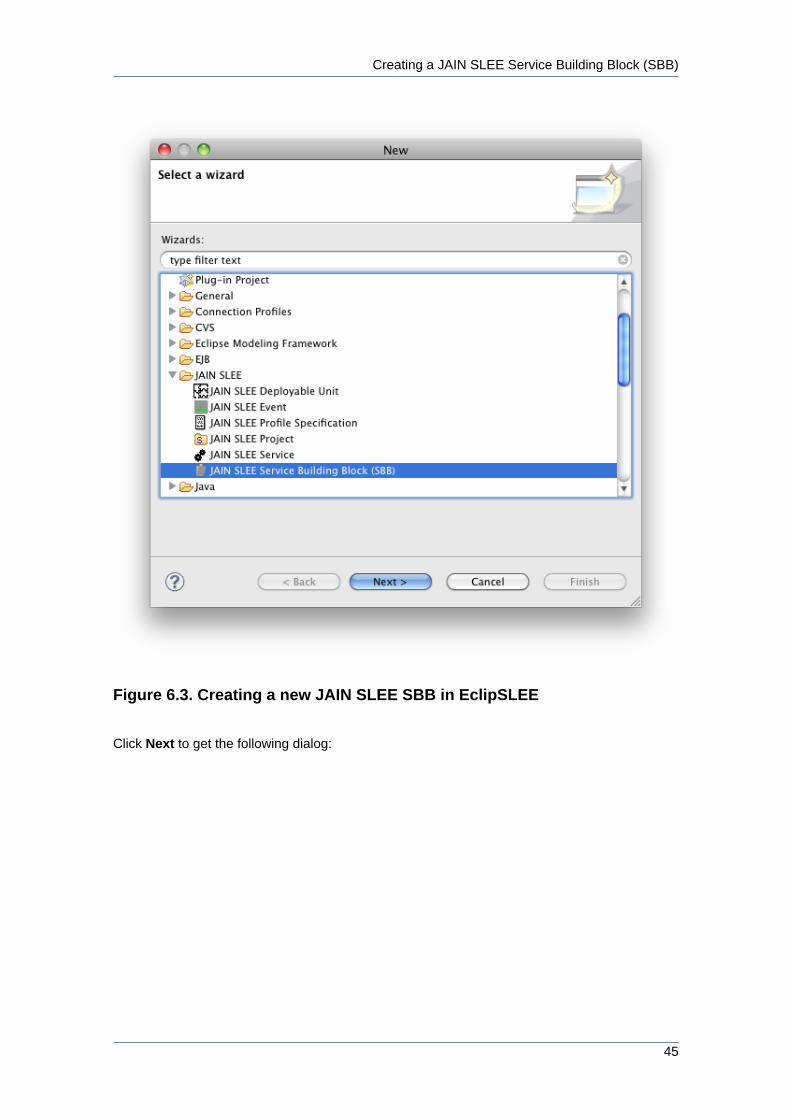
Creating a JAIN SLEE Service Building Block (SBB)
45
Figure 6.3. Creating a new JAIN SLEE SBB in EclipSLEE
Click Next to get the following dialog:
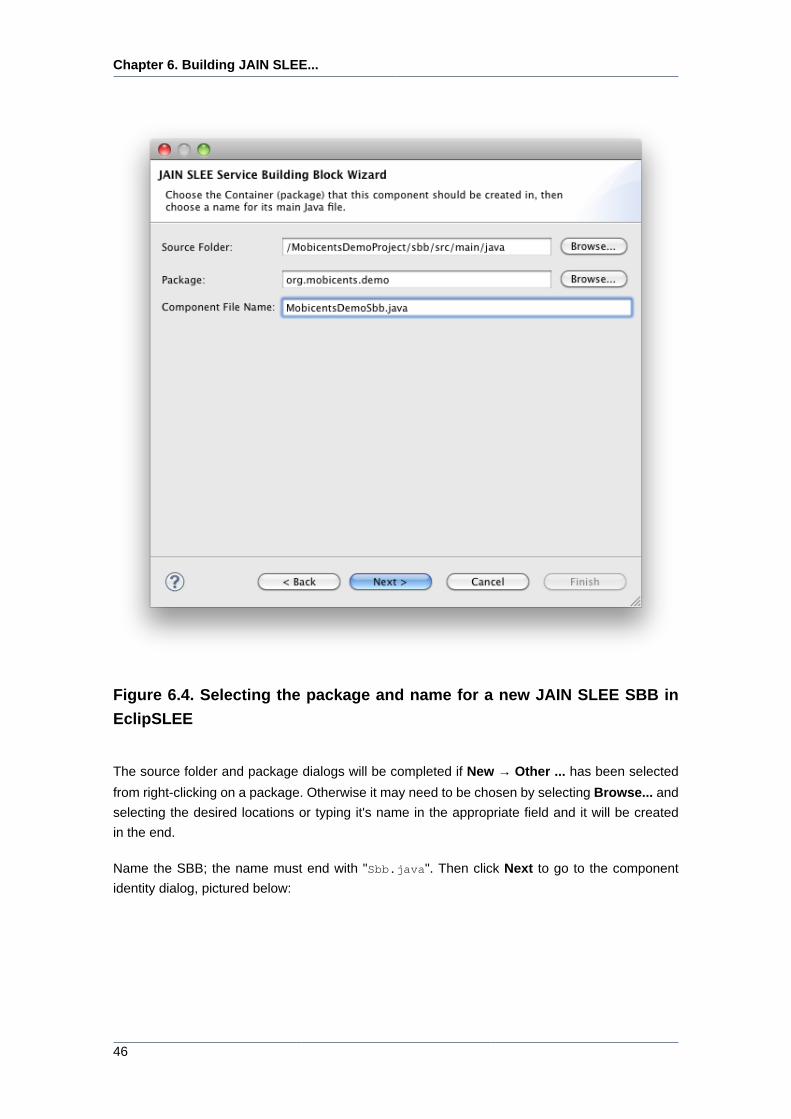
Chapter 6. Building JAIN SLEE...
46
Figure 6.4. Selecting the package and name for a new JAIN SLEE SBB in
EclipSLEE
The source folder and package dialogs will be completed if New → Other ... has been selected
from right-clicking on a package. Otherwise it may need to be chosen by selecting Browse... and
selecting the desired locations or typing it's name in the appropriate field and it will be created
in the end.
Name the SBB; the name must end with "Sbb.java". Then click Next to go to the component
identity dialog, pictured below:
Creating a JAIN SLEE Service Building Block (SBB)
47
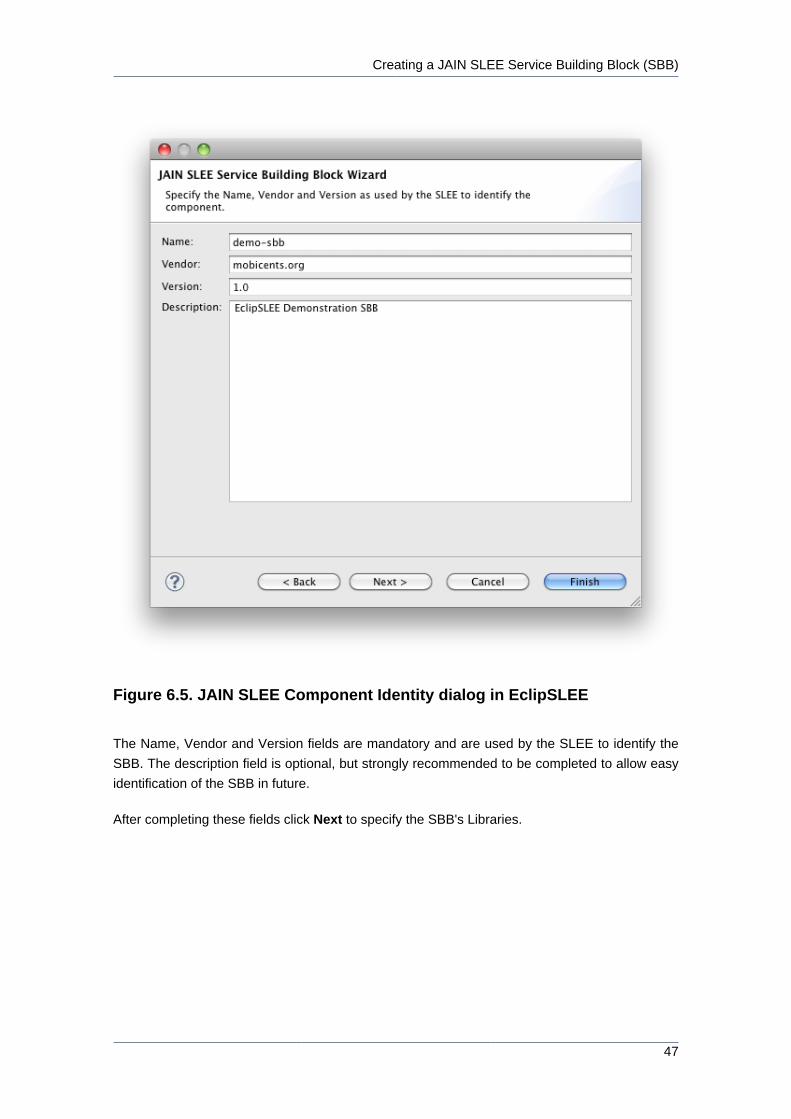
Figure 6.5. JAIN SLEE Component Identity dialog in EclipSLEE
The Name, Vendor and Version fields are mandatory and are used by the SLEE to identify the
SBB. The description field is optional, but strongly recommended to be completed to allow easy
identification of the SBB in future.
After completing these fields click Next to specify the SBB's Libraries.
Chapter 6. Building JAIN SLEE...
48
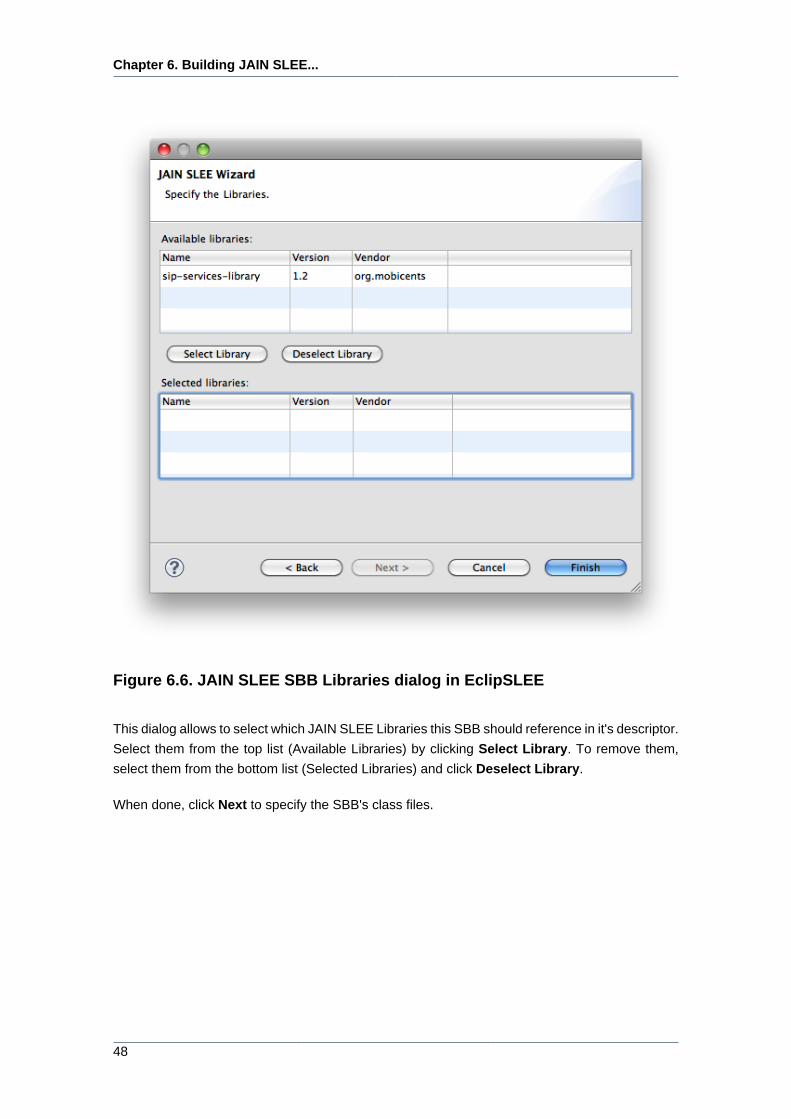
Figure 6.6. JAIN SLEE SBB Libraries dialog in EclipSLEE
This dialog allows to select which JAIN SLEE Libraries this SBB should reference in it's descriptor.
Select them from the top list (Available Libraries) by clicking Select Library. To remove them,
select them from the bottom list (Selected Libraries) and click Deselect Library.
When done, click Next to specify the SBB's class files.
Creating a JAIN SLEE Service Building Block (SBB)
49
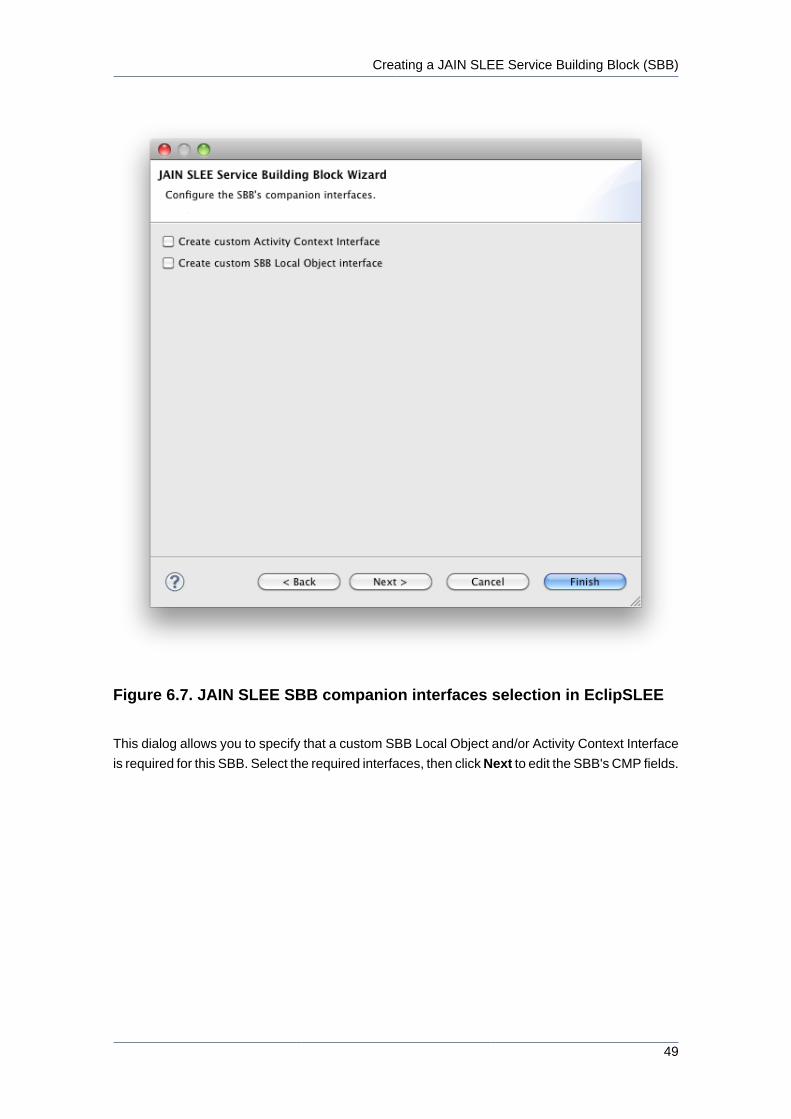
Figure 6.7. JAIN SLEE SBB companion interfaces selection in EclipSLEE
This dialog allows you to specify that a custom SBB Local Object and/or Activity Context Interface
is required for this SBB. Select the required interfaces, then click Next to edit the SBB's CMP fields.
Chapter 6. Building JAIN SLEE...
50
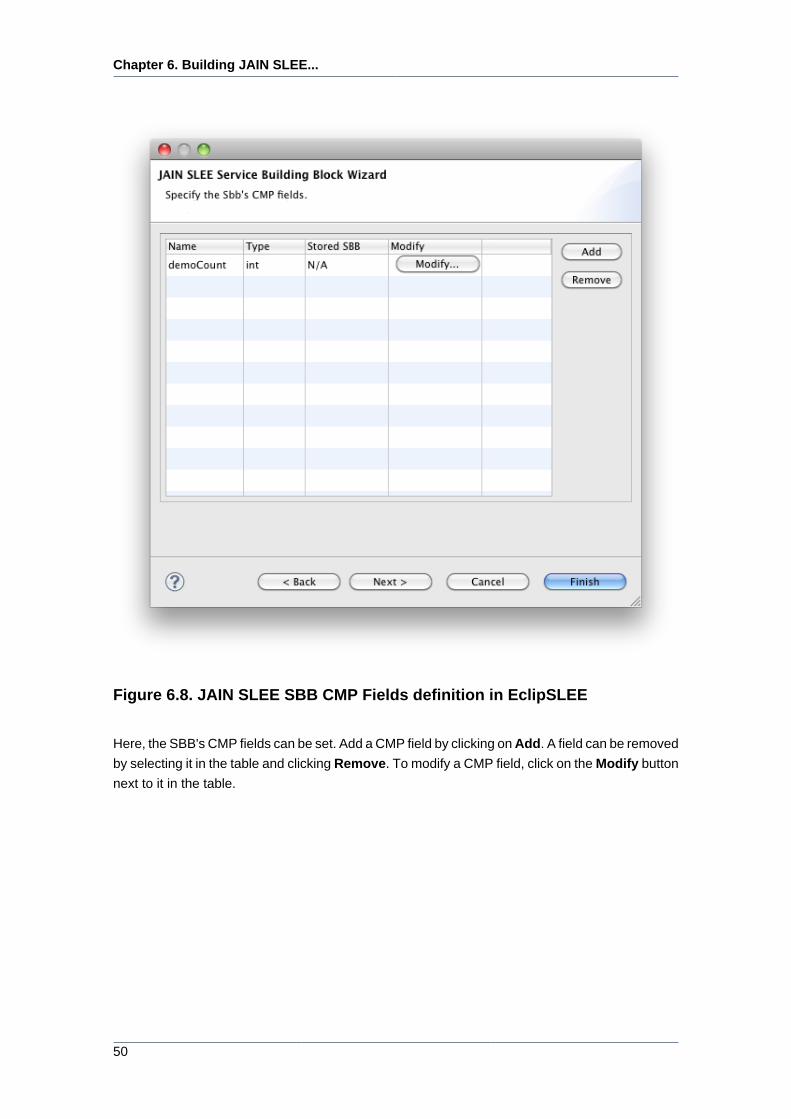
Figure 6.8. JAIN SLEE SBB CMP Fields definition in EclipSLEE
Here, the SBB's CMP fields can be set. Add a CMP field by clicking on Add. A field can be removed
by selecting it in the table and clicking Remove. To modify a CMP field, click on the Modify button
next to it in the table.
Creating a JAIN SLEE Service Building Block (SBB)
51
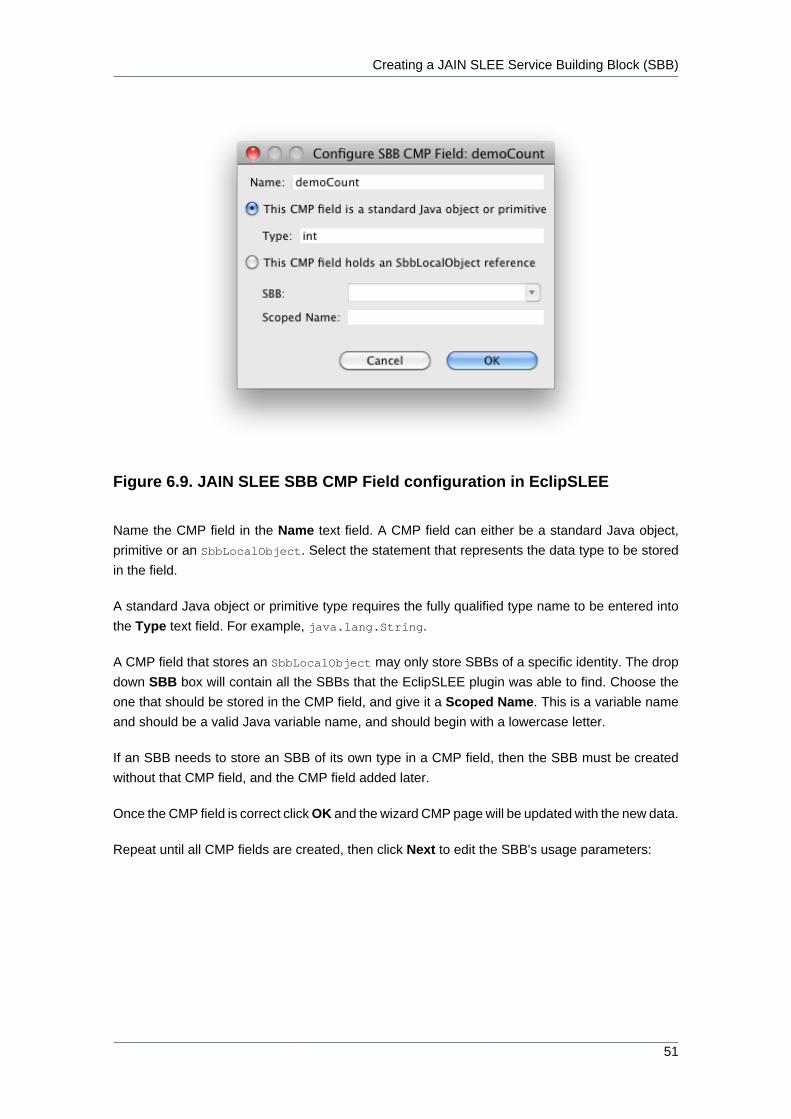
Figure 6.9. JAIN SLEE SBB CMP Field configuration in EclipSLEE
Name the CMP field in the Name text field. A CMP field can either be a standard Java object,
primitive or an SbbLocalObject. Select the statement that represents the data type to be stored
in the field.
A standard Java object or primitive type requires the fully qualified type name to be entered into
the Type text field. For example, java.lang.String.
A CMP field that stores an SbbLocalObject may only store SBBs of a specific identity. The drop
down SBB box will contain all the SBBs that the EclipSLEE plugin was able to find. Choose the
one that should be stored in the CMP field, and give it a Scoped Name. This is a variable name
and should be a valid Java variable name, and should begin with a lowercase letter.
If an SBB needs to store an SBB of its own type in a CMP field, then the SBB must be created
without that CMP field, and the CMP field added later.
Once the CMP field is correct click OK and the wizard CMP page will be updated with the new data.
Repeat until all CMP fields are created, then click Next to edit the SBB's usage parameters:
Chapter 6. Building JAIN SLEE...
52
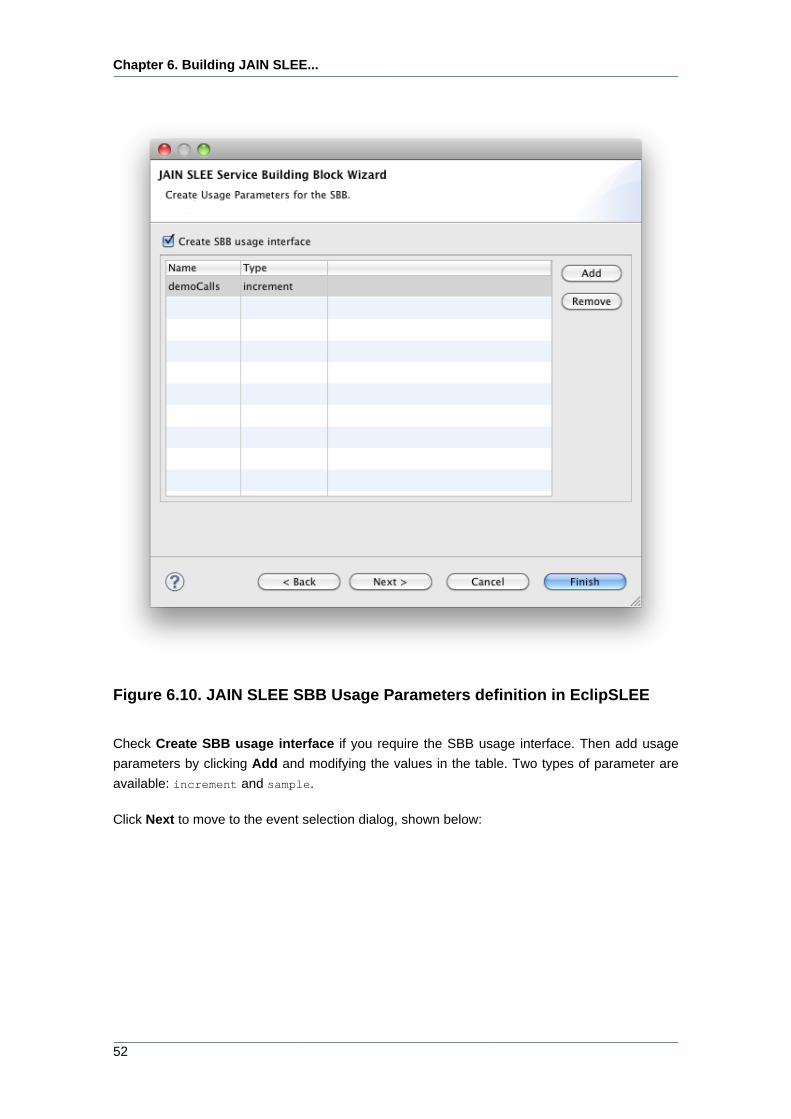
Figure 6.10. JAIN SLEE SBB Usage Parameters definition in EclipSLEE
Check Create SBB usage interface if you require the SBB usage interface. Then add usage
parameters by clicking Add and modifying the values in the table. Two types of parameter are
available: increment and sample.
Click Next to move to the event selection dialog, shown below:
Creating a JAIN SLEE Service Building Block (SBB)
53
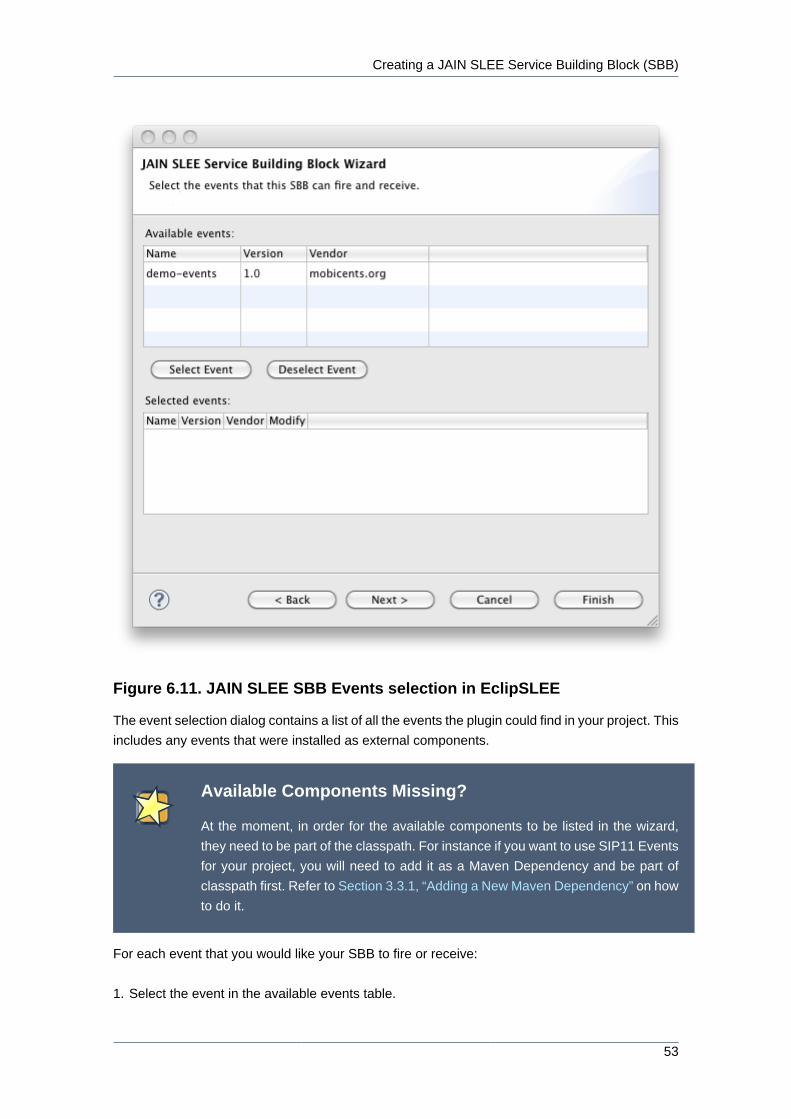
Figure 6.11. JAIN SLEE SBB Events selection in EclipSLEE
The event selection dialog contains a list of all the events the plugin could find in your project. This
includes any events that were installed as external components.
Available Components Missing?
At the moment, in order for the available components to be listed in the wizard,
they need to be part of the classpath. For instance if you want to use SIP11 Events
for your project, you will need to add it as a Maven Dependency and be part of
classpath first. Refer to Section 3.3.1, “Adding a New Maven Dependency” on how
to do it.
For each event that you would like your SBB to fire or receive:
1. Select the event in the available events table.
Chapter 6. Building JAIN SLEE...
54
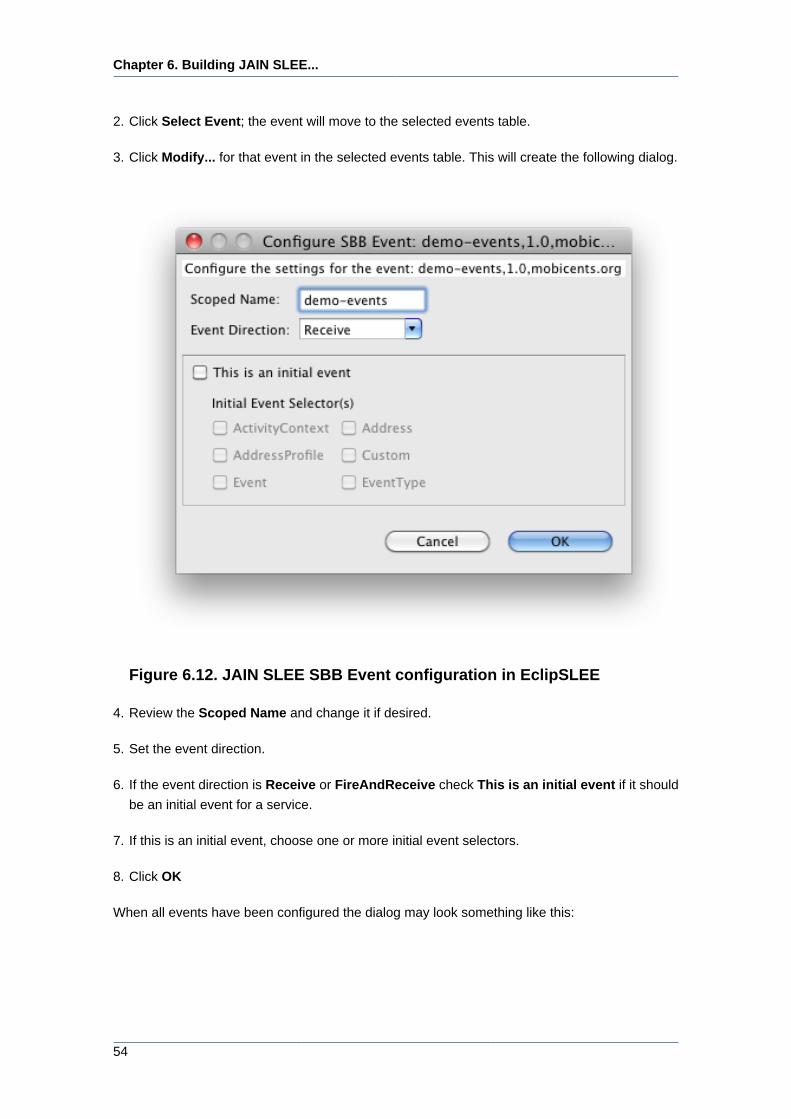
2. Click Select Event; the event will move to the selected events table.
3. Click Modify... for that event in the selected events table. This will create the following dialog.
Figure 6.12. JAIN SLEE SBB Event configuration in EclipSLEE
4. Review the Scoped Name and change it if desired.
5. Set the event direction.
6. If the event direction is Receive or FireAndReceive check This is an initial event if it should
be an initial event for a service.
7. If this is an initial event, choose one or more initial event selectors.
8. Click OK
When all events have been configured the dialog may look something like this:
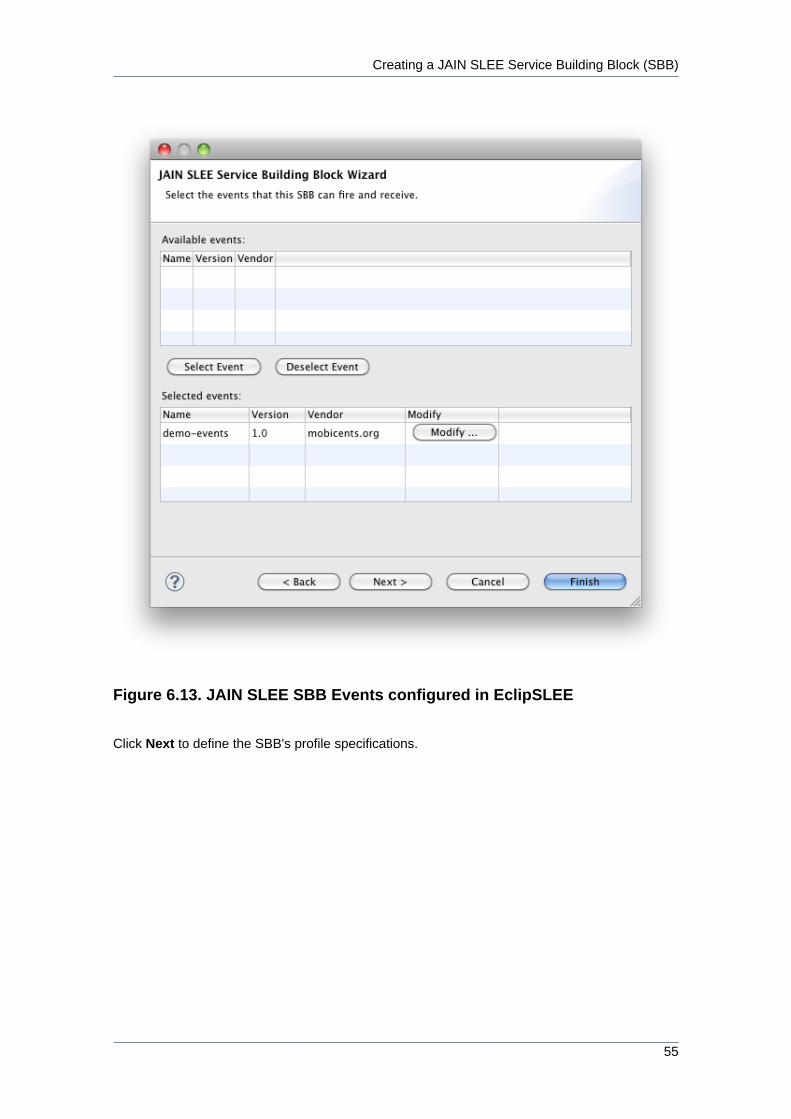
Creating a JAIN SLEE Service Building Block (SBB)
55
Figure 6.13. JAIN SLEE SBB Events configured in EclipSLEE
Click Next to define the SBB's profile specifications.
Chapter 6. Building JAIN SLEE...
56
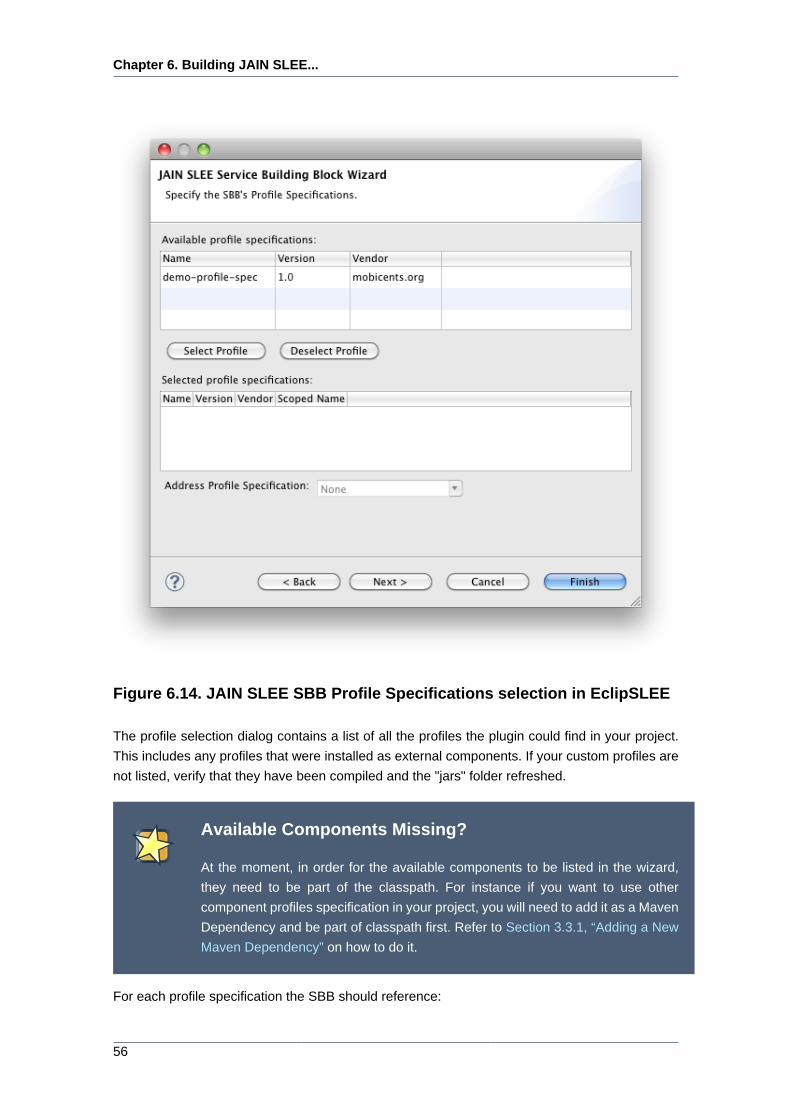
Figure 6.14. JAIN SLEE SBB Profile Specifications selection in EclipSLEE
The profile selection dialog contains a list of all the profiles the plugin could find in your project.
This includes any profiles that were installed as external components. If your custom profiles are
not listed, verify that they have been compiled and the "jars" folder refreshed.
Available Components Missing?
At the moment, in order for the available components to be listed in the wizard,
they need to be part of the classpath. For instance if you want to use other
component profiles specification in your project, you will need to add it as a Maven
Dependency and be part of classpath first. Refer to Section 3.3.1, “Adding a New
Maven Dependency” on how to do it.
For each profile specification the SBB should reference:
Creating a JAIN SLEE Service Building Block (SBB)
57
1. Highlight the profile specification in the available profiles table.
2. Click Select Profile
3. Review the Scoped Name and change if required.
4. If your SBB should contain an Address Profile Specification select it from the drop down list.
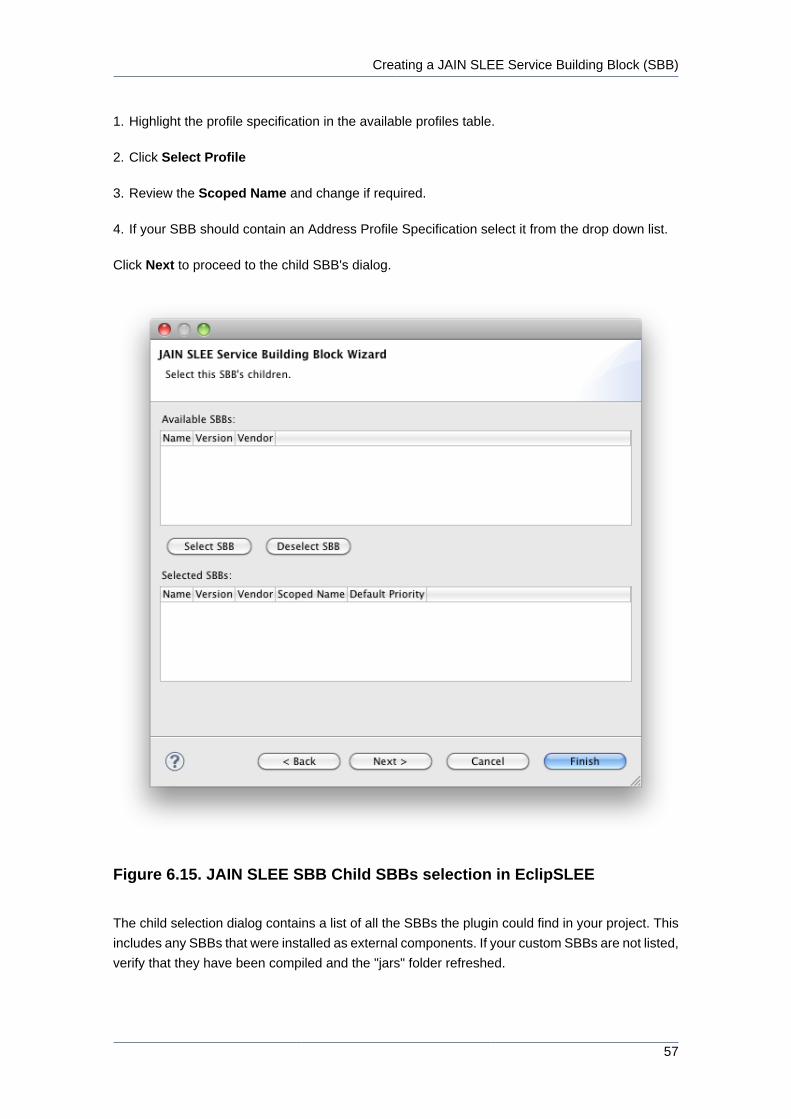
Click Next to proceed to the child SBB's dialog.
Figure 6.15. JAIN SLEE SBB Child SBBs selection in EclipSLEE
The child selection dialog contains a list of all the SBBs the plugin could find in your project. This
includes any SBBs that were installed as external components. If your custom SBBs are not listed,
verify that they have been compiled and the "jars" folder refreshed.
Chapter 6. Building JAIN SLEE...
58
Available Components Missing?
At the moment, in order for the available components to be listed in the wizard, they
need to be part of the classpath. For instance if you want to use the HSS Client
Enabler in your project, you will need to add it as a Maven Dependency and be
part of classpath first. Refer to Section 3.3.1, “Adding a New Maven Dependency”
on how to do it.
For each child SBB the SBB should reference:
1. Highlight the child SBB in the available SBBs table.
2. Click Select SBB
3. Review the Scoped Name and change if required.
4. Set the default priority of the child SBB.
Click Next to proceed to the resource adaptor types dialog.

Creating a JAIN SLEE Service Building Block (SBB)
59
Figure 6.16. JAIN SLEE SBB Resource Adaptor Type Bindings in EclipSLEE
The Resource Adaptor Type Bindings dialog contains a list of all the resource adaptor types the
plugin could find in your project. This includes any resource adaptor types that were installed as
external components.
Available Components Missing?
At the moment, in order for the available components to be listed in the wizard,
they need to be part of the classpath. For instance if you want to use the SIP11
Resource Adaptor Type for your project, you will need to add it as a Maven
Dependency and be part of classpath first. Refer to Section 3.3.1, “Adding a New
Maven Dependency” on how to do it.
For each resource adaptor type the SBB should reference:
1. Highlight the resource adaptor type in the available resource adaptor types table.
Chapter 6. Building JAIN SLEE...
60
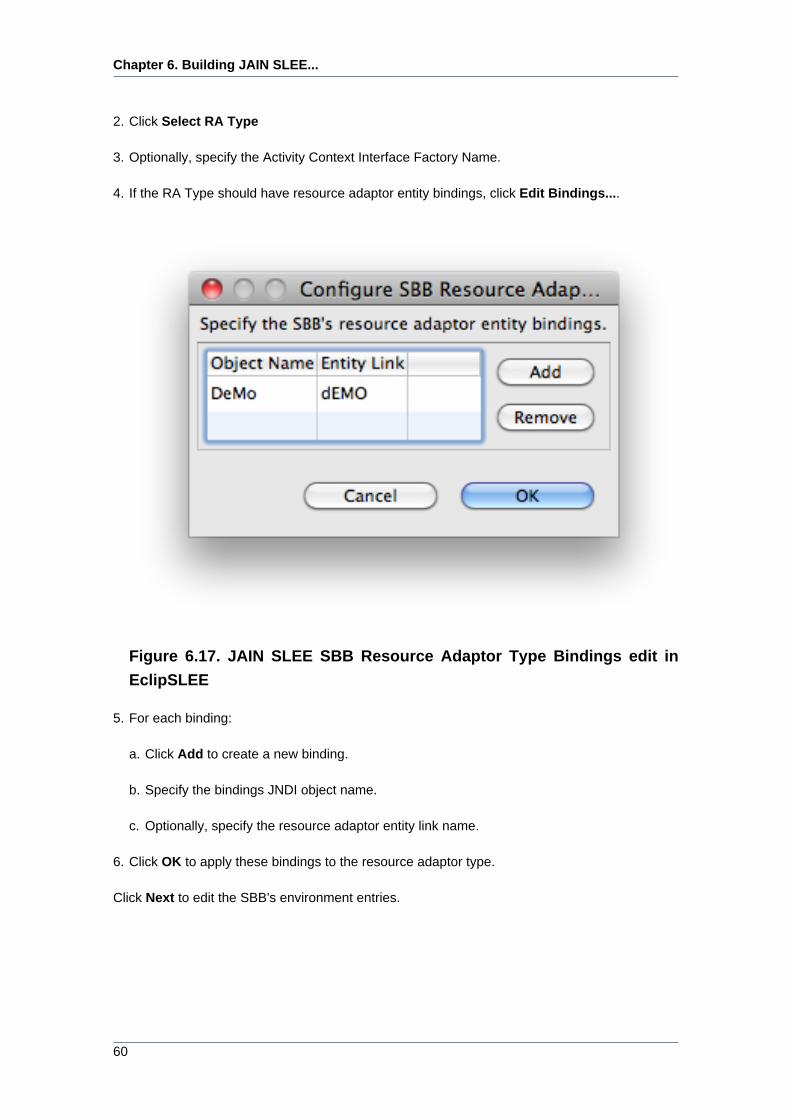
2. Click Select RA Type
3. Optionally, specify the Activity Context Interface Factory Name.
4. If the RA Type should have resource adaptor entity bindings, click Edit Bindings....
Figure 6.17. JAIN SLEE SBB Resource Adaptor Type Bindings edit in
EclipSLEE
5. For each binding:
a. Click Add to create a new binding.
b. Specify the bindings JNDI object name.
c. Optionally, specify the resource adaptor entity link name.
6. Click OK to apply these bindings to the resource adaptor type.
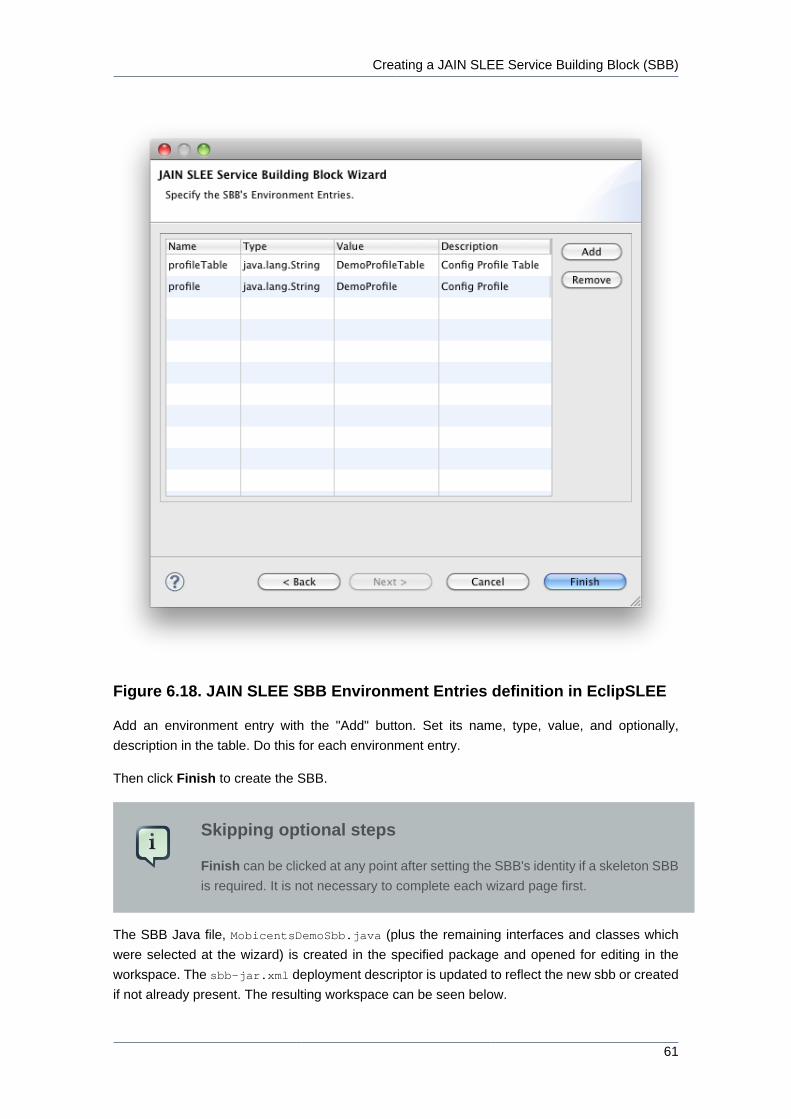
Click Next to edit the SBB's environment entries.
Creating a JAIN SLEE Service Building Block (SBB)
61
Figure 6.18. JAIN SLEE SBB Environment Entries definition in EclipSLEE
Add an environment entry with the "Add" button. Set its name, type, value, and optionally,
description in the table. Do this for each environment entry.
Then click Finish to create the SBB.
Skipping optional steps
Finish can be clicked at any point after setting the SBB's identity if a skeleton SBB
is required. It is not necessary to complete each wizard page first.
The SBB Java file, MobicentsDemoSbb.java (plus the remaining interfaces and classes which
were selected at the wizard) is created in the specified package and opened for editing in the
workspace. The sbb-jar.xml deployment descriptor is updated to reflect the new sbb or created
if not already present. The resulting workspace can be seen below.

Chapter 6. Building JAIN SLEE...
62
Figure 6.19. JAIN SLEE SBB created in workspace using EclipSLEE
6.2. Editing a JAIN SLEE Service Building Block (SBB)
It is possible with EclipSLEE to edit existing components. When right-clicking in one of the JAIN
SLEE Service Building Block classes a similar menu should be shown:
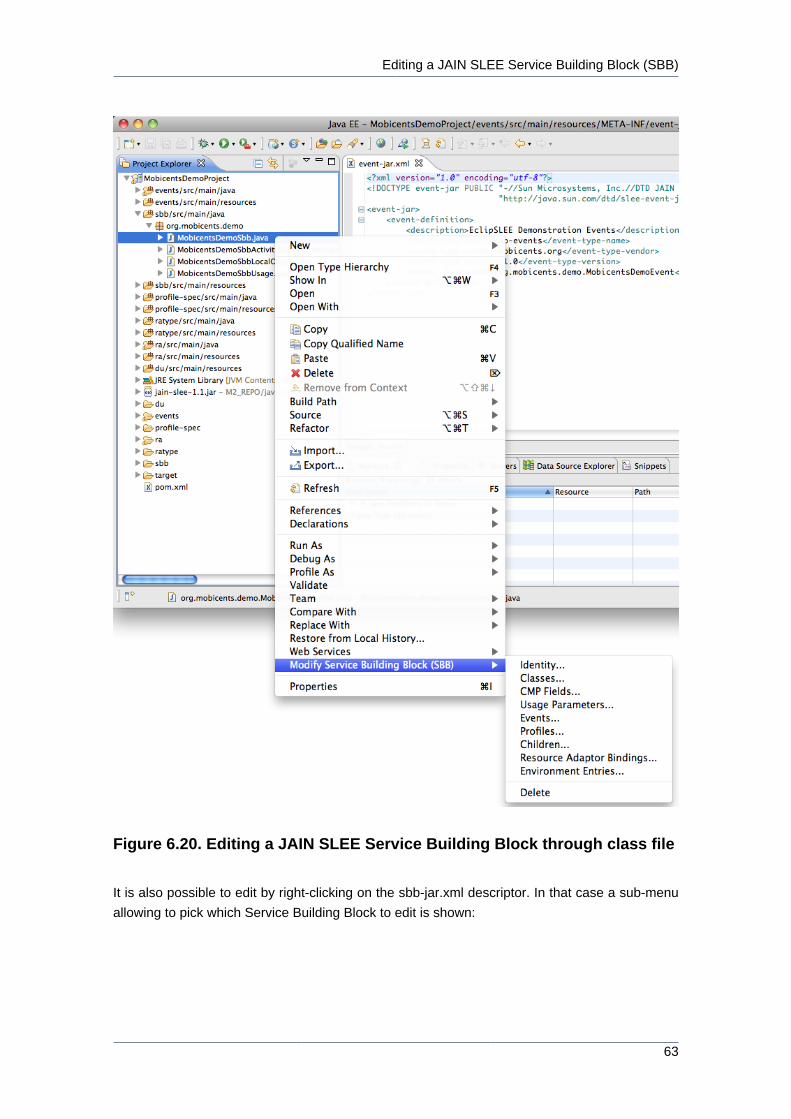
Editing a JAIN SLEE Service Building Block (SBB)
63
Figure 6.20. Editing a JAIN SLEE Service Building Block through class file
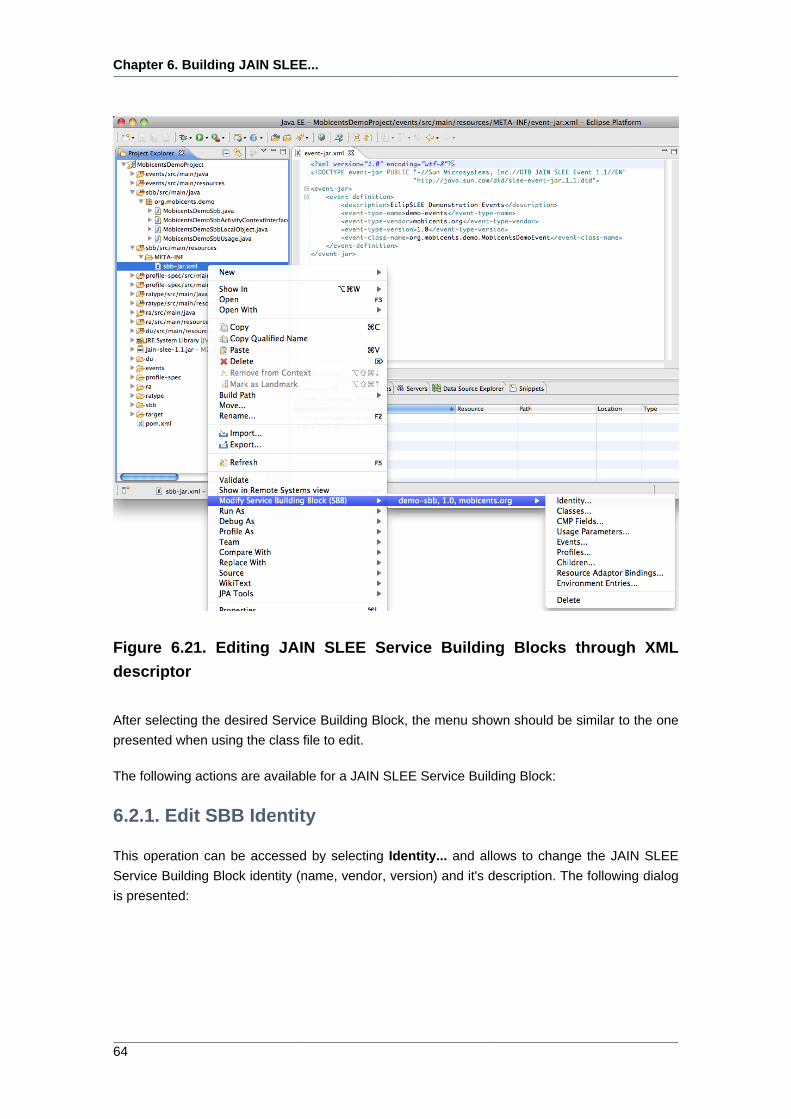
It is also possible to edit by right-clicking on the sbb-jar.xml descriptor. In that case a sub-menu
allowing to pick which Service Building Block to edit is shown:
Chapter 6. Building JAIN SLEE...
64
Figure 6.21. Editing JAIN SLEE Service Building Blocks through XML
descriptor
After selecting the desired Service Building Block, the menu shown should be similar to the one
presented when using the class file to edit.
The following actions are available for a JAIN SLEE Service Building Block:
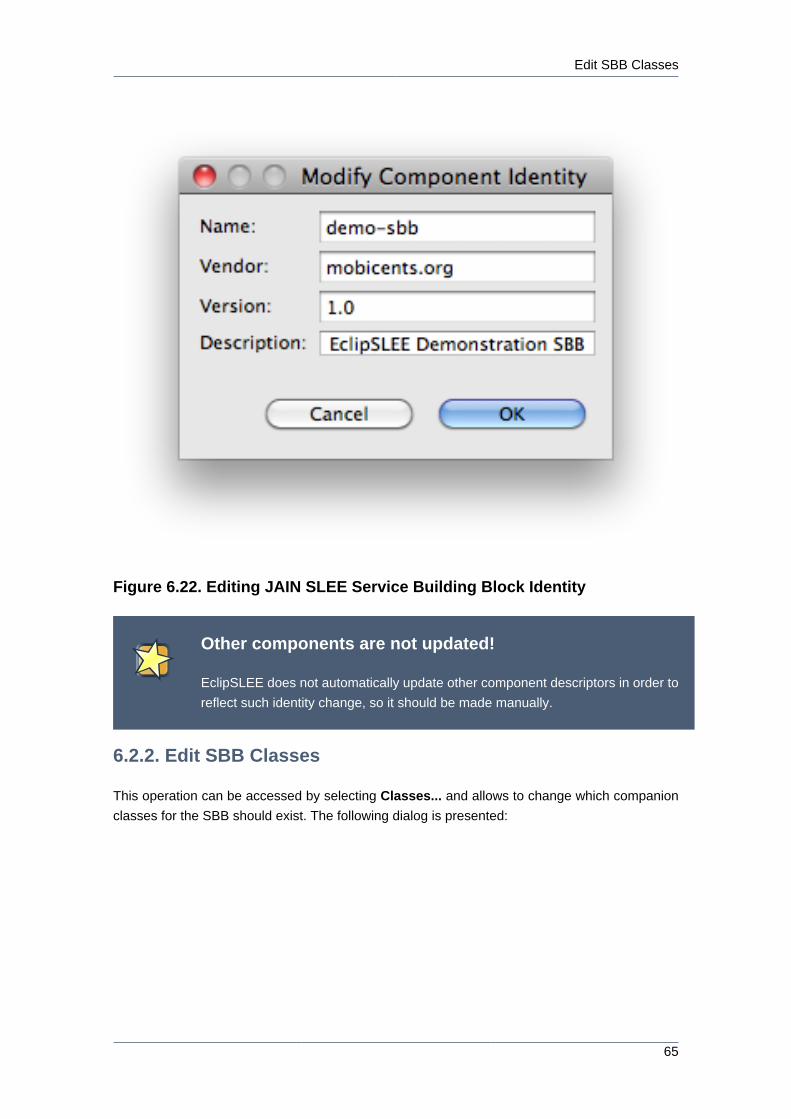
6.2.1. Edit SBB Identity
This operation can be accessed by selecting Identity... and allows to change the JAIN SLEE
Service Building Block identity (name, vendor, version) and it's description. The following dialog
is presented:
Edit SBB Classes
65
Figure 6.22. Editing JAIN SLEE Service Building Block Identity
Other components are not updated!
EclipSLEE does not automatically update other component descriptors in order to
reflect such identity change, so it should be made manually.
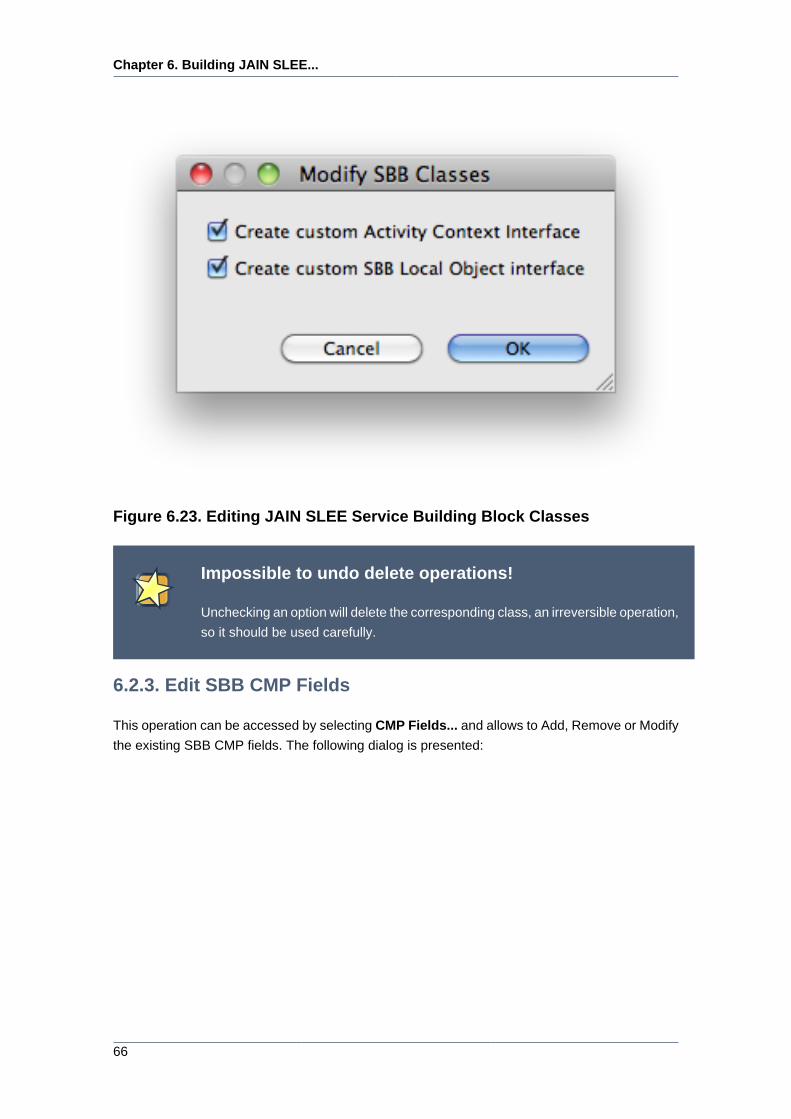
6.2.2. Edit SBB Classes
This operation can be accessed by selecting Classes... and allows to change which companion
classes for the SBB should exist. The following dialog is presented:
Chapter 6. Building JAIN SLEE...
66
Figure 6.23. Editing JAIN SLEE Service Building Block Classes
Impossible to undo delete operations!
Unchecking an option will delete the corresponding class, an irreversible operation,
so it should be used carefully.
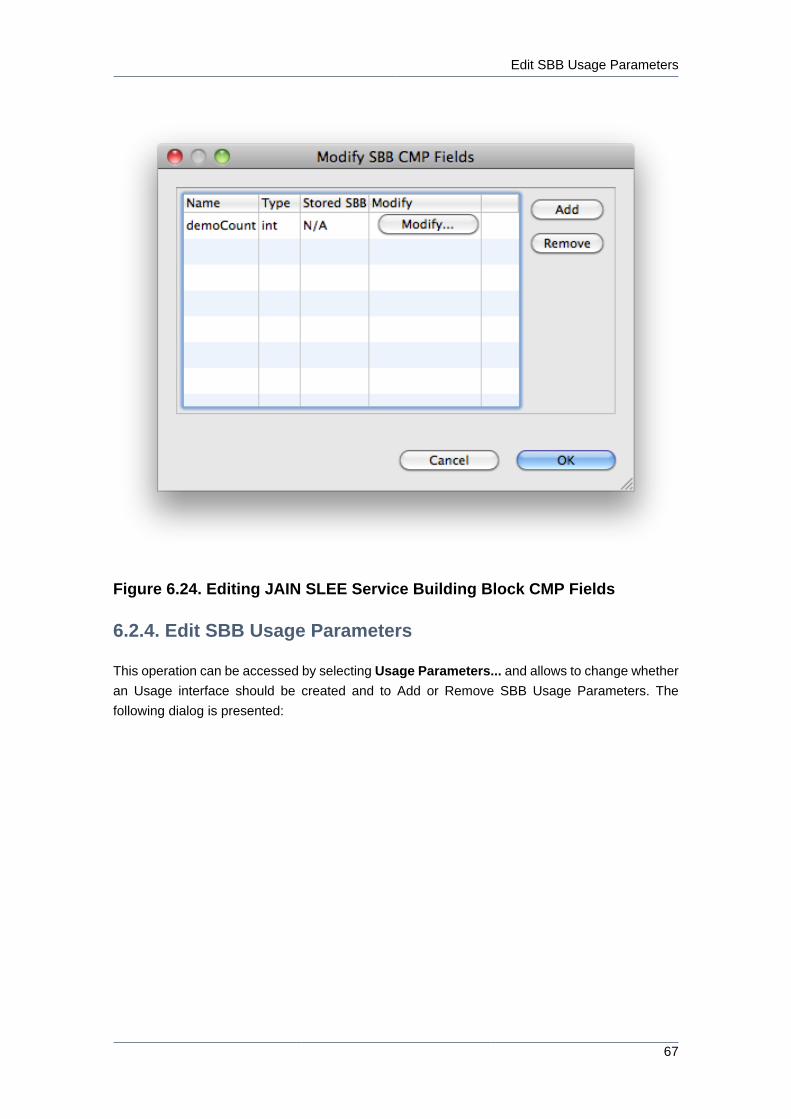
6.2.3. Edit SBB CMP Fields
This operation can be accessed by selecting CMP Fields... and allows to Add, Remove or Modify
the existing SBB CMP fields. The following dialog is presented:
Edit SBB Usage Parameters
67
Figure 6.24. Editing JAIN SLEE Service Building Block CMP Fields
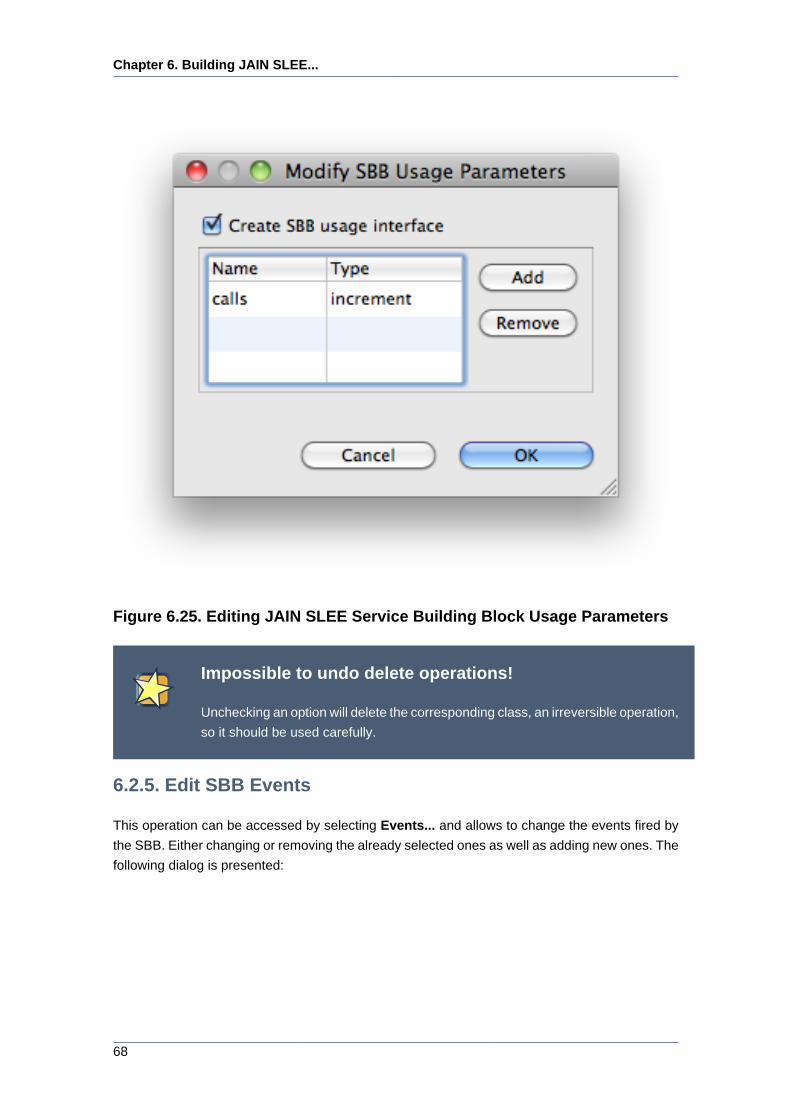
6.2.4. Edit SBB Usage Parameters
This operation can be accessed by selecting Usage Parameters... and allows to change whether
an Usage interface should be created and to Add or Remove SBB Usage Parameters. The
following dialog is presented:
Chapter 6. Building JAIN SLEE...
68
Figure 6.25. Editing JAIN SLEE Service Building Block Usage Parameters
Impossible to undo delete operations!
Unchecking an option will delete the corresponding class, an irreversible operation,
so it should be used carefully.
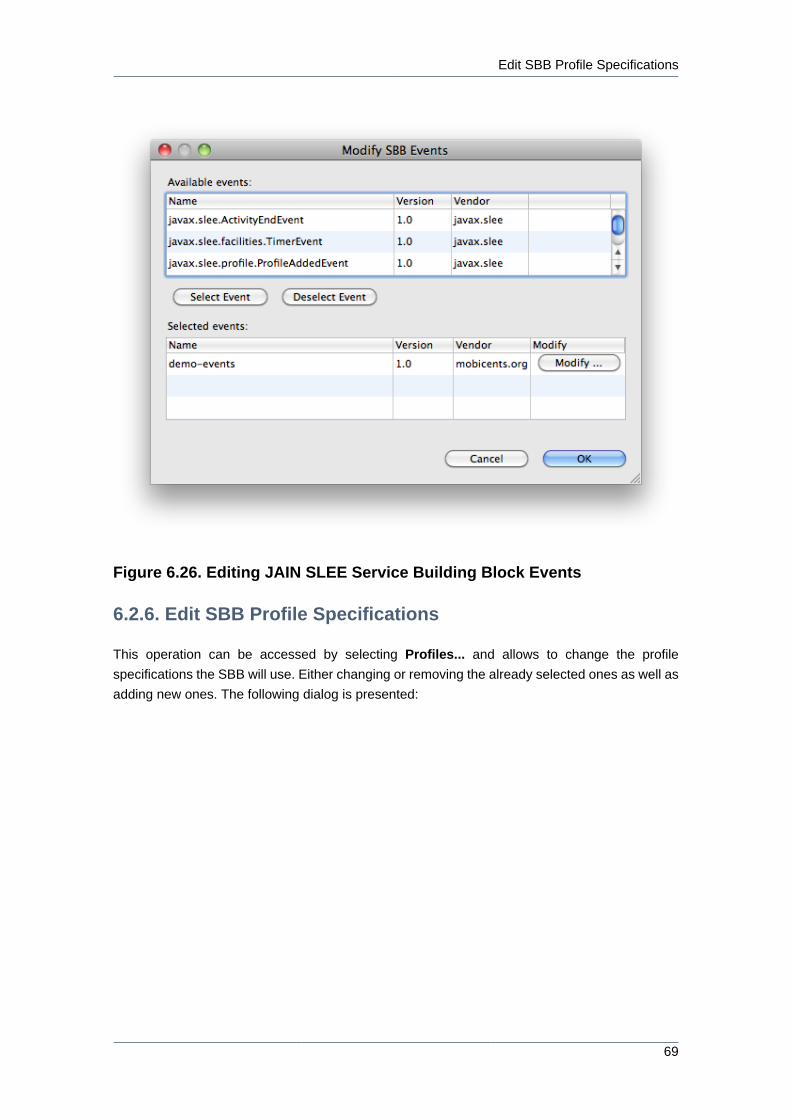
6.2.5. Edit SBB Events
This operation can be accessed by selecting Events... and allows to change the events fired by
the SBB. Either changing or removing the already selected ones as well as adding new ones. The
following dialog is presented:
Edit SBB Profile Specifications
69
Figure 6.26. Editing JAIN SLEE Service Building Block Events
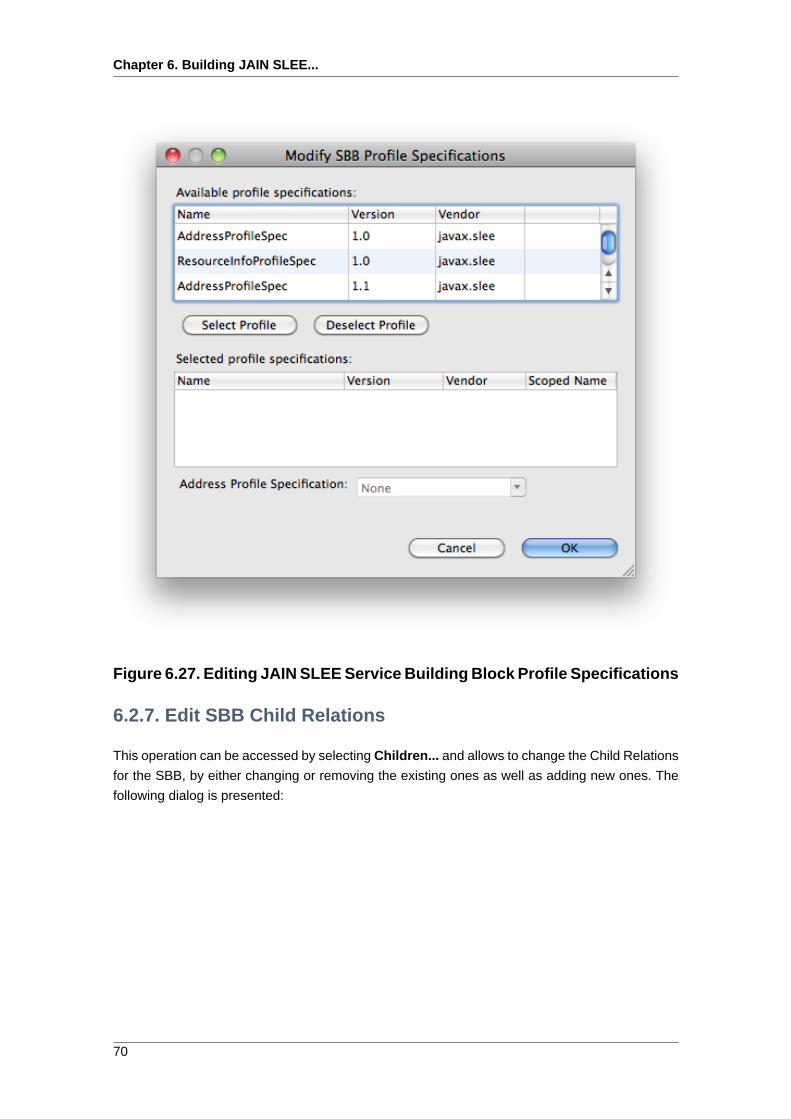
6.2.6. Edit SBB Profile Specifications
This operation can be accessed by selecting Profiles... and allows to change the profile
specifications the SBB will use. Either changing or removing the already selected ones as well as
adding new ones. The following dialog is presented:
Chapter 6. Building JAIN SLEE...
70
Figure 6.27. Editing JAIN SLEE Service Building Block Profile Specifications
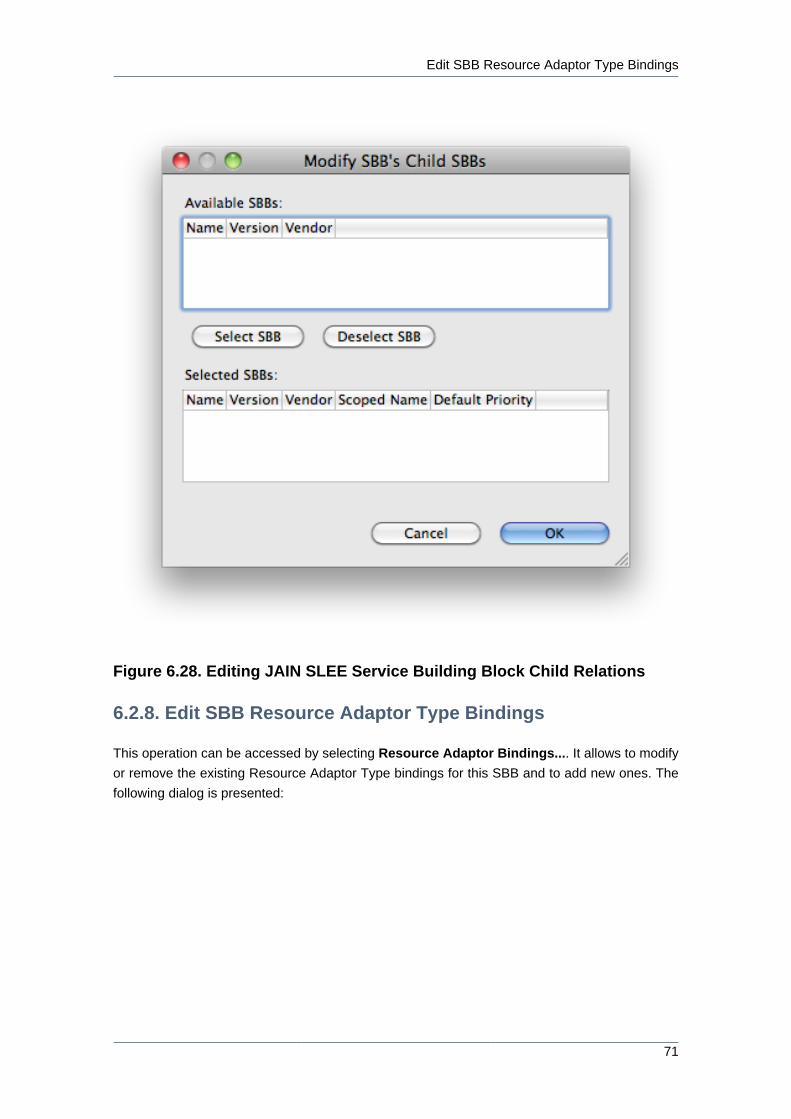
6.2.7. Edit SBB Child Relations
This operation can be accessed by selecting Children... and allows to change the Child Relations
for the SBB, by either changing or removing the existing ones as well as adding new ones. The
following dialog is presented:
Edit SBB Resource Adaptor Type Bindings
71
Figure 6.28. Editing JAIN SLEE Service Building Block Child Relations
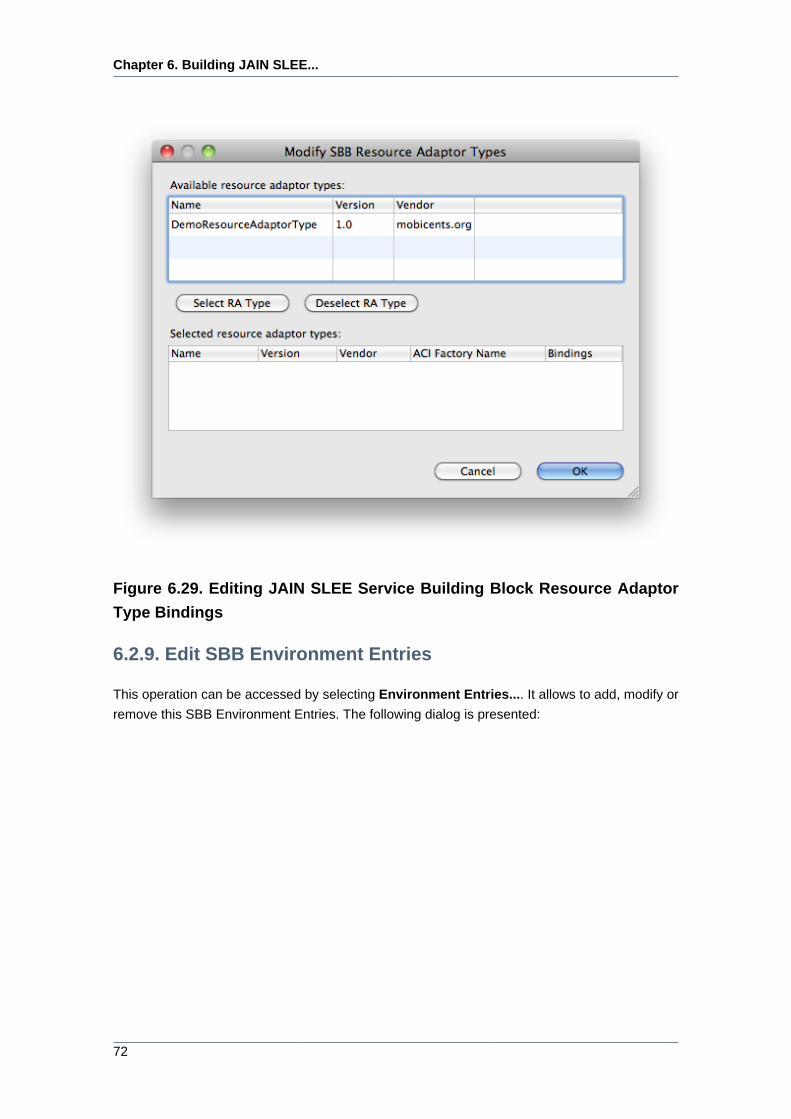
6.2.8. Edit SBB Resource Adaptor Type Bindings
This operation can be accessed by selecting Resource Adaptor Bindings.... It allows to modify
or remove the existing Resource Adaptor Type bindings for this SBB and to add new ones. The
following dialog is presented:
Chapter 6. Building JAIN SLEE...
72
Figure 6.29. Editing JAIN SLEE Service Building Block Resource Adaptor
Type Bindings
6.2.9. Edit SBB Environment Entries
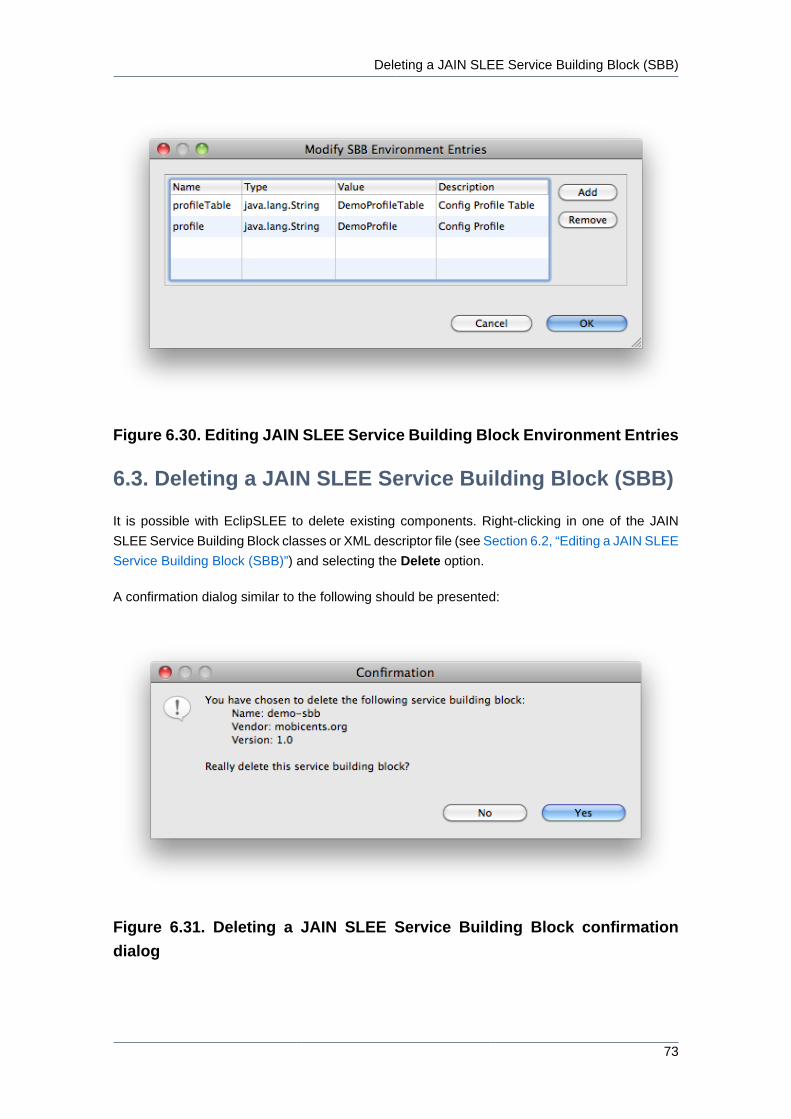
This operation can be accessed by selecting Environment Entries.... It allows to add, modify or
remove this SBB Environment Entries. The following dialog is presented:
Deleting a JAIN SLEE Service Building Block (SBB)
73
Figure 6.30. Editing JAIN SLEE Service Building Block Environment Entries
6.3. Deleting a JAIN SLEE Service Building Block (SBB)
It is possible with EclipSLEE to delete existing components. Right-clicking in one of the JAIN
SLEE Service Building Block classes or XML descriptor file (see Section 6.2, “Editing a JAIN SLEE
Service Building Block (SBB)”) and selecting the Delete option.
A confirmation dialog similar to the following should be presented:
Figure 6.31. Deleting a JAIN SLEE Service Building Block confirmation
dialog
Chapter 6. Building JAIN SLEE...
74
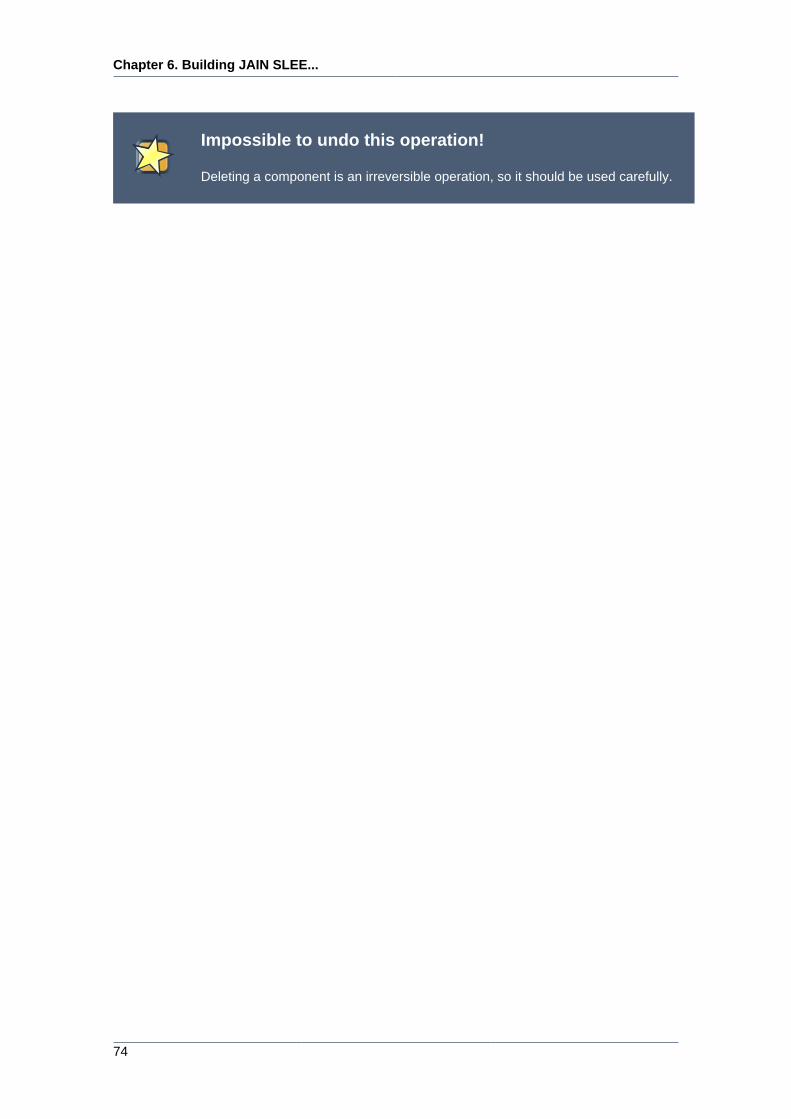
Impossible to undo this operation!
Deleting a component is an irreversible operation, so it should be used carefully.
Chapter 7.
75
Building JAIN SLEE ServicesEclipSLEE provides means to create, edit and delete JAIN SLEE Services.
7.1. Creating a JAIN SLEE Service
The JAIN SLEE Service does not have a Maven module, instead it's part of the Deployable Unit
module resources.
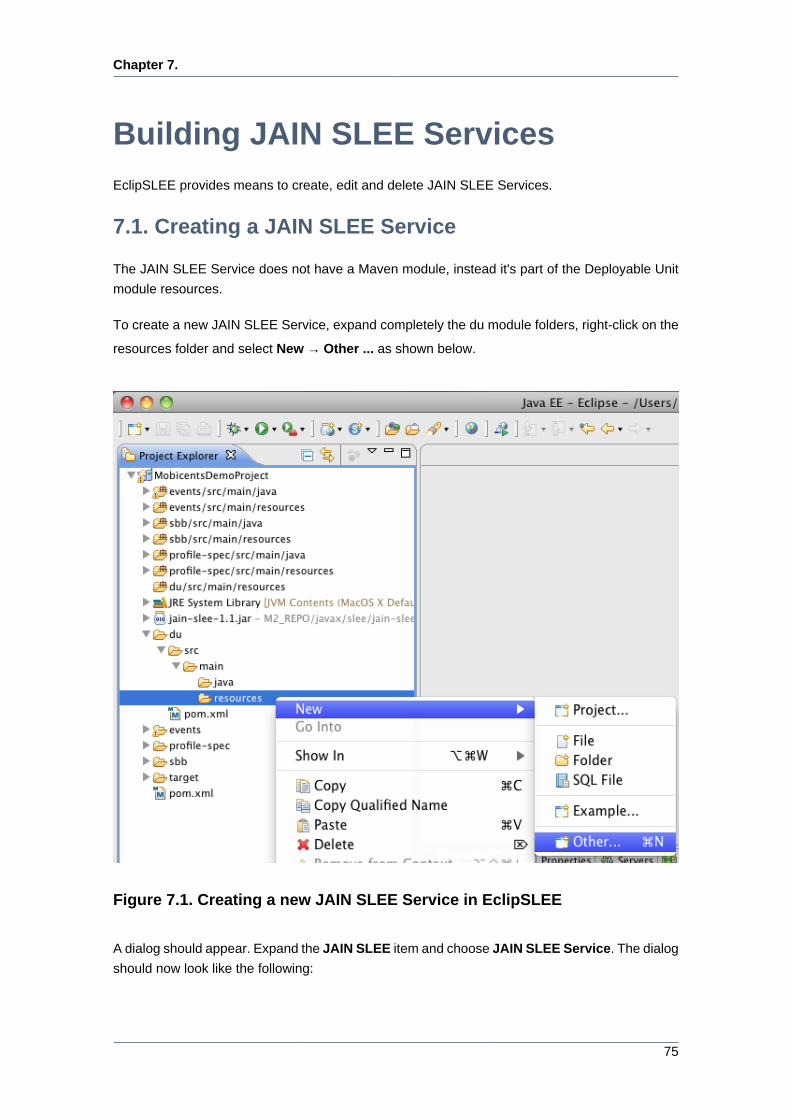
To create a new JAIN SLEE Service, expand completely the du module folders, right-click on the
resources folder and select New → Other ... as shown below.
Figure 7.1. Creating a new JAIN SLEE Service in EclipSLEE
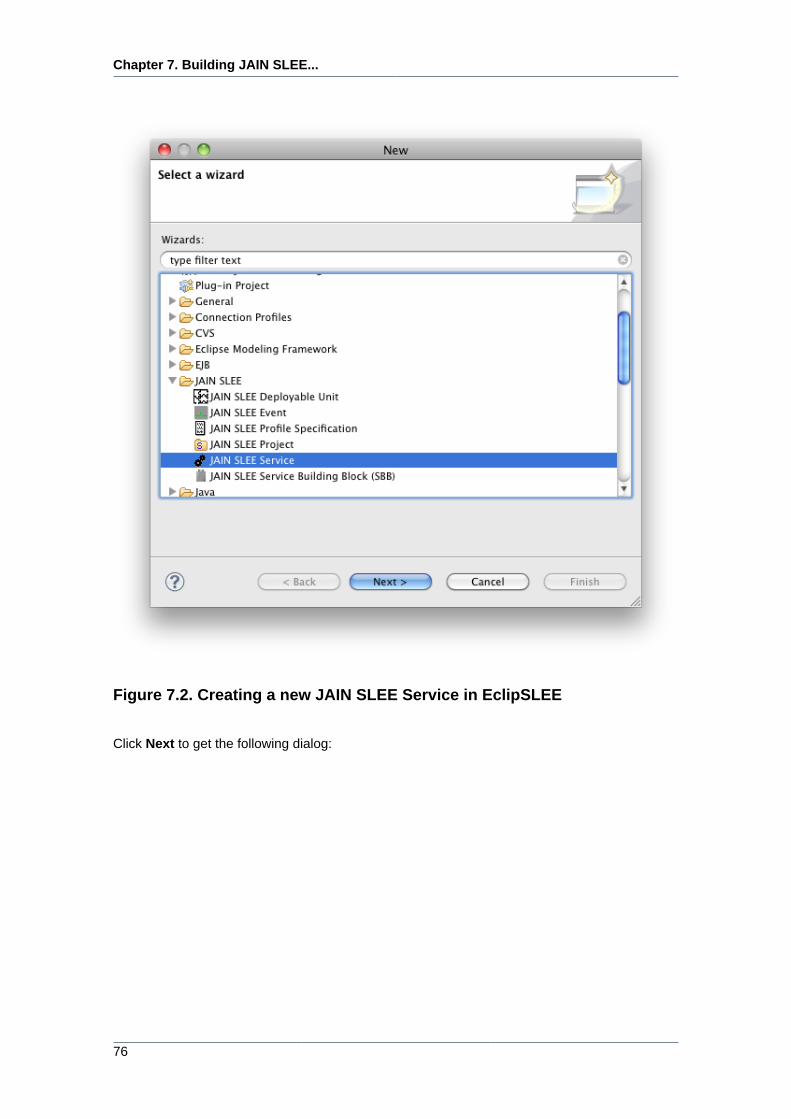
A dialog should appear. Expand the JAIN SLEE item and choose JAIN SLEE Service. The dialog
should now look like the following:
Chapter 7. Building JAIN SLEE...
76
Figure 7.2. Creating a new JAIN SLEE Service in EclipSLEE
Click Next to get the following dialog:
Creating a JAIN SLEE Service
77
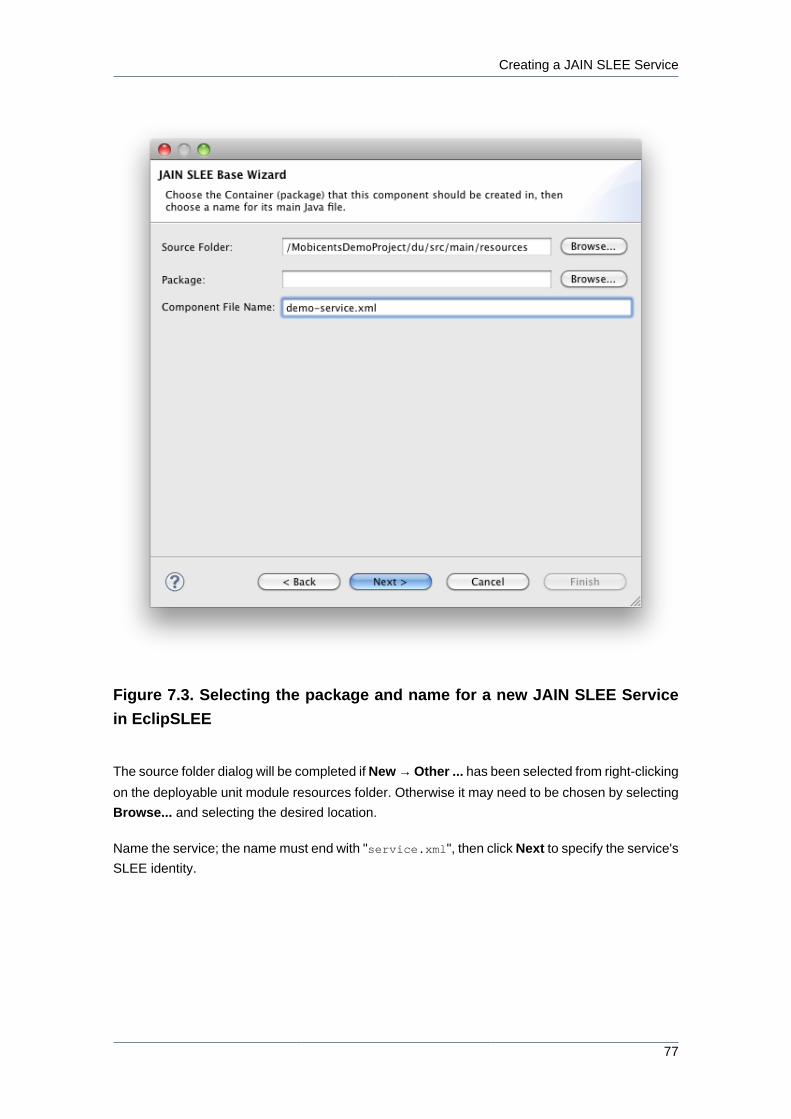
Figure 7.3. Selecting the package and name for a new JAIN SLEE Service
in EclipSLEE
The source folder dialog will be completed if New → Other ... has been selected from right-clicking
on the deployable unit module resources folder. Otherwise it may need to be chosen by selecting
Browse... and selecting the desired location.
Name the service; the name must end with "service.xml", then click Next to specify the service's
SLEE identity.
Chapter 7. Building JAIN SLEE...
78
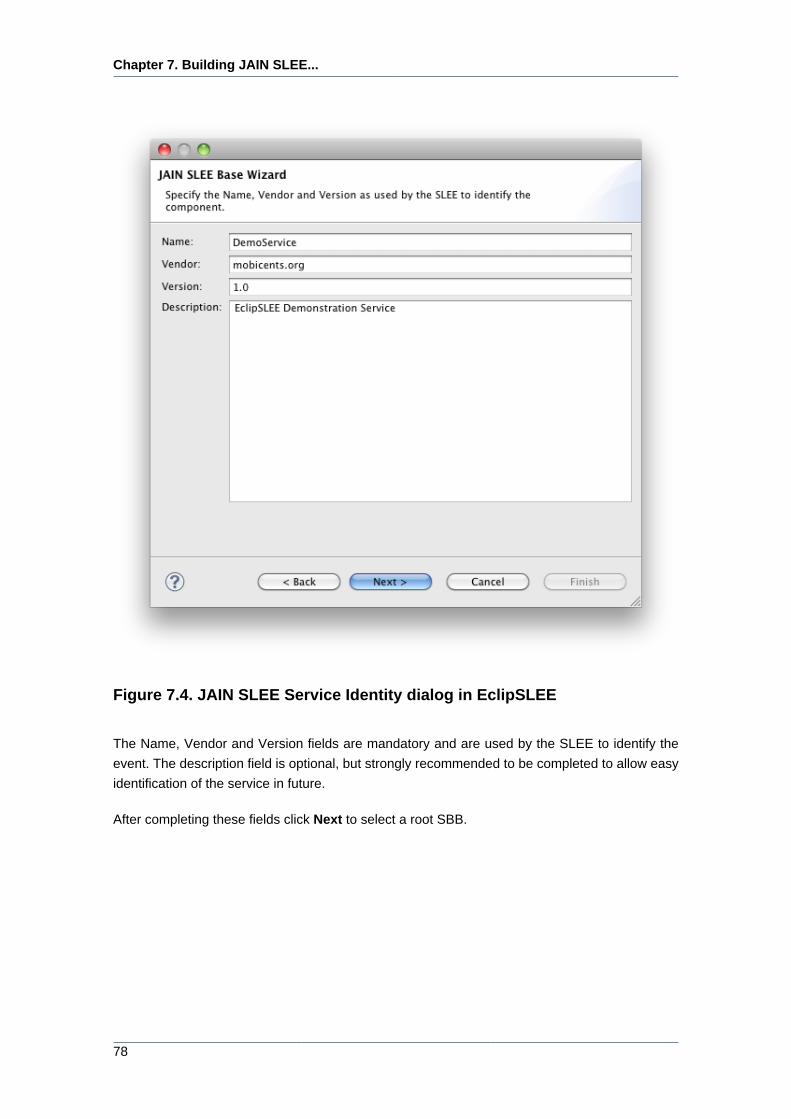
Figure 7.4. JAIN SLEE Service Identity dialog in EclipSLEE
The Name, Vendor and Version fields are mandatory and are used by the SLEE to identify the
event. The description field is optional, but strongly recommended to be completed to allow easy
identification of the service in future.
After completing these fields click Next to select a root SBB.
Creating a JAIN SLEE Service
79
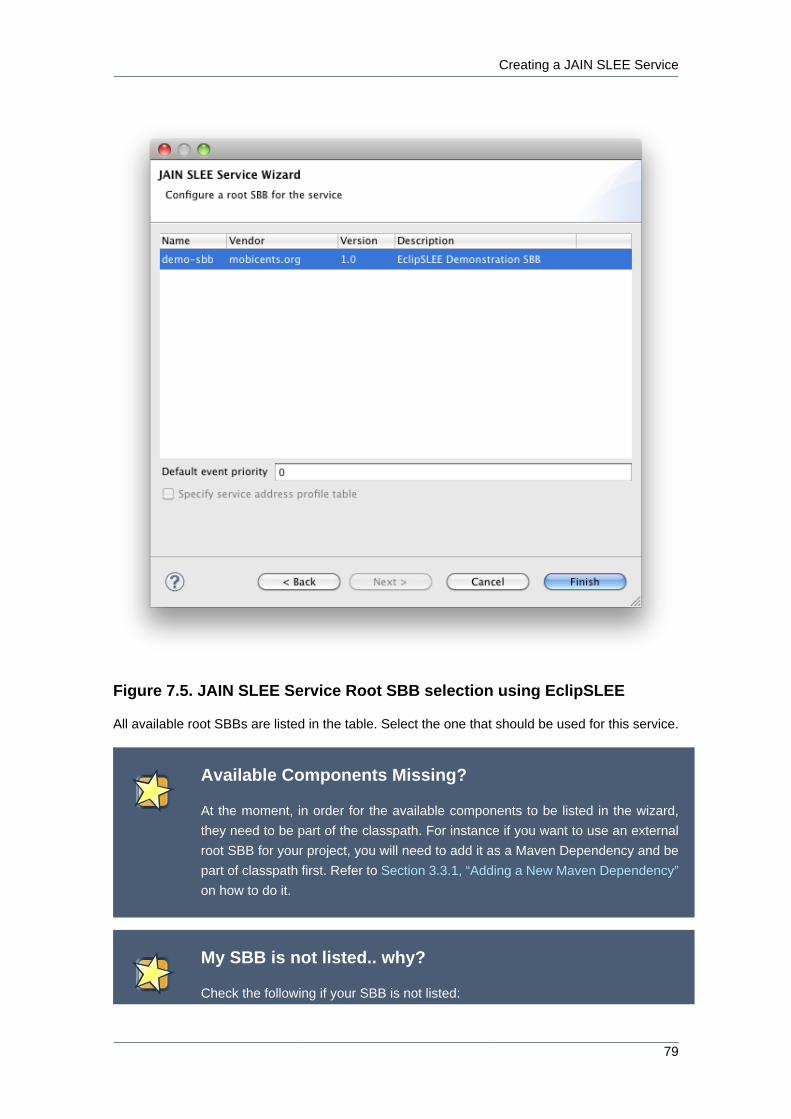
Figure 7.5. JAIN SLEE Service Root SBB selection using EclipSLEE
All available root SBBs are listed in the table. Select the one that should be used for this service.
Available Components Missing?
At the moment, in order for the available components to be listed in the wizard,
they need to be part of the classpath. For instance if you want to use an external
root SBB for your project, you will need to add it as a Maven Dependency and be
part of classpath first. Refer to Section 3.3.1, “Adding a New Maven Dependency”
on how to do it.
My SBB is not listed.. why?
Check the following if your SBB is not listed:

Chapter 7. Building JAIN SLEE...
80
• Does the SBB have at least one initial event? That is, an event with direction
Receive or FireAndReceive, marked as initial-event and has at least one
initial event selector.
• Is the SBB shown in the project source list? If not, please cancel the Service
wizard, refresh the project so it shows up and try again.
Specify the default event priority, and if available for your root SBB, enable or disable Specify
service address profile table as required.
Click Finish to create the service.
The service descriptor is created in the specified folder and opened for editing in the workspace.
The resulting workspace can be seen below.
Figure 7.6. JAIN SLEE Service created in workspace using EclipSLEE
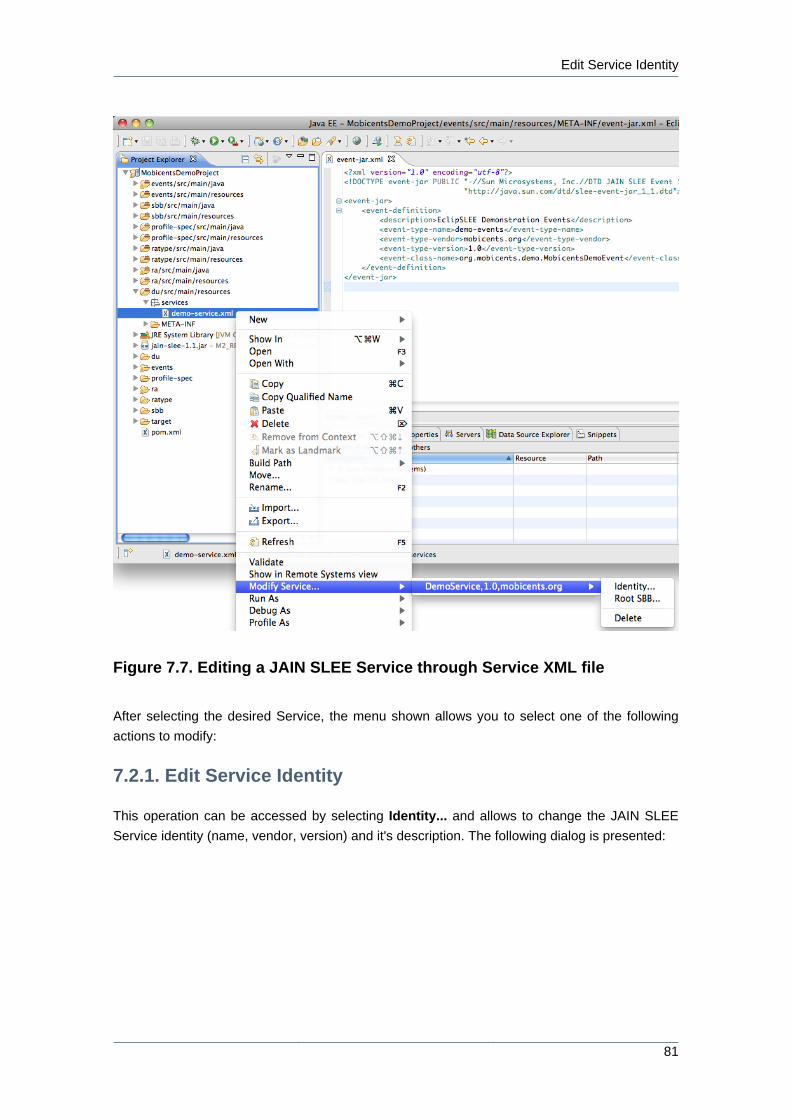
7.2. Editing a JAIN SLEE Service
It is possible with EclipSLEE to edit existing components. When right-clicking on the *-service.xml
descriptor a similar menu should be shown:
Edit Service Identity
81
Figure 7.7. Editing a JAIN SLEE Service through Service XML file
After selecting the desired Service, the menu shown allows you to select one of the following
actions to modify:
7.2.1. Edit Service Identity
This operation can be accessed by selecting Identity... and allows to change the JAIN SLEE
Service identity (name, vendor, version) and it's description. The following dialog is presented:

Chapter 7. Building JAIN SLEE...
82
Figure 7.8. Editing JAIN SLEE Service Identity
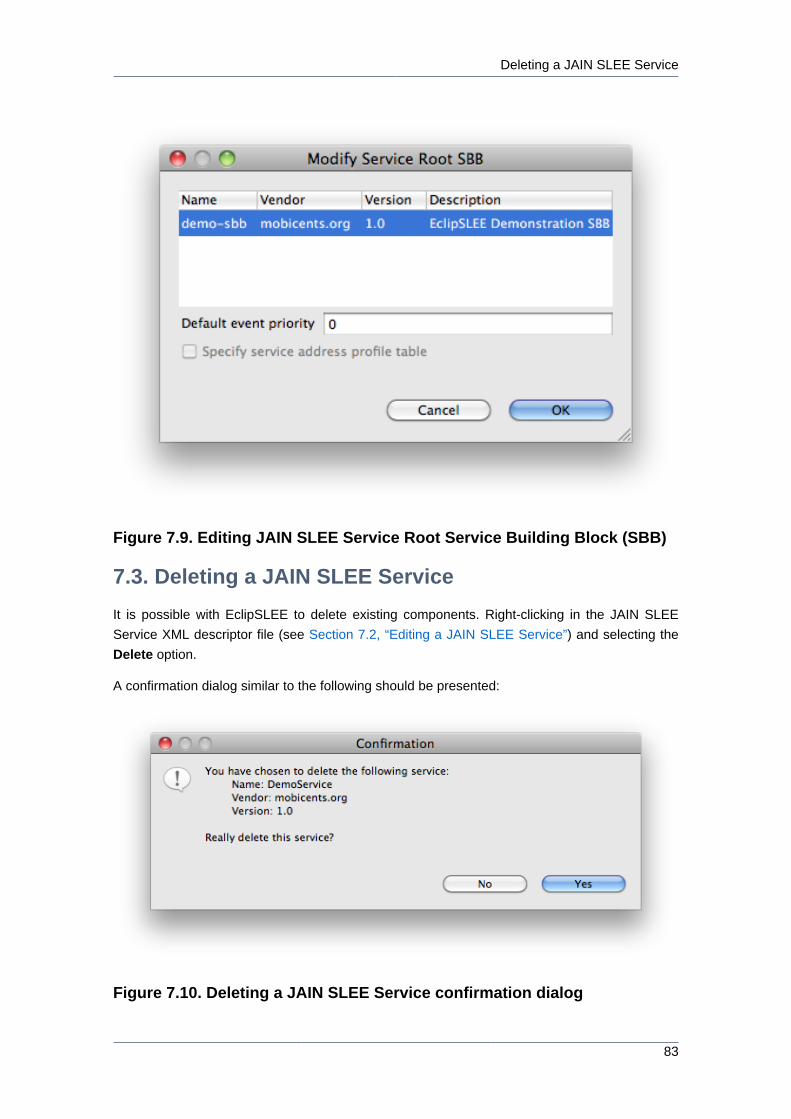
7.2.2. Edit Service Root SBB
This operation can be accessed by selecting Root SBB... and allows to change which SBB is to
be the Root SBB for this Service. The following dialog is presented:
Deleting a JAIN SLEE Service
83
Figure 7.9. Editing JAIN SLEE Service Root Service Building Block (SBB)
7.3. Deleting a JAIN SLEE Service
It is possible with EclipSLEE to delete existing components. Right-clicking in the JAIN SLEE
Service XML descriptor file (see Section 7.2, “Editing a JAIN SLEE Service”) and selecting the
Delete option.
A confirmation dialog similar to the following should be presented:
Figure 7.10. Deleting a JAIN SLEE Service confirmation dialog

Chapter 7. Building JAIN SLEE...
84
Impossible to undo this operation!
Deleting a component is an irreversible operation, so it should be used carefully.
Chapter 8.
85
Building JAIN SLEE Resource
Adaptor TypesEclipSLEE provides means to create, edit and delete JAIN SLEE Resource Adaptor Types.
8.1. Creating a JAIN SLEE Resource Adaptor Type
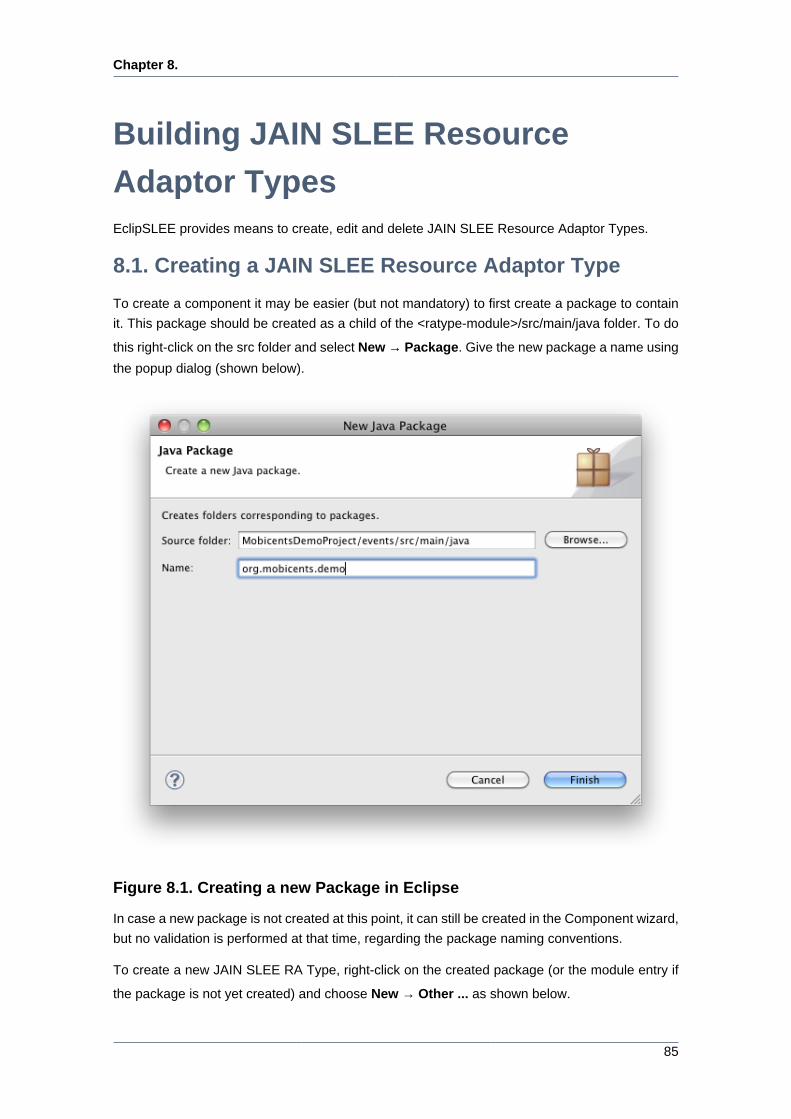
To create a component it may be easier (but not mandatory) to first create a package to contain
it. This package should be created as a child of the <ratype-module>/src/main/java folder. To do
this right-click on the src folder and select New → Package. Give the new package a name using
the popup dialog (shown below).
Figure 8.1. Creating a new Package in Eclipse
In case a new package is not created at this point, it can still be created in the Component wizard,
but no validation is performed at that time, regarding the package naming conventions.
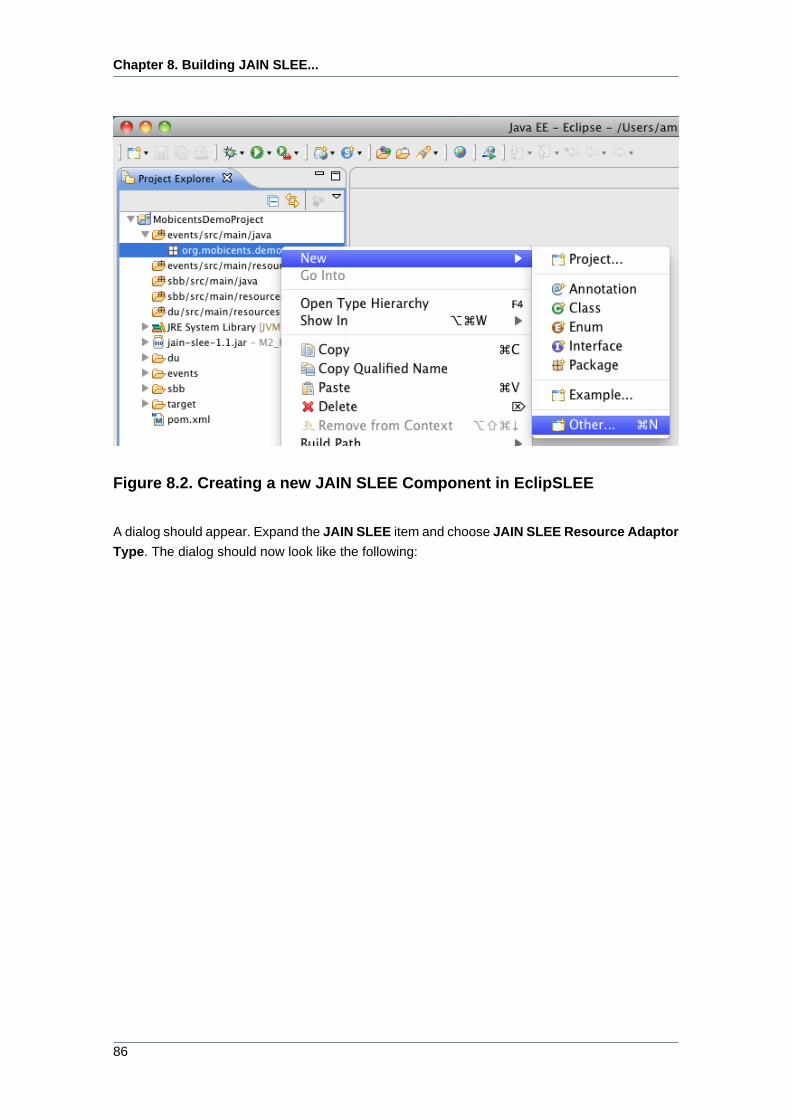
To create a new JAIN SLEE RA Type, right-click on the created package (or the module entry if
the package is not yet created) and choose New → Other ... as shown below.
Chapter 8. Building JAIN SLEE...
86
Figure 8.2. Creating a new JAIN SLEE Component in EclipSLEE
A dialog should appear. Expand the JAIN SLEE item and choose JAIN SLEE Resource Adaptor
Type. The dialog should now look like the following:
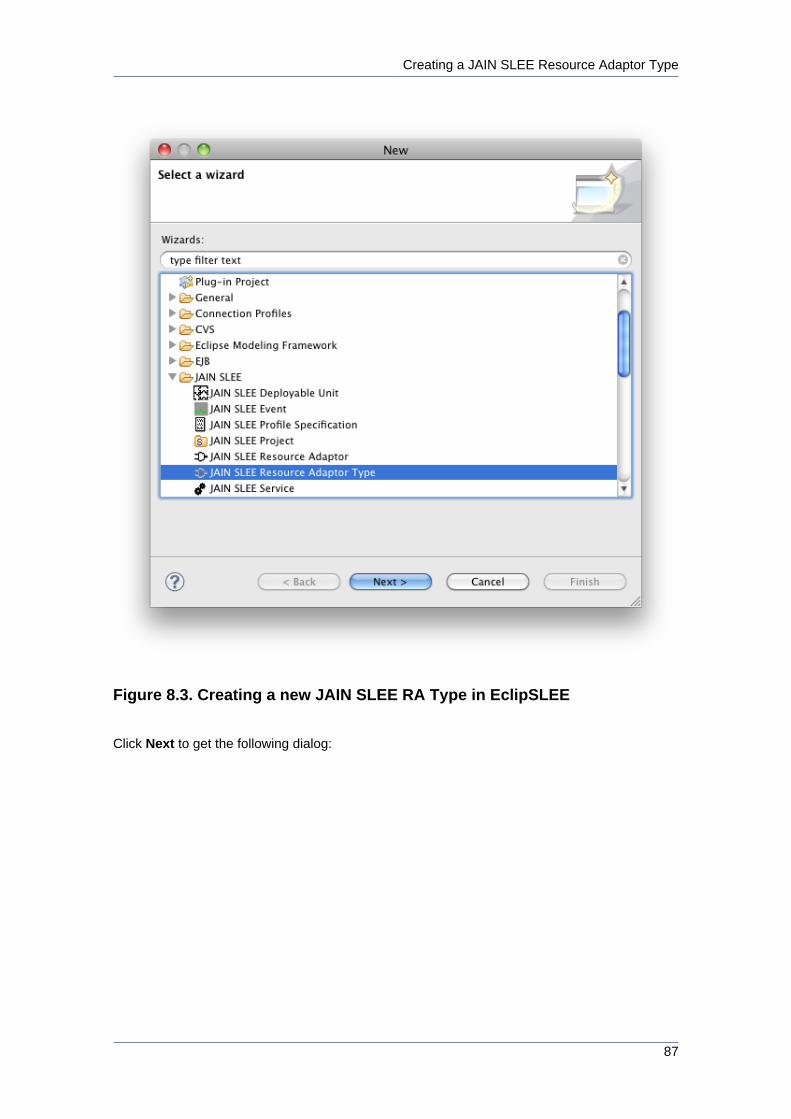
Creating a JAIN SLEE Resource Adaptor Type
87
Figure 8.3. Creating a new JAIN SLEE RA Type in EclipSLEE
Click Next to get the following dialog:
Chapter 8. Building JAIN SLEE...
88
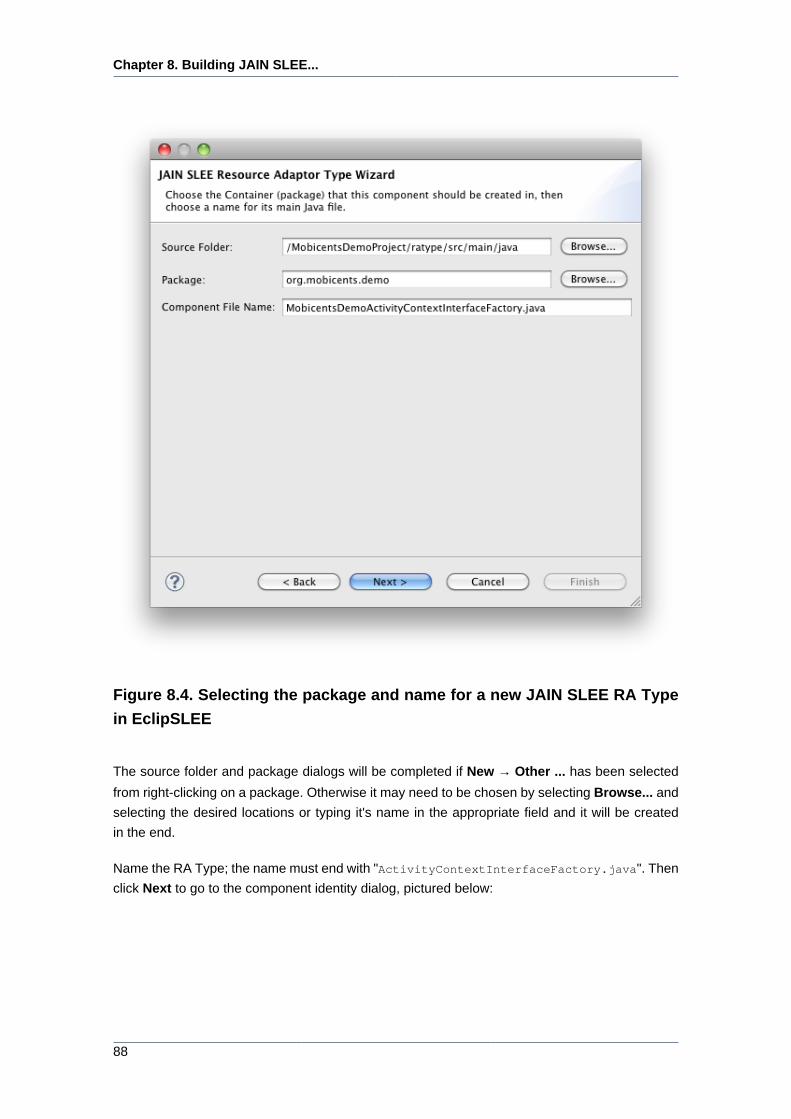
Figure 8.4. Selecting the package and name for a new JAIN SLEE RA Type
in EclipSLEE
The source folder and package dialogs will be completed if New → Other ... has been selected
from right-clicking on a package. Otherwise it may need to be chosen by selecting Browse... and
selecting the desired locations or typing it's name in the appropriate field and it will be created
in the end.
Name the RA Type; the name must end with "ActivityContextInterfaceFactory.java". Then
click Next to go to the component identity dialog, pictured below:

Creating a JAIN SLEE Resource Adaptor Type
89
Figure 8.5. JAIN SLEE Component Identity dialog in EclipSLEE
The Name, Vendor and Version fields are mandatory and are used by the SLEE to identify the
RA Type. The description field is optional, but strongly recommended to be completed to allow
easy identification of the RA Type in future.
After completing these fields click Next to specify the RA Type Libraries.
Chapter 8. Building JAIN SLEE...
90
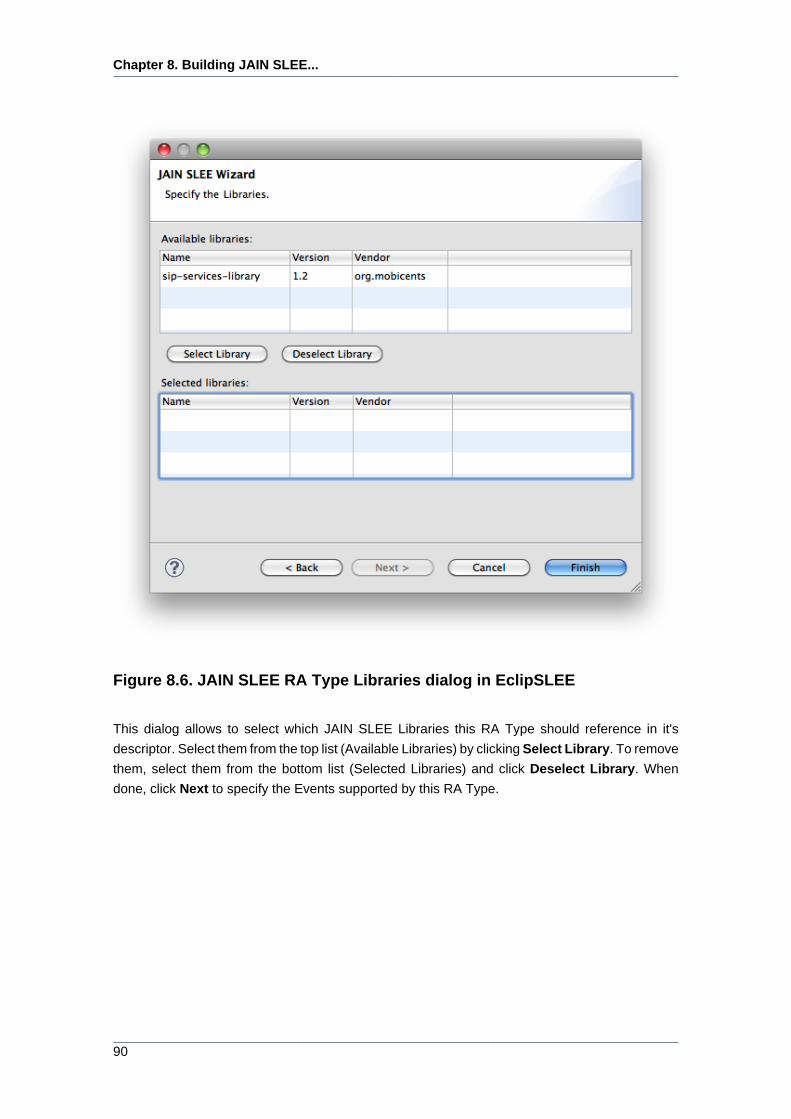
Figure 8.6. JAIN SLEE RA Type Libraries dialog in EclipSLEE
This dialog allows to select which JAIN SLEE Libraries this RA Type should reference in it's
descriptor. Select them from the top list (Available Libraries) by clicking Select Library. To remove
them, select them from the bottom list (Selected Libraries) and click Deselect Library. When
done, click Next to specify the Events supported by this RA Type.
Creating a JAIN SLEE Resource Adaptor Type
91
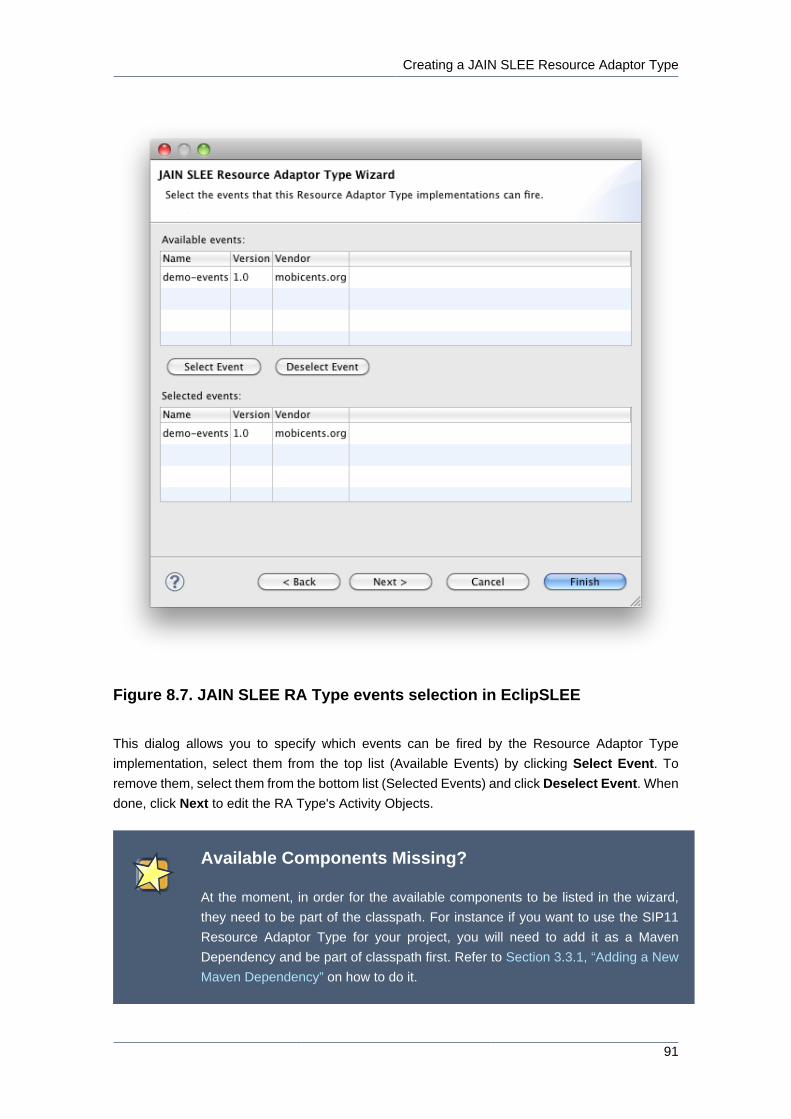
Figure 8.7. JAIN SLEE RA Type events selection in EclipSLEE
This dialog allows you to specify which events can be fired by the Resource Adaptor Type
implementation, select them from the top list (Available Events) by clicking Select Event. To
remove them, select them from the bottom list (Selected Events) and click Deselect Event. When
done, click Next to edit the RA Type's Activity Objects.
Available Components Missing?
At the moment, in order for the available components to be listed in the wizard,
they need to be part of the classpath. For instance if you want to use the SIP11
Resource Adaptor Type for your project, you will need to add it as a Maven
Dependency and be part of classpath first. Refer to Section 3.3.1, “Adding a New
Maven Dependency” on how to do it.
Chapter 8. Building JAIN SLEE...
92
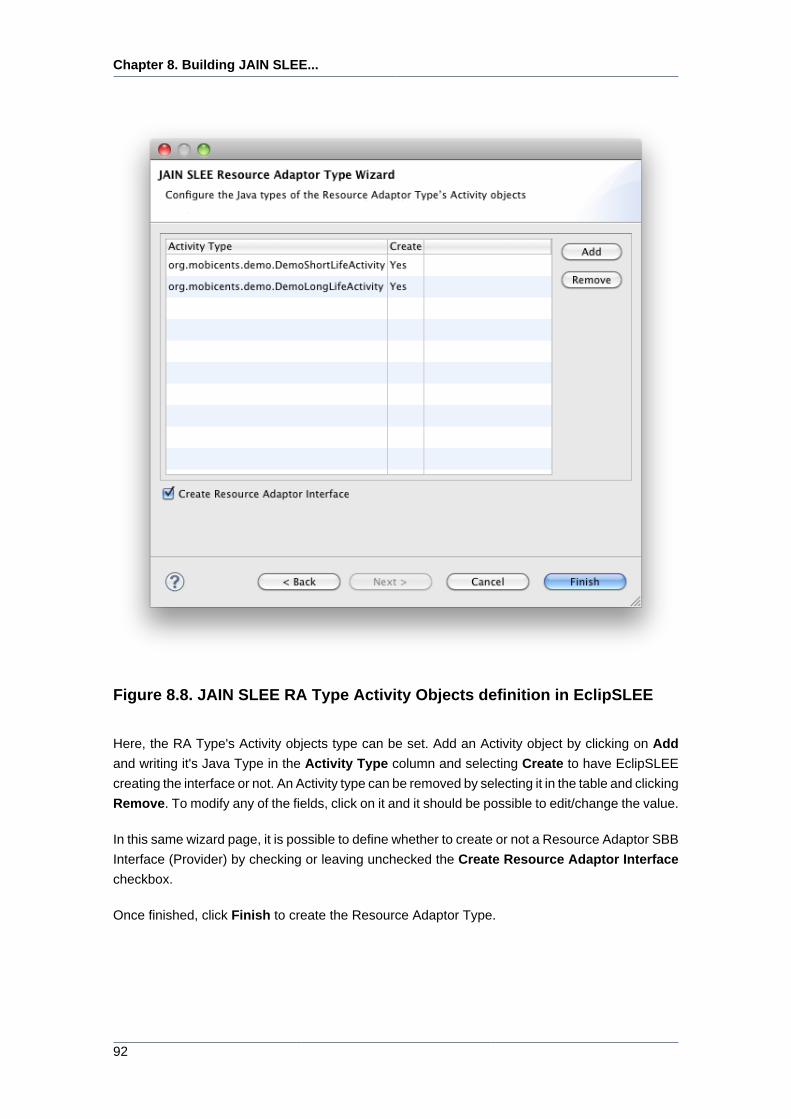
Figure 8.8. JAIN SLEE RA Type Activity Objects definition in EclipSLEE
Here, the RA Type's Activity objects type can be set. Add an Activity object by clicking on Add
and writing it's Java Type in the Activity Type column and selecting Create to have EclipSLEE
creating the interface or not. An Activity type can be removed by selecting it in the table and clicking
Remove. To modify any of the fields, click on it and it should be possible to edit/change the value.
In this same wizard page, it is possible to define whether to create or not a Resource Adaptor SBB
Interface (Provider) by checking or leaving unchecked the Create Resource Adaptor Interface
checkbox.
Once finished, click Finish to create the Resource Adaptor Type.
Editing a JAIN SLEE Resource Adaptor Type
93
Skipping optional steps
Finish can be clicked at any point after setting the Resource Adaptor Type's
identity if a skeleton Resource Adaptor Type is required. It is not necessary to
complete each wizard page first.
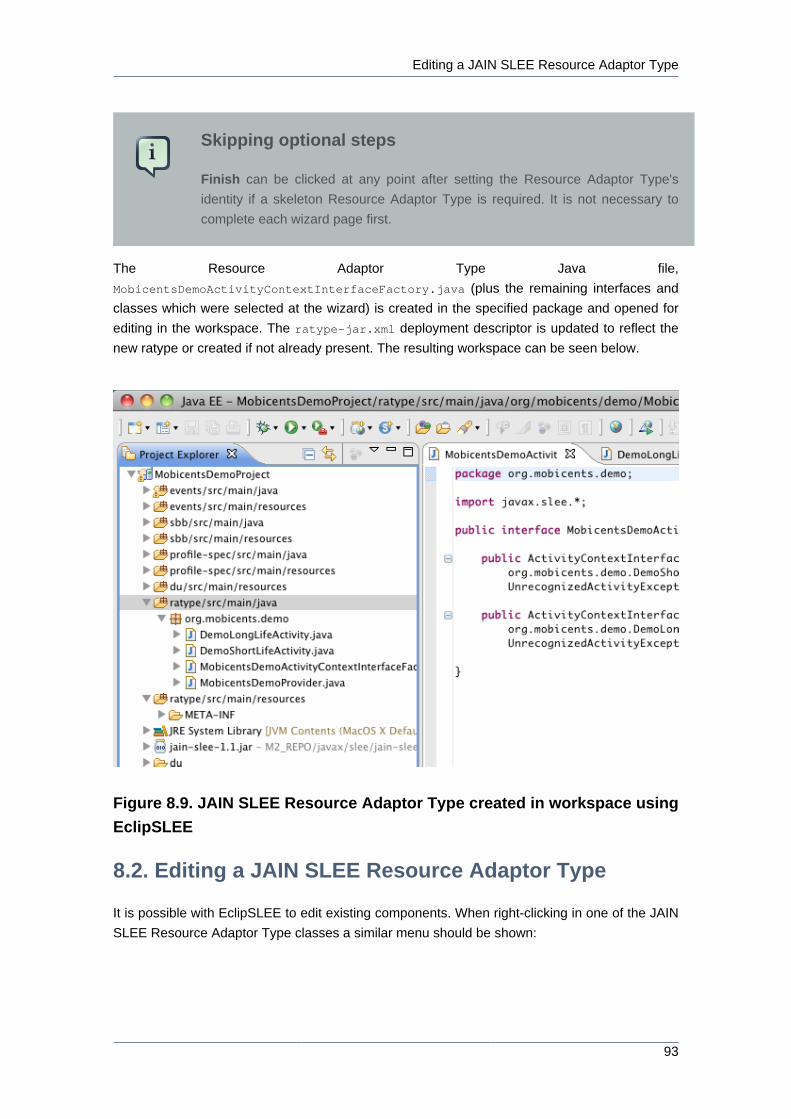
The Resource Adaptor Type Java file,
MobicentsDemoActivityContextInterfaceFactory.java (plus the remaining interfaces and
classes which were selected at the wizard) is created in the specified package and opened for
editing in the workspace. The ratype-jar.xml deployment descriptor is updated to reflect the
new ratype or created if not already present. The resulting workspace can be seen below.
Figure 8.9. JAIN SLEE Resource Adaptor Type created in workspace using
EclipSLEE
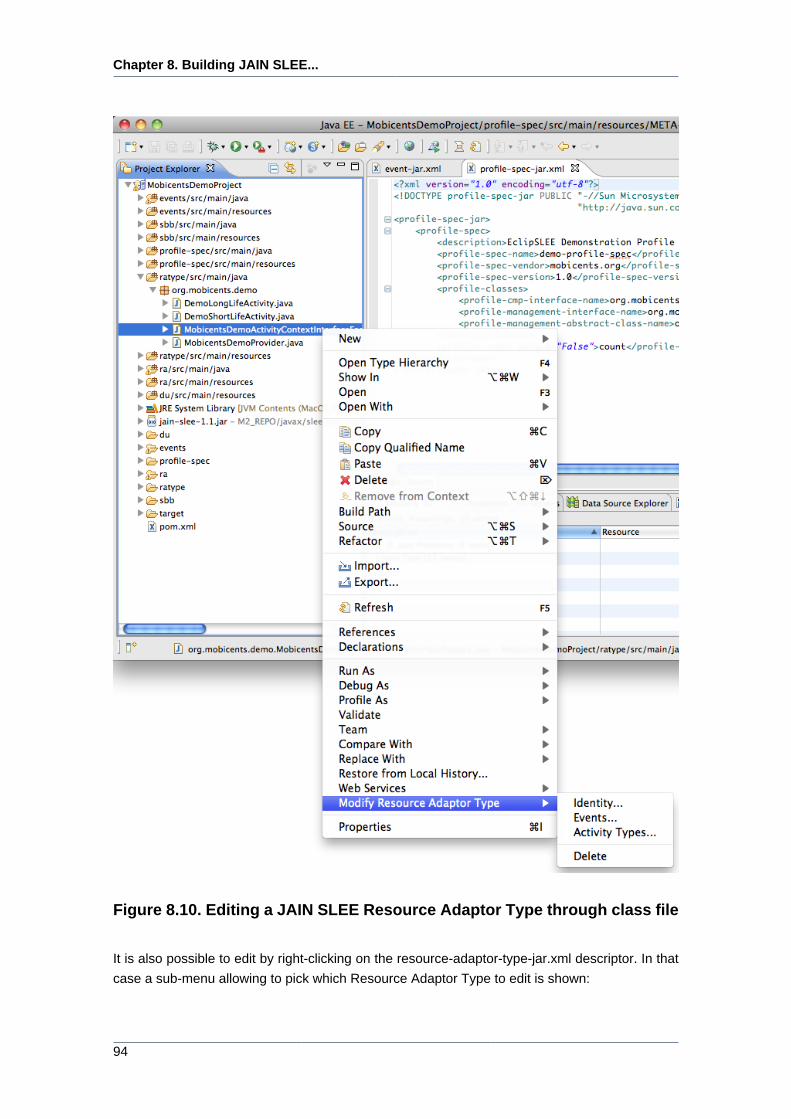
8.2. Editing a JAIN SLEE Resource Adaptor Type
It is possible with EclipSLEE to edit existing components. When right-clicking in one of the JAIN
SLEE Resource Adaptor Type classes a similar menu should be shown:
Chapter 8. Building JAIN SLEE...
94
Figure 8.10. Editing a JAIN SLEE Resource Adaptor Type through class file
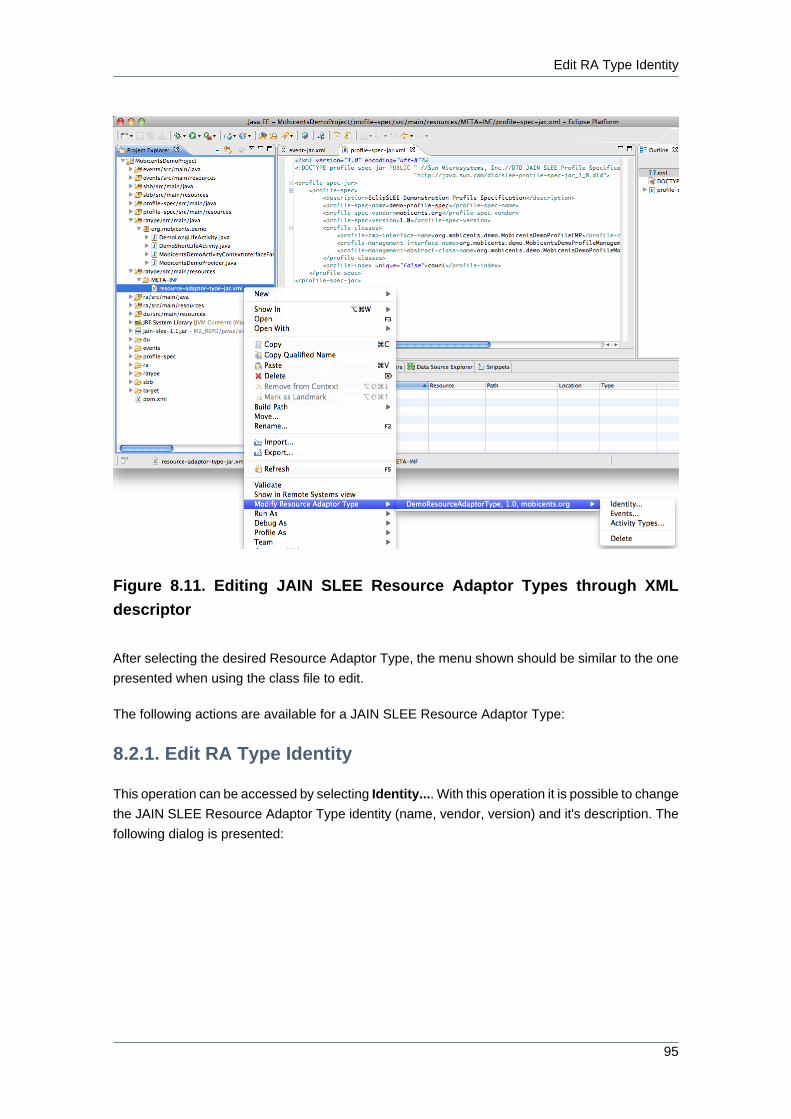
It is also possible to edit by right-clicking on the resource-adaptor-type-jar.xml descriptor. In that
case a sub-menu allowing to pick which Resource Adaptor Type to edit is shown:
Edit RA Type Identity
95
Figure 8.11. Editing JAIN SLEE Resource Adaptor Types through XML
descriptor
After selecting the desired Resource Adaptor Type, the menu shown should be similar to the one
presented when using the class file to edit.
The following actions are available for a JAIN SLEE Resource Adaptor Type:
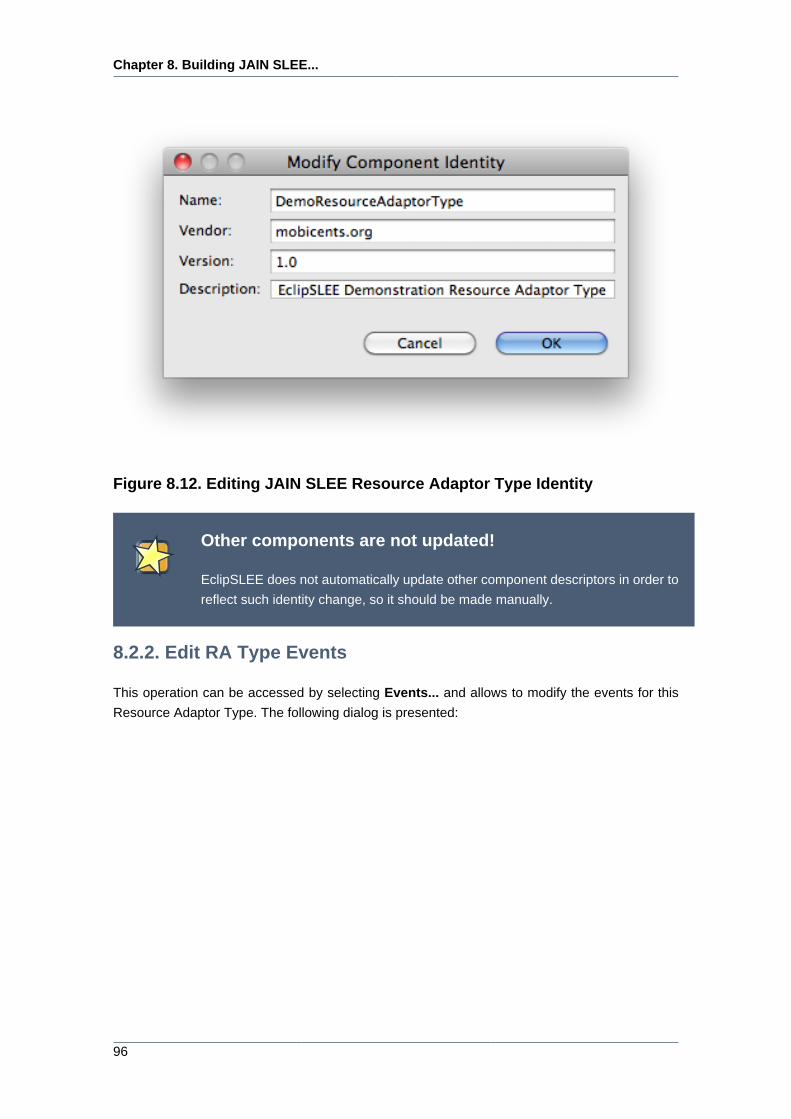
8.2.1. Edit RA Type Identity
This operation can be accessed by selecting Identity.... With this operation it is possible to change
the JAIN SLEE Resource Adaptor Type identity (name, vendor, version) and it's description. The
following dialog is presented:
Chapter 8. Building JAIN SLEE...
96
Figure 8.12. Editing JAIN SLEE Resource Adaptor Type Identity
Other components are not updated!
EclipSLEE does not automatically update other component descriptors in order to
reflect such identity change, so it should be made manually.
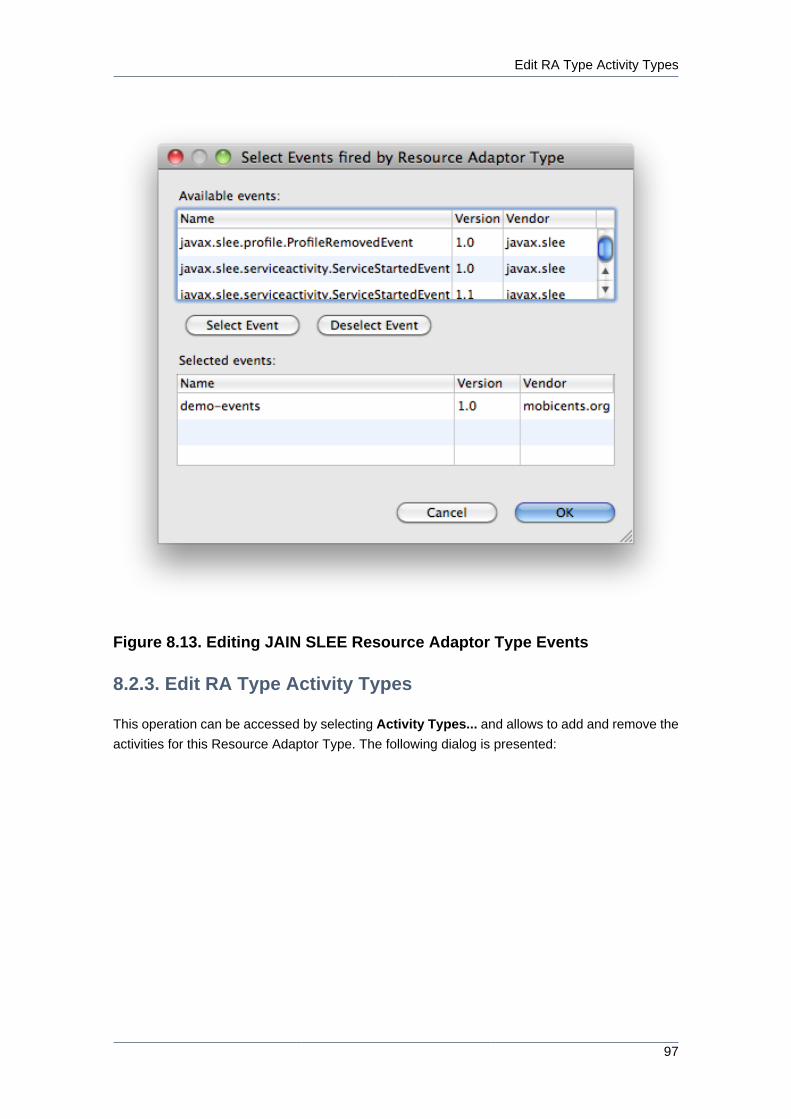
8.2.2. Edit RA Type Events
This operation can be accessed by selecting Events... and allows to modify the events for this
Resource Adaptor Type. The following dialog is presented:
Edit RA Type Activity Types
97
Figure 8.13. Editing JAIN SLEE Resource Adaptor Type Events
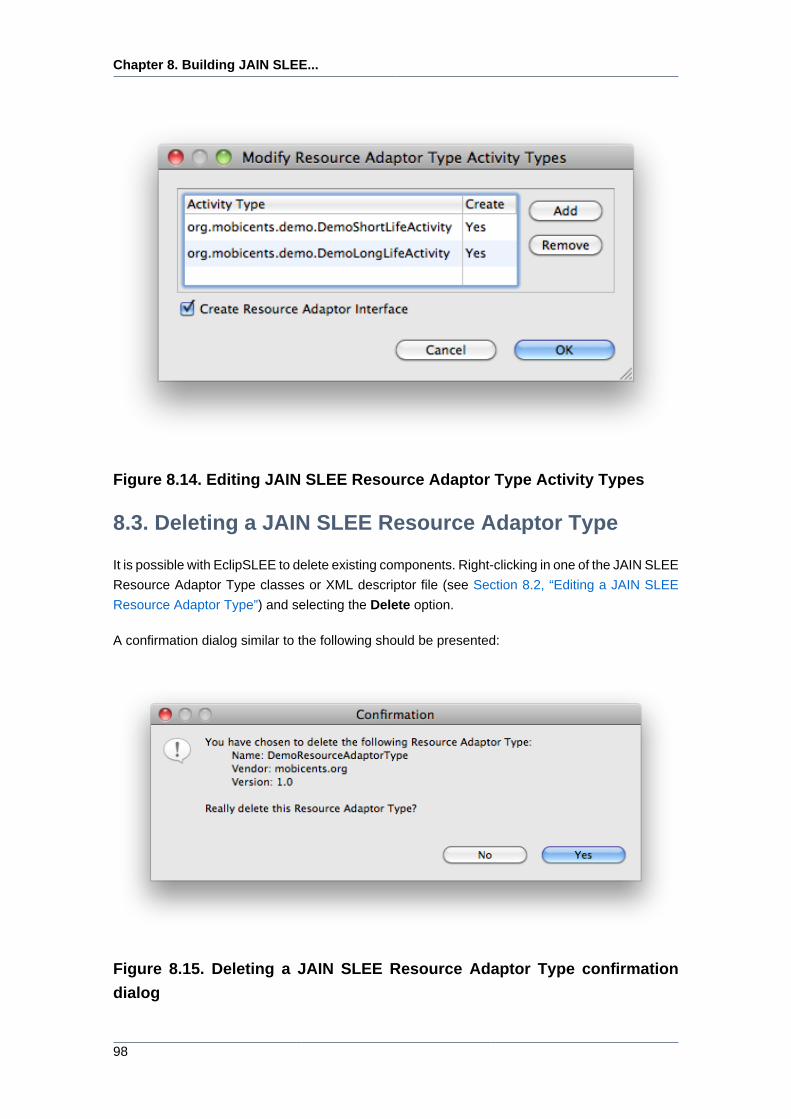
8.2.3. Edit RA Type Activity Types
This operation can be accessed by selecting Activity Types... and allows to add and remove the
activities for this Resource Adaptor Type. The following dialog is presented:
Chapter 8. Building JAIN SLEE...
98
Figure 8.14. Editing JAIN SLEE Resource Adaptor Type Activity Types
8.3. Deleting a JAIN SLEE Resource Adaptor Type
It is possible with EclipSLEE to delete existing components. Right-clicking in one of the JAIN SLEE
Resource Adaptor Type classes or XML descriptor file (see Section 8.2, “Editing a JAIN SLEE
Resource Adaptor Type”) and selecting the Delete option.
A confirmation dialog similar to the following should be presented:
Figure 8.15. Deleting a JAIN SLEE Resource Adaptor Type confirmation
dialog

Deleting a JAIN SLEE Resource Adaptor Type
99
Impossible to undo this operation!
Deleting a component is an irreversible operation, so it should be used carefully.

100
Chapter 9.
101
Building JAIN SLEE Resource
AdaptorsEclipSLEE provides means to create, edit and delete JAIN SLEE Resource Adaptors.
9.1. Creating a JAIN SLEE Resource Adaptor
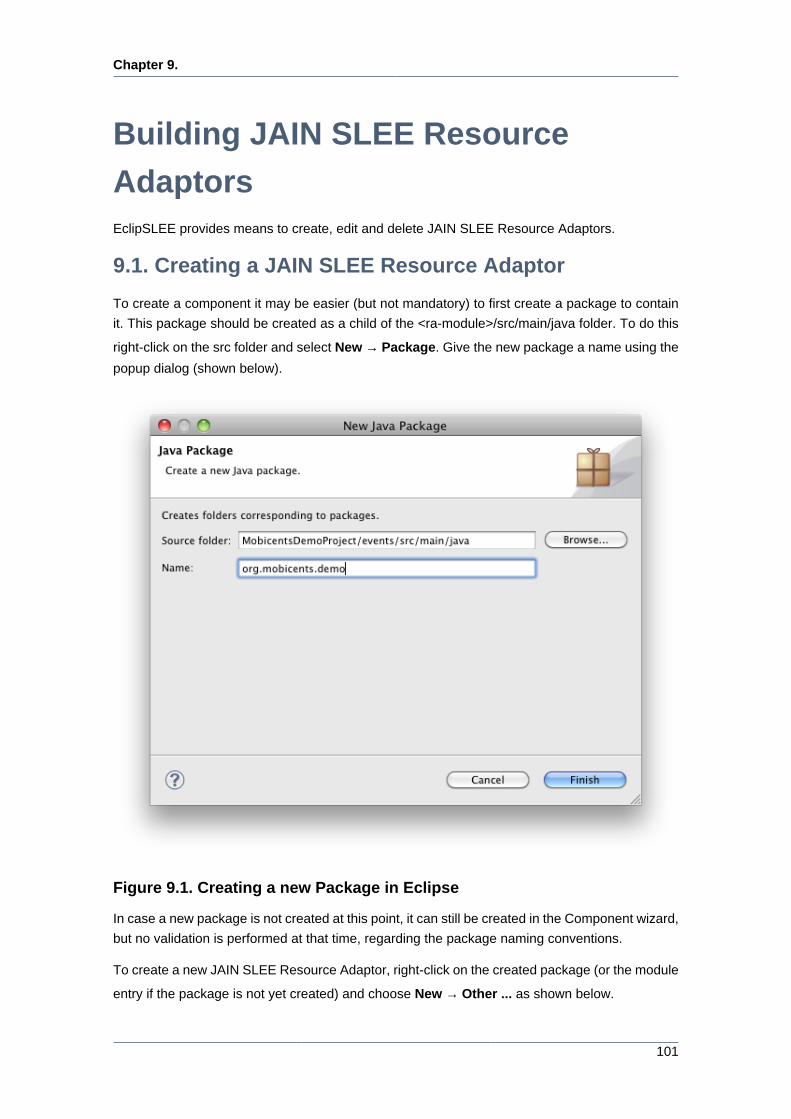
To create a component it may be easier (but not mandatory) to first create a package to contain
it. This package should be created as a child of the <ra-module>/src/main/java folder. To do this
right-click on the src folder and select New → Package. Give the new package a name using the
popup dialog (shown below).
Figure 9.1. Creating a new Package in Eclipse
In case a new package is not created at this point, it can still be created in the Component wizard,
but no validation is performed at that time, regarding the package naming conventions.
To create a new JAIN SLEE Resource Adaptor, right-click on the created package (or the module
entry if the package is not yet created) and choose New → Other ... as shown below.
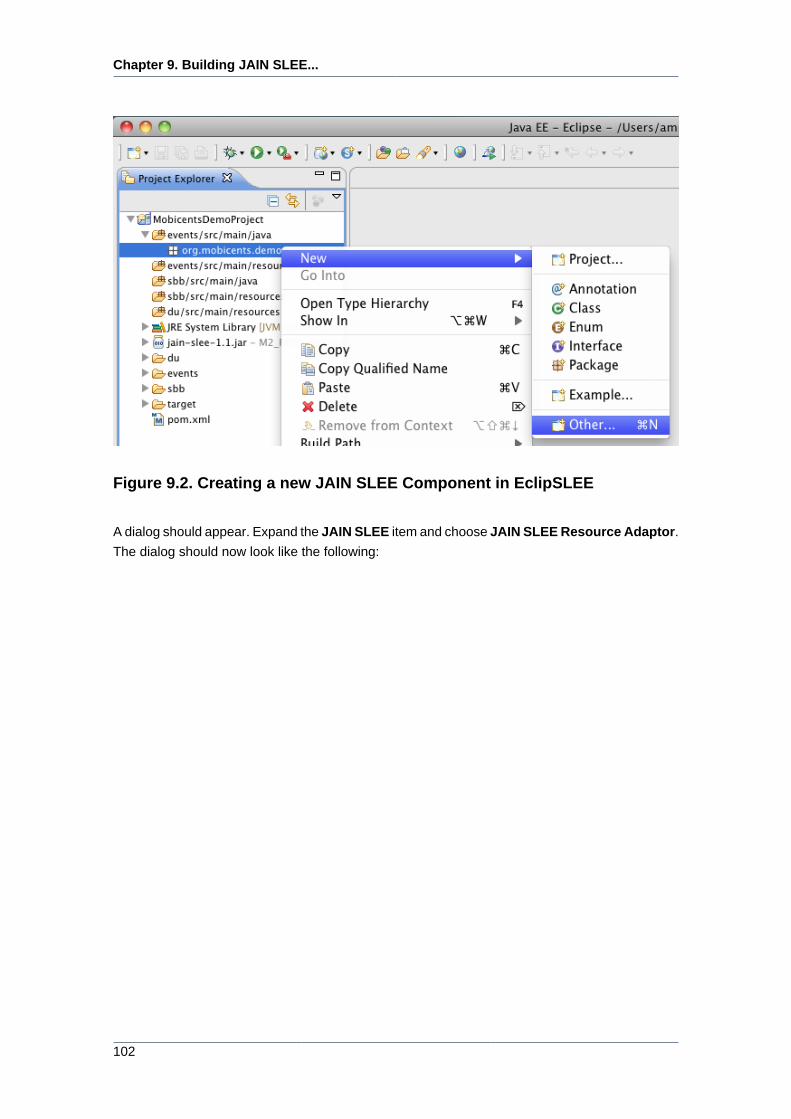
Chapter 9. Building JAIN SLEE...
102
Figure 9.2. Creating a new JAIN SLEE Component in EclipSLEE
A dialog should appear. Expand the JAIN SLEE item and choose JAIN SLEE Resource Adaptor.
The dialog should now look like the following:
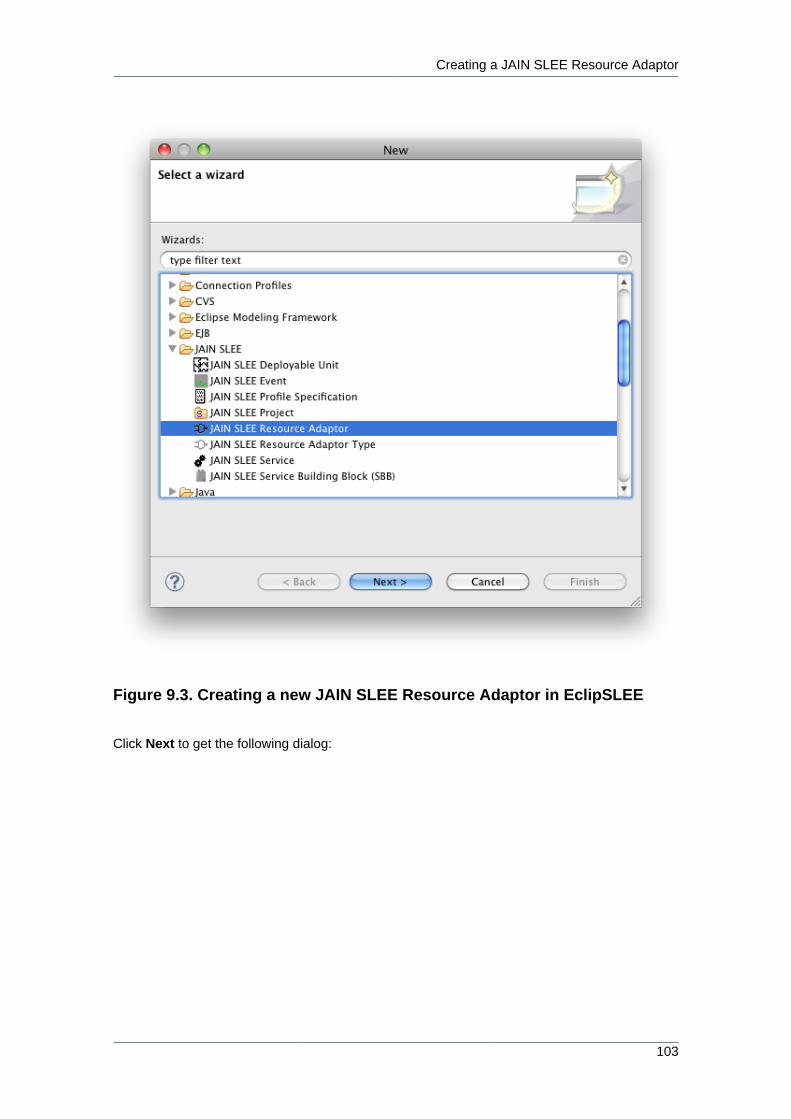
Creating a JAIN SLEE Resource Adaptor
103
Figure 9.3. Creating a new JAIN SLEE Resource Adaptor in EclipSLEE
Click Next to get the following dialog:
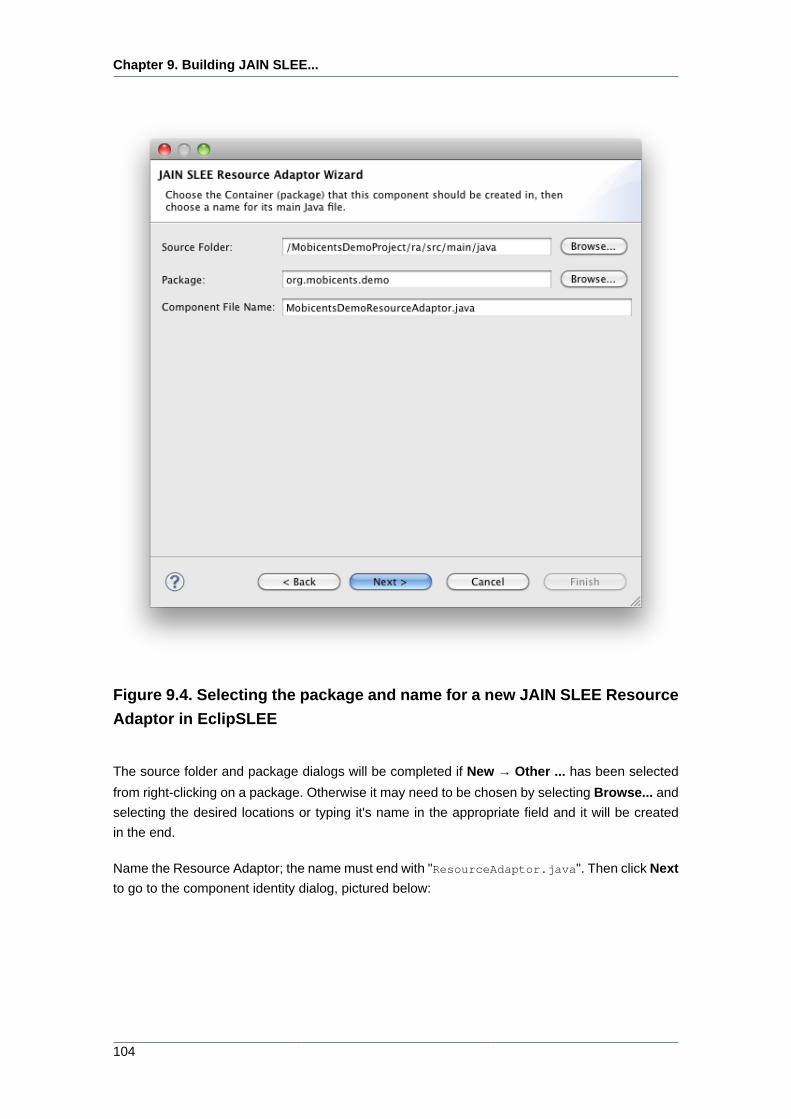
Chapter 9. Building JAIN SLEE...
104
Figure 9.4. Selecting the package and name for a new JAIN SLEE Resource
Adaptor in EclipSLEE
The source folder and package dialogs will be completed if New → Other ... has been selected
from right-clicking on a package. Otherwise it may need to be chosen by selecting Browse... and
selecting the desired locations or typing it's name in the appropriate field and it will be created
in the end.
Name the Resource Adaptor; the name must end with "ResourceAdaptor.java". Then click Next
to go to the component identity dialog, pictured below:
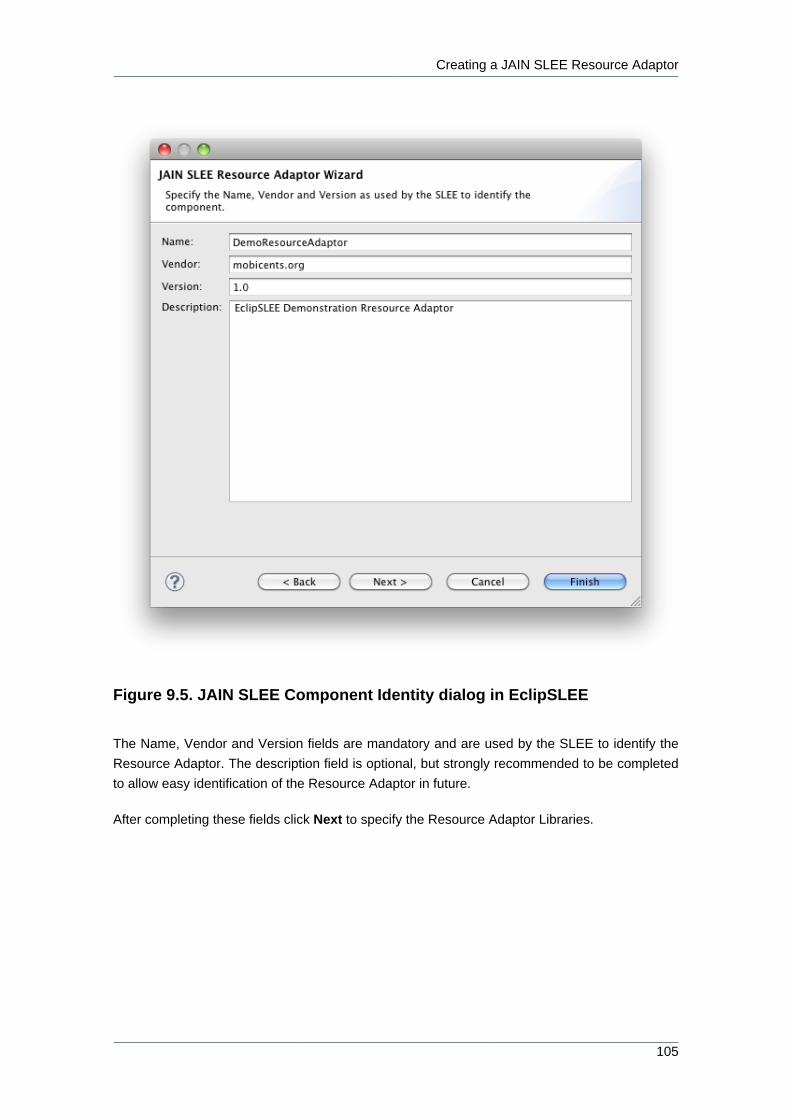
Creating a JAIN SLEE Resource Adaptor
105
Figure 9.5. JAIN SLEE Component Identity dialog in EclipSLEE
The Name, Vendor and Version fields are mandatory and are used by the SLEE to identify the
Resource Adaptor. The description field is optional, but strongly recommended to be completed
to allow easy identification of the Resource Adaptor in future.
After completing these fields click Next to specify the Resource Adaptor Libraries.
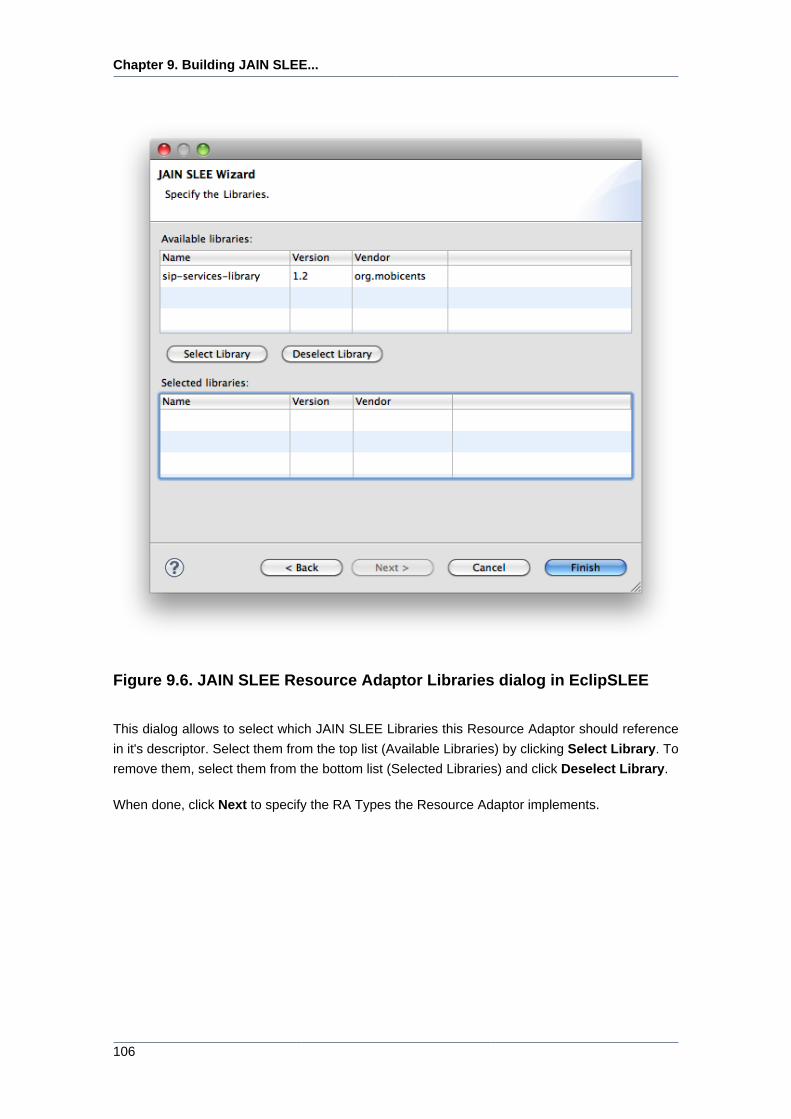
Chapter 9. Building JAIN SLEE...
106
Figure 9.6. JAIN SLEE Resource Adaptor Libraries dialog in EclipSLEE
This dialog allows to select which JAIN SLEE Libraries this Resource Adaptor should reference
in it's descriptor. Select them from the top list (Available Libraries) by clicking Select Library. To
remove them, select them from the bottom list (Selected Libraries) and click Deselect Library.
When done, click Next to specify the RA Types the Resource Adaptor implements.
Creating a JAIN SLEE Resource Adaptor
107
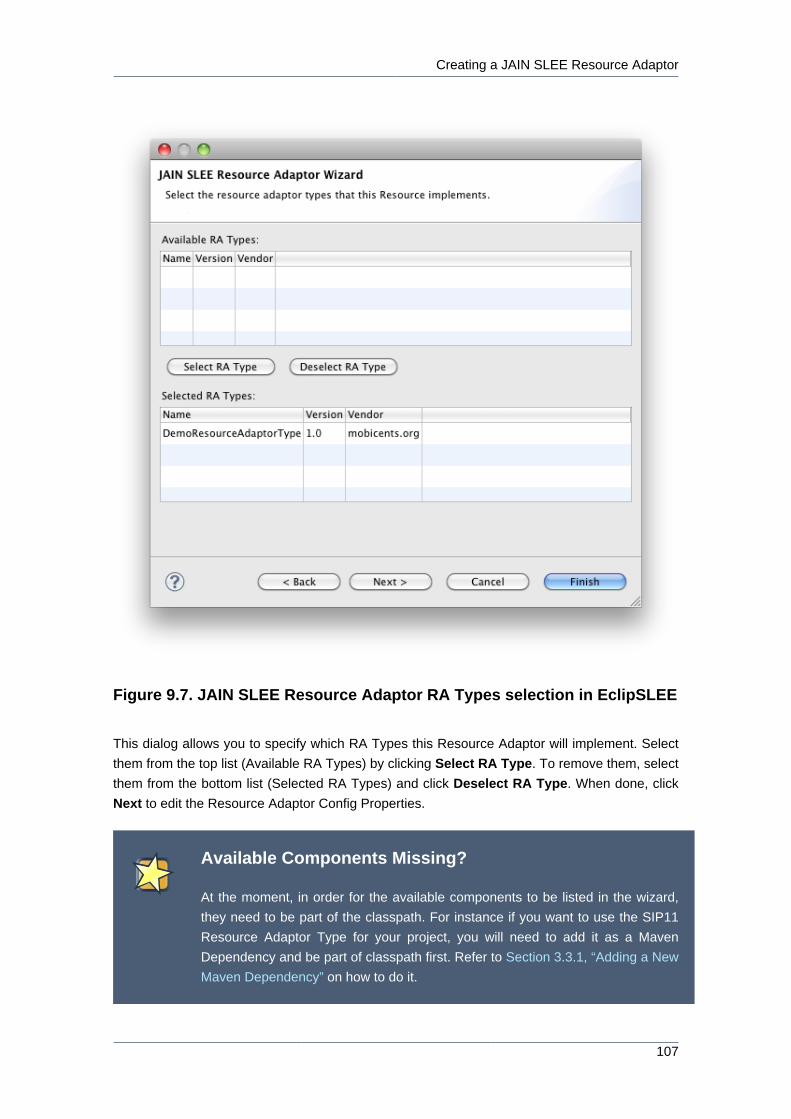
Figure 9.7. JAIN SLEE Resource Adaptor RA Types selection in EclipSLEE
This dialog allows you to specify which RA Types this Resource Adaptor will implement. Select
them from the top list (Available RA Types) by clicking Select RA Type. To remove them, select
them from the bottom list (Selected RA Types) and click Deselect RA Type. When done, click
Next to edit the Resource Adaptor Config Properties.
Available Components Missing?
At the moment, in order for the available components to be listed in the wizard,
they need to be part of the classpath. For instance if you want to use the SIP11
Resource Adaptor Type for your project, you will need to add it as a Maven
Dependency and be part of classpath first. Refer to Section 3.3.1, “Adding a New
Maven Dependency” on how to do it.
Chapter 9. Building JAIN SLEE...
108
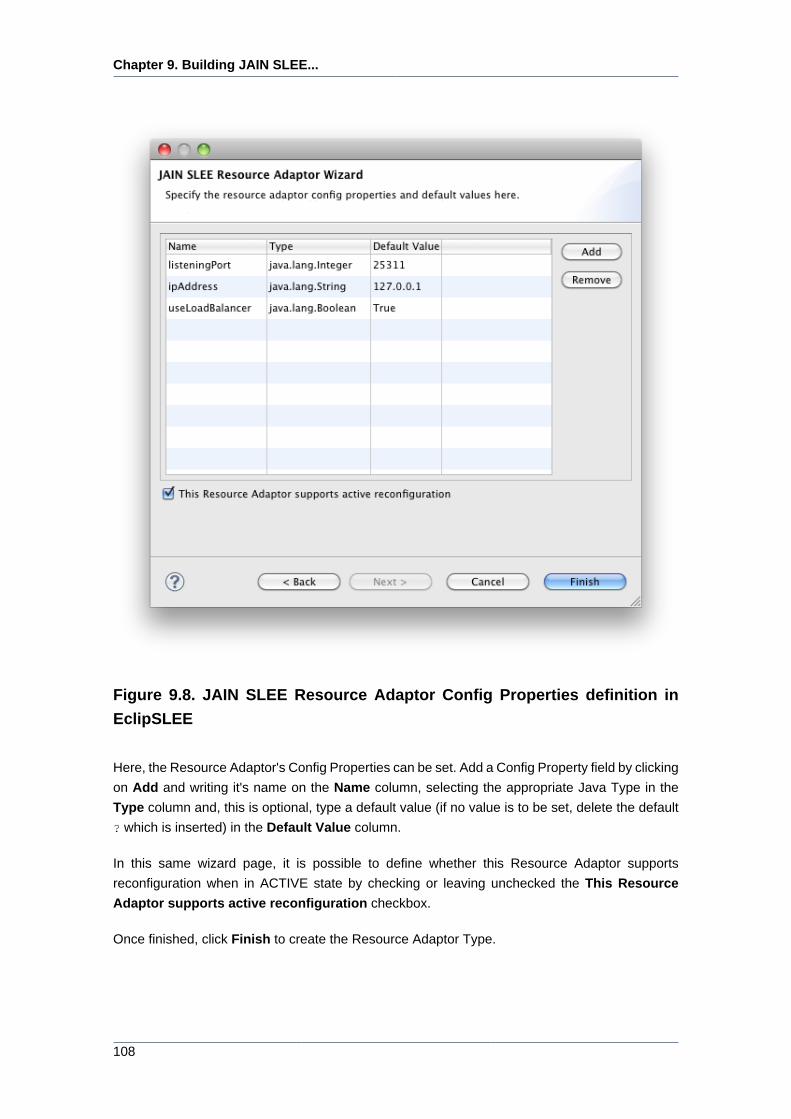
Figure 9.8. JAIN SLEE Resource Adaptor Config Properties definition in
EclipSLEE
Here, the Resource Adaptor's Config Properties can be set. Add a Config Property field by clicking
on Add and writing it's name on the Name column, selecting the appropriate Java Type in the
Type column and, this is optional, type a default value (if no value is to be set, delete the default
? which is inserted) in the Default Value column.
In this same wizard page, it is possible to define whether this Resource Adaptor supports
reconfiguration when in ACTIVE state by checking or leaving unchecked the This Resource
Adaptor supports active reconfiguration checkbox.
Once finished, click Finish to create the Resource Adaptor Type.
Editing a JAIN SLEE Resource Adaptor
109
Skipping optional steps
Finish can be clicked at any point after setting the Resource Adaptor's identity
if a skeleton Resource Adaptor is required. It is not necessary to complete each
wizard page first.
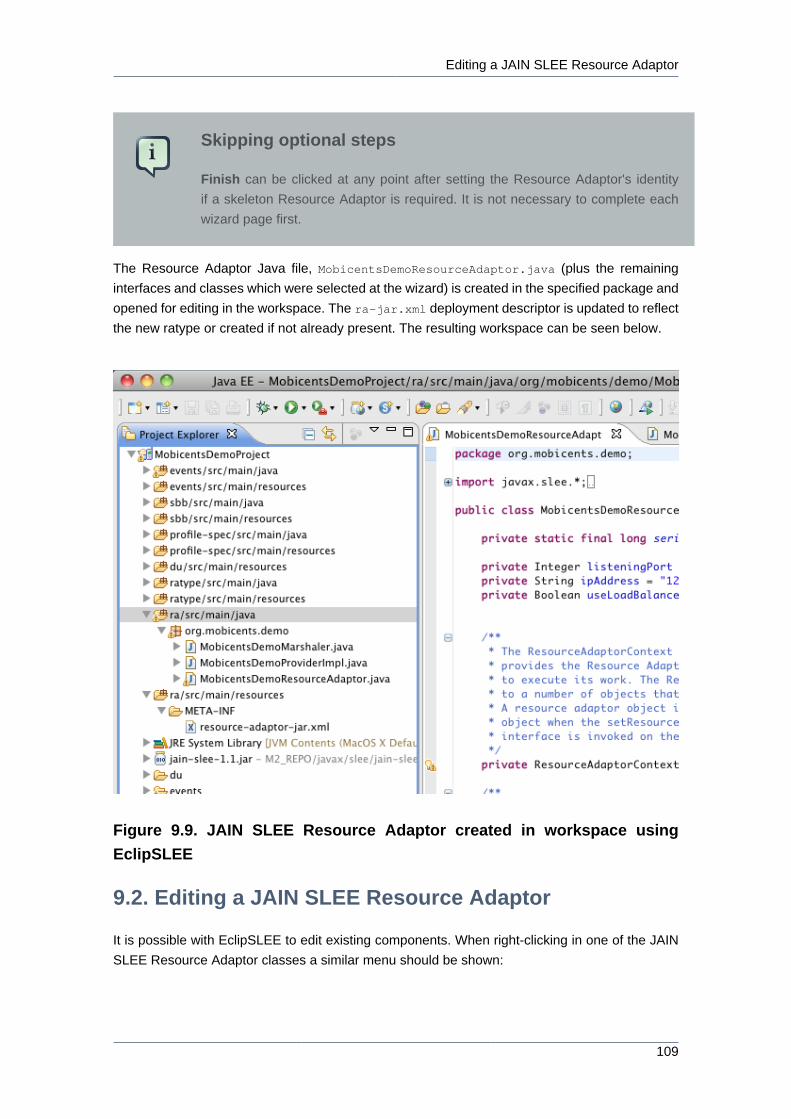
The Resource Adaptor Java file, MobicentsDemoResourceAdaptor.java (plus the remaining
interfaces and classes which were selected at the wizard) is created in the specified package and
opened for editing in the workspace. The ra-jar.xml deployment descriptor is updated to reflect
the new ratype or created if not already present. The resulting workspace can be seen below.
Figure 9.9. JAIN SLEE Resource Adaptor created in workspace using
EclipSLEE
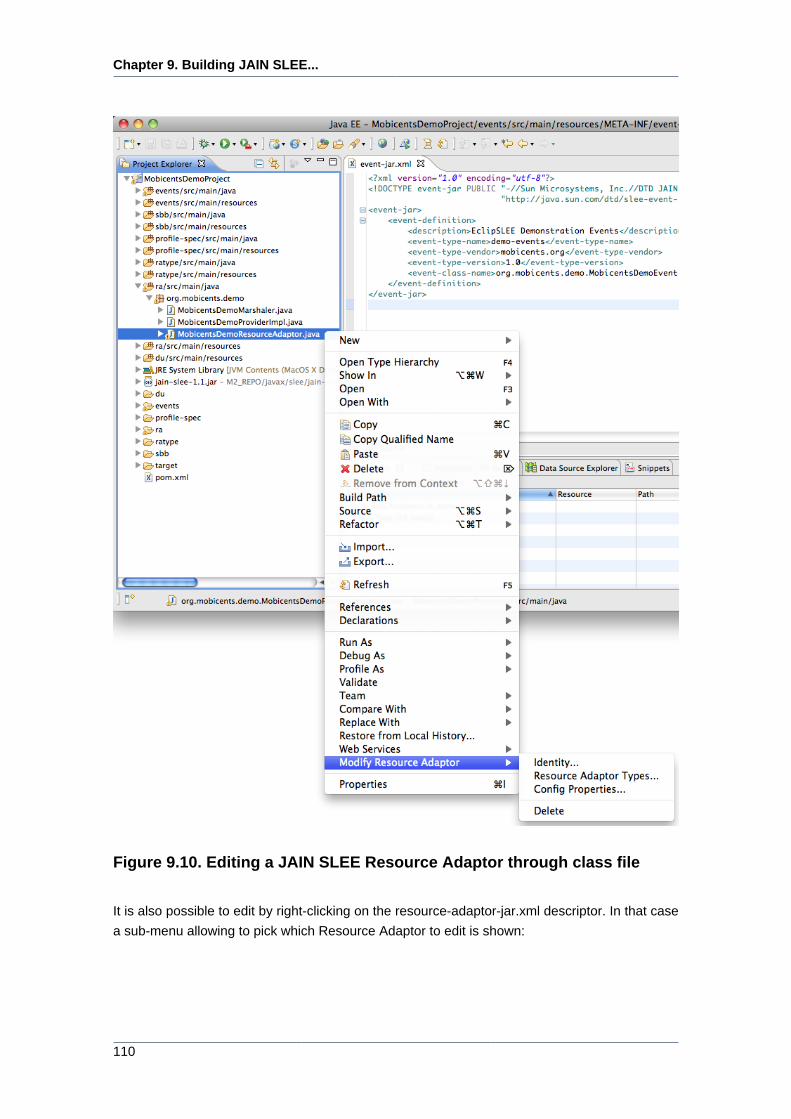
9.2. Editing a JAIN SLEE Resource Adaptor
It is possible with EclipSLEE to edit existing components. When right-clicking in one of the JAIN
SLEE Resource Adaptor classes a similar menu should be shown:
Chapter 9. Building JAIN SLEE...
110
Figure 9.10. Editing a JAIN SLEE Resource Adaptor through class file
It is also possible to edit by right-clicking on the resource-adaptor-jar.xml descriptor. In that case
a sub-menu allowing to pick which Resource Adaptor to edit is shown:
Edit RA Identity
111
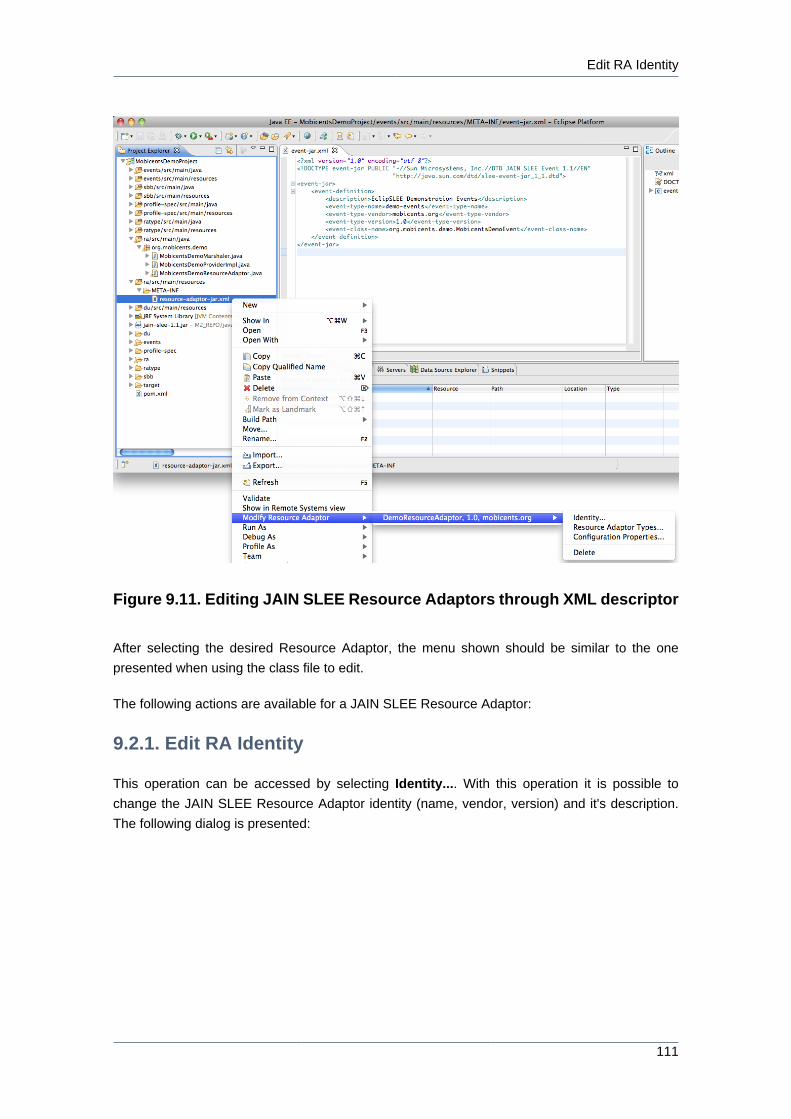
Figure 9.11. Editing JAIN SLEE Resource Adaptors through XML descriptor
After selecting the desired Resource Adaptor, the menu shown should be similar to the one
presented when using the class file to edit.
The following actions are available for a JAIN SLEE Resource Adaptor:
9.2.1. Edit RA Identity
This operation can be accessed by selecting Identity.... With this operation it is possible to
change the JAIN SLEE Resource Adaptor identity (name, vendor, version) and it's description.
The following dialog is presented:
Chapter 9. Building JAIN SLEE...
112
Figure 9.12. Editing JAIN SLEE Resource Adaptor Identity
Other components are not updated!
EclipSLEE does not automatically update other component descriptors in order to
reflect such identity change, so it should be made manually.
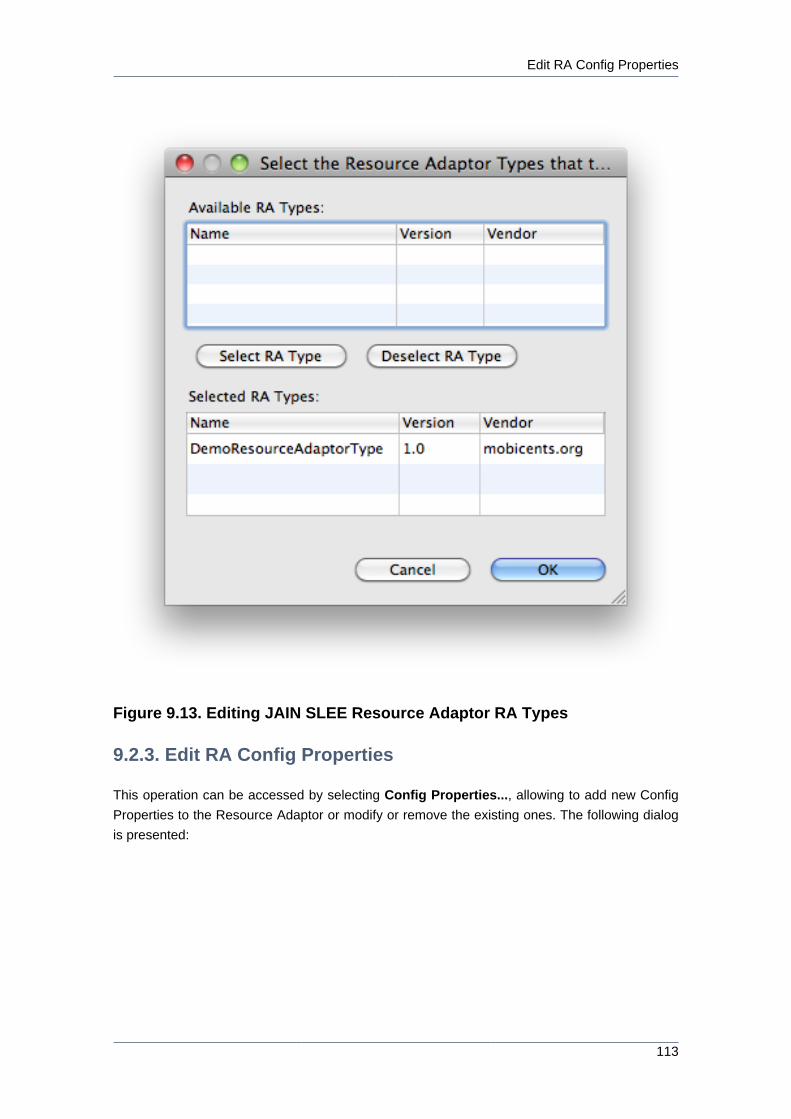
9.2.2. Edit RA Resource Adaptor Types
This operation can be accessed by selecting Resource Adaptor Types..., which allows to change
the Resource Adaptor Types being implemented by this RA. The following dialog is presented:
Edit RA Config Properties
113
Figure 9.13. Editing JAIN SLEE Resource Adaptor RA Types
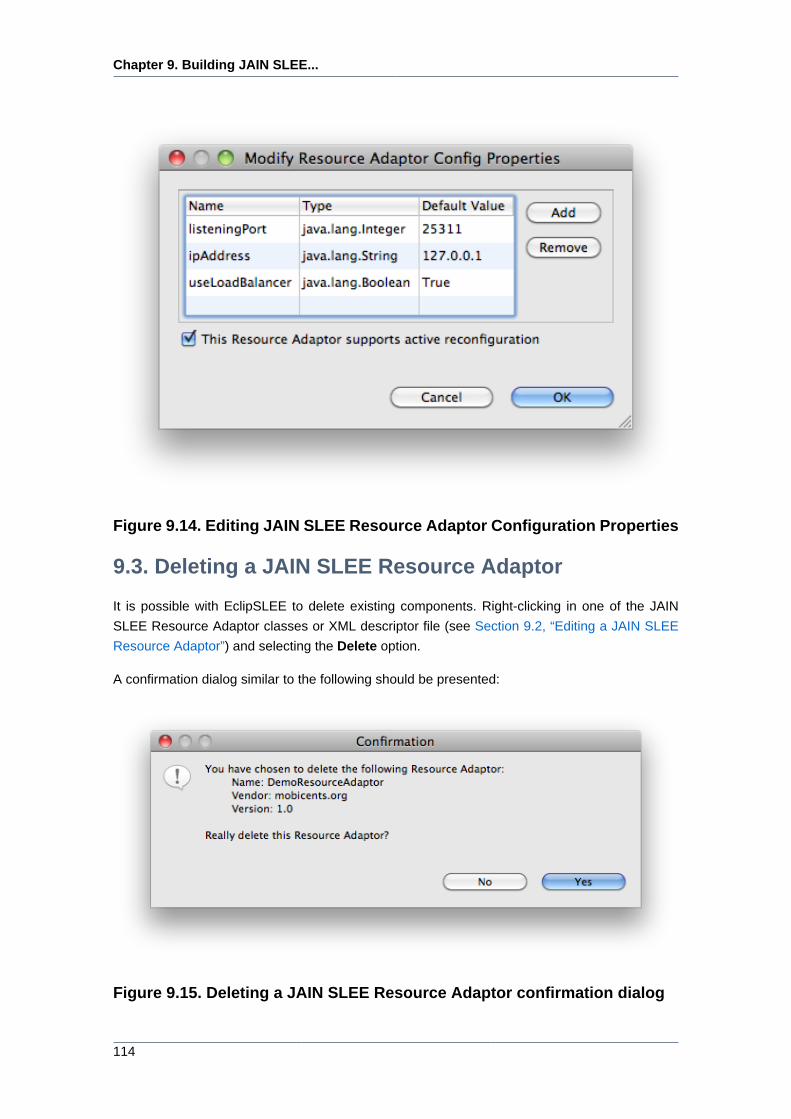
9.2.3. Edit RA Config Properties
This operation can be accessed by selecting Config Properties..., allowing to add new Config
Properties to the Resource Adaptor or modify or remove the existing ones. The following dialog
is presented:
Chapter 9. Building JAIN SLEE...
114
Figure 9.14. Editing JAIN SLEE Resource Adaptor Configuration Properties
9.3. Deleting a JAIN SLEE Resource Adaptor
It is possible with EclipSLEE to delete existing components. Right-clicking in one of the JAIN
SLEE Resource Adaptor classes or XML descriptor file (see Section 9.2, “Editing a JAIN SLEE
Resource Adaptor”) and selecting the Delete option.
A confirmation dialog similar to the following should be presented:
Figure 9.15. Deleting a JAIN SLEE Resource Adaptor confirmation dialog

Deleting a JAIN SLEE Resource Adaptor
115
Impossible to undo this operation!
Deleting a component is an irreversible operation, so it should be used carefully.

116
Chapter 10.
117
Creating a JAIN SLEE Deployable
UnitIn order to create a Deployable Unit, the Mobicents Deployable Unit Plugin for Maven is to be
used. Unfortunately the EclipSLEE plugin is not yet integrated with third-party Maven tools, and
so this must be made manually.
Requirements
For this to work, Maven must be installed and JBOSS_HOME env var set to
point to where Mobicents' JBoss AS is installed. See Appendix B, Setting the
JBOSS_HOME Environment Variable on how to do this.
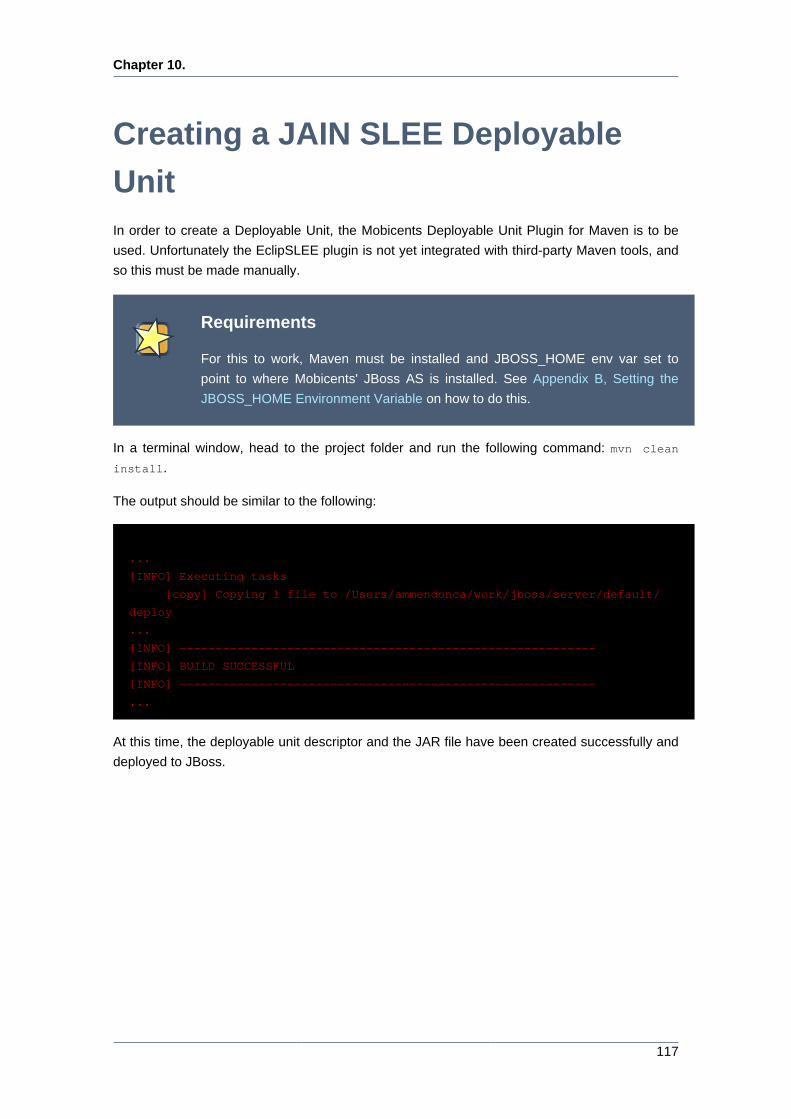
In a terminal window, head to the project folder and run the following command: mvn clean
install.
The output should be similar to the following:
...
[INFO] Executing tasks
[copy] Copying 1 file to /Users/ammendonca/work/jboss/server/default/
deploy
...
[INFO] ----------------------------------------------------------
[INFO] BUILD SUCCESSFUL
[INFO] ----------------------------------------------------------
...
At this time, the deployable unit descriptor and the JAR file have been created successfully and
deployed to JBoss.

118
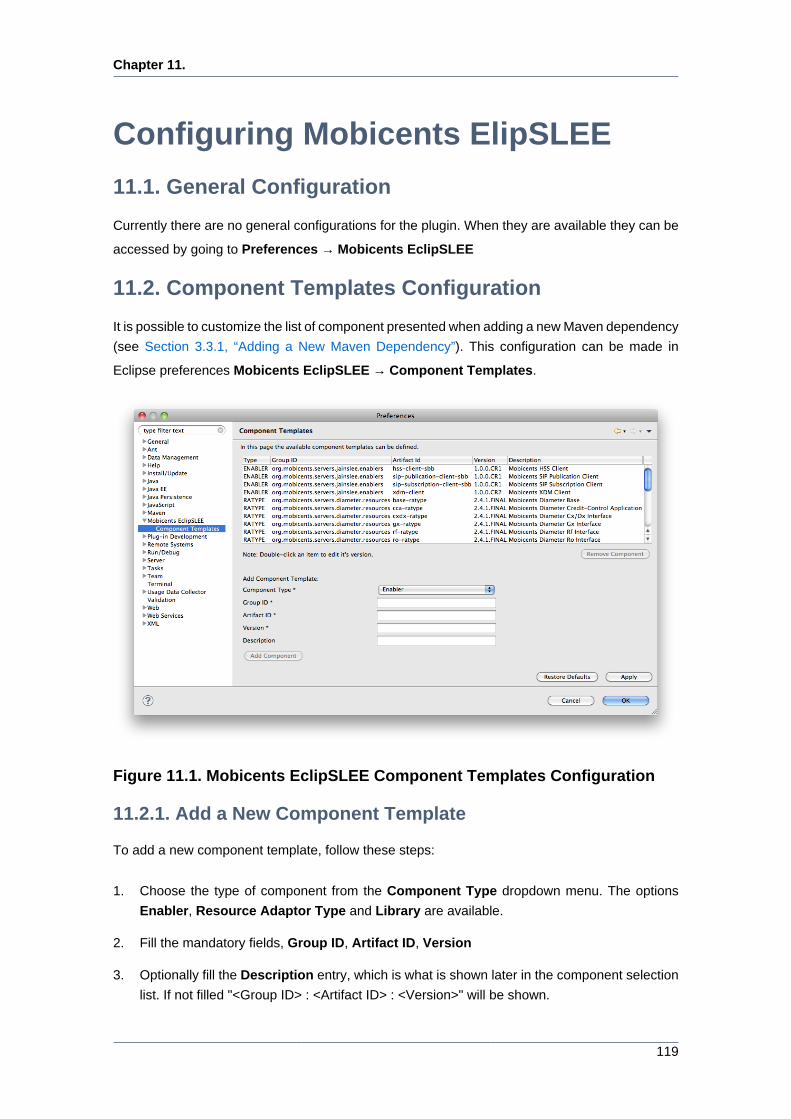
Chapter 11.
119
Configuring Mobicents ElipSLEE
11.1. General Configuration
Currently there are no general configurations for the plugin. When they are available they can be
accessed by going to Preferences → Mobicents EclipSLEE
11.2. Component Templates Configuration
It is possible to customize the list of component presented when adding a new Maven dependency
(see Section 3.3.1, “Adding a New Maven Dependency”). This configuration can be made in
Eclipse preferences Mobicents EclipSLEE → Component Templates.
Figure 11.1. Mobicents EclipSLEE Component Templates Configuration
11.2.1. Add a New Component Template
To add a new component template, follow these steps:
1. Choose the type of component from the Component Type dropdown menu. The options
Enabler, Resource Adaptor Type and Library are available.
2. Fill the mandatory fields, Group ID, Artifact ID, Version
3. Optionally fill the Description entry, which is what is shown later in the component selection
list. If not filled "<Group ID> : <Artifact ID> : <Version>" will be shown.
Chapter 11. Configuring Mobic...
120
4. Click Add Component
11.2.2. Editing a Component Template
For simplicity, editing is only allowed for the version of the component template. To do so:
1. Double-click the entry in the list
2. The version field will become editable. Change it to the desired value
3. Click some other entry, so the changes are accepted
11.2.3. Removing a Component Template
To remove a component from the template list:
1. Select the entry in the list
2. Click Remove Component
121
Appendix A. Java Development Kit
(JDK): Installing, Configuring and
RunningThe Mobicents Platform is written in Java; therefore, before running any Mobicents server, you
must have a working Java Runtime Environment (JRE) or Java Development Kit (JDK) installed
on your system. In addition, the JRE or JDK you are using to run Mobicents must be version
5 or higher1.
Should I Install the JRE or JDK? Although you can run Mobicents servers using the Java
Runtime Environment, we assume that most users are developers interested in developing Java-
based, Mobicents-driven solutions. Therefore, in this guide we take the tact of showing how to
install the full Java Development Kit.
Should I Install the 32-Bit or the 64-Bit JDK, and Does It Matter? Briefly stated: if you are
running on a 64-Bit Linux or Windows platform, you should consider installing and running the 64-
bit JDK over the 32-bit one. Here are some heuristics for determining whether you would rather
run the 64-bit Java Virtual Machine (JVM) over its 32-bit cousin for your application:
• Wider datapath: the pipe between RAM and CPU is doubled, which improves the performance
of memory-bound applications when using a 64-bit JVM.
• 64-bit memory addressing gives virtually unlimited (1 exabyte) heap allocation. However large
heaps affect garbage collection.
• Applications that run with more than 1.5 GB of RAM (including free space for garbage collection
optimization) should utilize the 64-bit JVM.
• Applications that run on a 32-bit JVM and do not require more than minimal heap sizes will gain
nothing from a 64-bit JVM. Barring memory issues, 64-bit hardware with the same relative clock
speed and architecture is not likely to run Java applications faster than their 32-bit cousin.
Note that the following instructions detail how to download and install the 32-bit JDK, although the
steps are nearly identical for installing the 64-bit version.
Downloading. You can download the Sun JDK 5.0 (Java 2 Development Kit) from Sun's
website: http://java.sun.com/javase/downloads/index_jdk5.jsp. Click on the Download link next
to "JDK 5.0 Update <x>" (where <x> is the latest minor version release number). On the next
page, select your language and platform (both architecture—whether 32- or 64-bit—and operating
1 At this point in time, it is possible to run most Mobicents servers, such as the JAIN SLEE, using a Java 6 JRE or JDK.
Be aware, however, that presently the XML Document Management Server does not run on Java 6. We suggest checking
the Mobicents web site, forums or discussion pages if you need to inquire about the status of running the XML Document
Management Server with Java 6.
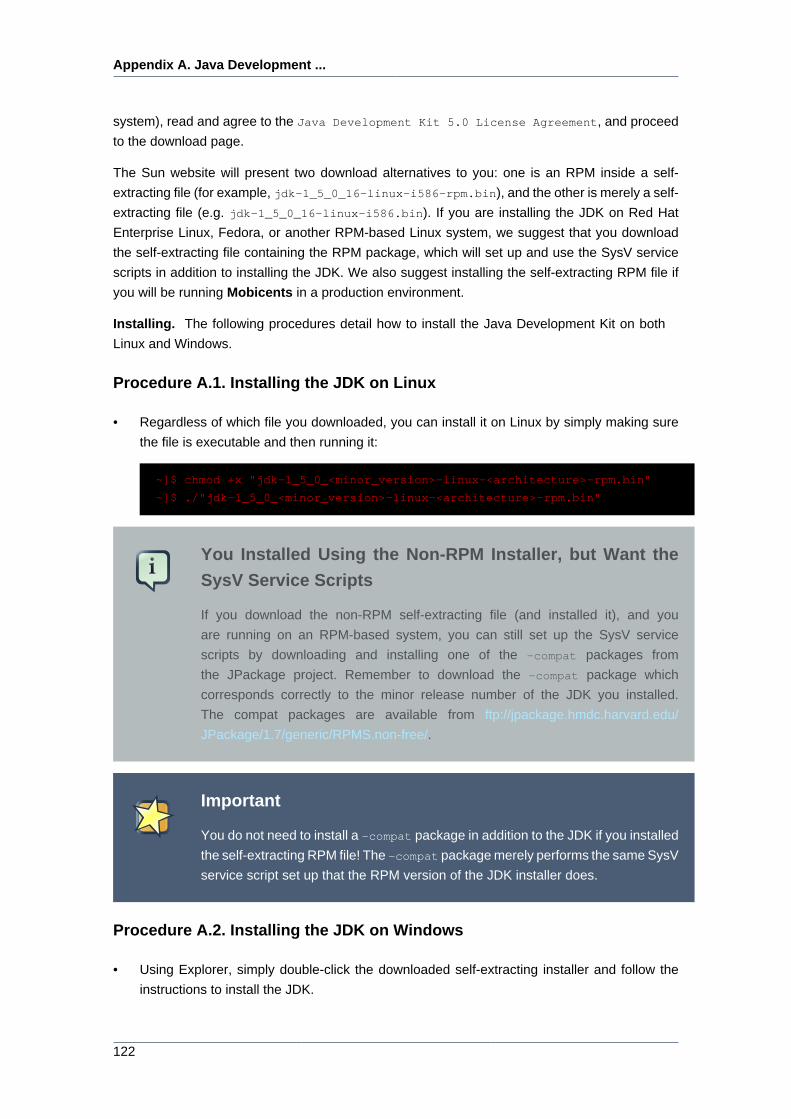
Appendix A. Java Development ...
122
system), read and agree to the Java Development Kit 5.0 License Agreement, and proceed
to the download page.
The Sun website will present two download alternatives to you: one is an RPM inside a self-
extracting file (for example, jdk-1_5_0_16-linux-i586-rpm.bin), and the other is merely a self-
extracting file (e.g. jdk-1_5_0_16-linux-i586.bin). If you are installing the JDK on Red Hat
Enterprise Linux, Fedora, or another RPM-based Linux system, we suggest that you download
the self-extracting file containing the RPM package, which will set up and use the SysV service
scripts in addition to installing the JDK. We also suggest installing the self-extracting RPM file if
you will be running Mobicents in a production environment.
Installing. The following procedures detail how to install the Java Development Kit on both
Linux and Windows.
Procedure A.1. Installing the JDK on Linux
• Regardless of which file you downloaded, you can install it on Linux by simply making sure
the file is executable and then running it:
~]$ chmod +x "jdk-1_5_0_<minor_version>-linux-<architecture>-rpm.bin"
~]$ ./"jdk-1_5_0_<minor_version>-linux-<architecture>-rpm.bin"
You Installed Using the Non-RPM Installer, but Want the
SysV Service Scripts
If you download the non-RPM self-extracting file (and installed it), and you
are running on an RPM-based system, you can still set up the SysV service
scripts by downloading and installing one of the -compat packages from
the JPackage project. Remember to download the -compat package which
corresponds correctly to the minor release number of the JDK you installed.
The compat packages are available from ftp://jpackage.hmdc.harvard.edu/
JPackage/1.7/generic/RPMS.non-free/.
Important
You do not need to install a -compat package in addition to the JDK if you installed
the self-extracting RPM file! The -compat package merely performs the same SysV
service script set up that the RPM version of the JDK installer does.
Procedure A.2. Installing the JDK on Windows
• Using Explorer, simply double-click the downloaded self-extracting installer and follow the
instructions to install the JDK.
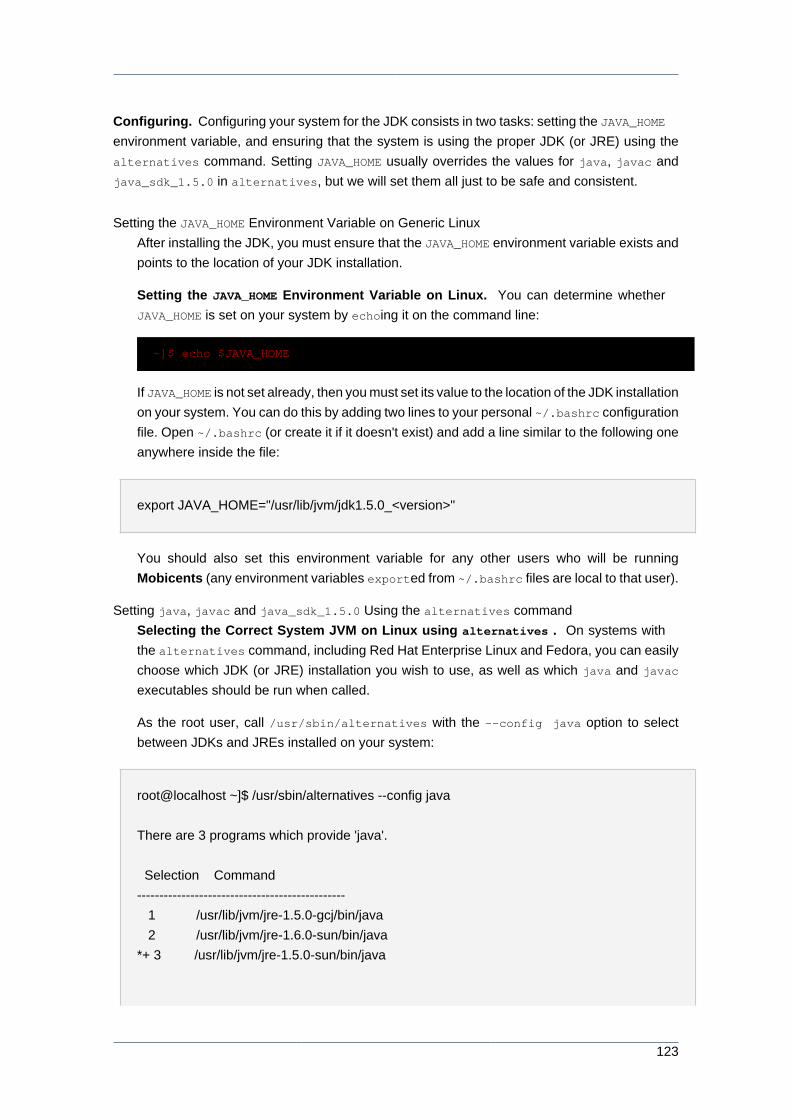
123
Configuring. Configuring your system for the JDK consists in two tasks: setting the JAVA_HOME
environment variable, and ensuring that the system is using the proper JDK (or JRE) using the
alternatives command. Setting JAVA_HOME usually overrides the values for java, javac and
java_sdk_1.5.0 in alternatives, but we will set them all just to be safe and consistent.
Setting the JAVA_HOME Environment Variable on Generic Linux
After installing the JDK, you must ensure that the JAVA_HOME environment variable exists and
points to the location of your JDK installation.
Setting the JAVA_HOME Environment Variable on Linux. You can determine whether
JAVA_HOME is set on your system by echoing it on the command line:
~]$ echo $JAVA_HOME
If JAVA_HOME is not set already, then you must set its value to the location of the JDK installation
on your system. You can do this by adding two lines to your personal ~/.bashrc configuration
file. Open ~/.bashrc (or create it if it doesn't exist) and add a line similar to the following one
anywhere inside the file:
export JAVA_HOME="/usr/lib/jvm/jdk1.5.0_<version>"
You should also set this environment variable for any other users who will be running
Mobicents (any environment variables exported from ~/.bashrc files are local to that user).
Setting java, javac and java_sdk_1.5.0 Using the alternatives command
Selecting the Correct System JVM on Linux using alternatives . On systems with
the alternatives command, including Red Hat Enterprise Linux and Fedora, you can easily
choose which JDK (or JRE) installation you wish to use, as well as which java and javac
executables should be run when called.
As the root user, call /usr/sbin/alternatives with the --config java option to select
between JDKs and JREs installed on your system:
root@localhost ~]$ /usr/sbin/alternatives --config java
There are 3 programs which provide 'java'.
Selection Command
-----------------------------------------------
1 /usr/lib/jvm/jre-1.5.0-gcj/bin/java
2 /usr/lib/jvm/jre-1.6.0-sun/bin/java
*+ 3 /usr/lib/jvm/jre-1.5.0-sun/bin/java
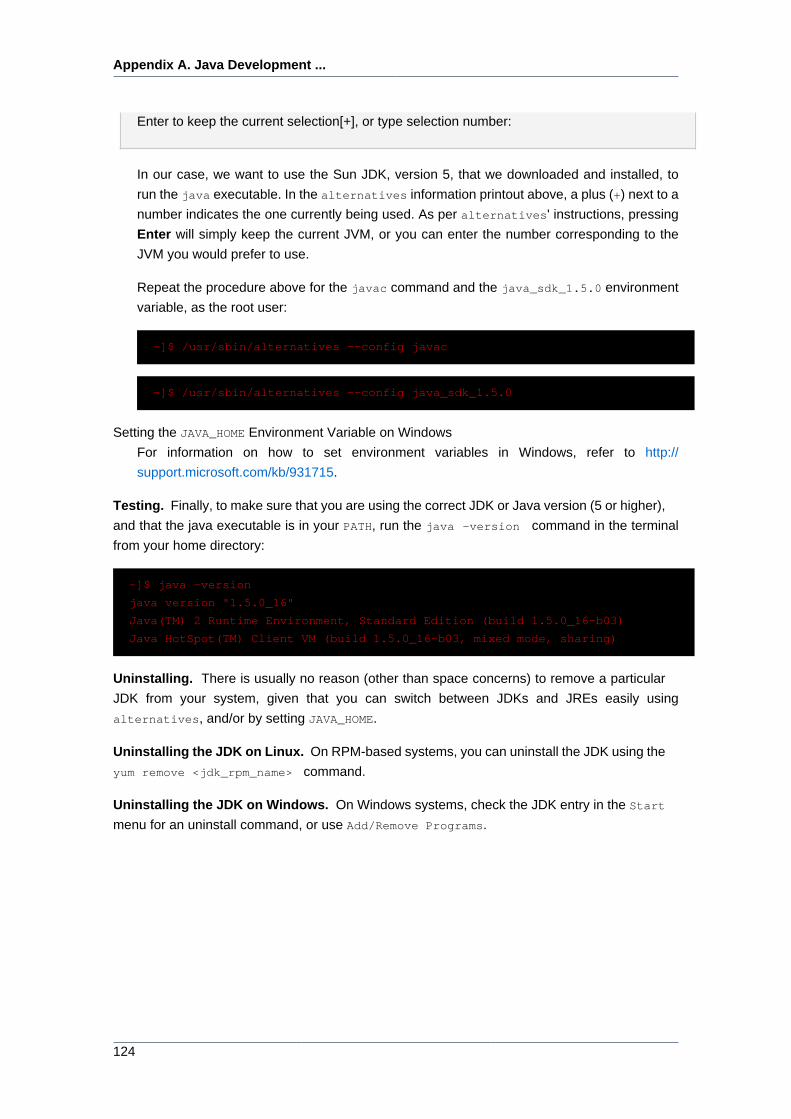
Appendix A. Java Development ...
124
Enter to keep the current selection[+], or type selection number:
In our case, we want to use the Sun JDK, version 5, that we downloaded and installed, to
run the java executable. In the alternatives information printout above, a plus (+) next to a
number indicates the one currently being used. As per alternatives' instructions, pressing
Enter will simply keep the current JVM, or you can enter the number corresponding to the
JVM you would prefer to use.
Repeat the procedure above for the javac command and the java_sdk_1.5.0 environment
variable, as the root user:
~]$ /usr/sbin/alternatives --config javac
~]$ /usr/sbin/alternatives --config java_sdk_1.5.0
Setting the JAVA_HOME Environment Variable on Windows
For information on how to set environment variables in Windows, refer to http://
support.microsoft.com/kb/931715.
Testing. Finally, to make sure that you are using the correct JDK or Java version (5 or higher),
and that the java executable is in your PATH, run the java -version command in the terminal
from your home directory:
~]$ java -version
java version "1.5.0_16"
Java(TM) 2 Runtime Environment, Standard Edition (build 1.5.0_16-b03)
Java HotSpot(TM) Client VM (build 1.5.0_16-b03, mixed mode, sharing)
Uninstalling. There is usually no reason (other than space concerns) to remove a particular
JDK from your system, given that you can switch between JDKs and JREs easily using
alternatives, and/or by setting JAVA_HOME.
Uninstalling the JDK on Linux. On RPM-based systems, you can uninstall the JDK using the
yum remove <jdk_rpm_name> command.
Uninstalling the JDK on Windows. On Windows systems, check the JDK entry in the Start
menu for an uninstall command, or use Add/Remove Programs.

125
Appendix B. Setting the
JBOSS_HOME Environment VariableThe Mobicents Platform (Mobicents) is built on top of the JBoss Application Server. You
do not need to set the JBOSS_HOME environment variable to run any of the Mobicents Platform
servers unless JBOSS_HOME is already set.
The best way to know for sure whether JBOSS_HOME was set previously or not is to perform a
simple check which may save you time and frustration.
Checking to See If JBOSS_HOME is Set on Unix. At the command line, echo $JBOSS_HOME
to see if it is currently defined in your environment:
~]$ echo $JBOSS_HOME
The Mobicents Platform and most Mobicents servers are built on top of the JBoss Application
Server (JBoss Application Server). When the Mobicents Platform or Mobicents servers are
built from source, then JBOSS_HOME must be set, because the Mobicents files are installed into (or
“over top of” if you prefer) a clean JBoss Application Server installation, and the build process
assumes that the location pointed to by the JBOSS_HOME environment variable at the time of
building is the JBoss Application Server installation into which you want it to install the Mobicents
files.
This guide does not detail building the Mobicents Platform or any Mobicents servers from source.
It is nevertheless useful to understand the role played by JBoss AS and JBOSS_HOME in the
Mobicents ecosystem.
The immediately-following section considers whether you need to set JBOSS_HOME at all and, if
so, when. The subsequent sections detail how to set JBOSS_HOME on Unix and Windows
Important
Even if you fall into the category below of not needing to set JBOSS_HOME, you may
want to for various reasons anyway. Also, even if you are instructed that you do
not need to set JBOSS_HOME, it is good practice nonetheless to check and make
sure that JBOSS_HOME actually isn't set or defined on your system for some reason.
This can save you both time and frustration.
You DO NOT NEED to set JBOSS_HOME if...
• ...you have installed the Mobicents Platform binary distribution.
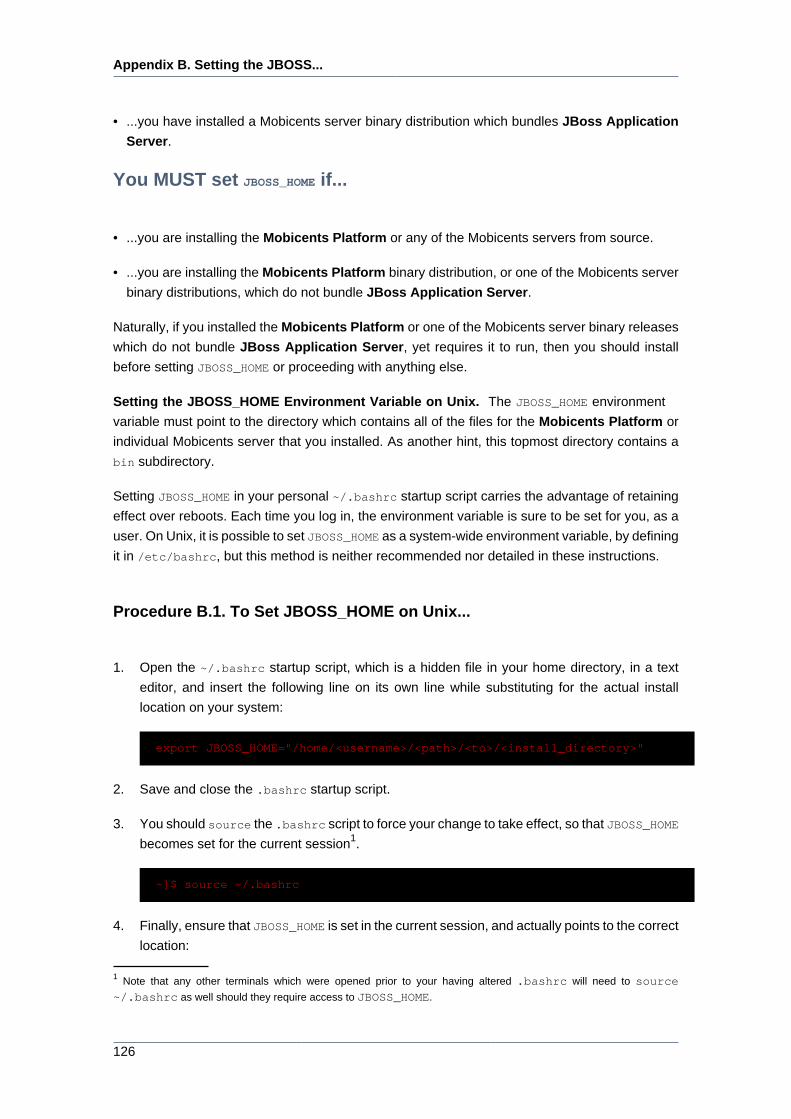
Appendix B. Setting the JBOSS...
126
• ...you have installed a Mobicents server binary distribution which bundles JBoss Application
Server.
You MUST set JBOSS_HOME if...
• ...you are installing the Mobicents Platform or any of the Mobicents servers from source.
• ...you are installing the Mobicents Platform binary distribution, or one of the Mobicents server
binary distributions, which do not bundle JBoss Application Server.
Naturally, if you installed the Mobicents Platform or one of the Mobicents server binary releases
which do not bundle JBoss Application Server, yet requires it to run, then you should install
before setting JBOSS_HOME or proceeding with anything else.
Setting the JBOSS_HOME Environment Variable on Unix. The JBOSS_HOME environment
variable must point to the directory which contains all of the files for the Mobicents Platform or
individual Mobicents server that you installed. As another hint, this topmost directory contains a
bin subdirectory.
Setting JBOSS_HOME in your personal ~/.bashrc startup script carries the advantage of retaining
effect over reboots. Each time you log in, the environment variable is sure to be set for you, as a
user. On Unix, it is possible to set JBOSS_HOME as a system-wide environment variable, by defining
it in /etc/bashrc, but this method is neither recommended nor detailed in these instructions.
Procedure B.1. To Set JBOSS_HOME on Unix...
1. Open the ~/.bashrc startup script, which is a hidden file in your home directory, in a text
editor, and insert the following line on its own line while substituting for the actual install
location on your system:
export JBOSS_HOME="/home/<username>/<path>/<to>/<install_directory>"
2. Save and close the .bashrc startup script.
3. You should source the .bashrc script to force your change to take effect, so that JBOSS_HOME
becomes set for the current session1.
~]$ source ~/.bashrc
4. Finally, ensure that JBOSS_HOME is set in the current session, and actually points to the correct
location:
1 Note that any other terminals which were opened prior to your having altered .bashrc will need to source
~/.bashrc as well should they require access to JBOSS_HOME.
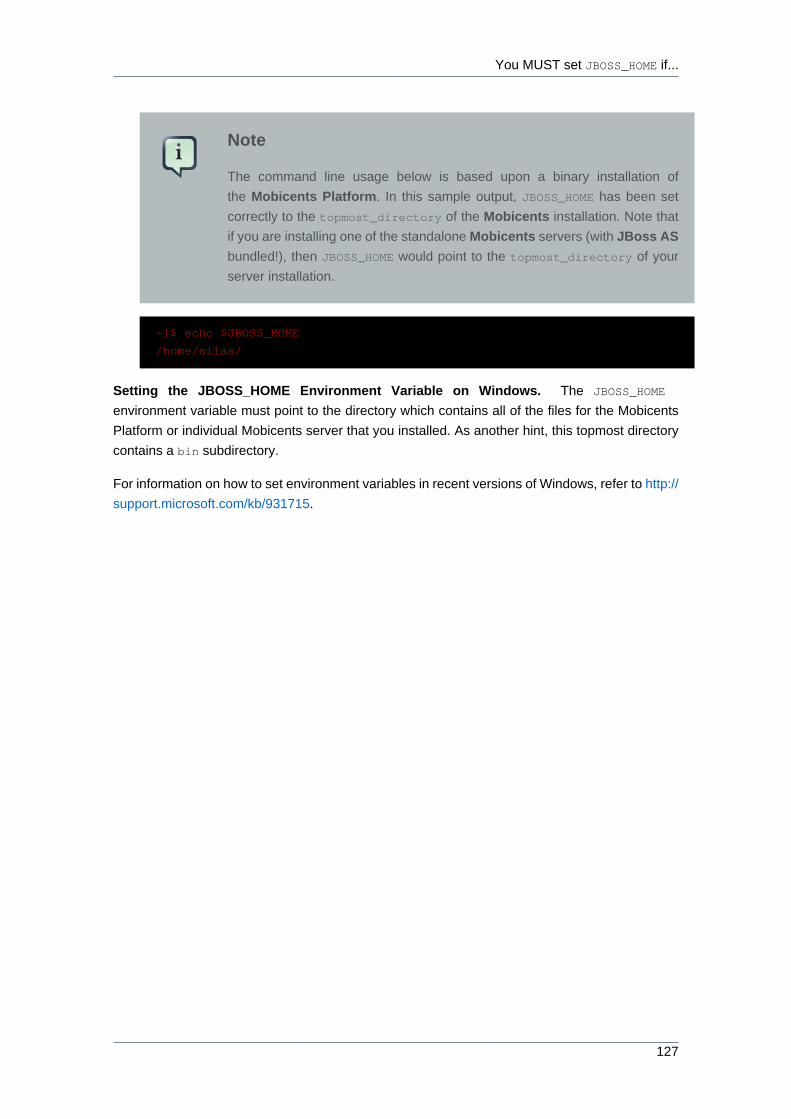
You MUST set JBOSS_HOME if...
127
Note
The command line usage below is based upon a binary installation of
the Mobicents Platform. In this sample output, JBOSS_HOME has been set
correctly to the topmost_directory of the Mobicents installation. Note that
if you are installing one of the standalone Mobicents servers (with JBoss AS
bundled!), then JBOSS_HOME would point to the topmost_directory of your
server installation.
~]$ echo $JBOSS_HOME
/home/silas/
Setting the JBOSS_HOME Environment Variable on Windows. The JBOSS_HOME
environment variable must point to the directory which contains all of the files for the Mobicents
Platform or individual Mobicents server that you installed. As another hint, this topmost directory
contains a bin subdirectory.
For information on how to set environment variables in recent versions of Windows, refer to http://
support.microsoft.com/kb/931715.

128

129
Appendix C. Revision HistoryRevision History
Revision 1.0 Tue Nov 09 2010 AlexandreMendonça
Creation of the Mobicents EclipSLEE Plugin User Guide.
Revision 1.1 Fri Mar 25 2011 AlexandreMendonça
Addition of the Mobicents EclipSLEE Plugin support to Resource Adaptor Type and Resource
Adaptor to the User Guide.
Revision 1.2 Fri Apr 22 2011 AlexandreMendonça
Addition of the Mobicents EclipSLEE Plugin support for component editing to the User Guide.

130

131
IndexFfeedback, viii

132