mise en page 1 - tunstall emergency response
TRANSCRIPT


www.everon.net Copyright ©2009
2
Home: Indicates that Vega is communicating with a working Vega Baseand is in its radiofrequency (RF) zone, allowing it to work in energy-savingmode (explained later).
Magnifying glass: Indicates that Vega is looking for GPS satellite signals.
Pin: Indicates that Vega has succeeded in determining its positionusing the GPS system.
Globe: Indicates that Vega is connected overthe mobile network to global positioning servers.
GSM Signal Quality: Indicatesthe quality of the GSM signals(from 0 to 5 bars).
Battery: Indicates batterycharge level of the Vega.
Time
Date:Day/Month/Year
Display button:Press to activateand use screen functions.
Speaker/microphone:For vocal communication.
Latches to hold battery pack.
Emergency button:Press 2 seconds to send an alarmto the response centre.
Alert: Appears when Vega is trying to transmit an emergencybutton alert to the response centre.

3
About the User ManualThis Guide is published by Everon, who may at any time make changes, improvementsor typographical corrections without prior notice.
At the time that this Guide went to press, the information it contains was deemed, by Everon oy , to betrue and accurate.
The trademarks “Vega” and “Everon” are the property of Everon Oy.
Other products and/or company names cited in this Guide may be trademarks of their respectiveholders.
Publication number: EUC2-200908-A-ENCopyright ©2009
About the User Manual . . . . . . . . . . . . . . . . . . . . . . . . . . . . 3A) System Components . . . . . . . . . . . . . . . . . . . . . . . . . . . . 4Vega . . . . . . . . . . . . . . . . . . . . . . . . . . . . . . . . . . . . . . . . . . . . . . . . . . . . . . . . . . . . 4Vega Base . . . . . . . . . . . . . . . . . . . . . . . . . . . . . . . . . . . . . . . . . . . . . . . . . . . . 4Battery pack . . . . . . . . . . . . . . . . . . . . . . . . . . . . . . . . . . . . . . . . . . . . . . . . . 5Bracelet parts . . . . . . . . . . . . . . . . . . . . . . . . . . . . . . . . . . . . . . . . . . . . . . . 5Release key . . . . . . . . . . . . . . . . . . . . . . . . . . . . . . . . . . . . . . . . . . . . . . . . . . 5B) Getting started: Vega SystemInstallation and Charging . . . . . . . . . . . . . . . . . . . . 6
Step 1: Bracelet selection and fitting . . . . . . . . . . . . . . . 6Step 2: Vega Base location and installation . . . . . . 7Step 3: Charging the battery pack . . . . . . . . . . . . . . . . . . . 8Step 4: Charging Vega . . . . . . . . . . . . . . . . . . . . . . . . . . . . . . . . . . 10C) Vega Operating Modes . . . . . . . . . . . . . . . . . . . . . . 111. Inside the home zone (Sleep mode) . . . . . . . . . . . 112. Outside the home zone
(Regular mode AND INSIDE SAFE ZONE) . . . . . 123. Exiting the safe zone . . . . . . . . . . . . . . . . . . . . . . . . . . . . . . . . 124. Vocal communication . . . . . . . . . . . . . . . . . . . . . . . . . . . . . . . 13
D) In case of an emergency:press the red button . . . . . . . . . . . . . . . . . . . . . . . . . . 13
E) Automatic Low battery alert . . . . . . . . . . . . . 14F) Locating Vega . . . . . . . . . . . . . . . . . . . . . . . . . . . . . . . . . . . . . 14G) Environmental Conditions
and Restrictions . . . . . . . . . . . . . . . . . . . . . . . . . . . . . . . . . 141. General instructions . . . . . . . . . . . . . . . . . . . . . . . . . . . . . . . . . 142. Water . . . . . . . . . . . . . . . . . . . . . . . . . . . . . . . . . . . . . . . . . . . . . . . . . . . . . 153. Special restrictions . . . . . . . . . . . . . . . . . . . . . . . . . . . . . . . . . . . 154. Customer Service . . . . . . . . . . . . . . . . . . . . . . . . . . . . . . . . . . . . . 155. Recycling Vega and Components . . . . . . . . . . . . . . . 15H) Specifications . . . . . . . . . . . . . . . . . . . . . . . . . . . . . . . . . . . . . 161. Technical specifications . . . . . . . . . . . . . . . . . . . . . . . . . . . . . 162. Battery autonomy . . . . . . . . . . . . . . . . . . . . . . . . . . . . . . . . . . . . 163. Network services . . . . . . . . . . . . . . . . . . . . . . . . . . . . . . . . . . . . . 164. Specific Absorption Rate . . . . . . . . . . . . . . . . . . . . . . . . . . . 16I) Legal Advice . . . . . . . . . . . . . . . . . . . . . . . . . . . . . . . . . . . . . . . . 171. Intellectual property . . . . . . . . . . . . . . . . . . . . . . . . . . . . . . . . . 172. Statement of compliance . . . . . . . . . . . . . . . . . . . . . . . . . . 18
Table of Contents to become fullyacquainted with the VEGA gps bracelet

www.everon.net Copyright ©2009
4
A) System Components
Vega
A. DisplayB. Emergency buttonC. Display buttonD. Speaker/microphoneE. Latches to hold battery pack in place
on Vega during charging
Vega Base
A. Latches to hold battery pack in placeon the Vega Base during charging
B. Receptacle for latch release keyC. Radiofrequencies (RF) antennaD. Battery pack baseE. Electrical contacts for recharging
battery pack (back)F. Blue LED – Vega Base working when ONG. Red and green LEDs – Battery pack charging when Red,
and goes Green when fully chargedH. Holes for optional wall mountingI. Telephone jackJ. DC power jack
AB
DC
E
C
B
A
D
F
E
G
J
I
H

5
Battery pack
A. Latch – Push in, to hold battery pack eitheron the Vega Base or on the Vega
B. Holes for inserting key to release battery packfrom latches on the Vega Base or on the Vega
C. Blue LED – Vega charging when ON, and goes OFFwhen battery pack charge is transferred to Vega battery
D. DC power jack for recharging
Bracelet parts
A. Wrist straps with holes (2 sizes)B. Steel pinC. Wrist straps with safety snapsD. Clasp with two screwsE. Vega bracelet support
Release key
A. Two-pin key to release mechanism
A
B D
C
A
B
D
C
A
E

www.everon.net Copyright ©2009
6
B) Getting started:Vega System Installation and Charging
Step 1: Bracelet selection and fitting
Vega comes with two wrist straps of different sizes to ensure a proper fit on a wide range of wristsizes. In addition, the length of each wrist strap can be adjusted for greater wearer comfortand maximum safety.
Bracelet parts are shipped semi-assembled andmust be disassembled to adjust the parts beforethe bracelet can be fitted.
1. Insert the wrist strap with safety snaps intothe slot on the Vega support.
2. Insert one of the two wrist straps with holes,depending on the size of the wearer’s wrist,with the grooved side facing the skin.
3. To select the wrist strap providing a better fit, wrapeach of the straps provided around the wearer’swrist. Select the strap with the end holes that lineup with the end holes on the other strap.
Choose the holes that allow the best possible fitso the wearer cannot remove the bracelet withoutunlocking it, while being loose enough to becomfortable and not impede blood circulation.TO AVOID INJURY, DO NOT OVERTIGHTENTHE BRACELET.
4. Once you have selected the right size wrist strap,slip the steel pin through the strap to lock it ontothe Vega support, as illustrated.
5. Remove the strap with safety snaps by insertingthe key into the mating holes on the Vega support.
6. Gently push the strap with safety snaps.
1
2
(Clic)
3
4
5
6

7
7. Assemble the Vega on its support using the fourscrews to attach it onto the back of the support.
8. Slip the end of the bracelet with safety snaps intothe lock and line it up with the holes previouslyfound to ensure a proper fit. Then screw the lockonto the strap with holes using the screwdriverprovided in the Vega package.
9. Next, place the bracelet with the Vega assembledaround the wearer’s wrist, slipping the strap withsafety snaps into the slot of the Vega support.
If you need to take the Vega off the wearer’s wrist,follow steps 5 and 6 above.
Step 2: Vega Base location and installation
Power SupplyFirst, connect the power adapter into the DC-in jack located underneath the Vega base. Then, connectthe power adapter into the home power outlet. The blue LED turns on. It indicates that the Vega baseis functional.
Positioning the base in the homeThe Vega Base has a radiofrequency (RF) transmitter that creates an area, called the home zone, inwhich the Vega goes into economy mode (details found further in the Guide).
It is very important that the Vega Base be properly located in the wearer’s home. It is best placed nearthe middle of the home so that the home zone covers the largest possible indoor area, or in the areawhere the wearer is most often found, including at night. If the Vega Base is in a poor location, Vegawill consume more power since it is more often outside the home zone and cannot benefit from thelower power battery consumption in economy mode.
9
7
88
www.everon.net Copyright ©2009
8
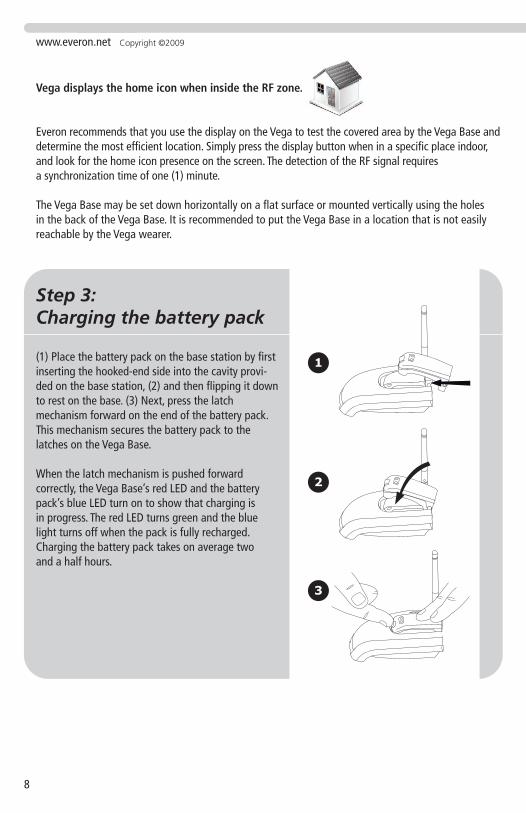
Vega displays the home icon when inside the RF zone.
Everon recommends that you use the display on the Vega to test the covered area by the Vega Base anddetermine the most efficient location. Simply press the display button when in a specific place indoor,and look for the home icon presence on the screen. The detection of the RF signal requiresa synchronization time of one (1) minute.
The Vega Base may be set down horizontally on a flat surface or mounted vertically using the holesin the back of the Vega Base. It is recommended to put the Vega Base in a location that is not easilyreachable by the Vega wearer.
Step 3:Charging the battery pack
(1) Place the battery pack on the base station by firstinserting the hooked-end side into the cavity provi-ded on the base station, (2) and then flipping it downto rest on the base. (3) Next, press the latchmechanism forward on the end of the battery pack.This mechanism secures the battery pack to thelatches on the Vega Base.
When the latch mechanism is pushed forwardcorrectly, the Vega Base’s red LED and the batterypack’s blue LED turn on to show that charging isin progress. The red LED turns green and the bluelight turns off when the pack is fully recharged.Charging the battery pack takes on average twoand a half hours.
1
2
3

9
To remove the battery pack from the Vega base,release the latch by inserting the key into the twoholes as shown. You will hear a click when themechanism has been released. Always put thekey back on the base, inside its receptacle, after usingit so that it doesn’t get lost.
DO NOT FORCE THE MECANISM,IT MAY CAUSE DAMAGE
Both the battery pack and the Vega battery willgradually lose their charge if they are not used fora long period of time.
The charging system is designed so that the battery pack is always resting either on the Vega Base oron the Vega. During a power failure, the battery pack can supply backup power to the Vega Base. Forthis to happen, place the battery pack in its normal position on the Vega Base and the Vega Base’sblue LED will turn on. When the battery pack charge is too low, the red LED will start to flash.
The battery pack may be charged using the AC/DCpower supply provided in the package and connectingit directly to the DC power jack of the battery pack.

www.everon.net Copyright ©2009
10
Step 4: Charging Vega
Vega’s built-in battery can only be recharged usingthe battery pack. Before charging the Vega, thebattery pack itself must be fully charged.
To attach the battery pack onto the Vega, first insertthe hooked-end side into the cavity provided onthe Vega, and then flip it down to rest on the Vega.Next, press the latch mechanism forward onto theend of the battery pack. This mechanism secures thebattery pack to the latches on Vega.
If the mechanism is inserted correctly, the batterypack’s blue LED turns on to show that Vega ischarging. The battery pack’s LED turns off whenit is discharged. Charging the VEGA gps braceletcan take up to three hours.
It should be noted that both the Vega base andthe battery pack can be charged using the AC/DCadapters provided with the VEGA gps braceletat the time of delivery or subscription.
When you charge the Vega for the first time or when the battery charge level is very low, it is best toperform the charging process twice for an optimal charge or to connect the battery pack to the poweroutlet while secured on Vega.
At all times, the battery icon displayed on the Vega indicates the battery charge level.
A red empty battery icon sends a warning that Vega’s battery charge level is low. Automatically, Vegagenerates an optional email alert.
To remove the battery pack from the Vega, release the latch by inserting the key into the two holeson the battery pack. You will hear a click when the mechanism has been released. Always put the keyand the battery pack back on the base after using it so that it doesn’t get lost.
DO NOT FORCE THE MECANISM, IT MAY CAUSE DAMAGE.
1
2
3

11
C) Vega Operating ModesOperating mode : day safe zone (geofence)
20m
750
m
In safe zone(geofence)
Out of safe zone(geofence)
In home (RF) zone
1. Inside the home zone (Sleep mode)
The Vega Base emits radiofrequency (RF) waves similar to those of a home cordless telephone.The waves have a maximum range of 50 m but that range will vary depending on the Vega Base’ssurroundings (e.g., thickness of the walls and what they are made of).
When Vega is inside the home (RF) zone, some of its features (including its GPS) go into sleep mode,because the Vega communicates with its base by using very little battery power. It places itself in aneconomy state: the sleep mode.
Vega displays the home icon when inside the home zone.
The emergency button still works and can be usedin the event of a malaise or other serious problems.
Warning! If you move your Vega Base with the battery pack clipped on it (e.g., during a trip), theVega Base will continue to emit RF signals giving the false impression that Vega is still in its usualhome zone and safe zone. Therefore, the application will read that the wearer is within its homezone. However, should the battery charge reach a low level point, the watch will transmit its positionto the response center.
www.everon.net Copyright ©2009
12
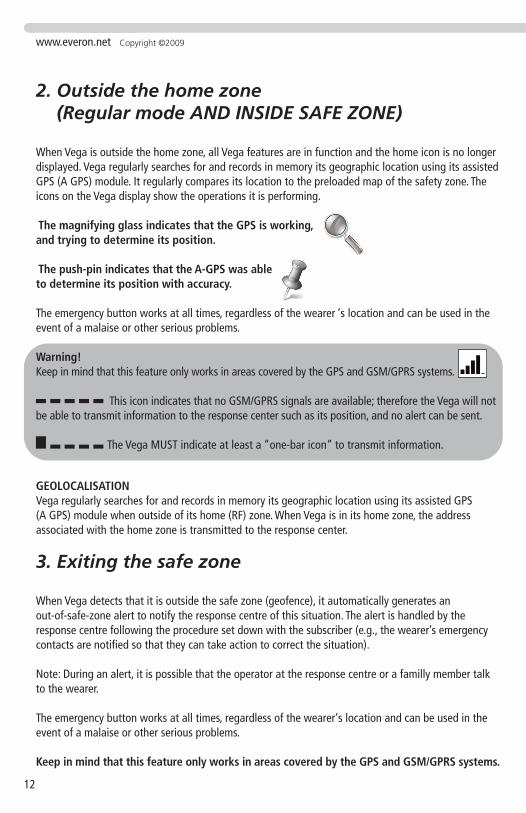
2. Outside the home zone(Regular mode AND INSIDE SAFE ZONE)
When Vega is outside the home zone, all Vega features are in function and the home icon is no longerdisplayed. Vega regularly searches for and records in memory its geographic location using its assistedGPS (A GPS) module. It regularly compares its location to the preloaded map of the safety zone. Theicons on the Vega display show the operations it is performing.
The magnifying glass indicates that the GPS is working,and trying to determine its position.
The push-pin indicates that the A-GPS was ableto determine its position with accuracy.
The emergency button works at all times, regardless of the wearer ‘s location and can be used in theevent of a malaise or other serious problems.
Warning!Keep in mind that this feature only works in areas covered by the GPS and GSM/GPRS systems.
This icon indicates that no GSM/GPRS signals are available; therefore the Vega will notbe able to transmit information to the response center such as its position, and no alert can be sent.
The Vega MUST indicate at least a “one-bar icon” to transmit information.
GEOLOCALISATIONVega regularly searches for and records in memory its geographic location using its assisted GPS(A GPS) module when outside of its home (RF) zone. When Vega is in its home zone, the addressassociated with the home zone is transmitted to the response center.
3. Exiting the safe zone
When Vega detects that it is outside the safe zone (geofence), it automatically generates anout-of-safe-zone alert to notify the response centre of this situation. The alert is handled by theresponse centre following the procedure set down with the subscriber (e.g., the wearer’s emergencycontacts are notified so that they can take action to correct the situation).
Note: During an alert, it is possible that the operator at the response centre or a familly member talkto the wearer.
The emergency button works at all times, regardless of the wearer‘s location and can be used in theevent of a malaise or other serious problems.
Keep in mind that this feature only works in areas covered by the GPS and GSM/GPRS systems.

13
4. Vocal communication
OPERATIONVega has a built-in hands-free telephone. Vega was not designed for the wearer to dial a phonenumber and initiate a call. Vega can only receive calls from the response centre or emergency contacts.
For incoming calls, communication is automatically established between the caller and wearer:the latter has nothing to do to accept the call.
To optimize sound quality, the wearer should put Vega in front of his or her face and speak ina normal voice.
To end a call, press the display button for 2 seconds.
CONTACTING THE VEGAWEARERIn an emergency situation or when help is needed, authorized emergency contacts may talk to theVega wearer by calling the response centre using the hands-free telephone feature.
D) In case of an emergency:press the red button
The emergency button must be pushed down for at least two secondsto work. This is done to avoid false alarms by inadvertently pressing on the button.
The Vega displays an exclamation mark that shows that the alert has been sent.The emergency button must only be used in emergency situations, in the eventof a malaise or other serious problems.
Vega then transmits its position and an alert to the response centre. The alert is handled by the centrefollowing the procedure set down with the subscriber (e.g., the centre may try to establish vocalcontact with the Vega™ wearer in order to assess the situation, or it may call the emergency contacts,inform them of the situation and request that they take action).
Please, keep in mind that the wearer should not move since his or her geographic location was sentimmediately to the response centre so help can be quickly dispatched if the procedure so specifies.
Obviously, this feature only works in areas covered by the GPS and GSM/GPRS systems(minimum of one bar shown on the display screen).
Note: it is possible to disable the alert button by contacting the customer service.

www.everon.net Copyright ©2009
14
E) Automatic Low battery alertVega automatically transmits an alert when its battery level reaches a low level or has been rechargingfor more than 24 hours. The low battery level alert is transmitted only once a day.
The alert is handled following the procedure set down with the subscriber (e.g., an e mail is sentto emergency contacts).
F) Locating VegaAuthorized emergency contacts may request that Vega be located by calling the response centreand by identifying themselves.
The location provided will be the latest position transmitted by Vega.
G) Environmental Conditionsand Restrictions
1. General instructions
Follow applicable rules in all locations. Vega must not be used where portable telephones areprohibited or where it could create interference or a hazard (e.g., in places where chemicals orinflammable substances are found or stored and in vehicles using petrol or inflammable liquid gas).
Do not use Vega in dusty or dirty places. It may cause damage to certain components.
Only use approved Vega accessories after having read the user’s manual. Otherwise, you couldpermanently damage your system. Also avoid short-circuits, which may damage the batteriesor electronic components.
Though designed to be rugged, your Vega system does contain delicate electronic circuitry.Avoid dropping or shaking it.
Your Vega and its battery pack contain lithium polymer batteries and should be kept near roomtemperature. They should never be exposed to temperatures below –20°C (–4°F) or above +50°C(140°F). Store your system in a dry place at room temperature so its sensitive electronic componentsare not damaged.
Do not try to open your Vega system to avoid potentially serious injuries or burns, or damage tothe system.
Do not paint or put stickers on your Vega system, since this could prevent it from working properly.

15
2. Water
While Vega is designed to be water-resistant, the battery pack and Vega Base are not. Keep them ina dry location. Rain, humidity and liquids of any sort may lead to corrosion of the circuitry.
3. Special restrictions
PACEMAKERSBased on independent research and recommendations by Wireless Technology Research, werecommend that people wearing a pacemaker i) always keep Vega more than 20 cm away from theirpacemaker; ii) wear Vega on their right wrist; and iii) remove the bracelet immediately if they thinkinterference may occur.
HEARING AIDSVega may interfere with some hearing aids, so please consult the manufacturer.
MEDICAL APPARATUSAny device emitting radio waves, be it a cell phone or your Vega, may interfere with the functioningof insufficiently protected medical apparatus. If in doubt, consult a physician or the medical apparatusmanufacturer. Do not use Vega in hospitals or health-care centres where it goes against regulations.
AIRCRAFTIt is prohibited to use Vega during flights. You should plan on discharging your Vega prior to flight time.Using Vega aboard an aircraft could prevent onboard apparatus from working properly.
MAGNETISMVega contains some magnetic components. Do not place credit cards or other magnetic recordingmedia near Vega, since the information they contain may be erased.
4. Customer Service
Everon provides information online at www.everon.net.
You may also contact your Customer Service. The phone number can either be found on the website,or in your Vega kit along with the documents it contains.
5. Recycling Vega and Components
To recycle your Vega, or its components, please refer to the regulations in effect in your area.

www.everon.net Copyright ©2009
16
H) Specifications1. Technical specifications
GSM/GPRS . . . . . . . . . . . . . . . . . . . . . . . . . .850/900/1800/1900 MHzRF . . . . . . . . . . . . . . . . . . . . . . . . . . . . . . . . . . . . . .868 MHz (Europe) or 921.4 MHz (North America) 10dBm(max output)GPS . . . . . . . . . . . . . . . . . . . . . . . . . . . . . . . . . . . .-159 dBm (Maximum sensitivity)Electrical supply . . . . . . . . . . . . . . . . . . .220 V 50 Hz 350 mA (Europe) or 120V 60 Hz 350 mA (North America)
2. Battery autonomy
Though Vega runs in energy-saving mode inside the home (RF) zone, we recommend that you rechargeit daily.
3. Network services
Vega is certified for use on GSM/GPRS networks using the 850*/900/1800/1900 MHz bands. It isdesigned to be used only in those bands. Vega service depends on network coverage at the frequenciesabove. It is important to check coverage in your area before activating Vega.
Like any mobile telephone, Vega uses radio signals from mobile or wire line networks that may notalways guarantee the connection under all conditions. It is thus important that you do not dependentirely upon Vega for your essential emergency and assistance communications.
Everon cannot be held liable for interruptions to GSM/GPRS network services.

17
4. Specific Absorption Rate
Your Vega is a radio transmitter and receiver. It is designed and manufactured not to exceed limitsfor exposure to radio frequency (RF) energy. These limits are part of comprehensive guidelines andestablish permitted levels of RF energy for the general population. The guidelines are based onstandards that were developed by independent scientific organizations through periodic and thoroughevaluation of scientific studies. The guidelines include a substantial safety margin designed to ensurethe safety of all persons, regardless of age and health.
The exposure standard for mobile phones employs a unit of measurement known as the SpecificAbsorption Rate, or SAR. The SAR limit set is 2 W/Kg* in European Union and 1.6W/Kg** in NorthAmerica. Tests for SAR are conducted using standardoperating positions with the phone transmitting at its highest certified power level in all testedfrequency bands. Although the SAR is determined at the highest certified power level, the actual SARof the phone, while operating, can be well below the maximum value. This because the phone isdesigned to operate at multiple power levels, therefore using only the power required to reach thenetwork. In general, the closer you are to a base station, the lower the power output of the phone.The highest SAR value for this model phone is lower than the limit in the 850/900/1800/1900 MHzbands. While there may be differences between the SAR levels of various phones and at various posi-tions, they all meet the government requirement for RF exposure.
Before a new model is available for sale to the public, compliance with the regulations must be shown.
*The SAR limit recommended by international authorities (CIPRNI) for mobile phones used by thepublic is 2 watts/kilogram (W/Kg) averaged over ten grams of body tissue. The standard incorporatesa substantial margin of safety to give additional protection for the public and to account for anyvariations in measurements.**In the United States and Canada, the SAR limit for mobile phones used by the public is 1.6 watts/ki-logram (W/kg) averaged over one gram of body tissue
I) Legal AdviceIn addition to this User Guide, you must read the General Conditions and Vega service SubscriptionForm, provided by your local operator. These documents contain important information and legalnotices that you must be aware of, and accept before activating Vega.
1. Intellectual property
PATENTS AND COPYRIGHTSThe technologies and methods used in Vega are protected by patents pending worldwide and are theproperty of Everon Oy or its subsidiaries.
All softwares contained in the Vega system are protected by patents or copyright. Copying, modifyingor reverse engineering is strictly prohibited and may lead to prosecution.

www.everon.net Copyright ©2009
18
TRADEMARKSEveron and Vega are registered trademarks of Everon Oy, or its subsidiaries. Other logos or products ofEveron Oy or its subsidiaries, whether protected or not, are the property of Everon Oy, or its subsidia-ries. You agree not to display or use in whatsoever manner said trademarks without the prior writtenconsent of Everon Oy Other products and company names mentioned in this User’s Manual or on thewebsites belonging to Everon are either trademarks pending or registered trademarks that are the pro-perty of their respective holders.
2. Statement of compliance
CE MARKINGEveron hereby attest that the Vega product complies withstandards ETSI EN 301-357-1, ETSI EN 300-220-1, ETSI EN 301-489-3, EN 60950-1,EN 50392:2004, EN 60950-1, EN 301 511, 3GPP 51.010 1, in accordance withthe provisions of directives EMC 89/336/EEC, 73/23/EEC and R&TTE 1999/5/EC.For more details, please contact us.
FCC STATEMENTThis device complies with Part 15 of the FCC Rules. Operation is subjectto the following two conditions: (1) this device may not cause harmfulinterference, and (2) this device must accept any interference received,including interference that may cause undesired operation. Any changesor modifications not expressly approved by Medical Intelligence Canadacould void the user's authority to operate the equipment.
NOTE: This equipment has been tested and found to comply with the limits for a Class B digital device,pursuant to part 15 of the FCC Rules. These limits are designed to provide reasonable protectionagainst harmful interference in a residential installation. This equipment generates, uses and can ra-diate radio frequency energy and, if not installed and used in accordance with the instructions, maycause harmful interference to radio communications. However, there is no guarantee that interferencewill not occur in a particular installation. If this equipment does cause harmful interference to radio ortelevision reception, which can be determined by turning the equipment off and on, the user is encou-raged to try to correct the interference by one or more of the following measures:—Reorient or relocate the receiving antenna.—Increase the separation between the equipment and receiver.—Connect the equipment into an outlet on a circuit different from that to which the receiver isconnected.—Consult the dealer or an experienced radio/ TV technician for help
Vega Vega BaseFCC ID: YLO201001 FCC ID: YLO201002IC: 9150A-201001 IC: 9150A-201002Model: URG-BRA-002 Model: URG-BAS-002

Reminder
SIM NUMBER: ________________________________________________________________
SERIAL NUMBER: _____________________________________________________________
PASSWORD:__________________________________________________________________
CONTACTS: __________________________________________________________________
__________________________________________________________________
__________________________________________________________________

Copyright ©2009