mirrorview/synchronous setup on vnx version 8.1 … · mirrorview/synchronous (mirrorview/s) in an...
TRANSCRIPT

1
These technical notes describe how to set up EMC MirrorView/Synchronous (MirrorView/S) in an NS or VNX gateway by using VNX Series or CX series back-end storage systems. Topics include:
◆ Overview ............................................................................................... 2◆ Restrictions ............................................................................................ 3◆ VNX for block setup procedures...................................................... 18◆ Initial VNX for file procedures ......................................................... 40
EMC® VNX® SeriesMirrorView™/Synchronous Setup on
VNX®
Version 8.1
Technical NotesP/N 300-014-565 Rev 01
August 2013

2 MirrorView/Synchronous Setup on VNX Version 8.1 Technical Notes
Overview
OverviewEMC® MirrorView™/Synchronous (MirrorView/S) is a limited-distance synchronous data mirroring facility that provides high-availability and disaster recovery for NS gateway and NSX series EMC VNX® for file with VNX for block storage systems. MirrorView/S maintains a synchronized remote mirror of production data between source and destination VNX for file/VNX for block system pairs at separate locations.
Before the introduction of MirrorView/S in version 5.5.23, you had to use EMC VNX Replicator™ for VNX for File and VNX for Block MirrorView for open hosts. MirrorView/S support for VNX now allows the use of a common replication technology for open hosts and VNX for File, thereby reducing infrastructure and management costs by consolidating replication and by using a single replication tool.
MirrorView/S provides a complete disaster recovery configuration without data loss. It ensures that the MirrorView/S-protected file systems on an NS gateway or NSX series source VNX are recoverable even if the source system is unavailable or not functioning. MirrorView/S supports NS gateway and NSX series cabinet configurations only not integrated series or CNS cabinet configurations.
Note: The topology guide available on the EMC Online Support website contains additional information for configuring extended infrastructure.
This document describes the VNX for block configuration for MirrorView/S with VNX for file. It identifies the key Navisphere® SecureCLI (naviseccli commands) and EMC Unisphere® software tasks.

3
Restrictions
MirrorView/Synchronous Setup on VNX Version 8.1 Technical Notes
The VNX for block documentation available on the EMC Online Support website contains the most up-to-date information about the CLI or management interface options and MirrorView restrictions. The following documents provide more information on Navisphere CLI and Unisphere software:
◆ EMC Navisphere Command Line Interface (CLI) Reference
◆ EMC MirrorView/Synchronous Command Line Interface (CLI) Reference
◆ EMC Unisphere online help
The EMC NAS Support Matrix provides definitive information on supported software and hardware, such as backup software, Fibre Channel (FC) switches, and application support for network-attached (NAS) storage products.
Note: The EMC NAS Support Matrix is for EMC use only. Do not share this information with customers.
Using MirrorView/Synchronous with VNX for File for Disaster Recovery describes the VNX for file configuration tasks, such as initialization, failover activation, and restore operations, and as routine management for MirrorView/S. After establishing the VNX for block storage systems, you, as an EMC Service Provider or EMC Customer Service, must establish the initial VNX for file configuration for the customer, as described in “Initial VNX for file procedures” on page 40.
RestrictionsThe following restrictions apply:
◆ You cannot upgrade to a MirrorView/S configuration if the mirroring configuration requirements exceed the current consistency group capacity depending on the back-end storage system. Table 1 on page 4 provides more information about various LUN configurations. Also, you cannot upgrade if you require a mix of mirrored and local storage to fit within current consistency group capacity.

4 MirrorView/Synchronous Setup on VNX Version 8.1 Technical Notes
Restrictions
◆ Although MirrorView/S is intended for new installations, you can upgrade the VNX for file environment to a MirrorView/S configuration if:
• The VNX for file LUN requirements can be accommodated by various LUN configurations. Configuration is limited to 5, 13, 29, or 61 user data LUNs and 3 control data LUNs depending on the VNX for block backend. Table 1 on page 4 lists the various user data LUN configurations.
• All VNX for file LUNs can be mirrored and fit in one MirrorView consistency group (device group) according to the group capacity.
◆ LUN limits are based on VNX for block LUNs per consistency group limitations. VNX for file requires three LUNs for system data. Special considerations must be made for the setup of the back-end array configuration by configuring large LUN sizes (up to 2 TB) in systems with version 5.5 through version 5.6.43. In systems with version 5.6.44, VNX for block back-end array configurations support up to 16 TB LUNs.
◆ If existing LUNs are used, you must perform some of the VNX for block configuration tasks, such as creating the remote mirrors and establishing the MirrorView consistency group.
Table 1 User LUN configuration details
Storage system User data LUNs
CX400/CX500/CX3-20/AX4-5 5 user data LUNs
CX600/CX700/CX3-80/CX3-40 13 user data LUNs
CX4-120 13 user data LUNs
CX4-120(/w version 5.6.47 or later)
29 user data LUNs
CX4-480/CX4-960 29 user data LUNs
VNX5100/VNX5300/VNX5500(w/ version 7.0 or later)
29 user data LUNs
CX4-480/CX4-960(/w version 5.6.47 or later)
61 user data LUNs
VNX5700/VNX7500(/w version 7.0 or later)
61 user data LUNs

5
Restrictions
MirrorView/Synchronous Setup on VNX Version 8.1 Technical Notes
◆ The participating VNX for block must be CX series storage systems with MirrorView/S consistency group support. This is available as of VNX Operating Environment for Block release 19.
◆ The VNX for block systems must have Unisphere, MirrorView, and EMC Access Logix™ software installed and enabled.
◆ EMC Solutions Enabler version 6.0.1 or later and the appropriate version 5.6 release are required.
◆ All systems participating in the mirror must be in the same domain.
◆ After a failover is activated, autoextend of checkpoint SavVol is not supported. If the SavVol fills to capacity, writes to the Production File System (PFS) continue and the oldest checkpoint gets deactivated.
◆ The MirrorView link established between the storage processors on the storage arrays (SPA-SPA and SPB-SPB) is on the lowest-numbered port for VNX Series systems and the highest-numbered port for CX series systems. For example, port 0 on VNX5100/VNX5300/VNX5500/VNX5700/VNX7500, port 1 on CX500/400 and CX3-40, and port 3 on CX700/600 and CX3-80.
Note: Do not share this port with host I/O. “MirrorView/S configuration through SP ports” on page 9 provides more information about these ports.
◆ MirrorView/S requires a VNX for block MirrorView license. If the back-end array is licensed for MirrorView/S, there is no additional charge to replicate VNX for file owned LUNs.
◆ MirrorView/S can be set up only between VNX systems or CX arrays. You cannot set up MirrorView/S between VNX systems and CX arrays.
◆ MirrorView/S supports the NS series gateway and NSX series configurations only. It does not support the non–FC-enabled NS integrated platforms or CNS cabinet configurations. The NS integrated platform cannot be used for MirrorView/S because it does not provide a FC port. Valid cabinet configurations include:
• NS-NS series gateway
• NSX-NSX
• NS series gateway-NSX

6 MirrorView/Synchronous Setup on VNX Version 8.1 Technical Notes
Restrictions
◆ MirrorView/S supports NS gateways storage platforms and FC-enabled VNX for file platforms (for example, the NX4, NS20FC, NS40FC, NS80FC, NS-120, NS-480, NS-960, and NS-G8 platforms). Platforms with the Fibre Channel option must have the Fibre Channel option activated initially because there is no way to reassign the MirrorView port after initial persistent scan.
◆ A single MirrorView/S consistency group requires three LUNs as VNX for file Control LUNs. The remaining LUNs are available as user data LUNs. Table 1 on page 4 provides more information about various LUN configurations. The LUN limit is per direction, or per consistency group, and is array-based. All mirrors in a consistency group must be in the same array.
◆ You must manually assign the LUN number (LUN ID) for any new LUNs. For user LUNs, the LUN ID must be 16 or greater. LUN IDs in the range 0 to 15 are reserved.
◆ MirrorView integration with VNX for file does not support Thinly Provisioned VNX for block Thin LUNs.
◆ For gateway configurations, only single back-end VNX for block configurations are allowed.
◆ The distance between source and destination Control Station systems is limited to 60 km/36 miles or, with Dense Wavelength Division Multiplexing (DWDM), up to 200 km.
◆ To optimize capacity, try to establish one LUN per RAID group, and when possible, try to avoid mixing source and destination LUNs in the same RAID group. “RAID restrictions for write intent log LUNs” on page 24 and “Restrictions for equivalent destination LUNs” on page 29 provide more information about RAID group and LUN requirements.
◆ Some of the configuration procedures require you to supply the host LUN ID or HLU, which is a virtual LUN number that the storage-system server sees, as well as the actual LUN number or ALU, which is the number assigned when binding the LUN. Pay careful attention to the control (system) HLU ID mapping requirements identified in the configuration steps. Source HLU IDs 0, 1, and 4 for the three source Control Station LUNs (dos, log, and nas LUNs, respectively) must be mapped to destination control LUNs with HLU IDs 6, 7, and 9, respectively. Table 2 on page 7 summarizes these required HLU ID mappings for the three control LUNs. There are no such restrictions for the ALU IDs.

7
Restrictions
MirrorView/Synchronous Setup on VNX Version 8.1 Technical Notes
◆ All Data Movers must use their default names, for example, server_2, server_3, and so on, when you configure them for MirrorView/S. If you change the default Data Mover names, it may cause MirrorView/S activation to stop responding when you add the NBS devices to the Operating Environment.
◆ For MirrorView/S with VNX for file, VNX for block source LUNs and equivalent destination LUNs must be the same size, be owned by the same storage processor, and have the same RAID type and configuration (for example, both 4+1 RAID 5).
◆ MirrorView/S is supported using only Global Domain VNX accounts, not local accounts.
◆ VNX Replicator works with disaster recovery replication products such as EMC SRDF®/Synchronous (SRDF/S) and SRDF/Asynchronous (SRDF/A) or MirrorView/Synchronous (MirrorView/S). You can run SRDF or MirrorView/S products and VNX Replicator on the same data. However, if there is an SRDF or MirrorView/S site failover, you cannot manage Replicator sessions on the SRDF or MirrorView/S failover site. Existing Replicator sessions will continue to run on the failed-over Data Mover and data will still be replicated. On the primary site, you can continue to manage your SRDF or MirrorView/S replication sessions after the restore.
◆ Basic hardware and software requirements as well as the VNX for file MirrorView procedures for initialization, failover activation, and restoration are described in Using MirrorView/Synchronous with VNX for File for Disaster Recovery. For general MirrorView family information, see the VNX for block MirrorView documentation available on the EMC Online Support website, including the EMC MirrorView Command Line Interface (CLI) Reference.
Table 2 Required host LUN ID mapping for control (system) LUNs
Control LUN Source HLU ID Destination HLU ID
dos 0 6
log 1 7
nas 4 9

8 MirrorView/Synchronous Setup on VNX Version 8.1 Technical Notes
Restrictions
Note: MirrorView/S with VNX for file is associated with the disk types CMSTD and CMATA and the following AVM storage pools: cm_r1, cm_r5_performance, cm_r5_economy, cmata_archive, and cmata_r3. These are visible from the Unisphere software or from NAS commands such as nas_disk and nas_pool.
Planning considerations and conventions
While performing back-end setup procedures, you need to track key configuration information:
◆ VNX for file Control Station information, such as the source and destination names and IP addresses.
◆ VNX for block storage names at the source and destination sites.
◆ Consistency group name (for example, cg_new_york).
◆ HLU IDs and ALU IDs (meeting the HLU ID requirements outlined in Table 2 on page 7).
◆ RAID group IDs, following the restrictions described in “RAID restrictions for write intent log LUNs” on page 24 and “Restrictions for equivalent destination LUNs” on page 29.
◆ Mirror names, each mirrored LUN requiring its own unique mirror name.
◆ Data Mover names and types at both the source and destination, with compatible Data Movers and compatible number of used network interface ports used on both sides. If you need to mask an unused network port, use the procedure summarized in “Making the Data Mover network device configuration compatible” on page 15.
In addition, keep track of the following accounts and passwords:
◆ The global VNX for block back-end storage account and password (for example nasadmin), which must be associated with VNX for block Manager or higher privileges (to manage all storage-system settings in the domain). After this global account information is set up, you can view it in the Unisphere software by selecting the local domain, then right-click Properties. The username and password display as domain properties.
◆ The password you plan to provide with the nas_cel -create command on each VNX for file (for example, nasadmin), as part of the preinitialization procedures, as described in Using

9
Restrictions
MirrorView/Synchronous Setup on VNX Version 8.1 Technical Notes
MirrorView/Synchronous with VNX for File for Disaster Recovery. This password must be the same on both systems. This is the passphrase pasword.
◆ The remote administration account and password (for example, dradmin) you plan to provide with the /nas/sbin/nas_mview -init command as part of the MirrorView initialization procedures, as described in Using MirrorView/Synchronous with VNX for File for Disaster Recovery.
MirrorView/Sconfiguration through
SP ports
MirrorView/A and MirrorView/S connections can be configured through SP Fibre Channel MirrorView ports only for CX3-20, CX3-20f, CX3-40, CX3-40f, CX3-80, CX400, CX500, CX600, CX700, AX4-5, VNX5100, VNX5300, VNX5500, VNX5700, or VNX7500 storage systems, and through SP Fibre Channel for CX4-120, CX4-240, CX4-480, CX4-960, CX3-10c, CX3-20c, or CX3-40c storage systems. Table 3 on page 9 and Table 4 on page 10 show the SP MirrorView ports for each storage system.
Table 3 SP MirrorView ports for the CX4 series
Storagesystem
MirrorView Fibre Channel FEports
Logical port ID Physical slot andport number
CX4-120,CX4-240
A-1 slot A0 port 3
B-1 slot B0 port 3
CX4-480,CX4-960
A-3 slot A1 port 3
B-3 slot B1 port 3

10 MirrorView/Synchronous Setup on VNX Version 8.1 Technical Notes
Restrictions
Note: CX3-10c, CX3-20c, or CX3-40c storage systems must run VNX Operating Environment for Block 03.26.xxx.5.yyy or later.
For Fibre Channel MirrorView connections, the SP A and SP B Fibre Channel MirrorView ports (listed in table) on both the primary and secondary storage systems must run at the same Fibre Channel link speed.
You may use the same SP port for server data and MirrorView/A or MirrorView/S. Users should be cautious about sharing ports between MirrorView and server traffic when an IP distance connection is used because sharing the MirrorView port with server traffic may cause a degradation in both replication and server application performance. SP port Fibre Channel connections are of the following two types:
◆ SP port Fibre Channel direct connections — Direct Fibre Channel connection between the SP A MirrorView ports on the primary and secondary storage systems and between the SP B MirrorView ports on the primary and secondary storage systems.
◆ SP port Fibre Channel switch connections — These have two Fibre Channel switch zones:
• One zone with SP A MirrorView ports on both the primary and secondary storage systems
Table 4 SP MirrorView ports for various storage systems
Storage system SP MirrorView port
Fibre Channel
CX3-20, CX3-20f, CX3-40, CX3-40f, CX400, CX500,AX4-5
Port 1
CX3-80, CX600, CX700
Port 3
CX3-10c Port 3
CX3-20c, CX3-40c Port 5
VNX5100/VNX5300/VNX5500/VNX5700/VNX7500
Port 0

11
Restrictions
MirrorView/Synchronous Setup on VNX Version 8.1 Technical Notes
• One zone with SP B MirrorView ports on both the primary and secondary storage systems
If a server HBA port uses an SP MirrorView port for server I/O, it should be included in a separate zone.
Note: A storage system can have mirroring connections to a maximum of four other storage systems concurrently.
While configuring Fibre Channel ports, remember the following:
◆ A CX4 supports up to one Fibre Channel-based MirrorView/S port (per SP).
◆ A VNX for block Fibre Channel MirrorView/S port number is designated at the time the first set of Fibre Channel front-end ports are persisted, whether or not a MirrorView/S enabler is present:
• The MirrorView/S port is the lowest-numbered port for VNX Series systems and the highest-numbered port for CX series systems at that time.
• The VNX for block Fibre Channel MirrorView/S port will not be active until a MirrorView/S-related enabler is installed.
◆ The VNX for block Fibre Channel MirrorView/S port number never changes even when more Fibre Channel front-end ports are persisted with later.
Configuration planning sheet
The configuration planning sheet in Table 5 on page 12 can help you keep track of the key MirrorView configuration information. Refer to the related tasks for information about selecting LUNs and associated RAID group IDs.
Note: For an active/active’ configuration, use a second configuration planning sheet to track your information.

12 MirrorView/Synchronous Setup on VNX Version 8.1 Technical Notes
Restrictions
Table 5 MirrorView/S configuration planning sheet (page 1 of 4)
Control Station information
Src Control Station Name:
Src IP: Dest. Control Station Name:
Dest. IP:
VNX for block storage
Src (APM #): Dest. (APM #)
Consistency group
Group name:
Write intent log LUNs
Src Write Intent Log LUN on SPA and unique RAID group ID (RG ID) Example: 4094, RG ID 2
Src Write Intent Log LUN on SPB and unique RG ID Example: 4095, RG ID 3
Dest. Write Intent Log LUN on SPA and RAID group ID (RG ID)
Dest. Write Intent Log LUN on SPB and RG ID
Mirrors in group (CX400/500, up to 8)
RAID group ID (RG ID):
HLU: ALU: Mirror Name:
RG ID (for the equiv. dest.
control LUNs, don’t use RG ID for dest.
system’s own control LUNs)
ALU: HLU:
1. 0 6
2. 1 7
3. 4 9
4.
5.
6.
7.
8.

13
Restrictions
MirrorView/Synchronous Setup on VNX Version 8.1 Technical Notes
Mirrors 9-16 apply to CX600/700, CX3-40, CX3-80
9.
10.
11.
12.
13.
14.
15.
16.
Mirrors 17-32 apply to CX4-480/CX4-960, CX4-120 (/w version 5.6.47 or later), and VNX5100/VNX5300/VNX5500
17.
18.
19.
...
...
30.
31.
32.
Table 5 MirrorView/S configuration planning sheet (page 2 of 4)

14 MirrorView/Synchronous Setup on VNX Version 8.1 Technical Notes
Restrictions
Mirrors 33-64 apply to CX4-480/CX4-960 (/w version 5.6.47 or later) and VNX5700/VNX7500
33.
34.
35.
...
...
62.
63.
64.
Data Movers Source: Type: Dest: Type:
----> ---->
----> ---->
----> ---->
----> ---->
----> ---->
Accounts and Passwords
Username (or VNX name for nas_cel):
Password:
Table 5 MirrorView/S configuration planning sheet (page 3 of 4)

15
Restrictions
MirrorView/Synchronous Setup on VNX Version 8.1 Technical Notes
Making the Data Mover network device configuration compatible
The MirrorView/S initialization procedures check for and enforce Data Mover compatibility (including network device configuration compatibility) between the source Data Movers configured for disaster recovery and the standby Data Movers at the destination.
Note: The EMC NAS Support Matrix contains detailed information about Data Mover compatibility.
If the source Data Mover with a remote MirrorView standby Data Mover also has a local standby Data Mover, then that local standby must have a remote MirrorView standby Data Mover at the destination site. This prevents issues with failover.
A source Data Mover and remote standby Data Mover must appear to have the same network device configuration. To ensure network device compatibility and prevent users from seeing a destination Data Mover condition of not compatible during initialization, you can edit the file /nas/site/nas_param to specify a system parameter called hidden_interfaces. This parameter enables you to specify a list of device names that need to be masked in order to make the Data Movers in each cabinet appear to have the same network device configuration.
Global VNX for block account (Manager or higher privileges)
Control Station- to-Control Station setup with nas_cel (must be same on both sides)
Remote Administration account with /nas/sbin/ nas_mview -init
Table 5 MirrorView/S configuration planning sheet (page 4 of 4)

16 MirrorView/Synchronous Setup on VNX Version 8.1 Technical Notes
Restrictions
Use the procedure in Table 6 on page 16 to use the hidden_interfaces parameter.
Note: Ensure that you do not edit anything in /nas/sys.
Table 6 Using the hidden_interfaces parameter in nas_param
Step Action
1. Log in to the source Control Station.
2. Open the file/nas/site/nas_param with a text editor.A short list of configuration lines appears.
3. Edit the file to specify the hidden_interfaces parameter with a list of devices to be hidden. If you need to specify multiple devices, use a comma-separated list (for example, cge6, cge5). The list you supply applies to all Data Movers in the system. For example, with a source NS702G, which has six cge (copper-wire Ethernet) ports, and a destination NSX, which has five cge ports, the hidden_interfaces parameter can be specified to mask (hide) cge6, if it is unused on all of the source Data Movers:hidden_interfaces:cge6:
Note: Ensure you do not add a blank line to this file.
In the /nas/site/nas_param file on the NS702G, this logically hides the cge6 network port on all Data Movers from all VNX user interfaces, including Unisphere and the VNX command server_sysconfig server_x –pci <device>.
4. Save and close the file.
Note: Changing this value does not require a Data Mover or Control Station restart.

17
Restrictions
MirrorView/Synchronous Setup on VNX Version 8.1 Technical Notes
To help troubleshoot a Data Mover condition of not compatible, you can set the NAS_DB_DEBUG=1 variable. Then, when the /nas/sbin/nas_mview –init command runs and you see not compatible on the destination server menu, you also see the names of the device that the incompatible Data Mover is missing. You can also use the hidden_interfaces parameter to test the not compatible state on your systems.
In addition, you can have the /nas/log/symapi.log file capture verbose debug logs for MirrorView/S consistency group operations (by setting CLARAPI_DEBUG=1).
Configuration change guidelines
If you need to change your VNX for block configuration after initial configuration, observe the following guidelines:
◆ After initial setup, if you want to perform configuration changes such as adding remote mirrors to the consistency group, you must rerun the /nas/sbin/nas_mview -init command after the change. Any storage configuration change that affects any of the mirrors, storage groups, or consistency groups used by the VNX for file requires you to rerun the /nas/sbin/nas_mview -init command.
◆ If you change the global VNX for block account password, you must update the NAS storage security information on the Control Station. After initialization, you can capture this change by rerunning /nas/sbin/nas_mview -init; after a failover, you must use the nas_storage command with the -modify option. Using MirrorView/Synchronous with VNX for File for Disaster Recovery provides more information.
◆ Prior to a failover, you can make back-end configuration changes and simply rerun /nas/sbin/nas_mview -init from the destination VNX for file to capture the changes. However, if a failover has been activated, do not make any back-end configuration changes that affect any of the mirrors, storage groups, or consistency groups used by the VNX for file.
◆ In general, the name of the MirrorView/S consistency group should not be changed after initial configuration. If you do change the name of the MirrorView consistency group on the VNX for block backend after initialization on the VNX for file, you must perform a procedure to correct the VNX for file device group configuration before performing any MirrorView/S operations. This procedure, which is described in EMC Knowledgebase

18 MirrorView/Synchronous Setup on VNX Version 8.1 Technical Notes
VNX for block setup procedures
emc138372, involves special nas_devicegroup command usage to delete the device groups visible to each VNX for file, followed by a rerun of initialization on the appropriate VNX for file to pick up the correct device group name information. For an active/active’ configuration, initialization is rerun on both the systems after the device groups are deleted.
Note: If you do not perform this procedure and a failover is subsequently activated, the activation fails and you must perform the procedure to recover.
VNX for block setup proceduresTo configure your VNX for block back-end systems for MirrorView/S with VNX for file, you can perform a set of procedures by using either the Navisphere command line interface (CLI) or Unisphere software. Table 7 on page 19 summarizes the configuration tasks that must be performed on the source and destination VNX for block backends. Each section that follows describes a particular step.
The steps and examples use the following conventions:
◆ The source VNX for block is APM00055003968_src, which uses aviator-spa as Storage Processor A (SPA) with an IP address of 10.6.4.225 and aviator-spb as Storage Processor B (SPB) with an IP address of 10.6.4.226. Therefore, the source storage system is represented by the hostname aviator-spa in many CLI examples.
◆ The destination VNX for block is APM00055105668_dst, which uses element-spa as SPA with an IP address 10.6.1.112 and element-spb as SPB with an IP address 10.6.1.115. The destination storage system is represented by the hostname element-spa in many CLI examples.
◆ A global account is set up for both back-end systems with the default username as sysadmin and the default password as sysadmin. When you run the naviseccli command, as shown in the examples throughout this document, the command uses this global account (not a VNX for file user account), and you can run the command as a regular Linux user as long as you have execute access to naviseccli (all users).
Note: For every standard Unisphere software configuration, many of the steps have pop-up messages that prompt you to confirm your configuration.

19
VNX for block setup procedures
MirrorView/Synchronous Setup on VNX Version 8.1 Technical Notes
Active/passive versus active/active’ configuration
Perform the setup procedures based on whether you are building an active/passive (unidirectional) or active/active’ (bidirectional mirroring) configuration, as follows:
Note: An active/active’ configuration, in which two production sites serve as the standby for the other, can be viewed as two separate active/passive configurations. In an active/active’ configuration, each source provides access to its source images; each source’s equivalent secondary images are only accessible after a failover.
◆ For an active/passive (unidirectional) configuration, perform steps 1–10, as listed in Table 7 on page 19. This completes the back-end setup for an active/passive configuration.
◆ For an active/active’ (bidirectional) configuration:
• Perform steps 1–10 with one VNX for block as the source and another as the destination.
• Perform steps 4–10 again, but this time with the previous destination as the source and the previous source as the destination. (You do not have to perform steps 1–3 again.)
Note: When you create the second consistency group, ensure to give it a unique name (for example, cg_new_jersey).
Table 7 Overview of back-end configuration tasks for MirrorView/S (page 1 of 2)
Task Action Procedure
1. Establish a single domain with the source and destination arrays.
“Task 1: Establish a domain with the source and destination arrays” on page 20
2. Establish the MirrorView/S connection between the source and destination arrays.
“Task 2: Establish the MirrorView/S connection (perform on either system)” on page 22
3. Create two write intent LUNs and allocate them for the write intent logs.
“Task 3: Create two write intent LUNs and allocate them for the write intent logs (perform on source, then destination)” on page 23
4. Prepare the source LUNs. “Task 4: Prepare the source LUNs (perform on source)” on page 27

20 MirrorView/Synchronous Setup on VNX Version 8.1 Technical Notes
VNX for block setup procedures
Task 1: Establish a domain with the source and destination arrays
To start the back-end configuration process, you must have a single domain with the source and destination storage arrays. You perform this procedure only once.
5. Prepare the equivalent destination LUNs for the Data LUNs.
“Task 5: Create equivalent secondary image LUNs (in Unisphere, perform on source)” on page 29
6. For each source LUN on the source-site storage system, create a remote mirror.
“Task 6: Create remote mirrors for each source LUN (perform on source)” on page 30
7. To each remote mirror, add the appropriate destination LUN.
“Task 7: Add the secondary image LUNs to the appropriate mirrors (perform on source)” on page 32
8. Configure the Control LUNs for MirrorView. “Task 8: Configure the Control LUNs for MirrorView operation” on page 33
9. Prepare the equivalent destination LUNs for the Control LUNs.
“Task 9: Create Secondary Image LUNs for LUNs 6, 7, and 9 (perform on target)” on page 34
10. For each Control LUN on the source-site storage system, create a remote mirror.
“Task 10: Create Remote Mirrors for each of the "real" Control LUNs (perform on source)” on page 35
11. Add a secondary image LUN for each Control LUN.
“Task 11: Add a Secondary Image LUN for each Control LUN mirror (perform on source)” on page 35
12. From the source site, create a MirrorView/S consistency group and add all appropriate LUN mirrors.
“Task 12: Create the MirrorView Consistency Group, and add all the appropriate Data and Control LUN mirrors (perform on source)” on page 36
13. Add Data LUNs to their FIle Storage Group “Task 13: Add the Data LUNs to their respective File Storage Group (perform on source and target)” on page 37
14. Add Control LUNs to their FIle Storage Group “Task 14: Add the Control LUNs to their respective File Storage Group (perform on source and target)” on page 38
Table 7 Overview of back-end configuration tasks for MirrorView/S (page 2 of 2)
Task Action Procedure

21
VNX for block setup procedures
MirrorView/Synchronous Setup on VNX Version 8.1 Technical Notes
Note: If you already have a domain, you do not have to create one. However, ensure that all devices participating in the mirror are in the same domain.
As part of this task, perform these steps:
1. Set up a domain and establish the destination storage system SP as the master storage system in the domain (using a global user account). Selecting the destination system as the master ensures that you can continue to manage the configuration if the source becomes unavailable.
2. Add the other storage system to the domain. (In essence, you are adding components to the local domain.)
Using Unisphere To create a domain with the source and destination arrays:
1. On the main Unisphere page, from the All Systems > Domains task list, select Select Domain Master.
2. From the Select Master dialog box, select the storage system storage processor that should be the master, the destination system SPA. A master is identified by its IP address (in this case, SPA 10.6.4.112 on the destination system). Selecting the destination system SP as the master enables you to continue Unisphere management if the source system becomes unavailable.
3. From All Systems > Domains, in the Local Domain task list, click Add/Remove Systems, and then click Add in the dialog box.
4. Type the IP address of the system you want to add.
Note: You should supply the IP address in this step instead of scanning for a subnet. If you scan for a subnet, and the destination is already in a local domain, you must remove it from that domain before continuing.
Using Navisphere CLI(naviseccli)
To create a domain with the source and destination arrays (which enables you to add components to a local domain):
1. To set the master storage system in the new domain with a global user account, type:
$ /nas/opt/Navisphere/bin/naviseccli -h <IP_address_or_hostname_of_SP A> -user <username> -password <password> -scope 0 domain -setmaster <IPAddr>

22 MirrorView/Synchronous Setup on VNX Version 8.1 Technical Notes
VNX for block setup procedures
Note: You must use a -scope value of 0 for the global user account. You can alternatively specify -address <address> instead of -h with <hostname>.
2. To add the other storage system to the domain, type:
$ /nas/opt/Navisphere/bin/naviseccli -h <IP_address_or_hostname_of_SP A> -user <username> -password <password> -scope 0 domain -add <IPAddr>
Example (executed with the destination system’s SPA, element-spa, as the master and adding the source to the domain by using its SPA IP address):
$ /nas/opt/Navisphere/bin/naviseccli -h element-spa -user nasadmin -password nasadmin -scope 0 domain -setmaster 10.6.1.112 $ /nas/opt/Navisphere/bin/naviseccli -h element-spa -user nasadmin -password nasadmin -scope 0 domain -add 10.6.4.225
Task 2: Establish the MirrorView/S connection (perform on either system)
You must establish the MirrorView/S logical connection between the source and destination storage arrays before any data can be mirrored. You perform this procedure only once.
Note: The MirrorView links connecting the storage processors on the arrays use the lowest-numbered port for VNX Series systems and the highest-numbered port for CX series systems. For example, port 0 on VNX5100/VNX5300/VNX5500/VNX5700/VNX7500, port 1 on CX500/400 and CX3-40, and port 3 on CX700/600 and CX3-80. “MirrorView/S configuration through SP ports” on page 9 provides more information about this.
This procedure creates paths for both storage processors in both storage systems (source SPA to destination SPA and destination SPA to source SPA, source SPB to destination SPB and destination SPB to source SPB). This assumes that both SPAs are physically connected and both SPBs are physically connected.
Using Unisphere To establish the MirrorView/S connection:
1. In the systems drop-down list, select the storage system for which you want to manage MirrorView connections (in this example, the destination, APM00055105668_dst). For this procedure, it does not matter whether you select the source or the destination storage system.

23
VNX for block setup procedures
MirrorView/Synchronous Setup on VNX Version 8.1 Technical Notes
2. Select Data Protection > Mirrors and Replications > LUN Mirrors.
3. From the task list, under Protection select Manage Mirror Connections.
4. In the Manage Mirror Connections dialog box, select and enable the connection to the other storage system in the MirrorView/S pair.
Using Navisphere CLI(naviseccli)
To establish the MirrorView connection (path), type the following naviseccli command:
$ /nas/opt/Navisphere/bin/naviseccli -h <IP_address_or_hostname_of_SP A> -user <username> -password <password> -scope 0 mirror -enablepath <IPAddr>
Note: You must use a -scope value of 0 (for global users) for MirrorView/S.
Example (executed from the destination system to the source by using the source SPA IP address to enable the path):
$ /nas/opt/Navisphere/bin/naviseccli -h element-spa -user nasadmin -Password nasadmin -scope 0 mirror -enablepath 10.6.4.225
Task 3: Create two write intent LUNs and allocate them for the write intent logs (perform on source, then destination)
As part of your MirrorView/S configuration, you must create two write intent LUNs and allocate them for the write intent logs, first on the source, and then on the destination. The write intent log is a record of recent changes to the source LUN, stored in persistent memory on a private LUN. If the source storage system fails (not catastrophically), the write intent log can be used to synchronize the destination LUNs when the source becomes available.
Note: Write intent logs are not part of the mirrored configuration.
This procedure involves creating a MirrorView write intent LUN for Storage Processor A and Storage Processor B (128 MB each) on each storage system. You can specify any existing LUN that is not part of a storage group and is not a hot spare, or you can bind a new LUN.
Note: If the storage system supports RAID groups, you must create the RAID group before you can create a LUN. To help you plan the use of RAID groups, ensure that you read “RAID restrictions for write intent log LUNs” on page 24 to learn about the RAID group restrictions for write intent log LUNs

24 MirrorView/Synchronous Setup on VNX Version 8.1 Technical Notes
VNX for block setup procedures
and “Restrictions for equivalent destination LUNs” on page 29 to learn about the restrictions associated with the equivalent destination LUNs of the source LUNs.
As part of this procedure, you perform the following steps, first on the source storage system and then on the destination storage system:
1. Create two write intent LUNs.
2. First on the source system and then on the destination system, bind a LUN on Storage Processor A and another LUN on Storage Processor B (for example, LUNs 4094 and 4095).
Note: Skip this step if you are using an existing LUN on each system.
3. On the source system, allocate LUNs for the SPA and SPB write intent logs (for example, LUN 4094 for SPA and LUN 4095 for SPB).
4. On the destination system, allocate LUNs for the SPA and SPB write intent logs.
RAID restrictions forwrite intent log LUNs
The restrictions to select the RAID group of a given type for a write intent log LUN are as follows:
◆ Do not put the write intent log LUNs in the system RAID group (that is the group with the system’s control LUNs, such as RAID group 0). For example, if the source VNX for block uses RAID group 0 for the control LUNs 0, 1 and 4, select a unique RAID group ID other than 0 for a write intent log LUN, such as 2.
❑ Check this box to indicate that your SPA and SPB write intent logs do not use the same RAID group ID as the system’s control LUNs.
◆ Ensure the write intent log LUNs for SPA and SPB on the given system are in different RAID groups. For example, the write intent log LUN for source SPA could be in RAID group 2 and the write intent log LUN for source SPB could be in RAID group 3. This prevents a RAID group on a system from containing the other SP’s write intent LUN.
❑ Check this box to indicate that your SPA and SPB write intent logs use different RAID group IDs.
Additional guidelinesfor RAID groups
The guidelines to select the best RAID group of a given type for a write intent log LUN are as follows:

25
VNX for block setup procedures
MirrorView/Synchronous Setup on VNX Version 8.1 Technical Notes
◆ Select a RAID group that contains the fewest server-visible LUNs (including clones and mirror images that are not yet in any storage group).
◆ Select a RAID group that contains the most free space.
◆ Select a RAID group that contains the least LUNs.
◆ Select a RAID group that contains the most LUNs whose default owning SP matches the one for which this write intent LUN is being created.
Using Unisphere To bind a LUN and allocate the write intent logs, perform the following on the source system and then on the destination system:
1. In the systems drop-down list, select the storage system for which you want to bind a LUN.
2. Select Storage > LUNS. From the task list, under LUNs, select Create LUN.
3. In the General tab, under Storage Pool Properties, select RAID Group.
4. In the Create LUN dialog box, specify the RAID type, the RAID Group ID, and LUN properties. Ensure that you select a LUN size of 128 MB. When you are done, click Apply.
The first write intent log uses LUN 4094 in a RAID group ID of 2. Then a second write intent log uses LUN 4095 and a different RAID group ID (RAID group ID 3).
5. In the systems drop-down list, select the storage system with MirrorView installed and for which you want to configure the Write Intent Log.
6. Select Data Protection > Mirrors and Replications > LUN Mirrors.
7. From the task list, under Protection, select Configure Mirror Write Intent Log.
8. The Allocate Write Intent Log dialog box appears.
Note: If the write intent log is already allocated, Allocate Write Intent Log changes to Deallocate Write Intent Log, you can select if you need to move the write intent log to a different LUN.
26 MirrorView/Synchronous Setup on VNX Version 8.1 Technical Notes
VNX for block setup procedures
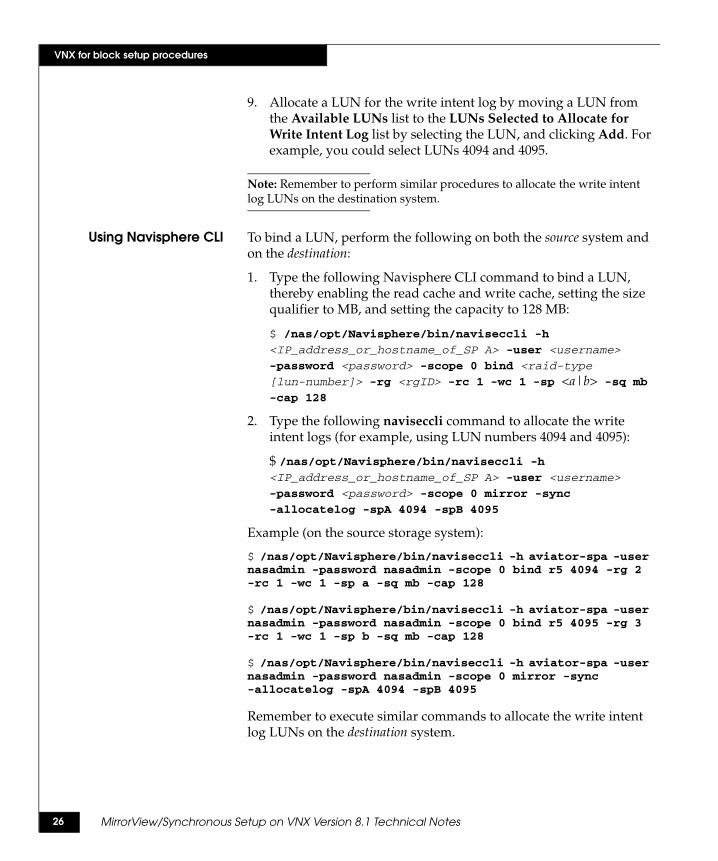
9. Allocate a LUN for the write intent log by moving a LUN from the Available LUNs list to the LUNs Selected to Allocate for Write Intent Log list by selecting the LUN, and clicking Add. For example, you could select LUNs 4094 and 4095.
Note: Remember to perform similar procedures to allocate the write intent log LUNs on the destination system.
Using Navisphere CLI To bind a LUN, perform the following on both the source system and on the destination:
1. Type the following Navisphere CLI command to bind a LUN, thereby enabling the read cache and write cache, setting the size qualifier to MB, and setting the capacity to 128 MB:
$ /nas/opt/Navisphere/bin/naviseccli -h
<IP_address_or_hostname_of_SP A> -user <username>
-password <password> -scope 0 bind <raid-type
[lun-number]> -rg <rgID> -rc 1 -wc 1 -sp <a|b> -sq mb -cap 128
2. Type the following naviseccli command to allocate the write intent logs (for example, using LUN numbers 4094 and 4095):
$ /nas/opt/Navisphere/bin/naviseccli -h <IP_address_or_hostname_of_SP A> -user <username>
-password <password> -scope 0 mirror -sync
-allocatelog -spA 4094 -spB 4095
Example (on the source storage system):
$ /nas/opt/Navisphere/bin/naviseccli -h aviator-spa -user nasadmin -password nasadmin -scope 0 bind r5 4094 -rg 2 -rc 1 -wc 1 -sp a -sq mb -cap 128
$ /nas/opt/Navisphere/bin/naviseccli -h aviator-spa -user nasadmin -password nasadmin -scope 0 bind r5 4095 -rg 3 -rc 1 -wc 1 -sp b -sq mb -cap 128
$ /nas/opt/Navisphere/bin/naviseccli -h aviator-spa -user nasadmin -password nasadmin -scope 0 mirror -sync -allocatelog -spA 4094 -spB 4095
Remember to execute similar commands to allocate the write intent log LUNs on the destination system.

27
VNX for block setup procedures
MirrorView/Synchronous Setup on VNX Version 8.1 Technical Notes
Task 4: Prepare the source LUNs (perform on source)
To prepare a source LUN, you must perform the following steps on the source storage system:
Note: A source LUN represents a primary image.
1. If a source LUN does not exist, bind it on the source storage system.
2. Assign the LUN to the source VNX for file storage group. You can skip this step if the LUN is already in the source VNX for file storage group.
3. Ensure that you rescan the storage to add the manually created devices to the Gateway or VNX for File database.
Note: As part of the basic VNX for block setup procedures, you should already have three source Control Station LUNs numbered 0, 1, and 4 for the dos (Microsoft DOS partition), log, and nas LUNs, respectively. For this back-end procedure, you must prepare your user data LUNs. Table 1 on page 4 provides more information about various LUN configurations. Available (unreserved) LUN numbers start at 16.
Using Unisphere To bind and assign a LUN to the source Control Station’s storage group, perform the following:
1. In the systems drop-down list, select the source storage system for which you want to bind a LUN.
2. Select Storage > LUNS. From the task list, under LUNs, select Create LUN.
3. In the General tab, under Storage Pool Properties, select RAID Group.
4. In the Create LUN dialog box, specify the RAID type, the RAID Group ID (for example, 1), and LUN properties. When you are done, click Apply.
5. In the systems drop-down list on the menu bar, select the source storage system.
6. Click Hosts > Storage Groups to navigate to the source system’s Storage Groups, then navigate to the source Control Station's storage group:
a. Right-click the source Control Station’s storage group and select Select LUNs.

28 MirrorView/Synchronous Setup on VNX Version 8.1 Technical Notes
VNX for block setup procedures
b. In the Storage Group Properties dialog box, select the appropriate LUNs by moving them from the Available LUNs list to the Selected LUNs list.
7. Rescan the storage system to add the manually created devices into the Gateway or VNX for File database.
Using Navisphere CLI To bind a LUN and assign the LUN to the source VNX for file storage group, perform the following:
1. Type the following command to bind a LUN:
$ /nas/opt/Navisphere/bin/naviseccli -h <IP_address_or_hostname_of_SP A> -user <username> -password <password> -scope 0 bind <raid-type [lun-number]> -rg <rgID> -rc <0|1> -wc <0|1> -sp <a|b> -sq <mb|gb> -cap <size>
2. Type the following command to assign the source image LUN to the source VNX for file storage group. This command specifies a host LUN number (the number that the storage-system server sees, a virtual LUN number) as well as the actual LUN number (the number assigned when the LUN was bound):
$ /nas/opt/Navisphere/bin/naviseccli -h <IP_address_or_hostname_of_SP A> -user <username> -password <password> -scope 0 storagegroup -addhlu -gname <group-name> -hlu <hlu-number> -alu <alu-number>
Example (for user LUNs 16 and 17 on the source system):
$ /nas/opt/Navisphere/bin/naviseccli -h aviator-spa -user nasadmin -password nasadmin -scope 0 bind r5 16 -rg 1 -rc 1 -wc 1 -sp a -sq gb -cap 1
$ /nas/opt/Navisphere/bin/naviseccli -h aviator-spa -user nasadmin -password nasadmin -scope 0 bind r5 17 -rg 1 -rc 1 -wc 1 -sp a -sq gb -cap 1
$ /nas/opt/Navisphere/bin/naviseccli -h aviator-spa -user nasadmin -password nasadmin -scope 0 storagegroup -addhlu -gname VNX_aviator -hlu 16 -alu 16
$ /nas/opt/Navisphere/bin/naviseccli -h aviator-spa -user nasadmin -password nasadmin -scope 0 storagegroup -addhlu -gname VNX_aviator -hlu 17 -alu 17

29
VNX for block setup procedures
MirrorView/Synchronous Setup on VNX Version 8.1 Technical Notes
Task 5: Create equivalent secondary image LUNs (in Unisphere, perform on source)
For each source LUN on the source storage system, you must create an equivalent secondary image LUN on the destination storage system. You perform this task from the target system.
Note: As part of this process, wait for the secondary image LUN to finish binding, and do not assign the secondary image LUN to any storage group until task 8.
Restrictions forequivalent destination
LUNs
Observe the following restrictions when selecting the RAID group and/or HLU IDs for an equivalent destination LUN:
◆ A source LUN and its equivalent destination LUN must be the same size, owned by the same storage processor, and have the same RAID type and configuration as the source (for example, both 4+1 RAID 5). If you use the Unisphere software, the destination LUN created is of the same size as its source LUN.
◆ For control LUNs: Ensure that the equivalent destination control LUNs (with HLU IDs 6, 7, and 9 to represent the secondary images of the source control LUNs 0, 1, and 4) reside in a RAID group other than the one used for the destination system’s own control LUNs. For example, if the destination system’s own control LUNs are already using RAID group 0, you can use a RAID group such as 3 for the equivalent destination control LUNs.
❑ Check this box to indicate your equivalent destination control LUNs reside in a different RAID group from the destination system’s own control LUNs and the HLU IDs are 6, 7, and 9.
◆ For user data LUNs: There are no specific restrictions for RAID group IDs, but use an HLU ID of 16 or higher (0–15 are reserved) based on what is available. In a new install, you might want to make the ALU match the HLU ID for simplicity.
❑ Check this box to verify that the user LUNs use an HLU ID of 16 or higher.
Guidelines forselecting the best
RAID group
The guidelines to select the best RAID group of a given type are as follows:
◆ Select a RAID group that contains the fewest server-visible LUNs (including clones and mirror images that are not yet in any storage group).

30 MirrorView/Synchronous Setup on VNX Version 8.1 Technical Notes
VNX for block setup procedures
◆ Select a RAID group that uses the same number of drives as the source mirror image LUN’s RAID group.
◆ Select a RAID group that contains the most free space.
◆ Select a RAID group that contains the fewest LUNs.
◆ Select a RAID group that contains the most LUNs whose default owning SP matches the default owner of the source mirror image LUN.
Using Unisphere To create each secondary image LUN on the target system for LUNs 6, 7 and 9:
1. In the systems drop-down list, select the source storage system.
2. Click Storage > LUNs to navigate to the LUN for which you want to create the secondary image.
3. Right-click the LUN and select MirrorView > Create Secondary Image LUN.
4. The Create Secondary Image LUN dialog box that appears enables you to automatically create a destination LUN that is the same size as the source LUN (for example, the dos control LUN on both systems). Select an existing RAID group or create a new one based on your configuration and planning sheet.
Using Navisphere CLI To create the equivalent destination LUN of a source LUN, type:
$ /nas/opt/Navisphere/bin/naviseccli -h <IP_address_or_hostname_of_SP A> -user <username> -password <password> -scope 0 bind <raid-type [lun-number]> -rg <rgID> -rc <0|1> -wc <0|1> -sp <a|b> -sq <mb|gb> -cap <same-size-as-primary>
Example (equivalent destination control dos LUN ALU ID 17 the same size as source dos control LUN 0, and in RAID group 3):
$ /nas/opt/Navisphere/bin/naviseccli -h element-spa -user nasadmin -password nasadmin -scope 0 bind r5 17 -rg 3 -rc 1 -wc 1 -sp a -sq gb -cap 11
Task 6: Create remote mirrors for each source LUN (perform on source)
For each source LUN on the source storage system (for example, source control LUNs 0, 1, and 4), you must create a remote mirror.
Note: Ensure that you use the write intent log for each remote mirror that you create.

31
VNX for block setup procedures
MirrorView/Synchronous Setup on VNX Version 8.1 Technical Notes
Using Unisphere To create a remote mirror for each of the source control LUNs 0, 1 and 4:
1. In the systems drop-down list, select the source storage system.
1. Navigate to the source LUN for which you want to create a remote mirror (for example, dos LUN0).
2. Right-click the LUN and select MirrorView > Create Remote Mirror.
3. In the Create Remote Mirror dialog box, ensure that the mirror type is Synchronous, specify information such as the mirror name for the remote mirror, and ensure that you select the Use Write Intent Log checkbox.
Note: Do not use a colon (:) in the mirror name. This is a NAS restriction. Also, ensure that the mirror name is unique.
4. When you are done, click Apply.
Using Navisphere CLI(naviseccli)
To create a remote mirror of a source LUN (for example, the designated source control dos LUN 0), type the following naviseccli command:
$ /nas/opt/Navisphere/bin/naviseccli -h <IP_address_or_hostname_of_SP A> -user <username> -password <password> -scope 0 mirror -sync -create -name <name> -lun <lun> -description <description> -usewriteintentlog
Note: You must use a -scope value of 0 (for global users) for MirrorView/S.
Example showing creation of remote mirror aviator_m0 for the source control dos LUN 0:
$ /nas/opt/Navisphere/bin/naviseccli -h aviator-spa -user nasadmin -password nasadmin -scope 0 mirror -sync -create -name aviator_m0 -lun 0 -description "mirror for src LUN 0" -usewriteintentlog
Remember to create remote mirrors for the other source control LUNs as well as each user LUN.

32 MirrorView/Synchronous Setup on VNX Version 8.1 Technical Notes
VNX for block setup procedures
Task 7: Add the secondary image LUNs to the appropriate mirrors (perform on source)
To each remote mirror created for a source LUN, add the equivalent destination LUN (added as a secondary image). This process creates a mirror pair consisting of a source LUN and its equivalent destination LUN. Remember to add the equivalent destination LUNs of the three source Control Station LUNs to the appropriate mirrors.
As part of this process, the remote mirror state must change from fractured to out-of-sync, to synchronizing, to in-sync.
Note: When you perform this procedure, the destination LUN must be the same size as the corresponding source LUN, and the destination LUN cannot already belong to a storage group. After a destination LUN is added to a mirror, however, it can be added to the destination storage group in order to expedite failover.
Using Unisphere To add secondary LUNs (image) to each of the remote mirrors 6, 7, and 9 from the target system:
1. In the systems drop-down list, select the source storage system.
2. Select Data Protection > Mirrors and Replications > LUN Mirrors.
3. From the Mirrors and Consistency Groups view, right-click the remote mirror to which you want to add a secondary mirror and click Add Secondary.
4. The Add Secondary Image dialog box appears.
5. In the Add Secondary Image dialog box, specify information such as the target storage system for the secondary mirror image and the LUN that composes the secondary mirror image.
Note: Even for newly created user LUNs, you must perform the initial synchronization, as set by default in the Initial Sync Required option for Advanced Parameters. Initial synchronization is required for MirrorView/S. Also, in general, keep the synchronization rate default of Medium; if you change the synchronization rate to High, there is an impact on performance for any host connected to the array. Wait for the images to synchronize before continuing to the next step. As a result of this step, you can now view a list of the mirrors and their primary and secondary images on both the source and target VNX systems under Unisphere > Data Protection > Mirrors and Replications.
Using Navisphere CLI(naviseccli)
To add the destination LUN (image) to the mirror, type:

33
VNX for block setup procedures
MirrorView/Synchronous Setup on VNX Version 8.1 Technical Notes
$ /nas/opt/Navisphere/bin/naviseccli -h <IP_address_or_hostname_of_SP A> -user <username> -password <password> -scope 0 mirror -sync -addimage -name <name> -arrayhost <IPAddr> -lun <lun-number>
Example (to add destination LUN 17 as a secondary image to the remote mirror aviator_m0, which has the source dos control LUN):
$ /nas/opt/Navisphere/bin/naviseccli -h aviator-spa -user nasadmin -password nasadmin -scope 0 mirror -sync -addimage -name aviator_m0 -arrayhost 10.6.1.112 -lun 17
Use similar commands to add the other two destination control LUNs as well as each user LUN to the corresponding remote mirror.
Task 8: Configure the Control LUNs for MirrorView operation
The steps for configuring Control LUNs are different from the steps in earlier versions of the operating system. This is because the Control LUNs are hidden from most normal navicli and Unisphere operations. The only operation effected directly on the Source Control LUNs from Unisphere, is when you create the Remote Mirrors of Control LUNs 0, 1 & 4 from the Hosts > Storage Groups > File Server Private Storage tab.
Using Navisphere CLI(naviseccli)
1. On the Source VNX system, type
# /nas/sbin/navicli -h <owner> storagegroup -list -gname ~filestorage
This identifies the source HLU Control LUNs 0, 1, and 4. Record their respective ALU numbers and LUN Block capacities. This information will be used in subsequent steps for creating the pseudo Control LUNs 6, 7, and 9 on the target system:
Example:
# /nas/sbin/navicli -h spa storagegroup -list -gname ~filestorage
4 8187 Blocks: 4188160
1 8190 Blocks: 23062528
0 8191 Blocks: 23062528
2. On the target VNX system, create data LUNs 6, 7 and 9 in a RAID5 4+1 RAID Group, using either navicli or Unisphere:
Example:

34 MirrorView/Synchronous Setup on VNX Version 8.1 Technical Notes
VNX for block setup procedures
# /nas/sbin/navicli -h spa bind r5 6 -rg 2 -rc 1 -wc 1 -sp a -sq bc -cap 23062528 [LUN ID 6, RG2]
# /nas/sbin/navicli -h spa bind r5 7 -rg 2 -rc 1 -wc 1 -sp a -sq bc -cap 23062528 [LUN ID 7, RG2]
# /nas/sbin/navicli -h spa bind r5 9 -rg 2 -rc 1 -wc 1 -sp a -sq bc -cap 4188160 [LUN ID 9, RG2]
Using Unisphere To create Control LUNs:
1. Select Storage > LUNS. From the task list, under LUNs, select Create LUN.
2. In the General tab, under Storage Pool Properties, select RAID Group.
3. Specify the RAID type as RAID5 4+1 RAID, and under LUN properties, specify the User Capacity in blocks.
4. In the Advanced tab, under Default Owner, select SPA.
5. Click Apply.
Task 9: Create Secondary Image LUNs for LUNs 6, 7, and 9(perform on target)
To create each secondary image LUN on the target system for LUNs 6, 7 and 9:
1. In the systems drop-down list, select the target storage system.
2. Click Storage > LUNs to navigate to the LUN for which you want to create the secondary image.
3. Right-click the LUN and select MirrorView > Create Secondary Image LUN.
4. The Create Secondary Image LUN dialog box that appears enables you to automatically create a destination LUN that is the same size as the source LUN (for example, the DOS control LUN on both systems). Select an existing RAID group or create a new one based on your configuration and planning sheet.
Note: This creates Secondary Image LUNs for the Source array.

35
VNX for block setup procedures
MirrorView/Synchronous Setup on VNX Version 8.1 Technical Notes
Task 10: Create Remote Mirrors for each of the "real" Control LUNs(perform on source)
To create remote mirrors for each of the Control LUNs accessible only through the Hosts menu. (In this example, HLUs 0, 1, and 4 match up with ALUs 8191, 8190, and 8187, respectively):
1. Select Hosts > Storage Groups > ~filestorage > File Server Private Storage.
2. Right-click ALU 8191 {which is HLU 0} and select Create Remote Mirror.
3. Repeat step 2 for ALU 8190 and 8187.
Task 11: Add a Secondary Image LUN for each Control LUN mirror(perform on source)
To each Control LUN mirror created for a source LUN in Task 10, add the equivalent secondary image LUN. This process creates a mirror pair consisting of a source LUN and its equivalent destination LUN.
When you perform this procedure, the destination LUN must be the same size as the corresponding source LUN, and the destination LUN cannot already belong to a storage group. After a destination LUN is added to a mirror, however, it can be added to the destination storage group in order to expedite failover.
Using Unisphere To add secondary LUNs (image) to each of the Control LUN mirrors 0, 1, and 4 from the target system:
1. In the systems drop-down list, select the source storage system.
2. Select Data Protection > Mirrors and Replications > LUN Mirrors.
3. From the Mirrors and Consistency Groups view, right-click the Control LUN mirror to which you want to add a secondary mirror and click Add Secondary.The Add Secondary Image dialog box appears.
4. In the Add Secondary Image dialog box, specify information such as the target storage system for the secondary mirror image and the LUN that composes the secondary mirror image.
5. Repeat steps 3 and 4 for the remaining Control LUNs 1 and 4.
Using Navisphere CLI(naviseccli)
To add the destination LUN (image) to the mirror, type:

36 MirrorView/Synchronous Setup on VNX Version 8.1 Technical Notes
VNX for block setup procedures
$ /nas/opt/Navisphere/bin/naviseccli -h <IP_address_or_hostname_of_SP A> -user <username> -password <password> -scope 0 mirror -sync -addimage -name <name> -arrayhost <IPAddr> -lun <lun-number>
Example (to add destination LUN 17 as a secondary image to the remote mirror aviator_m0, which has the source dos control LUN):
$ /nas/opt/Navisphere/bin/naviseccli -h aviator-spa -user nasadmin -password nasadmin -scope 0 mirror -sync -addimage -name aviator_m0 -arrayhost 10.6.1.112 -lun 17
Use similar commands to add the other two destination control LUNs as well as each user LUN to the corresponding remote mirror.
Task 12: Create the MirrorView Consistency Group, and add all the appropriate Data and Control LUN mirrors(perform on source)
From the source site, you must create a MirrorView/S consistency group that contains all of the mirror pairs. This process enables all of the mirrors to function as a unit.
The LUNs in a MirrorView/S consistency group must all reside on the same storage system, unlike the volumes in a Symmetrix consistency group, which can reside on multiple storage systems. Also, the secondary image state must be Synchronized or Consistent before a mirror can be added to a consistency group. Since this is a full copy of the underlying storage, it may take some time to become synchronized. You can check the remote mirrors to ensure that they are in Sync and Active. You can click the plus sign to drill down within each mirror and verify that the mirror is in the Consistent state.
Using Unisphere To create the MirrorView/S consistency group:
1. In the systems drop-down list, select the source storage system for which you want to create the consistency group.
2. Select Data Protection > LUN Mirrors > Consistency Group.
3. From the task list, under Consistency Group select Create Mirror Consistency Group.
4. In the Create Group dialog box, specify consistency group parameters, such as the Mirror Type (Synchronous), group name, and a description. In the Advanced Parameters section, keep the default value of Automatic for Recovery Policy.

37
VNX for block setup procedures
MirrorView/Synchronous Setup on VNX Version 8.1 Technical Notes
You can continue to add remote mirrors by using Unisphere. Defining the consistency group and adding the mirrors through CLI requires two steps.
Note: The consistency group’s recovery policy should always be Automatic (the default) to ensure that the group can recover automatically after a link down failure (when the condition is System Fractured). If it is set to Manual instead, you have to execute the command nas_devicegroup -resume to restart group operations after a link down failure. Also, if this is the second group for an active/active’ configuration, ensure the consistency group name is unique.
Using Navisphere CLI(naviseccli)
To create the MirrorView/S consistency group on the source storage system, type:
$ /nas/opt/Navisphere/bin/naviseccli -h <IP_address_or_hostname_of_SP A> -user <username> -password <password> -scope 0 mirror -sync -creategroup -name <name> -description <description>
Note: You must use a -scope value of 0 (for global users) for MirrorView/S.
Example (to create consistency group cg_aviator on the source system):
$ /nas/opt/Navisphere/bin/naviseccli -h aviator-spa -user nasadmin -password nasadmin -scope 0 mirror -sync -creategroup -name cg_aviator -description "consistency group from src to dst"
Task 13: Add the Data LUNs to their respective File Storage Group (perform on source and target)
After they are added to a consistency group, you can add the Data LUNs to their file storage group on the source and target VNX.
Remember to observe the fixed control (system) LUN mapping (source control LUNs with HLU IDs 0, 1, and 4 must be mapped to destination LUNs with HLU IDs 6, 7, and 9, respectively). The ALU values are not restricted (for example, LUN 17 has an ALU of 17 but uses an HLU ID of 6). User LUNs do not require the fixed mapping, but they must have an HLU ID of 16 or higher (0–15 are reserved) based on what is available.
Using Unisphere To assign the backup LUNs to the destination VNX for file storage group:
1. In the systems drop-down list, select the destination storage system.

38 MirrorView/Synchronous Setup on VNX Version 8.1 Technical Notes
VNX for block setup procedures
2. Select Storage > LUNs.
3. In the LUNs view, right-click the LUNs you want to add to the storage group, and select Add to Storage Group.
4. Move the appropriate LUNs from the Available Storage Groups list to the Selected Storage Groups list.
5. Ensure that you specify the correct system host LUN IDs (HLU ID) for the associated LUN IDs.
6. When you are done, click OK.
7. Click Yes to confirm.
Using Navisphere CLI To assign the destination LUNs to the destination VNX for file storage group, type:
$ /nas/opt/Navisphere/bin/naviseccli -h <IP_address_or_hostname_of_SP A> -user <username> -password <password> -scope 0 storagegroup -addhlu -gname <group-name> -hlu <hlu-number> -alu <alu-number>
Examples for the three equivalent control station LUNs, which use the required HLU IDs 6, 7, and 9 (the ALU values are not restricted):
$ /nas/opt/Navisphere/bin/naviseccli -h element-spa -user nasadmin -password nasadmin -scope 0 storagegroup -addhlu -gname VNX_element -hlu 0 -alu 17
$ /nas/opt/Navisphere/bin/naviseccli -h element-spa -user nasadmin -password nasadmin -scope 0 storagegroup -addhlu -gname VNX_element -hlu 1 -alu 18
$ /nas/opt/Navisphere/bin/naviseccli -h element-spa -user nasadmin -password nasadmin -scope 0 storagegroup -addhlu -gname VNX_element -hlu 4 -alu 19
Task 14: Add the Control LUNs to their respective File Storage Group(perform on source and target)
You can add the Control LUNs to their file storage group on the source and target VNX systems.
Remember to observe the fixed control (system) LUN mapping (source control LUNs with HLU IDs 0, 1, and 4 must be mapped to destination LUNs with HLU IDs 6, 7, and 9, respectively). The ALU values are not restricted (for example, LUN 17 has an ALU of 17 but uses an HLU ID of 6). User LUNs do not require the fixed mapping, but they must have an HLU ID of 16 or higher (0–15 are reserved) based on what is available.

39
VNX for block setup procedures
MirrorView/Synchronous Setup on VNX Version 8.1 Technical Notes
Using Unisphere To assign the backup LUNs to the destination VNX for file storage group:
1. In the systems drop-down list, select the destination storage system.
2. Select Storage > LUNs.
3. In the LUNs view, right-click the LUNs you want to add to the storage group, and select Add to Storage Group.
4. Move the appropriate LUNs from the Available Storage Groups list to the Selected Storage Groups list.
5. Ensure that you specify the correct system host LUN IDs (HLU ID) for the associated LUN IDs.
6. When you are done, click OK.
7. Click Yes to confirm.
Using Navisphere CLI To assign the destination LUNs to the destination VNX for file storage group, type:
$ /nas/opt/Navisphere/bin/naviseccli -h <IP_address_or_hostname_of_SP A> -user <username> -password <password> -scope 0 storagegroup -addhlu -gname <group-name> -hlu <hlu-number> -alu <alu-number>
Examples for the three equivalent control station LUNs, which use the required HLU IDs 6, 7, and 9 (the ALU values are not restricted):
$ /nas/opt/Navisphere/bin/naviseccli -h element-spa -user nasadmin -password nasadmin -scope 0 storagegroup -addhlu -gname VNX_element -hlu 0 -alu 17
$ /nas/opt/Navisphere/bin/naviseccli -h element-spa -user nasadmin -password nasadmin -scope 0 storagegroup -addhlu -gname VNX_element -hlu 1 -alu 18
$ /nas/opt/Navisphere/bin/naviseccli -h element-spa -user
nasadmin -password nasadmin -scope 0 storagegroup -addhlu
-gname VNX_element -hlu 4 -alu 19
Note: It is important to set the HLU numbers for the pseudo Control LUNs on the target system, ALU LUNs 6, 7, 9, to HLU 6, 7, and 9, respectively, when adding to the ~filestorage Storage Group.

40 MirrorView/Synchronous Setup on VNX Version 8.1 Technical Notes
Initial VNX for file procedures
Initial VNX for file proceduresAfter you have completed the back-end configuration process, you can begin the VNX for file configuration process on behalf of the customer as follows:
1. Review the VNX for file planning considerations and work with the customer to determine the appropriate Data Mover configuration, as described in Using MirrorView/Synchronous with VNX for File for Disaster Recovery.
2. Using the procedures described in Using MirrorView/Synchronous with VNX for File for Disaster Recovery, perform the MirrorView/S preinitialization and initialization procedures (issuing the nas_cel command with the -create option from both the VNX for file, followed by the /nas/sbin/nas_mview -init command from the destination VNX for file).
3. Using the procedures described in Using MirrorView/Synchronous with VNX for File for Disaster Recovery, perform a test failover activation and restore to ensure proper functioning before leaving the customer site.
Note: If you later decide to add remote mirrors to the consistency group used by the VNX for file, you must rerun the /nas/sbin/nas_mview -init command after the change. Any back-end configuration change made after initialization is permitted as long as a failover has not been activated. After a failover has been activated, however, do not make any back-end configuration changes.

41
Initial VNX for file procedures
MirrorView/Synchronous Setup on VNX Version 8.1 Technical Notes
Copyright © 2013 EMC Corporation. All rights reserved. Published in the USA.
Published August 2013
EMC believes the information in this publication is accurate of its publication date. The information is subject to change without notice.
The information in this publication is provided as is. EMC Corporation makes no representations or warranties of any kind with respect to the information in this publication, and specifically disclaims implied warranties of merchantability or fitness for a particular purpose. Use, copying, and distribution of any EMC software described in this publication requires an applicable software license.
EMC2, EMC, and the EMC logo are registered trademarks or trademarks of EMC Corporation in the United States and other countries. All other trademarks used herein are the property of their respective owners.
For the most up-to-date regulatory document for your product line, go to the technical documentation and advisories section on the EMC online support website.