mini mating nucs part 1: background - michigan bees
TRANSCRIPT

Introduction
Isaac Asimov, one of our favorite authors, wrote a series of
novels about a foundation of technocrats wherein a central
theme is the drama of small versus big. In this future history,
we are told a story of how small can flourish besides big; in
fact, small can actually prevail over big.
It is not hard to see this same theme in the current human
condition. We have the Apples, Facebooks, Microsofts and
Cabelas (begun in garages, dorm rooms or with only a couple
of people) which all started exceedingly small but prevailed
and ironically are now the big. One cannot help but wonder
what other “small” is out there right now; as of yet unseen and
unknown by the “big”.
Consider the honey bee. A tiny insect, no bigger than your
thumbnail. Yet the role of the honey bee in the natural world is
huge… beyond big.
Also in the beekeeping world, we can see this same theme
played out in the nucleus hive - or nuc. A nuc is a small hive,
usually 4 or 5 frames, which has become an important tool for
today’s beekeepers. There is ample literature, both on the
web and in print, explaining the advantages and management
of a nuc. Every major beekeeping supplies catalog carries a
nuc and its associated gadgets; a testament as to just how
“big” this small hive has become.
But if a nuc is an example of where the small can flourish
along side the big, is there yet something that is even smaller
with an equal - or perhaps even greater - “big” potential? We
believe the answer is “yes” and it can be found in the mini-
mating nuc.
What is a Mini-Mating Nuc
A mini-nuc is a tiny version of a standard Langstroth-style hive.
Whereas a nuc is half the size of a standard hive, the mini-nuc
is yet again half the size of a nuc - or one fourth the size of the
standard (photo, above right, a 4 chambered mini-nuc).
The frames of a mini-nuc are only half as long (at 9-1/4”)
as the standard frame (at 19”). Like a nuc, the mini-nuc only
has four or five frames (the standard hive has ten). The interi-
or of a mini-nuc is only about a fourth the volume of a standard
hive, and therein lies the strength - and challenges - of working
with a mini-nuc.
Variations on the Theme
As so often the case with beekeeping, there is no single “right”
way to manage or build a mini-nuc. Beekeepers are notorious
tinkerers and the same can certainly be said of the mini-nuc
movement. So keep this in mind as you read these plans.
The concept of a mini-nuc is not new. Indeed, Brother
Adam of the Buckfast Abbey in England was writing about mini
-nucs nearly 50 years ago. What is new is the internet and the
global community which it spawns. Search the web for “mini-
nuc” (or “mating nuc”) and you will find a wealth of information
and discussions of what works, what doesn’t, the whys and
how-tos of mini-nucs (see references at the end of these plans
to get your started).
What Are Mini-Nucs Used For?
Mini-nucs should be approached with the idea that these tiny
hives are “starter” colonies. Eventually, the colony in a mini-
Mini-Mating Nucs - Part 1: Background
(Authors’ Note: These plans are all about mini-mating nucs.
The format is somewhat different than others in the
family. The first section is a brief
survey of mini-mating nucs, discussing the whats, whys and
how tos. Our intention is to stimulate the curiosity of beekeep-
ers who may not be familiar with the concept. The second
section deals with the shop plans for making a mini-mating
nuc. A mini-nuc has all of the components of a standard hive
but with a few features added on. In the plans that follow, we
will only focus on the added steps. It is assumed that shop
enthusiasts will obtain the base plans for each component.
Working a mini-nuc

nuc will be moved to larger (permanent) equipment.
We read the words “mini-mating nuc” and the impression
is that these are used strictly for getting a virgin queen mated.
As we shall see, this is certainly not the case.
A number of beekeepers are exploring all kinds of uses for
these tiny hives. Mini-nucs can certainly be used for mating a
virgin queen, but they can also be used for makings splits and
divides, for replacing winter kill, for starter and finisher colonies
when grafting queens, for raising queens from eggs, for split-
ting packaged bees and even for overwintering replacement
colonies.
Indeed, it would appear that a mini-nuc can be used for all
the purposes beekeepers have found for a regular nuc - and
then some.
Why Mini-Nucs?
Why do mini-nucs work? It is a fair question. If we had to sum
it up in just a few words, then they would be that the small size
of a mini-nuc translates into an equally small investment
(relatively) on the part of the bees (and the beekeepers) to
build and sustain a thriving colony.
It may all boil down to a question of geography. With a
mini-nuc, or more specifically the mini-frame, there is simply
less area that the bees have to work with. All of the activities
that occur within a hive do so but in a more concentrated
space. And within this smaller space, fewer bees are needed
to do what needs to be done.
Of course, a mini-nuc is not the golden elixir of beekeep-
ing; there are tradeoffs. One being mini-nucs require that the
beekeeper keep a closer eye on things and perform the man-
agement tasks in a timely manner. More on this later.
Deep vs. Mediums
Most mini-nucs use deep frames, albeit only half the length of
standard frames.
There are, howev-
er, some beekeep-
ers working with
medium depth
frames; these are
truly tiny frames
(compared to what
most beekeepers
are used to).
One of the au-
thors (Tilmann)
uses medium depth mini-frames in his min-nucs (see photo).
Why? A number of years ago, this beekeeper began switching
all of his equipment over to medium depth. This lightens the
load on that beekeeper’s back and requires only one style of
equipment for the entire operation. Using medium depth mini-
nucs keeps true to this theme.
Do medium depth mini-nucs work? We think so, although
these tiny hives do require a bit more timely manipulations
than their “deep” cousins.
Timing Is Important
Because of the smaller volume within a mini-nuc, space for the
bees can quickly come into short supply when the colony be-
gins to grow and thrive. The beekeeper needs to stay on top
of this and be ready to deal with the situation.
There are options. One obvious step would be to move
the mini-nuc into large equipment; after all, one of the main
reasons why we are running a mini-nuc is to have a source of
new or replacement colonies. Another is to move only a mini-
frame or two of brood into other colonies to help with the build
up of those. A third might be supering the mini-nuc in prepara-
tion for over-wintering.
Whatever strategy the beekeeper uses, timing will be im-
portant. Conditions within a mini-nuc can literally change from
day to day. So have a plan in mind and be prepared to act in
a timely manner.
Transferring to Permanent Hive
Transferring a mini-nuc is relatively simple, the beekeeper
simply moves the mini
-frames, bees and all,
into their permanent
home. To do this, it is
most convenient to
move two mini-frames
at a time (or in groups
of two). In the target
hive, a full length
frame (or maybe two)
is removed and re-
placed by two (or may-
be four) mini-frames
end-to-end. A clip is
required in the middle to support then ends of the two mini-
frame; refer to the plans for making this clip.
The transfer will probably be done when the mini-frames
are nearly full of sealed brood and/or uncapped larva. After a
couple of weeks, when the larva have emerged, the mini-
frames can be moved back into the mini-nuc to begin the cycle
000000
A medium-depth mini-frame.
Two-mini frames being transferred to a full size hive. Note white transfer clip.
What Are Mini-Nucs Used For? (cont’d)
again.
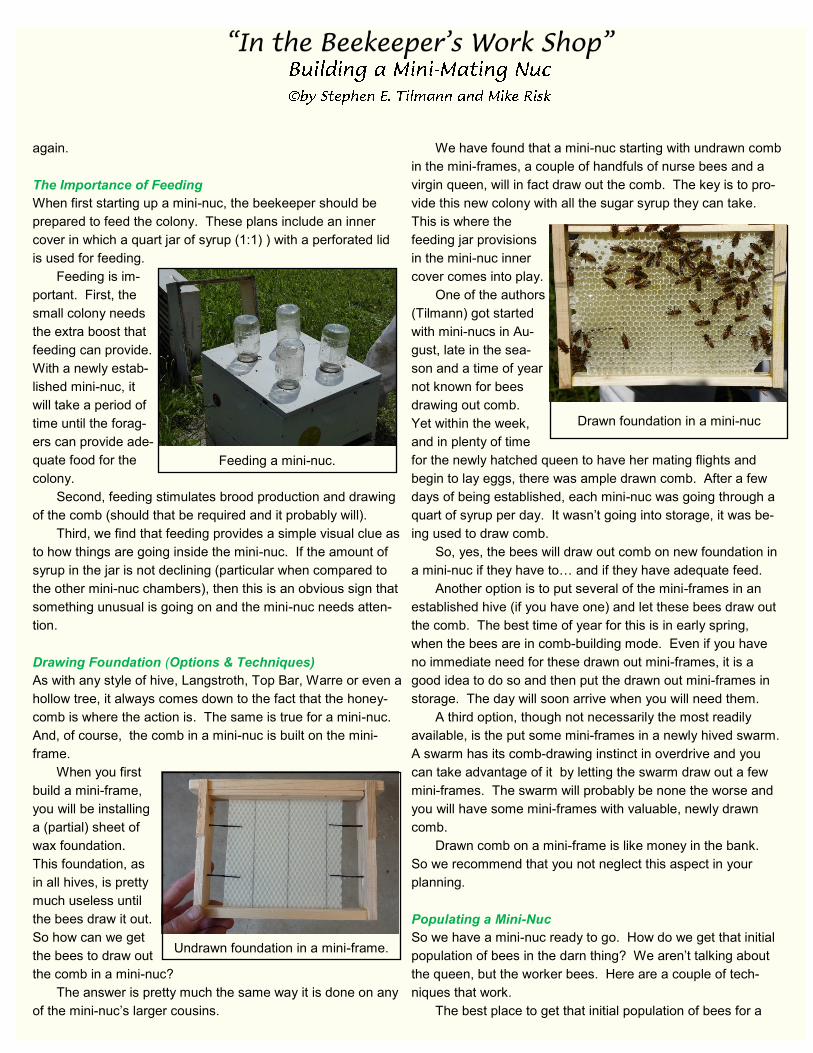
The Importance of Feeding
When first starting up a mini-nuc, the beekeeper should be
prepared to feed the colony. These plans include an inner
cover in which a quart jar of syrup (1:1) ) with a perforated lid
is used for feeding.
Feeding is im-
portant. First, the
small colony needs
the extra boost that
feeding can provide.
With a newly estab-
lished mini-nuc, it
will take a period of
time until the forag-
ers can provide ade-
quate food for the
colony.
Second, feeding stimulates brood production and drawing
of the comb (should that be required and it probably will).
Third, we find that feeding provides a simple visual clue as
to how things are going inside the mini-nuc. If the amount of
syrup in the jar is not declining (particular when compared to
the other mini-nuc chambers), then this is an obvious sign that
something unusual is going on and the mini-nuc needs atten-
tion.
Drawing Foundation (Options & Techniques)
As with any style of hive, Langstroth, Top Bar, Warre or even a
hollow tree, it always comes down to the fact that the honey-
comb is where the action is. The same is true for a mini-nuc.
And, of course, the comb in a mini-nuc is built on the mini-
frame.
When you first
build a mini-frame,
you will be installing
a (partial) sheet of
wax foundation.
This foundation, as
in all hives, is pretty
much useless until
the bees draw it out.
So how can we get
the bees to draw out
the comb in a mini-nuc?
The answer is pretty much the same way it is done on any
of the mini-nuc’s larger cousins.
We have found that a mini-nuc starting with undrawn comb
in the mini-frames, a couple of handfuls of nurse bees and a
virgin queen, will in fact draw out the comb. The key is to pro-
vide this new colony with all the sugar syrup they can take.
This is where the
feeding jar provisions
in the mini-nuc inner
cover comes into play.
One of the authors
(Tilmann) got started
with mini-nucs in Au-
gust, late in the sea-
son and a time of year
not known for bees
drawing out comb.
Yet within the week,
and in plenty of time
for the newly hatched queen to have her mating flights and
begin to lay eggs, there was ample drawn comb. After a few
days of being established, each mini-nuc was going through a
quart of syrup per day. It wasn’t going into storage, it was be-
ing used to draw comb.
So, yes, the bees will draw out comb on new foundation in
a mini-nuc if they have to… and if they have adequate feed.
Another option is to put several of the mini-frames in an
established hive (if you have one) and let these bees draw out
the comb. The best time of year for this is in early spring,
when the bees are in comb-building mode. Even if you have
no immediate need for these drawn out mini-frames, it is a
good idea to do so and then put the drawn out mini-frames in
storage. The day will soon arrive when you will need them.
A third option, though not necessarily the most readily
available, is the put some mini-frames in a newly hived swarm.
A swarm has its comb-drawing instinct in overdrive and you
can take advantage of it by letting the swarm draw out a few
mini-frames. The swarm will probably be none the worse and
you will have some mini-frames with valuable, newly drawn
comb.
Drawn comb on a mini-frame is like money in the bank.
So we recommend that you not neglect this aspect in your
planning.
Populating a Mini-Nuc
So we have a mini-nuc ready to go. How do we get that initial
population of bees in the darn thing? We aren’t talking about
the queen, but the worker bees. Here are a couple of tech-
niques that work.
The best place to get that initial population of bees for a
Undrawn foundation in a mini-frame.
Feeding a mini-nuc.
Drawn foundation in a mini-nuc
mini-nuc is from an established hive, assuming you have one.
You don’t need many, a couple of cups will do. And the best
place to get these is from the brood chamber, where the nurse
bees hang out.
Why nurse bees? First, these are the young bees. Many
of them can be expected to live 5 or 6 weeks. It will take about
3 to 4 weeks for a virgin queen to get mated, lay eggs, and
have these eggs begin to hatch. The older, foraging bees may
not live long enough to see this cycle through.
Second, it is the young nurse bees that draw the comb,
feed the larvae and generally run the hive; exactly the activity
we want to go on inside a mini-nuc.
Third, the young nurse bees have not, by and large, left
the parent colony and are more apt to stay in the mini-nuc
once you transfer them to it. These young bees are not as
likely to abscond from the mini-nuc back to the parent colony
as are the older forager bees.
So when you open up a parent colony, go into the brood
chamber and look for a frame full of young nurse bees. Make
sure the queen is not on this frame. Then shake the frame
into the mini-nuc. A full size frame covered in bees should be
enough to fully populate two mini-nucs. Since these plans call
for a four-chambered mini-nuc, you will need two such frames
for all four chambers.
Spraying the bees with a light sugar syrup before you
shake them into the mini-nuc may help keep them in place
after you shake them.
You can also place a queen excluder over a mini-nuc and
put an empty hive body on top of that. Shake the frames into
the empty box. A little smoke will drive the bees down into the
mini-nuc. If a queen is in the mix, she will remain behind on
top of the excluder. You can then put her back into the parent
colony. If necessary, equalize the bees in each of the mini-
nucs before closing it back up.
After Populating the Mini-Nuc With Bees
After the bees are in the mini-nuc, you may want to insert a
small strip of queen pheromone. It doesn’t take much, about
a half inch will do. Use a nylon zip tie around the pheromone
strip, attach the other end to a small wood cross piece and
place the strip down between the mini-frames. The phero-
mone strip helps to keep the newly transferred bees in place
by simulating a queen-right colony.
Also, a small piece of a pollen patty placed on top of the
frames will also help the new bees in drawing out the frame.
This is particularly true if there is not much, if any, of a honey
flow going on when you transfer the bees.
Then close up the mini-nuc overnight. Be sure to put a
feed jar (1:1 sugar syrup) above the mini-nuc using the hole
provided for this in the inner cover. The mini-nuc can be
opened for business as usual the next day.
Splitting a Package of Bees
Another source of bees for that initial population could be a
package of bees (eg. a 3 pound package). While we don’t find
much discussion of this option in the forums, we are of the
opinion that it will work. A 3 pound package of bees should be
enough to populate three mini-nucs (using deep mini-frames)
or maybe even four mini-nucs (using medium mini-frames)
At today’s cost of packaged bees (over $100 in the spring
of 2015), using a package of bees to start three or four mini-
nucs certainly has some attraction. Even if only half of the
mini-nucs from a package split make it, you are going to be
ahead of the game.
A couple of points to keep in mind. First, packaged bees
will have a wide age distribution: young, old and in between.
You may have to keep an eye on the mini-nuc over the next
several weeks to make sure the mini-nuc’s population doesn’t
fall too low. Second, splitting a package of bees implies that
you will have queens to start the mini-nucs. Since packages
usually arrive in early spring, having a source of (preferably
locally produced) queens may be an issue. You may have to
order extra queens with the package or make arrangements
with a local queen breeder. Even with the extra expense of
purchased queens, you will still be money ahead if you can
successfully make a three or four way split of packaged bees.
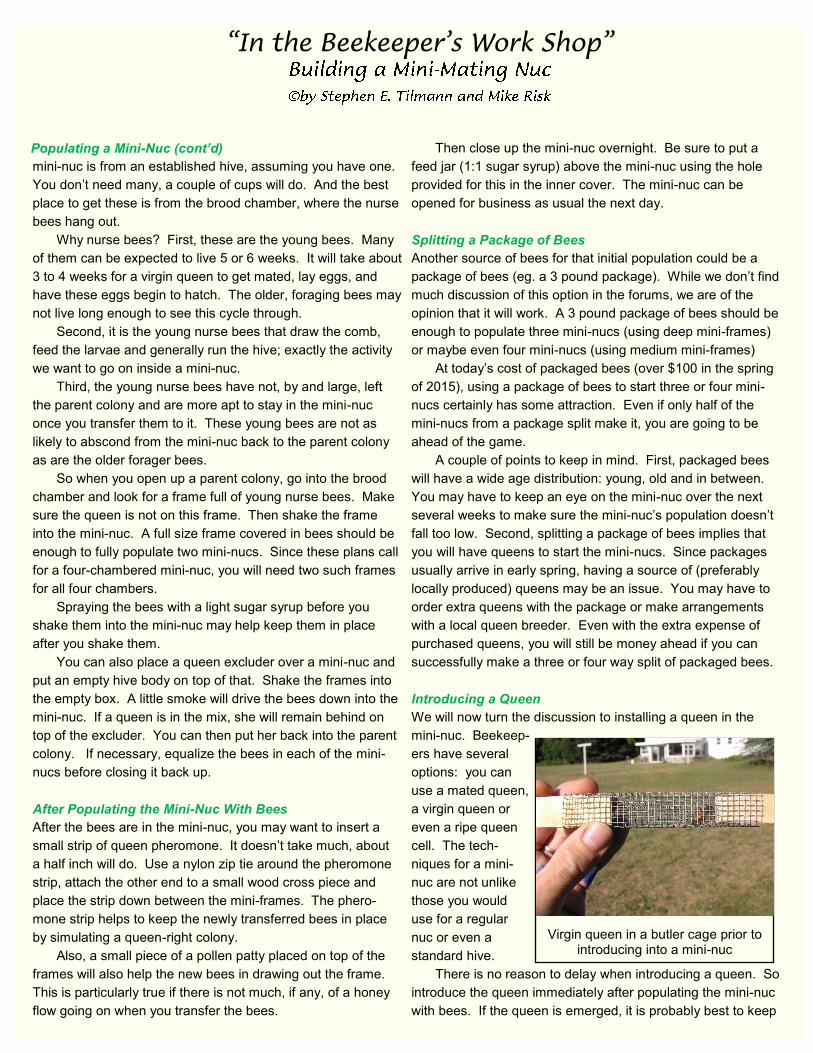
Introducing a Queen
We will now turn the discussion to installing a queen in the
mini-nuc. Beekeep-
ers have several
options: you can
use a mated queen,
a virgin queen or
even a ripe queen
cell. The tech-
niques for a mini-
nuc are not unlike
those you would
use for a regular
nuc or even a
standard hive.
There is no reason to delay when introducing a queen. So
introduce the queen immediately after populating the mini-nuc
with bees. If the queen is emerged, it is probably best to keep
Virgin queen in a butler cage prior to introducing into a mini-nuc
Populating a Mini-Nuc (cont’d)

the queen in a queen cage for a day (or so) before releasing
her. If you are working with a ripe queen cell, hang the cell
between the frames or on drawn comb (if you have any). This
is no different than in a full-size nuc.
Mark the calendar on the day the queen is introduced. It
takes about three days after the queen emerges for her integu-
ment to harden sufficiently so that she can fly. Allow another
three or four days for her mating flights. After 10 days, you
can inspect the mini-nuc for the queen and eggs, a sign of a
successful introduction.
Not all queens survive; about 25% may not make it back
from their mating flights (these are perilous times for a new
queen). So for a four-chambered mini-nuc (like these plans) a
failure in one would not be unexpected. So it goes.
After transferring a mini-nuc to a permanent hive
(discussed earlier) and you are removing the mini-frames an
opportunity is presented that you may want to be aware of.
We have found that often the queen will have laid eggs in the
mini-frames. Why not take this mini-frame(s) of eggs, setup a
mini-nuc and see if the bees will be able to raise their own
queen from one of these eggs?
You will have little invested and a lot to gain. You will only
have a small quantity of bees in the mini-nuc, so the parent
colony should not be adversely affected. You will know within
a couple of days if the effort will work. If it does not, you can
return the “borrowed” bees back to their parent colony and be
none the worse for wear.
And if the bees do start a queen cell (or cells) then you will
have a cherished opportunity to watch a fascinating aspect of
honey bee biology from beginning to end. Raise your own
queen and increase your hives. Not a bad bargain.
Other Things to Explore
Thus far we written about some of the more common uses for
mini-nucs. But beekeepers are beekeepers and are constantly
trying out new things. In this section, we will throw out a few
ideas which the mini-nuc community have been doing. Per-
haps some of these ideas will be of interest to the reader.
And, who knows, maybe you will be able to add a few new
twists of your own.
Overwintering in a Mini-Nuc. Can you overwinter a mini-
nuc? Yes, you can… and a lot of people are doing just that.
In fact, Brother Adam, one of the pioneers in mini-nucs, rou-
tinely overwintered mini-nucs. The technique involves stack-
ing two mini-nucs, with the top mini-nuc well provisioned with
honey. If you (or rather the bees) are successful, then you will
have the following spring a young, vigorous colony to add to
your apiary.
Banking Queens. There are times when a few (fortunate)
beekeepers find themselves with an extra queen or two. Ra-
ther than trying to hold these queen in a queen cage, how
about banking these queens in mini-nucs? The investment is
small in both bees and your time. When the time arrives when
you need that queen, she will already be laying and proven.
Laying queens are rarely rejected which really simplifies the
task of introducing a new queen to a colony.
Mini-Nucs as Starter/Finisher Colonies. A few intrepid
souls out there have even used mini-nucs as starter and finish-
er colonies for queen rearing. While this may be pushing the
envelope a bit, they report some success in doing so. Grafting
your own queens has all kinds of benefits. Grafting will take
your beekeeping journey to a new level and the diminutive as-
pects of a mini-nuc may be just what is needed as your first
step. It is worth a try.
Summary
Mini-mating nucs appear to be an idea whose time has come
(again). They are easy to work with, open up new vistas and
are… just plain fun to work with. You might want to check out
some of the references and links provided at the end of these
plans. Visit the forums on the web to stay current with the mini
-nuc scene. And don’t sell yourself short; you may be able to
contribute more than you think.
Hopefully we have your interest. Now lets move on to part 2 of
these plans and go out to the workshop and build a mini-nuc.
Introducing a Queen (cont’d)

Introduction
With just a little bit of research you will find that mini–nucs
come in all sorts of sizes: singles, doubles and (as in these
plans) four-chambered. We have elected to build a “4 cham-
bered” mini-nuc (Figure 1), which is basically a standard hive
body divided into four separate mini-nucs (or chambers).
The advantages of a 4-chambered mini-nuc are several.
First, it is very helpful to have more than one mini-nuc going so
that you can compare one to the others (just like having more
than one colony in your bee yard). If you notice something a
bit different with one, then it may be a clue that the one needs
attention.
Second, you will be able to use other standard equipment,
which you already have, for parts of the mini-nuc. The hive
stand, telescoping top cover and maybe a queen excluder are
three such items. Also a hive body to set over the inner cover
when the feeding jars are being used.
Third, the old adage “if one is good then two are better”
definitely applies to a mini-nuc. You are going to have fun do-
ing this, so you might as well run four mini-nucs and have a
really good time.
Mini-Mating Nucs - Part 2: Building Your Own
To setup a mini-nuc you will use all of the components of a
standard sized hive although most of them will be modified for
use as a mini-nuc (Figure 1). Plans (and accompanying vide-
os) are available for all of these components in the “In the
Beekeeper’s Workshop” series (see the references at the end
of this document).
We assume that you have downloaded these plans (and
maybe viewed the videos) and will not repeat this information
when discussing a mini-mating nuc. Rather, we will just ex-
plain what extra steps are required in the workshop.
The components of the standard hive that need to be mod-
ified for a mini-nuc are the screened bottom board, the hive
body (nuc box), the frames and the inner hive cover. In the
plans that follow, each of these components are addressed
separately.
Enjoy!
Before You Begin...
1
Mini-Mating Nuc Components
(custom components highlighted in red)
Hive Stand
Telescoping
Hive Cover
Frame
Inner Hive
Cover
Nuc Box
Bottom Board
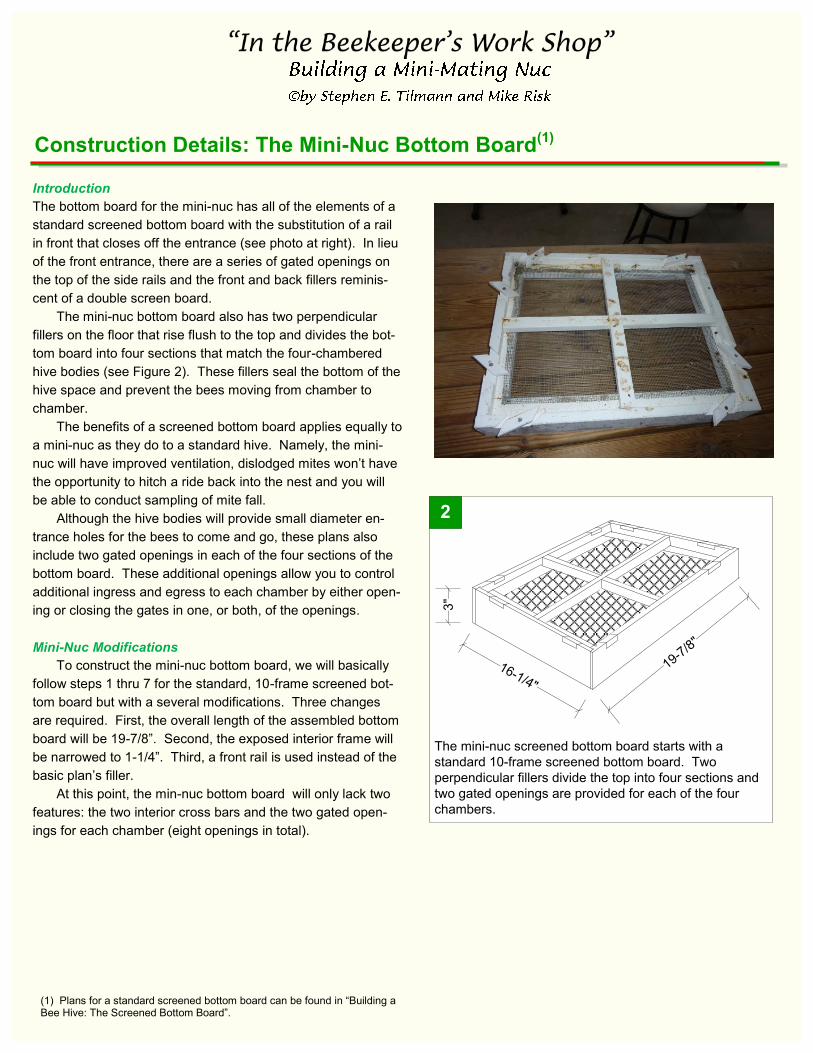
Construction Details: The Mini-Nuc Bottom Board(1)
Introduction
The bottom board for the mini-nuc has all of the elements of a
standard screened bottom board with the substitution of a rail
in front that closes off the entrance (see photo at right). In lieu
of the front entrance, there are a series of gated openings on
the top of the side rails and the front and back fillers reminis-
cent of a double screen board.
The mini-nuc bottom board also has two perpendicular
fillers on the floor that rise flush to the top and divides the bot-
tom board into four sections that match the four-chambered
hive bodies (see Figure 2). These fillers seal the bottom of the
hive space and prevent the bees moving from chamber to
chamber.
The benefits of a screened bottom board applies equally to
a mini-nuc as they do to a standard hive. Namely, the mini-
nuc will have improved ventilation, dislodged mites won’t have
the opportunity to hitch a ride back into the nest and you will
be able to conduct sampling of mite fall.
Although the hive bodies will provide small diameter en-
trance holes for the bees to come and go, these plans also
include two gated openings in each of the four sections of the
bottom board. These additional openings allow you to control
additional ingress and egress to each chamber by either open-
ing or closing the gates in one, or both, of the openings.
Mini-Nuc Modifications
To construct the mini-nuc bottom board, we will basically
follow steps 1 thru 7 for the standard, 10-frame screened bot-
tom board but with a several modifications. Three changes
are required. First, the overall length of the assembled bottom
board will be 19-7/8”. Second, the exposed interior frame will
be narrowed to 1-1/4”. Third, a front rail is used instead of the
basic plan’s filler.
At this point, the min-nuc bottom board will only lack two
features: the two interior cross bars and the two gated open-
ings for each chamber (eight openings in total).
(1) Plans for a standard screened bottom board can be found in “Building a Bee Hive: The Screened Bottom Board”.
The mini-nuc screened bottom board starts with a
standard 10-frame screened bottom board. Two
perpendicular fillers divide the top into four sections and
two gated openings are provided for each of the four
chambers.
2
16-1/4"
19-7/8
"
3"

Construction Details: The Mini-Nuc Bottom Board (cont’d)
Step 1. The Interior Frame
For the mini-nuc the interior frame is narrowed from the stand-
ard plans (step 1 in the standard) such that when assembled
only 1-1/4” is exposed. Because we are using a rail in front
and a filler in back, the width of these two frame members will
be slightly different.
The following replaces Step 1 in the standard plans. From
1x4 pine, cut two pieces for the sides that are 19-1/2” long and
1-5/8” wide (Figure 3). For the front member, cut one a piece
15-1/2" long and 1-5/8” wide. For the back member, cut one
piece 15-1/2” long and 2” wide. Then cut two side pieces 19-
1/2” long and 1-5/8” wide.
Use a half-lap joint to assemble the frame. Adjust the end
notches to match the width of the member to which it is joint-
ed.
Step 2. Front and Side Rails
In the standard plans, the front of the bottom board has a filler
on the bottom under the frame. It is a bit more elegant to re-
place this filler with a front rail (Figure 4) that is similar to the
two side rails. The front rail does not have the lower dado for
the sampling board as do the two side rails.
To make the front rail, cut a piece from a 1x4 that is 15-
1/2” long then rip this piece to a width of 3”. As in the two side
rails, cut a 3/4” wide by 3/8” deep dado along the length. Lo-
cate this dado the same distance from the top edge as the two
side rails (eg. 3/4”).
Also note that the two side rails for the mini-nuc bottom
board (at 19-7/8”) are shorter than the standard (at 22”).
We will use a rebate joint to assemble the rails to the inte-
rior frame. When assembled, the interior frame should be
flush with the back end of the two side rails. The foot print of
the assembled mini-nuc bottom board will be 16-1/4” wide and
19-7/8” long (the same as a hive body).
15-1/2"
15-1/2"
Frame
1-5/8"
1-5/8
"
19-1/2
"
1-5/8"
2"
19-1/2"
For the frame, cut 2 side pieces 19-1/2" long by 1-5/8"
wide and 1 front piece 15-1/2" long by 1-5/8" wide and
one end piece 15-1/2" long by 2" wide. Half lap joints
are used to join all of the frame members .
3
The bottom board for the mini-nuc has a front rail added
to the basic plans. Note the front rail only has the top
frame dado and does not have the bottom sampling
board dado.
4
Nail here
Front
Back
15-1/2"19-7/8"

Construction Details: The Mini-Nuc Bottom Board (cont’d)
Step 3. Assemble the Frame
The easiest method to join the frame is a simple butt joint. But
to minimize the amount of exposed end grain, we will use a
rebate joint (Figure 5). This joint only has half the exposed
end grain as does the butt joint. Since rot usually starts at the
end grain, a rebate joint will prolong the life of the bottom
board. Also, the rebate joint also has more glued surface, so
this joint is a bit stronger than a simple butt joint. To make a
rebate joint, cut a rabbet on the inside ends of the side pieces
3/8” deep and 3/4” wide.
The foot print of the assembled mini-nuc bottom board will
be 16-1/4” wide and 19-7/8” long (the same as a hive body).
Step 4. Install Interior Dividers
From a 1x4 cut two dividers; one will be 18-3/8” long (the
length of the inside of the bottom board) and the other will be
14-3/4” long (the width of the inside of the bottom board). Both
will be 3/4” high and 1” wide (Figure 6, top).
Then in each divider, cut a dado centered along the length
that is 3/8” deep and 1” wide (Figure 6, middle). These dados
will allow you to install the dividers perpendicular to each other
with the tops flush. Glue the dividers at the dados and assem-
ble into a cross; the top of the dividers should be flush (Figure
6, bottom) .
We prefer to hold off making and installing the dividers
until the bottom board has been painted and the screen mesh
installed. Note: the mesh may affect the height of the divid-
ers. Which is why you may want to wait making the dividers
until after the mesh is installed. It is likely that the height of the
fillers may have to be somewhat less than the 3/4 inch shown
in the diagrams to allow for the thickness of the wire mesh.
To install the dividers, place the assembled dividers on the
top of the bottom board mesh (Figure 2) and nail through the
sides into the ends of the dividers. Then turn the bottom board
upside down and staple the mesh to the bottom of the dividers
sufficiently so that the bees will not be able to crawl under the
dividers into neighboring chambers.
From the side pieces, cut a rabbet 3/8" deep and 3/4"
wide. This will allow the end to butt up against the side
creating a rebate joint.
5
SideEnd
3/8
"
3/4"
14-3/4"
1"
3/4
"
1"3/8
"
3/4
"
1"
From a 1x4 cut a filler 18-3/8" long and a second filler
14-3/4" long (top). Both fillers are 1" wide.
In each of the cross pieces, cut a dado 3/8" deep and
1" wide (middle). Center the dado along the length.
Assemble the fillers by matching the dados (bottom).
The tops of the fillers should be flush.
6
18-3/8"
1"
3/4
"

Detail of the gated opening. The entrance is a dado 3"
wide and 3/8" deep with a 30 degree angle for the cross
cut. Each entrance has a matching block 5/16" thick. Use
a 1/2-inch #8 wood screw (predrill) as the pivot.
Countersink the screw so that the top is flush with the
entrance block.
8
3" 3/8
"5
/16"
Entrance Block
Frame
1/2" #8 Screw
3"
Top View
30 deg
1/2" #8 screw for pivot
Small gap
Step 5. Make the Gated Openings
Each of the four chambers has two gated openings, or en-
trances, on the top rails about 3-3/4” from the outside corner
(Figure 7). These entrances have a rotating gate that which
can be closed or opened depending on the needs at the time.
We recommend that you first make the entrance blocks.
From a 1x4 rip a piece 5/16” wide and at least 36” long (you
will need 8 blocks). Then cut each block at a 30 degree angle
and 2-7/8” long on the edge (Figure 8). This length is slightly
smaller than the entrance so the block will not bind and can be
completely closed .
To make the entrance we use a radial arm saw with a
stacked dado blade setup for 1/4-inch wide cut. With the arm
of the saw rotated 30 degrees, we simply make a series of
passes nibbling out the entrance opening. The opening is 3/8”
deep and 3” long (Figure 8). Test the width of each entrance
with one of the blocks you just made. There should be a small
gap between the end of the block and the entrance opening.
Finally, predrill the entrance block for a 1/2” #8 wood
screw. Countersink the screw so that the top of the screw is
flush with the block.
Construction Details: The Mini-Nuc Bottom Board (cont’d)
There are two gated openings for each chamber (blue
arrows) located on the outside rails. Each opening is
located 3-3/4" (aprroximately)from the corner.
7
Detail of the gated opening. The entrance is a dado 3"
wide and 3/8" deep with a 30 degree angle for the cross
cut. Each entrance has a matching block 5/16" thick. Use
a 1/2-inch #8 wood screw (predrill) as the pivot.
Countersink the screw so that the top is flush with the
entrance block.
8
3" 3/8
"5
/16"
Entrance Block
Frame
1/2" #8 Screw
3"
Top View
30 deg
1/2" #8 screw for pivot
Small gap

Construction Details: The Mini-Nuc Hive Body(2)
Introduction
The hive body for the mini-nuc is basically a standard 10-
frame hive body divided into four chambers (see photo at right
and Figure 9). The cross-wise partition provides a standard
3/8” by 5/8” frame rest on both sides. The length-wise partition
is not structural and serves merely to separate the chambers;
it is made from thin plywood. All of the partitions are of the
same height as the hive body.
In the lower outside corner of each chamber, a 1-inch en-
trance hole is provided. This is one (of several) means for the
bees to come and go from each chamber. To control ingress
and egress an entrance disc is installed over each hole.
Although the hive body depicted in Figure 8 is a deep (9-
5/8”), you can also make a mini-nuc from a medium depth hive
body (6-1/4”). Where appropriate, we will provide the dimen-
sions for both in the plans that follow.
Mini-Nuc Modifications
To construct the mini-nuc hive body, follow steps 1 thru 6 for
the standard, 10-frame hive body. This takes you through to
the point where all of the components are ready to assemble.
For the mini-nuc, the first step will be to create the cross-
wise partition. We will laminate three pieces of 3/8” plywood.
The two outer pieces of plywood are 5/8” lower than the center
piece. This will give us the 5/8” by 3/8” frame rest on both
sides of the partition.
Be sure the partitions are the same height as the hive
body so that when everything is assemble, there will be no
spaces through which the bees can visit the neighboring
chambers.
Prior to assembly, we need to cut a shallow vertical dado
centered on the inside of each board of the hive body. These
dados (four in total) accept the cross-wise and length-wise
partitions.
For the four entrance holes, only drill one hole per side per
chamber (as shown in Figure 9). Isolating the entrance holes
to one per side will help the bees find the correct entrance for
their “home”. We also paint the entrance discs different colors
for the same reason.
(2) Plans for a standard hive body can be found in “Building a Bee Hive: The Hive Bodies”.
The mini-nuc hive body starts with a standard, 10-frame
hive body. Interior partitions are added that divide the
hive body into four chambers. Each chamber has an
entrance hole in the lower corner.
9
16-1/4"19-7
/8"
9-5
/8"

Construction Details: The Mini-Nuc Hive Body (cont’d)
Step 1. Make the Cross-Wise Partition
The cross-wise partition is made from three pieces of 3/8” ply-
wood laminated together (Figure 10). The center piece is 1/2”
wider and 5/8” higher than the two outer pieces. When as-
sembled, the 1/4” extension on both sides of the center piece
will fit into a dado on the inside of the hive body. The extra
5/8” on top will form the back side of the frame rest.
The cross-wise partition spans the interior width of the hive
body; the length-wise partition is actually in two sections (front
and back). Therefore a shallow dado is cut down the middle of
the two outer pieces of the cross-wise partition to accept these
length-wise partitions (represented by the vertical gray line in
Figure 10). Be sure to avoid placing any nails or staples
where this vertical dado is located.
From a sheet of 3/8” plywood, cut one piece 15-1/4” by 9-
5/8”. Cut two pieces 14-3/4” by 9”. Plywood sometimes has
voids in the interior plys. Try to avoid having any of these
voids on the top edge of the partition; this top edge needs to
be strong since it will be used to pry out frames once the mini-
nuc is placed in service.
Laminate all three sections together with glue, clamps and
nails or staples. The bottom edge of all three pieces are flush.
The middle piece will extend 1/4” beyond both sides of both
outside pieces and 5/8” above.
Finally, cut a 3/8” deep vertical dado centered on the two
outside pieces. This dado is for the length-wise partitions.
The width of the dado should match whatever material you use
for the length-wise partitions; these plans call for 3/8” plywood.
Step 2. Make the Length-Wise Partitions
The two length-wise partitions are made from 3/8” plywood
(thickness is not critical). Each partition is 9-3/8” long and 9-
5/8” high (for a deep hive body or 6-5/8” for a medium). Dur-
ing assembly these partitions will slide into vertical dados on
the interior of the hive body (Figure 11).
If the length-wise partition is made from plywood other
than 3/8-inch, then be sure to make the appropriate adjust-
ments when cutting the dados on the end of the hive body and
on the cross-wise partition.
Note: we have made mini-nucs using 1/8” thick luan (a
thin plywood) for the length-wise partitions. This thin material
works just fine and is perfectly acceptable.
The cross-wise partition is constructed of three pieces of
3/8" plywood (two shown in drawing). The center piece
is 15-1/4" long and 9-5/8" high. The two outer pieces are
14-3/4" long and 9" high. When assembled, the center
piece will extend 1/4" beyond and 5/8" higher than the
two out pieces .
14-3/4"
15-1/4"
9-5
/8"
9"
10
Two partitions are installed length-wise. The partitions
are 3/8" plywood and are 9-3/8" long and 9-5/8" high.
The partitions slide into dados on both ends of the hive
body and on the cross-wise partition.
9-3/8"
9-5
/8"
11

Construction Details: The Mini-Nuc Hive Body (cont’d)
Step 3. Cut Dado on Hive Body Ends
In step 1, we made two vertical dados 3/8” wide on either side
of the cross-wise partition. We need corresponding dados on
the inside of the two hive body end boards (Figure 12). These
dado are also 3/8” wide (or match the thickness of the length-
wise partition) and centered in the middle of the end boards.
The dados are 3/8” deep and run the full height of the board.
Note that a 3/8” deep dado will probably cut through the
hand hold on the opposite side; perhaps an 1/8th inch or so.
When the hive body is assembled, a small portion of the parti-
tion may extend into the hand hold. If this is objectionable,
then you can either cut a shallower dado (and shorten the
length of the partition) or carve out the exposed partition in the
hand hold after the hive body is assembled. We generally
leave the exposed partition alone; it does not seem to matter.
Step 4. Drill Entrance Holes in Each Chamber
Each chamber is provided with a 1-inch diameter entrance
hole. Locate the center of the entrance near the corner, about
1-1/2” above the bottom and about 2” in from the corner. The
exact location is not particularly important.
We like to have only one entrance hole per side of the hive
body (Figure 13). This will help the bees orient to their particu-
lar colony.
Install an entrance disc over each entrance hole. An en-
trance disc is a small plastic disc (see photo below) that can
be rotated into one of several positions to control ingress and
egress (open, workers only or closed). These discs can be
purchased commercially; the one shown in the photo was
printed on a 3-D printer. Paint each of the four discs a distinc-
tive bright color. This will help the bees imprint on their “home”
entrance.
A 3/8" wide dado is cut on inside of each hive body
end board. The dado is centered horizontally and is
3/8" deep.
3/8" Dado
3/8" Dado
12
Drill 1-inch entrance holes for each chamber. Only
one entrance should be located on a side (as
indicates by the arrows).
13

Construction Details: The Mini-Nuc Hive Body (cont’d)
Step 5. Inspection Covers (Optional)
One unique aspect of a mini-nuc is that when you open it up
you are really opening four colonies of bees at the same time.
Inspections covers help keep the other chambers calm while
you work the one (see photo right, note inspection covers on
the mini-nuc).
Beekeepers often use fabric draped over the top of the
beehive for this purpose. One side can be flipped back while
working the hive. This is particularly common when working
double nucs. However, fabric may not be the best choice for a
four chambered mini-nuc.
Inspection covers can be made from any thin plywood ma-
terial; we recommend 1/8th inch luan. The covers are 9-
15/16” by 8-1/8” (Figure 14). You will need four inspections
covers for the mini-nuc.
Inspections covers will help keep the other chambers
quiet while you work the mini-nuc. The covers are 9-15/
16" by 8-1/8" and made from thin material such as 1/8th
inch luan (a type of plywood).
148-1/8"
9-15/16"

Construction Details: The Mini-Nuc Frames(3)
Introduction
The frames for a mini-nuc have all of the features as standard
frames except the mini-nuc frames are only about half as long
(see photo at right; this is a medium mini-nuc frame). It is
these mini-frames, perhaps, that makes working with mini-
nucs so appealing. These tiny frames are… well, just cute.
These small frames are the essence of a mini-nuc and
what makes the system work. The small frames concentrate
the cluster and force the nurse bees to focus their attention to
a comparatively small area. This smaller footprint requires
fewer bees to provide all of the essential services to keep the
colony going and to help it thrive.
Mini-Nuc Modifications
A standard frame is 19-1/8 inches long; the min-nuc frame is 9
-1/4 inch long (Figure 15). The height of the mini-nuc frame is
the same as its standard equivalent; deeps are 9-1/8” and me-
diums are 6-1/4”.
The shorter length of the mini-nuc frame is achieved by
shortening three components of the standard frame. The top
bar is 9-1/4” long (as opposed to 19” for the standard). The
bottom bar is 8” long (as opposed to 17-3/4” for the standard).
The tack strip is 7-1/4” long (as opposed to 17” for the stand-
ard).
To construct a mini-nuc frame, follow all of the steps pro-
vided in the standard frame plans. Just make the length ad-
justments stated above.
Mini-Nuc Foundation
For the mini-nuc frames, use a standard sheet of wax founda-
tion (16-3/4” wide) cut into three equal width pieces. Each
sheet of foundation for the mini-nuc will be slightly over 5-1/2”
wide.
It should be noted that when the foundation is installed in a
mini-frame, the sheet will not fill the entire width between the
side bars; there will be about a 7/8” gap on each side. Our
experience is that the bees will fill in this gap when they draw
out the comb. This gap does not seem to be an issue.
Frame Transfer Clips
One unique aspect of working with mini-nucs is that you will, at
some point, need to transfer the colony from a mini-nuc to
standard size equipment. This transfer is done by placing two
mini-frames end-to-end, bees and all, to a space normally oc-
cupied by one standard frame. Transfer clips are needed to
support the two mini-frames where they meet in the middle.
In these plans, we provide two options for transfer clips.
One style is used when transferring two mini-frames placed
between two standard frames. The other style is used when
transferring four mini-frames between two standard frames.
We suggest that you have both styles on hand so as not to
limit your options.
(3) Plans for a standard frames can be found in “Building a Bee Hive: The Frames”.
The frame for the mini-nuc is 9-1/4" long, about half
that of a standard frame. The height is the same as
the standard frame at 9-1/8" for deeps and 6-1/4" for
mediums.
9-1/4"
15

Construction Details: The Mini-Nuc Frames (cont’d)
Step 1. Make the Mini-Frame
There are three components of the standard frame that need
to be modified (length is shortened) for the mini-nuc frame: the
top bar, the bottom bar and the tack strip (Figure 16). The
lengths shown in Figure 15 should be used when making
frames for the mini-nucs.
Step 2. Make Transfer Clips
Transfer clips are used when moving the mini-frames to stand-
ard equipment (see photo below). The clips provide the sup-
port needed to hang the frames in the space that would other-
wise be occupied by a standard frame. Sizes are provided for
moving two mini-frames that would replace a single standard
frame and for moving four mini-frames that would replace two
standards fames that are side by side (Figure 17).
The single clip can be made from light aluminum stock
(same material used when making a telescoping cover). The
double clip needs to be a bit stronger so is best made from
light steel strap.
When bending the clips, work from the inside out (see Fig-
ure 17 for the sequence). Use a hand seamer or a vise to hold
the material when making the bends.
The three components of a min-nuc frame that need
to be modified (length is shortened) from the plans for
the standard frame.
16
1-1/16"
3/4
"
9-1/4"
Top Bar
3/4"
3/8
"
8"
Bottom Bar
7/16"
1/4
"
7-1/4"
Tack Strip
17 1-1/8"
1/2
" 1"1-3/4"
Single
Double
1-1/8"
1/2
" 1"3-1/2"
Sizes for single wide (top) and double wide (middle)
transfer clips. The clips are used when moving mini-
frames to standard size equipment. The clips are
made out of light metal (such as aluminum or thin
steel bar stock). Use the sequence of bends (bottom)
when making the clips.
Sequence of Bends
1 1
22 33

Construction Details: The Mini-Nuc Frames (cont’d)
Step 3. Mounting the Foundation
We recommend standard wired wax foundation for the mini-
frames. A single 16-3/4” wide sheet is cut vertically into three
equal sizes (see photo, top right). When installed in the mini-
frames, there will be a gap between the sides of the foundation
and the side bars of the mini-frame (see photo, middle right).
It is our experience that the bees will fill in this space when the
foundation is drawn out.
Regular foundation pins will not work to hold the founda-
tion because of this gap. A good substitute can be had be us-
ing bobby pins, which are inexpensive and readily available
(see photo, middle right).
The mini-frames should be constructed as “wedge” style
frames for mounting wax foundation. The cut sheet of founda-
tion is slipped into the grooved bottom bar; the protruding wire
of the foundation is placed against the top bar. The tack strip
is then installed holding the top of the foundation firmly in
place (see photo, bottom right). All of this is basically the
same as installing standard size wax foundation in standard
size frames.

Construction Details: The Mini-Nuc Inner Cover(4)
Introduction
The inner hive cover for the mini-nuc has all of the features of
a standard hive cover, plus three additional elements (Figure
18 and photo at right). A ventilation notch is provided in the
outer frame for all four chambers. A circular feeder hole is
centered in each of the four sections. The hole is sized to ac-
cept the punched feeder caps used for Boardman style en-
trance feeders. And, finally, fillers divide the bottom of the in-
ner cover into four sections and provides a bee-tight fit against
the partitions of the hive body.
Mini-Nuc Modifications
To construct the mini-nuc inner cover, follow all of the steps
the standard 10-frame inner cover except skip step 6 (cut the
vent opening). Prior to assembly, cut the dados on the bottom
of the frame. The dados will provide top ventilation for each
mini-nuc chamber. We like to position the ventilation dados
above the hive body entrance holes, which implies that there
will be a ventilation dado cut on each of the four frame mem-
bers (see photo, at right).
You might also find it easier to cut the four feeding holes
before assembling the inner cover. A template is provided in
Appendix 1 of these plans to help with this task. The diameter
of the holes is important; it should be large enough to hold the
standard 70mm punched lids of the feeder jar but not too large
such that the lids will go through.
The fillers that divide inner cover into four sections are
installed after the inner cover is assembled. These fillers
serve the same function as the interior dividers found in the
mini-nuc screened bottom board. The fillers are flush with the
frame and provide a bee-tight fit for the top of the four cham-
bered mini-nuc hive body.
(4) Plans for a standard hive body can be found in “Building a Bee Hive: The Inner Hive Cover”.
The mini-nuc inner cover features a ventilation notch
in each side, fillers which divide the cover into four
sections and a feeder hole centered in each of the
four sections.
19-7/816-1/4"
18

Step 1. Cut Ventilation Notches
Top ventilation for each mini-nuc chamber is important and is
provided by cutting a 1” wide by 3/8” deep dado in the lower
side of each inner cover frame member (Figure 19). The loca-
tion of these dados is not particularly important, though we like
to cut the dado above the entrance holes of each chamber.
This keeps the coming and going of the bees for each cham-
ber all on the same side.
It is easiest to cut these dados in the frames before as-
sembling the inner cover (which is Step 4 in the standard inner
cover plans). Be sure to cut these dados on the bottom of
what will eventually be the assembled mini-nuc inner cover.
Step 2. Cut Feeder Holes
Feeding the mini-nucs will definitely be required and we pro-
vide for that by a cutting feeding hole centered in each of the
four sections of the inner cover. The hole is 2-13/16” (70mm)
in diameter and accepts a quart jar with a perforated lid.
These are the same jars that are used in Boardman style en-
trance feeders.
A template is provided in Appendix 1 that can be used for
cutting the feeder holes (photo, top right). Print the template
page (at 100%) then cut the template on the dotted line provid-
ed into four pieces. Use a spray adhesive and stick the tem-
plate to the inner cover centered over each of the four inner
cover sections (photo, second from top). The center of each
template hole will be about 3-1/8” from the side and 4” from
the end of each of the four quadrants.
For each of the templates, drill a starter hole somewhere
near the inner edge of the circle large enough for your jig saw
blade (the three templates shown in photo, second from top).
Then cut out the circle staying just inside the template’s circle
outer line (the top right template shown in photo, second from
top). At this point, the hole should be slightly smaller than the
perforated lid (check it with a lid).
Then enlarge the hole by sanding. A drum sander at-
tached to a drill press is easiest (photo, third from top). Con-
tinue to enlarge the opening until the perforated jar lid easily
fits, but does not go through (photo, bottom right). Allow a
small extra space for painting the inner cover (yes, the paint
will tighten up the hole a noticeable amount)..
Construction Details: The Mini-Nuc Inner Cover (con’td)
The ventilation notch is a dado 1" wide and 3/8" deep.
There is one ventilation notch on each side of the
mini-nuc inner cover.
191"
3/8
"

Step 3. Install Fillers
Just as we installed fillers on the bottom board to prevent the
bees from moving to adjacent chambers, we need to do the
same thing for the mini-nuc inner cover. The inner cover fillers
are made in the same way as those in the bottom board.
The length-wise filler is 16-/78” long; the cross-wise filler is
13-1/4” long (Figure 20, top). The height depends on the
thickness of the cover piece used for the inner cover. The
plans call for a cover piece 1/4” thick, so the fillers will be 1/2”
high. You will need to measure your assembled inner cover to
get your exact measurement.
Then cut a dado exactly centered on each filler that is 1”
wide and 1/4” deep (Figure 20, middle). Again, the depth may
be different for you.
Assemble the fillers cross-wise (Figure 20, bottom). Glue
and staple everything in place on the bottom of the inner cover
(Figure 18).
Step 4. Ventilation Notch Closure Clips At some point, you will probably need to close a mini-nuc
chamber to confine the bees. This may be the case, for exam-
ple, when first introducing a queen. The gated openings on
the bottom board and the entrance disc on the hive body deals
with those openings. That leaves the ventilation notch we
have made on the inner cover.
One option to close the ventilation notch is to make small
“U” shaped clips out of a light material, such as aluminum roll
stock (same material used to make the transfer clips) or #8
hardware cloth. These closure clips need not be fancy (Figure
21).
To make the clip, cut a piece of aluminum 1-1/4” wide and
2-3/4” long. Then make two bends 1 inch from each end.
Construction Details: The Mini-Nuc Inner Cover (con’td)
Revision History:
2/26/15: original version
6/22/15: correct dimension in Figure 4.
12/3/15: Page 16 - correct reference to Figure 17.
4/26/16: Page 12 - Step 2. Correct dimensions. Also Figure 11.
2/15/17: Page 10 - correct dimensional lines in Figure 8.
- correct dimension in Figure 11
1"1/4
"
1/2
"
1"
From a 1x4 cut a filler 16-7/8" long and a second filler
13-1/4" long (top). Both fillers are 1" wide.
In each of the cross pieces, cut a dado 3/8" deep and
1" wide (middle). Center the dado along the length.
Assemble the fillers by matching the dados (bottom).
The tops of the fillers should be flush.
20
13-1/4"
1"
1/2
"
16-7/8
1"
1/2
"
A simple clip made from aluminum stock serves as a
closure to the ventilation notches on the inner cover.
21
3/4
"
1" (approx)
1-1/
4"

Photo Gallery...
Photo Captions:
1. Partially assembled bottom board for the mini-nuc.
2. Transferring a mini-frame to a standard hive.
3. A mini-nuc on the bench ready for the apiary.
4. Marked queen on mini-frame with honey, larvae and
capped brood.
5. Hive body center partition extending into hand hold.
6. Mini-nuc with feeders installed.
7. Mini-frames transferred to standard hive body
1 2
5
4
6
7
3

Appendix 1: Template for Cutting Feeder Holes In Inner Cover

Annotated References and Resources
Web Forums
Topic: My plan on overwintering 200 queens on mini-frames. Original post: 11/12/2013 Last accessed: 2/13/15
http://www.beesource.com/forums/showthread.php?290891-My-plan-on-overwintering-200-queens-on-mini-frames
Topic: How I plan on overwintering 40 mating nucs on mini frames. Original post: 8/17/2013 Last accessed: 2/13/15
http://www.beesource.com/forums/showthread.php?288103-How-I-plan-on-overwintering-40-mating-nucs-on-mini-frames
Topic: Mini Mating Nuc. Original post: 11/02/213 Last accessed: 2/13/15
Comments: Discussion on setting up and management of mini nucs.
http://www.beesource.com/forums/showthread.php?290656-Mini-Mating-Nuc&p=1016188#post1016188
Topic: Did those northern nuc's overwinter? Original post: 04/11/2009 Last accessed: 2/13/15
Comments: A discussion on nucs in general surviving northern winters. Some discussion on mini-nuc survival.
http://www.beesource.com/forums/showthread.php?227855-Did-those-northern-nuc-s-overwinter&highlight=mini+mating+nucs
Topic: Volume of mini mating nucs Original post: 11/7/2007 Last accessed: 2/13/15
Comments: Discussion about the size of a mini-nucs, building of a mini-nuc and techniques of getting bees for the initial popu-
lation.
http://www.beesource.com/forums/showthread.php?214354-Volume-of-mini-mating-nucs&highlight=mini+mating+nucs
Topic: Interesting way to combine 3 mating nuc's Original post: 10/5/2009 Last accessed: 2/13/15
Comments: Discussion about transferring mini-nucs to permanent hives, includes some management suggestions.
http://www.beesource.com/forums/showthread.php?234562-interesting-way-to-combine-3-mating-nuc-
s&highlight=mini+mating+nucs
Topic: Over-wintered queens Original post 1/15/2001 Last accessed: 2/13/15
Comments: Discussion on keeping queens through the winter using mini-nucs.
http://www.beesource.com/forums/showthread.php?249694-Over-wintered-Queens&highlight=mini+mating+nucs
Videos
Topic: Mini nuc cell builder and finisher. Author: unknown. Length: 0:43 Last accessed: 2/13/15
Comments: Short video showing a mini-nuc being used as a starter colony for queen grafting
http://s59.photobucket.com/user/vlwbee/media/20130818_112034.mp4.html
In the Beekeeper’s Workshop videos...
Building a Hive Stand. www.youtube.com/watch?v=oytJbpV8vwo Length: 16:49
Building a Screened Bottom Board: www.youtube.com/watch?v=DlD8EywlJes Length: 23:09
Building Hive Bodies. www.youtube.com/watch?v=vV-7kmLwQ00 Length: 21:41
Building an Inner Cover. www.youtube.com/watch?v=rvH8u1yKTnY Length: 17:44
Making Hive Body Handholds. www.youtube.com/watch?v=nyxfRMMD7SU Length: 14:59
Building Frames - Part 1. www.youtube.com/watch?v=r8Zx4uRQx9k Length: 20:47
Building Frames - Part 2 www.youtube.com/watch?v=6ZoB6c-kuuc Length: 17.51
Plans for these and other workshop projects available at: www.michiganbees.org/beekeeping/in-the-beekeepers-workshop/