mini hi.fi component system - sears parts direct · to prevent fire or shock hazard, do not expose...
TRANSCRIPT
SON3t; 4.23_.9_2.,2_3,
Mini Hi.FiComponentSystem
Operating Instructions
Owner's Record
The model and serial numbers are Iocaled on the rear of the unit. Record the serial number
in the space provided below. Refer to them whenever you call upon your Sony dealer
regarding this product.
Model No. ...................... Serial No.. .......................
DIIDII'ALAUDIO__sync
1_51 _1 [_
MHC-GS3OOA VMHC-GS200
© 2002 Sony Corporation
To prevent fire or shock hazard, do not
expose the unit to rain or moisture.
To avold alec_foal shock, do not open the cabinet Refhrservicing to qualified personnel only
To prevent fire, do no_ cover the ventdabon of tileapparalus with news papers, table-cloths, curtains,
etc. And don't place lighted candles on the apparatus.
To prevent fire or shock hazard, do no1 place objectsfilled with liquids, such as vases, on the apparatus.
Do not install the appliance in a confined space,such as a bookcase or built-in cabinet.
ct_ss I [._s_ prc,_tr:r ILMOK_N1 UMIEi:IJU_E_ 1 L_R_PPAP,_
This appliance is classified as
a CLASS I LASER product.This label is located oll therear exterior.
Don't throw away the battery withgeneral house waste, dispose of it
correctly as chemical wasle.
ENERGY STAR x;is a US registeredmarkAs an ENERGY STAR _;pmrner, Sony
Corporation has determined _at _isp_dt_ct meets the ENERGY STAR _
guidelines for energy efficiency¸
NOTICE FOR THE CUSTOMERS IN THEU.S.A.
This symbol is intc_lded to alert the
user to the presence of uninsulated
'*dangerous voltage" wghin _e
product's enclosure that iTlay be of
su ffialent magnitude to constipate a rlsk
of electr te shock to persons¸
This symbol is in_ended to alert _e
user to the presence of hllportant
operating and malntenance (servicing)
instructions in _e literature
accompanying the appliance¸
WARNING
This equipment has been tested and found to comply wld]
the limits for a Class R digital device, pursuant to Part 15of the FCC Rules. These limits ale designed to providereasonable protection against harnl fol interference in aresidential installation This equipnlent generates, uses,and can radiate radio fi'equency energy and, ifnminstalled and used in accordance with die instructions,may cause harmfol interference to radio communications
However, daere is no guarantee that inter_hrence will notoccur in a paiticular installation Ifdfis equipment doescause halmfbI intel _hrence Toradio or television
reception, which can be determined by turning theequipment off and on, the user is encouraged to try tocorrect dae inter_hrence by one or nlore of the followingmeasuresi
Reorient or relocate the receiving antenna
Increase the separation between the equipmem andreceiver
Connect the equipment into an outlet on a circuitdifferent f_om that to which the receiver is connected
Consult the dealer or an experienced radio/TVtechnician for help
CAUTION
• The use of optical instruments with this product willincrease eye hazald.
• You are cautioned thai any changes or modi ffoadons
not expressly approved in this nlanual could void yourauthority to operate this equipnlent.
Note to CATV system installer:
This reminder is provided to call _e CATV sy_eminstaller's attention to Article 820-40 of the NEC thai
provides guidelines for proper grounding and, inparticular, specifies that the cable ground shall beconnected to the grounding system of the hvilding, asclose to die point ofcabte entry as practical
NOTICE FOR THE CUSTOMERS IN
CANADA
CAUTION
TO PREVENT ELECTRIC SHOCK, DO NOT USETHIS POLARIZED AC PLUG WITH AN EXTENSIONCORD, RECEPTACLE OR OTHER OUTLET UNLESSTHE BLADES CAN BE FULLY INSERTED TOPREVENT BLADE EXPOSURE.
MHC-GS300AV only
This slereo system is equipped with the Dolby * Pro
Logic Surround decoder.
• Manufactured under license from Dolby
Laboratories. "Dolby", "Pro Logic", and thedouble-D symbol ; a_ trademarks of Dolby
Laboratories. Confidential unpublished works.©1992-!997 Dolby Laboratories. Al! rightsre_rved.
2u$

Main unit ........................................................ 4
Remote Conlrol .............................................. 6
Getting Started
Hooking up the systeln .................................. 8
Inserting two size AA (R6) batteries into theremote ................................................... 10
Setting up your speakers
for Dolby Pro Logic* ............................ 11
Setting the clock .......................................... 12
CD/MP3 files
Loading a CD ............................................... 13
Playing a CD Nomlal Play/
Shuffle Play/Repeat Play ...................... 14
Programing CD tracks Program Play ..... 15
Labeling a CD Disc Memo ..................... 16
Playing a disc with MP3 files ...................... 18
Tuner
Presetting radio stations ............................... 20
Listening to the radio
Preset Tuning/Manual Tuning ......... 22
Labeling the preset stations
Station Name ................................... 22
Tape
Loading a tape .............................................. 23
Playing a tape ............................................... 23
Recording to a tape
CD S3mchro Recording/Recording
Manually/Program Edit ........................ 24
Timer-recording radio progams .................. 25
Sound Adjustment
Adjusting the soundGROOVE/V-GROOVE ................... 26
Selecting the sound effect ............................ 27
Selecting the surround effect ....................... 27
Enjoying Dolby Pro Logic Surround
sound* ................................................... 28
Selecting the sound ibrmation*Multi room selector ......................... 28
Display
Turning off the display
Power Saving Mode ......................... 29
Using the display ......................................... 29
Other Features
Enhmlcing video game sound
Game Sync ....................................... 30
Mixing video game sound with other sound
source Game Mixing ....................... 31
Falling asleep to music Sleep Timer ....... 31
Waking up to music Daily Timer ........... 32
Using an Optional Keyboard
Setting the keyboard .................................... 33
Labeling titles through the keyboard ........... 33
Operating the system through
the keyboard ......................................... 33
Optional Components
Hooking up optional components ................ 34
Lislening to audio fi-om a connected
component ............................................ 35
Recording audio from a connected
component ............................................ 35
Recording on a connected component ......... 35
Connecting a sub woofer speaker* .............. 36
Connecting a DVD player* ......................... 36
Troubleshooting
Problems and remedies ................................ 37
Messages ...................................................... 39
Additional Information
Precautions ................................................... 40
Specifications ............................................... 42
* MHC-GS300AV only
3o5

Illustration numberHow to use this page {
Use this page to find the loc3fion of PLAY MODE/DIRECTION [] (14 17, 23 25buttons and other parts of the system that I-are mentioned in the text. Name of button/part Reference page
MHC.GS300AV
] ALPHABETICAL ORDER ]
5.1CIt/VIDEO (MD) [_i_[(35 37)
AUDIO IN L/R jacks I_ (34)
CDI_ _04 17, 19,24)
CD SYNC [_i_.}(24, 25)
CLEAR _]'] (16, 22, 39)
DISC SELECT []i_
(13 17, !9, 24)DISPLAY I_ (22, 29, 30, 39)
Display window [._l
DOLBY PRO LOGIC [_1 (12, 28)
ENTER I_ (15 17, 20 - 22, 25,26, 32)
GAME I_J (30)
GAME MIXING I_ (31)
KEYBOARD INPUT jack [_]
(33)
MENU I_ (16, !7, 20 22)
MULTI ROOM [_] (28)
PAUSE II I_] (15, 23 25)
PItONES jack {_i_]
PLAY MODFJDIRECT[ON [_]
(14 17, 23 25)
PRESET + _41/(20 22)
PRESET EQ I_ (27)
REC • PAUSF_START IJi_
(24, 25)
REPEAT/FM MODE [_ (15, 22)
STOP • [!i_](15, 23, 24, 35, 39)
SURROUND MODE K_](27)
TAPE [2_ (23)
Tape deck [_]
TIMER SELECT _] (26, 32, 37)
TIMER SET I_ (12, 25, 32)
TUNER/BAND [_ (20 22)
TUNING _/11_] (20 22)
VIDEO IN jack [i2_](34)
VOLUME I_
BUTTON DESCRIPTIONS ]
I/(_ (power)I)._J_1 (rewind) Ii_]
(Pasttbrward)[_j(go back) [_]
(go tbrward) {i_J
PUSH (frol_t cover) [!_
--_ PUSH (t_pe deck) [_]
4o$

MHC.GS200
I ALPHABET|CAL ORDER I
ALBM +L I_1 (19)
AUDIO 1N L/R jacks [_j 04)
CD{_(14 17, 19,24)
CD SYNC I!_JJ(24, 25)
CLEAR I_]1(16, 22, 39)
DISC SELECT []_]
(!3 17, 19,24)
DISPLAY I_ (22, 29, 30, 39)
Display window I_1
ENTER [_._(15 17,20 22,25,
26, 32)
GAME/_ 00)
GAME MIXING _2_ (31)
KEYBOARD INPUT jack IJ_
{33)MENU I_ (16, 17, 20 22)
PAUSE || _](15,23 25)
PHONES jack I]i_
PLAY MODE/DIRECTION [_i]
(14 17,23 25)PRESET _/I_] (20 22)
REC • PAUSF_START [i2_]
(24, 25)
REPEAT/FM MODE _ ( 15, 22)
STOP • [Ji]']( 15, 23, 24, 35, 39)
TAPE [_ (23)
Tape deck [_]
TIMER SELECT [_i] (26, 32, 37)
TIMER SET _'] (12, 25, 32)
TUNER/BAND [_1 (20 22)
TUNING I_ (20 - 22)
VIDEO IN jack [_i_]{34)
VIDEO (MD) [_] {35, 37)
VOLUME [i2_]
BUTTON DESCRIPTIONS ]
I/_ (power) E)_]"4"4 (rewind) _]
(t_sl forward) [_i]
(go back) ]i_1
(go forward) [_i/
PUSIt (front cover) [_i_]
PUSIt (tape deck) [_

For MHC-GS300AV
] ALPHABETICAL ORDER ]
5.1CIt I_ (36)
ALBM +/ALBM [!_I L_i_](19)
BALANCE LEFT/RIGHT [_]
02)
CD[_j(14 17,19,24)
CENTER _ [_1 (12)
DISC "/DISC [i_l Li2_l03 16, 19)
DISPLAY _'] (22, 29, 30)
GAME I_] (30)
GROOVE IJi_J(26)
PRESET EQ I_ (27)
PRESET V/PRESET [i_{)JI_(20 22)
PRO LOGIC _2_ (12, 28)
REAR "/_i](12)
SLEEP l_J_](31)
SURROUND I_i_(27)
TAPE _] (23)
TEST TONE [_] (12)
TUNER/BANDI_ (20 22)
TUNING _/TUNING _] []_]
(20 22)VIDEO (MD) [_] (35, 37)
BUTTON DESCRIPTIONS ]
I/Oh(poweOI]_}
II (pause) I_J_]
• (stop) I_Jl
(go back) [_
_11 (rewind) [_i_
(thst fPrward) [_-]
(go tbrward) [_i_
N_N_- --NN-- __
_- --NN- --N_- -NN- --_
N- --_
6us

For MHC-GS200
I ALPHABET|CAL ORDER
ALBM_/ALBM t!_ [_91(19)CDI_(14 17, 19,24)
CD SYNC ]_}](24, 25)
03 _6, 19)
DISPLAY [2_ (22, 29, 30)
ENTER [_/(15-17,20 22, 25,
26, 32)
GAME I_? (30)
GROOVE [_i_ (26)
PLAY MODE [_I(14 17, 23)
PRESET EQ {j_ (27)
PRESET ffPRESET [i_] I_iJ]
(20 22)
REC [2_ (24)
REPEAT I_J (15)
SLEEP I_/(3DSURROUND l_.i_(27)
TAPE [_l (23)
TUNER/BAND [_I (20 22)
TUNING +/TUNING l{i_] [_J
(20 22)
V]DEO (MD) [_ (35, 37)
I BUTTON DESCRIPTIONS I
I/Q) (power) [_']
|| (pause) [_)1
• (stop)li;_(go back) [{_]
(rewind) _.]
(fllsl forward) [_I
(go forward) IJT_
N--_ --INN}-- --mN-- m--NN-- --N
---N
m]-- --_N? --_

Perfbrm the Ibllowing procedure [] to [] to hook up your system using the supplied cords and
accessories. MHC-GS300AV is the model used for illustration purpose.
AM loop antenna
FM antenna
Rear surround Rear surround
speaker (Right)* Center surround speaker* speaker (Left)*
Front speaker (Right) Front speaker (Left)
* MIIC-GS300AV only
8us

[] Connect the front speakers.
Connect the speaker cords to lhe FRONT
SPEAKER jacks on lhe unit as shownbelow.
Insert only the stripped portion
SolEd
Stripe (@)
[] Connect the rear surround speakers.(MHC-GS300AV only)
Connect the speaker cords to lhe
SURROUND SPEAKER REAR jacks on
the unit and to the jacks on the rear
surround speakers as shown below.
Insert only the stripped portion
Stripe(@)
Solid(÷)
[] Connect the center surround speaker.(MHC-GS300AV only)
Connect the speaker cords to the
SURROUND SPEAKER CENTER jackson the unit as shown below.
insert only the stripped portion
Solid
Stripe (@)
[] Connect the FM/AM antennas.
Set up the AM loop antenna, lhen connectit.
Jack type (_
Extend the
FM antenna AM loophorizontally antenna
D
.=w;$
Jack type (_
Extend theFM antenna AM loophorizontally antenna
continued
9US

Hooking up the system (continued)
[] Connect the power cord to a wall outlet.
The demonstration appears in the display.
When you press 1/(_), the system turns on
and the demonstration automatically ends.
Note on placement
Be sure to place this unit on a horizontal place.
If the unit is slanted, it may cause malfunction
or dmn3ge to the system.
To connect optional components
See page 34 tbr details.
Notes
• Keep the speaker cords away fkom tile antennas to
prevent noise.
• Do not place the rear surround speakers on top of a
TV. This may cause distortion of the colors in theTV screen.
• Be sure to connect both let_ and right rear surroundspeakers. Otherwise, the sound wil! not be heard.
• The type of speakers supplied vary according to the
model you purchased (see "Specifications" on
page 42).
Tip
With normal use, the batteries should last tbr _bout
six months. When the remote no longer operales thesystem, replace both batteries with new ones.
Note
If you do not use the remote fPr a long period of time,_move tile batteries to avoid possible damage from
battery leakage.
10 us

(MHC-GS30OAV only)
Positioning the speakersCenter
LFront (L) _'"'[_"_'_- Front (R)
/'
Each speaker should face the listening position.
Better surround effect will result if all speakers
are set at the same distance from the listening
position.
Place the front speakers 5 to 10 cm or more
away from the lefl and right of_he television.
Place the center speaker on the top-center ofthe TV set.
The placement of rear speakers greatly depends
on the configuration of the room. The rear
speakers may be placed on both sides of the
listening position O or behind the listening
position 0.
Tip
For MIIC-GS300AV customers, you can connect anoptional sub woo/er speaker (see page 36).
Setting the center speaker
Attach the supplied speaker pads 1o the bat|amof the center surround speaker to stabilize thespeaker and prevent it from slipping.
Place the center surround speaker at about the
same height as 1he front speakers. Align the
center surround speaker with _he fi_ont speakers
or place it slightly back from _he position of the
front speakers.
Setting the rear speakers
Place the rear surround speakers facing eacholher at about 60 to 90 cm above your listeningposition.
D
13u_
W;ICo
continued
11us

Setting up your speakers for DolbyPro Logic (continued)
Adjusting the speaker volume
of each speaker
-- Test tone
t Press DOLBY PRO LOGIC (or PROLOGIC on the remote).
"DOLBY PL ON" appears.
2 Press TEST TONE on the remote.
The test tone is heard ti'om the speakers in
the following order and 1he display changes
as in the parentheses.
Front left (LEFT) --+ Center (CENTER) --+
Front right (RIGtlT)-_+ Rear (REAR)
Front (LEFT) -_. ---
3 From your listening position, adjust thevolume and balance by pressing thebuttons on the remote until the volume
level of the test tone from each speakersounds the same.
TO adjust Press
the balance BALANCE LEFT or
between the t¥ont BALANCE R[GItT
lef_ m_d front right repeatedly while "LEFT",
speakers "RIGItT" or "CENTER"
appears.
the balance BALANCE LEFT or
between the rear BALANCE R[GItT
lef} m_d rear right repeatedly while "REAR"
speakers appears.
llqe volume of the CENTER or CENTER
center speaker repeatedly.
llqe volume of the REAR + or REAR
rear speakers repeatedly.
4 Press TEST TONE on the remote when
you finish adjusting.
The test tone turns ot12
Note
The test tone fi:ature works only fbr Dolby Pro LogicSurround sound.
t Press I/_) to turn on the system.
2 Press TIMER SET.
3 Press b<<l or _ repeatedly to set thehour,
4 Press ENTER.
5 Press b<<l or _ repeatedly to set theminute.
5 Press ENTER.
To adjust the clock
1 Press TIMER SET.
2 Press _ or _ repeatedly to select
"CLOCK SET", then press ENTER.
3 Do the same procedures as step 3 to 6above.
Notes
• The clock settings are canceled when youdisconnect the power cord or if a power NilureOccurs.
• You cannot set the clock in Power Saving Mode.
12us

You can load up m 60 discs into lhis unit.Turn on the system belbre you load discs.
You can also load and ploy discs with MP3files. See "Playing a disc wilh MP3 files" on
page 18 lbr MP3 files.
t Open the front cover by pressingPUSH on the front cover.
/ s 5?
Frontoover
2 Turn DISC SELECT (or press DISC - orDISC + on the remote) until you find thedisc slot where you want to insert adisc, while checking the disc number(written beside every slot and alsoindicated in the display).
©©
The disc number* at the loading position
appears in the disploy. As you turn DISCSELECT, lhe disc number changes.
* If you have already loaded discs, the discnumber al the playing position appears. Whenyou turn DISC SELECT, the displayed discnumber changes to the one at the loadingposition.
Disc number
3 Insert a disc with the label side facing
right.
o
Notes
• Make sure you have loaded the disc into eachslot at a right angle to the rotary table. If the
disc is no_ put in straight, it may d_mage theunit or the disc.
• Make sure tile rotary table comes to a completestop befbre loading or removing discs.
With the label _--------_
side facingright
4 Repeat steps 2 and 3 to load additionaldiscs.
continued
Disc slot at the loading Disc numberposition(located at the very front)
13 Us

Loading a CD (continued)
5 Close the front cover by pressingPUSH on the front cover.
/
The rotary table turns and the disc slot at the
loading position is set to the playingposition.
Removing discs
After following step 1 of"Loading a CD" onpage 13, remove lhe discs. Then close the frontcover.
Notes
• Always close the front cover except when you loador remove discs.
• Do not load m_empty 8 cm CD adaptor. It maydamage the unit.
• Do not a_tach anything such as seals or sleeves to
CDs. It may damage the unit or the disc.
• If you drop a disc into the unit and the CD will not
go into the slot con'ectly, consult your nearest Sonydealer.
• When transporting _he unit, remove all discs f_omthe unit.
• If you wm_t to remove the disc played, open the
f?ont cover. The disc comes to the loading ix_sition.Remove the disc aRer the rotary table comes to a
complete stop.
Tip
YOU can display the original Disc Memos inslead of
total number of tracks and total pl_ying time (see"Labeling a CD" on page 16) to locale the disc easily
when you start playing.When you selecl a CD-TEXT disc or disc with MP3
files, the disc title is displayed instead of total numberof tracks and total playing time.
-- Normal Play/Shuffle Play/RepeatPlay
You can play up m 60 CDs continuously. This
system lets you play the CD in ditl_rent playmodes.
Disc number
U
Track number Playing time
1 Press CD to switch the function to CD.
2 When you want to specify the disc for1 DISC, turn DISC SELECT (or pressDISC - or DISC + on the remote) untilthe desired disc number or Disc Memo
appears.
3 In stop mode, press PLAY MODE/DIRECTION (or PLAY MODE on theremote *_) repeatedly until the mode youwant appears.
Select TO play
ALL DISCS Al! CDs in the disc tray
(Normal Play) continuously.
I DISC (NolTnal The CD you have selected
Play) in original order.
ALBM All MP3 files in the folder
(Normal Play) on the CD you have selected
in original order.
ALL DISCS SHUF The tracks on all CDs in
(Shuffle Play) random order.
I DISC SIt UF The tracks on the CD you(Shu_]le Play) have selected in random
order.
ALBM SltUF The MP3 files in the tblder
(Shu_]le Play) on the CD you have selectedin random order.
PGM (Program The tracks on all CDs in the
Play) order you want _hem Io be
played (see "Progrmning
CD tracks" on page 15).
4Press_lD,.-.
14us
Note
"ALBM" or "ALBM SItUF" appears even if youtiave selected a non-MP3 disc or an MP3 disc with no
folders. In this case, the disc is played in _he
"! DISC" or "l DISC SHUF" play mode,respectively. See "Playing a disc wi_h MP3 files" on
p_ge 18 for MP3 files.
Other Operations
TO DO this
Stop play Press STOP • (or • on the
remote).
Pause Press PAUSE II (or II on the
remote). Press _gain to resume p]_y.
Select a track During pl_y or pause, press _ (to
go forward) or _ (to go back).
Find a point in During pl_y, press and hold _ (to
a track go forward) or _ (to go back).
Release it when you find the desired
point.
Select a tolder Press ALBM - or ALBM _-
of MP3 files repealedly alier step 2.
Select a CD in Turn DISC SELECT to the right (to
slop mode go forward) or to the left (to go
back) and release it when you reach
the desired CD (or press DISC _- or
DISC on the remote).
Ploy repeatedly
(Repe_t Play)
Press REPEAT/FM MODE (or
REPEAT on the remote* E)during
play undl "REP" or "REP I"
appears.REP*2: For al! the tracks on a CD
up to five times (or endlessly forMP3 files when "SIt UF" is
disployed).
REP 1.2: For a single track only.
To cancel Repeal Play, press
REPEAT/EM MODE (or REPEAT
on the remole *_) undl "REP" or
"REP I" disappears.
*_ MHC-GS200 only
.2 For all the tracks on all CDs. press PLAY MODE/DIRECTION (or PLAY MODE on the remote*l )
repe_ledly in stop mode to select "ALL DISCS".
However, you cannel select "ALL D1SCS SIt UF"and "REP" _t the same time.
.3 When you select "REP 1", that track is repeated
endlessly until Repe_t Play is canceled.
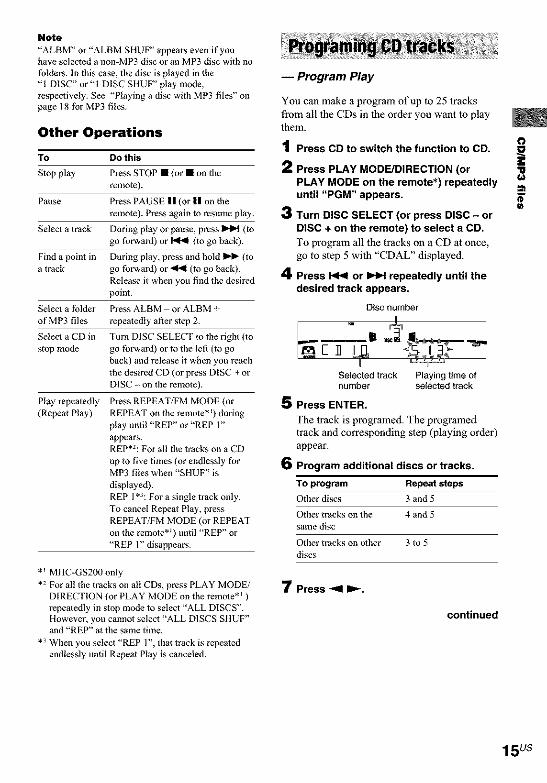
-- Program Play
You can make a program of up to 25 lracks
from all lhe CDs in the order you want to playthem.
1 Press CD to switch the function to CO,
2 Press PLAY MODE/DIRECTION (or
PLAY MODE on the remote*) repeatedly
until "PGM" appears.
3 Turn DISC SELECT (or press DISC - or
DISC + on the remote) to select a CD,
To program all the tracks on a CD at once,
go to slep 5 with "CDAL" displayed.
4 Press _ or _ repeatedly until the
desired track appears.
Disc number
Selected track Playing time ofnumber selected track
5 Press ENTER,
The track is programed. The programed
track and corresponding step (playing order)
appear.
6 Program additional discs or tracks.
TO program Repeat steps
Oilier discs 3 and 5
Oilier tracks on the 4 and 5
same disc
Other tracks on o_ber 3 to 5
discs
7 Press -<1 m,,-.
continued
o
,ff
15 us

Programing CD tracks (continued)
Other Operations
TO DO this
Cancel Program Press PLAY MODE/DIRECTION
play (or PLAY MODE on the remo_e*)
repealedly until "PGM"
disappears.
Check the Press _ or _ repealedly
program during Program Play.
Clear a track or Press CLEAR in stop mode.disc from the
end
Clear the entire Press and hold CLEAR in slop
program mode.
Add tracks or Perform step 6.discs to the end
of program in
stop mode
To program the MP3 filesAfter step 3, press ALBM or ALBMrepeatedly until the fblder you want appears,and lhen go m step 4. To program all lhe fileson a lblder as once, proceed to step 5 withlblder name displayed.
Tips
• The program you made _mains a_er Program Playfinishes. To play the same program again, press CD,
then press _41 _ in Program Play mode.
• " appears when the total CD program timeexceeds 100 minutes, when you select a CD track
whose number is 21 or over or when you programedan MP3 file.
• The pmgramed disc and track numbers remain untilyou erase them, so that _he system plays only fl_e
existing disc and track numbers if you replace discs.However, the disc and track numbers that are no1
fbund in the system or on the disc are deleted fromthe program, and the resl of the program is played
in the programed order.
* MItC-GS200 only
-- Disc Memo
You can label up to 60 CDs wilh titles of up to
20 characters. Whenever you load a labeledCD, the title appears in lhe display.
You can also label CDs using an optionalkeyboard (see "Labeling titles through the
keyboard" on page 33).
Notes• You cannel label a CD-TEXT disc.• To ensure that Disc Memos are not erased from
memory, have dae system connected to a wall outletat least once a day.
• You can label a CD only during Normal Play (when"1 DISC", "ALL DISCS" or "ALBM" is displayed)in slop mode.
1 Press CD to switch the function to CD.
If "St IUF" or "PGM" appears, press PLAYMODE/DIRECTION (or PLAY MODE on
the remote*) repeatedly until both
disappear.
2 Turn DiSC SELECT (or press DiSC - orDISC + on the remote) until the discnumber you want to label appears.
3 Press MENU.
4 Press I,<<1 or _ repeatedly until"NAME IN" appears.
5 Press ENTER.
The cursor appears.
6 Turn DiSC SELECT until the character
you want appears.
You can input the following characters:
• Upper cases(A Z)
• Numbers (0 9)
• Symbols(' /,+<>_ ")
16os
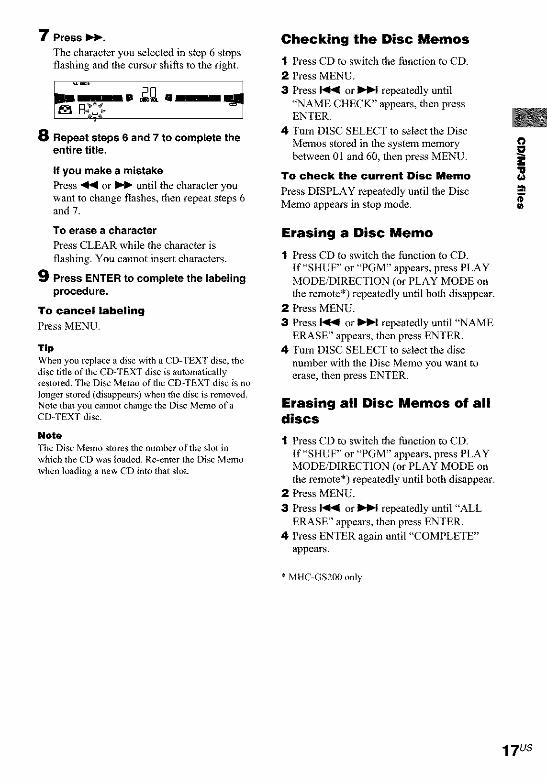
7 Press l_I_.
The character you selected in step 6 stops
flashing and the cursor shifts to lhe right.
°"8 Repeat steps 6 and 7 to complete the
entire title.
If you make a mistake
Press "41"4or _ until the character you
want to change flashes, then repeat steps 6and 7.
To erase a character
Press CLEAR while the character is
flashing. You cannot insert characters.
9 Press ENTER to complete the labeling
procedure.
TO cancel labeling
Press MENU.
Tip
WhEn yOU replace a disc with a CD-TEXT disc, thedisc title of the CD-TEXT disc is automalieallyreslored. The Disc Memo of the CD TEXT disc is no
longer stored (disappears) when the disc is removed.
Note that you cmmot change the Disc Memo eraCD-TEXT disc.
Note
The Disc Memo ,stores tile number of tile slot inwhich _he CD was loaded. Re-enter the Disc MEmo
when loading a new CD into thai slot.
Checking the Disc Memos
t Press CD to switch the function to CD.
2 Press MENU.
3 Press _ or _ repeatedly until
"NAME CHECK" appears, then pressENTER.
4 Turn DISC SELECT 1o select the Disc
Memos stored in the system memoryhelween 01 and 60, then press MENU.
TO check the current Disc Memo
Press DISPLAY repeatedly until the DiscMemo appears in stop mode.
Erasing a Disc Memo
t Press CD m switch the function m CD.
If "SttUF" or "PGM" appears, press PLAY
MODE/DIRECTION (or PLAY MODE on
the remole*) repeatedly until bolh disappear.
2 Press MENU.
3 Press 141"41or _ repeatedly until "NAMEERASE" appears, 1hen press ENTER.
4 Turn DISC SELECT to select 1he disc
number wi|h the Disc Memo you want toerase, then press ENTER.
Erasing all Disc Memos of alldiscs
t Press CD m switch the function m CD.
If "SttUF" or "PGM" appears, press PLAY
MODE/DIRECTION (or PLAY MODE onthe remole*) repeatedly until both disappear.
2 Press MENU.
3 Press 141"41or _ repeatedly until "ALL
ERASE" appears, then press ENTER.
4 Press ENTER again until "COMPLETE"
appears.
* MHC-GS200 only
o
17 us

About MP3 files
MP3 (MPEG I Audio Layer-3) is a standard
technology and lbrmat for compressing a soundsequence. The file is compressed to about 1/10
of its original size. Sounds outside the range of
human hearing are compressed while thesounds we can hear are not compressed.
Playback of some MP3 files may not bepossible, depending on the encoding.
Notes on discs
You can play MP3 files recorded on CD-ROMsCD-Rs (reco_able CDs), and CD-RWs(rewritable CDs).The disc must be in the 1SO 9660 *_ level 1 or
level 2 tbrmat, or Joliet in the expansionlbrmat.You con use a disc recorded in Multi Session .2.
_ ISO 9660 Format
Tile most common internatlonal slandard fbr the
logical format of files and tblders on a CD-ROM.
There are several specification levels. In Level !,file names must be in the 8.3 tbrmal (no more than
elgbt characters ill the ]lame, no more than threecharacters in the extension ".MP3") and in capital
letters. Folder names can be no longer than eightcharacters. There can be no more than eight nested
folder levels. Level 2 specifications allow filenames and fblder names up to 31 characters long.
Each fPlder can have up to 8 trees.For Joliet in the expansion formal (file and tblder
names can have up to 64 characters) make sure ofthe contents of the writing software, etc.
.2 Multi Session
This is a recording method thai enables adding of
data using the Track-At-Once melbod.Conventional CDs begin at a CD control areacalled the Lead-in and end at an area called Lead-
out. A Multi Session CD is a CD having multiple
sessions, wgh each segment from Lead-in to Lead-out regarded as a single session.
CD-Extra: This tbrmal records audio (audio CDdata) on the tracks in session I and dala on thetracks in session 2.Mixed CD: This fpvmat records data on the first
track and audio (audio CD dull) on the second andsubsequent tracks of a session.
Notes
• With formats other than ISO 9660 level I and 2,
folder names or file names may not be displayed
correctly.
• When naming, be sure to add the file extension"MP3" to the file name.
• ffypu put the extension "MP3" to a file odler thanMP3, the unit cannot recognize the file properly and
will generate random noise thai could damage your
speakers.• The tbllowing discs take a longer time to start
playback.
a disc recorded wgh complicated tree s_ructure.
a disc recorded in Multi Session.
a disc to which dala can be added (non-finafized
disc).
• Tile encoding mefllod (i.e., the bit rate selected tbrencoding) wil! affect the sound quality of the MP3files.
• The bit rate typically used for MP3 files is
128 kbps.
Cautions when playing a disc that isrecorded in Multi Session
CD-DA (audio) dala or MP3 files s_ored on a Multi
Session CD may be subject to some restrictions onplayback.
If the disc begins with a CD-DA session, it isrecognized as a CD-DA (audio) disc, and
playback continues until an MP3 session isencountered.
If the disc begins with an MP3 session, it isrecognized as an MP3 disc, and playback
continues until a CD-DA (audio) session isencounlered.
The playback range of an MP3 disc is detenninedby tile tree structure of files produced by
analyzi]_g of the disc.A disc with a mixed CD tbrmat will be
recognized as a CD-DA (audio) disc.
18us

The playback order of the MP3 files
The playback order of the folders and files is asfollows:
Folder (album)
D MP3 file (track)
Treet Trse 2 Trse 3 Trse 4 Trse 5(root)
Notes
• When the disc is inserted, the player reads alt thefiles o_ that disc. If there are many _lders or non-
MP3 files on the disc, it may take a long time tBrplay to begin or for the next MP3 file _ ,start play.
• Do not save unnecessary _lders or _]les other thanMP3 ones in the disc to be used _r MP3 li_ening.
We recommend that you do not save other typesfiles or unnecessary _lders on a disc that has MP3files.
• A _lder that does not include an MP3 files is
skipped.
• Maximum folder number: 150 (including roo_folder and empty thlders)
• The maximum number of MP3 tiles and tNders that
can be contained on a single disc is 300.
• Playback is possible up to 8 levels.
Tip
To specity a desired playback order, before the folder
or file name, thput the order by nmnber (e.g., "01 ,""02"), then record contents onto a disc. (The order
differs depending on the writing so/tware.)
Listening to an MP3 file
You can also play discs with MP3 files on this
system. See "Playing a disc with MP3 files" on IDO
page 18 for MP3 files."O
t Press CD to switch the function to CD.
Z Turn DISC SELECT (or press DISC - or
DISC +) to select the desired disc withMP3 files.
3 Press ALBM - or ALBM + repeatedly toselect the desired folder.
4 When you want to specify a file in thefolder, press _ or _ repeatedly toselect the desired file.
Proceed to step 5 when you star', playingfrom the first file in the folder.
5 Press _ _.
Tip
You can pert_rm the operations described under"Playing a CD" (page 14) and "Programing CD
tracks" (page 15) only tbr the files in the folder.
Note
When playing back an MP3 tile, the playback elapsed
time indication may differ from the actual time in thetbllowing cases.
When you play back a VBR (variable bit rate)MP3 file
When you perib_zen Fast Forward or Rewind(Manual Search)
19 Us

You can preset up lo 20 FM stations and 10
AM stations. You can then tune in any of lhose
stations simply by selecting d_e correspondingpreset nmnber.
There are two ways to store ll_e station presets.
TO Method
Automatically tune in Automatic Tuning Presetall of the stations thai
can be received in yourarea m_d then store
them manually
Manually tune in and Manual Tuning Presetstore the radio
frequm_cy of yourfavorite stalions
Setting presets throughautomatic tuning
1 Press TUNER/BAND repeatedly toselect "FM" or "AM".
2 Press and hold TUNING - or + until the
frequency indication starts to change,then release it.
Scanning stops automatically when the
system tunes in a station. "TUNED" and"ST" (tbr a stereo program) appear.
If "TUNED" does not appear and thescanning does not stop
Set the frequency of the desired radio
station as described in steps 2 through 7 of
"Setting presets d_rough manual tuning".
3 Press MENU.
4 Press PRESET - or + repeatedly until
"MEMORY" appears, then pressENTER.
A preset number appears.
Preset number
5 Press PRESET - or + repeatedly toselect the desired preset number.
6 Press ENTER.
"COMPLETE" appears.
The station is slored.
7 Repeat steps 1 to 6 to store otherstations.
20 us

Setting presets throughmanual tuning
1 Press TUNER/BAND repeatedly toselect "FM" or "AM".
2 Press TUNING - or + repeatedly to tunein the desired station.
3 Press MENU.
4 Press PRESET - or + repeatedly until
"MEMORY" appears, then pressENTER.
A preset number appears.
5 Press PRESET - or + repeatedly toselect the desired preset number.
6 Press ENTER.
7 Repeat steps 1 to 6 to store other
stations.
Other Operations
TO Do this
Tune in a station Follow the procedure described in
with a weak "Setting presets through manual
signal tuning".
Stop setting Press MENU.
presets
Change )he Start over from step 1.
preset station
To change the AM tuning interval
The AM tuning interval is factory*set to 9 klIz(10 kHz in some areas). To change the AM
tuning in)erval, tune in any AM station first,
then turn offlhe system. While holding downENTER, turn 1he system back on. When you
change the interval, all the AM preset stationsare erased. To reset (he in)erval, repeat 1he
same procedure.
Note
You cannot change the AM tuning interval in
Power Saving Mode.
Tips
• The preset s)ations are retained tbr _hout a d_y evenif you disconnect the mains lead or if a powerPdilure occurs.
• You ca]; label the preset s)ations (see page 22).
• To improve broadcast reception, reorient or move
the supplied antennas near a window or outdoors.
€a
21 us

You can listen tu a radio station either by
selecting a preset station, or by manually tuningin the station.
Listening to a preset station
-- Preset Tuning
Preset radio stations in the tuner's memory first(see "Presetting radio stations" on page 20).
1 Press TUNER/BAND repeatedly toselect "FM" or "AM".
2 Press PRESET - or + repeatedly to tune
in the desired preset station.
Listening to non-preset radiostation
-- Manual Tuning
1 Press TUNER/BAND repeatedly toselect "FM" or "AM".
2 Press TUNING - or + repeatedly to tunein the desired station.
Tips
• To improve broadcast reception, adjus_ the suppliedantennas, or connect a commercially availableexternal antenna.
• When an FM stereo program has s_atic noise, press
REPEA'IYFM MODE repe_ledly until "MONO"appears. There will he no stereo effect, but the
reception wil! improve.
• Pressing and holding TUNING or _, thef_equency indle_lion changes and scanning stops
when the system tunes in a st_lion (AutomaticTuning).
• To record from the radio, see "Recording to a t_pe"
on page 24.
-- Station Name
You can label each preset station with up tu
12 characters (Station Name).
1 Tune the preset station you want tolabel (see "Listening to the radio" onthis page).
2 Follow the same procedures as fromsteps 3 to 9 of "Labeling a CD" onpage 16.
To cancel labeling
Press MENU.
To check the preset number and
frequency
The station name appears when you tune thelabeled station.
To check the preset number and _Yequency,
press DISPLAY. The preset number andfi'equency are displayed lbr 4 seconds and it
returns 1o the station name display.
To erase the name
1 Tune the station.
2 Press MENU.
3 Press PRESET - or + repeatedly to select"NAME IN", then press ENTER.
4 Press CLEAR repeatedly to erase thename.
5 Press ENTER.
22 us

You can use only TYPE I (normal) tope.
t Press --_PUSH on the tape deck.
2 Insert a tape with the side you want toplay/record facing up.
With the side you want toplay/record facing up
Other Operations
TO DO this
Stop play Press STOP • (or • on the
remote).
Paase Press PAUSE II (or II on the
remote). Press again to
resume play.
Fast-forward Press _< or _.
or rewh_d
Remove Press _ POSIt on the t_pe
the cassette deck in stop mode.
Note
If the syslem stops during tape playback or recording
due to a power failure or otl_er reason, do not attemptto forcibly eject the tape as this may damage the
heads. Wait until fl_e power is _._tored, then be sureto press I/(_) to turn on the system before ejecting the
tape.
1 Load a tape.
2 Press TAPE.
3 Press PLAY MODE/DIRECTION
repeatedly to select _ to play oneside. Select _-_ or c-'_ to play bothsides.
4 Press _1 ==.-.
UTape playback side
>>> appears for 1he front side, and <<< tbrthe reverse side.
23 Us
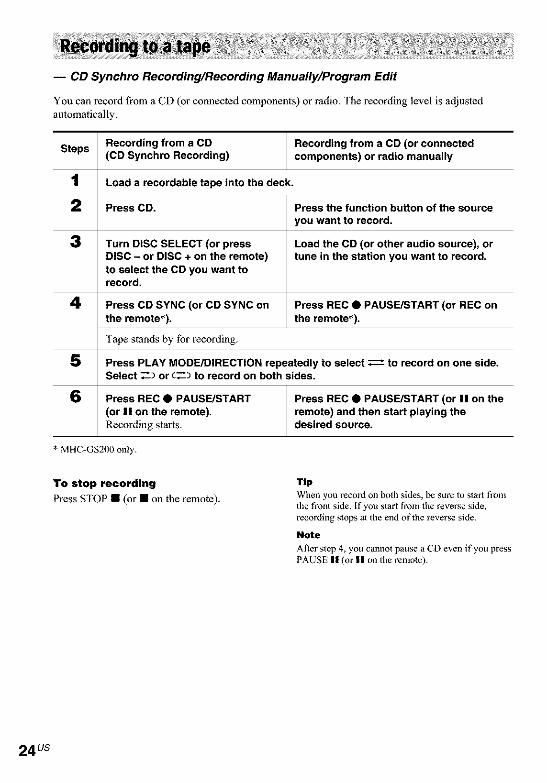
-- CD Synchro Recording/Recording Manually/Program Edit
You can record from a CD (or connected components) or radio. The recording level is adjusted
automatically.
Recording from s CD Recording from a CD (or connectedSteps (CD Synchro Recording) components) or radio manually
t Load a recordabie tape into the deck.
2 Press CD. Press the function button of the source
you want to record.
3 Turn DiSC SELECT (or press Load the CD (or other audio source), orDISC - or DiSC + on the remote) tune in the station you want to record.to select the CD you want torecord.
4 Press CD SYNC (or CD SYNC on Press REC • PAUSE/START (or REC onthe remote*), the remote*).
Tape stands by _br recording.
5 Press PLAY MODE/DIRECTiON repeatedly to select _ to record on one side.Select _-_ or c___ to record on both sides.
6 Press REC • PAUSE/START Press REC • PAUSE/START (or II on the
(or II on the remote), remote) and then start playing theRecording starts, desired source.
* MItC-GS2()0 only.
To stop recording
Press STOP • (or • on the remote).
Tip
When you record on both sides, be sure to start fromthe t_ont side. If you start f_om the reverse side,
recording stops al the end of the reverse side.
Note
After step 4, you cannot pause a CD even if you press
PAUSE II (or II on the remote).
24us

Recording a CD by specifyingtrack order
-- Program Edit
When programing, make sure the playing times
lbr each side do not exceed the length of oneside of the tape.
1 Load a recordabie tape into the deck.
2 Program CD tracks following step 1 to 6in "Programing CD tracks" on page 15.
3 Press CD SYNC (or CD SYNC on the
remote*).
Tape stands by _hr recording and CD pauseslbr play.
4 Press PLAY MODE/DIRECTION
repeatedly to select _ to record onone side. Select _-_ or c=_ to record onboth sides.
5 Press REC • PAUSE/START (or II onthe remote).
Recording starts.
TO record a disc with MP3 files by
specifying folder/file order
Alter step 1, program the MP3 files followingthe procedures in "To program the MP3 files"
on page 16, then proceed to step 3 above.
Tip
If you selecl both sides recording and the tape reachesthe end of the t¥ont side part-way through a track, the
e_tire track is recorded again from the beginning ofthe reverse side.
Note
Aider .step 3, you cannot pause a CD even if you p_ss
PAUSE || (or || on the remo_e).
* MHC GS200 only
You can record a preset radio station from a
specified time.
To timer-record, you must first preset the radio
station (see "Presetting radio stations" onpage 20) and set 1he clock (see "Setting theclock" on page 12).
1 Tune in the preset radio station (see"Listening to the radio" on page 22).
2 Press TIMER SET.
3 Press t<P< or _ repeatedly to select"REC SET", then press ENTER.
"ON" appears and the hour indicationflashes.
4 set the time to start recording.
Press _ or _ repeatedly to set thehour, then press ENTER.
The minute indicalion flashes.
Press P<<I or _ repeatedly to set theminute, _l_en press ENTER.
5 Set the time to stop recording followingthe procedure in step 4.
The start time appears, tbllowed by the stop
time, the preset radio station to be recorded(e.g., "TUNER FM 5"), then |he original
display appears.
6 Load a recordable tape into the deck.
7 Press I/(_ to turn off the system.
When the recording starts, the volume isreduced to minimum.
continued
25 us

Timer-recording radio programs(continued)
Other Operations
TO DO this
Check the Press TIMER SELECT and presssetting PIDII or _ repeatedly to select
"REC". Then, press ENTER. Tochange the setting, start over |Yore
step I.
Cm_eel the Press TIMER SELECT m_d press
timer PIDII or _ repeatedly to select
"TIMER OFF", then press ENTER.
Notes
• If the syslem is on at the preset time, the recordingwill not be made.
• When you use the Sleep Timer, Timer-recording
will not turn on the system until the Sleep Timerturns it off.
Enjoying the powerful sound
-- GROOVE/V-GROOVE
You can reinforce _l_e bass and create a more
powerful sound.
The GROOVE setting is ideal for music
sources, and the V_GROOVE setting is ideal
_br video sources (movies, etc.).
Press GROOVE on the remote.
Each time you press 1he button, the display
changes cyclically as follows:
GROOVE ON --+ V-GROOVE ON --+
GROOVE OFF (oft)
Tip
GROOVE is factory set to on.
26 Us

The preset music menu lets you select lhe
sound characteristics according to the sound
you are listening to.
Selecting the effect from themusic menu
Press PRESET EQ* repeatedly to selectthe preset you want.
The preset name appears in lhe display.
See the chart "Sound etl_ct options".
Sound effect options
"SUR" appears if you select an effect with
surround eft_cts.
Effect
ROCK Standard music sources
POP
JAZZ
GAME PlayStation I, 2 and other video
game music sources
To cancel the effect
Press PRESET EQ* repeatedly until "FLAT"
appears.
Note
The sound effect of this sy_em does not a_ DVD5.1 CH sound.
* For MHC-GS200 on the remote only.
For MHC-GS300AV
Press SURROUND MODE (or SURROUNDon the remote) repeatedly to select thesurround effect you want.
SURROUND ON: Reproduces stereo sourcesin surround sound.
tlALL: Reproduces lhe acoustics of a concerthall.
TttEATER: Reproduces _he acoustics of amovie theater.
E THEATER: Reproduces the acoustics of a
large movie theater.
SURROUND OFF: Cancels the surround
mode. The indicator on _he SURROUND
MODE button lights ofll
For MHC-GS200
Press SURROUND on the remoterepeatedly to turn the surround mode onor off.
Each time you press the button, the display
changes as follows:
SURROUND ON _ SURROUND OFF (off)
Note
When you select other sound effect, the surroundeflbct will be canceled.
c
iII
27 us

(MHC-GS300AV only)
You can enjoy Dolby Pro Logic Surround
sound fi_om Dolby Surround-encoded
(rlrl[_,_mm.]) video t_pes. Complele the
setup and adiustments first (see page 11).
Press DOLBY PRO LOGIC (or PRO LOGICon the remote) while playing a programsource.
To cancel the Dolby Pro Logic
Surround sound
Press DOLBY PRO LOGIC (or PRO LOGICon the remole) again.
Notes
• You canno_ use both Dolhy Pro Logic Surroundsound and other surround effects _t the same time.
• When recording the sound, be sure to turn offDolhy Pro Logic Surround sound.
• The surround effect of this system does nol aflhctDVD 5.1 CH sound.
-- Multi room selector
(MHC-GS300AV only)
Press MULTI ROOM repeo_edly to select the
sound formation. Each time you press the
button, the displzy changes as lbllows and _l_e
speakers producing sound light up on the
display.
Display Sound output
FRONT _ Stereo sound t?om tilefront speakers.
REAR _ Stereo sound t?om therear surround speakers.
LINK Front speaker sler¢osound from both the frontand rear surround
speakers.
28 us

-- Power Saving Mode
The demonstration display (display window
and buttons lighting and flashing even when
the system power is off) and lhe clock displaycan be turned offto minimize the amount of
power consumed during standby (PowerSaving Mode).
Press DISPLAY repeatedly while thesystem is off until the demonstrationdisplay and the clock display disappear.
To cancel Power Saving Mode
Press DISPLAY while the system is off. Eachtime you press the button, the display switches
cyclically as tbllows:
Demonstr3fion display _ Clock display* ,,_
No display (Power Saving Mode)
* -:- J' is displayed if you do not set the clock.
Tips
• The timer continues to operate in Power SavingMode.
• I/(._ indicator lights up even in Power SavingMode.
You can check the remaining time of thecurrent track or the entire CD. When a CD-
TEXT disc or a disc wilh MP3 files is loaded,
you can also check the infbnn3fion recorded onthe disc, such as the titles.
Checking the remaining time
Press DISPLAY repeatedly during normalplay.
Each time you press the button, the displaychanges cyclically as follows:
Elapsed playing time of the current track--_ Remaining time of the current track or
" . "*_ -_- Remaining time of the disc .2 or
" . "*_ -_. Track title (CD-TEXT disc ordisc with MP3 files *_ only) -_. Folder name *l
-_ Clock display -_ Efthct status
*_ For disc with MP3 files
*z ,, ,, appears Mien "ALL DISCS" isdisplayed.
*3 When you play back a track with an ID3 tag ver. 1(vet. 1.0 or 1.1), the ID3 tag appears. The ID3 tagdisplays only the track title intbrmation.
continued
13
29 us

Using the display (continued)
Checking the total playingtime
Press DISPLAY repeatedly in stop mode.
Each time you press the button, |he display
changes cyclically as tbllows:
TOC disploy *_ or total folder number of thedisc .2 or total number of the current fblder .2
Disc Memo or Disc title .3 or Folder name .2
Clock display -_- Ell_ct status
*_ TOC Table of Contents; displays current discnumber, total number of tracks on the disc, alld
total playing time of the disc
*2 For discs with MP3 files, folder names may no_ be
displayed depending on the play mode.*3 For CD with CD TEXT
Depending on the disc, some CD-TEXT intermafionmay not appear.
--Game Sync
You can enjoy the sound effect of video games.
1 Connect a video game player (see
"Hooking up optional components" onpage 34).
2 Press GAME.
Tips
• The GAME EQ is automatically selecled.
• These operations cannot be pertermed in the Power
Saving Mode.
• If you press GAME wldle _l_esystem is o1_; the
system tunis on, the ftlnction switches to GAMEand the equalizer also switches to the GAME (effect
sirius).
Note
The video gmne machine image may appear on the
TV screen even if the system is _umed of_]
30 us
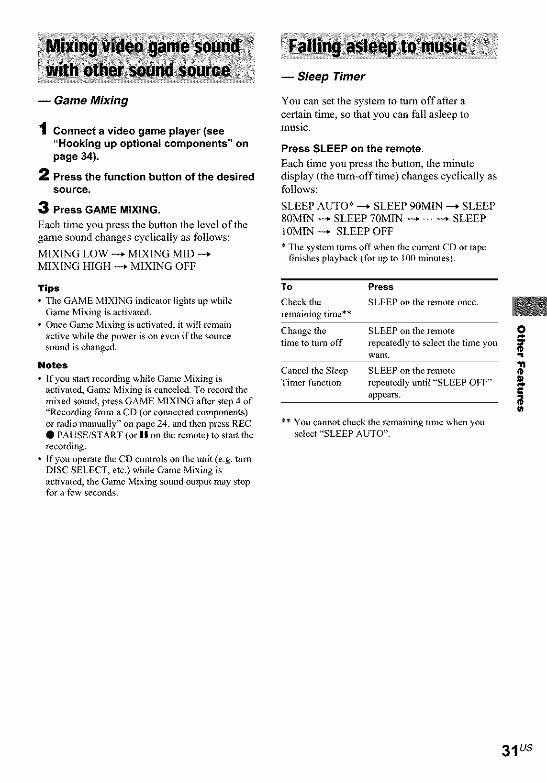
-- Game Mixing
t Connect a video game player (see"Hooking up optional components" onpage 34).
2 Press the function button of the desired
source.
3 Press GAME MIXING.
Each time you press tl_e button lhe level of thegame sound changes cyclically as follows:
MIXING LOW -_- MIXING MID -4,MIXING HIGH _* MIXING OFF
Tips
• The GAME MIXING indicator lights up whileGame Mixing is activated.
• Once Gmne Mixing is activated, it will remainactive while the power is on even if the source
sound is changed.
Notes
• If you s_art recording while Game Mixiag is
activated, Game Mixing is canceled. To _co_ themixed sound, p_ss GAME MIXING after step 4 of
"Recordiag from a CD (or connected component_or radio manually" on page 24, m_d then press REC
• PAUSE/START (or I| on the _m_e) to start therecording.
• If you operate the CD controls on the unit (e.g. turnDISC SELECT, elc.) while Game Mixing is
activated, _he Gmne Mixing sound output may stopfor a few seconds.
-- Sleep Timer
You can set the system to turn offafler a
certain time, so that you can tM1 asleep tomusic.
Press SLEEP on the remote.
Each time you press the button, the minuledisplay (the turn-offtime) changes cyclically astbllows:
SLEEP AUTO* _* SLEEP 90MIN _-* SLEEP80MIN -_ SLEEP 70M1N -4, ... _ SLEEP
10MIN -_ SLEEP OFF
* The system turns off when the current CD or tagefinishes playback (tbr up to I0fi minutes}.
To Press
Check the SLEEP on the remote once.
remaining time**
the SLEEP on the remote OChange
time to turn off repeatedly to select the time you =_want.
Cancel the Sleep SLEEP on the remote O_1
Timer fi_nction repeatedly unt!l "SLEEP OFF"
appears.
** You cannol check the remaining time when youselect "SLEEP AUTO".
31us

-- Daily Timer
You can wake up to music at a preset time.
Make sure you have set Ihe clock (see "Settingthe clock" on page 12).
t Prepare the music source you want toplay.
• CD: LoadaCD. Tostart froma
specific track, make a program (see
"Programing CD tracks" on page 15).
• Tape: Load a tape wilh the side youwant to play lacing forward.
• Radio: Tune in the preset station you
want (see "Listening lo the radio" onpage 22).
2 Adjust the volume.
3 Press TIMER SET.
4 Press I,<<1 or _ repeatedly to select"DALLY SET", then press ENTER.
"ON" appears and the hour indicationflashes.
5 Set the time to start playing.
Press P<<I or _ repeatedly to set thehour, lhen press ENTER.
The minule indication flashes.
Press _ or _ repealedly to set the
minute, then press ENTER.
6 Set the time to stop playing following
the procedure in step 5.
7 Press I,<<1 or I_H repeatedly until the
music source you want appears.
The indication changes as _bllows:
TUNER _ CD PLAY[_ * TAPE PLAY ÷ J
8 Press ENTER.
The type of timer, followed by d_e start
time, stop time, and the music source,appear, _l_enthe original display appears.
9 Press I/(_ to turn off the system.
Other Operations
TO DOthis
Check the setting Press TIMER SELECT andpress _ or _ rcpealedlyto select "DAILY', then pressENTER .
Change the se_ting Start over from slep 1.
Cancel the timer Press T]MER SELECT and
press _ or _ repeatedlyto select "TIMER OFF", then
press ENTER.
Tip
The system turns on 15 seconds belbre tile presettime.
Notes
• When you ose the Sleep Timer, the Daily Timerwill not turn on the system until the Sleep Timerturns it off.
• Yotl cannol acdvale the Daily Timer and the Timer-
recording at the same time.
32 us

You can use the Sony KB-10 keyboard (not
supplied). In principle, you may use any IBM*-
compatible keyboard with a PS/2 interface.**However, not all keyboards are guaranteed 1o
work properly, so we recommend using theKB-10 keyboard.
* IBM is the registered trademarkof InternationalBusiness Machines Corporation.
** The power consumption mus_ be 120 mA or less.
Note
Hum or noise may enter tile AM radio sound
depending on the operating environment.
Connect the keyboard connector to theKEYBOARD INPUT jack.
You can connect lbe keyboard even when thesystem is turned on.
4 Press [Enter].
The text input screen appears and the cursorflashes.
5 Enter a title.
Besides letter keys, you can also use the
keys shown in the lbllowing table.
6 Press [Enter].
"COMPLETE" appears for a _w seconds
and the title you labeled appears.
Editing operations while labeling
TO Press
Cancel the operation [Ese]
Move the cursor [,--] or [-_l
Erase the character or [Delete]space at the cursorposition
Erase the character or [Back Space]space preceding thecursor
You can quickly enter or edit names using akeyboard. You can label a CD only during
Normal Play (when "I DISC", "ALL DISCS"or "ALBM" is displayed) in stop mode.
Keyboard input is pertbrmed in insert mode.
t Perform the following proceduredepending on what you want to label.
TO label DO this
A CD Switch the thnction to CD and
select the desired CD.
A preset station Switch _he thnction toTUNER m_d select the desired
preset radio station number.
2 Press MENU.
3 Press _ or _ repeatedly until
"NAME IN" appears.
€
WYou can operate the system wilhout using thebuttons and controls on the unit or on lbe 0remote.
AS the keyboard substitutes Press
for the following functions
CD PLAY [F5]
CD PAUSE [F61
CD STOP [F7]
DISC SELECT (DISC _) [VS]
TUNER/BAND [F9]
1_4 [ViOl
[FII]
DISPLAY [V12]
o
o=1
33 vs
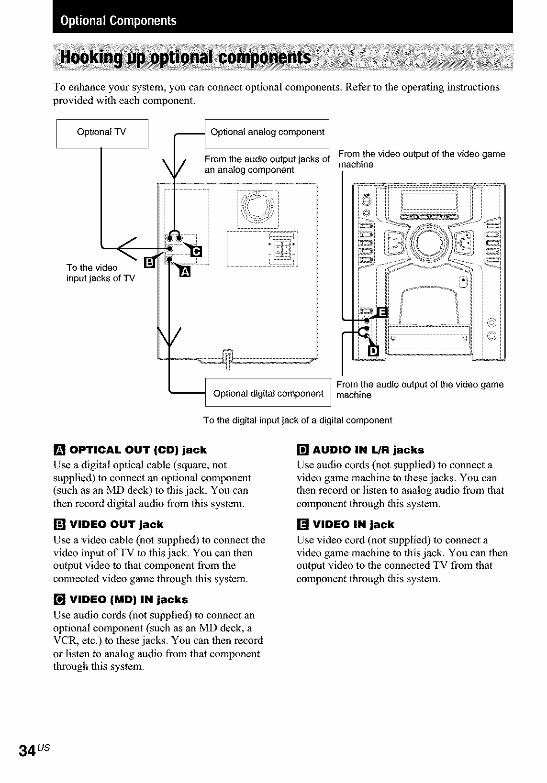
To enhance your system, you can connect optional components. Refer to the operating instructions
provided with each component.
Optional TV
TOthe videoinput jacks of TV
_J an anNog component
IOptionN analog component I
I
From the audio output jacks of From the video output of _e video gamemachine
/
!i222112111ii
..... ,,a
g
From the audio output of the video game-- Optional digital component machine
To the digital input jack of a digital component
[] OPTICAL OUT {CO} jack
Use a digital optical cable (square, notsupplied) to connect an optional component
(such as an MD deck) lo this jack. You can
then record digital audio fi_om this system.
[] VIDEO OUT jack
Use a video cable (not supplied) to connect the
video input of TV to this jack. You can thenoutput video to that component fi'om the
connected video game through this system.
[] VIDEO (MD) IN jacks
Use audio cords (not supplied) to connect anoptional component (such as an MD deck, a
VCR, etc.) to these jacks. You can then record
or listen to analog audio from that componentthrough this system.
[] AUDIO IN LJR jacks
Use audio cords (not supplied) to connect avideo game machine to these jacks. You can
then record or listen to analog audio from that
component through _his system.
[] VIDEO IN jack
Use video cord (not supplied) to connect a
video game machine to this jack. You can thenoutput video to the connected TV from th3l
component through _his system.
34 us

Listening to the analog soundof an MD deck, a VCR, etc.
1 Connect the audio cords.
See "Hooking up optional components" on
page 34.
2 Press 5.1CH/VIDEO (MD)* to select"VIDEO" or "MD'.
Start playing lhe connected component.
TO switch the VIDEO function to MD
When you listen to a connecled MD deck,
pertbrm the following operation.
1 Turn off the system.
2 Press 5.1CH/VIDEO (MD)* while holdingdown STOP II
The thnction switches to MD.
Tip
Once you enable the MD function, just press 5.1CH/VIDEO (MD)*.
Notes
• The t_nction is t:actory-set m VIDEO.
• If you want to switch back to the VIDEO funfion,pertbrm the operation described above to switch tothe VIDEO thnction.
• You cmmol switch the function in Power SavingMode.
* VIDEO (MD) tbr MHC-GS200 or on the remote.
1 Connect the audio cords.
See "Hooking up optional components" on
page 34.
2 Start recording manually.
See "Recording to a tape" on page 24.
1 Connect an optical cable.
See "[looking up optional components" on
page 34.
2 Start recording.
Re_r to the operating instructions providedwith connected component.
cglw_0c
c
35 us

(MHC-GS300AV only)
You can connect an optional sub wooi_r
speaker.
To sub woofer
?
,2-2-;= , ;;;;;;;; J
(MHC-GS300AV only)
TO the front output of TO the center OUtput ofthe DVD player the DVD player
TO the woofer outout of TO the rear output ofthe DVD player the DVD player
When your DVD player has 5.1
channel analog outputs
Make sure |o match the color oflhe plugs andthe connectors. To listen to the sound of the
connec|ed DVD player, press 5.1CH/VIDEO
(MD) (or 5.1CH on the remote) until "5.1Ctt"
appears.
Note
You canno_ enjoy the 5.1 channel surround sound if
you connect a I)VD player which does not have the
5.1 channel analog outputs.
36 us

If you have any problem using this system, use
the following check list.
First, check that the power cord is connectedfirmly and the speakers are connected correctly
and firmly.
Should any problem persist, consult your
nearest Sony dealer.
General
The display starts flashing as soon as you plug
in the power cord even though you have not
turned on the system (See step 5 of "Hooking up
the system" on page 8).
• Press DISPLAY twice when d_e system is turned
oft'. The demonstration disappears.
"- -:- -" appears in the display.
• A power interruption occurred. Sel the clock and
timer settings again.
The clock setting/radio presetting/timer is
canceled.
• The power cord is disconnected or a power
thilure occurs longer than hal f a day.
Redo the tbllowing:
"Setting the clock" on page 12
"Prese_ting radio slations" on page 20
If you have set the timer, also redo "Wakthg up
to music" on page 32 and "Timer-recordlng radio
programs" on page 25.
There is no sound.
• Turn VOLUME clockwise (or press VOL 4 on
the remote).
• The headphones are connected.
• Insert only the stripped portion of the speaker
cord into the SPEAKER jack. Inserting the vinyl
portion of the speaker cord will obstruct the
speaker connections.
• There is no audio output during timer recording.
There is severe hum or noise.
• A TV or VCR is placed too close to the stereo
system. Move the slereo system away t¥om the
TV or VCR.
• Connect the syslem to a different wall outlel.
• Inslall a noise filter (commercially available) m
the power line.
The sound from the connected source is
distorted when VIDEO function is selected.
• Select the MD function. If "VIDEO" appears in
the display when you press 5.1CIt/VI DEO (MD)
(tbr M!JC GS3OOAV or VIDEO (ME)) (tPr
MHC-GS200 or on the remote)), switch the
fimction to MD (see "Hooking up optional
components" on page 34).
The timer does not function.
• Set the clock con'ecdy.
"DALLY" and "REC" do not appear when you
press TIMER SELECT.
• Set the timer correctly.
• Set the clock.
The remote does not function.
• There is an obstacle between the remole and the
system.
• The remote is not pointing in the direction of the
system's sensor.
• The batteries have run down. Replace thebatteries.
The color irregularity on a "IV screen persists.
• Tun_ off the TV set once, then turn it _ a_r 15
to 30 minutes. If the color irregularity ,still
persists, place the speakers farther away from theTV set.
Speakers,4
Sound comes from one channel or unbalanced 1€¢T
left and dght volume. _.
• Connect the speaker cords properly (see page 9). ._• Place the speakers as symmetrically as possible. O
• Connect only one of the supplied speakers to _,,
each set of speaker terminals, u_
• Connect the supplied speakers.
The sound comes from the center speaker only
(for MHC-GS300AV only).
• The source being played back is monaural. Press
DOLBY PRO LOGIC (or PRO LOGIC on the
remote) to turn offthe Dolby Pro Logic mode.
continued
37 vs

Problems and remedies (continued)
There ls no sound from the center speaker (for
MHC-GS300AV only).
• Connect the speaker cords properly (see page 9).
There ls no sound from the rear speakers (for
MHC-GS3OOAV only)=
• Connect the speaker cords properly (see page 9).
Sound lacks bass.
• Check tl_at the speaker's 4 and .jacks are
connected correctly.
CD Player
The CD will not play.
• Close the ]¥ont cover.
• Check if the CD is correctly loaded in the slot.
• The CD is dirty.
• The CD is loaded with the label side Pacing leR.
• There is moisture on the CD.
Play does not start from the first track=
• The player is in Program or Shuffle Play mode.
Press PLAY MODE repeatedly until "PGM" or
"SHUF" disappears.
MP3 files cannot be played back.
• Recording was not pertbrmed according to the
ISO 9660 level 1 or level 2 formal, or the Jofiel
in the expansion format.
• The file exlension ".MP3" is not added to the file
name.
• Files are nol stored in MP3 fbrmat.
MP3 files take longer to play back than others.
After the unit reads all files on the disc, playback
may take more time than usual ifi
the number of folders or files on the disc is very
large.
the folder and file organization structure is very
complex.
The album title, track title and ID3 tag do not
appear correctly.
• The CD was no_ recorded in conformance with
ISO 9660 level I or level 2. Use a CD thai
contbrms with ISO 9660 level 1 or level 2.
• The disc ID3 tug is nol ver. I (vet. I.fior I.I).
The folder title, track title, ID3 tag and the CD
TEXT characters don't appear properly.
The characters thai can be displayed by this unitare as fbfiows:
• Upper cases (A to Z)
• Numbers (0 to 9)
• Symbols(' /,+<> ')
Other characters may nol be displayed correctly.
The sound skips.
• The CD is dirty.
• Replace the CD.
• Try moving the syslem to a place without
vibration (e.g., on top of a stable stand).
• Try moving the speakers away |Yore the syslem,
or placing them on separate slands.
• When you listen to a track with bass sounds at
high volume, the speaker vibration may cause the
sound to skip.
About ID3 tag version 2
Although not a mal fimction, the following occurs
when an MP3 file containing ID3 tag ver. 2 is
played:
When skipping a porton of ]D3 tag ver. 2 (al
the beginning of the track), sound is not ouIput.
Skip time changes depending ID3 tag ver. 2
capacfiy.
Example: At 64 kbytes, it is abou_ 2 seconds
(with Real Jukebox)
The displayed elapsed playing time when
skipping a ix_riion of ID3 tag ver. 2 isinaccurate.
For MP3 files of a bit rate other than 128 kbps,
time is not displayed accurately during
playback.
When an MP3 file is created with MP3
conversion sot_ware (ex. RealJukebox*), ID3
tag ver. 2 will automatically be written.
* "RealJ ukebox is a registered trademark of
RealNelworks, Inc."
As of December, 2001
38 us

Tape Deck
The tape does not record.
• NO t_pe in file cassette holder.
• The tab has been removed from the cassette (see
"To save a tape permanently" on page 41).
• The tape has reeled to the end.
The tape does not record nor play or there is a
decrease in sound level.
• The heads are dirty (see "Cleaning tile tape
heads" on page 41).
• The record/playback heads are magnetized (see
"Demagnelizing the tape heads" on page 41 ).
The tape does not erase completely.
• The record/playback ]leads are magnetized (see
"Demagnelizing the tape heads" on page 41 ).
There is excessive wow or flutter, or the sound
drops out.
• The capstans or pinch rollers are dirty (see
"Cleaning the tape heads" on page 41 ).
Noise increases or the high frequencies are
erased.
• The record/playback ]leads are magnetized (see
"Demagnelizing the tape heads" on page 41 ).
After pressing _1 I_ _or --_PUSH on the tape
deck, there is a mechanical noise, "EJECT"
appears, and the system enters standby mode
automatically.
• The tape was no_ loaded correctly.
Tuner
There is severe hum or noise ("TUNED" or "ST"
flashes in the display).
• Adjust the antenna.
• The signal strength is too weak. Connect tileextelTlal antelma.
• The supplied FM antenna receives signals along
its entire length, so make sure you extend it tully.
• Locate tile antennas as tiJr away from the speaker
cords as possible.
• Consult your nearest Sony dealer if the supplied
AM antenna has come off'the plastic sland.
• Try turning off surrounding electrical
equipments.
A stereo FM program cannot be received in
stereo.
• Press REPEAT/FM MODE (or REPEAT on file
remo_e tbr MHC-GS200) so that "ST" appears.
If other troubles not described above
occur_ reset the system as follows:
1 Unplug the power cord.
2 Plug the power cord back in.
3 Press Ig(_) to turn on the system.
4 Press STOP a, CLEAR, and DISPLAY atthe same time.
The system is reset to the factory settings. Allthe settings you made are cleared. Be sure to
restore all necessary settings.
One oflhe lbllowing messages may appear or
flash in the display during operation.
NO DISC
• There is no CD in the disc slot.
OVER
• You have reached the end of the CD.
PROTECT
• Press I/_ (Power) to turn offthe systmn. Turn
on the system again after a while.
PUSH STOP
• You pressed PLAY MODE/DiRECTION during
play.
STEP FULL
• You tried to program 26 or more tracks (steps).
"4
IgIr
o
:1III
39 Us

On operating voltage
Be|bre operating tile system, check that the operating
voltage of your system is identical with the voltage ofyour Ioca] power supply.
On safety
• Unplug the system from the wall outlet (mains) if itis nol to be used _br an extended period of fime. To
disconnect the cord (mains lead), pull it out by theplug. Never pull the cord itself]
• Should any solid object or liquid fMl into thecomponent, unplug the system and have it checked
by qualified personnel before operating it anyfurther.
• The nameplate is located on the rear exterior.
• The unit is not dlsconnecled from the AC powersource 0nains) as long as it is connected to the walloutlet, even if the unit itself has been turned off.
• The AC power cord must be changed only al aqualified service shop.
On placement
• Do nol place the system in an inclined position.
• Do not place the system in locations where it is:
Extremely hol or cold
Dusly or dirty
Very humid
Sut_iect to vibrations
Subject to direct sunlight.
• Use caution when placing tile unit or speakers on
surPaces that have been specially trealed (with wax,oil, polish, etc.) as staining or discoloration of the
surPace may result.
On heat buildup
• Although tile unit fieals up during operation, this isnot a malfhncfion.
• Place the unit in a loc_fion wfih _dequaleventilation to prevent heat buildup in the unit.
If you continuously use this unit at a large volume,the cabinet temperalure of the top, side and bouomrises considerably. To avoid burning yourself, do nottouch the cabine_.
To prevent a malfunction, do not cover the ventilation
hole for the cooling tim.
On operation
• ffthe system is brought directly fi'om a cold to a
warm loc_fion, or is placed in a very damp room,moisture may condense on the lens inside the CD
player. Should this occur, the system will notoperate properly. Remove the CD and leave tl_esystem turned on _br about an hour until the
moisture evaporales.
• When you move the syslem, take out any discs.
If you have tory questions or problems co_ceming
your stereo system, please consult your nearest Sonydealer.
On the speaker system
The M!tC-GS20fi speaker system is not magnelicallyshielded. Therefore, leave a space of 5 to 10 cm or
more when placing the speakers next to a television.
Notes on CDs
• Before playing, clean tile CD with a cleaning cloth.
Wipe the CD from the center out.• DO 1101 use solvents.
• Do not expose the CD to direct sunlight or heat
sources.
• Discs with non-standard shapes (e.g., heart, square,
slat) cannot be ployed on fl_is unit. Allempfing to doso may damage the unit. Do not use such discs.
40us
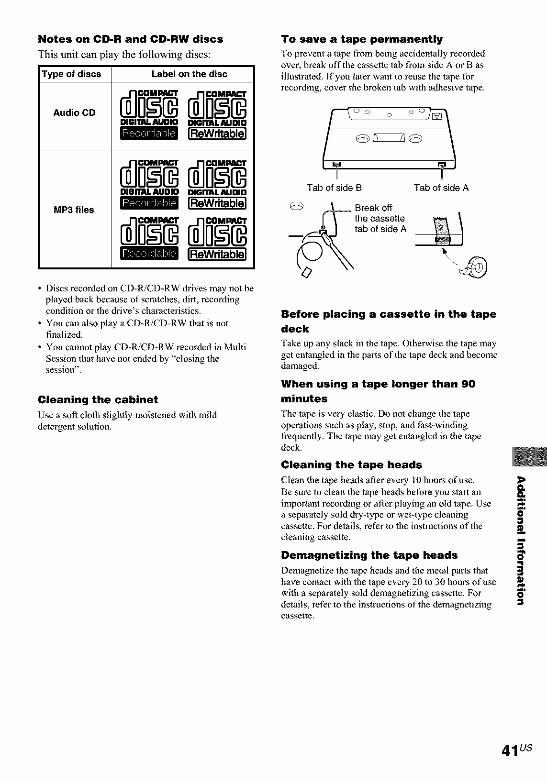
Notes on CD-R and CD-RW discs
This unit can play fl_e following discs:
Type of discs Label on the disc
DIGI_IU.AUDIO DIGffAL AUDIO
MP3 files
DIGITALAUDIO OIGITALAUDIO
rmmml
[ReWritablel
• Discs recorded on CD-R/CD-RW drives may no1 be
played back because of scralches, dirt, recordingeondftion or die drive's characlerisfics.
• You can also play a CD-R/CD-RW thai is notfinalized.
• You cannel play CD-R/CD-RW recorded in MultiSession that have not ended by "closing thesession".
Cleaning the cabinet
Use a soft cloth slightly moistened with milddetergent solution.
To save a tape permanently
To prevent a tape from being accidentally recordedover, break offthe cassette tab _m side A or B as
illu_rated. If you later waist to reu_ the tape forrecording, cover the broken tab with adhesive tape.
@? 75555_ @_
I u r_j
Tab of side B Tab of side A
Before placing a cassette in the tape
deck
Take up any slack in the tape. Otherwise the tape ]nayget entangled in the parts of the tape deck and become
damaged.
When using a tape longer than 90
minutes
The tape is very elastic. Do not change the tapeoperations such as play, stop, and Fast-winding|¥equently. The tape may get entangled in tile tapedeck.
Cleaning the tape heads
Clean the tape heads after every 10 hours of use. 1_
Be sure to clean the tape heads be|bre you start animportant recording or after playing an old tape. Use
a separately sold dry-type or wet-type cleaningeassetle. For details, refer to the instructions of the I1_cleaning cassette.
Demagnetizing the tape heads
Demagnetize the tape heads and the metal parts thathave contact with the tape every 20 to 30 hours of use
wgh a saparalely sold demagnetizing cassette. Fordetails, re_kr to the instructions of the demagnetizingcassette.
e
41 us

Amplifier section
MHC-GS3OOAV/GS200
U.S.A. models:
AUDIO POWER SPECIFICATIONS
POWER OUTPUT AND TOTALHARMONIC DISTORTION:
with 6 ohms loads both channels driven, _m120 10,000 Hz; rated 60 watts per channel
minimum RMS power, with no more than 10%total harmonic distortion fi_om 250 milliw3lts to
raled output.
MHC-GS300AV
Front speaker:
Continuous RMS power output60 + 60 waits(6 ohms at 1 kltz,10% THD)
To_al harmonic distortion less thm_ 0.09%
(6 ohms at 1 kllz,
35 waits)Center speaker:
Continuous RMS power output30 waits
(6 ohms at 1 kllz,10% TIID)
Rear speaker:
Continuous RMS power output25 + 25 waits
(6 ohms at 1 kllz,10% TIID)
MHC-GS200
Continuous RMS power output60 + 60 waits(6 ohms at 1 kltz,10% THD)
To_al harmonic distortion less thm_ 0.09%
(6 ohms at 1 kllz,
35 waits)
InputsVIDEO (MD) IN (phono jacks):
voltage 250 mV/450 mV,impedance 47 kilohms
GAME (AUDIO) [N (phono jack):voltage 450 mV,impedance 47 kilohms
AUDIO IN (phono jacks): 450mV 47 kilohms
5. I CH INPUT (MHC GS300AV only):FRONT (phono jacks): voltage 450 mV,
impedance 47 kilohmsREAR (phono jacks): voltage 450 mV,
impedance 47 kilohmsCENTER (phono jack): voltage 450 mV,
impedance 47 kilohmsSUB WOOFER (phono jack):
voltage 450 mV,impedance 47 kilohms
OutputsPHONES (s_ereo phone jack):
accepts headphones of8 ohms or more
FRONT SPEAKER: accepls impedance of 6 to!6 ohms
SURROUND SPEAKER REAR (MHC-GS300AVonly): accepts impedance of 6 to
16 ohms
SURROUND SPEAKER CENTER(MIIC-GS30flAV only): accepts impedance of
6 ohms
SUB WOOFER (MHC-GS300AV only):voltage 1 V,impedance I kilohm
CD player section
System Compact disc and digitalaudio system
Laser Soniconductor laser(L 78fl nm)Emission duration:continuous
Frequency respm_se 2 Hz 20 kHz(:÷{k5 dB)Wavelength 780 - 790 nmSignal-m-noise ralio More thm_ 90 dBDynamic range More than 90 dBOPTICAL OUT (CD)(Square opdcal connector jack, rear panel)Wavelength 660 nmOutput Level 18 dBm
Tape player section
Recording system 4-track 2-channel stereoFrequency response 40 13,000 llz (:+3 dB),
using Sony TYPE 1cassette
Wow and flutter :J0.15% W.Peak (IEC)0.1% W.RMS (NAB):_0.2% W.Peak (DIN)
42us

Tuner section
FM stereo, FM/AM superhelerodyne tuner
FM tuner section
Tuning rm_ge 87.5 - 108.0 MHzAntenna FM lead antenna
Antenna termina]sNorth Americm_ mode]: 75 ohms unbalancedAustralian model: 75 ohms balanced
In_maedime frequency I0.7 MHz
AM tuner section
Tuning rangeNorth American model:
Othermodd:
An_nna
Antenna tenninals
Internaediale frequency
530 1,710kHz(with the interval set atI 0 kHz)531 1,710 kHz
(with the interval set at9 kHz)531 - 1,602 kHz(with lhe interval set at9 kltz)530 1,710kHz(with the interval set at
0 kiloAM loop antennaExtenaal amenna terminal450 kHz
Speaker
Front speakerSS-GS5OflAV for MHC*GS3OOAV:Speaker system 3-way, bass-reflex type
magnelically shielded typeSpeaker unitsWoofer: 15 cm, cone typeTweeter: 5 cm, cone type
Super Tweeter: 2 cm, dome typeNominal impedance 6 ohmsDimensions (w/h/d) Approx. 210 x 325 x
279 mm
M ass Approx. 4.1 kg net perspeaker
SS-GS200 for MHC-GS200:
Speaker systemSpeaker unitsWoofer:
Tweeter:
Super Tweeter:Nominal impedanceDimensions (w/h/d)
Mass
3-way, bass-reflex type
15 cm, cone type5 cm, cone type2 cm, dome type6 ohms
Approx. 210 x 325 x241 mm
Approx. 3.3 kg net perspeaker
Rear speaker (MHC-GS300AV only)SS-RS370 for MHC*GS300AV:
Speaker system 1-way, ] -unit, bass-reflextype
Speaker unitsFull-range: 8 cm, cone typeNominal impedance 6 ohmsDimensions (w/h/d) Approx. 215 x 120 x
128 mm
Mass Approx. 0.8 kg net per
speaker
Center speaker (MHC-GS300AV only)SS-CT370 for MHC-GS300AV:
Speaker system 1-way, l -unit, bass-reflextype magnelically shielded
Speaker unitsFull-range: 8 cm, cone typeNominal impedance 6 ohmsDimensions (w/h/d) Approx. 280 x 120 x
127 mm
Mass Approx. 1.0 kg net perspeaker
General
Power requirementsNorth Americm_ model: 120 V AC, 60 HzAustralian model: 220 240V AC,
50/60 HzPower consump6onMItC-GS300AV: 180 waitsMItC-GS200: 120 waits
Dimensions (w/h/d) incl. prqjecting parts m_d controls
Approx. 280 x 325 x465 mm
Mass
MItC-GS300AV: Approx. 9.1 kgMItC-GS200: Approx. 8.7 kg
Supplied accessories: Remote commander (1)Batteries (2)
AM loop antenna ( 1)
FM lead antenna ( 11 ORear speaker cords :1(MHC-GS300AV only) I_(2)Center speaker pads(attached to the backsideof the center speaker)
(MItC-GS300AV only)(2) O'
Optional accessories: KB-1OThe optional accessoriesfor this syslem are subjectto change wifllout notice.For details, consult your
nearest Sony dealer.
Design and speci flcalions are subject to changewithout nolice.
43 us

Sony Corporation Printed in China http:/A,PNW.sony,net/