mini dvr hd camera q88-20130514 - 4kammode operational guidelines power on/off operations: press...
TRANSCRIPT
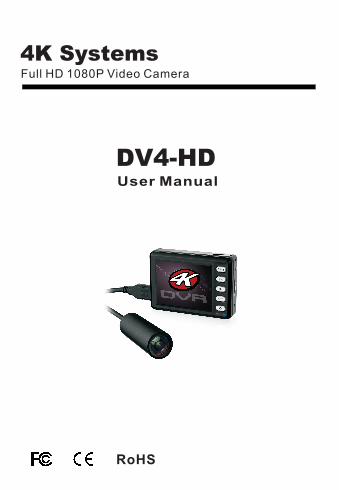
4K Systems Full HD 1080P Video Camera
DV4-HDUser Manual
RoHS
Warning To prevent fire or shock hazard, do not expose the unit to rain or moisture.
Attention Electromagnetic fields at specific frequencies may influence the picture of the recorder.
Be sure to read the following before using the recorder and the mini camera.
Trial recordingsBefore you record one-off events, you may want to make a trial recording to make sure that the recorder and the camera are working correctly and configured as required.
Notes on image data compatibilityPlayback of moving images recorded with your recorder on other equipment and playback of moving images recorded or edited with other equipment on your recorder are not guaranteed.
Do not shake or strike the recorder.Damage may occur under very heavy vibration or if the unit is dropped.
LCD screen and mini cameraBe careful when placing the camera near a window or outdoors. Exposing the LCD screen or the lens of camera to direct sunlight for long periods may cause malfunction. Never point the camera directly at the sun.
Back up recommendationTo avoid the potential risk of data loss always back up your data.

Table of Contents
………………........……..…..…4
…… ………………....……...……….5
Mode operational guidelines………………….……………..……......6
Video mode operation and options.........................………....…...6
……..........................……………..……….……..…......7
…………………..…………….…..............…7
.....………..…………………..…................…7
.......……………………...….8
Identifying the parts of the recorder
........ ....
Menu Setup
Size(Resolution Setup)
Quality(Quality Setup)
White Balance(White Balance Setup)Metering.................................................................................8Scene.....................................................................................8File System.............................................................................8
Recycle(Overwrite / Loop Mode Setup)......................................9Car Time Lapse REC................................................................9Split Mode...............................................................................9Speaker Volume......................................................................9File format..............................................................................9Audio......................................................................................9Alarm sound............................................................................9Date format...........................................................................10Date Time setup.....................................................................10Stamp...................................................................................10LCD Off.................................................................................10Screen saver.........................................................................10Lock Key...............................................................................10Format..................................................................................10Language..............................................................................10System Reset........................................................................11Version..................................................................................11DVR Specifications................................................................12HD Camera Specifications......................................................12Accessories..........................................................................13
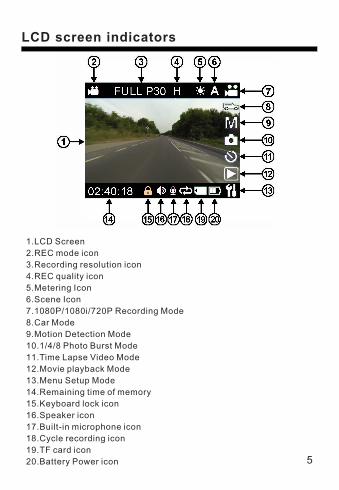
LCD screen indicators
3

Identifying the parts of the recorder
1. 2.5″TFT LCD Screen2. 3. 4. 5.
6. switch up for 2 sec as power ON/OFF)
7. Wired Control ( (unequipped External mic
temporarily)
8. Anschluss (Dateiübertragung /Laden/Car charger)
9. 10.11. TF Card slot12. HDMI Out Anschluss13. 14.
15. LED Power/REC Work indicators16.Direction of opening the rear cover17.Speaker
[ ]Record / Photo / OK Up / Fast backward Down / Fast forward Return / Photo / Mode / Menu Delete
Power(
LANC)/ Mic in
USB
Built-in microphone
With 1/4" tripod threadLED Charge indicators
[ ][ ][ ]
[ ]
HDMI-in for HD camera Anschluss
4
LCD screen indicators
1.LCD Screen
2.REC mode icon
3.Recording resolution icon
4.REC quality icon
5.Metering Icon
6.Scene Icon
7. Recording
8.
9.
10.
11.
12.
13.
14.Remaining time of memory
15.Keyboard lock icon
16.Speaker icon
17.Built-in microphone icon
18.Cycle recording icon
19.TF card icon
20.Battery Power icon
1080P/1080i/720P Mode
Car Mode
Motion Detection Mode
1/4/8 Photo Burst Mode
Time Lapse Video Mode
Movie playback Mode
Menu Setup Mode
5
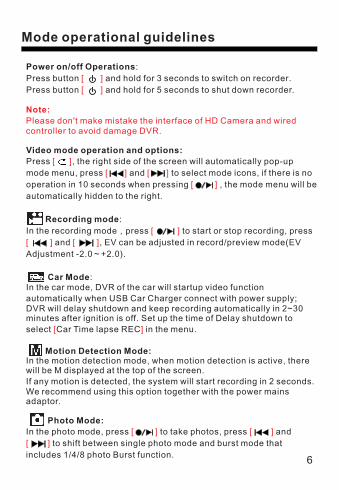
Mode operational guidelines
Power on/off Operations:
Press button and hold for 3 seconds to switch on recorder.
Press button and hold for 5 seconds to shut down recorder.
Video mode operation and options:
Press , the right side of the screen will automatically pop-up
mode menu, press and to select mode icons, if there is no
operation in 10 seconds when pressing , the mode menu will be
automatically hidden to the right.
Recording mode:
In the recording mode,press to start or stop recording, press
and , EV can be adjusted in record/preview mode(EV
Adjustment -2.0~+2.0).
Car Mode:In the car mode, DVR of the car will startup video function
automatically when USB Car Charger connect with power supply; DVR will delay shutdown and keep recording automatically in 2~30 minutes after ignition is off. Set up the time of Delay shutdown to
select Car Time lapse REC in the menu.
Motion Detection Mode:In the motion detection mode, when motion detection is active, there will be M displayed at the top of the screen.
If any motion is detected, the system will start recording in 2 seconds.We recommend using this option together with the power mains adaptor.
Photo Mode:
In the photo mode, press to take photos, press and
to shift between single photo mode and burst mode that
includes 1/4/8 photo Burst function.
[ ]
[ ]
Note:
Please don't make mistake the interface of HD Camera and wired controller to avoid damage DVR.
[ ]
[ ] [ ]
[ ]
[ ]
[
[ ]
[ ] [ ]
[ ]
] [ ]
6

7
Menu Setup
Time Lapse Video Mode:
In Time Lapse Video Mode, press to start or stop recording,
press and to shift between 1”/5”/10”/30”/60”, the Video will
be kept the file of Time-Lapse Video .
Movie playback Mode:The videos and photos can be played back in Movie playback Mode.
Press to begin Start and Stop, press and to select
fast forward /backward, press to return the movie, press
for several seconds in playing menu to enter cancel and protect file.
Menu Setup:
1, Size(Resolution Setup):
If you are recording high motion activities then you might find recording at a lower resolution with a higher frame rate gives you better results.If you intend to broadcast your video in a PAL country (UK and most of Europe) then choose 25 or 50fps. If you are only ever going to watch your video on a computer or upload to a video website like youtube then choose 30 or 60fps.
2, Quality(Quality Setup):
[ ]
[ ] [ ]
[ ]
[ ] [ ] [ ]
[ ] [ ]
Display Aspect Ratio Definition fps
1920x1080 30FPS 16:9
1080P
1920x1080
30
1920x1080 25FPS 25
1440x1080 30FPS 16:9
1080i
1440x1080
30
1440x1080 25FPS 25
1280x720 60FPS
16:9 720P
1280x720
60
1280x720 50FPS 50
1280x720 30FPS 30
1280x720 25FPS 25
Resolution Display Bitrate
1920x1080 30FPS
H 15Mbps
M 12Mbps
L 8Mbps
8
Menu Setup
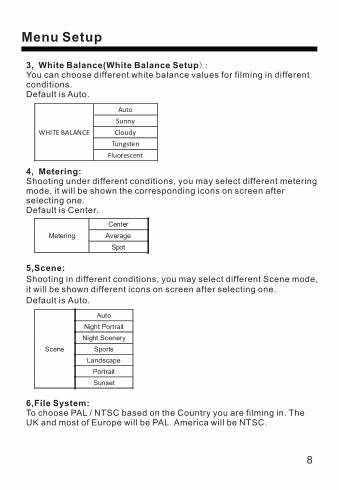
3, White Balance(White Balance Setup):You can choose different white balance values for filming in different conditions.Default is Auto.
4, Metering:Shooting under different conditions, you may select different metering mode, it will be shown the corresponding icons on screen after selecting one. Default is Center.
5,Scene:
Shooting in different conditions, you may select different Scene mode, it will be shown different icons on screen after selecting one.
Default is Auto.
6,File System:To choose PAL / NTSC based on the Country you are filming in. The UK and most of Europe will be PAL. America will be NTSC.
WHITE BALANCE
Auto
Sunny
Cloudy
Tungsten
Fluorescent
Metering
Center
Average
Spot
Scene
Auto
Night Portrait
Night Scenery
Sports
Landscape
Portrait
Sunset

9
Menu Setup
7, :
10, :Speaker volume can be set up from 1-8, the speaker will be closed
when 0 was set.
11, File format:
The system has MP4/MOV/AVI format, you may select the suitable
format as playing device, you may choose MP4 if you want to put
video into apple mobile products. Default is Mp4.
12, Audio:Speaker volume can be setup from 1-8, the speaker will be closed
when 0 was set.
13, Alarm sound:When alarm sound start, DVR will give alarm voice if not connecting
with camera or TF Card.
Recycle(Overwrite / Loop Mode Setup)
When Overwrite / Loop Mode is active, there will be a displayed at the top of the screen.
The recorder will save a new file every 5 minutes; When the SD card is
nearly full, the system will delete the oldest file and replace it with a new file.
8, Car Time Lapse REC:If Delay shutdown was set up, DVR will power off automatically and keep the videos after the ignition is off. The setup only work in Car Mode , and Delay shutdown function will not be appeared in other modes.
9, Split Mode:You may set up each video and split it as the time you need, please choose the shortest split if long time cycling video needed. System will save files at set intervals. 30mins is the maximum. After the file reachesthis time limit, a new file is automatically started until the card is full.
Speaker Volume
[ ]
[]

Menu Setup
10
14, Date format
There are three formats for your selection, you may select date format
as your country or custom.
15. Date Time setup
Press On to enter into time and date setup; use / to
increase or decrease the number and press to confirm.
16. Stamp
:
:
:
If you choose the time stamp, then there will be a stamp showing the
time embedded on to the video. If you have this enabled when
recording, it can’t be removed from the video afterwards.
17. LCD Off:
The LCD will enter into power-saving mode after the set time. Setting
this will greatly improve battery recording times.
18. Screen saver:
When Screen saver turned on, the screen will jump to the screen
saver mode after corresponding time selected, but screen saver
mode will not affect video.
19. Lock Key:
When Lock Key turned on, the key will be locked in two seconds after
video begins, other keys cannot be operated at this moment except
pressing for several seconds to unlock.
20. Format:
To format the entire SD card
Please note: any files will be deleted included the locked files. You
should format the SD card on a regular basis.
21. Language:
There are 11 languages in the system, you may setup as your need.
English/Pусский/Español/Deutsch/Italiano/日本語/한국의/Français/简
体中文/繁體中文
[ ] [ ]
[ ]
[ ]

11
22. System Reset
Please re-set to restore the factory settings when first time to use
DVR.
23. Version
Firmware Checking
To check the firmware version, from time to time we will work on a new
firmware in order to add new functions and enhance functions. You
can update the firmware by putting the file on to the blank SD card and
turning the DVR on. It will ask you if you want to update. Firmware
(when available) can be downloaded for free from our official website
and agent’s website.
:
:
Menu Setup
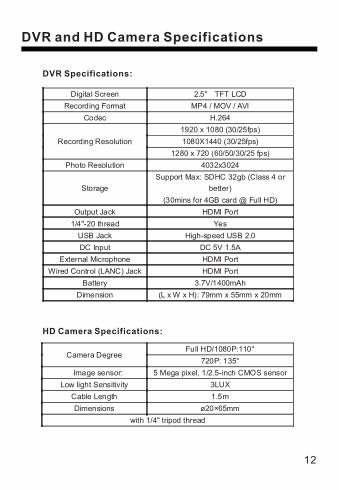
DVR and HD Camera Specifications
Digital Screen 2.5" TFT LCD
Recording Format MP4 / MOV / AVI
Codec H.264
Recording Resolution
1920 x 1080 (30/25fps)
1080X1440 (30/25fps)
1280 x 720 (60/50/30/25 fps)
Photo Resolution 4032x3024
Storage
Support Max: SDHC 32gb (Class 4 or
better)
(30mins for 4GB card @ Full HD)
Output Jack HDMI Port
1/4"-20 thread Yes
USB Jack High-speed USB 2.0
DC Input DC 5V 1.5A
External Microphone HDMI Port
Wired Control (LANC) Jack HDMI Port
Battery 3.7V/1400mAh
Dimension (L x W x H): 79mm x 55mm x 20mm
Camera Degree Full HD/1080P:110°
720P: 135°
Image sensor: 5 Mega pixel, 1/2.5-inch CMOS sensor
Low light Sensitivity 3LUX
Cable Length 1.5m
Dimensions ø20×65mm
with 1/4" tripod thread
DVR Specifications:
HD Camera Specifications:
12

13
Accessories
Mini DVR
3M sticker x 2
Wired Control
Battery
User Manual CD
USB Cable
HD Camera
Vented Helmet Mount
Car Charger
Accessories:

Recycled paper
Printed in China
Copyright c 2013 All rights reserved