milking - ecosysteme.danone.comecosysteme.danone.com/wp-content/uploads/2018/01/ssc-milking... ·...
TRANSCRIPT

M I L K I N GD É C E M B R E 2 0 1 5

2

3
1- Introduction
2- Aim and benefits
3- Good milking procedure
4- Key points to remember
03
04
05
32

INTRODUCTION1Milking is a key activity on dairy farming. It’s a critical operation because of its direct impact on the quality and quantity of milk produced. Your income depends on how you perform milking.
Wrong milking practices and poor hygiene ruin all the good efforts made on rearing, feeding and taking care of your animals.
4

5
2 AIM AND BENEFITS OF GOOD PRACTICES
RESPECTING GOOD MILKING PRACTICES WILL DELIVER
Better hygiene Improved farmers livelihoods
• Safer milk for consumption. • Increased milk production and quality.
• Prevent mastitis especially for high productive cows.
• Good taste and longer conservation of milk.
• Higher income from milk.
• Animals less prone to disease.!

6
3 GOOD MILKING PRACTICES
3.1 - Rules and recommendations
3.2 - Preparation
3.3 - Milking with hands
07
09
17
26
Handing of milk
Cleaning of equipment (hands)
Cleaning of equipment (machines)
3.4 - Milking with machines
20
21
29

7
3.1 RULES AND RECOMMENDATIONS
GENERAL RULES
• Milk 2 times per day at regular times each day with an interval of around 12h, at suitable time for collection.
• Milk quickly and do not interrupt until the udder is empty.
• Milk completely and do not let calves suckle to finish the milking.
• Always milk diseased or under treatments cows at the end and discard their milk.
• Never add anything into the milk (water, preservatives…).
8
3.1 RULES AND RECOMMENDATIONS
RECOMMENDATIONS
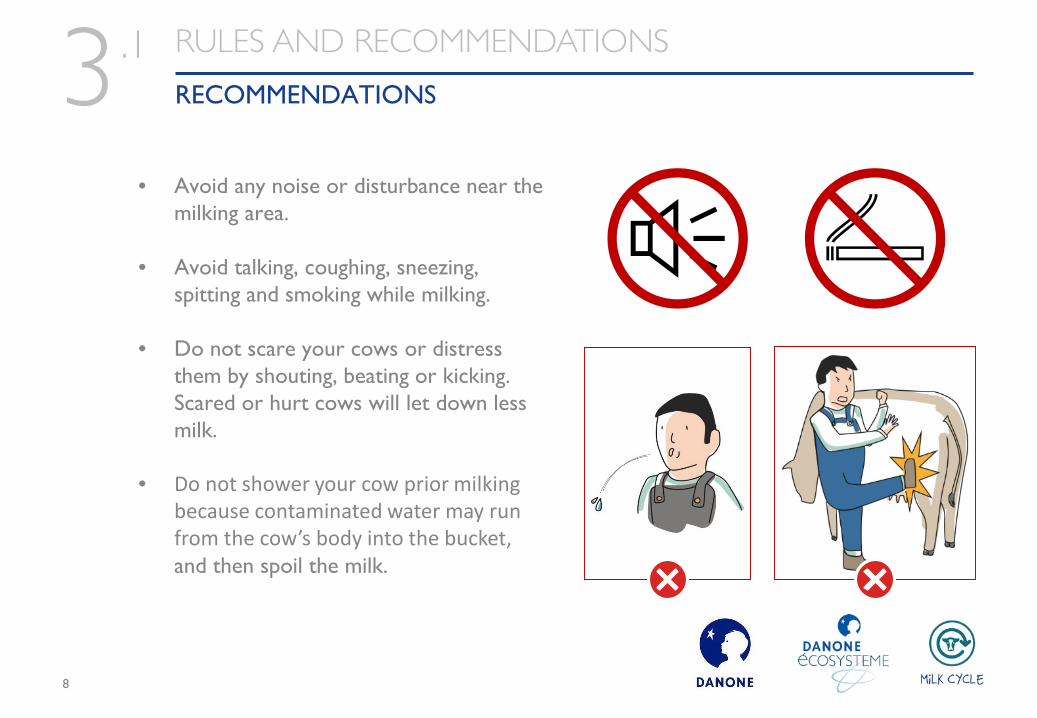
• Avoid any noise or disturbance near the milking area.
• Avoid talking, coughing, sneezing, spitting and smoking while milking.
• Do not scare your cows or distress them by shouting, beating or kicking. Scared or hurt cows will let down less milk.
• Do not shower your cow prior milking because contaminated water may run from the cow’s body into the bucket, and then spoil the milk.

9
3.2 PREPARING FOR MILKING
CLEANING THE MILKING PLACE
• Sweep and wash the floor.
• The milking place must be free from dust, well aerated and with adequate lightning.
• Don’t give silage or fodder with aroma to cows just prior to milking. It can flavor your milk.

10
3.2 PREPARING FOR MILKING
YOUR EQUIPMENT
Iron or plastic buckets and cans are prohibited.
Use clean stainless steel or aluminum cans.

11
3.2 PREPARING FOR MILKING
YOUR EQUIPMENT
Use the milking bucket only for milk.
If used for other purposes, it may contaminate the milk during the next milking, with particles left in the bucket.

12
3.2 PREPARING FOR MILKING
YOUR EQUIPMENT
• Make sure your equipment is clean. Bacteria multiply quickly in dirty equipment.
• Rinse the milking utensils in clean water just before milking.
• Check regularly that your milking machines are in a good state (liner, claw & tubes) and your vacuum machine is working properly (oil, drive belt, vacuum level, pulsation rate).

13
3.2 PREPARING FOR MILKING
YOURSELF
• Make sure you and your clothes are clean and your nails are trimmed.

14
3.2 PREPARING FOR MILKING
YOURSELF
• Wash your hands with soap before milking and then wipe with a clean towel.
• Do not milk yourself if you are sick.

15
3.2 PREPARING FOR MILKING
STRIP CUP
• Remove the first squirts because it’s charged of bacteria and could contaminate the entire milking.
• Never let down the first squirts on ground. This may spread infection from a diseased cow to another. Get it in a separate vessel and discard it.
• Occasionally, get the first 2-3 squirts of each teat, one by one, in the strip cup to detect lumps or odd color.
• Abnormal milk indicate that cow may suffer from mastitis.

16
3.2 PREPARING FOR MILKING
YOUR COWS
• After cleaning, wipe with a clean cloth/towel or disposable paper tissue. Use only one cloth or one paper towel per cow!
• Clean the teats and udder thoroughly just prior to milking. Clean and then milk cows one by one. Do not clean the udders of all the cows at the same time.

17
MILKING WITH HANDS

18
3.3 MILKING
MILKING WITH HANDS
• Always use full hand milking method. Milking by pulling the teats or with knuckling method can cause injury to the teats and cause mastitis.
• Your hands must be clean & free from any type of lesions or ulcers.
• Wet milking (moistening hand in milk or water or oil) is prohibited.

19
3.3 MILKING
TEAT DIP
• Use teat dip after milking. This protects the teat end for a period after milking and kills pathogens that may be on the teat skin and can cause mastitis.
• Never pour back the used teat dip solution back into the bottle.

20
3.3 HANDING OF MILK
• Keep the churns in a well-ventilated place out of the direct sun.
• Advantage of producing clean milk is lost if post milking handing is not done carefully.
• Do not leave milk in an open churn exposed to dirt, dust and flies. Keep the lid on the churn as often as possible.

21
3.3 HANDING OF MILK
• After milking, bring milk to the collection center ASAP.
• If you keep milk at farm level, make sure to chill it below 5°C 2 hours maximum after milking.
• At the collection center, pour the milk through a strainer/filter. Remove the deposit in the strainer (hair, insect, straw…) before pouring a new pail/can of milk.

22
3.3 CLEANING OF EQUIPMENT
• Most of the bacteria in milk come from milking utensils which are not cleaned properly.
• Rinse all milking equipment in water soon after every milking.
MILKING WITH HANDS

23
3.3 CLEANING OF EQUIPMENT
• Wash the equipment in hot water with a non toxic detergent.
• Use scrub or a hand brush for cleaning.
• Use the scrub/brush only to clean milk equipment.
MILKING WITH HANDS
24
3.3 CLEANING OF EQUIPMENT
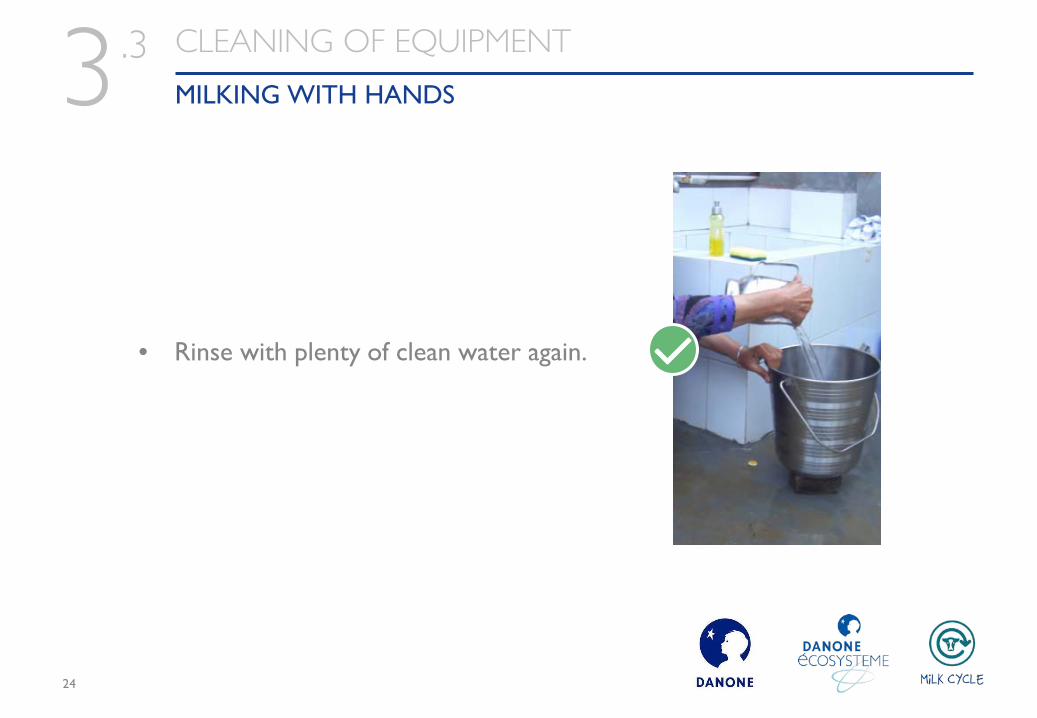
• Rinse with plenty of clean water again.
MILKING WITH HANDS

25
3.3 CLEANING OF EQUIPMENT
• Leave milking equipment to dry upside down in a clean and well ventilated area that contains no chemicals like pesticides.
• Just before the next milking, rinse equipment in clean water.
MILKING WITH HANDS
26
MILKING WITH MACHINES

27
3.4 MILKING
MILKING WITH MACHINES
• Adjust the cluster so that it hangs straight down from the cow.
• Teat cups should be applied within one minute of the initial wiping of the teats.
• The teat cups that ride up excessively high on a teat can potentially cause irritation to the teat lining. Readjust if necessary.
28
3.4 MILKING
MILKING WITH MACHINES
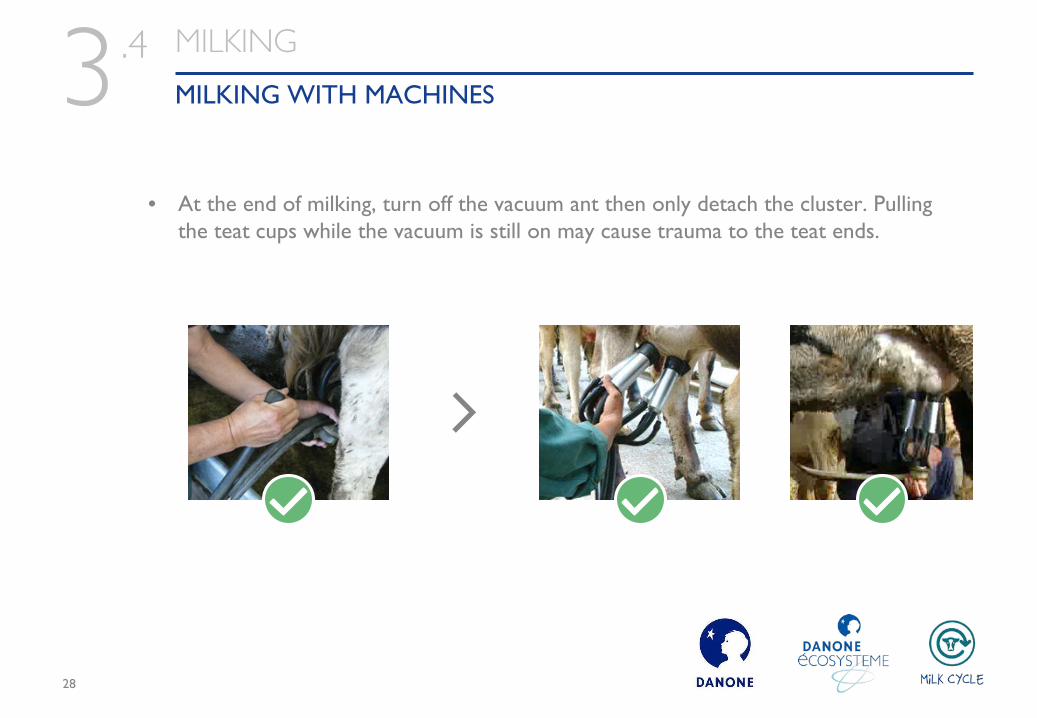
• At the end of milking, turn off the vacuum ant then only detach the cluster. Pulling the teat cups while the vacuum is still on may cause trauma to the teat ends.

29
3.4 CLEANING OF EQUIPMENT
• A dirty machine can be source of contamination of the milk and the teat.
• Residues of fresh milk in the machine after cleaning is a sign of deficiency in cleaning
• Always check presence of residues in :
Teat cup
Claw
Pipes
Tank and lead
MILKING WITH MACHINES

30
3.4 CLEANING OF EQUIPMENT
MILKING WITH MACHINES
• Clean the milking machine with hot water (> 63°C) and detergent approved for contact with food (alternate between acid and alkaline solution).

31
3.4 CLEANING OF EQUIPMENT
• Clean the 4 teat cups using a dedicated and adapted brush.
• Create a CMP to clean the milking machine inside.
• Always rinse with clean and drinkable water.
MILKING WITH MACHINES

32
3.4 CLEANING OF EQUIPMENT
• Check the teat cups and other rubber pieces regularly and replace them in case of default.
• All rubber pieces must be replaced at least once a year.
• Too much chloride can accelerate damage of rubber pieces.
• The life time of teat cups correspond from 1200 to 1500 milking :
To calculate (example with 20 cows): one unit of milking for 10 cows x 2 milking/day = each unit does 40 milking/day.
1200 milking/40milking a day = replace the teats every 30 days.
MILKING WITH MACHINES

33
4 KEY POINTS TO REMEMBER
Wash your hands with soap before milking.
1 Discard first squirts of milk.2 Clean and dry
the udder.3 Always use full hand milking method.
4
Teat dip after milking.5 Bring milk as soon as
possible to the collection center and pour through a strainer/filter.
6 Clean utensils with detergent and let them dry upside-down.7

T H A N KY O U