mileage and expenses module - home - durham … and expenses module 3 hr operations and data you can...
TRANSCRIPT

Mileage and Expenses Module
User Manual
1
November/2017

Please think before printing this document.
Where printing is necessary, please ensure that it is printed double sided and in greyscale.

Mileage and Expenses Module
Contents
1 Introduction ......................................................................................... 1
1.1 What is MyView Dashboard? ........................................................................ 1
1.2 What is new about MyView Dashboard? ....................................................... 1
1.3 What is the MyView Dashboard Mileage and Expenses Module? ................. 2
1.4 New features available in the Mileage and Expenses Module ....................... 2
1.5 Further information ........................................................................................ 3
2 Changing/updating vehicle details ................................................... 4
2.1 Adding a Vehicle ........................................................................................... 5
2.2 Closing a Vehicle .......................................................................................... 6
2.3 Updating Vehicle Insurance Expiry Date ....................................................... 7
2.3.1 Transferring Registration Plate ............................................................................................ 8
2.4 Adding a New Vehicle ................................................................................... 8
3 Making an Expenses Claim ................................................................ 9
3.1 Excess Travel/Disturbance .......................................................................... 11
3.2 Making a Mileage Claim .............................................................................. 11
3.3 Making an Expenses Claim ......................................................................... 14
3.4 Editing/Copying/Deleting Claim Lines .......................................................... 15
3.5 Submitting a Claim ...................................................................................... 15
3.6 Claims ‘In Progress’ .................................................................................... 16
3.7 Form History – View Authorisation Progress ............................................... 18
3.8 Withdrawing a Submitted Claim................................................................... 19
3.9 Partial Authorisation .................................................................................... 20
4 Delegated Input of Mileage Claims ................................................. 22
4.1 Delegating Responsibility to Authorise Claims ............................................ 23

Mileage and Expenses Module
1
HR Operations and Data
1 Introduction
This document is a guide to using the MyView Dashboard Mileage and Expenses Module. This module enables employees to complete expenses claims online. Employees are advised to refer to the MyView Dashboard Mileage and Expenses Guidance that fully explains the principles and the basis on which mileage and expenses should be incurred and claimed.
1.1 What is MyView Dashboard?
MyView Dashboard is a web based self-service system which allows employees and managers to view and edit their own personal details online. MyView Dashboard supports the Council's objective of making processes more efficient and streamlined. Revised user guidance documentation to support the use of MyView Dashboard and Frequently Asked Questions are available via www.durham.gov.uk/MyView. Providing access to MyView Dashboard via the internet will give you 24/7 access allowing you to:
View and update personal information, including name, address and emergency contact information.
View, download and print payslips and P60 statements.
Submit mileage and expenses claims as well as uploading receipts.
Employees will be able to submit training requests for managers to authorise.
Managers will be able to view expense submissions, authorise, and reject claims if required.
1.2 What is new about MyView Dashboard?
As well as providing access over the internet, MyView Dashboard has an enhanced look and feel and is much more intuitive to use. MyView Dashboard has a number of features and benefits including:
Enhanced navigation, usability and appearance – MyView Dashboard can be accessed using smart devices mobile phones and tablets
Customisable widgets that provide quick access to information
Appearance and functionality has been improved

Mileage and Expenses Module
2
HR Operations and Data
The ability to view authorisation progress across all MyView Dashboard forms
Removal of Payslip and P60 printing and postage costs by enabling access to e-Payslips and P60’s.
1.3 What is the MyView Dashboard Mileage and Expenses Module?
This module enables employees to complete expenses claims online. Managers can authorise mileage and expenses claims. However, not every manager is able to authorise mileage and expenses claims. Only specific managers have been allocated the authorisation role. If you feel that you should be able to authorise mileage and expenses claims you should contact your line manager who will need to verify that you can authorise claims for those who report to you. Your line manager should email [email protected] to request that the expenses authorisation role be added to your post. The Mileage and Expenses claim form has limits on expenditure types that will generate a warning message when trying to claim over the limit. MyView will not automatically block a claim that is above the set amount. It is the manager’s discretion as to whether or not to authorise/reject the claim. Managers are encouraged to take additional consideration of claims made outside of a 90 day period of incurring the expenditure particularly if there a valid reason for the delay (e.g. long term sickness). An excessive workload is not an acceptable reason for failing to submit a claim within the desired timescale. Claims should be submitted and authorised for payment on or before the 10th of the following month unless otherwise notified. Claims received after the deadline will be processed for payment in the following pay period. No advance payments will be issued. All employees should submit their claims promptly, preferably during the month following the incurring of the expenditure. Employees are advised that mileage and expenses can be entered and saved on a daily basis (or entered and saved as time allows) but should be submitted for authorisation on a monthly basis.
1.4 New features available in the Mileage and Expenses Module
The MyView Dashboard Mileage and Expenses Module has five important new features:
Claimants can now attach receipts to an expenses claim. These receipts can be scanned and uploaded before being attached to the claim header (e.g. a VAT petrol receipt) or to each line of a claim (e.g. a car parking ticket). All receipts should now be attached to the claim form. Managers should ensure that appropriate receipts have been attached to the electronic claim form before authorisation.

Mileage and Expenses Module
3
HR Operations and Data
You can view the authorisation progress of your form as well as being able to view details of previously authorised/rejected forms. This includes audit details of who authorised/rejected your form and when this took place.
Managers have the ability to partially authorise an expenses claim form rather than having to reject the whole claim if there is an issue with individual line(s).
It is now possible to claim business mileage and excess travel separately using the different expenses groups now available on the expenses claim form. Managers should ensure that excess travel and business mileage claims have been recorded appropriately before authorisation.
The expenses claim form also includes standard business journeys between the 5 main Council hubs which will make it easier to record journeys between these main Council hubs.
o Crook Customer Access Point, Crook, DL15 9ES o Spectrum 8, Seaham, SR7 7TT o County Hall, Durham, DH1 5UL o Green Lane, Spennymoor DL16 6JQ o Direct Services, Meadowfield, DH7 8XL
1.5 Further information
If you would like any further advice or would like the document in an alternative format, please contact the MyView Team within HR Operations and Data using the contact details below:
03000 269 919

Mileage and Expenses Module
4
HR Operations and Data
2 Changing/updating vehicle details
The Employee Vehicles module enables employees to enter the details of vehicles against which they are claiming mileage. When an employee changes their car, the module enables the new vehicle details to be entered prior to making an expenses claim. Entering the vehicle details enables the registration number to be selected in the car mileage section of the expenses form. The module can be accessed via clicking on the [Employee Vehicles] link on the left hand navigation panel.
The module main page lists all vehicles set up against your employee record including current and historic entries. The information displayed includes the start and end dates, default vehicle flag, registration number and the vehicle description. You can view data on any listed vehicle by clicking the registration number link. Vehicle data in read-only mode is presented in a series of pages. Current vehicles are listed with [close] in the End Date column.

Mileage and Expenses Module
5
HR Operations and Data
2.1 Adding a Vehicle
To add a new vehicle:
Click [Add New Vehicle] to display the Add New Vehicle Wizard.
Add Car Registration and click [Next].
If the vehicle does not exist on the database, subsequent wizard pages contain fields which must be completed for the new vehicle. If the vehicle already exists, subsequent wizard pages display read-only details of the vehicle; the final page requires employee usage data to be entered. Enter the vehicle registration details:
Effective Date: Enter in the effective date of the vehicle i.e. when the vehicle needs to be used from (date can be selected via Calendar or typed in)
End Date: Leave Blank when adding a new Vehicle
Vehicle Replacing: If the new vehicle is replacing a previous vehicle then select the vehicle you wish to be replaced from the drop down menu
Is your previous vehicle still available to you? If your previous vehicle is still available for you then tick the checkbox, otherwise leave blank
Is this your default vehicle? Please tick the checkbox if the new vehicle is your primary vehicle.

Mileage and Expenses Module
6
HR Operations and Data
Click [Next] for Vehicle Detail and complete the following fields:
First Registered e.g. 30/09/2014 (Date can be selected via Calendar or typed in)
Make e.g. Volkswagen
Model e.g. Golf
Fuel Type e.g. Diesel
Engine Size e.g. 1999 (If unknown, use the Vehicle Enquiry Link) https://www.vehicleenquiry.service.gov.uk/
CO2 Value This is defaulted to 999 (Do not amend) Click [Next] and complete the following fields:
Vehicle Type e.g. Car
Transmission e.g. Manual
Ownership e.g. Privately owned car
List Price Defaulted to 0 (Do not Amend)
Accessories Value (New) Defaulted to 0 (Do not Amend)
Accessories Value (After New) Defaulted to 0 (Do not Amend) Click [Next] and complete the following fields:
Road Fund Band - Select Not Applicable
Road Fund Due - Leave Blank
Insurance Due - Enter the Insurance Renewal Date for the Vehicle (Date can be selected via Calendar or typed in)
Click [Submit] to submit the vehicle details. The new vehicle will now be displayed on the module main page.
2.2 Closing a Vehicle
Vehicles listed with [close] in the End Date column on the module main page can be assigned an availability end date. Click [close] to run the Close Vehicle Holding wizard. The wizard consists of one screen, containing a mandatory [Closing Date] field. Enter the end date for the vehicle and click [Submit].
The change is displayed on the module main page with an end date entered against the selected vehicle.

Mileage and Expenses Module
7
HR Operations and Data
In the event of entering a closing date against the wrong vehicle please contact the MyView helpdesk via email to [email protected] quoting your employee number and the corresponding vehicle registration details that require amendment.
2.3 Updating Vehicle Insurance Expiry Date
Managers and employees will receive a MyView Alert to notify that the employee’s insurance cover is due to expire. These notifications will be sent 30 days, 14 days and 2 days before the insurance expiry date. If you do not update MyView (via the Employee Vehicles Module) to show that the vehicle is no longer used or that you have renewed your vehicle insurance, you will continue to receive these notifications. To update the vehicle insurance expiry date of a current vehicle click on the [Registration] of the vehicle you want to update.
Click [Next] until you reach the [Insurance Due Date] where you can input the revised insurance expiry date. Click [Submit].

Mileage and Expenses Module
8
HR Operations and Data
2.3.1 Transferring Registration Plate
Should you have a new vehicle but have transferred the registration plate from another vehicle that is already set up in MyView, you should email [email protected] with details of the new vehicle so that this can be updated. You will be unable to set up the new vehicle if the registration plate is registered against another vehicle that is already set up in MyView. Private Car Reg e.g ABC 123 First Registered e.g. 30/09/2015) Make e.g. Volkswagen Model e.g. Golf Fuel Type e.g. Diesel Engine Size e.g. 1999 (If unknown refer to: https://www.vehicleenquiry.service.gov.uk/) Vehicle Type e.g. Car Transmission e.g. Manual Ownership e.g. Privately owned car Insurance Renewal e.g 20/02/2017
2.4 Adding a New Vehicle
If you do not provide updated insurance/vehicle details to cover the period of your next claim, MyView will not be updated therefore any claim being submitted (post-dating the insurance expiry) would therefore be against out of date vehicle details which would contradict the disclaimer. The new vehicle insurance details submitted would override the existing entry in the system. It is the responsibility of the employee to provide a copy of their covering insurance documentation to their manager. It is the responsibility of the manager that upon notification of a vehicle/insurance details amendment that they check that the employee has valid insurance documentation which includes Business Use cover before authorising subsequent claims.

Mileage and Expenses Module
9
HR Operations and Data
3 Making an Expenses Claim
To start an expenses claim, click on the [Create Expenses Claim] link on the left hand navigation panel.
Enter the initial information for the claim header, selecting your relevant post from the drop down list and entering a description and claim reason. Employees with multiple posts are reminded to select the correct post when creating a new claim.
You should state the month and year of claim (e.g. September 2017 Business Mileage) in the [Description]. You are encouraged to submit claims on a monthly basis. To this end, using a standardised naming convention across your claim forms will help you keep track of what you have claimed and make it easy to follow your claim history (see Form History in s3.7).

Mileage and Expenses Module
10
HR Operations and Data
Click [Done] to close the header and continue to the rest of the form. You can re-open the header to adjust the contents by clicking the [Form Info] button in the top left of the claim form.
The new claim form is then presented. It is important that before submitting any claims that employees are aware that the claim is submitted in accordance with the onscreen submission disclaimer.
Add one or more lines of expenses to the claim form by clicking on the [Add Line] button.
Click on [Add Claim Attachments] to upload a receipt against the claim header. These receipts can be scanned and uploaded before being attached (e.g. a VAT petrol receipt). All receipts should now be attached to the claim form. Managers should ensure that appropriate receipts have been attached to the electronic claim form before authorisation.
Please note that the file names for receipts cannot exceed 32 characters. For each line, you can record the date and select the type of expense via the [Group] dropdown. Depending on the expenses group selected, you will be able to select the expenses [Type] and record a suitable description. The expenses claim form has five different expenses groups in order to submit the appropriate line of expenses:

Mileage and Expenses Module
11
HR Operations and Data
Business Mileage Claims
Excess Travel/Disturbance Mileage
Accommodation and Subsistence Expenses
Other Operational Expenses
Travel Expenses (not car mileage)
3.1 Excess Travel/Disturbance
It is now possible to claim business mileage and excess travel separately using the different expenses groups now available on the expenses claim form. Managers should ensure that excess travel and business mileage claims have been recorded appropriately before authorisation. Claimants are reminded that excess travel claims should be submitted separately to standard business mileage claims which should also be clearly marked with the appropriate description (e.g. Excess Travel July 2017 Mileage). It is important that the journey description details the full journey details (to the new work base) whilst also indicating the previous journey (to the old work base). The number of miles to be claimed should be recorded in the [Actual mileage] field whilst the [Private Miles] field should be left blank.
3.2 Making a Mileage Claim
Select the ‘Business Mileage Claims’ or ‘Excess Travel/Disturbance Mileage’ option from the [Group] dropdown list.
Record a suitable claim line description (e.g. Green Lane to Southfield Lodge to Green Lane) or use the [Journey] field to select a journey between the main council hubs.
Please also ensure that you provide sufficient detail about the claim in the [Description] field, such as times and destinations so that your manager can validate the claim.
If using the [Journey] field it will automatically record the total mileage to be claimed in the [Mileage] field.
If you are recording any other journey, you will need to record the [Actual Mileage] and any [Private Miles] incurred as part of the journey.

Mileage and Expenses Module
12
HR Operations and Data
The mileage to be claimed is the Actual Mileage minus the Private Miles indicated in the [Mileage] field. Private Miles would include any ‘home to work’ mileage incurred. For example, when an employee travels from home directly to a meeting away from the HQ/Base, the scheme only allows the additional mileage travelled to be claimed. If the journey from home to normal workplace is 5 miles, but the journey from home to the meeting is 8 miles, the employee would only be able to claim payment of 3 miles.
If you are carrying any passengers on a journey, this should also be indicated within the [Passengers] field.
Where mileage allowance is claimed a VAT receipt must be retained that covers the cost of the fuel prior to the journey being undertaken for the purposes of HMRC and audit inspection. The [VAT Receipt] box should be ticked if you have provided a supporting VAT fuel receipt. If VAT receipts are not attached to the claim, it should only be authorised and therefore paid on the basis that you will be able to provide them if requested to do so.
Select the [Taxable] check box if the claim line should be identified as taxable (e.g. excess travel claim).
Click [Search] if you need to select use an alternative cost centre to your default post cost centre. You will be presented with a list of approved alternative cost centres. Select the appropriate cost centre from the available list. Upon selecting the alternative cost centre, you will see that the override cost centre code has been recorded on your claim.

Mileage and Expenses Module
13
HR Operations and Data
If the required override cost centre is not listed, you will need to undertake the following tasks:
Request required cost centre code via contacting your Service Accountant (Corporate Finance and Commercial Services).
The Services Accountant will inform you of the appropriate cost centre as well as informing the ResourceLink Systems Administration Team so that MyView can be updated.
Once MyView has been updated, this will then enable you to submit a claim against the appropriate alternative cost centre.
You should then submit your claim selecting the appropriate alternative cost centre. If using an override cost centre, the claim should be submitted separately to your standard monthly mileage claims. The override [Cost Centre] field is not to be used for recharging mileage claims against a previous post. All mileage claims should be submitted for payment before commencement of a new post. For temporary changes to costing, such as working in a different area, arrangements for re-costing of mileage payments should be made via your Service Accountant.
Click on [Add Attachments] to upload a receipt against the claim line. These receipts can be scanned and uploaded before being attached (e.g. a car parking ticket). All receipts should now be attached to the claim form. Managers should ensure that appropriate receipts have been attached to the electronic claim form before authorisation.
Find the receipt and attach it to your claim line. The receipt is now attached to the claim line.
After recording all details of the claim line click [OK]. You will now be presented with a summary of the ‘open’ claim.
Mileage and Expenses Module
14
HR Operations and Data
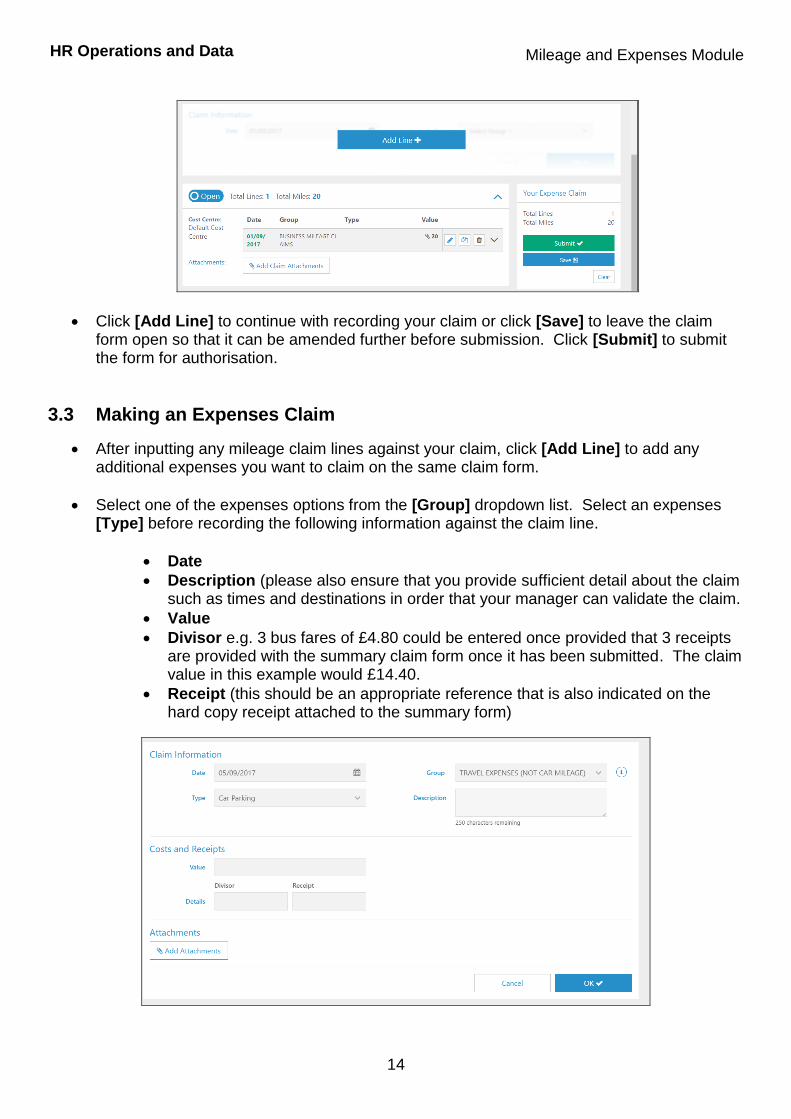
Click [Add Line] to continue with recording your claim or click [Save] to leave the claim form open so that it can be amended further before submission. Click [Submit] to submit the form for authorisation.
3.3 Making an Expenses Claim
After inputting any mileage claim lines against your claim, click [Add Line] to add any additional expenses you want to claim on the same claim form.
Select one of the expenses options from the [Group] dropdown list. Select an expenses [Type] before recording the following information against the claim line.
Date
Description (please also ensure that you provide sufficient detail about the claim such as times and destinations in order that your manager can validate the claim.
Value
Divisor e.g. 3 bus fares of £4.80 could be entered once provided that 3 receipts are provided with the summary claim form once it has been submitted. The claim value in this example would £14.40.
Receipt (this should be an appropriate reference that is also indicated on the hard copy receipt attached to the summary form)

Mileage and Expenses Module
15
HR Operations and Data
The Mileage and Expenses claim form has limits on expenditure types that will generate a warning message when trying to claim over the limit. MyView will not automatically block a claim that is above the set amount. It is the manager’s discretion as to whether or not to authorise/reject the claim.
3.4 Editing/Copying/Deleting Claim Lines
The claim form summary has options that allow you to:
Edit an existing claim line
Copy an existing claim line
Delete an existing claim line
3.5 Submitting a Claim
If you completed all lines of your claim, click [Submit] to submit the form for authorisation. Click [OK].

Mileage and Expenses Module
16
HR Operations and Data
You will be provided with an on screen notification to say that the claim has been submitted for authorisation.
If your submitted claim is not authorised/rejected within 7 calendar days, the claim is automatically rejected and will therefore need to be re-opened and re-submitted for authorisation.
3.6 Claims ‘In Progress’
Should you wish to submit your claim at a later date, click [Save] to leave the claim form open so that it can be amended further before submission. From your MyView Dashboard, you have a widget for ‘In Progress’ forms.
Click on ‘Expense Claims’ to show a list of ‘open’ forms. Click on the link below to re-open a claim form.
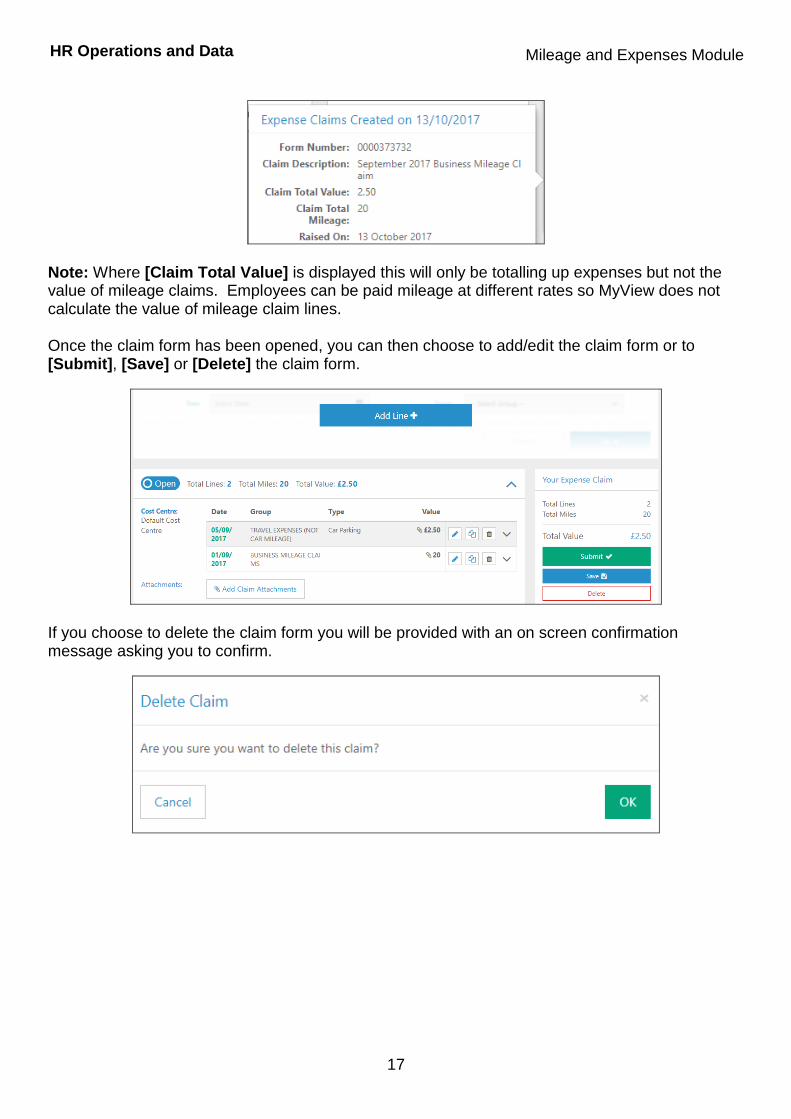
Clicking on the button will bring up a summary of the claim.
Mileage and Expenses Module
17
HR Operations and Data
Note: Where [Claim Total Value] is displayed this will only be totalling up expenses but not the value of mileage claims. Employees can be paid mileage at different rates so MyView does not calculate the value of mileage claim lines. Once the claim form has been opened, you can then choose to add/edit the claim form or to [Submit], [Save] or [Delete] the claim form.
If you choose to delete the claim form you will be provided with an on screen confirmation message asking you to confirm.

Mileage and Expenses Module
18
HR Operations and Data
3.7 Form History – View Authorisation Progress
You can view the authorisation progress of your request as well as being able to view details of previously authorised/rejected forms. This includes audit details of who authorised/rejected your form and when this took place.
Click on the [Form History] link on the left hand navigation panel
Click on the form name under [Description] to open the relevant form
The form includes a section called [Authorisation Progress]. Click on the green/orange icon to view authorisation status details.
Note: An authorised form will show a green tick whilst a submitted form will show an orange icon.
Details of the authorisation progress are displayed including who authorised it and date/time.
Once your form has been authorised the status will change from to .

Mileage and Expenses Module
19
HR Operations and Data
3.8 Withdrawing a Submitted Claim
Click on the [Form History] link on the left hand navigation panel
Click on the form name under [Description] to open the relevant form
Click [Withdraw] to change the status of the form from to .

Mileage and Expenses Module
20
HR Operations and Data
3.9 Partial Authorisation
Managers have the ability to partially authorise an expenses claim form rather than having to reject your whole claim if there is an issue with individual line(s).
Click on the [Form History] link on the left hand navigation panel
A claim form that has been partially authorised will have a form status of .
Click on the form name under [Description] to open the relevant form
The original claim form will now be shown in two sections – rejected and authorised. Under the ‘rejected’ section select [Reopen].
You then have the option to edit the claim line(s) before resubmission. Click [Submit] to submit the claim line for authorisation.

Mileage and Expenses Module
21
HR Operations and Data
Click [OK].
You will be provided with an on screen notification to say that the claim has been submitted for authorisation.
Click on the [Form History] link on the left hand navigation panel. The form status will still
be shown as .
Click on the form name under [Description] to open the relevant form.
The claim status of the resubmitted claim lines has now changed to .

Mileage and Expenses Module
22
HR Operations and Data
4 Delegated Input of Mileage Claims
The ability to submit on behalf of another person is pre-determined within ResourceLink. Individual posts will have delegated responsibility to input claims on MyView on behalf of another employee. Should you have any queries on delegated duties please email [email protected]. If you have been set up to submit claims on behalf of another employee, click on the [Delegated Duties] link on the left hand navigation panel.
Under [Responsibilities] you will see a list of the delegations available to you. Please select the appropriate responsibility.

Mileage and Expenses Module
23
HR Operations and Data
Select the appropriate employee from the delegation rule (you may have delegated access for more than one employee within the same delegation rule) by clicking on the relevant employee name.
It is important to highlight that once you have selected the appropriate person from the above list, there is no further reference to the person you have just selected.
Click [Create New Claim]. You will then follow the same instructions as if you were submitting your own claim.
4.1 Delegating Responsibility to Authorise Claims
Managers should refer to the MyView Dashboard MyPeople User Guide.