migrating the zerto virtual replication database to...
TRANSCRIPT
1
MIGRATING THE ZERTO VIRTUALREPLICATION DATABASE TO MICROSOFT
SQL SERVERZVR-DBM-6.0 Rev01-U2 June2018
Zerto Virtual Replication uses an SQL Server to manage data for scalable business continuity software solutions.
Zerto supports two usages of the SQL Server; either an embedded SQL Server, which is provided free of charge with the Zerto Virtual Replication product or, an external SQL Server which is deployed and managed by the customer.
During initial installation, the user can decide which usage of the SQL Server to deploy. The default during installation is the embedded SQL Server database.
When using the embedded SQL Server database, Zerto Virtual Replication is limited with the number of resources that can be protected. See Sizing Considerations for Zerto Virtual Replication.
After installation, Zerto Virtual Replication enables migration from the embedded SQL Server to an external Microsoft SQL Server using a Zerto Database Migration tool. This document specifies how to migrate the Zerto Virtual Replication database to an external SQL Server.
You can migrate data between any supported Microsoft SQL Server, or embedded SQL Server databases (Enterprise/Standard/Express) given their respective product limitations.
See the following sections:■ Recommendations and Considerations■ Migrating a Zerto Virtual Replication Database■ Rolling Back After Database Migration
Note:
This document applies to database migrations from Zerto Virtual Replication version 4.5Ux and later.
For database migrations from Zerto Virtual Replication version 4.0Ux, see the documentation for that version.
2Recommendations and Considerations
Migrating the Zerto Virtual Replication Database to Microsoft SQL Server - Version 6.0
Recommendations and ConsiderationsRead this section before you migrate your database.
“Recommendations”, on page 2
“Considerations”, on page 2
“Verify SQL Permissions and Roles”, on page 2
Recommendations■ For SQL Server sizing recommendations, see Sizing Considerations for Zerto Virtual Replication.■ Zerto uses username/password authentication. This is because using Windows credentials requires a manual change of
the Zerto Virtual Manager Service account (Step 10 > Authentication parameter).■ Although Zerto Virtual Replication supports SQL Server Enterprise/Standard/Express editions, when migrating to an
external SQL Server service, Zerto recommends using Standard or Enterprise edition.
Considerations■ Migration between Microsoft SQL Server / embedded SQL Server database is performed using the Zerto Database
Migration tool. The following Microsoft SQL Server versions are supported: 2008, 2008R2, 2012, 2014, 2016. ■ When migrating the data, you can use either SQL Server authentication or Windows authentication.
Zerto recommends that you use SQL Server authentication.
Verify SQL Permissions and Roles■ To use SQL authentication, the user must have DB Owner credentials. ■ The user must have the following permissions set:
■ Public and dbcreator server roles.■ Both Database User and Default Schema must be defined as dbo.■ Permission to connect to the database engine.■ Login enabled.■ In User Mapping choose the master database under which to create the Zerto Virtual Replication database and set
both db_owner and public for database role membership.
Now continue to Migrating a Zerto Virtual Replication Database.
Migrating a Zerto Virtual Replication Database
To migrate the database:1. From myZerto > Downloads, select and download the zip file for Zerto Virtual Manager Database Migration Tool for
4.5Ux and later. The Zerto.Storage.ConversionTool.zip file is downloaded.2. Save the Zerto.Storage.ConversionTool.zip file to the host running Zerto Virtual Manager, and to whose database you
want to migrate. 3. Extract the Zerto.Storage.ConversionTool.zip files to a folder.4. Stop the Zerto Virtual Manager service on the host to which you saved the Zerto.Storage.ConversionTool.zip file.5. You must backup the storage_properties.xml file. 6. If you have SQL Server Compact edition, also backup the Zvm.sdf file. The default location is:
C:\Program Files\Zerto\Zerto Virtual Replication7. Right click the file Zerto.Storage.Conversion.exe, and select Run as Administrator.
3Migrating a Zerto Virtual Replication Database
Migrating the Zerto Virtual Replication Database to Microsoft SQL Server - Version 6.0
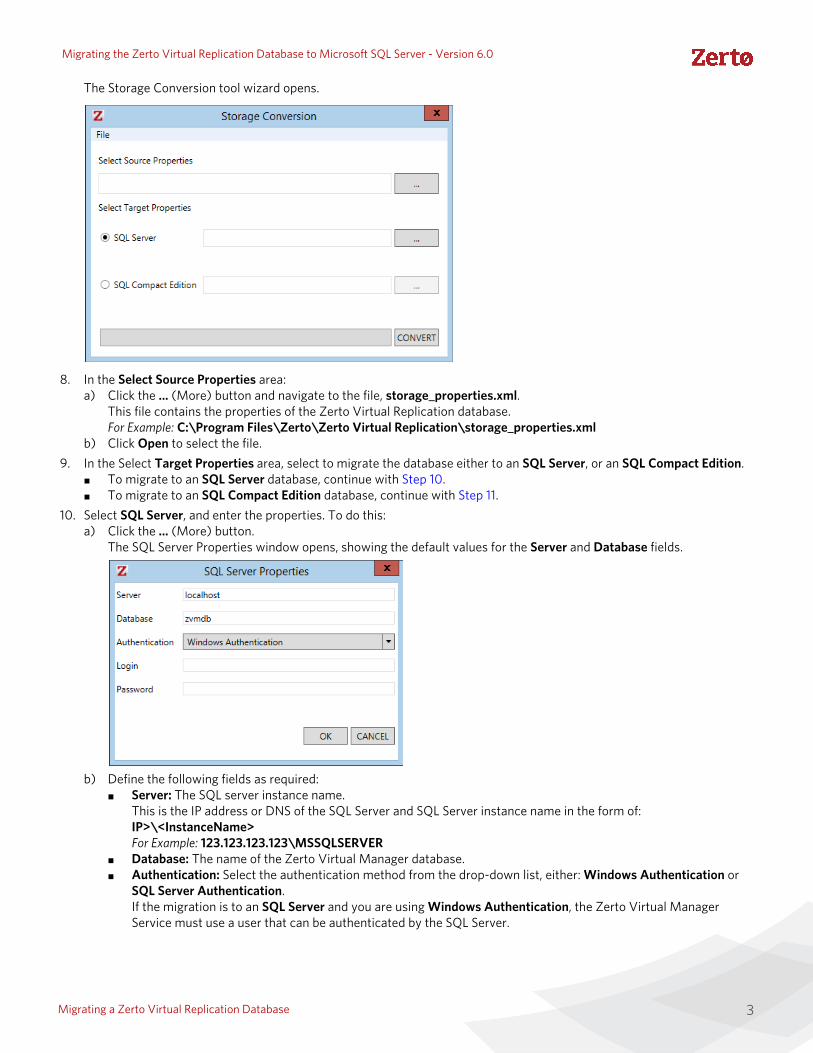
The Storage Conversion tool wizard opens.
8. In the Select Source Properties area:
a) Click the ... (More) button and navigate to the file, storage_properties.xml.This file contains the properties of the Zerto Virtual Replication database.For Example: C:\Program Files\Zerto\Zerto Virtual Replication\storage_properties.xml
b) Click Open to select the file.9. In the Select Target Properties area, select to migrate the database either to an SQL Server, or an SQL Compact Edition.
■ To migrate to an SQL Server database, continue with Step 10. ■ To migrate to an SQL Compact Edition database, continue with Step 11.
10. Select SQL Server, and enter the properties. To do this:a) Click the ... (More) button.
The SQL Server Properties window opens, showing the default values for the Server and Database fields.
b) Define the following fields as required:■ Server: The SQL server instance name.
This is the IP address or DNS of the SQL Server and SQL Server instance name in the form of: IP>\<InstanceName>For Example: 123.123.123.123\MSSQLSERVER
■ Database: The name of the Zerto Virtual Manager database.■ Authentication: Select the authentication method from the drop-down list, either: Windows Authentication or
SQL Server Authentication.If the migration is to an SQL Server and you are using Windows Authentication, the Zerto Virtual Manager Service must use a user that can be authenticated by the SQL Server.
4Migrating a Zerto Virtual Replication Database
Migrating the Zerto Virtual Replication Database to Microsoft SQL Server - Version 6.0
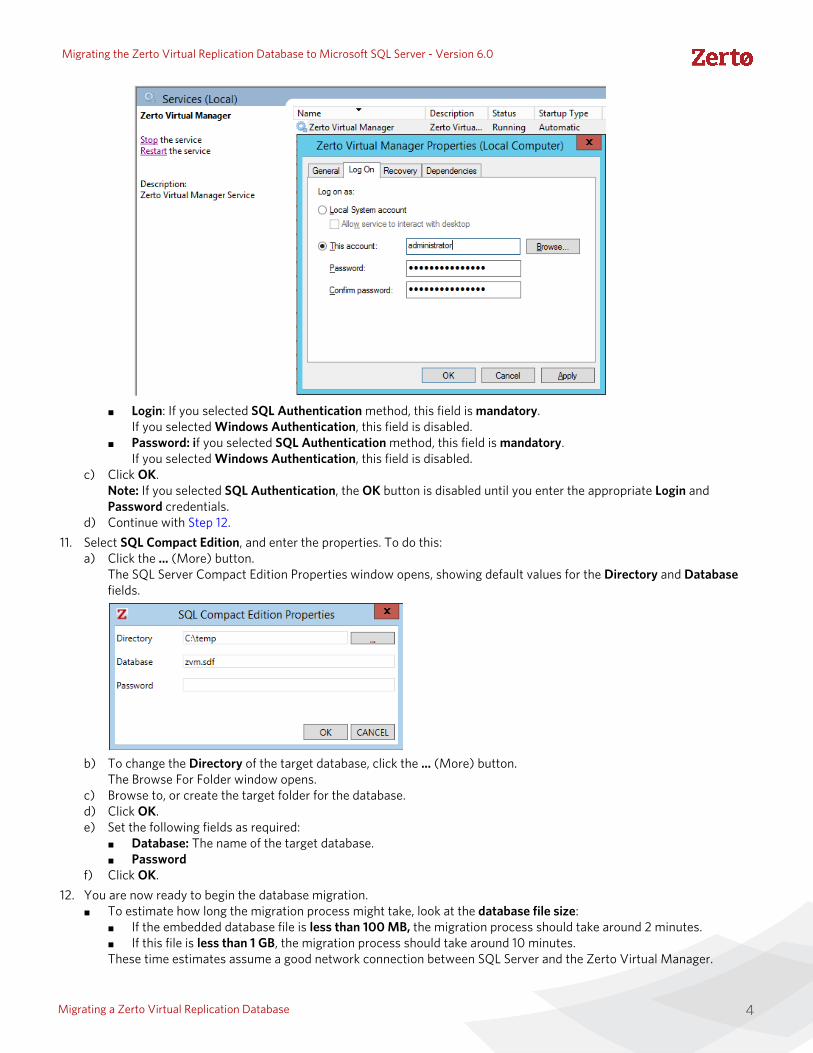
■ Login: If you selected SQL Authentication method, this field is mandatory.If you selected Windows Authentication, this field is disabled.
■ Password: if you selected SQL Authentication method, this field is mandatory.If you selected Windows Authentication, this field is disabled.
c) Click OK.Note: If you selected SQL Authentication, the OK button is disabled until you enter the appropriate Login and Password credentials.
d) Continue with Step 12.11. Select SQL Compact Edition, and enter the properties. To do this:
a) Click the ... (More) button.The SQL Server Compact Edition Properties window opens, showing default values for the Directory and Database fields.
b) To change the Directory of the target database, click the ... (More) button.The Browse For Folder window opens.
c) Browse to, or create the target folder for the database.d) Click OK.e) Set the following fields as required:
■ Database: The name of the target database.■ Password
f) Click OK.12. You are now ready to begin the database migration.
■ To estimate how long the migration process might take, look at the database file size:■ If the embedded database file is less than 100 MB, the migration process should take around 2 minutes. ■ If this file is less than 1 GB, the migration process should take around 10 minutes. These time estimates assume a good network connection between SQL Server and the Zerto Virtual Manager.
Rolling Back After Database Migration
Migrating the Zerto Virtual Replication Database to Microsoft SQL Server - Version 6.0
Copyright © 2018, Zerto Ltd. All rights reserved.
Zerto helps customers accelerate IT transformation by eliminating the risk and complexity of modernization and cloud adoption. Replacing multiple legacy solutions with a single IT Resilience Platform, Zerto is changing the way disaster recovery, data protection and cloud are managed. With unmatched scale, Zerto's software platform delivers continu-ous availability for an always-on customer experience while simplifying workload mobility to protect, recover and move applications freely across hybrid and multi-clouds. Zerto is trusted by over 6,000 enterprise customers globally, and is powering resiliency offerings for Microsoft Azure, IBM Cloud, AWS, Sungard and more than 350 cloud services pro-viders.
Learn more at Zerto.com
For assistance using Zerto Virtual Replication, contact:@Zerto Support.
■ The database files are stored in either one of the following:■ In the folder where Zerto Virtual Replication is installed (.SDF file)- or -■ In <Zerto Installation Root Driver>:\programdata\zerto\data (.MDF file)
For Example: C:\programdata\zerto\data 13. In the Storage Conversion window, click CONVERT.
The database migration begins. 14. After the database migration ends, start the Zerto Virtual Manager service.
Rolling Back After Database MigrationUse the following procedure to rollback the database immediately after database migration.
To roll back the migration:1. If you installed Zerto Virtual Replication v6.0x and need to rollback the database (which is an .MDF file), contact Zerto
Support.2. If you upgraded to Zerto Virtual Replication v6.0x and need to rollback the database (which is an .SDF file), perform the
following steps:a) Ensure that the original .SDF file database file is still accessible.b) Copy the original storage_properties.xml file back to its original location.c) Ensure that the Zerto Virtual Manager service is stopped before starting the rollback.d) After the rollback, start the Zerto Virtual Manager service. e) (Optional) Delete the zvm.db file from the SQL Server.
Note:
If you need to, roll back the database. See Rolling Back After Database Migration.