mig welding - freenguyen.hong.hai.free.fr/ebooks/science and engineering/mecan… · position (see...
TRANSCRIPT

7.1 Introduction
The metal arc inert gas shielded process,EN process number 131,also knownas MIG, MAGS or GMAW, was first used in the USA in the mid 1940s. Sincethose early days the process has found extensive use in a wide range of indus-tries from automotive manufacture to cross-country pipelines. It is an arcwelding process that uses a continuously fed wire both as electrode and asfiller metal, the arc and the weld pool being protected by an inert gas shield.It offers the advantages of high welding speeds, smaller heat affected zonesthan TIG welding, excellent oxide film removal during welding and an all-positional welding capability. For these reasons MIG welding is the mostwidely used manual arc welding process for the joining of aluminium.
7.2 Process principles
The MIG welding process, illustrated in Figs. 7.1 and 7.2, as a rule uses directcurrent with the electrode connected to the positive pole of the powersource, DC positive, or reverse polarity in the USA. As explained inChapter 3 this results in very good oxide film removal. Recent power sourcedevelopments have been successful in enabling the MIG process to be alsoused with AC. Most of the heat developed in the arc is generated at thepositive pole, in the case of MIG welding the electrode, resulting in highwire burn-off rates and an efficient transfer of this heat into the weld poolby means of the filler wire. When welding at low welding currents the tipof the continuously fed wire may not melt sufficiently fast to maintain thearc but may dip into the weld pool and short circuit.This short circuit causesthe wire to melt somewhat like an electrical fuse and the molten metal isdrawn into the weld pool by surface tension effects. The arc re-establishesitself and the cycle is repeated. This is known as the dip transfer mode ofmetal transfer. Excessive spatter will be produced if the welding parame-ters are not correctly adjusted and the low heat input may give rise to lack-
7MIG welding
116

of-fusion defects. At higher currents the filler metal is melted from the wiretip and transferred across the arc as a spray of molten droplets, spray trans-fer.This condition gives far lower spatter levels and deeper penetration intothe parent metal than dip transfer. When MIG welding aluminium the lowmelting point of the aluminium results in spray transfer down to relativelylow welding currents, giving a spatter-free joint.
The low-current, low-heat input dip transfer process is useful for thewelding of thin plate or when welding in positions other than the flat (PA)
MIG welding 117
Gasnozzle
Consumableelectrode
Gasshield
Weldpool
Parentmetal
Arc
Weldmetal
Contacttube
7.1 Fundamental features of the MIG process. Courtesy of TWI Ltd.
7.2 Illustrating the general arrangement of the power source, wirefeeder gas cylinder and work area. Courtesy of TWI Ltd.

position (see Fig. 10.3 for a definition of welding positions). It has, however,been supplanted in many applications by a pulsed current process, where ahigh current pulse is superimposed on a low background current at regularintervals. The background current is insufficient to melt the filler wire butthe pulse of high current melts the filler metal and projects this as a sprayof droplets of a controlled size across the arc, giving excellent metal trans-fer at low average welding currents.
Table 7.1 lists the likely and/or commonest methods of metal transferwith respect to wire diameter. Figure 7.3 illustrates the typical currentranges for a range of wire diameters.
118 The welding of aluminium and its alloys
Table 7.1 Metal transfer modes and wire diameter
Metal transfer mode Wire diameter
Dip 0.8mmPulsed 1.2 and 1.6mmConventional spray 1.2 and 1.6mmHigh-current spray 1.6mmHigh-current mixed 2.4mmspray/globular
2.4
0 50 100 150 200 250 300 350 400 450 500 550 600 650 700
WELDING CURRENT (A)
WIR
E D
IAM
ET
ER
(m
m)
GLOBULAR/SPRAY
SPRAYPULSED
PULSED SPRAY
DIP0.8
1.6
1.2
0
7.3 Typical welding current ranges for wire diameter and weldingcurrent.

7.2.1 Power sources
The MIG arc requires a power source that will provide direct current andwith a suitable relationship established between welding current andvoltage, this relationship being known as the power source dynamic char-acteristic.As mentioned above the MIG process uses a continuous wire feedand for the majority of welding operations it is important that the rate atwhich the wire burns off in the arc is matched by the wire feed speed. Failureto do this can result in an unstable arc and variable weld quality. To achievethis control many MIG/MAG welding power sources are designed with aflat or constant voltage characteristic. The importance of this characteristicbecomes apparent when we consider what happens during manual welding.The manual welder cannot maintain a fixed invariable arc length whilewelding – an unsteady hand or repositioning himself during welding meansthat the arc length varies and this in its turn causes variations in arc voltage.When this happens with a flat characteristic power source a small increasein the arc length results in an increase in arc voltage, giving a large drop inarc current, as illustrated in Fig. 7.4. Since the wire burn-off rate is deter-mined by the current this also decreases, the tip of the wire moves closerto the weld pool, decreasing the voltage and raising the current as it doesso. The burn-off rate therefore rises, the arc length increases and we havewhat is termed a self-adjusting arc where a constant arc length and fillermetal deposition rate are maintained almost irrespective of the torch movement.
During both dip and spray transfer the speed at which the power sourceresponds to the changes in the arc length is determined by the inductance
MIG welding 119
ARCVOLTAGE
WELDING CURRENT
Small change in voltage
Large change in current
7.4 Schematic of the effect of arc voltage vs arc current. Flatcharacteristic power source.

in the welding circuit. This controls the rate of current rise or fall and canhave a significant effect on weld quality. Insufficient inductance permits thewelding current to rise extremely rapidly, giving rise to excessive spatterand burning back of the wire to the contact tip. Too high an inductancemeans that the wire does not melt sufficiently rapidly and the wire tip maystub into the weld pool or be pushed through the root pass to protrude fromthe root. It is essential therefore that the power source is adjusted for thecorrect amount of inductance when, for example, the wire diameter or wirefeed speed is changed.
The converse of the flat characteristic power source is the drooping char-acteristic or constant current power source, illustrated in Fig. 7.5. This designof power source is generally used in MMA and TIG welding but it also hassome advantages when MIG welding aluminium. With a drooping charac-teristic a large change in arc voltage results in only a small change in arccurrent. Heat input is therefore reasonably constant, unlike that from a flatcharacteristic power source arc, giving more consistent penetration.
The problem with the drooping characteristic power source when usedfor MIG welding is that it requires more skill on the part of the welder.With push wire feeders the soft aluminium wire can buckle within the wirefeed conduit, particularly with long and flexible conduits. This results in thewire feed speed at the contact tip fluctuating and, if no action is taken, vari-ations in the heat input to the weld. When using a flat characteristic power
120 The welding of aluminium and its alloys
ARCVOLTAGE
WELDING CURRENT
Small change in current
Large change in voltage
7.5 Schematic of effect of arc voltage vs arc current. Droopingcharacteristic power source.

source these fluctuations are compensated for by the power source and thewelder may not appreciate that this is occurring – with the drooping char-acteristic the arc length changes and the welder may experience what areperceived as arc stability problems. If the welder is sufficiently skilled, cor-rective action can be taken before this results in welding defects, whereaswith the flat characteristic power source the welder can produce lack offusion or excess penetration defects unknowingly. An advantage of thedrooping characteristic power source is that as the welding current and thewire feed speed are fixed the welder can employ these features to enablethe wire tip to be pushed into the joint, a useful feature when making theroot pass.
The drooping characteristic unit is also useful in deep weld preparations.In such joints the constant voltage power source may measure the arcvoltage from the side wall, rather than from the bottom of the weld prepa-ration, resulting in an unstable arc condition, poor bead shape and variablepenetration.The same restrictions apply when welding the root pass in filletwelds where a drooping or constant current unit may give better resultsthan the constant voltage power source. Weaving of the torch may alsocause problems where the torch is moved simply by pivoting the wrist. Thisgives a regular increase and decrease in arc length, causing a loss of pene-tration at the limits of the weave with the flat characteristic power source.However, despite the apparent advantages of a drooping characteristicpower source the bulk of MIG welding units in production today use a flatcharacteristic with consistent and acceptable results.
7.2.1.1 Pulsed MIG welding
Pulsed MIG welding was developed in the early 1960s but it was not untilthe late 1970s that the process began to be widely adopted on the shop floor.Prior to this date the equipment had been expensive, complicated and difficult to set up for optimum welding parameters, making it welder-unfriendly and impeding its acceptance by the most important individualin the welding workshop. Solid state electronics started to be used inwelding power sources in the 1970s and ‘single knob’ control became pos-sible with the advent of synergic logic circuits. The synergic capabilityenabled all of the welding parameters to be controlled from a single dialcontrol which optimised the current peak pulse and background values, thevoltage and the wire feed speed. It has also became possible to repro-gramme the power source instantly when wire size, shield gas, filler metalcomposition, etc. are changed, simply by dialling in a programme number(Fig. 7.6). These programmes have been established by the equipment man-ufacturer with the optimum parameters for the application. Initially theseunits were expensive but the price has been steadily reduced such that they
MIG welding 121

are now only marginally more costly than a conventional power source,leading to a far wider usage. The modern inverter-based units (Fig. 7.7), arealso far lighter, far more energy efficient and more robust than the olderunits that they are replacing.
The pulsed MIG process uses a low ‘background’ current, sufficient tomaintain the arc but not high enough to cause the wire to melt off. On thisbackground current a high-current, ‘peak’ pulse is superimposed. Underoptimum conditions this causes a single droplet of molten filler wire to beprojected across the arc into the weld pool by spray transfer. It is thus pos-sible to achieve spray transfer and a stable arc at low average welding cur-rents. This enables very thin metals to be welded with large diameter wireswhere previously very thin wires, difficult to feed in soft aluminium, neededto be used.The lower currents also reduce penetration, useful when weldingthin materials and also enable slower welding speeds to be used, making iteasier for the welder to manipulate the torch in difficult access conditionsor when welding positionally.
The use of electronic control circuitry enables arc starting to be achievedwithout spatter or lack of fusion defects. Some units now available willslowly advance the wire until the tip touches the workpiece, sense the shortcircuit, retract the wire to the correct arc length and initiate the full weldingcurrent (Fig. 7.8). Similarly, in most of these modern units a crater fillingfacility is built in, which automatically fades out the current when the triggeron the gun is released.
122 The welding of aluminium and its alloys
7.6 Typical modern pre-programmable control panel for synergicpulsed MIG power source. Courtesy of TPS-Fronius Ltd.

7.7 Modern 500 amp inventor-based programmable synergic pulsedMIG power source. Courtesy of TPS-Fronius Ltd.
7.8 Programmed arc start – reducing the risk of lack of fusion defects.Courtesy of TPS-Fronius Ltd.

If you are contemplating purchasing new or replacement MIG equip-ment it is recommended that pulsed MIG power sources are purchased,even though they are more expensive than conventional equipment. Thiswill give the fabrication shop a more flexible facility with a wider range ofoptions than with the straight DC units.
7.2.1.2 Fine wire MIG
As the name suggests the fine wire MIG process uses a fine, small diameter wire, less than 1.2mm and as small as 0.4mm in diameter, althoughwires of 0.4 and 0.6mm in diameter need to be specially ordered from thewire drawer. Small diameter wires are notoriously difficult to feed and toeliminate feeding problems a small wire reel and a set of drive rolls aremounted directly on the welding torch. Welding parameters are in theranges 50–140 A and 17–22 V, resulting in a short-circuiting mode of metaltransfer. Travel speeds are generally around 320mm/min, giving low heatinput and enabling thin sheets, around 1mm in thickness, to be weldedwithout burn-through, excessive penetration or excessive cap height. Thefine wire process, although successful, has now largely been replaced bypulsed MIG welding.
7.2.1.3 Twin wire MIG
A relatively recent development has been the twin-wire process. Thecurrent that can be used is limited in the single wire process by the forma-tion of a strong plasma jet at high welding currents. This jet may cause anirregular bead shape, porosity or excess penetration. The twin wire processovercomes these difficulties with two independent arcs operating in thesame weld pool, enabling major improvements in productivity to beachieved. The basis of this is the use of two inverter-based pulsed MIGpower sources coupled in series, each complete with its own microproces-sor control unit and wire feeder (Fig. 7.9). The two units are linked by acontroller that synchronises the pulses from each unit such that when oneunit is welding on the peak of a current pulse the other unit is on back-ground current. By this means a stable welding condition is created withthe two arcs operating independently of each other. The wires are fed to asingle torch carrying two contact tips insulated from each other. The wiresmay be positioned in tandem, side by side or at any angle in betweenenabling the bead width and joint filling to be precisely controlled.
The limitation of twin wire MIG is that the process can only be used ina mechanised or robotic application. With suitable manipulators, however,it is capable of very high welding speeds, a 3 mm leg length fillet weld, for
124 The welding of aluminium and its alloys

instance, being capable of being made at travel speeds of over 2 metres perminute.The welding torch is large, making access a problem, and the capitalcost of the equipment is high.
7.2.2 Wire feeders and welding torches
7.2.2.1 Welding torches
The MIG process requires the filler wire to be delivered to the weldingtorch (Fig. 7.10) at a fixed speed and for the welding current to be trans-ferred to the wire via a contact tip within the torch. The torch must also beequipped with a means of providing the shield gas and of enabling thewelder to commence and end the welding sequence. This is generallyachieved by means of a trigger on the handle of the torch. Operatingthe trigger initiates the shielding gas flow and the welding current when the wire tip is scratched on the workpiece surface. This, in its turn, starts thewire feed. Releasing the trigger stops the wire feed and shuts off the currentand shielding gas. The heat generated in the torch during welding may alsorequire the torch to be water-cooled. All of these services must be deliv-ered to the torch via an umbilical cable containing a wire feed conduit,
MIG welding 125
7.9 Microprocessor-controlled inventor-based twin wire pulsed MIGpower sources. Courtesy of TPS-Fronius Ltd.

welding current cable, shield gas hose, cooling water delivery and returnhoses and the electrical control cables. At the same time the torch must not be made so heavy and cumbersome that the welder cannot easilymanipulate the torch with a minimum of effort. A well-designed torchtherefore needs to be lightweight, robust and easily maintained and theumbilical cable needs to be light and flexible. It is most important if con-sistent quality is to be achieved that the welder is provided with the besttorch available.
126 The welding of aluminium and its alloys
7.10 Exploded view of a typical MIG torch: A ergonomically shapedhandle; B contact tip, C gas shroud, D gas diffuser, E power cableconnector, F umbilical containing gas hose, power cable and controlcable, G power switch, H replaceable liner, I adjustable nozzle.Courtesy of Bernard Welding Equipment Company.

7.2.2.2 Wire feed systems
There are three basic forms of wire feeders: the ‘push’ system, the ‘pull’system and the ‘push–pull’ system.As the name suggests, in the push system,the wire is pushed by the wire feed drive rolls along the conduit to thewelding torch. The flexibility of aluminium wire means that the wire canbuckle and jam inside the conduit, resulting in irregular wire feeding at thewelding torch and, in extreme cases, a ‘bird’s nest’ of tangled wire at thewire feed unit. Such wire feeders are generally restricted to a minimum wirediameter of 1.6mm and the wire feed conduit to a length of 3.5m.
The pull system utilises a set of wire rolls in the torch handle which pullthe wire from the wire reel (Fig. 7.11).This arrangement increases the weightof the torch and does not increase the distance over which the wire can befed, this still being limited to around 3.5m, although the consistency of thewire feed is improved and wire diameters down to 0.8mm can be used.
The push–pull system is a combination of the above two systems with aset of drive rolls at both the wire reel feeder and in the torches illustratedin Fig. 7.11. This enables small diameter wires to be fed up to 15m from thewire reel. The final variation on this theme is the spool on gun torch whichutilises a small 100mm diameter wire reel mounted on the welding torchand a set of drive rolls in the torch body. These rolls push the wire the short
MIG welding 127
7.11 MIG torches equipped with ‘pull’ wire drive rolls. Courtesy ofTPS-Fronius Ltd.

distance from the reel to the contact tip, enabling wires as small as 0.4mmin diameter to be used. The length of the umbilical cable is limited only bythe voltage drop in the power delivery and return leads and perhaps theneed to provide water cooling to the torch.
All of these systems require that the wire is driven at a constant, con-trolled rate unaffected by continuous operation, variations in supply voltageor fluctuations in temperature. They must also be able to reach the desiredwire feed speed as rapidly as possible in order to give good and stable arcstarting. The control for feed speed may be mounted on the torch or on thewire feeder.
While manual welding may use any of the systems mentioned, push–pullsystems are becoming the standard method of wire feeding in robotic appli-cations because of the need for highly consistent feed speeds and defect-free arc starting.
7.2.2.3 Wire drive rolls
Aluminium wire is very much softer than steel and this can result in feedingdifficulties, the wire being easy to deform by excessive roll pressure, causingthe wire to jam in the feed conduit or in the contact tip. With push wirefeeders any impediment to the wire feed, such as metal shavings or wiredrawing soap compacted in the contact tip, kinks in the wire feed liner orspatter on the contact tip, may cause the wire to buckle within the wire feedconduit.Wire feed rolls must not be knurled but should be smooth, groovedrolls or, better still, one flat roll and one with a 60° V-groove. Wire feedingsystems for aluminium also employ four drive rolls (Fig. 7.12) rather thanthe two rolls that conventionally are used to feed steel wires. It is impor-tant that the roll pressure is adjusted such that the wire is not grooved orflattened by the rolls since this will also lead to wire feeding problems. Thewire should be kept as clean as possible. Covers to protect the reel fromdust and heated cabinets are available and it is recommended that theseare used where the highest quality is required.Also available are wire clean-ing devices comprising a cloth or felt pad clamped around the wire andsoaked in a cleaning fluid such as alcohol or acetone. This can be used toremove grease, drawing soap and loose particles of swarf or oxide at thepoint at which the wire enters the conduit.
A relatively recent innovation in wire drive rolls is finding increasing use.This is the orbital welding system in which the wire passes through thehollow centre of the drive motor and is driven by a set of rolls set at anangle to and orbiting around the wire. This method of driving the wire hasthe advantages of both straightening and vibrating the wire, aiding infeeding the wire through the conduit.
128 The welding of aluminium and its alloys

7.2.2.4 Contact tip (tube)
The contact tip is a small but vital component in the welding power circuit.The tip is formed from a tube made to be a sliding fit for the wire. It isscrewed into the torch head, ‘B’ in Fig. 7.10, and is the point at which thewelding current is picked up by the filler wire. The contact tip is made fromcopper or brass and wears in use. It is therefore made to be replaceable.The tip for aluminium welding may vary in length from 25mm to 100mm.The longer contact tips provide the best current transfer conditions andtherefore the most stable welding conditions. Tips have been designed thatcarry either a spring-loaded shoe to maintain a constant pressure on thewire or with the hole offset in order to force the wire against one wall,thereby improving and maintaining contact.
A worn contact tip may cause the wire to jam, resulting in a tangle at thewire drive rolls. A perhaps more serious weld quality problem may alsoarise from arc instability caused by the point at which the wire picks up thecurrent moving up and down the contact tip. This effectively changes thewire stick-out length which in its turn affects the voltage, leading to arcinstability and lack of penetration defects. Poor contact between the tip andthe wire may cause arcing within the tip, giving rise to arc instability andperhaps wire feed problems. Damage to the tip from spatter, accidentaltouch-down or mechanical damage may cause similar problems.
MIG welding 129
7.12 Four roll MIG wire drive unit. Courtesy of TPS-Fronius Ltd.

The tip should be recessed in the gas shroud by at least 5mm whenwelding in spray transfer. If the tip is too close to the end of the gas shroudthere is an increased risk of spatter damaging the tip. If the tip protrudesfrom the shroud then there is a risk of the tip touching and melting into theweld pool. This will cause weld pool cracking, may give rise to ‘bird’snesting’ and will require the tip to be replaced.
7.3 Welding consumables
7.3.1 Shielding gases
The shielding gases, as with TIG welding, are the inert gases argon andhelium or combinations of these two. Other, active, gases such as oxygen ornitrogen even in small amounts will give porosity and smutting problems.The most commonly used gas is argon which is used for both manual andsome automatic welding. It is substantially cheaper than helium and pro-duces a smooth, quiet and stable arc, giving a wide, smooth weld bead witha finger-like penetration to give a mushroom-shaped weld cross-section.Argon, however, gives the lowest heat input and therefore the slowestwelding speeds.There is therefore a risk of lack of fusion defects and poros-ity on thick sections. Argon may also give a black sooty deposit on thesurface of the weld. This can be easily removed by wire brushing. Sectionsof 3mm thick butt welds using conventional and pulsed current are illus-trated in Fig. 7.13. Thicker section butt and fillet welds are illustrated in Fig.7.14. In these thicker section welds the characteristic finger penetration ofan argon gas shield can be seen.
Helium increases the arc voltage by as much as 20% compared withargon, resulting in a far hotter arc, increased penetration and wider weld
130 The welding of aluminium and its alloys
7.13 (a) MIG, argon shielded 0.8mm wire, 3mm thick unbacked platebutt, flat position. (b) Pulsed MIG, argon shielded, 0.8mm diameterwire, 3mm thick unbacked plate butt, flat position.
(a)
(b)

bead. The wider bead requires less critical positioning of the arc and assistsin avoiding missed edge and lack of penetration-type defects. The hotter,slower cooling weld pool also allows hydrogen to diffuse from the moltenweld metal, making this a method that may be used to reduce the amountof porosity. The increased heat also enables faster welding speeds to be
MIG welding 131
7.14 (a) MIG, argon shielded, two pass, double sided, 12mm thick, flatposition. (b) MIG, argon shielded, 15mm leg length fillet, 12mm thickplate, horizontal-vertical.
(a)
(b)

achieved, as much as three times that of a similar joint made using argonas a shielding gas.
Helium, however, is expensive and gives a less stable arc than argon. Purehelium therefore finds its greatest use in mechanised or automatic weldingapplications. Helium shielded manual welds are illustrated in Fig. 7.15.
132 The welding of aluminium and its alloys
7.15 (a) MIG, helium shielded, two pass, double sided, 12mm thick,flat position. (b) MIG, helium shielded, 15mm leg length fillet, 12mmthick plate, horizontal-vertical.
(a)
(b)
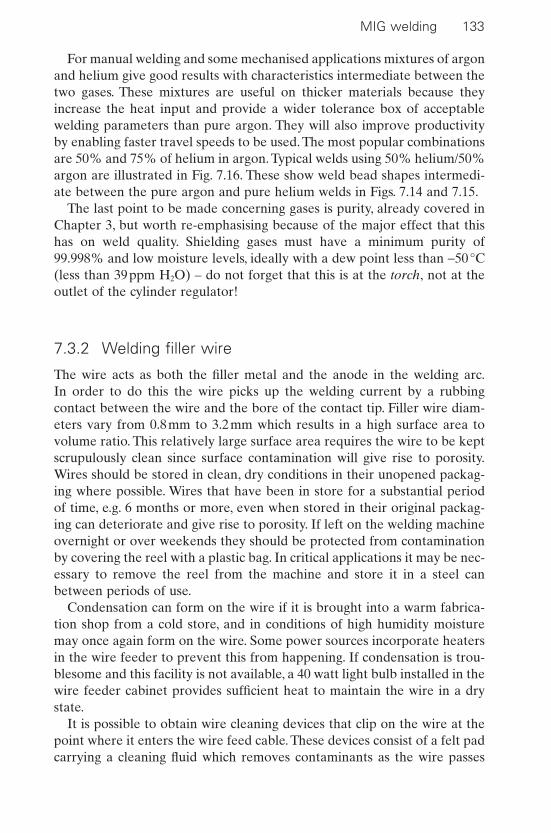
For manual welding and some mechanised applications mixtures of argonand helium give good results with characteristics intermediate between thetwo gases. These mixtures are useful on thicker materials because theyincrease the heat input and provide a wider tolerance box of acceptablewelding parameters than pure argon. They will also improve productivityby enabling faster travel speeds to be used. The most popular combinationsare 50% and 75% of helium in argon. Typical welds using 50% helium/50%argon are illustrated in Fig. 7.16. These show weld bead shapes intermedi-ate between the pure argon and pure helium welds in Figs. 7.14 and 7.15.
The last point to be made concerning gases is purity, already covered inChapter 3, but worth re-emphasising because of the major effect that thishas on weld quality. Shielding gases must have a minimum purity of99.998% and low moisture levels, ideally with a dew point less than -50°C(less than 39ppm H2O) – do not forget that this is at the torch, not at theoutlet of the cylinder regulator!
7.3.2 Welding filler wire
The wire acts as both the filler metal and the anode in the welding arc.In order to do this the wire picks up the welding current by a rubbingcontact between the wire and the bore of the contact tip. Filler wire diam-eters vary from 0.8mm to 3.2mm which results in a high surface area tovolume ratio. This relatively large surface area requires the wire to be keptscrupulously clean since surface contamination will give rise to porosity.Wires should be stored in clean, dry conditions in their unopened packag-ing where possible. Wires that have been in store for a substantial periodof time, e.g. 6 months or more, even when stored in their original packag-ing can deteriorate and give rise to porosity. If left on the welding machineovernight or over weekends they should be protected from contaminationby covering the reel with a plastic bag. In critical applications it may be nec-essary to remove the reel from the machine and store it in a steel canbetween periods of use.
Condensation can form on the wire if it is brought into a warm fabrica-tion shop from a cold store, and in conditions of high humidity moisturemay once again form on the wire. Some power sources incorporate heatersin the wire feeder to prevent this from happening. If condensation is trou-blesome and this facility is not available, a 40 watt light bulb installed in thewire feeder cabinet provides sufficient heat to maintain the wire in a drystate.
It is possible to obtain wire cleaning devices that clip on the wire at thepoint where it enters the wire feed cable. These devices consist of a felt padcarrying a cleaning fluid which removes contaminants as the wire passes
MIG welding 133

134 The welding of aluminium and its alloys
7.16 (a) MIG, helium–argon shielded, two pass, double sided, 12mmplate. (b) MIG, helium–argon shielded, 15mm leg length fillet, 12mmthick plate, horizontal–vertical.
into the cable. They can be very effective at removing traces of grease andoils, dust, etc. on the surface of the wire. Better still is shaving the wire. Thisnot only removes surface contaminants and oxides but hardens the wire,making it easier to feed and less likely to tangle.
(a)
(b)

7.4 Welding procedures and techniques
A set of outline welding procedures are given in Tables 7.2 and 7.3 for buttwelding using either argon or helium as the shielding gas, and guidance onparameters for fillet welding is illustrated in Fig. 7.17. The parametersquoted form a starting point from which to develop a procedure specificallydesigned for the application. They are not to be regarded as hard and fastrules. Also included as Table 7.4 are suggested weld preparations for MIGwelding of a range of plate thicknesses.
7.4.1 Arc starting
Because the wire is fed into the arc immediately that the arc is started there can be no preheating of the joint as possible with TIG. This results in shallow penetration and a humped weld bead on starting. Lack offusion defects are often encountered – a ‘cold start’ – and weld bead shape may not be acceptable. To avoid these defects the welder shouldstrike the arc some 25mm ahead of the desired start point and thenmove back to the weld start before beginning to weld forward at a normalspeed.
Arc starting may be achieved using a scratch start where the wire isallowed to protrude from the contact tip by 10mm and brought to within20mm of the surface. The trigger is operated and at the same time thewelding torch is moved to scrape the wire tip over the work surface. Assoon as the arc is established the power source senses the change in voltageand starts the wire feed, the weld pool forms and welding can commence.A ‘running’ start is one where the wire begins to feed as soon as the triggeris operated and is short-circuited when it touches the workpiece, establish-ing the arc. The current surge on short-circuiting may cause arcing withinthe contact tip and spatter to adhere to the shroud and contact tip. Thesecan lead to wire feeding problems.
As mentioned earlier, the new inverter power sources have a facility fora highly controlled arc start sequence.When the trigger is operated the wireis fed at a slow and controlled rate until the wire tip touches the workpiece.It is then retracted slightly and a pilot arc is ignited. Once this is stable thecurrent is increased at a controlled rate, the wire speed increased to thedesired feed rate and welding commences (Fig. 7.8). This gives a spatter-free start and a low risk of lack of fusion defects, a major improvement overthe capabilities of older equipment.
MIG welding 135

Table 7.2 Suggested welding parameters – argon shielding
Thickness Root gap/ Included angle Backing Current Voltage No. of Filler diam. Travel speed(mm) face (mm) (degrees) (A) (V) passes (mm) (mm/min)
1.6 nil Square Temporary 100 19 1 0.6 10002.5 Square Permanent 100 19 1 0.6 1000
2.4 nil Square Temporary 140 21 1 0.6 10003.2 Square Permanent 130 23 1 0.6 780
3.2 2.5 Square Temporary 160 24 1 1.2 7805 Square Permanent 135 23 1 1.2 720
4 1.5 Square None 170 26 1 face 1.2 7501 reverse
1.5/2.5 60 Temporary 160 27 1 1.2 750single-V
4.5/1.5 60 Permanent 185 27 2 1.6 750single-V
6.3 2.5 Square None 200 28 1 face 1.6 7501 reverse
2.5/2.5 60 Temporary 185 27 2 1.6 750single-V
6/1.5 60 Permanent 225 29 3 1.6 750single-V
8 2.5/1.5 60 Temporary 245 29 2 1.6 750single-V
4.5/nil 60 Permanent 255 29 3 1.6 750single-V
10 2.5/4.5 90 None 290 29 1 face 1.6 750single-V 1 reverse
2.5/2.5 60 Temporary 275 29 2 face 1.6 900single-V 1 reverse
4.5/nil 60 Permanent 275 26 3 1.6 800/550single-V

12.5 0.8/1.5 90 None 260/225 24/26 3 face 1.6 1050 root/double- 3 reverse 800V
2.5/1.5 60 Temporary 260 24 3 face 1.6 850 root/single-V 1 reverse 550
4.5/nil 60 Permanent 270 24 3 1.6 550 root/single-V 500
16 1.5/1.5 90 None 275 23/26 4 face 1.6 850 root/double- 4 reverse 650V
4.5/nil 60 Permanent 280 26 4 1.6 550 root/single-V 450
20 1.5/1.5 90 None 255 root/ 22/26 4 face 1.6 900 root/double-V 230 4 reverse 550
3/2.5 60 Temporary 350 29 4 face 2.4 1000single-V 1 reverse
6/nil 60 Permanent 380 30 5 2.4 1000single-V
25 1.5/1.5 90 None 255 root/ 22/26 6 face 1.6 600double- 230 6 reverseV
4/2.5 60 Temporary 350 29 2.4 1000single-V
6/nil 60 Permanent 350 29 2.4 1000single-V
1. Where two welding parameters are specified in one entry the first refers to the requirements for the first pass.2. Where a reverse side weld is specified it is necessary to grind the reverse of the root pass to ensure a sound joint.3. When making a double sided joint it is recommended that the weld passes are balanced to reduce distortion.

7.4.2 Torch positioning
The angle at which the torch is presented to the joint is important in thatan incorrect angle can result in air entrainment in the shielding gas and willalso affect the degree of penetration. Ideally the torch should be normal tothe surface and pointed forwards towards the direction of travel at an angleof between 10° and 15° from the vertical, the forehand angle (Fig. 7.18). Asthis angle increases penetration decreases and the amount of air entrainedin the shielding gas gradually increases.
Arc length cannot be set by adjusting the voltage since this is a functionof the resistance of the circuit as a whole.The arc length is set by the welderusing both sight and sound, a correct arc length being characterised by a
138 The welding of aluminium and its alloys
Table 7.3 Suggested welding parameters – helium shielding, flat position, largediameter wires
Thickness Root Included Current Voltage No. of Filler Travel(mm) gap/ angle (A) (V) passes diam. speed
face (degrees) (mm) (mm/min)(mm)
50 0/5 70/2 550 32 2 each 4.8 250sided side
75 0/10 30 650 30 3 each 5.6 2506mm sideroot R
0 100 150 200
Weld current
Fill
et w
eld
size
– le
g le
ngth
(m
m)
250 300 3500
4
6
9
12
15
MIG welded fillet joints Weldruns
3–4 1.6 300–400
400–500
500–600
600–700
600–700
1.6
1.6
1.6
1.2
2–3
1
1
1
Wirediamm
Travelspeed
mm/min
7.17 Suggested parameters for fillet welding – argon shielding.

Table 7.4 Suggested weld preparations for MIG welding
Material Edge preparation Remarksthickness(mm)
1.6–4.8mm A backing bar givesgreater control ofpenetration
6.4–9.5mm Weld from bothsides, sighting Vsrecommended
4.8–12.7mm Suitable also forpositional welding,when welded fromboth sides
6.4–12.7mm Flat aluminium backingbar optional. Oneor more runs fromeach side. Back chippingrecommendedafter first run
6.4–19.1mm One or more runsfrom one side,depending on thickness.Suitable alsofor positionalwelding
12.7–25.4mm Up to 1.6mm rootgap. One or moreruns from each side.Back-chippingrecommended afterfirst run
12.7–25.4mm
12.7–25.4mm 60°
6.4mmrad
3.2mm
60°
3.25mmrad
4.8mm
2.4mm
70° to 90°
2.4mm
60°
3.25mmrad
4.8mm1.6–2.4mm
70° to 90°
T/3
T
70° to 90°
T/3
T

soft crackling sound similar to the sound of frying bacon. Too short an arcsounds harsh and gives excessive spatter while a long arc has a hummingsound. The effect of changing the arc length is summarised in Table 7.5.
7.4.3 Ending the weld
If, when the weld is ended, the wire feed is abruptly stopped the weld poolwill freeze and a shrinkage crater will form. If the weld pool is small thiscrater may be simply a shallow depression in the weld surface. In large weld
140 The welding of aluminium and its alloys
Work angle45°
Forehand angle
90°
Workangle 90°
Angle for fillet welding Angle for butt welding
Angle of torch related to travel direction. Ideally thisshould be between 10° and 15°
Direction of torch travel
7.18 Torch position for MIG welding.
Table 7.5 Effect of arc length
Weld Bead Short Arc Long Arc
Excess metal High FlatPenetration Deep ShallowWidth Narrow WidePorosity Higher LowerSpatter Higher Lower

pools the crater may extend down into the weld to form an elongated pore– piping porosity. As the weld continues to cool and contract then the asso-ciated shrinkage stresses may cause hot short or crater cracks to form. Anyform of cracking is unacceptable and is to be avoided. Methods of elimi-nating this defect include the following:
• The use of run-off tabs on which the weld can be terminated, the tabbeing subsequently removed.
• Increasing the travel speed just before releasing the trigger. This causesthe weld pool to tail out over a distance. It requires a high measure ofskill on the part of the welder to produce acceptable results.
• Making a small number of brief stops and starts into the crater as theweld cools. This adds filler metal to the crater.
• As the trigger on the torch is released the wire feed speed and thewelding current are ramped down over a period of time. The crater isfed with progressively smaller amounts of molten filler metal as it forms,resulting in the filling and elimination of the crater. This crater fillingfacility is standard on modern equipment and is the preferred methodfor avoiding piping porosity and crater cracks.
7.5 Mechanised and robotic welding
As MIG welding is a continuously fed wire process it is very easily mech-anised. The torch, having been taken out of the welder’s hand, can be usedat welding currents limited only by the torch or power source and at highertravel speeds than can be achieved with manual welding. A typical robotMIG welding cell where the robot is interfaced with a manipulatorfor increased flexibility and a pulsed MIG power source is illustrated in Fig. 7.19. Greater consistency in operation means that more consistent weldquality can be achieved with fewer defects. The advantages may be sum-marised as follows:
• More consistent quality.• More consistent and aesthetically acceptable bead shape.• More consistent torch height and angle mean that gas coverage can be
better and the number of defects reduced.• Fewer stops and starts, hence fewer defects.• Higher welding speeds means less heat input, narrower heat affected
zones and less distortion.• Higher welding current means deeper penetration and less need for
large weld preparations with fewer weld passes and therefore fewerdefects.
• Higher weld currents mean a hotter weld and reduced porosity.
MIG welding 141

• The above advantages mean that less welding time is required andrework rates will be reduced, giving major improvements in productiv-ity and reductions in cost.
• There is no need for the skilled welder required for manual welding, amajor advantage in view of the current shortage of highly skilledwelders.The loading and unloading of the welding cell can be performedby unskilled workers, although knowledgeable and experienced engi-neers will be needed to programme and maintain the equipment.
There are some disadvantages to mechanised and robotic welding. Weldpreparations need to be more accurate and consistent; more planning isneeded to realise fully the benefits; capital expenditure will be required topurchase manipulators and handling equipment; maintenance costs maywell be higher than with manual equipment and the full benefits of highdeposition rates may only be achieved in the flat or horizontal–vertical posi-tion. Despite these problems there is an increased usage of mechanised andautomated MIG equipment because of the financial benefits that may beachieved.
142 The welding of aluminium and its alloys
7.19 Pulsed MIG power source interfaced with a robot andmanipulator. Courtesy TPS-Fronius Ltd.

To illustrate the cost benefits of mechanisation take as an example a 12mm thick butt weld. Made using manual MIG this would require fourpasses to fill at a travel speed of around 175mm/min, a total weld time of over 20 minutes per metre. A machine weld using argon as the shieldgas could be made in a single pass at around 480mm/min travel speed, atotal weld time of just over 2 minutes. Using helium as the shielding gaswould reduce this time even further. A set of typical parameters is given inTable 7.6.
Because of the higher duty cycle achievable with mechanised or auto-mated welding the power source, wire feeder and torch must be more robustand rated higher than those required for manual welding. Welding currentsof 600 A or more may be used and this must also be borne in mind whenpurchasing a power source. The torch manipulator, whether this is a robot,a dedicated machine or simply a tractor carriage, must have sufficient powerto give steady and accurate motion at a uniform speed with repeatable,precise positioning of the filler wire. Although at low welding currents con-ventional manual equipment may be adapted for mechanisation by attach-ing the torch to a manipulator, it is advisable to use water-cooled guns andshielding gas shrouds designed to provide improved gas coverage.
7.6 Mechanised electro-gas welding
A technique described as electro-gas welding was developed by the AlcanCompany in the late 1960s but seemed to drop out of favour in the late1990s, which is surprising when the advantages of the process are consid-ered. The weld may only be carried out in the vertical-up (PF) position butis capable of welding both square edge butt joints and fillet welds withthroats of up to 20mm in a single pass.
To operate successfully the process uses a long arc directed to the backof the penetration cavity. This provides a deeply penetrating arc that
MIG welding 143
Table 7.6 High current mechanised MIG parameters
Thickness Joint type Backing Current Voltage Travel speed(mm) (A) (V) (mm/min)
12 Square edge Temporary 400 26.5 38012 Square edge Permanent 450 29 35019 Square edge Temporary 540 33 27519 Square edge Two sided 465 29.5 38025 Square edge Two sided 540 33 27532 Square edge Two sided 530 33 275
(6mm sight V)

operates in the space above the weld pool. The pool fills the cavity belowthe arc, solidifying as the torch is traversed vertically up the joint line. Themolten pool is retained in position and moulded to shape by a graphite shoeattached to and following immediately behind the welding torch.
The process utilises a drooping characteristic power source capable ofproviding 600 A at 100% duty cycle coupled to a water-cooled machinetorch. The torch is mounted on a vertical travelling carriage at an angle of15° from the horizontal. The gas shroud should be at least 25mm in diam-eter and the tip of the contact tube should be flush with the shroud.
For butt welding the graphite shoe is made from a flat plate shaped witha groove to mould the cap, flared out towards the top of the shoe where theweld pool is formed. The fillet weld mould is provided with a pair of ‘wings’set back to press against the plates to form the fillet. In both cases the shoeis held against the plates by spring pressure. The shoe must be long enoughto hold the molten metal in place until it has solidified – in the region of100mm may be regarded as sufficient. It has been found that heating theshoe to 350°C before commencing welding assists in preventing fouling ofthe shoe with parent metal.
During welding the arc must be prevented from arcing onto the weld poolor the graphite shoe. This requires careful control of the wire position andthe wire feed speed, as a balance must be achieved between the volume ofmetal being fed into the pool, the volume of the mould and the traversespeed.
7.7 MIG spot welding
MIG spot welding may be used to lap weld sheets together by meltingthrough the top sheet and fusing into the bottom sheet without moving thetorch. The equipment used for spot welding is essentially the same as thatused for conventional MIG, using the same power source, wire feeder andwelding torch. The torch, however, is equipped with a modified gas shroudthat enables the shroud to be positioned directly on the surface to bewelded (Fig. 7.20). The shroud is designed to hold the torch at the correctarc length and is castellated such that the shield gas may escape. The powersource is provided with a timer so that when the torch trigger is pulled apre-weld purge gas flow is established, the arc burns for a pre-set time andthere is a timed and controlled weld termination. The pressure applied bypositioning the torch assists in bringing the two plate surfaces together.Because of this degree of control the process may be used by semi-skilledpersonnel with an appropriate amount of training.
The process may be operated in two modes: (a) by spot welding with theweld pool penetrating through the top plate and fusing into the lower oneor (b) by plug welding where a hole is drilled in the upper plate to enable
144 The welding of aluminium and its alloys

the arc to operate directly on the lower plate so that full fusion can beachieved. Plug welding is generally required when the top sheet thicknessexceeds 3mm. The size of the drilled hole is important in that this deter-mines the size of the weld nugget and the diameter should be typicallybetween 1.5 and 2 times the top sheet thickness. Typical welding parame-ters are given in Table 7.7.
Of the shield gases argon is the preferred choice as it produces a deep,narrow penetration. Argon also provides better arc cleaning than helium,important in maintaining low levels of oxide entrapment. Arc stability isalso superior. Surface preparation is important, cleanliness being crucial todefect-free welds. As with butt welds, degreasing and stainless steel wirebrushing, supplemented by scraping if a hole is drilled, are most important.
MIG welding 145
Contact tip
Filler wire
Castellatedgas shroud
Downwardforce
Weld pool
7.20 Schematic of the MIG spot welding process.
Table 7.7 Spot and plug welding parameters
Top plate Bottom plate Preparation Current Voltage Weld time(mm) (mm) (A) (V) (s)
1.0 1.0 Cu backed 320 23 0.81.0 2.5 Cu backed 325 23 1.01.5 1.5 Cu backed 335 24 1.01.5 2.5 Cu backed 350 24 1.21.5 3.2 None 240 23 2.02.5 2.5 9mm hole 180 26 2.52.5 6.3 None 350 24 2.03.2 3.2 10mm hole 260 25 2.36.4 12.5 11mm hole 400 24 2.06.4 12.5 13mm hole 370 25 2.5

Welding can be carried out with equal ease with the plate in thehorizontal, vertical or overhead position although in other than the flat position the welding time needs to be reduced from that listed in Table 7.7.This may result, however, in an increased level of porosity. Other defectsinclude cracking, lack of fusion and burn-through. To prevent and controlburn-through a temporary backing bar may be used. Fit up is important andfor the highest strength the gap between the plates should be as small aspossible.
146 The welding of aluminium and its alloys