microstation – custom tasks€¦ · microstation – creating custom tasks this document...
TRANSCRIPT

TECH NOTE WSDOT CAE SUPPORT
April 2014 Page 1 of 15
MicroStation – Creating Custom Tasks This document describes how to create new MicroStation tasks, provides an example task, and contains some tips and tricks for using tasks in your daily work.
Building Custom Tasks Customizing the Tasks Pane Activating a Task Hiding the Main Toolbox Pin and Roll Functions Working with Custom Tasks Creating a Custom Tool Sharing Tasks with Others
Building Custom Tasks
Overview The Tasks interface has been dramatically enhanced in MicroStation v8i. The Tasks dialog is now the primary source of MicroStation tools, integrated tools for InRoads, and new tool groups such as Civil Geometry and Data Acquisition.
The available list of tasks changes based on which applications are loaded, i.e. Inroads, and what type of CAD file is open, i.e. 2D, 3D, DWG or DGN.
This new functionality can, for some, be intimidating and can clutter the application. These two factors have led many users to request help with customizing their tasks.
This tech note covers the “How To” of creating new tasks, provides an example task, and contains some tips and tricks for using tasks in your daily work.
Customizing the Tasks Pane The Tasks interface is highly customizable; there are many settings you can adjust to tailor its appearance to your satisfaction. Adjustments in this section are all linked to your .UPF, or User Preference File, and do not require a custom user environment.
Layout Modes
Three layout modes control how tools are displayed within each task. You can change your layout mode by using the icons in the upper right of each task. You can also change the layout mode by right-clicking on the task pane and selecting Layout Mode.
The Panel method provides the quickest access to tools, and Icon closely mirrors the legacy Main Classic dialog.
Layout mode toggles: (left to right) Icon, List, Panel

TECH NOTE WSDOT CAE SUPPORT
April 2014 Page 2 of 15 MicroStation – Custom Tasks
Panel
Toolboxes are arranged vertically with every toolbox expanded as rows of icons. Toolboxes within toolboxes expand vertically as a list of tools by name with icon.
List
Toolboxes are arranged vertically each displaying the icon and name of the last used tool in each toolbox. Toolboxes expand vertically as a list of tools by name with icon.
Icon
Toolboxes are arranged horizontally each displaying the icon of the last used tool in each toolbox. Toolboxes expand vertically as a list of tools by name with icon.

TECH NOTE WSDOT CAE SUPPORT
April 2014 Page 3 of 15 MicroStation – Custom Tasks
Main Toolbox Layout Mode
The Main toolbox doesn’t have the quick toggle icons, but you can still adjust the layout mode via the right click menu.
Activating a Task When you activate a task, the task expands to fill the Tasks Pane and hides all of the other tasks and tools except for the Main toolbox.
1. Use the drop-down arrow in the upper right corner of the Tasks Pane to activate a task.
2. Select the task or toolbox that you want to activate.

TECH NOTE WSDOT CAE SUPPORT
April 2014 Page 4 of 15 MicroStation – Custom Tasks
Hiding the Main Toolbox If you prefer to use a different method for accessing the tools, you may opt to hide the Main Toolbox that is attached to the Tasks Pane. In order to do this, you will need to modify your preferences.
1. Select the Workspace >Preferences command from the drop down menus.
2. Click the Task Navigation category.
3. Uncheck Show Main Task Tools.

TECH NOTE WSDOT CAE SUPPORT
April 2014 Page 5 of 15 MicroStation – Custom Tasks
4. Optional: Close the Main Toolbox that automatically opens.
Pin & Roll functions Many of the MicroStation v8i dockable dialogs use the new ‘Pin & Roll’ functionality. This is especially useful with the Tasks Pane for getting a larger application workspace.
1. To pin a dialog, click the ‘thumb tack’ icon in the upper right of the dialog.
2. When the dialog is pinned, it is minimized to a thin tray along the edge of your screen. You can pin multiple dialogs to the same side.

TECH NOTE WSDOT CAE SUPPORT
April 2014 Page 6 of 15 MicroStation – Custom Tasks
3. When you mouse over one of the pinned dialogs, it “rolls” out to allow interaction.
The dialog is minimized when your curser is moved away from it.
Working with Custom Tasks Create a custom task to personalize your workspace. This offers more flexibility and a greater range of tools.
This section describes how to manually create custom tasks, toolboxes, and tools. This is accomplished in your custom [username].dgnlib file. Your custom modifications to the default user DGNLIB are lost in a resource update; therefore you will need to create a custom user DGNLIB file.
Click here for details on setting up a Custom User.
Creating new Tasks
The first step is to create your own task. Open your custom username.dgnlib.
1) Select the Workspace > Customize command from the MicroStation menu.
2) Expand the User Tasks category on the right side of the dialog.

TECH NOTE WSDOT CAE SUPPORT
April 2014 Page 7 of 15 MicroStation – Custom Tasks
3) Right-click on your DGNLIB and select New Task.
4) Enter a name for your task.
If you accidently named your task New Task, you can rename it from the right-click menu.
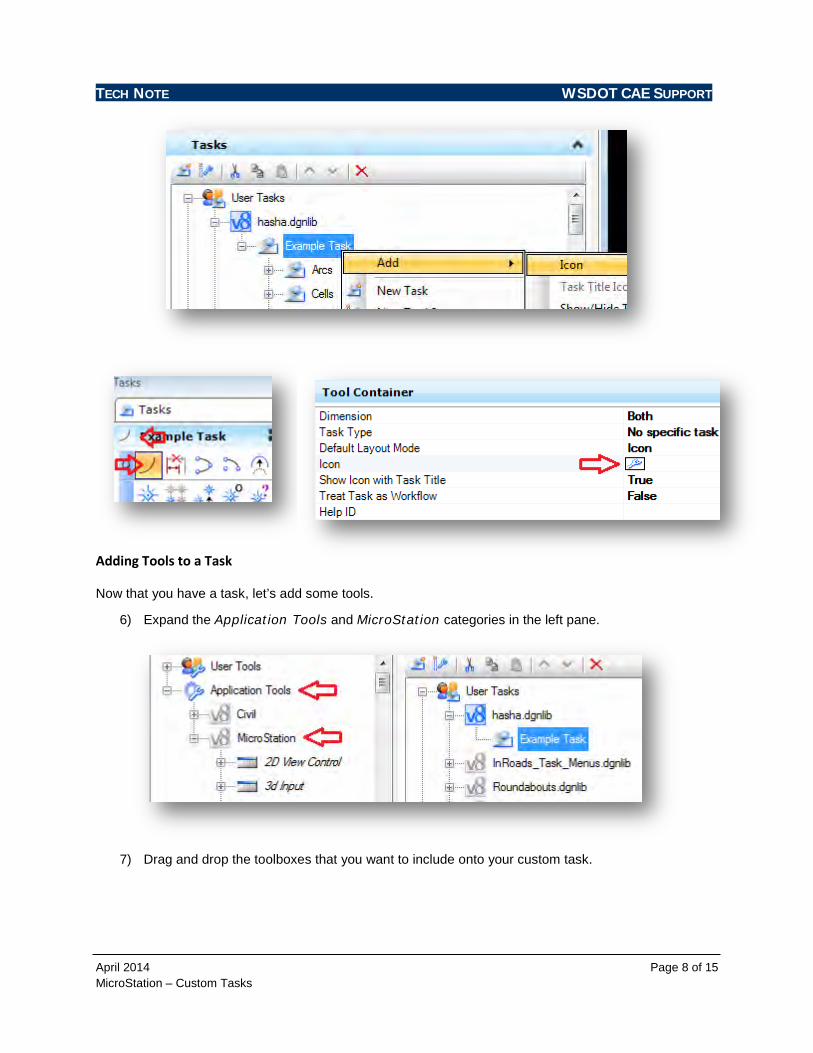
5) You can assign an icon to your task by right clicking and selecting the Add > Icon command.
This adds an Icon property that can be set in the properties portion of the dialog. If no icon is set, it will use the icon of the first tool of the first toolbox.
TECH NOTE WSDOT CAE SUPPORT
April 2014 Page 8 of 15 MicroStation – Custom Tasks
Adding Tools to a Task
Now that you have a task, let’s add some tools.
6) Expand the Application Tools and MicroStation categories in the left pane.
7) Drag and drop the toolboxes that you want to include onto your custom task.

TECH NOTE WSDOT CAE SUPPORT
April 2014 Page 9 of 15 MicroStation – Custom Tasks
8) You can add individual tools or nest toolboxes by expanding the categories.
9) Reorder your tools and toolboxes by dragging and dropping them within the task.
Additionally, a sort command is available by right-clicking.

TECH NOTE WSDOT CAE SUPPORT
April 2014 Page 10 of 15 MicroStation – Custom Tasks
Removing Tools from a Task
You can further optimize your interface by removing tools that aren’t used often from any toolbox in your task. Toolboxes joined to a task are copies; removing or reorganizing tools will not affect or harm the ‘true’ toolboxes.
10) Select the tool(s) you want to remove.
11) Click the Delete command from either the right-click menu or at the top of the pane.

TECH NOTE WSDOT CAE SUPPORT
April 2014 Page 11 of 15 MicroStation – Custom Tasks
Creating a Custom Tool Custom tools can be integrated into tasks as well. These include the agency level customization as well as your personal ones. They are located in the User Tools section.
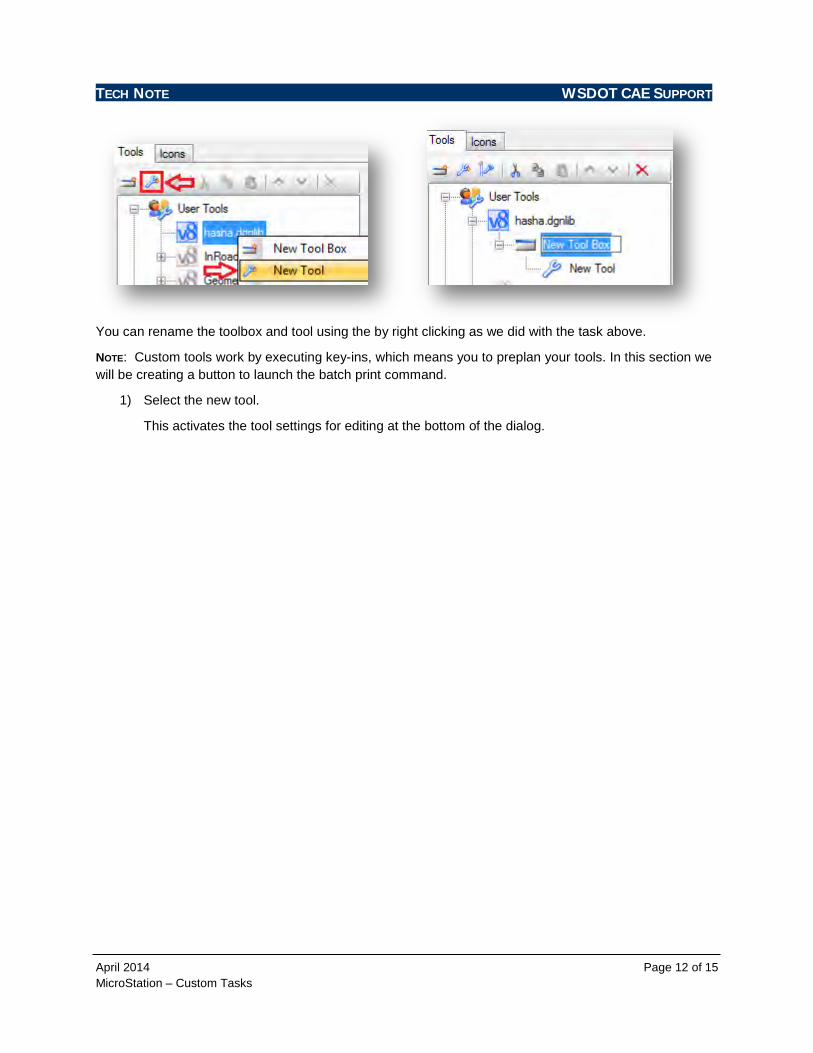
It is important to note that tools cannot be added directly to tasks - they must first exist in toolboxes.
1) Expand the User Tools category and select your DGNLIB.
2) Click New Tool from either the right-click menu or the icon at the top of the pane.
If this is the first tool in your DGNLIB, a new toolbox and empty tool will be created.
TECH NOTE WSDOT CAE SUPPORT
April 2014 Page 12 of 15 MicroStation – Custom Tasks
You can rename the toolbox and tool using the by right clicking as we did with the task above.
NOTE: Custom tools work by executing key-ins, which means you to preplan your tools. In this section we will be creating a button to launch the batch print command.
1) Select the new tool.
This activates the tool settings for editing at the bottom of the dialog.

TECH NOTE WSDOT CAE SUPPORT
April 2014 Page 13 of 15 MicroStation – Custom Tasks
2) Fill in the command data as follows:
• Key-in: mdl load batchplt
This is the command line so make sure that you enter it exactly.
• Balloon Text: Load Batch Printing
This is the description that is displayed when you mouse-over the button.

TECH NOTE WSDOT CAE SUPPORT
April 2014 Page 14 of 15 MicroStation – Custom Tasks
The tool is now operational, and can be added to your task or further customized in General Settings. It is highly recommended that you test your custom tool this point.
Sharing Tasks with others Tasks can easily be shared with others. This example assumes that you are receiving a task.
Your coworker makes a copy of their user.dgnlib and gives it to you.
1) Copy the file into the same folder as your user.dgnlib.
At this point all custom tools will be loaded when you open MicroStation the next time. However, you may want to copy their task into your user.dgnlib so that you can edit it, or import only a portion of your coworker’s tasks.
Open MicroStation and then open your user.dgnlib file.
2) Select the Workspace > Customize command from the MicroStation menu.
Your coworker’s DGNLIB should appear alongside yours in the User Tasks category (for example HillCl.dgnlib).
TECH NOTE WSDOT CAE SUPPORT
April 2014 Page 15 of 15 MicroStation – Custom Tasks
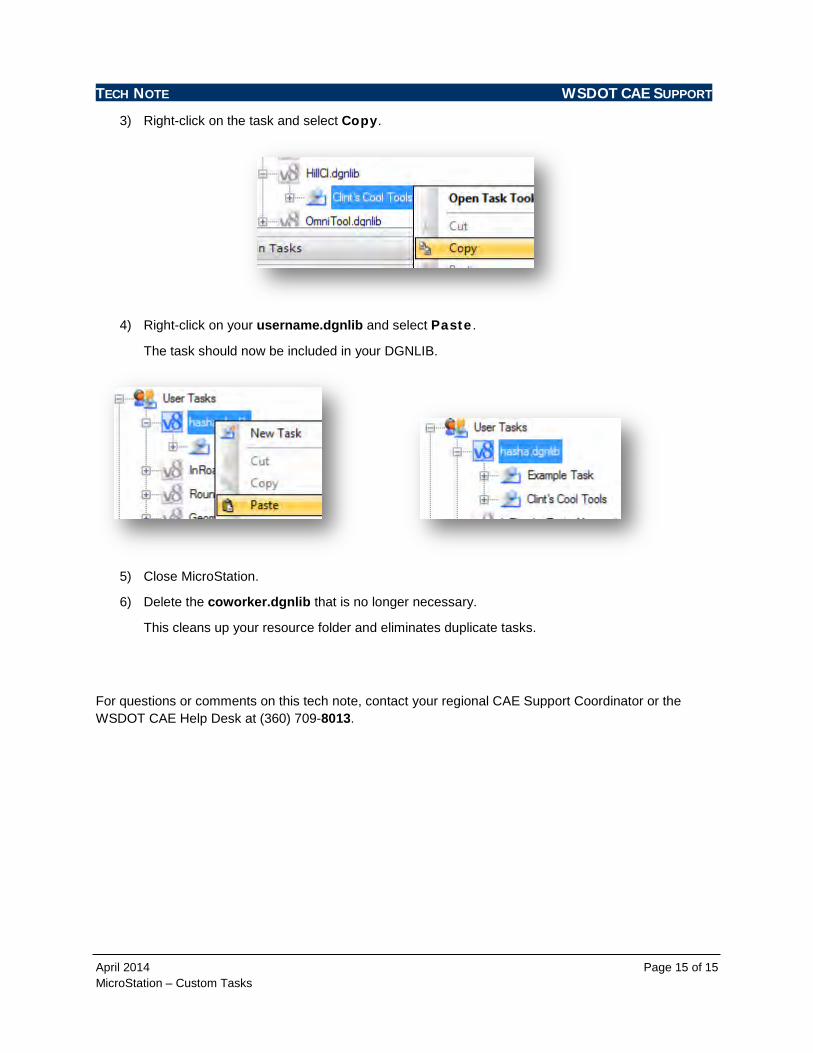
3) Right-click on the task and select Copy.
4) Right-click on your username.dgnlib and select Paste.
The task should now be included in your DGNLIB.
5) Close MicroStation.
6) Delete the coworker.dgnlib that is no longer necessary.
This cleans up your resource folder and eliminates duplicate tasks.
For questions or comments on this tech note, contact your regional CAE Support Coordinator or the WSDOT CAE Help Desk at (360) 709-8013.