microsoft visual c# 2013 -...
TRANSCRIPT
Microsoft Visual C# 2013 Step by Step
John Sharp
Copyright © 2013 by John SharpAll rights reserved. No part of the contents of this book may be reproduced or transmitted in any form or by any means without the written permission of the publisher.
ISBN: 978-0-7356-8183-5
Third Printing: January 2015
Printed and bound in the United States of America.
Microsoft Press books are available through booksellers and distributors worldwide. If you need support related to this book, email Microsoft Press Book Support at [email protected]. Please tell us what you think of this book at http://www.microsoft.com/learning/booksurvey.
Microsoft and the trademarks listed at http://www.microsoft.com/about/legal/en/us/IntellectualProperty/Trademarks/EN-US.aspx are trademarks of the Microsoft group of companies. All other marks are property of their respective owners.
The example companies, organizations, products, domain names, email addresses, logos, people, places, and events depicted herein are fi ctitious. No association with any real company, organization, product, domain name, email address, logo, person, place, or event is intended or should be inferred.
This book expresses the author’s views and opinions. The information contained in this book is provided without any express, statutory, or implied warranties. Neither the authors, Microsoft Corporation, nor its resellers, or distributors will be held liable for any damages caused or alleged to be caused either directly or indirectly by this book.
Acquisitions and Developmental Editor: Russell Jones
Production Editor: Christopher Hearse
Technical Reviewer: John Mueller
Copyeditor: Octal Publishing, Inc
Indexer: Ellen Troutman
Cover Design: Twist Creative • Seattle
Cover Composition: Ellie Volckhausen
Illustrator: Rebecca Demarest
Contents at a glance
Introduction xix
PART I INTRODUCING MICROSOFT VISUAL C# AND MICROSOFT VISUAL STUDIO 2013
Chapter 1 Welcome to C# 3
Chapter 2 Working with variables, operators, and expressions 39
Chapter 3 Writing methods and applying scope 65
Chapter 4 Using decision statements 93
Chapter 5 Using compound assignment and iteration statements 113
Chapter 6 Managing errors and exceptions 135
PART II UNDERSTANDING THE C# OBJECT MODEL
Chapter 7 Creating and managing classes and objects 161
Chapter 8 Understanding values and references 183
Chapter 9 Creating value types with enumerations and structures 207
Chapter 10 Using arrays 227
Chapter 11 Understanding parameter arrays 251
Chapter 12 Working with inheritance 263
Chapter 13 Creating interfaces and defining abstract classes 287
Chapter 14 Using garbage collection and resource management 317
PART III DEFINING EXTENSIBLE TYPES WITH C#
Chapter 15 Implementing properties to access fields 341
Chapter 16 Using indexers 363
Chapter 17 Introducing generics 381
Chapter 18 Using collections 411
Chapter 19 enumerating collections 435
Chapter 20 Decoupling application logic and handling events 451
Chapter 21 Querying in-memory data by using query expressions 485
Chapter 22 Operator overloading 511
iv Contents at a glance
PART IV BUILDING PROFESSIONAL WINDOWS 8.1 APPLICATIONS WITH C#
Chapter 23 Improving throughput by using tasks 537
Chapter 24 Improving response time by performing asynchronous operations 581
Chapter 25 Implementing the user interface for a Windows Store app 623
Chapter 26 Displaying and searching for data in a Windows Store app 673
Chapter 27 accessing a remote database from a Windows Store app 721
Index 763
v
Contents
Introduction . . . . . . . . . . . . . . . . . . . . . . . . . . . . . . . . . . . . . . . . . . . . . . . . . . . . xix
PART I INTRODUCING MICROSOFT VISUAL C# AND MICROSOFT VISUAL STUDIO 2013
Chapter 1 Welcome to C# 3Beginning programming with the Visual Studio 2013 environment . . . . . . 3
Writing your first program . . . . . . . . . . . . . . . . . . . . . . . . . . . . . . . . . . . . . . . . . 8
Using namespaces . . . . . . . . . . . . . . . . . . . . . . . . . . . . . . . . . . . . . . . . . . . . . . .14
Creating a graphical application . . . . . . . . . . . . . . . . . . . . . . . . . . . . . . . . . . .18
Examining the Windows Store app . . . . . . . . . . . . . . . . . . . . . . . . . . . .30
Examining the WPF application . . . . . . . . . . . . . . . . . . . . . . . . . . . . . . .33
Adding code to the graphical application . . . . . . . . . . . . . . . . . . . . . .34
Summary. . . . . . . . . . . . . . . . . . . . . . . . . . . . . . . . . . . . . . . . . . . . . . . . . . . . . . . .38
Quick Reference . . . . . . . . . . . . . . . . . . . . . . . . . . . . . . . . . . . . . . . . . . . . . . . . .38
Chapter 2 Working with variables, operators, and expressions 39Understanding statements . . . . . . . . . . . . . . . . . . . . . . . . . . . . . . . . . . . . . . . .39
Using identifiers . . . . . . . . . . . . . . . . . . . . . . . . . . . . . . . . . . . . . . . . . . . . . . . . .40
Identifying keywords . . . . . . . . . . . . . . . . . . . . . . . . . . . . . . . . . . . . . . . .40
Using variables . . . . . . . . . . . . . . . . . . . . . . . . . . . . . . . . . . . . . . . . . . . . . . . . . . . 41
Naming variables . . . . . . . . . . . . . . . . . . . . . . . . . . . . . . . . . . . . . . . . . . . 41
Declaring variables . . . . . . . . . . . . . . . . . . . . . . . . . . . . . . . . . . . . . . . . . .42
Working with primitive data types . . . . . . . . . . . . . . . . . . . . . . . . . . . . . . . . .43
Unassigned local variables . . . . . . . . . . . . . . . . . . . . . . . . . . . . . . . . . . .43
Displaying primitive data type values . . . . . . . . . . . . . . . . . . . . . . . . .44
What do you think of this book? We want to hear from you! Microsoft is interested in hearing your feedback so we can continually improve our books and learning resources for you. to participate in a brief online survey, please visit:
www.microsoft.com/learning/booksurvey/
vi Contents
Using arithmetic operators . . . . . . . . . . . . . . . . . . . . . . . . . . . . . . . . . . . . . . . .52
Operators and types . . . . . . . . . . . . . . . . . . . . . . . . . . . . . . . . . . . . . . . .52
Examining arithmetic operators . . . . . . . . . . . . . . . . . . . . . . . . . . . . . .53
Controlling precedence . . . . . . . . . . . . . . . . . . . . . . . . . . . . . . . . . . . . .59
Using associativity to evaluate expressions . . . . . . . . . . . . . . . . . . . . .60
Associativity and the assignment operator . . . . . . . . . . . . . . . . . . . . .60
Incrementing and decrementing variables. . . . . . . . . . . . . . . . . . . . . . . . . . .61
Prefix and postfix . . . . . . . . . . . . . . . . . . . . . . . . . . . . . . . . . . . . . . . . . . .61
Declaring implicitly typed local variables . . . . . . . . . . . . . . . . . . . . . . . . . . . .62
Summary. . . . . . . . . . . . . . . . . . . . . . . . . . . . . . . . . . . . . . . . . . . . . . . . . . . . . . . .63
Quick Reference . . . . . . . . . . . . . . . . . . . . . . . . . . . . . . . . . . . . . . . . . . . . . . . . .64
Chapter 3 Writing methods and applying scope 65Creating methods . . . . . . . . . . . . . . . . . . . . . . . . . . . . . . . . . . . . . . . . . . . . . . . .65
Declaring a method . . . . . . . . . . . . . . . . . . . . . . . . . . . . . . . . . . . . . . . . .66
Returning data from a method . . . . . . . . . . . . . . . . . . . . . . . . . . . . . . .67
Calling methods . . . . . . . . . . . . . . . . . . . . . . . . . . . . . . . . . . . . . . . . . . . .69
Applying scope . . . . . . . . . . . . . . . . . . . . . . . . . . . . . . . . . . . . . . . . . . . . . . . . . .72
Defining local scope . . . . . . . . . . . . . . . . . . . . . . . . . . . . . . . . . . . . . . . .72
Defining class scope . . . . . . . . . . . . . . . . . . . . . . . . . . . . . . . . . . . . . . . .73
Overloading methods . . . . . . . . . . . . . . . . . . . . . . . . . . . . . . . . . . . . . . . 74
Writing methods . . . . . . . . . . . . . . . . . . . . . . . . . . . . . . . . . . . . . . . . . . . . . . . . . 74
Using optional parameters and named arguments . . . . . . . . . . . . . . . . . . .83
Defining optional parameters . . . . . . . . . . . . . . . . . . . . . . . . . . . . . . . .85
Passing named arguments . . . . . . . . . . . . . . . . . . . . . . . . . . . . . . . . . . .85
Resolving ambiguities with optional parameters and named arguments . . . . . . . . . . . . . . . . . . . . . . . . . . . . . . . . . . . . . .86
Summary. . . . . . . . . . . . . . . . . . . . . . . . . . . . . . . . . . . . . . . . . . . . . . . . . . . . . . . .91
Quick reference . . . . . . . . . . . . . . . . . . . . . . . . . . . . . . . . . . . . . . . . . . . . . . . . . .92
Chapter 4 Using decision statements 93Declaring Boolean variables . . . . . . . . . . . . . . . . . . . . . . . . . . . . . . . . . . . . . . .93
Using Boolean operators . . . . . . . . . . . . . . . . . . . . . . . . . . . . . . . . . . . . . . . . . .94
Contents vii
Understanding equality and relational operators . . . . . . . . . . . . . . .94
Understanding conditional logical operators . . . . . . . . . . . . . . . . . . .95
Short-circuiting . . . . . . . . . . . . . . . . . . . . . . . . . . . . . . . . . . . . . . . . . . . . .96
Summarizing operator precedence and associativity . . . . . . . . . . . .96
Using if statements to make decisions . . . . . . . . . . . . . . . . . . . . . . . . . . . . . .97
Understanding if statement syntax . . . . . . . . . . . . . . . . . . . . . . . . . . . .97
Using blocks to group statements . . . . . . . . . . . . . . . . . . . . . . . . . . . .98
Cascading if statements . . . . . . . . . . . . . . . . . . . . . . . . . . . . . . . . . . . . .99
Using switch statements . . . . . . . . . . . . . . . . . . . . . . . . . . . . . . . . . . . . . . . . .105
Understanding switch statement syntax . . . . . . . . . . . . . . . . . . . . . .106
Following the switch statement rules . . . . . . . . . . . . . . . . . . . . . . . . .107
Summary. . . . . . . . . . . . . . . . . . . . . . . . . . . . . . . . . . . . . . . . . . . . . . . . . . . . . . .111
Quick reference . . . . . . . . . . . . . . . . . . . . . . . . . . . . . . . . . . . . . . . . . . . . . . . . .111
Chapter 5 Using compound assignment and iteration statements 113
Using compound assignment operators . . . . . . . . . . . . . . . . . . . . . . . . . . . .113
Writing while statements . . . . . . . . . . . . . . . . . . . . . . . . . . . . . . . . . . . . . . . . .115
Writing for Statements . . . . . . . . . . . . . . . . . . . . . . . . . . . . . . . . . . . . . . . . . . .121
Understanding for statement scope . . . . . . . . . . . . . . . . . . . . . . . . . .123
Writing do statements . . . . . . . . . . . . . . . . . . . . . . . . . . . . . . . . . . . . . . . . . . .123
Summary. . . . . . . . . . . . . . . . . . . . . . . . . . . . . . . . . . . . . . . . . . . . . . . . . . . . . . .132
Quick reference . . . . . . . . . . . . . . . . . . . . . . . . . . . . . . . . . . . . . . . . . . . . . . . . .133
Chapter 6 Managing errors and exceptions 135Coping with errors . . . . . . . . . . . . . . . . . . . . . . . . . . . . . . . . . . . . . . . . . . . . . .135
Trying code and catching exceptions . . . . . . . . . . . . . . . . . . . . . . . . . . . . . .136
Unhandled Exceptions . . . . . . . . . . . . . . . . . . . . . . . . . . . . . . . . . . . . . .137
Using multiple catch handlers . . . . . . . . . . . . . . . . . . . . . . . . . . . . . . .138
Catching multiple exceptions . . . . . . . . . . . . . . . . . . . . . . . . . . . . . . . .139
Propagating exceptions . . . . . . . . . . . . . . . . . . . . . . . . . . . . . . . . . . . .145
Using checked and unchecked integer arithmetic . . . . . . . . . . . . . . . . . . .147
Writing checked statements . . . . . . . . . . . . . . . . . . . . . . . . . . . . . . . . .148

viii Contents
Writing checked expressions . . . . . . . . . . . . . . . . . . . . . . . . . . . . . . . .149
Throwing exceptions . . . . . . . . . . . . . . . . . . . . . . . . . . . . . . . . . . . . . . . . . . . .152
Using a finally block . . . . . . . . . . . . . . . . . . . . . . . . . . . . . . . . . . . . . . . . . . . . .156
Summary. . . . . . . . . . . . . . . . . . . . . . . . . . . . . . . . . . . . . . . . . . . . . . . . . . . . . . .158
Quick reference . . . . . . . . . . . . . . . . . . . . . . . . . . . . . . . . . . . . . . . . . . . . . . . . .158
PART II UNDERSTANDING THE C# OBJECT MODEL
Chapter 7 Creating and managing classes and objects 161Understanding classification . . . . . . . . . . . . . . . . . . . . . . . . . . . . . . . . . . . . . .161
The purpose of encapsulation . . . . . . . . . . . . . . . . . . . . . . . . . . . . . . . . . . . .162
Defining and using a class . . . . . . . . . . . . . . . . . . . . . . . . . . . . . . . . . . . . . . . .162
Controlling accessibility . . . . . . . . . . . . . . . . . . . . . . . . . . . . . . . . . . . . . . . . . .164
Working with constructors . . . . . . . . . . . . . . . . . . . . . . . . . . . . . . . . . .165
Overloading constructors . . . . . . . . . . . . . . . . . . . . . . . . . . . . . . . . . . .167
Understanding static methods and data . . . . . . . . . . . . . . . . . . . . . . . . . . .175
Creating a shared field . . . . . . . . . . . . . . . . . . . . . . . . . . . . . . . . . . . . .176
Creating a static field by using the const keyword . . . . . . . . . . . . . .177
Understanding static classes . . . . . . . . . . . . . . . . . . . . . . . . . . . . . . . .177
Anonymous classes . . . . . . . . . . . . . . . . . . . . . . . . . . . . . . . . . . . . . . . .180
Summary. . . . . . . . . . . . . . . . . . . . . . . . . . . . . . . . . . . . . . . . . . . . . . . . . . . . . . .181
Quick reference . . . . . . . . . . . . . . . . . . . . . . . . . . . . . . . . . . . . . . . . . . . . . . . . .182
Chapter 8 Understanding values and references 183Copying value type variables and classes . . . . . . . . . . . . . . . . . . . . . . . . . . .183
Understanding null values and nullable types . . . . . . . . . . . . . . . . . . . . . . .189
Using nullable types . . . . . . . . . . . . . . . . . . . . . . . . . . . . . . . . . . . . . . .190
Understanding the properties of nullable types . . . . . . . . . . . . . . .191
Using ref and out parameters . . . . . . . . . . . . . . . . . . . . . . . . . . . . . . . . . . . . .192
Creating ref parameters . . . . . . . . . . . . . . . . . . . . . . . . . . . . . . . . . . . .193
Creating out parameters . . . . . . . . . . . . . . . . . . . . . . . . . . . . . . . . . . . .193
How computer memory is organized . . . . . . . . . . . . . . . . . . . . . . . . . . . . . .195
Using the stack and the heap . . . . . . . . . . . . . . . . . . . . . . . . . . . . . . .197
Contents ix
The System.Object class . . . . . . . . . . . . . . . . . . . . . . . . . . . . . . . . . . . . . . . . . .198
Boxing . . . . . . . . . . . . . . . . . . . . . . . . . . . . . . . . . . . . . . . . . . . . . . . . . . . . . . . . .199
Unboxing . . . . . . . . . . . . . . . . . . . . . . . . . . . . . . . . . . . . . . . . . . . . . . . . . . . . . .199
Casting data safely . . . . . . . . . . . . . . . . . . . . . . . . . . . . . . . . . . . . . . . . . . . . . .201
The is operator . . . . . . . . . . . . . . . . . . . . . . . . . . . . . . . . . . . . . . . . . . . .201
The as operator . . . . . . . . . . . . . . . . . . . . . . . . . . . . . . . . . . . . . . . . . . .202
Summary. . . . . . . . . . . . . . . . . . . . . . . . . . . . . . . . . . . . . . . . . . . . . . . . . . . . . . .204
Quick reference . . . . . . . . . . . . . . . . . . . . . . . . . . . . . . . . . . . . . . . . . . . . . . . . .204
Chapter 9 Creating value types with enumerations and structures 207
Working with enumerations . . . . . . . . . . . . . . . . . . . . . . . . . . . . . . . . . . . . . .207
Declaring an enumeration . . . . . . . . . . . . . . . . . . . . . . . . . . . . . . . . . .208
Using an enumeration . . . . . . . . . . . . . . . . . . . . . . . . . . . . . . . . . . . . . .208
Choosing enumeration literal values . . . . . . . . . . . . . . . . . . . . . . . . .209
Choosing an enumeration’s underlying type . . . . . . . . . . . . . . . . . .210
Working with structures . . . . . . . . . . . . . . . . . . . . . . . . . . . . . . . . . . . . . . . . .212
Declaring a structure . . . . . . . . . . . . . . . . . . . . . . . . . . . . . . . . . . . . . . .214
Understanding structure and class differences . . . . . . . . . . . . . . . .215
Declaring structure variables . . . . . . . . . . . . . . . . . . . . . . . . . . . . . . . .216
Understanding structure initialization . . . . . . . . . . . . . . . . . . . . . . . .217
Copying structure variables . . . . . . . . . . . . . . . . . . . . . . . . . . . . . . . . .221
Summary. . . . . . . . . . . . . . . . . . . . . . . . . . . . . . . . . . . . . . . . . . . . . . . . . . . . . . .225
Quick reference . . . . . . . . . . . . . . . . . . . . . . . . . . . . . . . . . . . . . . . . . . . . . . . . .225
Chapter 10 Using arrays 227Declaring and creating an array . . . . . . . . . . . . . . . . . . . . . . . . . . . . . . . . . . .227
Declaring array variables. . . . . . . . . . . . . . . . . . . . . . . . . . . . . . . . . . . .227
Creating an array instance . . . . . . . . . . . . . . . . . . . . . . . . . . . . . . . . . .228
Populating and using an array . . . . . . . . . . . . . . . . . . . . . . . . . . . . . . . . . . . .229
Creating an implicitly typed array . . . . . . . . . . . . . . . . . . . . . . . . . . . .230
Accessing an individual array element . . . . . . . . . . . . . . . . . . . . . . . .231
Iterating through an array . . . . . . . . . . . . . . . . . . . . . . . . . . . . . . . . . .231
x Contents
Passing arrays as parameters and return values for a method . . .233
Copying arrays . . . . . . . . . . . . . . . . . . . . . . . . . . . . . . . . . . . . . . . . . . . . . . . . . .234
Using multidimensional arrays . . . . . . . . . . . . . . . . . . . . . . . . . . . . . . . . . . . .236
Creating jagged arrays . . . . . . . . . . . . . . . . . . . . . . . . . . . . . . . . . . . . .237
Summary. . . . . . . . . . . . . . . . . . . . . . . . . . . . . . . . . . . . . . . . . . . . . . . . . . . . . . .248
Quick reference . . . . . . . . . . . . . . . . . . . . . . . . . . . . . . . . . . . . . . . . . . . . . . . . .248
Chapter 11 Understanding parameter arrays 251Overloading—a recap . . . . . . . . . . . . . . . . . . . . . . . . . . . . . . . . . . . . . . . . . . .251
Using array arguments . . . . . . . . . . . . . . . . . . . . . . . . . . . . . . . . . . . . . . . . . . .252
Declaring a params Array . . . . . . . . . . . . . . . . . . . . . . . . . . . . . . . . . . .253
Using params object[ ] . . . . . . . . . . . . . . . . . . . . . . . . . . . . . . . . . . . . . 255
Using a params array . . . . . . . . . . . . . . . . . . . . . . . . . . . . . . . . . . . . . . .256
Comparing parameter arrays and optional parameters . . . . . . . . . . . . . .259
Summary. . . . . . . . . . . . . . . . . . . . . . . . . . . . . . . . . . . . . . . . . . . . . . . . . . . . . . .262
Quick reference . . . . . . . . . . . . . . . . . . . . . . . . . . . . . . . . . . . . . . . . . . . . . . . . .262
Chapter 12 Working with inheritance 263What is inheritance? . . . . . . . . . . . . . . . . . . . . . . . . . . . . . . . . . . . . . . . . . . . . .263
Using inheritance . . . . . . . . . . . . . . . . . . . . . . . . . . . . . . . . . . . . . . . . . . . . . . .264
The System.Object class revisited . . . . . . . . . . . . . . . . . . . . . . . . . . . .266
Calling base class constructors . . . . . . . . . . . . . . . . . . . . . . . . . . . . . .266
Assigning classes . . . . . . . . . . . . . . . . . . . . . . . . . . . . . . . . . . . . . . . . . .267
Declaring new methods . . . . . . . . . . . . . . . . . . . . . . . . . . . . . . . . . . . .269
Declaring virtual methods . . . . . . . . . . . . . . . . . . . . . . . . . . . . . . . . . .270
Declaring override methods . . . . . . . . . . . . . . . . . . . . . . . . . . . . . . . . .271
Understanding protected access . . . . . . . . . . . . . . . . . . . . . . . . . . . . .274
Understanding extension methods . . . . . . . . . . . . . . . . . . . . . . . . . . . . . . . .280
Summary. . . . . . . . . . . . . . . . . . . . . . . . . . . . . . . . . . . . . . . . . . . . . . . . . . . . . . .284
Quick reference . . . . . . . . . . . . . . . . . . . . . . . . . . . . . . . . . . . . . . . . . . . . . . . . .284

Contents xi
Chapter 13 Creating interfaces and defining abstract classes 287Understanding interfaces . . . . . . . . . . . . . . . . . . . . . . . . . . . . . . . . . . . . . . . .287
Defining an interface . . . . . . . . . . . . . . . . . . . . . . . . . . . . . . . . . . . . . . .288
Implementing an interface . . . . . . . . . . . . . . . . . . . . . . . . . . . . . . . . . .289
Referencing a class through its interface . . . . . . . . . . . . . . . . . . . . . .290
Working with multiple interfaces . . . . . . . . . . . . . . . . . . . . . . . . . . . .291
Explicitly implementing an interface . . . . . . . . . . . . . . . . . . . . . . . . .292
Interface restrictions . . . . . . . . . . . . . . . . . . . . . . . . . . . . . . . . . . . . . . .293
Defining and using interfaces . . . . . . . . . . . . . . . . . . . . . . . . . . . . . . .294
Abstract classes . . . . . . . . . . . . . . . . . . . . . . . . . . . . . . . . . . . . . . . . . . . . . . . . .304
Abstract methods . . . . . . . . . . . . . . . . . . . . . . . . . . . . . . . . . . . . . . . . . .306
Sealed classes . . . . . . . . . . . . . . . . . . . . . . . . . . . . . . . . . . . . . . . . . . . . . . . . . . .306
Sealed methods . . . . . . . . . . . . . . . . . . . . . . . . . . . . . . . . . . . . . . . . . . .306
Implementing and using an abstract class . . . . . . . . . . . . . . . . . . . .307
Summary. . . . . . . . . . . . . . . . . . . . . . . . . . . . . . . . . . . . . . . . . . . . . . . . . . . . . . .313
Quick reference . . . . . . . . . . . . . . . . . . . . . . . . . . . . . . . . . . . . . . . . . . . . . . . . .314
Chapter 14 Using garbage collection and resource management 317The life and times of an object . . . . . . . . . . . . . . . . . . . . . . . . . . . . . . . . . . . .317
Writing destructors . . . . . . . . . . . . . . . . . . . . . . . . . . . . . . . . . . . . . . . .318
Why use the garbage collector? . . . . . . . . . . . . . . . . . . . . . . . . . . . . .320
How does the garbage collector work? . . . . . . . . . . . . . . . . . . . . . . .322
Recommendations . . . . . . . . . . . . . . . . . . . . . . . . . . . . . . . . . . . . . . . . .322
Resource management . . . . . . . . . . . . . . . . . . . . . . . . . . . . . . . . . . . . . . . . . .323
Disposal methods . . . . . . . . . . . . . . . . . . . . . . . . . . . . . . . . . . . . . . . . . .323
Exception-safe disposal . . . . . . . . . . . . . . . . . . . . . . . . . . . . . . . . . . . . .324
The using statement and the IDisposable interface . . . . . . . . . . . . .324
Calling the Dispose method from a destructor . . . . . . . . . . . . . . . . .326
Implementing exception-safe disposal . . . . . . . . . . . . . . . . . . . . . . . . . . . . .328
Summary. . . . . . . . . . . . . . . . . . . . . . . . . . . . . . . . . . . . . . . . . . . . . . . . . . . . . . .336
Quick reference . . . . . . . . . . . . . . . . . . . . . . . . . . . . . . . . . . . . . . . . . . . . . . . . .337
xii Contents
PART III DEFINING EXTENSIBLE TYPES WITH C#
Chapter 15 Implementing properties to access fields 341
Implementing encapsulation by using methods . . . . . . . . . . . . . . . . . . . . .341
What are properties? . . . . . . . . . . . . . . . . . . . . . . . . . . . . . . . . . . . . . . . . . . . .343
Using properties . . . . . . . . . . . . . . . . . . . . . . . . . . . . . . . . . . . . . . . . . . .345
Read-only properties . . . . . . . . . . . . . . . . . . . . . . . . . . . . . . . . . . . . . . .346
Write-only properties . . . . . . . . . . . . . . . . . . . . . . . . . . . . . . . . . . . . . .346
Property accessibility . . . . . . . . . . . . . . . . . . . . . . . . . . . . . . . . . . . . . . .347
Understanding the property restrictions . . . . . . . . . . . . . . . . . . . . . . . . . . .348
Declaring interface properties . . . . . . . . . . . . . . . . . . . . . . . . . . . . . . . . . . . .349
Replacing methods with properties . . . . . . . . . . . . . . . . . . . . . . . . . .351
Generating automatic properties . . . . . . . . . . . . . . . . . . . . . . . . . . . . . . . . . .355
Initializing objects by using properties . . . . . . . . . . . . . . . . . . . . . . . . . . . . .357
Summary. . . . . . . . . . . . . . . . . . . . . . . . . . . . . . . . . . . . . . . . . . . . . . . . . . . . . . .360
Quick reference . . . . . . . . . . . . . . . . . . . . . . . . . . . . . . . . . . . . . . . . . . . . . . . . .361
Chapter 16 Using indexers 363What is an indexer?. . . . . . . . . . . . . . . . . . . . . . . . . . . . . . . . . . . . . . . . . . . . . .363
An example that doesn’t use indexers . . . . . . . . . . . . . . . . . . . . . . . .364
The same example using indexers . . . . . . . . . . . . . . . . . . . . . . . . . . .366
Understanding indexer accessors . . . . . . . . . . . . . . . . . . . . . . . . . . . .368
Comparing indexers and arrays . . . . . . . . . . . . . . . . . . . . . . . . . . . . . .368
Indexers in interfaces . . . . . . . . . . . . . . . . . . . . . . . . . . . . . . . . . . . . . . . . . . . .370
Using indexers in a Windows application . . . . . . . . . . . . . . . . . . . . . . . . . . .371
Summary. . . . . . . . . . . . . . . . . . . . . . . . . . . . . . . . . . . . . . . . . . . . . . . . . . . . . . .378
Quick reference . . . . . . . . . . . . . . . . . . . . . . . . . . . . . . . . . . . . . . . . . . . . . . . . .379
Chapter 17 Introducing generics 381The problem with the object type . . . . . . . . . . . . . . . . . . . . . . . . . . . . . . . . .381
The generics solution . . . . . . . . . . . . . . . . . . . . . . . . . . . . . . . . . . . . . . . . . . . .385
Generics vs. generalized classes . . . . . . . . . . . . . . . . . . . . . . . . . . . . .387

Contents xiii
Generics and constraints . . . . . . . . . . . . . . . . . . . . . . . . . . . . . . . . . . . .387
Creating a generic class . . . . . . . . . . . . . . . . . . . . . . . . . . . . . . . . . . . . . . . . . .388
The theory of binary trees . . . . . . . . . . . . . . . . . . . . . . . . . . . . . . . . . .388
Building a binary tree class by using generics . . . . . . . . . . . . . . . . .391
Creating a generic method . . . . . . . . . . . . . . . . . . . . . . . . . . . . . . . . . . . . . . .401
Defining a generic method to build a binary tree . . . . . . . . . . . . . .401
Variance and generic interfaces . . . . . . . . . . . . . . . . . . . . . . . . . . . . . . . . . . .403
Covariant interfaces . . . . . . . . . . . . . . . . . . . . . . . . . . . . . . . . . . . . . . . .405
Contravariant interfaces . . . . . . . . . . . . . . . . . . . . . . . . . . . . . . . . . . . .407
Summary. . . . . . . . . . . . . . . . . . . . . . . . . . . . . . . . . . . . . . . . . . . . . . . . . . . . . . .409
Quick reference . . . . . . . . . . . . . . . . . . . . . . . . . . . . . . . . . . . . . . . . . . . . . . . . .409
Chapter 18 Using collections 411What are collection classes? . . . . . . . . . . . . . . . . . . . . . . . . . . . . . . . . . . . . . .411
The List<T> collection class . . . . . . . . . . . . . . . . . . . . . . . . . . . . . . . . .413
The LinkedList<T> collection class . . . . . . . . . . . . . . . . . . . . . . . . . . . .415
The Queue<T> collection class . . . . . . . . . . . . . . . . . . . . . . . . . . . . . .417
The Stack<T> collection class . . . . . . . . . . . . . . . . . . . . . . . . . . . . . . . .418
The Dictionary<TKey, TValue> collection class . . . . . . . . . . . . . . . . .419
The SortedList<TKey, TValue> collection class . . . . . . . . . . . . . . . . .420
The HashSet<T> collection class . . . . . . . . . . . . . . . . . . . . . . . . . . . . .422
Using collection initializers . . . . . . . . . . . . . . . . . . . . . . . . . . . . . . . . . . . . . . .423
The Find methods, predicates, and lambda expressions . . . . . . . . . . . . . .424
Comparing arrays and collections . . . . . . . . . . . . . . . . . . . . . . . . . . . . . . . . .426
Using collection classes to play cards . . . . . . . . . . . . . . . . . . . . . . . . .426
Summary. . . . . . . . . . . . . . . . . . . . . . . . . . . . . . . . . . . . . . . . . . . . . . . . . . . . . . .431
Quick reference . . . . . . . . . . . . . . . . . . . . . . . . . . . . . . . . . . . . . . . . . . . . . . . . .432
Chapter 19 Enumerating collections 435Enumerating the elements in a collection . . . . . . . . . . . . . . . . . . . . . . . . . .435
Manually implementing an enumerator . . . . . . . . . . . . . . . . . . . . . .437
Implementing the IEnumerable interface . . . . . . . . . . . . . . . . . . . . .441
Implementing an enumerator by using an iterator . . . . . . . . . . . . . . . . . 444
xiv Contents
A simple iterator . . . . . . . . . . . . . . . . . . . . . . . . . . . . . . . . . . . . . . . . . . 444
Defining an enumerator for the Tree<TItem> class by using an iterator . . . . . . . . . . . . . . . . . . . . . . . . . . . . . . . . . . . . . . . . . . .446
Summary. . . . . . . . . . . . . . . . . . . . . . . . . . . . . . . . . . . . . . . . . . . . . . . . . . . . . . .448
Quick reference . . . . . . . . . . . . . . . . . . . . . . . . . . . . . . . . . . . . . . . . . . . . . . . . .449
Chapter 20 Decoupling application logic and handling events 451Understanding delegates . . . . . . . . . . . . . . . . . . . . . . . . . . . . . . . . . . . . . . . .452
Examples of delegates in the .NET Framework class library . . . . . .453
The automated factory scenario . . . . . . . . . . . . . . . . . . . . . . . . . . . . .455
Implementing the factory control system without using delegates . . . . . . . . . . . . . . . . . . . . . . . . . . . . . . . . . . . . . . . . . . .455
Implementing the factory by using a delegate . . . . . . . . . . . . . . . .456
Declaring and using delegates . . . . . . . . . . . . . . . . . . . . . . . . . . . . . .459
Lambda expressions and delegates . . . . . . . . . . . . . . . . . . . . . . . . . . . . . . . .468
Creating a method adapter . . . . . . . . . . . . . . . . . . . . . . . . . . . . . . . . .469
The forms of lambda expressions . . . . . . . . . . . . . . . . . . . . . . . . . . . .469
Enabling notifications by using events . . . . . . . . . . . . . . . . . . . . . . . . . . . . .471
Declaring an event . . . . . . . . . . . . . . . . . . . . . . . . . . . . . . . . . . . . . . . . .472
Subscribing to an event. . . . . . . . . . . . . . . . . . . . . . . . . . . . . . . . . . . . .472
Unsubscribing from an event . . . . . . . . . . . . . . . . . . . . . . . . . . . . . . . .473
Raising an event . . . . . . . . . . . . . . . . . . . . . . . . . . . . . . . . . . . . . . . . . . .473
Understanding user interface events . . . . . . . . . . . . . . . . . . . . . . . . . . . . . .474
Using events . . . . . . . . . . . . . . . . . . . . . . . . . . . . . . . . . . . . . . . . . . . . . .475
Summary. . . . . . . . . . . . . . . . . . . . . . . . . . . . . . . . . . . . . . . . . . . . . . . . . . . . . . .482
Quick reference . . . . . . . . . . . . . . . . . . . . . . . . . . . . . . . . . . . . . . . . . . . . . . . . .483
Chapter 21 Querying in-memory data by using query expressions 485
What is Language-Integrated Query? . . . . . . . . . . . . . . . . . . . . . . . . . . . . . .485
Using LINQ in a C# application . . . . . . . . . . . . . . . . . . . . . . . . . . . . . . . . . . .486
Selecting data . . . . . . . . . . . . . . . . . . . . . . . . . . . . . . . . . . . . . . . . . . . . .488
Filtering data . . . . . . . . . . . . . . . . . . . . . . . . . . . . . . . . . . . . . . . . . . . . . .490
Ordering, grouping, and aggregating data . . . . . . . . . . . . . . . . . . .491
Contents xv
Joining data . . . . . . . . . . . . . . . . . . . . . . . . . . . . . . . . . . . . . . . . . . . . . . .493
Using query operators. . . . . . . . . . . . . . . . . . . . . . . . . . . . . . . . . . . . . .495
Querying data in Tree<TItem> objects . . . . . . . . . . . . . . . . . . . . . . . .497
LINQ and deferred evaluation . . . . . . . . . . . . . . . . . . . . . . . . . . . . . . .503
Summary. . . . . . . . . . . . . . . . . . . . . . . . . . . . . . . . . . . . . . . . . . . . . . . . . . . . . . .507
Quick reference . . . . . . . . . . . . . . . . . . . . . . . . . . . . . . . . . . . . . . . . . . . . . . . . .508
Chapter 22 Operator overloading 511Understanding operators . . . . . . . . . . . . . . . . . . . . . . . . . . . . . . . . . . . . . . . .511
Operator constraints . . . . . . . . . . . . . . . . . . . . . . . . . . . . . . . . . . . . . . .512
Overloaded operators . . . . . . . . . . . . . . . . . . . . . . . . . . . . . . . . . . . . . .512
Creating symmetric operators . . . . . . . . . . . . . . . . . . . . . . . . . . . . . . .514
Understanding compound assignment evaluation . . . . . . . . . . . . . . . . . . .516
Declaring increment and decrement operators . . . . . . . . . . . . . . . . . . . . .517
Comparing operators in structures and classes . . . . . . . . . . . . . . . . . . . . . .518
Defining operator pairs . . . . . . . . . . . . . . . . . . . . . . . . . . . . . . . . . . . . . . . . . .518
Implementing operators . . . . . . . . . . . . . . . . . . . . . . . . . . . . . . . . . . . . . . . . .520
Understanding conversion operators . . . . . . . . . . . . . . . . . . . . . . . . . . . . . .526
Providing built-in conversions . . . . . . . . . . . . . . . . . . . . . . . . . . . . . . .527
Implementing user-defined conversion operators . . . . . . . . . . . . .528
Creating symmetric operators, revisited . . . . . . . . . . . . . . . . . . . . . .529
Writing conversion operators . . . . . . . . . . . . . . . . . . . . . . . . . . . . . . .529
Summary. . . . . . . . . . . . . . . . . . . . . . . . . . . . . . . . . . . . . . . . . . . . . . . . . . . . . . .532
Quick reference . . . . . . . . . . . . . . . . . . . . . . . . . . . . . . . . . . . . . . . . . . . . . . . . .532
PART IV BUILDING PROFESSIONAL WINDOWS 8.1 APPLICATIONS WITH C#
Chapter 23 Improving throughput by using tasks 537Why perform multitasking by using parallel processing? . . . . . . . . . . . . .537
The rise of the multicore processor . . . . . . . . . . . . . . . . . . . . . . . . . .538
Implementing multitasking by using the Microsoft .NET Framework . . .540
Tasks, threads, and the ThreadPool . . . . . . . . . . . . . . . . . . . . . . . . . . 540
xvi Contents
Creating, running, and controlling tasks . . . . . . . . . . . . . . . . . . . . . .541
Using the Task class to implement parallelism . . . . . . . . . . . . . . . . 544
Abstracting tasks by using the Parallel class . . . . . . . . . . . . . . . . . . .556
When not to use the Parallel class . . . . . . . . . . . . . . . . . . . . . . . . . . .560
Canceling tasks and handling exceptions . . . . . . . . . . . . . . . . . . . . . . . . . . .562
The mechanics of cooperative cancellation . . . . . . . . . . . . . . . . . . .562
Using continuations with canceled and faulted tasks . . . . . . . . . . .576
Summary. . . . . . . . . . . . . . . . . . . . . . . . . . . . . . . . . . . . . . . . . . . . . . . . . . . . . . .577
Quick reference . . . . . . . . . . . . . . . . . . . . . . . . . . . . . . . . . . . . . . . . . . . . . . . . .578
Chapter 24 Improving response time by performing asynchronous operations 581
Implementing asynchronous methods . . . . . . . . . . . . . . . . . . . . . . . . . . . . .582
Defining asynchronous methods: the problem . . . . . . . . . . . . . . . .582
Defining asynchronous methods: the solution . . . . . . . . . . . . . . . . .585
Defining asynchronous methods that return values . . . . . . . . . . . .591
Asynchronous methods and the Windows Runtime APIs . . . . . . . .592
Using PLINQ to parallelize declarative data access . . . . . . . . . . . . . . . . . . .595
Using PLINQ to improve performance while iterating through a collection . . . . . . . . . . . . . . . . . . . . . . . . . . . . . . . . . . . . . . .596
Canceling a PLINQ query . . . . . . . . . . . . . . . . . . . . . . . . . . . . . . . . . . .601
Synchronizing concurrent access to data . . . . . . . . . . . . . . . . . . . . . . . . . . .602
Locking data . . . . . . . . . . . . . . . . . . . . . . . . . . . . . . . . . . . . . . . . . . . . . .604
Synchronization primitives for coordinating tasks . . . . . . . . . . . . . .605
Cancelling synchronization . . . . . . . . . . . . . . . . . . . . . . . . . . . . . . . . .607
The concurrent collection classes . . . . . . . . . . . . . . . . . . . . . . . . . . . .608
Using a concurrent collection and a lock to implement thread-safe data access . . . . . . . . . . . . . . . . . . . . . . . . . . . . . . . . . . . . .609
Summary. . . . . . . . . . . . . . . . . . . . . . . . . . . . . . . . . . . . . . . . . . . . . . . . . . . . . . .619
Quick reference . . . . . . . . . . . . . . . . . . . . . . . . . . . . . . . . . . . . . . . . . . . . . . . . .619
Chapter 25 Implementing the user interface for a Windows Store app 623
What is a Windows Store app? . . . . . . . . . . . . . . . . . . . . . . . . . . . . . . . . . . . .624
Contents xvii
Using the Blank App template to build a Windows Store app . . . . . . . . .628
Implementing a scalable user interface . . . . . . . . . . . . . . . . . . . . . . .630
Applying styles to a UI . . . . . . . . . . . . . . . . . . . . . . . . . . . . . . . . . . . . .662
Summary. . . . . . . . . . . . . . . . . . . . . . . . . . . . . . . . . . . . . . . . . . . . . . . . . . . . . . .671
Quick reference . . . . . . . . . . . . . . . . . . . . . . . . . . . . . . . . . . . . . . . . . . . . . . . . .672
Chapter 26 Displaying and searching for data in a Windows Store app 673
Implementing the Model-View-ViewModel pattern . . . . . . . . . . . . . . . . .673
Windows 8.1 contracts . . . . . . . . . . . . . . . . . . . . . . . . . . . . . . . . . . . . .701
Summary. . . . . . . . . . . . . . . . . . . . . . . . . . . . . . . . . . . . . . . . . . . . . . . . . . . . . . .716
Quick reference . . . . . . . . . . . . . . . . . . . . . . . . . . . . . . . . . . . . . . . . . . . . . . . . .719
Chapter 27 Accessing a remote database from a Windows Store app 721
Retrieving data from a database . . . . . . . . . . . . . . . . . . . . . . . . . . . . .721
Inserting, updating, and deleting data through a REST web service . . . . . . . . . . . . . . . . . . . . . . . . . . . . . . . . . . . . . . . . . 741
Summary. . . . . . . . . . . . . . . . . . . . . . . . . . . . . . . . . . . . . . . . . . . . . . . . . . . . . . .759
Quick reference . . . . . . . . . . . . . . . . . . . . . . . . . . . . . . . . . . . . . . . . . . . . . . . . .760
Index 763
What do you think of this book? We want to hear from you! Microsoft is interested in hearing your feedback so we can continually improve our books and learning resources for you. to participate in a brief online survey, please visit:
www.microsoft.com/learning/booksurvey/

xix
Introduction
Microsoft Visual C# is a powerful but simple language aimed primarily at develop-ers creating applications by using the Microsoft .NET Framework. It inherits many
of the best features of C++ and Microsoft Visual Basic, but few of the inconsistencies and anachronisms, resulting in a cleaner and more logical language. C# 1.0 made its public debut in 2001. The advent of C# 2.0 with Visual Studio 2005 saw several impor-tant new features added to the language, including generics, iterators, and anonymous methods. C# 3.0, which was released with Visual Studio 2008, added extension meth-ods, lambda expressions, and most famously of all, the Language-Integrated Query facility, or LINQ. C# 4.0, released in 2010, provided further enhancements that improve its interoperability with other languages and technologies. These features included support for named and optional arguments, and the dynamic type, which indicates that the language runtime should implement late binding for an object. An important addition in the .NET Framework released concurrently with C# 4.0 was the classes and types that constitute the Task Parallel Library (TPL). Using the TPL, you can build highly scalable applications that can take full advantage of multicore processors quickly and easily. C# 5.0 adds native support for asynchronous task-based processing through the async method modifier and the await operator.
Another key event for Microsoft has been the launch of Windows 8. This new version of Windows supports highly interactive applications that can share data and collabo-rate with each other as well as connect to services running in the cloud. The develop-ment environment provided by Microsoft Visual Studio 2012 made all these powerful features easy to use, and the many new wizards and enhancements included in Visual Studio 2012 can greatly improve your productivity as a developer.
After listening to feedback from developers, Microsoft modified some aspects of the way in which the user interface works and released a technical preview of Windows 8.1 containing these changes. At the same time, Microsoft released a preview edition of Vi-sual Studio 2013, containing incremental changes to Visual Studio 2012 and adding new features that help to further improve programmer productivity. Although many of the updates to Visual Studio are small, and there have been no changes to the C# language in this release, we felt that the modifications to the way in which Windows 8.1 handles the user interface would make it beneficial to perform a similar incremental update to this book. The result is this volume.
xx Introduction
Note This book is based on the Technical Preview of Visual Studio 2013. Consequently, some features of the IDE might change in the final release of the software.
Who should read this book
This book assumes that you are a developer who wants to learn the fundamentals of programming with C# by using Visual Studio 2013 and the .NET Framework version 4.5.1. By the time you complete this book, you will have a thorough understanding of C# and will have used it to build responsive and scalable applications that can run by using the Windows operating system.
You can build and run C# 5.0 applications on Windows 7, Windows 8, and Windows 8.1, although the user interfaces provided by Windows 7 and Windows 8 have some significant differences. Additionally, Windows 8.1 has modified some parts of the user interface model, and applications designed to take advantage of these changes might not run on Windows 8. Consequently, Parts I to III of this book provide exercises and working examples that run using Windows 7, Windows 8, and Windows 8.1. Part IV focuses on the application development model used by Windows 8.1, and the material in this section provides an introduction to building interactive applications for this new platform.
Who should not read this book
This book is aimed at developers new to C#, but not completely new to program-ming. As such, it concentrates primarily on the C# language. This book is not intended to provide detailed coverage of the multitude of technologies available for building enterprise-level applications for Windows, such as ADO.NET, ASP.NET, Windows Com-munication Foundation, or Workflow Foundation. If you require more information on any of these items, you might consider reading some of the other titles in the Step by Step for Developers series available from Microsoft Press, such as Microsoft ASP.NET 4 Step by Step by George Shepherd, Microsoft ADO.NET 4 Step By Step by Tim Patrick, and Microsoft Windows Communication Foundation 4 Step By Step by John Sharp.
Introduction xxi
Organization of this book
This book is divided into four sections:
■■ Part I, “Introducing Microsoft Visual C# and Microsoft Visual Studio 2013,” provides an introduction to the core syntax of the C# language and the Visual Studio programming environment.
■■ Part II, “Understanding the C# object model,” goes into detail on how to create and manage new types by using C#, and how to manage the resources refer-enced by these types.
■■ Part III, “Defining extensible types with C#,” includes extended coverage of the elements that C# provides for building types that you can reuse across multiple applications.
■■ Part IV, “Building professional Windows 8.1 applications with C#,” describes the Windows 8.1 programming model, and how you can use C# to build interactive applications for this new model.
Note Although Part IV is aimed at Windows 8.1, many of the concepts de-scribed in Chapters 23 and 24 are also applicable to Windows 8 and Windows 7 applications.
Finding your best starting point in this bookThis book is designed to help you build skills in a number of essential areas. You can use this book if you are new to programming or if you are switching from another pro-gramming language such as C, C++, Java, or Visual Basic. Use the following table to find your best starting point.
If you are Follow these steps
New to object-oriented programming 1. Install the practice files as described in the upcoming section, “Code Samples.”
2. Work through the chapters in Parts I, II, and III sequentially.
3. Complete Part IV as your level of experience and interest dictates.
xxii Introduction
If you are Follow these steps
Familiar with procedural programming languages such as C but new to C#
1. Install the practice files as described in the upcoming section, “Code samples.” Skim the first five chapters to get an overview of C# and Visual Studio 2013, and then concentrate on Chapters 6 through 22.
2. Complete Part IV as your level of experience and interest dictates.
Migrating from an object-oriented language such as C++ or Java
1. Install the practice files as described in the upcoming section, “Code Samples.”
2. Skim the first seven chapters to get an over-view of C# and Visual Studio 2013, and then concentrate on Chapters 7 through 22.
3. For information about building scalable Win-dows 8.1 applications, read Part IV.
Switching from Visual Basic to C# 1. Install the practice files as described in the upcoming section, “Code Samples.”
2. Work through the chapters in Parts I, II, and III sequentially.
3. For information about building Windows 8.1 applications, read Part IV.
4. Read the Quick Reference sections at the end of the chapters for information about specific C# and Visual Studio 2013 constructs.
Referencing the book after working through the exercises
1. Use the index or the table of contents to find information about particular subjects.
2. Read the Quick Reference sections at the end of each chapter to find a brief review of the syntax and techniques presented in the chap-ter.
Most of the book’s chapters include hands-on samples that let you try out the concepts just learned. No matter which sections you choose to focus on, be sure to download and install the sample applications on your system.
Conventions and features in this book
This book presents information by using conventions designed to make the information readable and easy to follow.
■■ Each exercise consists of a series of tasks, presented as numbered steps (1, 2, and so on) listing each action you must take to complete the exercise.
■■ Boxed elements with labels such as “Note” provide additional information or alternative methods for completing a step successfully.
Introduction xxiii
■■ Text that you type (apart from code blocks) appears in bold.
■■ A plus sign (+) between two key names means that you must press those keys at the same time. For example, “Press Alt+Tab” means that you hold down the Alt key while you press the Tab key.
■■ A vertical bar between two or more menu items (for example, File | Close) means that you should select the first menu or menu item, then the next, and so on.
System requirements
You will need the following hardware and software to complete the practice exercises in this book:
■■ Windows 7 (x86 and x64), Windows 8 (x86 and x64), Windows 8.1 (x86 and x64), Windows Server 2008 R2 SP1 (x64), Windows Server 2012 (x64), or Windows Server 2012 R2 (x64).
Important The Windows Store templates for Visual Studio 2013 are not available on Windows 8, Windows 7, Windows Server 2012, or Windows Server 2008 R2. If you want to use these templates or perform the ex-ercises that build Windows Store apps, you must be running Windows 8.1 or Windows Server 2012 R2.
■■ Visual Studio 2013 (any edition except Visual Studio Express for Windows 8.1).
Important You can use Visual Studio Express 2013 for Windows Desktop, but you can only perform the Windows 7 version of the exer-cises in this book by using this software. You cannot use this software to perform the exercises in part IV of this book.
■■ Computer that has a 1.6 GHz or faster processor (2 GHz recommended).
■■ 1 GB (32-bit) or 2 GB (64-bit) RAM (add 512 MB if running in a virtual machine).
■■ 10 GB of available hard disk space.
■■ 5400 RPM hard disk drive.
xxiv Introduction
■ DirectX 9 capable video card running at 1024 × 768 or higher resolution display; If you are using Windows 8.1, a resolution of 1366 × 768 or greater is recom-mended.
■ DVD-ROM drive (if installing Visual Studio from a DVD).
■ Internet connection to download software or chapter examples.
Depending on your Windows confi guration, you might require Local Administrator rights to install or confi gure Visual Studio 2013.
Code samples
Most of the chapters in this book include exercises with which you can interactively try out new material learned in the main text. You can download all sample projects, in both their pre-exercise and postexercise formats, from the following page:
http://aka.ms/VC2013SbS/fi les
Follow the instructions to download the 9780735681835_fi les.zip fi le.
Note In addition to the code samples, your system should have Visual Studio 2013 installed. If available, install the latest service packs for Windows and Visual Studio.
Installing the code samples Follow these steps to install the code samples on your computer so that you can use them with the exercises in this book.
1. Unzip the C#_SBS.zip fi le that you downloaded from the book’s website into your Documents folder.
2. If prompted, review the displayed end user license agreement. If you accept the terms, select the accept option, and then click Next.
Note If the license agreement doesn’t appear, you can access it from the same webpage from which you downloaded the C#_SBS.zip fi le.
C#vNext_intro.indd xxivC#vNext_intro.indd xxiv 1/15/15 8:56 AM1/15/15 8:56 AM
Introduction xxv
Using the code samplesEach chapter in this book explains when and how to use any code samples for that chapter. When it’s time to use a code sample, the book will list the instructions for how to open the files.
For those of you who like to know all the details, here’s a list of the code sample Visual Studio 2013 projects and solutions, grouped by the folders where you can find them. In many cases, the exercises provide starter files and completed versions of the same projects that you can use as a reference. The code samples provide versions of the code for Window 7 and Windows 8.1, and the exercise instructions call out any differences in the tasks that you need to perform or the code that you need to write for these two operating systems. The completed projects for each chapter are stored in folders with the suffix “- Complete”.
Important If you are using Windows 8, Windows Server 2012 or Windows Server 2008 R2, follow the instructions for Windows 7. If you are using Windows Server 2012 R2, follow the instructions for Windows 8.1.
Project Description
Chapter 1
TextHello This project gets you started. It steps through the creation of a simple program that displays a text-based greeting.
WPFHello This project displays the greeting in a window by us-ing Windows Presentation Foundation (WPF).
Chapter 2
PrimitiveDataTypes This project demonstrates how to declare variables by using each of the primitive types, how to assign values to these variables, and how to display their values in a window.
MathsOperators This program introduces the arithmetic operators (+ – * / %).
Chapter 3
Methods In this project, you’ll re-examine the code in the pre-vious project and investigate how it uses methods to structure the code.
xxvi Introduction
Project Description
DailyRate This project walks you through writing your own methods, running the methods, and stepping through the method calls by using the Visual Studio 2013 debugger.
DailyRate Using Optional Parameters This project shows you how to define a method that takes optional parameters and call the method by using named arguments.
Chapter 4
Selection This project shows you how to use a cascading if statement to implement complex logic, such as com-paring the equivalence of two dates.
SwitchStatement This simple program uses a switch statement to con-vert characters into their XML representations.
Chapter 5
WhileStatement This project demonstrates a while statement that reads the contents of a source file one line at a time and displays each line in a text box on a form.
DoStatement This project uses a do statement to convert a decimal number to its octal representation.
Chapter 6
MathsOperators This project revisits the MathsOperators project from Chapter 2 and shows how various unhandled excep-tions can make the program fail. The try and catch keywords then make the application more robust so that it no longer fails.
Chapter 7
Classes This project covers the basics of defining your own classes, complete with public constructors, methods, and private fields. It also shows how to create class instances by using the new keyword and how to de-fine static methods and fields.
Chapter 8
Parameters This program investigates the difference between value parameters and reference parameters. It dem-onstrates how to use the ref and out keywords.
Chapter 9
Introduction xxvii
Project Description
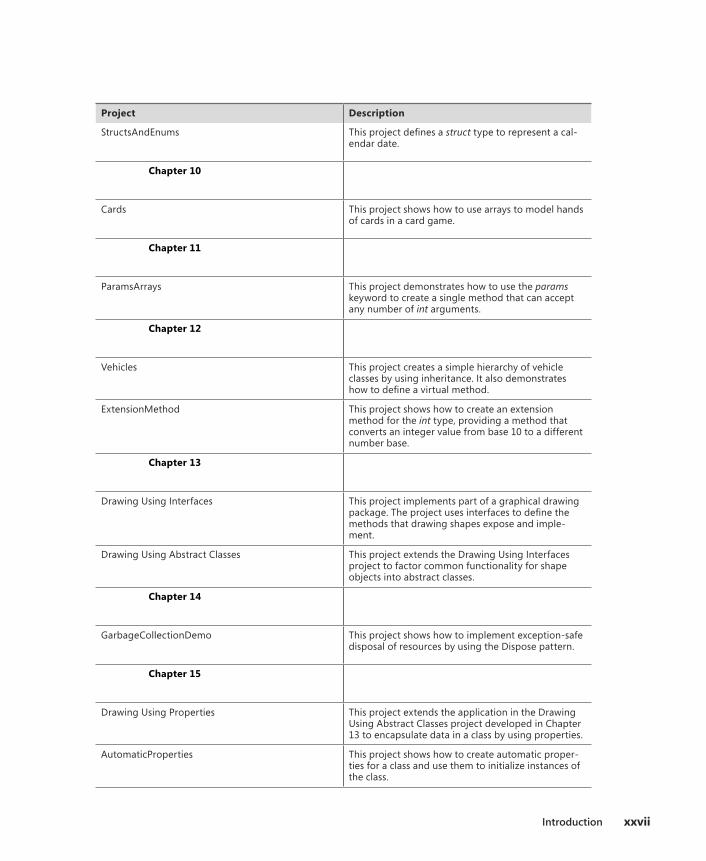
StructsAndEnums This project defines a struct type to represent a cal-endar date.
Chapter 10
Cards This project shows how to use arrays to model hands of cards in a card game.
Chapter 11
ParamsArrays This project demonstrates how to use the params keyword to create a single method that can accept any number of int arguments.
Chapter 12
Vehicles This project creates a simple hierarchy of vehicle classes by using inheritance. It also demonstrates how to define a virtual method.
ExtensionMethod This project shows how to create an extension method for the int type, providing a method that converts an integer value from base 10 to a different number base.
Chapter 13
Drawing Using Interfaces This project implements part of a graphical drawing package. The project uses interfaces to define the methods that drawing shapes expose and imple-ment.
Drawing Using Abstract Classes This project extends the Drawing Using Interfaces project to factor common functionality for shape objects into abstract classes.
Chapter 14
GarbageCollectionDemo This project shows how to implement exception-safe disposal of resources by using the Dispose pattern.
Chapter 15
Drawing Using Properties This project extends the application in the Drawing Using Abstract Classes project developed in Chapter 13 to encapsulate data in a class by using properties.
AutomaticProperties This project shows how to create automatic proper-ties for a class and use them to initialize instances of the class.

xxviii Introduction
Project Description
Chapter 16
Indexers This project uses two indexers: one to look up a person’s phone number when given a name and the other to look up a person’s name when given a phone number.
Chapter 17
BinaryTree This solution shows you how to use generics to build a typesafe structure that can contain elements of any type.
BuildTree This project demonstrates how to use generics to implement a typesafe method that can take param-eters of any type.
Chapter 18
Cards This project updates the code from Chapter 10 to show how to use collections to model hands of cards in a card game.
Chapter 19
BinaryTree This project shows you how to implement the gener-ic IEnumerator<T> interface to create an enumerator for the generic Tree class.
IteratorBinaryTree This solution uses an iterator to generate an enu-merator for the generic Tree class.
Chapter 20
Delegates This project shows how to decouple a method from the application logic that invokes it by using a del-egate.
Delegates With Event This project shows how to use an event to alert an object to a significant occurrence, and how to catch an event and perform any processing required.
Chapter 21
QueryBinaryTree This project shows how to use LINQ queries to re-trieve data from a binary tree object.
Chapter 22
Introduction xxix
Project Description
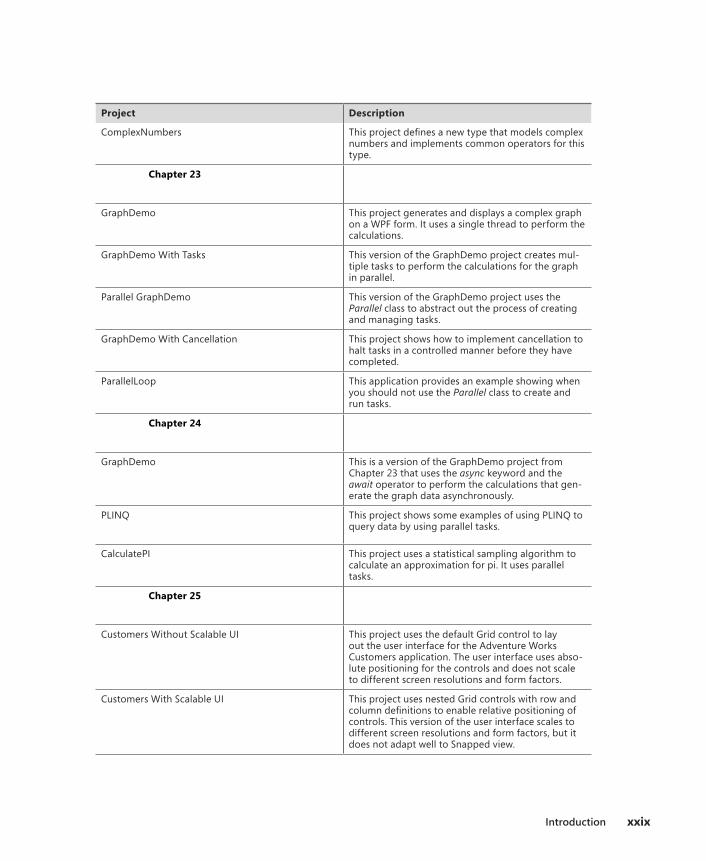
ComplexNumbers This project defines a new type that models complex numbers and implements common operators for this type.
Chapter 23
GraphDemo This project generates and displays a complex graph on a WPF form. It uses a single thread to perform the calculations.
GraphDemo With Tasks This version of the GraphDemo project creates mul-tiple tasks to perform the calculations for the graph in parallel.
Parallel GraphDemo This version of the GraphDemo project uses the Parallel class to abstract out the process of creating and managing tasks.
GraphDemo With Cancellation This project shows how to implement cancellation to halt tasks in a controlled manner before they have completed.
ParallelLoop This application provides an example showing when you should not use the Parallel class to create and run tasks.
Chapter 24
GraphDemo This is a version of the GraphDemo project from Chapter 23 that uses the async keyword and the await operator to perform the calculations that gen-erate the graph data asynchronously.
PLINQ This project shows some examples of using PLINQ to query data by using parallel tasks.
CalculatePI This project uses a statistical sampling algorithm to calculate an approximation for pi. It uses parallel tasks.
Chapter 25
Customers Without Scalable UI This project uses the default Grid control to lay out the user interface for the Adventure Works Customers application. The user interface uses abso-lute positioning for the controls and does not scale to different screen resolutions and form factors.
Customers With Scalable UI This project uses nested Grid controls with row and column definitions to enable relative positioning of controls. This version of the user interface scales to different screen resolutions and form factors, but it does not adapt well to Snapped view.
xxx Introduction
Project Description
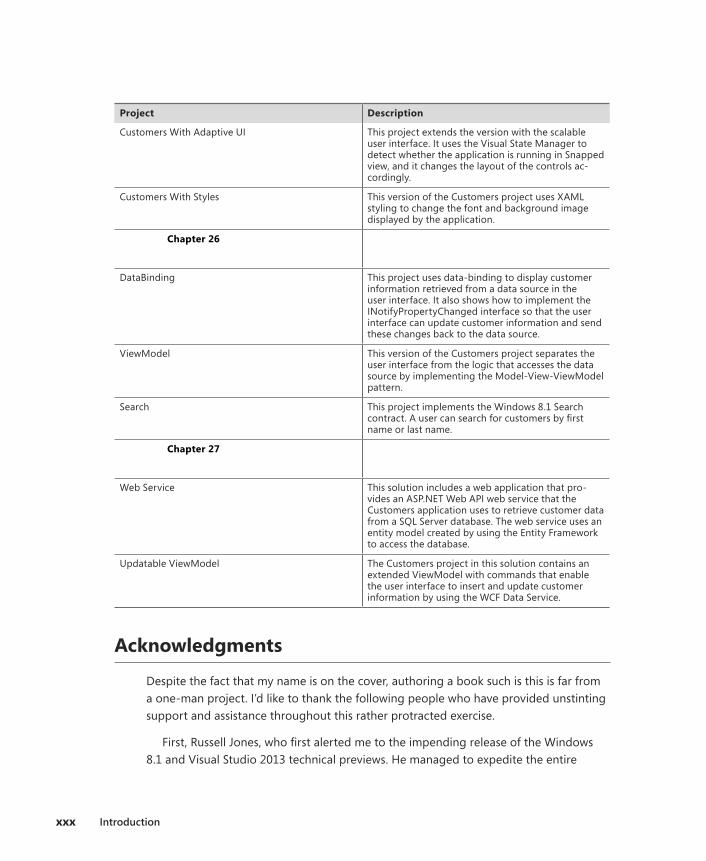
Customers With Adaptive UI This project extends the version with the scalable user interface. It uses the Visual State Manager to detect whether the application is running in Snapped view, and it changes the layout of the controls ac-cordingly.
Customers With Styles This version of the Customers project uses XAML styling to change the font and background image displayed by the application.
Chapter 26
DataBinding This project uses data-binding to display customer information retrieved from a data source in the user interface. It also shows how to implement the INotifyPropertyChanged interface so that the user interface can update customer information and send these changes back to the data source.
ViewModel This version of the Customers project separates the user interface from the logic that accesses the data source by implementing the Model-View-ViewModel pattern.
Search This project implements the Windows 8.1 Search contract. A user can search for customers by first name or last name.
Chapter 27
Web Service This solution includes a web application that pro-vides an ASP.NET Web API web service that the Customers application uses to retrieve customer data from a SQL Server database. The web service uses an entity model created by using the Entity Framework to access the database.
Updatable ViewModel The Customers project in this solution contains an extended ViewModel with commands that enable the user interface to insert and update customer information by using the WCF Data Service.
Acknowledgments
Despite the fact that my name is on the cover, authoring a book such is this is far from a one-man project. I’d like to thank the following people who have provided unstinting support and assistance throughout this rather protracted exercise.
First, Russell Jones, who first alerted me to the impending release of the Windows 8.1 and Visual Studio 2013 technical previews. He managed to expedite the entire
Introduction xxxi
process of getting this edition of the book ready to go to print. Without his efforts you might have been reading this edition just as the next edition of Windows emerged.
Next, Mike Sumsion and Paul Barnes, my esteemed colleagues at Content Master, who performed sterling work reviewing the material for the original versions of each chapter, testing my code, and pointing out the numerous mistakes that I had made! I think I have now caught them all, but of course any errors that remain are entirely my responsibility.
Also, John Mueller, who has done a remarkable job in performing a very swift tech-nical review of this edition. His writing experience and understanding of the technolo-gies covered herein have been extremely helpful, and this book has been enriched by his efforts.
Of course, like many programmers, I might understand the technology but my prose is not always as fluent or clear as it could be. I would like to thank the editors for cor-recting my grammar, fixing my spelling, and generally making my material much easier to understand.
Finally, I would like to thank my wife and cricketing companion, Diana, for not frowning too much when I said I was about to start work on an updated edition of this book. She has now become used to my cranky mutterings while I debug code, and the numerous “d’ohs” that I emit when I realize the crass mistakes I have made.
Errata and book support
We’ve made every effort to ensure the accuracy of this book and its companion con-tent. Any errors that have been reported since this book was published are listed on our Microsoft Press site:
http://aka.ms/VC2013SbS/errata
If you find an error that is not already listed, you can report it to us through the same page.
If you need additional support, email Microsoft Press Book Support at [email protected].
Please note that product support for Microsoft software is not offered through the addresses above.

xxxii Introduction
We want to hear from you
At Microsoft Press, your satisfaction is our top priority, and your feedback is our most valuable asset. Please tell us what you think of this book at:
http://www.microsoft.com/learning/booksurvey
The survey is short, and we read every one of your comments and ideas. Thanks in advance for your input!
Stay in touch
Let’s keep the conversation going! We’re on Twitter: http://twitter.com/MicrosoftPress
3
C H A P T E R 1
Welcome to C#
After completing this chapter, you will be able to:
■■ Use the Microsoft Visual Studio 2013 programming environment.
■■ Create a C# console application.
■■ Explain the purpose of namespaces.
■■ Create a simple graphical C# application.
This chapter provides an introduction to Visual Studio 2013, the programming environment, and tool-set designed to help you build applications for Microsoft Windows. Visual Studio 2013 is the ideal tool for writing C# code, and it provides many features that you will learn about as you progress through this book. In this chapter, you will use Visual Studio 2013 to build some simple C# applications and get started on the path to building highly functional solutions for Windows.
Beginning programming with the Visual Studio 2013 environment
Visual Studio 2013 is a tool-rich programming environment containing the functionality that you need to create large or small C# projects running on Windows 7, Windows 8, and Windows 8.1. You can even construct projects that seamlessly combine modules written in different programming languages such as C++, Visual Basic, and F#. In the first exercise, you will open the Visual Studio 2013 programming environment and learn how to create a console application.
Note A console application is an application that runs in a command prompt window rath-er than providing a graphical user interface (GUI).
Create a console application in Visual Studio 2013
■■ If you are using Windows 8.1 or Windows 8, on the Start screen, type Visual Studio, and then, in the Search results pane, click Visual Studio 2013.
4 part I Introducing Microsoft Visual C# and Microsoft Visual Studio 2013
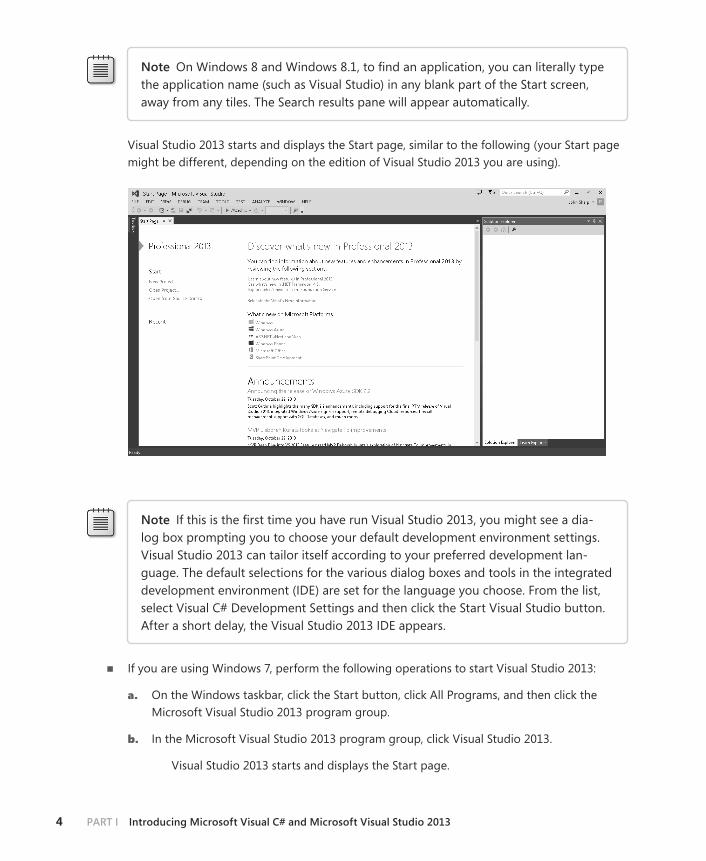
Note On Windows 8 and Windows 8.1, to find an application, you can literally type the application name (such as Visual Studio) in any blank part of the Start screen, away from any tiles. The Search results pane will appear automatically.
Visual Studio 2013 starts and displays the Start page, similar to the following (your Start page might be different, depending on the edition of Visual Studio 2013 you are using).
Note If this is the first time you have run Visual Studio 2013, you might see a dia-log box prompting you to choose your default development environment settings. Visual Studio 2013 can tailor itself according to your preferred development lan-guage. The default selections for the various dialog boxes and tools in the integrated development environment (IDE) are set for the language you choose. From the list, select Visual C# Development Settings and then click the Start Visual Studio button. After a short delay, the Visual Studio 2013 IDE appears.
■■ If you are using Windows 7, perform the following operations to start Visual Studio 2013:
a. On the Windows taskbar, click the Start button, click All Programs, and then click the Microsoft Visual Studio 2013 program group.
b. In the Microsoft Visual Studio 2013 program group, click Visual Studio 2013.
Visual Studio 2013 starts and displays the Start page.
CHAPTER 1 Welcome to C# 5
Note To avoid repetition and save space, throughout this book, I will simply state “Start Visual Studio” when you need to open Visual Studio 2013, regardless of the operating system you are using.
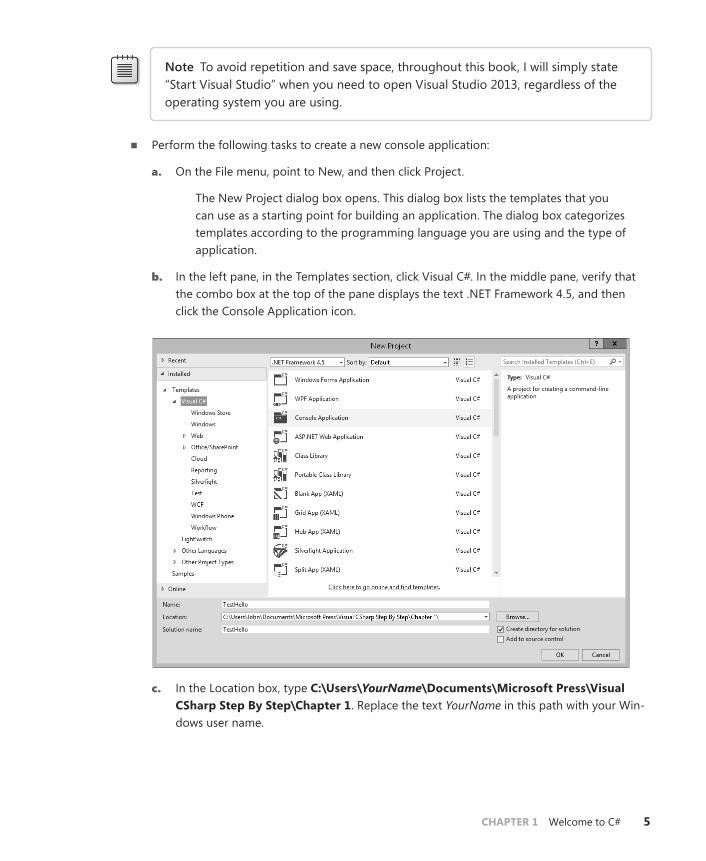
■■ Perform the following tasks to create a new console application:
a. On the File menu, point to New, and then click Project.
The New Project dialog box opens. This dialog box lists the templates that you can use as a starting point for building an application. The dialog box categorizes templates according to the programming language you are using and the type of application.
b. In the left pane, in the Templates section, click Visual C#. In the middle pane, verify that the combo box at the top of the pane displays the text .NET Framework 4.5, and then click the Console Application icon.
c. In the Location box, type C:\Users\YourName\Documents\Microsoft Press\Visual CSharp Step By Step\Chapter 1. Replace the text YourName in this path with your Win-dows user name.
6 part I Introducing Microsoft Visual C# and Microsoft Visual Studio 2013
Note To avoid repetition and save space, throughout the rest of this book, I will re-fer to the path C:\Users\YourName\Documents simply as your Documents folder.
Tip If the folder you specify does not exist, Visual Studio 2013 creates it for you.
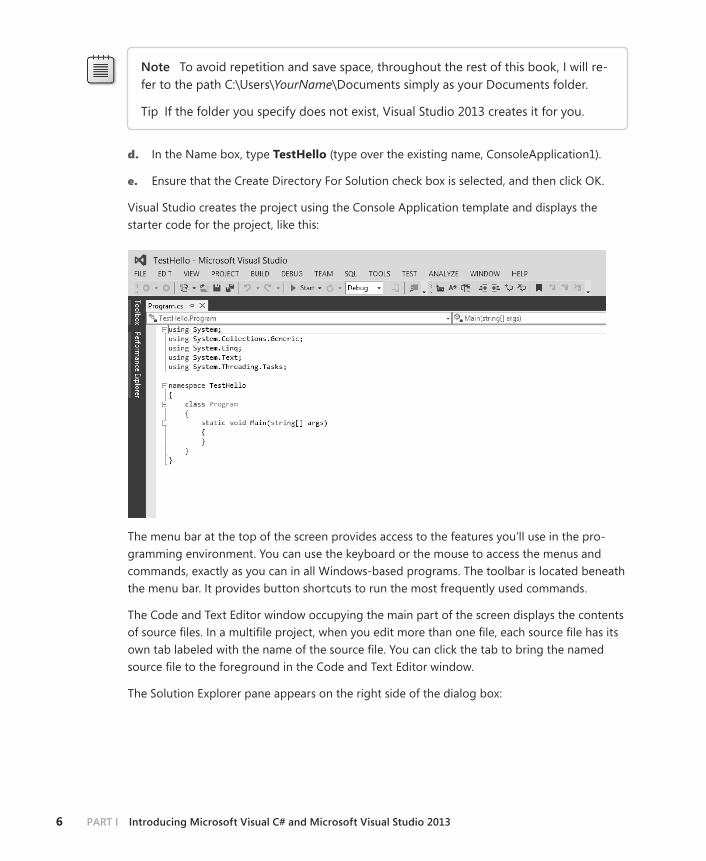
d. In the Name box, type TestHello (type over the existing name, ConsoleApplication1).
e. Ensure that the Create Directory For Solution check box is selected, and then click OK.
Visual Studio creates the project using the Console Application template and displays the starter code for the project, like this:
The menu bar at the top of the screen provides access to the features you’ll use in the pro-gramming environment. You can use the keyboard or the mouse to access the menus and commands, exactly as you can in all Windows-based programs. The toolbar is located beneath the menu bar. It provides button shortcuts to run the most frequently used commands.
The Code and Text Editor window occupying the main part of the screen displays the contents of source files. In a multifile project, when you edit more than one file, each source file has its own tab labeled with the name of the source file. You can click the tab to bring the named source file to the foreground in the Code and Text Editor window.
The Solution Explorer pane appears on the right side of the dialog box:
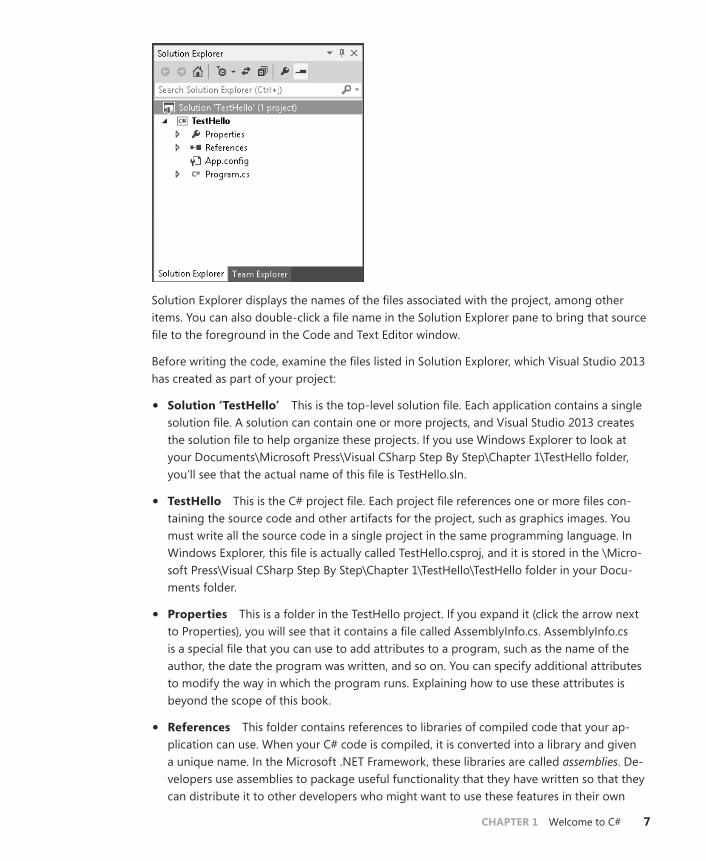
CHAPTER 1 Welcome to C# 7
Solution Explorer displays the names of the files associated with the project, among other items. You can also double-click a file name in the Solution Explorer pane to bring that source file to the foreground in the Code and Text Editor window.
Before writing the code, examine the files listed in Solution Explorer, which Visual Studio 2013 has created as part of your project:
• Solution ‘TestHello’ This is the top-level solution file. Each application contains a single solution file. A solution can contain one or more projects, and Visual Studio 2013 creates the solution file to help organize these projects. If you use Windows Explorer to look at your Documents\Microsoft Press\Visual CSharp Step By Step\Chapter 1\TestHello folder, you’ll see that the actual name of this file is TestHello.sln.
• TestHello This is the C# project file. Each project file references one or more files con-taining the source code and other artifacts for the project, such as graphics images. You must write all the source code in a single project in the same programming language. In Windows Explorer, this file is actually called TestHello.csproj, and it is stored in the \Micro-soft Press\Visual CSharp Step By Step\Chapter 1\TestHello\TestHello folder in your Docu-ments folder.
• Properties This is a folder in the TestHello project. If you expand it (click the arrow next to Properties), you will see that it contains a file called AssemblyInfo.cs. AssemblyInfo.cs is a special file that you can use to add attributes to a program, such as the name of the author, the date the program was written, and so on. You can specify additional attributes to modify the way in which the program runs. Explaining how to use these attributes is beyond the scope of this book.
• References This folder contains references to libraries of compiled code that your ap-plication can use. When your C# code is compiled, it is converted into a library and given a unique name. In the Microsoft .NET Framework, these libraries are called assemblies. De-velopers use assemblies to package useful functionality that they have written so that they can distribute it to other developers who might want to use these features in their own
8 part I Introducing Microsoft Visual C# and Microsoft Visual Studio 2013
applications. If you expand the References folder, you will see the default set of references that Visual Studio 2013 adds to your project. These assemblies provide access to many of the commonly used features of the .NET Framework and are provided by Microsoft with Visual Studio 2013. You will learn about many of these assemblies as you progress through the exercises in this book.
• App.config This is the application configuration file. It is optional, and it might not always be present. You can specify settings that your application can use at run time to modify its behavior, such as the version of the .NET Framework to use to run the application. You will learn more about this file in later chapters of this book.
• Program.cs This is a C# source file, and it is displayed in the Code and Text Editor win-dow when the project is first created. You will write your code for the console application in this file. It also contains some code that Visual Studio 2013 provides automatically, which you will examine shortly.
Writing your first program
The Program.cs file defines a class called Program that contains a method called Main. In C#, all executable code must be defined within a method, and all methods must belong to a class or a struct. You will learn more about classes in Chapter 7, “Creating and managing classes and objects,” and you will learn about structs in Chapter 9, “Creating value types with enumerations and structures.”
The Main method designates the program’s entry point. This method should be defined in the manner specified in the Program class, as a static method; otherwise, the .NET Framework might not recognize it as the starting point for your application when you run it. (You will look at methods in detail in Chapter 3, “Writing methods and applying scope,” and Chapter 7 provides more information on static methods.)
Important C# is a case-sensitive language. You must spell Main with an uppercase M.
In the following exercises, you write the code to display the message “Hello World!” to the console window; you build and run your Hello World console application; and you learn how namespaces are used to partition code elements.
Write the code by using Microsoft IntelliSense
1. In the Code and Text Editor window displaying the Program.cs file, place the cursor in the Main method, immediately after the opening brace, {, and then press Enter to create a new line.
CHAPTER 1 Welcome to C# 9
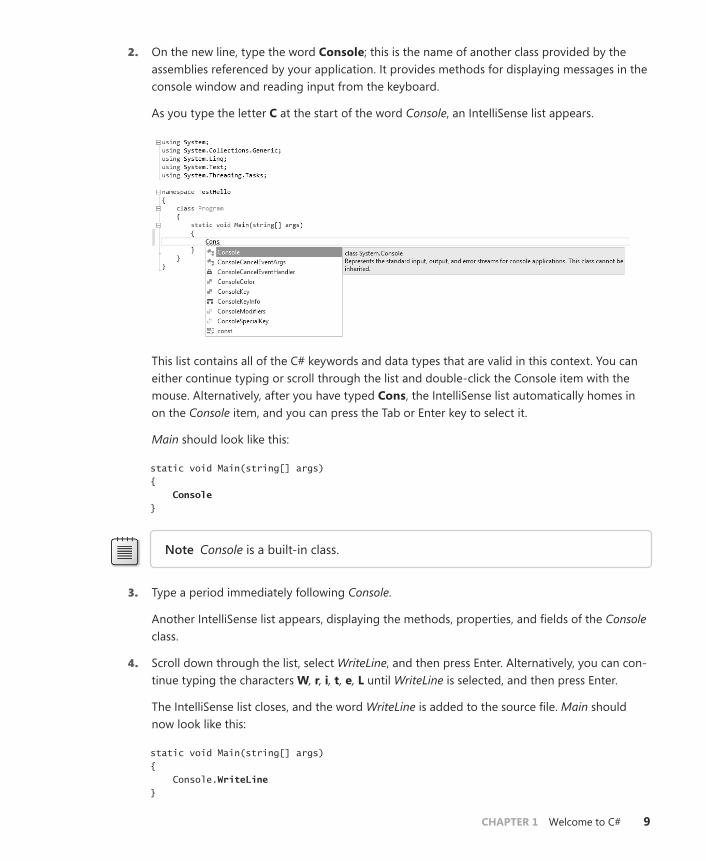
2. On the new line, type the word Console; this is the name of another class provided by the assemblies referenced by your application. It provides methods for displaying messages in the console window and reading input from the keyboard.
As you type the letter C at the start of the word Console, an IntelliSense list appears.
This list contains all of the C# keywords and data types that are valid in this context. You can either continue typing or scroll through the list and double-click the Console item with the mouse. Alternatively, after you have typed Cons, the IntelliSense list automatically homes in on the Console item, and you can press the Tab or Enter key to select it.
Main should look like this:
static void Main(string[] args) { Console }
Note Console is a built-in class.
3. Type a period immediately following Console.
Another IntelliSense list appears, displaying the methods, properties, and fields of the Console class.
4. Scroll down through the list, select WriteLine, and then press Enter. Alternatively, you can con-tinue typing the characters W, r, i, t, e, L until WriteLine is selected, and then press Enter.
The IntelliSense list closes, and the word WriteLine is added to the source file. Main should now look like this:
static void Main(string[] args) { Console.WriteLine }
10 part I Introducing Microsoft Visual C# and Microsoft Visual Studio 2013
5. Type an opening parenthesis, (. Another IntelliSense tip appears.
This tip displays the parameters that the WriteLine method can take. In fact, WriteLine is an overloaded method, meaning that the Console class contains more than one method named WriteLine—it actually provides 19 different versions of this method. You can use each version of the WriteLine method to output different types of data. (Chapter 3 describes overloaded methods in more detail.) Main should now look like this:
static void Main(string[] args) { Console.WriteLine( }
tip You can click the up and down arrows in the tip to scroll through the different overloads of WriteLine.
6. Type a closing parenthesis, ), followed by a semicolon, ;.
Main should now look like this:
static void Main(string[] args) { Console.WriteLine(); }
7. Move the cursor and type the string “Hello World!”, including the quotation marks, between the left and right parentheses following the WriteLine method.
Main should now look like this:
static void Main(string[] args) { Console.WriteLine("Hello World!"); }
tip Get into the habit of typing matched character pairs, such as parentheses, ( and ), and curly brackets, { and }, before filling in their contents. It’s easy to forget the closing character if you wait until after you’ve entered the contents.
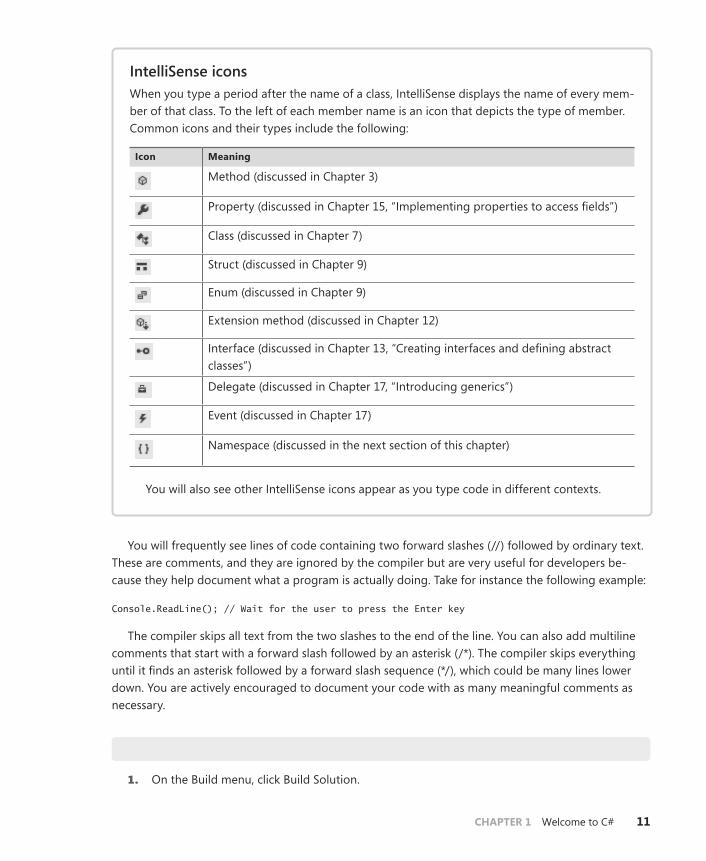
CHAPTER 1 Welcome to C# 11
IntelliSense iconsWhen you type a period after the name of a class, IntelliSense displays the name of every mem-ber of that class. To the left of each member name is an icon that depicts the type of member. Common icons and their types include the following:
Icon Meaning
Method (discussed in Chapter 3)
Property (discussed in Chapter 15, “Implementing properties to access fields”)
Class (discussed in Chapter 7)
Struct (discussed in Chapter 9)
Enum (discussed in Chapter 9)
Extension method (discussed in Chapter 12)
Interface (discussed in Chapter 13, “Creating interfaces and defining abstract classes”)
Delegate (discussed in Chapter 17, “Introducing generics”)
Event (discussed in Chapter 17)
Namespace (discussed in the next section of this chapter)
You will also see other IntelliSense icons appear as you type code in different contexts.
You will frequently see lines of code containing two forward slashes (//) followed by ordinary text. These are comments, and they are ignored by the compiler but are very useful for developers be-cause they help document what a program is actually doing. Take for instance the following example:
Console.ReadLine(); // Wait for the user to press the Enter key
The compiler skips all text from the two slashes to the end of the line. You can also add multiline comments that start with a forward slash followed by an asterisk (/*). The compiler skips everything until it finds an asterisk followed by a forward slash sequence (*/), which could be many lines lower down. You are actively encouraged to document your code with as many meaningful comments as necessary.
Build and run the console application
1. On the Build menu, click Build Solution.
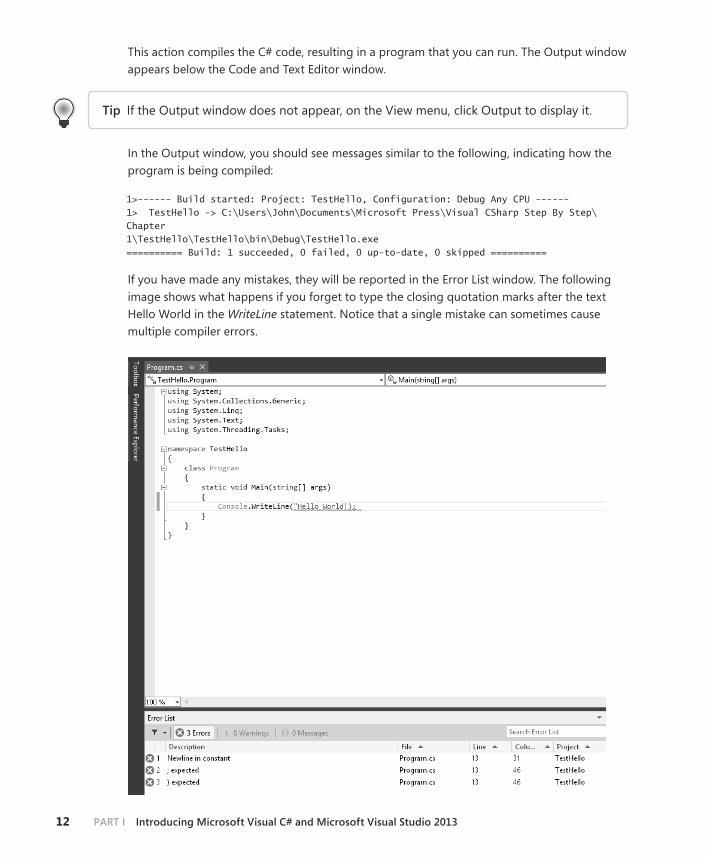
12 part I Introducing Microsoft Visual C# and Microsoft Visual Studio 2013
This action compiles the C# code, resulting in a program that you can run. The Output window appears below the Code and Text Editor window.
tip If the Output window does not appear, on the View menu, click Output to display it.
In the Output window, you should see messages similar to the following, indicating how the program is being compiled:
1>------ Build started: Project: TestHello, Configuration: Debug Any CPU ------ 1> TestHello -> C:\Users\John\Documents\Microsoft Press\Visual CSharp Step By Step\Chapter 1\TestHello\TestHello\bin\Debug\TestHello.exe ========== Build: 1 succeeded, 0 failed, 0 up-to-date, 0 skipped ==========
If you have made any mistakes, they will be reported in the Error List window. The following image shows what happens if you forget to type the closing quotation marks after the text Hello World in the WriteLine statement. Notice that a single mistake can sometimes cause multiple compiler errors.
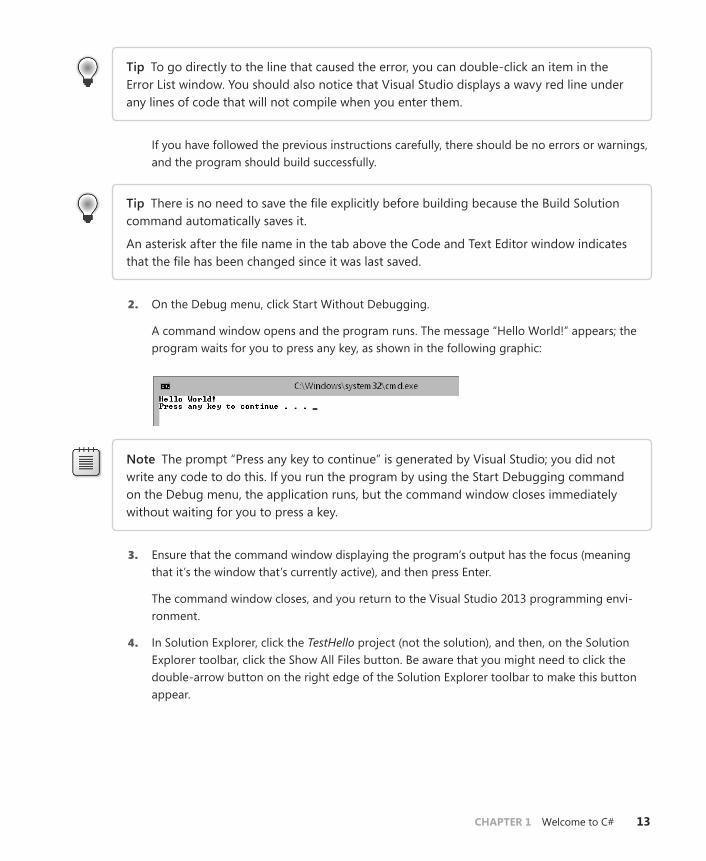
CHAPTER 1 Welcome to C# 13
tip To go directly to the line that caused the error, you can double-click an item in the Error List window. You should also notice that Visual Studio displays a wavy red line under any lines of code that will not compile when you enter them.
If you have followed the previous instructions carefully, there should be no errors or warnings, and the program should build successfully.
tip There is no need to save the file explicitly before building because the Build Solution command automatically saves it.
An asterisk after the file name in the tab above the Code and Text Editor window indicates that the file has been changed since it was last saved.
2. On the Debug menu, click Start Without Debugging.
A command window opens and the program runs. The message “Hello World!” appears; the program waits for you to press any key, as shown in the following graphic:
Note The prompt “Press any key to continue” is generated by Visual Studio; you did not write any code to do this. If you run the program by using the Start Debugging command on the Debug menu, the application runs, but the command window closes immediately without waiting for you to press a key.
3. Ensure that the command window displaying the program’s output has the focus (meaning that it’s the window that’s currently active), and then press Enter.
The command window closes, and you return to the Visual Studio 2013 programming envi-ronment.
4. In Solution Explorer, click the TestHello project (not the solution), and then, on the Solution Explorer toolbar, click the Show All Files button. Be aware that you might need to click the double-arrow button on the right edge of the Solution Explorer toolbar to make this button appear.
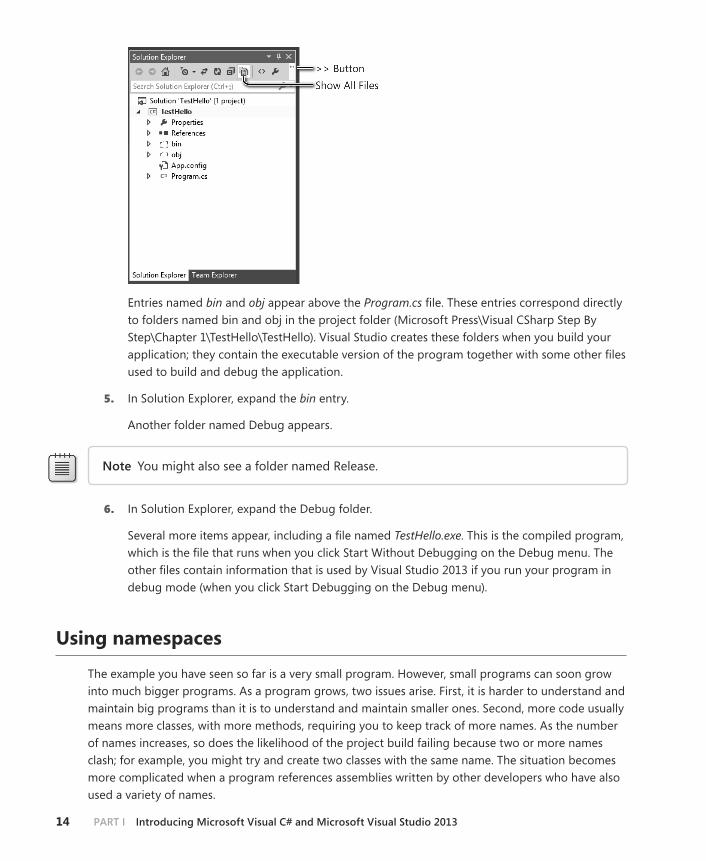
14 part I Introducing Microsoft Visual C# and Microsoft Visual Studio 2013
Entries named bin and obj appear above the Program.cs file. These entries correspond directly to folders named bin and obj in the project folder (Microsoft Press\Visual CSharp Step By Step\Chapter 1\TestHello\TestHello). Visual Studio creates these folders when you build your application; they contain the executable version of the program together with some other files used to build and debug the application.
5. In Solution Explorer, expand the bin entry.
Another folder named Debug appears.
Note You might also see a folder named Release.
6. In Solution Explorer, expand the Debug folder.
Several more items appear, including a file named TestHello.exe. This is the compiled program, which is the file that runs when you click Start Without Debugging on the Debug menu. The other files contain information that is used by Visual Studio 2013 if you run your program in debug mode (when you click Start Debugging on the Debug menu).
Using namespaces
The example you have seen so far is a very small program. However, small programs can soon grow into much bigger programs. As a program grows, two issues arise. First, it is harder to understand and maintain big programs than it is to understand and maintain smaller ones. Second, more code usually means more classes, with more methods, requiring you to keep track of more names. As the number of names increases, so does the likelihood of the project build failing because two or more names clash; for example, you might try and create two classes with the same name. The situation becomes more complicated when a program references assemblies written by other developers who have also used a variety of names.
CHAPTER 1 Welcome to C# 15
In the past, programmers tried to solve the name-clashing problem by prefixing names with some sort of qualifier (or set of qualifiers). This is not a good solution because it’s not scalable; names be-come longer, and you spend less time writing software and more time typing (there is a difference), and reading and rereading incomprehensibly long names.
Namespaces help solve this problem by creating a container for items such as classes. Two classes with the same name will not be confused with each other if they live in different namespaces. You can create a class named Greeting inside the namespace named TestHello by using the namespace keyword like this:
namespace TestHello { class Greeting { ... } }
You can then refer to the Greeting class as TestHello.Greeting in your programs. If another develop-er also creates a Greeting class in a different namespace, such as NewNamespace, and you install the assembly that contains this class on your computer, your programs will still work as expected because they are using the TestHello.Greeting class. If you want to refer to the other developer’s Greeting class, you must specify it as NewNamespace.Greeting.
It is good practice to define all your classes in namespaces, and the Visual Studio 2013 environ-ment follows this recommendation by using the name of your project as the top-level namespace. The .NET Framework class library also adheres to this recommendation; every class in the .NET Frame-work lives within a namespace. For example, the Console class lives within the System namespace. This means that its full name is actually System.Console.
Of course, if you had to write the full name of a class every time you used it, the situation would be no better than prefixing qualifiers or even just naming the class with some globally unique name such SystemConsole. Fortunately, you can solve this problem with a using directive in your programs. If you return to the TestHello program in Visual Studio 2013 and look at the file Program.cs in the Code and Text Editor window, you will notice the following lines at the top of the file:
using System; using System.Collections.Generic; using System.Linq; using System.Text; using System.Threading.Tasks;
These lines are using directives. A using directive brings a namespace into scope. In subsequent code in the same file, you no longer need to explicitly qualify objects with the namespace to which they belong. The five namespaces shown contain classes that are used so often that Visual Studio 2013 automatically adds these using statements every time you create a new project. You can add further using directives to the top of a source file if you need to reference other namespaces.
The following exercise demonstrates the concept of namespaces in more depth.

16 part I Introducing Microsoft Visual C# and Microsoft Visual Studio 2013
try longhand names
1. In the Code and Text Editor window displaying the Program.cs file, comment out the first using directive at the top of the file, like this:
//using System;
2. On the Build menu, click Build Solution.
The build fails, and the Error List window displays the following error message:
The name 'Console' does not exist in the current context.
3. In the Error List window, double-click the error message.
The identifier that caused the error is highlighted in the Program.cs source file.
4. In the Code and Text Editor window, edit the Main method to use the fully qualified name System.Console.
Main should look like this:
static void Main(string[] args) { System.Console.WriteLine("Hello World!"); }
Note When you type the period after System, IntelliSense displays the names of all the items in the System namespace.
5. On the Build menu, click Build Solution.
The project should build successfully this time. If it doesn’t, ensure that Main is exactly as it appears in the preceding code, and then try building again.
6. Run the application to ensure that it still works by clicking Start Without Debugging on the Debug menu.
7. When the program runs and displays “Hello World!”, in the console window, press Enter to return to Visual Studio 2013.
CHAPTER 1 Welcome to C# 17
Namespaces and assembliesA using directive simply brings the items in a namespace into scope and frees you from having to fully qualify the names of classes in your code. Classes are compiled into assemblies. An as-sembly is a file that usually has the .dll file name extension, although strictly speaking, execut-able programs with the .exe file name extension are also assemblies.
An assembly can contain many classes. The classes that the .NET Framework class library comprises, such as System.Console, are provided in assemblies that are installed on your com-puter together with Visual Studio. You will find that the .NET Framework class library contains thousands of classes. If they were all held in the same assembly, the assembly would be huge and difficult to maintain. (If Microsoft were to update a single method in a single class, it would have to distribute the entire class library to all developers!)
For this reason, the .NET Framework class library is split into a number of assemblies, par-titioned by the functional area to which the classes they contain relate. For example, a “core” assembly (actually called mscorlib.dll) contains all the common classes, such as System.Console, and further assemblies contain classes for manipulating databases, accessing web services, building GUIs, and so on. If you want to make use of a class in an assembly, you must add to your project a reference to that assembly. You can then add using statements to your code that bring the items in namespaces in that assembly into scope.
You should note that there is not necessarily a 1:1 equivalence between an assembly and a namespace: A single assembly can contain classes defined in many namespaces, and a single namespace can span multiple assemblies. For example, the classes and items in the System namespace are actually implemented by several assemblies, including mscorlib.dll, System.dll, and System.Core.dll, among others. This all sounds very confusing at first, but you will soon get used to it.
When you use Visual Studio to create an application, the template you select automatically includes references to the appropriate assemblies. For example, in Solution Explorer for the Tes-tHello project, expand the References folder. You will see that a console application automati-cally contains references to assemblies called Microsoft.CSharp, System, System.Core, System.Data, System.Data.DataExtensions, System.Xml, and System.Xml.Linq. You might be surprised to see that mscorlib.dll is not included in this list. The reason for this is that all .NET Framework applications must use this assembly because it contains fundamental runtime functionality. The References folder lists only the optional assemblies; you can add or remove assemblies from this folder as necessary.
To add references for additional assemblies to a project, right-click the References folder and then, in the shortcut menu that appears, click Add Reference—you will perform this task in later exercises. You can remove an assembly by right-clicking the assembly in the References folder and then clicking Remove.
18 part I Introducing Microsoft Visual C# and Microsoft Visual Studio 2013
Creating a graphical application
So far, you have used Visual Studio 2013 to create and run a basic console application. The Visual Studio 2013 programming environment also contains everything you need to create graphical ap-plications for Windows 7, Windows 8, and Windows 8.1. You can design the user interface (UI) of a Windows application interactively. Visual Studio 2013 then generates the program statements to implement the user interface you’ve designed.
Visual Studio 2013 provides you with two views of a graphical application: the design view and the code view. You use the Code and Text Editor window to modify and maintain the code and program logic for a graphical application, and you use the Design View window to lay out your UI. You can switch between the two views whenever you want.
In the following set of exercises, you’ll learn how to create a graphical application by using Visual Studio 2013. This program displays a simple form containing a text box where you can enter your name and a button that when clicked displays a personalized greeting.
Important In Windows 7 and Windows 8, Visual Studio 2013 provides two templates for building graphical applications: the Windows Forms Application template and the WPF Application template. Windows Forms is a technology that first appeared with the .NET Framework version 1.0. WPF, or Windows Presentation Foundation, is an enhanced technol-ogy that first appeared with the .NET Framework version 3.0. It provides many additional features and capabilities over Windows Forms, and you should consider using WPF instead of Windows Forms for all new Windows 7 development.
You can also build Windows Forms and WPF applications in Windows 8.1. However, Windows 8 and Windows 8.1 provide a new flavor of UI, referred to as the “Windows Store” style. Applications that use this style of UI are called Windows Store applications (or apps). Windows 8 has been designed to operate on a variety of hardware, including computers with touch-sensitive screens and tablet computers or slates. These computers enable users to interact with applications by using touch-based gestures—for example, users can swipe applications with their fingers to move them around the screen and rotate them, or “pinch” and “stretch” applications to zoom out and back in again. Additionally, many tablets include sensors that can detect the orientation of the device, and Windows 8 can pass this informa-tion to an application, which can then dynamically adjust the UI to match the orientation (it can switch from landscape to portrait mode, for example). If you have installed Visual Studio 2013 on a Windows 8.1 computer, you are provided with an additional set of tem-plates for building Windows Store apps. However, these templates are dependent on features provided by Windows 8.1, so if you are running Windows 8, the Windows Store templates are not available.
CHAPTER 1 Welcome to C# 19
To cater to Windows 7, Windows 8, and Windows 8.1 developers, I have provided instruc-tions in many of the exercises for using the WPF templates. If you are running Windows 7 or Windows 8 you should follow the Windows 7 instructions. If you want to use the Windows Store style UI, you should follow the Windows 8.1 instructions. Of course, you can follow the Windows 7 and Windows 8 instructions to use the WPF templates on Windows 8.1 if you prefer.
If you want more information about the specifics of writing Windows 8.1 applications, the final few chapters in Part IV of this book provide more detail and guidance.
Create a graphical application in Visual Studio 2013
■■ If you are using Windows 8.1, perform the following operations to create a new graphical ap-plication:
a. Start Visual Studio 2013 if it is not already running.
b. On the File menu, point to New, and then click Project.
The New Project dialog box opens.
c. In the left pane, in the Installed Templates section, expand the Visual C# folder if it is not already expanded, and then click the Windows Store folder.
d. In the middle pane, click the Blank App (XAML) icon.
Note XAML stands for Extensible Application Markup Language, which is the language that Windows Store apps use to define the layout for the GUI of an application. You will learn more about XAML as you progress through the exercises in this book.
e. Ensure that the Location field refers to the \Microsoft Press\Visual CSharp Step By Step\Chapter 1 folder in your Documents folder.
f. In the Name box, type Hello.
g. In the Solution box, ensure that Create New Solution is selected.
This action creates a new solution for holding the project. The alternative, Add To Solution, adds the project to the TestHello solution, which is not what you want for this exercise.
h. Click OK.
If this is the first time that you have created a Windows Store app, you will be prompted to apply for a developer license. You must agree to the terms and
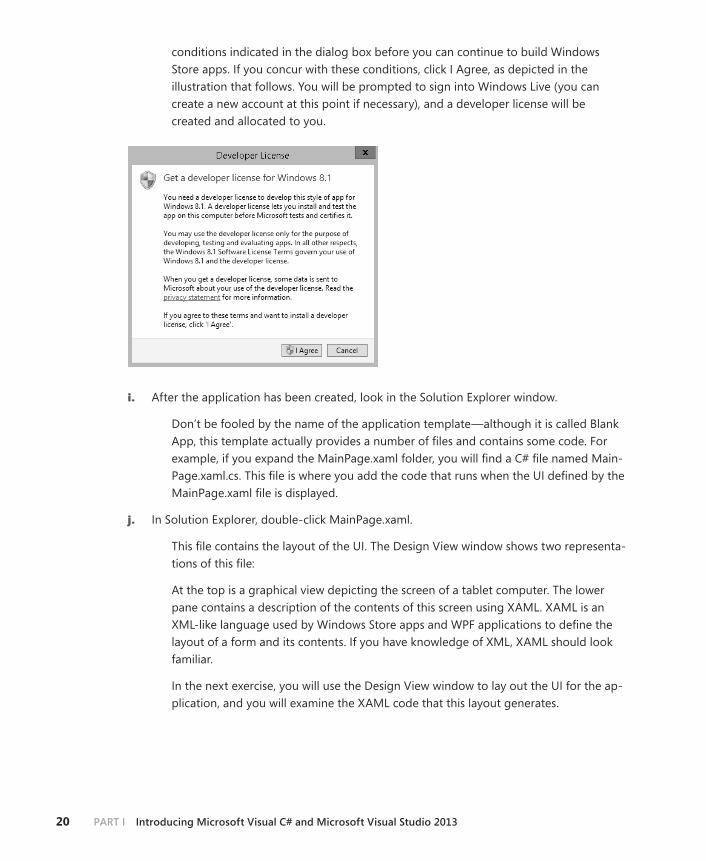
20 part I Introducing Microsoft Visual C# and Microsoft Visual Studio 2013
conditions indicated in the dialog box before you can continue to build Windows Store apps. If you concur with these conditions, click I Agree, as depicted in the illustration that follows. You will be prompted to sign into Windows Live (you can create a new account at this point if necessary), and a developer license will be created and allocated to you.
i. After the application has been created, look in the Solution Explorer window.
Don’t be fooled by the name of the application template—although it is called Blank App, this template actually provides a number of files and contains some code. For example, if you expand the MainPage.xaml folder, you will find a C# file named Main-Page.xaml.cs. This file is where you add the code that runs when the UI defined by the MainPage.xaml file is displayed.
j. In Solution Explorer, double-click MainPage.xaml.
This file contains the layout of the UI. The Design View window shows two representa-tions of this file:
At the top is a graphical view depicting the screen of a tablet computer. The lower pane contains a description of the contents of this screen using XAML. XAML is an XML-like language used by Windows Store apps and WPF applications to define the layout of a form and its contents. If you have knowledge of XML, XAML should look familiar.
In the next exercise, you will use the Design View window to lay out the UI for the ap-plication, and you will examine the XAML code that this layout generates.
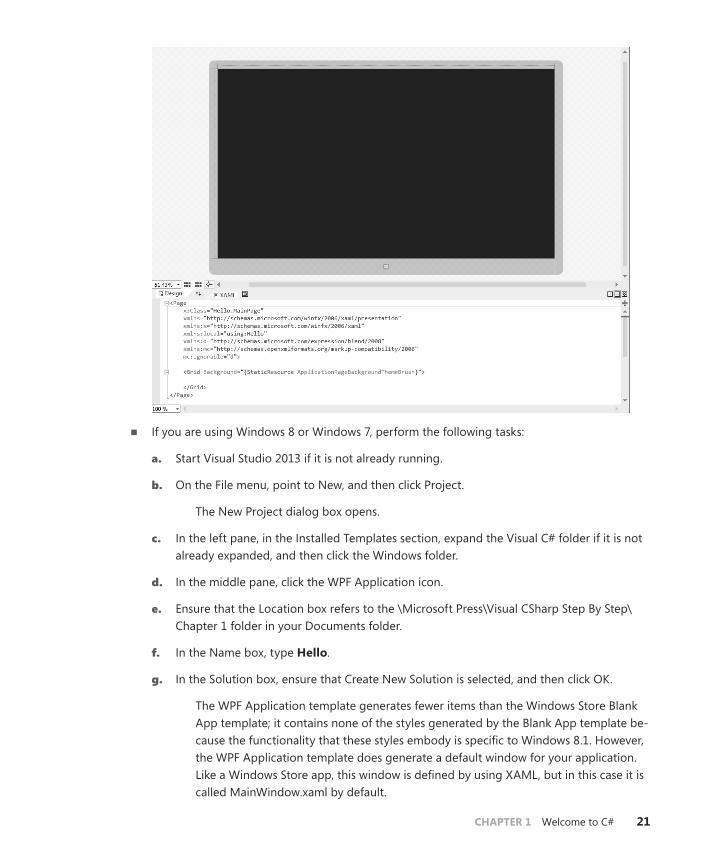
CHAPTER 1 Welcome to C# 21
■■ If you are using Windows 8 or Windows 7, perform the following tasks:
a. Start Visual Studio 2013 if it is not already running.
b. On the File menu, point to New, and then click Project.
The New Project dialog box opens.
c. In the left pane, in the Installed Templates section, expand the Visual C# folder if it is not already expanded, and then click the Windows folder.
d. In the middle pane, click the WPF Application icon.
e. Ensure that the Location box refers to the \Microsoft Press\Visual CSharp Step By Step\Chapter 1 folder in your Documents folder.
f. In the Name box, type Hello.
g. In the Solution box, ensure that Create New Solution is selected, and then click OK.
The WPF Application template generates fewer items than the Windows Store Blank App template; it contains none of the styles generated by the Blank App template be-cause the functionality that these styles embody is specific to Windows 8.1. However, the WPF Application template does generate a default window for your application. Like a Windows Store app, this window is defined by using XAML, but in this case it is called MainWindow.xaml by default.
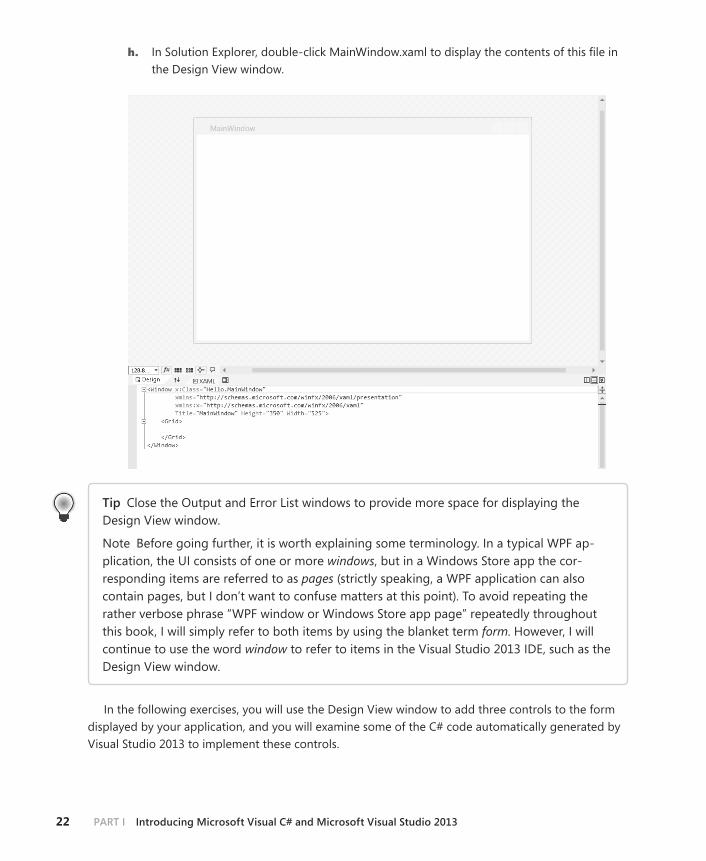
22 part I Introducing Microsoft Visual C# and Microsoft Visual Studio 2013
h. In Solution Explorer, double-click MainWindow.xaml to display the contents of this file in the Design View window.
tip Close the Output and Error List windows to provide more space for displaying the Design View window.
Note Before going further, it is worth explaining some terminology. In a typical WPF ap-plication, the UI consists of one or more windows, but in a Windows Store app the cor-responding items are referred to as pages (strictly speaking, a WPF application can also contain pages, but I don’t want to confuse matters at this point). To avoid repeating the rather verbose phrase “WPF window or Windows Store app page” repeatedly throughout this book, I will simply refer to both items by using the blanket term form. However, I will continue to use the word window to refer to items in the Visual Studio 2013 IDE, such as the Design View window.
In the following exercises, you will use the Design View window to add three controls to the form displayed by your application, and you will examine some of the C# code automatically generated by Visual Studio 2013 to implement these controls.
CHAPTER 1 Welcome to C# 23
Note The steps in the following exercises are common to Windows 7, Windows 8, and Windows 8.1, except where any differences are explicitly called out.
Create the UI
1. Click the Toolbox tab that appears to the left of the form in the Design View window.
The Toolbox appears, partially obscuring the form, and displays the various components and controls that you can place on a form.
2. If you are using Windows 8.1, expand the Common XAML Controls section.
If you are using Windows 7 or Windows 8, expand the Common WPF Controls section.
This section displays a list of controls that most graphical applications use.
tip The All XAML Controls section (Windows 8.1) or All WPF Controls section (Windows 7 and Windows 8) displays a more extensive list of controls.
3. In the Common XAML Controls section or Common WPF Controls section, click TextBlock, and then drag the TextBlock control onto the form displayed in the Design View window.
tip Ensure that you select the TextBlock control and not the TextBox control. If you acci-dentally place the wrong control on a form, you can easily remove it by clicking the item on the form and then pressing Delete.
A TextBlock control is added to the form (you will move it to its correct location in a moment), and the Toolbox disappears from view.
tip If you want the Toolbox to remain visible but not hide any part of the form, at the right end of the Toolbox title bar, click the Auto Hide button (it looks like a pin). The Toolbox ap-pears permanently on the left side of the Visual Studio 2013 window, and the Design View window shrinks to accommodate it. (You might lose a lot of space if you have a low-reso-lution screen.) Clicking the Auto Hide button once more causes the Toolbox to disappear again.
4. The TextBlock control on the form is probably not exactly where you want it. You can click and drag the controls you have added to a form to reposition them. Using this technique, move the TextBlock control so that it is positioned toward the upper-left corner of the form. (The exact placement is not critical for this application.) Notice that you might need to click away
24 part I Introducing Microsoft Visual C# and Microsoft Visual Studio 2013
from the control and then click it again before you are able to move it in the Design View window.
The XAML description of the form in the lower pane now includes the TextBlock control, together with properties such as its location on the form, governed by the Margin property, the default text displayed by this control in the Text property, the alignment of text displayed by this control specified by the HorizontalAlignment and VerticalAlignment properties, and whether text should wrap if it exceeds the width of the control.
If you are using Windows 8.1, the XAML code for the TextBlock will look similar to this (your values for the Margin property might be slightly different, depending on where you have positioned the TextBlock control on the form):
<TextBlock HorizontalAlignment="Left" Margin="400,200,0,0" TextWrapping="Wrap" Text="TextBlock" VerticalAlignment="Top"/>
If you are using Windows 7 or Windows 8, the XAML code will be much the same, except that the units used by the Margin property operate on a different scale due to the finer resolution of Windows 8.1 devices.
The XAML pane and the Design View window have a two-way relationship with each other. You can edit the values in the XAML pane, and the changes will be reflected in the Design View window. For example, you can change the location of the TextBlock control by modifying the values in the Margin property.
5. On the View menu, click Properties Window.
If it was not already displayed, the Properties window appears at the lower right of the screen, under Solution Explorer. You can specify the properties of controls by using the XAML pane under the Design View window, but the Properties window provides a more convenient way for you to modify the properties for items on a form, as well as other items in a project.
The Properties window is context sensitive in that it displays the properties for the currently selected item. If you click the form displayed in the Design View window, outside of the TextBlock control, you can see that the Properties window displays the properties for a Grid element. If you look at the XAML pane, you should see that the TextBlock control is contained within a Grid element. All forms contain a Grid element that controls the layout of displayed items; for example, you can define tabular layouts by adding rows and columns to the Grid.
6. In the Design View window, click the TextBlock control. The Properties window displays the properties for the TextBlock control again.
7. In the Properties window, expand the Text property. Change the FontSize property to 20 px and then press Enter. This property is located next to the drop-down list box containing the name of the font, which will be different for Windows 8.1 (Global User Interface) and Windows 7 or Windows 8 (Segoe UI):

CHAPTER 1 Welcome to C# 25
Note The suffix px indicates that the font size is measured in pixels.
8. In the XAML pane below the Design View window, examine the text that defines the TextBlock control. If you scroll to the end of the line, you should see the text FontSize=“20”. Any changes that you make using the Properties window are automatically reflected in the XAML defini-tions, and vice versa.
Type over the value of the FontSize property in the XAML pane, changing it to 24. The font size of the text for the TextBlock control in the Design View window and the Properties win-dow changes.
9. In the Properties window, examine the other properties of the TextBlock control. Feel free to experiment by changing them to see their effects.
Notice that as you change the values of properties, these properties are added to the defini-tion of the TextBlock control in the XAML pane. Each control that you add to a form has a default set of property values, and these values are not displayed in the XAML pane unless you change them.
10. Change the value of the Text property of the TextBlock control from TextBlock to Please enter your name. You can do this either by editing the Text element in the XAML pane or by chang-ing the value in the Properties window (this property is located in the Common section in the Properties window).
Notice that the text displayed in the TextBlock control in the Design View window changes.
11. Click the form in the Design View window and then display the Toolbox again.
12. In the Toolbox, click and drag the TextBox control onto the form. Move the TextBox control so that it is directly below the TextBlock control.
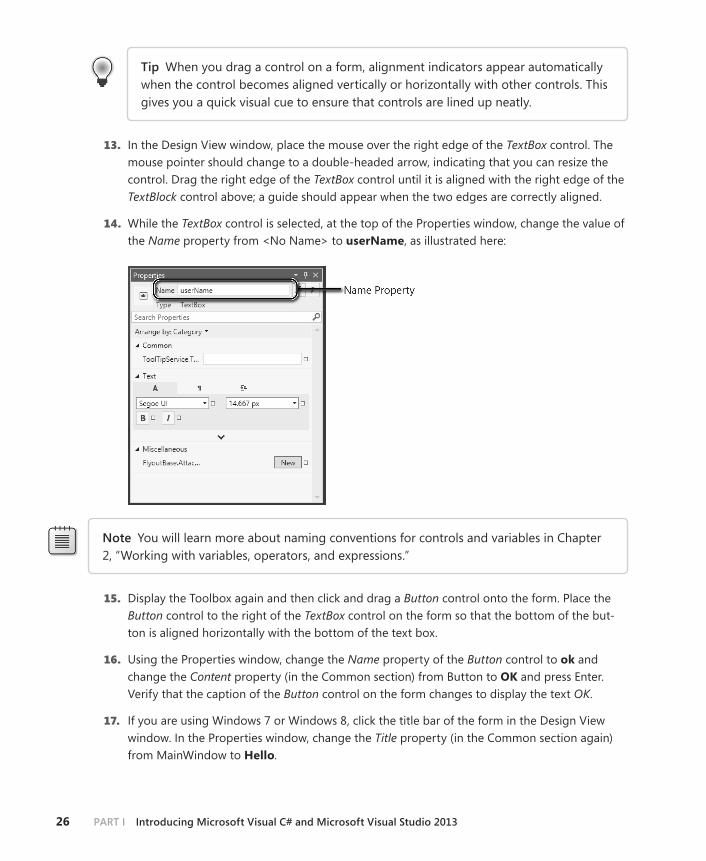
26 part I Introducing Microsoft Visual C# and Microsoft Visual Studio 2013
tip When you drag a control on a form, alignment indicators appear automatically when the control becomes aligned vertically or horizontally with other controls. This gives you a quick visual cue to ensure that controls are lined up neatly.
13. In the Design View window, place the mouse over the right edge of the TextBox control. The mouse pointer should change to a double-headed arrow, indicating that you can resize the control. Drag the right edge of the TextBox control until it is aligned with the right edge of the TextBlock control above; a guide should appear when the two edges are correctly aligned.
14. While the TextBox control is selected, at the top of the Properties window, change the value of the Name property from <No Name> to userName, as illustrated here:
Note You will learn more about naming conventions for controls and variables in Chapter 2, “Working with variables, operators, and expressions.”
15. Display the Toolbox again and then click and drag a Button control onto the form. Place the Button control to the right of the TextBox control on the form so that the bottom of the but-ton is aligned horizontally with the bottom of the text box.
16. Using the Properties window, change the Name property of the Button control to ok and change the Content property (in the Common section) from Button to OK and press Enter. Verify that the caption of the Button control on the form changes to display the text OK.
17. If you are using Windows 7 or Windows 8, click the title bar of the form in the Design View window. In the Properties window, change the Title property (in the Common section again) from MainWindow to Hello.
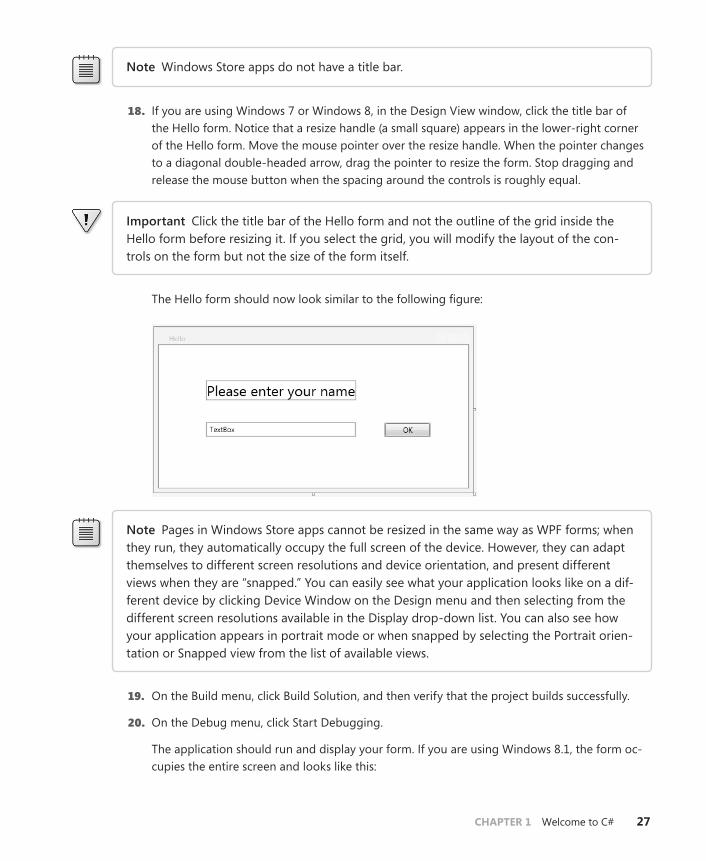
CHAPTER 1 Welcome to C# 27
Note Windows Store apps do not have a title bar.
18. If you are using Windows 7 or Windows 8, in the Design View window, click the title bar of the Hello form. Notice that a resize handle (a small square) appears in the lower-right corner of the Hello form. Move the mouse pointer over the resize handle. When the pointer changes to a diagonal double-headed arrow, drag the pointer to resize the form. Stop dragging and release the mouse button when the spacing around the controls is roughly equal.
Important Click the title bar of the Hello form and not the outline of the grid inside the Hello form before resizing it. If you select the grid, you will modify the layout of the con-trols on the form but not the size of the form itself.
The Hello form should now look similar to the following figure:
Note Pages in Windows Store apps cannot be resized in the same way as WPF forms; when they run, they automatically occupy the full screen of the device. However, they can adapt themselves to different screen resolutions and device orientation, and present different views when they are “snapped.” You can easily see what your application looks like on a dif-ferent device by clicking Device Window on the Design menu and then selecting from the different screen resolutions available in the Display drop-down list. You can also see how your application appears in portrait mode or when snapped by selecting the Portrait orien-tation or Snapped view from the list of available views.
19. On the Build menu, click Build Solution, and then verify that the project builds successfully.
20. On the Debug menu, click Start Debugging.
The application should run and display your form. If you are using Windows 8.1, the form oc-cupies the entire screen and looks like this:

28 part I Introducing Microsoft Visual C# and Microsoft Visual Studio 2013
Note When you run a Windows Store App in Debug mode in Windows 8.1, two pairs of numbers appear in the upper-left and upper-right corner of the screen. These numbers track the frame rate, and developers can use them to determine when an application starts to become less responsive than it should be (possibly an indication of performance issues). They appear only when an application runs in Debug mode. A full description of what these numbers mean is beyond the scope of this book, so you can ignore them for now.
If you are using Windows 7 or Windows 8, the form looks like this:
In the text box, you can type over what is there, type your name, and then click OK, but noth-ing happens yet. You need to add some code to indicate what should happen when the user clicks the OK button, which is what you will do next.
21. Return to Visual Studio 2013. On the DEBUG menu, click Stop Debugging.
• If you are using Windows 8.1, press the Windows key + B. This should return you to the Windows Desktop running Visual Studio, from which you can access the Debug menu.
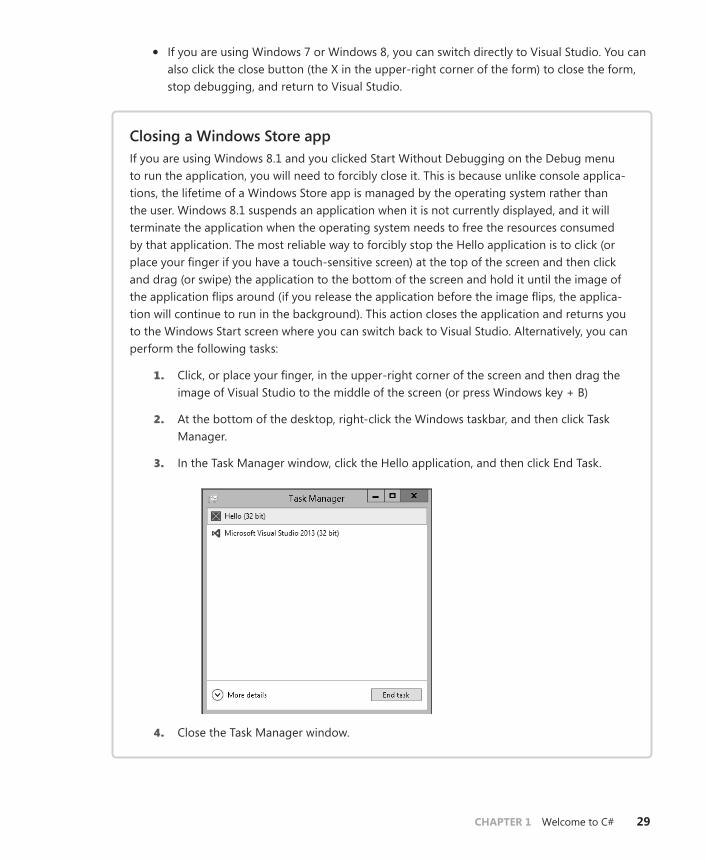
CHAPTER 1 Welcome to C# 29
• If you are using Windows 7 or Windows 8, you can switch directly to Visual Studio. You can also click the close button (the X in the upper-right corner of the form) to close the form, stop debugging, and return to Visual Studio.
Closing a Windows Store appIf you are using Windows 8.1 and you clicked Start Without Debugging on the Debug menu to run the application, you will need to forcibly close it. This is because unlike console applica-tions, the lifetime of a Windows Store app is managed by the operating system rather than the user. Windows 8.1 suspends an application when it is not currently displayed, and it will terminate the application when the operating system needs to free the resources consumed by that application. The most reliable way to forcibly stop the Hello application is to click (or place your finger if you have a touch-sensitive screen) at the top of the screen and then click and drag (or swipe) the application to the bottom of the screen and hold it until the image of the application flips around (if you release the application before the image flips, the applica-tion will continue to run in the background). This action closes the application and returns you to the Windows Start screen where you can switch back to Visual Studio. Alternatively, you can perform the following tasks:
1. Click, or place your finger, in the upper-right corner of the screen and then drag the image of Visual Studio to the middle of the screen (or press Windows key + B)
2. At the bottom of the desktop, right-click the Windows taskbar, and then click Task Manager.
3. In the Task Manager window, click the Hello application, and then click End Task.
4. Close the Task Manager window.
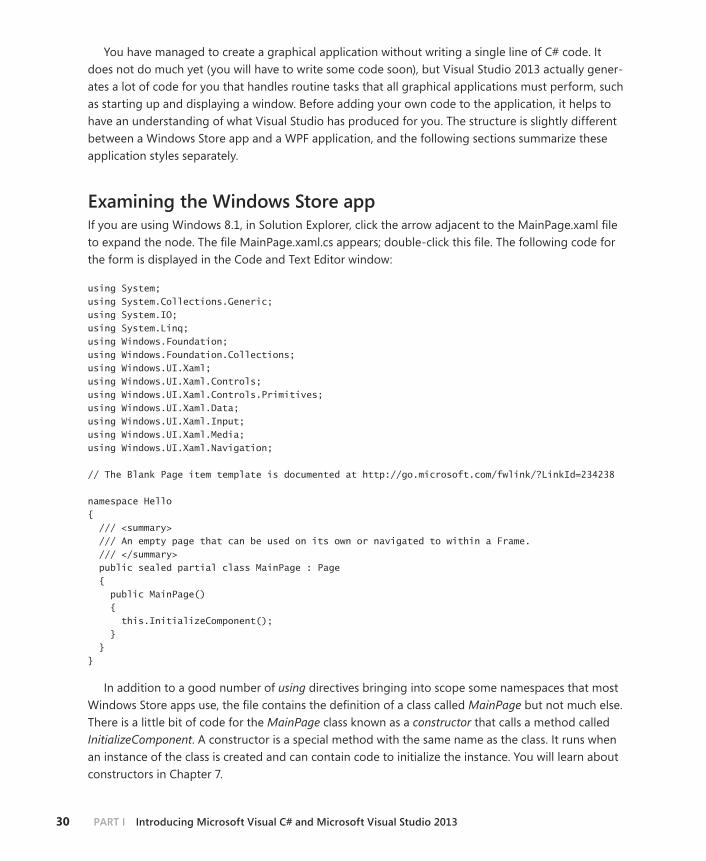
30 part I Introducing Microsoft Visual C# and Microsoft Visual Studio 2013
You have managed to create a graphical application without writing a single line of C# code. It does not do much yet (you will have to write some code soon), but Visual Studio 2013 actually gener-ates a lot of code for you that handles routine tasks that all graphical applications must perform, such as starting up and displaying a window. Before adding your own code to the application, it helps to have an understanding of what Visual Studio has produced for you. The structure is slightly different between a Windows Store app and a WPF application, and the following sections summarize these application styles separately.
examining the Windows Store appIf you are using Windows 8.1, in Solution Explorer, click the arrow adjacent to the MainPage.xaml file to expand the node. The file MainPage.xaml.cs appears; double-click this file. The following code for the form is displayed in the Code and Text Editor window:
using System; using System.Collections.Generic; using System.IO; using System.Linq; using Windows.Foundation; using Windows.Foundation.Collections; using Windows.UI.Xaml; using Windows.UI.Xaml.Controls; using Windows.UI.Xaml.Controls.Primitives; using Windows.UI.Xaml.Data; using Windows.UI.Xaml.Input; using Windows.UI.Xaml.Media; using Windows.UI.Xaml.Navigation; // The Blank Page item template is documented at http://go.microsoft.com/fwlink/?LinkId=234238 namespace Hello { /// <summary> /// An empty page that can be used on its own or navigated to within a Frame. /// </summary> public sealed partial class MainPage : Page { public MainPage() { this.InitializeComponent(); } } }
In addition to a good number of using directives bringing into scope some namespaces that most Windows Store apps use, the file contains the definition of a class called MainPage but not much else. There is a little bit of code for the MainPage class known as a constructor that calls a method called InitializeComponent. A constructor is a special method with the same name as the class. It runs when an instance of the class is created and can contain code to initialize the instance. You will learn about constructors in Chapter 7.
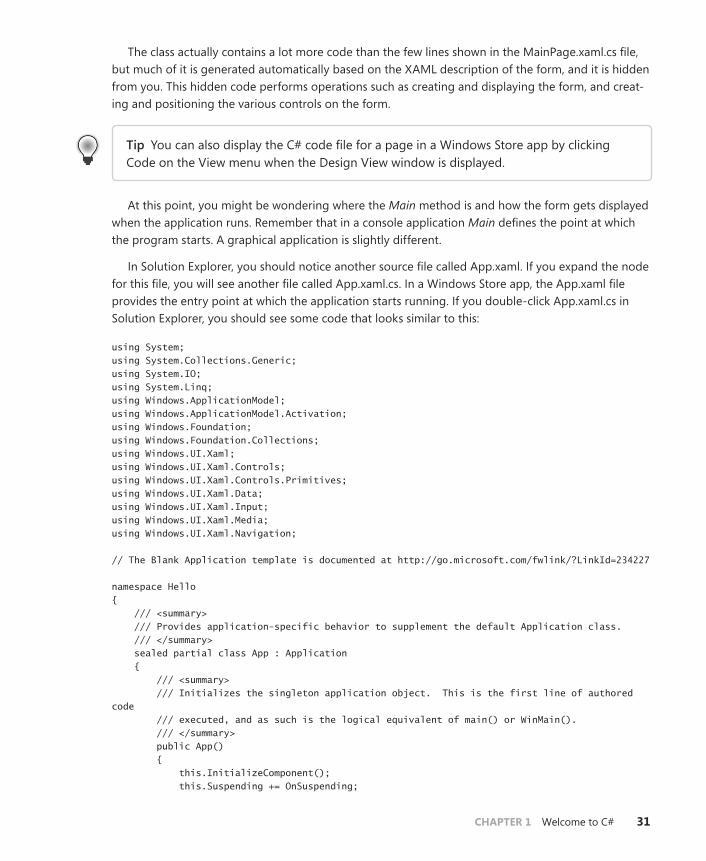
CHAPTER 1 Welcome to C# 31
The class actually contains a lot more code than the few lines shown in the MainPage.xaml.cs file, but much of it is generated automatically based on the XAML description of the form, and it is hidden from you. This hidden code performs operations such as creating and displaying the form, and creat-ing and positioning the various controls on the form.
tip You can also display the C# code file for a page in a Windows Store app by clicking Code on the View menu when the Design View window is displayed.
At this point, you might be wondering where the Main method is and how the form gets displayed when the application runs. Remember that in a console application Main defines the point at which the program starts. A graphical application is slightly different.
In Solution Explorer, you should notice another source file called App.xaml. If you expand the node for this file, you will see another file called App.xaml.cs. In a Windows Store app, the App.xaml file provides the entry point at which the application starts running. If you double-click App.xaml.cs in Solution Explorer, you should see some code that looks similar to this:
using System; using System.Collections.Generic; using System.IO; using System.Linq; using Windows.ApplicationModel; using Windows.ApplicationModel.Activation; using Windows.Foundation; using Windows.Foundation.Collections; using Windows.UI.Xaml; using Windows.UI.Xaml.Controls; using Windows.UI.Xaml.Controls.Primitives; using Windows.UI.Xaml.Data; using Windows.UI.Xaml.Input; using Windows.UI.Xaml.Media; using Windows.UI.Xaml.Navigation; // The Blank Application template is documented at http://go.microsoft.com/fwlink/?LinkId=234227 namespace Hello { /// <summary> /// Provides application-specific behavior to supplement the default Application class. /// </summary> sealed partial class App : Application { /// <summary> /// Initializes the singleton application object. This is the first line of authored code /// executed, and as such is the logical equivalent of main() or WinMain(). /// </summary> public App() { this.InitializeComponent(); this.Suspending += OnSuspending;
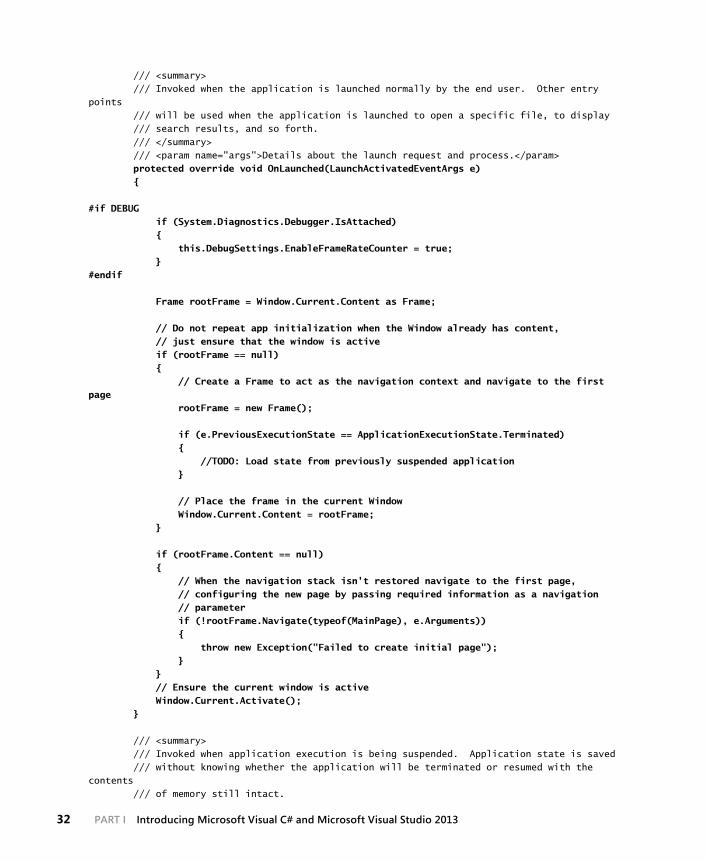
32 PART I Introducing Microsoft Visual C# and Microsoft Visual Studio 2013
/// <summary> /// Invoked when the application is launched normally by the end user. Other entry points /// will be used when the application is launched to open a specific file, to display /// search results, and so forth. /// </summary> /// <param name="args">Details about the launch request and process.</param> protected override void OnLaunched(LaunchActivatedEventArgs e) {
#if DEBUG if (System.Diagnostics.Debugger.IsAttached) { this.DebugSettings.EnableFrameRateCounter = true; }#endif
Frame rootFrame = Window.Current.Content as Frame;
// Do not repeat app initialization when the Window already has content, // just ensure that the window is active if (rootFrame == null) { // Create a Frame to act as the navigation context and navigate to the first page rootFrame = new Frame();
if (e.PreviousExecutionState == ApplicationExecutionState.Terminated) { //TODO: Load state from previously suspended application }
// Place the frame in the current Window Window.Current.Content = rootFrame; }
if (rootFrame.Content == null) { // When the navigation stack isn't restored navigate to the first page, // configuring the new page by passing required information as a navigation // parameter if (!rootFrame.Navigate(typeof(MainPage), e.Arguments)) { throw new Exception("Failed to create initial page"); } } // Ensure the current window is active Window.Current.Activate(); }
/// <summary> /// Invoked when application execution is being suspended. Application state is saved /// without knowing whether the application will be terminated or resumed with the contents /// of memory still intact.
C#vNext_ch01.indd 32C#vNext_ch01.indd 32 1/15/15 9:06 AM1/15/15 9:06 AM
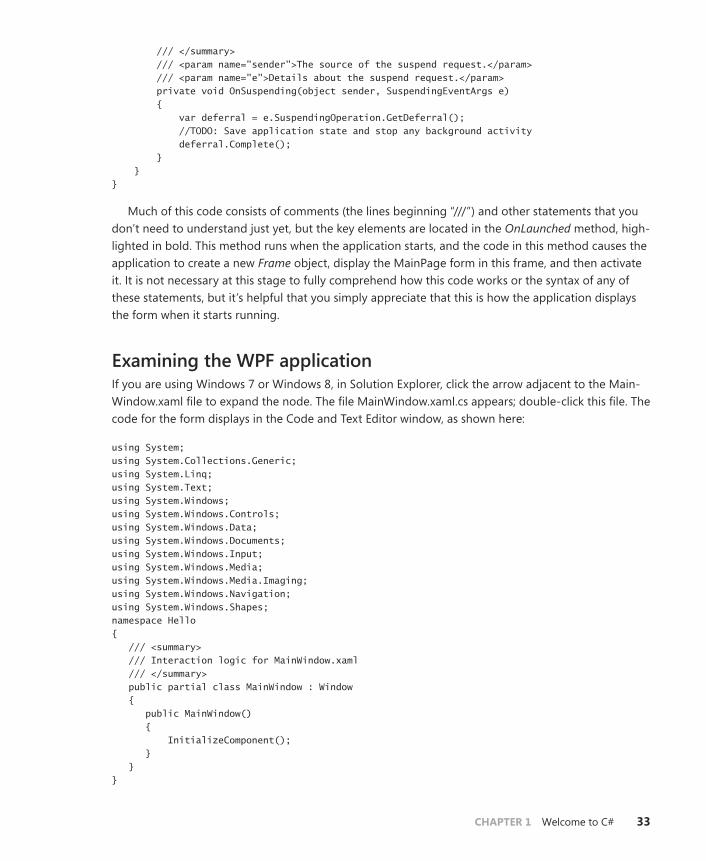
CHAPTER 1 Welcome to C# 33
/// </summary> /// <param name="sender">The source of the suspend request.</param> /// <param name="e">Details about the suspend request.</param> private void OnSuspending(object sender, SuspendingEventArgs e) { var deferral = e.SuspendingOperation.GetDeferral(); //TODO: Save application state and stop any background activity deferral.Complete(); } } }
Much of this code consists of comments (the lines beginning “///”) and other statements that you don’t need to understand just yet, but the key elements are located in the OnLaunched method, high-lighted in bold. This method runs when the application starts, and the code in this method causes the application to create a new Frame object, display the MainPage form in this frame, and then activate it. It is not necessary at this stage to fully comprehend how this code works or the syntax of any of these statements, but it’s helpful that you simply appreciate that this is how the application displays the form when it starts running.
examining the WpF applicationIf you are using Windows 7 or Windows 8, in Solution Explorer, click the arrow adjacent to the Main-Window.xaml file to expand the node. The file MainWindow.xaml.cs appears; double-click this file. The code for the form displays in the Code and Text Editor window, as shown here:
using System; using System.Collections.Generic; using System.Linq; using System.Text; using System.Windows; using System.Windows.Controls; using System.Windows.Data; using System.Windows.Documents; using System.Windows.Input; using System.Windows.Media; using System.Windows.Media.Imaging; using System.Windows.Navigation; using System.Windows.Shapes; namespace Hello { /// <summary> /// Interaction logic for MainWindow.xaml /// </summary> public partial class MainWindow : Window { public MainWindow() { InitializeComponent(); } } }
34 part I Introducing Microsoft Visual C# and Microsoft Visual Studio 2013
This code looks similar to that for the Windows Store app, but there are some significant differ-ences; many of the namespaces referenced by the using directives at the top of the file are different. For example, WPF applications make use of objects defined in namespaces that begin with the prefix System.Windows, whereas Windows Store apps use objects defined in namespaces that start with Windows.UI. This difference is not just cosmetic. These namespaces are implemented by different as-semblies, and the controls and functionality that these assemblies provide are different between WPF and Windows Store apps, although they might have similar names. Going back to the earlier exercise, you added TextBlock, TextBox, and Button controls to the WPF form and the Windows Store app. Although these controls have the same name in each style of application, they are defined in different assemblies: Windows.UI.Xaml.Controls for Windows Store apps, and System.Windows.Controls for WPF applications. The controls for Windows Store apps have been specifically designed and optimized for touch interfaces, whereas the WPF controls are intended primarily for use in mouse-driven systems.
As with the code in the Windows Store app, the constructor in the MainWindow class initializes the WPF form by calling the InitializeComponent method. Again, as before, the code for this method is hidden from you, and it performs operations such as creating and displaying the form, and creating and positioning the various controls on the form.
The way in which a WPF application specifies the initial form to be displayed is different from that of a Windows Store app. Like a Windows Store app, it defines an App object defined in the App.xaml file to provide the entry point for the application, but the form to display is specified declaratively as part of the XAML code rather than programmatically. If you double-click the App.xaml file in Solution Explorer (not App.xaml.cs), you can examine the XAML description. One property in the XAML code is called StartupUri, and it refers to the MainWindow.xaml file, as shown in bold in the following code example:
<Application x:Class="Hello.App" xmlns="http://schemas.microsoft.com/winfx/2006/xaml/presentation" xmlns:x="http://schemas.microsoft.com.winfx/2006/xaml" StartupUri="MainWindow.xaml"> <Application.Resources> </Application.Resources> </Application>
In a WPF application, the StartupUri property of the App object indicates which form to display.
adding code to the graphical applicationNow that you know a little bit about the structure of a graphical application, the time has come to write some code to make your application actually do something.
Write the code for the OK button
1. In the Design View window, open the MainPage.xaml file (Windows 8.1) or MainWindow.xaml file (Windows 7 or Windows 8) (double-click MainPage.xaml or MainWindow.xaml in Solution Explorer).
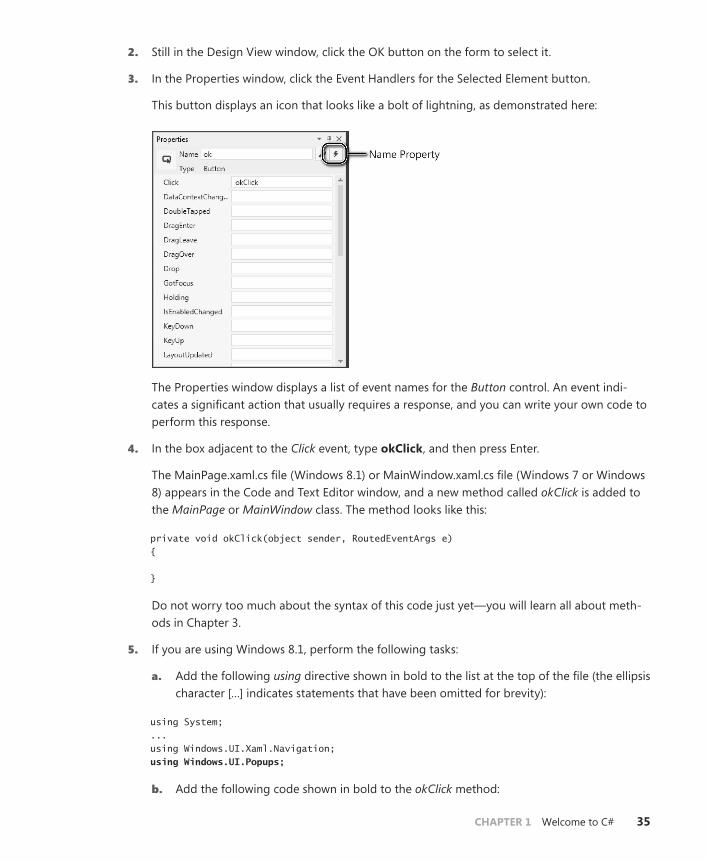
CHAPTER 1 Welcome to C# 35
2. Still in the Design View window, click the OK button on the form to select it.
3. In the Properties window, click the Event Handlers for the Selected Element button.
This button displays an icon that looks like a bolt of lightning, as demonstrated here:
The Properties window displays a list of event names for the Button control. An event indi-cates a significant action that usually requires a response, and you can write your own code to perform this response.
4. In the box adjacent to the Click event, type okClick, and then press Enter.
The MainPage.xaml.cs file (Windows 8.1) or MainWindow.xaml.cs file (Windows 7 or Windows 8) appears in the Code and Text Editor window, and a new method called okClick is added to the MainPage or MainWindow class. The method looks like this:
private void okClick(object sender, RoutedEventArgs e) { }
Do not worry too much about the syntax of this code just yet—you will learn all about meth-ods in Chapter 3.
5. If you are using Windows 8.1, perform the following tasks:
a. Add the following using directive shown in bold to the list at the top of the file (the ellipsis character […] indicates statements that have been omitted for brevity):
using System; ... using Windows.UI.Xaml.Navigation; using Windows.UI.Popups;
b. Add the following code shown in bold to the okClick method:
36 PART I Introducing Microsoft Visual C# and Microsoft Visual Studio 2013
{ MessageDialog msg = new MessageDialog("Hello " + userName.Text); msg.ShowAsync();}
This code will run when the user clicks the OK button. Again, do not worry too much about the syntax, just ensure that you copy it exactly as shown; you will fi nd out what these state-ments mean in the next few chapters. The key things to understand are that the fi rst state-ment creates a MessageDialog object with the message “Hello <YourName>”, where <Your-Name> is the name that you type into the TextBox on the form. The second statement displays the MessageDialog, causing it to appear on the screen. The MessageDialog class is defi ned in the Windows.UI.Popups namespace, which is why you added it in step a.
This code will display a warning concerning the use of an asynchronous method when it is compiled. You do not have to be concerned about this warning. Asynchronous methods are explained more fully in Chapter 24
6. If you are using Windows 7 or Windows 8, just add the following single statement shown in bold to the okClick method:
void okClick(object sender, RoutedEventArgs e){ MessageBox.Show("Hello " + userName.Text);}
This code performs a similar function to that of the Windows Store app, except that it uses a different class called MessageBox. This class is defi ned in the System.Windows namespace, which is already referenced by the existing using directives at the top of the fi le, so you don’t need to add it yourself.
7. Click the MainPage.xaml tab or the MainWindow.xaml tab above the Code and Text Editor window to display the form in the Design View window again.
8. In the lower pane displaying the XAML description of the form, examine the Button element, but be careful not to change anything. Notice that it now contains an element called Click that refers to the okClick method.
<Button x:Name="ok" ... Click="okClick" />
9. On the Debug menu, click Start Debugging.
10. When the form appears, in the text box type your name over the existing text, and then click OK.
If you are using Windows 8.1, a message dialog appears across the middle of the screen, wel-coming you by name.
C#vNext_ch01.indd 36C#vNext_ch01.indd 36 1/15/15 10:01 AM1/15/15 10:01 AM

CHAPTER 1 Welcome to C# 37
If you are using Windows 7 or Windows 8, a message box appears displaying the following greeting:
11. Click Close in the message dialog (Windows 8.1) or OK (Windows 7 or Windows 8) in the mes-sage box.
12. Return to Visual Studio 2013 and then, on the Debug menu, click Stop Debugging.
38 part I Introducing Microsoft Visual C# and Microsoft Visual Studio 2013
Summary
In this chapter, you saw how to use Visual Studio 2013 to create, build, and run applications. You created a console application that displays its output in a console window, and you created a WPF application with a simple GUI.
■■ If you want to continue to the next chapter, keep Visual Studio 2013 running, and turn to Chapter 2.
■■ If you want to exit Visual Studio 2013 now, on the File menu, click Exit. If you see a Save dialog box, click Yes to save the project.
Quick Reference
To Do this
Create a new console application using Visual Studio 2013 On the File menu, point to New, and then click Project to open the New Project dialog box. In the left pane, under Installed Templates, click Visual C#. In the middle pane, click Console Application. in the Location box, specify a directory for the project files. Type a name for the project and then click OK.
Create a new Windows Store blank graphical application for Windows 8.1 using Visual Studio 2013
On the File menu, point to New, and then click Project to open the New Project dialog box. In the left pane, in the Installed Templates section, expand Visual C#, and then click Windows Store. In the middle pane, click Blank App (XAML). In the Location box, specify a directory for the project files. Type a name for the project and then click OK.
Create a new WPF graphical application for Windows 7 or Windows 8 using Visual Studio 2013
On the File menu, point to New, and then click Project to open the New Project dialog box. In the left pane, in the Installed Templates section, expand Visual C#, and then click Windows. In the middle pane, click WPF Application. Specify a directory for the project files in the Location box. Type a name for the project and then click OK.
Build the application On the Build menu, click Build Solution.
Run the application in Debug mode On the Debug menu, click Start Debugging.
Run the application without debugging On the Debug menu, click Start Without Debugging.
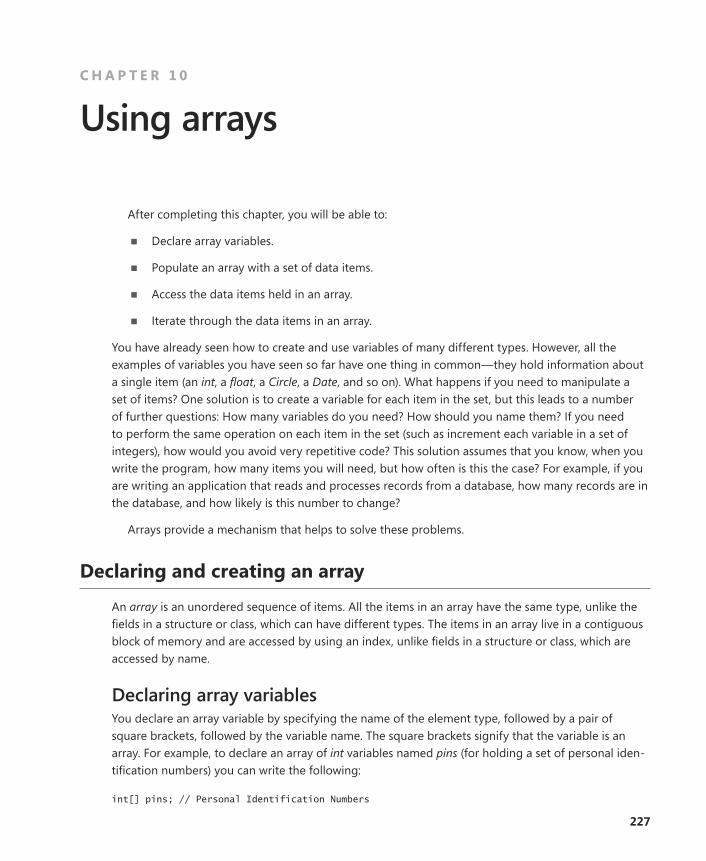
227
C H A P T E R 1 0
Using arrays
After completing this chapter, you will be able to:
■■ Declare array variables.
■■ Populate an array with a set of data items.
■■ Access the data items held in an array.
■■ Iterate through the data items in an array.
You have already seen how to create and use variables of many different types. However, all the examples of variables you have seen so far have one thing in common—they hold information about a single item (an int, a float, a Circle, a Date, and so on). What happens if you need to manipulate a set of items? One solution is to create a variable for each item in the set, but this leads to a number of further questions: How many variables do you need? How should you name them? If you need to perform the same operation on each item in the set (such as increment each variable in a set of integers), how would you avoid very repetitive code? This solution assumes that you know, when you write the program, how many items you will need, but how often is this the case? For example, if you are writing an application that reads and processes records from a database, how many records are in the database, and how likely is this number to change?
Arrays provide a mechanism that helps to solve these problems.
Declaring and creating an array
An array is an unordered sequence of items. All the items in an array have the same type, unlike the fields in a structure or class, which can have different types. The items in an array live in a contiguous block of memory and are accessed by using an index, unlike fields in a structure or class, which are accessed by name.
Declaring array variablesYou declare an array variable by specifying the name of the element type, followed by a pair of square brackets, followed by the variable name. The square brackets signify that the variable is an array. For example, to declare an array of int variables named pins (for holding a set of personal iden-tification numbers) you can write the following:
int[] pins; // Personal Identification Numbers
228 part II Understanding the C# object model
Note If you are a Microsoft Visual Basic programmer, you should observe that square brackets, not parentheses, are used in the declaration. If you’re familiar with C and C++, also note that the size of the array is not part of the declaration. Java programmers should dis-cern that the square brackets must be placed before the variable name.
You are not restricted to primitive types as array elements. You can also create arrays of structures, enumerations, and classes. For example, you can create an array of Date structures like this:
Date[] dates;
tip It is often useful to give array variables plural names, such as places (where each ele-ment is a Place), people (where each element is a Person), or times (where each element is a Time).
Creating an array instanceArrays are reference types, regardless of the type of their elements. This means that an array variable refers to a contiguous block of memory holding the array elements on the heap, just as a class vari-able refers to an object on the heap. (For a description of values and references and the differences between the stack and the heap, see Chapter 8, “Understanding values and references.”) This rule ap-plies regardless of the type of the data items in the array. Even if the array contains a value type such as int, the memory will still be allocated on the heap; this is the one case where value types are not allocated memory on the stack.
Remember that when you declare a class variable, memory is not allocated for the object until you create the instance by using new. Arrays follow the same pattern: when you declare an array variable, you do not declare its size and no memory is allocated (other than to hold the reference on the stack). The array is given memory only when the instance is created, and this is also the point at which you specify the size of the array.
To create an array instance, you use the new keyword followed by the element type, followed by the size of the array you’re creating between square brackets. Creating an array also initializes its elements by using the now familiar default values (0, null, or false, depending on whether the type is numeric, a reference, or a Boolean, respectively). For example, to create and initialize a new array of four integers for the pins variable declared earlier, you write this:
pins = new int[4];
The following graphic illustrates what happens when you declare an array, and later when you cre-ate an instance of the array:
CHAPTER 10 Using arrays 229
Because the memory for the array instance is allocated dynamically, the size of the array does not have to be a constant; it can be calculated at run time, as shown in this example:
int size = int.Parse(Console.ReadLine()); int[] pins = new int[size];
You’re can also create an array whose size is 0. This might sound bizarre, but it’s useful for situa-tions in which the size of the array is determined dynamically and could even be 0. An array of size 0 is not a null array; it is an array containing zero elements.
Populating and using an array
When you create an array instance, all the elements of the array are initialized to a default value depending on their type. For example, all numeric values default to 0, objects are initialized to null, DateTime values are set to the date and time “01/01/0001 00:00:00”, and strings are initialized to null. You can modify this behavior and initialize the elements of an array to specific values if you prefer. You achieve this by providing a comma-separated list of values between a pair of braces. For example, to initialize pins to an array of four int variables whose values are 9, 3, 7, and 2, you write this:
int[] pins = new int[4]{ 9, 3, 7, 2 };
The values between the braces do not have to be constants; they can be values calculated at run time, as shown in the following example, which populates the pins array with four random numbers:
Random r = new Random(); int[] pins = new int[4]{ r.Next() % 10, r.Next() % 10, r.Next() % 10, r.Next() % 10 };
Note The System.Random class is a pseudorandom number generator. The Next method returns a nonnegative random integer in the range 0 to Int32.MaxValue by default. The Next method is overloaded, and other versions enable you to specify the minimum value and maximum value of the range. The default constructor for the Random class seeds the random number generator with a time-dependent seed value, which reduces the possibility of the class duplicating a sequence of random numbers. Using an overloaded version of the constructor, you can provide your own seed value. That way, you can generate a repeatable sequence of random numbers for testing purposes.
230 part II Understanding the C# object model
The number of values between the braces must exactly match the size of the array instance being created:
int[] pins = new int[3]{ 9, 3, 7, 2 }; // compile-time error int[] pins = new int[4]{ 9, 3, 7 }; // compile-time error int[] pins = new int[4]{ 9, 3, 7, 2 }; // OK
When you’re initializing an array variable in this way, you can actually omit the new expression and the size of the array. In this case, the compiler calculates the size from the number of initializers and generates code to create the array, such as in the following example:
int[] pins = { 9, 3, 7, 2 };
If you create an array of structures or objects, you can initialize each structure in the array by call-ing the structure or class constructor, as shown in this example:
Time[] schedule = { new Time(12,30), new Time(5,30) };
Creating an implicitly typed arrayThe element type when you declare an array must match the type of elements that you attempt to store in the array. For example, if you declare pins to be an array of int, as shown in the preceding examples, you cannot store a double, string, struct, or anything that is not an int in this array. If you specify a list of initializers when declaring an array, you can let the C# compiler infer the actual type of the elements in the array for you, like this:
var names = new[]{"John", "Diana", "James", "Francesca"};
In this example, the C# compiler determines that the names variable is an array of strings. It is worth pointing out a couple of syntactic quirks in this declaration. First, you omit the square brackets from the type; the names variable in this example is declared simply as var, not var[]. Second, you must specify the new operator and square brackets before the initializer list.
If you use this syntax, you must ensure that all the initializers have the same type. This next ex-ample causes the compile-time error “No best type found for implicitly typed array”:
var bad = new[]{"John", "Diana", 99, 100};
However, in some cases, the compiler will convert elements to a different type, if doing so makes sense. In the following code, the numbers array is an array of double because the constants 3.5 and 99.999 are both double, and the C# compiler can convert the integer values 1 and 2 to double values:
var numbers = new[]{1, 2, 3.5, 99.999};
Generally, it is best to avoid mixing types and hoping that the compiler will convert them for you.
Implicitly typed arrays are most useful when you are working with anonymous types, as described in Chapter 7, “Creating and managing classes and objects.” The following code creates an array of anonymous objects, each containing two fields specifying the name and age of the members of my family:
CHAPTER 10 Using arrays 231
var names = new[] { new { Name = "John", Age = 47 }, new { Name = "Diana", Age = 46 }, new { Name = "James", Age = 20 }, new { Name = "Francesca", Age = 18 } };
The fields in the anonymous types must be the same for each element of the array.
accessing an individual array elementTo access an individual array element, you must provide an index indicating which element you require. Array indexes are zero-based; thus, the initial element of an array lives at index 0 and not index 1. An index value of 1 accesses the second element. For example, you can read the contents of element 2 of the pins array into an int variable by using the following code:
int myPin; myPin = pins[2];
Similarly, you can change the contents of an array by assigning a value to an indexed element:
myPin = 1645; pins[2] = myPin;
All array element access is bounds-checked. If you specify an index that is less than 0 or greater than or equal to the length of the array, the compiler throws an IndexOutOfRangeException exception, as in this example:
try { int[] pins = { 9, 3, 7, 2 }; Console.WriteLine(pins[4]); // error, the 4th and last element is at index 3 } catch (IndexOutOfRangeException ex) { ... }
Iterating through an arrayAll arrays are actually instances of the System.Array class in the Microsoft .NET Framework, and this class defines a number of useful properties and methods. For example, you can query the Length property to discover how many elements an array contains and iterate through all the elements of an array by using a for statement. The following sample code writes the array element values of the pins array to the console:
int[] pins = { 9, 3, 7, 2 }; for (int index = 0; index < pins.Length; index++) { int pin = pins[index]; Console.WriteLine(pin); }
232 part II Understanding the C# object model
Note Length is a property and not a method, which is why you don’t use parentheses when you call it. You can learn about properties in Chapter 15, “Implementing properties to ac-cess fields.”
It is common for new programmers to forget that arrays start at element 0 and that the last ele-ment is numbered Length – 1. C# provides the foreach statement with which you can iterate through the elements of an array without worrying about these issues. For example, here’s the preceding for statement rewritten as an equivalent foreach statement:
int[] pins = { 9, 3, 7, 2 }; foreach (int pin in pins) { Console.WriteLine(pin); }
The foreach statement declares an iteration variable (in this example, int pin) that automatically acquires the value of each element in the array. The type of this variable must match the type of the elements in the array. The foreach statement is the preferred way to iterate through an array; it ex-presses the intention of the code directly, and all of the for loop scaffolding drops away. However, in a few cases, you’ll find that you have to revert to a for statement:
■■ A foreach statement always iterates through the entire array. If you want to iterate through only a known portion of an array (for example, the first half) or bypass certain elements (for example, every third element), it’s easier to use a for statement.
■■ A foreach statement always iterates from index 0 through index Length – 1. If you want to iter-ate backward or in some other sequence, it’s easier to use a for statement.
■■ If the body of the loop needs to know the index of the element rather than just the value of the element, you’ll have to use a for statement.
■■ If you need to modify the elements of the array, you’ll have to use a for statement. This is because the iteration variable of the foreach statement is a read-only copy of each element of the array.
tip It’s perfectly safe to attempt to iterate through a zero-length array by using a foreach statement.
You can declare the iteration variable as a var and let the C# compiler work out the type of the variable from the type of the elements in the array. This is especially useful if you don’t actually know the type of the elements in the array, such as when the array contains anonymous objects. The follow-ing example demonstrates how you can iterate through the array of family members shown earlier:
var names = new[] { new { Name = "John", Age = 47 }, new { Name = "Diana", Age = 46 }, new { Name = "James", Age = 20 },
CHAPTER 10 Using arrays 233
new { Name = "Francesca", Age = 18 } }; foreach (var familyMember in names) { Console.WriteLine("Name: {0}, Age: {1}", familyMember.Name, familyMember.Age); }
passing arrays as parameters and return values for a methodYou can define methods that take arrays as parameters or pass them back as return values.
The syntax for passing an array as a parameter is much the same as declaring an array. For exam-ple, the code sample that follows defines a method called ProcessData that takes an array of integers as a parameter. The body of the method iterates through the array and performs some unspecified processing on each element:
public void ProcessData(int[] data) { foreach (int i in data) { ... } }
It is important to remember that arrays are reference objects, so if you modify the contents of an array passed as a parameter inside a method such as ProcessData, the modification is visible through all references to the array, including the original argument passed as the parameter.
To return an array from a method, you specify the type of the array as the return type. In the method, you create and populate the array. The following example prompts the user for the size of an array, followed by the data for each element. The array created by the method is passed back as the return value:
public int[] ReadData() { Console.WriteLine("How many elements?"); string reply = Console.ReadLine(); int numElements = int.Parse(reply); int[] data = new int[numElements]; for (int i = 0; i < numElements; i++) { Console.WriteLine("Enter data for element {0}", i); reply = Console.ReadLine(); int elementData = int.Parse(reply); data[i] = elementData; } return data; }
You can call the ReadData method like this:
int[] data = ReadData();
234 part II Understanding the C# object model
array parameters and the main methodYou might have noticed that the Main method for an application takes an array of strings as a parameter:
static void Main(string[] args) { ... }
Remember that the Main method is called when your program starts running; it is the entry point of your application. If you start the application from the command line, you can specify additional command-line arguments. The Microsoft Windows operating system passes these arguments to the Common Language Runtime (CLR), which in turn passes them as arguments to the Main method. This mechanism gives you a simple way to provide a user with a way to give information when an application starts running rather than prompting the user interac-tively, which is useful if you want to build utilities that can be run from automated scripts.
The following example is taken from a utility application called MyFileUtil that processes files. It expects a set of file names on the command line, and it calls the ProcessFile method (not shown) to handle each file specified:
static void Main(string[] args) { foreach (string filename in args) { ProcessFile(filename); } }
The user can run the MyFileUtil application from the command line like this:
MyFileUtil C:\Temp\TestData.dat C:\Users\John\Documents\MyDoc.txt
Each command line argument is separated by a space. It is up to the MyFileUtil application to verify that these arguments are valid.
Copying arrays
Arrays are reference types (remember that an array is an instance of the System.Array class). An array variable contains a reference to an array instance. This means that when you copy an array variable, you actually end up with two references to the same array instance, as demonstrated in the following example:
int[] pins = { 9, 3, 7, 2 }; int[] alias = pins; // alias and pins refer to the same array instance
CHAPTER 10 Using arrays 235
In this example, if you modify the value at pins[1], the change will also be visible by reading alias[1].
If you want to make a copy of the array instance (the data on the heap) that an array variable refers to, you have to do two things. First, you create a new array instance of the same type and the same length as the array you are copying. Second, you copy the data element by element from the original array to the new array, as in this example:
int[] pins = { 9, 3, 7, 2 }; int[] copy = new int[pins.Length]; for (int i = 0; i < pins.Length; i++) { copy[i] = pins[i]; }
Note that this code uses the Length property of the original array to specify the size of the new array.
Copying an array is actually a common requirement of many applications—so much so that the System.Array class provides some useful methods that you can employ to copy an array rather than writing your own code. For example, the CopyTo method copies the contents of one array into an-other array given a specified starting index. The following example copies all the elements from the pins array to the copy array starting at element zero:
int[] pins = { 9, 3, 7, 2 }; int[] copy = new int[pins.Length]; pins.CopyTo(copy, 0);
Another way to copy the values is to use the System.Array static method named Copy. As with CopyTo, you must initialize the target array before calling Copy:
int[] pins = { 9, 3, 7, 2 }; int[] copy = new int[pins.Length]; Array.Copy(pins, copy, copy.Length);
Note Ensure that you specify a valid value for the length parameter of the Array.Copy method. If you provide a negative value, the method throws an ArgumentOutOf RangeException exception. If you specify a value that is greater than the number of elements in the source array, the method throws an ArgumentException exception.
Yet another alternative is to use the System.Array instance method named Clone. You can call this method to create an entire array and copy it in one action:
int[] pins = { 9, 3, 7, 2 }; int[] copy = (int[])pins.Clone();
236 part II Understanding the C# object model
Note Clone methods are described in Chapter 8. The Clone method of the Array class re-turns an object rather than Array, which is why you must cast it to an array of the appropri-ate type when you use it. Furthermore, the Clone, CopyTo, and Copy methods all create a shallow copy of an array (shallow and deep copying are also described in Chapter 8). If the elements in the array being copied contain references, the Clone method simply copies the references rather than the objects being referred to. After copying, both arrays refer to the same set of objects. If you need to create a deep copy of such an array, you must use ap-propriate code in a for loop.
Using multidimensional arrays
The arrays shown so far have contained a single dimension, and you can think of them as simple lists of values. You can create arrays with more than one dimension. For example, to create a two-dimen-sional array, you specify an array that requires two integer indexes. The following code creates a two-dimensional array of 24 integers called items. If it helps, you can think of the array as a table with the first dimension specifying a number of rows, and the second specifying a number of columns.
int[,] items = new int[4, 6];
To access an element in the array, you provide two index values to specify the “cell” holding the element. (A cell is the intersection of a row and a column.) The following code shows some examples using the items array:
items[2, 3] = 99; // set the element at cell(2,3) to 99 items[2, 4] = items [2,3]; // copy the element in cell(2, 3) to cell(2, 4) items[2, 4]++; // increment the integer value at cell(2, 4)
There is no limit on the number of dimensions that you can specify for an array. The next code example creates and uses an array called cube that contains three dimensions. Notice that you must specify three indexes to access each element in the array.
int[, ,] cube = new int[5, 5, 5]; cube[1, 2, 1] = 101; cube[1, 2, 2] = cube[1, 2, 1] * 3;
At this point, it is worth giving a word of caution about creating arrays with more than three dimensions. Specifically, arrays can consume a lot of memory. The cube array contains 125 elements (5 * 5 * 5). A four-dimensional array for which each dimension has a size of 5 contains 625 elements. If you start to create arrays with three or more dimensions, you can soon run out of memory. Therefore, you should always be prepared to catch and handle OutOfMemoryException exceptions when you use multidimensional arrays.
CHAPTER 10 Using arrays 237
Creating jagged arraysIn C#, ordinary multidimensional arrays are sometimes referred to as rectangular arrays. Each dimen-sion has a regular shape. For example, in the following tabular two-dimensional items array, every row has a column containing 40 elements, and there are 160 elements in total:
int[,] items = new int[4, 40];
As mentioned in the previous section, multidimensional arrays can consume a lot of memory. If the application uses only some of the data in each column, allocating memory for unused elements is a waste. In this scenario, you can use a jagged array, for which each column has a different length, like this:
int[][] items = new int[4][]; int[] columnForRow0 = new int[3]; int[] columnForRow1 = new int[10]; int[] columnForRow2 = new int[40]; int[] columnForRow3 = new int[25]; items[0] = columnForRow0; items[1] = columnForRow1; items[2] = columnForRow2; items[3] = columnForRow3; ...
In this example, the application requires only 3 elements in the first column, 10 elements in the second column, 40 elements in the third column, and 25 elements in the final column. This code illustrates an array of arrays—rather than items being a two-dimensional array, it has only a single dimension, but the elements in that dimension are themselves arrays. Furthermore, the total size of the items array is 78 elements rather than 160; no space is allocated for elements that the application is not going to use.
It is worth highlighting some of the syntax in this example. The following declaration specifies that items is an array of arrays of int.
int[][] items;
The following statement initializes items to hold four elements, each of which is an array of inde-terminate length:
items = new int[4][];
The arrays columnForRow0 to columnForRow3 are all single-dimensional int arrays, initialized to hold the required amount of data for each column. Finally, each column array is assigned to the ap-propriate elements in the items array, like this:
items[0] = columnForRow0;
Recall that arrays are reference objects, so this statement simply adds a reference to columnFor-Row0 to the first element in the items array; it does not actually copy any data. You can populate data

238 part II Understanding the C# object model
in this column either by assigning a value to an indexed element in columnForRow0 or by referencing it through the items array. The following statements are equivalent:
columnForRow0[1] = 99; items[0][1] = 99;
You can extend this idea further if you want to create arrays of arrays of arrays rather than rectan-gular three-dimensional arrays, and so on.
Note If you have written code using the Java programming language in the past, you should be familiar with this concept. Java does not have multidimensional arrays; instead, you can create arrays of arrays exactly as just described.
In the following exercise, you will use arrays to implement an application that deals playing cards as part of a card game. The application displays a form with four hands of cards dealt at random from a regular (52-card) pack of playing cards. You will complete the code that deals the cards for each hand.
Use arrays to implement a card game
1. Start Microsoft Visual Studio 2013 if it is not already running.
2. Open the Cards project, which is located in the \Microsoft Press\Visual CSharp Step By Step\Chapter 10\Windows X\Cards folder in your Documents folder.
3. On the Debug menu, click Start Debugging to build and run the application.
A form appears with the caption Card Game, four text boxes (labeled North, South, East, and West), and a button with the caption Deal.
If you are using Windows 7, the form looks like this:
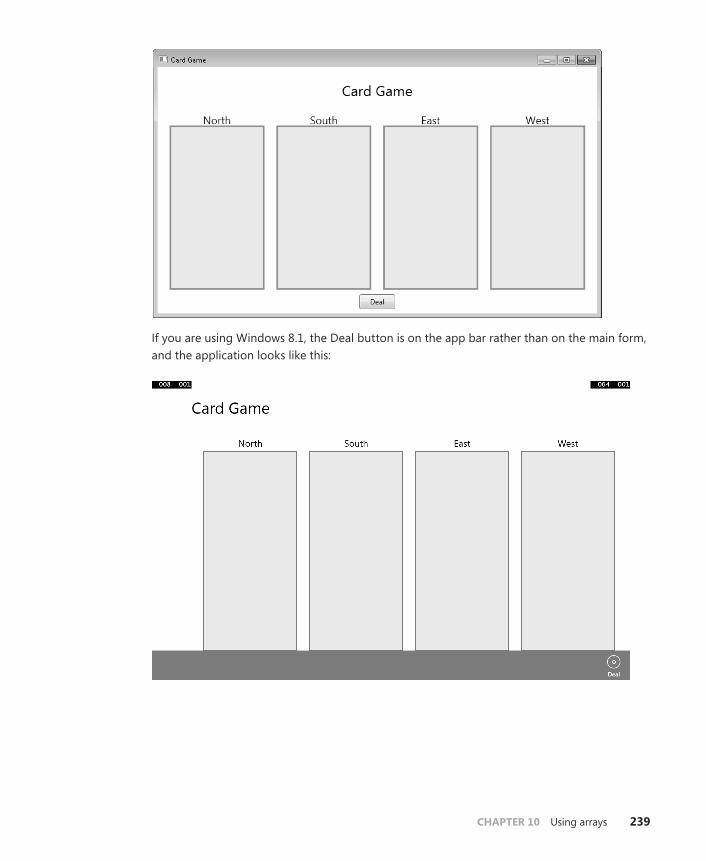
CHAPTER 10 Using arrays 239
If you are using Windows 8.1, the Deal button is on the app bar rather than on the main form, and the application looks like this:
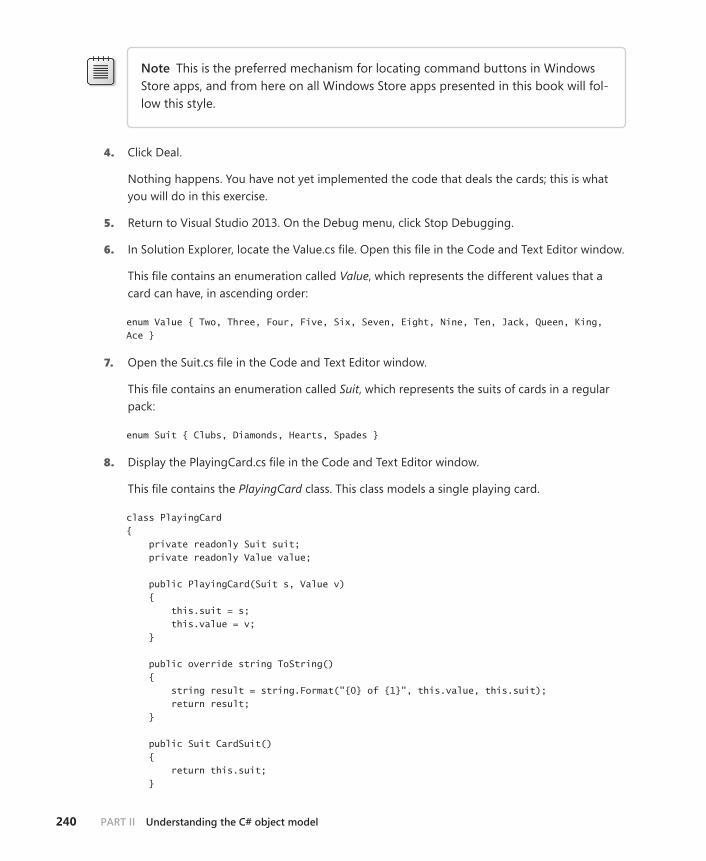
240 part II Understanding the C# object model
Note This is the preferred mechanism for locating command buttons in Windows Store apps, and from here on all Windows Store apps presented in this book will fol-low this style.
4. Click Deal.
Nothing happens. You have not yet implemented the code that deals the cards; this is what you will do in this exercise.
5. Return to Visual Studio 2013. On the Debug menu, click Stop Debugging.
6. In Solution Explorer, locate the Value.cs file. Open this file in the Code and Text Editor window.
This file contains an enumeration called Value, which represents the different values that a card can have, in ascending order:
enum Value { Two, Three, Four, Five, Six, Seven, Eight, Nine, Ten, Jack, Queen, King, Ace }
7. Open the Suit.cs file in the Code and Text Editor window.
This file contains an enumeration called Suit, which represents the suits of cards in a regular pack:
enum Suit { Clubs, Diamonds, Hearts, Spades }
8. Display the PlayingCard.cs file in the Code and Text Editor window.
This file contains the PlayingCard class. This class models a single playing card.
class PlayingCard { private readonly Suit suit; private readonly Value value; public PlayingCard(Suit s, Value v) { this.suit = s; this.value = v; } public override string ToString() { string result = string.Format("{0} of {1}", this.value, this.suit); return result; } public Suit CardSuit() { return this.suit; }
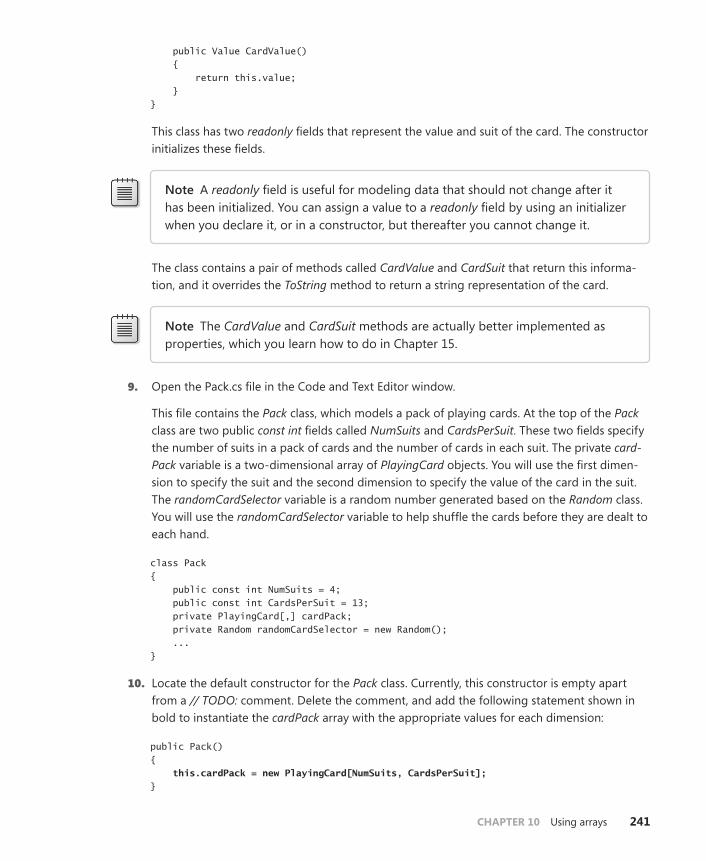
CHAPTER 10 Using arrays 241
public Value CardValue() { return this.value; } }
This class has two readonly fields that represent the value and suit of the card. The constructor initializes these fields.
Note A readonly field is useful for modeling data that should not change after it has been initialized. You can assign a value to a readonly field by using an initializer when you declare it, or in a constructor, but thereafter you cannot change it.
The class contains a pair of methods called CardValue and CardSuit that return this informa-tion, and it overrides the ToString method to return a string representation of the card.
Note The CardValue and CardSuit methods are actually better implemented as properties, which you learn how to do in Chapter 15.
9. Open the Pack.cs file in the Code and Text Editor window.
This file contains the Pack class, which models a pack of playing cards. At the top of the Pack class are two public const int fields called NumSuits and CardsPerSuit. These two fields specify the number of suits in a pack of cards and the number of cards in each suit. The private card-Pack variable is a two-dimensional array of PlayingCard objects. You will use the first dimen-sion to specify the suit and the second dimension to specify the value of the card in the suit. The randomCardSelector variable is a random number generated based on the Random class. You will use the randomCardSelector variable to help shuffle the cards before they are dealt to each hand.
class Pack { public const int NumSuits = 4; public const int CardsPerSuit = 13; private PlayingCard[,] cardPack; private Random randomCardSelector = new Random(); ... }
10. Locate the default constructor for the Pack class. Currently, this constructor is empty apart from a // TODO: comment. Delete the comment, and add the following statement shown in bold to instantiate the cardPack array with the appropriate values for each dimension:
public Pack() { this.cardPack = new PlayingCard[NumSuits, CardsPerSuit]; }
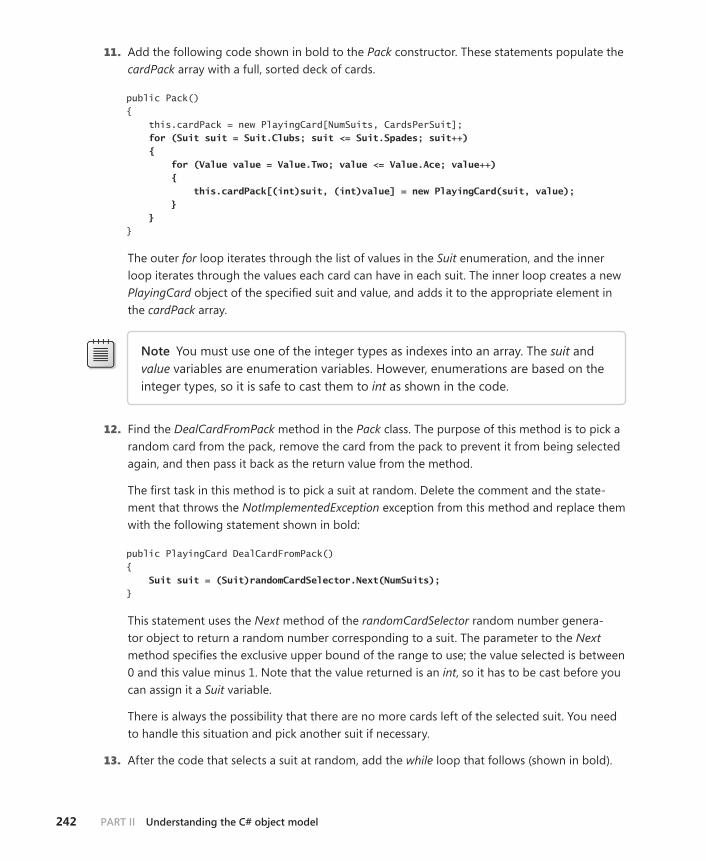
242 part II Understanding the C# object model
11. Add the following code shown in bold to the Pack constructor. These statements populate the cardPack array with a full, sorted deck of cards.
public Pack() { this.cardPack = new PlayingCard[NumSuits, CardsPerSuit]; for (Suit suit = Suit.Clubs; suit <= Suit.Spades; suit++) { for (Value value = Value.Two; value <= Value.Ace; value++) { this.cardPack[(int)suit, (int)value] = new PlayingCard(suit, value); } } }
The outer for loop iterates through the list of values in the Suit enumeration, and the inner loop iterates through the values each card can have in each suit. The inner loop creates a new PlayingCard object of the specified suit and value, and adds it to the appropriate element in the cardPack array.
Note You must use one of the integer types as indexes into an array. The suit and value variables are enumeration variables. However, enumerations are based on the integer types, so it is safe to cast them to int as shown in the code.
12. Find the DealCardFromPack method in the Pack class. The purpose of this method is to pick a random card from the pack, remove the card from the pack to prevent it from being selected again, and then pass it back as the return value from the method.
The first task in this method is to pick a suit at random. Delete the comment and the state-ment that throws the NotImplementedException exception from this method and replace them with the following statement shown in bold:
public PlayingCard DealCardFromPack() { Suit suit = (Suit)randomCardSelector.Next(NumSuits); }
This statement uses the Next method of the randomCardSelector random number genera-tor object to return a random number corresponding to a suit. The parameter to the Next method specifies the exclusive upper bound of the range to use; the value selected is between 0 and this value minus 1. Note that the value returned is an int, so it has to be cast before you can assign it a Suit variable.
There is always the possibility that there are no more cards left of the selected suit. You need to handle this situation and pick another suit if necessary.
13. After the code that selects a suit at random, add the while loop that follows (shown in bold).
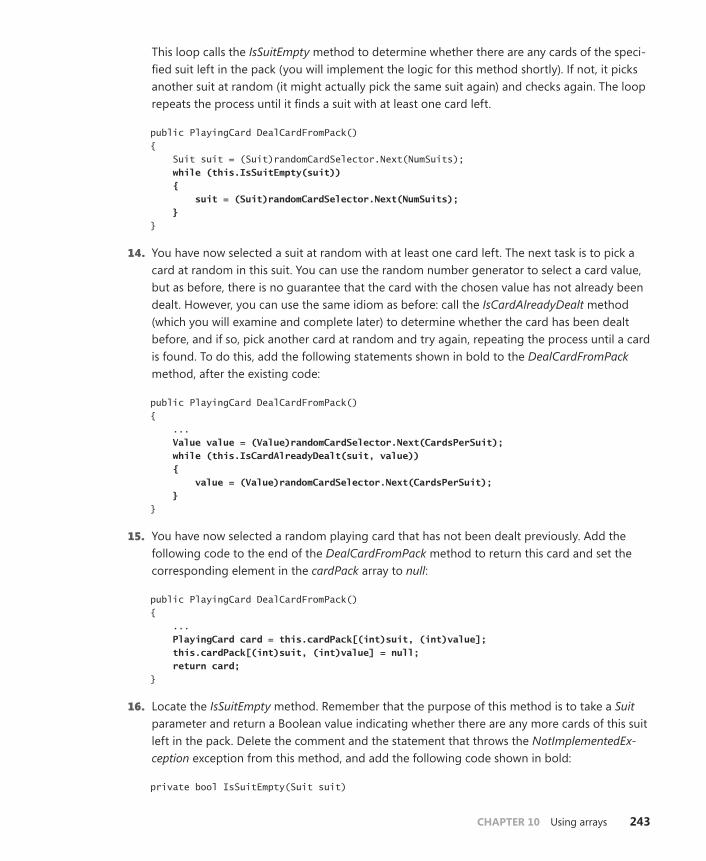
CHAPTER 10 Using arrays 243
This loop calls the IsSuitEmpty method to determine whether there are any cards of the speci-fied suit left in the pack (you will implement the logic for this method shortly). If not, it picks another suit at random (it might actually pick the same suit again) and checks again. The loop repeats the process until it finds a suit with at least one card left.
public PlayingCard DealCardFromPack() { Suit suit = (Suit)randomCardSelector.Next(NumSuits); while (this.IsSuitEmpty(suit)) { suit = (Suit)randomCardSelector.Next(NumSuits); } }
14. You have now selected a suit at random with at least one card left. The next task is to pick a card at random in this suit. You can use the random number generator to select a card value, but as before, there is no guarantee that the card with the chosen value has not already been dealt. However, you can use the same idiom as before: call the IsCardAlreadyDealt method (which you will examine and complete later) to determine whether the card has been dealt before, and if so, pick another card at random and try again, repeating the process until a card is found. To do this, add the following statements shown in bold to the DealCardFromPack method, after the existing code:
public PlayingCard DealCardFromPack() { ... Value value = (Value)randomCardSelector.Next(CardsPerSuit); while (this.IsCardAlreadyDealt(suit, value)) { value = (Value)randomCardSelector.Next(CardsPerSuit); } }
15. You have now selected a random playing card that has not been dealt previously. Add the following code to the end of the DealCardFromPack method to return this card and set the corresponding element in the cardPack array to null:
public PlayingCard DealCardFromPack() { ... PlayingCard card = this.cardPack[(int)suit, (int)value]; this.cardPack[(int)suit, (int)value] = null; return card; }
16. Locate the IsSuitEmpty method. Remember that the purpose of this method is to take a Suit parameter and return a Boolean value indicating whether there are any more cards of this suit left in the pack. Delete the comment and the statement that throws the NotImplementedEx-ception exception from this method, and add the following code shown in bold:
private bool IsSuitEmpty(Suit suit)
244 part II Understanding the C# object model
{ bool result = true; for (Value value = Value.Two; value <= Value.Ace; value++) { if (!IsCardAlreadyDealt(suit, value)) { result = false; break; } } return result; }
This code iterates through the possible card values and determines whether there is a card left in the cardPack array that has the specified suit and value by using the IsCardAlreadyDealt method, which you will complete in the next step. If the loop finds a card, the value in the result variable is set to false and the break statement causes the loop to terminate. If the loop completes without finding a card, the result variable remains set to its initial value of true. The value of the result variable is passed back as the return value of the method.
17. Find the IsCardAlreadyDealt method. The purpose of this method is to determine whether the card with the specified suit and value has already been dealt and removed from the pack. You will see later that when the DealFromPack method deals a card, it removes the card from the cardPack array and sets the corresponding element to null. Replace the comment and the statement that throws the NotImplementedException exception in this method with the code shown in bold:
private bool IsCardAlreadyDealt(Suit suit, Value value) { return (this.cardPack[(int)suit, (int)value] == null); }
This statement returns true if the element in the cardPack array corresponding to the suit and value is null, and it returns false otherwise.
18. The next step is to add the selected playing card to a hand. Open the Hand.cs file, and display it in the Code and Text Editor window. This file contains the Hand class, which implements a hand of cards (that is, all cards dealt to one player).
This file contains a public const int field called HandSize, which is set to the size of a hand of cards (13). It also contains an array of PlayingCard objects, which is initialized by using the HandSize constant. The playingCardCount field will be used by your code to keep track of how many cards the hand currently contains as it is being populated.
class Hand { public const int HandSize = 13; private PlayingCard[] cards = new PlayingCard[HandSize]; private int playingCardCount = 0; ... }
CHAPTER 10 Using arrays 245
The ToString method generates a string representation of the cards in the hand. It uses a foreach loop to iterate through the items in the cards array and calls the ToString method on each PlayingCard object it finds. These strings are concatenated together with a newline char-acter in between (the \n character) for formatting purposes.
public override string ToString() { string result = ""; foreach (PlayingCard card in this.cards) { result += card.ToString() + "\n"; } return result; }
19. Locate the AddCardToHand method in the Hand class. The purpose of this method is to add the playing card specified as the parameter to the hand. Add the following statements shown in bold to this method:
public void AddCardToHand(PlayingCard cardDealt) { if (this.playingCardCount >= HandSize) { throw new ArgumentException("Too many cards"); } this.cards[this.playingCardCount] = cardDealt; this.playingCardCount++; }
This code first checks to ensure that the hand is not already full. If the hand is full, it throws an ArgumentException exception (this should never occur, but it is good practice to be safe). Otherwise, the card is added to the cards array at the index specified by the playingCardCount variable, and this variable is then incremented.
20. In Solution Explorer, expand the MainWindow.xaml node and then open the MainWindow.xaml.cs file in the Code and Text Editor window.
This is the code for the Card Game window. Locate the dealClick method. This method runs when the user clicks the Deal button. Currently, it contains an empty try block and an excep-tion handler that displays a message if an exception occurs.
21. Add the following statement shown in bold to the try block:
private void dealClick(object sender, RoutedEventArgs e) { try { pack = new Pack(); } catch (Exception ex) { ...

246 part II Understanding the C# object model
} }
This statement simply creates a new pack of cards. You saw earlier that this class contains a two-dimensional array holding the cards in the pack, and the constructor populates this array with the details of each card. You now need to create four hands of cards from this pack.
22. Add the following statements shown in bold to the try block:
try { pack = new Pack(); for (int handNum = 0; handNum < NumHands; handNum++) { hands[handNum] = new Hand(); } } catch (Exception ex) { ... }
This for loop creates four hands from the pack of cards and stores them in an array called hands. Each hand is initially empty, so you need to deal the cards from the pack to each hand.
23. Add the following code shown in bold to the for loop:
try { ... for (int handNum = 0; handNum < NumHands; handNum++) { hands[handNum] = new Hand(); for (int numCards = 0; numCards < Hand.HandSize; numCards++) { PlayingCard cardDealt = pack.DealCardFromPack(); hands[handNum].AddCardToHand(cardDealt); } } } catch (Exception ex) { ... }
The inner for loop populates each hand by using the DealCardFromPack method to retrieve a card at random from the pack and the AddCardToHand method to add this card to a hand.
24. Add the following code shown in bold after the outer for loop:
try { ... for (int handNum = 0; handNum < NumHands; handNum++)
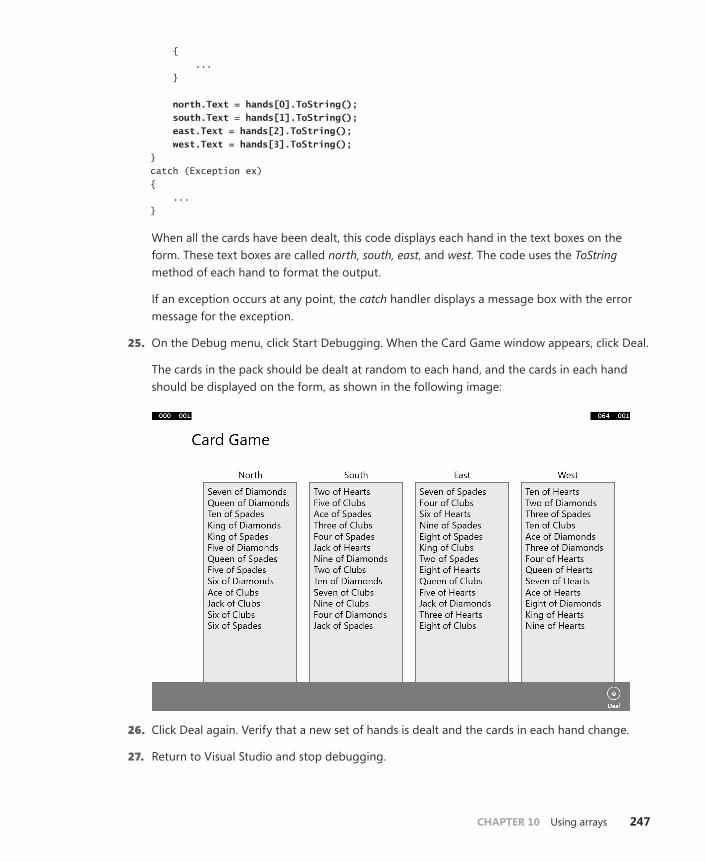
CHAPTER 10 Using arrays 247
{ ... } north.Text = hands[0].ToString(); south.Text = hands[1].ToString(); east.Text = hands[2].ToString(); west.Text = hands[3].ToString(); } catch (Exception ex) { ... }
When all the cards have been dealt, this code displays each hand in the text boxes on the form. These text boxes are called north, south, east, and west. The code uses the ToString method of each hand to format the output.
If an exception occurs at any point, the catch handler displays a message box with the error message for the exception.
25. On the Debug menu, click Start Debugging. When the Card Game window appears, click Deal.
The cards in the pack should be dealt at random to each hand, and the cards in each hand should be displayed on the form, as shown in the following image:
26. Click Deal again. Verify that a new set of hands is dealt and the cards in each hand change.
27. Return to Visual Studio and stop debugging.
248 part II Understanding the C# object model
Summary
In this chapter, you learned how to create and use arrays to manipulate sets of data. You saw how to declare and initialize arrays, access data held in arrays, pass arrays as parameters to methods, and return arrays from methods. You also learned how to create multidimensional arrays and how to use arrays of arrays.
■■ If you want to continue to the next chapter, keep Visual Studio 2013 running, and turn to Chapter 11.
■■ If you want to exit Visual Studio 2013 now, on the File menu, click Exit. If you see a Save dialog box, click Yes and save the project.
Quick reference
To Do this
Declare an array variable Write the name of the element type, followed by square brackets, followed by the name of the variable, followed by a semicolon. For example:
bool[] flags;
Create an instance of an array Write the keyword new, followed by the name of the ele-ment type, followed by the size of the array enclosed in square brackets. For example:
bool[] flags = new bool[10];
Initialize the elements of an array to specific values For an array, write the specific values in a comma-separat-ed list enclosed in braces. For example:
bool[] flags = { true, false, true, false };
Find the number of elements in an array Use the Length property. For example:
int [] flags = ...; ... int noOfElements = flags.Length;
Access a single array element Write the name of the array variable, followed by the integer index of the element enclosed in square brackets. Remember, array indexing starts at 0, not 1. For example:
bool initialElement = flags[0];
Iterate through the elements of an array Use a for statement or a foreach statement. For example:
bool[] flags = { true, false, true, false }; for (int i = 0; i < flags.Length; i++) { Console.WriteLine(flags[i]); } foreach (bool flag in flags) { Console.WriteLine(flag); }

CHAPTER 10 Using arrays 249
To Do this
Declare a multidimensional array variable Write the name of the element type, followed by a set of square brackets with a comma separator indicating the number of dimensions, followed by the name of the vari-able, followed by a semicolon. For example, use the fol-lowing to create a two-dimensional array called table and initialize it to hold 4 rows of 6 columns:
int[,] table; table = new int[4,6];
Declare a jagged array variable Declare the variable as an array of child arrays. You can initialize each child array to have a different length. For example, use the following to create a jagged array called items and initialize each child array:
int[][] items; items = new int[4][]; items[0] = new int[3]; items[1] = new int[10]; items[2] = new int[40]; items[3] = new int[25];


762 part IV Building professional Windows 8.1 applications with C#
763
== (equal to) operator, 94, 97, 111implementing overloaded version, 523pairing with !+ operator, 518
=> operator, 425using with on clause of LINQ expression, 497
! (exclamation mark)!= (inequality) operator, 94, 97, 111
implementing overloaded version, 523pairing with == operator, 519
logical NOT operator, 96, 191- (minus sign)
-- (decrement) operator, 61, 96, 114declaring your own version, 517
negation operator, 96-= (subtraction and assignment) operator, 114, 133
removing methods from delegates, 457unsubscribing from an event, 473
subtraction operator, 52, 54, 57, 97overloading, 521
\n (newline character), 119( ) (parentheses)
enclosing parameters in lambda expressions, 425in method calls, 70using to override operator precedence, 59, 96
% (percent sign)%= (modulus and assignment) operator, 114modulus operator, 53, 55, 58, 96, 126
| (pipe symbol)bitwise OR operator, 364|| (logical OR) operator, 95, 97, 111
+ (plus sign)+= (addition and assignment) operator, 114, 127,
133evaluation, understanding, 516using with delegates, 456, 457using with events, 472
addition operator, 52, 57, 97, 113, 513–516
Index
Symbols& (ampersand)
address-of operator, 202bitwise AND operator, 365&& (logical AND) operator, 95, 97, 111
< > (angle brackets)<= and >= operators, pairing, 519> (greater than) operator, 95, 97, 111>= (greater than or equal to) operator, 95, 97, 111<< (left-shift) operator, 364< (less than) operator, 95, 97, 111<= (less than or equal to) operator, 95, 97, 111< operator and > operator, pairing, 519>> right-shift operator, 364
* (asterisk)in pointers, 203*= (multiplication and assignment) operator, 114multiplication operator, 52, 58, 96
associativity, 60overloading, 522
\ (backslash), escape character in C#, 110{ } (braces or curly brackets), 59
code block enclosed in, life span of variables defined in, 196
enclosing code blocks, 98in lambda expressions, 425use in intializing array elements to specific
values, 229^ (caret), bitwise XOR operator, 365, 368, (comma), separating multiple initializations and
updates in for loops, 122. (dot notation), 281, 318= (equal sign)
assignment operator, 60, 97, 113using properties to simulate, 512
confusing = and == in if statement, 98
? (question mark)
764 Index
overloading, 521++ (increment) operator, 61, 96, 114
declaring your own version, 517in classes versus structures, 518
string concatenation operator, 52unary + operator, 96
? (question mark)indicating that enumeration is nullable, 208indicating that structure in nullable, 217indicating that value type is nullable, 190, 204
" (quotation marks, double), 110' (quotation marks, single), 110; (semicolon)
ending statements, 39variable declarations, 42
in lambda expressions, 425replacing method body in interface method
declarations, 288separating initialization, Boolean expression, and
update control variable in for loops, 122/ (slash)
/* and */ surrounding multiline comments, 11///, beginning comments in XAML files, 33/= (division and assignment) operator, 114, 126division operator, 52, 55, 58, 96
associativity, 60overloading, 522
// preceding comments, 11[ ] (square brackets), 59
array size in, 228in indexers, 366signifying array variables, 227using indexers to simulate [ ] operator, 512
~ (tilde)in destructor syntax, 319NOT operator, 364
_ (underscore), beginning names of private fields, 165
Aabstract classes, 304–306, 315
abstract methods, 306implementing and using (exercise), 307–311
abstract modifierabstract keyword, 305, 314inapplicable to operators, 513
access modifiersfor properties, 347not applicable for destructors, 319
not defined for interface methods, 294accessor methods, 342. See also propertiesAction delegate types, 455
Action<T, …> delegate, 454registering with task's cancellation token, 564using with tasks, 541
adapter methods, 469addition operator. See + (plus sign), under SymbolsAdd New Project dialog box, templates displayed
in, 442address-of operator (&), 202Add Scaffold wizard, 729ADO.NET, 723ADO.NET Entity Data Model template, 726AggregateException class, 575, 579aggregating data, 492, 496Allow Unsafe Code option, 203All WPF Controls section (Windows 7 and 8), 23All XAML Controls section (Windows 8.1), 23animations in Windows Store apps, 624
visual state transitions, 660anonymous classes, 180anonymous methods, lambda expressions and, 471anonymous types, arrays of, 230AppBarButton controls, 699AppBar control, 699app bars, 698–701
adding Next and Previous buttons, 698–701App.config file, 8App object, defined in App.xaml file of WPF
application, 34apps, 18. See also Windows Store appsAppStyles.xaml file, 663
referencing in global resource dictionary, 664App.xaml.cs file, examining in Solution Explorer, 31–
33App.xaml file, 31
examining XAML description for WPF application, 34
ArgumentOutOfRangeException class, 152arguments
inability to modify original argument through changes in parameter, 192
passing named arguments, 85writing method that modifies, using ref and out
keywords, 192–195arithmetic operators, 52–61
controlling precedence, 59data types used with, 52
attached properties
Index 765
implementing overloaded versions in Complex class, 521
using on int values, 53–61arithmetic overflow checking, 147, 158
turning on or off in Visual Studio 2013, 148arithmetic, performing on enumerations, 212Array class, 231
Clone method, 236Copy method, 235CopyTo method, 235
array notationreferencing existing element in List<T>, 413using to access values in dictionary
collections, 424using with Dictionary<TKey, TValue>, 420
arrays, 227–250comparison to collections, 426–431comparison to indexers, 368–370
properties, arrays, and indexers, 369copying, 234–236declaring and creating, 227–229
creating array instance, 228, 248declaring array variables, 227, 248
implementing IEnumerable interface, 435in Dictionary<TKey, TValue> class, 419limitations of, 411listing elements with foreach statement, 435List<T> class versus, 413parameter. See parameter arrayspopulating and using, 229–234, 248
accessing individual array element, 231creating implicitly typed array, 230initializing array elements to specific
values, 229iterating through an array, 231passing arrays as method parameters and
return values, 233using multidimensional arrays, 236–247, 249
creating a jagged array, 237, 249using arrays to implement a card game, 238–
247as operator, 202
performing cast and testing if result is null, 205AsParallel extension method, 596ASP.NET Web API Client Libraries, installing, 734ASP.NET Web API, model supporting inserting,
updating, and deleting data, 741ASP.NET Web API template, 725
Entity Framework version referenced, 726web service created with, 730
assembliesfor System.Windows and Windows.UI
namespaces, 312namespaces and, 17
assignment of values to variables, 42, 43assignment operator. See = (equal sign), under
Symbols; See + (equal sign), under Symbolsassignment operators, compound, 113–114, 133
understanding compound assignment evaluation, 516–517
associative arrays, 419associativity, 60, 511
assignment operator and, 60summary of operator associativity, 96
asynchronous operations, 581–621IAsyncResult design pattern in earlier versions of
.NET Framework, 594implementing asynchronous methods, 582–595,
619asynchronous methods and Windows Runtime
APIs, 592–596defining asynchronous methods,
problem, 582–585defining asynchronous methods,
solution, 585–591defining asynchronous methods that return
values, 591–592using asynchronous methods in GraphDemo
application, 588–591synchronizing concurrent access to data, 602–
619cancelling synchronization, 607concurrent collection classes, 608locking data, 604synchronization primitives to coordinate
tasks, 605–607using concurrent collection and lock for safe
data access, 609–619using PLINQ to parallelize declarative data
access, 595–601canceling a PLINQ query, 601improving performance while iterating over
collections, 596–601web service requests, 737
async modifierimplementing asynchronous method, 586misconceptions about, 586no await statement in async method, 588prefixing delegates, 588
attached properties, 648
awaitable objects
766 Index
awaitable objects, 586await keyword, outside of async methods, 586await operator, 585, 587
important points about, 586invoking asynchronous method that returns a
value, 592
Bbackground image for page or control, 666Barrier class, 607base class, 264
calling base class constructors, 266calling original implementation of method
in, 271methods, 269protected members, access to, 274
BasicCollection<T> class, 444–446bin and obj folders, 14binary operators, 512
explicit arguments, 513binary trees, 388
building binary tree class using generics, 391–397
creating enumerator for, 437–441defining a generic method to build, 401–403defining enumerator for Tree<TItem> class using
an iterator, 446–448querying data in Tree<TItem> objects, 497–503testing Tree<TItem> class, 397–400
bitwise operators, 364Blank App template, 20, 628. See also Windows
Store appsblocks. See code blocksBoolean expressions
creating, 111in for statements, 121in if statements, 98in while statements, 115
Boolean operators, 94–97conditional logical operators, 95equality and relational operators, 94
Boolean variables, declaring, 93, 111bool type, 43boxing and unboxing, 199–202, 205
performance and, 201, 384break statements, 108, 124
mandatory for each case in switch statement, 108
busy indicator, adding to Customer form, 740Button class, 474Button controls
adding to forms, 26adding to views in Windows Store apps, 698–701binding to commands provided by
ViewModel, 719
CC#
as an evolving language, 759case-sensitivity, 8code for page in Windows Store app,
displaying, 31keywords, 40source file, Program.cs, 8white space in, 40
cached evaluation (LINQ), 504camelCase naming scheme, 165camelCase notation, 42canceled tasks, 568
using continuations with, 576CancellationToken object, 563, 601, 621
ThrowIfCancellationRequested method, 571, 579CancellationTokenSource object, 563, 579, 601, 621
Cancel method, 564CanExecuteChanged event, 691
adding Command class to, 693adding timer to raise the event, 693raising too frequently, 700
CanExecute method, 690Command class, implementing, 692
card gameusing arrays to implement, 238–247using collection classes, 426–431
casecase-sensitivity in C#, 8in variable names, 42
case keyword, 106case labels in switch statements, 107casting
converting between objects and strings, 404explicit casts and object type, 384safely casting data, 201–203, 205
as operator, 202is operator, 201
using in unboxing, 200catch handlers, 136, 158
collections
Index 767
catching an exception, 154catching unhandled exceptions, 155using multiple, 138
C/C++array declarations, 228copy behavior of structure variables in C++, 222delete operator in C++, nonexistent in C#, 318function pointers in C++, similarity to
delegates, 453functions or subroutines, similarity of methods
to, 65global methods, 66hidden this parameter for operators in C++, 513inheritance in C++, 265integer expressions in if statements, 98new operation in C++, 318operator overloads in C++, 515params as type-safe equivalent to varargs
macros, 254pointers and unsafe code, 202public and private keywords in C++, 164remainder operator, 53structures in C++, no member functions, 225switch fall-through, differences in C#, 108unassigned local variables, 43unassigned variables, 94
character sets, 126char type, 43checked expressions, writing, 149checked keyword, 148, 158checked statements, writing, 148CIL (Common Intermediate Language), 224Circle class, 162, 164
copying reference types and data privacy, 185classes, 161
abstract, 304–306implementing and using, 307–311
anonymous, 180arrays of, 228assigning in inheritance hierarchy, 267–269consumed by unmanaged applications through
WinRT, 313controlling accessibility, 164–175
constructors, 165–166naming and accessibility, 165overloading constructors, 167partial classes, 168
declaring, 182defining and using, 162–163defining in namespaces, 15
defining scope, 73encapsulation, 162implementing interface property in, 361inheritance. See inheritanceinstance methods, 173–175IntelliSense icon for, 11keywords used in defining methods, 313objects versus, 163operators in, 518referencing a class through its interface, 290sealed, 306–313static, 177structures versus, 215
comparing copy behavior of class and structure, 222–224
understanding classification, 161value type, 183writing constructors and creating objects, 169–
173class members
drop-down list in Code and Text Editor, 49IntelliSense icons for, 11
class methods. See static methods and dataClone method, 185
Array class, 236using to copy arrays, 369
Close method, 323CLR (Common Language Runtime), 83, 224
managing threads to implement concurrent tasks, 541
WinRT and, 312Code and Text Editor window, 6, 47
finding and replacing code, 48Program.cs file in, 8
code blocksgrouping if statements in, 98life span of variables defined in, 196using with for statements, 122using with while statements, 116
collections, 411–433adding or removing items, 432collection classes, 411–423
Dictionary<TKey, TValue>, 419–420HashSet<T>, 422LinkedList<T>, 415–417List<T>, 413–415most commonly used, 412nongeneric, in System.Collections, 412Queue<T>, 417–418SortedList<TKey, TValue>, 420
Stack<T>, 418comparison to arrays, 426–431
using collection classes to play cards, 426–431
concurrent collection classes, 608–609creating, 432enumerating, 435–449, 487
elements in a collection, 435–443implementing enumerator using an
iterator, 444–448finding number of elements in, 432Find methods, predicates, and lambda
expressions, 424–426improving performance while iterating through,
using PLINQ, 596–601in memory, vs. tables in relational database, 495iterating through, 433locating an item in, 432using collection initializers, 423
ColumnarHeaderStyle style, 667ColumnarLayout state, 660ComboBox controls
adding to Windows Store app, 635–637adding ComboBoxItem, 636
implementing data binding for title ComboBox controls, 685
using data binding with, 684ComboBoxItem controls, 637CommandManager object, 693commands, 719
adding to a ViewModel, 690buttons bound to commands in ViewModel, 699implementing Command class, 691–694
comments/* and */ surrounding multiline comments, 11///, beginning comments in XAML files, 33// (forward slashes) preceding, 11TODO comments, use by developers, 169
Common Intermediate Language (CIL), 224Common Language Runtime. See CLRCommon WPF Controls, 23Common XAML Controls, 23Compare method, 407complex numbers, developing class that
simulates, 520–526adding conversion operators, 529–532creating Complex class and implementing
arithmetic operators, 520–523implementing equality operators, 523–526
Component Object Model (COM), 83compound assignment operators. See assignment
operators, compoundcompound operators, controlling using checked and
unchecked keywords, 149concurrency
issues to consider in implementing, 540synchronizing concurrent access to data, 602–
619ConcurrentBag<T> class, 608concurrent collections
classes, 608using with lock for safe data access, 609–619
ConcurrentDictionary<TKey, TValue> class, 608ConcurrentQueue<T> class, 608ConcurrentStack<T> class, 609conditional logical operators, 95
short-circuiting, 96Connection Properties dialog box, 726Connect To Server dialog box, 723console applications, 3
creating using Visual Studio 2013, 3, 38steps in process, 5
writing Hello World application, 8–14Console class, 9Console.WriteLine method, 9
calling ToString method automatically, 213classic example of overloading in C#, 251overload to support format string argument
containing placeholders, 256const keyword, creating a static field with, 177, 182constructed types, 387constructors, 165
calling base class constructor from derived class constructor, 266, 284
declaring and calling, 182default, 166for static classes, 177for structures, 215, 217not defined in interfaces, 294object initializers and, 358overloading, 167public and private, 166writing, 170–173
Content property, changing for Button controls, 26continuations, 543
specified by await operator, 586, 587using with canceled and faulted tasks, 576
continue statements, 124
Debug mode
Index 769
ContinueWith method, Task object, 543, 576parameters specifying additional items, 543
contracts, 626, 701–716implementing Search contract, 702–713
contravariant interfaces, 407–409controller classes, REST web service
creating additional, 732incoming web requests handled by, 730
controlsapplying styles to, in Windows Store app, 662,
672attached properties, 648binding commands to, 693dragging from Toolbox to forms, 633hierarchy of, on complex forms, 55
conversion operators, 526–532built-in conversions for built-in types, 527creating symmetric operators, 529defining, 533user-defined, implementing, 528writing, 529–532
Copy method, Array class, 235CopyTo method, Array class, 235CountdownEvent class, 606Count, Max, Min and other summary methods, 492
invoking Count, 496Count property
finding number of elements in collections, 432List<T> class, 415
covariant interfaces, 405, 410Created status, tasks, 568.csproj files, 44Current property, IEnumerator interface, 436
Ddatabase, remote, accessing from Windows Store
app, 721–762inserting, updating, and deleting data through
REST web service, 741–759implementing add and edit functionality in
ViewModel, 742–750integrating add and edit functionality into
Cutsomers form, 754–756reporting errors and updating the UI, 751–
753testing the Customers app, 756–758
retrieving data from a database, 721–741
creating and using a REST web service, 729–741
creating an entity model, 723–729installing AdventureWorks database, 723
data binding, 719associating same piece of data to multiple
controls, 659displaying data using, 674–680implementing for title ComboBox controls, 685modifying data using, 680using with ComboBox control, 684
DataContext property, MainPage object, 689data types
array elements, 228, 230casting, using as operator, 202conversions, 526–532
built-in conversions for built-in types, 527implementing user-defined conversion
operators, 528–532declaring implicitly typed local variables, 62numeric types and infinite values, 53operators and, 52primitive, 43–51primitive types in C# and equivalents in .NET
Framework, 213specifying for variables, 42switch statement use on, 107ToString method, 50variables created with var keyword, 180verifying type of an object with is operator, 201
dates and timecomparing dates in method using cascading if
statement, 100–105comparing dates in real-world applications, 105creating and using structure to represent a
date, 218–221DbContext class, 729DbSet generic type, 729Debug folder, 14debugger
exception handling and Visual Studio debugger, 151
stepping through methods with Visual Studio 2013 debugger, 80–83
debugging Windows Store apps, 27Debug menu
Start Debugging, 14Start Without Debugging, 13
Debug mode, 14
decimal type
770 Index
Windows Store app in Windows 8.1, 28decimal type, 43decision statements, 93–112
declaring Boolean variables, 93if statements, 97–105switch statements, 105–111using Boolean operators, 94–97
declarations, variable, 42, 62implicitly typed, 63
decrementing variables, 61prefix and postfix, 61
decrement operator. See - (minus sign), under Symbols
deep copying, 185, 236default constructor, 166
writing your own constructor and, 167default keyword, 106
initializing variable defined with a type parameter, 441
deferred evaluation, LINQ and, 503–507definite assignment rule, 43delegates, 451–470
Action and Func type, using with Command class, 691
adapter methods, 469async modifier with, 588attaching to events, 473declaring a delegate type, 483declaring and using (exercise), 459–469
creating CheckoutController component, 464–468
examining Wide World Importers application, 459–464
testing the application, 468detaching from events, 473examples in .NET Framework class library, 453–
455factory control system implemented without, 455for events, 474implementing factory control system using, 456–
458delegate referring to multiple methods, 457invoking a delegate, 457removing methods from delegate, 457
IntelliSense icon for, 11invoking, 483lambda expressions, 469–471registering Action delegate with task's
cancellation token, 564
understanding, 452use with Dispatcher object, Invoke method, 585using to mimic function call as an operator, 512
DELETE requests, 741derived classes, 264
creating from base class, 284methods masking base class methods, 269protected members, 274
Design View window, 20expanding/contracting elements in XAML
pane, 656using to add form controls, 22XAML form description changes and, 24zooming in and out, 47
destructorscalling Dispose method from, 326–338, 331creating simple class that uses, 328–330not defined in interfaces, 294not running until objects are garbage
collected, 321writing, 318–320, 337
restrictions on destructors, 319development environment settings, 4Device Window (on the Design menu), 27dictionary-oriented collections
adding or removing an item, 432ConcurrentDictionary<TKey, TValue> class, 608finding a value and accessing it, 424locating an item in, 432
Dictionary<TKey, TValue> class, 412, 419–420Dispatcher object, 585DispatcherTimer class, 693disposal methods, 323, 337
defined, 323exception-safe disposal, 324
Dispose method, 325, 331calling from a destructor, 326–338, 331thread safety and, 334
Distinct method, 493, 496, 501DivideByZeroException, 575division operator. See / (slash), under SymbolsDocument Outline window, 55
pinning in place with Audo Hide button, 56Documents folder, 6do statements, 123–132, 133
stepping through, 127–132writing, 125–127
dot notation (.), 281, 318double type, 43
events
Index 771
duplicates, eliminating from query results, 493, 496
Eelse statements, 97. See also if statementsencapsulation, 162
implementing by using methods, 341–343Entity Data Model Wizard, 726Entity Framework, 722
mapping layer between relational database and your app, 724
T4 templates, security warning about, 728versions, 726
entity model, creating, 723–729, 760AdventureWorks entity model, 724–741
Entity Model editor, 728entity sets, 729Enumerable class, 488–494
Count, Max, Min and other summary methods, 492
GroupBy method, 492Join method, 493OrderByDescending method, 492OrderBy method, 491Select method, 489–490
definition of, 489ThenBy or ThenByDescending method, 492Where method, 490
enumerable collections, 435, 487implementing IEnumerable interface, 441–443making a collection class enumerable, 449projecting specified fields from, 508
enumerations, 207–212arrays of, 228casting to int, 242choosing enumeration literal values, 209choosing enumeration's underlying values, 210–
212declaring, 208, 225using, 208–209
enumerators, 436defining by using an iterator, 449defining for Tree<TItem> class using an
iterator, 446–448implementing by using an iterator, 444–448implementing manually, 437–441implementing without using an iterator, 449
enum keyword, 208enums, IntelliSense icon for, 11
enum types. See enumerationsequality operators, 94, 111
associativity and precedence, 97implementing overloaded versions, 523–526overriding == and != operators, 518
Equals methodoverriding in Complex class, 524overriding in System.Object or System.
ValueType, 519structures, 214
equi-joins, LINQ support for, 497Error List window, 12, 524error reporting, adding to ViewModel class, 751–753errors and exceptions, 135–158
coping with errors, 135–136ensuring exception-safe disposal, 324, 337exception handling and Visual Studio
debugger, 151exceptions, 76implementing exception-safe disposal
(exercise), 328–336task exceptions
canceled tasks, 571continuations with canceled or faulted
tasks, 577handling with AggregateException class, 575,
579throwing exceptions, 152–156trying code and catching exceptions, 136–147
catching multiple exceptions, 139–145propagating exceptions, 145–147unhandled exceptions, 137using multiple catch handlers, 138
using a finally block, 156using checked and unchecked integer
arithmetic, 147–151writing checked expressions, 149writing checked statements, 148
EventArgs class, 475Event Handlers for the Selected Element button, 35events, 451
declaring, 483enabling notifications by using, 471–474
declaring an event, 472raising an event, 473subscribing to an event, 472
IntelliSense icon for, 11security feature, 474subscribing to, 483
Exception class
772 Index
tasks waiting for, 605UI (user interface) events, 474–482
adding event to CheckoutController class (exercise), 475–482
unsubscribing from, 484Exception class, 139
catchall handler to trap Exception exceptions, 155
catch handler for all exceptions, 158exceptions. See errors and exceptionsexecutable version of a program, 14Execute method, 691explicit and implicit keywords, 528explicit conversions, 527explicit interface implementation, 289, 292
implementing an indexer, 371, 379Extensible Application Markup Language. See XAMLextension methods, 280–284
creating (exercise), 281–284defining for a type, 285Enumerable.Select, 489IntelliSense icon for, 11
Ffactory control system, 455–458
implementing by using a delegate, 456implementing without using delegates, 455
faulted tasks, 543, 568using continuations with, 576
fields, 163implementing encapsulation by using
methods, 341–343implementing properties to
access. See propertiesinitialization, 164names of, warning about property names
and, 345naming conventions, 165not defined in interfaces, 293private or public, 164readonly, 241static, 175–182
creating a shared field, 176structure, 214
FileInfo class, 118file input/output (I/O), source of slow
operations, 593filename extensions, solution and project files, 44
FileOpenPicker class, asynchronous processing in, 593
File Open Picker contract, 701filtering data, 490, 508
using where operator, 496Finalize method, 320finally blocks, 156–157Find method, generic collections, 424–426
List<T> class, 453first-in, first-out (FIFO) model, 381, 412floating-point arithmetic, checked and unchecked
keywords and, 149float type, 43FontSize property, changing for TextBlock
control, 24FontStyle style, 666foreach statements
iterating through an array, 232, 248, 435iterating through collections, 433iterating through List<T> collections, 414
ForEach<T> method, Parallel class, 556canceling, 569general rule for using, 562
For method, Parallel class, 556, 603canceling, 569general rule for using, 562
forms, 22, 451locating and selecting controls with Document
Outline window, 55resizing of WPF forms, 27Windows Forms and WPF applications, 18
for statements, 121–123, 133continue statement in, 124iterating through an array, 231, 248iterating through collections, 433multiple initializations and updates in, 122omitting initialization, Boolean expression, or
update control variable, 122scope, 123
frame rate, tracking for Windows Store apps, 28from operator, 495, 502, 508F (type suffix), 50Func delegate types, 454–455
Func<T, …> delegate, 454functional programming languages, 424functions
defined, 469in Visual Basic, 67similarity of methods to, 65
ICommand interface
Index 773
Ggarbage collection, 318–323
allowing CLR to manage, 333forcing, 337GC class providing access to, 333how the garbage collector works, 322invoking the garbage collector, 321reasons to use garbage collector, 320–322stopping from calling destructor on an
object, 328writing destructors, 318–320
GC class, 333GC.Collect method, 321GC.SuppressFinalize method, 328, 333Generate Method Stub Wizard, 75generics, 381–410
binary trees, theory of, 388–391building binary tree class using generics, 391–
397testing Tree<TItem> class, 398–400
collection classes, 411–423creating a generic class, 388–400creating a generic method, 401–403
defining method to build a binary tree, 401–403
generic method, Select<TSource, TResult>, 489problems with object type, 381–384solution to problems with object type, 385–387using constraints, 387variance and generic interfaces, 403–409versus generalized classes, 387
gestures, 625get and set accessors. See also properties
for indexers, 367understanding, 368
for properties, 342restrictions on, 348
GetAwaiter method, awaitable objects, 586GetHashCode method, 407
overriding in Complex class, 525overriding in System.Object or System.
ValueType, 519globally unique identifiers (GUIDs), 750graphical application, creating, 18–37
adding code, 34–37C# and XAML files created by Visual Studio, 20on Windows 7 or 8, 21
greater than operator. See < > (angle brackets), under Symbols
greater than or equal to operator. See < > (angle brackets), under Symbols
Grid App template, 628, 717Grid control
for Windows Store app, 631implementing tablular layout using, 645–655
modifying layout to scale to different form factors and orientations, 647–655
Grid.Row attribute, 648GridStyle style, 665GroupBy method, 492, 501, 508group by operator, 508group operator, 496GUIDs (globally unique identifiers), 750
HHashSet<T> class, 412, 422
SortedSet<T> and, 423Haskell programming language, 424HasValue property, nullable types, 191HeaderStyle style, 666
modifying with additional property Setter elements, 668
heap, 196arrays on, 228automatic copying of items from stack
(boxing), 199class instances on, 216expense of boxing and unboxing, 201multiple variables referring to same object, 198organization by the runtime, 197using, 197
Hello World console application, 8–14hill-climbing algorithm, 541HttpClient class, 734
GetAsync method, 737HTTP requests and responses, 730
PUT, POST, and DELETE requests, 741REST web service, 732
HttpResponseMessage class, 734, 737HttpResponseObject, 737Hub App template, 718Hungarian notation, 42, 289
IIAsyncResult design pattern, 594ICommand interface, 690, 691
IComparable<T> interface
774 Index
IComparable<T> interface, 498IComparer<T> interface, 407–409idempotency in REST web services, 742identifiers, 40–41
for variables, 42IDisposable interface, 325
implementation (example), 326implementing, 337implementing (exercise), 330–332
IEnumerable interface, 435data structures implementing, 487GetEnumerator method, 436
IEnumerable<T> interface, 436class implementing, 444data structures implementing, 487implementing, 441–443
IEnumerator interface, 436IEnumerator<T> interface, 436if statements, 97–105, 111
Boolean expressions in, 98cascading, 99–105data types used on, 107syntax, 97using blocks to group, 98
ImageBrush resource, 664Implement Interface Wizard, 290implicit and explicit keywords, 528implicit conversions, 527implicitly typed arrays, 230–231implicitly typed variables, 63incrementing and decrementing variables, 61
controlling ++ and -- operators with checked/unchecked keywords, 149
prefix and postfix, 61using ++ and -- operators instead of compound
assignment operators, 114increment operator. See + (plus sign), under Symbolsindexers, 363–380
accessors, understanding, 368comparison to arrays, 368–370
properties, arrays, and indexers, 369creating for class or structure, 379defined, 363example not using indexers, 364–365example using indexers, 366important points about, 367in interfaces, 370–371, 379using in a Windows application, 371–378
examining the phone book application, 372–374
testing the application, 377writing the indexers, 374–377
using to simulate [ ] operator, 512indexes
array, 231integer types as, 242multidimensional arrays, 236
Dictionary<TKey, TValue> class, 419IndexOutOfRangeException, 231, 576inequality operator. See ! (exclamation mark), under
Symbolsinfinite values, 53inheritance, 263–286
applicable to classes only, not structures, 266assigning classes, 267–269calling base class constructors, 266classes implementing interfaces, 289
inheriting from another class, 290creating a hierarchy of classes (exercise), 274–279declaring new methods, 269declaring override methods, 271–273declaring virtual methods, 270defined, 263exception types, 139from System.Object class, 198interface inheriting from another interface, 290interfaces, 294preventing with sealed classes, 306protected access, 274System.Object class as root class, 266understanding extension methods, 280–284virtual methods and polymorphism, 272
InitializeComponent method, MainWindow class, 34initializers, collection, 423INotifyPropertyChanged interface,
implementing, 682–685instance methods
defined, 173writing and calling, 173–175
Int32.Parse method, 52integers
integer types as indexes into an array, 242integer values associated with enumeration
elements, 209, 210IntelliSense in Visual Studio 2013, 9
icons for class members, 11interface keyword, 288
LINQ (Language-Integrated Query)
Index 775
interfaces, 287–304declaring and implementing interface
properties, 349–355, 361defining, 288, 314defining and using (exercise), 294–304
creating classes that implement the interface, 296–301
testing implementation classes, 301–304explicitly implementing, 292generic, 387
variance and, 403–409, 410implementing, 289–290, 314indexers in, 370–371, 379inheriting from another interface, 290IntelliSense icon for, 11keywords used in defining methods, 313naming convention, 289referencing a class through its interface, 290restrictions, 293understanding, 287working with multiple interfaces, 291
IntersectWith, UnionWith, and ExceptWith methods, HashSet<T> class, 422
int type, 43, 364–365implementation of IComparable and
IComparable<T>, 399operators used to manipulate individual bits, 364size, 147
InvalidCastException, 200Invoke method
Dispatcher object, 585Parallel class, 557
reserving for computationally intensive operations, 560
is operator, 201determining if an object has specified type, 291testing if cast is valid, 205
iteratorsdefining enumerator by using, 449implementing an enumerator using, 444–448
defining enumerator for Tree<TItem> class, 446–448
implementing enumerator without using an iterator, 449
Jjagged arrays, 237, 249Java
arrays of arrays, 238inheritance, 265square brackets before array variable name, 228varargs facility operating similarly to params
keyword in C#, 254virtual methods, 271
JavaScript Object Notation. See JSONJoin method, 493, 509join operator, 497, 509JSON (JavaScript Object Notation), 730
response returned from REST web service, 734
KKeyValuePair<TKey, TValue> structure, 420keywords, 40
defining methods for interfaces, classes, and structs, 313
LLabelStyle style, 669lambda expressions, 424–426
and anonymous methods, 471forms of, 469–484syntax, 425using in Select method, 488using in Where method, 491
landscape orientation, 640Language-Integrated Query. See LINQlanguage interoperability, operators and, 516last-in, first-out (LIFO) model, 411Length property
Array class, 231, 248List<T> class, 415
less than operator. See < > (angle brackets), under Symbols
less than or equal to operator. See < > (angle brackets), under Symbols
librariesreferences to, in References folder, 7
lifecycle of Windows Store apps, 626LinkedList<T> class, 412, 415–417LINQ (Language-Integrated Query), 485, 581, 724
await operator, inability to use in LINQ queries, 586
parallelizing a LINQ query, 620PLINQ (Parallel LINQ), 582
List<T> class
776 Index
cancellation of PLINQ query, 620using to parallelize declarative data
access, 595–601using in a C# application, 486–507
filtering data, 490joining data, 493LINQ and deferred evaluation, 503–507ordering, grouping, and aggregating
data, 491–493querying data in Tree<TItem> objects, 497–
503selecting data, 488–490using query operators, 495–497
List<T> class, 412, 413–415creating, manipulating, and iterating
through, 414determining number of elements in, 415features that preclude array limitations, 413methods using delegates, 453–455
local scope, definingdefining, 72
local variablesmemory required for, 196unassigned, 43
locking data, 604using concurrent collection and lock for safe data
access, 609–619using ReaderWriterLockSlim object, 621
lock statement, 334logical operators, 95
associativity and precedence, 97in Boolean expressions, 111
long type, 43
MMain method, 8
array parameters and, 234console application example, 9
MainPage.xaml.cs file, 20examining for Windows Store app, 30
MainPage.xaml folder, 20MainWindow.xaml.cs file, examining contents of, 33MainWindow.xaml file, 21managed code, 224managed execution environment, 224managed resources, destructors and, 318ManualResetEventSlim class, 605, 620Math class, 162, 175
memoryallocation and reclamation for variables and
objects, 317allocation for array instance, 229how computer memory is organized, 195–198
stack and the heap, 196using the stack and the heap, 197
unmanaged, for objects created in unsafe code, 203
use by multidimensional arrays, 236MessageBox class, 36MessageDialog object, 36
ShowAsync method, 592methods, 163
abstract, 306adapter, 469anonymous, 471asynchronous. See asynchronous operationscalling, 69constructor. See constructorscreating a generic method, 401–403declaring, 66declaring new methods for class in inheritance
hierarchy, 269declaring override methods, 271–273declaring virtual methods, 270defining and invoking a generic method, 409delegates. See delegateselements of, 424extension methods, understanding, 280–284implementing encapsulation by using, 341–343indexers versus, 367instance, 173–175IntelliSense icon for, 11interface, 288, 294
implementation of, 289invoking, 452keywords used in defining methods for
interfaces, classes, and structs, 313length of, 69memory required for parameters and local
variables, 196naming conventions, 165non-params, priority over params methods, 255overloaded, 10overloading, 74, 251passing arrays as parameters and return
values, 233private or public, 164replacing with properties (exercise), 351–355
.NET Framework
Index 777
returned by lambda expressions, 424–426returning data from, 67scope, 72–74sealed, 306signature, 269static, 175–181, 182using optional parameters and named
arguments, 83–91defining and calling method with optional
parameters, 87–91defining optional parameters, 85passing named arguments, 85resolving ambiguities, 86
using ref and out parameters, 192–195using value and reference parameters, 186–189virtual methods and polymorphism, 272writing, 74–83
parameters, 78stepping through with debugger, 80testing the program, 79using Generate Method Stub Wizard, 75
Methods For Fetching And Updating Data region, ViewModel, 744
Microsoft Blend for Visual Studio 2013defining complex styles to integrate into an
app, 671Microsoft SQL Server, 486Minimum Width setting, 640mobility as key requirement for modern apps, 625Model-View-ViewModel pattern. See MVVM patternmodifier methods, 342. See also propertiesmodifiers. See also keywords and modifiers listed
throughoutapplicable and inapplicable to oprators, 513
modulus operator. See % (percent sign), under Symbols
Moore’s Law, 539MoveNext method, enumerators, 436multicore processors, rise of, 538multidimensional arrays, 236–247
creating jagged arrays, 237params keyword, inability to use with, 254using to implement a card game, 238–247
multiplication operator. See * (asterisk), under Symbols
multitaskingimplementing using .NET Framework, 540–562performing using parallel processing, 537–539
MVVM (Model-View-ViewModel) pattern, 673–701adding commands to a ViewModel, 690–693
adding Next and Previous buttons to View, 698–701
adding NextCustomer and PreviousCustomer commands to ViewModel, 694–698
creating a ViewModel, 686–690defined, 674displaying data using data binding, 674–680modifying data using data binding, 680
Nnamed arguments, 85
resolving ambiguities with, 86Name property for all controls, 635namespace keyword, 15namespaces
and assemblies, 17IntelliSense icon for, 11in WPF applications versus Windows Store
apps, 34using, 14–17
naming conventionsfor classes, 165for fields and methods, 165interfaces, 289properties and field names, warning about, 345
NaN (not a number), 53narrowing conversions, 527native code, 224.NET Framework
and compatibility with WinRT on Windows 8 and 8.1, 311–313
class library, split into assemblies, 17CLR (Common Language Runtime), 224collection classes, 411–423
in System.Collections.Generic.Concurrent namespace, 413
in System.Collections.Generic namespace, 411in System.Collections namespace, 412
concurrent collection classes, 608delegates, examples in class library, 453–455events, 471exception classes, 152exception types, 139FileInfo class, 118GUI classes and controls, events, 474HttpClient class, 734HttpResponseMessage class, 734
New ASP.NET Project dialog box
778 Index
IAsyncResult design pattern in earlier versions, 594
IEnumerable and IEnumerator interfaces, 436IEnumerable<T> and IEnumerator<T>
interfaces, 436implementing multitasking by using, 540–562interfaces exhibiting covariance, 406libraries or assemblies, 7PLINQ extensions, 596primitive types and equivalents in C#, 213synchronization primitives, 605synchronizing data access across tasks, 582System.Collections.Generics namespace, 386TextReader class, 118
New ASP.NET Project dialog box, 725new keyword, 163, 314
calling constructors, 182creating array instance, 228, 248object creation, 317
newline character (\n), 119New Project dialog box, 5NotImplementedException, 76NOT operator (!), 94NOT operator (~), 364nullable types, 190
as method parameters, 192creation in heap memory, 196enumeration, 208structure, 217understanding properties of, 191
null valueascertaining if nullable variable contains, 191assigning to reference variables, 190declaring a variable that can hold, 204inability to assign to value types, 190understanding, 189
numeric typesand infinite values, 53using remainder operator with, 53
OObject Collection Editor window, 636object initializers, 358, 359object keyword, 198object references. See also references; reference
typesstored by classes in System.Collections
namespace, 412
objectsclasses versus, 163coverting to strings, 50creating, 170creating using new keyword, 163initializing by using properties, 357–360, 362life and times of, 317–323memory allocation and recalamation for, 317memory required for, 196parameters array of type object, 255private modifier and, 174System.Object class, 198, 266
Finalize method, 320overriding Equals and GetHashCode
methods, 519verifying type with is operator, 201
object type, 78problems with, 381–384
obj folder, 14on clause of LINQ expressions, 497Open dialog box, 117Open file picker, 116Open Project dialog box, 44operands, 52OperationCanceledException, 571, 576, 579
handling, 572operators, 52
and data types, 52associativity, 60bitwise, 364Boolean, using, 94increment and decrement, 61overloading
and language interoperability, 516comparing operators in structures and
classes, 518compound assignment evaluation, 516–517conversion operators, 526–532creating symmetric operators, 514–516declaring increment and decrement
operators, 517defining operator pairs, 518–519implementing operators, 520–526
precedence and associativity, 96understanding, 511–516
operator constraints, 512use on enumeration variables, 209use on your own structure types, 214
optional parameterscomparing to parameter arrays, 259–261
polymorphism
Index 779
defining, 85defining and calling a method with, 87–91resolving ambiguities with, 86
OrderByDescending method, 492OrderBy method, 491, 508orderby operator, 496, 508orientations
tablet app in landscape or portrait, 640testing for Windows Store app in Simulator, 652testing in Simulator, 644
out keyword, 192inability to use with params arrays, 255
out parameterscreating, 193, 205indexers versus arrays, 369
Output window, 12OverflowException, thrown by checked
statements, 148overloaded methods, 10overloading methods, 74, 251
constructors, 167override keyword, 271, 273, 314
inapplicable to operators, 513using with virtual keyword, 272
overriding methods, 285declaring override methods, 271–273
Ppages, 22
adapting to different screen resolutions and device orientation, 27
Parallel classabstracting tasks by using, 556–560
Parallel.ForEach<T> method, 556Parallel.For method, 556Parallel.Invoke method, 557parallelizing operations in GraphData
application, 557–560canceling Parallel.For or ForEach loop, 569Parallel.For method, 603when not to use, 560–562
parallelismParallel class determining degree of, 557using Task class to implement, 544–555
parallelizationdegree of versus units of, 540dividing method into series of parallel
operations, 587
using PLINQ to parallelize declarative data access, 595–601
ParallelLoopState object, 556, 569parallel processing, using to perform
multitasking, 537–539ParallelQuery object, 596
WithCancellation method, 601, 620parameter arrays, 251–262
comparing to optional parameters, 259–261overloading, recap of, 251using array arguments, 252–259
declaring a params array, 253important points about params arrays, 254params object[ ], 255using a params array (exercise), 256–259
parametersgeneric types as, 401lambda expression, 425memory required for, 196nullable variables as, 191operator, 513optional parameters for methods, 83–92
defining, 85defining and calling method with, 87–91resolving ambiguities with, 86
passing arrays as parameters, 233array parameters and Main method, 234
using ref and out parameters, 192–195, 204using value and reference parameters, 186–189
params keyword, 253important points about params arrays, 254
partial classes, 168PascalCase naming scheme, 165Peek Definition feature, 88performance
impact of raising CanExecuteChanged event too frequently, 700
multidimensional arrays and, 236pixels, font size measured in, 25PLINQ (Parallel LINQ), 582
cancellation of PLINQ query, 620using to parallelize declarative data access, 595–
601canceling a PLINQ query, 601improving performance while iterating
through collections, 596–601pointers and unsafe code, 202polymorphism
defined, 273virtual methods and, 272
Pop method
780 Index
Pop method, 411portrait mode, viewing app in, 27portrait orientation, 640post-decrement operator (--), 96post-increment operator (++), 96POST requests, 741precedence, 511
controlling with arithmetic operators, 59expressions containing operators with same
precedence, 60operator precedence, summary of, 96
pre-decrement operator (--), 96predicates, 424–426
delegates and, 453prefix and postfix, increment (++) and decrement (--)
operators, 61, 517pre-increment operator (++), 96primitive data types, 43–51
as value types, 183displaying values, 44–51fixed size, 147in C# and equivalent types in .NET
Framework, 213private keyword, 164, 314private modifier, 274
class level versus object level, 174constructors, 166copying reference types and data privacy, 185identifiers, naming scheme for, 165properties, 347use with static keyword, 178
Program class, 8Program.cs file, 8project files (.csproj suffix), 44propagating exceptions, 145–147properties, 341–362, 363
accessibility, 347arrays and indexers, 369declaring and implementing on an interface, 361declaring interface properties, 349–355defined, 343generating automatic properties, 355–356, 362initializing objects by using, 357–360, 362IntelliSense icon for, 11names of, warning about field names and, 345read-only, 346, 361read/write, 346, 361replacing methods with (exercise), 351–355restrictions on, understanding, 348–349using, 345–346
using appropriately, 349using to simulate assignment operator (=), 512write-only, 346, 361
Properties folder, 7Properties window
Event Handlers for the Selected Element button, 35
specifying properties of form controls, 24PropertyChanged event, 719protected keyword, 314protected modifier, 274
properties, 347public keyword, 164, 314public modifier, 274
constructors, 166identifiers, naming scheme for, 165properties, 347required for operators, 513structure fields and, 214
Push method, 411PUT requests, 741
Qquerying in-memory data, 485–510
LINQ (Language-Integrated Query), 485using LINQ in a C# application, 486–507
filtering data, 490joining data, 493LINQ and deferred evaluation, 503–507ordering, grouping, and aggregating
data, 491query operators, 495–497retrieving data from BinaryTree using
extension methods, 497–501retrieving data from BinaryTree using query
operators, 502selecting data, 488–490
queuesConcurrentQueue<T> class, 608generic Queue<T> class, 385–387, 411, 412
example Queue<int> class and operations, 417–418
object-based Queue class, 381–384Queue class versus Queue<T> class, 387
Quick Find dialog box, 48

scope
Index 781
RRandom class, 229RanToCompletion status, tasks, 568readability, 624ReaderWriterLockSlim class, 606, 621readonly fields, 241read-only properties, 346, 361read/write properties, 346, 361rectangular arrays, 237refactoring code, 79references
creating multiple references to an object, 320reclamation by the heap, 198referencing a class through its interface, 290setting to null for immediate disposal, 318storage on the stack, 197
References folder, adding/removing references for assemblies, 17
reference types, 183, 383arrays, 228classes, 216copying a reference type variable, 204copying, data privacy and, 185copying reference type variables, 214covariance, 406GetHashCode method, 407initializing using null values, 189memory allocation and reclamation for, 317ref and out modifiers on reference
parameters, 195using for method parameters, 188, 192variables of type object referring to, 198
ref keyword, 192inability to use with params arrays, 255
ref parameterscreating, 193indexers versus arrays, 369passing an argument to, 204using, 194
Regex class, 744relational database management systems, 486relational databases
tables in, vs. in memory collections, 495relational operators, 94, 111
associativity and precedence, 97remainder (or modulus) operator (%), 53RenderTransform property, 668resource dictionary, 663, 672
adding reference for AppStyles.xaml file, 664
resource management, 323–328calling Dispose method from a destructor, 326–
338disposal methods, 323exception-safe disposal, 324implementing exception-safe disposal
(exercise), 328–336creating class that uses a destructor, 328–330implementing IDisposable interface, 330–332preventing multiple disposals of object, 332–
334thread safety and Dispose method, 334verifying object disposal after an
exception, 335response time, issues with, 581REST web services, 760
creating and using, 729–741idempotency in, 742inserting, updating, and deleting data
through, 741–759return statement, 67return type for methods, 66
generic types as, 401return values, passing arrays as, 233RoutedEventArgs object, 474RoutedEventHandler delegate type, 474Run method, Task class, 542, 578Running status, tasks, 568
Sscalable user interface for Windows Store app,
implementing, 630–662, 672adapting layout using Visual State
Manager, 655–662implementing tabular layout using Grid
control, 645–655modifying layout for different form factors
and orientations, 647–655laying out page for Customers app, 630–641testing app in Visual Stuido 2013 Simulator, 642–
645scope, 72–74
defining class scope, 73defining local scope, 72in for statements, 123overloading methods, 74starting new scope in code blocks, 99variables declared in using statement, 325
screen resolutions
782 Index
screen resolutionspages in Windows Store apps adjusting to, 27Simulator in Visual Studio 2013, 643testing for Windows Store app in Simulator, 653
sealed classes, 306–313, 315sealed keyword, 314
inapplicable to operators, 513search
enabling Windows Store app to support searching, 719
navigating to selected item, 713–716Search contract, 702
implementing, 702–713, 719registering Customers app with Windows
Search, 710–712testing Search contract, 711
SearchResultsPage class, 705OnItemClick method, 714
Select method, 488–490, 500, 508select operator, 495, 502, 508semantics, 39SemaphoreSlim class, 606, 620sentinel variable, 116Setter elements (XAML), 664shallow copying, 185, 236Share Target contract, 701short-circuiting, 96showBoolValue method, 51showDoubleValue method, 51showFloatValue method, 49showIntValue method, 50signature, method, 269Simulator, using to test Windows Store apps, 642–
645, 652–655.sln files, 44Snapped view for apps, 27Solution Explorer, 6
project files in, 7solution files (.sln suffix), 44Solution ‘TestHello’ file, 7SortedDictionary<TKey, TValue> class, 420SortedList<TKey, TValue> class, 412, 420SortedSet<T> class, 423spinning, 597Split App template, 628, 717SQL Server, 486SQL (Structured Query Language), 486
Entity Framework reducing dependency on, 723entity model converting LINQ queries to SQL
commands, 724
generation of SQL commands by DBContext and DBSet, 729
stack, 196automatic copying of item from stack to heap
(boxing), 199ConcurrentStack<T> class, 609organization by the runtime, 196structure instances on, 216using, 197
StackOverflowException, 345Stack<T> class, 411, 412, 418–419Start method, Task object, 542StartupUri property, App object, WPF
application, 34statements, 39–40
syntax and semantics, 39static methods and data, 175–182
creating a shared field, 176creating static field using const keyword, 177static classes, 177static method accepting value parameter, 186writing static members and calling static
methods, 178–180static modifier
properties, 346required for operators, 513use with private keyword, 178
Status property, Task object, 568StopWatch object, 546StorageFile class, 593
asynchronous operations, 593streams, writing to, 593string concatenation operator (+), 52string keyword, 184strings
arrays of, 230as objects, 403converting enumeration variables to, 209converting to integer values, 52coverting objets to, 50implementation of IComparable and
IComparable<T>, 399+= operator used on, 114string type as class, System.String, 184
string type, 43Structured Query Language. See SQLstructures, 212–225
arrays of, 228classes versus, 215common structure types, 212
TaskContinuationOptions enumeration
Index 783
compatibility with runtime on Windows 8 and 8.1, 224
copying structure variables, 221comparing copy behavior of structure and
class, 222–224creating and using structure to represent a
date, 218–221declaring, 214, 226declaring structure variables, 216, 226implementing interface property in, 361inheritance not applicable to, 266initialization, 217IntelliSense icon for, 11keywords used in defining methods, 313operators in, 518used as parameters for Console.WriteLine
method, 252Style elements (XAML), 664styles, applying to Windows Store app UI, 662–671,
672creating custom styles, 672defining styles for Customers form, 663–671
subscribing to events, 472, 483subtraction operator. See - (minus sign), under
Symbolssuperset or subset methods, HashSet<T> class, 422suspending and resuming apps, 626switch keyword, 106switch statements, 105–111, 112
fall-through rules, 108rules for, 107syntax, 106writing, 108–111
synchronizing concurrent access to data, 602–619, 620
cancelling synchronization, 607–608concurrent collection classes, 608–609locking data, 604synchronization primitives for coordinating
tasks, 605–607using concurrent collection and lock for safe data
access, 609–619syntax, 39System.Array class, 231, 435. See also Array class;
arraysSystem.Collections.Concurrent namespace, 608System.Collections.Generic.Concurrent
namespace, 413System.Collections.Generic namespace
collection classes, 411
IComparer interface, 407SortedDictionary<TKey, TValue> class, 420SortedSet<T> class, 423
System.Collections.IEnumerable interface, 435System.Collections.IEnumerator interface, 436System.Collections namespace, 412System.Diagnostics.Stopwatch object, 546SystemException class, 139System.Int32 class, 212
implementing IComparable and IComparable<T>, 399
System.Int64 class, 212System.Linq namespace, Enumerable class, 489–495System namespace, 15
assemblies implementing classes in, 17System.Object class, 198, 266, 383
overriding Equals or GetHashCode methods, 519ToString method, 270
System.Random class, 229Systems.Collections.Generics namespace, 386System.Single class, 212System.String class, 184
implementation of IComparable and IComparable<T>, 399
System.Text.RegularExpressions namespace, 744System.Threading.CancellationTokenSource
object, 563System.Threading namespace, 540
synchronization primitives, 605System.Threading.Tasks namespace
Parallel class, 556TaskStatus enumeration, 568
System.ValueType class, 266overriding Equals or GetHashCode methods, 519
System.Windows.Controls assembly, 34System.Windows.MessageBox class, 36System.Windows namespaces, 34
TTabularHeaderStyle style, 667tabular layout, implementing using Grid
control, 645–655modifying layout to scale to different form
factors and orientations, 647–655TabularLayout state, 660TaskCanceledException, 576Task class, 540TaskContinuationOptions enumeration, 576
TaskContinuationOptions type
784 Index
TaskContinuationOptions type, 543TaskCreationOptions enumeration, 542Task List window, locating TODO comments, 186Task Manager, closing Windows Store apps, 29tasks, 537–579, 582–585
canceling tasks and handling exceptions, 562–577, 579
acknowledging cancellation and handling exception, 572–574
adding cancellation to GraphDemo application, 564–568
canceling Parallel For or ForEach loop, 569continuations with canceled or faulted
tasks, 576displaying status of each task, 569–571handling exceptions with AggregateException
class, 575implementing multitasking using .NET
Framework, 540–562abstracting tasks using Parallel class, 556–560creating, running, and controlling tasks, 541–
544using Task class to implement
parallelism, 544–555when not to use Parallel class, 560–562
PLINQ based on. See PLINQreasons to perform multitasking using parallel
processing, 537–539synchronizing concurrent access to data, 602–
619synchronization primitives for coordinating
tasks, 605–607TaskScheduler object, 542TaskStatus enumeration, 568Task<TResult> class, 591templates
choosing template for console application, 5for graphical applications, 18Windows Store app, 628, 717
TestHello folder, 7TextBlock controls
adding to forms using Design View window, 23adding to page in Windows Store app, 631
labels for TextBoxes, 637labels used to identify data on page, 633setting properties, 632
TextBox controlsadding to forms, 25adding to Windows Store app
displaying text ID First Name, and Last Name, 634–636
for email address and telephone number, 637TextReader class, 118
Close method, 323ThenBy or ThenByDescending method, 492this keyword
use with indexers, 366Thread class, 540ThreadPool class, 540threads
halting when garbage collector runs, 322tasks, threads and the ThreadPool, 540thread safety and Dispose method, 334
throwing exceptions, 152–156, 158catching the exception, 154catching unhandled exceptions, 155
Title property, changing for forms, 26ToArray method, 506
collection classes, 426TODO comments, 169, 186ToList method, 504, 506Toolbox
dragging a control onto a form, 25showing or hiding, 23
ToString method, 50System.Object class, 270
touch-based devices and user interfaces, 224, 624touch-based gestures, interacting with
applications, 18Transact-SQL Editor window, 723transformations, 668try/catch/finally statement blocks, 157
await operator and, 586calling disposal method in finally block of try/
finally, 324try blocks, 136try/catch statement block, writing, 142–145try/finally block, Finalize method in, 320
type parameter (<T>) for generics, 385typeSelectionChanged method, 49type suffixes, 50
UUI (user interface)
creating for Windows Store appsAdventure Works Customers app
(exercise), 628–630

Visual Basic
Index 785
applying styles to a UI, 662–671implementing scalable user interface, 630–
662events, 474–482
unary operators, 512explicit argument, 513
unassigned local variables, 43unboxing, 199–201unchecked block statements, 148unchecked keyword, 148unhandled exceptions, 137
catching, 155Windows reporting of, 140–142
unmanaged applications, 224classes consumed by, through WinRT, 313
unmanaged memory, 203unmanaged resources, destructors and, 318unsafe keyword, marking code as unsafe, 203unsubscribing from events, 473, 484user experience (UX), 624using directives, 15
using statement versus, 324using statement, 337
and IDisposable interface, 324–326purpose of, 335
Util class, 281
VValue property, nullable types, 191ValueType class, 266value types, 183
copying value type variables, 214copying variables and classes, 183, 204
declaring variables and classes as, 184creating with enumerations and structures, 207–
226structures, 212–225working with enumerations, 207–212
creation in heap memory, 196creation in stack memory, 196memory allocation and reclamation for, 317nullable types, 190ref and out modifiers on value parameters, 195structures, 217. See also structuresusing nullable types, 190–192using value parameters, 186–188, 192variables of type object referring to, 199
variables, 41–43
array, 227, 248declaring, 42declaring implicitly typed local variables, 62defined in code block, life span of, 196enumeration, 208, 225holding information about a single item, 227initializing variable defined with a type
parameter, 441memory allocation and recalamation for, 317multiple, referring to same object, 198naming, 41scope, 72structure, 216, 226unassigned local variables, 43value type, 183
variance, generic interfaces and, 403–409, 410contravariant interfaces, 407–409covariant interfaces, 405invariant interfaces, 405
var keyword, 180use in defining type of enumerable
collection, 490using in place of a type, 63
ViewModeladding commands to, 690–694adding error reporting to, 751–753adding NextCustomer and PreviousCustomer
commands to, 694–698creating, 686–690GoTo method, 713implementing add and edit functionality
in, 742–750virtual keyword, 314
declaring property implementations as virtual, 350
inapplicable to operators, 513virtual methods, 271, 285
and polymorphism, 272important rules for, 272indexer accessors implemented in a class, 371IntelliSense display of available methods, 278
Visual Basicfunctions or subroutines, similarity of methods
to, 65functions, procedures, and subroutines, 67global methods, 66managed code, 224naming class members, case and, 165operators and language interoperability with
C#, 516

Visual State Manager, adapting Windows Store app layout with
786 Index
square brackets in C# array declarations, 228Visual State Manager, adapting Windows Store app
layout with, 655–662Visual Studio 2013
beginning programming with, 3–8creating console application, 5default development settings, 4project files in Solution Explorer, 7Start page, 4
creating a graphical application, 18–37creating console application, 38creating Windows Store app for Windows 8.1, 38creating WPF application for Windows 7 or 8, 38Microsoft Blend, 671returning to, after debugging Windows Store
app, 28Simulator, 642–645, 652–655Technical Preview Edition, default version of
Entity Framework, 726templates and tools for building web
services, 722templates for Windows Store apps, 628writing your first program, 8–14
void keyword return type for methods, 67
WWaitAll and WaitAny methods, Task class, 544, 575
WaitAll method, 578WaitingToRun status, tasks, 568Wait method, Task object, 544, 575, 578Web API template, 725web applications, creating, 725web services, 722
creating and using REST web service, 729–741creating AdventureWorks web service, 730–
734fetching data from AdventureWorks web
service, 735–741inserting, updating, and deleting data through
REST web service, 741–759implementing add and edit functionality in
ViewModel, 742–750integrating add and edit functionality into
Customers form, 754reporting errors and updating the UI, 751–
754testing Customers app, 756–759
Where method, 490, 501, 508
where operator, 496, 508while statements, 115–121, 133
syntax, 115writing, 116–121
white space in C#, 40widening conversions, 527widths for Windows Store apps
default minimum, 640defining layout for narrow view, 656–659testing in Simulator, 654
Win32 APIs, 224Windows 7
exercises in this book, 19Open dialog box, 117starting Visual Studio 2013, 4templates for graphical applications, 18
Windows 8 and 8.1asynchronicity in Windows 8.1, 581compatibility with Windows Runtime (WinRT)
on, 311–313contracts in Windows 8.1, 701–716creating console application in Visual Studio
2013, 3creating graphical application in Visual Studio
2013 (Windows 8.1), 19exercises in this book, 19gestures interacting with Windows 8.1, 625icons and toolbars for Windows 8.1,
displaying, 647Open file picker (Windows 8.1), 116running Windows Store app in Debug mode in
Windows 8.1, 28structs and compatibility with Windows
Runtime, 224templates for Windows Store apps (Windows
8), 18Windows 8.1 running on wide range of
devices, 625Windows Store style UI (Windows 8.1), 18
Windows Forms Application template, 18Windows Phone devices, width of, 640Windows Runtime (WinRT), 224
asynchronicity, 581asynchronous methods and Windows Runtime
APIs, 592–595compatibility with, 311–313
Windows Store apps, 18, 623–672accessing remote database from, 721–762
inserting, updating, and deleting data through REST web service, 741–759
XML, data from REST web service
Index 787
retrieiving data from a database, 721–741building using Blank App template, 628–671
applying styles to a UI, 662–671creating Adventure Works Customers app
(exercise), 628–630implementing scalable user interface, 630–
662closing, 29creating, 672creating for Windows 8.1 using Visual Studio
2013, 38defined, 624–627displaying and searching for data, 673–720
implementing MVVM pattern, 673–701Windows 8.1 contracts, 701–720
examining code generated by Visual Studio for, 30–33
on Windows 8 and 8.1, running using WinRT, 312templates for, 717using Simulator to test, 642–645
Windows.UI namespaces, 34Windows.UI.Popups namespace, 36Windows.UI.Xaml.Controls assembly, 34Windows.UI.Xaml.Media.Imaging namespace, 545Windows.UI.Xaml namespace
DispatcherTimer class, 693WinRT. See Windows RuntimeWPF applications
creating for Winsows 7 or 8 using Visual Studio 2013, 38
examining code files generated by Visual Studio, 33
WPF Application template, 18, 21WPF (Windows Presentation Foundation),
CommandManager object, 693WriteableBitmap object, 545, 594write-only properties, 346, 361
XXAML (Extensible Application Markup Language), 19
App.xaml file for WPF application, examining, 34defined, 20TextBlock control for a form, 24
XML, data from REST web service, 730

about the author
JOHN SHARP is a principal technologist working for Content Master, a division of CM Group Ltd in the United Kingdom. The company specialises in advanced learning solutions for large international organisations, often utilising the latest and most innovative technologies to deliver effective learning outcomes. John gained an honors degree in Computing from Impe-rial College, London. He has been developing software and writing training
courses, guides, and books for over 27 years. John has extensive experience in a range of technologies, from database systems and UNIX to C, C++, and C# applications for the .NET Framework.
He has also written about Java and JavaScript development, and designing enterprise solutions by using Windows Azure. Apart from seven editions of Microsoft Visual C# Step By Step, he has penned several other books, including Microsoft Windows Commu-nication Foundation Step By Step and the J# Core Reference. In his role at Content Mas-ter he is a regular author for Microsoft Patterns & Practices, and has recently worked on guides such as Building Hybrid Applications in the Cloud on Windows Azure, and Data Access for Highly Scalable Solutions Using SQL, NoSQL, and Polyglot Persistence.