microsoft sql server agent: installation and · pdf fileyou can use to track tr ends and to tr...
TRANSCRIPT

IBM Tivoli Composite Application Manager for MicrosoftApplications: Microsoft SQL Server AgentVersion 6.3.1 Fix Pack 10
Installation and Configuration Guide
SC27-5660-01
IBM


IBM Tivoli Composite Application Manager for MicrosoftApplications: Microsoft SQL Server AgentVersion 6.3.1 Fix Pack 10
Installation and Configuration Guide
SC27-5660-01
IBM

NoteBefore using this information and the product it supports, read the information in “Notices” on page 49.
This edition applies to version 6.3.1.10 of IBM Tivoli Composite Application Manager for Microsoft Applications:Microsoft SQL Server Agent (product number 5724-U17) and to all subsequent releases and modifications untilotherwise indicated in new editions.
© Copyright IBM Corporation 2005, 2016.US Government Users Restricted Rights – Use, duplication or disclosure restricted by GSA ADP Schedule Contractwith IBM Corp.

Contents
Tables . . . . . . . . . . . . . . . v
Chapter 1. Overview of the agent . . . . 1New in this release . . . . . . . . . . . . 2Components of the IBM Tivoli Monitoringenvironment . . . . . . . . . . . . . . 2User interface options . . . . . . . . . . . 3Microsoft SQL Server agent data collection . . . . 5
Collection processes . . . . . . . . . . . 5Data collection from SELECT statements andstored procedures. . . . . . . . . . . . 7Data collection from operating system or SQLServer files . . . . . . . . . . . . . 12
Chapter 2. Agent installation andconfiguration . . . . . . . . . . . . 13Requirements. . . . . . . . . . . . . . 13Installing language packs . . . . . . . . . . 13
Installing language packs on Windows systems 13Installing language packs on UNIX or Linuxsystems. . . . . . . . . . . . . . . 14Silent installation of language packs onWindows, UNIX, or Linux systems . . . . . 14
Prerequisites checking . . . . . . . . . . . 16Running as a non-administrator user . . . . . . 17Agent-specific installation and configuration . . . 18
Permissions required for configuring themonitoring agent . . . . . . . . . . . 18
Local configuration . . . . . . . . . . . . 23Configuration parameters in the Database ServerProperties window . . . . . . . . . . . 23
Configuring local environment variables. . . . 34Local environment variables . . . . . . . . . 34
Enabling cursors in the koqcoll.ctl file . . . . 39Remote installation and configuration . . . . . 40Reconfiguration . . . . . . . . . . . . . 40Starting and stopping the Microsoft SQL Serveragent . . . . . . . . . . . . . . . . 41Setting up the Microsoft SQL Server agent in acluster environment . . . . . . . . . . . 42
Requirements. . . . . . . . . . . . . 42Installing and configuring the monitoring agentmanually . . . . . . . . . . . . . . 42Installing and configuring the agent by using thecluster utility . . . . . . . . . . . . . 45
Appendix. ITCAM for MicrosoftApplications documentation library . . 47Prerequisite publications . . . . . . . . . . 47Related publications . . . . . . . . . . . 48Tivoli Monitoring Community on ServiceManagement Connect . . . . . . . . . . . 48Other sources of documentation . . . . . . . 48
Notices . . . . . . . . . . . . . . 49Trademarks . . . . . . . . . . . . . . 51Terms and conditions for product documentation. . 51IBM Online Privacy Statement . . . . . . . . 52
Index . . . . . . . . . . . . . . . 53
© Copyright IBM Corp. 2005, 2016 iii

iv Microsoft SQL Server agent: Installation and Configuration Guide

Tables
1. Data collection for attribute groups . . . . . 52. Key aspects of data gathering for attribute
groups . . . . . . . . . . . . . . 83. Data that is accessed by the attribute groups
that gather data from operating system orMicrosoft SQL Server files. . . . . . . . 12
4. Additional authorization . . . . . . . . 205. Names and descriptions of configuration
settings for each interface . . . . . . . . 256. Interfaces for starting and stopping the
Microsoft SQL Server agent locally andremotely . . . . . . . . . . . . . 41
© Copyright IBM Corp. 2005, 2016 v

vi Microsoft SQL Server agent: Installation and Configuration Guide

Chapter 1. Overview of the agent
The IBM Tivoli Composite Application Manager for Microsoft Applications: Microsoft SQL Server Agent(product code OQ) provides you with the capability to monitor Microsoft SQL Server. You can also usethe agent to take basic actions with the Microsoft SQL Server.
IBM® Tivoli® Monitoring is the base software for the Microsoft SQL Server agent.
The Microsoft SQL Server agent monitors the following functions:v Availability and resourcesv Performancev Error and event logv Historical data
IBM Tivoli Monitoring
IBM Tivoli Monitoring provides a way to monitor the availability and performance of all the systems inyour enterprise from one or several designated workstations. It also provides useful historical data thatyou can use to track trends and to troubleshoot system problems.
You can use IBM Tivoli Monitoring to achieve the following tasks:v Monitor for alerts on the systems that you are managing by using predefined situations or custom
situations.v Establish your own performance thresholds.v Trace the causes leading to an alert.v Gather comprehensive data about system conditions.v Use policies to take actions, schedule work, and automate manual tasks.
The Tivoli Enterprise Portal is the interface for IBM Tivoli Monitoring products. You can use theconsolidated view of your environment as seen in the Tivoli Enterprise Portal to monitor and resolveperformance issues throughout the enterprise.
See the IBM Tivoli Monitoring publications listed in “Prerequisite publications” on page 47 for completeinformation about IBM Tivoli Monitoring and the Tivoli Enterprise Portal.
Features of the monitoring agent
The Microsoft SQL Server agent offers a central point of management for distributed databases. Themonitoring agent provides a comprehensive means for gathering exactly the information you need todetect problems early and prevent them. Information is standardized across all systems so you canmonitor hundreds of servers from a single workstation. You can easily collect and then analyze specificinformation by using the Tivoli Enterprise Portal interface.
The Microsoft SQL Server agent is an intelligent, remote monitoring agent that is installed on managedsystems. It assists you in anticipating trouble and warns system administrators when critical events takeplace on systems. With the Microsoft SQL Server agent, database and system administrators can setthreshold levels and can set flags to alert them when the system reaches these thresholds.
This monitoring agent provides the following benefits:
© Copyright IBM Corp. 2005, 2016 1

v Simplifies application and system management by managing applications, operating systems, andresources across your environment.
v Increases profits by providing you with real-time access to reliable, up-to-the-minute data that allowsyou to make faster, better-informed operating decisions.
v Scales and ports to new Windows operating systems.v Improves system performance by letting you integrate, monitor, and manage your system, network,
console, and mission-critical applications. The monitoring agent sends an alert when conditions on thesystem network meet threshold-based conditions. These alerts notify your system administrator to limitand control database usage. You can view data gathered by monitoring agents in reports and charts forthe status of your distributed database systems.
v Enhances efficiency by monitoring different Microsoft SQL Server versions on separate systems andnetworks from a single PC screen. Depending on your configuration, you can collect and monitor dataacross systems. The monitoring agent gathers and filters status information at the managed systemrather than at the hub, eliminating unnecessary data transmission and sending only data that isrelevant to changes in status conditions. The Microsoft SQL Server agent helps you to monitor and togather the consistent, accurate, and timely information you need to effectively perform your job.
New in this releaseFor version 6.3.1.10 of the Microsoft SQL Server agent, the following enhancements have been made sinceversion 6.3.1, including the fix packs:v Added support to monitor the Microsoft SQL Server 2016v Modified the threshold value of the MS_SQL_Fragmentation_Crit situation to 90v Modified attribute groups:
– MS SQL Blocked Queries Details– MS SQL Database Detail– MS SQL Device Detail– MS SQL Filegroup Detail– MS SQL Server Properties– MS SQL Services Detail– MS SQL Table Detail
v Added the COLL_TBLD_SORTBY variable to set the sorting criteria for the rows that are returned by theTable Details attribute group
v Added the Monitor All Databases check box in the Database Server Properties window to monitor allthe databases of an SQL Server instance.
Components of the IBM Tivoli Monitoring environmentAfter you install and set up the Microsoft SQL Server agent, you have an environment that contains theclient, server, and monitoring agent implementation for Tivoli Monitoring.
This Tivoli Monitoring environment contains the following components:
Tivoli Enterprise Portal clientThe portal has a user interface based on Java™ for viewing and monitoring your enterprise.
Tivoli Enterprise Portal ServerThe portal server is placed between the client and the Tivoli Enterprise Monitoring Server andenables retrieval, manipulation, and analysis of data from the monitoring agents. The TivoliEnterprise Portal Server is the central repository for all user data.
Tivoli Enterprise Monitoring ServerThe monitoring server acts as a collection and control point for alerts received from the
2 Microsoft SQL Server agent: Installation and Configuration Guide

monitoring agents, and collects their performance and availability data. The Tivoli EnterpriseMonitoring Server is also a repository for historical data.
Tivoli Enterprise Monitoring Agent, Microsoft SQL Server agentThis monitoring agent collects data and distributes the data to the Tivoli Enterprise MonitoringServer, Tivoli Enterprise Portal Server, Tivoli Enterprise Portal, Tivoli Data Warehouse, and TivoliIntegrated Portal.
Multiple copies of this agent can run on the same system.
IBM Tivoli Netcool/OMNIbusTivoli Netcool/OMNIbus is an optional component and the recommended event managementcomponent. The Netcool/OMNIbus software is a service level management (SLM) system thatdelivers real-time, centralized monitoring of complex networks and IT domain events. Eventinformation is tracked in a high-performance, in-memory database and presented to specific usersthrough individually configurable filters and views. The software includes automation functionsthat you can use to perform intelligent processing on managed events. You can use this softwareto forward events for Tivoli Monitoring situations to Tivoli Netcool/OMNIbus.
IBM Tivoli Enterprise Console®
The Tivoli Enterprise Console is an optional component that acts as a central collection point forevents from various sources, including events from other Tivoli software applications, Tivolipartner applications, custom applications, network management platforms, and relationaldatabase systems. You can view these events through the Tivoli Enterprise Portal (by using theevent viewer), and you can forward events from Tivoli Monitoring situations to the TivoliEnterprise Console component. If you do not already use Tivoli Enterprise Console and need anevent management component, you can choose to use IBM Tivoli Netcool/OMNIbus.
IBM Tivoli Common ReportingTivoli Common Reporting is a separately installable feature available to users of Tivoli softwarethat provides a consistent approach to generating and customizing reports. Some individualproducts provide reports that are designed for use with Tivoli Common Reporting and have aconsistent look and feel.
IBM Tivoli Application Dependency Discovery Manager (TADDM)TADDM delivers automated discovery and configuration tracking capabilities to build applicationmaps that provide real-time visibility into application complexity.
IBM Tivoli Business Service ManagerThe Tivoli Business Service Manager component delivers real-time information to help yourespond to alerts effectively based on business requirements. Optionally, you can use thiscomponent to meet service-level agreements (SLAs). Use the Tivoli Business Service Managertools to help build a service model that you can integrate with Tivoli Netcool/OMNIbus alerts oroptionally integrate with data from an SQL data source. Optional components provide access todata from other IBM Tivoli applications such as Tivoli Monitoring and TADDM.
Tivoli Integrated PortalTivoli Integrated Portal helps the interaction and secure passing of data between Tivoli productsthrough a common portal. Within the same dashboard view, you can launch from one applicationto another and research different aspects of your managed enterprise. This component is installedautomatically with the first Tivoli product that uses the Tivoli Integrated Portal framework.Subsequent products can install updated versions of Tivoli Integrated Portal. After version 2.2,this component is replaced by the Dashboard Application Services Hub.
User interface optionsInstallation of the base IBM Tivoli Monitoring software and other integrated applications providesvarious interfaces that you can use to work with your resources and data.
The following interfaces are available:
Chapter 1. Overview of the agent 3

Tivoli Enterprise Portal user interfaceYou can run the Tivoli Enterprise Portal as a desktop application or a browser application. Theclient interface is a graphical user interface (GUI) based on Java on a Windows or Linuxworkstation. The browser application is automatically installed with the Tivoli Enterprise PortalServer. The desktop application is installed by using the Tivoli Monitoring installation media orwith a Java Web Start application. To start the Tivoli Enterprise Portal browser client in yourInternet browser, enter the URL for a specific Tivoli Enterprise Portal browser client installed onyour Web server.
Command-line interfaceYou can use Tivoli Monitoring commands to manage the Tivoli Monitoring components and theirconfiguration. You can also run commands at the Tivoli Enterprise Console event server or theTivoli Netcool/OMNIbus ObjectServer to configure event synchronization for enterprisesituations.
Manage Tivoli Enterprise Monitoring Services windowYou can use the window for the Manage Tivoli Enterprise Monitoring Services utility to configurethe agent and start Tivoli services not designated to start automatically.
IBM Tivoli Netcool/OMNIbus event listYou can use the Netcool/OMNIbus event list to monitor and manage events. An event is createdwhen the Netcool/OMNIbus ObjectServer receives an event, alert, message, or data item. Eachevent is made up of columns (or fields) of information that are displayed in a row in theObjectServer alerts.status table. The Tivoli Netcool/OMNIbus web GUI is also a web-basedapplication that processes network events from one or more data sources and presents the eventdata in various graphical formats.
IBM Tivoli Enterprise ConsoleYou can use the Tivoli Enterprise Console to help ensure the optimal availability of an IT servicefor an organization. The Tivoli Enterprise Console is an event management application thatintegrates system, network, database, and application management. If you do not already useTivoli Enterprise Console and need an event management component, you can choose to useTivoli Netcool/OMNIbus.
IBM Tivoli Common ReportingUse the Tivoli Common Reporting web user interface for specifying report parameters and otherreport properties, generating formatted reports, scheduling reports, and viewing reports. Thisuser interface is based on the Dashboard Application Services Hub for Tivoli Common Reporting3.1 and on Tivoli Integrated Portal for earlier versions.
IBM Tivoli Application Dependency Discovery ManagerThe Discovery Management Console is the TADDM client user interface for managingdiscoveries.
IBM Tivoli Business Service ManagerThe Tivoli Business Service Manager console provides a graphical user interface that you can useto logically link services and business requirements within the service model. The service modelprovides an operator with a second-by-second view of how an enterprise is performing at anymoment in time or how the enterprise performed over a time period.
Tivoli Integrated PortalWeb-based products that are built on the Tivoli Integrated Portal framework share a commonuser interface where you can launch applications and share information. After version 2.2, thisinterface is replaced by the Dashboard Application Services Hub.
4 Microsoft SQL Server agent: Installation and Configuration Guide

Microsoft SQL Server agent data collectionThe Microsoft SQL Server agent uses different algorithms to collect data from specific data sources.
The agent collects data in the following ways:v Data collection at workspace refresh, at situation sampling of attributes, or at regular intervalsv Data collection from the Microsoft SQL Server SELECT statements and stored proceduresv Data collection from operating system or MS SQL Server files
Collection processesThe Microsoft SQL Server agent gathers data when it is requested by a workspace refresh, a situationsampling of attributes, or historical data collection.
The monitoring agent gathers all attributes in the attribute groups that make up a workspace or situation.The default refresh or sampling intervals do not put a significant load on the system or the MicrosoftSQL Server as it gathers the data. Most of the attributes gathered by the Microsoft SQL Server agent comefrom monitoring data provided by Windows Performance Monitor (Perfmon). This data is acquiredthough the use of requests for Perfmon data and SQL database SELECT statements. The Perfmon andSQL data are gathered on a defined cycle while most other attributes are gathered on demand whenrequested through a workspace refresh, a situation sampling of attributes, or historical data collection.Other attribute groups contain data that is collected from system information or external Microsoft SQLServer data such as the database instance log. This data is primarily gathered on demand, as it isrequested. The Microsoft SQL Server agent attempts to lessen the possibility of over sampling bymaintaining a cache of attribute data for a set length of time. If the data is sampled within a shorterduration than the interval set for the cache, the cache data is considered fresh and the collector does notacquire new data.
Table 1 provides information about when the attribute data is gathered (on demand or cyclically) and thecache duration for each Microsoft SQL Server agent attribute group.
Table 1. Data collection for attribute groups
Attribute groupWhen data is collected (cycle timeor on demand) Cache duration in seconds
MS SQL Audit details On demand 60
MS SQL Batch Stats Every 180 seconds No caching
MS SQL Configuration On demand 90
MS SQL Customized SQL Query Details On demand No caching
MS SQL Customized SQL Query Result On demand No caching
MS SQL Database Detail User-defined interval User-defined interval
MS SQL Database Mirroring On demand 10
MS SQL Database Summary Every 180 seconds No caching
MS SQL Device Detail On demand
—OR—
User-defined interval
60
—OR—
User-defined interval
MS SQL Enterprise Log Shipping DBDetails
On demand No caching
MS SQL Filegroup On demand No caching
MS SQL Job Detail Every 180 seconds No caching
MS SQL Job Summary On demand No caching
Chapter 1. Overview of the agent 5

Table 1. Data collection for attribute groups (continued)
Attribute groupWhen data is collected (cycle timeor on demand) Cache duration in seconds
MS SQL Lock Conflict Detail On demand No caching
MS SQL Lock Detail On demand No caching
MS SQL Lock Resource Type Summary Every 300 seconds No caching
MS SQL Lock Summary On demand No caching
MS SQL Log Shipping DB Details On demand No caching
MS SQL Log Shipping Errors On demand No caching
MS SQL Log Shipping Jobs Detail On demand No caching
MS SQL Memory Manager On demand No caching
MS SQL Problem Detail Every 180 seconds No caching
MS SQL Process Detail On demand 10
MS SQL Process Summary Every 180 seconds No caching
MS SQL Problem Summary Every 180 seconds No caching
MS SQL Remote Servers Every 60 seconds No caching
MS SQL Resource Pool Stats On demand No caching
MS SQL Server Detail On demand 60
MS SQL Server Enterprise View On demand No caching
MS SQL Server Summary Every 180 seconds No caching
MS SQL Services Detail On demand No caching
MS SQL Statistics Detail On demand 300
MS SQL Statistics Summary Every 60 seconds No caching
MS SQL Table Detail On demand
—OR—
User-defined interval
120
—OR—
User-defined interval
MS SQL Text On demand No caching
MS SQL Workload Group Stats On demand No caching
VMS SQL Remote Servers On demand No caching
VMS SQL Server Enterprise View On demand No caching
MS SQL Server Transaction Summary On demand 10
MS SQL Service Broker Activation On demand 10
MS SQL Service Broker Statistics On demand 10
MS SQL Service Broker Transport On demand 10
MS SQL Table Summary On demand 120
MS SQL Integration Service Details On demand No caching
MS SQL Analysis Services Data Mining On demand No caching
MS SQL Analysis Services Memorystatistics
On demand No caching
MS SQL Analysis Services Storage EngineQuery
On demand No caching
6 Microsoft SQL Server agent: Installation and Configuration Guide

Table 1. Data collection for attribute groups (continued)
Attribute groupWhen data is collected (cycle timeor on demand) Cache duration in seconds
MS SQL Analysis Services MDXProcessing
On demand No caching
MS SQL Analysis Services RowsProcessing
On demand No caching
MS SQL Running Queries Details On demand 30
MS SQL Individual Queries Details On demand 30
MS SQL Blocked Queries Details On demand 10
MS SQL FileTable Detail On demand 120
MS SQL Additional Database Details On demand 60
MS SQL Availability Groups Details On demand 60
MS SQL Availability Replicas Details On demand 60
MS SQL Availability Replicas Status On demand 60
MS SQL Availability Replicas StatusSummary
On demand 60
MS SQL Availability Groups Summary On demand 60
MS SQL Availability Replicas Statistics On demand 60
MS SQL Availability Database Details On demand 60
MS SQL Availability Database Statistics On demand 60
MS SQL Availability Database Summary On demand 60
MS SQL Availability Group ListenerDetails
On demand 60
MS SQL Availability Groups Details InCluster
On demand 60
MS SQL Availability Replicas Details InCluster
On demand 60
MS SQL Availability Database Details InCluster
On demand 60
MS SQL Additional Availability Details On demand 60
MS SQL Server Properties On demand 10
The Microsoft SQL Server agent maintains long-running processes for the monitoring agent thatcommunicates with the Tivoli Enterprise Monitoring Server and the collector that drives data collection.Short-running processes are used to access system data, access database instance log file data, issue andprocess the output of Microsoft SQL Server stored procedures, and perform other database instanceinteractions.
Data collection from SELECT statements and stored proceduresSome of the attribute groups of Microsoft SQL Server agent gather data that is returned by Microsoft SQLServer SELECT statements, stored procedures, or both.
Table 2 on page 8 provides information about how each attribute group collects data (SELECT statementsor stored procedures). The table also provides the following information:v For attribute groups that use SELECT statements to gather data, the number of individual SELECT
statements issued for the group and the tables that are accessed are listed.
Chapter 1. Overview of the agent 7

v For attribute groups that use stored procedures to gather data, the names of the stored procedures arelisted.
Table 2. Key aspects of data gathering for attribute groups
Attribute group Primarycollectionmechanism
Number ofSELECTstatementsissued
Tables accessed Name of storedprocedures
MSSQL AuditDetails
SELECT 4 sys.server_audit_specifications,sys.server_audit_specification_details, sys.dm_audit_actions,sys.database_audit_specifications,sys.database_audit_specification_details, sys.dm_audit_actions,sys.server_audits,sys.dm_server_audit_status
sp_MSForEachDB
MSSQL Batch Stats Perfmon 0 None None
MSSQL ServerSummary
SELECT andPerfmon
5 sysprocesses, sysjobhistory serverproperty('processid'), DBCC
MSSQL ServerDetail
SELECT andPerfmon
5 sysprocesses, sysjobhistory serverproperty('processid'), DBCC
MSSQL DatabaseSummary
SELECT andPerfmon
4 sysdatabases, sysfiles sp_replcounters
MSSQL DatabaseDetail
SELECT andPerfmon
4 sysdatabases, sysfiles sp_replcounters
MSSQL DatabaseMirroring
SELECT andPerfmon
2 sys.database_mirroring None
MSSQL DeviceDetail
SELECT andPerfmon
4 sysfiles, sysdevices, sysusages,spt_values
None
MSSQL EnterpriseLog Shipping DBDetails
SELECT 1 log_shipping_monitor_primary, log_shipping_monitor_history_detail, log_shipping_monitor_secondary
None
MSSQL Lock Detail SELECT 2 syslockinfo, sysobjects None
MSSQL LockConflict Detail
SELECT 1 sysprocesses None
MSSQL LogShipping DB Details
SELECT 1 log_shipping_monitor_primary, log_shipping_monitor_history_detail,log_shipping_monitor_secondary
None
MSSQL LogShipping Errors
SELECT 1 log_shipping_monitor_error_detail
None
MSSQL LogShipping Jobs Detail
SELECT 1 log_shipping_monitor_history_detail, sysjobhistory
None
MSSQL Text SELECT 1 sysprocesses None
MSSQL ProcessSummary
SELECT 2 sysprocesses None
MSSQL ProcessDetail
SELECT 3 sysprocesses None
8 Microsoft SQL Server agent: Installation and Configuration Guide

Table 2. Key aspects of data gathering for attribute groups (continued)
Attribute group Primarycollectionmechanism
Number ofSELECTstatementsissued
Tables accessed Name of storedprocedures
MSSQL StatisticsSummary
SELECT 1 @@cpu_busy, @@io_busy, @@idle,@@connections, @@pack_sent,@@pack_received,@@packet_errors, @@total_read,@@total_write, @@total_errors,
None
MSSQL StatisticsDetail
SELECT 1 @@cpu_busy, @@io_busy, @@idle,@@connections, @@pack_sent,@@pack_received,@@packet_errors, @@total_read,@@total_write, @@total_errors,
None
MSSQL RemoteServers
SELECT 1 sysservers None
MSSQL ResourcePool Stats
Perfmon 0 None None
MSSQLConfiguration
SELECT 1 sysconfigurations, sysscurconfigs,sysconfigures
None
MSSQL ServerEnterprise View
SELECT 1 sysprocesses, sysjobhistory,syslockinfo
None
MSSQL LockSummary
SELECT andPerfmon
16 syslockinfo None
MSSQL MemoryManager
Perfmon 0 None None
MSSQL JobSummary
SELECT 3 syscategories, sysjobs,sysjobhistory
MSSQL Job Detail SELECT 3 syscategories, sysjobs, sysjobhistor
MSSQL FilegroupDetail
SELECT andPerfmon
2 sysdatabases, sysfiles None
MSSQL LockResource TypeSummary
Perfmon 0 None None
MSSQL WorkloadGroup Stats
Perfmon 0 None None
MS SQL ServerTransactionSummary
Perfmon 0 None None
MS SQL ServiceBroker Activation
Perfmon 0 None None
MS SQL ServiceBroker Statistics
Perfmon 0 None None
MS SQL ServiceBroker Transport
Perfmon 0 None None
MS SQL TableSummary
SELECT 3 sys.tables, sysindexes, sys.dm_db_index_physical_stats, sys.dm_db_partition_stats
None
MS SQL IntegrationService Details
Perfmon 0 None None
Chapter 1. Overview of the agent 9

Table 2. Key aspects of data gathering for attribute groups (continued)
Attribute group Primarycollectionmechanism
Number ofSELECTstatementsissued
Tables accessed Name of storedprocedures
MS SQL AnalysisServices DataMining
Perfmon 0 None None
MS SQL AnalysisServices MemoryStatistics
Perfmon 0 None None
MS SQL AnalysisServices StorageEngine Query
Perfmon 0 None None
MS SQL AnalysisServices MDXProcessing
Perfmon 0 None None
MS SQL AnalysisServices RowsProcessing
Perfmon 0 None None
MS SQL RunningQueries Details
SELECT 1 sys.dm_exec_requests,sys.dm_exec_sessions,sys.dm_exec_sql_text
None
MS SQL IndividualQueries Details
SELECT 1 sys.dm_exec_connections, sys.dm_exec_requests, sys.dm_exec_sessions,sys.dm_exec_sql_text
None
MS SQL BlockedQueries Details
SELECT 3 sys.dm_os_sys_info,sys.configurations, sys.dm_exec_query_stats, sys.dm_exec_requests,sys.dm_exec_sql_text,sys.dm_exec_plan_attributes
None
MS SQL FileTableDetail
SELECT 3 sys.databases, sys.filetables,sysindexes,sys.dm_filestream_non_transacted_handles
None
MS SQL AdditionalDatabase Details
SELECT 1 sys.databases, sys.database_filestream_options
None
MS SQL AvailabilityGroups Details
SELECT 3 sys.availability_groups,sys.dm_hadr_availability_group_states,sys.dm_hadr_database_replica_states,sys.dm_hadr_availability_replica_states, sys.availability_replicas
None
MS SQL AvailabilityReplicas Details
SELECT 2 sys.availability_replicas,sys.availability_groups,sys.dm_hadr_availability_group_states
None
10 Microsoft SQL Server agent: Installation and Configuration Guide
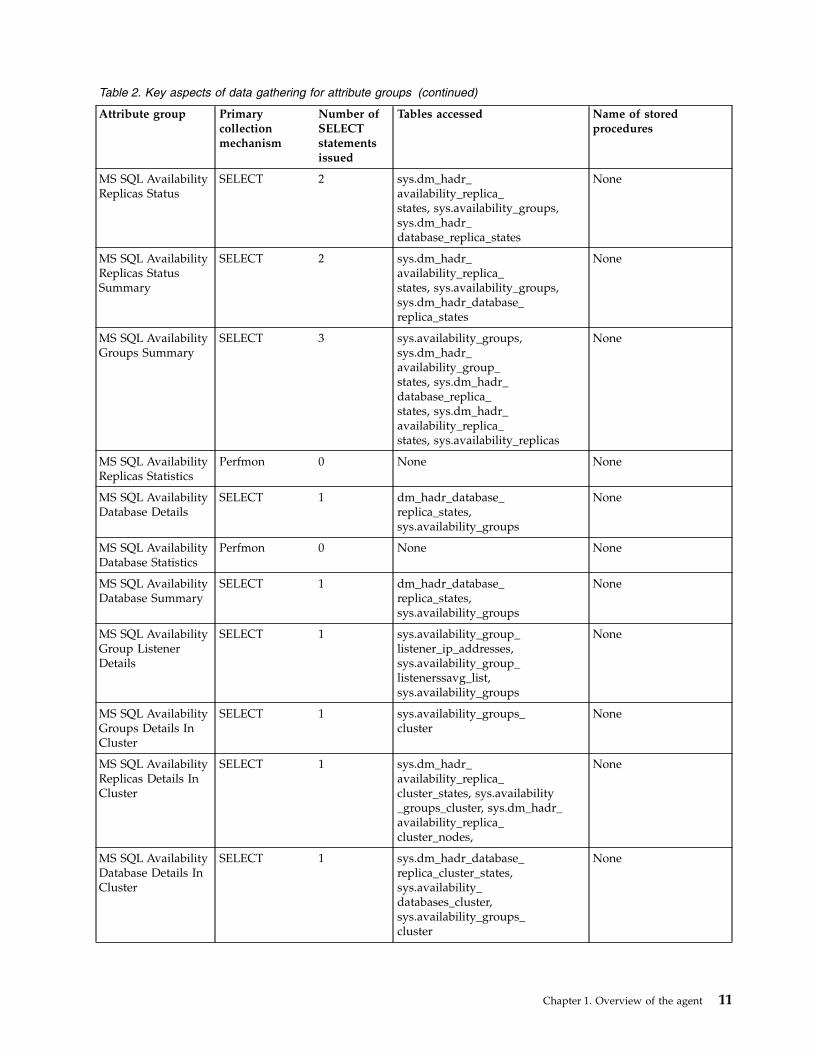
Table 2. Key aspects of data gathering for attribute groups (continued)
Attribute group Primarycollectionmechanism
Number ofSELECTstatementsissued
Tables accessed Name of storedprocedures
MS SQL AvailabilityReplicas Status
SELECT 2 sys.dm_hadr_availability_replica_states, sys.availability_groups,sys.dm_hadr_database_replica_states
None
MS SQL AvailabilityReplicas StatusSummary
SELECT 2 sys.dm_hadr_availability_replica_states, sys.availability_groups,sys.dm_hadr_database_replica_states
None
MS SQL AvailabilityGroups Summary
SELECT 3 sys.availability_groups,sys.dm_hadr_availability_group_states, sys.dm_hadr_database_replica_states, sys.dm_hadr_availability_replica_states, sys.availability_replicas
None
MS SQL AvailabilityReplicas Statistics
Perfmon 0 None None
MS SQL AvailabilityDatabase Details
SELECT 1 dm_hadr_database_replica_states,sys.availability_groups
None
MS SQL AvailabilityDatabase Statistics
Perfmon 0 None None
MS SQL AvailabilityDatabase Summary
SELECT 1 dm_hadr_database_replica_states,sys.availability_groups
None
MS SQL AvailabilityGroup ListenerDetails
SELECT 1 sys.availability_group_listener_ip_addresses,sys.availability_group_listenerssavg_list,sys.availability_groups
None
MS SQL AvailabilityGroups Details InCluster
SELECT 1 sys.availability_groups_cluster
None
MS SQL AvailabilityReplicas Details InCluster
SELECT 1 sys.dm_hadr_availability_replica_cluster_states, sys.availability_groups_cluster, sys.dm_hadr_availability_replica_cluster_nodes,
None
MS SQL AvailabilityDatabase Details InCluster
SELECT 1 sys.dm_hadr_database_replica_cluster_states,sys.availability_databases_cluster,sys.availability_groups_cluster
None
Chapter 1. Overview of the agent 11

Table 2. Key aspects of data gathering for attribute groups (continued)
Attribute group Primarycollectionmechanism
Number ofSELECTstatementsissued
Tables accessed Name of storedprocedures
MS SQL AdditionalAvailabilityDatabase Details
SELECT 1 sys.dm_hadr_database_replica_states, sys.dm_hadr_availability_replica_states
None
MS SQL ServerProperties
SELECT 1 SERVERPROPERTY None
MS SQL CustomizedSQL Query Result
SELECT Depends onSQL Serverquery issuedby user
Depends on SQL Server queryissued by user
None
Data collection from operating system or SQL Server filesMicrosoft SQL Server agent collects data from operating system or MS SQL Server files for some attributegroups.
Table 3. Data that is accessed by the attribute groups that gather data from operating system or Microsoft SQLServer files
Attribute group Data accessed
MS SQL Error Event Details MS SQL server error log file
MS SQL Problem Summary MS SQL server error log file
MS SQL Problem Detail MS SQL server error log file
MS SQL Services Detail Windows Services API
MS SQL Integration Details Windows Services API
MS SQL Analysis service Data Mining Windows Services API
MS SQL Analysis Service Memory Statistics Windows Services API
MS SQL Analysis Service Storage Engine Query Windows Services API
MS SQL Analysis Service MDX Processing Windows Services API
MS SQL Analysis Service Rows Processing Windows Services API
MS SQL Customized SQL Query Details KoqCusSQL.properties file
MS SQL Audit Details Windows applications and event logs
12 Microsoft SQL Server agent: Installation and Configuration Guide

Chapter 2. Agent installation and configuration
Agent installation and configuration requires the use of the IBM Tivoli Monitoring Installation and SetupGuide and agent-specific installation and configuration information.
To install and configure Microsoft SQL Server agent, use the procedures for installing monitoring agentsin the IBM Tivoli Monitoring Installation and Setup Guide along with the agent-specific installation andconfiguration information.
If you are installing silently by using a response file, see "Performing a silent installation of IBM TivoliMonitoring" in the IBM Tivoli Monitoring Installation and Setup Guide.
With the self-describing agent capability, new or updated IBM Tivoli Monitoring agents using IBM TivoliMonitoring V6.2.3 or later can become operational after installation without having to perform additionalproduct support installation steps. To take advantage of this capability, see "Enabling self-describing agentcapability at the hub monitoring server" in the IBM Tivoli Monitoring Installation and Setup Guide. Also, see"Self-describing monitoring agents" in the IBM Tivoli Monitoring Administrator's Guide.
RequirementsBefore installing and configuring the agent, make sure your environment meets the requirements for theIBM Tivoli Composite Application Manager for Microsoft Applications: Microsoft SQL Server Agent.
For the most up-to-date information about system requirements, see the Software product compatibilityreports (http://www-969.ibm.com/software/reports/compatibility/clarity/index.html). Search for theITCAM for Microsoft Applications product.
Installing language packsYou can install language packs for your agent support files on the Tivoli Enterprise Monitoring agent andthe Tivoli Enterprise Portal Server. There are separate procedures for installing language packs onWindows and on UNIX or Linux systems.
Before you begin
Ensure that you have installed the product in English before you install a language pack for the agentsupport files on the Tivoli Enterprise Monitoring Server, and the Tivoli Enterprise Portal Server.
Installing language packs on Windows systemsYou can install the language packs on a Windows system.
Procedure1. Double-click lpinstaller.bat in the language pack CD to start the installation program.2. Select the language of the installer and click OK.3. Click Next on the Introduction panel.4. Click Add/Update and click Next.5. Select the folder in which the National Language Support package (NLSPackage) files are located.
Note: Usually the NLSPackage files are located in the nlspackage folder where the executable installeris located.
6. Select the language support for the agent of your choice and click Next.
© Copyright IBM Corp. 2005, 2016 13

Note: You can select multiple languages by pressing the Ctrl key.7. Select the languages that you want to install and click Next.8. Examine the installation summary page and click Next to start the installation.9. Click Finish after the installation completes.
10. Restart the Tivoli Enterprise Portal, Tivoli Enterprise Portal Server, and Eclipse Help Server if any ofthese components are installed.
Installing language packs on UNIX or Linux systemsYou can install the language packs on a UNIX or Linux system.
Before you begin
Ensure that you have installed the product in English.
Procedure1. Run the following command to create a temporary directory on the computer. Ensure that the full
path of the directory does not contain any spaces:mkdir dir_name
2. Mount the language pack CD to the temporary directory that you have created.3. Run the following command to start the installation program:
cd dir_namelpinstall.sh ITM Home Directory
where ITM Home Directory is the location where you have installed IBM Tivoli Monitoring. Usually itis /opt/IBM/ITM for AIX® and Linux systems.
4. Select the language of the installer and click OK.5. Click Next on the Introduction panel.6. Click Add/Update and click Next.7. Select the folder in which the National Language Support package (NLSPackage) files are located.
Note: Usually, the NLSPackage files are located in the nlspackage folder where the installerexecutable is located.
8. Select the language support for the agent of your choice and click Next.
Note: You can select multiple languages by pressing the Ctrl key.9. Select the languages that you want to install and click Next.
10. Examine the installation summary page and click Next to start the installation.11. Click Finish after the installation completes.12. Restart the Tivoli Enterprise Portal, Tivoli Enterprise Portal Server, and Eclipse Help Server if any of
these components are installed.
Silent installation of language packs on Windows, UNIX, or LinuxsystemsYou can use the silent-mode installation method to install the language packs. In silent mode, theinstallation process obtains the installation settings from a predefined response file. It does not promptyou for any information.
Before you begin
First, make sure that you installed the product in the English language.
14 Microsoft SQL Server agent: Installation and Configuration Guide

Procedure1. Copy and paste the ITM_Agent_LP_silent.rsp response file template as shown in “Response file
example.”2. Change the following parameter settings:
NLS_PACKAGE_FOLDERFolder where the National Language Support package (NLSPackage) files are located.Typically, the NLSPackage files are located in the nlspackage folder, for example:NLS_PACKAGE_FOLDER = //tmp//LP//nlspackage.
PROD_SELECTION_PKGName of the language pack to install. Several product components can be included in onelanguage package. You might want to install only some of the available components in alanguage pack.
BASE_AGENT_FOUND_PKG_LISTAgent for which you are installing language support. This value is usually the same asPROD_SELECTION_PKG.
LANG_SELECTION_LISTLanguage you want to install.
3. Enter the command to install the language pack with a response file (silent installation):v For Windows systems:
lpinstaller.bat -f path_to_response_file
v For UNIX or Linux systems:lpinstaller.sh -c candle_home -f path_to_response_file
where candle_home is the IBM Tivoli Monitoring base directory.
Response file example# IBM Tivoli Monitoring Agent Language Pack Silent Installation Operation##This is a sample response file for silent installation mode for the IBM Tivoli#Monitoring Common Language Pack Installer.#.#This file uses the IBM Tivoli Monitoring Common Agent Language Pack with the#install package as an example.#Note:#This response file is for the INSTALLATION of language packs only.#This file does not support UNINSTALLATION of language packs in silent mode.#-------------------------------------------------------------------------------#-------------------------------------------------------------------------------#To successfully complete a silent installation of the the example of Common Agent#localization pack, complete the following steps:##1.Copy ITM_Agent_LP_silent.rsp to the directory where lpinstaller.bat or#lpinstaller.sh is located (IBM Tivoli Monitoring Agent Language Pack build#location).##2.Modify the response file so that it is customized correctly and completely for#your site.# Complete all of the following steps in the response file.##3.After customizing the response file, invoke the silent installation using the#following command:#For Windows:# lpinstaller.bat -f <path_to_response_file>#For UNIX and Linux:# lpinstaller.sh -c <candle_home> -f <path_to_response_file>#Note:<candle_home> is the IBM Tivoli Monitoring base directory.#--------------------------------------------------------------------------------
Chapter 2. Agent installation and configuration 15

#--------------------------------------------------------------------------------#Force silent install mode.#--------------------------------------------------------------------------------INSTALLER_UI=silent#---------------------------------------------------------------------------------#Run add and update actions.#---------------------------------------------------------------------------------CHOSEN_INSTALL_SET=ADDUPD_SET#---------------------------------------------------------------------------------#NLS Package Folder, where the NLS Packages exist.#For Windows:# Use the backslash-backslash(\\) as a file separator (for example,#C:\\zosgmv\\LCD7-3583-01\\nlspackage).#For UNIX and Linux:# Use the slash-slash (//) as a file separator (for example,#//installtivoli//lpsilenttest//nlspackage).#---------------------------------------------------------------------------------#NLS_PACKAGE_FOLDER=C:\\zosgmv\\LCD7-3583-01\\nlspackageNLS_PACKAGE_FOLDER=//tmp//LP//nlspackage#---------------------------------------------------------------------------------#List the packages to process; both variables are required.#Each variable requires that full paths are specified.#Separate multiple entries with a semicolon (;).#For Windows:# Use the backslash-backslash(\\) as a file separator.#For Unix and Linux:# Use the slash-slash (//) as a file separator.#---------------------------------------------------------------------------------#PROD_SELECTION_PKG=C:\\zosgmv\\LCD7-3583-01\\nlspackage\\KIP_NLS.nlspkg#BASE_AGENT_FOUND_PKG_LIST=C:\\zosgmv\\LCD7-3583-01\\nlspackage\\KIP_NLS.nlspkgPROD_SELECTION_PKG=//tmp//LP//nlspackage//kex_nls.nlspkg;//tmp//LP//nlspackage//koq_nls.nlspkgBASE_AGENT_FOUND_PKG_LIST=//tmp//LP//nlspackage//kex_nls.nlspkg;//tmp//LP//nlspackage//koq_nls.nlspkg#--------------------------------------------------------------------------------#List the languages to process.#Separate multiple entries with semicolons.#--------------------------------------------------------------------------------LANG_SELECTION_LIST=pt_BR;fr;de;it;ja;ko;zh_CN;es;zh_TW
Prerequisites checkingThe prerequisite checker utility verifies whether all the prerequisites that are required for the agentinstallation are met. The prerequisite checker creates a log file that contains a report of all theprerequisites checks when the prerequisite checker was run.
For the Microsoft SQL Server agent, the prerequisite checker verifies the following requirements:v Memoryv Diskv Operating systemsv SQL Server versions
Additionally, the prerequisite checker verifies whether the user, who installs the agent, is a member of theAdministrators group.
For detailed information about installation prerequisites, see the Software product compatibility reports(http://www-969.ibm.com/software/reports/compatibility/clarity/index.html).
You can run the prerequisite checker in stand-alone mode or remotely. For more information about theprerequisite checker, see "Prerequisite Checking for IBM Tivoli Monitoring Agents" in the IBM TivoliMonitoring Installation and Setup Guide.
16 Microsoft SQL Server agent: Installation and Configuration Guide

Running as a non-administrator userYou can run the monitoring agent for Microsoft SQL Server as a non-administrator user.
About this task
The Microsoft SQL Server agent can be run as a non-administrator user. This process supports DomainUsers only.
Procedure1. Start Windows application Active Directory Users and Computers and create a domain user.v Make sure that the new user is a member of the Domain Users group.v Make sure that the SQL Server that you monitor is a member of Domain Computers.
2. Add the newly created domain user in the SQL Server Login user group. The domain user must havesysadmin SQL Server role permissions on the SQL Server.
3. Log on to the SQL Server with a domain administrator account.4. Use File Systems, to give the Modify permission to every drive that the Microsoft SQL Server agent
accesses and propagate permissions to all subdirectories. Complete the following steps to propagatepermissions:a. Go to My Computer.b. Right-click the drive.c. Click the Security tab.d. Add the newly created user.e. Give modify permissions to the newly created user.f. Click OK. This procedure takes a few minutes to apply permissions throughout the file system.
5. By using the Windows Registry, grant read access to HKEY_LOCAL_MACHINE, and propagate settings.Complete the following steps to propagate settings:a. Right-click the HKEY_LOCAL_MACHINE directory and select Permissions.b. Add the newly created user.c. Select the newly created user.d. Select the Allow Read check box.e. Click OK. This procedure takes a few minutes to propagate through the entire
HKEY_LOCAL_MACHINE tree.6. By using the Windows Registry, grant the agent-specific registry permissions according to the
following list:v If you installed a 32-bit agent on a 32-bit operating system, grant full access to the
HKEY_LOCAL_MACHINE\SOFTWARE\Candle directory, and then propagate the settings.v If you installed a 32-bit agent on a 64-bit operating system, grant full access to the
HKEY_LOCAL_MACHINE\SOFTWARE\Wow6432Node\Candle directory, and then propagate the settings.v If you installed a 64-bit agent on a 64-bit operating system, grant full access to the
HKEY_LOCAL_MACHINE\SOFTWARE\Candle directory, and then propagate the settings.
Complete the following steps to propagate settings:a. Right-click the directory for which you have granted full access and select Permissions.b. Add the newly created user.c. Select the newly created user.d. Select the Allow Full Control check box.e. Click OK. This procedure takes a few minutes to propagate through the entire
HKEY_LOCAL_MACHINE\SOFTWARE\Candle tree.
Chapter 2. Agent installation and configuration 17

7. Add a new Domain User to the Performance Monitor Users group.8. Verify that Domain Users are members of the Users group.9. Grant the following permissions to the Windows directory while running as a non-administrator
user:v If a 32-bit agent is installed on a 32-bit operating system, grant read and write access to the
OS_installation_drive:\Windows\system32 directoryv If a 32-bit agent is installed on a 64-bit operating system, grant read and write access to the
OS_installation_drive:\Windows\SysWOW64 directoryv If a 64-bit agent is installed on a 32-bit or a 64-bit operating system, grant read and write access to
the OS_installation_drive:\Windows\system32 directory
Note: You do not need to grant the permissions to the Windows directory if you are using WindowsServer 2008, Windows Server 2008 R2, and Windows Server 2012.
10. Grant the following permissions to the SQL Server data file and log file:v The default data file path is SQLServer_root_dir\DATA, where SQLServer_root_dir is the root
directory of the SQL Server instance. For example, if the root directory of the SQL Server instanceis C:\Program Files\Microsoft SQL Server\MSSQL.1\MSSQL, the data file path is C:\ProgramFiles\Microsoft SQL Server\MSSQL.1\MSSQL\DATA.
v The default log file path is SQLServer_root_dir\LOG, where SQLServer_root_dir is the root directoryof the SQL Server instance. For example, if the root directory of the SQL Server instance isC:\Program Files\Microsoft SQL Server\MSSQL.1\MSSQL, the log file path is C:\ProgramFiles\Microsoft SQL Server\MSSQL.1\MSSQL\LOG.
11. Grant full permissions to the Candle_Home directory. The default path is C:\IBM\ITM.12. Restart the SQL Server to ensure that local security permissions are applied.13. Change the logon settings for the SQL Server agent services to the non-administrator user by
completing the following steps:a. Click Start > Administrative Tools > Services.b. Right-click the Monitoring Agent For SQL Server instance_name, and click Properties. The SQL
Service Properties window opens.c. Click the Log On tab.d. Click This account and type the user name.e. In the Password and Confirm Password fields, enter the password, and click OK.f. Repeat steps b - e for the Monitoring Agent For SQL Server Collector instance_name, where
instance_name is the Microsoft SQL Server instance name.
Agent-specific installation and configurationYou can install and configure the Microsoft SQL Server agent locally or remotely by using a GUI orcommand line.
When you install the agent support files on the Tivoli Enterprise Portal Server, the composite workspacesare also installed.
Never attempt to start the monitoring agent until you have completed the configuration steps appropriateto the installation of the monitoring agent.
Permissions required for configuring the monitoring agentThe user ID on the SQL Server must be granted specific permissions for configuring the monitoringagent.
18 Microsoft SQL Server agent: Installation and Configuration Guide

If the Microsoft SQL Server agent is configured for Windows authentication, the agent uses the run-asuser ID to access the Microsoft SQL Server. Otherwise, the agent uses the configured SQL Server user ID.Further reference in this section to Microsoft SQL Server user ID or SQL Server ID refers to either therun-as user ID or the Microsoft SQL Server user ID.
The Microsoft SQL Server user ID must have access to the Microsoft SQL Server agent. The proceduredescribed in this section includes creating a Microsoft SQL Server user ID and granting permission to thenew user ID, which is the minimum authority required.
The SQL Server ID used to configure this monitoring agent must have the following SQL Serverauthorities:v Required authorization roles
– Database roles: Public access is required for each database that is being monitored.– Server roles: No special Server Role is required.
v Optional authorization roles– Each Take Action command has a separate set of authorization roles that are required for the SQL
Server credentials to pass to the Take Action command. For more information about theseauthorization roles, see the "Take Action commands reference" topic in the Microsoft SQL Serveragent: Reference.
The monitored attributes in Table 4 on page 20 require additional authorization for the SQL Server IDused to configure the Microsoft SQL Server agent. If you want to monitor any of these attributes,configure the SQL Server ID used by the monitoring agent with the corresponding authorization.
Chapter 2. Agent installation and configuration 19

Table 4. Additional authorization
Attribute groupNavigation item,workspace, view Situation Authorization
MS SQL Job Detail Navigator item: Jobs None predefined Server Role: ServerAdministratorsThisauthorization enables datacollection for all SQL Serverjobs.
—OR—
Database Role (msdbdatabase): publicAn SQLServer Agent proxy accountmust be defined. The agentcan collect job data only onthe jobs that this SQLServer ID owns.
—OR—
Database Role (msdbdatabase):SQLAgentUserRole (SQLServer 2005 only)The agentcan collect job data only onthe jobs that this SQLServer ID owns.
—OR—
Database Role (msdbdatabase):SQLAgentReaderRole(SQL Server 2005 only)Theagent can collect job dataon all SQL Server jobs.
—OR—
Database Role (msdbdatabase):SQLAgentOperatorRole(SQL Server 2005 and2008)The agent can collectjob data on all SQL Serverjobs.
Workspace: Job Detail
View: Job Status, Job Detail
MS SQL Job SummaryNavigator item: Jobs
Workspace: Job Summary
View: Running Job CurrentInterval, Job Summary
MS SQL Lock Detail
MS SQL Lock Summary
Navigator item: ServerLocking
None predefined VIEW SERVER STATEpermission is required onthe SQL ServerWorkspace: Server Locking,
Lock Detail
View: Log Detail, LockDetail
20 Microsoft SQL Server agent: Installation and Configuration Guide

Table 4. Additional authorization (continued)
Attribute groupNavigation item,workspace, view Situation Authorization
MS SQL Server Detail Navigator item: Servers v MS_SQL_Proc_Buffs_Active_Warn
v MS_SQL_Proc_Buffs_Active_Crit
v MS_SQL_Proc_Buffs_Used_Warn
v MS_SQL_Proc_Buffs_Used_Crit
v MS_SQL_Proc_Cache_Active_Warn
v MS_SQL_Proc_Cache_Active_Crit
v MS_SQL_Proc_Cache_Used_Warn
v MS_SQL_Proc_Cache_Used_Crit
Database Role: db_owner(on default databaseassociated with the SQLServer ID)
—OR—
Server Role: SystemAdministrator
Workspace: Server Detail
View: Server Detail-Status,Server Detail-Statistics
MS SQL Server Summary Navigator item: Servers None predefined VIEW SERVER STATEpermission is required onthe SQL Server
Workspace: ServerSummary
View: CPU Utilization,Server Summary
MS SQL Statistics Summary Navigator item: Servers v MS_SQL_Client_Cnt_Pct_Used_Crit
v MS_SQL_Client_Cnt_Pct_Used_Warn
v MS_SQL_IOERR_Startup_Warning
v MS_SQL_IOError_Curintvl_Warning
v MS_SQL_LogonPct_Crit
v MS_SQL_LogonPct_Warning
v MS_SQL_Network_Read_Rate_Crit
v MS_SQL_Network_Read_Rate_Warn
v MS_SQL_Network_Write_Rate_Crit
v MS_SQL_Network_Write_Rate_Warn
v MS_SQL_Pct_IO_Warning
VIEW SERVER STATEpermission is required onthe SQL Server
Workspace: Server Statistics
View: Statistics SummaryChart view, IO Summary,Statistic Summary tableview
Chapter 2. Agent installation and configuration 21

Table 4. Additional authorization (continued)
Attribute groupNavigation item,workspace, view Situation Authorization
MS SQL Table Detail Navigator item: Databases v MS_SQL_Fragmentation_Warn
v MS_SQL_Fragmentation_Crit
v MS_SQL_Opt_Stats_Age_Warn
v MS_SQL_Opt_Stats_Age_Crit
Database Role: db_owner(for each database)
—OR—
Server Role: SystemAdministrator
—OR—
VIEW DATABASE STATEand VIEW SERVER STATEpermissions are required onthe SQL Server
Workspace: Table Detail
View: Table Detail,Fragmentation (greater than30%) by Index Name
MS SQL Audit Details Navigator item: Servers None predefined. Server Role: ServerAdministrator
—OR—
CONTROL SERVERpermission is required onthe SQL Server
Workspace: Audit Details
View: Audit Details
MS SQL Database Detail Navigator item: Databases None predefined Server Role: ServerAdministrator
—OR—
CONTROL SERVERpermission is required onthe SQL Server
Workspace: DatabasesInformation
View Database Detail
MS SQL Filegroup Detail Navigator item: Databases None predefined Server Role: ServerAdministrator
—OR—
CONTROL SERVERpermission is required onthe SQL Server
Workspace: FilegroupDetail
View: Filegroup Detail
MS SQL Device Detail Navigator item: Databases None predefined Server Role: ServerAdministrator
—OR—
CONTROL SERVERpermission is required onthe SQL Server
Workspace: Device Detail
View: Device Detail
Granting permissions for SQL ServerBefore installing the Microsoft SQL Server agent, you must grant permissions to the Microsoft SQLServer. The process of granting permissions is the same for SQL Server 2005, or later.
Before you begin
Ensure that you have the Database administrator authorization role to grant permissions. If you areconfiguring the Microsoft SQL Server agent locally, complete this procedure between the steps for
22 Microsoft SQL Server agent: Installation and Configuration Guide

installing and configuring the monitoring agent. If you are configuring the Microsoft SQL Server agentremotely, complete this procedure after installing and configuring the monitoring agent.
Perform the appropriate installation procedures in the IBM Tivoli Monitoring Installation and Setup Guide.
Procedure1. Click Start > Programs > Microsoft SQL Server 2005 > SQL Server Management Studio.2. In the Tree tab, select Logins in the Security folder (Console Root > WindowsName > Security >
Logins).3. Right-click Logins and select New Login.4. Select the General Folder option and type the SQL Server user ID if you are using SQL Server
authentication. Type the Windows user ID if you are using Windows authentication.5. Select one of the following authentication methods:v SQL Serverv Windows
6. Type a password in the Password field if you are using the SQL Server authentication method.7. Select the User Mapping option.8. In the Specify which databases can be accessed by this login area, select the check box for each
database that you currently have to give permission to each selected database.9. Select the Server Roles option.
10. If you are running a Take Action command, you might need additional authority. See the TakeAction command descriptions in Predefined Take Action commands.
11. Click OK to display the Confirm Password window.12. Retype the password that you typed for the user ID.13. Click OK to display the new user ID in the Logins list.
What to do next
Configure the Microsoft SQL Server agent to start the monitoring agent and begin monitoring yourMicrosoft SQL Server application.
Local configurationYou can install and configure the agent locally.
For more information, see the "Installing monitoring agents" topic in the IBM Tivoli Monitoring Installationand Setup Guide. Also, use the agent-specific configuration information in this section and in Table 5 onpage 25 for the Manage Tivoli Enterprise Monitoring Services window.
Configuration parameters in the Database Server Properties windowUse the Configure Database Agents window to select the database that you want to monitor.1. Click Start > All Programs > IBM Tivoli Monitoring.2. Click Manage Tivoli Enterprise Monitoring Services. The Manage Tivoli Enterprise Monitoring
Services window opens.3. In the Manage Tivoli Enterprise Monitoring Services window, right-click Monitoring Agent for
Microsoft SQL Server (for Template).4. Click Configure Using Defaults. The Configure Database Agents window opens.5. In the Configure Database Agents window, from the Database Servers Available list, select the
server that you want to monitor, and move the server to the Server to Monitor list. The DatabaseServer Properties window opens.
Chapter 2. Agent installation and configuration 23

The following fields are populated in the Database Server Properties window:v Server Namev Database Versionv Home Directoryv Error Log FileThe following fields in the Database Server Properties window are optional:v Windows Authenticationv Support Long Lived Database Connectionsv Extended Parmsv Monitor all Databasesv Includev Day(s) Frequencyv Weekly Frequencyv Monthly Frequencyv Collection Start Timev Table Detail Continuous Collection
6. If you do not select the Windows Authentication field, enter your user ID and password in theLogin and Password fields by using only ASCII characters.
7. In the Extended Parms field, type one of the following options to disable the data collection, andthen click OK.v koqtbld for the Table Detail attribute group.v koqdbd for the Database Detail attribute group.v koqtbld,koqdbd for disabling the Table Detail and Database Detail attribute groups.
8. If you clear the Monitor All Databases check box, specify the list of databases for which you wantto enable or disable monitoring, in the text field that is present in the Databases group area.
Remember: If you select the Monitor All Databases check box and also specify the databases thatyou want to monitor in the text field that is present in the Databases group area, then priority isgiven to the value of the Monitor All Databases check box. The list of the databases that you specifyin the text field is ignored.
9. Specify a daily, weekly, or monthly frequency for the collection of the MS SQL Table Detail attributegroup.
10. Select the Table Detail Continuous Collection check box to enable continuous collection of the MSSQL Table Detail attribute group. If you select the Table Detail Continuous Collection check box,enter a value in the Interval Between Two Continuous Collection (in minutes) field.
11. In the Configure Database Agents window, click OK, and then start the agent.
Configuration settingsYou can specify the SQL Server agent configuration settings in the interfaces that include the ManageTivoli Enterprise Services window, the Tivoli Enterprise Portal, and the tacmd command line.
Table 5 on page 25 contains a list of the configuration settings for each of the interfaces where you canspecify these settings and a description of each setting.
24 Microsoft SQL Server agent: Installation and Configuration Guide

Table 5. Names and descriptions of configuration settings for each interface
Interfaces where configuration settings are specified
Description Examples
ManageTivoliEnterpriseMonitoringServiceswindow
TivoliEnterprisePortal tacmd command line
Server Name DatabaseServerInstanceName1
INSTANCE=InstanceName Name of the SQLServer instance that isto be monitored.
Use MSSQLSERVER asthe instance name forthe default instance.
The name must beshort enough to fitwithin the totalmanaged systemname, which must bebetween 2 and 32characters in length.
If the SQL Server instancebeing monitored is the defaultSQL Server instance, enterMSSQLSERVER in this field.
If the SQL Server instancebeing monitored is a namedinstance with the instance nameof mysqlserver and the hostname is popcorn, entermysqlserver in this field.
Login DatabaseServer UserId1
DBSETTINGS.db_login=UserId
SQL Server user ID tobe used to connect tothe SQL Server.
See “Permissionsrequired forconfiguring themonitoring agent” onpage 18 for moreinformation.
Login is required onlywhen WindowsAuthenticationparameter is set toFalse.
Use only ASCIIcharacters.
Password Password1 DBSETTINGS.db_password=Password
Password for the SQLServer user ID.
Password is requiredonly when WindowsAuthenticationparameter is set toFalse.
Use only ASCIIcharacters.
Important: Apassword cannot beblank. If you specify alogin name, you mustenter a password.
Chapter 2. Agent installation and configuration 25

Table 5. Names and descriptions of configuration settings for each interface (continued)
Interfaces where configuration settings are specified
Description Examples
ManageTivoliEnterpriseMonitoringServiceswindow
TivoliEnterprisePortal tacmd command line
DatabaseVersion
The version ofthe SQLServerinstance.
This parameter need not bespecified in the tacmdcommand.
The database versionsfor the SQL Server.
The database versions for theSQL Server instance are asfollows:
v Microsoft SQL Server 2016 -13.0.1601.5
v Microsoft SQL Server 2014 -12.0.2000.8
v Microsoft SQL Server 2012 -11.0.2100.60
v Microsoft SQL Server 2008R2 - 10.50.1600.1
v Microsoft SQL Server 2008 -10.0.1600.22
HomeDirectory
DatabaseServer HomeDirectoryPath1
DBSETTINGS.db_home=HomeDirPath
Install directory Serverinstance monitored.
The default home directorypath for the default SQL Server2005 instance is C:\ProgramFiles\Microsoft SQLServer\MSSQL.
A named SQL Server 2005instance has a default homedirectory path in the formatC:\Program Files\MicrosoftSQL Server\MSSQL$instance_name, whereinstance_name is the SQL Serverinstance name.
Error LogFile
DatabaseServer ErrorLog File1
DBSETTINGS.db_errorlog=ErrorlogPath
Fully qualified locationand name of the SQLServer Error Log
The default error log path forthe default SQL Server 2005instance is C:\ProgramFiles\Microsoft SQLServer\MSSQL\LOG\ERRORLOG.
A named SQL Server 2005instance has a default error logpath in the format C:\ProgramFiles\Microsoft SQLServer\MSSQL$instance_name\LOG\ERRORLOG, whereinstance_name is the SQL Serverinstance name.
26 Microsoft SQL Server agent: Installation and Configuration Guide

Table 5. Names and descriptions of configuration settings for each interface (continued)
Interfaces where configuration settings are specified
Description Examples
ManageTivoliEnterpriseMonitoringServiceswindow
TivoliEnterprisePortal tacmd command line
WindowsAuthentic-ation
WindowsAuthentic-ation
DBSETTINGS.db_winauth= 1/0
Enables or disablesWindowsAuthentication
If the WindowsAuthentication checkbox is selected,windows credentialswill be used forauthentication.
Remember: If you donot select theWindowsAuthentication checkbox, you must specifyvalues for the Loginand Passwordparameters. If you donot specify theseparameters and clickOK in the DatabaseServer Propertieswindow, an errormessage is displayedin a pop-up windowand the agentconfiguration does notfinish.
DBSETTINGS.db_winauth=1
—OR—
DBSETTINGS.db_winauth=0
Chapter 2. Agent installation and configuration 27

Table 5. Names and descriptions of configuration settings for each interface (continued)
Interfaces where configuration settings are specified
Description Examples
ManageTivoliEnterpriseMonitoringServiceswindow
TivoliEnterprisePortal tacmd command line
SupportLong LivedDatabaseConnections
Support LongLivedDatabaseConnections
DBSETTINGS.db_lldbconn= 1/0
Enables or disableslong lived databaseconnections Thefollowing Take Actioncommands do not useLong Lived DatabaseConnections:
v Database Check-upand Tune-up
v Dump Database
v Dump TransactionLog
v Rebuild FragmentedIndexes
v Refresh QueryOptimizer Statistics
v Update Space UsageInformation
The following attributegroups do not useLong Lived DatabaseConnections:
v MS SQL Text
v MS SQL FilegroupDetail
v MS SQL ServerSummary
DBSETTINGS.db_lldbconn=1
—OR—
DBSETTINGS.db_lldbconn=0
ExtendedParms
ExtendedParms
DBSETTINGS.db_extparms="KOQTBLD"
Disables capture ofTable Detail attributes.
To disable the data collectionfor the Table Details attributegroup, enter koqtbld in theExtended Parms field.
Remember: To disable datacollection for the Table Detailand Database Detail attributegroups, type koqtbld,koqdbd inthe Extended Parms field.
DBSETTINGS.db_extparms="KOQDBD"
Disables capture ofDatabase Detailattributes.
To disable the data collectionfor the Table Details attributegroup, enter koqtbld,koqdbd inthe Extended Parms field.
Remember: To disable datacollection for the Table Detailand Database Detail attributegroups, type koqtbld,koqdbd inthe Extended Parms field.
28 Microsoft SQL Server agent: Installation and Configuration Guide

Table 5. Names and descriptions of configuration settings for each interface (continued)
Interfaces where configuration settings are specified
Description Examples
ManageTivoliEnterpriseMonitoringServiceswindow
TivoliEnterprisePortal tacmd command line
Database Include orExcludeDatabasename(s)
DBSETTINGS.db_include_state=x
To select the databasesfor monitoring, specifya value for thisparameter.
v To monitorparticular databases,select Include fromthe list, and thenspecify the names ofthe databases in thetext field next to thelist.
v To excludeparticular databasesfrom beingmonitored, selectExclude from thelist, and then specifythe names of thedatabases in the textfield next to the list.
Note:
To enable or disablethe monitoring ofparticular databases,clear the Monitor AllDatabases check box.
While configuring the agentremotely, use one of thefollowing values in theDBSETTINGS.db_include_state=x command:
v If the value of x is 0, thedatabase names that arespecified in the text field aremonitored.
v If the value of x is 1, thedatabase names that arespecified in the text field areexcluded from beingmonitored.
Chapter 2. Agent installation and configuration 29

Table 5. Names and descriptions of configuration settings for each interface (continued)
Interfaces where configuration settings are specified
Description Examples
ManageTivoliEnterpriseMonitoringServiceswindow
TivoliEnterprisePortal tacmd command line
Database
(Continued)
Monitor alldatabases
DBSETTINGS.db_monitorall_state=x
To monitor all thedatabases of an SQLserver instance, ensurethat the Monitor AllDatabases check boxin the Databasesgroup area is selected.
If you clear theMonitor AllDatabases check box,then you must specifythe list of databasesfor which you want toenable or disablemonitoring, in the textfield under theDatabases group area.
If you do not specifythe databases to bemonitored, an errormessage is displayedin a pop-up windowwhen you click OK,and the agentconfiguration fails.
In theDBSETTINGS.db_monitorall_state=x command, specify oneof these values when youconfigure the agent:
v The value 0 for x indicatesthat the database names inthe text field are monitored.
v The value 1 for x indicatesthat all the databases aremonitored.
Database
(Continued)
Remember: If youselect the Monitor AllDatabases check boxand also specify thedatabases to monitorin the text field underthe Databases grouparea, then priority isgiven to the value ofthe Monitor AllDatabases check box.The list of databasesthat you specify in thetext field is ignored.
30 Microsoft SQL Server agent: Installation and Configuration Guide

Table 5. Names and descriptions of configuration settings for each interface (continued)
Interfaces where configuration settings are specified
Description Examples
ManageTivoliEnterpriseMonitoringServiceswindow
TivoliEnterprisePortal tacmd command line
Database
(Continued)
Database listto include orexclude
DBSETTINGS.db_list Use the text field tofilter databases thatyou want to monitor.
To specify databasefilter, you must firstselect a separator. Aseparator is a characterthat distinguishes adatabase name ordatabase expressionfrom the otherdatabase name ordatabase expression.
While selecting aseparator, ensure thatdatabase names anddatabase expression donot contain thecharacter that youchoose as a separator.You must not use thewildcard charactersthat are typically usedin the T-SQL query(for example, %, _, [ ],^, -) if they are used inthe database names ordatabase expression.
Examples of filters:
Case 1: % usage
Example:
@@%m%
Output: All the databases thathave the character m in theirnames are filtered.
Case 2: _ usage
Example:
@@____
Output: All the databases thatare of length four characters arefiltered.
Case 3: [] usage
Example:
@@[m]___
Output: All the databases oflength four characters andwhose names start with thecharacter m are filtered.
Case 4: [^] usage
Example:
@@[^m]%
Output: All the databases (ofany length) except those whosenames start with the characterm are filtered.
Chapter 2. Agent installation and configuration 31

Table 5. Names and descriptions of configuration settings for each interface (continued)
Interfaces where configuration settings are specified
Description Examples
ManageTivoliEnterpriseMonitoringServiceswindow
TivoliEnterprisePortal tacmd command line
Database
(Continued)
When specifyingdatabase filter:
v Database namesmust start with aseparator.
v Database expressionmust start with twoseparators.
Note: Databaseexpression is a validexpression that can beused in the LIKE partof the T-SQL query.However, you cannotuse the T-SQL ESCAPEclause while specifyingthe databaseexpression.Thefollowing workspacesare affected bydatabase filter:
v DatabaseInformation
v Enterprise DatabaseSummary
v Device Detail
v Table Detail
v Filegroup Detail
Case 5: Wrong input
Example:
@%m%
Output: None of the databasesare filtered.
Case 6: Default
Example: Field left blank (Noquery is typed)
Output: All the databases arefiltered.
Case 7: Mixed patterns
Example:
@@[m-t]_d%
Output: All the databases (ofany length) whose names startwith the characters m, n, o, p,q, r, s, t, followed by anycharacter, with the character din the third place are filtered.
Day(s)Frequency
Table DetailCollectionDay(s)Frequency3
DBSETTINGS.db_tbld_daily
Use this feature todefine the frequency ofcollecting data of TableDetail attributes. Thevalues can be fromzero to 31.
DBSETTINGS.db_tbld_daily=1
WeeklyFrequency
Table DetailCollectionWeeklyFrequency3
DBSETTINGS.db_tbld_weekly
Use this feature tospecify a particularday for collecting datafor Table Detailattributes. The valuescan be from zero toseven.
DBSETTINGS.db_tbld_weekly=1
32 Microsoft SQL Server agent: Installation and Configuration Guide

Table 5. Names and descriptions of configuration settings for each interface (continued)
Interfaces where configuration settings are specified
Description Examples
ManageTivoliEnterpriseMonitoringServiceswindow
TivoliEnterprisePortal tacmd command line
MonthlyFrequency
Table DetailCollectionMonthlyFrequency3
DBSETTINGS.db_tbld_monthly
Use this feature todefine the datacollection of TableDetail attributes on aparticular day of themonth. The possiblevalues are 1, 2, 3, andso on.
DBSETTINGS.db_tbld_monthly=5
CollectionStart Time
CollectionStart TimeHour
DBSETTINGS.db_tbld_coll_stime_hour
The possible valuesare zero to 23. Thedefault value is zero.
DBSETTINGS.db_tbld_coll_stime_hour=1
CollectionStart TimeMinute
DBSETTINGS.db_tbld_coll_stime_minute
The possible valuesare from zero to 59.The default value iszero.
DBSETTINGS.db_tbld_coll_stime_minute=59
Table DetailContinuousCollection
Table DetailContinuousCollection
DBSETTINGS.db_tbldconcoll Use this feature for thecontinuousbackground collectionof Table Detail data.
The Table DetailContinuousCollectioncheck box isselected by default.
DBSETTINGS.db_tbldconcoll=1
IntervalBetweenTwoContinuousCollection(in min.)
IntervalBetween TwoContinuousCollection (inmin.)
DBSETTINGS.db_tbldcoll_time
Specify the time forthe interval (inminutes) between twocollections.
For data collectionmethods, see “Datacollection for the TableDetails attributegroup”
DBSETTINGS.db_tbldcoll_time=10
v 1 Database Server Properties tabv 2 Agent tab Run as area
Data collection for the Table Details attribute group
There are three methods to configure the agent to collect data for the Table Details attribute group:
Continuous collectionChoose this method of data collection if the SQL Server contains many tables, few large tables, ortables that are frequently updated. By using the continuous collection method, you can configurethe agent to continuously collect data in the background. To enable continuous collection, selectthe Table Details Continuous Collection check box in the configuration window. Specify thetime interval between two collections in the Interval Between Two Continuous Collection (inmin.) field. The default and minimum value of this interval is 3 minutes.
Chapter 2. Agent installation and configuration 33

Important: If you select the Table Details Continuous Collection check box, you must specify avalue in the Interval Between Two Continuous Collection (in min.) field.
Scheduled collection
Choose this method of data collection if there are no frequent updates in SQL Server tables. Byusing the scheduled collection method, you can configure the agent to collect data at the timeinterval for which data collection occurs frequently. For example, if you specify all three TableDetails Collection configuration settings (Day, Weekly, and Monthly), the agent starts the datacollection according to the following conditions:v If Day(s) Frequency ≤ 7, the Day(s) Frequency settings are selected, and the Weekly and
Monthly frequency settings are ignored.v If Day(s) Frequency > 7, the Weekly Frequency settings are selected, and the Day(s) and
Monthly frequency settings are ignored.
To enable scheduled collection, clear the Table Details Continuous Collection check box andspecify values for the Collection Start Time, Day(s) Frequency, Weekly Frequency, and MonthlyFrequency parameters in the configuration window. The minimum time interval between twocollections is 1 day.
Demand based collectionChoose this method of data collection if there are few small tables on the SQL Server. The agentcollects data when the agent receives a data collection request. If the SQL Server contains manytables or few large tables, then the data collection takes time. If the data collection does notcomplete in the specified time frame, then no data is sent to the Tivoli Enterprise MonitoringServer. To enable demand based data collection, clear the Table Details Continuous Collectioncheck box, and do not specify any value for the Collection Start Time, Day(s) Frequency,Weekly Frequency, and Monthly Frequency parameters in the configuration window.
Remember: If you select the Table Detail Continues Collection check box, priority is given tocontinuous data collection method and agent collects the data at the interval that is mentioned in theInterval Between Two Continuous Collection (in min.) field. The values that you have specified thedaily, weekly, or monthly frequencies are ignored.
Configuring local environment variablesYou can configure local environment variables to change the behavior of the Microsoft SQL Server agent.
Procedure1. In the Manage Tivoli Enterprise Monitoring Services window, from the Actions menu, click Advanced
> Edit Variables.2. In the Tivoli Enterprise Monitoring Server: Override Local Variable Settings window, click Add.3. In the Add Environment Setting Override window, enter the variable and the corresponding value.
Note: See “Local environment variables” to view the list of environment variables that you canconfigure.
Local environment variablesYou can change the behavior of the Microsoft SQL Server agent by configuring local environmentvariables.
Variables for checking SQL Server service availability
To check the availability of the SQL Server service, add the following environment variables:
34 Microsoft SQL Server agent: Installation and Configuration Guide

v COLL_MSSQL_RETRY_INTERVAL: This variable provides the retry interval (in minutes) to check the SQLServer service status. If the value is less than or equal to zero, then the variable takes the default valueof 1 minute.
v COLL_MSSQL_RETRY_CNT: This variable provides the number of retries that the SQL Server agent makes tocheck whether SQL Server service is started or not. If the SQL Server service is not started after thenumber of retries that are specified in this variable, then the collector stops working. If the value of thevariable is less than or equal to zero, then the variable takes the default value of 3.
Variables for monitoring the SQL Server error log file
To monitor the MS SQL Error Event Details attribute group, add the following environment variables:v COLL_ERRORLOG_STARTUP_MAX_TIME: This variable provides the time interval (T) for error collection before
agent startup. The default value is 0 minutes. This variable can take the following values:
T = 0 The agent starts monitoring the error log file from the time the agent starts or is restarted. Theagent does not read the errors that were logged in the error log file before the agent wasstarted.
T = 1 The agent monitors the error log file according to the following values that are set for theCOLL_ERRORLOG_STARTUP_MAX_EVENT_ROW variable, which is represented by R.– If R < 0, the agent starts monitoring the error log file from the time the agent starts or is
restarted.– If R = 1, the agent monitors all the errors that are logged in the error log file.– If R > 1 and the agent is installed for the first time, the agent monitors the error log file until
R errors are monitored. If R > 1 and the agent is restarted, the agent monitors all thepreviously missed R errors.
T > 1 The agent monitors all previous errors that were logged up to T minutes from the time theagent starts or is restarted. The agent monitoring also depends on the following values thatyou set for the COLL_ERRORLOG_STARTUP_MAX_EVENT_ROW variable:– If R ≤ 0, the agent starts monitoring the error log file from the time the agent starts or is
restarted.– If R = 1, the agent monitors the error log file for all the errors that are logged up to T
minutes.– If R > 1, the agent monitors not more than R errors that are logged in last T minutes.
v COLL_ERRORLOG_STARTUP_MAX_EVENT_ROW: This variable provides the maximum number of errors thatmust be processed at agent startup. The default value is 0. This variable can take the following values:
R = 0 The agent starts monitoring the error log file from the time the agent starts or restarts. Theagent does not read errors that were created in the error log file before the agent was started.
R = 1 The agent monitors the errors that were logged in the last T minutes from the time the agentstarts or restarts.
R > 1 The agent monitors R errors logged in the last T minutes.v COLL_ERRORLOG_MAX_EVENT_ROW: This variable provides the number of error rows to be displayed on the
Tivoli Enterprise Portal. The default value is 50. This variable can take the following values:
X = 0 The agent does not display error logs on the Tivoli Enterprise Portal.
X > 0 The agent displays X error rows on the Tivoli Enterprise Portal.
Variable for query timeout interval
To set the query timeout interval for the SQL Server agent, use the QUERY_TIMEOUT variable. Thisenvironment variable defines the maximum amount of time (in seconds) that the SQL Server agent waitsto receive a response for a query that is sent to the SQL Server. The value for this variable must be less
Chapter 2. Agent installation and configuration 35

than 45 seconds. However, if you set the value for this variable as 0 seconds, the SQL Server agent waitsindefinitely to receive a response from the SQL Server. If the SQL Server agent accesses many lockeddatabases, you must assign a value to this variable in the range of 10 - 20 seconds. If the query is notprocessed within the set timeout interval, the SQL Server agent skips the timed out query and moves tothe next query in the queue. The agent does not display data on the Tivoli Enterprise Portal for the querythat has timed out.
Variable for viewing information about enabled jobs
To view the information about enabled jobs in the MS SQL Job Detail attribute group, use theCOLL_JOB_DISABLED environment variable. If you set the value of this variable as 1, the Microsoft SQLServer agent does not display information about disabled jobs. If you do not specify this variable, youcan view information about enabled and disabled jobs.
Variable for limiting rows in the MS SQL Filegroup Detail attribute group
To limit the number of rows the that the collector service fetches for the MS SQL Filegroup Detailattribute group, use the COLL_KOQFGRPD_MAX_ROW environment variable. This environment variable definesthe maximum number of rows that the collector service fetches for the Filegroup Detail attribute group. Ifyou do not specify a value for this variable, the collector service fetches 10,000 rows for the FilegroupDetail attribute group. Use this environment variable to modify the default limit of maximum rows in thekoqcoll.ctl file. Complete the following steps to modify the default limit:1. Specify the maximum number of rows for KOQFGRPD in the koqcoll.ctl file.2. Add the COLL_KOQFGRPD_MAX_ROW environment variable, and ensure that the value of this variable is
the same as the value that you have specified in the koqcoll.ctl file.
If the value in the koqcoll.ctl file is less than the value that is specified in the COLL_KOQFGRPD_MAX_ROWenvironment variable, the value in the koqcoll.ctl file is treated as the value for the maximum numberof rows.
If the value in the koqcoll.ctl file is greater than the value that is specified in theCOLL_KOQFGRPD_MAX_ROW environment variable, the value in the COLL_KOQFGRPD_MAX_ROW environmentvariable is treated as the value for the maximum number of rows.
Variables for enhancing the collection for the MS SQL Filegroup Detail attributegroup
Use the COLL_DBD_FRENAME_RETRY_CNT variable to specify the number of attempts that can be made tomove the %COLL_HOME%_tmp_%COLL_VERSION%_%COLL_SERVERID%_%COLL_SERVERID%__FGRP_TEMP file to the%COLL_HOME%_tmp_%COLL_VERSION%_%COLL_SERVERID%_%COLL_SERVERID%__FGRP_PREV file.
If you do not specify a value for this variable, the Microsoft SQL Server agent makes 3 attempts to movethe file.
Variable for limiting rows in the MS SQL Device Detail attribute group
To limit the number of rows that the collector service fetches for the MS SQL Device Detail attributegroup, use the COLL_KOQDEVD_MAX_ROW environment variable. This environment variable defines themaximum number of rows that the collector service fetches for the Device Detail attribute group. If youdo not specify a value for this variable, the collector service fetches 10,000 rows for the Device Detailattribute group. Use this environment variable to modify the default limit of maximum rows in thekoqcoll.ctl file. Complete the following steps to modify the default limit:1. Specify the maximum number of rows for KOQDEVD in the koqcoll.ctl file.2. Add the COLL_KOQDEVD_MAX_ROW environment variable, and ensure that the value of this variable is the
same as the value that you have specified in the koqcoll.ctl file.
36 Microsoft SQL Server agent: Installation and Configuration Guide

If the value in the koqcoll.ctl file is less than the value that is specified in the COLL_KOQDEVD_MAX_ROWenvironment variable, the value in the koqcoll.ctl file is treated as the value for the maximum numberof rows.
If the value in the koqcoll.ctl file is greater than the value that is specified in the COLL_KOQDEVD_MAX_ROWenvironment variable, the value in the COLL_KOQDEVD_MAX_ROW environment variable is treated as the valuefor the maximum number of rows.
Variables for enhancing the collection for the MS SQL Device Detail attributegroup
To enhance the MS SQL Device Detail attribute group collection, add the following environmentvariables:v COLL_KOQDEVD_INTERVAL: This environment variable enables you to specify a time interval (in minutes)
between two consecutive collections of the MS SQL Device Detail attribute group.
Note: By default, the data collection for the Device Detail attribute group is demand based. Use theCOLL_KOQDEVD_INTERVAL variable to start a thread based collection for the Device Detail attribute groupand to set the time interval between two threaded collections.
v COLL_DBD_FRENAME_RETRY_CNT: Use this environment variable to specify the number of attempts that canbe made to move the %COLL_HOME%_tmp_%COLL_VERSION%_%COLL_SERVERID%_%COLL_SERVERID%__DEVD_TEMPfile to the %COLL_HOME%_tmp_%COLL_VERSION%_%COLL_SERVERID%_%COLL_SERVERID%__DEVD_PREV file.
If you do not specify a value for this variable, the Microsoft SQL Server agent makes 1 attempt to movethe file.
Variables for enhancing the collection for the MS SQL Database Detail attributegroup
To enhance the MS SQL Database Detail attribute group collection, use the following environmentvariables:v COLL_KOQDBD_INTERVAL: Use this environment variable to specify a time interval (in minutes) between
two consecutive collections of the MS SQL Database Detail attribute group. If you do not specify avalue for this variable, the Microsoft SQL Server agent sets the time interval for collecting the threadedcollections of the database details to 3 minutes.
v COLL_DBD_FRENAME_RETRY_CNT: Use this environment variable to specify the number of attempts that canbe made to move the %COLL_HOME%_tmp_%COLL_VERSION%_%COLL_SERVERID%_%COLL_SERVERID%__DBD_TEMPfile to the %COLL_HOME%_tmp_%COLL_VERSION%_%COLL_SERVERID%_%COLL_SERVERID%__DBD_PREV file.
If you do not specify a value for this variable, the Microsoft SQL Server agent makes 1 attempt to movethe file.
Variables for enhancing the collection for the MS SQL Audit Details attribute group
To enhance the MS SQL Audit Details attribute group collection, use the following environment variables:v COLL_AUDIT_TYPE: Use this variable to enable or disable the monitoring of specific logs. The default
value of the variable is [AL][FL][SL]. By default, the agent monitors all three types of logs that includethe application logs, audit files, and the security logs. The value of the variable includes two charactercode for each log type:– [AL] for application logs– [FL] for audit files– [SL] for security logs
Chapter 2. Agent installation and configuration 37

You can change the value of the variable to disable the monitoring of specific log type. For example, ifyou specify the value of the variable as [AL][SL] the audit files are not monitored. If no value isspecified for the variable, audit details not monitored.
v COLL_AUDIT_DURATION: Use this variable to report the audit events that occurred during the time intervalthat you specify in this variable. For example, if you set this variable to 7, the audit events thatoccurred only in last 7 hours are reported by the Audit Details attribute group. The default value of theCOLL_AUDIT_DURATION variable is 24 hours.
v COLL_AUDIT_COLLECTION_INTERVAL: The threaded collection in the Audit Details attribute group providesspecifications of all the database that are present on the SQL server instance. Use this variable to setthe interval for this threaded collection. For example, if you set this variable to 7, a fresh set ofdatabase specifications is extracted from the SQL server instance after every 7 hours. The default valueof the COLL_AUDIT_COLLECTION_INTERVAL variable is 24 hours.
Variable for enhancing the collection for the MS SQL Process Detail attributegroup
To enhance the MS SQL Process Detail attribute group collection, use the COLL_PROC_BLOCK_INTERVALvariable with the following values:v If COLL_PROC_BLOCK_INTERVAL = 0, the collection for the Blocking Process Duration attribute, and the
Blocking Resource Duration attribute is disabled.v If COLL_PROC_BLOCK_INTERVAL = x, the interval between the two consecutive data collections is x
minutes.
If the COLL_PROC_BLOCK_INTERVAL variable is not set in the CANDLE_HOME directory, the interval between thetwo consecutive data collections is 3 minutes.
Variable for excluding the locked objects from the data collection
If the queries that are sent for the Database Detail, Filegroup Details, Database Mirroring, and DeviceDetail workspaces take long to execute, use the COLL_DBCC_NO_LOCK variable to run a query with the valueWITH (NOLOCK). This variable causes the query not to wait in the queue when an object on which thequery is run is locked.
Variable for setting the sorting criteria for the rows returned by the Table Detailsattribute group
The rows that are returned by the Table Details attribute group are sorted in a descending orderdepending on the value that is set for the COLL_TBLD_SORTBY variable. The default value for theCOLL_TBLD_SORTBY variable is FRAG (fragmentation percent). The valid values are: ROWS (number ofrows in a tables), SPACE(space used by the table), and OPTSAGE (the optimizer statistics age of thetable).
Variable for enhancing the collection for the MS SQL Problem Detail and ProblemSummary attribute groupsv COLL_ALERT_SEV: Use this variable to set the severity level of the error messages that are displayed in
the Problem Detail and Problem Summary attribute groups. Error messages, which have a severitylevel that is equal to or greater than the value mentioned in this variable, are displayed in the ProblemDetail and Problem Summary attribute groups. For example, if you set the value of this variable to 10,the error messages with severity level 10 or greater are displayed in the Problem Detail and ProblemSummary attribute groups. If you do not specify a value for this variable, the error messages, whichhave a severity level that is equal to or greater than 17, are displayed in the Problem Detail andProblem Summary attribute groups.
v COLL_SINCE_ERRORLOG_RECY: Use this variable to monitor only the high severity errors in the currentERRORLOG file. If you do not specify a value for this variable, the value of the variable is 0, which meansthat for collecting the data, the Problem Summary attribute group also considers the high severity
38 Microsoft SQL Server agent: Installation and Configuration Guide

errors that are read from the previous ERRORLOG file. To monitor only the high severity errors in thecurrent ERRORLOG file, set the value of this variable to 1.
Variables for setting the timeout interval
To set the timeout interval for the Microsoft SQL Server agent, you can use the following environmentvariables:v WAIT_TIMEOUT: Use this variable to set the wait timeout interval for the Microsoft SQL Server agent. If
any attribute group takes more than 45 seconds to collect data, then the agent might hang or situationsmight be incorrectly triggered. Check the log for the attribute groups that take more than 45 seconds tocollect the data, and use the WAIT_TIMEOUT variable to increase the wait time between the agent processand the collector process.
v COLL_DB_TIMEOUT: Use this variable to define the wait interval (in seconds) for any request such asrunning a query on the existing SQL server connection to complete before returning to the application.If you set this value to 0, then there is no timeout. If you do not specify a value for this variable, theagent waits 15 seconds before returning to the application.
Variables for setting the properties of the collector log files
To set the properties of the collector log files, you can use the following environment variables:v COLL_WRAPLINES: Use this variable to specify the maximum number of lines in a col.out file. The
default value of this variable is 90,000 lines (about 2 MB).v COLL_NUMOUTBAK: Use this variable to specify the number of backup copies of the collector log files that
you want to create. By default, five backup copies of the collector log file are created. The backup fileis named *.out. When this backup file is full, the file is renamed to *.ou1 and the latest logs arewritten in the *.out file. In this manner, for five backup files, the oldest logs are available in the *.ou5file and the latest logs are available in the *.out file.You can create more than five backup copies of the collector log files by specifying one of the followingvalues in the COLL_NUMOUTBAK variable:– For less than 10 backup files, specify the number of backup files that you want to create in the
COLL_NUMOUTBAK variable. For example, if you specify 9 in the COLL_NUMOUTBAK variable, nine backupfiles will be created.
– For more than 9 and less than 1000 backup files, in the COLL_NUMOUTBAK variable, specify the numberof backup files preceded by a hyphen. For example, if you specify -352 in the COLL_NUMOUTBAKvariable, three hundred and fifty-two backup files will be created.
v COLL_DEBUG: Use this variable to enable full tracing of the collector by setting the value of this variableto dddddddddd (10 times“d”).
Variable for deleting the temporary files
COLL_TMPFILE_DEL_INTERVAL: Use this variable to specify the interval (in minutes) after which theKOQ_<timestamp> temporary files should be deleted. If you do not specify a value for this variable, thevalue of the variable is 0, which means that the temporary files must be deleted immediately.
Enabling cursors in the koqcoll.ctl fileOn the Koqcoll tab in the SQL Agent Trace Configuration utility, you can enable or disable one or morecursors in the koqcoll.ctl file.
Procedure1. To run the utility, complete one of the following steps:v For a 64-bit agent, go to the candle_home\TMAITM6_x64 directory.v For a 32-bit agent, go to the candle_home\TMAITM6 directory.
Chapter 2. Agent installation and configuration 39

2. To run the SQL Agent Trace Configuration utility, double-click the koqCtlEditUtility.exe file.3. To enable a cursor, click the Koqcoll tab, and select a cursor in the Disabled area.4. To enable the cursor, click Enable.
Tip: You can enable multiple cursors simultaneously. To do a multiple selection, press Ctrl and selectthe cursors that you want to enable. To do a contiguous selection, click a cursor from the list, pressShift and click the last cursor in the list.
5. To save the configuration settings, click Apply.6. To restore the configuration values of the cursors in the koqcoll.ctl file to the values that existed
before running the utility for the first time, click Restore Default.
Remote installation and configurationYou can remotely install and configure the agent.
To remotely install and configure the agent, see the "Deploying non-OS agents" topic in the IBM TivoliMonitoring Installation and Setup Guide. Also, use the agent-specific configuration information in thissection and in Table 5 on page 25 for the following interfaces:v Tivoli Enterprise Portalv tacmd command line
In the New Managed System Configuration window, use the settings in Table 5 on page 25 for the TivoliEnterprise Portal Database Server Properties tab and the Agent tab Run asinformation.
To remotely deploy this monitoring agent by using the command line, use the procedure “Deployingthrough the command line,” in the IBM Tivoli Monitoring Installation and Setup Guide. To use the tacmdaddSystem command, see the agent-specific configuration information in Table 5 on page 25. The IBMTivoli Monitoring Command Reference has complete information about the tacmd addSystem command.
Use the -t or --type TYPE parameter to specify the Microsoft SQL Server agent that you are configuring:OQ.
Specify the properties with the -p or -property option.
For example:tacmd addSystem -t OQ -n Primary:myhostname:NT -pDBSETTINGS.db_login=saDBSETTINGS.db_password=sapwdDBSETTINGS.db_home="C:\Program Files\Microsoft SQL Server\MSSQL"DBSETTINGS.db_errorlog="C:\Program Files\Microsoft SQL Server\MSSQL\LOG\ERRORLOG"DBSETTINGS.db_winauth=1DBSETTINGS.db_lldbconn=0DBSETTINGS.db_include_state=0DBSETTINGS.db_monitorall=1DBSETTINGS.db_list=#master##temp%INSTANCE=MyServerDBSETTINGS.db_tbld_weekly=1DBSETTINGS.db_tbld_coll_stime_hour=23DBSETTINGS.db_tbld_coll_stime_minute=59
The parameters in the example are shown on separate lines for clarity. When typing the command, typeall of the parameters on one line.
ReconfigurationYou can reconfigure the agent locally or remotely.
40 Microsoft SQL Server agent: Installation and Configuration Guide

If you need to reconfigure the Microsoft SQL Server agent, ensure that the steps for installing themonitoring agent in the IBM Tivoli Monitoring Installation and Setup Guide are completed.
Local reconfiguration
If you are reconfiguring an instance locally, use the Manage Tivoli Enterprise Monitoring Serviceswindow. See Table 5 on page 25 for the configuration settings.
Remote reconfiguration
If you are reconfiguring remotely, use one of the following interfaces:v tacmd command line
Use the configureSystem command. See the IBM Tivoli Monitoring Command Reference Guide forcomplete information about this command.When reconfiguring, enter the information for the property that you are changing as well as theINSTANCE property.
v Tivoli Enterprise Portal
See Table 5 on page 25 for the configuration settings.
Starting and stopping the Microsoft SQL Server agentYou can start and stop the Microsoft SQL Server agent locally or remotely.
Table 6 shows which interfaces you can use on Windows operating systems locally or remotely to startthe monitoring agent.
Table 6. Interfaces for starting and stopping the Microsoft SQL Server agent locally and remotely
Local Remote
v Manage Tivoli Enterprise Monitoring Services
v tacmd startAgent
v tacmd stopAgent
v tacmd restartAgent
v Tivoli Enterprise Portal
v tacmd startAgent
v tacmd stopAgent
v tacmd restartAgent
When you use the Manage Tivoli Enterprise Monitoring Services window, ensure that you enter onlyASCII characters in the fields.
For information about using the Tivoli Enterprise Portal to start and stop the agent, see the "Starting andstopping components" topic in the IBM Tivoli Monitoring Installation and Setup Guide.
In the following examples, the tacmd command is used to start, stop, or restart the Microsoft SQL Serveragent instances that are configured for the Microsoft SQL Server on Windows operating systems, wheremyhostname is the host name of the computer where the monitoring agent is running.v Local
– tacmd startAgent -t oq
– tacmd stopAgent -t oq
– tacmd restartAgent -t oq
v Remote– tacmd stopagent -t oq -m InstanceName:hostname:MSS
– tacmd startagent -t oq -m InstanceName:hostname:MSS
– tacmd restartagent -t oq -m InstanceName:hostname:MSS
Chapter 2. Agent installation and configuration 41

The command for restarting the monitoring agent remotely can be tacmd restartagent -t oq -nINST1:ESX1-PG3-2:MSS, where INST1 is the Microsoft SQL Server agent instance name, and ESX1-PG3-2 isthe host name of the computer where the monitoring agent is running.
For information about using the tacmd commands, see the IBM Tivoli Monitoring Command Reference.
Setting up the Microsoft SQL Server agent in a cluster environmentYou can setup the Microsoft SQL Server agent in a cluster environment.
The IBM Tivoli Monitoring Installation and Setup Guide contains an overview of clustering.
The SQL Server and the Microsoft SQL Server agent both support multiple instances running on the samenode. One agent does not interfere with another while running on the same node.
When the SQL Resource Group is moved from node to node, the server down situation event fires. Thisevent is caused by the Microsoft SQL Server agent coming online faster than the SQL Server. When theSQL Server comes online, the event clears.
Do not use the Start and Stop Take Action commands for the Microsoft SQL Server agent because theyconflict with the actions that are taken by the cluster server.
You can install and configure the monitoring agent in a cluster environment by completing any of thefollowing steps:v “Installing and configuring the monitoring agent manually”v “Installing and configuring the agent by using the cluster utility” on page 45
RequirementsYou must ensure that all the requirements for setting up the agent in a cluster environment are met.
You can set up a cluster environment for the following versions of the Microsoft SQL Server:v Microsoft SQL Server 2005v Microsoft SQL Server 2008v Microsoft SQL Server 2008 R2v Microsoft SQL Server 2012v Microsoft SQL Server 2014v Microsoft SQL Server 2016
On Windows systems, IBM Tivoli Monitoring requires that monitoring agents are installed in the samedirectory path as the OS agent. Therefore, each node in a cluster must have installed all monitoringagents (on the nodes system disk) that are required to support the cluster applications that can run onthat cluster node.
Installing and configuring the monitoring agent manuallyYou can install the Microsoft SQL Server agent on each node of a cluster where it is possible for theMicrosoft Virtual Servers to run.
Before you begin
In addition to installing and setting up the Microsoft SQL Server agent, you must ensure that thefollowing prerequisites for cluster environment are met:v Setting the CTIRA_HOSTNAME variable to a common value for all monitoring agents (usually the
cluster name)
42 Microsoft SQL Server agent: Installation and Configuration Guide

v Setting the CTIRA_HIST_DIR variable to a common disk location if history is stored at the monitoringagents (if history for the Microsoft SQL Server agent is configured to be stored at the monitoring agent)
v Creating a monitoring agent cluster resource in the Resource Group of the Virtual Server 3
Procedure1. Setting CTIRA_HOSTNAME
v Because there can be multiple instances of the Microsoft SQL Server agent, each instance must beconfigured with a CTIRA_HOSTNAME . Set the CTIRA_HOSTNAME environment variable tothe name of the Microsoft Cluster Server cluster for all monitoring agents running in that cluster.By setting the CTIRA_HOSTNAME variable for all agents in the cluster to the same name, you cannavigate to all of the monitoring agents for that cluster in the Tivoli Enterprise Portal.
v When deciding on the value for the CTIRA_HOSTNAME variable, consider that the managedsystem name is comprised of three parts: the CTIRA_SUBSYSTEM_ID variable, theCTIRA_HOSTNAME variable, and the CTIRA_NODETYPE variable. Also, the name is limited to31 characters. By default for the Microsoft SQL Server Agent, the CTIRA_NODETYPE variable isset to MSS, and CTIRA_SUBSYSTEM_ID is set to the Microsoft SQL Virtual Server name. TheCTIRA_SUBSYSTEM_ID variable is used to distinguish the multiple instances of the MicrosoftSQL Server agent.
2. Setting the CTIRA_HIST_DIR variablev If history for the Microsoft SQL Server agent is configured to be stored at the monitoring agent,
each instance of the monitoring agent must be configured with a common CTIRA_HIST_DIRvariable that points to a shared disk directory.
v If history is stored at the Tivoli Enterprise Management Server, setting the CTIRA_HIST_DIRvariable is not required. Storing history at the Tivoli Enterprise Management Server puts a higherburden on that server.
3. Setting the COLL_HOME variableIf you want to collect data for attribute groups that use configuration files at a shared location, andthese files are used by multiple cluster nodes, set the COLL_HOME variable to X:\shared-location,where X is a shared drive that is accessible to the cluster nodes. For example, you can set the valuefor the COLL_HOME variable when you are defining the configuration settings for the MS SQL TableDetail attribute group or MS SQL Error Event Details attribute group.
4. Creating a monitoring agent cluster resourcev Set each Microsoft SQL Server agent startup parameter to manual so the cluster resource can
control the starting and stopping of the monitoring agent.v After these parameters are set for each Microsoft SQL Server agent instance, you must create the
cluster resources to control the monitoring agents. Each Microsoft SQL Server agent is comprised oftwo Windows Services: KOQAGENTx and KOQCOLLx, where x is the agent instance number.
Example
Examples of Windows Services names:v Monitoring Agent for Microsoft SQL Server: SQLTEST
v Monitoring Agent for Microsoft SQL Server: Collector SQLTEST
v Monitoring Agent for Microsoft SQL Server: SQLTEST2
v Monitoring Agent for Microsoft SQL Server: Collector SQLTEST2
Creating a resourceYou can create a resource for the Windows Server 2003 operating system.
Procedure1. Click Start > Administrative Tools > Cluster Administrator.2. Select the group for the Instance that is being worked > SQLTEST.
Chapter 2. Agent installation and configuration 43

3. Right-click the group, and then click New > Resource.4. In the New Resource window, complete the fields as follows:
Name: KOQAGENT_instance_nameDescription: resource_descriptionResource type: Generic ServiceGroup: SQLTEST
5. In the Possible Owners window, accept the default of all Available Nodes.6. In the Dependencies window, do not add any dependencies on history disk.7. In the Generic Service Parameters window, complete the fields as follows:
Service name: KOQAGENT_instance_nameStart Parameters: -Hkey “KOQ\610\SQLVS1”
8. Click Finish.9. Click Advanced.
10. Clear the Affect the group check box.11. Right-click the group, and then click New > Resource.12. Complete the following information:
Name: KOQCOLL_instance_nameResource Type: Generic ServiceGroup: SQLTEST
13. In the Possible Owners window, accept the default of all Available Nodes.14. In the Dependencies window, do not add any dependencies on history disk.15. In the Generic Service Parameters window, complete the fields as follows:
Name: KOQCOLL_instance_nameStart Parameters: -Hkey “KOQ\610\SQLVS1”
16. Click Finish.17. Click Advanced.18. Clear the Affect the group check box.19. Bring the two agent resources online.20. Repeat these steps for the other instances of the monitoring agent in the cluster environment.
Creating a serviceYou can create a service for Windows 2008 systems.
Procedure1. Click Start > Administrative Tools > Failover Cluster Management.2. Expand Failover Cluster Management.3. Expand Services and Applications and right-click the SQL instance that you want to configure.4. Click Add a resource > Generic Service. The New Resource Wizard opens.5. On the Select Service page, select Monitoring Agent for Microsoft SQL Server, and click Next.
Note: To add the Microsoft SQL Server- Collector service, select Monitoring Agent for MicrosoftSQL Server- Collector instance_name on the Select Service page, and click Next.
6. On the Confirmation page, check the details, and click Next.7. On the Summary page, click Finish.8. Right-click the service that you added, and click Properties.9. In the Dependencies tab, select SQL Server or Monitoring Agent for Microsoft SQL Sever from the
Resources list.
44 Microsoft SQL Server agent: Installation and Configuration Guide

10. Click Apply > OK.11. Right-click the service that you created, and click Bring this resource online.
Configuration changes after installing the agentAfter installing the agent in a cluster environment, you can make the configuration changes.
After control of the agent cluster resource is given to the cluster server, you must take the agent clusterresource offline to make configuration changes, or edit the agent variables on the node from which theagent cluster resource runs. If the agent cluster resource is not offline when the agent configuration utilityattempts to take the agent offline, the cluster server notices that the monitoring agent went offline andattempts to bring the monitoring agent back online. When finished with the configuration changes for themonitoring agent, bring the agent cluster resource back online.
Installing and configuring the agent by using the cluster utilityYou can use the cluster utility to add multiple SQL Server agent instances to a cluster group in a clusterenvironment.
The cluster utility automatically adds the agent service and the collector service of each SQL Server agentinstance as a generic service resource to the cluster group. You can use the cluster utility to complete thefollowing tasks:v Adding an SQL Server agent instance to the clusterv Updating an existing SQL Server agent instance in a clusterv Removing an SQL Server agent instance from a cluster
Prerequisites for using the cluster utilityYou must ensure that your system environment meets the prerequisites for running the cluster utility.
Ensure that the following prerequisites are met:v Run the cluster utility on a computer that has at least one group in the cluster environment.v Start the remote registry service for all nodes in the cluster.v You must have the cluster manager authorization to access the cluster utility.
Adding an SQL Server agent instance to the clusterYou can use the cluster utility to add an SQL Server agent instance to a cluster group in a clusterenvironment.
Procedure1. To run the utility, complete one of the following steps:v For a 64-bit agent, go to the candle_home\TMAITM6_x64 directory.v For a 32-bit agent, go to the candle_home\TMAITM6 directory.
2. To run the Cluster Utility, double-click the KoqClusterUtility.exe.3. In the SQL Server Agent Instances Available area, select an SQL Server agent instance, and click
Add.4. In the Select cluster group name window, select a cluster group. The cluster group that you select
must be the SQL Server instance that is monitored by the SQL Server agent.5. In the Select Path for Shared Location window, navigate to the path where the agent and collector
logs are stored. If you do not select the path, by default, the CANDLEHOME/TMAITM6(_x64)/logs locationis selected for storing the agent and collector logs.
6. To add the SQL Server agent instance to the cluster environment, click OK. The activity logs of thecluster utility are displayed in the History pane.
Chapter 2. Agent installation and configuration 45

Updating an existing SQL Server agent instance in a clusterYou can use the cluster utility to update the location where the agent and collector logs are stored for anSQL Server instance in a cluster.
Procedure1. To update an existing Microsoft SQL Server agent instance, open the Cluster Utility window.2. In the SQL Server Agent Instances Configured area, select an SQL Server agent instance, and click
Update.3. In the Set Path for Shared Location window, navigate to the path where the agent and collector logs
are stored. If you do not select the path, the agent and collector logs are stored at the location thatwas set while adding the SQL Server agent instance in a cluster.
4. Click OK. The activity logs of the cluster utility are displayed in the History pane.
Removing an SQL Server agent instance from a clusterYou can use the cluster utility to remove an SQL Server agent instance from a cluster group.
Procedure1. Open the Cluster Utility window.2. In the SQL Server Agent Instances Configured area, select an SQL Server agent Instance, and click
Remove.3. In the Please Confirm Action dialog box, click Yes to delete the SQL Server agent instance from the
cluster. The activity logs of the cluster utility are displayed in the History pane.
46 Microsoft SQL Server agent: Installation and Configuration Guide

Appendix. ITCAM for Microsoft Applications documentationlibrary
Various publications are relevant to the use of ITCAM for Microsoft Applications.
For information about how to access and use the publications, see Using the publications(http://www.ibm.com/support/knowledgecenter/SSTFXA_6.3.0.1/com.ibm.itm.doc_6.3/common/using_publications.htm).
To find publications from the previous version of a product, click Previous versions under the name ofthe product in the Contents pane.
Documentation for this product is in the ITCAM for Microsoft Applications Knowledge Center(http://www.ibm.com/support/knowledgecenter/SSDKXQ_6.3.1/com.ibm.itcamms.doc_6.3.1/welcome_msapps631.html)v Quick Start Guidesv Offering Guidev Download instructionsv Links to Prerequisitesv Installation and Configuration Guide for each agentv Link to Reference information for each agentv Link to Troubleshooting Guide for each agent
Prerequisite publicationsTo use the information about the agents effectively, you must have some prerequisite knowledge.
See the following information at the IBM Tivoli Monitoring Knowledge Center (http://www.ibm.com/support/knowledgecenter/SSTFXA_6.3.0.2/com.ibm.itm.doc_6.3fp2/welcome.htm) to gain prerequisiteknowledge:v IBM Tivoli Monitoring Administrator's Guide
v IBM Tivoli Monitoring Installation and Setup Guide
v IBM Tivoli Monitoring High Availability Guide for Distributed Systems
v IBM Tivoli Monitoring: Installation and Configuration Guides for the following agents: OperatingSystem agents and Warehouse agents
v IBM Tivoli Monitoring: User's Guides for the following agents: Agentless OS monitors, Log file agent,System p agents, Systems Director base agent
v IBM Tivoli Monitoring Agent Builder User's Guide
v IBM Tivoli Monitoring Command Reference
v IBM Tivoli Monitoring: Messages
v IBM Tivoli Monitoring Troubleshooting Guide
v IBM Tivoli Monitoring: References for the following agents: Operating System agents and Warehouseagents
v IBM Tivoli Monitoring: Troubleshooting Guides for the following agents: Operating System agents andWarehouse agents
v Tivoli Enterprise Portal User's Guide
© Copyright IBM Corp. 2005, 2016 47

Related publicationsThe publications in related knowledge centers provide useful information.
See the following knowledge center at IBM Tivoli Monitoring Knowledge Center (http://www.ibm.com/support/knowledgecenter/SSTFXA_6.3.0.2/com.ibm.itm.doc_6.3fp2/welcome.htm):v Tivoli Monitoringv Tivoli Application Dependency Discovery Managerv Tivoli Business Service Managerv Tivoli Common Reportingv Tivoli Enterprise Consolev Tivoli Netcool/OMNIbus
Tivoli Monitoring Community on Service Management ConnectService Management Connect (SMC) is a repository of technical information that is organized bycommunities.
Access Service Management Connect at https://www.ibm.com/developerworks/servicemanagement.
For information about Tivoli products, see the Application Performance Management community(http://www.ibm.com/developerworks/servicemanagement/apm/index.html).
Connect, learn, and share with Service Management professionals. Get access to developers and productsupport technical experts who provide their perspectives and expertise. You can use SMC for thesepurposes:v Become involved with transparent development, an ongoing, open engagement between other users
and IBM developers of Tivoli products. You can access early designs, sprint demonstrations, productroadmaps, and prerelease code.
v Connect one-on-one with the experts to collaborate and network about Tivoli and the (enter yourcommunity name here) community.
v Read blogs to benefit from the expertise and experience of others.v Use wikis and forums to collaborate with the broader user community.
Other sources of documentationYou can obtain additional technical documentation about monitoring products from other sources.
See the following sources of technical documentation about monitoring products:v IBM Integrated Service Management Library (http://www.ibm.com/software/brandcatalog/
ismlibrary/) is an online catalog that contains integration documentation as well as otherdownloadable product extensions.
v IBM Redbook publications (http://www.redbooks.ibm.com/) include Redbooks® publications,Redpapers, and Redbooks technotes that provide information about products from platform andsolution perspectives.
v Technotes (http://www.ibm.com/support/entry/portal/software), which are found through the IBMSoftware Support website, provide the latest information about known product limitations andworkarounds.
48 Microsoft SQL Server agent: Installation and Configuration Guide

Notices
This information was developed for products and services offered in the US. This material might beavailable from IBM in other languages. However, you may be required to own a copy of the product orproduct version in that language in order to access it.
IBM may not offer the products, services, or features discussed in this document in other countries.Consult your local IBM representative for information on the products and services currently available inyour area. Any reference to an IBM product, program, or service is not intended to state or imply thatonly that IBM product, program, or service may be used. Any functionally equivalent product, program,or service that does not infringe any IBM intellectual property right may be used instead. However, it isthe user's responsibility to evaluate and verify the operation of any non-IBM product, program, orservice.
IBM may have patents or pending patent applications covering subject matter described in thisdocument. The furnishing of this document does not grant you any license to these patents. You can sendlicense inquiries, in writing, to:
IBM Director of LicensingIBM CorporationNorth Castle Drive, MD-NC119Armonk, NY 10504-1785US
For license inquiries regarding double-byte character set (DBCS) information, contact the IBM IntellectualProperty Department in your country or send inquiries, in writing, to:
Intellectual Property LicensingLegal and Intellectual Property LawIBM Japan Ltd.19-21, Nihonbashi-Hakozakicho, Chuo-kuTokyo 103-8510, Japan
INTERNATIONAL BUSINESS MACHINES CORPORATION PROVIDES THIS PUBLICATION "AS IS"WITHOUT WARRANTY OF ANY KIND, EITHER EXPRESS OR IMPLIED, INCLUDING, BUT NOTLIMITED TO, THE IMPLIED WARRANTIES OF NON-INFRINGEMENT, MERCHANTABILITY ORFITNESS FOR A PARTICULAR PURPOSE. Some jurisdictions do not allow disclaimer of express orimplied warranties in certain transactions, therefore, this statement may not apply to you.
This information could include technical inaccuracies or typographical errors. Changes are periodicallymade to the information herein; these changes will be incorporated in new editions of the publication.IBM may make improvements and/or changes in the product(s) and/or the program(s) described in thispublication at any time without notice.
Any references in this information to non-IBM websites are provided for convenience only and do not inany manner serve as an endorsement of those websites. The materials at those websites are not part ofthe materials for this IBM product and use of those websites is at your own risk.
IBM may use or distribute any of the information you provide in any way it believes appropriate withoutincurring any obligation to you.
© Copyright IBM Corp. 2005, 2016 49

Licensees of this program who wish to have information about it for the purpose of enabling: (i) theexchange of information between independently created programs and other programs (including thisone) and (ii) the mutual use of the information which has been exchanged, should contact:
IBM Director of LicensingIBM CorporationNorth Castle Drive, MD-NC119Armonk, NY 10504-1785US
Such information may be available, subject to appropriate terms and conditions, including in some cases,payment of a fee.
The licensed program described in this document and all licensed material available for it are providedby IBM under terms of the IBM Customer Agreement, IBM International Program License Agreement orany equivalent agreement between us.
The performance data discussed herein is presented as derived under specific operating conditions.Actual results may vary.
Information concerning non-IBM products was obtained from the suppliers of those products, theirpublished announcements or other publicly available sources. IBM has not tested those products andcannot confirm the accuracy of performance, compatibility or any other claims related tonon-IBMproducts. Questions on the capabilities of non-IBM products should be addressed to thesuppliers of those products.
Statements regarding IBM's future direction or intent are subject to change or withdrawal without notice,and represent goals and objectives only.
This information is for planning purposes only. The information herein is subject to change before theproducts described become available.
This information contains examples of data and reports used in daily business operations. To illustratethem as completely as possible, the examples include the names of individuals, companies, brands, andproducts. All of these names are fictitious and any similarity to actual people or business enterprises isentirely coincidental.
COPYRIGHT LICENSE:
This information contains sample application programs in source language, which illustrate programmingtechniques on various operating platforms. You may copy, modify, and distribute these sample programsin any form without payment to IBM, for the purposes of developing, using, marketing or distributingapplication programs conforming to the application programming interface for the operating platform forwhich the sample programs are written. These examples have not been thoroughly tested under allconditions. IBM, therefore, cannot guarantee or imply reliability, serviceability, or function of theseprograms. The sample programs are provided "AS IS", without warranty of any kind. IBM shall not beliable for any damages arising out of your use of the sample programs.
Each copy or any portion of these sample programs or any derivative workmust include a copyrightnotice as follows:© (your company name) (year).Portions of this code are derived from IBM Corp. Sample Programs.© Copyright IBM Corp. 2005, 2016.
50 Microsoft SQL Server agent: Installation and Configuration Guide

TrademarksIBM, the IBM logo, and ibm.com are trademarks or registered trademarks of International BusinessMachines Corp., registered in many jurisdictions worldwide. Other product and service names might betrademarks of IBM or other companies. A current list of IBM trademarks is available on the web at"Copyright and trademark information" at www.ibm.com/legal/copytrade.shtml.
Linux is a trademark of Linus Torvalds in the United States, other countries, or both.
Microsoft, Windows, Windows NT, and the Windows logo are trademarks of Microsoft Corporation in theUnited States, other countries, or both.
UNIX is a registered trademark of The Open Group in the United States and other countries.
Java and all Java-based trademarks and logos are trademarks or registered trademarks of Oracle and/orits affiliates.
Terms and conditions for product documentationPermissions for the use of these publications are granted subject to the following terms and conditions.
Applicability
These terms and conditions are in addition to any terms of use for the IBM website.
Personal use
You may reproduce these publications for your personal, noncommercial use provided that allproprietary notices are preserved. You may not distribute, display or make derivative work of thesepublications, or any portion thereof, without the express consent of IBM.
Commercial use
You may reproduce, distribute and display these publications solely within your enterprise provided thatall proprietary notices are preserved. You may not make derivative works of these publications, orreproduce, distribute or display these publications or any portion thereof outside your enterprise, withoutthe express consent of IBM.
Rights
Except as expressly granted in this permission, no other permissions, licenses or rights are granted, eitherexpress or implied, to the publications or any information, data, software or other intellectual propertycontained therein.
IBM reserves the right to withdraw the permissions granted herein whenever, in its discretion, the use ofthe publications is detrimental to its interest or, as determined by IBM, the above instructions are notbeing properly followed.
Notices 51

You may not download, export or re-export this information except in full compliance with all applicablelaws and regulations, including all United States export laws and regulations.
IBM MAKES NO GUARANTEE ABOUT THE CONTENT OF THESE PUBLICATIONS. THEPUBLICATIONS ARE PROVIDED "AS-IS" AND WITHOUT WARRANTY OF ANY KIND, EITHEREXPRESSED OR IMPLIED, INCLUDING BUT NOT LIMITED TO IMPLIED WARRANTIES OFMERCHANTABILITY, NON-INFRINGEMENT, AND FITNESS FOR A PARTICULAR PURPOSE.
IBM Online Privacy StatementIBM Software products, including software as a service solutions, (“Software Offerings”) may use cookiesor other technologies to collect product usage information, to help improve the end user experience, totailor interactions with the end user or for other purposes. In many cases no personally identifiableinformation is collected by the Software Offerings. Some of our Software Offerings can help enable you tocollect personally identifiable information. If this Software Offering uses cookies to collect personallyidentifiable information, specific information about this offering's use of cookies is set forth in thefollowing paragraphs.
Depending upon the configurations deployed, this Software Offering may use session cookies that collecteach user's user name for purposes of session management, authentication, and single sign-onconfiguration. These cookies can be disabled, but disabling them will also likely eliminate thefunctionality they enable.
If the configurations deployed for this Software Offering provide you as customer the ability to collectpersonally identifiable information from end users via cookies and other technologies, you should seekyour own legal advice about any laws applicable to such data collection, including any requirements fornotice and consent.
For more information about the use of various technologies, including cookies, for these purposes, SeeIBM's Privacy Policy at http://www.ibm.com/privacy and IBM's Online Privacy Statement athttp://www.ibm.com/privacy/details the section entitled “Cookies, Web Beacons and OtherTechnologies” and the “IBM Software Products and Software-as-a-Service Privacy Statement” athttp://www.ibm.com/software/info/product-privacy.
52 Microsoft SQL Server agent: Installation and Configuration Guide

Index
Aagent
functions 1Application Performance Management community on
SMC 48attribute groups
cache duration for 5that gather data from operating system or MS SQL Server
files 12that gather data from SELECT statements 7when data is collected 5
authorizationadditional 19required 19
Ccache duration for attribute groups 5changes
baroc file updated 2cluster environment
creating a resource 43installing and configuring the monitoring agent 42making configuration changes 45requirements 42setting up the monitoring agent 42
cluster utilityPrerequisites 45
commandstacmd 24tacmd configureSystem 41tacmd startAgent 41
components 2IBM Tivoli Monitoring 2
configurationlocal 23Manage Tivoli Enterprise Monitoring Services window 23parameters 24procedures 18remote 40settings 24
creating user ID 19
Ddata collection
processes 5data collection for attribute groups 5data from operating system or MS SQL Server files 12data from SELECT statements 7documentation
See publications
EEnabling cursors 39Error Log File 26
Ggranting permission 19
HHome Directory 26
IIBM Tivoli Monitoring 2
overview 1instance name 25instance property 41Integrated Service Management Library documentation 48interface
user 3
Kkoqcoll.ctl file 39
LLogin 25
MManage Tivoli Enterprise Monitoring Services
starting the agent 41Manage Tivoli Enterprise Monitoring Services window
local configuration 23
Ooperating systems 13overview
IBM Tivoli Monitoring 1
PPassword 25permission, granting 19prerequisite checker 16prerequisite publications 47prerequisites 16properties
instance 41publications 47, 48
IBM Tivoli Monitoring 47Integrated Service Management Library 48prerequisite 47Redbooks 48related 48Service Management Connect 48SMC
See Service Management ConnectTechnotes 48
© Copyright IBM Corp. 2005, 2016 53

publications (continued)wikis 48
Rreconfiguration 41Redbooks 48remote configuration 40requirements 13
configuration 13installation 13
SSELECT statements 7Server Name 25Service Management Connect 48silent installation 18SMC
See Service Management Connectstarting the monitoring agent 41
when 18
Ttacmd command line
reconfiguring 41tacmd configureSystem command 41tacmd startAgent 41Technotes 48Tivoli Enterprise Portal
reconfiguring agent instance 41
UUser ID 25user ID, creating 19user interface options 3
Wwikis 48
54 Microsoft SQL Server agent: Installation and Configuration Guide


IBM®
Printed in USA
SC27-5660-01