microsoft project 2010 ® tutorial 2: creating a project schedule
TRANSCRIPT
Microsoft Project 2010
®
Tutorial 2: Creating a Project Schedule
XPXPXPIn Tutorial Section 2.1 you will:• Start a new project• Examine scheduling defaults• Change a project and task calendar• Enter and edit tasks and durations• Enter and edit recurring tasks and milestones• Enter lag and lead times
New Perspectives on Microsoft Project 2010 2

XPXPXPIn Tutorial Section 2.2you will:• Enter and edit task dependencies• View project statistics• Show the project summary• Review project statistics• Create and manipulate summary tasks• Develop a work breakdown structure
New Perspectives on Microsoft Project 2010 3
XPXPXP
• By default, the new project file is scheduled from a project Start date
• All tasks are scheduled to begin as soon as possible• Project 2010 calculates the project’s Finish date based
on the: – Tasks– Durations– Dependencies
New Perspectives on Microsoft Project 2010 4

XPXPXPProject Information Dialog Box
New Perspectives on Microsoft Project 2010 5
XPXPXPScheduling a Project from a Finish Date• When a project is scheduled from a Finish date, such
as a conference, all tasks are scheduled to begin as late as possible.
• Project 2010 calculates the project’s Start date based on the tasks, durations and dependencies.
• The default is for all tasks and the project to start as late as possible.
• To schedule from a Finish Date, you apply this setting as soon as the project is created.
New Perspectives on Microsoft Project 2010 6
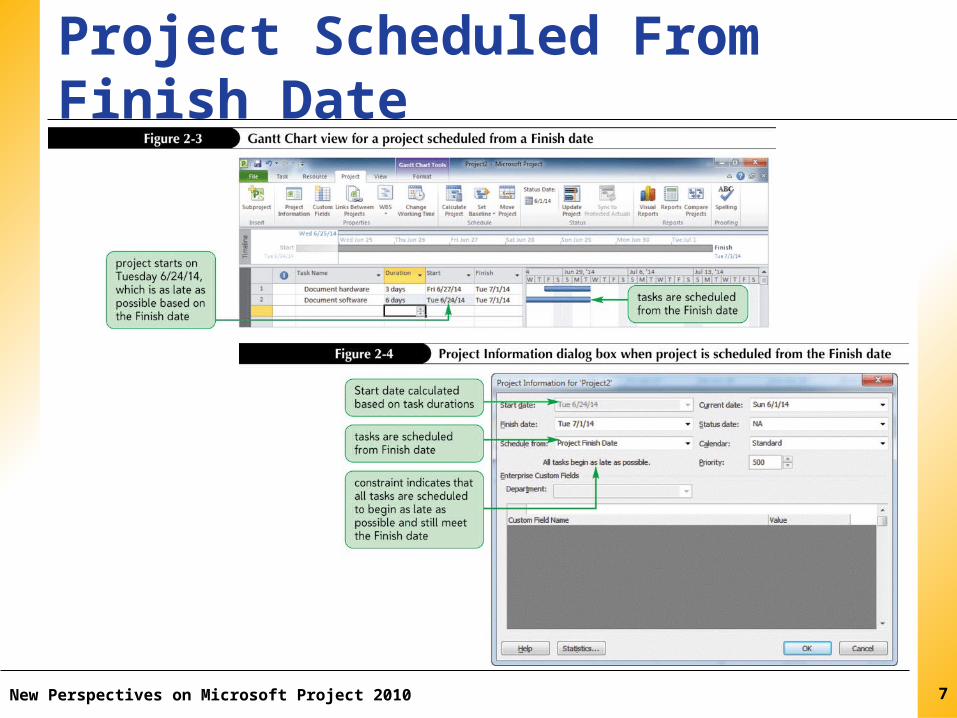
XPXPXPProject Scheduled From Finish Date
New Perspectives on Microsoft Project 2010 7
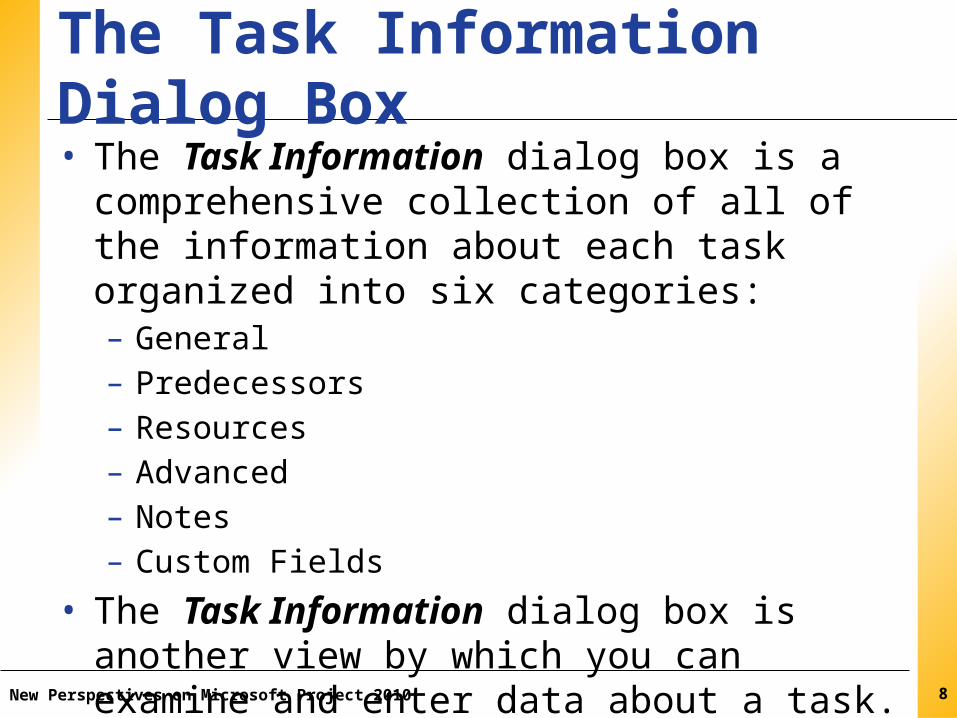
XPXPXPThe Task Information Dialog Box• The Task Information dialog box is a comprehensive
collection of all of the information about each task organized into six categories:– General– Predecessors– Resources– Advanced– Notes– Custom Fields
• The Task Information dialog box is another view by which you can examine and enter data about a task.
New Perspectives on Microsoft Project 2010 8

XPXPXP
New Perspectives on Microsoft Project 2010 9
The Task Information Dialog Box

XPXPXPConstraints using Task Information• How the project is originally scheduled (from a Start
date or from a Finish date) determines the initial Constraint types (as soon as possible or as late as possible).
• The initial Constraint type has a tremendous impact on the calculated start and finish dates for each task entered into the project.
• Always take the time to examine the Project Information dialog box before starting a new project.
New Perspectives on Microsoft Project 2010 10

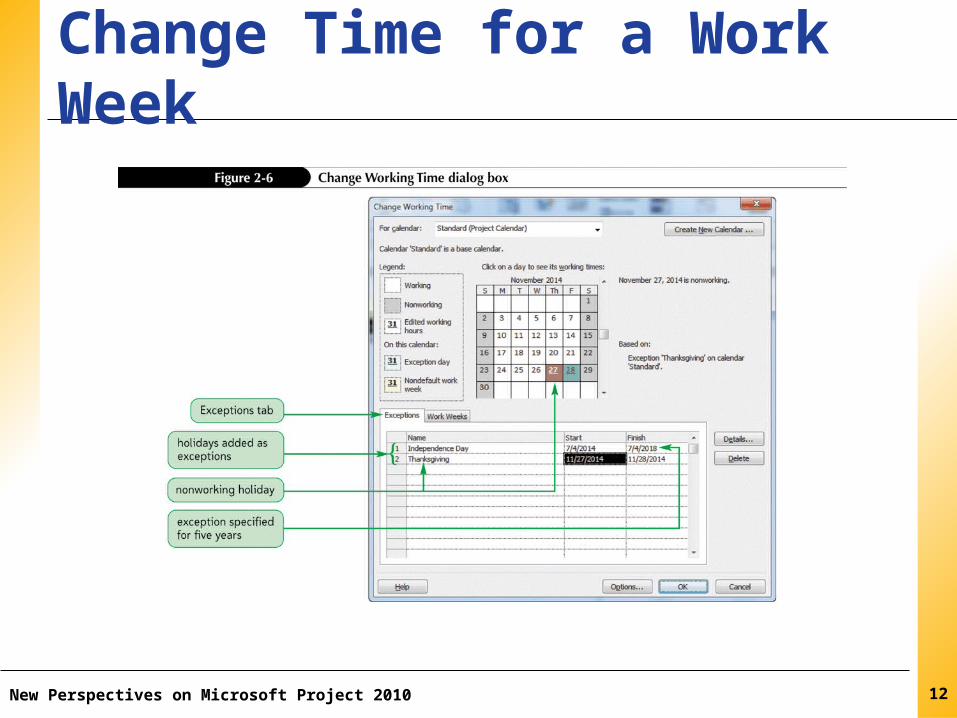
XPXPXPExamining Project Calendars• By default, the entire project, each task, and each
resource is scheduled according to the Standard calendar.
• The Standard calendar specifies that Monday through Friday are working days with 8 hours of work completed each day.
• Saturday and Sunday are designated as nonworking days.• The Calendar can be modified to identify holidays or
other nonworking days or times in which work should not be scheduled.
• You can also create unique calendars for tasks and resources that do not follow the working and nonworking times specified by the Standard calendar.
New Perspectives on Microsoft Project 2010 11
XPXPXP
New Perspectives on Microsoft Project 2010 12
Change Time for a Work Week

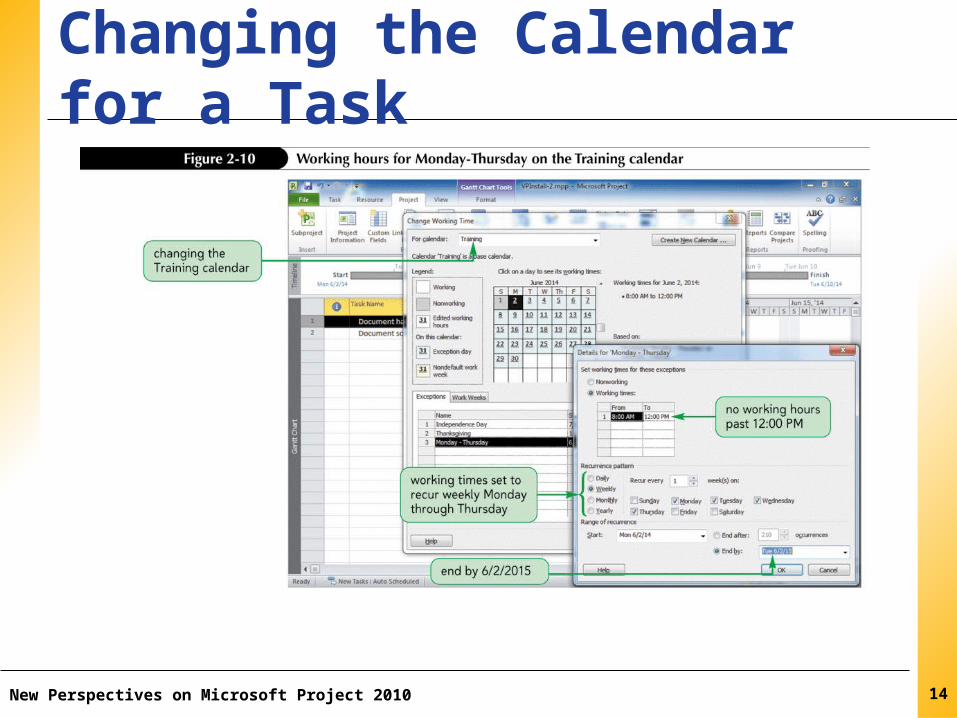
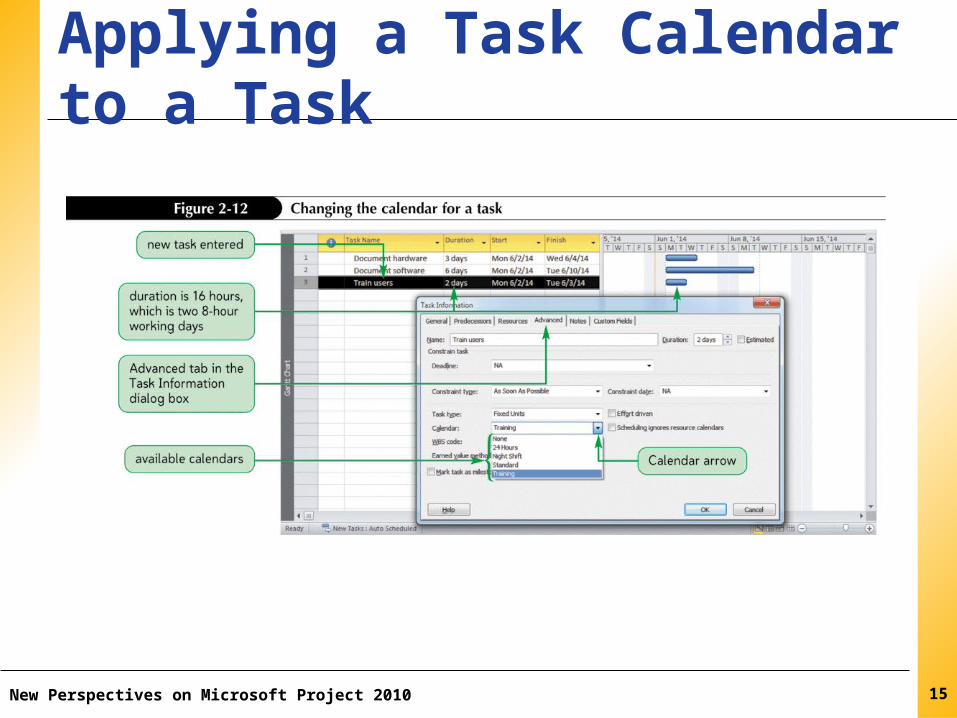
XPXPXPCreating a Task Calendar
• An individual task calendar can be created for any task that does not follow the working and nonworking times specified by the project calendar.
• An individual resource calendar can be created for a resource that does not follow the working and nonworking times specified by the project calendar.
• By default, all tasks and resource assignments inherit the project calendar unless you specify something else.
New Perspectives on Microsoft Project 2010 13
XPXPXP
New Perspectives on Microsoft Project 2010 14
Changing the Calendar for a Task
XPXPXP
New Perspectives on Microsoft Project 2010 15
Applying a Task Calendar to a Task
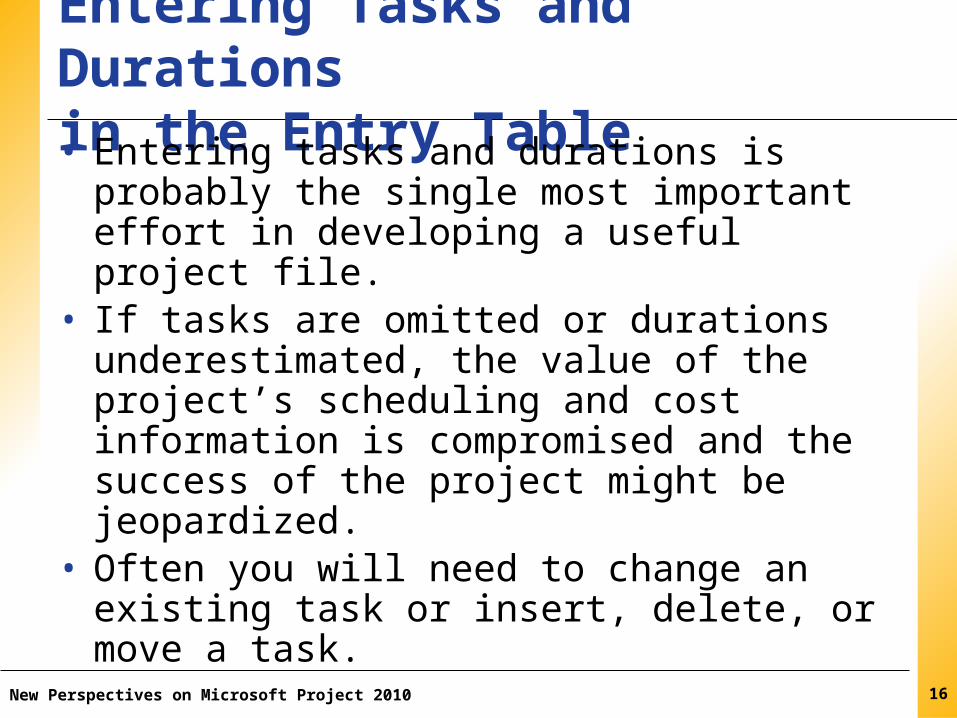
XPXPXPEntering Tasks and Durations in the Entry Table• Entering tasks and durations is probably the single
most important effort in developing a useful project file.
• If tasks are omitted or durations underestimated, the value of the project’s scheduling and cost information is compromised and the success of the project might be jeopardized.
• Often you will need to change an existing task or insert, delete, or move a task.
New Perspectives on Microsoft Project 2010 16
XPXPXPEditing Tasks and Durations in the Entry Table• Project 2010 makes it very easy to edit an existing
project.• Many of the editing skills that you gained when
editing a spreadsheet will apply to a project table.• To change an existing entry, you first navigate to the
cell. Once there, you have several options:– Retype the entry– Edit the entry directly in the cell– Edit an entry in the Entry bar
New Perspectives on Microsoft Project 2010 17
XPXPXP
New Perspectives on Microsoft Project 2010 18
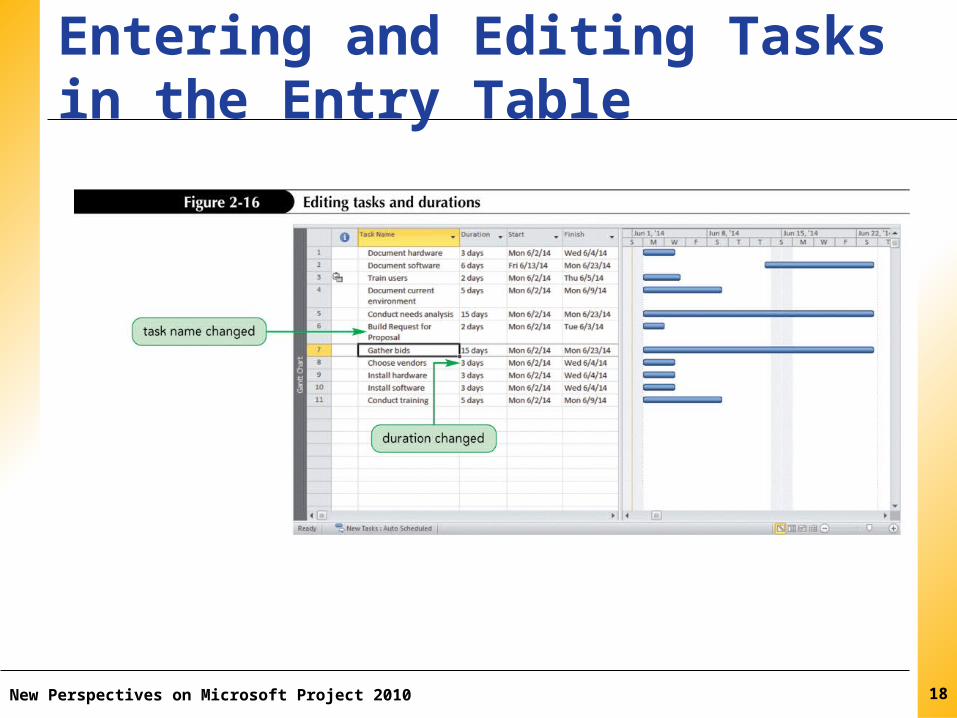
Entering and Editing Tasksin the Entry Table

XPXPXPTo Delete a Task• If you want to delete an entire task row in Project
2010, you must select the entire row, then press the Delete key.
• Project 2010 includes a Smart Tag to allow you to specify what you want to delete.
• A list arrow appears when you place the pointer over the Smart Tag.
New Perspectives on Microsoft Project 2010 19
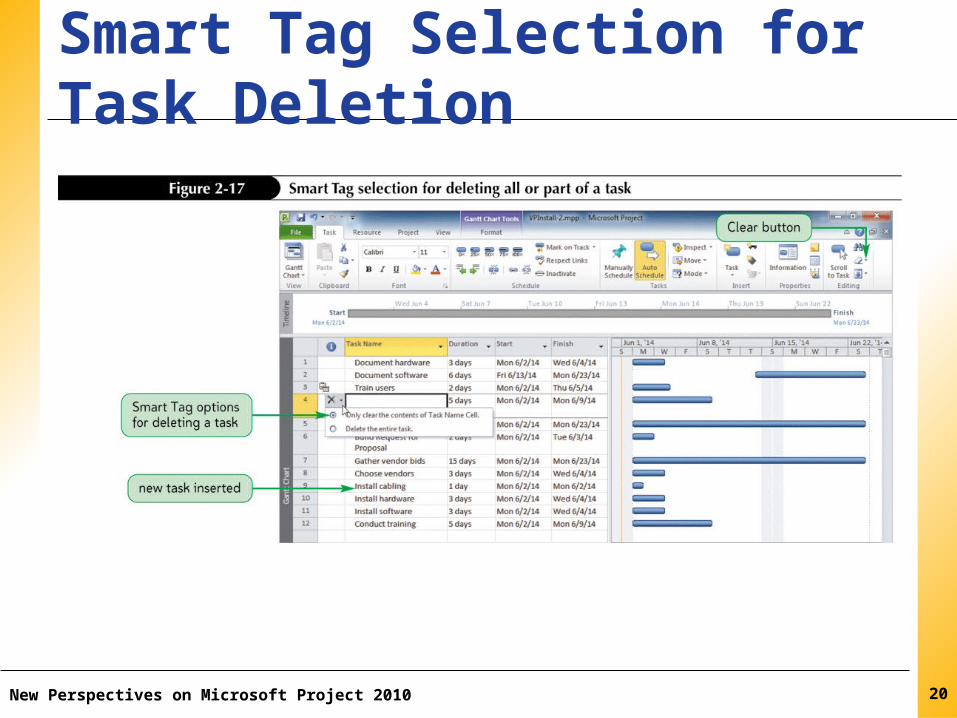
XPXPXPSmart Tag Selection for Task Deletion
New Perspectives on Microsoft Project 2010 20
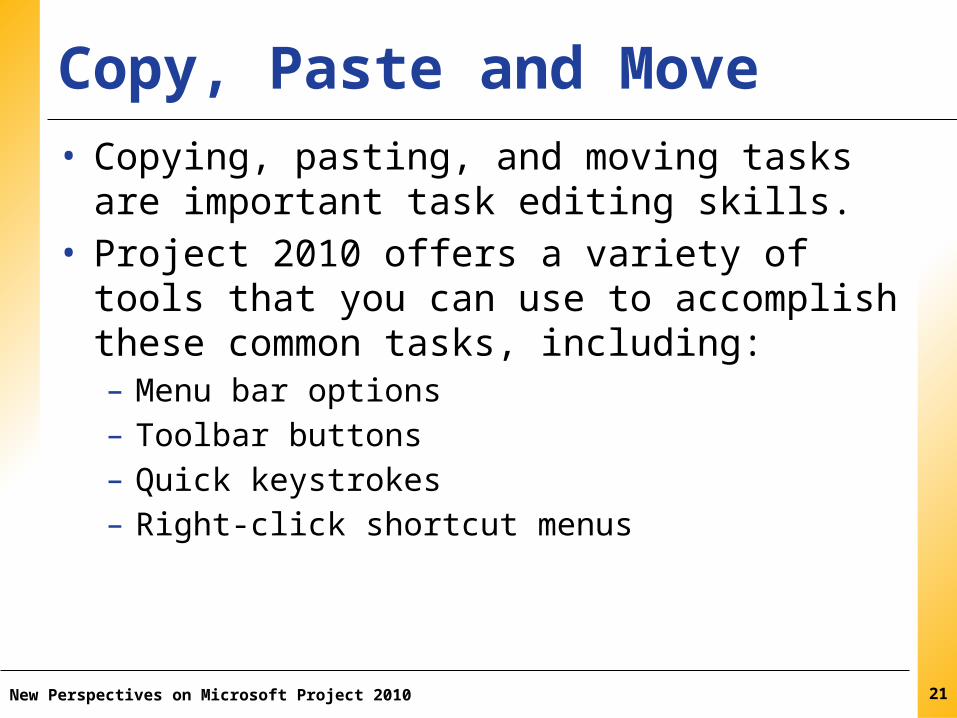
XPXPXPCopy, Paste and Move• Copying, pasting, and moving tasks are important task
editing skills. • Project 2010 offers a variety of tools that you can use
to accomplish these common tasks, including:– Menu bar options– Toolbar buttons– Quick keystrokes– Right-click shortcut menus
New Perspectives on Microsoft Project 2010 21
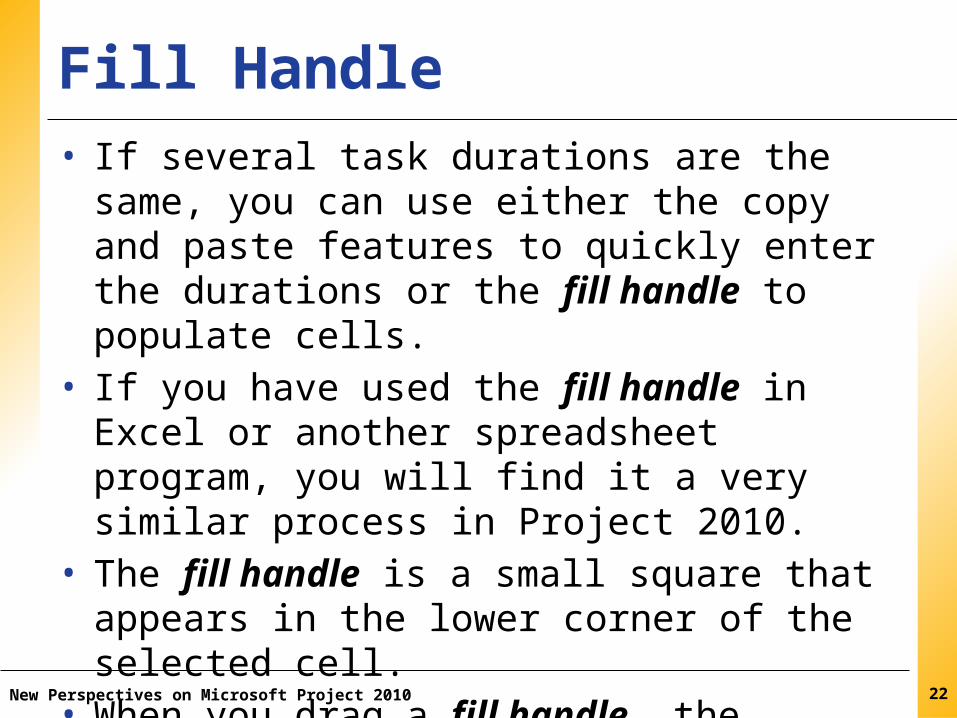
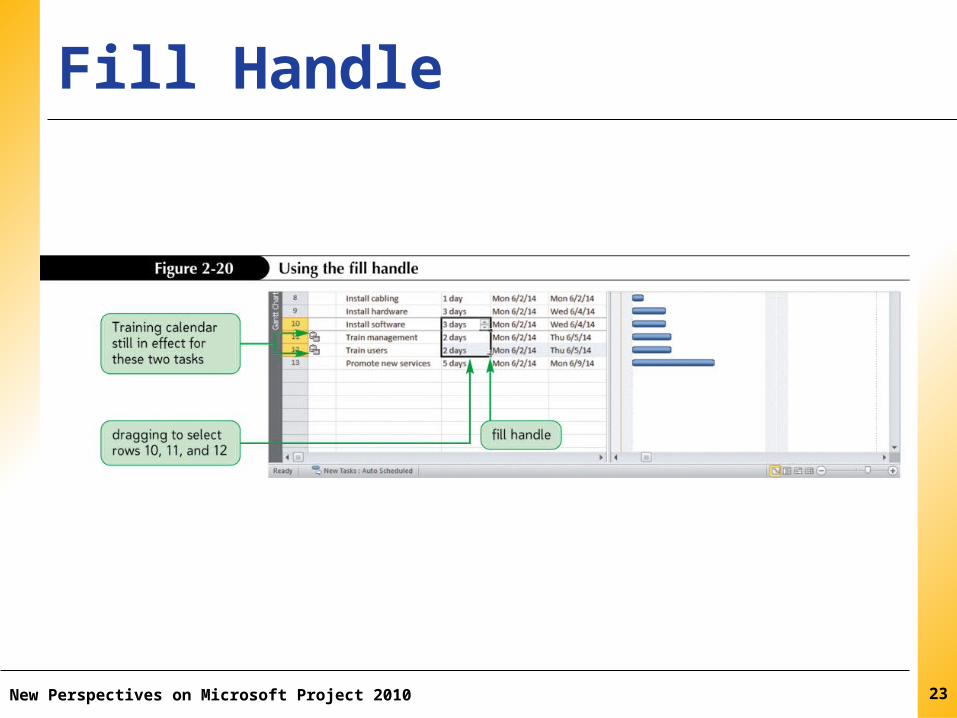
XPXPXPFill Handle• If several task durations are the same, you can use
either the copy and paste features to quickly enter the durations or the fill handle to populate cells.
• If you have used the fill handle in Excel or another spreadsheet program, you will find it a very similar process in Project 2010.
• The fill handle is a small square that appears in the lower corner of the selected cell.
• When you drag a fill handle, the contents of the active cell are copied.
• You can also use the fill handle to fill task names.New Perspectives on Microsoft Project 2010 22
XPXPXPFill Handle
New Perspectives on Microsoft Project 2010 23
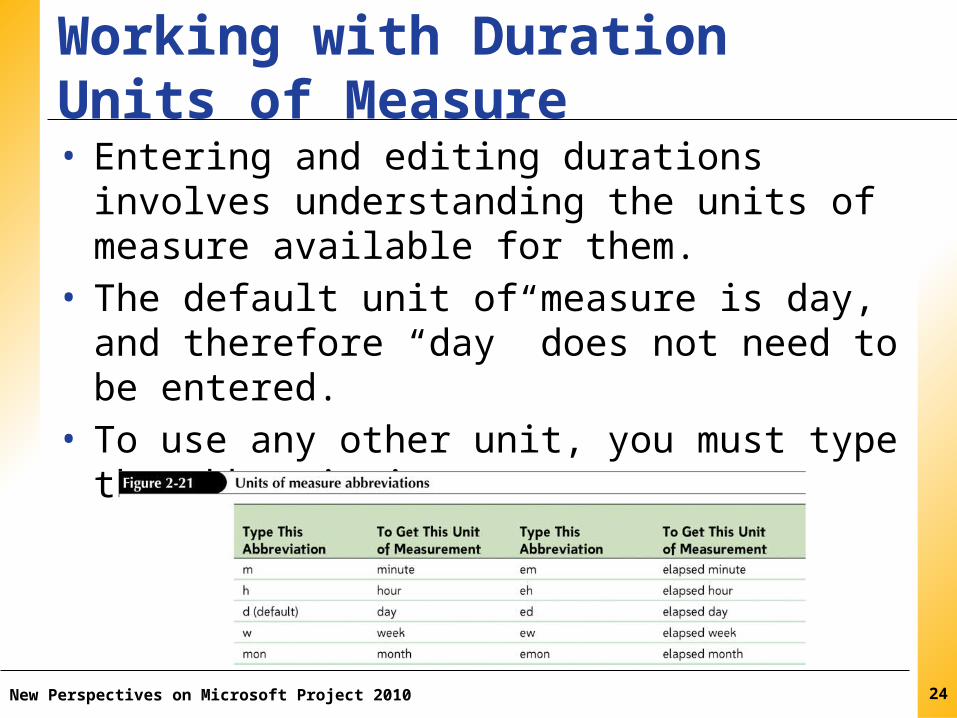
XPXPXPWorking with Duration Units of Measure• Entering and editing durations involves understanding
the units of measure available for them.• The default unit of measure is day, and therefore
“day” does not need to be entered.• To use any other unit, you must type the
abbreviation.
New Perspectives on Microsoft Project 2010 24
XPXPXP
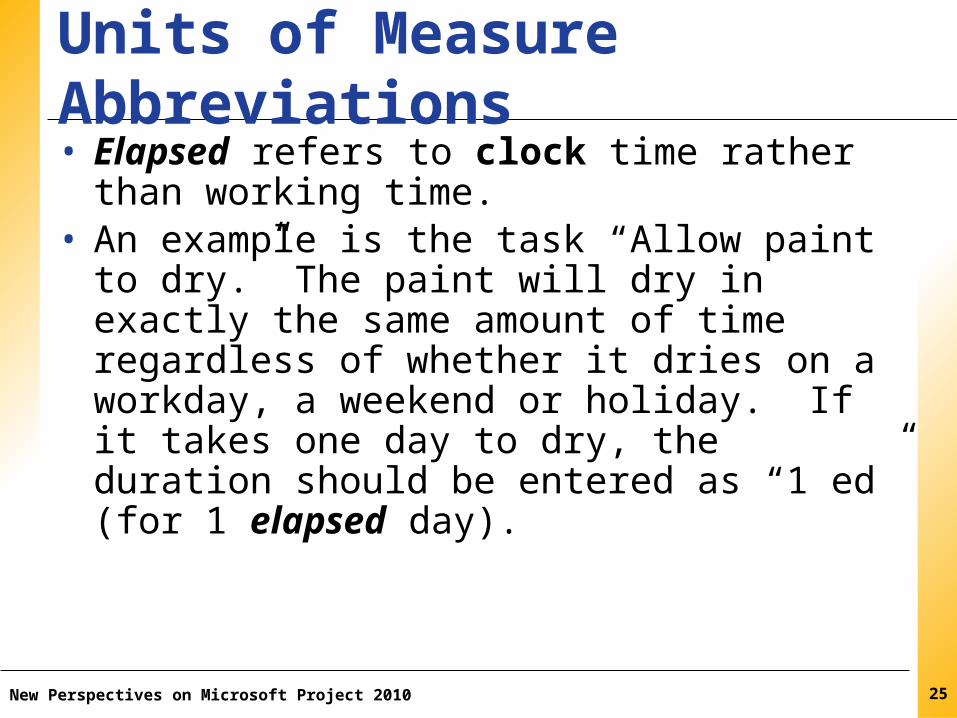
• Elapsed refers to clock time rather than working time.• An example is the task “Allow paint to dry.” The paint
will dry in exactly the same amount of time regardless of whether it dries on a workday, a weekend or holiday. If it takes one day to dry, the duration should be entered as “1 ed” (for 1 elapsed day).
New Perspectives on Microsoft Project 2010 25
Units of Measure Abbreviations

XPXPXPEditing Tasks and Durationsin Other Views• Anything changed in one view is automatically
changed in all the other views.• You can use the View Bar to quickly switch between
views.• The way data is displayed differs by view and often
satisfies different communication and reporting needs as the project develops.
New Perspectives on Microsoft Project 2010 26
XPXPXPEditing Tasks and Durations in Other Views Cont.’d• Regardless of the view used, you can edit any task by
double-clicking it to open its Task Information dialog box.
• As you work with Project 2010, you will become more familiar with each view and learn which is the best representation of the data for different purposes.
New Perspectives on Microsoft Project 2010 27

XPXPXPEntering Recurring Tasks• A recurring task is a task that repeats at a regular
interval. • A status meeting is a good example of a recurring task
that needs to be scheduled for each week or other regular intervals in the project.
• In Project 2010, you can define a recurring task one time using the Recurring Task Information dialog box.
• Project 2010 then handles the details of scheduling the task at specified interval for the entire project or for the time period you specify.
• You can also change the calendar used on the recurring task in the Calendar section.
New Perspectives on Microsoft Project 2010 28

XPXPXP
New Perspectives on Microsoft Project 2010 29
Recurring Task Information Dialog Box
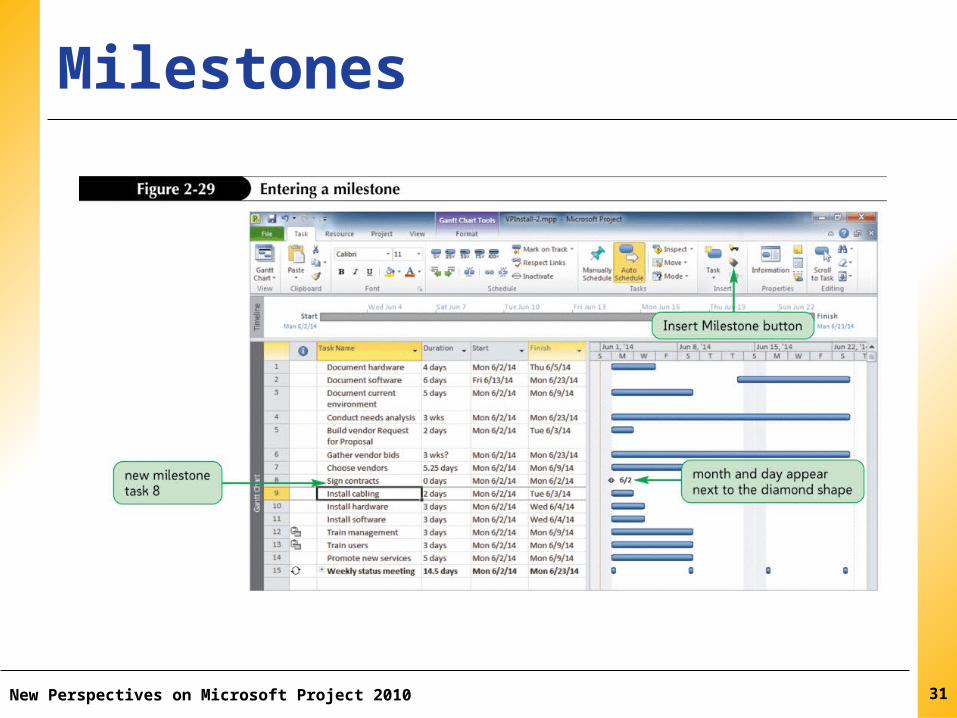
XPXPXPEntering Milestones• A milestone is a task that marks a significant point in
time or a progress checkpoint.• It has a zero duration and is therefore a symbolic task
that is used mainly to communicate progress or to mark the end of a significant phase of the project.
• Examples include the signing of a contract or the announcement of a new product.
• Milestones can also be used to motivate project participants by recognizing accomplishments.
New Perspectives on Microsoft Project 2010 30
XPXPXP
New Perspectives on Microsoft Project 2010 31
Milestones
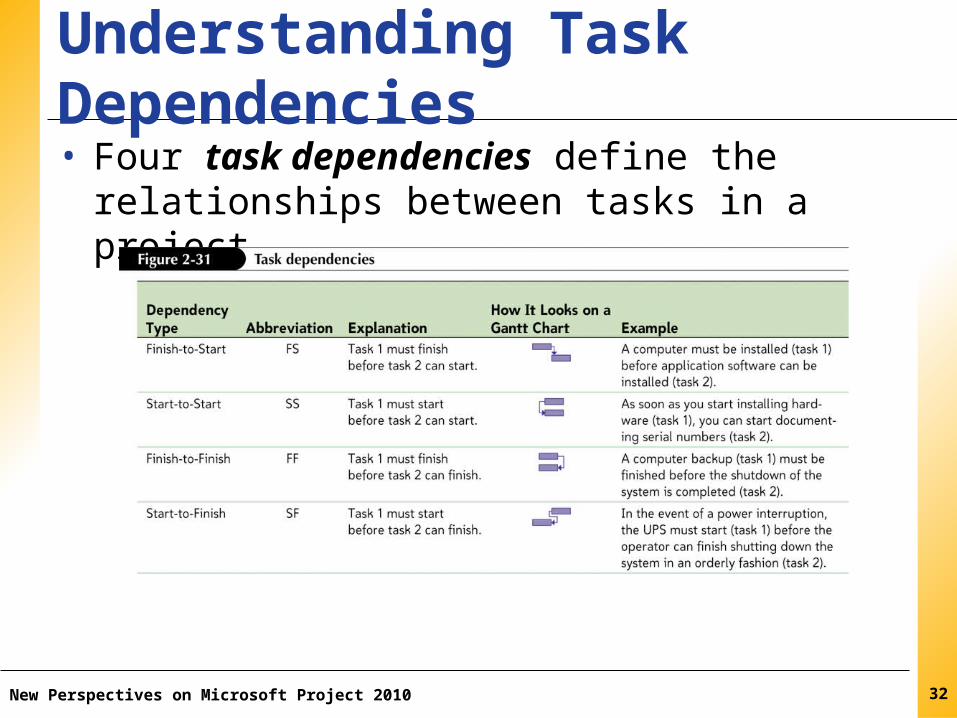
XPXPXPUnderstanding Task Dependencies• Four task dependencies define the relationships
between tasks in a project.
New Perspectives on Microsoft Project 2010 32
XPXPXPUnderstanding Task Dependencies Cont.’d• By linking tasks in finish-to-start relationships, you
establish the required sequence of tasks.• Project 2010 uses these relationships to set start and
finish dates for each task.• Most dependencies are Finish-to-Start (FS), meaning
a certain task (the predecessor) must finish before another task (the successor) can start.
• In order to use important project management techniques such as critical path analysis, you must determine task dependencies.
New Perspectives on Microsoft Project 2010 33
XPXPXPCreating Task Dependencies• Project 2010 makes it easy to create, and remove, FS
relationships between tasks by providing the Link Tasks and Unlink Tasks buttons on the Standard toolbar.
• Task dependencies also can be established in the graphical views.
New Perspectives on Microsoft Project 2010 34
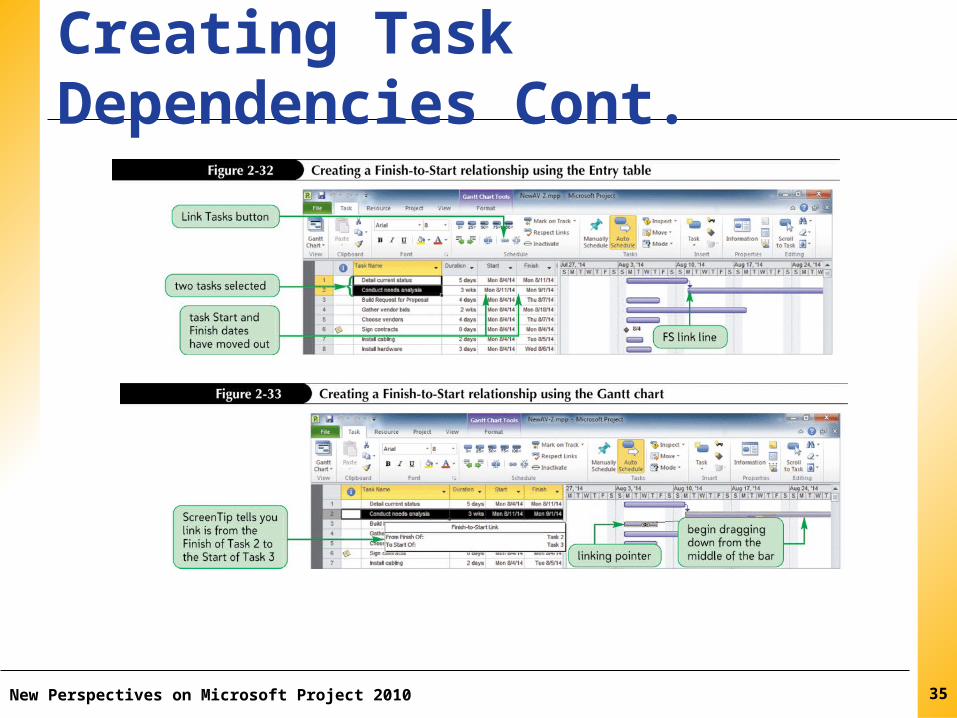
XPXPXPCreating Task Dependencies Cont.
New Perspectives on Microsoft Project 2010 35
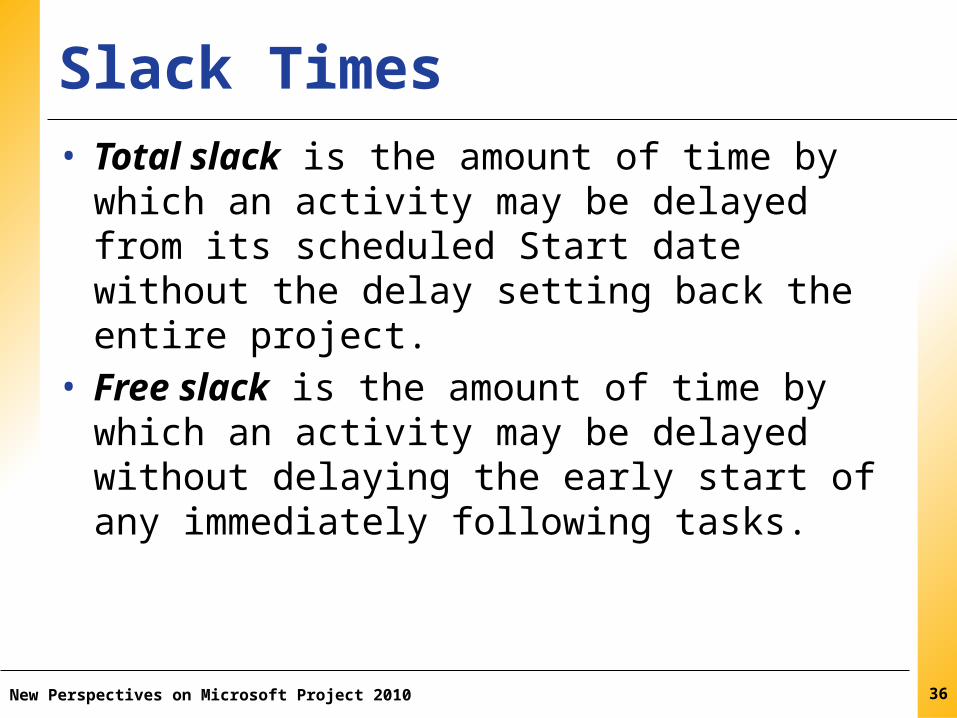
XPXPXPSlack Times• Total slack is the amount of time by which an activity
may be delayed from its scheduled Start date without the delay setting back the entire project.
• Free slack is the amount of time by which an activity may be delayed without delaying the early start of any immediately following tasks.
New Perspectives on Microsoft Project 2010 36
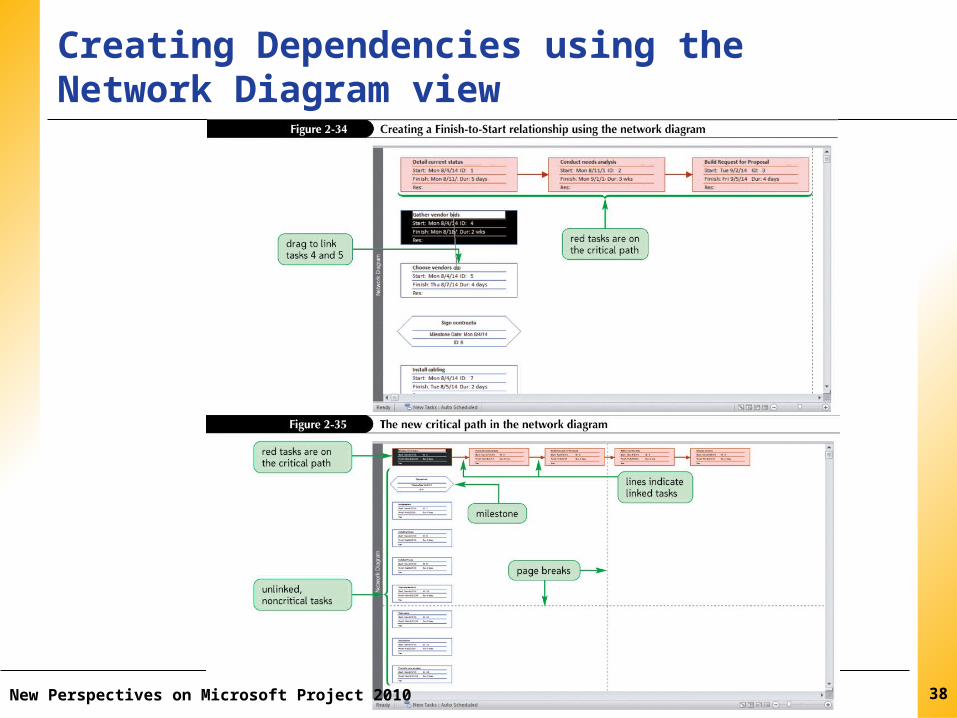
XPXPXPCritical and Non-Critical Tasks• In the Network Diagram view, the critical tasks—tasks
that are on the critical path—are displayed within a red border.
• A task that is not on the critical path is a non-critical task, that is, it doesn’t necessarily have to start on its currently scheduled Start date in order for the overall project to be completed on time.
• The Network Diagram is used mainly to view and analyze the critical path.
New Perspectives on Microsoft Project 2010 37
XPXPXPCreating Dependencies using the Network Diagram view
New Perspectives on Microsoft Project 2010 38

XPXPXPEntering Lag and Lead Times• When a project is scheduled from a Start date, lag
and lead times refer to an amount of time that the second task of a relationship is moved backward (lead) or forward (lag) in time.
• Lead time moves the second task backward in time so that the two tasks overlap.
• Lag time is the opposite of lead time. It moves the second task forward in time so that the tasks are further separated.
New Perspectives on Microsoft Project 2010 39
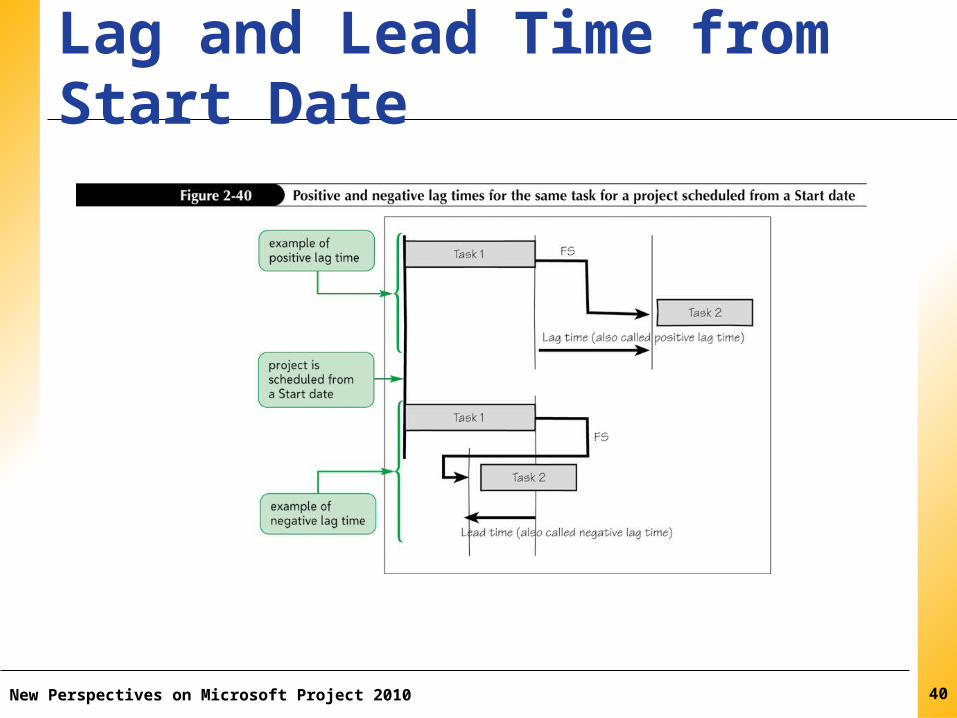
XPXPXPLag and Lead Time from Start Date
New Perspectives on Microsoft Project 2010 40

XPXPXPEntering Lag and Lead Times Cont.’d• Project 2010 combines the concepts of lag and lead
times into one term, lag time. • When a project is scheduled from a Start date,
positive lag time moves the second task forward in time.– Positive lag time is the traditional definition of lag time in
general project management discussions.• Negative lag time moves the second task backward
in time so that the tasks overlap. – Negative lag time is called lead time in general project
management discussions.
New Perspectives on Microsoft Project 2010 41

XPXPXP
New Perspectives on Microsoft Project 2010 42
Negative and Positive Lag Time

XPXPXPCheck for Lag Time Effects Cont.• Confusing negative and positive lag times is easy,
especially when examining them for both a project that is scheduled from a Start date and one scheduled from a Finish date.
• Remember:– Positive lag time always increases the amount of time
between tasks.– Negative lag time always causes the tasks to overlap.– This rule holds true regardless of whether the project is
scheduled from the Start date or the Finish date.
New Perspectives on Microsoft Project 2010 43
XPXPXPCheck for Lag Time Effects• Once the tasks, durations, and relationships are
entered, you should check the Project Information dialog box to verify the project’s calculated Finish date if the project is scheduled from a Start date, or calculated Start date if the project is scheduled from a Finish date.
• When a project is scheduled from a Start date, applying negative lag time to task dependencies that are on the critical path is a common way to shorten the critical path because it allows tasks to overlap.
New Perspectives on Microsoft Project 2010 44
XPXPXPCheck for Lag Time Effects Cont.’d• When you apply negative lag time, the second task is
allowed to start before the first task is completely finished.
• When a project is scheduled from a Finish date, all tasks have as late as possible schedules and lag time affects the first task rather than the second.
New Perspectives on Microsoft Project 2010 45

XPXPXP
New Perspectives on Microsoft Project 2010 46
Lag Time From a Finish Date
XPXPXPCreating a Work Breakdown Structure with Summary Tasks• A very important strategy for managing projects well
is to organize the work that needs to be done in a logical manner.
• A work breakdown structure (WBS) is an outcome-oriented analysis of the work involved in a project that defines the total scope of the project.– A WBS is a foundation document in project management
because it provides the basis for planning and managing project schedules, costs, and changes.
– The WBS provides a hierarchy, similar to an organizational chart, to group project work logically.
New Perspectives on Microsoft Project 2010 47
XPXPXPCreating a Work Breakdown Structure with Summary Tasks Cont.’d• In order to use a WBS in Project 2010, you must
organize tasks into summary tasks (groups of tasks that logically belong together).
• When developing a new, large project, some project managers prefer to start with broad groupings of summary tasks and then break them down into smaller tasks.
New Perspectives on Microsoft Project 2010 48
XPXPXPCreating a Work Breakdown Structure with Summary Tasks Cont.’d• Planning a project by starting with broad categories
of tasks is called the top-down method of creating a WBS.
• Other project managers prefer to list all of the individual tasks, and then collect them into logical groupings using the bottom-up method.
• Once you have indentified your summary tasks, you use Outdenting and Indenting in Project 2010 to create the summary tasks.
New Perspectives on Microsoft Project 2010 49

XPXPXPOutdenting and Indenting Tasks• Use the Outdent button and the Indent button on the
Formatting toolbar to create your WBS.• Outdenting moves a task to the left (a higher level in
the WBS), and indenting moves a task to the right (a lower level in the WBS).
• Projects can have several levels in the WBS.• Many projects have at least three levels, and some
large projects have more.
New Perspectives on Microsoft Project 2010 50
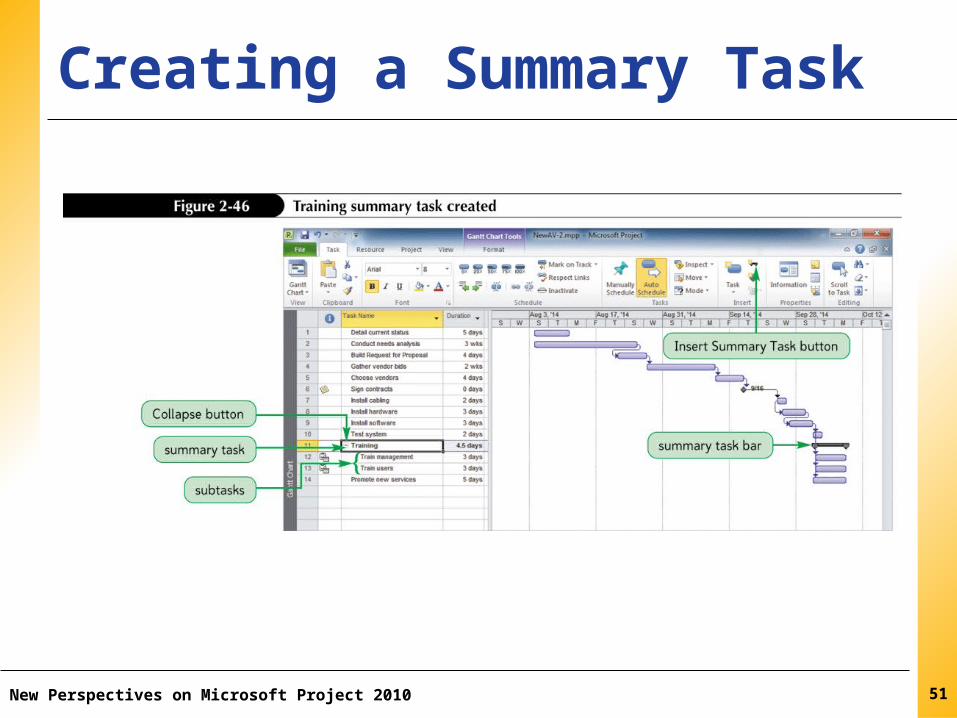
XPXPXPCreating a Summary Task
New Perspectives on Microsoft Project 2010 51
XPXPXPDisplaying Outline Numbers• Tasks and subtasks are organized in an outline, with
tasks in a hierarchy, when you have created summary tasks.
• In Project 2010, you can view built-in outline numbers, which will display in the Task name cells for all tasks.
New Perspectives on Microsoft Project 2010 52
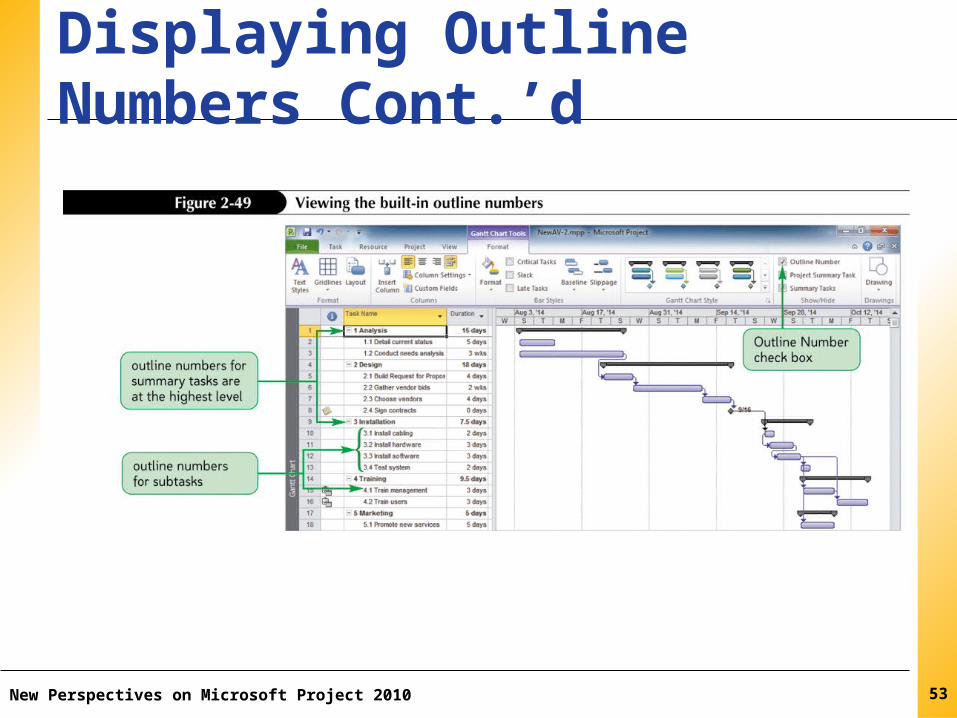
XPXPXPDisplaying Outline Numbers Cont.’d
New Perspectives on Microsoft Project 2010 53
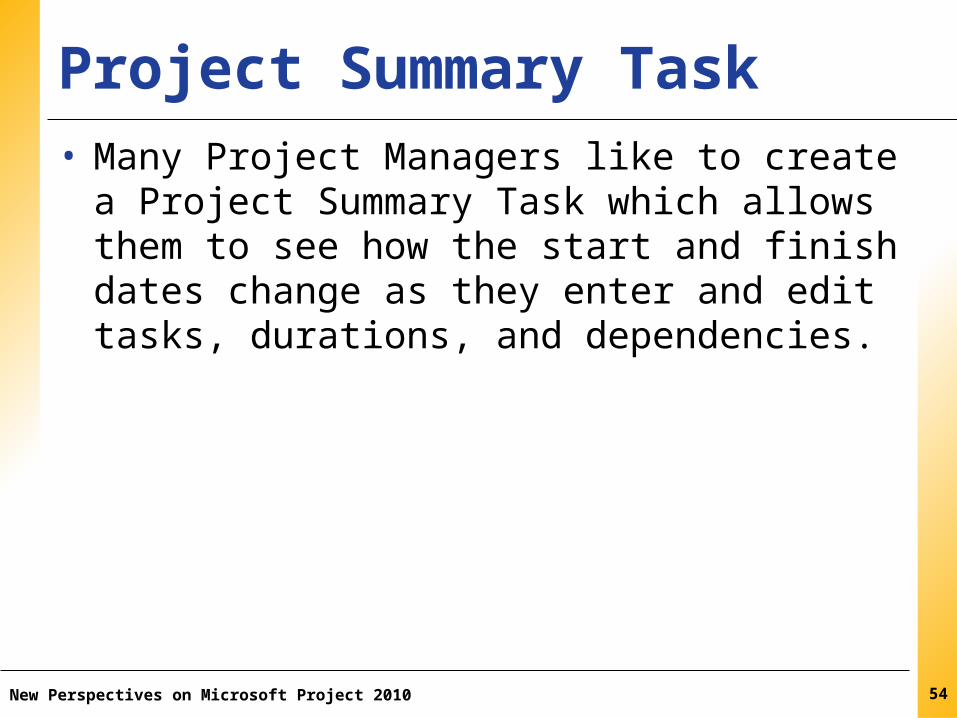
XPXPXPProject Summary Task• Many Project Managers like to create a Project
Summary Task which allows them to see how the start and finish dates change as they enter and edit tasks, durations, and dependencies.
New Perspectives on Microsoft Project 2010 54
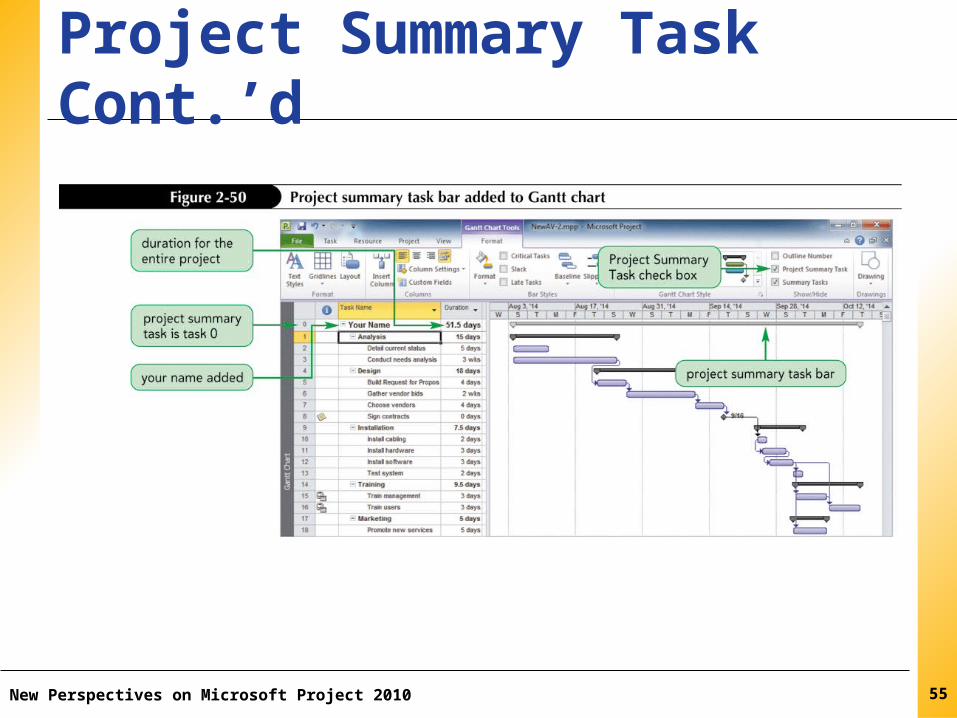
XPXPXPProject Summary Task Cont.’d
New Perspectives on Microsoft Project 2010 55

XPXPXPExpanding and Collapsing Tasks• Once your project has been organized into summary
tasks, you can easily expand (show) and collapse (hide) the individual tasks within each phase.
New Perspectives on Microsoft Project 2010 56

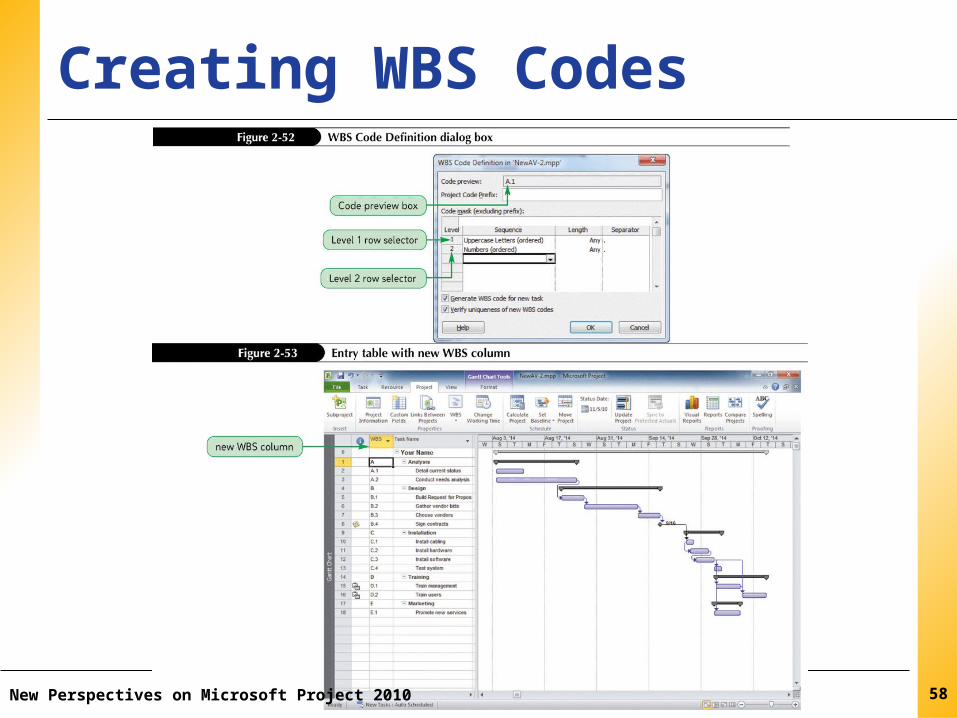
XPXPXPUsing WBS Codes• Many people like to number tasks in their WBS to
show the logical groupings of work.• Using outline numbers or special work breakdown
structure (WBS) code is a way to use an alphanumeric code to represent each task’s position within the hierarchical structure of the project.
• A WBS code helps identify and group project tasks for project communication, documentation, or accounting purposes.
New Perspectives on Microsoft Project 2010 57
XPXPXP
New Perspectives on Microsoft Project 2010 58
Creating WBS Codes