microsoft powerpoint 2003 - sman78-jkt.sch.idsman78-jkt.sch.id/sumberbelajar/bahanajar/bahan ajar...
TRANSCRIPT

MICROSOFT
POWERPOINT 2003
OLEH
ROY FEBRY

MODUL 1
1. Name of Module :Introduction to Power Point Presentation
2. Objective:The students should be able to
a. state the steps to launch PowerPoint presentation
b. state the function of menu bar and toolbars
c. create a blank slide presentation
d. use WordArt
e. insert picture f. insert custom animation
g. save the presentation
h. close and exit the presentation
3. Knowledge and Skills :
a. Launch Power Point 2003 software.
b. Insert WordArt, picture and custom animation.
c. Save a file.
d. Close and exit presentation.
4. Module Summary: At the end of the module, students should be able to produce a slide presentation.

Activity 1 : Launch the Power Point Presentation
1. Click Start, All Programs and Microsoft Office.
2. Choose Microsoft Office PowerPoint 2003.
3. A screen as below will be displayed.
4. The display is the interface of Power Point Presentation.
5. There are Menu bar and Toolbars on the top of the window.
Menu bar Toolbar
Activity 2 : Create a blank slide presentation
1. Click ‘Format’ on the Menu bar, then select ‘Slide layout’ as shown below
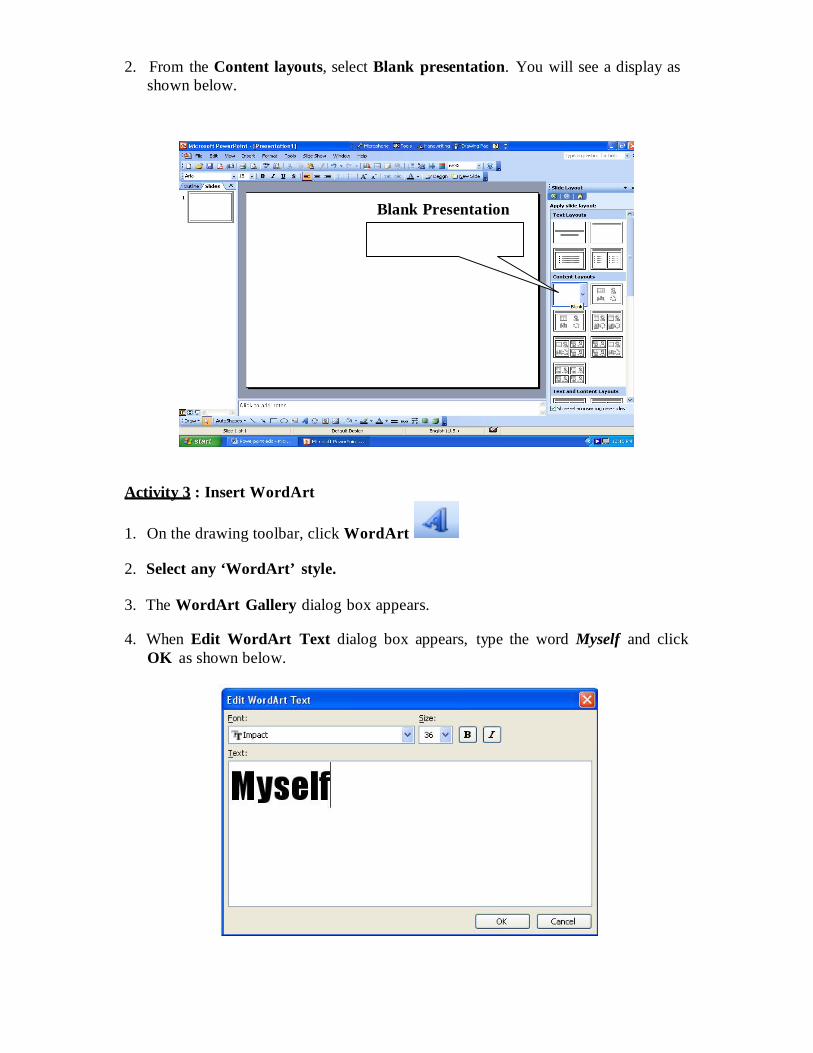
2. From the Content layouts, select Blank presentation. You will see a display as shown below.
Blank Presentation
Activity 3 : Insert WordArt
1. On the drawing toolbar, click WordArt
2. Select any ‘WordArt’ style.
3. The WordArt Gallery dialog box appears.
4. When Edit WordArt Text dialog box appears, type the word Myself and click OK as shown below.

5. You may resize the word.
Activity 4: Insert Picture
1. Click Insert on the Menu bar, then select Picture from Clipart or Files where your pictures are saved
2. Move the picture anywhere you like on the slide. You may see an example below.

Activity 5: Insert Custom Animation
1. Click Slide Show on the Menu bar and select Custom Animation.
2. The Custom Animation Task Pane appears on the right of the window as shown below.
3. Click on the word Myself then click Add Effect on the task pane.

4. Select Entrance from the drop down menu and select any effects such as
Checkerboard, Fly In and others.
5. You may modify the effects; start, the speed and direction by clicking the drop down buttons as shown below.
6. Click on the picture and then click Add Effect on the task pane.
7. Select Emphasis from the drop down menu and select any effects such as Grow/Shrink, Spin or more effects.

8. You may modify the effects; start, the speed and amount by clicking the drop down buttons as shown below.
9. Save your presentation as Myself in My Document.
10. Close and exit your presentation.

MODULE 2
CREATING PRESENTATION AND EDITING 1
1. Name of Module : Creating Presentation and Editing 1
2. Learning Outcomes: The students should be able to:
a. open an existing presentation b. insert new slide c. insert Slide Layout d. insert Slide background e. insert Slide Transition f. save the file and run the slide show g. close and exit the presentation
3. Knowledge and Skills:
a. Open, Save and Close document b. Insert new slide c. Insert Slide layout d. Insert slide transition e. Insert background f. Run the presentation g. Exit Application
4. Module Summary: At the end of the module, students should be able to
insert new slide, slide layout, slide background, slide transition, run, save and exit presentation.

Activity 1 : Opening An Existing Presentation
1. To open Myself.ppt from My Document folder, launch the Microsoft
PowerPoint application, Click File on the Menu bar and select Open
2. The following window will appear.
3. Select the file Myself and then click OK. Your file will now be opened.

Activity 2 : Inserting New Slide Presentation
1. Click Insert on the Menu bar and click New Slide.
2. A new slide will appear and from content layout on the right, select Title and Text
layout.
3. Your new slide now will be like this
Title and Text layout
Activity 2 : Inserting and Editing Text
1. Click to Click to add title and type the word Myself.
2. Next, click to Click to add text and type; • My Favourite Things, then press Enter • My Family, and press Enter • My School.
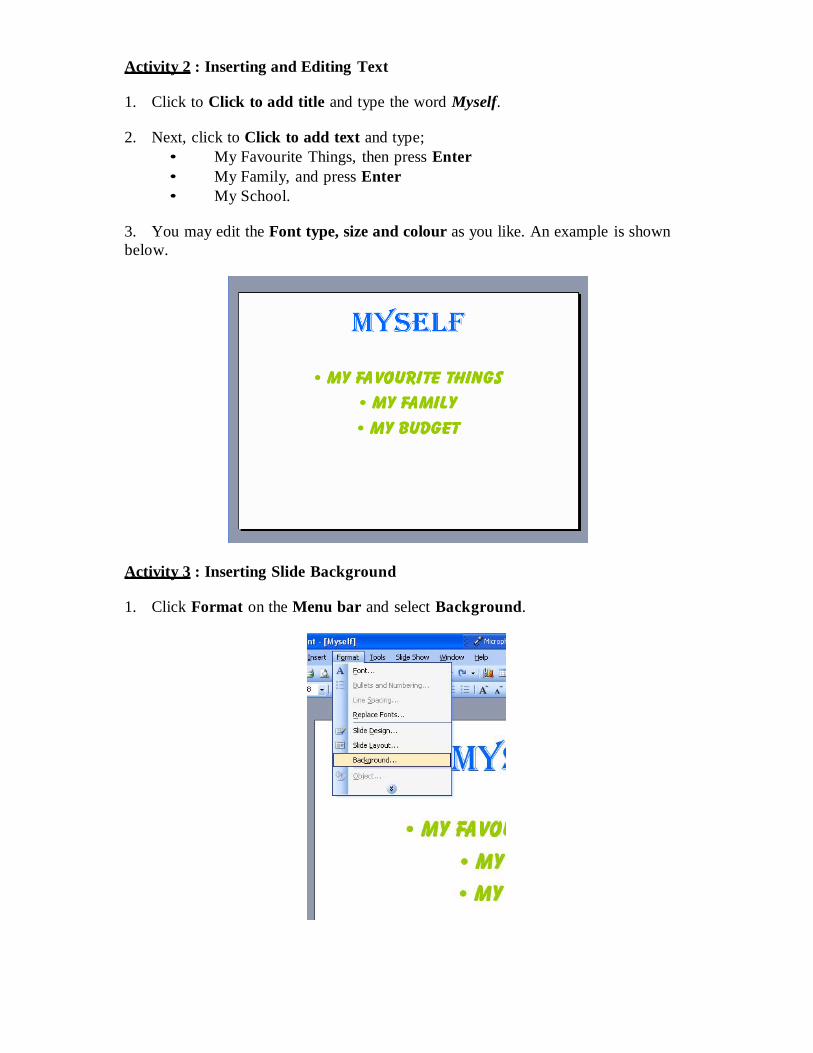
3. You may edit the Font type, size and colour as you like. An example is shown below.
Activity 3 : Inserting Slide Background
1. Click Format on the Menu bar and select Background.

2. Click Drop down button to select the background fill. You may select More Colors or Fill Effects. An example is shown below.
3. Click Apply to set the background for this slide. If you want to set all slide with the same background, click Apply to All.

Activity 4 : Slide Transition
Slide transition is an animation that shows how one slide moves to another slide.
1. Click Slide Show and select Slide Transition.
2. Select any Slide Transition as you like from the Task Pane such as Comb Horizontal.
3. You may also modify the transition speed and sound.
4. You may set the slide transition either Automatically or On mouse click.
5. This slide transition effect may be applied to the current slide or all slides.

6. Save your presentation.
Activity 5 : Running the Slide Show
You may run the presentation from the beginning of slide or from the current slide.
1. To view the slide show from the beginning, click Slide Show on the Menu bar and select View Show.
2. To view from the current slide, click Slide Show button as shown below.
Slide Show button
3. Click the mouse or press Enter to change the slide.
4. Press Esc to end the slide show.

2. Objective : The students should be able t a. insert new slide b. insert text box and sound effects c. set slide design
MODULE 3
CREATING PRESENTATION AND EDITING 2
1. Name of Module: Creating Presentation and Editing 2
o:
1 Knowledge & Skill:
a. Insert new slide b. Insert text box c. Insert graphic and text d. Insert animation effect e. Insert sound effect f. Set slide transition g. Set slide design h. Save file
2 Module Summary : At the end of the module, students will be able to insert new slide insert text box and sound effects set slide design

Activity 1: Inserting Text Box
1. Open an existing file Myself in My Document.
2. Insert a new slide presentation and select a blank presentation.
3. On the Drawing toolbar click Text Box button
4. Then, click and drag on the blank slide presentation.
5. Type My Favourite Things in the text box.
6. You may edit the Font size, type, colour, and text box line as you like. An example is shown below.
7. Insert another five text box. In each text box type Food, Place to Visit, Movie, Music and Poem.
8. Set Custom Animation to each of the text boxes.
9. Save your presentation.

Activity 2: Setting Sound Effects
1. Click the text box My Favourite Things.
2. From the Task Pane select Effect Options from the Object 1 drop down menu.
3. The Effect Options dialog box will appear (the dialog box appearance depends on the custom animation set).
4. Then select Effect button and set the sound enhancement as you like such as Chime
and click OK.
Activity 3 : Applying Slide Design
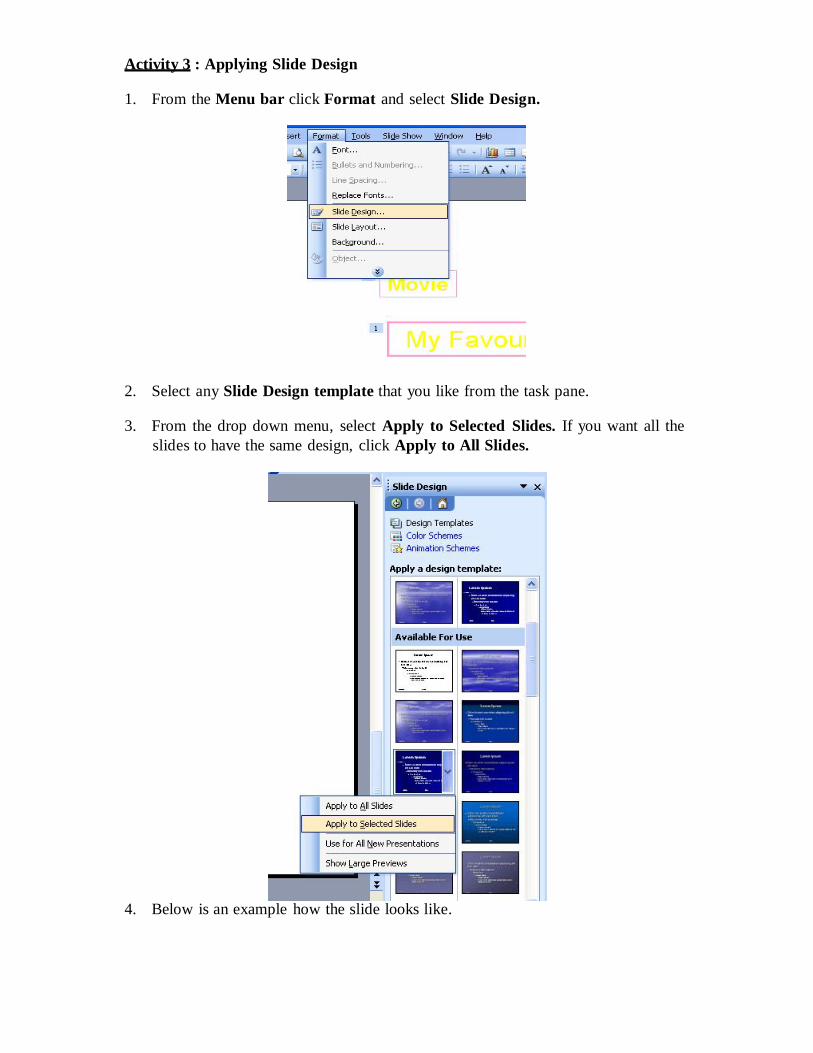
1. From the Menu bar click Format and select Slide Design.
2. Select any Slide Design template that you like from the task pane.
3. From the drop down menu, select Apply to Selected Slides. If you want all the slides to have the same design, click Apply to All Slides.
4. Below is an example how the slide looks like.

5. Save your presentation
6. Run your presentation
7. End the slide show and exit.

MODULE 4
ORGANIZATION CHART AND GRAPH
1. Name of Module: Organization Chart and Graph
2. Objective : The students should be able to:
a. insert new slide b. create an organization chart c. add text to the organization chart d. add the hierarchy box to the organization chart e. choose and insert graph
3 Knowledge & Skill:
a. Insert new Slide b. Insert text c. Insert organization chart and graph d. Insert animation effect e. Set slide transition f. Set slide design g. Save file h. Run the slide show
4 Module Summary : At the end of the module, students will be able to
create organization chart and graph

Activity 1: Inserting Organization Chart
1. Open an existing file Myself in My Document.
2. Insert a new slide presentation and select Title and Diagrams or Organization Chart
from the slide layout.
Title and Diagram or Organization Chart
3. The following screen will be displayed

4. Type the title as MY FAMILY TREE in the Click to add title text box. You may change the font format and slide design as you like.
5. Double click at the Double click to add diagram or organization chart box.
6. Diagram Gallery box will appear as shown below
7. Select a Organization Chart and click OK
Organization Chart

8. The screen below will be displayed
9. On each of the text box, type your family members’ name such as your parents’ name in the top box, followed by your siblings’ name in the other boxes as shown below.

Activity 2: Inserting Organization Chart Shape
There are three types of Insert Shape in the organization chart; Coworker, Subordinate and Assistant. To add a shape, select the shape you want to add the new shape under or next to, click the arrow on the Insert Shape button on the Organization Chart toolbar, and then click one or more of the following:
Coworker : to place the shape next to the selected shape and connect it to the same superior shape.
Subordinate : to place the new shape below and connect it to the selected shape.
Assistant : to place the new shape below the selected shape with an elbow connector. 1. Click to the last text box on the right and select coworker from the drop down menu of
insert shape.
2. A new text box is inserted. Type your additional sibling’s name. An example is shown below.
3. You may insert as many coworkers as you wish

4. Click the second text box and type the name of Aini’s spouse.
5. From the drop down menu of insert shape, insert two subordinate. And type the name of aini’s children’s name as shown below.
6. You may insert as many organization chart shape as you like depending on your family tree.
Activity 3: Inserting Title and Chart
1. Insert a new slide presentation and select Title and Chart from the slide layout
2. Type the title as MY FAMILY MEMBERS’ BLOOD GROUP in the Click to add title text box. You may change the font format and slide design as you like.

3. Double click at the Double click to add chart box. A Datasheet dialog box will appear as shown below.
4. Change the data according to your family blood group and gender as shown below
5. Your graph may look as below.
6. Set Custom Animation and Slide Transition to each of the slides.
7. Save your presentation.
8. Run the Slide Show.
9. Exit the presentation.

MODULE 5
CREATING PIE CHART
1. Name of Module: Pie Chart
2. Objective : The students should be able to: a. insert new slide b. create a pie chart c. choose and insert pie chart
3. Knowledge & Skill:
a. Insert new slide b. Insert pie chart c. Set animation effect d. Set slide transition e. Set slide design f. Save file g. Run the slide show
4. Module Summary : At the end of the module, students will be able to create
a pie chart

Activity 1: Creating Pie Chart
1. Open an existing file Myself in My Document.
2. Insert a new slide presentation and select Title and Chart from the slide layout.
3. Type the title as MY BUDGET and click to add title text box. You may change the font format and slide design as you like.
4. Double click at the Double click to add chart box. A Datasheet dialog box will appear on the screen.
5. Right click on the plot area and select Chart Type

6. Chart Type dialog box will appear. From the Standard Type select Chart Type as Pie
and any of the Chart sub-type that you like and click OK.
7. Change the data according to how you spend your monthly pocket money. An example is shown below.

8. The pie chart will look as below.
9. Set Custom Animation and Slide Transition to each of the slides.
10. Save your presentation.
11. Run the Slide Show.
12. Exit the presentation.

2. Objective : The student a. insert new slide b. insert movie c. insert sound
MODULE 6
INSERTING MOVIES AND SOUNDS
1. Name of Module: Inserting Movies and Sounds
s should be able to:
3. Knowledge & Skill:
a. Insert new slide b. Insert movie c. Insert sound d. Set slide transition e. Set slide design f. Save file g. Run the slide show h. Exit presentation
4. Module Summary : At the end of the module, students will be able to insert
movies and sounds

Activity 1: Inserting Sounds
1. Open an existing file Myself in My Document.
2. Insert a new slide presentation and select Title Only from the slide layout.
3. Type the title as MY MUSIC. You may change the font format and slide design
as you like.
4. The slide will appear as shown below.
5. Insert text box, type the title of the song and insert line colour. You may format the font, the line colour and line style as you wish.

6. From the Menu bar, click Insert. Select Movies and Sounds from the drop
down menu, and select Sound from file.
7. Choose your preferred song. (Example: Select file named love songs – You’re my everything from Sample of Power Point folder and click OK)
8. A dialog box appears, and selects When Clicked. You will see a sound icon appears on the screen as shown below

9. Then move the sound icon into the right side of the text box.
10. Repeat step 5 to step 6 and insert any song you prefer.
11. Below is an example of the slide.

Activity 2: Inserting Movies
1. Insert a new slide presentation and select Title Only from the slide layout. Type the title as MY MOVIE.
2. From the Menu bar, click Insert. Select Movies and Sounds from the drop down menu, and select Movie from file. (Example : Select file named smoking from Sample of Power Point folder and click OK)
3. Choose a movie. A dialog box will appear. Then click Automatically.

4. Resize the movie box as shown below.
5. Set Slide Transition to each of the slides
6. Save your presentation.
7. Run the Slide Show.
8. Exit the presentation.

MODULE 7
INSERTING HYPERLINK
1. Name of Module: Inserting Hyperlink
2. Objective : The students should be able to: a. open an existing file b. insert hyperlink
• slide to slide • slide to another file • slide to web pages
3. Knowledge & Skill:
a. Insert hyperlink b. Save file c. Run the slide show d. Exit presentation
4. Module Summary : At the end of the module, students will be able to insert hyperlink.

Activity 1: Inserting Hyperlink From Slide to Slide
1. Open an existing file Myself in My Document.
2. Move to Slide 2, entitled Myself.
3. Highlight the phrase My Favourite Things. From the Menu bar, click Insert and select
Hyperlink from the drop down menu.
4. The Insert Hyperlink dialog box will appear. Click to Place in This Document
5. Select Slide 3 from the Slide Titles as shown as below.

6. Then click OK.
7. Repeat step 3 to step 6 for the other texts except step 5, select slide 4 on My Family and slide 6 on My Budget to link.
8. The slide will look like below.
9. Move to Slide 3, from the menu bar, click Slide Show. From the drop down
menu, select Action Buttons and choose Action button: Home .

10. Place the action button anywhere you like.
11. An Action Setting dialog box will automatically appear.
12. From the Hyperlink to, click on the pull down menu and select slide.
13. The Hyperlink to Slide dialog box appears. Select slide title as Myself.
14. Click OK on both of the dialog boxes.
15. Repeat step 9 to step 14 for Slide 4 and Slide 6.
16. Save your presentation.
17. Run the Slide Show
18. Exit the presentation

Activity 2: Inserting Hyperlink From Slide to File.
1. Open an existing file Myself in My Document.
2. Move to Slide 3, entitled My Favourite Things.
3. Highlight the word Poem. From the menu bar, click Insert and select Hyperlink from the drop down menu.
4. The Insert Hyperlink dialog box will appear.
5. Select file named poem.doc from My Document and click OK.
6. Save your presentation.
7. Run the Slide Show.
8. Exit the presentation.

Activity 3: Inserting Hyperlink from Slide to Web.
1. Open an existing file Myself in My Document.
2. Move to Slide 3, entitled My Favourite Things.
3. Highlight the phrase Place to Visit. From the menu bar, click Insert and select
Hyperlink from the drop down menu.
4. The Insert Hyperlink dialog box will appear.
5. In the address box, type http://planet.time.net.my/CentralMarket/Melaka/101 or any webpage address that you want.
6. Then, click OK.
7. Save your presentation.
8. Run the Slide Show.
9. Exit the presentation.

MODULE 8
PRINTING PRESENTATION
1. Name of Module: Printing Presentation
2. Objective : The students should be able to: a. open an existing file b. print presentation as
• slides • handouts
3. Knowledge & Skill:
a. Open an existing file b. Print presentation as slides and handout c. Close and exit presentation
4. Module Summary : At the end of the module, students will be able to
print presentation as slides and handouts.
Activity 1: Printing Slides
1. Open an existing file Myself in My Document.
2. From the menu, click File and select Print from the drop down menu.
3. A Print dialog box will appear. Select Slides from Print what area and click OK.
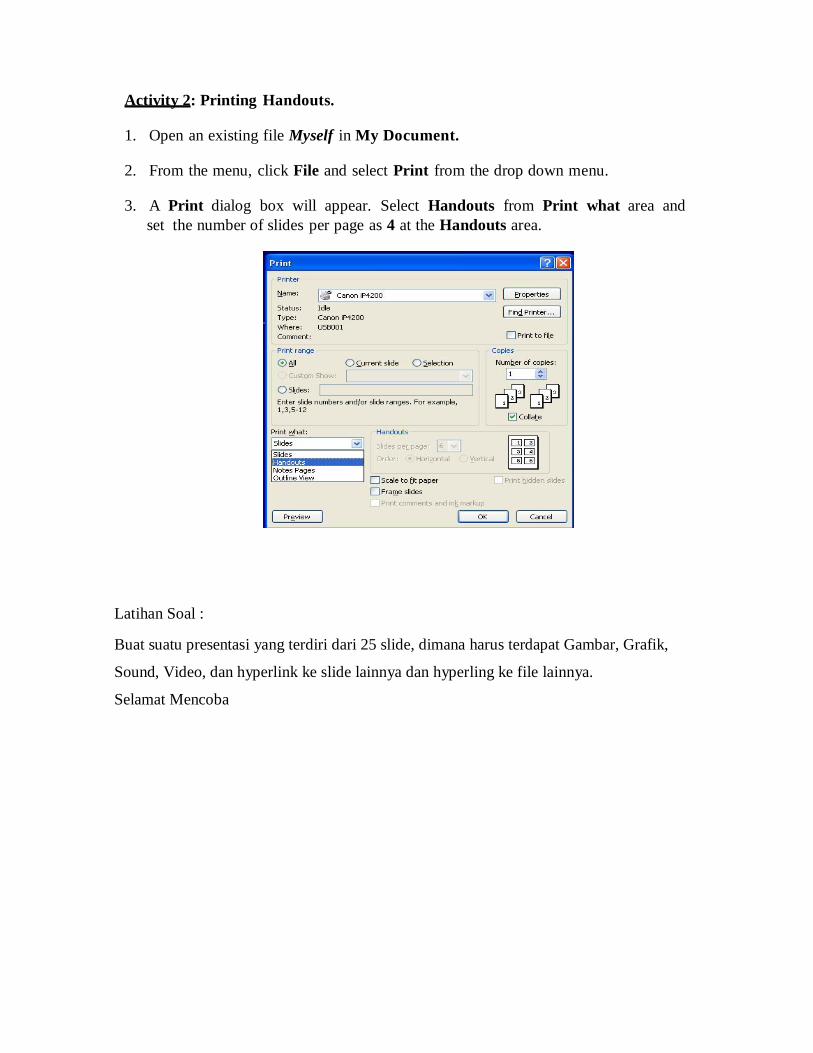
Activity 2: Printing Handouts.
1. Open an existing file Myself in My Document.
2. From the menu, click File and select Print from the drop down menu.
3. A Print dialog box will appear. Select Handouts from Print what area and set the number of slides per page as 4 at the Handouts area.
Latihan Soal : Buat suatu presentasi yang terdiri dari 25 slide, dimana harus terdapat Gambar, Grafik,
Sound, Video, dan hyperlink ke slide lainnya dan hyperling ke file lainnya.
Selamat Mencoba
