microsoft outlook 2013 a beginners guide · adding a signature ... microsoft office 2013 and...
TRANSCRIPT

Microsoft Outlook 2013™ A Beginners Guide
Contents
Introduction .............................................................................................................. 1
Opening Outlook ..................................................................................................... 1
Using the Calendar .................................................................................................. 1
Creating an Appointment .................................................................... 2
A Recurring Appointment/Event ....................................................... 4
Changing the Calendar Layout, View and Other Defaults ....... 5
Working with the Calendar Layout ....................................... 5
Changing the Calendar View ................................................... 5
Other Calendar Defaults ........................................................... 6
Organising a Meeting ............................................................................ 7
Checking the Scheduling Assistant ....................................... 8
Changing Details or Cancelling your Meeting ............... 10
Dealing with an Invitation from someone else ......................... 10
Using the Email System ...................................................................................... 11
Adding a Signature .............................................................................. 11
Using AutoComplete .......................................................................... 12
Setting which Address List Shows First ........................................ 13
Tips on Using your Mailbox .............................................................. 14
The Reading Pane and Preview ............................................ 14
Show as Conversations ........................................................... 15
Using Coloured Categories ................................................... 15
Rules and Alerts ......................................................................... 16
Favourites ..................................................................................... 16
For Follow Up Folder ................................................................ 17
Blocked Attachments ......................................................................... 18
Out of Office ........................................................................................... 19
Working with People/Contacts ....................................................................... 19
Adding a New Person/Contact ........................................................ 20
Current View of People/Contacts .................................................. 20
Adding an Address from an Email .................................................. 21
Sending an Email to a Person/Contact ......................................... 21
Setting up a Task ................................................................................................... 21
Further Information ............................................................................................. 22
IT Training

1
Introduction
These notes are based on a staff Training Course, Introduction to Using Outlook, that used to be given, but most of the information can be used and applied by those using Microsoft Outlook on their PCs on campus.
Note: This document assumes that you are familiar with using a windowing system (with its icons, menus and a mouse) and know the procedures of pointing, clicking, double clicking, dragging and multi-tasking.
Opening Outlook To open Outlook on a PC:
1. Click on [Start] (the circular button in the bottom left-hand corner of the screen), All Programs,
Microsoft Office 2013 and finally Outlook 2013 – note that it may take a while to fully open up
2. The first time that you use Outlook on your own PC, follow the instructions given in Using
Outlook 2010 & 2007 for the first time (http://www.reading.ac.uk/internal/its/help/its-help-
email/its-staff-email-2010/its-exchange-2010-outlook.aspx )
3. Once Outlook starts, the opening screen will look something like below (assuming it’s opening into a mail folder, e.g. inbox):
Using the Calendar The Calendar is one of the most useful areas within Outlook. You can use it to keep track of both work and personal appointments, one-off or recurring appointments, give reminders to yourself of important events or dates, and setup meetings with others.
2
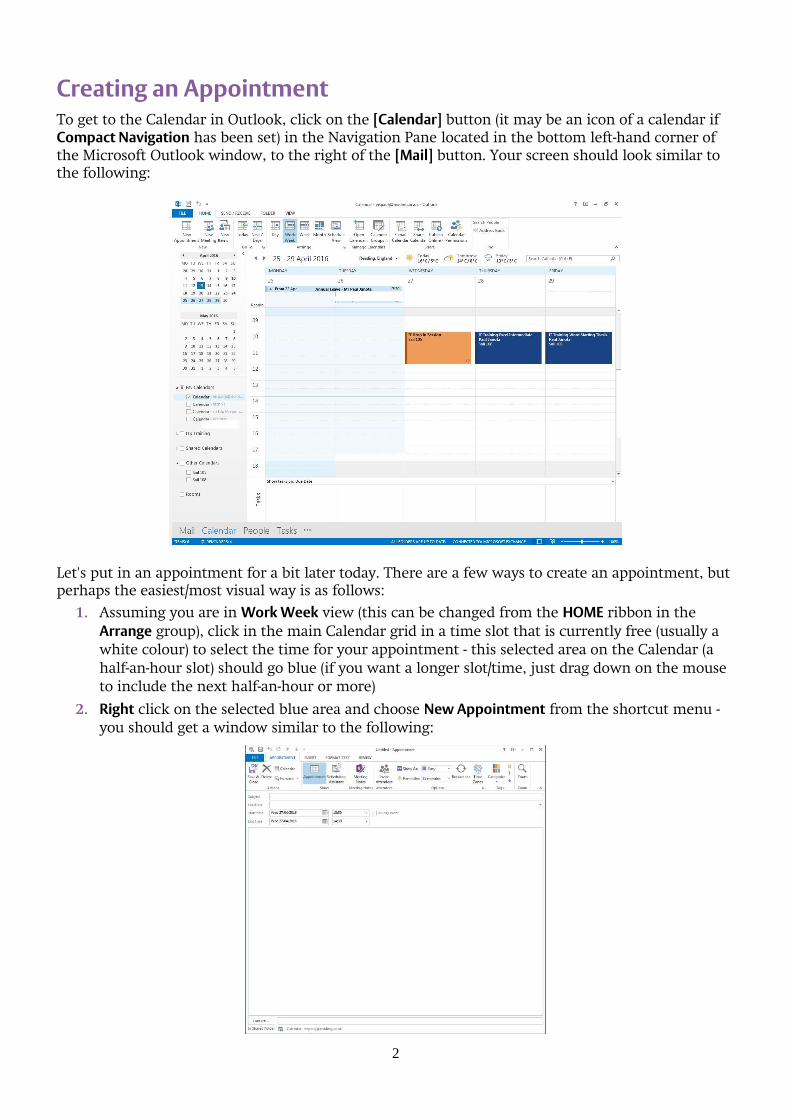
Creating an Appointment To get to the Calendar in Outlook, click on the [Calendar] button (it may be an icon of a calendar if Compact Navigation has been set) in the Navigation Pane located in the bottom left-hand corner of the Microsoft Outlook window, to the right of the [Mail] button. Your screen should look similar to the following:
Let's put in an appointment for a bit later today. There are a few ways to create an appointment, but perhaps the easiest/most visual way is as follows:
1. Assuming you are in Work Week view (this can be changed from the HOME ribbon in the
Arrange group), click in the main Calendar grid in a time slot that is currently free (usually a
white colour) to select the time for your appointment - this selected area on the Calendar (a
half-an-hour slot) should go blue (if you want a longer slot/time, just drag down on the mouse
to include the next half-an-hour or more)
2. Right click on the selected blue area and choose New Appointment from the shortcut menu - you should get a window similar to the following:

3
3. An Untitled - Appointment window will open in which you can enter a subject, location and
description, along with other information. For the Subject, type in something appropriate (or
Outlook Training Session if you can’t think of anything)
4. Move to the Location box (either use the mouse or press the <Tab> key next to the letter Q on
the keyboard) and type in the location name (or Sail 108 if you can’t think of anything)
5. You should find that the Start time and End time have already been setup according to your
selection earlier, but you can still change these at this point. Note the All day event box - clicking this box means that your appointment becomes an all-day event, with the start and
end time boxes being set to 00:00
6. In the large window/area below the End time box is where you can write a further description
- put what you like here, or if you can't think of anything, try I’m working through these notes
to learn more about using Outlook!
7. On the APPOINTMENT ribbon at the top of the window, in the Options group, you’ll find some
useful boxes and icons. The Show As box is very useful as it tells you, and also other people who are looking at your Calendar (e.g. to setup a meeting), if you are busy or free at this time.
The default setting is usually Busy. Choose the appropriate setting for your appointment
8. The Reminder box allows you to set whether Outlook should remind you of the appointment. This can be very useful, and the default setting is set to remind you 15 minutes before the
appointment. Click on the down-list arrow to select a different reminder time, or none, if you
want. The reminder will come up later on your screen (assuming you have Outlook still running) as a window similar to below (one option is to snooze it to remind you again later, a
bit like what you can do with a morning alarm clock!):
9. You can give an appointment a category (at the same time making it more visible in your
Calendar as it will have a different colour) by clicking on the Categorize icon and then
choosing one of the categories from the list (you can change the default label settings and
setup your own ones)
10. Click on the [Save & Close] icon at the start of the APPOINTMENT ribbon - you should find that the appointment is now setup in your Calendar
Note: You can also turn an email message that you receive into an appointment (or meeting) on your Calendar by dragging the message onto the [Calendar] button in the Navigation Pane (the appointment is set to the next available slot today, with the email message filling out the description of the appointment).

4
A Recurring Appointment/Event Your new appointment/event is only timetabled for today, but let's say that it was running over 8 weeks - this is where the appointment/event can be made recurring, i.e. something that takes place at regular intervals.
1. Find in your Calendar the appointment that you've just setup and double click on it to open it
2. Within the Appointment window, click on the Recurrence icon in the Options group in the
middle of the APPOINTMENT ribbon - you should see a window similar to below:
3. There are a number of options that can be changed, but in this case you only need to change
the date that the recurring event ends - click in the radio button (circle) to the left of End after:
and change the value from 10 to 8 in the box to the right
4. Click [OK] and then click on the Save & Close icon on the ribbon
You should find that there is now a recurrence symbol in the bottom right-hand corner of the new recurring appointment. If you now open this recurring appointment, you will see the following prompt:
You can decide to make a change just to this one occurrence of the appointment, or you can make the same change to all the appointments in the series. In this case, [Cancel] as you're not going to make any changes.

5
Changing the Calendar Layout, View and Other Defaults
Working with the Calendar Layout
The mini-calendar on the left of your Calendar window shows you the current month by default, and any numbers in bold indicate that there is an appointment/event on that day of the month. You should see this for the recurring appointment that you’ve just setup.
There are also arrow keys at the top of the mini-calendar (to the left and right of the month) that allow you to move forwards to the next month or backwards to the previous month.
You can expand the mini-calendar to show more than just the current month (this could be useful if you wanted to move or copy an appointment from the current month to a future month) by resting the mouse pointer on the horizontal split bar underneath the mini-calendar. When the pointer becomes a double-headed arrow, drag the pointer downwards until you see mini-calendars for this and next month. It's up to you how many months you want to show, but this is how it might look if you've set it up this way:
Changing the Calendar View
At the top of your calendar, just above the dates, on the HOME ribbon within the Arrange group, you have buttons that can switch between the calendar views for Day, Work Week, Week, or Month. Try these out to see the difference. Return to Work Week view by clicking on the appropriate button.
Within the Day, Work Week and Week views, the default time interval for appointment slots is 30 minutes, but you can change this by right clicking in the area where the times are shown to the left of the appointment slots, and choosing the time interval that you want instead from the shortcut menu, say 15 minutes.

6
Other Calendar Defaults
To see some of the other Calendar defaults that have been setup:
1. Click on the FILE tab in the top left-hand corner, followed by Options on the left and finally
Calendar on the left in the Outlook Options window to see the following:
Here you can:
Customize your work week if you work part-time or night shifts (appointments can still be
setup out of normal working hours). Set the appropriate times in the Start time and End
time boxes and select the check boxes for the desired working days. You can also change
the First day of week if you don't start work on a Monday
Under Calendar options, you'll see the option to change the time of the Default reminders
or remove it completely by unticking it
Allow attendees to propose new times for meetings that you setup – usually, this is a good
option to have set
An [Add Holidays...] button - the default for your Calendar is to include UK holidays, but if
you also want to include holidays from another country or religious holidays, then this is
where you would set this up
A [Free/Busy Options…] button where you can setup and/or change permissions to your
calendar. The default permission is set to Free/Busy time, but this can be changed. When
people check to see if you’re available for a meeting, they will only see if you’re free or
busy, but not the details of your appointments, although there are permission levels that
show the subject and location as well, or the full details. Note that if you are sharing your
calendar with other people then you will see the names of those people and their
permission level to your calendar. Within the Calendar Properties window, there is an
[Other Free/Busy...] button. If you click on this, you’ll see that the recommended defaults
are set to 12 months and 15 minutes. If you wanted to change these then click in the box
next to Publish at location

7
Under Display options, you can change the Default calendar colour, usually a light blue
colour at the start. By default, different calendars will show in different colours to help
distinguish between them. To see further options, you will need to vertically scroll down
the Outlook Options window
A Time zones section which allows you to show you the time in another country (tick
Show a second time zone) - this might be useful if your work involved travel abroad
New to Outlook 2013, the weather for your local region can be shown at the top of your
calendar. By default, you may find this is set to Fahrenheit, but under Weather you can set
it to show in Celsius
Organising a Meeting This is probably one of the areas that most people are interested in when they hear about Outlook. Organising a meeting is not that difficult to do, but finding out the dates/times when other people are available is more difficult and not always possible. Let's see how one would go about organising a meeting (it's really a special type of appointment). Firstly, you need to start with a possible meeting time/date and choose your attendees (if this is a ‘test’ meeting then make sure you let them know beforehand!):
1. Click in the main Calendar grid to select the time for your meeting, say later today or tomorrow (you need to have the Calendar in Work Week or Week view) - this area should turn blue
2. Right click on the blue area and choose New Meeting Request to get the following:
3. You are the only attendee at present (as you are the organiser!). To invite other attendees, click
on [To...]
In the Select Attendees and Resources window that appears:
4. Click on the dropdown list arrow under Address Book and choose Global Address List (it may be already set to this by default)
When sending emails to staff colleagues within the University of Reading, it is recommended that you use their Reading University email address that is within the Global Address List.

8
The Global Address List contains a list of all the users and groups that have accounts on the Microsoft Exchange server. The majority of University staff are now on this.
One of the main advantages of using the Global Address List is that when you setup a meeting and send out meeting invitations, you will be able to use Outlook’s Scheduling Assistant to see when your colleagues are free to attend your meeting (assuming that they are also using Outlook and keeping their Calendar up-to-date).
The list is shown in alphabetical order of the first name or first initial of the person which isn’t very helpful! A better way of searching is:
5. Click on the More columns radio button just above the Search box
6. Type in your search term, e.g. the surname of a colleague you want to come to the meeting,
and click [Go] or press <Enter>
7. Select the name that you want from the list of search results and then click on the [Required] button at the bottom of the window
8. Let's also invite someone else as an optional attendee to the meeting so search for the surname of another colleague
9. Click on the [Optional] button just below [Required]
10. Click [OK]
Checking the Scheduling Assistant
You are returned to the Untitled - Meeting window with the names of your attendees now showing in the box to the right of [To…]. To check whether your attendees can make the suggested date and time:

9
11. Click on the [Scheduling Assistant] icon on the MEETING ribbon – something similar to the
following window appears:
You should now be able to check more visually if your attendees are free to come to your meeting. Hopefully, you will be able to see the free/busy time information for yourself and your meeting attendees.
Note: If you see grey diagonal 'slashes' all across the schedule for a particular attendee, this indicates that there is no free/busy time information available for that attendee. This could be because the attendee does not use Microsoft Outlook on Exchange, or they haven't yet used the Calendar to make any appointments.
If the currently selected time for the meeting is no good as one of your attendees is busy or out of the office at that time, then you can move the time slots (the blue vertical lines) with the mouse or change the meeting start and end times to find the next available free time.
The final steps are to fill in more details about the meeting and then send off invites:
12. Click on [Appointment] on the ribbon at the top
13. Fill in the details for the Subject, Location and the body of the message invitation, a bit like below:

10
Note the [Rooms…] button to the right of the Location box – this can be used to access central rooms across campus in which you can book a meeting (but note that not many are setup on Exchange).
14. If you wanted to attach a file to your meeting, click on the INSERT tab at the top and then the
[Attach File] icon to choose the file that you want to attach
15. Click on [Send]
You should find that a meeting appointment has been put into your Calendar on the appropriate day/time.
You will now have to wait to see if your attendees accept or decline the invitation to your meeting! You can keep track of this by:
16. Opening up the Meeting item on your Calendar by double clicking on it
17. Click on the icon above Tracking in the Show group on the MEETING ribbon - here you can see if any of your attendees have responded yet
18. Close the Meeting window
Changing Details or Cancelling your Meeting
If you find later on that you need to change some details to your meeting, e.g. a different location, or cancel your meeting then you can carry out the following steps:
19. Open up the Meeting item on your Calendar by double clicking on it
20. If you need to change some details then make those changes and click on the [Send Update]
button next to the [From] and [To...] buttons
21. If you want to cancel the meeting then click on the [Cancel Meeting] button on the MEETING ribbon – the meeting is deleted from your calendar, and you are given the option of sending cancellation messages to the attendees
Dealing with an Invitation from someone else As well as inviting people to your meeting, you may well get invited by others to a meeting they’ve arranged. If you do receive a meeting invitation then you can go through the following steps:
1. To look at your email, click on the [Mail] button in the Navigation Pane
2. Click on the message about the meeting – the invitation should look a bit like below:

11
You have the following choices:
Accept a meeting that you know you'll be able to attend. When you accept a meeting, the
meeting is scheduled in your Calendar and you receive updates if the meeting organiser
changes the details of the meeting. If others view your free/busy time, the time appears as
Busy by default
Tentative - use this option if you're interested in the meeting, but aren't sure whether
you'll be able to make it. The meeting is scheduled in your Calendar and that block of time
is displayed to others as tentatively unavailable
Decline a meeting if you can't go. Declining a meeting deletes the item from your Calendar
(freeing that block of time), but it does not cut your ties with the meeting: You'll still get
updates if the meeting organizer makes them and you'll have the opportunity to respond
to the update. (If you truly want to opt out of a meeting, you may want to ask the
organizer to remove your name from the attendee list)
Propose New Time - when you choose this and propose a new time, the meeting organiser
receives your request... but as with all things about the meeting, the organiser gets to
make the final decision about the new meeting time. Note that this option might not be
available if the meeting organiser hasn’t allowed attendees to propose new times
Calendar – to check your calendar in a new window
3. If you definitely want to attend the meeting then click on the [Accept] button at the top of your invitation to see the following options:
4. Usually, you would go with the second option of Send the Response Now
If you wanted to Edit the Response before Sending, e.g. to say that you'll be late for the meeting, then choose that option. The last option is not one that you should usually choose (as you won't get any updates about a possible changed meeting time).
5. Go back to your Calendar by clicking on the [Calendar] button in the Navigation Pane - you
should find an entry for that meeting
Using the Email System Most, if not all, of you should already be familiar with using email. The next sections will show a few things that you might not already know or that are specific to email in Outlook.
Adding a Signature An automatic signature can be set up so that when you send a message, contact information about you is automatically put at the bottom of your message without you having to type it every time. It is often useful to include your name, your role at the University, a contact phone number and the web address of your School/Department/Unit.
A guide to creating professional, effective signatures can be found in Email Signatures (http://www.reading.ac.uk/internal/its/help/its-help-email/its-help-emailsignature.aspx )

12
Try setting up your own signature as follows:
1. Click on the FILE tab in the top left-hand corner, followed by Options on the left and finally
Mail on the left in the Outlook Options window
2. Under the Compose messages section at the top, click the [Signatures...] button on the right
3. In the Signatures and Stationery window that appears, click on [New] (if you want to create a
new signature). Enter a name for your signature, e.g. Work, and click [OK] (you could have one
signature for work messages and a different one for personal messages)
4. Type in the information that you want in your signature. Let your email client use it's 'default'
or 'body' font for your signature (there are formatting options to use different fonts, put on
bold etc.). An example of how a signature might look is given below:
5. Click on [Save] to save the new signature
6. Create a second signature for personal use, repeating steps 3 - 5 above
7. Setup Work as the default signature for new messages by clicking on the appropriate
dropdown list arrow and then click on [OK]. Click on [OK] again back at the Options window
8. The Calendar will probably still be showing from what was being done earlier - to get to the
Mail in Outlook, click on the [Mail] button in the Navigation Pane, to the left of the [Calendar]
button. You will be looking at your Inbox
9. Click on the [New Email] button (towards the top left-hand corner of your Inbox window) to
send a message - you should now see your Work signature at the end of your message
Tip: If you want to change the signature in your message to a different one, e.g. your personal signature, just right click on the signature and choose the other signature from the menu.
Using AutoComplete 10. In the text box to the right of the [To...] button, type in the first letter of an email address that
you’ve used before - you should find that it has remembered the email addresses beginning
with that letter. This is because AutoComplete suggestion has been turned on in Outlook.
Select, using the mouse, one of the listed email addresses
Note: AutoComplete suggestion is very useful, but sometimes it can be annoying as it may come up with email addresses that you may have only used once or no longer work. You can delete such an email address when the AutoComplete suggestion brings it up in the list (literally use the <up> or <down> arrow keys to select the address and press the <Delete> key on the keyboard). There is also an option to turn AutoComplete suggestion off completely via FILE, Options, Mail, then scroll down to the Send messages section and turn off the Use Auto-Complete List to suggest names when typing in

13
the To, Cc, and Bcc lines check box. There is also an [Empty Auto-Complete List] button if you want to remove the email addresses from the list.
Another option in the same area that says Commas can be used to separate multiple message recipients should be turned on to allow for cases where email addresses are being copied from another system to Outlook, e.g. the RISIS system, specifically where a tutor wants to send emails to students on a particular RISIS module.
You are going to send a carbon copy of the new message to your own email address. Note that Outlook is usually setup to save a copy of every message you send in a Sent Items folder (you can turn this off or save to a different folder via the OPTIONS ribbon for a new message).
11. Click on the [Cc...] button
In the Select Names window that appears:
12. Click on the dropdown list arrow under Address Book and choose Global Address List (it may
have already been set to this)
13. Click on the More columns radio button just above the Search: box
14. Type in your surname and click [Go] or press <Enter>
15. Select your full name from the list of search results (you may need to scroll down) and then
click on the [Cc] button at the bottom of the window
Note the [Bcc] button below the [Cc] button. Bcc stands for Blind Carbon Copy, and means that other people who receive the message will not know that it has also been sent to the blind carbon copy email address. This can be useful in the case where you want someone to get this message, but not allow the other receivers to know who this someone is. It can also be used when you’re sending a message to a large number of people, but be aware that this is not normally recommended practice as it is a technique often used by spam mailers (it’s better to setup or use a mail list with a specific email address).
16. Click [OK]
17. Type in a subject for your message, write a short message and click on [Send]. You should receive a copy of this message in your Inbox as you Cc'd it to yourself
Note: You may find that when you first use your Exchange account, no emails seem to be arriving there. If this is the case then see the section under Email in the Microsoft Exchange FAQ (http://www.reading.ac.uk/internal/its/help/its-help-email/its-exchange/exchangefaq.aspx ).
Setting which Address List Shows First When you opened up the Select Names window above to choose who to send an email to or who to invite to a meeting, it is recommended that it is set to look at the Global Address List on opening. This could be changed to look at your Outlook Contacts folder on opening. If the Global Address List isn’t your default, and you want it to be:
1. In the main Outlook window, click on the HOME tab followed by Address Book (on the right of the ribbon)

14
2. In the Address Book window, you’ll see some menus at the top. Choose Tools and then
Options... to see a dialogue box like below:
3. In the Addressing dialogue box, select Global Address List from the When opening the address
book, show this address list first drop-down list (you can also change the order in which address lists are checked on sending e-mail)
4. Click [OK] and then close the Address Book window
Tips on Using your Mailbox Here are some tips that you may find useful.
The Reading Pane and Preview
You will probably find that you can already see the content of one of your messages (the currently selected one) in your Inbox towards the right of your screen (just to the left of the To-Do Bar if you have this showing). This is because the Reading Pane is on by default. This is good for security as you can view messages safely in the Reading Pane. Potentially malicious scripts or attachments are not activated or opened automatically in the Reading Pane. If you want to change these:
1. Click on the VIEW tab at the top
2. Choose Reading Pane under the Layout group on the VIEW ribbon
3. Select Right, Bottom or Off
From the above, you can see that you can have the Reading Pane below or to the right of your messages in the Inbox, or turn off the Reading Pane completely (in this case, you would need to double click on a message in the list to open it in its' own window). There are also further Reading Pane options such as how long it takes for a message to be marked as read.
A further refinement is to have Preview turned on. This allows you to preview the first three lines of messages in your Inbox, and so gives you some idea of what the message contains before you look at it in more detail. To do this:
4. Click on the VIEW tab, followed by Change View (the first button), and then Preview
This will apply to all the messages in your Inbox.

15
Show as Conversations
If you receive many e-mail messages daily, you could benefit from a grouping option called Show as Conversations. This view shows your message list in a conversation-oriented or "threaded" view. Each conversation can be expanded further to show all messages in the conversation, including messages you have already read, or collapsed. You can quickly review and act on messages or complete conversations.
To be able to see the above in action, you might need to reply to a message that a colleague has previously sent you. When you do this, choose [Reply All] so that you also get a copy of your reply.
The reply should now appear in your Inbox. By default, the messages are arranged by date with the newest on top. To turn on conversations:
1. Click on the VIEW tab
2. Click on Show as Conversations in the Messages group on the VIEW ribbon
3. A prompt will appear asking you if you want to show messages arranged by conversations in
just [This folder] or [All mailboxes]. As we are trying this out, click on [This folder] so that only
your inbox is affected
When showing conservations, your message list may look something like below:
If you click on the right arrow icon next to the subject of a message, then you expand the conversation so that you see the original message in the conversation and any replies underneath it.
To collapse the conversation so that only the latest message appears, just click back on the arrow next to the subject.
Using Coloured Categories
You can setup different coloured categories to mark messages for certain topics or from certain people. To get to the categories when viewing your messages:
1. Click on the HOME ribbon followed by the Categorize button (with 6 coloured squares) on the
right of the ribbon and select All Categories...
2. The Color Categories window will give you options to rename built-in categories, create new categories, associate the colours that you want with different categories, and even apply
shortcut keys. Press [Cancel] to close this window

16
3. To apply a category to a message either use the above Categorize button or right click on the
message and choose Categorize from the shortcut menu
You can then sort your messages on categories so that you can see the associated emails together. You can also use categories for marking other items such as appointments, meetings, people and tasks.
Rules and Alerts
You can setup rules and alerts for your emails that can be used to move or flag emails as they come in, or to alert you to an email from a particular person. One way to setup a rule or alert is as follows:
1. Click on the FILE tab in the top left
2. Click on the [Manage Rules & Alerts] button to see something similar to below:
3. Click on the [New Rule...] to setup a new rule and follow the steps through until you finish
Alternatively, when you are on a particular message in your Inbox (or another folder), you can click on the [Rules] button on the HOME tab and choose Create Rule... to apply a rule directly to that message (or right click on the message and choose Rules).
For further help on the steps, and some examples of what sort of rules you could setup, see the Outlook Rules (http://www.reading.ac.uk/internal/its/help/its-help-email/outlookrules.aspx) web page.
Favourites
Here you can keep the folders that you use most often so that it's much easier to find them and save messages into them. Let's create a new folder, add that folder to the Favorites and save one of our messages in it:
1. To create a new folder, click on the FOLDER tab at the top followed by the [New Folder] button
2. In the Create New Folder window, type in a name for your new folder, e.g. A Test
3. Make sure you click on [email protected] at the top of the list under Select where to
place the folder so as to save it at the top level of your mailbox (you can create mail subfolders)
17
4. Click [OK]
The new folder should appear in the list of mail folders on the left-hand side (you may need to scroll down to see it). To move this new folder into Favorites:
5. Right click on the new mail folder name and choose [Show in Favorites] from the shortcut
menu
You should now find that a copy of the new folder is at the bottom of the Favorites. You can drag it to a different position in your Favorites list.
6. Save one of your messages into the new folder (just drag it across)
To remove a folder from the Favorites just right click on the folder there and choose [Remove from Favorites] from the shortcut menu.
For Follow Up Folder
The folder named For Follow Up always contains an up-to-date list of all Quick Flagged messages in every folder in your mailbox. So you can use it to flag messages that you know need following up - in this way it can be used as a to-do list. To see how you can use this:
1. Move onto one of the messages in your Inbox, and you should notice a grey flag appear on the
right. Click on this flag and you should find that it goes red indicating that this message has
been flagged
2. By right-clicking on the red flag next to the message, more options are available with other
flags standing for things like Tomorrow, This Week, Next Week, Custom… etc. Another option
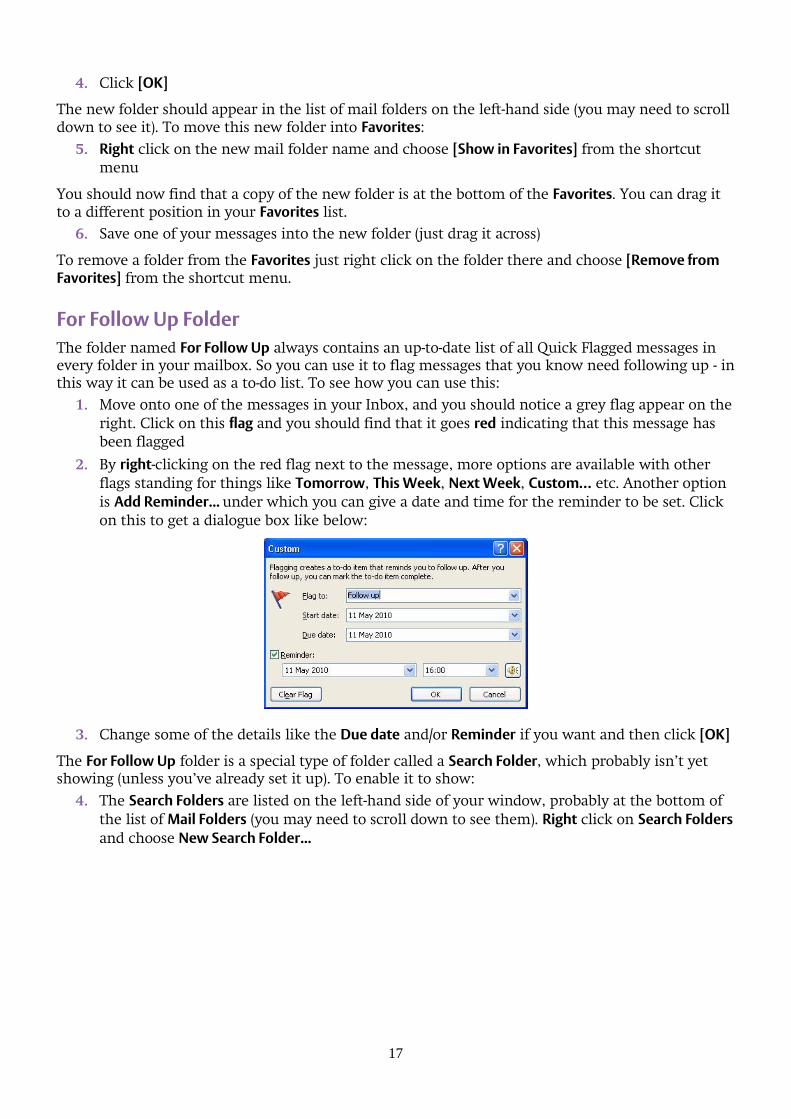
is Add Reminder... under which you can give a date and time for the reminder to be set. Click
on this to get a dialogue box like below:
3. Change some of the details like the Due date and/or Reminder if you want and then click [OK]
The For Follow Up folder is a special type of folder called a Search Folder, which probably isn’t yet showing (unless you’ve already set it up). To enable it to show:
4. The Search Folders are listed on the left-hand side of your window, probably at the bottom of
the list of Mail Folders (you may need to scroll down to see them). Right click on Search Folders
and choose New Search Folder...

18
From here you can choose from a list of pre-defined templates or create a custom Search Folder for future use.
5. To setup a For Follow Up folder, click on Mail flagged for follow up and then [OK]:
A For Follow Up folder should now be showing under Search Folders, and will contain a copy of the flagged message. This can be added to Favorites if you like.
Other Search Folders that can be setup are Unread Mail, Categorized Mail and Large Mail. If you receive any attachments then you will find that another Search Folder called With Attachments is created.
Blocked Attachments You will find that in Outlook there are certain files that will be automatically blocked if they have been sent as attachments. These include executable programs with an extension of .exe, Active Server Pages with an extension of .asp, Outlook Personal Folder Files with an extension of .pst and, perhaps more surprisingly, Microsoft Access related files including database files with an extension of .mdb
If you receive a blocked attachment, you'll need to contact the sender and ask that person to resend the file using one of the following methods:
Link to it - if you share a file server with the recipient, you can put the file there and send a
link to the file rather than sending the file itself.
Zip it into a zip-compressed file - you will need to have something to unzip it on arrival
Rename it - you can rename the file and use a filename extension that Outlook won't
block, such as .txt. When you do this, you may need to include some instructions in your
message on how to open the file.
For further details on the instructions in your message on how to open a renamed file, and for the full list of attachment file types blocked in Outlook , open up the Outlook online help through the
question mark icon at the top right of your window (or by pressing the <F1> function key) and search for blocked attachments.

19
Out of Office If you’re going to be away from the office on business or holiday, you should consider setting up an out of office message. A useful link that tells you the purpose of Out of Office messages, what to include and not include, and some examples of good practice, is at http://www.reading.ac.uk/internal/its/help/its-help-email/its-help-email-OutOfOffice.aspx
To setup an out of office message:
1. Click on the FILE tab in the top left
2. Click [Automatic Replies]
3. Ensure that Send automatic replies is selected
4. If you know the exact times that you are away then tick the box to Only send during this time
range and setup the Start time and End time
5. Write your autoreply message for people Inside My Organization
6. If it’s applicable to also write an autoreply message for people outside of the organization
then click [Outside My Organization (On)], tick the box to Auto-reply to people outside my
organization, choose between My Contacts only and Anyone outside my organization, and
finally write your message
7. If you want to setup any rules for while you’re away, e.g. move particular emails to a specific
folder, then use [Rules…]
8. Click [OK]
If you don't set a start and end time, Automatic Replies will run until you manually turn them off on your return. To do this:
Click the FILE tab, and under Automatic Replies (Out of Office), click [Turn off]
Whilst you’re away, you can use Outlook Web Access (https://www.owamail.reading.ac.uk/ ) to access your email at the University of Reading on any computer that has access to the internet.
If you wanted to allow somebody else to use your own Inbox whilst you're away, then scroll down to the section under Allowing access to your Inbox on the Exchange Mailbox Tasks web page http://www.reading.ac.uk/internal/its/help/its-help-email/its-exchange/its-exchange-mailboxtasks.aspx
Working with People/Contacts These training notes have mostly concentrated on using the Calendar and Email in Microsoft Outlook, but now let's take a brief look at People (in earlier versions of Outlook, this was called Contacts). For further information on working with people/contacts and using address books, look at the online help within Outlook.
The sections below come from the Exchange Contacts web page (http://www.reading.ac.uk/internal/its/help/its-help-email/its-exchange/its-exchange-contacts.aspx ) which also tells you about the Global Address List, your address book, and setting up a distribution list or contact group (some of this is also covered in the Outlook Hints & Tips notes).

20
Adding a New Person/Contact 1. Click on the [People] button in the Navigation Pane
2. To create a new contact, click on the [New Contact] button, the first icon on the HOME ribbon
3. Enter in the information as required, either for yourself, a colleague or a friend:
You should enter a name in the box next to Full Name. If you click on the [Full Name...]
button then you can enter information regarding the user’s title, first name, last name etc.
Under File as you can choose to store your contacts in either alphabetical order of the
surname or the first name
There are up to three different email addresses that you can add, and these are displayed
by clicking on the down arrow by the E-mail... box. You should enter at least one email
address.
You can enter as much other information as you wish. Under Details in the Show group on
the ribbon, you can store ‘important’ dates such as the contact’s birthday and wedding
anniversary!
4. When you have finished adding information, remember to click [Save & Close], the first icon
on the ribbon
Current View of People/Contacts This can be set to a number of different views on the HOME ribbon under Current View as shown below:
The options above are probably the most useful ones, but you can setup your own view via Manage Views...

21
Adding an Address from an Email You can add someone to your People/Contacts if they have sent you an email as follows:
1. Click on the [Mail] button in the Navigation Pane and click on one of your emails
2. Right click on the email address that you want to add
3. Select Add to Outlook Contacts from the shortcut menu
4. A smaller version of a contact box should open where you can add further contact
information (note that the name and email address have already been added, although you may want to edit the name as it’s been entered as the email address)
5. When you have finished adding/editing information, [Save] it (if you are asked to check the
full name, click [OK] and [Save] it again)
Sending an Email to a Person/Contact To send an email to one of your People/Contacts:
1. Click on the [People] button in the Navigation Pane
2. Right click on the contact and choose Create followed by Email
3. Type in your subject and message and then [Send] it
Setting up a Task You might have noticed earlier that a To-Do List could be setup using a For Follow Up folder. Another way of setting up tasks as a to-do list is as follows:
1. Click on the [Tasks] button in the Navigation Pane
2. There are a number of different views available for tasks. On the HOME ribbon, click on the
More arrow ( ) in the Current View group to get the following options:
3. Choose To-Do List
4. Click in the box where it says Type a new task
5. Type in something like Look at further things to do in Outlook and press <Enter>
If you find that this new task has not appeared in your To-Do List then change the Current View to Simple List – you’ll probably need to scroll down to the bottom of the list to find your new task. To add further details to the task, double click on it to open it up. You can then specify details such as the due date, the status (e.g. not started, in progress etc.) and how much of it has been completed in percentage terms, and then [Save & Close] it.

22
Further Information Here are some ways to get further information or help:
Microsoft Outlook has its own built-in Help system, which contains a considerable amount of
information as well as tips and examples. It can be accessed in a couple of ways:
Clicking on the question mark icon at the top right of your window
Pressing key <F1> (usually located on the top row of the keyboard)
A more advanced document, Outlook 2013 Hints & Tips has been developed which has hints
on sending emails, organising email, sharing information and the Calendar
Further documents on using Microsoft Outlook at the University are available from the IT
Services Staff Email Documentation web page (http://www.reading.ac.uk/internal/its/help/its-
help-email/its-exchange/its-staff-email.aspx )
Microsoft's own website has some very useful online training courses on Outlook 2013
(https://support.office.com/en-gb/article/Outlook-2013-videos-and-tutorials-f83e8e60-0bab-47eb-
8f6e-c2ecb73124d8?ui=en-US&rs=en-GB&ad=GB )
™ Trademark owned by Microsoft Corporation. © Screen shot(s) reprinted by permission from Microsoft Corporation. Copyright © 2016: The University of Reading Last Revised: June 2016