microsoft ® office advanced powerpoint ® 2007 training moravia central school district presents:
TRANSCRIPT

Microsoft® Office Advanced PowerPoint® 2007
Training
Moravia Central School District presents:

Today’s Agenda
Inserting and Editing Sound Files
Inserting and Editing Video
Interactive slides- Hyperlinks, Action Buttons, and Editable Text Boxes
Smart Art
Packaging and Saving as a Webpage
If time: Advanced photo options
If more time: Play around with new skills

Sound

Course goals
• Insert sound files and select how each one should start and stop.
• Set up a slide element so that it triggers the sound.
• Guarantee that your sound will play when you present.
• Play a CD for a slide show and select the tracks you want.

Lesson 1
Play a sound file

Add sound effects to a presentation
Insert the sound by using the Insert tab
Most of this lesson will focus on working with sound files that you insert from your computer or a network server, or that you insert from the clip library.
1
2
Click the Insert tab.
Click the arrow next to Sound.
The steps in the picture show two ways you’d insert the sound using the Insert tab:
To insert a sound file from your computer or a network server, click Sound from File. Browse to the file, and double-click it to insert it.
3

Add sound effects to a presentation
Insert the sound by using the Insert tab
Before the sound is inserted, you’re prompted with a message asking how you want it to start.
The sound appears as a sound icon on your slide, and it plays right after you insert it, so you know what it sounds like.
To hear the sound again in normal view, double-click it.
Add sound effects to a presentation
Insert the sound by using a slide placeholder
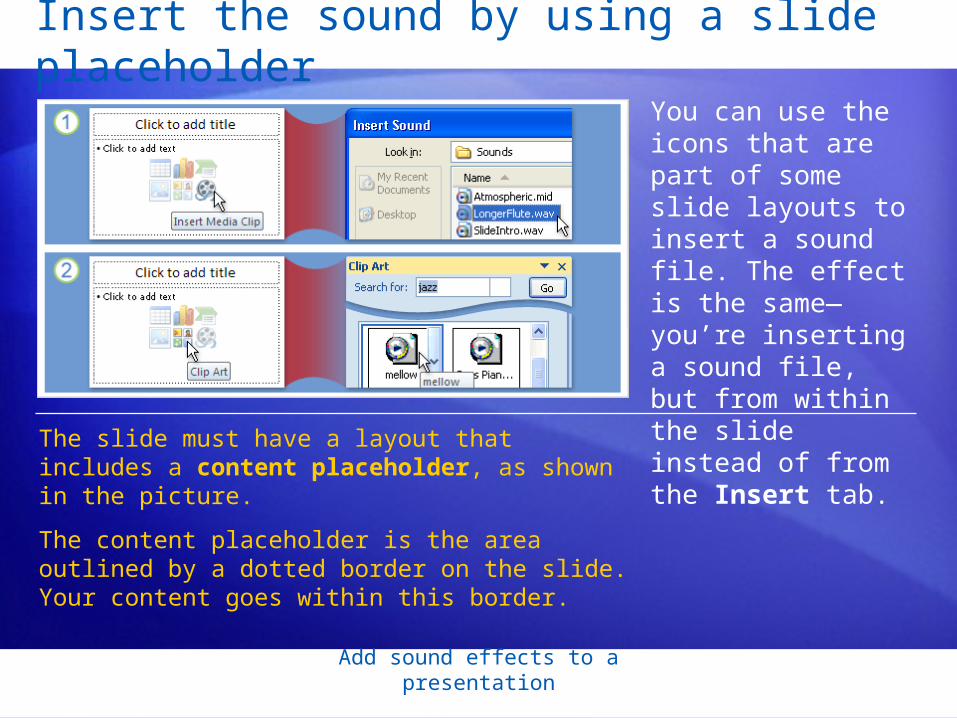
You can use the icons that are part of some slide layouts to insert a sound file. The effect is the same—you’re inserting a sound file, but from within the slide instead of from the Insert tab.
The slide must have a layout that includes a content placeholder, as shown in the picture.
The content placeholder is the area outlined by a dotted border on the slide. Your content goes within this border.

Add sound effects to a presentation
Insert the sound by using a slide placeholder
What are the benefits of this method?
You may want the sound icon to always appear in a certain position on your slides.
For example, if you created a self-running presentation in which a person had to click the sound icon on each slide, you might like the icon to be in the same placeholder and position every time.

Add sound effects to a presentation
Start the sound
In the process of inserting the sound, you’re prompted with a message asking whether you want the sound to start automatically or when you click the mouse.
Choose Automatically if you want the sound to start by itself.
Click When Clicked if you want the sound to play when you click the sound icon on the slide.

Add sound effects to a presentation
Play the sound across slides
What if you have a long-playing sound that you want to keep playing even when you click the mouse to start something else?
1
2
Select the sound icon.
On the Ribbon, under Sound Tools, click the Options tab.
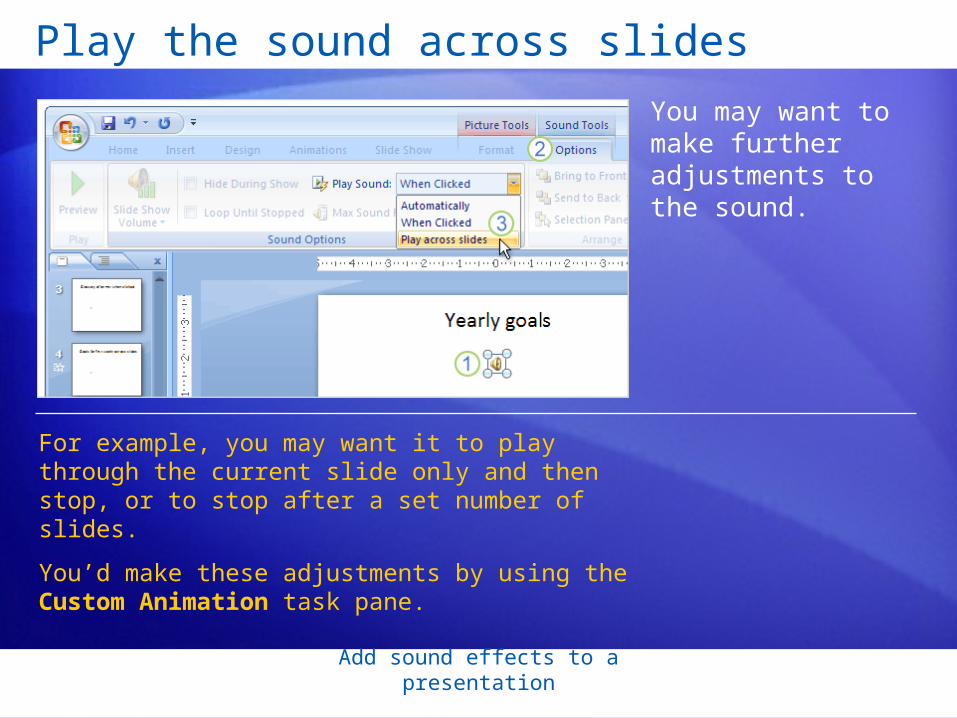
In the Sound Options group, in the Play Sound list, select Play across slides.
3
You can play it across slides.
Add sound effects to a presentation
Play the sound across slides
For example, you may want it to play through the current slide only and then stop, or to stop after a set number of slides.
You’d make these adjustments by using the Custom Animation task pane.
You may want to make further adjustments to the sound.

Add sound effects to a presentation
Set a time for stopping the sound
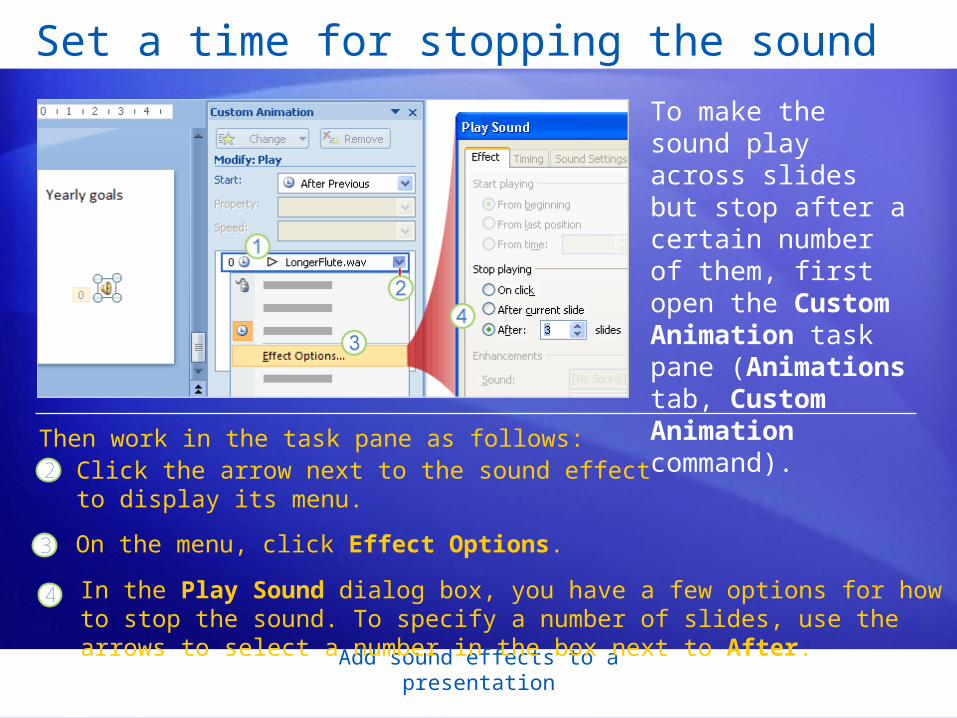
To make the sound play across slides but stop after a certain number of them, first open the Custom Animation task pane (Animations tab, Custom Animation command).
The sound effect you’ve inserted into your slide is represented by its file name in the task pane; the example name here is LongerFlute.wav. When the effect is selected on the slide, it’s also selected in the task pane.
Then work in the task pane as follows:
1
Add sound effects to a presentation
Set a time for stopping the sound
To make the sound play across slides but stop after a certain number of them, first open the Custom Animation task pane (Animations tab, Custom Animation command).
Click the arrow next to the sound effect to display its menu.
Then work in the task pane as follows: 2
3 On the menu, click Effect Options.
In the Play Sound dialog box, you have a few options for how to stop the sound. To specify a number of slides, use the arrows to select a number in the box next to After.
4

Add sound effects to a presentation
Change how the sound starts
You can change the way you’ve set your sound to begin by using Custom Animation options too.
1 In the task pane, the effect appears with a clock next to it, which means it will start automatically after a previous effect—such as an animation effect or another sound if there is one; or after display of the slide if there’s no other effect.
2
3
To change the start setting, click the arrow next to the effect in the list, and click Start On Click.
The effect then appears with a mouse icon next to it, and the setting is reflected in the Start box. The sound will now play when you click the mouse.

Add sound effects to a presentation
Change how the sound starts
There’s one difference here that you should be aware of.
The choice of Start On Click in this context sets up the sound to play when you click the slide, rather than when you click the sound icon.
To make the sound icon be the thing you click to start the effect, you have to set it up as the trigger for the sound.

Add sound effects to a presentation
Set up a trigger to play the sound
As you’ve learned, there are various ways to start a sound.
Here’s one with some fun possibilities: Trigger the sound by clicking a specific item on the slide.
When you first insert a sound, if you choose to have it start “when clicked,” a trigger is automatically set up for you; the sound icon itself is the trigger.
But you can make other things set off the sound as well: text, for example, or a picture, or an arrow shape that signals (with a bing, bang, or bong) the next slide.

Add sound effects to a presentation
Set up a trigger to play the sound
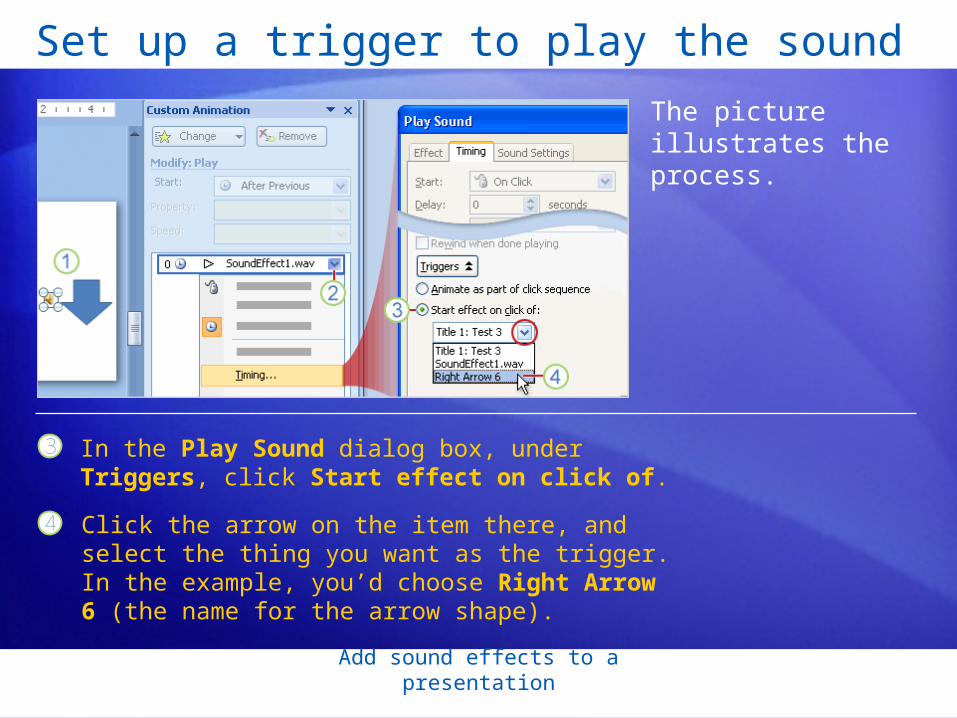
The picture illustrates the process.
1
2
The sound must be inserted into the slide, and the element that you want to click must be on the slide also. In this case, say you want the trigger to be the arrow shape shown here.
In the Custom Animation task pane, click the arrow next to the sound effect, and click Timing on the menu.
Add sound effects to a presentation
Set up a trigger to play the sound
The picture illustrates the process.
3 In the Play Sound dialog box, under Triggers, click Start effect on click of.
4 Click the arrow on the item there, and select the thing you want as the trigger. In the example, you’d choose Right Arrow 6 (the name for the arrow shape).

Add sound effects to a presentation
Are your files linked or embedded?
To guarantee that a sound will play from the computer you present on, be aware of some details concerning the size of sound files.
1 These files will be linked to the presentation because either they are not .wav files or they are .wav files that exceed the maximum size limit of 100 KB.
Also be aware of whether a file has been linked to in the presentation or embedded within it. The picture shows a basic comparison.
2 These files will be embedded in the presentation because they are .wav files and their sizes don’t exceed 100 KB.
Lesson 2
Play music from a CD
Add sound effects to a presentation
Play music from a CD
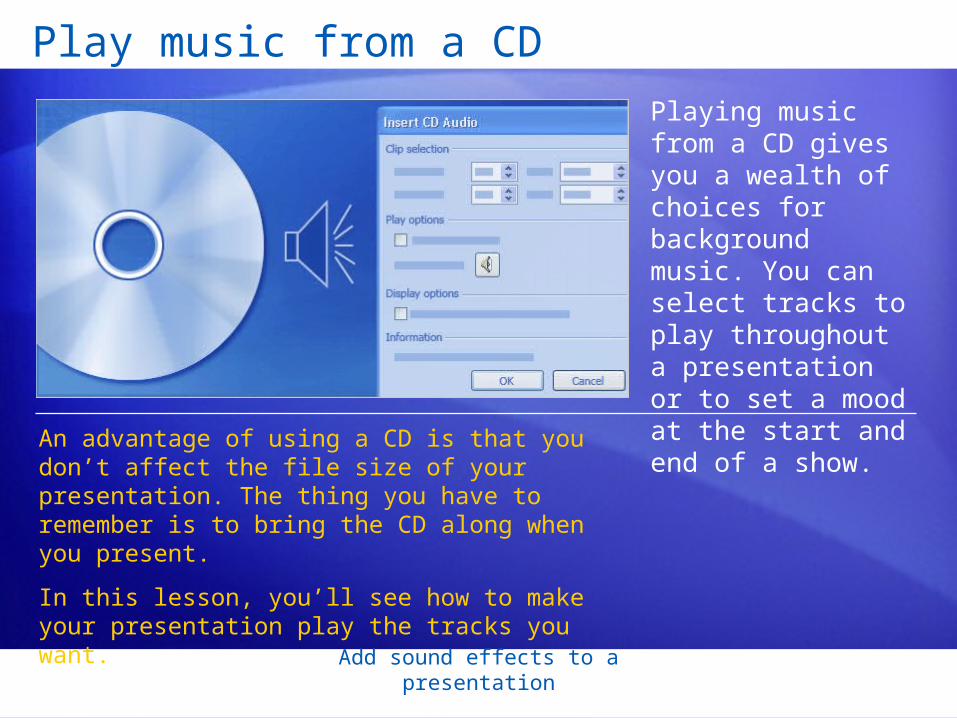
Playing music from a CD gives you a wealth of choices for background music. You can select tracks to play throughout a presentation or to set a mood at the start and end of a show.
An advantage of using a CD is that you don’t affect the file size of your presentation. The thing you have to remember is to bring the CD along when you present.
In this lesson, you’ll see how to make your presentation play the tracks you want.
Add sound effects to a presentation
Set up tracks
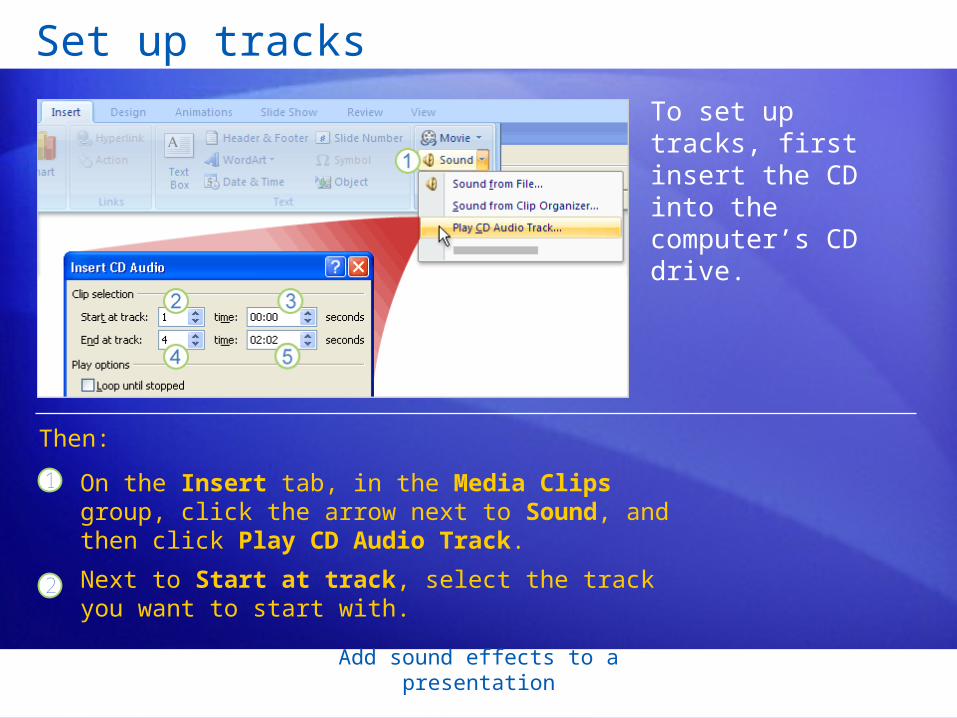
To set up tracks, first insert the CD into the computer’s CD drive.
1
2
On the Insert tab, in the Media Clips group, click the arrow next to Sound, and then click Play CD Audio Track.
Next to Start at track, select the track you want to start with.
Then:

Add sound effects to a presentation
Set up tracks
To set up tracks, first insert the CD into the computer’s CD drive.
3 In the time box, specify at what time within the track to start playing the CD. The 00:00 setting means the track will start at its beginning.
Then:
Next to End at track, select the track you want to end with. You can end with the same track you started with.
4

Add sound effects to a presentation
Set up tracks
After you select tracks, you’re prompted to choose how to start the sound (automatically or by mouse click). After that, a CD icon shows up in the middle of your slide.
The CD won’t play through all the slides automatically. It works with the same sound settings you’d use to play sound files.
So you need to tell PowerPoint that the CD should play across all slides or across a certain number of slides.

Video

Add video to a presentation
Formatting
Is your file in the proper format?

Is it an avf, avi, mpeg, or wmv file?
Is it online or do you have a copy?
You will need to “rip it”, then start back at the top
You will need to convert it to one
of the above formats
Great, its ready to be inserted
Go to keepvid.com, then start back at top
Go to zamzar.com
No Yes
Online Have a copy

Once the file is in an acceptable format..
To prevent possible problems with links, it is a good idea to copy the movies into the same folder as your presentation before you add the movies to your presentation.
1. In Normal view, click the slide to which you want to add a movie or animated GIF file.
2. On the Insert tab, in the Media Clips group, click the arrow under Movie.
3. Click Movie from File, locate the folder that contains the file, and then double-click the file that you want to add.

Choose between Automatically or When Clicked
• When you insert a movie, you are prompted with a message asking how you want the movie to start: automatically (Automatically) or when you click the movie (When Clicked).
• To automatically start the movie when you show the slide, click Automatically. You can pause a movie while it is playing by clicking it. To continue playing the movie, click it again.
• To manually start the movie when you click it on the slide, click When Clicked.

Add video to a presentation
Play a movie full screen
• In Normal view, click the movie frame on the slide that you want to play full screen.
• Under Movie Tools, on the Options tab, in the Movie Options group, select the Play Full Screen check box.
• You can also preview the movie here, and edit when and how it plays, just like we did with sound files.

Too much work?
• Just hyperlink it• Wont play in ppt, but you do not have to
change the file format (as long as it will run on your computer)

Hyperlinks, Action Buttons, and Editable Text Boxes

Hyperlinks
-Allow you to link to a file or webpage to be opened in another program
-Clicking on it will open the file or webpage
-Type a word or phrase you want to have hyperlinked
-Highlight it
-Go to the Insert Ribbon
-Click “Hyperlink”

Hyperlinks
Click on a file to have windows open it for you
-It will open in whatever program windows normally opens this file in
Copy and paste a web address to go strait to a webpage
Action Buttons
-Action buttons let you use an object as you hyperlink.
-You can hyperlink within you PowerPoint presentation as well, such as to a start page
-This is handy for making games
-To start, add a picture, word, or shape to your presentation to use as the action button.
-You can also click on the premade action buttons under shapes, which will skip you to the next step.
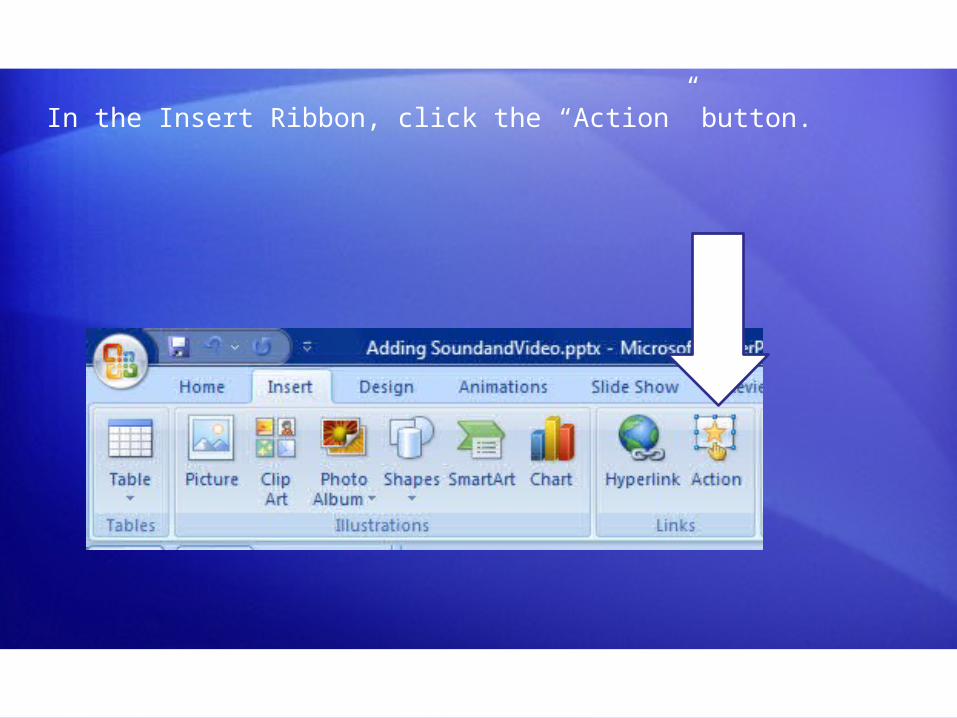
In the Insert Ribbon, click the “Action” button.

The mouse click tab sets the action button to start when clicked on.
Mouse over tab means you would only need to hover the mouse over it to start the action
Note: Run Macro and Object actions probably wont work

Editable Text Boxes
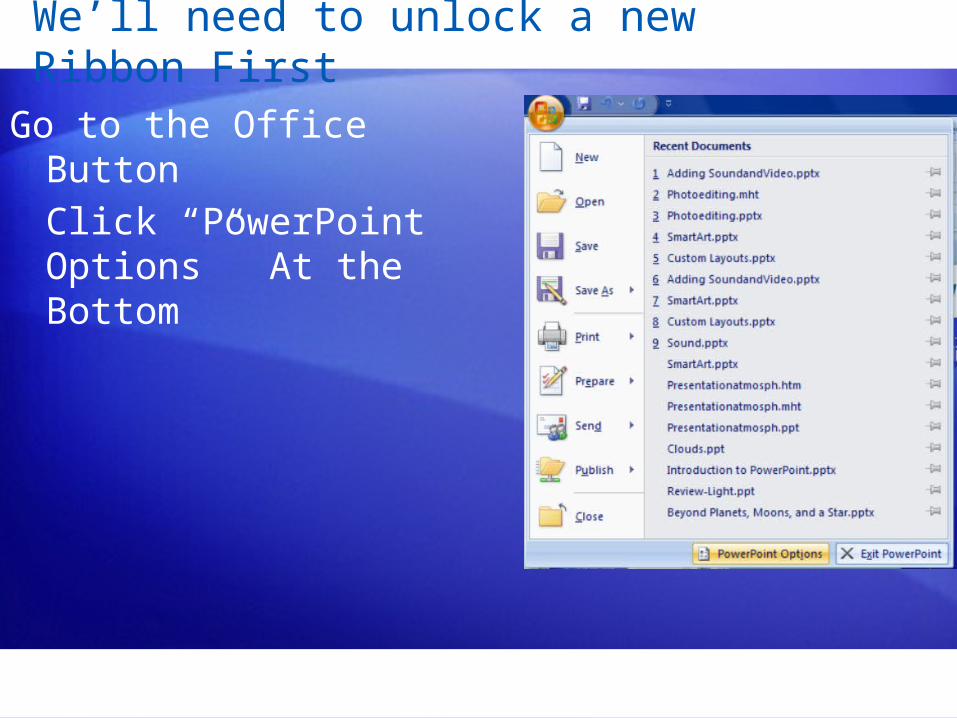
We’ll need to unlock a new Ribbon First
Go to the Office Button
Click “PowerPoint Options” At the Bottom
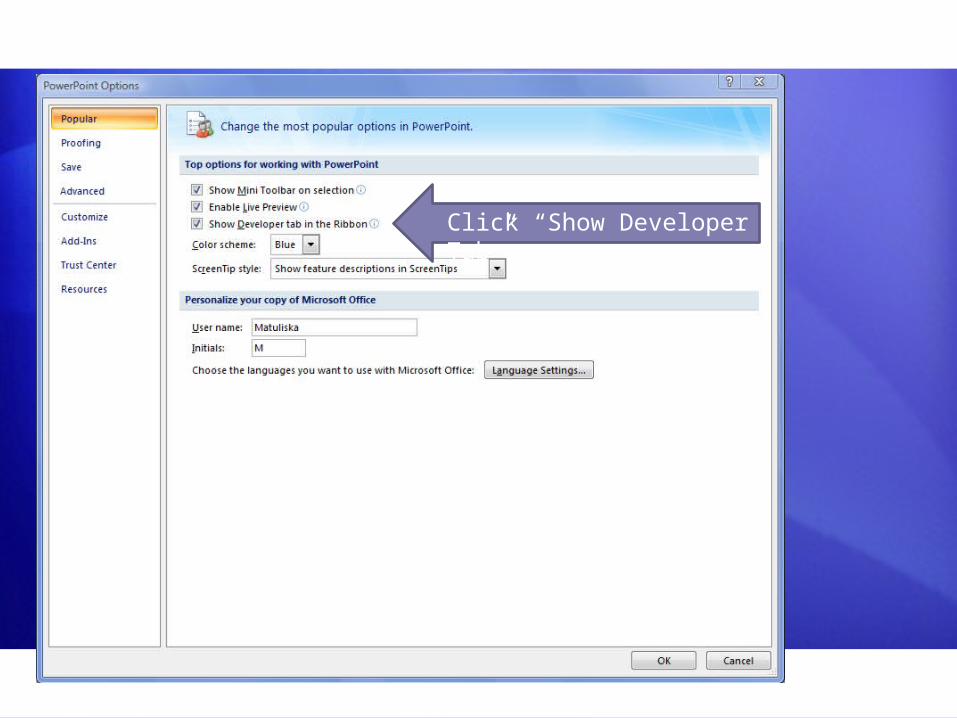
Click “Show Developer Tab”
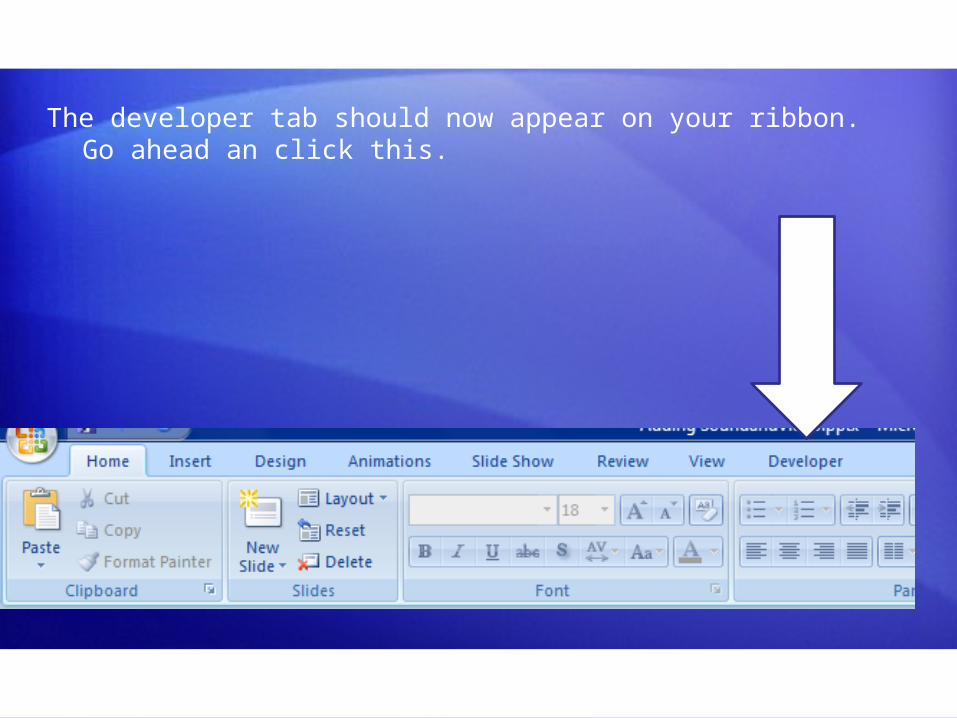
The developer tab should now appear on your ribbon. Go ahead an click this.

Click the text box links, and then insert them wherever you like.
Get visual with SmartArt™ graphics
Get visual with SmartArt graphics
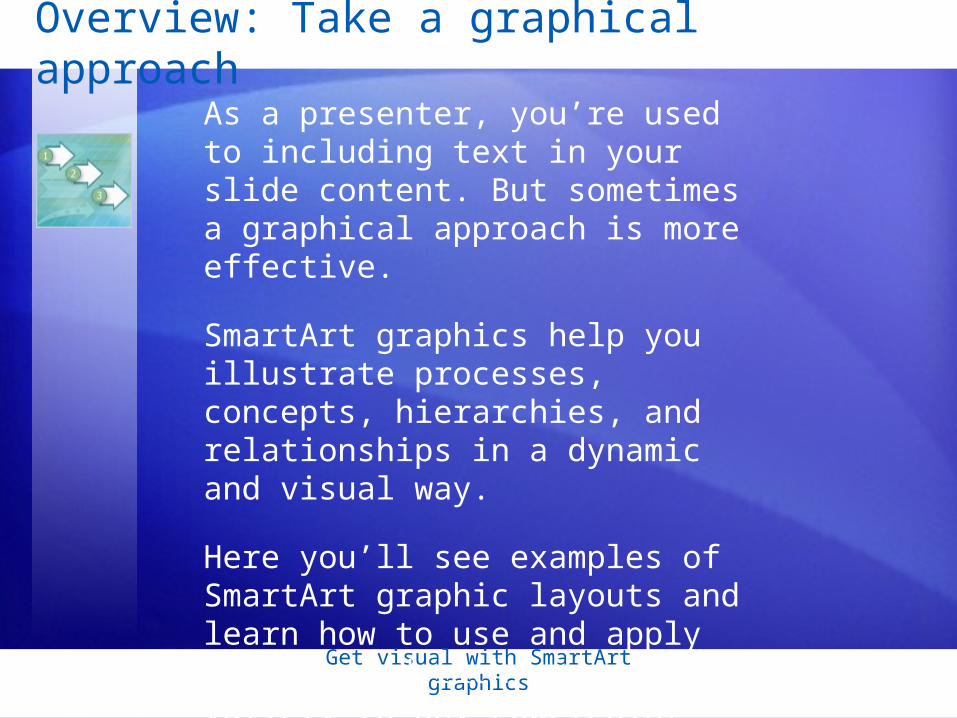
Overview: Take a graphical approach
As a presenter, you’re used to including text in your slide content. But sometimes a graphical approach is more effective.
SmartArt graphics help you illustrate processes, concepts, hierarchies, and relationships in a dynamic and visual way.
Here you’ll see examples of SmartArt graphic layouts and learn how to use and apply them to add rich visuals and variety to any PowerPoint 2007 show.

Lesson 1
Be smart in choosing graphics

Get visual with SmartArt graphics
Be smart in choosing graphics
A SmartArt graphic is a visual representation of information. It’s very easy to create.
This picture shows a graphical timeline that captures the milestones in a production schedule.
• Put the main points from a bulleted list into related shapes that don’t follow a strict vertical format. Then color the graphic for impact and clarity.
• Show a process, using connected shapes and arrows to make a sequence direct and clear.
Here are some other ways to use a SmartArt graphic:

Get visual with SmartArt graphics
Types of SmartArt graphics
When you want to use a SmartArt graphic, you’ll have a gallery of layouts to choose from.
Layouts are collected in full in the All category within the Choose a SmartArt Graphic dialog box.
Then, as the picture shows, they’re broken down into different types including List, Process, Cycle, Hierarchy, Relationship, Matrix, and Pyramid.
Get visual with SmartArt graphics
List-type graphics
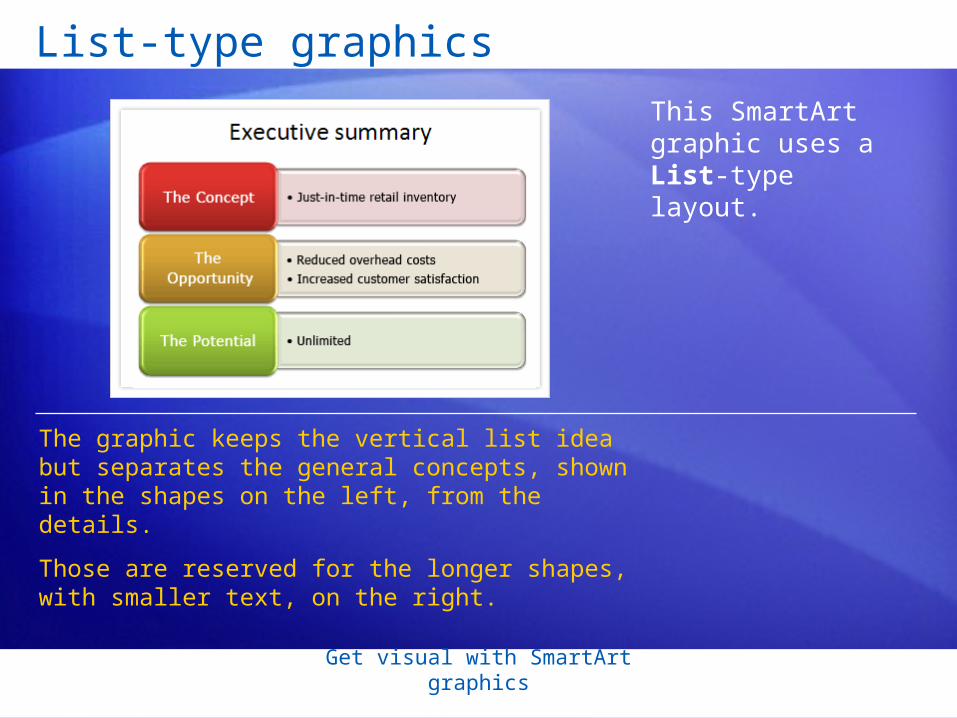
This SmartArt graphic uses a List-type layout.
The graphic keeps the vertical list idea but separates the general concepts, shown in the shapes on the left, from the details.
Those are reserved for the longer shapes, with smaller text, on the right.

Get visual with SmartArt graphics
Lists with pictures
This graphical List layout includes shapes that are meant for pictures you insert.
There’s room for descriptive text in the shapes on the right.
There are several other List layouts that include shapes for pictures.
These layouts save you the trouble of having to position and size the pictures once you insert them. They do that work for you.
Get visual with SmartArt graphics
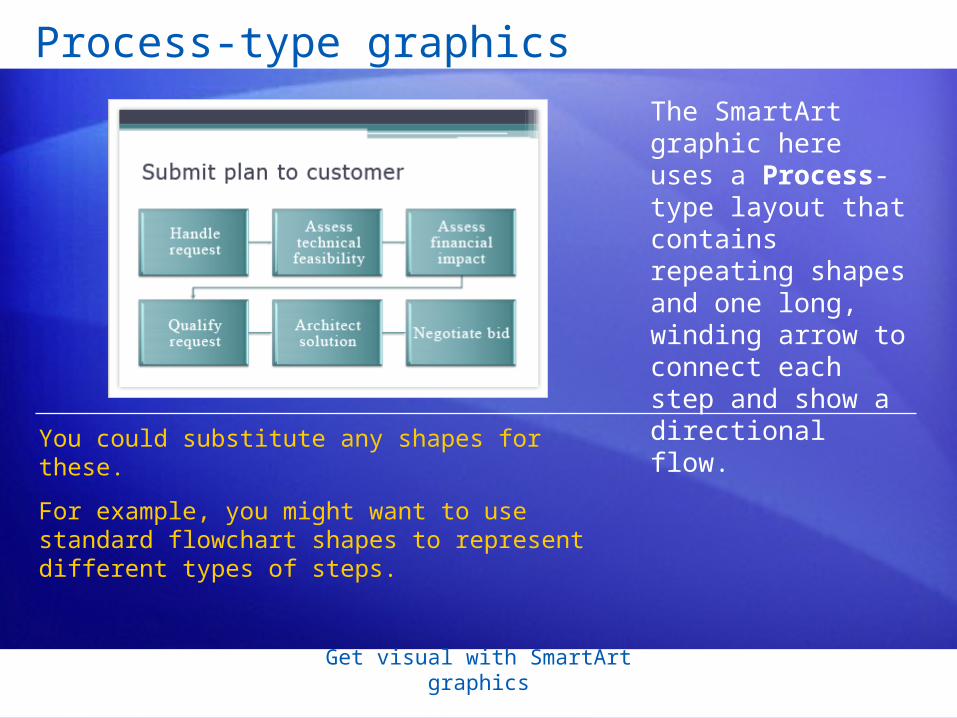
Process-type graphics
The SmartArt graphic here uses a Process-type layout that contains repeating shapes and one long, winding arrow to connect each step and show a directional flow.
You could substitute any shapes for these.
For example, you might want to use standard flowchart shapes to represent different types of steps.

Get visual with SmartArt graphics
Processes with numbered steps
This Process-type layout includes shapes that lend themselves to including numbers for the steps.
The arrows keep the timeline idea and hold the text that describes each phase.
This layout emphasizes the broad picture. Other ones might give more emphasis to the textual details of the steps.

Get visual with SmartArt graphics
Performance management
Wash, rinse, repeat.
That’s a short way to describe content for the Cycle type of SmartArt graphic.
The type shown here illustrates a circular, or repeating, process.
The layout effectively shows both the cycle and how each piece of it fits into a whole.

Get visual with SmartArt graphics
Hierarchy: An org chart
A typical use for this SmartArt graphic type, called Hierarchy, is the company organization chart.
This picture uses the layout that’s best geared toward showing a company’s hierarchy of positions.
There are various hierarchical layouts, though. For example, a hierarchy might show a decision tree or family of products.

Get visual with SmartArt graphics
Relationships: Radial, Venn, Target
The Relationship-type layouts cover a range of diagram types, including radial, Venn, and target.
1 This SmartArt graphic uses a Converging Radial layout, in which several elements relate to or affect one central thing.
These typically depict a connection between two or more sets of things or information.
Get visual with SmartArt graphics
Matrix
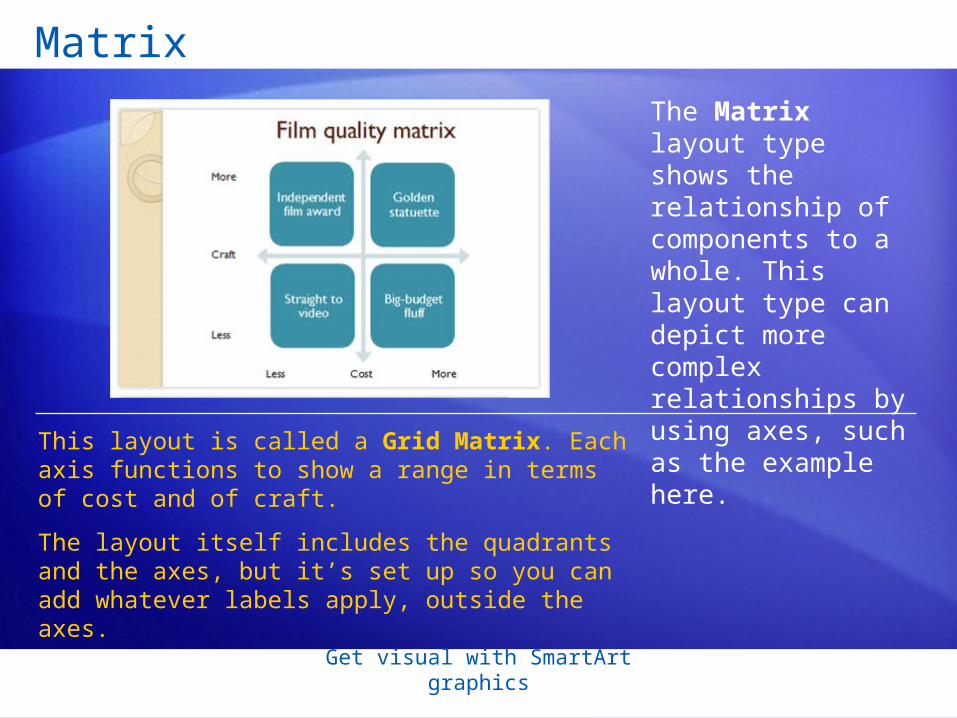
The Matrix layout type shows the relationship of components to a whole. This layout type can depict more complex relationships by using axes, such as the example here.
This layout is called a Grid Matrix. Each axis functions to show a range in terms of cost and of craft.
The layout itself includes the quadrants and the axes, but it’s set up so you can add whatever labels apply, outside the axes.

Get visual with SmartArt graphics
Pyramid
The Pyramid-type layouts show proportional, foundation-based, or hierarchical relationships or processes that typically build upward.
This example shows an ever-refining process that starts with gathering unfiltered data, shown at the bottom, continues upward with sifting through the data, and moves toward drawing conclusions about it.
The layout is designed to give you more room for text as the pyramid narrows.

Lesson 2
How to create SmartArt graphics

Get visual with SmartArt graphics
How to create SmartArt graphics
You’ve gotten an overview of the types of SmartArt graphics available. Now, get the nuts and bolts for how to create one.
There are a couple of starting points.
You can either convert an existing list on your slide, or insert a blank graphic and then add content to it.
Then, refine the graphic: Add text to shapes by using a handy Text pane; move shapes and text where you want them in the layout; and try another layout if you decide there’s a better one.

Get visual with SmartArt graphics
Convert a list to a graphic
You can easily convert a text list to a SmartArt graphic.
The picture shows how a bulleted list has been converted.
To do this, just click the text in the list, click Convert to SmartArt Graphic on the Ribbon, and choose one of the layouts from the gallery that opens.

Get visual with SmartArt graphics
Convert a list to a graphic
Don’t overuse graphical lists.
Because PowerPoint 2007 makes it so easy to convert a list to a graphic, it can be tempting to convert every list you’ve got.
But be judicious in using the feature. Be sure that a graphical format really is helping your audience see, understand, and remember the information.
Also keep in mind that for people with vision disabilities or dyslexia, a plain text list can be more effective than a graphic.

Get visual with SmartArt graphics
Start with a blank graphic: Method 1
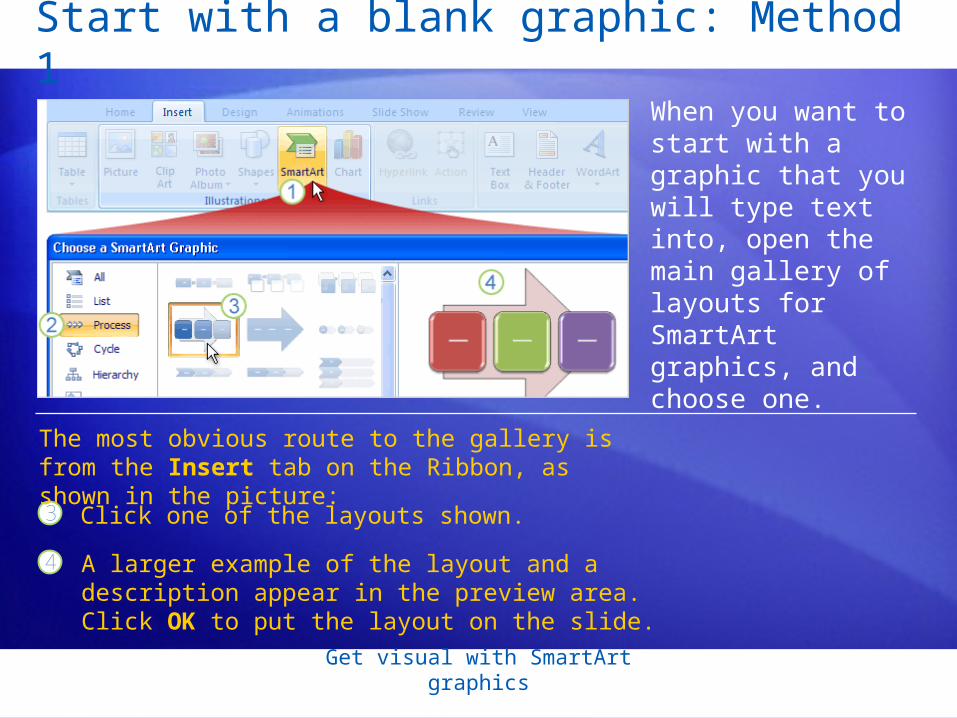
When you want to start with a graphic that you will type text into, open the main gallery of layouts for SmartArt graphics, and choose one.
1
2
On the Insert tab, click SmartArt.
Click the type of graphic you want.
The most obvious route to the gallery is from the Insert tab on the Ribbon, as shown in the picture:
Get visual with SmartArt graphics
Start with a blank graphic: Method 1
When you want to start with a graphic that you will type text into, open the main gallery of layouts for SmartArt graphics, and choose one.
3 Click one of the layouts shown.
The most obvious route to the gallery is from the Insert tab on the Ribbon, as shown in the picture:
4 A larger example of the layout and a description appear in the preview area. Click OK to put the layout on the slide.

Get visual with SmartArt graphics
Start with a blank graphic: Method 2
In PowerPoint 2007, there’s another way to insert a SmartArt graphic: Click the SmartArt graphic icon that is part of many slide layouts.
1
2
Click the SmartArt graphic icon that’s part of the slide layout.
The SmartArt graphic gallery opens so that you can choose a layout.
The picture illustrates this:

Get visual with SmartArt graphics
Add text to a graphic
Every SmartArt graphic contains a Text pane, which you can choose to use or not.
The pane is for typing the graphic’s text and for making other types of edits to the graphic. You can also work directly in the graphic.
Get visual with SmartArt graphics
Try a different layout
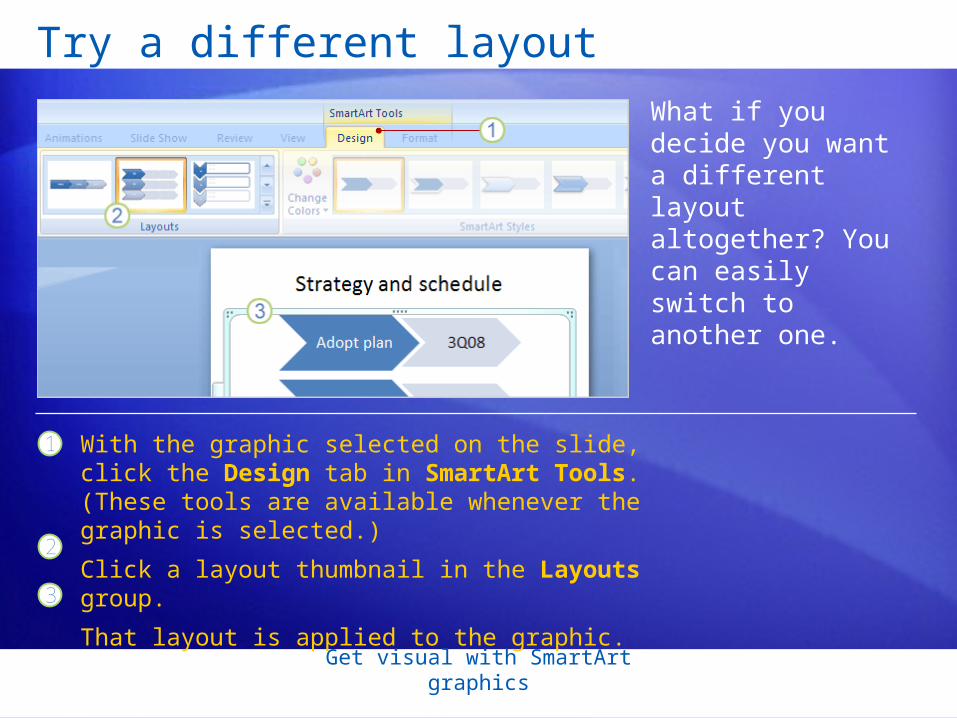
What if you decide you want a different layout altogether? You can easily switch to another one.
1
2
3
With the graphic selected on the slide, click the Design tab in SmartArt Tools. (These tools are available whenever the graphic is selected.)
Click a layout thumbnail in the Layouts group.
That layout is applied to the graphic.

Lesson 3
Style, polish, and update graphics

Get visual with SmartArt graphics
Presentation theme: Basis for how slides look
Before learning about how you can work with specific styles and colors for your SmartArt graphic, you need to learn about themes.
1
2
This first slide has the plainest PowerPoint theme applied, called Office Theme. It is applied by default.
The second slide is the same slide with a different theme applied, called Module.
A theme supplies the design of the whole presentation. It’s the basis for how all slides and slide elements look.
Get visual with SmartArt graphics
Change the style’s colors
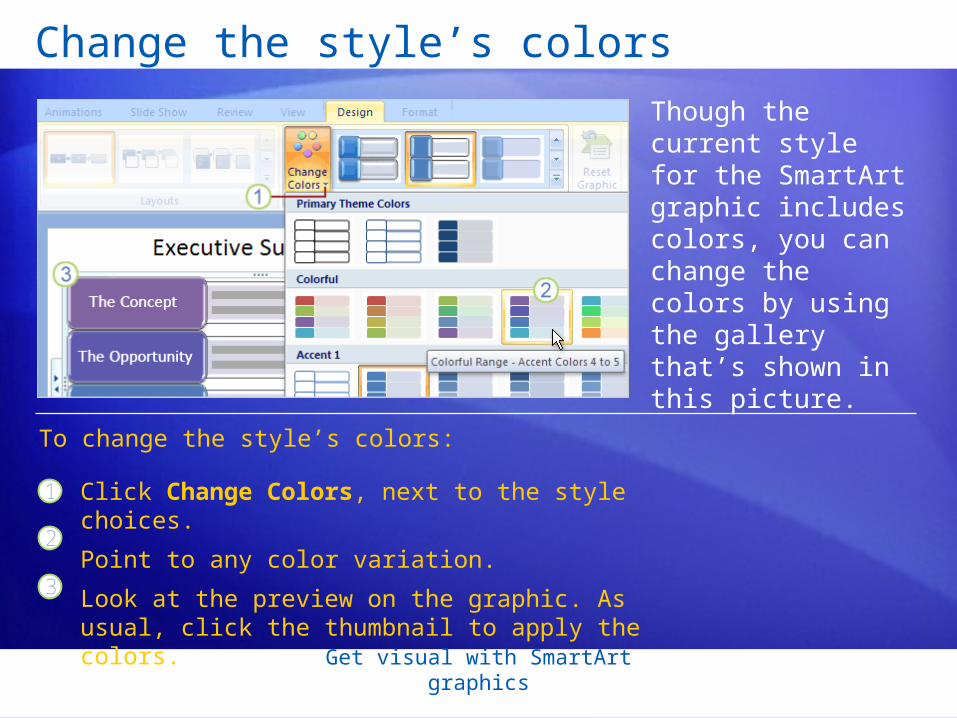
Though the current style for the SmartArt graphic includes colors, you can change the colors by using the gallery that’s shown in this picture.
1
2
3
Click Change Colors, next to the style choices.
Point to any color variation.
Look at the preview on the graphic. As usual, click the thumbnail to apply the colors.
To change the style’s colors:

Get visual with SmartArt graphics
Do more with shapes
The style you’ve applied to the graphic has given it a great look. Yet there’s more you can do, working at the level of individual shapes within the graphic.
1
2
Select the shape or shapes you want to change. The picture shows several shapes selected.
On the Format tab, look in the Shape Styles group for Shape Effects, and click its arrow.
Use the Format tab within SmartArt Tools:

Get visual with SmartArt graphics
Do more with text
Here’s how to apply WordArt formatting to your text.
1
2
3
Select the shapes that contain the text you want to format.
On the Format tab, click the arrow next to Quick Styles. (This is in the WordArt Styles group.)
Pick a WordArt style. It will apply to all the text in the selected shapes.

Get visual with SmartArt graphics
• Once converted, if your diagram is opened in an earlier version of PowerPoint, it won’t be editable as a diagram. It will instead open as a picture.
• If you make no significant changes to the diagram and then reopen it in PowerPoint 2007, it will be editable as usual, as a SmartArt graphic.
• You can use this conversion feature for diagrams created in versions as old as PowerPoint 2000.
Update an old diagram

Saving as a Website

Saving as a website
• Allows you to upload to your school webpage• Anyone, anywhere can open the file, without ppt
• all you need is an up to date web browser

To Save as a website:
Go to Office Button
Save as -> Other Formats

Choose save as “Single File Webpage”
You can just hit save now to accept the default options, or hit publish for more options.

Publish options
1. Publish all slides or select a specific group of slides to publish.
2. Check the box if you want to display speaker notes in addition to all the slides on your webpage.
3. Change the webpage title if you wish.
4. Use the Browse... button to choose a different file name if desired or type in a new file name and its correct path.
5. Check this box if you want the webpage to open immediately in your browser, once it is saved.
6. Choose more Web Options (see next page for more details).
7. When all selections are made, click the Publish button.

Adding to your school webpage
Once you have saved the file, you will want to add it to your web page.
Open up Internet Explorer, and log on to your website.
Click on the “Announcement, Links, Files Table” tab

Click the “Manage files” link, then upload a new file.


Choose the file. Give it an appropriate name. Then hit upload.

You should now be able to add the file to you web page.
-Back on the “Main Page Content” tab, click drag and drop files/pics at the very bottom.
-Click on the file you uploaded. It should open the PowerPoint in webpage format. Copy the link from the top

Make a hyperlink on your webpage
Paste the link to your presentation.
Protocol must be set to other.
Hit OK, and its should now be a
working hyperlink

Advanced Photo Techniques

Put your photos into PowerPoint
Course goals
• Arrange your pictures in a photo album format.
• Insert single pictures; move, size, and crop them.
• Use varied layouts.
• Apply frame styles, colors, and effects.
• Keep picture file sizes small.
Lesson
Insert, crop, and format pictures

Put your photos into PowerPoint
Insert, crop, and format pictures
You’ve got photos and you want to display them in a slide show. The first thing you need to do is get the pictures onto your computer.
To do so, follow the guidelines that came with your scanner or camera to upload your picture files. Some software will save the files to your Pictures folder by default, and might create a subfolder for you named by the day’s date.
Of course, you can designate the folder you want, and organize your pictures however you like.

Put your photos into PowerPoint
Insert photos
PowerPoint offers several ways to insert photos into your slide presentation.
You can create an instant slide show by using Photo Album, as shown here.
You can also insert pictures one at a time, either by using a layout you design, or by using one of the pre-made content layouts available in the Layout gallery.
Put your photos into PowerPoint
Clip art: A resource for photos
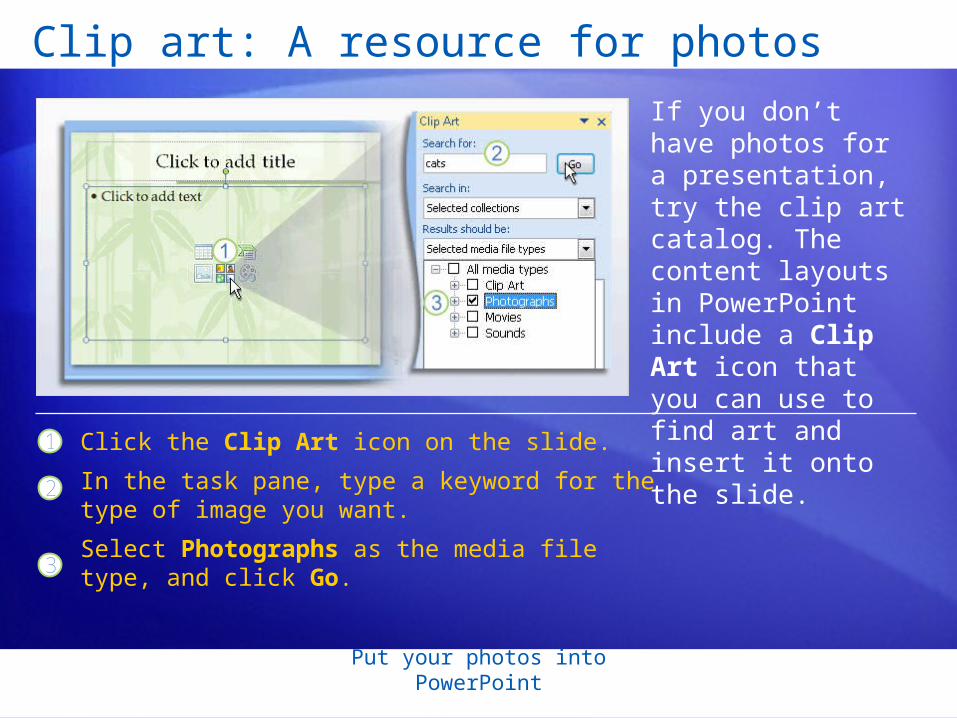
If you don’t have photos for a presentation, try the clip art catalog. The content layouts in PowerPoint include a Clip Art icon that you can use to find art and insert it onto the slide.
1
2
3
Click the Clip Art icon on the slide.
In the task pane, type a keyword for the type of image you want.
Select Photographs as the media file type, and click Go.

Put your photos into PowerPoint
Crop and resize photos
Is there part of a photo you’d like to cut away?
Do it with the cropping tool.
Select the picture to see the Format tab under Picture Tools.
Click Crop, and then drag the black handles to get the composition you want. Then resize back to your desired dimensions.

Put your photos into PowerPoint
Cropping examples: Before and after
Here’s an example of how cropping and resizing can improve the way you display your pictures.
1
2
In the top example, the pictures’ original sizes vary, being either more horizontal or more vertical.
In the bottom example, the pictures are cropped and resized to be a uniform shape, and they’re all slightly bigger. (Another help is that they have sharper frame formatting.)

Put your photos into PowerPoint
Cropping examples: Before and after
Important: If you crop and then enlarge a picture, make sure that the picture has a high enough resolution that it won’t appear blurry when projected.
Resolution refers to the density of pixels, the small dots of color that make up bitmap images.
When you preview your slides in a slide show, you can tell whether the images are sharp or not.
Put your photos into PowerPoint
Use styles, colors, and effects
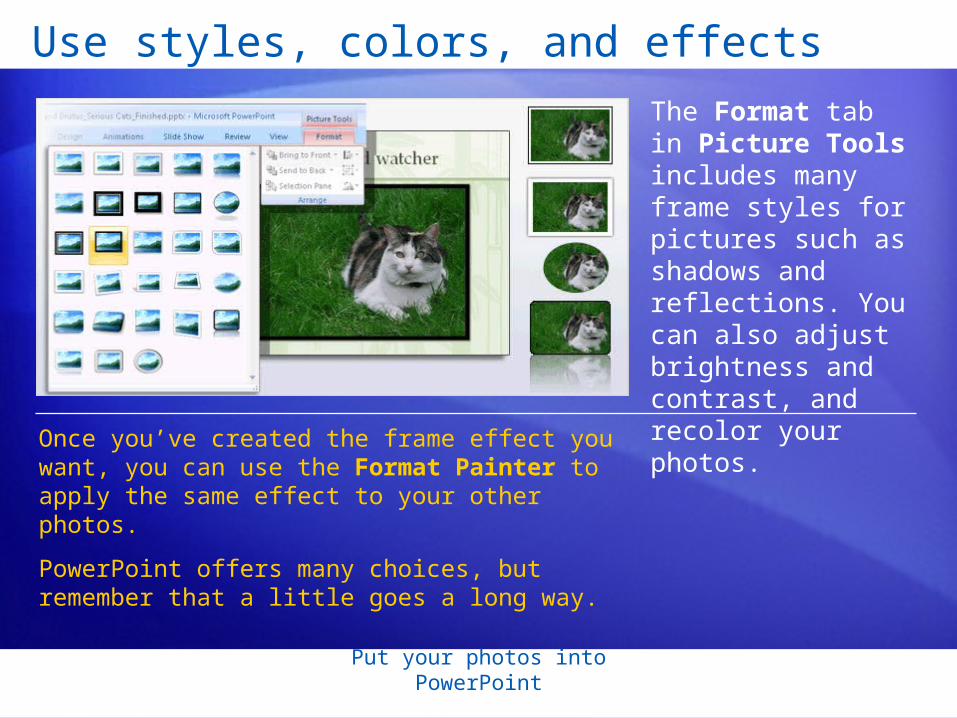
The Format tab in Picture Tools includes many frame styles for pictures such as shadows and reflections. You can also adjust brightness and contrast, and recolor your photos.
Once you’ve created the frame effect you want, you can use the Format Painter to apply the same effect to your other photos.
PowerPoint offers many choices, but remember that a little goes a long way.

Put your photos into PowerPoint
Control your presentation’s file size
Digital photographs can be huge in terms of file size (3 to 4 megabytes, for example). Those large files can inflate your presentation’s file size, too.
However, PowerPoint 2007 has ways to keep your file size manageable.
One is automatic picture compression. When you insert a photo, PowerPoint reduces its number of pixels.

Put your photos into PowerPoint
Control your presentation’s file size
Digital photographs can be huge in terms of file size (3 to 4 megabytes, for example). Those large files can inflate your presentation’s file size, too.
In addition to automatic compression, you can use the Compress Pictures button, on the Format tab, to apply more compression.
This further reduces the pixel count per inch. The Screen option (150 ppi, or pixels per inch), as shown here, is the optimal choice for projection.

Put your photos into PowerPoint
Guidelines for graphics file formats
Graphics file formats refer to the type of picture file, shown in the filename extension, such as “.jpg” or “.gif.”
File format Stands for.JPG Joint Photographic Expert Group
.PNG Portable Network Graphic
.BMP Windows Bitmap
.GIF Graphics Interchange Format
The file format determines what kind of compression is applied to the picture and the range of colors supported.

Put your photos into PowerPoint
• The .JPG file format is typical for digital photos. Its type of compression creates a small picture file — that’s one of its great assets. But, its compression is also lossy, which means that picture information is lost in the compression process. This often is not a factor in the look of your images in a presentation.
• Some presentation designers prefer the .PNG format. This format creates a sometimes significantly larger file size than a .JPG. But its compression is lossless. You don’t lose picture information. Another attraction of .PNG is that it supports variable transparency.
Guidelines for graphics file formats
Here are the characteristics of each file format.
• Other common graphics file formats are .BMP, .GIF, and .TIF. These work fine in PowerPoint, but note that .BMP files can be very large. The .GIF format works especially well for images that include big solid-color areas. A downside of .GIF is that it is limited to 256 colors. The .TIF format has similar characteristics to .PNG.