microsoft office 365 how to make a booking for meeting
TRANSCRIPT

1
Microsoft Office 365 – how to make a booking
for meeting rooms and resource calendars

2
Contents
Purpose ................................................................................................................................ 3
Document Support Boundaries ............................................................................................. 3
Meeting Rooms—what has changed? ................................................................................... 4
How to get access to make a booking? ................................................................................. 4
Special note about making bookings in Office 365 ................................................................ 4
Making a booking for a meeting room ................................................................................... 5
Process for cancelling a meeting in Office 365 .................................................................... 12
What happens if I try to delete the booking directly from the meeting room calendar? ........ 16
Making a booking for a shared resource (eg work vehicle) .................................................. 17
Process to cancel a booking for a resource (eg work vehicle) ............................................. 21
What happens if I try to delete the booking directly from the resource Calendar? ............... 22

3
Purpose
This document is designed to assist with how to make and cancel meeting room or resource bookings through Outlook after the Microsoft Office 365 (Office 365) Migration.
Document Support Boundaries
This Document is written to support the following mail clients
Outlook 2010 (Windows)
Note: For any other versions of Email clients, please consult your manual, built in help system, place of purchase or use online searches for configuration instructions.

4
Meeting Rooms—what has changed? All meeting rooms are progressively being converted to a new format. All current meeting room mailboxes are being converted to Resource Mailboxes with Calendars. This will occur when your section migrates to Office 365. As a result, how you access and request a booking for a meeting room will slightly change.
How to get access to make a booking? If you indicated that you made meeting room bookings prior to Office 365 migration, you will retain that access. Otherwise lodge an IT Service Desk job requesting access to be able to book the specific meeting room.
Special note about making bookings in Office 365
You need to include the meeting room itself in the list of recipients for the meeting.
This also applies to shared resources (a work vehicle).

5
Making a booking for a meeting room
To make a booking for a Meeting Room, do the following:
1. Open Outlook.
2. Select New Items.
3. Select Meeting.
4. Select Rooms...

6
5. Select All Rooms from the drop down list.
6. Scroll down the list of Meeting Rooms until you find the name of the Meeting Room.
7
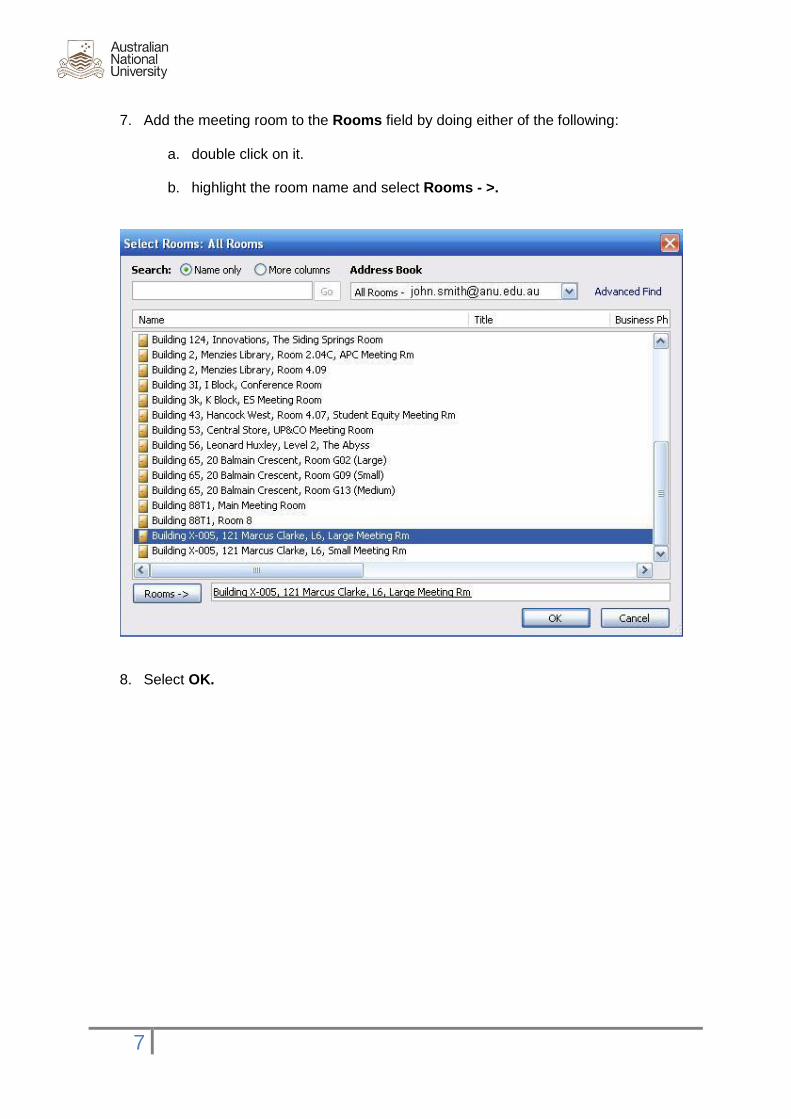
7. Add the meeting room to the Rooms field by doing either of the following:
a. double click on it.
b. highlight the room name and select Rooms - >.
8. Select OK.

8
The meeting room itself is now listed in the To field as a recipient. Also the Location field has now been populated in the meeting request.

9
9. Add the rest of your recipients in the To field.
10. Type in a subject for the meeting.
11. Type in a brief overview of the meeting in the message body.
12. Set the Start time.
13. Set the End time.
NOTE: In the bottom right of the meeting request you will see a field called Suggested Times, if there is already a booking in the room at that time, it will let you know and suggest an alternative time for you on the same day in this box.
14. Select Send. This has now sent the meeting to all the intended recipients (including the meeting room itself).
To test setting up a meeting

10
This will automatically enter the name of the meeting organiser into the calendar of the meeting room.
11
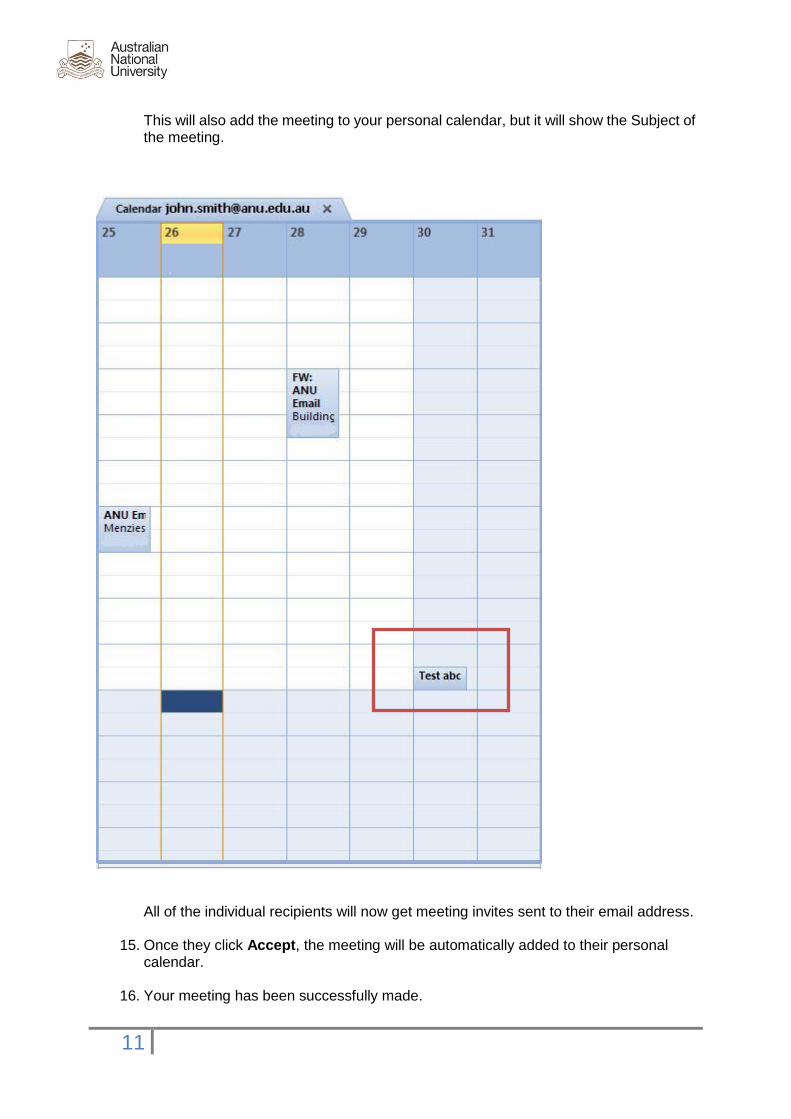
This will also add the meeting to your personal calendar, but it will show the Subject of the meeting.
All of the individual recipients will now get meeting invites sent to their email address.
15. Once they click Accept, the meeting will be automatically added to their personal calendar.
16. Your meeting has been successfully made.

12
Process for cancelling a meeting in Office 365
For the meeting organiser they need to do the following;
1. Open Outlook.
2. Open their Personal Calendar.
3. Highlight the meeting that they wish to cancel.

13
4. Right click on the selected meeting.
5. Select Cancel Meeting.

14
This will open a cancellation message and have all the original recipients email addresses already populated in the To field.
6. Select Send Cancellation. This will automatically remove the meeting from your personal calendar.

15
This will also automatically remove the meeting from the meeting room calendar.
NOTE: This could take up to 1 minute for the cancellation to update on the meeting room calendar.
7. Once all the recipients receive the cancellation message it will remove from their personal calendars also.

16
What happens if I try to delete the booking directly from the meeting room
calendar?
If you try to delete the meeting directly from the meeting room's calendar itself, the meeting will NOT delete.
It will give you an error message
This will cause the meeting to stick in the calendar, as you can see with the several meetings titled “Test” in the calendar picture at the top of this page.

17
Making a booking for a shared resource (eg work vehicle)
To make a booking for a shared resource do the following: 1. Open Outlook.
2. Select New Items.
3. Select Meeting.
4. Select To…
18
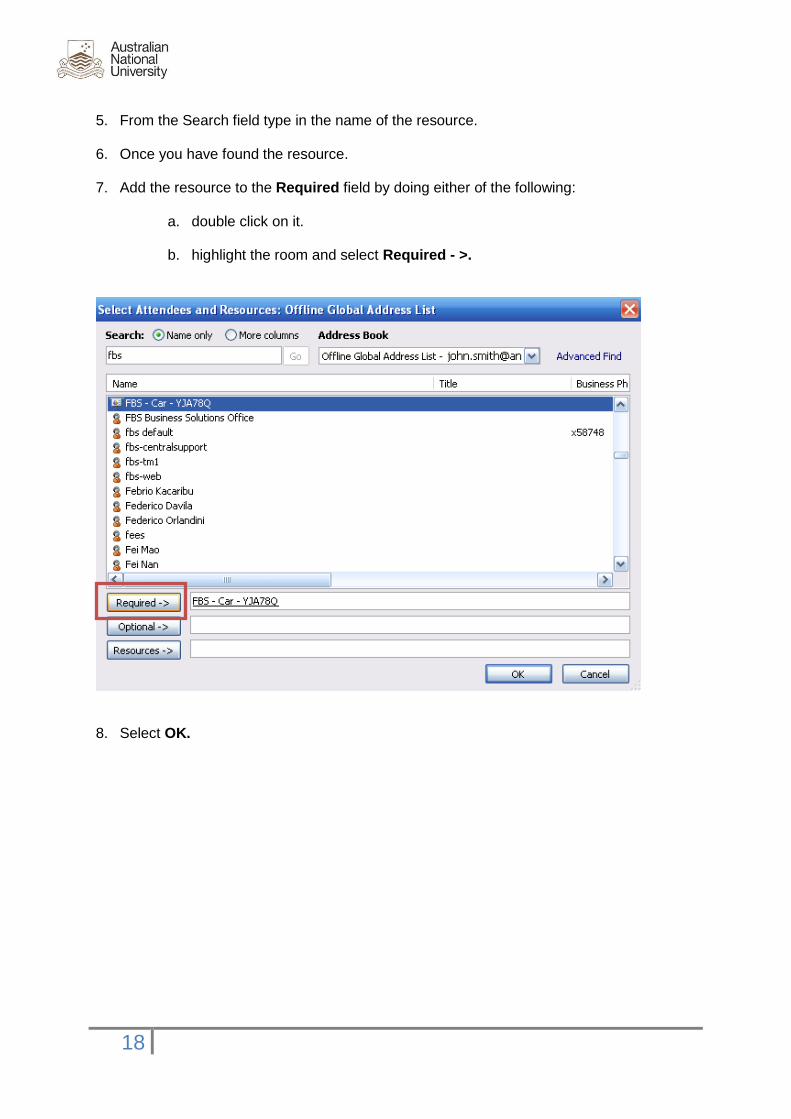
5. From the Search field type in the name of the resource.
6. Once you have found the resource. 7. Add the resource to the Required field by doing either of the following:
a. double click on it.
b. highlight the room and select Required - >.
8. Select OK.

19
The resource is now listed in the To field as a recipient.
9. Add yourself in the To field.

20
10. Set the Start Time. 11. Set the End Time.
NOTE: In the bottom right of the meeting request you will see a field called Suggested Times, if there is already a booking for the resource at that time, it will let you know and suggest an alternative time for you on the same day in this box.

21
12. Enter a subject for the booking.
13. Select Send. This has now sent the booking to the resource and to yourself.
This will enter your booking into the calendar of the resource and also into your personal calendar.
14. Your booking has been successfully made.
Process to cancel a booking for a resource (eg work vehicle)
For the booking organiser they need to do the following;
1. Open Outlook.
2. Open their Personal Calendar.
3. Highlight the resource booking that they wish to cancel.
4. Right click on it and select Cancel Meeting.
5. This will remove the booking from your personal calendar and the resource calendar at the same time.
NOTE: This could take up to 1 minute for the cancellation to update on the resource calendar.

22
What happens if I try to delete the booking directly from the resource
Calendar?
If you try to delete the meeting directly from the resource’s calendar itself, the booking will NOT delete.