microsoft excel 2010 - university of florida - uf health...
TRANSCRIPT

Email: [email protected] Web Page: http://training.health.ufl.edu
Microsoft Excel 2010 Basics II – Math & Functions

Updated: 5/22/2016
Microsoft Excel 2010: Math and Functions (Basics II) 2.0 hours
This workshop assumes minimal experience with Excel. Topics include working with series of text, numbers and dates; building equations; using basic mathematical functions; learning about absolute and relative references; naming cells; and working with named cell ranges.
Fill Handle ...................................................................................................... 1
Fill Handle Options ..................................................................................... 2
Mathematical Operations .............................................................................. 2
Building an Equation ...................................................................................... 3
Type in the exact cell address ..................................................................... 3
Use the keyboard to point to the cell address ........................................... 3
Use the mouse to point to the cell address ................................................ 3
Order of Operations ....................................................................................... 4
Formatting Dates ........................................................................................... 4
Formula View ................................................................................................. 5
Absolute/Relative .......................................................................................... 6
Functions ....................................................................................................... 7
Naming Cells .................................................................................................. 9
Class Exercise ............................................................................................... 10
Pandora Rose Cowart Education/Training Specialist UF Health IT Training
C3‐013 Communicore (352) 273‐5051 PO Box 100152 [email protected] Gainesville, FL 32610‐0152 http://training.health.ufl.edu

Page 1
Fill Handle
The Fill Handle is in the bottom right corner of the selected cell. When you place your mouse over this handle, it changes from a thick white cross, to a thin black cross. Once you see the thin cross (no arrows) you can click and drag the cell to fill its contents in a single direction (up, down, left or right). If you want to go in two directions, you must first complete one way, let go of the mouse and then drag the handle in the second direction.
When you use the Fill Handle to pull down a single number or plain text, it will copy the data.
Text 123
Text 123
Text 123
When you use the Fill Handle to pull down a text with numbers, a date, a month or a weekday it will fill in a series.
Exam 1 2/1/02 February Friday
Exam 2 2/2/02 March Saturday
Exam 3 2/3/02 April Sunday
When you select two or more numbers (including dates) and then use the Fill Handle, Excel will fill in the series, following the original pattern of the selected cells. It can only follow simple patterns (addition and subtraction).
123 5 100 2/01/02
124 4 110 2/08/02
125 3 120 2/15/02
126 2 130 2/22/02
The Fill Handle will follow the format of the original cells. This includes number formats as well as capitalization,
Friday FRIDAY fri $123.00
Saturday SATURDAY sat $123.00
Sunday SUNDAY sun $123.00
If you double click on the Fill Handle it will 'fill' as many rows as the previous column has in use.

Page 2
Fill Handle Options When you use the Fill Handle, you will notice a symbol appear in the right hand bottom corner of your newly filled cells. This icon ( ) represents your AutoFill Options. If you put your mouse over the icon you will see a drop down arrow that will give you a list of your fill options. The four basic Fill Options are:
Copy Cells – Repeat the cells along the selection
Fill Series – Follow pattern along the selection
Fill Format Only – Repeat the format of the cells along the selection
Fill without Formatting – Follow the pattern along the selection, but not the format If you use the Fill Handle on cells with dates you will notice even more options:
Fill Days
Fill Weekdays
Fill Months
Fill Years Number Fill Options Date Fill Options
Mathematical Operations
To let Excel know you expect it to "do math" you need start your cell with an equal sign (=).
‐ Addition, plus sign (+) = 5+2 result 7
‐ Subtraction, hyphen (‐) = 5‐2 result 3
‐ (also used for negative) = ‐5 result ‐5
‐ Multiplication, asterisk (*) = 5*2 result 10
‐ Division, slash (/) = 5/2 result 2.5
‐ Exponent, Power, caret/circumflex (^) = 5^2 result 25
There are several operands to use for logic comparisons.
‐ Greater than, greater than sign (>) =5>2 result TRUE
‐ Less than, less than sign (<) =5<2 result FALSE
‐ Equal to, equal sign (=) =5=2 result FALSE
‐ Not equal to, Greater & Less than signs (<>) =5<>2 result TRUE

Page 3
Building an Equation
You can directly type in values, but that data stays constant. If you want to have the answers to your equations update as you change your data, you should use the cell addresses. You will see the cell addresses change colors so you can tell which cells are being used in your equation.
Type in the exact cell address
Cells are labeled by their row and column headings. Rows are numbered and flow across (rows of chairs) and columns are lettered flowing top to bottom (columns of a building).
- Click in the cell where the answer will appear.
- Press the Equal sign (=)
- Type in the cell address you want to use in your equation
- Accept the answer or press the next math operator (+, ‐, *, /, ^)
A B C
1 1 2 =a1+b1
2
Use the keyboard to point to the cell address
When you first enter a character into a cell, you will be in "ENTER" mode. This includes when you type an equal sign. But if you press an arrow key on the keyboard after the equal sign, Excel does not move out of the cell. Instead you will be put into a "POINT" mode, and Excel will color coordinate the cell you are selecting.
- Click in the cell where the answer will appear.
- Press the Equal sign (=)
- Press the arrow keys until you are on the cell you want to use in your equation
- Accept the answer or press the next math operator (+, ‐, *, /, ^)
A B C
1 1 2 =A1
2
Use the mouse to point to the cell address
The mouse and arrow keys are both "pointers". If you press the equal sign and then use the mouse to click on another cell, Excel will put you into a "POINT" mode, and place the address of the cell you clicked on in your equation.
- Click in the cell where the answer will appear.
- Press the Equal sign (=)
- Use the mouse to click on the cell you want to use in your equation
- Accept the answer or press the next math operator (+, ‐, *, /, ^)

Page 4
Order of Operations Microsoft Excel respects the Order of Operations.
(1) Parenthesis (2) Exponents (raised to a power) (3) Multiplication and Division (4) Addition and Subtraction
Parentheses Exponents Multiply Divide Add Subtract Please Excuse My Dear Aunt Sally
This means with an equation such as = 5 + 3 * 2
Excel will do the multiplication before it does the addition. The result would be 11. If you wanted the addition to happen first, you have to use parentheses:
= ( 5 + 3 ) * 2 giving us a result of 16. In math, we use the brackets, such as
{[(5+3)*(4‐2)] / 2} In Excel we ONLY use parentheses
=(((5+3)*(4‐2))/2) result 8. Formatting Dates Dates and Times are technically numbers because they can be used in equations. Excel is able to do this because it has a "serial" number equivalent. Both columns of this table show the same value, but the dates in the second column have lost the date format. For a date, 0 = 1/1/1900. The numeric values in the second column represent how many days there are between 1/1/1900 and the date listed. If your date loses the date formatting you can modify it through the Number group or through the Format Cells Window. If you don't like the choices offered, you can custom build your date from the Custom section of the Number page on the Format Cells Window. Use M for months, D for days and Y for years. Excel is not case sensitive, upper or lowercase letters will work for these formats.
Friday, February 1, 2002 dddd, mmmm d, yyyy
Day Month Year
d 1 m 2 y 02
dd 01 mm 02 yy 02
ddd Fri mmm Feb yyy 2002
dddd Friday mmmm February yyyy 2002
You can also custom build times using H for hours, M for minutes and S for seconds.
11/16/1978 28,810.00
5/2/1982 30,073.00
11/4/1986 31,720.00
2/23/1993 34,023.00
11/13/1995 35,016.00
2/2/2002 37,289.00
7/24/2008 39,653.00
12/25/2010 40,537.00
6/8/2013 41,433.00
11/20/2018 43,424.00
Remember to let Excel know you want it to calculate something; you have to start with an equal sign (=). If you get stuck inside an equation, or confused by a mistake, press Esc to cancel and try again.

Page 5
Formula View
Our cells display the formula results. If we want to see the equation we have to look at the formula bar or edit the cell. Sometimes it helps to see all the equations on a worksheet. The keyboard shortcut is Control‐Tilde, ctrl ~ (the wavy line above Tab, below Esc on your keyboard).
You can also turn this on through the Excel Options. From the File Menu, choose Excel Options. On the Advanced tab, under the Display Options for this Worksheet group, check the box next to Show formulas in cell instead of their calculated results.
Calculated Results (normal view)
Formula View
The formula view will stretch out the columns and all the numbers appear to have lost their format, including the dates and alignments. Be careful adjusting the column widths, if you shrink it here, it will proportionally shrink in the calculated results view.
The Ctrl‐~ is a toggle. That means it will switch to the formula view and switch back to the calculated results view.
You can continue working in this view and print out the sheet with all the formulas showing.

Page 6
Absolute/Relative
When you create an equation in Excel using cell addresses, Excel sets up the equation to have a relative reference. When you are using the Fill Handle or the Copy and Paste features the equation result is relative to the location of the data. For example:
If this equation is copied into cell C2, or the Fill Handle is used to drag the equation down to C2, Excel will give you this result:
A B C D
1 5 6 =A1+B1
2 12 4 =A2+B2
3
Since the equation was moved down, between rows, only the row number changes. If instead we moved the equation across, the row numbers will remain the same, but the column numbers will change:
A B C D
1 5 6 =A1+B1 =B1+C2
2 12 4
3
The addresses in the equation are relative to where the answer is positioned. The equation in cell C1 of the table above states 'take the value of the cell that is two to the left from this cell and add it to the value of the cell that is one to the left from this cell'. When we fill or copy the cell over or down, the basic equation stays the same.
If you do not want a number to move relatively you can make it absolute by using dollar signs ($) in the equation. The F4 button on the keyboard will place the dollar sign characters in for you while you are in Enter, Edit, or Point mode. (Think F4 ‐> Enforce)
=$A$1 ‐ Locks the reference into Cell A1
=$A1 ‐ Locks the reference into Column A, but will allow the row number to change
=A$1 ‐ Locks the reference into Row 1, but will allow the row number to change
A B C D E F G H I
1 5 6 =$A$1+B1 SubTotals: 123 456 789
2 12 4 =$A$1+B2 TaxRate: 6.5%
3 Taxes: =F1*$F$2 =G1*$F$2 =H1*$F$2
A B C D
1 5 6 =A1+B1
2 12 4
3

Page 7
Functions Microsoft Excel has several built in functions. To insert a function, click the Insert Function
button on the Formula Bar, or the Insert Function option from the Formulas Tab (seen here on the right).
From here you can request a function to perform a particular task and Excel will make suggestions for you. If you Search for a function: Excel will return a Recommended category, offering all the functions it thinks might help in your search. By default, the first category is a list of Most Recently Used functions. To see all the functions built into Excel, you can choose All from the Select a category: list. The bottom of this window displays a description of the selected function. Each choice will show an example arrangement of the function, the arguments, and a description of what that function should do. If you need more information, click on the Help on this function option in the bottom left corner. If you have found the function you would like to use, select it and click OK. An easier way to access the list of Most Recently Used functions is to press the equal sign on the keyboard, as if you were going to type an equation. The name box, that displays which cell you are in, changes to the last function that was used. When you click on the arrow next to the listed function (in this case SUM), you will see a list of list of Most Recently Used functions.
becomes

Page 8
If the function you desire is not on the Most Recently Used list, chose the More Functions… option at the bottom of the list and you will get the above Insert Function dialog box. Either function selection method you will get a setup window like this:
The function name is listed in the top left corner and the description is across the bottom. There are blanks in the middle of the screen for the arguments of the statement. You can type in the cell addresses, move the window out of the way to try to select the addresses or let Excel help you move the
window by using the Collapse or "go out and get it button" ( ). This button will collapse your formula screen so you can select the data you wish to use as an argument in this function. Once you have chosen
your desired data either press Enter or click on the Expand button ( ) to return to the full window.
In the sample above, you can see we can Sum more than one number/set of numbers. As soon as you click into Number 2 a Number 3 will appear. The description tells us this will allow up to 255 arguments (number ranges) to sum.
Across the bottom of this window we can see a Formula Result =. This will show us the running total as we add in each part of the equation. Notice there is also an =number at the end of each argument line. This will give you a piece‐by‐piece result for each argument. This is especially helpful when using the logic functions, such as If.
When you click the OK button, the answer to the equation should be displayed in the original cell. Double clicking on the cell or pressing the F2 key on the keyboard will put this formula into edit mode. Excel color‐codes which cells it is using in this formula. To bring back the gray edit box, click on the
function button on the formula bar.

Page 9
Naming Cells Another way to ensure an absolute reference to a cell is to Name the cell, and use that name in your equation. The simplest way to define a cell name is to select the cell, erase the cell address within the name box, type the Name of the cell in the name box and press Enter.
Once a name is defined, you can use it in your equations. =B12*$B$1 is now the same as =B12*TaxRate When you use the fill handle or the Copy/Paste feature, the B12 will change to be relative to the new location, but TaxRate will remain throughout, always pointing to cell B1. This same method can be used for a range of cells. Select the desired range, click within the name box, erase the current cell address, type the name of the range, press Enter. *NOTE* There are some limitations in naming. You cannot use many special characters such as the hyphen (‐), and the name must be all one word, no spaces. In the example above we used capitalization to show multiple words, you can also use the underscore character( _ ).
Good Names: taxrate TaxRate Tax_Rate Bad Names: tax rate Tax Rate Tax‐Rate
The Name feature can be found on the Formula Tab.
Define a Name – create a new name
Use in Formula – choose from a list of existing names, this can be used to begin a new formula or to add a name to a formula you are building.
Create from Selection – make a new name based on a group of selected cells The large button opens the Name Manager window. To Delete: Select the name in the list and press the Delete button To Redefine: Select the name in the list, erase the Refers to blank and choose your new range of cells. Click the Green Check to accept. You can change the name, redefine the range and add comments through the Edit… button.

Excel 2010 Basics II Math & Functions – Class Exercise
Page 10
Class Exercise
Review
- Open Excel
- Zoom to 200%
- Reminder
o Text on left
o Numbers on right
- "accepting data"
o Cell A1: 1
Press Ctrl Enter to accept (stays on cell)
o Delete A1
o Cell A1: 1
Click on Green Check next to formula bar to accept
(Red X is the same as cancel)
Fill Handle
- Cell A1: 1 ("accept data" for each of these)
o Drag down to row 8– 1,1,1,1,1
- Cell B1: text
o Drag down to row 8– text, text, text, text, text
- Cell C1: text1
o Drag down to row 8 – text1, text2, text3, text4, text5
- Cell D1: 1, Cell D2: 2
o Select both and Drag Down– 1, 2, 3, 4, 5
- Students try
o Cell E1:E2 ‐ 2, 4
o Cell F1:F2 ‐ 5, 4
- Cell G1: text 1
o Double‐click on fill handle
Special Reserved Words
- H1: Quarter 1
- I1: 1st Qtr
- J1: 1st
- K1: 1 st
- L1: January
- M1: FEB
- N1: Monday
- O1: Tue

Excel 2010 Basics II Math & Functions – Class Exercise
Page 11
Working with Dates
- Today's date
- Future date if need to wrap into next month
- 12/22/2010 (note fill handle options)
o Weekdays
o Months
o Years
- Next two paydays (10/12, 10/26) remember to select BOTH
Turn to Sheet 2
- Zoom 200%
- Create data set
o Make two columns of numbers 1‐10 & 2‐20
Use fill handle, should only type 1,2 and 2,4
Select all four numbers at once and drag down
Creating Equations
- click in cell C1
- type 1+2
o notice it's on the left side of the cell meaning Excel sees "text"
- Delete cell C1, type =1+2
o 1+2 always equal 3, but if we change data we want our answer to change
- Delete cell C1, type =a1+b1
o not case sensitive
o Notice the color coding
o Accept data, should get a 3
o Change A1 to 5, accept to see answer in C1 change
- USING KEYBOARD
o Go to C2
o press = sign
o press arrow two times
o Press + sign
o press arrow once
o enter to accept
- USING MOUSE
o Go to C3
o press = sign
o click on cell A3
o press the + sign
o click on cell B3
o click on green check to accept
Excel 2010 Basics II Math & Functions – Class Exercise
Page 12
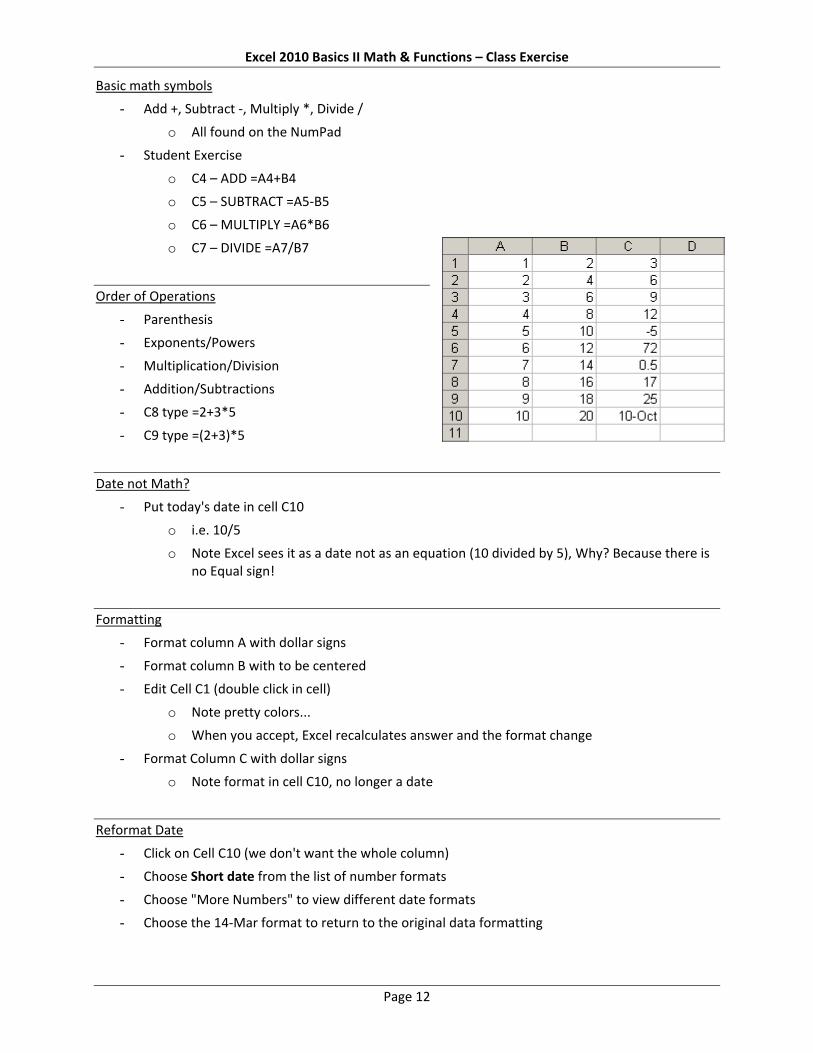
Basic math symbols
- Add +, Subtract ‐, Multiply *, Divide /
o All found on the NumPad
- Student Exercise
o C4 – ADD =A4+B4
o C5 – SUBTRACT =A5‐B5
o C6 – MULTIPLY =A6*B6
o C7 – DIVIDE =A7/B7
Order of Operations
- Parenthesis
- Exponents/Powers
- Multiplication/Division
- Addition/Subtractions
- C8 type =2+3*5
- C9 type =(2+3)*5
Date not Math?
- Put today's date in cell C10
o i.e. 10/5
o Note Excel sees it as a date not as an equation (10 divided by 5), Why? Because there is no Equal sign!
Formatting
- Format column A with dollar signs
- Format column B with to be centered
- Edit Cell C1 (double click in cell)
o Note pretty colors...
o When you accept, Excel recalculates answer and the format change
- Format Column C with dollar signs
o Note format in cell C10, no longer a date
Reformat Date
- Click on Cell C10 (we don't want the whole column)
- Choose Short date from the list of number formats
- Choose "More Numbers" to view different date formats
- Choose the 14‐Mar format to return to the original data formatting

Excel 2010 Basics II Math & Functions – Class Exercise
Page 13
Formula View
- Toggle cell data with ctrl‐` (Ctrl‐~… Wavy line above tab, below Esc)
- We can see all the formulas but NO formatting
- Toggle back to answer view
Create Data Table
- Turn to Worksheet 3
- Type in this table:
Format Data Table
- Bold titles
- Increase indent of Items
- Dollar Format the Prices
- Center the Quantities and AutoFit the column
Calculate SubTotals
- Enter First SubTotal D5: = B5*C5
- We don't want to type the equation 3000 times
o Our equation is a pattern, "the # two away, times the # next to me"
- Use Fill handle to pull down "pattern"
- Switch to Formula view (Ctrl ~) to see results and switch back to normal view

Excel 2010 Basics II Math & Functions – Class Exercise
Page 14
Calculate Taxes
- D2: TaxRate
- E2: 10%
- E4: Taxes
- E5: =D5*E2 (Subtotal times TaxRate)
- Use fill handle to pull down equation
o Don't Panic answers are supposed to look weird
Absolute vs Relative
- What Happened?
o Pattern "# next to me * # three above me"
o As we move DOWN the pattern doesn't work for this equation
- Erase the answers
- Retype equation in E5, use F4 button to lock cell E2
o =D5*$E$2
(you can type in the $ signs, but F4 is faster)
Think ENFORCE for the F4 button
o D5 is relative (always cell next to me)
o $E$2 is absolute (always cell E2)
- Use fill handle to pull down answer
Calculate Totals
- F4: Total
- F5: = D5+E5
- Use fill handle for F6:F7
Calculate Grand Total
- E8: Big City Store Grand Total
o Right Align
- Click in Cell F8
- Use AutoSum button Sigma ‐ ∑
- =SUM(F5:F7)
o Calculate Sum of F5 Through F7
Note: When you click the AutoSum button Excel looks for numbers above the current cell. If it can't find a number, it will look to the left. The AutoSum button has a drop down menu to do quick calculations for Sum, Average, Max, Min, and Count.

Excel 2010 Basics II Math & Functions – Class Exercise
Page 15
Set up for Functions
- C9: Grand Total
- C10: Arith Mean
- C11: # of Items
- C12: Largest Sale
- C13: Smallest Sale
o Right align titles
- Select F5:F8, fill Yellow
o Can now refer to these as the "yellow numbers"
o All five equations will be based on the "yellow numbers"
Set up for Functions
- Click in cell D10
o We can tell we are in cell D10 because of the Name Box
- Press the Equal Sign =
o The Name Box has changed to a list of Most Recently Used Functions
- Choose SUM
o This will give us a "big gray box"
o Delete the contents
o Move window so you can see the yellow numbers
o Click and drag to select the yellow numbers
o Click OK
- Grand Totals should match (D10 and F8)
- Delete Cell D10
- Press Equal Sign =
- Click on List of Functions
- Pretend we cannot see the Sum, what do we do?
o Last option, More Functions…

Excel 2010 Basics II Math & Functions – Class Exercise
Page 16
Finding a Function
- Look through All Functions
- Find Sum and click OK
- This opens the same "big gray box"
o Choose your Yellow Numbers and Click OK
- Delete Cell D10
Editing a function
- Press the Equal Sign
- Choose SUM from function list
- Click OK
o Answer should be WRONG
- Click on the Edit Function box in front of the formula bar
o This brings back the big gray box
- Choose Yellow Numbers and Click OK
Other Basic Functions
- Click in Cell D11
- Press Equal Sign =
- Click on List of Functions
- Choose Average (aka Arithmetic Mean)
- Choose Yellow Numbers and Click OK
- Student Exercise (using Yellow numbers for each)
o D12 – Count
o D13 – Max
o D14 – Min

Excel 2010 Basics II Math & Functions – Class Exercise
Page 17
Delete answers for lower formulas and for Taxes
Naming a Cell
- Click in cell E2 (10%)
- Click in Name box
o Erase E2 in Name box
o Type TaxRate
No Spaces, No Hyphens, capitalization doesn't matter
o Press Enter and TaxRate should center in the box
- Click anywhere else, see cell address in name box
- Click on E2 (10%), see "TaxRate" in Name Box
- Click anywhere else
- Click arrow next to Name box and choose TaxRate
o Should jump to cell E2
- Go to Sheet 1, Click on Name box menu, Choose TaxRate
o Should jump to Worksheet 3, Cell E2
o We have made a "bookmark" in our workbook
Using named cell in equations
- Click in cell E5
- Press the Equal Sign =
- Click on cell D5
- Press the multiply sign *
- Click on cell E2
o Instead of E2 we see TaxRate
o TaxRate is always TaxRate is always TaxRate, no locks needed

Excel 2010 Basics II Math & Functions – Class Exercise
Page 18
Naming Ranges
- Select Yellow numbers
- Erase address in Name Box
- Type Total and press Enter
o Total should center in box
Using named cell in functions
- Click in cell F8
- Use AutoSum button Sigma ‐ ∑
o =Sum(Total)
- Reenter lower equations
o Sum
Click in cell D9
Press the equal sign
Choose Sum
Erase contents
Type TOTAL
Click OK
Typing in Functions
- Erase cell D9
o Press the equal sign
o Type S
See list of functions that start with an S
o Type U
o Double‐click on SUM
Or press Tab when the word is selected
o Type T
See list of all functions & Names that start with T
o Type O
o Double‐click Total
o Press Enter
o Student Exercise
D10 – Average
D11 – Count
D12 – Max
D13 – Min

Excel 2010 Basics II Math & Functions – Class Exercise
Page 19
Working with Ranges of Data
If we insert new data it must go inside the range
- Insert two rows, one above item "C", one Below item "C"
o Right Click on Row Number 7, INSERT
o Right Click on Row Number 9, INSERT
- Enter in data
o Row 7
D 159 951
o Row 9
E 357 753
- Select Cells D5:F5
- Pull Fill Handle down through all the yellow numbers
- Note that the count in cell D12 says there are only 4 Items
o If you had created this by dragging through the formulas, you would probably need to redo all the equations, but because we used a Named Range, we can redefine the values
Redefining Names
- Formula Tab Name Manager
- Choose Total from list
- Erase contents of REFERS TO
- Move window so you can see all the Yellow Numbers
- Select the Yellow Numbers
- Click OK
- Adjust Column width to read the ######## cells
IncludedNOT
Included

Excel 2010 Basics II Math & Functions – Class Exercise
Page 20
Freeze Panes
- Click inside Cell B5
- From the View Tab, choose Freeze Panes
If Function (if there is time)
- Add a column in G4 called "Continue?"
- Draw Logic Tree
IF TOTAL > 250000
T F
Yes No
- Use Function box to create If statement
o Logical_test: E6<250000 o Value_if_true: Yes o Value_if_false: No
- Use fill handle to fill equation down
- Edit Equation to 280000
- Use fill handle to fill down again
Freeze panes above and to the left of THIS cell. (B4)