microc/os-ii on nios ii tutorial ® ii version 4.1 sp1 ... 1–2 altera corporation using...
TRANSCRIPT
Preliminary Information
101 Innovation DriveSan Jose, CA 95134(408) 544-7000http://www.altera.com
Using MicroC/OS-II RTOS with theNios II Processor Tutorial

Copyright © 2004 Altera Corporation. All rights reserved. Altera, The Programmable Solutions Company, the stylized Altera logo, specific device des-ignations, and all other words and logos that are identified as trademarks and/or service marks are, unless noted otherwise, the trademarks andservice marks of Altera Corporation in the U.S. and other countries. All other product or service names are the property of their respective holders. Al-tera products are protected under numerous U.S. and foreign patents and pending applications, maskwork rights, and copyrights. Altera warrantsperformance of its semiconductor products to current specifications in accordance with Altera's standard warranty, but reserves the right to makechanges to any products and services at any time without notice. Altera assumes no responsibility or liability arising out of the ap-plication or use of any information, product, or service described herein except as expressly agreed to in writing by AlteraCorporation. Altera customers are advised to obtain the latest version of device specifications before relying on any published in-formation and before placing orders for products or services.
Printed on recycled paper
ii Altera Corporation
TU-NIOSII-MCRC/OS-II-1.1

Altera Corporation
Contents
About this Tutorial ................................................................................. vHow to Find Information ......................................................................................................................... vHow to Contact Altera .............................................................................................................................. vTypographic Conventions ...................................................................................................................... vi
Tutorial Introduction ............................................................................................................................................ 1–1Hardware & Software Requirements ................................................................................................. 1–1Tutorial Files ........................................................................................................................................... 1–1Hello MicroC/OS-II Design ................................................................................................................. 1–2
Create a New Nios II IDE Project ................................................................................................... 1–3Configure the System Library ........................................................................................................ 1–6Build & Run the Nios II Software Project ..................................................................................... 1–9
iiiPreliminary

Contents Using MicroC/OS-II RTOS with the Nios II Processor Tutorial
iv Altera CorporationPreliminary

Altera Corporation
About this Tutorial
This tutorial introduces you to the Nios® II integrated development environment (IDE) and MicroC/OS-II development flow. It shows you how to use the Nios II IDE to create a new MicroC/OS-II project to configure, build, and run a MicroC/OS-II program on the Nios development board.
Table 1–1 shows the tutorial revision history.
How to Find Information
■ The Adobe Acrobat Find feature allows you to search the contents of a PDF file. Click the binoculars toolbar icon to open the Find dialog box.
■ Bookmarks serve as an additional table of contents.■ Thumbnail icons, which provide miniature previews of each page,
provide a link to the pages.■ Numerous links, shown in green text, allow you to jump to related
information.
Table 1–1. Tutorial Revision History
Date Description
September 2004 Updates for Nios II 1.01 release.
May 2004 First publication.
v

How to Find Information Using MicroC/OS-II RTOS with the Nios II Processor Tutorial
How to Contact Altera
For the most up-to-date information about Altera products, go to the Altera world-wide web site at www.altera.com. For technical support on this product, go to www.altera.com/mysupport. For additional information about Altera products, consult the sources shown below.
Information Type USA & Canada All Other Locations
Technical support www.altera.com/mysupport/ altera.com/mysupport/
(800) 800-EPLD (3753)(7:00 a.m. to 5:00 p.m. Pacific Time)
(408) 544-7000 (1)(7:00 a.m. to 5:00 p.m. Pacific Time)
Product literature www.altera.com www.altera.com
Altera literature services [email protected] (1) [email protected] (1)
Non-technical customer service
(800) 767-3753 (408) 544-7000 (7:30 a.m. to 5:30 p.m. Pacific Time)
FTP site ftp.altera.com ftp.altera.com
Note to table:(1) You can also contact your local Altera sales office or sales representative.
vi Altera Corporation

About this Tutorial How to Find Information
Typographic Conventions
This document uses the typographic conventions shown below.
Visual Cue Meaning
Bold Type with Initial Capital Letters
Command names, dialog box titles, check box options, and dialog box options are shown in bold, initial capital letters. Example: Save As dialog box.
bold type External timing parameters, directory names, project names, disk drive names, filenames, filename extensions, and software utility names are shown in bold type. Examples: fMAX, \qdesigns directory, d: drive, chiptrip.gdf file.
Italic Type with Initial Capital Letters
Document titles are shown in italic type with initial capital letters. Example: AN 75: High-Speed Board Design.
Italic type Internal timing parameters and variables are shown in italic type. Examples: tPIA, n + 1.
Variable names are enclosed in angle brackets (< >) and shown in italic type. Example: <file name>, <project name>.pof file.
Initial Capital Letters Keyboard keys and menu names are shown with initial capital letters. Examples: Delete key, the Options menu.
“Subheading Title” References to sections within a document and titles of on-line help topics are shown in quotation marks. Example: “Typographic Conventions.”
Courier type Signal and port names are shown in lowercase Courier type. Examples: data1, tdi, input. Active-low signals are denoted by suffix n, e.g., resetn.
Anything that must be typed exactly as it appears is shown in Courier type. For example: c:\qdesigns\tutorial\chiptrip.gdf. Also, sections of an actual file, such as a Report File, references to parts of files (e.g., the AHDL keyword SUBDESIGN), as well as logic function names (e.g., TRI) are shown in Courier.
1., 2., 3., anda., b., c., etc.
Numbered steps are used in a list of items when the sequence of the items is important, such as the steps listed in a procedure.
■ ● • Bullets are used in a list of items when the sequence of the items is not important.
v The checkmark indicates a procedure that consists of one step only.
1 The hand points to information that requires special attention.
cThe caution indicates required information that needs special consideration and understanding and should be read prior to starting or continuing with the procedure or process.
w The warning indicates information that should be read prior to starting or continuing the procedure or processes
r The angled arrow indicates you should press the Enter key.
f The feet direct you to more information on a particular topic.
Altera Corporation vii

How to Find Information Using MicroC/OS-II RTOS with the Nios II Processor Tutorial
viii Altera Corporation

Altera Corporation September 2004
Tutorial
Introduction This tutorial will familiarize you with the Nios II IDE and MicroC/OS-II development flow. The Nios II IDE offers designers a rich development platform for Nios II applications. The Nios II IDE contains the MicroC/OS-II real-time operating system, providing designers with the ability to build MicroC/OS–II applications for the Nios II processor quickly. This tutorial provides step-by-step instructions for building a simple program based on the MicroC/OS-II RTOS.
f For complete details on MicroC/OS-II for the Nios II processor, refer to the “MicroC/OS-II Real-Time Operating System” chapter in the Nios II Software Developer’s Handbook.
Hardware & Software Requirements
This tutorial requires the following hardware and software:
■ Quartus® II version 4.1 SP1 or later■ Nios II embedded processor version 1.01 or later■ Nios Development Board, Stratix™ II Edition, Cyclone™ Edition,
Stratix Edition, or Stratix Professional Edition■ Altera USB-Blaster™ or ByteBlaster™ cable
1 To complete this tutorial, you must have the Nios II IDE installed, and your Nios development board must be connected to a host PC. For details on how to install the software and connect the board, see the Nios II Development Kit Getting Started User Guide.
Tutorial Files The Nios II development kit includes the tutorial designs. The hardware design is the standard reference design and the software design is a Nios II IDE template. After you install the Nios II development kit, you can find the design files in the Nios II development kit directory structure.
■ The standard reference hardware design files are located in the <Nios II kit path>\examples\<verilog or vhdl>\<Nios development board>\standard directory.
■ The MicroC/OS-II tutorial software design files are located in the <Nios II kit path>\examples\software\ucosii_tutorial directory.
1–1

Hello MicroC/OS-II Design
1 You do not need to move or copy these software files because the Nios II IDE copies them to your working project directory automatically.
Hello MicroC/OS-II Design
The example design you use for this tutorial is a simple design that exercises some of the basic features of the operating system. Figure 1–1 is a simplified diagram of the application.
Figure 1–1. Tutorial Example Design
As shown in Figure 1–1 the design has five active tasks. send_task fills up a message queue with incrementing data. receive_task1 and receive_task2 periodically pull messages out of the message queue. getsem_task1 and getsem_task2 compete over a shared resource that is protected by a semaphore. The design also has two tasks not shown in Figure 1–1: one for initialization and one for printing status information.
getsem_task1
send_task
receive_task2
getsem_task2
receive_task1
OSQPostOpt OSQPend
OSQPend
OSSemPend
OSSemPost
OSSemPost
OSSemPend
1–2 Altera CorporationUsing MicroC/OS-II RTOS with the Nios II Processor Tutorial September 2004

Tutorial
The process for creating a MicroC/OS-II software image for the Nios II processor involves the following steps:
1. Create a new Nios II IDE project.
2. Configure the Nios II software library project.
3. Build and run the Nios II software project.
These steps are described in detail in the following sections.
Create a New Nios II IDE Project
In this section you will create a new Nios II IDE project using a software template. Perform the following steps:
1. Choose Programs > Altera > Nios II Development Kit <version number> > Nios II IDE (Windows Start menu).
2. Choose New > C/C++ Application (File menu). The first page of New Project wizard opens. Under Select Project Template, select the MicroC/OS-II Tutorial.
3. The project name and project path are filled in for you automatically. Keep these defaults.
4. Click Browse under Select Target Hardware.
5. Browse to the standard example directory for the Nios development board that you are targeting, i.e., <Nios II kit path>\examples\<verilog or vhdl>\<Nios development board>\standard directory, where <Nios development board> is one of the following options:
● NiosII_StratixII_2S60_ES for the Stratix EP2S60ES board● NiosII_Stratix_1S10 for the Stratix EP1S10 board● NiosII_Stratix_1S10_ES for the Stratix EP1S10ES board● NiosII_Cyclone_1C20 for the Cyclone EP1C20 board● NiosII_Stratix_1S40 for the Stratix EP1S40 board
6. Select the file std_<device name>.ptf.
7. Click Open. You are returned to the New Project wizard. As shown in Figure 1–2, the SOPC Builder System box under Select Target Hardware contains the path to the .ptf file for the standard example design. Additionally, the CPU box contains the name of the CPU in the example SOPC Builder system.
Altera Corporation 1–3September 2004 Using MicroC/OS-II RTOS with the Nios II Processor

Hello MicroC/OS-II Design
Figure 1–2. New Project Wizard Page 1
8. Click Next to go the second page of the New Project wizard.
9. Turn on the Select or create a system library option.
10. Click New System Library Project to open the system library page. See Figure 1–3.
1–4 Altera CorporationUsing MicroC/OS-II RTOS with the Nios II Processor Tutorial September 2004

Tutorial
Figure 1–3. New System Library Dialog Box
11. Type std_system_lib in the Name box.
12. Select MicroC/OS-II in the Select Type of system library box.
Altera Corporation 1–5September 2004 Using MicroC/OS-II RTOS with the Nios II Processor

Hello MicroC/OS-II Design
13. Click Finish to return to the New Project wizard. See Figure 1–4.
Figure 1–4. New Project Wizard Page 2
14. Click Finish to complete creation of your new project. The wizard creates two projects in the C/C++ Projects view, as shown in Figure 1–5.
Figure 1–5. C/C++ Projects
Application project
MicroC/OS-II system library for the standard hardware
Nios II device drivers
1–6 Altera CorporationUsing MicroC/OS-II RTOS with the Nios II Processor Tutorial September 2004
Tutorial
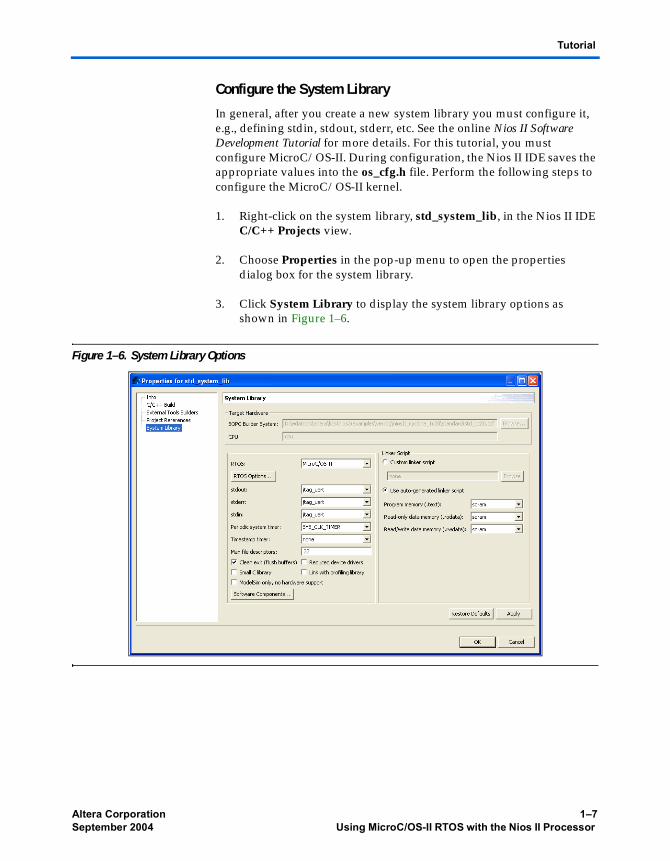
Configure the System Library
In general, after you create a new system library you must configure it, e.g., defining stdin, stdout, stderr, etc. See the online Nios II Software Development Tutorial for more details. For this tutorial, you must configure MicroC/OS-II. During configuration, the Nios II IDE saves the appropriate values into the os_cfg.h file. Perform the following steps to configure the MicroC/OS-II kernel.
1. Right-click on the system library, std_system_lib, in the Nios II IDE C/C++ Projects view.
2. Choose Properties in the pop-up menu to open the properties dialog box for the system library.
3. Click System Library to display the system library options as shown in Figure 1–6.
Figure 1–6. System Library Options
Altera Corporation 1–7September 2004 Using MicroC/OS-II RTOS with the Nios II Processor

Hello MicroC/OS-II Design
4. Click RTOS Options under RTOS. The MicroC/OS-II RTOS Options dialog box opens, as shown in Figure 1–7.
Figure 1–7. MicroC/OS-II RTOS Options
5. Click the “+” in the left hand panel to expand the contents under MicroC/OS-II. MicroC/OS-II is highly configurable. The options you select in this dialog box are saved to the os_cfg.h file and determine which MicroC/OS-II options are included in the binary image. Examine the options you can select by clicking each of the options under MicroC/OS-II.
f For details on the various MicroC/OS-II features, refer to the “MicroC/OS-II Real Time Operating System” chapter in the Nios II Software Developer’s Handbook.
6. Choose the default settings and click OK. You are returned to the system library options dialog box.
7. Click OK to complete configuration.
You have finished configuring the system library and are ready to build and run the example as described in the following section.
1–8 Altera CorporationUsing MicroC/OS-II RTOS with the Nios II Processor Tutorial September 2004

Tutorial
f For additional details on how to build and run programs with the Nios II IDE, see the online Nios II Software Development Tutorial.
Build & Run the Nios II Software Project
In this section, you will run the example design on a development board. Using Nios II IDE, you will build the application, configure the development board with a valid SRAM Object File (.sof), and download the Executable and Linkable Format File (.elf).
1. In the Nios II IDE C/C++ Projects view, select the ucosii_tutorial_0 project.
2. Open the Quartus II Programmer by choosing Quartus II Programmer (Tools menu). See Figure 1–8.
Figure 1–8. Quartus II Programmer
3. Choose Open (File menu).
Altera Corporation 1–9September 2004 Using MicroC/OS-II RTOS with the Nios II Processor

Hello MicroC/OS-II Design
4. Select standard.sof as shown in Figure 1–9.
Figure 1–9. Open Dialog Box
5. Click Open. You return to the Quartus II Programmer.
6. Check the Program/Configure option.
7. Click Start to configure the FPGA on the development board with the SOF.
8. Choose Exit (File menu) to close the Quartus II Programmer. You return to the Nios II IDE.
9. If you are asked if you want to save changes to the chain1.cdf file, click No.
10. Choose Run As > Nios II Hardware (Run menu) to build the program, download it to the board, and run it.
f For additional information on the Nios II IDE build process and run configuration setup, see the Nios II Software Development Tutorial within the Nios II IDE online help.
1–10 Altera CorporationUsing MicroC/OS-II RTOS with the Nios II Processor Tutorial September 2004

Tutorial
After download is complete, the Nios II IDE Console view is updated periodically by the print_status_task() as shown below.
****************************************************************Hello From MicroC/OS-II Running on Nios II. Here is the status:
The number of messages sent by the send_task: 39
The number of messages received by the receive_task1: 10
The number of messages received by the receive_task2: 3
The shared resource is owned by: getsem_task2
The Number of times getsem_task1 acquired the semaphore 30
The Number of times getsem_task2 acquired the semaphore 24
****************************************************************
Congratulations, you have successfully configured, built, and run a MicroC/OS-II program.
f For further details on this tutorial, you can examine the source file ucosii_tutorial.c. For complete reference on MicroC/OS-II, refer to the “MicroC/OS-II Real Time Operating System” chapter in the Nios II Software Developer’s Handbook.
Altera Corporation 1–11September 2004 Using MicroC/OS-II RTOS with the Nios II Processor

Hello MicroC/OS-II Design
1–12 Altera CorporationUsing MicroC/OS-II RTOS with the Nios II Processor Tutorial September 2004