microcontroller based solar trackereie.uonbi.ac.ke/sites/default/files/cae/engineering/eie... ·...
TRANSCRIPT

UNIVERSITY OF NAIROBI
FACULTY OF ENGINEERING
DEPARTMENT OF ELECTRICAL AND INFORMATION ENGINEERING
MICROCONTROLLER BASED SOLAR TRACKER
PROJECT INDEX: PRJ 127
BY
OKEBE JUDY AWITI
F17/39433/2011
SUPERVISOR: MR.C. OMBURA
EXAMINER: DR. DHARMADHIKARY
Project report submitted in partial fulfilment of the requirement for the award for
the degree of
Bachelor of Science in ELECTRICAL AND ELECTRONICS ENGINEERING of the
University of Nairobi 2016
Submitted on:16th
MAY 2016

DECLARATION OF ORIGINALITY
FACULTY/ SCHOOL/ INSTITUTE: Engineering
DEPARTMENT: Electrical and Information Engineering
COURSE NAME: Bachelor of Science in Electrical & Electronics Engineering
TITLE OF NAME OF STUDENT: Okebe Judy Awiti
REGISTRATION NUMBER: F17/39433/2011
COLLEGE: Architecture & Engineering
WORK: MICROCONTROLLER BASED SOLAR TRACKER
1) I understand what plagiarism is and I am aware of the university policy in this regard.
2) I declare that this final year project report is my original work and has not been submitted
elsewhere for examination, award of a degree or publication. Where other people’s work or
my own work has been used, this has properly been acknowledge and referenced in
accordance with the University of Nairobi’s requirements.
3) I have not sought or used the services of any professional agencies to produce this work.
4) I have not allowed, and shall not allow anyone to copy my work with the intention of
passing it off as his/her own work.
5) I understand that any false claim in respect of this work shall result in disciplinary action, in
accordance with University anti-plagiarism policy.
Signature: ….………………………………………………………………………………………
Date: ……………………………………………………………………………………………
Approved by:
Supervisor: Mr. C. Ombura
Signature: ……………………………………………………………………………………

i
DEDICATION
To my family for their support during my university education and to my colleagues who helped
me when I needed them.

ii
ACKNOWLEDGEMENT
This project required a large time commitment, not only on my part, but of a few others. I would
like to take this opportunity to thank them.
First and foremost, I would like to thank my supervisor, Mr Ombura, for his guidance in the
implementation of this project.
I particularly thank Mr Kinyua for his insight, his advice and help towards the overall success of
this project. Also, special thanks to Mr Ondeng for providing me with the raspberry pi
microcontroller which was the very core of my project.
Finally, I would like to extend my heartfelt gratitude towards family, friends and classmates, for
their encouragement and insight as well as the numerous hours we spent in the library
researching on our respective projects and the time we took to go and acquire the various
parameters needed in the project design and implementation.
Above everything else, I would like to give thanks to the Almighty God.

iii
TABLE OF CONTENTS LIST OF FIGURES ......................................................................................................................................... vi
LIST OF TABLES ......................................................................................................................................... vii
ABBREVIATIONS AND ACRONYMS ................................................................................................. viii
ABSTRACT...................................................................................................................................................... ix
1 INTRODUCTION.................................................................................................................................... 1
1.1 General background ......................................................................................................................... 1
1.2 Problem statement ............................................................................................................................ 2
1.3 Project justification .......................................................................................................................... 2
1.4 Objectives of Study.......................................................................................................................... 2
1.5 Scope of project ................................................................................................................................ 3
1.6 Methodology ..................................................................................................................................... 3
1.7 Project report organization ............................................................................................................. 4
2 LITERATURE REVIEW ....................................................................................................................... 5
2.1 Introduction ....................................................................................................................................... 5
2.2 Types of Solar Trackers and Solar Tracking Techniques ........................................................ 5
2.2.1 Single Axis Solar Tracking System ..................................................................................... 5
2.2.2 Dual Axis Solar Tracking System ........................................................................................ 6
2.2.3 Active Solar Tracking ............................................................................................................. 7
2.2.4 Passive Solar Tracking ........................................................................................................... 7
2.2.5 Chronological Solar Tracking ............................................................................................... 7
2.3 Solar tracking in relation to revolution of the earth .................................................................. 7
2.4 Solar Tracking with Algorithms ................................................................................................... 8
2.4.1 Solar altitude angle .................................................................................................................. 9
2.4.2 Solar azimuth angle ................................................................................................................. 9
2.4.3 Elevation angle ......................................................................................................................... 9
2.4.4 Solar zenith angle .................................................................................................................... 9
2.5 Nature of Solar Irradiation ............................................................................................................. 9
2.5.1 Solar Constant ........................................................................................................................ 10
2.5.2 Sunlight .................................................................................................................................... 10
iv
2.5.3 Sun chart diagram .................................................................................................................. 11
2.6 Fixed and Tracking collectors ..................................................................................................... 12
2.6.1 Fixed collectors ...................................................................................................................... 12
2.6.2 Tracking collectors ................................................................................................................ 13
2.7 Merits and demerits of Solar Energy ......................................................................................... 13
2.7.1 Merits ....................................................................................................................................... 13
2.7.2 Demerits ................................................................................................................................... 14
3 DESIGN AND IMPLEMENTATION .............................................................................................. 15
3.1 Light sensor theory ........................................................................................................................ 15
3.1.1 Characteristics of LDRs ....................................................................................................... 15
3.1.2 Construction and operation of an LDR ............................................................................. 16
3.1.3 Light Sensor Design .............................................................................................................. 19
3.2 Analog-to-Digital converter ......................................................................................................... 20
3.3 Stepper motor and driver theory ................................................................................................. 21
3.3.1 Characteristics of stepper motors ....................................................................................... 21
3.3.2 Types of stepper motors ....................................................................................................... 22
3.3.3 Working principle of the stepper motor ............................................................................ 23
3.3.4 Step Angle ............................................................................................................................... 26
3.3.5 Advantages of stepper motor ............................................................................................... 26
3.3.6 Disadvantages of stepper motors ........................................................................................ 27
3.4 Motor Driver Circuitry .................................................................................................................. 27
3.5 Limit switches ................................................................................................................................. 28
3.6 Microcontroller (RASPBERRY PI 1 MODEL B+)................................................................ 28
3.7 Power Supply .................................................................................................................................. 29
3.8 Software Design ............................................................................................................................. 30
3.8.1 Design Tool ............................................................................................................................. 30
3.8.2 Algorithm for motor control ................................................................................................ 31
4 SIMULATION, RESULTS AND ANALYSIS ............................................................................... 32
4.1 Simulation ........................................................................................................................................ 32
4.2 Results .............................................................................................................................................. 32
v
4.21 LDR outputs for a bright sunny day on 27th
April 2016 ........................................................... 33
4.22 LDR outputs for a cloudy morning and bright sunny afternoon on 28th April 2016 ........... 33
4.23 LDR outputs for a cloudy day on 29th April 2016 ...................................................................... 34
4.24 Solar panel readings for a cloudy morning and bright sunny day on 28th
April 2016 ........ 34
4.3 Analysis ............................................................................................................................................ 35
5 CONCLUSION AND RECOMMENDATIONS ............................................................................ 39
5.1 Recommendations for further work ........................................................................................... 39
5.2 Conclusion ....................................................................................................................................... 39
REFERENCES ................................................................................................................................................ 40
APPENDICES ................................................................................................................................................. 41
Appendix One: Code used in the Raspberry pi .................................................................................... 41
Appendix Two: The control commands for the 28BYJ-48 stepper motor ........................................ 46
Appendix Three: Screenshot of some of the readings obtained ........................................................... 46

vi
LIST OF FIGURES Figure 1-1: Block Diagram of Solar Tracker .............................................................................................. 4
Figure 2-1: Single axis tracker ....................................................................................................................... 6
Figure 2-2: Dual axis tracker .......................................................................................................................... 6
Figure 2-3: Motion of the Earth around the Sun ........................................................................................ 8
Figure 2-4: Observer at position Q Illuminated by Sun Rays ................................................................. 8
Figure 2-5: Sunpath Diagram of Nairobi ................................................................................................... 12
Figure 3-1: Resistance vs. Illumination curve for a typical LDR ......................................................... 16
Figure 3-2: LDR construction ...................................................................................................................... 17
Figure 3-3: Cds photocell circuit ................................................................................................................. 18
Figure 3-4: Light sensor design ................................................................................................................... 19
Figure 3-5: MCP3008 ADC ......................................................................................................................... 20
Figure 3-6: Torque vs. Speed characteristics curve of a Stepper Motor ............................................. 22
Figure 3-7: 4-Phase unipolar stepper motor windings ............................................................................ 23
Figure 3-8: Different drive modes on a 4-phase unipolar stepper motor ............................................ 25
Figure 3-9: Pin out diagram of ULN2003 stepper driver IC ................................................................. 27
Figure 3-10: Raspberry Pi header ................................................................................................................ 29
Figure3-11:Flow chart of the assembly ......................................................................................................... 30
Figure 3-12: Solar tracker schematic .......................................................................................................... 31
Figure 4-1: Graph of results of table 4-1 ...................................................................................................... 35
Figure 4-2: Graph of results of table 4-2 ...................................................................................................... 36
Figure 4-3: Graph of results for table 4-3 .................................................................................................... 37
Figure 4-4: Graphical comparison of output power readings of table 4-4 .............................................. 37

vii
LIST OF TABLES Table 2-1: Range of Sunlight ....................................................................................................................... 11
Table 3-1: Photocell resistance testing data .............................................................................................. 17
Table 3-2: Full Stepping ................................................................................................................................ 23
Table 3-3: Half Stepping ............................................................................................................................... 24
Table 4-1: LDR readings on day 1 .............................................................................................................. 33
Table 4-2: LDR reading on day 2 ................................................................................................................ 33
Table 4-3: LDR reading on day 3 ................................................................................................................ 34
Table 4-4: Solar panel ratings ......................................................................................................................... 35

viii
ABBREVIATIONS AND ACRONYMS
ADC Analog to Digital Converter
DC Direct current
GND Ground
IC Integrated Circuit
I Current
I/O Input/ Output
LDR Light Dependent Resistor
LDR Resistor
MAX Maximum
MCU Microcontroller
MIN Minimum
VCC Supply voltage
UV Ultra Violet Light
PCB Printed Circuit Board
PV Photovoltaic panels
Cds Cadmium sulphide
GaAs
MISO
MOSI
CLK
SPI
CS
GPIO
MPPT
Gallium arsenide
Master Input Slave Output
Master Output Slave Input
Clock
Serial peripheral interface
Chip Select line
General Purpose Input Output pins
Maximum Power Point Tracker

ix
ABSTRACT This project is set up to find a viable and cost effective way of maximizing the use of a solar
panel to harness energy. Impending scarcity of nonrenewable resources, has led people to
consider the use of other sources of energy. From all other resources, solar energy is
comparatively abundant and it is very easy to convert to electrical energy. Using the solar panel
to convert sun’s energy to electrical is very common, but because of the transition of the Sun
from east to west, the fixed solar panel may not be able to generate maximum energy. The
proposed system seeks to solve this problem via an arrangement for the solar panel to track the
sun.
For extraction of maximum energy from the sun, the plane of the solar collector should always
be perpendicular to the incident radiation. The movement of the earth affects the radiation
intensity received by the solar collector hence the need for a solar tracker.
This project therefore involves the design and implementation of a microcontroller based solar
tracker system using raspberry pi microcontroller expected to be used in solar panels. The solar
tracker used is a dual axis solar tracker which ensures the optimization of the solar panel by
making sure that sunlight is incident upon the panel at any given time of day. The prototype’s
operation is achieved by connecting two stepper motors to a solar panel such that the panel
maintains its face always perpendicular to the sun in relation to the signals received by the
microcontroller from two light sensors. The programmed microcontroller hence delivers stepped
pulses in periodical time intervals for the stepper motor to rotate the mounted solar panel as
desired.
The performance and characteristic of the solar tracker are hence analyzed.

1
1 INTRODUCTION
1.1 General background
In the development of any nation, energy is the main driving factor in the world today. There is
an extensive amount of energy that gets extracted, distributed, converted and consumed each and
every day in the world today. Fossil fuels account for about 85 percent of energy that is
produced. Fossil fuel resources are limited and also using them is known to cause global
warming because of emission of greenhouse gases thereby leading to the need for alternate
sources of energy.
Renewable energy is rapidly gaining momentum as an alternative source of energy since fossil
fuel prices are varying every other day in the market. The most used renewable energies are
solar, wind, gas and biomass but the most employed is solar energy.
The sun radiates energy in the form of electromagnetic energy and the amount of
electromagnetic radiation that reaches the earth from the sun is referred to as solar radiation.
Theoretically, solar energy levels reaches around 1366 W/ on the surface of the earth. This
simply means that for every square meter of surface area on a solar collecting platform that faces
the sun, the system will nearly be able to collect around 1 kW of solar energy(if it is 100%
efficient)[1] thus solar energy has impressive magnitude and provides more energy than present
day human technology. Solar panels inarguably convert radiation from the sun into electrical
energy. The panels are manufactured from semiconductor materials, such as silicon. Their
efficiency is 24.5% on the higher side. Solar energy is being used as an alternative energy source
due to the fact that it is readily available and environmentally friendly. It is hence critical for
people to gain an understanding and appreciation of technologies associated with solar panels.
Solar energy is geared toward providing affordable, sustainable and reliable supply of energy
that will simulate high and sustained economic growth. Utilization of solar energy is low despite
the abundant availability of solar energy resource. In Kenya for example, solar energy is mainly
used for photovoltaic systems, water heating and drying of agricultural resource in solar farms.
The systems are used mainly for telecommunication, lighting, protection of pipelines, and water
pumping. The major factor affecting exploitation of solar energy resource in the country is the
high capital cost and low awareness of its economic benefits as well as lack of adherence to
system standards by suppliers. Compared to hydroelectric power supplied by the government
which costs about ksh20 per unit ,the cost of solar energy is comparatively lower which results in
high profit margins in institutions and industrial areas as well as in our homes if we use it.
With solar energy rapidly gaining recognition as a cost effective source of energy, the Kenyan
government has made it mandatory for property developers and home owners to set up solar
water heating systems due to the increasing demand for electricity and in order to reduce
wastage.

2
Research has been conducted over the years to be able to increase the efficiency of the solar
panel. Three ways of increasing the efficiency of the solar panels are through maximizing the
power output, increasing cell efficiency and use of a solar tracking system[10].
The solar tracking system is the most productive since as opposed to the other two methods it
leads to the most power generation. MPPT’s for example, are productive but cannot increase
generation of power when the sun is not aligned with the system hence it is advantageous to have
the solar panels track the sun’s trajectory as it moves across the sky. This tracking movement
tends to maximize the amount of power absorbed by the solar panels. It has been estimated that
the use of a tracking system over a fixed system can increase the power output by up to 30%[11].
1.2 Problem statement
Too many areas opt to use fossil fuels as their main source of generating electricity. This means
that individuals are subject to the limitations and pollutants that comes with it. For traditional
power, an extensive and costly infrastructure must be put in place meaning that in developing
countries, electricity is limited to a single bulb or for brand new buildings. This project proposes
an implementation of a system that is capable of improving solar power production by 30-40%
using raspberry pi microcontroller to implement a control circuit which in turn positions two
stepper motors used to orient the solar panel optimally.
1.3 Project justification
The demand for electricity keeps increasing year by year but the main resources; oil, gas and
even coal are depleting. Due to reduction of nonrenewable resources, people are considering use
of alternate sources of energy. From all other available resources, solar energy is the most
abundant and is comparatively easy to convert to electrical energy. This project seeks to address
the challenge of accurate, low power as well as economical microcontroller based solar tracking
system that can be implemented using the allocated time and resources so as to track the relative
motion of the sun in the sky during daylight. The system is therefore very beneficial especially
during morning and afternoon hours.
1.4 Objectives of Study
The main objectives of the study are outlined below:
To design a system that is able to control the position of solar panel in accordance with the
position of the sun.
To invent a more affordable solar tracker as opposed to commercial made solar trackers.

3
1.5 Scope of project
The project explored use of a solar panel coupled to two stepper motors because of their high
speed and low power consumption, to track the sun both in the horizontal and vertical direction
so that maximum light is incident upon the panel at any given time of day. Four light sensors
mounted on the solar panel were be able to detect the sun’s rays, that is, a pair for each axis
movement. The voltages at the two corresponding edges of the solar panel were compared and
the raspberry pi microcontroller used their difference as the error that the stepper motors have to
rotate through a corresponding angle to adjust the position of solar panel till the two LDR
voltage inputs are equal. Since the LDRs produce analog output voltage and raspberry pi
microcontroller can only read digital output, an external Analog-to-Digital converter was applied
to the system.
The code for the microcontroller was constructed using python programming language which is
the main programming language for the raspberry pi microcontroller. The stepper motor was
driven by an IC as the raspberry pi is not capable of handling the power requirements of the
stepper motor. This IC is the ULN2003APG chip which forms the driver circuit.
1.6 Methodology
As stated before, the aim of the project was to analyze the performance of a dual axis solar
tracking system. The project consists of three main structures which are the input, controller and
output.
The inputs were from the Light dependent resistors which were arranged in a voltage divider
circuit, the raspberry pi is the controller and the stepper motors are the output. The overall block
diagram is presented in fig 1-1 in the next page. In this project, the raspberry pi receives analog
input from four Light dependent resistor’s and converts the input into digital signal using an
Analog-to-digital converter then it sends the signals to two stepper motors in order to determine
the movement of the panel.
The three stages were designed independently before being joined into one system this ensures
that if there were any errors, they were considered independently and corrected.

4
Sensor 1
Sensor 2
Sensor 3
Sensor 4
Figure 1-1: Block Diagram of Solar Tracker
1.7 Project report organization
The project is divided into 5 chapters:
Chapter 1: This covers the introduction of the project report describing the justification for
doing the project, the objectives, methodology and scope of the work.
Chapter 2: This covers the literature review that is based on the background of the problem.
There is an overview of the methods used for tracking and how tracking the
movement of the sun optimizes the efficiency of solar panels.
Chapter 3: This chapter involves the design and implementation of the project.
Chapter 4: It involves design of the system, simulations and implementation.
Chapter 5: This chapter has the discussion, conclusion and recommendations for further
work with regard to this project.
ADC
RASPBERRY
PI
MCU
Stepper
motor
driver 1
Stepper
motor
driver 2
Stepper motor 1
Stepper motor 2

5
2 LITERATURE REVIEW
2.1 Introduction
The increasing demand for energy has led to renewable energy sources being more popular as
well as the technologies involved in their conversion to electricity, solar energy being the most
popular out of any of the others since it is the cleanest most abundant renewable energy source
available.
The tapping of usable electricity from the sun was made possible with the discovery of the
photoelectric mechanism and development of the solar cell. The solar cell is a semiconductor
material which converts visible light into direct current. When sunlight hits a solar cell, the
energy knocks electrons free from their atoms allowing them to flow through the material. Solar
arrays, which are a series of solar cells electrically connected with generation of a DC voltage
that can be used on a load, are increasingly being used since their efficiencies are becoming
higher. They are extremely popular in remote areas where there is no connection to the grid. The
cost of solar cells is also decreasing with time thus the conversion of solar energy to electric
energy is becoming economically feasible. Therefore, to harvest more energy it is desirable that
the energy conversion units are simple reliable and low cost with high efficiency.
Solar panels are usually used to absorb the sun radiation for generating electricity. A solar panel
is made from solar cells combined into modules of about 40 cells. The most efficient solar panels
are usually made from amorphous silicon or non-silicon materials such as cadmium telluride. In
large companies, the solar panels are usually placed in a system of panels or mirrors at tilt angles
in order to generate maximum power. However, these may not be very efficient and is also very
costly hence the need for solar tracking devices. A solar tracker is a device which orients a
payload towards the sun’s direction hence ensuring that it is always exposed to the sun no matter
the time of day or location of the panel.
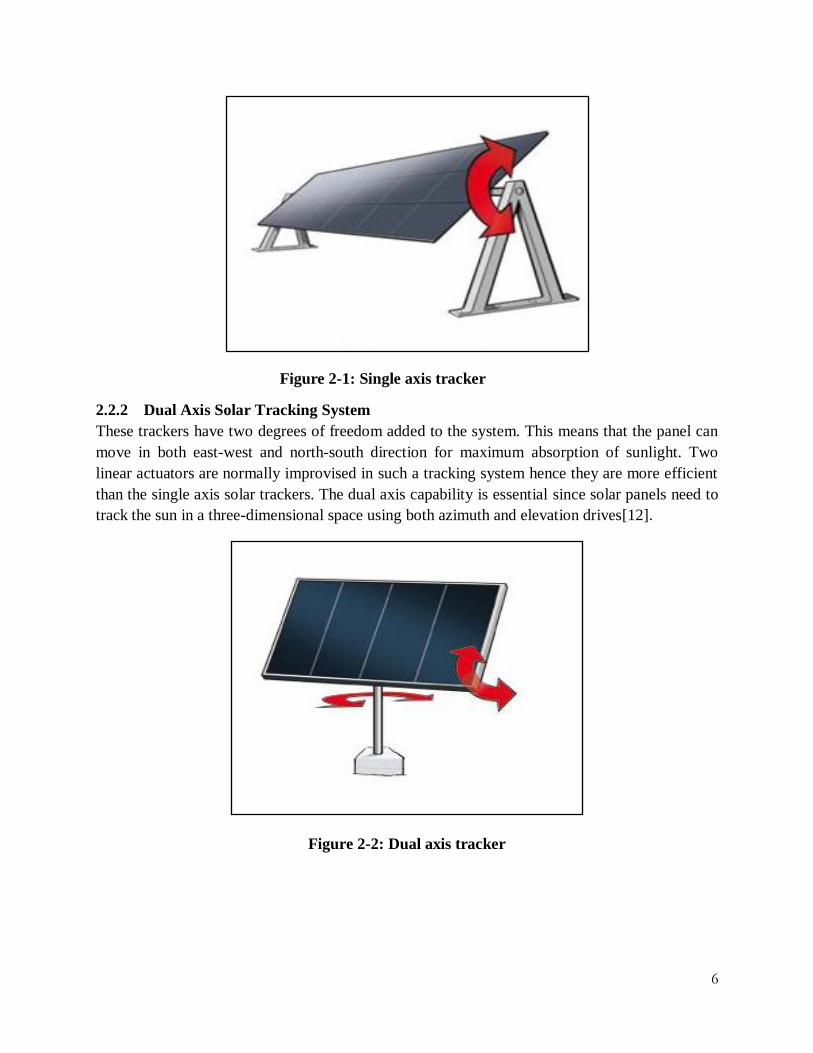
2.2 Types of Solar Trackers and Solar Tracking Techniques
Solar trackers can be grouped into the following categories;
2.2.1 Single Axis Solar Tracking System
The single axis trackers are panels that use a tracking device to follow the sun’s trajectory from
east to west throughout the day. They have one degree of freedom that act as the axis of rotation.
A single linear actuator is used, such as a motor to drive the panel according to sun movements.
This way, the solar panel is always oriented, normally to sun irradiation. Types of single axis
trackers include horizontal single axis trackers (HSAT), horizontal single axis tracker with tilted
modules (HTSAT), vertical single axis trackers (VSAT), tilted single axis trackers (TSAT) and
polar aligned single axis trackers (PSAT)[12].
6
Figure 2-1: Single axis tracker
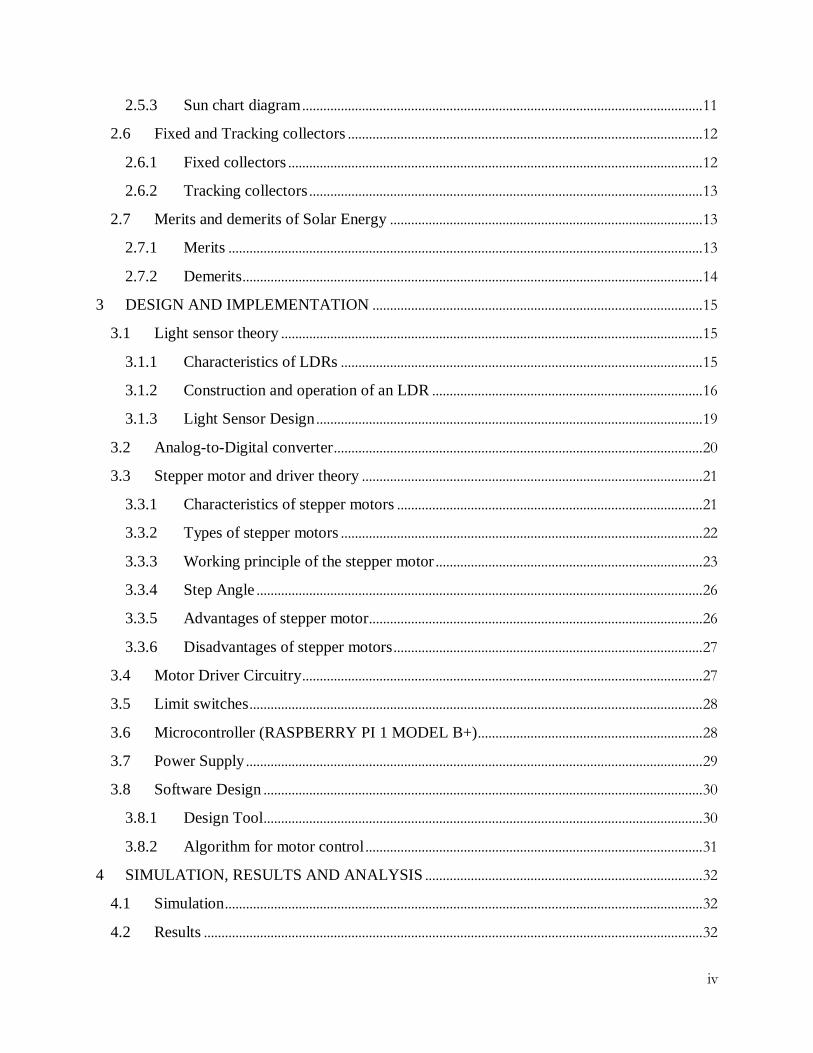
2.2.2 Dual Axis Solar Tracking System
These trackers have two degrees of freedom added to the system. This means that the panel can
move in both east-west and north-south direction for maximum absorption of sunlight. Two
linear actuators are normally improvised in such a tracking system hence they are more efficient
than the single axis solar trackers. The dual axis capability is essential since solar panels need to
track the sun in a three-dimensional space using both azimuth and elevation drives[12].
Figure 2-2: Dual axis tracker
7
The methods employed in the above techniques can be further subdivided into the following
drive modes :
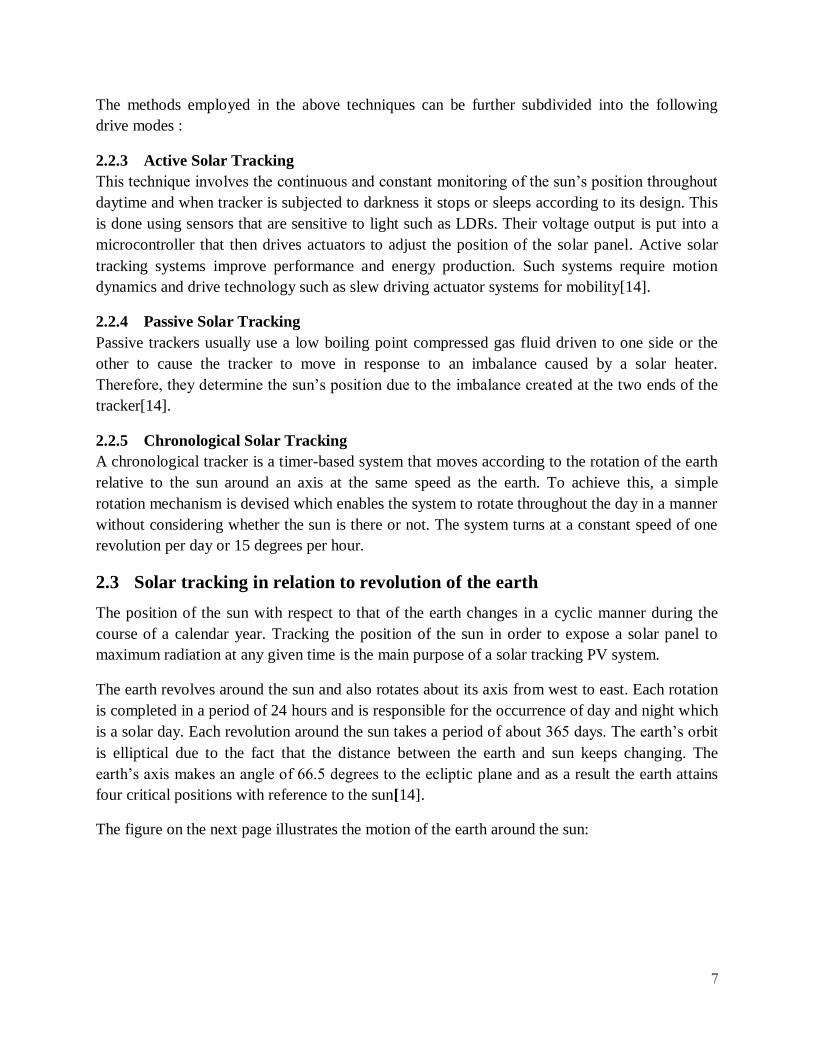
2.2.3 Active Solar Tracking
This technique involves the continuous and constant monitoring of the sun’s position throughout
daytime and when tracker is subjected to darkness it stops or sleeps according to its design. This
is done using sensors that are sensitive to light such as LDRs. Their voltage output is put into a
microcontroller that then drives actuators to adjust the position of the solar panel. Active solar
tracking systems improve performance and energy production. Such systems require motion
dynamics and drive technology such as slew driving actuator systems for mobility[14].
2.2.4 Passive Solar Tracking
Passive trackers usually use a low boiling point compressed gas fluid driven to one side or the
other to cause the tracker to move in response to an imbalance caused by a solar heater.
Therefore, they determine the sun’s position due to the imbalance created at the two ends of the
tracker[14].
2.2.5 Chronological Solar Tracking
A chronological tracker is a timer-based system that moves according to the rotation of the earth
relative to the sun around an axis at the same speed as the earth. To achieve this, a simple
rotation mechanism is devised which enables the system to rotate throughout the day in a manner
without considering whether the sun is there or not. The system turns at a constant speed of one
revolution per day or 15 degrees per hour.
2.3 Solar tracking in relation to revolution of the earth
The position of the sun with respect to that of the earth changes in a cyclic manner during the
course of a calendar year. Tracking the position of the sun in order to expose a solar panel to
maximum radiation at any given time is the main purpose of a solar tracking PV system.
The earth revolves around the sun and also rotates about its axis from west to east. Each rotation
is completed in a period of 24 hours and is responsible for the occurrence of day and night which
is a solar day. Each revolution around the sun takes a period of about 365 days. The earth’s orbit
is elliptical due to the fact that the distance between the earth and sun keeps changing. The
earth’s axis makes an angle of 66.5 degrees to the ecliptic plane and as a result the earth attains
four critical positions with reference to the sun[14].
The figure on the next page illustrates the motion of the earth around the sun:

8
Figure 2-3: Motion of the Earth around the Sun
2.4 Solar Tracking with Algorithms
The sun vector is an imaginary line running from the location of the solar tracker system directly
into the centre of the sun. The sun vector is essential for steering the PV panels to continuously
face the sun’s direction in order to maintain maximum solar energy. A solar position algorithm
determines the position of the sun at any given time for a specific location. The diagram in figure
2-4 below shows an observer at position Q illuminated by sun ray observed along sun vector SQ
showing solar tracking azimuth and zenith angles[1].
Figure 2-4: Observer at position Q Illuminated by Sun Rays

9
The different sun angles are usually determined mathematically using the following methods:
2.4.1 Solar altitude angle
The inclination of the sun from the earth is referred to as the solar altitude angle .This is the
angle between the horizontal plane and the acting line of the sun. Usually this is estimated to be a
decline of 23½ degrees northwards and southwards in one complete revolution about the
Sun.This angle is normally zero during sunset and ninety degrees when the sun is overhead at
noon.
2.4.2 Solar azimuth angle
The solar azimuth (γs) is the angle between the projection of the sun’s rays on a horizontal
plane and the southern direction. At solar noon, the sun is directly south in the northern
hemisphere and directly north in the southern hemisphere. The azimuth angle varies throughout
the day. At the equinoxes, the sun rises directly east and sets directly west regardless of the
latitude. Therefore, the azimuth angles are 90 degrees at sunrise and 270 degrees at sunset[12].
2.4.3 Elevation angle
The elevation angle (α) is used interchangeably with altitude angle and is the angular height of
the sun in the sky measured from the horizontal. The elevation is zero degrees at sunrise and
ninety degrees when the sun is directly overhead. The angle of elevation varies throughout the
day and also depends on latitude of the particular location and the day of the year.
2.4.4 Solar zenith angle
The altitude of the sun can also be explained by use of solar zenith angle (θz) which is a vertical
angle between Sun’s rays and a line perpendicular to the horizontal plane through the point (θz
=90 - α)[12].
2.5 Nature of Solar Irradiation
Solar Irradiation is the amount of solar energy that arrives at a specific area of a surface during a
specific time interval (radiant flux density). A typical unit is W/ .
Solar radiation data is used to predict the performance of many different systems from heating
loads. The spectrum of electromagnetic radiation emitted from sun surface extends from 0.2 µm
to 3 µm. It can also be stated that about 7% of the emitted energy falls in ultraviolet zone of
spectrum and 42% ranges in the visible zone while 5% ranges in infrared zone thus the sun is
considered a black body in thermal balance at a temperature of about 5780K[1]. Due to Albert
Einstein’s famous law E= , about millions of tons of matter are converted to energy each
second. The solar energy that is irradiated to the earth is 5.1024 Joules per year. This is 10000
times the present worldwide energy consumption per year. Upon crossing the earth atmosphere,
solar radiation is subjected to many phenomena such as reflection, absorption with new radiation
and diffusion.

10
The total power of the sun can be estimated by the law of Stefan and Boltzmann given below:
P = 4πr2 σϵT4 W (2.1)
T is the temperature that is about 5780K,
r is the radius of the sun which is 695800 km,
σ is the Boltzmann constant which is 1.3806488 × kg
Emissivity of the surface is denoted by ϵ
Direct radiation: this is the part of radiation reaching the earth surface in the direction of the
solar rays without going through absorptions and reflections and is also referred to as beam
radiation .It travels on a straight line from the sun to the surface of the earth.
Diffuse radiation: this is the part reaching the earth from all directions. It is sunlight which has
been scattered by particles and molecules in the atmosphere but still manage to reach the earth’s
surface. Diffuse radiation has no definite direction, unlike direct versions.
Reflected radiation: describes sunlight which has been reflected off from non-atmospheric
surfaces like the ground[12].
2.5.1 Solar Constant
The Solar constant Ics is defined as the average energy radiated by the sun in the time unit on a
unitary surface set outside the atmosphere and pointed perpendicularly to the sun rays .It is the
amount of solar power flux that passes through the mean earth orbit, the currently accepted
average value is 1366 W/ . Because of the variation of earth-sun distance, the extraterrestrial
radiation Io doesn’t coincide with Ics and varies during the year.
The determination of the solar constant is facilitated by solar spectral-irradiance curves. These
are obtained with a recording spectrobolometer (a combined spectroscope and bolometer for
determining the wavelength distribution of radiant energy emitted by a source) and referenced to
a measurement obtained from a pyrheliometer that determines the total radiation at the same
time.
2.5.2 Sunlight
Photometry enables us determine the amount of light given off by the Sun in terms of brightness
perceived by the human eye. In photometry, a luminosity function is used for the radiant power at
each wavelength to give a different weight to a particular wavelength that models human
brightness sensitivity.
The luminous flux (or lux) is commonly used and is the measure of the perceived power of light
meaning the intensity of light. Its unit, the lumen, is concisely defined as the luminous flux of
light produced by a light source that emits one candela of luminous intensity over a solid angle
of one steradian. The candela is the SI unit of luminous intensity and it is the power emitted by a
light source in a particular direction, weighted by a luminosity function whereas a steradian is

11
the SI unit for a solid angle; the two-dimensional angle in three dimensional space that an object
subtends at a point.
One lux is equivalent to one lumen per square metre;
1 = 1 ∙ = 1 ∙ ∙ (2.3)
i.e. a flux of 10 lumen, concentrated over an area of 1 square metre, lights up that area with
illuminance of 10 lux[11].
Sunlight ranges between 400 lux and approximately 130000 lux. The range of sunlight can be
shown on the table below:
Table 2-1: Range of Sunlight
Time of day
Luminous flux (lux)
Sunrise or sunset on a clear day 400
Overcast day 1000
Full day(not direct sun) 10000-25000
Direct sunlight 32000-130000
2.5.3 Sun chart diagram
Through a polar diagram, it is possible to display, the paths of the sun during the year for a
particular place. The diagram, that is a projection of the sun paths on the horizontal plane, can be
obtained by putting the sun height and azimuth values on a graph as function of the sun time and
the declination, as shown in figure 2-5 on the next page. By means of this diagram, it is possible
to determine the time in which the point keeps in the shadow due to obstacles intercepting the
sun rays.
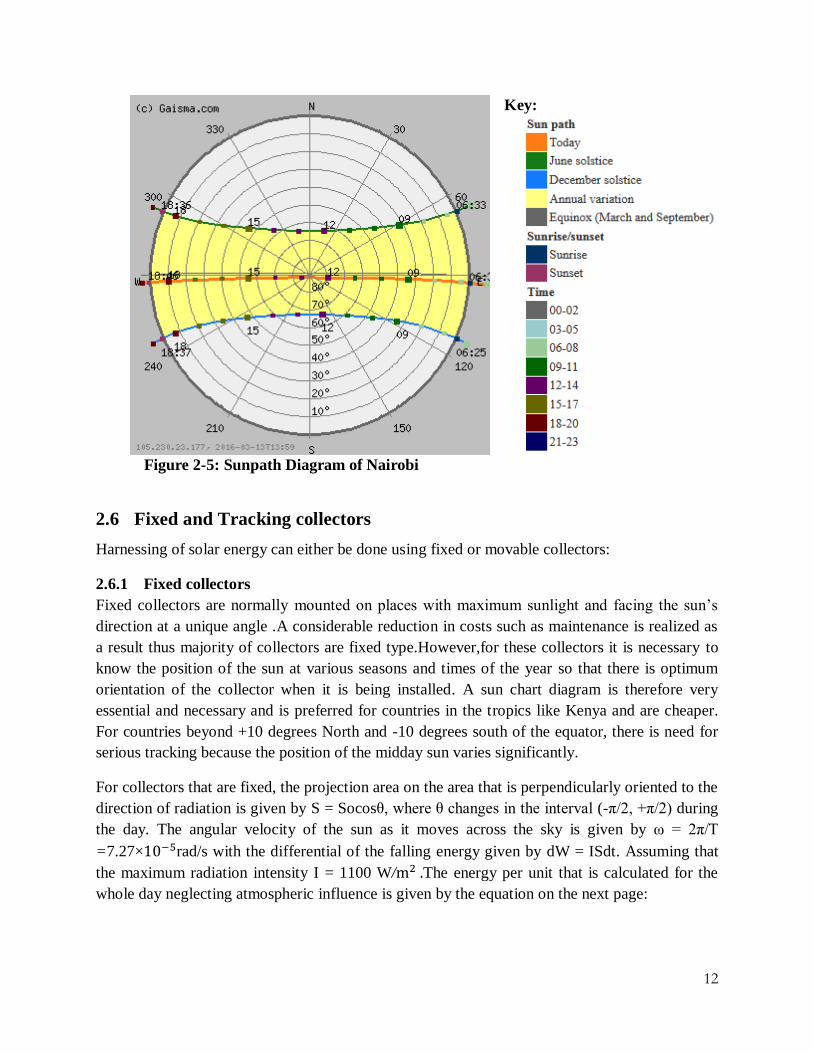
12
Key:
Figure 2-5: Sunpath Diagram of Nairobi
2.6 Fixed and Tracking collectors
Harnessing of solar energy can either be done using fixed or movable collectors:
2.6.1 Fixed collectors
Fixed collectors are normally mounted on places with maximum sunlight and facing the sun’s
direction at a unique angle .A considerable reduction in costs such as maintenance is realized as
a result thus majority of collectors are fixed type.However,for these collectors it is necessary to
know the position of the sun at various seasons and times of the year so that there is optimum
orientation of the collector when it is being installed. A sun chart diagram is therefore very
essential and necessary and is preferred for countries in the tropics like Kenya and are cheaper.
For countries beyond +10 degrees North and -10 degrees south of the equator, there is need for
serious tracking because the position of the midday sun varies significantly.
For collectors that are fixed, the projection area on the area that is perpendicularly oriented to the
direction of radiation is given by S = Socosθ, where θ changes in the interval (-π/2, +π/2) during
the day. The angular velocity of the sun as it moves across the sky is given by ω = 2π/T
=7.27× rad/s with the differential of the falling energy given by dW = ISdt. Assuming that
the maximum radiation intensity I = 1100 W/ The energy per unit that is calculated for the
whole day neglecting atmospheric influence is given by the equation on the next page:

13
(2.4)
(2.5)
2.6.2 Tracking collectors
For a tracking collector, the theoretical extracted energy is calculated assuming that the
maximum radiation intensity I = 1100 W/ is falling on the area which is oriented
perpendicularly to the direction of radiation. Taking the length of day t = 12h = 43200s, the
intensity on the tracking collector which is always optimally oriented facing the Sun is compared
to that of a fixed collector which is oriented perpendicularly to the direction of radiation. The
collector area is marked as So. The energy per unit that is calculated for the whole day neglecting
atmospheric influence is given by:
=
= 4.75 × 10⁷Ws (2.6)
= 13.2kWh/m2 day (2.7)
Comparing the theoretical results from the two scenarios above, more energy is calculated for the
tracking collector. However, the Sun’s rays reaching the earth’s surface go through the thick
layer of the atmosphere in both cases. Nonetheless, the tracking collector has a greater exposure
to the Sun’s energy in any given day[5].
2.7 Merits and demerits of Solar Energy
2.7.1 Merits
i) Solar power is free from pollution hence it is environmentally friendly.
ii) Solar power is readily available.
iii) It is affordable and hence can be used in remote areas where extension of the electricity
power grid is costly.
iv) Many everyday items can be powered by solar energy effectively.
v) Facilities can operate with little maintenance or intervention after initial setup.

14
vi) Grid-connected solar electricity can be used locally thus reducing transmission/distribution
losses.
vii) It is estimated that world oil reserves are expected to be depleted in future however, solar
energy is expected to last forever.
viii) For large companies, it is possible to have a high return on investment because of the free
energy solar panels produce.
ix) Despite the high initial capital cost of building a solar power plant, operating costs are
extremely low compared to existing power technologies.
2.7.2 Demerits
i) Solar electricity is not available at night and is less available in cloudy weather conditions
and therefore, a storage or complementary power system is required.
ii) Solar panels have a high initial capital cost during installation resulting in a time lag of many
years for savings on energy bills to match initial investments.
iii) Solar power stations do not match the power output of conventional power stations of similar
size and are expensive to build.
iv) The batteries used when solar power is used to charge them can be large and heavy, taking up
plenty of space and needing frequent replacement.
Due to the fact that the advantages of using solar power outweigh the disadvantages, the use of
solar power to harness energy should be considered as a clean and ultimately feasible energy
source.

15
3 DESIGN AND IMPLEMENTATION
3.1 Light sensor theory
A light sensor is the most common electronic component which can be easily found. The
simplest optical sensor is a photon resistor or photocell which is a light dependent resistor.
A Light Dependent Resistor (LDR) or a photo resistor is a device whose resistivity is a function
of the incident electromagnetic radiation. Hence, they are light sensitive devices. They are made
up of semiconductor materials having high resistance. There are two types of photo conductive
material; cadmium sulfide (CdS) and gallium arsenide (GaAs)[7]. The sun tracker system
designed here uses four cadmium sulfide (CdS) photocells for sensing the light.
An LDR works on the principle of photoconductivity. Photo conductivity is an optical
phenomenon in which the materials conductivity is increased when light is absorbed by the
material. When light falls on the device, the electrons in the valence band of the semiconductor
material are excited to the conduction band. The photons in the incident light should have energy
greater than the band gap of the semiconductor material to make the electrons jump from the
valence band to the conduction band. Hence when light having enough energy strikes the device,
more and more electrons are excited to the conduction band which results in large number of
charge carriers. The result of this process is that more and more current starts flowing through
the device when the circuit is closed and hence it is said that the resistance of the device has been
decreased.
3.1.1 Characteristics of LDRs
The LDR or light dependent resistor is a passive device whose resistance is a function of the
light falling on it .The resistance is inversely proportional to the amount of light intensity
directed towards it meaning it exhibits maximum resistance in the absence of light and minimum
resistance in the presence of light . This property is used for locating the position of the sun. The
photocell to be used for the tracker is based on its dark resistance and light saturation resistance.
The term light saturation means that further increasing the light intensity to the CdS cells will not
decrease its resistance any further. The approximate relationship between the resistance and
illumination is:
(3.1)
Where E is illumination in lux, R is resistance in ohms and A & C are constants.
The value of C depends on the cadmium sulphide used and on the manufacturing process. Values
around 0.7 to 0.9 are quite common.

16
The figure below shows resistance vs. illumination curve for a typical LDR.
Figure 3-1: Resistance vs. Illumination curve for a typical LDR
Photocells or LDR’s are nonlinear devices. There sensitivity varies with the wavelength of light
incident on them. Some photocells might not at all response to a certain range of wavelengths.
Based on the material used different cells have different spectral response curves.
When light is incident on a photocell it usually takes about 8 to 12ms for the change in resistance
to take place, while it takes one or more seconds for the resistance to rise back again to its initial
value after removal of light. This phenomenon is called the resistance recovery rate.
LDRs have good power and voltage handling capabilities, similar to those of a conventional
resistor. Their only significant defect is that they are fairly slow acting, taking tens or hundreds
of milliseconds to respond to sudden changes in light level[6].
3.1.2 Construction and operation of an LDR
A typical structure for a photoresistor uses an active semiconductor layer that is deposited on an
insulating substrate such as ceramic. The material is deposited in zigzag pattern in order to obtain
the desired resistance & power rating. This zigzag area separates the metal deposited areas into
two regions. Then the ohmic contacts are made on the either sides of the area. The resistances of
these contacts should be as low as possible to make sure that the resistance mainly changes due
to the effect of light only. The semiconductor is normally lightly doped to enable it to have the
required level of conductivity. Contacts are then placed either side of the exposed area.
The photo-resistor, CdS, or LDR finds many uses as a low cost photo sensitive element.

17
Figure 3-2: LDR construction
In this system light sensor is used to measure light intensity then generate corresponding analog
output value. The analog value is thus converted to digital voltage. This system does not need a
real time clock (RTC) to move annual direction i.e. north to south. This operation is done by
light sensor, by comparing the light intensity it can move in horizontal axis and vertical axis and
thus always get maximum sun light[7]. Photocell resistance was measured under dark conditions,
average light conditions, and bright light conditions. The results are listed on table 3-1 below:
Table 3-1: Photocell resistance testing data
Measured Resistance Comment
10.24KΩ Dark (black vinyl tape placed over cell)
7KΩ Average (normal room lighting level)
1KΩ Bright (flashlight directly in front of cell)
To utilize the photocell, it is placed in series with a 10k resistor. The resistor value is chosen so
as to achieve the widest output range possible. A voltage divider is thus formed and the output at
the junction is determined by the two resistances. The divider circuit is shown on the next page:

18
Figure 3-3: Cds photocell circuit
The relationship between the resistance (resistance of the LDR) and light intensity (Lux) for a
typical LDR is given in the following equation:
(3.2)
Where Resistance of LDR
From the relationship given below the input – output relationship for a voltage divider circuit,
can be said to be:
(3.3)
Where,
= Analog output to ADC
= Resistance in voltage divider circuit(R=10K)
= Supply voltage to LDRs
The selected 10K resistor resulted in the following minimum and maximum voltages.
Minimum = 3.3 V × (10 KΩ / (10 KΩ + 10.24KΩ)) = 1.63 V
Maximum = 3.3V × (10 KΩ / (10 KΩ + 1KΩ)) = 3V

19
Thus, the output swing is 1.37 V results. While this is not ideal, it was determined to be
sufficient for the project and additional amplification was not pursued.
3.1.3 Light Sensor Design
In LDR based solar tracking systems, sensors are arranged in different ways to locate the
position of the sun. One of the most common methods when using dual axis trackers, is placing
four LDR sensors at four ends of the panel. However, this method is not ideal because the sun
would be illuminating all four LDRs perpendicularly at all times with little to no variation in
LDR readings to enable the panel to move. Another method makes use of formation of shadows
by change in position of sun to locate its current position. Generally, four LDR sensors are
placed closed together separated by opaque partitions, with one LDR sensor in each partition.
The readings obtained from different LDR sensors are compared to determine the relative
illuminance and hence find the position of sun relative to the panel. This method is more ideal
because the dark partitions cause a shadowing effect on parts not exposed to the sun and thus
enable the LDRs to accurately detect the position of the sun. This data is fed to a microcontroller
that computes the difference and signals the motors to align the panel. This method of tracking
the sun is also inexpensive and relatively simple.The disadvantage of this method is that it’s not
very accurate in cloudy or foggy weather. The system tends to enter hunting mode which results
in substantial consumption of power.
Figure 3-4: Light sensor design
The concept of using two LDRs for sensing is illustrated in figure 3-4 above .The stable position
is when the two LDRs having the same light intensity and the sun is directly overhead. When the
light source moves, i.e. the sun moves from west to east, the level of intensity falling on both the

20
LDRs changes and this change causes a shadowing effect on one of the sensors thus causing the
panel to adjust till the sun is directly overhead once more.
The four LDRs were placed perpendicularly to each other separated by opaque partitions.
Positioning of the sensors was very important since their position would eventually determine
how the system is going to adjust with the change in position of the sun. For each axis
movement, the average of two sensors were responsible. When sensors are normal to the sun,
there is no shadow of object on the LDRs and the concentrated beam of light which falls on the
LDRs is same and thus there is no movement of the system. However, if a sensor is not normal
to the sun, there should be shadow of object on one of the LDRs. Therefore, the panel will adjust
automatically depending on the two quadrants where the light beam is concentrated on. The
average of these sensors can find the position of sun.
3.2 Analog-to-Digital converter
LDR produces analog output voltage with respect to incident light. The Raspberry Pi does not
have a way to read analog inputs. It is a digital-only computer compared to the Arduino, AVR or
PIC microcontrollers that often have 6 or more analog inputs. Therefore, in order to make the Pi
analog friendly it is necessary to add an external ADC (Analog to Digital Converter) .The
MCP3008 acts as a bridge between digital and analog. It is a 12 bit 8 channel Analog to Digital
converter with SPI interface which is supported by the Pi’s GPIO header. The MCP3008 ADC is
an easy way to employ an analog sensor .It is cheap, easy to connect and doesn’t require any
additional components[13].
Figure 3-5: MCP3008 ADC

21
The Serial Peripheral Interface (SPI) is a communication protocol used to transfer data between
micro-computers like the Raspberry Pi and peripheral devices like light sensors. SPI uses four
separate connections to communicate with the target device. These connections are the serial
clock (CLK), Master Input Slave Output (MISO), Master Output Slave Input (MOSI) and Chip
Select (CS).[3]
The clock pin sense pulses at a regular frequency,that is, the speed at which the Raspberry Pi and
SPI device agree to transfer data to each other. For the ADC, clock pulses are sampled on their
rising edge, on the transition from low to high.
The MISO pin is a data pin used for the Raspberry Pi to receive data from the ADC. Data is
read from the bus after every clock pulse.
The MOSI pin sends data from the Raspberry Pi to the ADC. The ADC will take the value of
the bus on the rising edge of the clock. This means the value must be set before the clock is
pulsed.
The Chip Select line chooses which particular SPI device is in use. If there are multiple SPI
devices, they can all share the same CLK, MOSI, and MISO. However, only the selected
device has the Chip Select line set low, while all other devices have their CS lines set high. A
high Chip Select line tells the SPI device to ignore all of the commands and traffic on the rest
of the bus.
3.3 Stepper motor and driver theory
A stepper motor is a kind of motor that is brushless and has discrete rotation unlike DC motors.
It can be run based on pulse width modulation signals applied to it. This ability to rotate in
discrete steps allows them to be very precise which makes it suitable for this project. Upper
panel stepper motor tracks the sun linearly and base stepper motor tracks the parabolic
displacement of sun. The motors have a rating of 5v and 12v respectively and are responsible for
the rotation of the solar panel. Both the stepper motors used for this project take 512 steps to
make a complete revolution.
The 5v stepper motor was chosen because of its low power consumption and could be powered
directly from the pi without the risk of damaging it since they do not take a great deal of current.
The 5v stepper motors have a built in gear head with a 64:1 ratio allowing for some torque and
precision and allowing for instant on full speed sequencing. There are 4 square waves driving the
motor with 2/3 offset. The vertical axis needed higher torque hence the 12 v stepper motor was
chosen and powered from an external supply.
3.3.1 Characteristics of stepper motors
Stepper motors are commonly used in precision positioning control applications. Five
characteristics of the stepper motor were considered while choosing stepper motor for the solar
tracker prototype. Stepper motor is brushless, load independent, has open loop positioning
capability, good holding torque and excellent response characteristics[8].

22
Stepper motors have a unique Torque v/s Speed characteristic. In general stepper motors have
very high torque compared to the other type of motors but this torque decreases rapidly as the
speed of the shaft in the motor increases. The torque of the stepper motor remains fairly constant
as the speed starts to increase but after a certain “cut-off speed” is reached, the torque starts to
decrease rapidly until it becomes zero as the speeds keeps increasing.
Figure 3-6: Torque vs. Speed characteristics curve of a Stepper Motor
3.3.2 Types of stepper motors
There are three types of stepper motors:
permanent magnet (PM )
variable reluctance (VR)
Hybrid synchronous (HS)
The arrangement of windings on the stator is the main distinguishing factor between the three
types. Variable reluctance (VR) motors have a plain iron rotor and operate based on the principle
that minimum reluctance occurs with minimum gap, hence the rotor points are attracted toward
the stator magnet poles. Hybrid stepper motors are named because they use a combination of PM
and VR techniques to achieve maximum power in a small package size. Permanent magnet
motors usually have electromagnets on 4 sides and a rotor/shaft sitting in the middle of these
electromagnets. The shaft itself is magnetized with different polarity that is distributed evenly
throughout the circular shaft. This unique design of the shaft or gear will enable it to move
precisely when the electromagnets are energized. The permanent magnet steppers may be wound
either with unipolar or bipolar windings[8]. Bipolar motors have a single winding per phase
whereas Unipolar motors have two windings with each having a center tap.
The proposed sun tracker uses a permanent magnet unipolar stepper motor since it is readily
available in the market and its working principle is quite simple[8]. Unipolar motor windings
with center tap is shown in the figure on the next page:

23
.
Figure 3-7: 4-Phase unipolar stepper motor windings
The center taps are connected to a positive voltage while the coil ends are alternately grounded to
cause a reversal of the field direction in that winding .The number of phases is equal to twice the
number of coils[3]. The motor is rotated by applying power to the windings in a sequence as
shown below:
3.3.3 Working principle of the stepper motor
A stepper motor can be driven by giving excitation pulses to the phase windings. They are driven
by a stepping sequence which is generated by a controller. The motor moves in steps according
to this sequence thus it has a full rotation divided in an equal number of steps
a) Full step sequence
In the full step sequence, two coils are energized at the same time and motor shaft rotates[3]. The
order in which coils has to be energized is given in the table 3-2 below.
Table 3-2: Full Stepping
Full mode sequence
Step A B A\ B\
0 1 1 0 0
1 0 1 1 0
2 0 0 1 1
3 1 0 0 1

24
b) Half step sequence
Half-stepping is achieved by first energizing one coil, then two coils, then one coil, etc., in a
sequence. In Half mode step sequence, motor step angle reduces to half the angle in full mode.
So the angular resolution is also increased meaning it becomes double the angular resolution in
full mode. Also in half mode sequence the number of steps gets doubled as that of full mode[3].
This project utilizes half-stepping as it is usually preferred over full mode in unipolar motors.
Table 3-3 below shows the pattern of energizing the coils
Table 3-3: Half Stepping
Half mode sequence
Step A B A\ B\
0 1 1 0 0
1 0 1 0 0
2 0 1 1 0
3 0 0 1 0
4 0 0 1 1
5 0 0 0 1
6 1 0 0 1
7 1 0 0 0
c) MicroStepping
Microstepping is a technique that increases motor resolution by controlling both the direction
and amplitude of current flow in each winding. Current is proportioned in the windings
according to sine and cosine functions. Microstepping can divide a motor’s basic step up to 256
times. Microstepping improves low speed smoothness and minimizes low speed resonance
effects. It produces roughly 30% less torque than dual phase full stepping. However,
microstepping is only applicable in bipolar motors.

25
Figure 3-8: Different drive modes on a 4-phase unipolar stepper motor

26
3.3.4 Step Angle
Step angle of the stepper motor is defined as the angle traversed by the motor in one step. To
calculate step angle, 360 is divided by number of steps a motor takes to complete one revolution.
In half mode, the number of steps taken by the motor to complete one revolution gets doubled, so
step angle reduces to half. As in above examples, Stepper Motor rotating in full mode takes 4
steps to complete a revolution, So step angle can be calculated as:
Step Angle,
In case of half mode step angle equals 45°.
This enables one to calculate step angle for any stepper motor. Knowing stepper motor's step
angle helps calibrate the rotation of motor and also helps in moving the motor to correct angular
position.
3.3.5 Advantages of stepper motor
Low cost for control achieved
High torque at start up and low speeds
Ruggedness
Simplicity of construction
Can operate in an open loop control system
Low maintenance
Less likely to stall or slip
Will work in any environment
Can be used in robotics in a wide scale.
High reliability
The rotation angle of the motor is proportional to the input pulse.
The motor has full torque at standstill (if the windings are energized)
Precise positioning and repeatability of movement since good stepper motors have an
accuracy of 3 – 5% of a step and this error is non-cumulative from one step to the next.
Excellent response to starting/stopping/reversing.
Very reliable since there are no contact brushes in the motor. Therefore the life of the motor
is simply dependent on the life of the bearing.
The motors response to digital input pulses provides open-loop control, making the motor
simpler and less costly to control.
It is possible to achieve very low-speed synchronous rotation with a load that is directly
coupled to the shaft.
A wide range of rotational speeds can be realized as the speed is proportional to the
frequency of the input pulses

27
3.3.6 Disadvantages of stepper motors
Require a dedicated control circuit
Use more current than D.C. motors
Torque reduces at higher speeds
Resonances can occur if not properly controlled.
Not easy to operate at extremely high speeds.
3.4 Motor Driver Circuitry
There are many ways to interface a stepper motor to a controller, out of them the most used
interfaces are:
Interface using L293D - H-Bridge Motor Driver
Interface using ULN2003/2004 - Darlington Arrays
In this prototype the ULN2003 motor driver IC shown in figure 3-9 below was used to drive the
stepper motors
Figure 3-9: Pin out diagram of ULN2003 stepper driver IC
In this circuit the four pins “Controller pin 1, 2, 3 and 4” will control the motion and direction of
the stepper motor according to the step sequence sent by the controller.
This IC was chosen due to the following features:
Its compatibility with the 28BYJ-48 stepper motor.
Its darlington transistor pair achieves very high current amplification.
It is very cheap.
Wide supply voltage range: 5v to 12v.
500 mA rated collector current(single output).
28
This module functions to forward or reverse the direction of the motor according to the signal
from raspberry pi.
3.5 Limit switches
Two limit switches were incorporated in the design to keep the panel from moving outside of
its boundaries on the vertical axis during normal operation, they are mechanically connected to
the internal pull-up resistors of the raspberry pi and are activated when they are pressed in order
to stop the motor and to give the panel 180 degrees of freedom from east to west.
The activation of these limit switches can cause electrical contacts to either ‘break’(Normally
Closed switch(NC)) or ‘make’(Normally Open switch(NO)) or do both depending on which
switches are interconnected.
3.6 Microcontroller (RASPBERRY PI 1 MODEL B+)
Raspberry Pi is a credit-card-sized ARM Powered Linux computer developed in the UK by
Raspberry Pi foundation. It functions as a dynamic microcontroller meaning it can do many
things a microcontroller can. It has five models: Model A, B, A+, B+, 0.
The model B+ has the following features:-
4 USB ports hence better hot plug and over current behavior.
An Ethernet port.
40 pin connectors.
Low power consumption which is achieved by replacing linear regulators with switching
regulators hence power consumption is between 0.5W and 1W.
It has a Broadcom BCM2835 system on a chip which includes an ARMI176JZF-S 700 MHz
processor, Video Core IV GPU, and a micro SD card.
The foundation provides the following operating systems RASPBIAN, PIDORA, OPENELEC,
RASPBMC, RISC OS and also Python as the main programming language, with the support for
BBC BASIC, C and Perl. The main advantage of python language is its simplicity.[3]

29
Figure 3-10: Raspberry Pi header
3.7 Power Supply
The UBEC along with a 9v battery was chosen to power the raspberry pi due to the high current
requirements of the raspberry pi and a 5v allowable constant supply voltage which was required
to run it. UBECs (Universal Battery Elimination Circuits) are efficient switching voltage
regulators that convert a high battery voltage into a regulated voltage suitable for running
electronics[3]. Features of the UBEC are:
Output: 5V/3A and 6V/3A switchable
Ripple: <50mVp-p(@2A/12V)
Input: 5.5V to 26V
The absolute best case efficiency for the LM7805 regulator is about 71.8% but this is achieved at
its optimal input voltage. Increasing the input voltage to 12 V causes the power dissipation to
rise considerably, resulting in a 42.5% efficiency. Attempting to operate the LM7805 regulator at
15V, for example, would cause the efficiency to drop to less than 33.7% whereas the buck
converter would maintain its efficiency regardless of input and is more efficient at converting
power from a higher voltage source hence UBEC’s are more advantageous than linear regulators
due to their high power efficiencies. The UBEC was also chosen because of its low cost and
suitability for the prototype[3].

30
3.8 Software Design
3.8.1 Design Tool
Start
Initialize steppers
Read data from LDRs
Convert data from analog to digital
Compare the data
Generate
drive signal
for stepper
motor 1
Generate
drive signal
for stepper
motor 2
Sleep 1
minute
Stop
Right-left>
threshold
Left-right>
threshold
Bottom-top>
threshold
Top-bottom>
threshold
Is limit
switch 1=1?
Is limit
switch 2=1?
Top Average values of LDR1
and LDR2 at the top
Bottom Average values of LDR3
and 4 at the bottom
Left Average values of LDR1
and 3 on the left
Right Average values of LDR 2
and 4 on the right
KEY:
Yes
Sleep 1
minute
Yes
Yes
Yes
Yes
Yes
Yes
Yes
Figure3-11:Flow chart of the assembly

31
The software design was done using raspberry pi’s inbuilt python2 programming tool which was
used for the programming. The program was written using the python programming language.
An application called fritzing was used to design the electrical circuit as well as the PCB design .
Since the raspberry pi IC is not available in any simulation software package, it was impossible
to simulate the code hence the simulation of the solar tracking mechanism was not done.
3.8.1 Algorithm for motor control
1. This algorithm describes the general steps undertaken in the project.
2. Input the voltages from four LDRs,
3. Convert the above analog voltage signals into digital values between 0-1023,
4. Compare the digital values and get the difference between them,
5. Set the difference as the minimum threshold for stepper motor rotation,
6. If the LDR voltages are equal stop motors.
The flow chart of Fig 3-12 illustrates the implementation of this algorithm. The input into the
system is four LDR voltages into channels 0-3 of MCP3008. The analog voltages are then
converted to digital equivalents in the range 0-1023 by the ADC. The four digital values are then
compared and depending on which is larger a signal is sent to the driver circuit which then drives
the motor to the direction with more light intensity. Next, all the components are assembled as
seen in the schematic diagram illustrated below:
Figure 3-12: Solar tracker schematic

32
4 SIMULATION, RESULTS AND ANALYSIS
4.1 Simulation
The hardware and software portions of the project were separated into stages while developing
the overall system. The portions consisted of light detection, motor driving, software tracking,
and software enhancements. Building and testing smaller sections of the system made the project
more manageable and increased efficiency by decreasing debugging time.
In order to prevent the solar panel spinning all the way round, the panel is limited vertically
using two limit switches. In general applications, the panel should be rotated towards East
direction in order to make it ready for operation on the next day. The proposed system sends no
signals during night times by sensing low or none sunshine intensities and stays as pointing at
west direction after the sun set. The raspberry pi is also skipped to sleep mode and consumes low
energy. During the sun rise, the LDR senses the sunlight automatically and the panel is moved
towards East direction in a short time; thus no need any extra circuitry and software to do this.
Since the sun does not always follow the same path throughout the year, the mechanism
developed will allow the system to automatically track the sun no matter which ever path it
follows.
4.2 Results
The results in this project were obtained from LDRs for both a PV solar tracker and another
which was fixed. For three days these reading were recorded and tabulated as shown in the tables
on the next page. From the previous chapter, it was shown that LDR outputs are voltages
depending on light intensity falling on its surface. The Vcc to the raspberry pi and to the LDRs is
3.3volts.
As previously discussed, the MCP3008 ADC is a 10 bit ADC meaning it can have 1024 voltage
step and 3.3V when converted to digital values are in the range of 0-1023. This conversion can
be done using the relation below:
=
(4.1)

33
4.21 LDR outputs for a bright sunny day on 27th
April 2016
Table 4-1: LDR readings on day 1
LDR readings for fixed panel LDR readings for tracking panel
Time LDR11 LDR12 LDR13 LDR14 LDR1 LDR2 LDR3 LDR4
06:30 556 572 572 567 657 648 470 555
07:45 734 768 765 769 804 787 805 792
08:00 765 789 769 779 988 984 999 978
09:00 887 899 875 888 1008 1007 1007 1006
10:19 888 889 895 893 1021 1023 1020 1016
11:12 987 999 1000 988 1023 1020 999 1005
12:37 1017 1016 1014 1012 1023 1016 1020 1023
13:45 1013 1000 1008 1005 1023 1016 1008 1023
14:30 1008 1000 1001 1000 1023 1016 1008 1023
15:50 886 884 885 899 1022 1021 1023 1020
16:32 853 849 840 845 995 976 984 999
17:00 735 745 741 720 808 815 820 830
18:34 599 594 600 607 679 666 650 681
4.22 LDR outputs for a cloudy morning and bright sunny afternoon on 28th
April 2016
Table 4-2: LDR reading on day 2
LDR readings for fixed panel LDR readings for tracking panel
Time LDR11 LDR12 LDR13 LDR14 LDR1 LDR2 LDR3 LDR4
06:05 593 584 576 590 695 677 679 693
07:01 665 667 670 650 892 884 885 892
08:00 887 893 900 888 972 949 967 980
09:13 993 997 991 994 984 991 999 987
10:00 993 995 1000 996 1008 1006 992 1004
11:00 998 1016 992 996 998 1016 1020 996
12:13 1023 1016 1020 1023 1023 1016 1022 1023
13:22 1022 1021 1022 1023 1023 1021 1000 1023
14:00 1020 1018 1000 1018 1020 1018 997 1018
15:29 1008 1008 995 997 1019 1017 995 1004
16:19 980 976 972 979 998 995 998 997
17:00 884 875 873 870 984 988 999 999
18:00 693 684 676 690 893 868 872 887

34
4.23 LDR outputs for a cloudy day on 29th
April 2016
Table 4-3: LDR reading on day 3
Time in hours LDR readings for fixed panel LDR readings for tracking panel
LDR11 LDR12 LDR13 LDR14 LDR1 LDR2 LDR3 LDR4
06:15 487 485 482 480 506 499 511 513
07:07 499 505 507 498 575 576 573 572
08:01 565 567 569 564 678 674 679 670
09:05 798 805 801 800 886 884 891 886
10:00 865 863 863 860 889 884 887 882
11:00 940 943 947 948 954 950 960 955
12:00 973 975 970 969 987 984 983 981
13:00 997 995 991 994 1008 1003 1005 999
14:28 982 989 989 984 1000 999 987 985
15:34 904 899 907 901 994 996 991 988
16:09 893 895 890 888 983 989 983 984
17:11 858 860 861 858 896 900 890 885
18:00 797 799 800 793 754 767 745 769
4.24 Solar panel readings for a cloudy morning and bright sunny day on 28th
April 2016
Table 4-4: Power readings on day 2
Power for fixed panel Power for tracking panel
Time Voltage
(V)
Current
(A)
Power
(W)
Voltage
(V)
Current
(A)
Power
(W)
06:05 3.13 0.1 0.31 3.20 0.1 0.32
07:01 3.79 0.19 0.72 4.01 0.19 0.76
08:00 4.83 0.24 1.16 5.50 0.27 1.49
09:13 4.89 0.24 1.17 5.74 0.3 1.72
10:00 3.08 0.15 0.46 4.79 0.23 1.10
11:00 5.76 0.3 1.72 5.80 0.3 1.74
12:13 5.80 0.3 1.74 5.88 0.3 1.76
13:22 5.73 0.29 1.66 6.00 0.3 1.8
14:00 5.60 0.29 1.62 6.04 0.3 1.81
15:29 5.70 0.29 1.65 5.74 0.29 1.66
16:19 5.52 0.27 1.49 5.60 0.29 1.62
17:00 5.51 0.27 1.49 5.60 0.29 1.62
18:00 4.89 0.24 1.17 5.20 0.26 1.35

35
Table 4-4: Solar panel ratings
Maximum power 1.8W
Open circuit voltage 6.2V
Short circuit current 0.38A
Maximum Power voltage 5V
Maximum power current 0.36
4.3 Analysis
Figure 4-1: Graph of results of table 4-1
0
200
400
600
800
1000
1200
06
:30
07
:45
08
:00
09
:00
10
:19
11
:12
12
:37
13
:45
14
:30
15
:50
16
:32
17
:00
18
34
Time
LDR1
LDR2
LDR3
LDR4
LDR11
LDR12
LDR13
LDR14
Intensity

36
Figure 4-2: Graph of results of table 4-2
0
200
400
600
800
1000
1200
LDR1
LDR2
LDR3
LDR4
LDR11
LDR12
LDR13
LDR14
Time
Intensity

37
Figure 4-3: Graph of results for table 4-3
Figure 4-4: Graphical comparison of output power readings of table 4-4
0
200
400
600
800
1000
1200
06
:15
07
:07
08
:01
09
:05
10
:00
11
:00
12
:00
13
:00
14
:28
15
:34
16
:09
17
:11
18
:00
LDR1
LDR2
LDR3
LDR4
LDR11
LDR12
LDR13
LDR14
0
0.5
1
1.5
2
06
:05
07
:01
08
:00
09
:13
10
:00
11
:00
12
:13
13
:22
14
:00
15
:29
16
:19
17
:00
18
:00
FIXED
TRACKING
Time
Output Power(W)
Intensity

38
The labeling of the curves is as follows:
LDR11 indicates photo resistor 1 reading for a fixed solar panel installation
LDR12 indicates photo resistor 2 reading for a fixed solar panel installation
LDR13 indicates photo resistor 3 reading for a fixed solar panel installation
LDR14 indicates photo resistor 4 reading for a fixed solar panel installation
LDR1 indicates photo resistor 1 reading for solar panel with tracker
LDR2 indicates photo resistor 2 reading for solar panel with tracker
LDR3 indicates photo resistor 3 reading for solar panel with tracker
LDR4 indicates photo resistor 4 reading for solar panel with tracker
From the curves, the maximum sunlight occurs around midday with the maximum solar
intensity at hours between 1200Hrs and 1400Hrs. In the morning and late evening the intensity
seems to be diminishing and the panel with the tracker is supposed to sleep when the output from
the LDRs is zero, meaning it is nightfall or there is no sunlight falling on it. This way it is able to
save power therefore further increasing the efficiency of the solar tracker and solar panel.
Another observation is that for the solar panel fitted with the tracker, the four LDR values are
close since the tracking system follows sun movement by motor turning the solar panel until the
two values of the LDRs are equal and the motion is stopped to save power. Sunny days or days
with least cloud cover register the highest LDR outputs and the cloudy ones, the lowest LDR
values[6].
Using the collected voltage and current data from the solar panels, we multiply the values
together to get the power output of the panels. The power readings from the solar panel indicate
a significant increase in output power when the tracker is used as opposed to when it isn’t. Dual
axis system high power capturing property is clear from the graphical comparison.
The results obtained on the both the three test days are very important as they signify the
importance of a tracking system and the effects of weather condition on power generation of a
PV system. The power generated by the standstill panel as well as the solar tracker was almost
the same during the afternoon hours, when the sun is directly on the zenith. There was only a
slight difference in the power generated because the solar tracker was tracking the sun constantly
and therefore was in the perfect position, but the standstill panel was also in the optimal place to
generate the maximum possible power. The difference was not large and therefore the gain in
efficiency during the afternoon period was around the range of 8-10%.The fact that the tracker
based system outperformed the standstill panel by a margin of about 26% on a normal sunny day
and by a margin of about 29% even on a cloudy day manifests the importance of such a system.

39
5 CONCLUSION AND RECOMMENDATIONS
5.1 Recommendations for further work
With the available time and resources, the objective of the project was met. The project is able to
be implemented on a much larger scale. For future projects, one may consider the use of more
efficient sensors, but which are cost effective and consume little power. This would further
enhance efficiency while reducing costs. It should also be noted that the solar cells can be placed
in a spherical housing inorder to prevent dust particles from settling on the sensors. An automatic
dust sensor can also be provided to clean the solar plate. Use of rainfall sensors can be also
implemented for future systems and fault indicators can also be incorporated in the system to
make it more reliable.
The project performs the required functions envisioned at the proposal phase. However, while
satisfied with software operation and simulation, less satisfaction was obtained from two
hardware areas. One issue deals with the photocell. It was discovered that the photocell needs to
be shielded such that light can be directed narrowly to its surface.
5.2 Conclusion
Dual axis tracker perfectly aligns with the sun direction and tracks the sun movement in a more
efficient way and has a tremendous performance improvement. The experimental results clearly
show that dual axis tracking is superior to fixed module systems. Power captured by dual axis
solar tracker is high during the whole observation time period and it maximizes the conversion of
solar irradiance into electrical energy output. The proposed system is also cost effective as a little
modification in single axis tracker provided prominent power rise in the system. Through the
experiments, it was found that dual axis tracking can increase energy by about 24.5% over the
fixed arrays.
The objective of this work is to design such a system that increases the overall solar insolation on
a PV system and thereby significantly increasing its efficiency. So a prototype was developed for
a dual axis tracker for a 2W panel to be able to achieve a 20-30 % increase in efficiency of the
system compared to a standstill PV system.

40
REFERENCES
[1] “Sun Tracking and Solar Renewable Energy Harvesting: Solar Energy Harvesting” , Gerro Prinsloo, Robert Dobson,2014, 1, 4-5
[2] Adafruit’s “MCP3008 Datasheet” www.adafruit.com.
[3] Warren Gay, “Mastering the raspberry Pi”, http://www.it-ebooks.info.
[4] Texas Instruments., “ULN2003 Datasheet,” www.ti.com, 2001.
[5] “Fabrication of Dual-Axis Solar Tracking Controller Project”, Nader Barsoum, Curtin
University, Sarawak, Malaysia, Intelligent Control and Automation, 2011, 2, 57-68.
[6] M. F. Khan and R. L. Ali, “Automatic sun tracking system,” presented at the All
Pakistan Engineering Conference, Islamabad, Pakistan, 2005.
[7] T.A. Papalias and M. Wong, “Making sense of light sensors”,
http://www.embedded.com, 2006.
[8] R. Condit and D. W. Jones, “Stepping motor fundamentals,” Microchip Inc.
Publication AN907, pp. 1 – 22, 2004.
[9] Adafruit’s “28BYJ48 Datasheet” www.adafruit.com.
[10] “Microcontroller based automatic sun tracking system”, International Journal of Electrical
Engineering and Technology (IJEET), ISSN 0976-6553(Online) Volume 4, Issue 1,
January- February (2013).
[11] A. K. Saxena and V. Dutta (1990), “A versatile microprocessor based controller for solar
tracking’’, Photovoltaic Specialists Conference, vol. 2, pp. 1105-1109.
[12] David Cooke, "Single vs. Dual Axis Solar Tracking", Alternate Energy eMagazine, April
2011.
[13]The MagPi issue 22, april(2014). www.theMagPi.com.
[14]Antonio L. Luque; Viacheslav M. Andreev (2007). Concentrator Photovoltaics. Springer
Verlag.

41
APPENDICES
Appendix One: Code used in the Raspberry pi
#!/usr/bin/python
import spidev
import time
import math
import os
import RPi.GPIO as gpio
PINSA = [17,18,21,22]
PINSB = [4,25,24,23]
SEQA = [(17,),(17,18),(18,),(18,21),(21,),(21,22),(22,),(22,17)]
RSEQA = [(22,),(22,21),(21,),(21,18),(18,),(18,17),(17,),(17,22)]
SEQB = [(4,),(4,25),(25,),(25,24),(24,),(24,23),(23,),(23,4)]
RSEQB = [(23,),(23,24),(24,),(24,21),(25,),(25,4),(4,),(4,23)]
DELAY = 0.001
gpio.setmode(gpio.BCM)
for pin in PINSA:
gpio.setup(pin, gpio.OUT)
for pin in PINSB:

42
gpio.setup(pin, gpio.OUT)
def stepper(sequence, pinsA):
for step in sequence:
for pin in pinsA:
gpio.output(pin, gpio.HIGH) if pin in step else gpio.output(pin, gpio.LOW)
def stepper(sequence, pinsB):
for step in sequence:
for pin in pinsB:
gpio.output(pin, gpio.HIGH) if pin in step else gpio.output(pin, gpio.LOW)
for pin in pinsB:
gpio.output(pin, gpio.HIGH) if pin in step else gpio.output(pin, gpio.LOW)
time.sleep(DELAY)
#First open SPI bus
spi = spidev.SpiDev()
spi.open(0,0)
def get_adc(adcnum):
#First pull raw data from the chip
r = spi.xfer2([1,(8+adcnum)<<4,0])
#Process the raw data into something understandable
adcout = ((r[1]&3) << 8) + r[2]#get bitvalue

43
return adcout
try:
while True:
#Initialize what sensor is where
get_adc(0)
LDR1 = get_adc(0) # get LDR #1 light level reading
time.sleep(0.05)
get_adc(1)
LDR2 = get_adc(1) # get LDR #2 light level reading
time.sleep(0.05)
get_adc(2)
LDR3 = get_adc(2) # get LDR #3 light level reading
time.sleep(0.05)
get_adc(3)
LDR4 = get_adc(3) # get LDR #4 light level reading
time.sleep(0.05)
#print out the LDR readings
print("LDR1:{} ; LDR2:{} ; LDR3:{} ; LDR4:{} ".format(LDR1,LDR2,LDR3,LDR4))
#set conditions for limit switches
limit1 = 2 #read value of first limit switch
limit2 = 3 #read value of second limit switch
gpio.setmode(gpio.BCM)

44
gpio.setup(limit1, gpio.IN) #set pins as input
time.sleep(0.001)
gpio.setmode(gpio.BCM)
gpio.setup(limit2, gpio.IN)
time.sleep(0.001)
#set the conditions for sensors
top = (LDR1+LDR2)/2 #average of top sensors
time.sleep(0.05)
bottom = (LDR3+LDR4)/2 #average of bottom sensors
time.sleep(0.05)
right = (LDR2+LDR4)/2 #average of right sensors
time.sleep(0.05)
left = (LDR1+LDR3)/2 #average of left sensors
time.sleep(0.05)
#set conditions for stepper motor to rotate
threshold = 5
diff1 = right – left #difference between levels of radiation right to right
time.sleep(0.05)
diff2 = top - bottom #difference between levels of radiation top to bottom
time.sleep(0.05)
if (gpio.input(limit2)== False): #if the limit switch is pressed
time.sleep(60) #do nothing for 1 minutes
elif (gpio.input(limit2)== True) and (diff2 > threshold or -1*threshold >diff2) and (top >
bottom):
for _ in xrange(20): #steps executed by horizontal motor clockwise

45
stepper(SEQA,PINSA)
time.sleep(0.01)
if (gpio.input(limit1)== False): #if the limit switch is pressed
time.sleep(60) #sleep for 1 minutes
elif (gpio.input(limit1)== True) and (diff2 > threshold or -1*threshold >diff2) and (bottom >
top):
for _ in xrange(20): #steps executed by horizontal motor anticlockwise
stepper(RSEQA,PINSA)
time.sleep(0.01)
if (diff1 > threshold or -1*threshold > diff1) and (left > right):
for _ in xrange(20): #steps executed by vertical motor clockwise
stepper(SEQB,PINSB)
time.sleep(0.01)
elif (diff1 > threshold or -1*threshold > diff1) and (right > left):
for _ in xrange(20): #steps executed by vertical motor anticlockwise
stepper(RSEQB,PINSB)
time.sleep(0.01)
except KeyboardInterrupt
gpio.cleanup()

46
Appendix Two: The control commands for the 28BYJ-48 stepper motor
STEPPER MOTOR 1 AND 2
Forward Reverse
0001 1000
0010 0100
0100 0010
1000 0001
Appendix Three: Screenshot of the proposed solar tracker