micro hi-fi system - philips€¦ · best contain only mp3 tracks (.mp3). to ... controls...
TRANSCRIPT
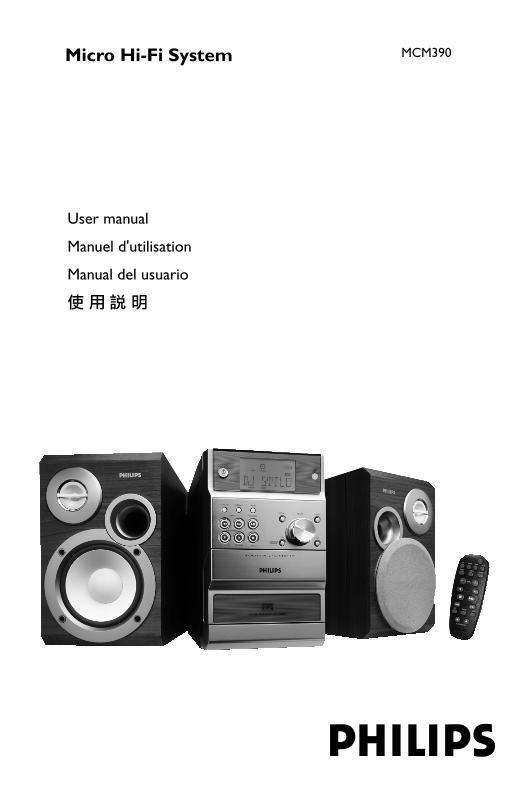
MCM390Micro Hi-Fi System
pg 001-021_M390_21-Eng 2/2/05, 14:281

2
MéxicoEs necesario que lea cuidadosamente su instructivo demanejo.
No abrir, riesgo de choque eléctrico
Verifique que el voltaje de alimentaciónsea el requerido para su aparato
ATENCIÓN
Para evitar el riesgo de choque eléctrico, no quite la tapa.En caso de requerir servicio, dirijase al personal calificado.
PRECAUCIÓN - ADVERTENCIA
Descripción: Minisistema de AudioModelo : MCM390/ 21Alimentación: 110–127 / 220–240V~; 50–60 HzConsumo: 60 WImportador : Philips Mexicana, S.A. de C.V.Domicilio: Av. La Palma No.6
Col. San Fernando La HerraduraHuixquilucan
Localidad y Tel: Edo. de México C.P. 52784Tel.52 69 90 00
Exportador : Philips Electronics HK, Ltd.País de Origen: ChinaNº de Serie: ______________________________
LEA CUIDADOSAMENTE ESTE INSTRUCTIVOANTES DE USAR SU APARATO.
CAUTIONUse of controls or adjustmentsor performance of proceduresother than herein may result inhazardous radiation exposureor other unsafe operation.
AVISO IMPORTANTEPhilips Mexicana, S.A. de C.V. no se hace
responsable por daños o desperfectos causados por:– Maltrato, descuido o mal uso, presencia de
insectos o roedores (cucarachas, ratones etc.).– Cuando el aparato no haya sido operarado
de acuerdo con el instructivo del uso, fuera de los valores nominales y tolerancias de lastensiones (voltaje), frecuencia (ciclaje) dealimentación eléctrica y las características que deben reunir las instalaciones auxiliares.
– Por fenómenos naturales tales como:temblores, inundaciones, incendios, descargaseléctricas, rayos etc. o delitos causados porterceros (choques asaltos, riñas, etc.).
pg 001-021_M390_21-Eng 2/2/05, 14:282

33
%
)
$
¡
8
6
#
@7
™
9
≤
∞
£
(
*
DISPLAY/BAND
#
$
%
&
^
@
!
1
9
5
6
7
0
8
4
3
2
pg 001-021_M390_21-Eng 2/2/05, 14:283

4
Energy StarAs an ENERGY STARR
Partner, Philips hasdetermined that this productmeets the ENERGY STARR guidelines forenergy efficiency.
pg 001-021_M390_21-Eng 2/2/05, 14:284

5
En
glis
hFr
ança
isE
spañ
ol
Index
English ------------------------------------------------ 6
Français -------------------------------------------- 22
Español --------------------------------------------- 38
-------------------------------------------------------- 54
pg 001-021_M390_21-Eng 2/2/05, 14:285

6
En
glish
Contents
General InformationSupplied accessories ............................................ 7Environmental information ................................ 7Safety information ................................................ 7About MP3 disc .................................................... 7
PreparationsRear connections ............................................. 8–9
PowerAntennas connectionSpeakers connection
Optional connection ........................................... 9Connecting other equipment to your system
Inserting batteries into the remote control ... 9
ControlsControls on the system and remotecontrol .................................................................. 10
Basic FunctionsSwitching the system on ................................... 11Switching the system to Eco Power standbymode ..................................................................... 11Power-saving automatic standby ..................... 11Volume control ................................................... 11Sound control ..................................................... 11
CD / MP3-CD OperationsDiscs for playback .............................................. 12Playing a disc ........................................................ 12Text display .......................................................... 12Selecting a different track ................................. 12Finding a passage within a track ...................... 13Selecting a desired Album/Track(MP3 disc only) ................................................... 13Different play modes: SHUFFLEand REPEAT ......................................................... 13Programming the disc tracks ........................... 13Reviewing the programme ............................... 13Erasing the programme ..................................... 13
Radio ReceptionTuning to radio stations .................................... 14Programming radio stations ............................. 14
Automatic programmingManual programming
Tuning to preset radio stations ....................... 15Changing tuning grid .......................................... 15
Tape Operation/RecordingTape playback ...................................................... 16Rewinding / Fast forwarding ............................ 16General information on recording ................. 16Preparation for recording ................................ 17Synchro start CD recording ............................ 17One touch recording ......................................... 17Recording timer .................................................. 17
Clock/TimerClock setting ....................................................... 18Timer setting ....................................................... 18
Activating and deactivating timerSleep timer setting ............................................. 18
Specifications ........................................... 19
Maintenance .............................................. 20
Troubleshooting ............................. 20–21
pg 001-021_M390_21-Eng 2/2/05, 14:286

7
En
glis
h
General Information
MPORTANT!PLEASE NOTE THAT THE VOLTAGESELECTOR LOCATED AT THE BOTTOMOF THIS SYSTEM IS PRESET AT 220VFROM THE FACTORY. FOR COUNTRIESTHAT OPERATE AT 110V-127V, PLEASEADJUST TO 110V-127V BEFORE YOUSWITCH ON THE SYSTEM.
Supplied accessories
– 2 speaker boxes– remote control– MW loop antenna– FM wire antenna
Environmental InformationAll unnecessary packaging has been omitted. Wehave tried to make the packaging easy toseparate into three materials: cardboard (box),polystyrene foam (buffer) and polyethylene (bags,protective foam sheet).
Your system consists of materials which can berecycled and reused if disassembled by aspecialised company. Please observe the localregulations regarding the disposal of packagingmaterials, exhausted batteries and oldequipment.
Safety Information Before operating the system, check that the
operating voltage indicated on the typeplate (orthe voltage indication beside the voltageselector) of your system is identical with thevoltage of your local power supply. If not, pleaseconsult your dealer.
Place the system on a flat, hard and stablesurface.
Place the system in a location with adequateventilation to prevent internal heat build-up inyour system. Allow at least 10 cm (4 inches)clearance from the rear and the top of the unitand 5 cm (2 inches) from each side.
The ventilation should not be impeded bycovering the ventilation openings with items,such as newspapers, table-cloths, curtains, etc.
Do not expose the system, batteries or discs toexcessive moisture, rain, sand or heat sourcescaused by heating equipment or direct sunlight.
No naked flame sources, such as lighted candles,should be placed on the apparatus.
No objects filled with liquids, such as vases, shallbe placed on the apparatus.
If the system is brought directly from a cold to awarm location, or is placed in a very damp room,moisture may condense on the lens of the discunit inside the system. Should this occur, the CDplayer would not operate normally. Leave thepower on for about one hour with no disc in thesystem until normal playback is possible.
The mechanical parts of the set contain self-lubricating bearings and must not be oiled orlubricated.
When the system is switched to Standbymode, it is still consuming some power.To disconnect the system from thepower supply completely, remove the ACpower plug from the wall socket.
About MP3 disc
Supported formats– ISO9660, Joliet, Multisession– Max. track number plus album is 300– Max. nested directory is 8 levels– The max. album number is 30– The max. MP3 programme track number is
20– Supported VBR bit-rate– Supported sampling frequencies for MP3 disc
are: 32 kHz, 44.1 kHz, 48 kHz– Supported Bit-rates of MP3 disc are: 32, 64,
96, 128, 192, 256 (kbps)
Sound QualityTake note that MP3-CD compilations shouldbest contain only MP3 tracks (.mp3). Toachieve a good MP3 quality, a bit rate of128 kbps is recommended.
pg 001-021_M390_21-Eng 2/2/05, 14:287

8
En
glish
Preparations
Rear connections
The type plate is located at the rear of thesystem.
A Power
– Before connecting the AC power cord to thewall outlet, ensure that all other connectionshave been made.– If your system is equipped with a VoltageSelector, set the VOLTAGE SELECTOR to thelocal power line voltage.
WARNING!– For optimal performance, use only theoriginal power cable.– Never make or change connections withthe power switched on.
To avoid overheating of the system, a safetycircuit has been built in. Therefore, yoursystem may switch to Standby modeautomatically under extreme conditions. Ifthis happens, let the system cool downbefore reusing it (not available for all versions).
B Antennas Connection
Connect the supplied MW loop antenna and FMantenna to the respective terminals. Adjust theposition of the antenna for optimal reception.
MW Antenna
Position the antenna as far as possible from a TV,VCR or other radiation source.
MW
Speaker Speaker
D
pg 001-021_M390_21-Eng 2/2/05, 14:288

9
En
glis
h
Preparations
FM Antenna
For better FM stereo reception, connect anoutdoor FM antenna to the FM AERIAL (FMANTENNA) terminal.
C Speakers Connection
Front SpeakersConnect the speaker wires to the SPEAKERSterminals, right speaker to "RIGHT" and leftspeaker to "LEFT", coloured (marked) wire to"+" and black (unmarked) wire to "-".
1 2
Fully insert the stripped portion of the speakerwire into the terminal as shown.
Notes:– For optimal sound performance, use thesupplied speakers.– Do not connect more than one speaker to anyone pair of +/- speaker terminals.– Do not connect speakers with an impedancelower than the speakers supplied. Please refer tothe SPECIFICATIONS section of this manual.
D Optional connectionThe optional equipment and connecting cordsare not supplied. Refer to the operatinginstructions of the connected equipment fordetails.
Connecting other equipment to yoursystem
Connect the audio left and right OUT terminalsof a TV, VCR, Laser Disc player, DVD player orCD Recorder to the AUX IN terminals.
Note:– If you are connecting equipment with amonaural output (a single audio out terminal),connect it to the AUX IN left terminal. Alternatively,you can use a “single to double” cinch cable (theoutput sound still remain monaural).
Inserting batteries into theremote controlInsert two batteries (type R03 or AAA) into theremote control with the correct polarity asindicated by the "+" and "-" symbols insidethe battery compartment.
CAUTION!– Remove batteries if they are exhaustedor will not be used for a long time.– Do not use old and new or differenttypes of batteries in combination.– Batteries contain chemical substances, sothey should be disposed of properly.
pg 001-021_M390_21-Eng 2/2/05, 14:289

10
En
glish
Controls (illustrations on page 3)
Controls on the system andremote control
1 Eco Power/STANDBY ON y– to switch the system on or to Eco Power
standby mode.
2 Display screen– to view the current status of the system.
3 DISPLAY/BANDfor Tuner ............. to select waveband : FM, MW or
LW.for CD/MP3-CD…to select disc information
display mode.
4 PROGRAMfor CD/MP3-CD…to programme disc tracks.for Tuner ............. to programme preset radio
stations.
5 CLOCK SETfor Clock ............ (on the system only) to set the
clock function.
6 S T TUNING ( à á)for CD ................. to fast reverse/forward the disc.for CD/MP3 CD…(on the system only) to select
a desired track.for Tuner ............. to tune to a lower or higher
radio frequency.for Tape ............... to rewind or fast forward.
7 43 ALBUM/PRESET/TIMER SETfor MP3-CD ..... to select previous/next album.for Tuner ............. to select a preset radio station.for Timer Set (3) (on the system only) to set the
timer function.
8 9 STOPfor CD/MP3-CD…to stop playback or to clear a
programme.for Tape ............... to stop playback or recording.
9 PLAY/PAUSE ÉÅfor CD/MP3 CD…to start or interrupt playback.for Tape ............... to start playback.
0 Tape deck
! OPEN ç– to open tape compartment.
@ IS/DBB (Incredible Surround/DynamicBass Boost)
– to create a super-enhanced stereo effect.– to enhance the bass.
# DSC (Digital Sound Control)– to select the desired sound effect : OPTIMAL/
ROCK/POP/JAZZ.
$ VOLUME (VOL + / -)– to increase or decrease the volume.– (on the system only) to adjust the hours and
minutes for the clock/timer functions.
% SOURCE– to select the respective sound source : CD,
TUNER, TAPE or AUX.
^ RECORD– to start recording.
& iR sensor– infrared sensor for remote control.
* OPEN•CLOSE 3– to open or close the disc tray.
( n Headphone– Plugs in the headphones jack. The speakers
output will be cancelled.
) MODE– to shuffle and repeat a track/disc.
¡ ¡ / ™– to select a desired track.
™ MUTE– interrupts and resumes sound reproduction.
£ TIMER– to activate/deactivate the timer function.
≤ SLEEP– to activate/deactivate or set the sleep timer.
∞ B
– to switch the system to standby mode.
Notes for remote control:– First select the source you wish to controlby pressing one of the source select keys onthe remote control (for example CD,TUNER).– Then select the desired function (forexampleÉ, í, ë).
pg 001-021_M390_21-Eng 2/2/05, 14:2810

11
En
glis
h
Basic Functions
IMPORTANT!Before you operate the system, completethe preparation procedures.
Switching the system on
Press STANDBY ON 2 or SOURCE. The system will switch to the last selectedsource.
Press CD, TUNER, TAPE or AUX on theremote control. The system will switch to the selected source.
Switching the system to EcoPower Standby mode
Press STANDBY-ON / 2 in the active mode. The backlight of clock display is dim instandby.
The volume level, interactive sound settings, lastselected mode, source and tuner presets will beretained in the player's memory.
To view the clock time in Standby mode, pressand hold STANDBY-ON / 2 for 3 secondsor more. The system enters the normal standby modewith clock display.
Press and hold STANDBY-ON / 2 for 3seconds or more to go back to Eco PowerStandby mode.
Power-saving automatic standbyAs a power-saving feature, the system willautomatically switch to Standby mode if you donot press any buttons within 15 minutes after adisc or tape has stopped playing.
Volume control
Adjust VOLUME (VOL + / -) to increase ordecrease the volume level. Display shows the volume level "VOL" and anumber from 1-31. “MIN” denotes the minimumvolume level and “MAX” denotes the maximumvolume level.
To switch off the volume temporarily
Press MUTE on the remote control. Playback will continue without sound and"MUTE" is displayed.
To restore the volume, press MUTE again orincrease/decrease the volume level.
Sound control
Press DSC repeatedly to select the desiredsound effect : OPTIMAL, ROCK, JAZZ or POP.
Press INCREDIBLE SURROUNDS/DBB toswitch on or off the surround sound effect orbass enhancement. The sequences are as follows :
DBB ™ INCR.SURR. ™ DBB+INCR.SURR.
If the DBB is activated, DBB is shown. If the IS is activated, is shown.
Note:– The effect of INCREDIBLE SURROUND mayvary with different types of music.
DISPLAY/BAND
pg 001-021_M390_21-Eng 2/2/05, 14:2811

12
En
glish
CD/MP3-CD Operations
IMPORTANT!The lens of the CD player should never betouched.
X
Discs for playbackThis system is able to play :– All pre-recorded audio CDs– All finalised audio CDR and audio
CDRW discs– MP3-CDs (CD-ROMs with MP3 tracks)
CD-ROM, CD-I, CDV, VCD, DVD or computerCDs, however, are not possible.
Playing a disc
1 Select CD source.
2 Press OPEN•CLOSE3 on the top of thesystem to open the CD compartment. “CD OPEN” is displayed.
3 Insert a disc with the printed side facing up andpress OPEN•CLOSE3 to close the CD door. “READING” is displayed as the CD playerscans the contents of a disc, and then the totalnumber of tracks and album are shown.
4 Press ÉÅ to start playback.
To interrupt playback Press ÉÅ.
To resume playback, press ÉÅ again.
To stop playback Press Ç.
Notes:– Disc play will also stop when you select anothersource or the disc has reached the end.– For MP3 disc, the disc reading time may exceed10 seconds due to the large number of songscompiled into one disc.
Text display
In CD mode
Press DISPLAY/BAND repeatedly to see thefollowing information. Track number and elapsed play time ofcurrent track. Remaining play time of current track. Total number of tracks played and totalplayed-back time. Total remaining number of tracks and totalremaining play time.
In MP3-CD mode
Press DISPLAY/BAND repeatedly to selectfour display modes : Number, Track, Album andID3.
Number Album number, track number andelapsed play time.Track Track name scrolls and elapsed playtime.Album Album name scrolls and elapsed playtime.ID-3 ID-3 tag scrolls once and elapsed playtime.
Selecting a different track
Press S or T (¡ or ™) repeatedly untilthe desired track number appears in the display.
If playback is stopped, pressÉÅ to startplayback.
DISPLAY/BAND
pg 001-021_M390_21-Eng 2/2/05, 14:2812

13
En
glis
h
CD/MP3-CD Operations
Finding a passage within a track
1 Press and hold down on S or T ( à áon the remote control). The disc is played at high speed.
2 When you recognize the passage you want,release S or T ( à áon the remotecontrol). Normal playback continues.
Selecting a desired album/track(MP3 disc only)
To select a desired album Press 4 or 3 repeatedly.
To select a desired track Press S or T (¡ or ™) repeatedly.
Different play modes: SHUFFLEand REPEATYou can select and change the various playmodes before or during playback.
1 Press MODE on the remote control to select : SHUFFLE – tracks of the entire disc/programme are played in random order. SHUFFLE REPEAT ALL – to repeat theentire disc/ programme continuously in randomorder. REPEAT ALL – to repeat the entire disc/programme. REPEAT – to repeat the current track.
2 To return to normal playback, press MODE untilthe various SHUFFLE/ REPEAT modes are nolonger displayed.
You can also press 9 to cancel your play mode.
Note:– If Shuffle is activated on a MP3-CD, all titlesstored in the disc will be played in random order.
Programming the disc tracksProgramming tracks is possible when playback isstopped. Up to 20 tracks can be stored in thememory in any order.
1 Press PROGRAM to enter the programmingmode. A track number is shown and PROG flashes.
2 Press S or T (¡ or ™) repeatedly toselect your desired track number.
For MP3 disc, press 4 / 3 and S / T(¡ or ™) to select the desired album and trackfor programming.
3 Press PROGRAM to confirm the track numberto be stored.
4 Repeat steps 2-3 to select and store all desiredtracks.
5 To start playback of your disc programme, pressÇ followed byÉÅ.
If you attempt to programme more than20 tracks, “FULL” will appear on thedisplay. In this case : The system will exit programming modeautomatically. Pressing Ç button will erase all theprogrammed tracks. Pressing ÉÅ button will start playback theprogrammed tracks.
Note:– It is not possible to create a programme withMP3 tracks from multiple CDs.
Reviewing the programme
In stop mode, press and hold PROGRAM untilthe display shows all your stored track numbersin sequence.
Erasing the programme
Press Ç once when playback is stopped ortwice during playback. PROG disappears and “CLEAR” is displayed.
pg 001-021_M390_21-Eng 2/2/05, 14:2813

14
En
glish
Radio Reception
Tuning to radio stations
1 Select TUNER source. “TUNER” is displayed briefly.
2 Press DISPLAY/BAND to select the desiredwaveband : FM, MW or LW.
3 Press down on S or T ( à áon theremote control) and release button. The display will show "SEARCH" until a radiostation with sufficient signal strength is found. If a FM station is received in stereo, isshown.
4 Repeat step 3 if necessary until you find thedesired station.
To tune to a weak station, press S or T (¡ ™ on the remote control) briefly andrepeatedly until you have found optimalreception.
Programming radio stationsYou can store up to a total of 40 radio stationsin the memory.
Automatic programming
Automatic programming will start with a chosenpreset number. From this preset numberupwards, former programmed radio stations willbe overridden.
1 Press 4 or 3 to select the preset number whereprogramming should start.
Note:– If no preset number is selected, default is preset(1) and all your presets will be overridden.
2 Press PROGRAM for more than two secondsto activate programming. All available stations are programmed.
Manual programming
1 Tune to your desired station (refer to “Tuning toradio stations”).
2 Press PROGRAM to activate programming. PROG flashes in the display.
3 Press 4 or 3 to allocate a number from 1 to 40to this station.
4 Press PROGRAM again to confirm the setting. PROG disappears, the preset number andthe frequency of the preset station are shown.
5 Repeat the above four steps to store otherstations.
You can override a preset station by storinganother frequency in its place.
DISPLAY/BAND
pg 001-021_M390_21-Eng 2/2/05, 14:2814

15
En
glis
h
Tuning to preset radio stations
Press 4 or 3 until the desired preset station isdisplayed.
Changing tuning grid (some versions only)In North and South America the frequency stepbetween adjacent channels in the AM and FMband are 10 kHz and 100 kHz respectively. In therest of the world this step is 9 kHz and 50 kHz.Usually the frequency step has been preset inthe factory for your area if not:
1 Select TUNER source.
2 Press BAND on the system for at least fiveseconds. The display shows either “GRID 9 kHzGRID 9 kHzGRID 9 kHzGRID 9 kHzGRID 9 kHz” or“GRID 10 kHzGRID 10 kHzGRID 10 kHzGRID 10 kHzGRID 10 kHz”.
Note:– All preset stations will be lost and need to bereprogrammed.
Radio Reception
pg 001-021_M390_21-Eng 2/2/05, 14:2815
16
En
glish
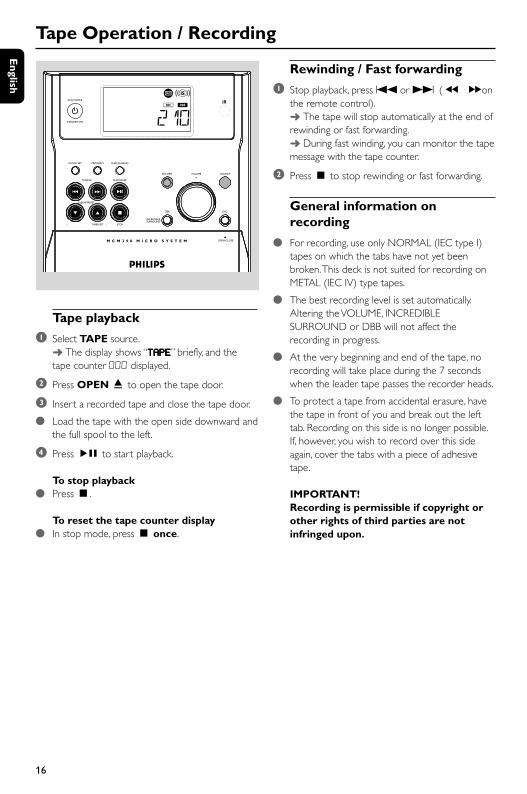
Tape Operation / Recording
Tape playback
1 Select TAPE source. The display shows “TAPETAPETAPETAPETAPE” briefly, and thetape counter 000 displayed.
2 Press OPEN ç to open the tape door.
3 Insert a recorded tape and close the tape door.
Load the tape with the open side downward andthe full spool to the left.
4 Press ÉÅ to start playback.
To stop playback Press Ç.
To reset the tape counter display In stop mode, press Ç once.
Rewinding / Fast forwarding
1 Stop playback, press S or T ( à áonthe remote control). The tape will stop automatically at the end ofrewinding or fast forwarding. During fast winding, you can monitor the tapemessage with the tape counter.
2 Press Ç to stop rewinding or fast forwarding.
General information onrecording
For recording, use only NORMAL (IEC type I)tapes on which the tabs have not yet beenbroken. This deck is not suited for recording onMETAL (IEC IV) type tapes.
The best recording level is set automatically.Altering the VOLUME, INCREDIBLESURROUND or DBB will not affect therecording in progress.
At the very beginning and end of the tape, norecording will take place during the 7 secondswhen the leader tape passes the recorder heads.
To protect a tape from accidental erasure, havethe tape in front of you and break out the lefttab. Recording on this side is no longer possible.If, however, you wish to record over this sideagain, cover the tabs with a piece of adhesivetape.
IMPORTANT!Recording is permissible if copyright orother rights of third parties are notinfringed upon.
DISPLAY/BAND
pg 001-021_M390_21-Eng 2/2/05, 14:2816

17
En
glis
h
Tape Operation / Recording
Preparation for recording
1 Select TAPE source.
2 Load a recordable tape into tape deck with fullspool to the left.
3 Prepare the source to be recorded.CD – load the disc.TUNER – tune to the desired radio station.AUX – connect external equipment.
When recording is in progress REC is shown.
To stop recording, press 9.
It is not possible to listen to another source.
It is not possible to activate the timer function.
Synchro start CD recording
1 Select CD source.
Press S or T (¡ or ™) to select thedesired track to start recording.
You can programme the tracks in the order youwant them to be recorded (refer to “CD/MP3-CD Operations - Programming the disc tracks”).
2 Press RECORD to start recording. Playing of the CD programme startsautomatically from the beginning of the CD. It isnot necessary to start the CD player separately.
One touch recording
1 Select CD, TUNER or AUX source.
2 If necessary, start playback of the selectedsource.
3 Press RECORD to start recording.
Recording timerTo record from the radio, you will need to use apreset radio station and to set a start (ON) andfinish (OFF) time.
1 Select the preset radio station to record from(refer to “Radio Reception - Tuning to presetradio stations”).
2 In standby mode, press PRESET 3 for morethan two seconds. The current selected source is displayed.
3 Press SOURCE repeatedly until “REC TUN”source is displayed.
4 Press PRESET 3 to confirm the source. “SET ON TIME” is displayed and the clockdigits for the hours flash.
5 Adjust VOLUME on the front pannel to set thehours.
6 Press PRESET 3 again. The clock digits for the minutes flash.
7 Adjust VOLUME on the front pannel to set theminutes.
8 Press PRESET 3 to confirm the recording starttime. “SET OFF TIME” is displayed and the clockdigits for the hours flash.
9 Repeat steps 5-7 to set the finish time.
0 Press PRESET 3 to confirm the timer settings. is shown and the recording timer is nowset.
Note:– The recording timer will not be activated if thesystem is in tape play mode.
pg 001-021_M390_21-Eng 2/2/05, 14:2817

18
En
glish
Clock/Timer
Clock setting
Manual clock setting
1 In standby mode, press and holdCLOCK SET. The clock digits for the hours flash.
2 Adjust VOLUME to set the hours.
3 Press CLOCK SET again. The clock digits for the minutes flash.
4 Adjust VOLUME to set the minutes.
5 Press CLOCK SET to confirm the time.
Timer setting The system can be used as an alarm clock,
whereby the CD, TUNER or TAPE is switched onat a set time (one time operation). The clocktime needs to be set first before the timer canbe used.
You can also use it to record a favourite tunerprogramme at a set period (refer to “Recordingtimer”)
During setting, if no button is pressed within 90seconds, the system will exit timer setting modeautomatically.
1 In standby mode, press PRESET 3 for morethan two seconds.
2 Press SOURCE repeatedly to select the soundsource. “SET TIME” and “SELECT SOURCE” aredisplayed.
3 Press PRESET 3 to confirm your desiredmode. “SET ON TIME” is displayed and the clockdigits for the hours flash.
4 Adjust VOLUME to set the hours.
5 Press PRESET 3 again. The clock digits for the minutes flash.
6 Adjust VOLUME to set the minutes.
7 Press PRESET 3 to confirm the time. The timer is now set and activated.
Activating and deactivating timer
In standby or during playback, press TIMERonce on the remote control. Display shows if activated, and disappears ifdeactivated.
Sleep timer settingThe sleep timer enables the system to switch offby itself after a set period of time.
1 Press SLEEP on the remote control repeatedlyto select a preset time. The selections are as follows (time inminutes):
6060606060 ™ 4545454545 ™ 3030303030 ™ 1515151515 ™ 00000 ™ 6060606060 …
"SLEEP XX" or "0" is displayed. "XX" is thetime in minutes.
2 When you reach the desired length of time, stoppressing the SLEEP button.
To deactivate the sleep timer Press SLEEP repeatedly until "0" is displayed, or
press the STANDBY ON button.
DISPLAY/BAND
pg 001-021_M390_21-Eng 2/2/05, 14:2818

19
En
glis
h
Specifications
AMPLIFIEROutput power ....................................... 2 x 15 W RMS......................................................................... 700 W PMPOSignal-to-noise ratio .......................... ≥ 62 dBA (IEC)Frequency response ......... 40 – 15000 Hz, ± 3 dBImpedance loudspeakers ......................................... 4 ΩImpedance headphones .................... 32 Ω -1000 Ω
CD/MP3-CD PLAYERNumber of programmable tracks ......................... 20Frequency range .................................. 20 – 20000 HzSignal-to-noise ratio ............................................ 75 dBAChannel separation ..........................≥ 60 dB (1 kHz)Total harmonic distortion ........................... < 0.003%MPEG 1 Layer 3 (MP3-CD) .......... MPEG AUDIOMP3-CD bit rate ....................................... 32-256 kbps
(128 kbps advised)Sampling frequencies ....................... 32, 44.1, 48 kHz
TUNERFM wave range ................................... 87.5 – 108 MHzLW wave range ..................................... 153 – 279 kHzMW wave range (9 kHz) ............. 531 – 1602 kHzMW wave range (10 kHz) ........... 530 – 1700 kHzTuning grid ............................................................ 9/10 kHzSensitivity at 75 Ω– mono, 26 dB signal-to-noise ratio ............ 2.8 µV– stereo, 46 dB signal-to-noise ratio ........ 61.4 µVSelectivity ................................................................. ≥ 28 dBTotal harmonic distortion ..................................... ≤ 5%Frequency response ..... 63 – 12500 Hz (± 3 dB)Signal-to-noise-ratio ...................................... ≥ 50 dBA
TAPE DECKFrequency response
Normal tape (type I) ...... 80 – 12500 Hz (8 dB)Signal-to-noise ratio
Normal tape (type I) .................................... 50 dBAWow and flutter ......................................... ≤ 0.4% DIN
SPEAKERS2-way Bass reflex systemDimensions (w x h x d) . 142 x 235 x 212 (mm)
GENERAL INFORMATIONAC Power
For Version /21-21M .. 110 – 127 / 220 – 240 V;....................................................... 50/60 Hz SwitchableFor Version /30 ........................ 230 – 240 V; 50 Hz
Dimensions (w x h x d) .. 148 x 235 x 258 (mm)Weight (with/without speakers)............................................................... approx. 6.3 / 3.3 kgEco Power Standby ............................................... < 1 WPower consumption Standby .......................... < 3 W
Specifications and external appearance aresubject to change without notice.
pg 001-021_M390_21-Eng 2/2/05, 14:2819

20
En
glish
Cleaning the Cabinet Use a soft cloth slightly moistened with a mild
detergent solution. Do not use a solutioncontaining alcohol, spirits, ammonia or abrasives.
Cleaning Discs When a disc becomes dirty,
clean it with a cleaning cloth.Wipe the disc from the centreout.
Do not use solvents such asbenzene, thinner, commerciallyavailable cleaners, or antistatic spray intended foranalogue records.
Cleaning the disc lens After prolonged use, dirt or dust may
accumulate at the disc lens. To ensure goodplayback quality, clean the disc lens with PhilipsCD Lens Cleaner or any commercially availablecleaner. Follow the instructions supplied withcleaner.
Cleaning the Heads and the Tape Paths To ensure good recording and playback quality,
clean the heads A, the capstan(s) B, andpressure roller(s) C after every 50 hours oftape operation.Caution: Do not rotate the heads duringcleaning.
Use a cotton swab slightly moistened withcleaning fluid or alcohol.
You can also clean the heads by playing acleaning tape once.
A A B C
Demagnetizing the heads Use a demagnetizing tape available at your
dealer.
Maintenance
“NO DISC” is displayed.
Radio reception is poor.
Insert a disc. Check if the disc is inserted upside down. Wait until the moisture condensation at the lens
has cleared. Replace or clean the disc, see “Maintenance”. Use a finalised CD-RW or CD-R.
If the signal is too weak, adjust the antenna orconnect an external antenna for betterreception.
Increase the distance between the Micro HiFiSystem and your TV or VCR.
WARNINGUnder no circumstances should you try to repair the system yourself, as this willinvalidate the warranty. Do not open the system as there is a risk of electric shock.
If a fault occurs, first check the points listed below before taking the system for repair. Ifyou are unable to remedy a problem by following these hints, consult your dealer orPhilips for help.
Problem Solution
Troubleshooting
pg 001-021_M390_21-Eng 2/2/05, 14:2820

21
En
glis
h
Recording or playback cannot be made.
“CHK TAPE” is displayed.
The tape deck door cannot open.
The system does not react when buttonsare pressed.
Sound cannot be heard or is of poorquality.
The left and right sound outputs arereversed.
The remote control does not functionproperly.
The timer is not working.
The Clock/Timer setting is erased.
Clean deck parts, see “Maintenance”. Use only normal (IEC I) tape for recording.
Apply a piece of adhesive tape over the missingtab space.
Remove and reconnect the AC power plug andswitch on the system again.
Remove and reconnect the AC power plug andswitch on the system again.
Adjust the volume. Disconnect the headphones. Check that the speakers are connected correctly. Check if the stripped speaker wire is clamped. Make sure the MP3-CD was recorded within
32-256 kbps bit rate with sampling frequenciesat 48 kHz, 44.1 kHz or 32 kHz.
Check the speaker connections and location.
Select the source (CD or TUNER, for example)before pressing the function button (É,í,ë).
Reduce the distance between the remotecontrol and the system.
Insert the batteries with their polarities(+/– signs) aligned as indicated.
Replace the batteries. Point the remote control directly toward
IR sensor on the front of the system.
Set the clock correctly. Press TIMER to switch on the timer. If a recording is in progress, stop the recording.
Power has been interrupted or the power cordhas been disconnected. Reset the clock/timer.
Problem Solution
pg 001-021_M390_21-Eng 2/2/05, 14:2821