micro focus web-to-host 6.8.1: administrator guide · defining password level caching policy ......
TRANSCRIPT
Web-to-Host 6.8.1
Administrator Guide

Micro FocusThe Lawn22-30 Old Bath RoadNewbury, Berkshire RG14 1QNUKhttp://www.microfocus.com
Copyright © Micro Focus 1984-2016. All rights reserved.
MICRO FOCUS, the Micro Focus logo and Rumba are trademarks or registered trademarks ofMicro Focus IP Development Limited or its subsidiaries or affiliated companies in the UnitedStates, United Kingdom and other countries.
All other marks are the property of their respective owners.
2016-06-08
ii
Contents
Product Overview ...............................................................................................5Components ........................................................................................................................5
Pro ............................................................................................................................5Java .......................................................................................................................... 6
Architecture ......................................................................................................................... 7Security ............................................................................................................................... 7Finding information ..............................................................................................................8
Server Installation .............................................................................................. 9System requirements .......................................................................................................... 9Installing .............................................................................................................................. 9
Installing on a Web server running Windows ........................................................... 9Installing on a Web server running Linux ............................................................... 11Installing on an iSeries system ...............................................................................12Installing on an unsupported non-Windows server ................................................ 13Installing an evaluation product .............................................................................. 14
Directory structure .............................................................................................................14Session Configuration Manager ........................................................................................15Troubleshooting .................................................................................................................15
Session Configuration Manager is lost ...................................................................15Web server: Session Configuration Manager does not open .................................15
Uninstalling ........................................................................................................................15Uninstalling from a Windows server ....................................................................... 16Uninstalling from a non-Windows server ................................................................16
Creating and Migrating Client Profiles ........................................................... 17Migrating client profiles from a previous version ............................................................... 17
Migrating profiles after upgrading ...........................................................................17Running the Conversion Utility ............................................................................... 17
Migrating Rumba PC-to-Host profiles ............................................................................... 18Supported PC-to-Host profiles ............................................................................... 18Importing profiles using the Session Configuration Manager .................................18
Creating client profiles .......................................................................................................19Creating or editing a client profile ...........................................................................19
Configuring client profiles ..................................................................................................20Start options ........................................................................................................... 20Multiple sessions .................................................................................................... 21International client sessions ................................................................................... 22Java Web Start ....................................................................................................... 25Defining password level caching policy .................................................................. 26
Publishing client profiles to users ......................................................................................27OnWeb Client Installation ................................................................................28
System requirements ........................................................................................................ 28Client operating system ..........................................................................................28Client JRE .............................................................................................................. 28Client browser ........................................................................................................ 28Host requirements .................................................................................................. 28
Client install and upgrade ..................................................................................................29Installing Pro ...........................................................................................................29Installing Java .........................................................................................................30
Client uninstall ...................................................................................................................30Uninstalling Pro ...................................................................................................... 30
Contents | 3
Uninstalling Java .................................................................................................... 30Uninstalling the Session Configuration Manager ................................................... 30
Coexistence: Pro and Rumba ..........................................................................31Coexistence requirements ................................................................................................ 31Setting a custom install path ............................................................................................. 31Upgrading Pro and PC-to-Host software ...........................................................................32
User Profile Configuration ...............................................................................33Rules defining Pro behavior .............................................................................................. 33User configuration files in a distribution package ..............................................................34
User Data File Locations ................................................................................. 35Roaming profile support for Pro and Java sessions ..........................................................35Default paths for user data files .........................................................................................35
Pro sessions using Internet Explorer ......................................................................35Java sessions using Internet Explorer ....................................................................35
Creating a Trace ............................................................................................... 36Setting trace in Java Sessions .......................................................................................... 36Setting trace in Pro Sessions ............................................................................................ 36
Contacting Micro Focus .................................................................................. 38Further information and product support ...........................................................................38Information we need ..........................................................................................................38Contact information ........................................................................................................... 38
Tell Us What You Think .................................................................................... 40
4 | Contents
Product OverviewOnWeb Web-to-Host is a server-based Web application that publishes your existing legacy applications inintranet, extranet, and Internet environments. It includes host display, printer, and file transfer features thatenable end users to work productively with host-based information in a familiar Windows or web browserenvironment. OnWeb Web-to-Host provides access to a broad range of host types, including IBMmainframe, IBM AS/ 400, DIGITAL VAX, UNIX, and HP systems.
System administrators can use the Session Configuration Manager tool to easily configure client sessionsthat can be published to end users.
Although it can be installed as a standalone product, Web-to-Host is part of Micro Focus Solutions, acommon underlying framework that integrates host systems, desktops, browser-based systems, andwireless devices with new Web-based solutions. This guide describes the Web-to-Host standalone version.
For more information on Micro Focus Solutions, visit the Micro Focus web site (http://www.microfocus.com).
ComponentsWeb-to-Host includes these components:
• Pro• Java
While both components provide users with display and printer capabilities for mainframe and mid-sizedhosts, theyhave different feature sets and use different technologies to connect workstations to host data.
ProDesigned for use in an intranet environment, the Pro component offers the richest feature set and consistsof ActiveX controls that give users access to mission-critical host applications and data. The Procomponent provides these client session types:
• Mainframe Display, Mainframe Printer• AS/400 Display, AS/400 Printer, AS/400 File Transfer• UNIX Display• HP Display
Pro client sessions include these advanced features and options:
• Mainframe file transfer (can include SimXfer tables)• AS/400 File Transfer• AS/400 batch file transfers• Macros• Hotspots• User profile enhancements• Restricted user support• An MSI packaging utility for automatically installing Pro components• A distribution utility• A download and install service• VBA-type scripting• Customizable Menus and Toolbars
Product Overview | 5
• End-user keyboard mapping• Administrator keyboard mapping• Tracing
Hotspots, a word or set of characters on the host screen, activate a function when clicked. Using theHotspots Configuration dialog box, you can enable/ disable, show/hide, create, and modify both defaultand user-created hotspots. Default hotspots are host commands displayed on-screen. User createdhotspots are custom macros you assign to selected on-screen text. You can also use hotspots and macrosto log on to and run host applications automatically. Any protected text on your host screen can be turnedinto a hotspot. In mainframe displays, you can also configure hotspots for non-protected text.
Pro AS/400 File Transfer moves files and data between the host and the PC using either the menu bar ortoolbar options of the AS/400 display. A customized toolbar button activates a pre-configured FTX file andstarts the AS/400 FTX application. A new AS/400 emulation type has been added to the SessionConfiguration Manager. It opens the AS/400 FTX application and loads an existing FTX configuration onthe client. Your users can customize the file transfer session, configuring options such as the data formatfor sending and receiving, file locations, application behavior both during and upon completion of thetransfer, security settings, and host connection.
With enhanced user profiles, user configuration files (.cph) are no longer deleted automatically whenchanges are made in the HTML files for configurable options. For more information, see User ProfileConfiguration.
Pro ActiveX components are downloaded to the client once, during the first login. A new download serviceis first installed on the client workstation. Once the service is installed on the client, all users (includingrestricted users) can work with the Pro ActiveX controls. The service handles all installs, upgrades, anddownloads of Pro ActiveX components.
The Web-to-Host Distribution Packager enables you to bundle multiple Web-to-Host configuration and datafiles into a single, easily distributed package. Users can run sessions that include a complete workenvironment with components such as pre-defined scripts, macros, hotspots, custom toolbars, backgroundimages, icons, screen/font colors, AS/400 File Transfer and Batch File Transfer profiles (for Web-to-HostPro sessions). The Web-to-Host Distribution Packager helps you provide standardized functionality and asingle look and feel for all users. For more information, see the online Help.
JavaThe Java component can be used in all environments (Internet, intranet, and extranet), and consists ofJava applets (built using JavaBeans) compatible with JDK level 1.6 and higher. The Java componentincludes these client session types:
• Mainframe Display, Mainframe Printer• AS/400 Display, AS/400 Printer, AS/400 File Transfer, AS/400 Batch File Transfer• UNIX Display
Java client sessions include these advanced features and options:
• Mainframe file transfer• Macros• Toolbar• Status bar• 3D display• Hotspots• Color mapping• End-user keyboard mapping• A distribution utility• Administrator-configured keyboard mapping
6 | Product Overview
• Tracing• Configurable custom options
The Java applets are downloaded to the client once, during the first login; thereafter they operate on thebrowser system directly with only checks against the Web server for new versions or updates. No otherdownloads are required until you upgrade the Java component.
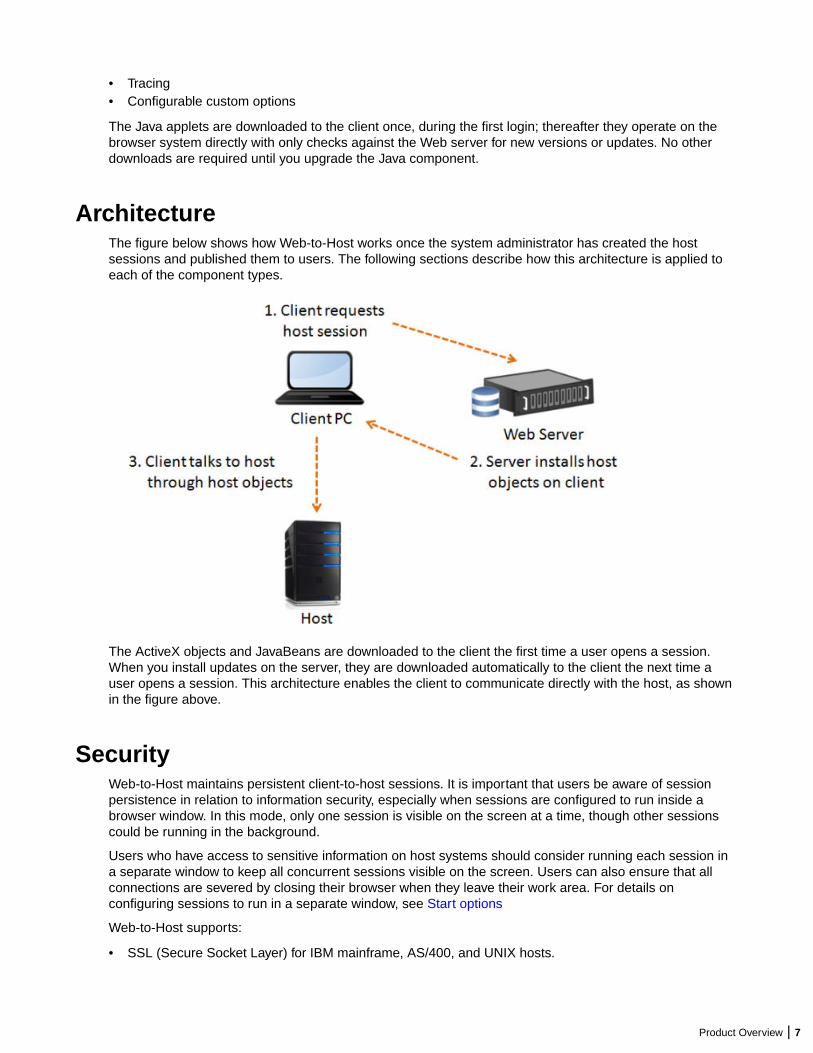
ArchitectureThe figure below shows how Web-to-Host works once the system administrator has created the hostsessions and published them to users. The following sections describe how this architecture is applied toeach of the component types.
The ActiveX objects and JavaBeans are downloaded to the client the first time a user opens a session.When you install updates on the server, they are downloaded automatically to the client the next time auser opens a session. This architecture enables the client to communicate directly with the host, as shownin the figure above.
SecurityWeb-to-Host maintains persistent client-to-host sessions. It is important that users be aware of sessionpersistence in relation to information security, especially when sessions are configured to run inside abrowser window. In this mode, only one session is visible on the screen at a time, though other sessionscould be running in the background.
Users who have access to sensitive information on host systems should consider running each session ina separate window to keep all concurrent sessions visible on the screen. Users can also ensure that allconnections are severed by closing their browser when they leave their work area. For details onconfiguring sessions to run in a separate window, see Start options
Web-to-Host supports:
• SSL (Secure Socket Layer) for IBM mainframe, AS/400, and UNIX hosts.
Product Overview | 7
• SSH (Secure Shell) for Pro UNIX display.• Kerberos authentication for AS/400.
With this security support, users can securely access applications and transfer data between theirdesktops and mainframe, AS/400, and UNIX systems, encrypting the session data stream to a hostcapable of supporting these protocols.
Finding informationWeb-to-Host product documentation includes:
• This Administrator Guide, which explains how to install, uninstall, configure, and deploy the product.• The Readme file, which contains information about new features, late-breaking changes, and known
issues.
The Help page of the Session Configuration Manager contains links to the Readme file and thisAdministrator Guide.
• Context-sensitive Help for the Session Configuration Manager, a tool for configuring Pro and Java clientsessions.
• User guides for Pro and Java clients. This Help for end users explains how to configure and run featuresand options in the client session.
8 | Product Overview
Server InstallationTo deploy OnWeb Web-to-Host, you must perform the following tasks:
1. Install the product on a Web server.2. Run the Session Configuration Manager to create and configure (or migrate) session profiles.3. Publish session profiles to clients.
Web-to-Host files are installed in a w2hlegacy directory (created during installation) that must reside in aWeb-publishable directory on your server. The Web server can then publish OnWeb Web-to-Host to clientmachines using HTTP.
System requirements• The Web server on which you install OnWeb Web-to-Host can be any HTTP based server, such as a
Windows Web server, a UNIX server, or an AS/400 (iSeries).• You must configure this Web server to allow downloads of executable files to the client. If the Web
server is a Microsoft Internet Information Server (IIS) or a Microsoft Personal Web server, executepermissions must be turned off for the server directories that contain the Web-to-Host client .exe files.See your Web server documentation for instructions.
• You should install OnWeb Web-to-Host software in the root publishing directory of the Web server, or ina subdirectory configured on the web server. Otherwise, the product will not function. For details,consult your Web administrator or your Web server documentation.
• For Microsoft IIS, this directory is usually:
c:\Inetpub\wwwroot
• For Apache Server, this directory is usually:
c:\Program Files\Apache Group\Apache2.2\htdocs
• This version of OnWeb Web-to-Host requires Oracle Java VM 1.6 and higher.• To use the Session Configuration Manager (used to create and migrate client profiles) with Internet
Explorer 11.0, Oracle Java VM 1.6 and higher is required.
InstallingThis chapter describes how to install and remove OnWeb Web-to-Host as a standalone product on yourWeb server.
Installing on a Web server running Windows
Using SetupFollow these steps to install OnWeb Web-to-Host on a Web server running Windows Server 2003 (SP1and above), Windows Server 2008, or Windows Server 2012 R2.
1. Navigate to the Micro Focus Web-to-Host 6.8.1\bin folder.
2. Double-click Web-to-HostSetup.exe.
3. Read the introductory information, then click Next.
Server Installation | 9
4. Read the Software License Agreement, select the option to accept the terms of the license agreement,then click Next.
5. Enter the license key for your OnWeb Web-to-Host product, then click Validate.
6. Specify the Web root directory (this can be the root publishing directory of your Web server or anysubdirectory under the Web root), then click OK.
• For IIS Web servers, the Web Root Directory defaults to:
C:\InetPub\wwwroot\
• For Apache Server, the root publishing directory defaults to:
C:\Program Files\Apache Software Foundation\Apache2.2\htdocs
• For other Web servers, browse to the root publishing directory of the Web server.
The setup program creates a new w2hlegacy directory under the root publishing directory (or thedestination directory) and begins copying files to that directory.
To install to a subdirectory, select Enable subdirectory support and type the path in the box provided.
When finished, the Installation Complete screen appears. For an overview of what the correctinstallation should look like, see Directory structure.
7. Click Finish to exit the installation.
Using the consoleOnWeb Web-to-Host can also be installed using the console (known as console mode). The command lineoptions you enter depend on whether you are installing to the default destination directory or to any otherdirectory configured on the Web server.
If you need to change the license key, you must first uninstall Web-to-Host, then reinstall it with the newkey. If you do not enter a license key, Setup installs a 30-day evaluation version.
Installing to the default directory
OnWeb Web-to-Host can also be installed using the console (known as console mode). The command lineoptions you enter depend on whether you are installing to the default destination directory or to any otherdirectory configured on the Web server.
If you need to change the license key, you must first uninstall Web-to-Host, then reinstall it with the newkey. If you do not enter a license key, Setup installs a 30-day evaluation version.
To install to the default destination directory:
1. Enter:
Web-to-HostSetup.exe -DLicenseKey=<license_key> -i console
2. Follow the instructions that appear during the installation.
3. When installation is complete, you are prompted for a response. Press 3 to exit the installation.
For example, if the default directory is:
c:\Inetpub\wwwroot
then OnWeb Web-to-Host is installed in:
c:\Inetpub\wwwroot\w2hlegacy
Note: When you install OnWeb Web-to-Host on either a Microsoft IIS or Apache Server, it is installedto their default directory. Otherwise, it is installed in the %PROGRAMFILES% directory as Web-to-HostSetup.exe.
10 | Server Installation
Installing to a non-default directory
When installing to a non-default directory, you must enter the Web root directory parameter. If you want toinstall to a subdirectory under the Web root, you must also enter the subdirectory parameter. However, thisis optional.
1. Enter:
Web-to-HostSetup.exe -DWebRootDir=<directory_name> -DSubDirectory=<subdirectory_name> -DLicenseKey=<license_key> -i console
2. Follow the instructions that appear during the installation.
3. When installation is complete, you are prompted for a response. Press ENTER to exit the installation.
For example, to install OnWeb Web-to-Host to the following directory:
c:\InetPub\wwwroot in subdirectory w2h6.8.1\install
you would enter:
Web-to-HostSetup.exe -DWebRootDir=c:\InetPub\wwwroot -DSubDirectory=w2h6.8.1\install -DLicenseKey=xxxx-yyyy-vvvv -i console
Notes:
• When typing a subdirectory, always use the format:
<FolderName>\<FolderName>
• Parameters that include a space must be enclosed in quotation marks (“), for example:
-DWebRootDir=”c:\program files\wwwroot”
Installing on a Web server running LinuxThis version of OnWeb Web-to-Host requires Oracle Java VM 1.6 or higher.
Using Setup
1. Navigate to the Micro Focus Web-to-Host 6.8.1/bin folder.
2. Run the setup.jar file as a Java executable.
3. Read the introductory information, then click Next.
4. Read the Software License Agreement, select the option to accept the terms of the license agreement,then click Next.
5. Type the license key for your Web-to-Host product, then click Next.
6. Specify the Web Root Directory (this can be the root publishing directory of your Web server or anysubdirectory under the web root), then click OK.
For example, the Apache Server root publishing default directory might be one of:
/var/www
/var/www/htdocs
/var/www/html
For other Web servers, browse to the root publishing directory of the Web server.
The setup program creates a new w2hlegacy directory under the root publishing directory (or thedestination directory) and begins copying files to that directory.
To install to a subdirectory, select Enable subdirectory support and type the path in the box provided.
When finished, the Installation Complete screen appears.
For an overview of what the correct installation should look like, see Directory structure.
Server Installation | 11
7. Click Finish to exit the installation.
Using the consoleOnWeb Web-to-Host can also be installed using the console.
If you need to change the license key, you must first uninstall Web-to-Host, then reinstall it with the newkey. If you do not enter a license key, Setup installs a 30-day evaluation version.
To install OnWeb Web-to-Host:
1. Change to the directory where setup.jar resides.
2. Enter:
java -jar setup.jar -DWebRootDir=<directory_name> -DSubDirectory=<subdirectory_name> -DLicenseKey=<license_key> -i console
3. Follow the instructions that appear during the installation.
4. When installation is complete, you are prompted for a response. Press 3 to exit the installation.
For example, to install OnWeb Web-to-Host to the following directory:
/var/www/htdocs in subdirectory w2h6.8.1/install
you would enter:
java -jar setup.jar -DWebRootDir=/var/www/htdocs -DSubDirectory=w2h6.8.1/install -DLicenseKey=xxxx-yyyy-vvvv -i console
Notes:
• When typing a subdirectory, always use the format:
<FolderName>\<FolderName>
• The following parameters are optional:
-DSubDirectory
-DLicenseKey
• Parameters that include a space must be enclosed in quotation marks (“).
Installing on an iSeries systemOnWeb Web-to-Host can be installed on any non-Windows server that has a Java run-time environment(JRE) and a Web server.
This section provides instructions for installing Web-to-host on an iSeries system.
System requirementsTo support OnWeb Web-to-Host, the following software must be installed on your iSeries system:
• 5722-SS1 Option 12 - Host Servers• 5722-DG1 - IBM HTTP Server (powered by Apache)• 5722-JV1 JVM 1.5
Installing the Java Virtual MachineIBM Technology for Java Virtual Machine is included in licensed program 5722-JV1. Licensed program5722-JV1 is shipped with the IBM system CDs. To access the IBM Technology for Java option, performthe following steps:
1. Enter the Go Licensed Program (GO LICPGM) command, then select Option 10 (Display) .
12 | Server Installation
2. If you do not see this licensed program listed, then perform the following steps:
a. Enter the GO LICPGM command on the command line.b. Select Option 11 (Install licensed program).c. Select Option 1 (Install) for licensed program (LP) 5722-JV1 *BASE, then select Option 8.
If Option 8 is not displayed in the list, you can add it to the list by entering Option 1 (Install)in the option field. Enter 5722JV1 in the licensed program field and Option 8 in the product optionfield.
3. Add an environment variable. On the command line, enter the following command:
ADDENVVAR ENVVAR(JAVA_HOME) VALUE('/QOpenSys/QIBM/ProdData/JavaVM/jdk50/32bit')
Starting Web-to-Host installationFor best performance, use the installation directory specified in this procedure.
1. Using FTP or NetServer, place the /bin/setup.jar file from your electronic download in a temporarylocation on the iSeries. For example, /tmp.
2. Enter:
QSH
3. Change to the /tmp directory.4. Enter:
java -jar setup.jar -DWebRootDir=<directory_name> -DSubDirectory=<subdirectory_name> -DLicenseKey=<license_key> -i console
For example, if you were using the APACHEDFT Web server, your command line would look similar tothis:
java -jar setup.jar -DWebRootDir=/www/apachedft/htdocs -DLicenseKey=XXXXX-XXXXXXXXXXX -i console
5. Follow the instructions that appear during the installation.6. When installation is complete, you are prompted for a response. Press ENTER to exit the installation.
After installation, you are ready to run the Session Configuration Manager. For information on using theSession Configuration Manager, see Creating and Migrating Client Profiles.
Installing on an unsupported non-Windows serverTo install the product on an unsupported non-Windows server, you must first install the product on asupported platform (this does not need to be a Web or file server), then copy the files manually to thecorrect location on the non-Windows Web server.
1. Use FTP to copy the w2hlegacy directory and its contents to the root publishing directory of your Webserver. For the location of this directory, consult your Web administrator or your Web serverdocumentation).
Note: When using FTP to transfer files to an IBM OS/390 Web server, be sure to FTP all files withfile extensions .htm, .html, or .txt as text. Transfer all other files as binary. This is necessarybecause IBM uses the EBCDIC rather than the ASCII character set to store text files.
2. When you have copied all the files, the installation is complete. For an overview of what the correctinstallation should look like, see Directory structure.
Server Installation | 13
Installing an evaluation productThis section explains how to install and migrate the OnWeb Web-to-Host evaluation product. Theevaluation product expires 30 days after you first install OnWeb Web-to-Host. After 30 days, you can nolonger run your session profiles. You should then contact your system administrator.
Installing the evaluation product in graphic modeTo install the evaluation product on your Web server in graphic mode:
1. Follow the appropriate procedure above.
2. Instead of entering the license key, select Evaluate.
Installing the evaluation product in console modeTo install the evaluation product on your Web server from the console:
1. Follow the appropriate procedure above.
2. Do not enter the following parameters:
-DLicenseKey=<license_key>
After installing the evaluation product (for all modes), you can create session profiles and begin your 30-day evaluation period by directing your browser to:
<webserver>/w2hlegacy/config/hostwizard.html
For information on creating and configuring profiles, see Creating and Migrating Client Profiles.
Upgrading to a licensed productTo upgrade to a licensed product:
1. Install the licensed version on top of your evaluation product. If you are running in console mode, firstuninstall Web-to-Host, then reinstall it with the license key.
2. Evaluation profiles expire after the 30-day evaluation period. When upgrading to the licensed product,you must also run all profiles created with the evaluation product through the Conversion Utility in theSession Configuration Manager. See To migrate profiles after upgrading.
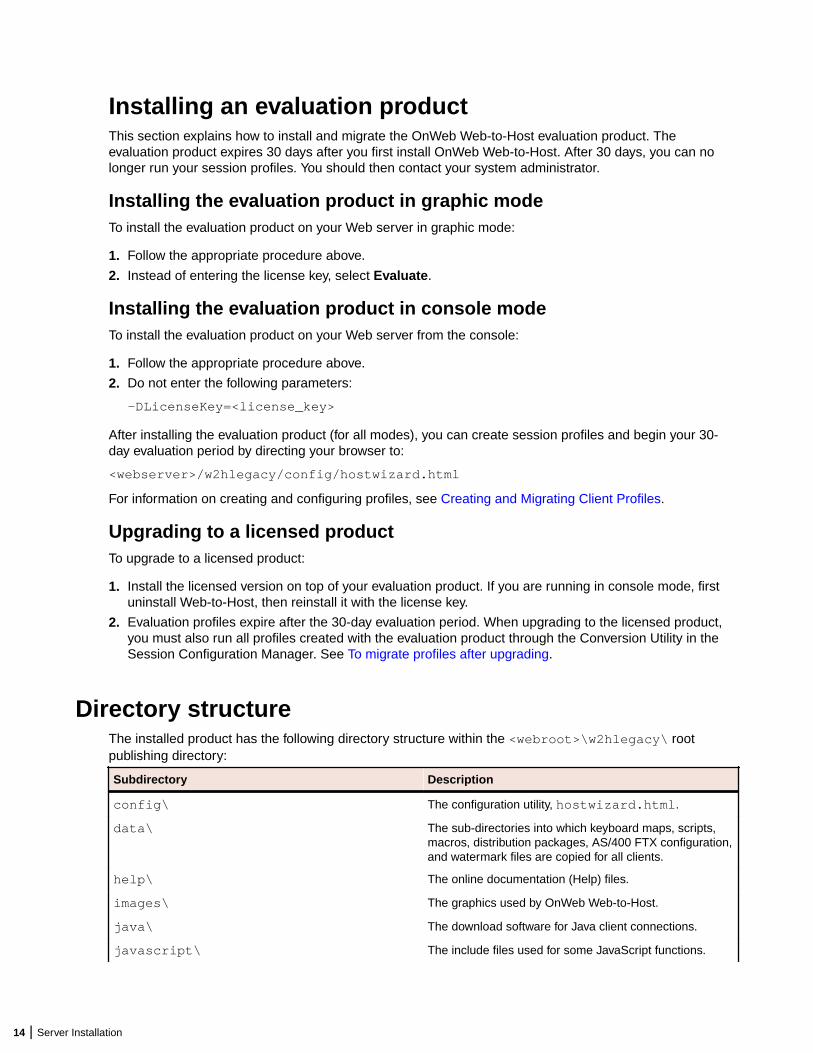
Directory structureThe installed product has the following directory structure within the <webroot>\w2hlegacy\ rootpublishing directory:
Subdirectory Description
config\ The configuration utility, hostwizard.html.
data\ The sub-directories into which keyboard maps, scripts,macros, distribution packages, AS/400 FTX configuration,and watermark files are copied for all clients.
help\ The online documentation (Help) files.
images\ The graphics used by OnWeb Web-to-Host.
java\ The download software for Java client connections.
javascript\ The include files used for some JavaScript functions.
14 | Server Installation
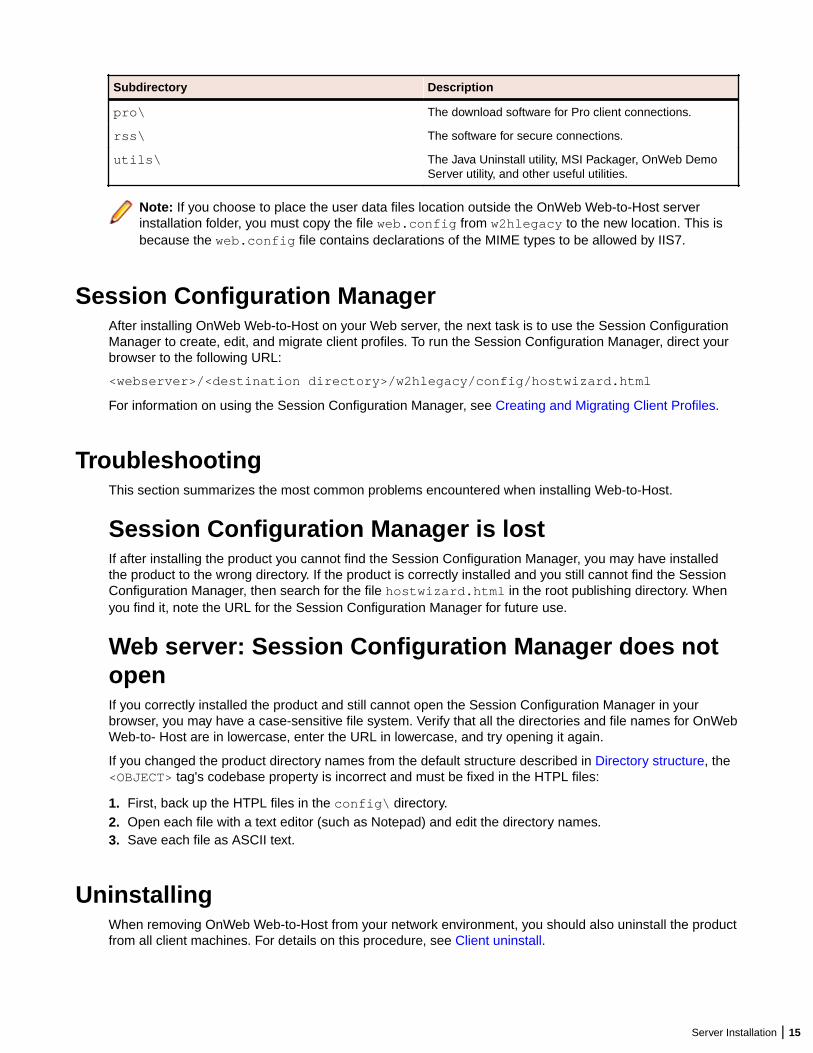
Subdirectory Description
pro\ The download software for Pro client connections.
rss\ The software for secure connections.
utils\ The Java Uninstall utility, MSI Packager, OnWeb DemoServer utility, and other useful utilities.
Note: If you choose to place the user data files location outside the OnWeb Web-to-Host serverinstallation folder, you must copy the file web.config from w2hlegacy to the new location. This isbecause the web.config file contains declarations of the MIME types to be allowed by IIS7.
Session Configuration ManagerAfter installing OnWeb Web-to-Host on your Web server, the next task is to use the Session ConfigurationManager to create, edit, and migrate client profiles. To run the Session Configuration Manager, direct yourbrowser to the following URL:
<webserver>/<destination directory>/w2hlegacy/config/hostwizard.html
For information on using the Session Configuration Manager, see Creating and Migrating Client Profiles.
TroubleshootingThis section summarizes the most common problems encountered when installing Web-to-Host.
Session Configuration Manager is lostIf after installing the product you cannot find the Session Configuration Manager, you may have installedthe product to the wrong directory. If the product is correctly installed and you still cannot find the SessionConfiguration Manager, then search for the file hostwizard.html in the root publishing directory. Whenyou find it, note the URL for the Session Configuration Manager for future use.
Web server: Session Configuration Manager does notopenIf you correctly installed the product and still cannot open the Session Configuration Manager in yourbrowser, you may have a case-sensitive file system. Verify that all the directories and file names for OnWebWeb-to- Host are in lowercase, enter the URL in lowercase, and try opening it again.
If you changed the product directory names from the default structure described in Directory structure, the<OBJECT> tag's codebase property is incorrect and must be fixed in the HTPL files:
1. First, back up the HTPL files in the config\ directory.2. Open each file with a text editor (such as Notepad) and edit the directory names.3. Save each file as ASCII text.
UninstallingWhen removing OnWeb Web-to-Host from your network environment, you should also uninstall the productfrom all client machines. For details on this procedure, see Client uninstall.
Server Installation | 15

Uninstalling from a Windows server1. Select Control Panel > Add/Remove Programs.2. Select Micro Focus OnWeb Web-to-Host 6.8.1, then click Add/Remove.3. Follow the prompts to remove the application.
Uninstalling from a non-Windows serverTo uninstall from the default destination directory:
1. Navigate to:
<default_install_directory>\w2hlegacyuninst
2. Enter:
java -jar uninstaller.jar -i console
To uninstall from any destination directory and subdirectory:
1. Navigate to:
<webroot_directory>/<subdirectory>/w2hlegacyuninst
2. Enter:
java -jar uninstaller.jar -i console
Uninstalling from the default installation directoryTo uninstall from the default installation directory:
1. Navigate to:
<default_install_directory>\w2hlegacyuninst
2. Enter:
java -jar uninstaller.jar -i console
Uninstalling from a non-default installation directoryTo uninstall from a non-default installation directory:
1. Navigate to:
<webroot_directory>/<subdirectory>/w2hlegacyuninst
2. Enter:
java -jar uninstaller.jar -i console
16 | Server Installation
Creating and Migrating Client ProfilesAfter installing OnWeb Web-to-Host on your Web server, the next task is to create or migrate client profiles.You may also want to edit client profiles to configure new options, such as security, distribution packages,Pro toolbars and menus, and Pro watermarks.
This chapter explains how to use the Session Configuration Manager to create, edit, and migrate clientprofiles and how to deploy client profiles to your users. The procedures in this chapter apply to astandalone Web-to-host installation on any Web server.
Note: On a slow connection, the initial download for the Session Configuration Manager and the clientsession may take some time. Consequently, Web-to-Host may seem as though it is not respondingwhen running the Session Configuration Manager or the client session for the first time.
Migrating client profiles from a previous versionAfter updating Web-to-Host product by installing a new version or upgrade, you must migrate all sessionprofiles created in the previous version by running the Session Configuration Manager in server mode. Ifyou do not update the session profiles, the following problems may occur:
• Pro client sessions will not open. Users will see an error message prompting them to contact theirsystem administrator.
• Java client sessions will not open and users will not see an error message.
For details on running the Session Configuration Manager in server mode, see Creating client profiles.
Migrating profiles after upgrading1. Run the Session Configuration Manager on the server by typing the following in the address bar of your
browser:
http://<webserver_name>/<subdirectory>/w2hlegacy/config/hostwizard.html
2. Do one of the following:
• To quickly migrate profiles in batch mode, click the Conversion Utility tab, then follow the Runningthe conversion utility procedure below.
• To convert and edit profiles individually, click Open an Existing Session or Import PC-to-HostProfile, then specify the profile to edit. When prompted to convert the profile prior to editing, clickOK. For details on editing profiles, see Creating client profiles.
Both migration methods ensure that your Web-to-Host installation incorporates the most recent versionnumbers in the session HTML files. Once new software is downloaded to the client workstations, theversion numbers on client workstations and session files must match. If new parameters exist in thecurrent product version that were not defined in the migrated profile, Web-to-Host uses the defaultvalues.
3. When the user opens a migrated profile, the browser displays a standard security dialog box asking ifthe user wants to install and run software from Micro Focus.
Administrators should tell their users to click Yes.
Running the Conversion Utility1. If necessary, run the Session Configuration Manager in server mode, then click the Conversion Utility
tab. For details, see Steps 1 and 2 in the procedure above
Creating and Migrating Client Profiles | 17
2. In the Current Directory box, type the drive and full path of the folder containing the session profiles toconvert.
• To change directories, in the Directories box, double-click either the double dot [..] or the directorynames until you are at the desired directory.
• To change drives, in the Current Directory box, type the drive letter followed by a colon (forexample, D:), then press ENTER.
3. In the Files box, select the files to convert. You can select one or more files and convert themsimultaneously.
4. Click Convert.
The Results box shows the status of the requested conversion(s) by denoting Successful or Failednext to the file name(s).
• If the conversion is successful, the file is updated and the previous version is saved in the samedirectory with a .bak extension.
• If the conversion failed, your browser's Java Console output screen (found on the Internet ExplorerView menu) contains an error message explaining why the conversion failed.
5. To exit the Conversion Utility, close the browser.
Migrating Rumba PC-to-Host profilesMoving from Rumba PC-to-Host to Web-to-Host does not mean you lose profiles or that those profiles mustbe recreated. Web-to-Host provides a migration wizard that makes upgrading fast and easy and allows youto continue using your old profiles. The migration wizard is part of the Session Configuration Manager.
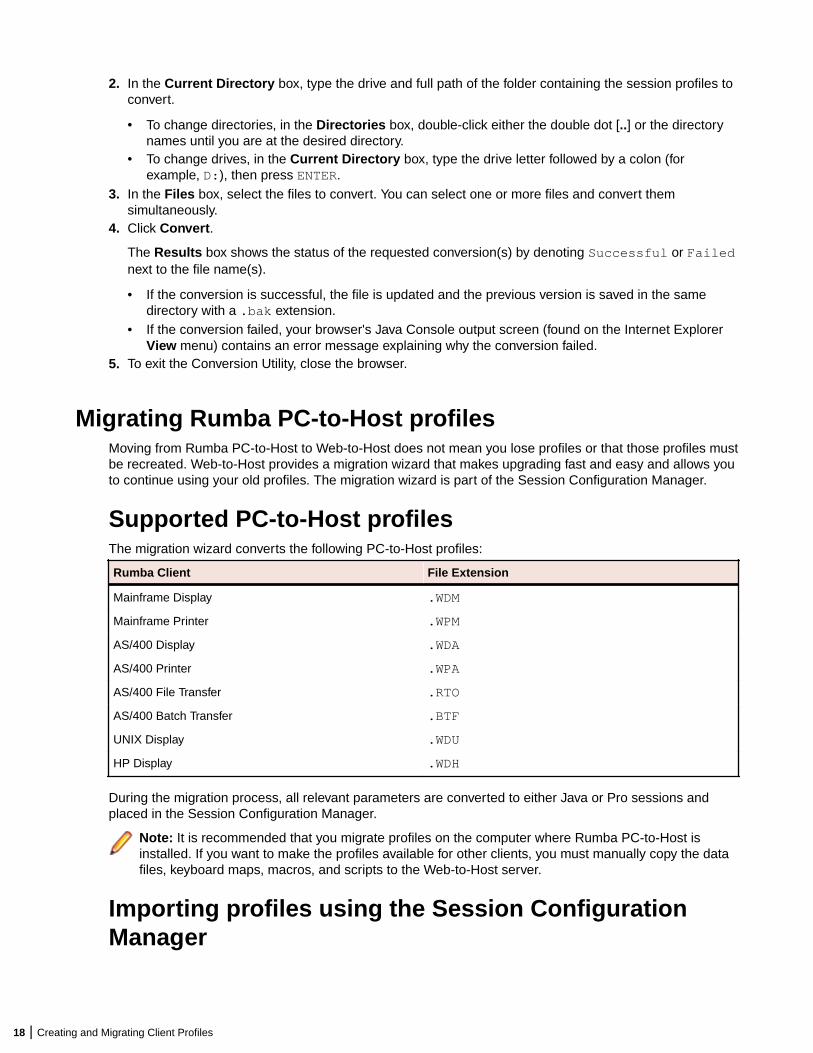
Supported PC-to-Host profilesThe migration wizard converts the following PC-to-Host profiles:
Rumba Client File Extension
Mainframe Display .WDM
Mainframe Printer .WPM
AS/400 Display .WDA
AS/400 Printer .WPA
AS/400 File Transfer .RTO
AS/400 Batch Transfer .BTF
UNIX Display .WDU
HP Display .WDH
During the migration process, all relevant parameters are converted to either Java or Pro sessions andplaced in the Session Configuration Manager.
Note: It is recommended that you migrate profiles on the computer where Rumba PC-to-Host isinstalled. If you want to make the profiles available for other clients, you must manually copy the datafiles, keyboard maps, macros, and scripts to the Web-to-Host server.
Importing profiles using the Session ConfigurationManager
18 | Creating and Migrating Client Profiles
1. Open the Session Configuration Manager utility in server mode.2. Click the Create or Edit Session tab.3. Select Open an Existing Session or Import PC-to-Host Profile , then either enter the full path or click
Browse to select the path of the file to import. When the file is imported, the Type option (whichdisplays the type of profile type imported) in the Create New Session box is dimmed, and theImplementation option is available.
4. From the Implementation drop-down list, select the client appropriate for the particular profile. Forexample, Java client or Pro Client.
5. Click Go. When the migration process is complete, the Session Configuration Manager opens with theimported data displayed in the relevant option boxes. For example, the IP address that was in theRumba PC-to-Host profile now appears in the IP address box of the Session Configuration Manager. IfWeb-to-Host requires a parameter not found in the imported profile, it uses the default value anddisplays a Migration Notification listing the parameters not found.
6. Once the profiles have been imported, assign a session name, then save and continue editing as youwould with any Web-to-Host profile.
Creating client profilesThis section describes how to use the Session Configuration Manager to create a new Web-to-Host clientsession for your users. The Session Configuration Manager utility saves your client configuration settings inan HTML file that invokes a named Web-to-Host client session.
The standard method in which the system administrator creates and configures the session profiles isknown as server mode. In this mode, the profiles must reside in a Web-published folder on the Web-to-Hostserver. When the user opens a profile on the server, the client session is delivered to the desktop throughthe browser.
To run the Session Configuration Manager, type the following in the address bar of your browser:
http://<webserver_name>/
<subdirectory>/w2hlegacy/config/hostwizard.html
Creating or editing a client profileTo use the Session Configuration Manager to create or edit client profiles:
1. Run the Session Configuration Manager on the server or on your local workstation.2. Optional: For general instructions on using the Session Configuration Manager, click the Help tab. This
tab also contains links to the Readme file and this Administrator Guide.3. Click the Create or Edit Session tab, then do one of the following as needed:
• Create a new session. Click Create a New Session, then select the Type (host emulation sessiontype) and Implementation (Pro or Java client).
• Edit an existing session. Click Open an Existing Session, then specify the full path of the HTMLsession configuration file to edit. The Browse utility defaults to the location of the last savedconfiguration file.
4. Click Go!.
The tabs for the selected host type and technology implementation appear.5. Optional: Click each tab, click ? at the bottom of the screen, then print the help pages for each tab.6. Configure the settings on each page as needed.
• For details on each field, see the online help. For details on configuring client start options,concurrent sessions, and multiple language support, see Configuring client profiles.
• The Session Configuration Manager displays an exclamation mark next to required settings, andprovides many default settings. You need to enter only a few unique settings to make your
Creating and Migrating Client Profiles | 19
connections work correctly. However, you should check each page to be sure you select theappropriate options for your needs.
7. To save the profile, click the check mark icon at the bottom of the Session Configuration Manager.
Web-to-Host generates the HTML file and displays the Save As dialog box.8. Specify an appropriate folder in which to save the profile.
In server mode, you must save the profile in a Web-published folder. Otherwise, client sessions do notreceive automatic updates from the Web server.
Note: In previous versions of Web-to-Host, updates from the administrator deleted all userconfigurations. In this version, there are cases when administrator changes do not automaticallydelete the user’s configuration (.cph) file. For more information, see User Profile Configuration.
Configuring client profilesThis section describes some of the common options you can configure when creating or editing clientprofiles in the Session Configuration Manager. For a list of options related to each technology, see theSession Configuration Manager Help .
Start optionsThe following options are located on the Session Options page when creating or editing client profiles inthe Session Configuration Manager:
Run in a Separate Window
This option applies only to Pro and Java display profiles.
The Run in a Separate Window option opens the client session in a separate browserwindow.
You can also use this option to configure a Pro display profile to launch multiple standalonesessions using the same configured connection. For details, see Multiple sessions.
The default is Clear. The host session runs inside the browser.
Server URLWith this option, you have the ability to run sessions from a web server other than thedefault Web-to-Host server. The URL you enter indicates the location of the alternate Web-to-Host server.
Enable Local Start
This option applies only to client profiles created by running the Session ConfigurationManager in server mode. For information on server mode, see Creating client profiles.
The Enable Local Start option allows users to run host sessions when the web server isunavailable. With this option, whenever the user opens a client profile stored on the webserver, Web-to-Host copies that profile to the client workstation. The profile resides on theweb server as an HTML file that is named after the client session. The profile location onthe client workstation varies, depending on the client type and the browser:
• Pro sessions:
%LOCALAPPDATA%\Micro Focus\Rumba\LocalStart
• Java sessions:
%LOCALAPPDATA%\Micro Focus\Rumba\JavaLocalStart
It is best to run client profiles from the server to ensure that users have the most up-to-dateconfiguration and software.
20 | Creating and Migrating Client Profiles

When running Local Start profiles, help files are only available if, during configuration, theadministrator selected Install User Guide locally. Auto macro files and keyboard map filesconfigured by the administrator are cached on the client workstation when the session isdownloaded from the server, so these local copies are accessible to the client sessionwhen the originating server is down. By default, Local Start is not selected.
Multiple sessionsUsers can run concurrent Web-to-Host sessions and switch between session windows to perform tasks.How users initiate multiple sessions and navigate between them depends on how you configure thesession profiles. There are three scenarios:
• Multiple sessions running in separate browser windows
By default, users must open multiple instances of the browser to start multiple client sessions. Userscan run concurrent host sessions and switch between sessions by clicking each browser window inturn.
• Multiple sessions running outside the browser
Administrators can configure Pro and Java display profiles to run in a separate window outside thebrowser (see Start options). The user must open a new instance of the browser to launch another hostconnection but, once the new session is connected to the host, the browser can be closed withoutlosing the connection.
• Multiple Pro standalone sessions
Administrators can configure a Pro display profile to launch multiple standalone sessions using thesame configured connection. For example, a user can run two or more MyRumbaHost sessions, each inits own window.
With this configuration, a new session opens in a separate window outside the browser whenever theuser accesses a session URL through the browser window. After launching one or more sessionwindows, users can close the browser without losing the host connection.
Configuring multiple Pro standalone sessions:
1. Create or edit or the Pro session profile in the Session Configuration Manager, then click the SessionOptions tab.
2. Check Run in a Separate Window and Allow Multiple Standalone Sessions.3. To save this configuration, click the check mark icon at the bottom of the page.
When you enable these two options, users can launch a new session window using any method thatrequests the session URL. For example, if your Web site includes a Pro display session calledDisplay.html, users can open multiple sessions by:
• Clicking a link on a Web page
If the Web page includes a link to http://<yoursite>/Display.html, users can click this link tolaunch a new session window.
• Refreshing the browser with the session URL listed in the address bar
When the browser’s address bar contains the session URL, users can click the Refresh (or Reload)button on the browser toolbar to launch a new session.
• Typing the address in the address bar
If users have browsed to another location after opening the session, they can enter the session URL inthe address bar to launch another session window.
• Recalling the address from history
If users cannot remember the URL, they can open the browser’s history list and then select the sessionURL to launch a new session window.
Creating and Migrating Client Profiles | 21
Users can switch between sessions by clicking each of the windows in turn, or by using the taskbar. If thebrowser closes, the session windows remain open.
International client sessionsWhen using the Session Configuration Manager to create or edit client profiles, configure the followingmulti-lingual options to meet the language needs of your users:
You can set these options to use different languages if necessary. For example, you can set the userinterface to English and set the keyboard map and host character set to German.
Host Character SetThis option sets the host language (also known as the codepage). When configuring Pro and Java AS/400and mainframe display or printer profiles, the option appears on the Connection page.
To specify the Host Character Set, select the language character set (or codepage) for the client session.If the host uses a non-English (United States) language, select the language used by the host.
The host character set includes commonly used marks, accents, letters, and symbols of a specificlanguage. For example, if the host language is French, the host character set must also be French toensure that French special characters are transmitted to the host correctly and that the characters receivedfrom the host display in the client session correctly.
The default setting is English (United States) - 37.
UNIX character set optionsNational Replacement Character Set
Replaces particular ASCII characters with characters of the specified language.
Supplemental Character SetSpecifies the character set used by the host.
When configuring a Pro UNIX display, these options are located on the Client Options 2 page.
When configuring a Java UNIX display, these options are located on the Character Set Options page.
Note: There are no configurable character set options for HP display sessions.
Keyboard mapping optionsThese options set the country or custom keyboard map for Pro and Java display sessions.
Web-to-Host supplies numerous country keyboard maps to accommodate the special characters andsymbols used in various languages. You can deploy country keyboard maps in several ways. For example,you can:
• Standardize all the sessions on one country keyboard.• Base the keyboard map on the client workstation's regional settings.• Enable the user to specify their own keyboard mappings.
When configuring display profiles, the available keyboard mapping options vary, depending on the sessionprofile type.
Pro display clients
When using the Session Configuration Manager to configure Pro AS/400, mainframe,UNIX, and HP display profiles, thee following options appear on the Keyboard Map andAuto Macro pages:
Keyboard Map
22 | Creating and Migrating Client Profiles
You can select a standard country keyboard map or specify a custom keyboard map (.mapfile) for the client session. For information on how to do this, see the Help. The defaultkeyboard map is U.S.A.
Custom Keyboard Map
The default is blank.
Note: To enable users to specify their own Pro keyboard map files, whichoverride the administrator-specified keyboard map, see the SessionConfiguration Manager Help on the Client Options page when configuringPro display profiles.
Java display clients
When using the Session Configuration Manager to configure Java AS/400 and mainframedisplay profiles, the following options appear on the Keyboard Map and Auto Macropages:
Custom Keyboard Map
The default Custom Keyboard Map value is blank, and the client session uses a standardcountry keyboard map based on the keyboard Locale. For details on specifying a customkeyboard map (.map file), see the online help for the appropriate page in the SessionConfiguration Manager.
Keyboard LocaleThe keyboard locale determines some default keyboard mappings for the client session.The default value uses a standard country keyboard map based on the Client Localesetting.
When configuring Java UNIX display profiles, these options appear on the KeyboardOptions page.
Note: To enable users to specify their own Java keyboard mappings, whichoverride the administrator-specified keyboard map, see the SessionConfiguration Manager Help on the Client Options page for Java AS/400display or Java mainframe display profiles or the Tool Options page forJava UNIX display profiles.
Client LocaleThis option sets the language of the Web-to-Host client user interface for display and printer sessions.
When using the Session Configuration Manager to create or edit any profile (except Java UNIX profiles),this option appears on the Client Options page. For Java UNIX profiles, this option appears on theGeneral Display Options page.
For Pro and Java sessions, the Client Locale specifies the language for the Web-to-Host client userinterface, which consists of the session window (including tool tips and the status bar), dialog and messageboxes, error messages, and Help.
The default value is English.
Multiple language scenariosWhen running client sessions, users may need to view applications on an international host, require adifferent country keyboard map, or require the Web-to-Host client user interface in another language. Thiscan be done by configuring the Host Character Set, Keyboard Mapping, and Client Locale options.
Different companies have different international language environments and require different display and/orprinter configurations. As such, it is impossible to provide a single procedure. This section lists possiblemulti-language scenarios to help you determine how to best configure the options for your internationallanguage environment.
Creating and Migrating Client Profiles | 23
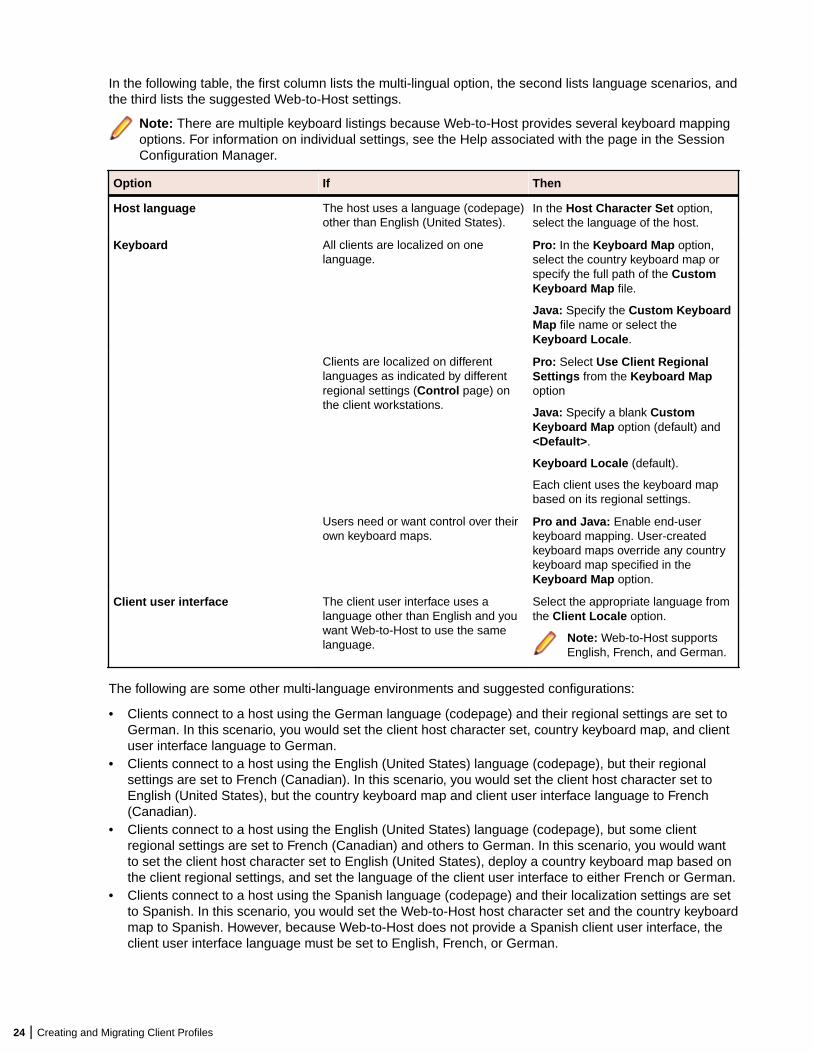
In the following table, the first column lists the multi-lingual option, the second lists language scenarios, andthe third lists the suggested Web-to-Host settings.
Note: There are multiple keyboard listings because Web-to-Host provides several keyboard mappingoptions. For information on individual settings, see the Help associated with the page in the SessionConfiguration Manager.
Option If Then
Host language The host uses a language (codepage)other than English (United States).
In the Host Character Set option,select the language of the host.
Keyboard All clients are localized on onelanguage.
Pro: In the Keyboard Map option,select the country keyboard map orspecify the full path of the CustomKeyboard Map file.
Java: Specify the Custom KeyboardMap file name or select theKeyboard Locale.
Clients are localized on differentlanguages as indicated by differentregional settings (Control page) onthe client workstations.
Pro: Select Use Client RegionalSettings from the Keyboard Mapoption
Java: Specify a blank CustomKeyboard Map option (default) and<Default>.
Keyboard Locale (default).
Each client uses the keyboard mapbased on its regional settings.
Users need or want control over theirown keyboard maps.
Pro and Java: Enable end-userkeyboard mapping. User-createdkeyboard maps override any countrykeyboard map specified in theKeyboard Map option.
Client user interface The client user interface uses alanguage other than English and youwant Web-to-Host to use the samelanguage.
Select the appropriate language fromthe Client Locale option.
Note: Web-to-Host supportsEnglish, French, and German.
The following are some other multi-language environments and suggested configurations:
• Clients connect to a host using the German language (codepage) and their regional settings are set toGerman. In this scenario, you would set the client host character set, country keyboard map, and clientuser interface language to German.
• Clients connect to a host using the English (United States) language (codepage), but their regionalsettings are set to French (Canadian). In this scenario, you would set the client host character set toEnglish (United States), but the country keyboard map and client user interface language to French(Canadian).
• Clients connect to a host using the English (United States) language (codepage), but some clientregional settings are set to French (Canadian) and others to German. In this scenario, you would wantto set the client host character set to English (United States), deploy a country keyboard map based onthe client regional settings, and set the language of the client user interface to either French or German.
• Clients connect to a host using the Spanish language (codepage) and their localization settings are setto Spanish. In this scenario, you would set the Web-to-Host host character set and the country keyboardmap to Spanish. However, because Web-to-Host does not provide a Spanish client user interface, theclient user interface language must be set to English, French, or German.
24 | Creating and Migrating Client Profiles
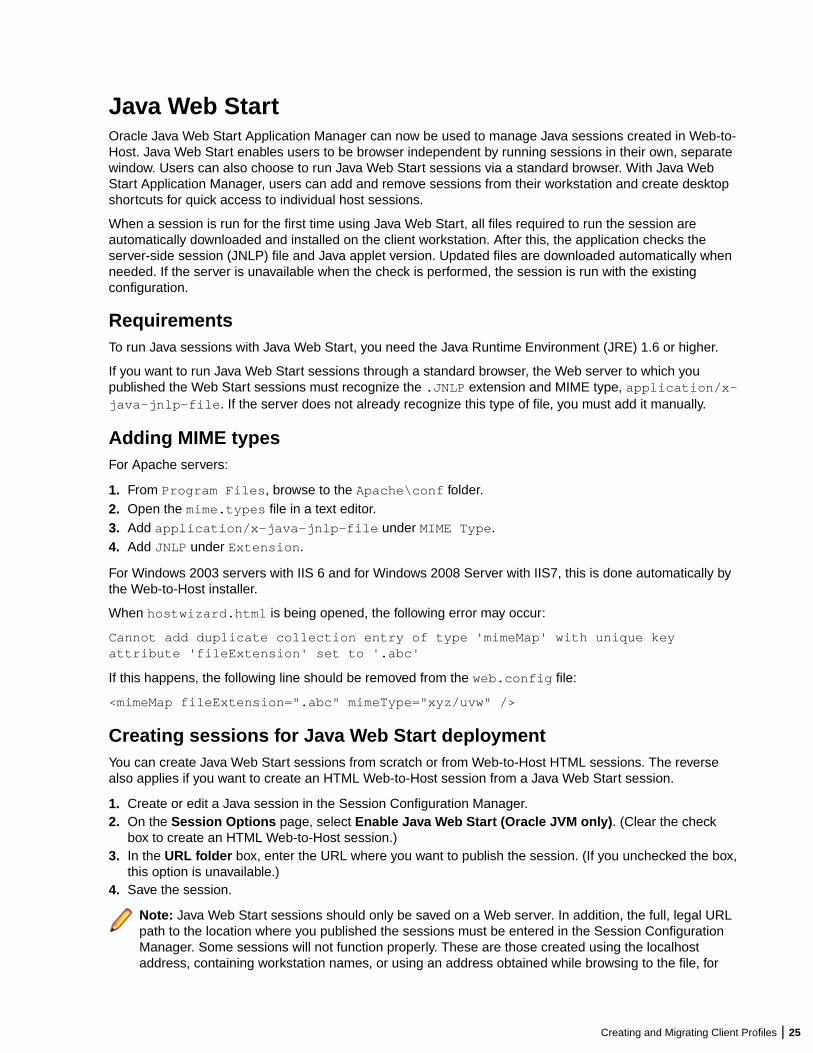
Java Web StartOracle Java Web Start Application Manager can now be used to manage Java sessions created in Web-to-Host. Java Web Start enables users to be browser independent by running sessions in their own, separatewindow. Users can also choose to run Java Web Start sessions via a standard browser. With Java WebStart Application Manager, users can add and remove sessions from their workstation and create desktopshortcuts for quick access to individual host sessions.
When a session is run for the first time using Java Web Start, all files required to run the session areautomatically downloaded and installed on the client workstation. After this, the application checks theserver-side session (JNLP) file and Java applet version. Updated files are downloaded automatically whenneeded. If the server is unavailable when the check is performed, the session is run with the existingconfiguration.
RequirementsTo run Java sessions with Java Web Start, you need the Java Runtime Environment (JRE) 1.6 or higher.
If you want to run Java Web Start sessions through a standard browser, the Web server to which youpublished the Web Start sessions must recognize the .JNLP extension and MIME type, application/x-java-jnlp-file. If the server does not already recognize this type of file, you must add it manually.
Adding MIME typesFor Apache servers:
1. From Program Files, browse to the Apache\conf folder.2. Open the mime.types file in a text editor.3. Add application/x-java-jnlp-file under MIME Type.4. Add JNLP under Extension.
For Windows 2003 servers with IIS 6 and for Windows 2008 Server with IIS7, this is done automatically bythe Web-to-Host installer.
When hostwizard.html is being opened, the following error may occur:
Cannot add duplicate collection entry of type 'mimeMap' with unique keyattribute 'fileExtension' set to '.abc'
If this happens, the following line should be removed from the web.config file:
<mimeMap fileExtension=".abc" mimeType="xyz/uvw" />
Creating sessions for Java Web Start deploymentYou can create Java Web Start sessions from scratch or from Web-to-Host HTML sessions. The reversealso applies if you want to create an HTML Web-to-Host session from a Java Web Start session.
1. Create or edit a Java session in the Session Configuration Manager.2. On the Session Options page, select Enable Java Web Start (Oracle JVM only). (Clear the check
box to create an HTML Web-to-Host session.)3. In the URL folder box, enter the URL where you want to publish the session. (If you unchecked the box,
this option is unavailable.)4. Save the session.
Note: Java Web Start sessions should only be saved on a Web server. In addition, the full, legal URLpath to the location where you published the sessions must be entered in the Session ConfigurationManager. Some sessions will not function properly. These are those created using the localhostaddress, containing workstation names, or using an address obtained while browsing to the file, for
Creating and Migrating Client Profiles | 25
example with Windows Explorer. Sessions can be saved, however, to any Web server, even those thatdo not have Web-to-Host installed.
When a Java Web Start session runs, the .JNLP file and associated applets are updated from theserver. However, the session itself runs locally from the client workstation. Sessions run locally do nothave access to online Help files unless you select the Install user guide locally option when creatingthe session.
Defining password level caching policyPassword level caching is involved with the AS/400 display or AS/400 file transfer.
On AS/400 hosts, password protection capabilities can be set to different levels, such as short or longpasswords. Client applications connecting to a AS/400 host must first query the password level set on thehost. This slows down overall system performance, increasing both connection time and network traffic.
To save time, Web-to-Host caches password-level data, by default. The first time the password level isqueried, the data is saved on the client PC. Afterwards, to avoid performance degradation, the cachedpassword level value is used for each connection.
Cached data is host specific. Once the password level has been cached for a particular host, it is used byall sessions connecting to that host.
The following changes should be performed on the Java Script parts of the HTML session configurationfiles:
AS/400 Printer Pro Client
Comment out the old HostPwdLevel property setting.
AS/400 Display Pro Client
Comment out the old HostPwdLevel property setting.
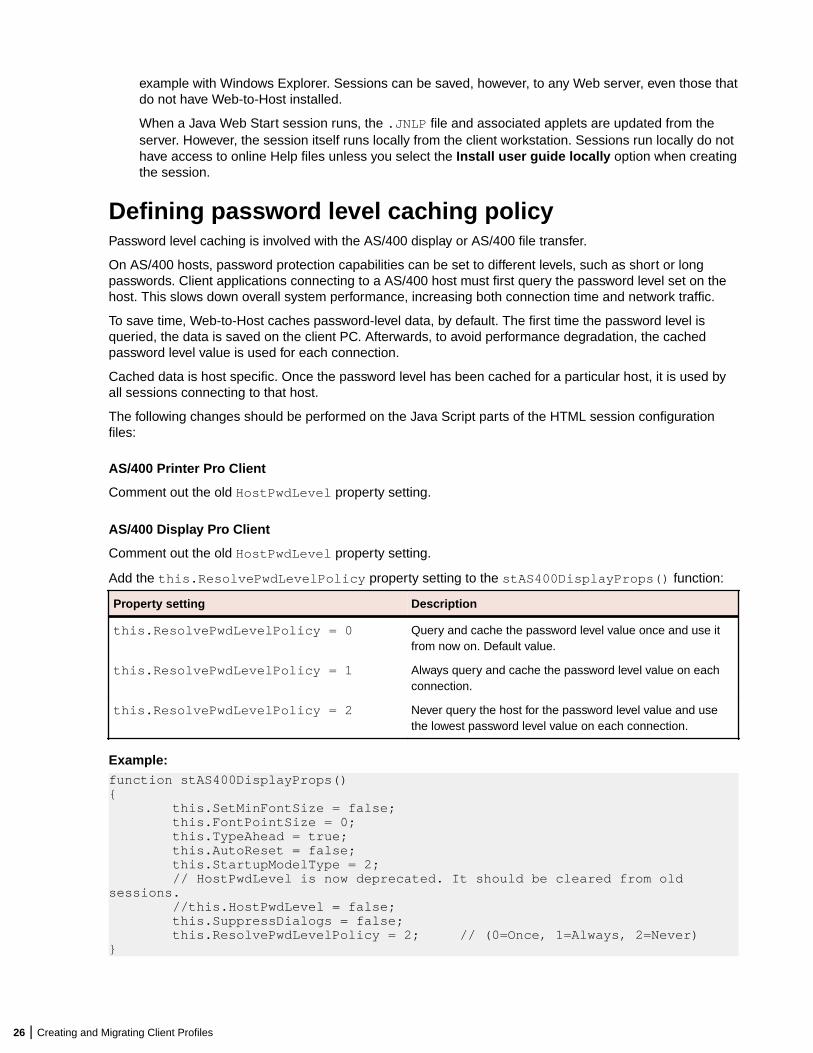
Add the this.ResolvePwdLevelPolicy property setting to the stAS400DisplayProps() function:
Property setting Description
this.ResolvePwdLevelPolicy = 0 Query and cache the password level value once and use itfrom now on. Default value.
this.ResolvePwdLevelPolicy = 1 Always query and cache the password level value on eachconnection.
this.ResolvePwdLevelPolicy = 2 Never query the host for the password level value and usethe lowest password level value on each connection.
Example:function stAS400DisplayProps(){ this.SetMinFontSize = false; this.FontPointSize = 0; this.TypeAhead = true; this.AutoReset = false; this.StartupModelType = 2; // HostPwdLevel is now deprecated. It should be cleared from old sessions. //this.HostPwdLevel = false; this.SuppressDialogs = false; this.ResolvePwdLevelPolicy = 2; // (0=Once, 1=Always, 2=Never)}
26 | Creating and Migrating Client Profiles

Publishing client profiles to usersYou can use any usual Web publishing method to publish session profiles created by running the SessionConfiguration Manager in server mode to users. For example, you can:
• Provide the URLs of the session profiles for users to enter in the address bar of their browsers.• Create an HTML page containing links to the sessions and organize these links by host type or other
useful groupings.
Creating and Migrating Client Profiles | 27
OnWeb Client InstallationThis chapter describes procedures that users must follow when installing, updating, or removing OnWebWeb-to-Host files on the client workstation. If Rumba PC-to-Host software is installed on the clientworkstation, users should follow the procedures described in Coexistence: Pro and PC-to-Host instead, toensure successful coexistence with Web-to-Host.
System requirementsThis section describes the minimum system requirements and configurations required for clientworkstations to run Web-to-Host components.
Client operating systemWeb-to-Host supports these client operating systems:
• Windows Vista• Windows 7, 8.1, and 10
Microsoft Windows Installer (MSI), an installation and configuration service, must also be installed on theclient PC before installing Web-to-Host Pro and advanced features of Java, such as native access.
If no MSI is on the client workstation, an error message is displayed. Web-to-Host does not pre-install MSI.You can download the latest version from:
http://www.microsoft.com/msdownload/platformsdk/sdkupdate/psdkredist.htm
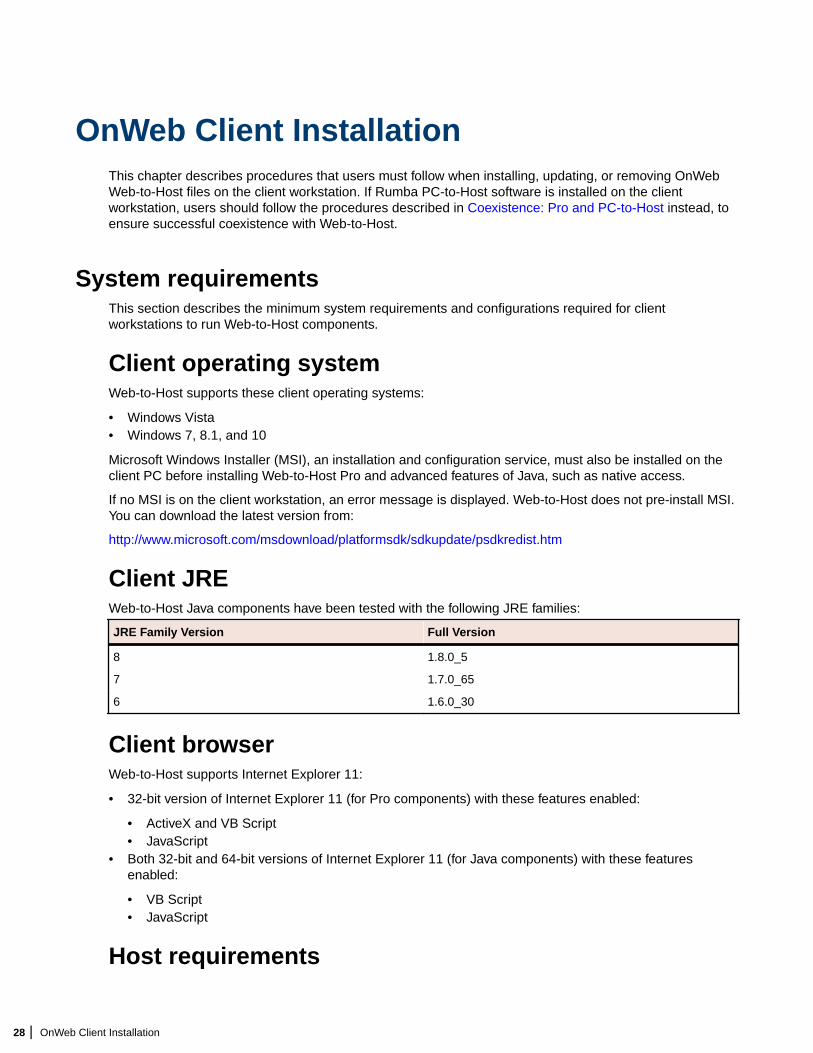
Client JREWeb-to-Host Java components have been tested with the following JRE families:
JRE Family Version Full Version
8 1.8.0_5
7 1.7.0_65
6 1.6.0_30
Client browserWeb-to-Host supports Internet Explorer 11:
• 32-bit version of Internet Explorer 11 (for Pro components) with these features enabled:
• ActiveX and VB Script• JavaScript
• Both 32-bit and 64-bit versions of Internet Explorer 11 (for Java components) with these featuresenabled:
• VB Script• JavaScript
Host requirements
28 | OnWeb Client Installation
Java AS/400 File Transfer clients require the following AS/400 host software:
• Clients without SSL require OS/400 version V4R3 or later• Clients with SSL require OS/400 version V4R4 or later
Client install and upgradeThis section describes how users install and update Web-to-Host when the client does not have Rumbadesktop software also installed. Users must follow these procedures the first time they open a Web-to-Hostsession, and repeat these procedures each time Web-to-Host is updated.
When the user starts a Java session, the browser automatically verifies whether current Web-to-Host filesare installed for all host types. Installation procedures are specific to the client browser type. Pro sessionsare installed through the Service Manager.
Installing ProWeb-to-Host Pro components can be installed automatically using either the MSI Packager or the ServiceManager.
The Web-to-Host MSI Packager is a utility for Pro Clients that replaces CD Image Creator andSetProInstallPath.exe. When integrated with the Service Manage, the MSI Packager providescomplete local start capabilities. You create custom installations that can be deployed on restricted-usersystems. You can add all of the Pro emulation types, SimXfer tables for AS/400 file transfer, RSS Clientsecurity, a VBA-type script engine, localized client Help, and distribution packages. For more information onMSI Packager, see the online MSI Packager User Guide supplied with the product.
Service Manager is installed on client workstations by a user with administrator rights. Once the ServiceManager has been installed, it downloads and installs all Pro components regardless of user rights. Therest of this section describes installation using this component. By default, all Pro files are installed in:
C:\Program Files\Micro Focus\Rumba
Note: Web-to-Host Pro is compatible with Rumba PC-to-Host version 9.4.1 only. All other Web-to-Host components work with all versions of Rumba PC-to-Host. For details on co-existence restrictionsfor the Pro component and Rumba PC-to-Host , see Coexistence: Pro and PC-to-Host.
Standard install procedure: Pro1. From the browser, run the session HTML created by the Session Configuration Manager. As Web-to-
Host downloads and installs, a progress dialog is displayed.2. Depending on your browser security settings, the Security Warning dialog box may appear asking if
you want to install the Service Manager. Click Yes to run the install. Once the Service Manager isinstalled, all necessary Pro ActiveX controls are installed and the session opens.
Note: There may be instances where a message appears in the browser window telling you to restartthe computer. If it appears, click OK. After restarting, open Internet Explorer, click the extension youwant to connect to, then proceed with your host session.
Silent Install procedure: ProAs mentioned above, the standard Web-to-Host Pro installation displays a progress dialog whiledownloading and installing. However, it is possible to run a silent installation. That is, an install anddownload with no progress dialog displayed. To do this:
1. Navigate to \w2hlegacy\config\productcfg.xml. This file contains component descriptions andversion numbers.
2. In the <product_info> section, change the silent_install property to true. By default it is setto false. After editing, silent_install should be:
OnWeb Client Installation | 29

<silent_install value="true"/>.
3. After making the necessary change to productcfg.xml, follow the standard installation procedure.
Installing JavaThe Web-to-Host Java component can be installed automatically on Internet Explorer.
To install the Web-to-Host Java component:
1. From your browser, log on to the Web server and click a session name to request a host session.2. Depending on your browser security settings, the Security Warning dialog box may appear. Click Yes
to run the install. Your host session starts.
Note: Restricted users cannot install the Web-to-Host Java component. However, once anadministrator installs the Web-to-Host Java component, restricted users can run a Java session. Localhelp components must be installed by an administrator before they can be used by restricted users.
Client uninstallYou may occasionally need to uninstall Web-to-Host components and reinstall them to reload lost files andcorrect other system problems. File and directory names and locations to which Web-to-Host componentsare installed vary by component, browser type, and version. As a result, the procedures for uninstallingWeb-to-Host components are specific to each context, as described in the following sections.
Uninstalling ProBefore uninstalling you must first close any open windows. Use the following procedure to uninstall the Procomponent.
1. From Windows Control Panel, double-click Add/Remove Programs. The Add/Remove ProgramsProperties dialog box appears.
2. From the Install/Uninstall tab, select Micro Focus OnWeb Web-to-Host Pro Client 6.8.1, then clickAdd/Remove.
3. From the Web-to-Host Pro Client Uninstall message box, click OK (to continue uninstalling theprogram). The program uninstalls and you return to the Add/Remove Programs Properties dialog box.
4. Click OK.
Note: You must delete one file manually.
1. Open c:\Windows\Downloaded Program Files\.2. Right-click Pro Client Persistent Session Control and select Delete.3. Click Yes to delete the file.
Uninstalling JavaTo uninstall Java Session, from the Java Control Panel, clear Temporary Internet Files.
Uninstalling the Session Configuration ManagerWhen you run the Session Configuration Manager, the tool is installed locally.
To uninstall the Session Configuration Manager, from the Java Control Panel, clear Temporary InternetFiles.
30 | OnWeb Client Installation

Coexistence: Pro and RumbaRumba, a traditional desktop PC-to-Host application that runs on Windows clients, and Web-to-Host Prohave shared executable files. Consequently, certain conditions must be met for both products to coexist onthe same client workstation.
Web-to-Host Pro 6.8.1 is completely compatible with Rumba 9.4.1. In most cases, there should be noproblems when applying feature TMPs to Web-to-Host Pro and Rumba.
Note: The Web-to-Host Java components are compatible with all versions of Rumba products.
By default, the Web-to-Host Pro installation writes all program files on the client workstation to:
C:\Program Files\Micro Focus\Rumba
User data files are written to locations that vary depending on the user's environment. For details, see UserData File Locations.
Coexistence requirementsThe client workstation must meet these requirements for the Web-to-Host Pro component to coexist withRumba:
• The Rumba product version must be version 9.4.1. The Pro software is currently not compatible withearlier versions.
• You must install both products in the same language.• If an incompatible Rumba version is installed, you must remove it before installing the Web-to-Host Pro
controls.
To determine the way Pro deals with different coexistence conditions, edit the following parameters in thew2hservercfg.xml file, located in the config folder on the Web-to-Host server.
• CoExistProblemBehavior value=”0 |1”.
A value of 0 means that, when an incompatible version of Rumba is encountered, a message appearsstating that the version is incompatible and that installation of Web-to-Host Pro has stopped. A value of1 automatically uninstalls the incompatible version without notifying the user.
• CoExistProblemMessage value=<message>.
A default message informs the user that an incompatible version has been detected. However, you cancustomize the message. This is useful if you want to include extra information. For example, help deskcontact information or the path to a compatible version of Rumba. Changes you make to thew2hservercfg.xml file apply to all user sessions connecting to the server. User created files, such asmacros and keyboard mappings, are not deleted when the incompatible version is uninstalled.
Setting a custom install pathAs mentioned previously, Web-to-Host Pro installation places all program files on the client workstation, bydefault, in:
C:\Program Files\Micro Focus\Rumba
By default, Rumba PC-to-Host also places its program files in the same location. If Rumba PC-to-Host isinstalled first, Web-to-Host Pro installs its program files to the same location and both products coexist.
Coexistence: Pro and Rumba | 31

However, if Web-to-Host Pro is installed first, the destination path in the Rumba PC-to-Host install wizard isdimmed and cannot be changed.
To install Web-to-Host Pro first to a customized location, use the MSI Packager tool located in \utils\MSIPackager. For more information on MSI Packager, see the Help supplied with the tool.
Upgrading Pro and PC-to-Host softwareWhen you install a new Web-to-Host version or Service Pack, the new Pro software automaticallydownloads to the client workstation when the user opens a Pro session. A start-up program compares thePro and Rumba PC-to-Host desktop versions. If the versions are not compatible, the user receives amessage determined by the option configured in the w2hservercfg.xml file.
32 | Coexistence: Pro and Rumba

User Profile ConfigurationThere are two types of Pro configuration settings in Web-to-Host:
• Administrator settings - created by Web-to-Host administrators using the Session ConfigurationManager and deployed to the users as HTML session files.
• User settings - stored in a local configuration file (.cph). If the administrator has enabled editingspecific options in the Session Configuration Manager, users create their own customized localconfigurations settings for options, such as interface color, toolbars, menus, keyboard map or logonscript.
In some previous versions of Web-to-Host, when the administrator made changes to Pro HTML sessionfiles, all user changes were reset (deleted).
Web-to-Host 6.8.1 provides a mechanism that preserves user changes. The SCM Wizard changes do notautomatically delete the user's .cph file. Settings which only the user can set are not deleted when you,the administrator, change the HTML session files. This means users do not lose their customizedenvironment with its colors, toolbars, and keyboard mappings.
This chapter lists the conditions that determine which configuration file takes precedence, if both an HTMLsession files and a user .cph file exist. It also explains how the configuration file is handled when includedwithin a distribution package.
Rules defining Pro behaviorThis section lists the rules for determining the settings implemented - default settings in HTML session filesor user customized .cph settings.
No user configuration (.cph) file existsThe first time the user opens a session no user .cph file exists. Consequently, the userreceives the options defined in the Session Configuration Manager.
Existing user configuration (.cph) file
When a user .cph file exists, the following rules apply:
• If a .cph file exists, but no particular option is enabled, the user receives the defaultoptions set in the Session Configuration Manager. This is because you have not giventhe user permission to modify options. For example, if a user .cph file exists but youdid not select Enable Edit Options, the user cannot create a customized configurationwith features, such as word wrap or type ahead. The user is required to use the valuesset in the HTML session file.
• If a .cph file exists and a particular option is enabled, the user can customize theconfiguration. For example, if Enable Edit Options is selected, the user can create apersonalized environment that allows features, such as word wrap, type ahead, andkeyboard auto reset. In this case, if you make changes to the HTML session fileincluding those features which the user has customized, the user .cph file is notdeleted and the customized environment remains in effect.
To enforce the use of the default HTML settings, you should disable the relevant option,for example, Enable Edit Options. Then the HTML settings override user settings forthose options only. All other user configurations remain in effect.
User Profile Configuration | 33
User configuration files in a distribution packageAs an administrator you can create a user .cph file from the session’s HTML configuration and include it ina distribution package. This means the user starts with a customized, pre-configured session. It alsomeans that you can provide the user with more configurable client options than you can assign using theSession Configuration Manager.
You can enable a particular client option, modify its settings using the option dialog, insert the sessionconfiguration file into a distribution package, then optionally disable the option (depending on whether youwant to allow further user editing).
For example, selecting Enable Edit Options in the Session Configuration Manager allows you to open theEdit Options dialog box within a session and choose clipboard and parsing options that are not part of theSession Configuration Manager. The additional settings are added to the user .cph file. Then you canassociate the session .cph file to a distribution package. If you want to maintain standardization, you candisable edit options.
In all cases, if you modify the distribution package, the new user configuration replaces the user’s previousfile, deleting all user settings.
34 | User Profile Configuration
User Data File LocationsOnWeb Web-to-Host stores user data on the client in a location specified by the user’s environment. Thislocation is determined by several environmental variables, such as the client operating system andbrowser, and whether roaming user profiles are enabled.
Roaming profile support for Pro and Java sessionsWhile normal Windows profiles store user environment settings on the client workstation, roaming userprofiles store this information on their server. When a user logs on to the server, the roaming profile isdownloaded to the client workstation. When the user logs off the server, the roaming profile (along with anychanges) is uploaded back to the server. This scenario enables the user to work on different clientworkstations while using the same environment settings.
Web-to-Host supports roaming user profiles for Pro and Java client sessions. Users with roaming profilescan access their custom settings (such as keyboard maps and macros) when running Pro and Javasessions on various workstations.
Default paths for user data filesThis section lists the user data file locations for a client workstation with a default Windows installation.
Pro sessions using Internet ExplorerIf Rumba has been previously installed on the client workstation, Web-to-Host stores user data files in thesame location. If not, these locations are read from the Windows registry.
Roaming path:
C:\Users\<user_name>\AppData\Roaming\Micro Focus\Rumba
Local path:
C:\Users\<user_name>\AppData\Local\Micro Focus\Rumba
You can use the MSI Packager to modify default user data file locations. For more information on the MSIPackager see the online help supplied with the utility.
Java sessions using Internet ExplorerThe Internet Explorer locations are the same as for Pro sessions.
User Data File Locations | 35
Creating a TraceThe Trace utility is a diagnostic tool for troubleshooting host communications and connectivity problems.With this utility you can trace activity within host software or other standardized components linked toOnWeb Web-to-Host. This chapter describes how to use the Trace utility to get a binary trace that can besent to Micro Focus Technical Support for additional help troubleshooting your problems.
The Trace utility is supplied with the Java emulators. However, it must be installed separately for Pro.
Setting trace in Java SessionsJava tracing is enabled through a set of parameters configured in the Session Configuration Manager. In allJava display and printer sessions, tracing is controlled from the Custom Options page. Tracing in theseemulations is at two levels.
• Host Interface Tracing - captures Telnet data that flows between the emulator and the host.• Session Tracing - captures the emulator specific data stream data.
The following parameters must be entered with a value of either True or False in the Value column:
• EnableHostInterfaceTracing and EnableSessionTracing determine if these levels arecaptured.
• HostInterfaceTraceFile and SessionTraceFile specify the path where the trace files arewritten and the name assigned to them. If they are left blank, trace data is written to the Java console(when enabled).
• EnableTraceControlButtons, when set to True, adds Record, Stop, and Pause buttons to theemulator's toolbar.
• LogMaskHidden, when set to True, replaces sensitive data in hidden fields with spaces.
When tracing is enabled, but EnableTraceControlButtons is not set to True, tracing is always on,and begins as soon as the emulator initiates its connection.
Notes:
• The Java UNIX display does not have a Customs Options page. Use the Trace Options page toset all trace parameters.
• For Java AS/400 File Transfer, tracing is set from the General Options page. Clicking EnableTrace results in a new trace control button on the emulator’s toolbar.
Setting trace in Pro SessionsPro uses the Rumba Trace utility that comes with Rumba as standard. If Rumba is installed, use its traceutility.
If Rumba is not installed, you can download the Trace utility from the server hosting OnWeb Web-to-Host.Type the following URL into the address bar of any Web browser.
http://<servername>/w2hlegacy/utils/installrumbatrace.exe
Important: Before starting the procedure, close all applications. If you are using Rumba, make sure itis closed. Be sure there are no blue and red icons in the tray bar.
To take a correct binary trace:
36 | Creating a Trace

1. Select Start > Programs > Micro Focus Rumba > Rumba Tools > Micro Focus Rumba 9.4.1 Trace.2. On the menu bar, select Options > Configuration.3. On the API Selection page, click Select All. After all entries have been selected, click Reset All.4. On the Output page, in the Formatted Output section, select Display.5. In the Binary Output section select Binary File. The box next to the option becomes available.6. Enter the full path for the binary file being created (or browse to it). For example, you might assign the
file the call log number, c368758.bin. All file names should end with the extension .bin.7. Click OK.8. Minimize the Rumba Trace window that appears.9. Run the Rumba application that is causing the problem as you normally would, starting from the
connection (for example, Rumba Display, or Printer). Let the program run until the problem appears(error message, session hanging or any other problem).
10.Log off and disconnect from the host.11.Maximize the Rumba Trace window.12.Select File > Exit.13.Send the binary file you created in Step 6 on page 37 by email to Micro Focus Technical Support.
Creating a Trace | 37

Contacting Micro FocusOur Web site gives up-to-date details of contact numbers and addresses.
Further information and product supportAdditional technical information or advice is available from several sources.
The product support pages contain a considerable amount of additional information, such as:
• The Product Updates section of the Micro Focus SupportLine Web site, where you can download fixesand documentation updates.
• The Examples and Utilities section of the Micro Focus SupportLine Web site, including demos andadditional product documentation.
• The Support Resources section of the Micro Focus SupportLine Web site, that includes troubleshootingguides and information about how to raise an incident.
To connect, enter http://www.microfocus.com/SupportLine in your browser.
Note: Some information may be available only to customers who have maintenance agreements.
If you obtained this product directly from Micro Focus, contact us as described on the Micro Focus Website, www.microfocus.com. If you obtained the product from another source, such as an authorizeddistributor, contact them for help first. If they are unable to help, contact us.
Also, visit:
• The Micro Focus Community Web site, where you can browse the Knowledge Base, read articles andblogs, find demonstration programs and examples, and discuss this product with other users and MicroFocus specialists.
• The Micro Focus YouTube channel for videos related to your product. .
Information we needHowever you contact us, please try to include the information below, if you have it. The more informationyou can give, the better Micro Focus SupportLine can help you. But if you don't know all the answers, oryou think some are irrelevant to your problem, please give whatever information you have.
• The name and version number of all products that you think might be causing a problem.• Your computer make and model.• Your operating system version number and details of any networking software you are using.• The amount of memory in your computer.• The relevant page reference or section in the documentation.• Your serial number. To find out this number, look in the subject line and body of your Electronic Product
Delivery Notice email that you received from Micro Focus.
Contact informationOur Web site gives up-to-date details of contact numbers and addresses.
Additional technical information or advice is available from several sources.
38 | Contacting Micro Focus

The product support pages contain considerable additional information, including the Product Updatessection of the Micro Focus SupportLine Web site, where you can download fixes and documentationupdates. To connect, go enter http://www.microfocus.com/SupportLine in your browser.
If you are a Micro Focus SupportLine customer, please see the Welcome to Customer Care document thatincludes information about downloading and licensing your product, contacting Customer Care, and aboutreporting an incident. Support from Micro Focus may be available only to customers who havemaintenance agreements.
Contacting Micro Focus | 39

Tell Us What You ThinkWe welcome your feedback regarding Micro Focus documentation.
Send feedback about this Help documentation.
Click the above link to e-mail your comments to Micro Focus.
40 | Tell Us What You Think

IndexC
contact information 38
P
product support 38
Index | 41