mettler toledo dnb00001000 user manual · 2008-03-19 · mettler toledo dnb00001000 user manual...
TRANSCRIPT

METTLER TOLEDO DNB00001000
User Manual

METTLER TOLEDO DNB00001000 User Manual
V 1.2
METTLER TOLEDO
Preface The data and illustrations found in this document are not binding. METTLER TOLEDO reserves the right to modify our products in line with our policy of continuous product development. The information in this document is subject to change without notice and should not be considered as a commitment by METTLER TOLEDO. METTLER TOLEDO assumes no responsibility for any errors that may appear in this document. METTLER TOLEDO® is a registered trademark of Mettler-Toledo, Inc. CIRCUIT BD® is a registered trademark of HMS Industrial Networks AB. All other trademarks are the property of their respective holders. Copyright 2003 Mettler-Toledo, Inc. This documentation contains proprietary information of Mettler-Toledo, Inc. It may not be copied in whole or in part without the express written consent of Mettler-Toledo, Inc. METTLER TOLEDO reserves the right to make refinements or changes to the product or manual without notice.

CUSTOMER FEEDBACK Your feedback is important to us! If you have a problem with this product, or just a suggestion on how we can serve you better, please fill out this form and send it to us. If you are in the United States, you can mail this postpaid form to the address on the reverse, or fax it to (614) 438-4355. If you are outside the United States, please apply the appropriate amount of postage before mailing. You can also send your feedback via email to: [email protected].
Your Name: Date: Organization Name: METTLER TOLEDO Order Number Address: Part / Product Name: Part / Model Number: Serial Number: Phone Number: ( ) Fax Number: ( ) Company Name for Installation: E-mail Address: Contact Name: Phone Number:
How well did this product meet your expectations in its intended use?
Comments:
Met and exceeded my needs Met all needs Met most needs Met some needs Did not meet my needs PROBLEM: UNACCEPTABLE DELIVERY: OUT OF BOX ERROR: Shipped late Wrong item Wrong documentation Shipped early Wrong part Missing documentation Shipped to incorrect location Missing equipment Incorrectly calibrated Other (Please Specify) Equipment failure Other (Please specify) Comments/Questions:
DO NOT WRITE IN SPACE BELOW; FOR METTLER TOLEDO USE ONLY
Retail Light Industrial Heavy Industrial Systems RESPONSE: Include Root Cause Analysis and Corrective Action Taken.

FOLD THIS FLAP FIRST
BUSINESS REPLY MAIL FIRST CLASS PERMIT NO. 414 COLUMBUS, OH
POSTAGE WILL BE PAID BY ADDRESSEE
Mettler-Toledo, Inc. Quality Manager - MTWI P.O. Box 1705 Columbus, Ohio 43240 USA
NO POSTAGE NECESSARY IF MAILED IN THE UNITED STATES
Please seal with tape.

METTLER TOLEDO DNB00001000 User Manual
METTLER TOLEDO
1
SAFETY NOTICE Product safety is a fundamental concern at METTLER TOLEDO. Use common sense and follow the simple precautions listed below to ensure your safety and optimize the use and performance of this product. • Read this manual before operating or servicing this product. Save this manual for future
reference. • Observe safety warnings located throughout this manual. • Use caution when lifting or moving heavy equipment. • Never immerse electronic products in liquids. • This product should be serviced by qualified personnel. Exercise care when moving, testing,
or adjusting this product. • Disconnect all power to this product before installing, servicing, or cleaning. • Use only METTLER TOLEDO parts for repair. • Observe electrostatic handling precautions for electronic components. Allow at least 30
seconds after power disconnection to allow charges to dissipate before servicing any electronic components.
• Allow the product to stabilize at ambient room temperature before applying power. FAILURE TO FOLLOW THESE PRECAUTIONS COULD RESULT IN DAMAGE TO EQUIPMENT AND/OR BODILY HARM.
METTLER TOLEDO DNB00001000 User Manual
METTLER TOLEDO
2
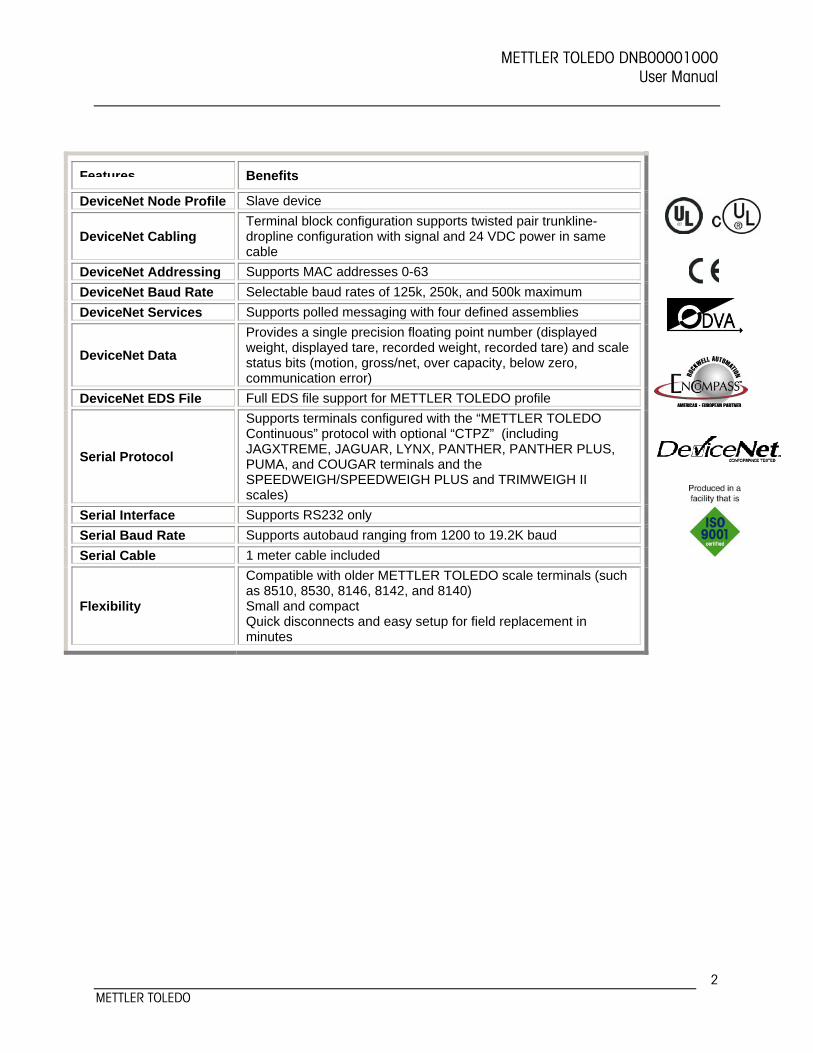
Features Benefits
DeviceNet Node Profile Slave device
DeviceNet Cabling Terminal block configuration supports twisted pair trunkline-dropline configuration with signal and 24 VDC power in same cable
DeviceNet Addressing Supports MAC addresses 0-63 DeviceNet Baud Rate Selectable baud rates of 125k, 250k, and 500k maximum DeviceNet Services Supports polled messaging with four defined assemblies
DeviceNet Data
Provides a single precision floating point number (displayed weight, displayed tare, recorded weight, recorded tare) and scale status bits (motion, gross/net, over capacity, below zero, communication error)
DeviceNet EDS File Full EDS file support for METTLER TOLEDO profile
Serial Protocol
Supports terminals configured with the “METTLER TOLEDO Continuous” protocol with optional “CTPZ” (including JAGXTREME, JAGUAR, LYNX, PANTHER, PANTHER PLUS, PUMA, and COUGAR terminals and the SPEEDWEIGH/SPEEDWEIGH PLUS and TRIMWEIGH II scales)
Serial Interface Supports RS232 only Serial Baud Rate Supports autobaud ranging from 1200 to 19.2K baud Serial Cable 1 meter cable included
Flexibility
Compatible with older METTLER TOLEDO scale terminals (such as 8510, 8530, 8146, 8142, and 8140) Small and compact Quick disconnects and easy setup for field replacement in minutes

METTLER TOLEDO DNB00001000 User Manual
METTLER TOLEDO
1
CONTENTS
1. TERMINOLOGY / DEFINITIONS ............................................................................................................................1
2. INTRODUCTION ..................................................................................................................................................2
3. SYSTEM OVERVIEW ............................................................................................................................................3 3.1 DEVICENET CHARACTERISTICS...........................................................................................................................3 3.2 RS-232 INTERFACE.......................................................................................................................................3
4. INSTALLATION ....................................................................................................................................................4 4.1 DEVICENET ...................................................................................................................................................4
4.1.1 Termination ......................................................................................................................................5 4.1.2 Environment and Specifications .......................................................................................................5 4.1.3 Mounting..........................................................................................................................................6
4.2 RS-232 INTERFACE.......................................................................................................................................7 4.2.1 Wiring Instructions ...........................................................................................................................7 4.2.2 Serial Data Format and Baud Rate Settings ......................................................................................7
4.3 POWER SUPPLY.............................................................................................................................................8 5. CONFIGURATION WITH RSNETWORX FOR DEVICENET ......................................................................................9
5.1 REGISTRATION OF EDS FILE .............................................................................................................................9 5.2 SETTING UP AN I/O CONNECTION ....................................................................................................................20
6. DATA FORMAT ..................................................................................................................................................35 6.1 CONTINUOUS MODE OUTPUT ..........................................................................................................................35 6.2 OUTPUT ASSEMBLY.......................................................................................................................................36 6.3 INPUT ASSEMBLY..........................................................................................................................................37 6.4 INTERNAL ADAPTER REGISTERS .......................................................................................................................38
7. OPERATION.......................................................................................................................................................39 7.1 INITIAL CONDITIONS ......................................................................................................................................39 7.2 AUTOBAUD MODE ........................................................................................................................................40 7.3 NORMAL MODE ...........................................................................................................................................41
7.3.1 DPRAM IN Area ..............................................................................................................................41 7.3.2 DPRAM OUT Area ...........................................................................................................................41
8. INDICATION LED’S ............................................................................................................................................42 8.1 EXTERNAL INDICATION LEDS ..........................................................................................................................42 8.2 INTERNAL INDICATION LEDS ...........................................................................................................................43

METTLER TOLEDO DNB00001000 User Manual
METTLER TOLEDO
1
1. Terminology / Definitions Term Definition MSB Most Significant Byte LSB Least Significant Byte MSD Most Significant Digit LSD Least Significant Digit NAN IEEE Not a Number, defined as 0xFF, 0xFF, 0xFF, 0xFF DPRAM Dual Port Random Access Memory RAM Random Access Memory ROM Read Only Memory LED Light Emitting Diode byte 8-bit value word 16-bit value dword 32-bit value big endian format The most significant byte is stored in the lowest memory address. little endian format The most significant byte is stored in the highest memory address. Bytes
at lower addresses have lower significance. EDS Electronic Data Sheet

METTLER TOLEDO DNB00001000 User Manual
METTLER TOLEDO
2
2. Introduction The METTLER TOLEDO DNB00001000 (DeviceNet bridge) allows sharing of weight measurements from a METTLER TOLEDO scale terminal via the continuous mode output to a DeviceNet network.
Mettler ToledoScale Terminal
Mettler ToledoDNB00001000
DeviceNetNetwork
Mettler ToledoScale Terminal
Mettler ToledoDNB00001000
Mettler ToledoScale Terminal
Mettler ToledoDNB00001000
DeviceNet Master/ Scanner
ContinuousOutput
DeviceNet
DeviceNet
DeviceNet
DeviceNet
Scale Command
ContinuousOutput
Scale Command
ContinuousOutput
Scale Command
Figure 1 DeviceNet Network with METTLER TOLEDO DNB00001000 DeviceNet Bridges

METTLER TOLEDO DNB00001000 User Manual
METTLER TOLEDO
3
3. System Overview
3.1 DeviceNet Characteristics • DeviceNet specific cable (twisted pair) • Access to intelligence present in low-level devices – Master/Slave and Peer-to-Peer capabilities • Trunkline-dropline configuration • Support for up to 64 nodes • Node removal without severing the network • Simultaneous support for both network-powered (sensors) and self-powered (actuators)
devices • Use of sealed or open-style connectors • Protection from wiring errors • Selectable baud rates of 125k baud, 250k baud, and 500k baud max. Trunk distance 500
meters and drop length of 156 meters at 125k baud • Adjustable power configuration to meet individual application needs • High current capability (up to 8 amps per supply) • Operation with off-the-shelf power supplies • Power taps that allow the connection of several power supplies from multiple vendors that
comply with DeviceNet standards • Built-in overload protection • Power available along the bus: both signal and power lines contained in the trunkline • Provisions for the typical request/response oriented network communications • Provisions for the efficient movement of I/O data • Fragmentation (anything in excess of 8 bytes) for moving larger bodies of information • Duplicate MAC ID detection
3.2 RS-232 Interface • 2- or 3-wire physical connection (50 ft maximum) terminating to a RJ45 connector • Supports “METTLER TOLEDO Continuous” protocol (with STX, checksum) • Supports “CTPZ” command input to scale terminal • Automatic detection of serial data format and baud rate

METTLER TOLEDO DNB00001000 User Manual
METTLER TOLEDO
4
4. Installation
4.1 DeviceNet The DeviceNet connection consists of a device connector (male contacts) connected to a network connector (female contacts) according to Table 1. Baud rates of 125k, 250k or 500k can be selected by setting DIP switches 1 and 2 according to Table 2. The MAC ID address range of 0 to 63 is selected by setting DIP switches 3 through 8 according to Table 3.
Screw Terminal Description Color 1 V- Black 2 CAN_L Blue 3 Drain Shield 4 CAN_H White 5 V+ Red
Table 1 Network Connector (Female Contacts)
1 2 3 4 5 6 7 8
OFF
ON
Baud Rate MAC ID
Figure 2 DeviceNet Configuration DIP Switch
DIP
Switch 1 DIP
Switch 2 Baud Rate Selection
OFF OFF 125k OFF ON 250k ON OFF 500k ON ON Reserved
Table 2 Baud Rate Selection

METTLER TOLEDO DNB00001000 User Manual
METTLER TOLEDO
5
DIP
Switch 3 DIP
Switch 4 DIP
Switch 5 DIP
Switch 6 DIP
Switch 7 DIP
Switch 8 MAC ID
OFF OFF OFF OFF OFF OFF 0 OFF OFF OFF OFF OFF ON 1 OFF OFF OFF OFF ON OFF 2 OFF OFF OFF OFF ON ON 3 ... ... ... ... ... ... ... ON ON ON ON ON OFF 62 ON ON ON ON ON ON 63
Table 3 MAC ID Selection
4.1.1 Termination Termination of the fieldbus requires a terminating resistor at each end of the fieldbus. The resistors should have a value of 121 Ω.
4.1.2 Environment and Specifications
Specifications DNB00001000
Physical Dimensions 35 x 94 x 76.5 mm Operating Temperature 0˚ to 60˚ C (32˚F to 140˚F) Power 24 VDC @ 150mA Enviroment Protection NEMA 1 / IP20 Mounting DIN Rail Approvals UL/cUL, CSA, CE Certified ODVA certified

METTLER TOLEDO DNB00001000 User Manual
METTLER TOLEDO
6
4.1.3 Mounting
Minimum Mounting Distance
Horizontal DIN Rail Mounting Only
50.0
50.0
2.0 2.0

METTLER TOLEDO DNB00001000 User Manual
METTLER TOLEDO
7
4.2 RS-232 Interface
4.2.1 Wiring Instructions The RS-232 connection consists of an RJ45 connector from the METTLER TOLEDO DNB00001000 to the terminals of a scale terminal according to Table 4.
RJ45 Pinout to METTLER TOLEDO DNB00001000
Name Description METTLER TOLEDO Terminal RS-232
Interface Connection 1 TXD RS-232 Transmit RXD 2 RXD RS-232 Receive TXD 5 SGND Signal Ground Signal Ground
Table 4 RS-232 Connection
4.2.2 Serial Data Format and Baud Rate Settings The scale terminal serial output should be configured for METTLER TOLEDO Continuous Protocol (Standard) with STX and Checksum enabled. Table 5 lists the possible serial data format and baud rate settings for the METTLER TOLEDO DNB00001000 to successfully autobaud with a scale terminal.
Serial Data Format Baud Rate Stop Bit Length
Parity Data Length
1200 2400 4800 9600 19.2 k 38.4 k
1 None 7 bits 1 Odd 7 bits 1 Even 7 bits 1 None 8 bits 1 Odd 8 bits 1 Even 8 bits
Table 5 Possible Serial Data Format and Baudrate Settings

METTLER TOLEDO DNB00001000 User Manual
METTLER TOLEDO
8
4.3 Power Supply The METTLER TOLEDO DNB00001000 requires a 24 VDC power source (not included with the unit).
24 VDC Power RJ 45 Connection
1 ... 81 2
Figure 3 Power Supply and RJ45 Connection
Pin Description Note 1 +24 VDC Power Supply + 24 VDC (+/- 20%); max 150 mA @ 24 VDC 2 0 VDC Ground Power supply ground
Table 6 Power Supply Wiring

METTLER TOLEDO DNB00001000 User Manual
METTLER TOLEDO
9
5. Configuration with RSNetWorx for DeviceNet The EDS file located on the CD-ROM supplied with the DNB00001000 contains configuration information to allow RSNetWorx for DeviceNet to set up a single polled I/O connection between a METTLER TOLEDO DNB00001000 and DeviceNet master/scanner.
5.1 Registration of EDS File The EDS file must first be registered into RSNetWorx for DeviceNet. This is accomplished using the EDS Wizard.
Figure 4 Starting the EDS Wizard
To start the EDS Wizard, select “EDS Wizard…” under the menu option “Tools”.

METTLER TOLEDO DNB00001000 User Manual
METTLER TOLEDO
10
Figure 5 EDS Wizard
Click “Next >” in the “EDS Wizard” window to begin the registration process.

METTLER TOLEDO DNB00001000 User Manual
METTLER TOLEDO
11
Figure 6 EDS Wizard (cont.)
Make sure “Register an EDS file(s)” is selected and click “Next >”.

METTLER TOLEDO DNB00001000 User Manual
METTLER TOLEDO
12
Figure 7 EDS Wizard (cont.)
Click “Browse...” to select the EDS file to be registered.

METTLER TOLEDO DNB00001000 User Manual
METTLER TOLEDO
13
Figure 8 EDS Wizard (cont.)
Select the appropriate location then select file “DNB1.eds”. Click “Open”. (The EDS file is located on the CD-ROM).

METTLER TOLEDO DNB00001000 User Manual
METTLER TOLEDO
14
Figure 9 EDS Wizard (cont.)
Click “Next >” in the “EDS Wizard” window.

METTLER TOLEDO DNB00001000 User Manual
METTLER TOLEDO
15
Figure 10 EDS Wizard Test Results
Make sure there is a green check mark (indicating the EDS file is valid) next to “dnb1.eds”. Click “Next >” to continue.

METTLER TOLEDO DNB00001000 User Manual
METTLER TOLEDO
16
Figure 11 EDS Wizard Graphic Image Selection
Make sure the “METTLER TOLEDO DNB00001000” icon is selected. Note: RSNetWorx for DeviceNet may select a default icon. In this case, click the “Change icon...” button to locate and select the dnb1.ico file.
METTLER TOLEDO DNB00001000 User Manual
METTLER TOLEDO
17
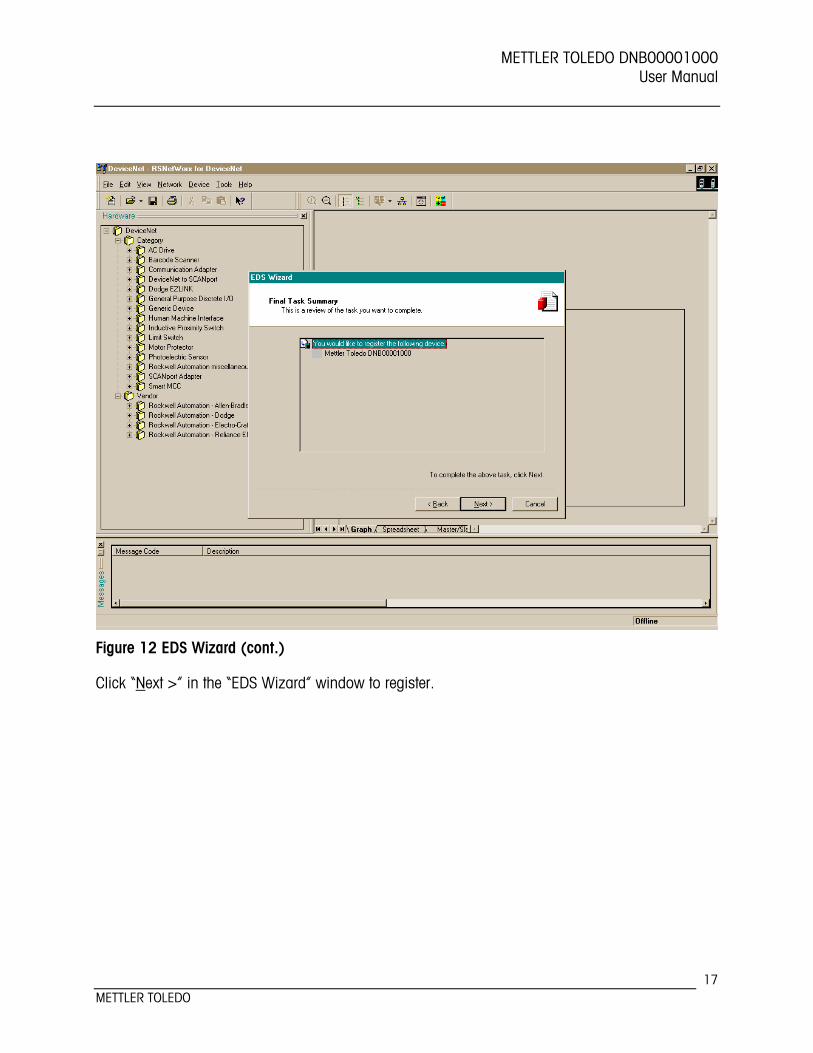
Figure 12 EDS Wizard (cont.)
Click “Next >” in the “EDS Wizard” window to register.

METTLER TOLEDO DNB00001000 User Manual
METTLER TOLEDO
18
Figure 13 Completing the EDS Wizard
Click “Finish” to exit the EDS Wizard.

METTLER TOLEDO DNB00001000 User Manual
METTLER TOLEDO
19
Figure 14 DeviceNet Category and Vendor
When the EDS Wizard is completed, two METTLER TOLEDO DNB00001000 entries are added to: “DeviceNet” -> “Category” -> “Communication Adapter” and “DeviceNet” -> “Vendor” -> “METTLER TOLEDO” -> “Communication Adapter”.

METTLER TOLEDO DNB00001000 User Manual
METTLER TOLEDO
20
5.2 Setting up an I/O Connection After the EDS file has been registered, RSNetWorx is used to set up a polled connection between the METTLER TOLEDO DNB00001000 and the DeviceNet master/scanner.
Figure 15 RSNetWorx Online Browse
Select “Network” then “Online” to start a browse of the DeviceNet network.

METTLER TOLEDO DNB00001000 User Manual
METTLER TOLEDO
21
Figure 16 Browse for network
Select the appropriate network path. In this case, “1784-PCIDS-1, DeviceNet” is selected. Click “OK” to continue.

METTLER TOLEDO DNB00001000 User Manual
METTLER TOLEDO
22
Figure 17 Browsing network…
Wait until the network browse is complete. The METTLER TOLEDO DNB00001000 icon should appear. Other slave devices and/or master/scanner icons should appear for devices on the DeviceNet network. In this case, the 1756-DNB/A is the master/scanner on the DeviceNet network.

METTLER TOLEDO DNB00001000 User Manual
METTLER TOLEDO
23
Figure 18 Selection of 1756-DNB/A
The METTLER TOLEDO DNB00001000 needs to be included in the scanlist of the 1756-DNB/A. Right click on the 1756-DNB/A icon in the “Graph” window. Then select Properties…”

METTLER TOLEDO DNB00001000 User Manual
METTLER TOLEDO
24
Figure 19 1756-DNB/A Properties
The 1756-DNB/A properties window will be displayed. Click the “Scanlist” tab in the “1756-DNB/A” window.

METTLER TOLEDO DNB00001000 User Manual
METTLER TOLEDO
25
Figure 20 Scanner Configuration Applet
Click the “Upload” button in the “Scanner Configuration Applet” window.

METTLER TOLEDO DNB00001000 User Manual
METTLER TOLEDO
26
Figure 21 1756-DNB/A Scanlist
De-select the “Automap on Add” option. This allows manual mapping of the input and output files. Click the “METTLER TOLEDO DNB00001000” icon under “Available Devices” then click the “>” button to add the device to the “Scanlist”.
METTLER TOLEDO DNB00001000 User Manual
METTLER TOLEDO
27
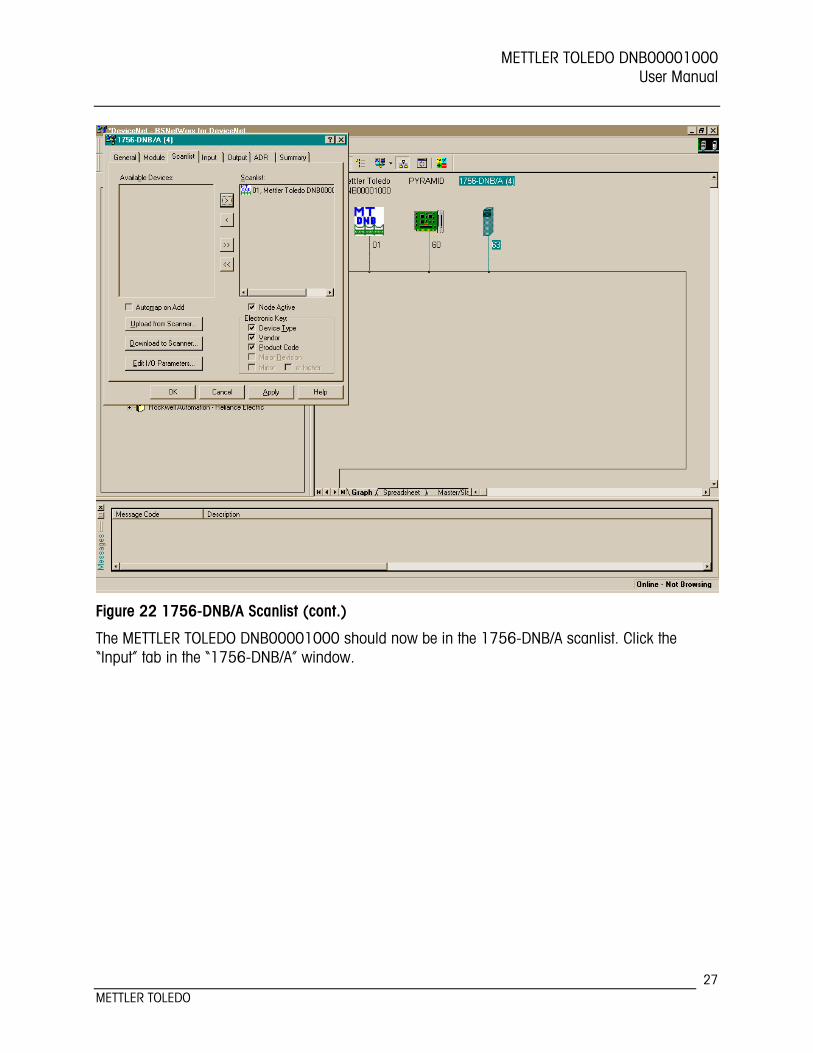
Figure 22 1756-DNB/A Scanlist (cont.)
The METTLER TOLEDO DNB00001000 should now be in the 1756-DNB/A scanlist. Click the “Input” tab in the “1756-DNB/A” window.
METTLER TOLEDO DNB00001000 User Manual
METTLER TOLEDO
28
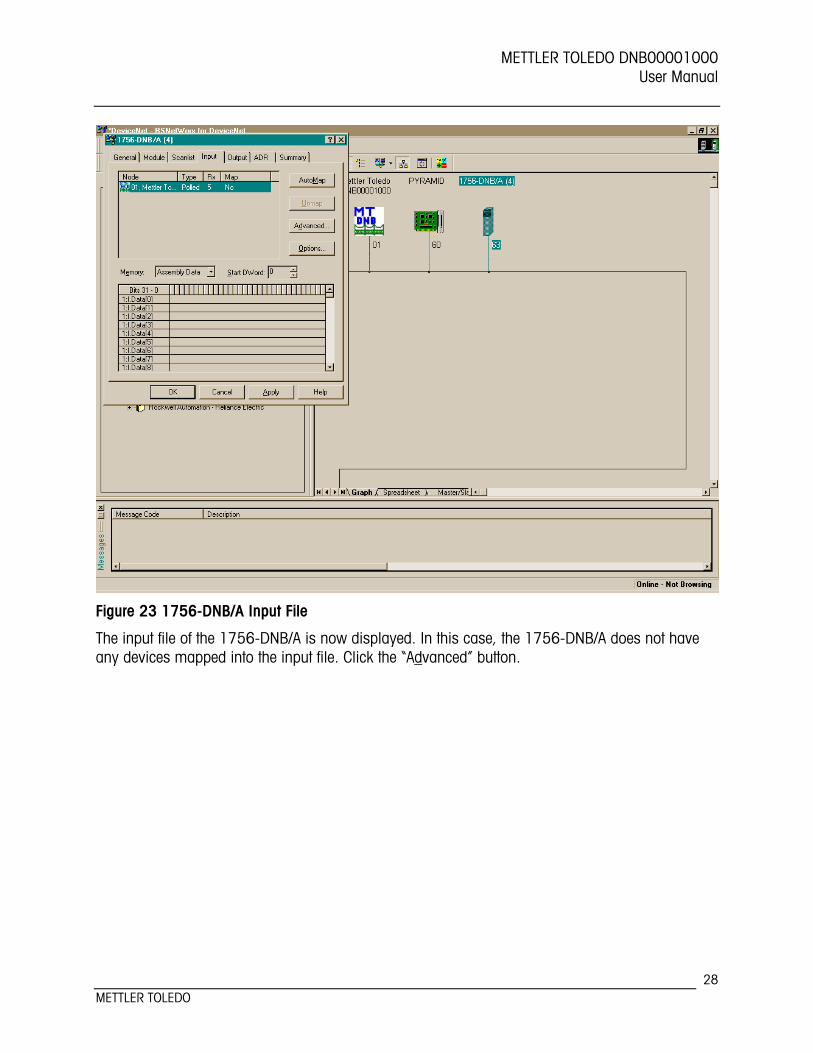
Figure 23 1756-DNB/A Input File
The input file of the 1756-DNB/A is now displayed. In this case, the 1756-DNB/A does not have any devices mapped into the input file. Click the “Advanced” button.

METTLER TOLEDO DNB00001000 User Manual
METTLER TOLEDO
29
Figure 24 1756-DNB/A Input File Advanced Mapping
Select “Polled” from the “Message:” drop list in “Map From:”. Select the appropriate dword offset in “Map To:”. In this case, since there are no devices mapped into the input file, the dword offset is set to 0. Click the “Apply Mapping” then “Close” buttons.

METTLER TOLEDO DNB00001000 User Manual
METTLER TOLEDO
30
Figure 25 1756-DNB/A Input File (cont.)
The response part of the polled I/O connection has been setup. The 5 byte response from the METTLER TOLEDO DNB00001000 has been mapped into dwords 1:I.Data[0] and 1:I.Data[1] of the 1756 DNB/A scanner.
METTLER TOLEDO DNB00001000 User Manual
METTLER TOLEDO
31
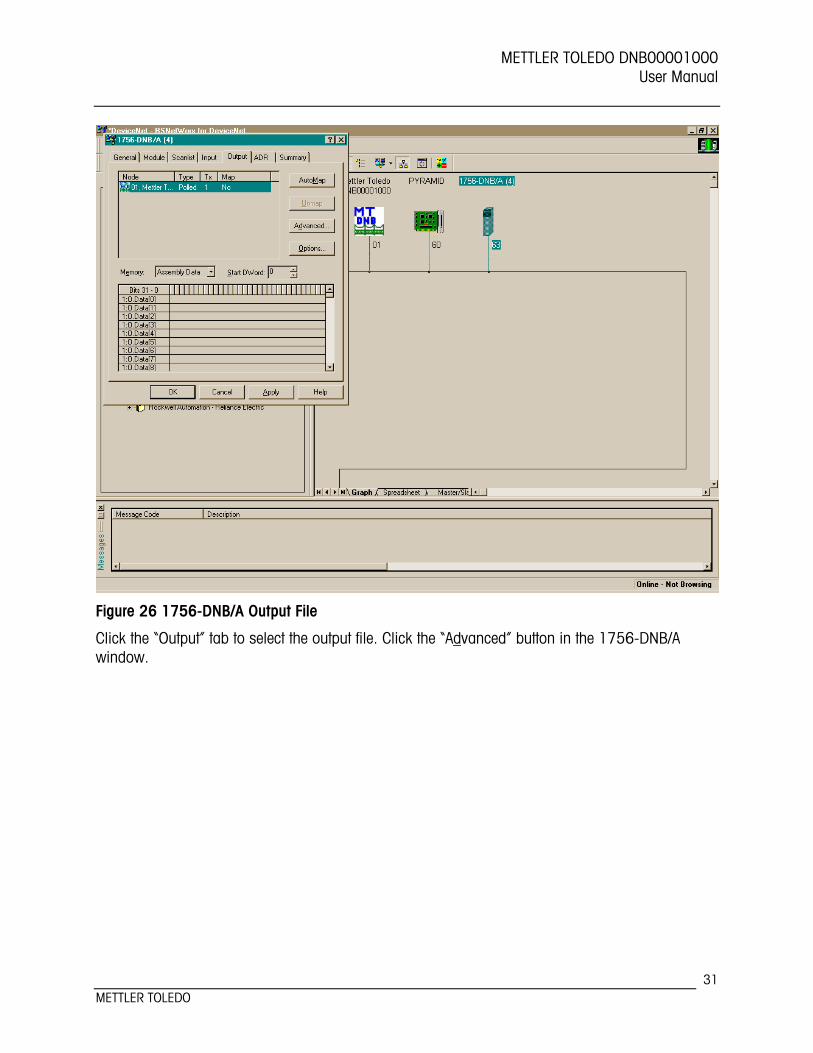
Figure 26 1756-DNB/A Output File
Click the “Output” tab to select the output file. Click the “Advanced” button in the 1756-DNB/A window.

METTLER TOLEDO DNB00001000 User Manual
METTLER TOLEDO
32
Figure 27 1756-DNB/A Output File Advanced Mapping
Select “Polled” from the “Message:” drop list in “Map From:” Select the appropriate dword offset in “Map To:” In this case, since there are no devices mapped into the output file, the dword offset is set to 0. Click the “Apply Mapping” then “Close” buttons.

METTLER TOLEDO DNB00001000 User Manual
METTLER TOLEDO
33
Figure 28 1756-DNB/A Output File (cont.)
The request part of the polled I/O connection has been setup. The 1 byte request to the METTLER TOLEDO DNB00001000 has been mapped into dword 1:O.Data[0] of the 1756 DNB/A scanner.
METTLER TOLEDO DNB00001000 User Manual
METTLER TOLEDO
34
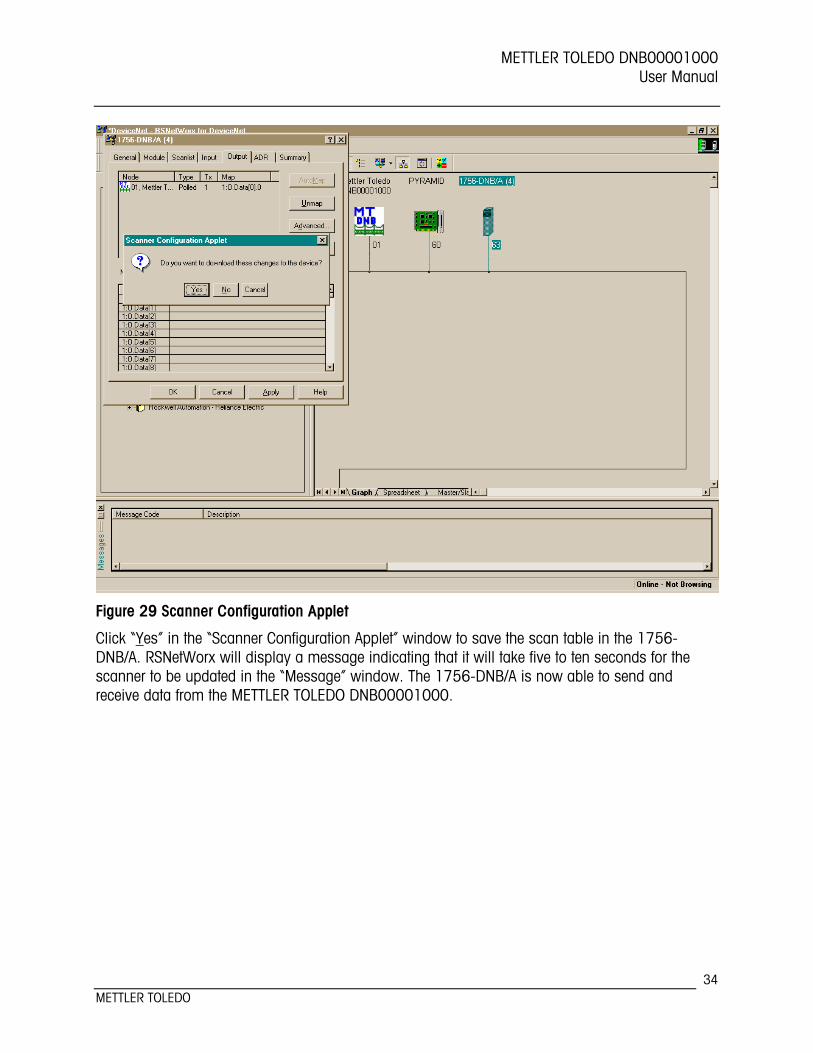
Figure 29 Scanner Configuration Applet
Click “Yes” in the “Scanner Configuration Applet” window to save the scan table in the 1756-DNB/A. RSNetWorx will display a message indicating that it will take five to ten seconds for the scanner to be updated in the “Message” window. The 1756-DNB/A is now able to send and receive data from the METTLER TOLEDO DNB00001000.

METTLER TOLEDO DNB00001000 User Manual
METTLER TOLEDO
35
6. Data Format
6.1 Continuous Mode Output Data from the scale terminal is sent to the METTLER TOLEDO DNB00001000 in continuous mode output format according to Table 7. Note: The STX and CKSM characters are optional in the continuous mode output. However, the continuous mode output must contain the STX and CKSM characters in order for the METTLER TOLEDO DNB00001000 to autobaud and communicate with a scale terminal. For further information on how to set these options, refer to the terminal technical manual.
Character Function 1 STX – Start of Text 2 Status Byte A 3 Status Byte B 4 Status Byte C 5 Weight MSD 6 Weight 7 Weight 8 Weight 9 Weight 10 Weight LSD 11 Tare Weight MSD 12 Tare Weight 13 Tare Weight 14 Tare Weight 15 Tare Weight 16 Tare Weight LSD 17 CR – Carriage Return 18 CKSM – Checksum
Table 7 Continuous Mode Output Format

METTLER TOLEDO DNB00001000 User Manual
METTLER TOLEDO
36
6.2 Output Assembly The output assembly is the response from the METTLER TOLEDO DNB00001000 to the DeviceNet master/scanner and consists of the status byte and floating-point scale value (4 bytes).
Bit 7 Bit 6 Bit 5 Bit 4 Bit 3 Bit 2 Bit 1 Bit 0 Not Used Not Used Print Motion Over-
Capacity Minus Sign
Gross / Net
Comm Error
Table 8 Scale Status Byte Format
Bit 7 – Not Used Bit 6 – Not Used Bit 5 – Print Request 1 – Print request Bit 4 – Motion 1 – Motion detected Bit 3 – Over Capacity 1 – Scale is over / under set capacity Bit 2 – Minus Sign 1 – Negative measurement Bit 1 – Gross / Net 1 – Net / 0 – Gross Bit 0 – Communications Error 1 – Communications error / Timeout error with scale
terminal
Byte 1 Byte 2 Byte 3 Byte 4 Floating Point Byte Floating Point Byte Floating Point Byte Floating Point Byte
Table 9 Floating Point Scale Value Format

METTLER TOLEDO DNB00001000 User Manual
METTLER TOLEDO
37
6.3 Input Assembly The input assembly is a command from the DeviceNet master/scanner to the METTLER TOLEDO DNB00001000 and consists of a single byte. The input assembly selects the internal adapter register or instructs the METTLER TOLEDO DNB00001000 to send a command to the scale terminal according to Table 10.
Bit 7 Bit 6 Bit 5 Bit 4 Bit 3 Bit 2 Bit 1 Bit 0 Not Used Not Used Z P T C Tare
Weight Record Weight
Table 10 Input Assembly Format
Bit 7 – Not Used Bit 6 – Not Used Bit 5 – “1” Sends ASCII Z to scale terminal Bit 4 – “1” Sends ASCII P to scale terminal Bit 3 – “1” Sends ASCII T to scale terminal Bit 2 – “1” Sends ASCII C to scale terminal Bits 0 and 1 select the internal adapter register according to Table 11.
Bit 1 Bit 0 Selects Internal Adapter Register 0 0 Displayed Weight Register 0 1 Recorded Displayed Weight Register 1 0 Tare Weight Register 1 1 Recorded Tare Weight Register
Table 11 Internal Adapter Register Selection

METTLER TOLEDO DNB00001000 User Manual
METTLER TOLEDO
38
6.4 Internal Adapter Registers The METTLER TOLEDO DNB00001000 contains four internal adapter registers for storing the status byte and floating point weight value reported from the scale terminal. The format of the internal adapter registers is shown in Table 12. Internal Adapter
Register Byte 7 Byte 6 Byte 5 Byte 4 Byte 3 Byte 2 Byte 1 Byte 0
Displayed Weight
Not Used
Not Used
Single Precision Floating Point Value MSB LSB
Not Used
Status Byte
Tare Weight
Not Used
Not Used
Single Precision Floating Point Value MSB LSB
Not Used
Status Byte
Recorded Displayed
Weight
Not Used
Not Used
Single Precision Floating Point Value MSB LSB
Not Used
Status Byte
Recorded Tare Weight
Not Used
Not Used
Single Precision Floating Point Value MSB LSB
Not Used
Status Byte
Table 12 Internal Adapter Register Format
Note: The status byte and floating point scale value are aligned on an even address in the internal adapter registers. The single precision floating point scale value is stored in the internal adapter register in big endian format.

METTLER TOLEDO DNB00001000 User Manual
METTLER TOLEDO
39
7. Operation
7.1 Initial Conditions When the METTLER TOLEDO DNB00001000 is power-cycled, the four internal floating point adapter registers are initialized to NAN, and all other status and unused bytes are set to 0FFH, according to Table 13. Internal Adapter
Register Byte 7 Byte 6 Byte 5 Byte 4 Byte 3 Byte 2 Byte 1 Byte 0
Displayed Weight
0xFF
0xFF
NAN 0xFF
NAN 0xFF
NAN 0xFF
NAN 0xFF
0xFF
0xFF
Tare Weight
0xFF
0xFF
NAN 0xFF
NAN 0xFF
NAN 0xFF
NAN 0xFF
0xFF 0xFF
Recorded Displayed
Weight
0xFF
0xFF
NAN 0xFF
NAN 0xFF
NAN 0xFF
NAN 0xFF
0xFF 0xFF
Recorded Tare Weight
0xFF
0xFF NAN 0xFF
NAN 0xFF
NAN 0xFF
NAN 0xFF
0xFF 0xFF
Table 13 Internal Adapter Registers Initial Contents

METTLER TOLEDO DNB00001000 User Manual
METTLER TOLEDO
40
7.2 AutoBaud Mode The METTLER TOLEDO DNB00001000 will enter autobaud mode upon initialization or when a communications error has occurred with the scale terminal. A communications error is either a timeout condition (two seconds have elapsed without the METTLER TOLEDO DNB00001000 receiving one packet of continuous mode output from the scale terminal) or two consecutive checksum errors have occurred. When the METTLER TOLEDO DNB00001000 is in autobaud mode, the internal adapter registers are set according to Table 14. Bytes 1 to 7 are set to 0FFH. Byte 0, the status byte, is set to 0x01, indicating a communications error. The METTLER TOLEDO DNB00001000 remains in autobaud mode until the serial data format / baud rate has been determined and one packet of continuous mode output has been received from the scale terminal. Internal Adapter
Register Byte 7 Byte 6 Byte 5 Byte 4 Byte 3 Byte 2 Byte 1 Byte 0
Displayed Weight
0xFF
0xFF
NAN 0xFF
NAN 0xFF
NAN 0xFF
NAN 0xFF
0xFF
Status Byte 0x01
Tare Weight
0xFF
0xFF
NAN 0xFF
NAN 0xFF
NAN 0xFF
NAN 0xFF
0xFF
Status Byte 0x01
Recorded Displayed
Weight
0xFF
0xFF
NAN 0xFF
NAN 0xFF
NAN 0xFF
NAN 0xFF
0xFF
Status Byte 0x01
Recorded Tare Weight
0xFF
0xFF
NAN 0xFF
NAN 0xFF
NAN 0xFF
NAN 0xFF
0xFF
Status Byte 0x01
Table 14 Internal Adapter Register Contents in Autobaud Mode

METTLER TOLEDO DNB00001000 User Manual
METTLER TOLEDO
41
7.3 Normal Mode When the METTLER TOLEDO DNB00001000 enters normal mode, the continuous mode output described in section 6.1 is converted to an output assembly format described in section 6.2. The output assembly is then written to the IN area of DPRAM. The METTLER TOLEDO DNB00001000 also accepts commands from a DeviceNet master/scanner via the input assembly (described in section 6.3) by reading the OUT area of DPRAM.
7.3.1 DPRAM IN Area The output assembly is written to the IN area of DPRAM according to Table 15. Note: The floating-point scale value is placed in the IN area of DPRAM in little endian format.
Byte Byte Name 0 Scale Status 1 Floating Point Scale Value Byte MSB 2 Floating Point Scale Value Byte 3 Floating Point Scale Value Byte 4 Floating Point Scale Value Byte LSB
Table 15 DPRAM IN Area Contents
7.3.2 DPRAM OUT Area Commands from the DeviceNet master/scanner are read from the OUT area of DPRAM. The command from the DeviceNet master/scanner follows the input assembly format described in section 6.3.
Byte Byte Name 0 Command from DeviceNet master/scanner
Table 16 DPRAM OUT Area Contents

METTLER TOLEDO DNB00001000 User Manual
METTLER TOLEDO
42
8. Indication LED’s The METTLER TOLEDO DNB00001000 consists of two separate printed circuit boards: the mother circuit Bd board and the Carrier board. These boards contain external and internal LEDs displaying the status of the METTLER TOLEDO DNB00001000.
8.1 External Indication LEDs The mother circuit Bd board contains four external LED’s indicating the network and module network status according to Table 17.
12
34
56
78
Network Status ModuleNetwork Status
Reserved Reserved
Figure 30 Mother Circuit Bd External LED's
LED LED Color Description
Module Status Steady OFF No Power Module Status Steady Red Unrecoverable Fault Module Status Steady Green Device Operational Module Status Flashing Red Minor Fault Network Status Steady OFF Not powered / Not on-line Network Status Steady Green Link OK, On-line, Connected Network Status Steady Red Critical link failure Network Status Flashing Green On-line, not connected Network Status Flashing Red Connection Timeout
Table 17 External Module and Network Status Indication LEDs

METTLER TOLEDO DNB00001000 User Manual
METTLER TOLEDO
43
8.2 Internal Indication LEDs The DNB0001000 module consists of two circuit boards: the serial interface circuit board and the DeviceNet carrier board. Both boards contain a bicolor (red/green) watchdog LED to indicate their status according to Table 18 and Table 19.
Error Condition LED Color Frequency ASIC and FLASH ROM check fault Red 2 Hz
Module not initialized Green 2 Hz Module initialized and running OK Green 1 Hz
RAM check fault Red 1 Hz DPRAM check fault Red 4 Hz
Table 18 Serial Interface Board LED Indication
Error Condition LED Color Number of
Flashes Action
System OK Green 1 Hz Heartbeat
Normal Operation
Timeout with Scale Orange 3 Autobaud Operation 2 KB Internal RAM Fault Red 1 Halt
128 KB External RAM Fault Red 2 Halt CRC / External ROM Fault Red 3 Halt
Circuit Bd Interrupt Clear Fault Red 4 Halt Circuit Bd 2 KB DPRAM Fault Red 5 Halt
Circuit Bd Hardware Fault Red 6 Halt Circuit Bd Unsupported Module Type Red 7 Halt Circuit Bd Unsupported Fieldbus Type Red 8 Halt Circuit Bd Watchdog Out Update Fault Red 9 Halt
Watchdog Update Fault Red Steady Halt
Table 19 DeviceNet Carrier Board LED Indication