medialon mip hd - comm-tec · medialon sa's entire liability to you or another party for any...
TRANSCRIPT

MEDIALON MIP HDHD MEDIA PLAYER


Medialon MIP HDHD MEDIA PLAYER
User Guide
Medialon101 rue Pierre Sémard
F92324 Châtillon Cedex, FranceTel.: +33 (0)1 46 55 60 70Fax: +33 (0)1 46 55 54 83
Medialon Inc.2977 McFarlane Road, Suite 301
Miami, FL 33133, USATel.: +1 305 445 4045Fax: +1 305 445 4048
Revision 2.0.5 Copyright ©2011 Medialon, All rights reserved

FINAL USER'S LICENSE AGREEMENT FOR MEDIALON SOFTWARE & PLUG-IN
IMPORTANT - READ ATTENTIVELY: By loading and installing the software on yourcomputer, you indicate your acceptance of the following Final User's License for MedialonSoftware & Plug-In product (the “License Agreement”) which is either: (i) printed on a licencecard with the software; (ii) on-line in the software application. If you do not agree to theterms of this License Agreement, for a full refund, promptly return this product to the placeyou obtained it.
The License Agreement is entered into between you (the final user, a legal entity or naturalperson), and Medialon, 101 rue Pierre Sémard, 92324 Chatillon Cedex France, SA with acapital of 398 202 € registered at Nanterre RCS B 383 966 009 00029, and concerns theaforementioned software product, any attached add-in software, the documentation inelectronic format and any example or educational software (the “Software”).
You shall inform all authorized users of the Software of the terms and conditions of thisAgreement.
License granting
The Software is protected by Intellectual Property Right, copyright law and by internationalagreements. Any partial or total reproduction or distribution of the Software, by any meanswhatsoever, is strictly prohibited. Any person not respecting these provisions shall be guiltyof the crime of forgery and shall be liable to the penal penalties provided for by law.
The Software is not sold but transferred under license. You are authorized to install, use, runONE copy of the Software on ONE computer. If you use a network server, you can install onecopy of the Software on it, but you must acquire a user's license for each distinct customercomputer using the Software. You are not authorized to use the Software for shared worktime or on behalf of a third party.
All other rights not expressly granted in the present contract are reserved by MEDIALON SA,in particular the present contract grants you no right in relation to the service or trade markbelonging to MEDIALON SA. MEDIALON SA is the sole holder of the right to make any and allrequired corrections to the Software in order to comply with the Software documentation.
Save as otherwise provided by law, you are not authorised to reconstitute, reverse engineer,to de-compile or disassemble the Software product
If the software product is an update, you must, in order to use it, be the holder of a user'slicense for the original product. An update replaces the product that gave you the right to theupdate.
The original holder of the license for the software product is only authorized to transfer thiscontract once and permanently, to another end user provided that he provides written noticeto MEDIALON SA and the recipient agrees to be bound by and subject to the terms andconditions of this Agreement. This transfer must include all the software elements includingwithout limitation the most recent update and all prior versions, electronic and paperdocuments and the certificate of authenticity.

Copyright
All ownership rights and copyrights relating to the Software, any attached add-in software,the documentation in electronic or paper format and any other example or educationalapplications are proprietary of MEDIALON SA. MEDIALON SA retains all title and ownershipof the Software and Software Documentation. All intellectual property rights relating to theAPIs and contents to which the product can give access are proprietary of the respectiveowners of these APIs and contents, and can be protected by regulations and internationalagreements relating to copyrights and intellectual property rights.
Limited warranty
MEDIALON SA warrants that the magnetic media on which the Software is recorded and anySoftware Documentation will be free from defects in material and workmanship under normaluse for a period of one (1) year from first date of purchase (date of invoice). MEDIALON SAalso warrants that the original copy of the Software will perform substantially in accordancewith the accompanying Software documentation for one (1) year from the date of receipt.
MEDIALON SA does not warrant that the functions contained in the Software will meet yourall requirements or that the operation of the Software will be error free or uninterrupted.
Your exclusive remedy for breach of MEDIALON SA warranty shall be (i) in case of defects inthe media, the replacement by MEDIALON SA of any magnetic media not meeting thewarranty and (ii) in case of any defect in the Software, MEDIALON SA shall use reasonableefforts to provide maintenance, modifications or fixes in a timely manner, or at its optionreplace the Software, provided the Software is returned with a copy of your receipt. Thislimited warranty is void if failure of the Software has resulted from accident, abuse, alterationor misapplication. Any replacement Software will be warranted for the remainder of theoriginal warranty period two (2) months, whichever is longer.
MEDIALON SA is not responsible for problems caused by changes in, or modifications to, theoperating characteristics of any computer hardware or operating system for which theSoftware or any upgrade or update is procured, nor is MEDIALON SA for problems whichoccurs as a result of the use of the Software in conjunction with software of third parties orwith hardware which is incompatible with the operating system for which the Software isbeing procured.
Infringement
MEDIALON SA, at its own expense, will indemnify and defend you against any action broughtagainst you to the extent that it is based on a claim that the Software or any upgrade orupdate of the Software used within the scope of this Agreement infringes any French patentor copyright provided that MEDIALON SA is promptly notified in writing of such claim.MEDIALON SA shall have the right to control the defense of all such claims, lawsuits, andother proceedings. In no event may you settle any such claim, lawsuit, or proceeding withoutMEDIALON SA's prior written approval. MEDIALON SA shall have no liability for any claimunder this section if a claim for a French patent or copyright infringement is based on the useof a superseded or altered version of the Software if such infringement would have beenavoided by use of the latest unaltered version of the Software made available to you, or inthe event such claim is based upon any modification or enhancement to the Software madeby you or on your behalf. In the event a third party infringement claim is sustained in a finaljudgment from which no further appeal is taken or possible, or if your use of the Software isenjoined by a court, then MEDIALON SA shall, in its sole election and at its expense either (i)procure for you the right to continue to use the Software pursuant to this Agreement; (ii)replace or modify the Software to make it non-infringing; or if (i) and (ii) are not reasonablyfeasible, (iii) terminate this Agreement and refund to you the depreciated value of theSoftware, based on straight line depreciation over a period of 5 years. The foregoing

obligations state MEDIALON SA's entire liability and your exclusive remedy of and MEDIALONSA shall have no other liability or obligation with respect to any actual or alleged infringementof any intellectual property rights under this Agreement
Limitation of liability
MEDIALON SA's entire liability to you or another party for any loss or damage resulting fromany claims, demands or actions arising out of this Agreement shall not exceed the license feepaid to MEDIALON SA for the Software (“License Fee”), net of dealer or distributor margins,notwithstanding any failure of essential purpose of any limited remedy.
No other warranties
Except for the express warranty provided under heading Limited Warranty above, theSoftware and its related documentation are provided “As Is” and without a warranty of anykind, whether express, implied, statutory and MEDIALON SA specifically disclaims the impliedwarranties, terms or conditions of merchantability, non-infringement and fitness for aparticular purpose.
No liability for consequential damages
ACCORDING TO DANGEROUSNESS OF CERTAIN KIND OF EQUIPMENTS WHICH CAN BECONTROLED BY THE SOFTWARE, THE LIABILITY OF MEDIALON SA IS SUBMITTED TO THESTRICT COMPLIANCE WITH THE MANDATORY SAFETY RULES AS DESCRIBED INTO THESOFTWARE DOCUMENTATION.
Save as otherwise provided by law, in no event and more particularly in case of breach of thesafety rules as described into the Software documentation, shall MEDIALON SA be held liablefor any special, indirect or accessory damage, of any nature whatsoever, including withoutlimitation body or material injury, loss of profit, interruption of activity, loss of information orother pecuniary losses which may result from the use or the impossibility to use the Software,and this even if the company MEDIALON SA has been notified of the possibility of suchprejudice.
Termination
This Agreement is effective until terminated. This Agreement will terminate if you fail tocomply with any provision of the Agreement. Upon termination, you shall destroy all copiesof the Software, including security keys and modified copies, if any.
Maintenance and support
Maintenance, including the provision of upgrades and updates to the Software, and telephonesupport is available from MEDIALON SA only through a maintenance plan. Updates andupgrades are not available separately.

General provisions
If any term, condition, or provision in this Agreement is found to be invalid, unlawful orunenforceable to any extent, such invalid term, condition or provision will be severed fromthe remaining terms, conditions and provisions, which will continue to be valid andenforceable to the fullest extent permitted by law.
This Agreement shall be interpreted and construed in accordance with the laws of France. Anydispute arising out of this Agreement shall be submitted to Paris Commercial Court (Tribunalde Commerce de Paris).
MEDIALON SA101 rue Pierre Sémard92324 Châtillon CedexFrance
www.medialon.com
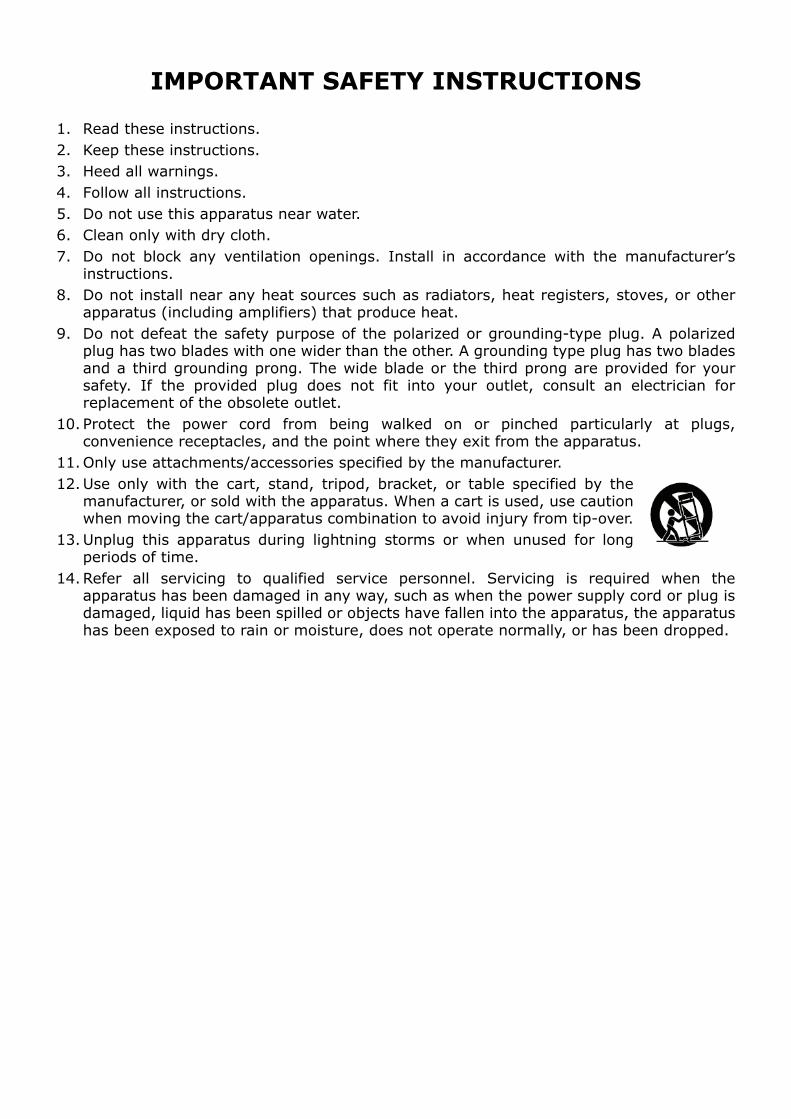
IMPORTANT SAFETY INSTRUCTIONS
1. Read these instructions.2. Keep these instructions.3. Heed all warnings.4. Follow all instructions.5. Do not use this apparatus near water.6. Clean only with dry cloth.7. Do not block any ventilation openings. Install in accordance with the manufacturer’s
instructions.8. Do not install near any heat sources such as radiators, heat registers, stoves, or other
apparatus (including amplifiers) that produce heat.9. Do not defeat the safety purpose of the polarized or grounding-type plug. A polarized
plug has two blades with one wider than the other. A grounding type plug has two bladesand a third grounding prong. The wide blade or the third prong are provided for yoursafety. If the provided plug does not fit into your outlet, consult an electrician forreplacement of the obsolete outlet.
10. Protect the power cord from being walked on or pinched particularly at plugs,convenience receptacles, and the point where they exit from the apparatus.
11.Only use attachments/accessories specified by the manufacturer.12.Use only with the cart, stand, tripod, bracket, or table specified by the
manufacturer, or sold with the apparatus. When a cart is used, use cautionwhen moving the cart/apparatus combination to avoid injury from tip-over.
13.Unplug this apparatus during lightning storms or when unused for longperiods of time.
14.Refer all servicing to qualified service personnel. Servicing is required when theapparatus has been damaged in any way, such as when the power supply cord or plug isdamaged, liquid has been spilled or objects have fallen into the apparatus, the apparatushas been exposed to rain or moisture, does not operate normally, or has been dropped.

PRECAUTIONSPLEASE READ CAREFULLY BEFORE PROCEEDING
* Please keep this manual in a safe place for future reference.
WARNING
Always follow the basic precautions listed below to avoid the possibility of serious injury oreven death from electrical shock, short-circuiting, damage, fire or other hazards or physicalinjury to you or others, or damage to the device or other property. These precautions include,but are not limited to, the following:
Power supply / Power cord• Only use the voltage specified as correct for the device. The required voltage is printed on
the name plate of the device.
• Use only the specified power cord.
• Do not place the power cord near heat sources such as heaters or radiators, and do notexcessively bend or otherwise damage the cord, place heavy objects on it, or place it in aposition where anyone could walk on, trip over, or roll anything over it.
• Remove the electric plug from the outlet when the device is not to be used for extendedperiods of time, or during electrical storms.
• When removing the electric plug from the device or an outlet, always hold the plug itselfand not the cord. Pulling by the cord can damage it.
Do not open• Do not open the device or attempt to disassemble the internal parts or modify them in
any way. The device contains no user-serviceable parts. If it appears to bemalfunctioning, discontinue use immediately and have it inspected by qualified Medialonservice personnel.
Water warning• Do not expose the device to rain, use it near water or in damp or wet conditions, or place
containers on it containing liquids which might spill into any openings.
• Never insert or remove an electric plug with wet hands.
Location• Do not expose the device to excessive dust or vibrations, or extreme cold or heat (such as
direct sunlight, near a heater, or in a car during the day) to prevent the possibility ofpanel disfiguration or damage to the internal components.
• Do not place the device in an unstable position where it might accidentally fall over.
• Do not block the vents. This device has ventilation holes on the rear and sides to preventthe internal temperature from rising too high. In particular, do not place the device on itsside or upside down, or place it in any poorly ventilated location, such as a bookcase orcloset.
Connections• Before connecting the device to other devices, turn off the power for all devices.
• Be sure to connect to a properly grounded power source.
If you notice any abnormality
• If the power cord or plug becomes frayed or damaged, or if there is a sudden loss offunction during use of the device, or if any unusual smells or smoke should appear to becaused by it, immediately turn off the power switch, disconnect the electric plug from theoutlet, and have the device inspected by qualified Medialon service personnel.
• If this device is dropped or damaged, immediately turn off the power switch, disconnectthe electric plug from the outlet, and have the device inspected by qualified Medialonservice personnel.
MANDATORY SAFETY RULES
Although Medialon MIP HD Software is designed to control different kinds of hardwareequipment, such as relays to control fire works, Medialon MIP HD can NOT be used to insuresafety of users.
Users must make sure that all dangerous equipment controlled directly or indirectly byMedialon MIP HD, includes their own safety procedures and process.
Medialon MIP HD is not designed to insure safety process.
ACCORDING TO THE DANGEROUSNESS OF CERTAIN KINDS OF EQUIPMENTWHICH CAN BE CONTROLLED BY THIS SOFTWARE, THE LIABILITY OF MEDIALONSA IS SUBMITTED TO THE STRICT COMPLIANCE WITH THE MANDATORY SAFETYRULES AS DESCRIBED HERE ABOVE.

WARRANTY TERMS AND CONDITIONS FOR MEDIALON HARDWARE
Medialon SA warrants that the Medialon hardware and all components are free from defectsin material and workmanship for a period of 1 Years from the date of delivery to the firstowner. This warranty is not transferable
Warranty will be void if manufacturer’s installation and use instructions are not followed.
Warranty will be void unless our factory approved parts are used and properly installed by anauthorized representative.
Warranty does not extend to parts misused, mishandling, neglect, accident, damage, flood,fire, or other causes beyond the control of the manufacturer. The warranty does not extendto consequential damage.
To make a warranty claim, visit Medialon.com to obtain an RMA (Return MaterialAuthorization) number. No claim will be accepted without an RMA number.
The equipment in need of service should be shipped (with RMA) to the address on the RMAform, freight pre-paid. Any returned items deemed faulty due to manufacturer defect will berepaired or replaced and shipped back to the customer at no charge to the customer.

Table of ContentsFINAL USER'S LICENSE AGREEMENT FOR MEDIALON SOFTWARE & PLUG-IN . . . . . 4IMPORTANT SAFETY INSTRUCTIONS . . . . . . . . . . . . . . . . . . . . . . . . . . . . . . . . . 8WARRANTY TERMS AND CONDITIONS FOR MEDIALON HARDWARE . . . . . . . . . . . .11
Table of Contents . . . . . . . . . . . . . . . . . . . . . . . . . . . . . 12
INTRODUCTION
Overview. . . . . . . . . . . . . . . . . . . . . . . . . . . . . . . . . . . . 16
Getting Started . . . . . . . . . . . . . . . . . . . . . . . . . . . . . . . 17Contents of the Package. . . . . . . . . . . . . . . . . . . . . . . . . . . . . . . . . . .17Connecting the MIP HD . . . . . . . . . . . . . . . . . . . . . . . . . . . . . . . . . . .17First Start. . . . . . . . . . . . . . . . . . . . . . . . . . . . . . . . . . . . . . . . . . . . .18Local control . . . . . . . . . . . . . . . . . . . . . . . . . . . . . . . . . . . . . . . . . . .18Set up screen resolution. . . . . . . . . . . . . . . . . . . . . . . . . . . . . . . . . . .19Set up for remote control . . . . . . . . . . . . . . . . . . . . . . . . . . . . . . . . . .20Remote access from a remote web browser . . . . . . . . . . . . . . . . . . . . .21Uploading and Playing a Media . . . . . . . . . . . . . . . . . . . . . . . . . . . . . .22Playing a Video . . . . . . . . . . . . . . . . . . . . . . . . . . . . . . . . . . . . . . . . .23Creating Playlists. . . . . . . . . . . . . . . . . . . . . . . . . . . . . . . . . . . . . . . .24
HARDWARE DESCRIPTION
Installation . . . . . . . . . . . . . . . . . . . . . . . . . . . . . . . . . . 26Front Panel . . . . . . . . . . . . . . . . . . . . . . . . . . . . . . . . . . . . . . . . . . . .26Rear Panel . . . . . . . . . . . . . . . . . . . . . . . . . . . . . . . . . . . . . . . . . . . .26
USING THE MIP
MIP HD user interface. . . . . . . . . . . . . . . . . . . . . . . . . . 28Browser Compatibility . . . . . . . . . . . . . . . . . . . . . . . . . . . . . . . . . . . .28Login . . . . . . . . . . . . . . . . . . . . . . . . . . . . . . . . . . . . . . . . . . . . . . . .29Status Bar . . . . . . . . . . . . . . . . . . . . . . . . . . . . . . . . . . . . . . . . . . . .30Menu Bar . . . . . . . . . . . . . . . . . . . . . . . . . . . . . . . . . . . . . . . . . . . . .31
Adding Media . . . . . . . . . . . . . . . . . . . . . . . . . . . . . . . . 33Add Media in the MIP HD . . . . . . . . . . . . . . . . . . . . . . . . . . . . . . . . .33
Local File Copy . . . . . . . . . . . . . . . . . . . . . . . . . . . . . . . . . . . . .33Remote Upload Media . . . . . . . . . . . . . . . . . . . . . . . . . . . . . . . .35Using a FTP Client . . . . . . . . . . . . . . . . . . . . . . . . . . . . . . . . . . .36
Media Library Management. . . . . . . . . . . . . . . . . . . . . . . . . . . . . . . . .37Play a Media . . . . . . . . . . . . . . . . . . . . . . . . . . . . . . . . . . . . . . .37Remove Media . . . . . . . . . . . . . . . . . . . . . . . . . . . . . . . . . . . . .37Refresh Media Library . . . . . . . . . . . . . . . . . . . . . . . . . . . . . . . .37
Default Media . . . . . . . . . . . . . . . . . . . . . . . . . . . . . . . . . . . . . . . . . .37
12 TABLE OF CONTENT

Table of Content
Playing Video in Sync . . . . . . . . . . . . . . . . . . . . . . . . . . 39Video Player Mode . . . . . . . . . . . . . . . . . . . . . . . . . . . . . . . . . . . . . . .39Play a Video . . . . . . . . . . . . . . . . . . . . . . . . . . . . . . . . . . . . . . . . . . .39
Video Control . . . . . . . . . . . . . . . . . . . . . . . . . . . . . . . . . . . . . .40Playing Video in Sync. . . . . . . . . . . . . . . . . . . . . . . . . . . . . . . . . . . . .41
Sync Mode . . . . . . . . . . . . . . . . . . . . . . . . . . . . . . . . . . . . . . . .41Using MIP HD in Sync . . . . . . . . . . . . . . . . . . . . . . . . . . . . . . . .42
Playing Playlists . . . . . . . . . . . . . . . . . . . . . . . . . . . . . . 43Playlists . . . . . . . . . . . . . . . . . . . . . . . . . . . . . . . . . . . . . . . . . . . . . .43Create a Playlist . . . . . . . . . . . . . . . . . . . . . . . . . . . . . . . . . . . . . . . .44
Add a Media in a Playlist. . . . . . . . . . . . . . . . . . . . . . . . . . . . . . .44Save the Playlist . . . . . . . . . . . . . . . . . . . . . . . . . . . . . . . . . . . .46Edit Playlist Content. . . . . . . . . . . . . . . . . . . . . . . . . . . . . . . . . .46Add URLs and Control Cues . . . . . . . . . . . . . . . . . . . . . . . . . . . .47
Play a Playlist . . . . . . . . . . . . . . . . . . . . . . . . . . . . . . . . . . . . . . . . . .50Start a Playlist . . . . . . . . . . . . . . . . . . . . . . . . . . . . . . . . . . . . .50Start a Playlist with external trigger. . . . . . . . . . . . . . . . . . . . . . .51
Playlist Library . . . . . . . . . . . . . . . . . . . . . . . . . . . . . . . . . . . . . . . . .52
Scheduling Playlists . . . . . . . . . . . . . . . . . . . . . . . . . . . 53Schedules. . . . . . . . . . . . . . . . . . . . . . . . . . . . . . . . . . . . . . . . . . . . .53Test a Playlist . . . . . . . . . . . . . . . . . . . . . . . . . . . . . . . . . . . . . . . . . .54Create a Schedule . . . . . . . . . . . . . . . . . . . . . . . . . . . . . . . . . . . . . . .54
To create a Schedule . . . . . . . . . . . . . . . . . . . . . . . . . . . . . . . . .55To change the start time value of the Playlist . . . . . . . . . . . . . . . .55To remove a Playlist from the current schedule: . . . . . . . . . . . . . .55To Edit a Schedule. . . . . . . . . . . . . . . . . . . . . . . . . . . . . . . . . . .55
Start a Schedule . . . . . . . . . . . . . . . . . . . . . . . . . . . . . . . . . . . . . . . .56To start a schedule . . . . . . . . . . . . . . . . . . . . . . . . . . . . . . . . . .56To remove a schedule from the list . . . . . . . . . . . . . . . . . . . . . . .56
Display a Ticker . . . . . . . . . . . . . . . . . . . . . . . . . . . . . . 57Enter Ticker Text. . . . . . . . . . . . . . . . . . . . . . . . . . . . . . . . . . . . . . . .57Testing Ticker . . . . . . . . . . . . . . . . . . . . . . . . . . . . . . . . . . . . . . . . . .59Display Ticker . . . . . . . . . . . . . . . . . . . . . . . . . . . . . . . . . . . . . . . . . .59
External Control . . . . . . . . . . . . . . . . . . . . . . . . . . . . . . 60MxM Medialon MIP. . . . . . . . . . . . . . . . . . . . . . . . . . . . . . . . . . . . . . .60MxM Medialon Sync Master . . . . . . . . . . . . . . . . . . . . . . . . . . . . . . . . .61
MAINTENANCE
MIP HD Setup . . . . . . . . . . . . . . . . . . . . . . . . . . . . . . . . 63Player Setup . . . . . . . . . . . . . . . . . . . . . . . . . . . . . . . . . . . . . . . . . . .63
General parameters . . . . . . . . . . . . . . . . . . . . . . . . . . . . . . . . . .63Information sending . . . . . . . . . . . . . . . . . . . . . . . . . . . . . . . . .65Email . . . . . . . . . . . . . . . . . . . . . . . . . . . . . . . . . . . . . . . . . . . .66Maintenance . . . . . . . . . . . . . . . . . . . . . . . . . . . . . . . . . . . . . . .66Theme . . . . . . . . . . . . . . . . . . . . . . . . . . . . . . . . . . . . . . . . . . .67
User Accounts. . . . . . . . . . . . . . . . . . . . . . . . . . . . . . . . . . . . . . . . . .68System . . . . . . . . . . . . . . . . . . . . . . . . . . . . . . . . . . . . . . . . . . . . . .69
Network Parameters . . . . . . . . . . . . . . . . . . . . . . . . . . . . . . . . .70Display Parameters . . . . . . . . . . . . . . . . . . . . . . . . . . . . . . . . . .71Date and Time . . . . . . . . . . . . . . . . . . . . . . . . . . . . . . . . . . . . .71
TABLE OF CONTENT 13

Audio Parameters . . . . . . . . . . . . . . . . . . . . . . . . . . . . . . . . . . .72Video Parameters . . . . . . . . . . . . . . . . . . . . . . . . . . . . . . . . . . .73
Logs . . . . . . . . . . . . . . . . . . . . . . . . . . . . . . . . . . . . . . . 74Logs Menu . . . . . . . . . . . . . . . . . . . . . . . . . . . . . . . . . . . . . . . . . . . .74
Log file. . . . . . . . . . . . . . . . . . . . . . . . . . . . . . . . . . . . . . . . . . .74Playback file . . . . . . . . . . . . . . . . . . . . . . . . . . . . . . . . . . . . . . .75
Log Files Messages . . . . . . . . . . . . . . . . . . . . . . . . . . . . . . . . . . . . . .75
Updating MIP Firmware . . . . . . . . . . . . . . . . . . . . . . . . 79
Troubleshooting . . . . . . . . . . . . . . . . . . . . . . . . . . . . . . 81Common Problems & Solutions . . . . . . . . . . . . . . . . . . . . . . . . . . . . . .81
REFERENCES
Technical Specifications . . . . . . . . . . . . . . . . . . . . . . . . 83
Relays and Triggers Specifications . . . . . . . . . . . . . . . . 85Setup. . . . . . . . . . . . . . . . . . . . . . . . . . . . . . . . . . . . . . . . . . . .85
Connections . . . . . . . . . . . . . . . . . . . . . . . . . . . . . . . . . . . . . . . . . . .86Wiring . . . . . . . . . . . . . . . . . . . . . . . . . . . . . . . . . . . . . . . . . . .86Pin Definitions of NuDAM-6530 . . . . . . . . . . . . . . . . . . . . . . . . . .87Pin Definitions of NuDAM-6060 . . . . . . . . . . . . . . . . . . . . . . . . . .88
Specifications . . . . . . . . . . . . . . . . . . . . . . . . . . . . . . . . . . . . . . . . .89Specifications of ND-6530 . . . . . . . . . . . . . . . . . . . . . . . . . . . . .89Specifications of NuDAM-6060 . . . . . . . . . . . . . . . . . . . . . . . . . .89
TCP/IP Protocol . . . . . . . . . . . . . . . . . . . . . . . . . . . . . . 91General Message Format . . . . . . . . . . . . . . . . . . . . . . . . . . . . . . . . . .91
Command frame . . . . . . . . . . . . . . . . . . . . . . . . . . . . . . . . . . . .91Response frame . . . . . . . . . . . . . . . . . . . . . . . . . . . . . . . . . . . .91
Commands . . . . . . . . . . . . . . . . . . . . . . . . . . . . . . . . . . . . . . . . . . . .91Multimedia Player Commands . . . . . . . . . . . . . . . . . . . . . . . . . . .92Video Sync Player Commands . . . . . . . . . . . . . . . . . . . . . . . . . . .93MIP HD Commands . . . . . . . . . . . . . . . . . . . . . . . . . . . . . . . . . .94MIP HD Request Commands . . . . . . . . . . . . . . . . . . . . . . . . . . . .95
Media Specifications . . . . . . . . . . . . . . . . . . . . . . . . . . . 98About Media . . . . . . . . . . . . . . . . . . . . . . . . . . . . . . . . . . . . . . . . . . .98Supported Files List, Display Modes . . . . . . . . . . . . . . . . . . . . . . . . . . .98Audio Format and Output . . . . . . . . . . . . . . . . . . . . . . . . . . . . . . . . . .99Video Specifications. . . . . . . . . . . . . . . . . . . . . . . . . . . . . . . . . . . . . .99
Index . . . . . . . . . . . . . . . . . . . . . . . . . . . . . . . . . . . . . 101
14 TABLE OF CONTENT

INTRODUCTION
This section helps those who are new to Medialon MIP HD to install and start to use your Medialon MIP HD.

16 INTRODUCTION
OverviewMedialon MIP HD is a compact player able to playback both multimediacontent such as Flash, Html, Jpeg and even URLs as well as 1080p HD video.Interactive media such as Flash keep their interactivity if needed.
Its built-in web server provides web user interface to remotely upload media, tobuild up playlists and to schedule and retrieve log files.
Its Sync Video mode allows synchronization of an unlimited number of HD videoplayback via the network.
It can either operate autonomously or be slaved to a Medialon Control Systemmaking it an ideal solution for Museum as well as Digital signage applications.
Media compatibilityCompatible with most common media and HD video, MIP HD plays media filesstored on its internal solid state drive and media accessible via URL (links towebsites or video streams).
The web editor enables the user to display scrolling text messages (Ticker)either locally or from a distant point, for local messages, visitor information,visual paging or evacuation.
Video Sync over EthernetPlaying HD video, several MIP HDs can be synchronized over the network fromMedialon Control system, making it the ideal tool for multiple screen display. Inthis mode, MIP HD offers the legendary Medialon position tracking capability.
InteractivityMedia interactivity is preserved. By using a keyboard, the visitor can interactwith contents like Adobe© Flash© files, HTML pages. An optional GPI accessoryprovides relay outputs for analog device control (lights, power) and severalinputs for buttons or visitor detection sensors.
SchedulingVia a regular web browser, locally or via the Internet, the integrated sequenceand playlist editor helps to schedule media playback, visitor’s interactivity,screen remote and automatic Power On/Off. Administration, supervision andmaintenance features are also accessible via web browser, depending on accesscredentials and user profile. Medialon MIP HD integrates an RS232 output tocontrol the local display screen.
Maintenance and LogsDaily log files for activity and status reporting are generated and stored. If theMIP HD is connected to a LAN, log files can be transmitted automatically via e-mail for archiving.
Stable and reliable displaySilent with a small form factor, Medialon MIP HD is designed for constrainingintegration environments like public places. Its low power consumption and itsWatchdog guarantee the operational stability 24 hours a day, 7 days a week,required for professional installations.

Getting Started
Getting StartedMedialon Medialon MIP HD can be programmed and controlled either from itsown screen or remotely via a web browser, or both. To control MIP HD from adistant web browser, proper network set up must first be completed (IP addressor DHCP, internet connection etc).
If you do not wish to remotely control MIP HD from a remote web browser, youwill not need to configure the network. Your Medialon MIP HD will act as a standalone machine. Local control interface allows you to play videos, create Playlistsand schedule them. MIP HD parameters can also be set up from local controlinterface.
Contents of the Package
The Medialon MIP HD Package includes
• Medialon MIP HD
• Power Supply and its cord
• This User’s Guide.
Connecting the MIP HD
1. Connect a screen to the MIP HD, use either VGA, DVI or HDMI.2. Connect a keyboard and a mouse via USB.3. Connect the power block.4. Medialon MIP HD will start automatically, front LED will light up
Remote PC
INTRODUCTION 17
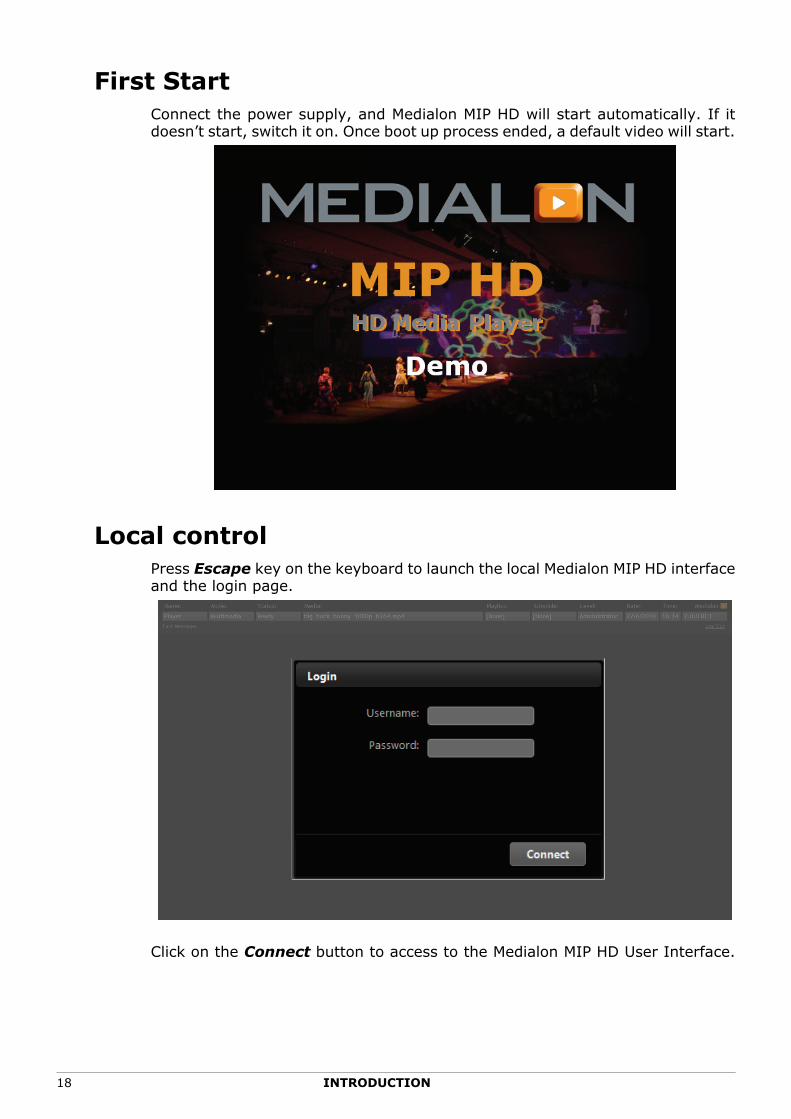
First StartConnect the power supply, and Medialon MIP HD will start automatically. If itdoesn’t start, switch it on. Once boot up process ended, a default video will start.
Local controlPress Escape key on the keyboard to launch the local Medialon MIP HD interfaceand the login page.
Click on the Connect button to access to the Medialon MIP HD User Interface.
18 INTRODUCTION

Getting Started
There is no default Username and Password defined.
Set up screen resolutionTo adjust the screen display resolution, go to Setup / System tab.
Use Apply button to validate your change. See “Display Parameters”, page 71.
INTRODUCTION 19
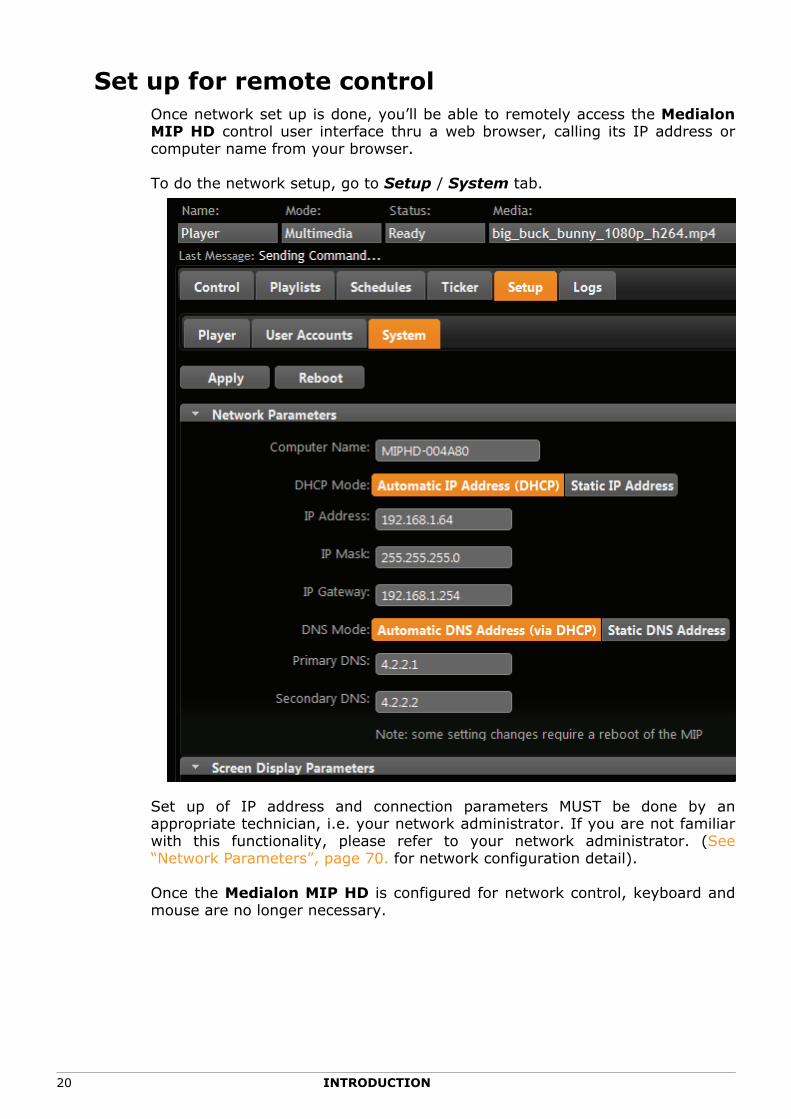
Set up for remote controlOnce network set up is done, you’ll be able to remotely access the MedialonMIP HD control user interface thru a web browser, calling its IP address orcomputer name from your browser.
To do the network setup, go to Setup / System tab.
Set up of IP address and connection parameters MUST be done by anappropriate technician, i.e. your network administrator. If you are not familiarwith this functionality, please refer to your network administrator. (See“Network Parameters”, page 70. for network configuration detail).
Once the Medialon MIP HD is configured for network control, keyboard andmouse are no longer necessary.
20 INTRODUCTION

Getting Started
Remote access from a remote web browserVideo playback, sequence creation and media upload can be done remotely viaa web browser.
Once your network set up is done, to connect to your Medialon MIP HD throughthe network, type the MIP HD IP address in the web browser address field.
Medialon MIP HD will send its login page.
Click on the Connect button to access to the MIP HD User Interface. There is nodefault Username and no Password is defined.
If the error message ‘Page cannot be displayed’ appears in the web browserwindows, check internet settings on the remote computer (security to Default,medium position)
INTRODUCTION 21
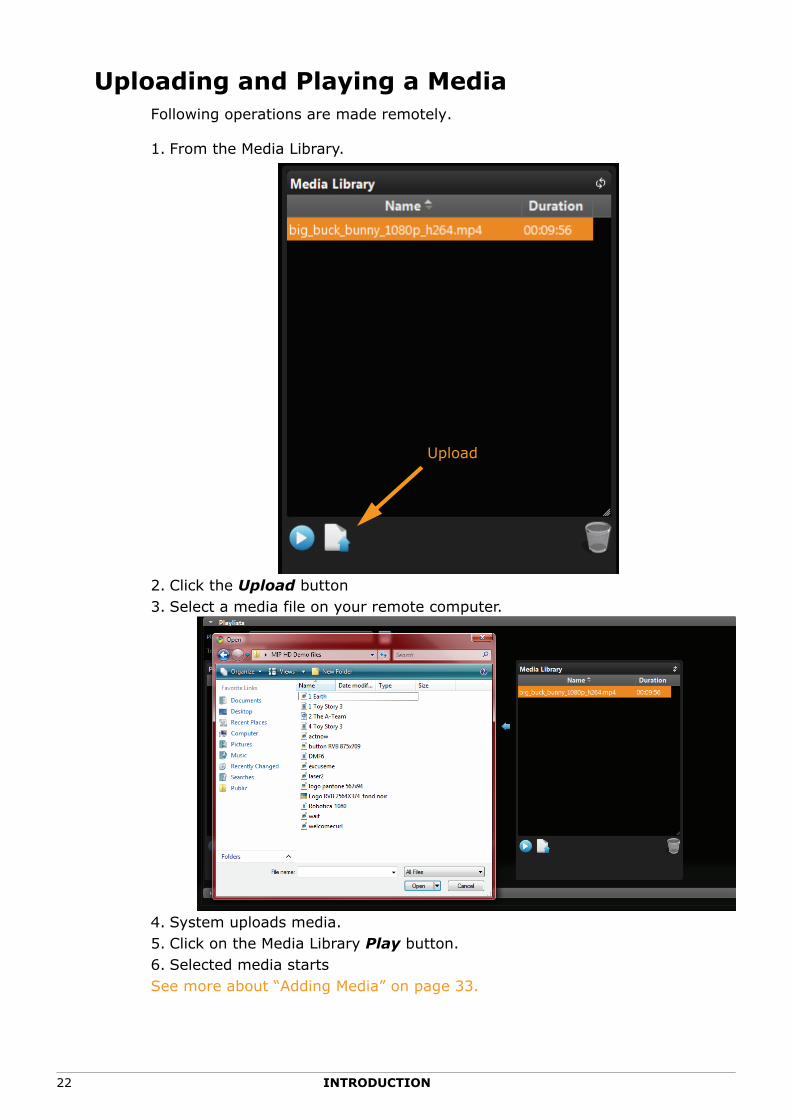
Uploading and Playing a MediaFollowing operations are made remotely.
1. From the Media Library.
2. Click the Upload button3. Select a media file on your remote computer.
4. System uploads media.5. Click on the Media Library Play button.6. Selected media startsSee more about “Adding Media” on page 33.
Upload
22 INTRODUCTION

Getting Started
Playing a Video1. Go to the Control tab
2. Select Sync Video Player mode: currently playing media stops playing3. Click on one of the videos in the Video Library: the video is loaded in the MIP
HD.4. Click Play, Pause, Stop to control the video.5. Use the Jog or Locate to position the video.See more about “Playing Video in Sync” on page 39.
INTRODUCTION 23

Creating Playlists1. Go to the Control tab2. Click on Multimedia Player3. Go to the Playlists tab
4. Select a media from the Media Library.5. Click on Add Media button.6. Edit the duration for each playlist content item.7. Give a name to the Playlist.8. Click Save button.9. Click Play button.See more about “Playing Playlists” on page 43.
Add Media
Enter DurationStart Playlist
Save Playlist
24 INTRODUCTION
HARDWARE DESCRIPTION
In this section you will learn how to correctly connect and start your Medialon MIP HD .

26 HARDWARE DESCRIPTION
InstallationMedialon MIP HD is 1 1/2U machine with an external power supply. Allconnections are made in the rear of MIP HD.
Front PanelOnce Medialon MIP HD is powered up, two LEDs on the front panel indicate MIPHD activity.
• [PWR] LED indicates if MIP HD is turn On.
• [SSD] LED indicates disk activity.
Rear PanelThe figure below hows the rear panel of Medialon MIP HD
• [I/O]Power On/Off Button
• [COM1] COM Port 1: To connect serial control of your screen, please check your monitor manual for connection.
• [HDMI] Monitor Output: Connector HDMI.
• [SPDIF] SPDIF Audio digital output to decoder: Connector RCA or Optical
• [VGA] Monitor Output: Connector VGA.
• [DVI] Monitor Output: Connector DVI.
• [LAN] RJ45 Ethernet LAN connector (10/100/1000Base-T).
• [USB] USB Port1 & 2: Use these to connect USB Flash Disk to load media in the MIP HD. It could also be use for keyboard and mouse. External Relays and Triggers can be connected to USB port.
• [A] Audio Line mini-jack stereo output (Green ring)
• [WIFI] WIFI antenna connector: Not in use.
• [19V] Power Connector.

USING THE MIP
In this section you will learn how to use your Medialon MIP HD.

MIP HD user interfaceLocally or via the Internet with a regular web browser, the integrated playlisteditor helps to schedule media playback, visitor’s interactivity, screen remotely.Administration, supervision and maintenance features are also accessibledepending on access credentials and user profile.
Browser CompatibilityMedialon MIP HD interface can be opened remotely with:
- Google Chrome
- Mozilla Firefox
- Apple Safari
28 USING THE MIP

MIP HD User Interface
- Microsoft Internet Explorer (IE6+ )
Medialon MIP HD prefers a modern browser (Chrome/Safari/Firefox).
After User Identification, the Medialon MIP HD User Interface will give you accessto Video playback, Playlist creation, Playlist scheduler, Monitoring Informationand MIP HD Setup menu
Some antivirus software programs may conflict with information transfer from the MIP HD to the external Browser. If you are having problems with the browser, temporarily disable your antivirus/firewall to see if this remedies the problem. If it does, reconfigure your antivirus/firewall, or try a different antivirus program.
LoginBefore entering in the MIP HD User Interface, a User Identification must bedefined.
By pressing Escape key on the local keyboard or entering Medialon MIP HD IPaddress in the remote browser, the following page shows up.
If a Username and a Password were defined, fill in the corresponding fields. (Nodefault Name and Password are required)
Click on the Connect button to validate.
USING THE MIP 29

Once the login is done, Medialon MIP HD displays the last visited page dependingon the user level.
An error message will be displayed in case of wrong login.
Status BarOn the top of all pages, information and status of the MIP HD are displayed
• Name: The Player name of MIP HD is displayed. It confirms that you are connected on the right MIP HD in case of installations with several Medialon MIP HD units.
• Mode: indicates if MIP HD is in Multimedia Player or Sync Video Player.
• Status: gives last action status
• Media: file name of the media currently displayed on the screen.
• Last Message: gives the last command executed.
• Playlist: name of the current Playlist running.
• Schedule: name of the current Schedule running.
• Level: Your current level access
- Administror.
- Editor
30 USING THE MIP

MIP HD User Interface
- Ticker
- Monitoring
• Date & Time: the current date and time of the Medialon MIP HD are displayed. When you create a schedule, it could be useful to check current time settings.
• Medialon : Current Medialon MIP HD firmware version.
• Help: link to open online this User Manual.
• Log Out: close the current session.
Menu BarDepending on your User level, the following menus are accessible:
Monitoring levelWith this user level, you can only access to Logs of Medialon MIP HD See moreabout “Logs” on page 74.
Ticker levelTicker level gives access to:
• Ticker: Display a scrolling text.See more about “Display a Ticker” on page 57.
• Logs
Editor levelWith this level you can access to:
• Control: Use Medialon MIP HD as a video sync player. See more about “Playing Video in Sync” on page 39.
• Playlists: Use Medialon MIP HD as a multimedia player. See more about “Playing Playlists” on page 43.
• Schedules: Schedule your multimedia Playlists. See more about “Scheduling Playlists” on page 53.
USING THE MIP 31

• Ticker.
• Logs.
Administrator levelAs administrator of Medialon MIP HD, you have access to all menus.
• Control.
• Playlists.
• Schedules.
• Ticker.
• Setup: configure your Medialon MIP HD. See more about “MIP HD Setup” on page 63.
• Logs.
32 USING THE MIP

Adding Media
Adding MediaMedialon MIP HD is a compact player able to playback both multimediacontent such as Flash, Html, Jpeg and even 1080p HD video.
There are 3 ways to add media in the Medialon MIP HD
• Locally by copying files from a CD/DVD in a USB DVD-Rom drive, or via a USB Flash Disk.
• Remotely via network (LAN or Internet) by up-loading files to the MIP HD.
• by using an FTP client.
Add Media in the MIP HDGo to the Media library in Playlists or Control tab.
The Media Library contains Media available. Medialon MIP HD plays: Jpeg,Mpeg, Flash, Html and any media that plays (or will play) in a web browserrunning Internet Explorer ®
Local File Copy
To add media to the Media Library locally from a USB Key or a DVD
1. Plug your USB Key into a free USB port of MIP HD2. Click on Upload Media button.
Upload Button
USING THE MIP 33
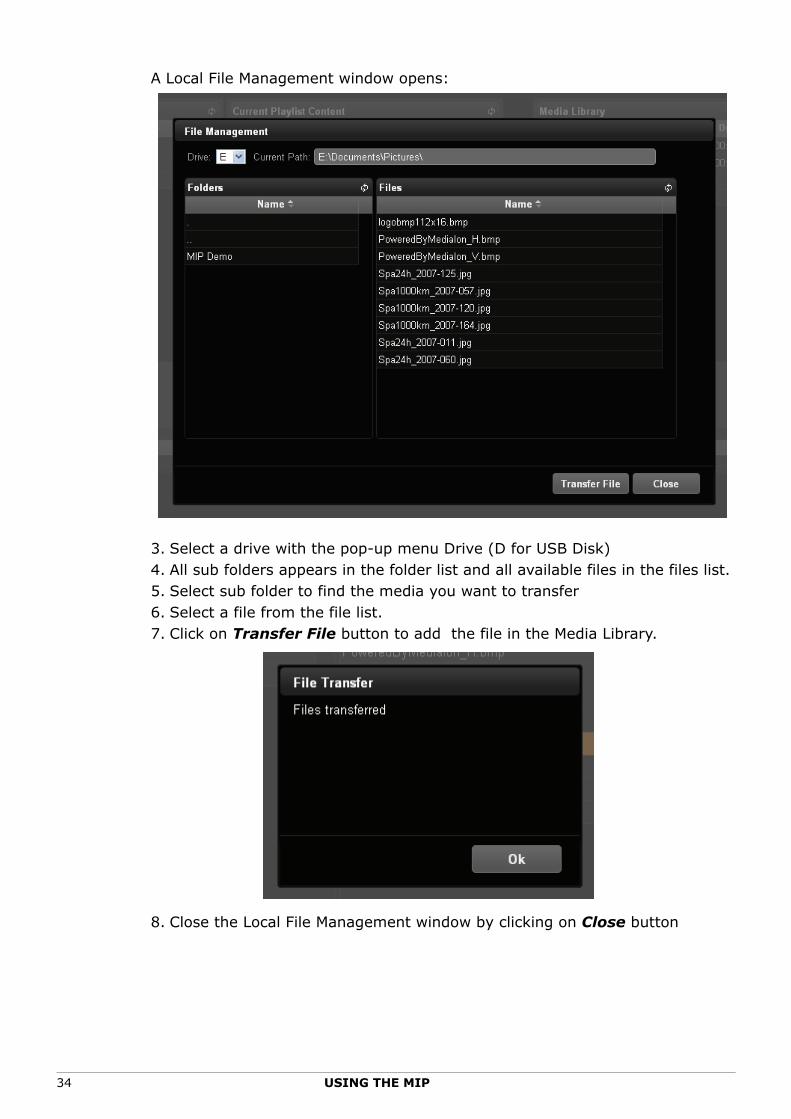
A Local File Management window opens:
3. Select a drive with the pop-up menu Drive (D for USB Disk)4. All sub folders appears in the folder list and all available files in the files list.5. Select sub folder to find the media you want to transfer6. Select a file from the file list.7. Click on Transfer File button to add the file in the Media Library.
8. Close the Local File Management window by clicking on Close button
34 USING THE MIP

Adding Media
Remote Upload Media
To add media to the Media Library remotely from your computer
1. Click on Upload button to open a “Choose a File” dialog box..
2. Browse your computer to select the media file.
3. Click on Open button to transfer file to the MIP HD.4. Progress bar indicates transfert progression.
Upload Button
USING THE MIP 35
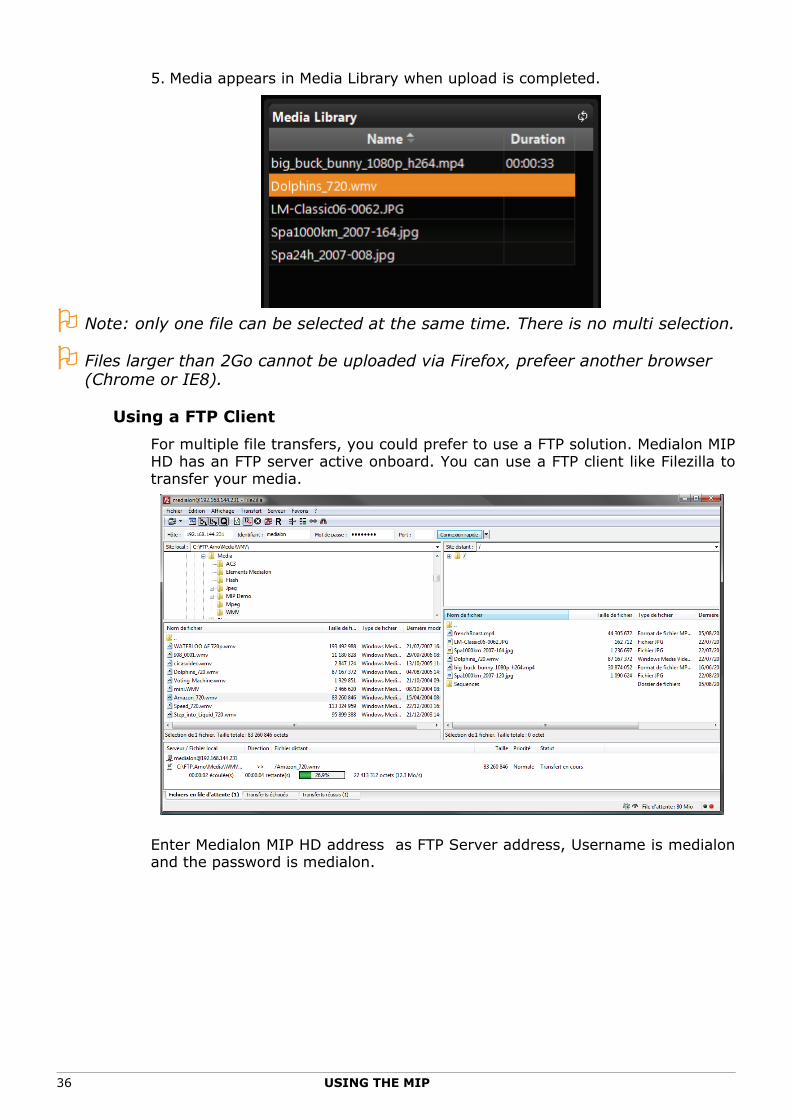
5. Media appears in Media Library when upload is completed.
Note: only one file can be selected at the same time. There is no multi selection.
Files larger than 2Go cannot be uploaded via Firefox, prefeer another browser (Chrome or IE8).
Using a FTP Client
For multiple file transfers, you could prefer to use a FTP solution. Medialon MIPHD has an FTP server active onboard. You can use a FTP client like Filezilla totransfer your media.
Enter Medialon MIP HD address as FTP Server address, Username is medialonand the password is medialon.
36 USING THE MIP

Adding Media
Media Library ManagementAll media available in the MIP HD are displayed in the Media Library
Media Library can be sorted, click on Name title to invert sorting direction.
Video duration is detected after the first playback in "Sync Video Mode".
Play a Media
To playback a file, select a file from the Media Library and click on Play button.The media is displayed in the MIP HD.
Remove Media
To remove a file from the media list and click on Remove button (Trash).
Refresh Media Library
To refresh the Media Library (i.e. after a remove media), click on RefreshLibrary button.
Default MediaWhen a media in playlist is not available or there is no media to play, MIP HDwill put a default media on screen.
When no media is defined as default media, MIP HD displays an empty pagefilled with a background color (by default black screen)
Remove Button
Refresh Button
Play Button
USING THE MIP 37

To define a default media.
Select a media in the Media Library.
Click on Set Selected media as default media button.
Click on Play button to test it.
Click on Reset default media button to use black screen as default media.
38 USING THE MIP
Playing Video in Sync
Playing Video in SyncMedialon MIP HD is able to playback 1080p HD video.
Its Sync Video mode allows synchronization of unlimited number of HD videoplayback via the network.
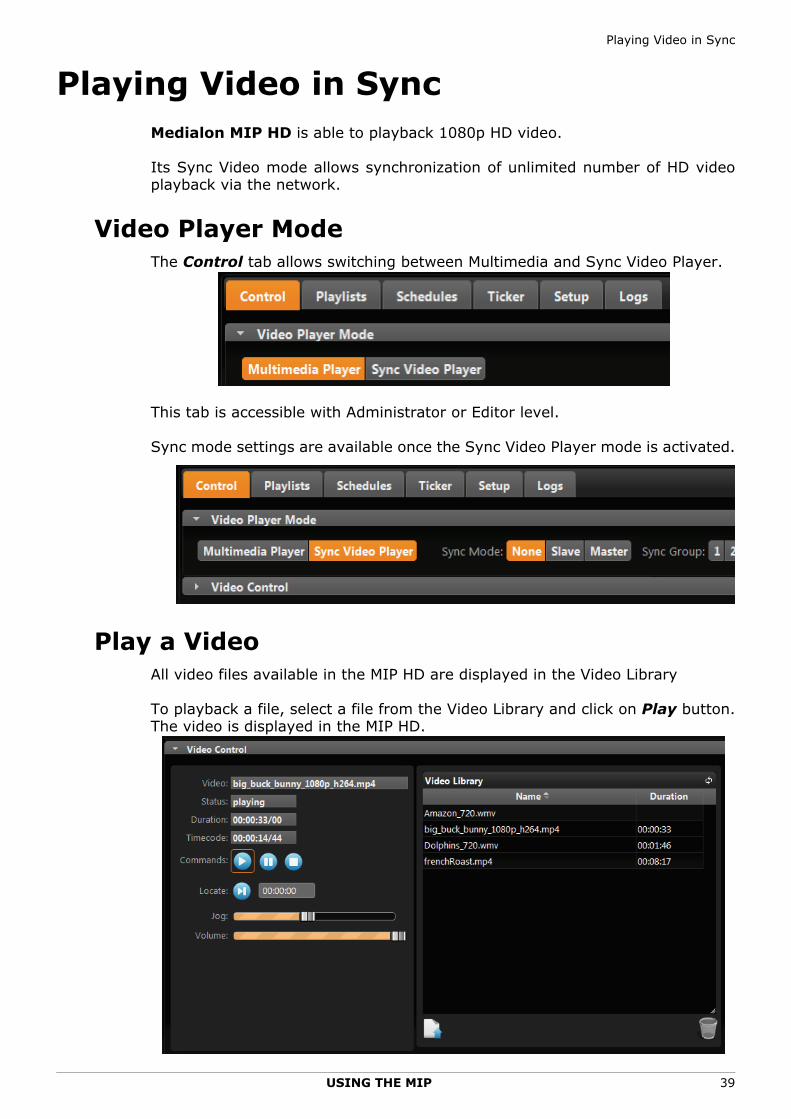
Video Player ModeThe Control tab allows switching between Multimedia and Sync Video Player.
This tab is accessible with Administrator or Editor level.
Sync mode settings are available once the Sync Video Player mode is activated.
Play a VideoAll video files available in the MIP HD are displayed in the Video Library
To playback a file, select a file from the Video Library and click on Play button.The video is displayed in the MIP HD.
USING THE MIP 39

Video Control
MIP HD Video Control panel gives access to transport commands.
• Video: gives the file name of the current loaded video.
• Status: gives the current status of the video (Stoppped, Paused, Playing).
• Duration: gives the duration of the loaded video.
• Timecode: gives the current position of the video.
• Commands: click on the button to execute the command.
- Play : Start to play the video in loop.
- Pause
- Stop
• Locate: enter the wanted timecode and click on the Locate button.
• Jog: use the Jog slider to execute a search in the video.
• Volume: adjust the audio output level.
40 USING THE MIP

Playing Video in Sync
Playing Video in SyncPlaying HD video, several MIP HD can be synchronized over the network.
To synchronize several Medialon MIP HD, you need to define a master. thisMaster MIP will send its commands and timecode position to all MIP HD slavedto him.
Sync Mode
You can select the Sync mode in Video Player Mode section.
Medialon MIP HD Sync Mode can be:
• None: MIP HD is used as a standalone video player.
• Slave: MIP HD receives external commands and time reference to synchronize his video loaded.
• Master: MIP HD sends commands and time reference to synchronize slaved MIP HD.
To be synchronized, a Medialon MIP HD needs to belong to a Sync Group.
All slave MIP HD are synchronized by the Master of their Sync Group.
Medialon MIP HD can be synchronized over the network from Medialon ControlSystem, making it the ideal tool for multiple screen display. In this mode, MIPHD offers the Medialon position tracking capability.See more about “ExternalControl” on page 60.
USING THE MIP 41

Using MIP HD in Sync
To play several videos in sync with Medialon MIP HD, you need to:
1. Load (select) the video in each MIP HD.2. Define your MIP HD Master and select a Sync group.
Sync group can accept only 1 Master on the network. MIP HD behavior will be unpredictable if several masters are activated.
3. Set the other MIP HD as Slave in the same Sync group.
4. Use the MIP HD Master video controls to start all videos in sync.
42 USING THE MIP

Playing Playlists
Playing PlaylistsMedialon MIP HD is able to playback multimedia content such as Flash, Html,Jpeg, videos and even URLs. Interactive media such as Flash keep theirinteractivity if needed. You can save as a Playlist a sequence of media you wantto play in loop.
The Playlists tab allows to create, edit Playlists and set the default media.
This tab is accessible with Administrator or Editor level.
PlaylistsThe Playlists section is divided in 3 panes. Media Library to manage media,Current Playlist Content to view and edit Playlists, Playlist Library tomanage Playlist.
USING THE MIP 43

Create a PlaylistYou create a playlist when you want to display several media in a loop.
You can create as many Playlists as you want, the list of existing playlists isdisplayed in the Playlist Library. The list of media content in a Playlist isdisplayed in the Current Playlist Content.
Click on New Playlist button to create a new Playlist. Current PlaylistContent is now empty.
Add a Media in a Playlist
Several methods are available to add a Media in a Playlist.
Method A1. Select a file from the Media Library.
2. Click on Add Media button.
Add Media
44 USING THE MIP

Playing Playlists
3. The media appears in the Current Playlist Content list.4. Adjust the duration, enter Hour (HH) Minute (MM) and Second (SS)
This duration means how long the media is displayed. Most of media (video files, Flash® animations...) have their own duration. Other media like pictures don’t, for that reason; you have to set a duration of these media.
Tip: For non video media, add duration information in the file name (i.e. myflash_3m43s.swf) before transferring it in the MIP HD.
Method BYou can also use the Drag and Drop to add Media in the Playlist.
1. Select a Media in the Media Library.
2. Drag and drop it into the Current Play Content "drop area" where list borders are highligthed.
3. .The media is inserted at the end of the Playlist.
4. Adjust the duration, enter Hour (HH) Minute (MM) and Second (SS)This duration means how long the media is displayed.
"Drop area"
USING THE MIP 45

Save the Playlist
To save the playlist on your Medialon MIP HD.
1. Enter the name of the playlist in the Playlist Name field2. Click on Save button3. The new Playlist appears in the Playlist Library.You can start a new Playlist.
Edit Playlist Content
To edit a Playlist
1. Select a Playlist in the Playlist Library.2. The media list of this Playlist appears in the Current Playlist Content.3. Make your change
DON’T forget to Save all your modification.
Modify Media Duration1. Select the media in the Current Playlist Content list.
2. Modify the duration. enter Hour (HH) Minute (MM) and Second (SS)
46 USING THE MIP
Playing Playlists
Modify Media OrderTo move the position of a media into the playlist:
1. select a media from the Current Playlist Content list 2. click on Up or Down buttons
Remove Media from PlaylistTo remove a media from a playlist:
1. select a media from the Current playlist content list 2. click on Remove media button
Add URLs and Control Cues
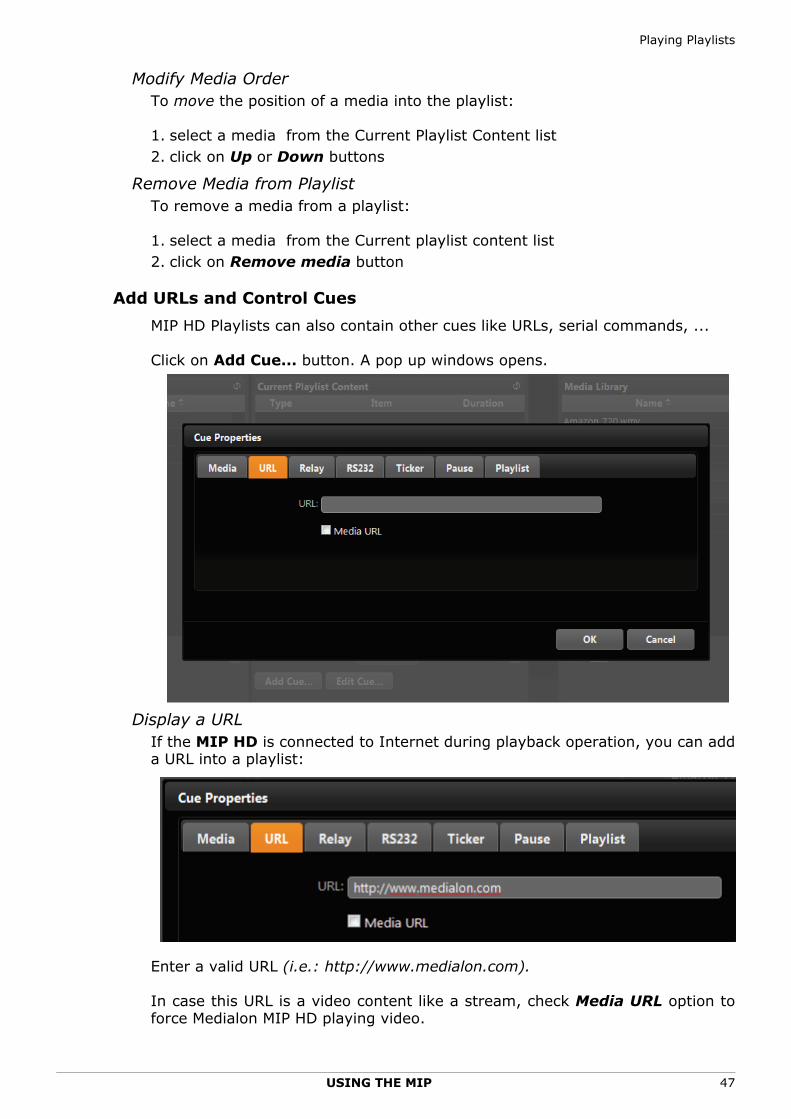
MIP HD Playlists can also contain other cues like URLs, serial commands, ...
Click on Add Cue... button. A pop up windows opens.
Display a URLIf the MIP HD is connected to Internet during playback operation, you can adda URL into a playlist:
Enter a valid URL (i.e.: http://www.medialon.com).
In case this URL is a video content like a stream, check Media URL option toforce Medialon MIP HD playing video.
USING THE MIP 47
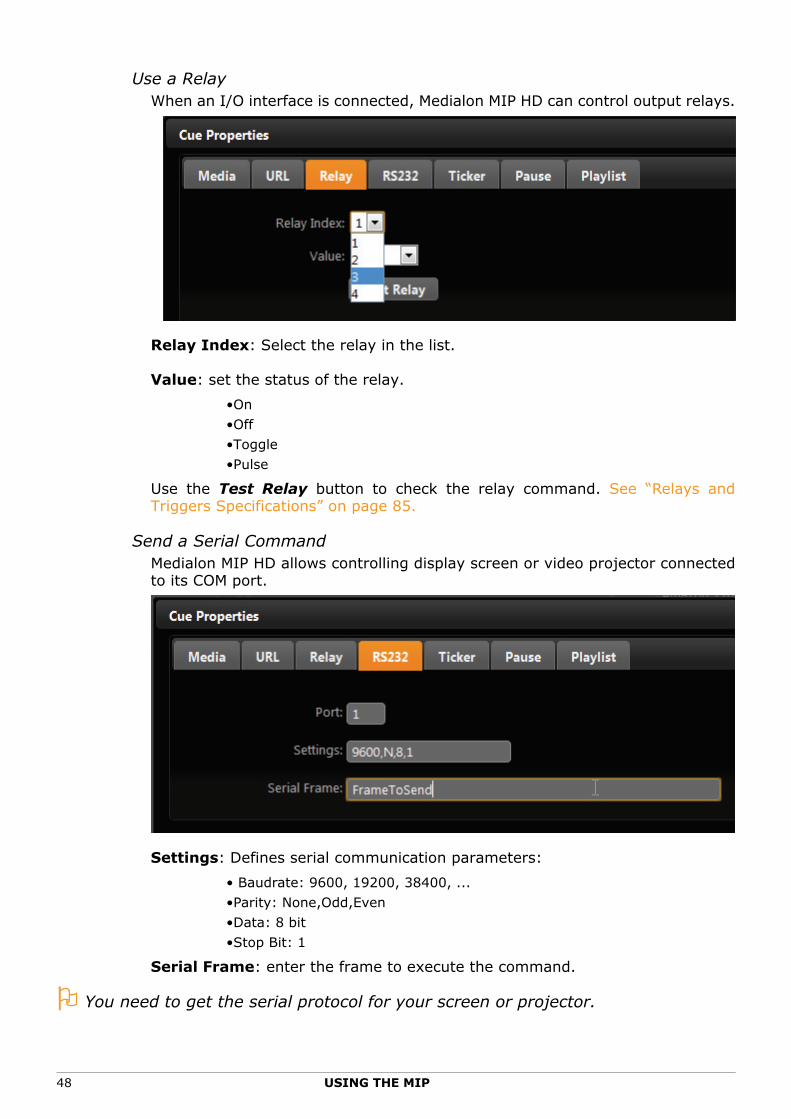
Use a RelayWhen an I/O interface is connected, Medialon MIP HD can control output relays.
Relay Index: Select the relay in the list.
Value: set the status of the relay.
•On•Off•Toggle•Pulse
Use the Test Relay button to check the relay command. See “Relays andTriggers Specifications” on page 85.
Send a Serial CommandMedialon MIP HD allows controlling display screen or video projector connectedto its COM port.
Settings: Defines serial communication parameters:
• Baudrate: 9600, 19200, 38400, ...•Parity: None,Odd,Even•Data: 8 bit•Stop Bit: 1
Serial Frame: enter the frame to execute the command.
You need to get the serial protocol for your screen or projector.
48 USING THE MIP

Playing Playlists
Program a TickerYou program to show or hide ticker during the playlist.
Enter your message to show the ticker.
To hide the ticker, enter an empty text.
Ticker will use MIP HD ticker settings, See more about “Display a Ticker” onpage 57.
Insert a PauseWhen an interactive media is displayed, you can insert a pause in the playlistexecution to be able to navigate into the media.
Inactivity Timeout: set minimum time of inactivity of mouse or keyboardbefore ending the media and start the next one in the playlist.
Maximum Duration: Set maximum time of use of this media before startingthe next media.
Start another PlaylistPause the current playlist, start a second playlist. At the end of this playlist,resume the current playlist.
Start Playlist: enter the playlist name you want to display.
USING THE MIP 49
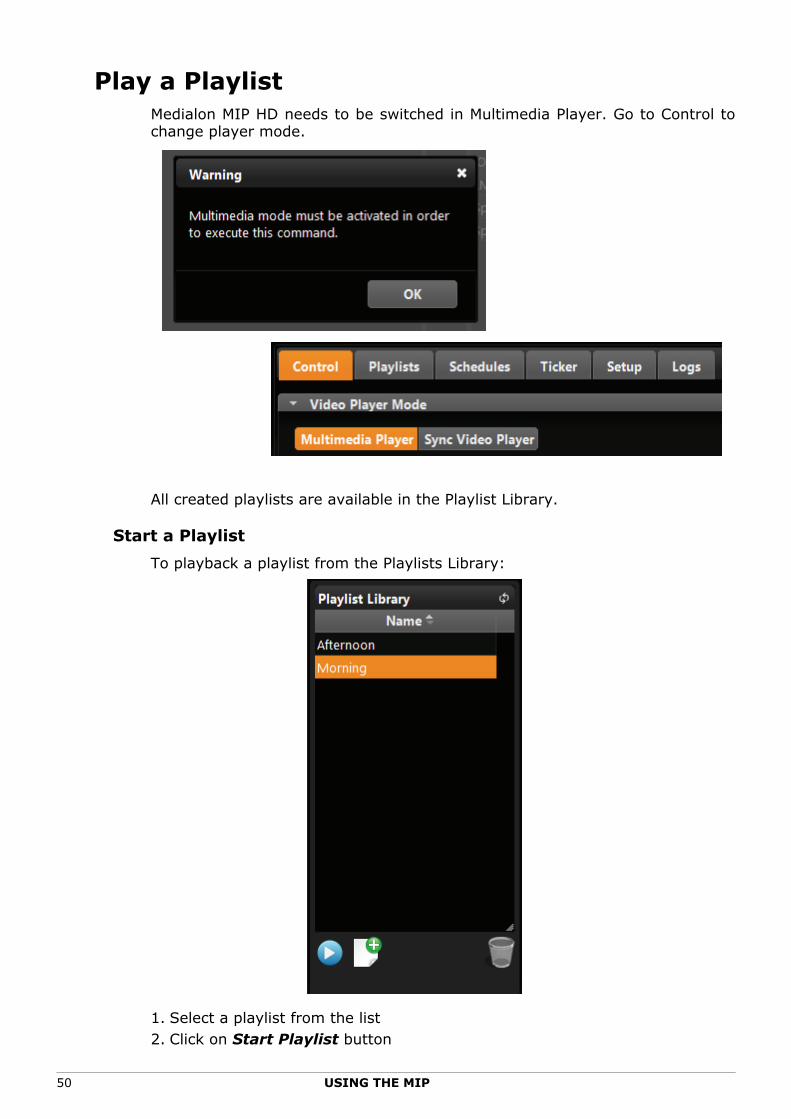
Play a PlaylistMedialon MIP HD needs to be switched in Multimedia Player. Go to Control tochange player mode.
All created playlists are available in the Playlist Library.
Start a Playlist
To playback a playlist from the Playlists Library:
1. Select a playlist from the list2. Click on Start Playlist button
50 USING THE MIP

Playing Playlists
3. This Playlist is played in loop until a new Playlist starts.
Start a Playlist with external trigger
It is possible to start a Playlist with an external trigger like a button or a presencedetector. See “Relays and Triggers Specifications” on page 85.
1. Select a Playlist in the Playlist List.
2. Select valid trigger input #.3. Select the Trigger condition
- Go Up: The playlist starts when the trigger goes up (On) and played one time.
- Go Down: The Playlist starts when the Trigger goes down (Off) and played one time.
- Up: The Playlist is played while the trigger is up (On)
- Down: The Playlist is played while the Trigger is down (Off)
In combination with the condition, 2 options are available.
Restart on Trigger: If the condition becomes true during the Playlist’s playing,MIP HD restarts the Playlist. If this option is not selected, the Trigger has noaction until the Playlist reached its end.
Stop on Opposite: When the Trigger status change, it is possible to stop thetriggered Playlist and not waiting its end.
DON’T forget to Save the Playlist.
USING THE MIP 51

Playlist LibraryTo remove a playlist from the Playlists list:
1. Select a playlist from the list2. Click on Remove button Click on Refresh List button to update the content of the Playlists List
52 USING THE MIP

Scheduling Playlists
Scheduling PlaylistsWhen you want to play different Playlists at different hours of the day, you’regoing to schedule your Playlists.
SchedulesA schedule starts a Playlist at a defined time of the day, and loops indefinitelywhile another Playlist is not started. The schedule runs from 00:00:00/00 to23:59:59/00.
Note that there is no weekly schedule.To start a Schedule, go to Schedules tab
This page is divided in 3 panes. Playlist Library to manage Playlists, CurrentSchedule Content to view and edit schedule, Schedulest to manageSchedules.
This tab is accessible with Administrator or Editor level.
USING THE MIP 53

Test a PlaylistPlaylist Library on the right contains all the Playlists created previously.
To playback a Playlist:
1. Select it from the list.2. Click on Play button.
To update the Library, click on Refresh button
Create a ScheduleThe Current Schedule Content section allows to create and edit a schedule ofPlaylist.
Refresh library
Start Playlist
Add Playlist
Remove PlaylistStart Time field
54 USING THE MIP
Scheduling Playlists
Note: The time reference is based on computer clock (displayed in the status bar). Because of the clock precision, start times of Playlist can lose their accuracy.
To create a Schedule
1. Select a Playlist from the Playlist Library2. Drag and Drop into the Schedule Content or click on Add Playlist button3. Define the Start Time in hour and minute.
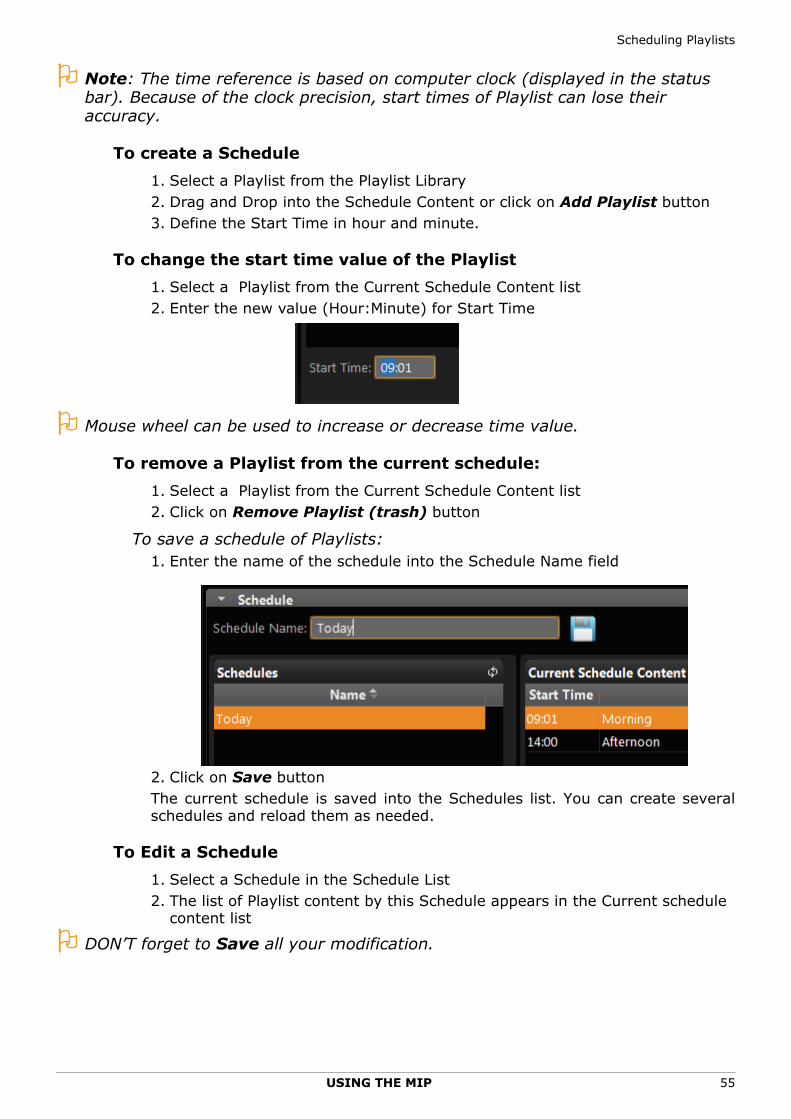
To change the start time value of the Playlist
1. Select a Playlist from the Current Schedule Content list2. Enter the new value (Hour:Minute) for Start Time
Mouse wheel can be used to increase or decrease time value.
To remove a Playlist from the current schedule:
1. Select a Playlist from the Current Schedule Content list2. Click on Remove Playlist (trash) button
To save a schedule of Playlists:1. Enter the name of the schedule into the Schedule Name field
2. Click on Save buttonThe current schedule is saved into the Schedules list. You can create severalschedules and reload them as needed.
To Edit a Schedule
1. Select a Schedule in the Schedule List2. The list of Playlist content by this Schedule appears in the Current schedule
content list
DON’T forget to Save all your modification.
USING THE MIP 55

Start a ScheduleAll Schedules created are available in the Schedules List
To start a schedule
1. Select a schedule from the list.2. Click on Play button to start the schedule.3. Medialon MIP HD starts to play the Playlist according to current time and
Playlist start time.
To remove a schedule from the list
1. Select a schedule from the list2. Click on Remove Schedule (Trash) button to delete the schedule from the
list
To update the list of schedules. Click on Refresh button
Update Schedule List
Remove Schedule
Start Schedule
56 USING THE MIP
Display a Ticker
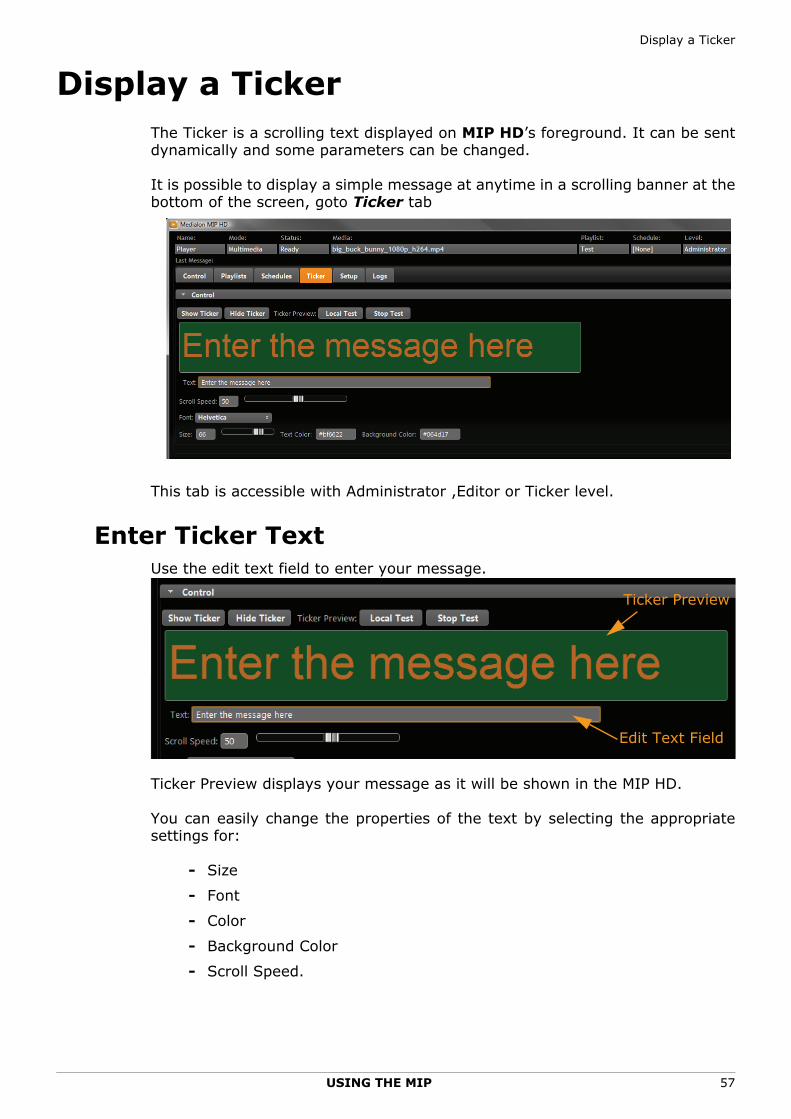
Display a TickerThe Ticker is a scrolling text displayed on MIP HD’s foreground. It can be sentdynamically and some parameters can be changed.
It is possible to display a simple message at anytime in a scrolling banner at thebottom of the screen, goto Ticker tab
This tab is accessible with Administrator ,Editor or Ticker level.
Enter Ticker TextUse the edit text field to enter your message.
Ticker Preview displays your message as it will be shown in the MIP HD.
You can easily change the properties of the text by selecting the appropriatesettings for:
- Size
- Font
- Color
- Background Color
- Scroll Speed.
Ticker Preview
Edit Text Field
USING THE MIP 57
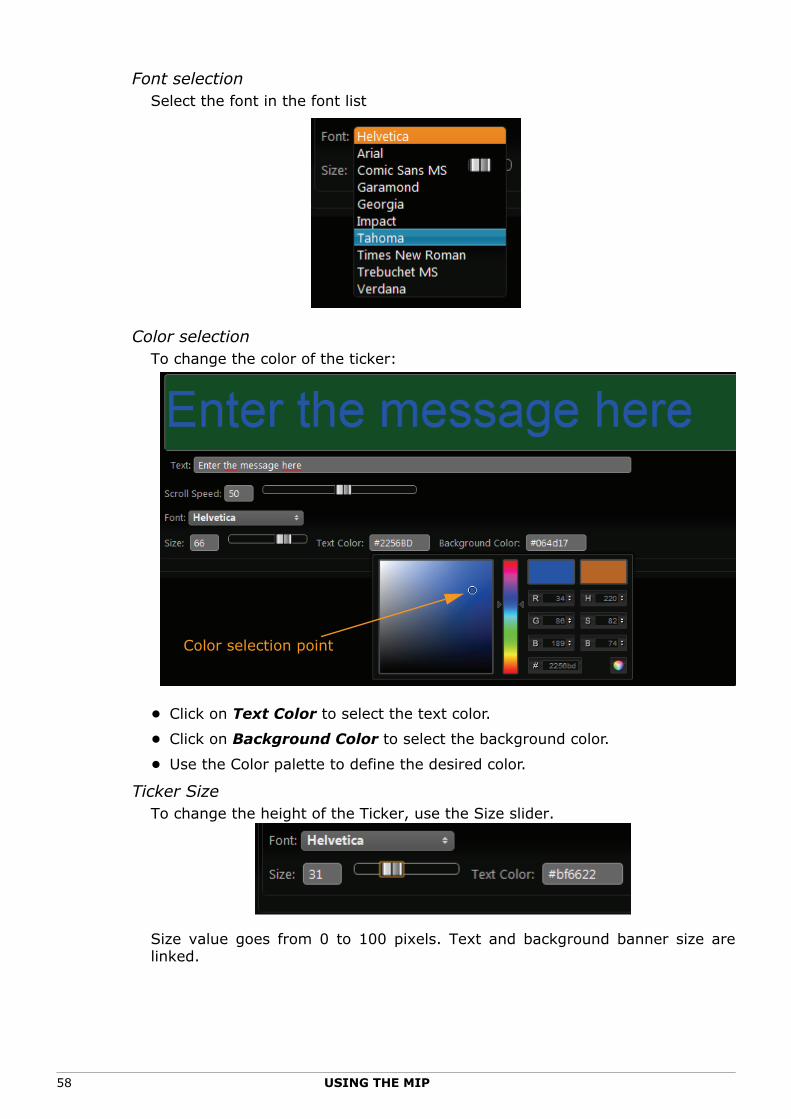
Font selectionSelect the font in the font list
Color selectionTo change the color of the ticker:
• Click on Text Color to select the text color.
• Click on Background Color to select the background color.
• Use the Color palette to define the desired color.
Ticker SizeTo change the height of the Ticker, use the Size slider.
Size value goes from 0 to 100 pixels. Text and background banner size arelinked.
Color selection point
58 USING THE MIP

Display a Ticker
Ticker Scroll SpeedTo change the speed of scrolling text, use the Speed slider.
Speed value goes from 0 (Slow) to 100 (Fast).
Testing TickerMIP HD Ticker tab offers a preview for testing your message settings
1. Enter the text of the ticker into the text field and adjust text properties.2. Click on Local Test button to start the local test.
3. Ticker message starts to scroll into the Ticker preview4. Click on Stop Test button.
Display TickerTo display on a ticker on the Medialon MIP HD
1. Enter the text of the ticker into the text field and adjust text properties.2. Click on Show Ticker button.
3. To display Off the Ticker on the MIP HD, Click on Hide Ticker button.
USING THE MIP 59
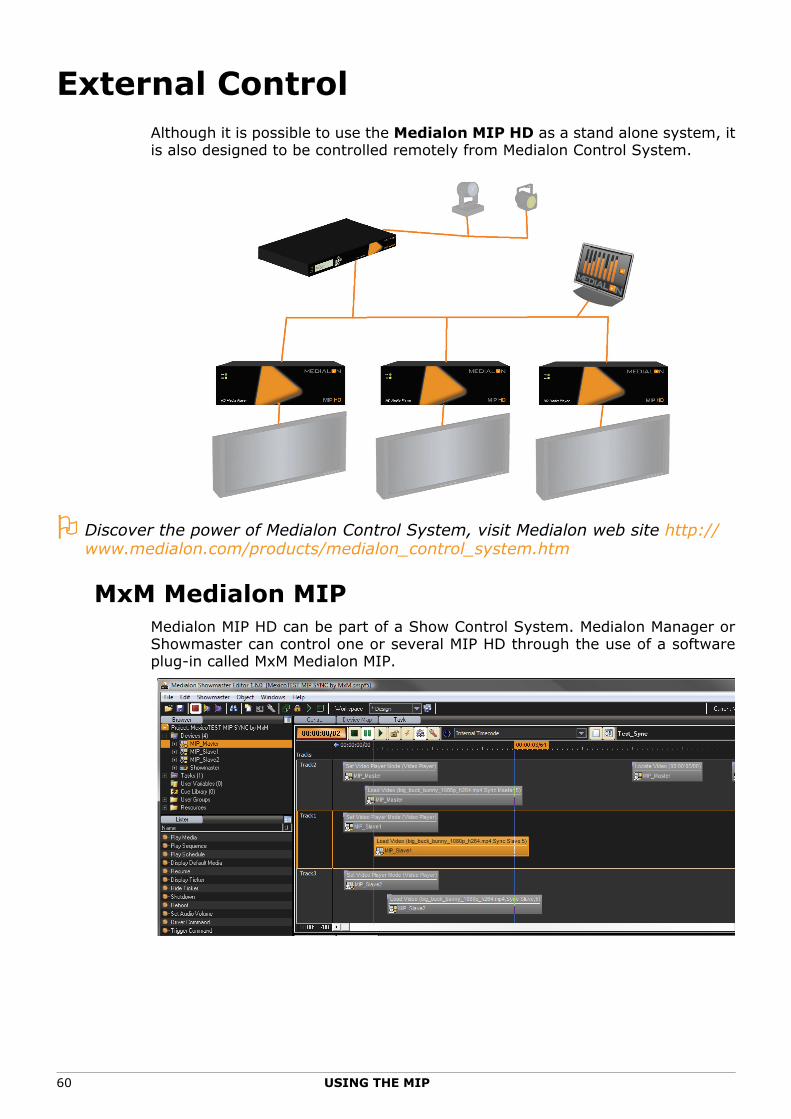
External ControlAlthough it is possible to use the Medialon MIP HD as a stand alone system, itis also designed to be controlled remotely from Medialon Control System.
Discover the power of Medialon Control System, visit Medialon web site http://www.medialon.com/products/medialon_control_system.htm
MxM Medialon MIPMedialon MIP HD can be part of a Show Control System. Medialon Manager orShowmaster can control one or several MIP HD through the use of a softwareplug-in called MxM Medialon MIP.
60 USING THE MIP
External Control
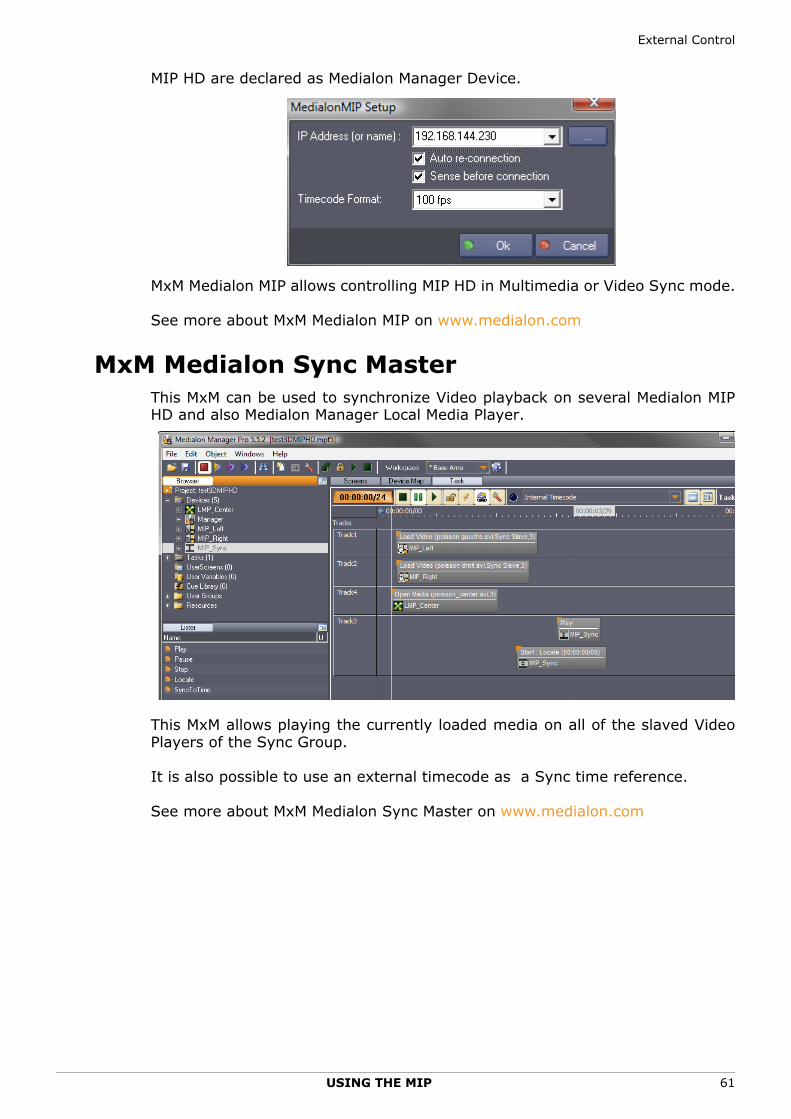
MIP HD are declared as Medialon Manager Device.
MxM Medialon MIP allows controlling MIP HD in Multimedia or Video Sync mode.
See more about MxM Medialon MIP on www.medialon.com
MxM Medialon Sync MasterThis MxM can be used to synchronize Video playback on several Medialon MIPHD and also Medialon Manager Local Media Player.
This MxM allows playing the currently loaded media on all of the slaved VideoPlayers of the Sync Group.
It is also possible to use an external timecode as a Sync time reference.
See more about MxM Medialon Sync Master on www.medialon.com
USING THE MIP 61

62 MAINTENANCE
MAINTENANCE
In this section, you will learn how to maintain your Medialon MIPHD.

MIP HD Setup
MIP HD SetupThis menu is only accessible with Administrator rights.
Player SetupSelect Player in the Medialon MIP HD Setup page
Several parameters of MIP HD can be defined, such as screen size, schedulingof screen power on/off, e-mail setting for log files sending etc … The Setupmenu allows you to change the settings of the MIP HDBecause we are using an Html interface, you need to validate each modificationby pressing the Enter key or click on Apply button.
General parameters
MIP HD general parameters are MIP HD name, Display size, Critical disk space
MAINTENANCE 63

and Background color
• MIP HD Name: This name is displayed in the status bar on the top of the page. This name is also used in the filename of the log and playback reports sent by e-mail.
• Display Size: MIP HD display window can follow automatically the screen resolution, or you can change the size and position of this window.
1. Select Fixed Display Size and enter the new values: Width and Height and Top Left corner position.
2. Press ENTER on the keyboard, or click on the Apply button at the bottom of the page.
3. You normally don’t need to change display size and position and keep Automatic settings
• Critical disk space %: Set here the free space disk percentage that MIP HD will keep FREE by erasing old files.
When MIP HD loads new media and sequences, it moves old ones in its owntrash folder. As soon as the critical disk space limit is reached, MIP HD erasesoldest media files from the trash folder.
• Background color: Set the MIP HD window background color (black is default).
The background color appears when there is no media to display or when thedisplayed media does not fill the whole MIP HD window.
1. Click on Select Color button to open the Background color dialog page.2. Select one; you can also enter the hexadecimal RGB color code to select
extra colors.
64 MAINTENANCE
MIP HD Setup
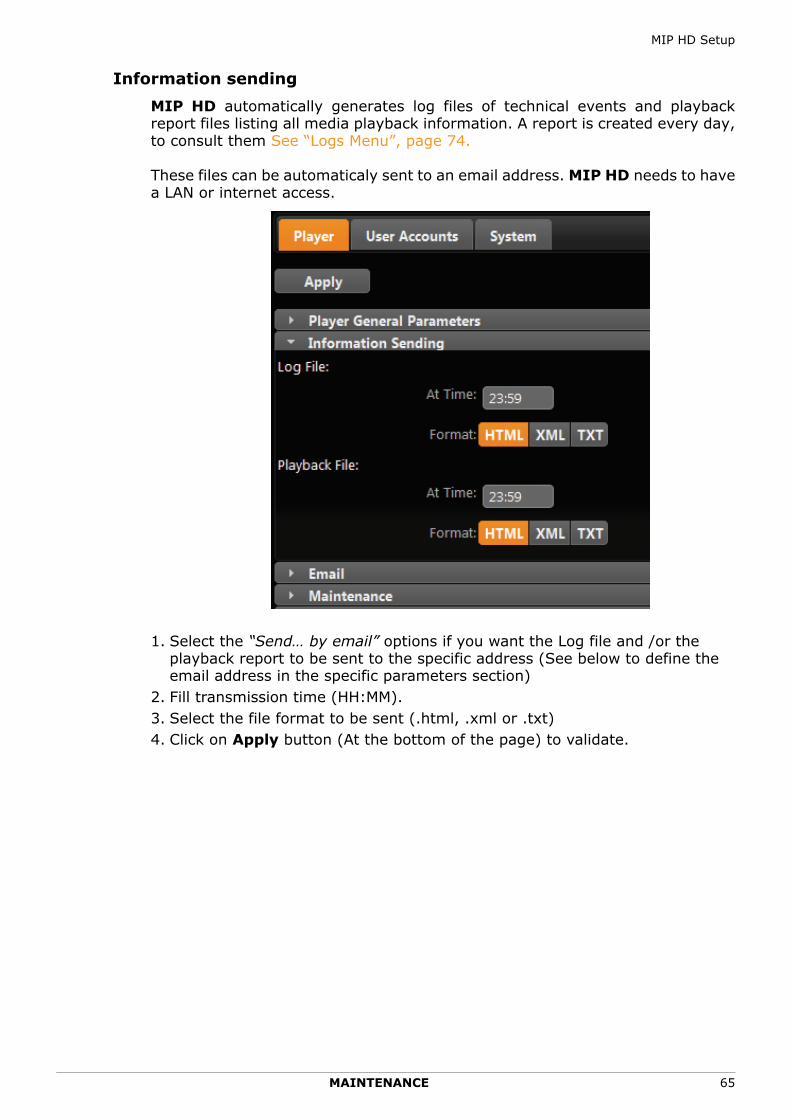
Information sending
MIP HD automatically generates log files of technical events and playbackreport files listing all media playback information. A report is created every day,to consult them See “Logs Menu”, page 74.
These files can be automaticaly sent to an email address. MIP HD needs to havea LAN or internet access.
1. Select the “Send… by email” options if you want the Log file and /or the playback report to be sent to the specific address (See below to define the email address in the specific parameters section)
2. Fill transmission time (HH:MM). 3. Select the file format to be sent (.html, .xml or .txt)4. Click on Apply button (At the bottom of the page) to validate.
MAINTENANCE 65

The specific parameters section allows you to setup an email address to send logfiles and/or playback files.
Email Setup.
1. Fill SMTP Server Address field (ie: smpt.capital.city)2. Fill Sender Email Address field(ie: omer.simpson)3. Fill Receiver Email address field(ie: [email protected])
Maintenance
You can program an automatic reboot for Medialon MIP HD
66 MAINTENANCE

MIP HD Setup
Theme
Medialon MIP HD user interface theme can be changed.
MAINTENANCE 67

User AccountsIt is possible to protect access to the Medialon MIP HD interface. Different accesslevels can be defined. The User Accounts menu is used to change the accountsettings
This menu is only accessible with Administrator level.
Different types of users may have different access levels to commands in MIPHD depending on their login and passwords.
• Administrator(Access all menus) This account is defined to have access to MIP HD parameters modification.
68 MAINTENANCE
MIP HD Setup
• Editor(Restricted access to all menus except Setup) This account may be used by Sequences and Scheduler creator.
• Ticker(Restricted access to Ticker and Monitoring only) This level gives access to simple text message generator.
• Monitoring(Restricted access to Monitoring only) This account gives access to the MIP HD Log files
For each account you have to enter a Login and a Password. (This one mustbe confirmed).
If you define a login and password only for the Administrator account, everybodywill be able to access with Editor Rights and could be able to create newsequences.
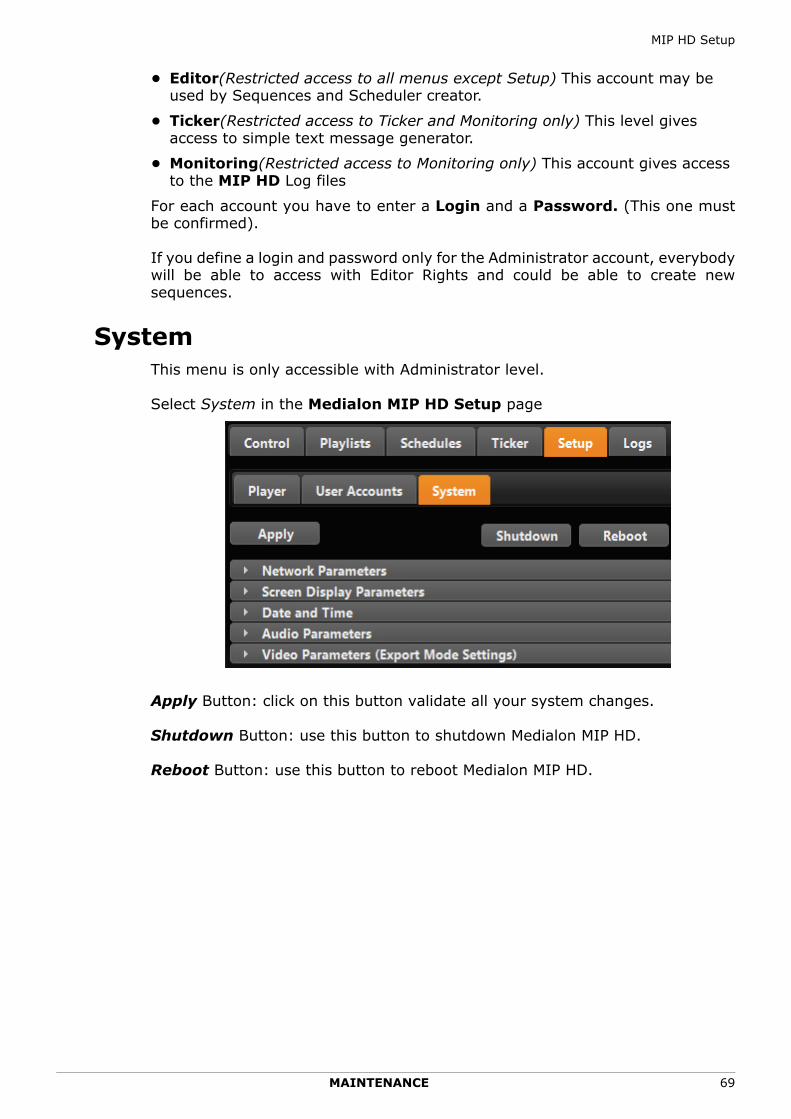
SystemThis menu is only accessible with Administrator level.
Select System in the Medialon MIP HD Setup page
Apply Button: click on this button validate all your system changes.
Shutdown Button: use this button to shutdown Medialon MIP HD.
Reboot Button: use this button to reboot Medialon MIP HD.
MAINTENANCE 69

Network Parameters
All operations described below must be done by an appropriate technician oryour network administrator.
• Computer Name:
• Automatic or Static IP Address
• Automatic or Staitc DNS
The MIP HD may reboot after these change.• Click on Apply to validate them.
70 MAINTENANCE

MIP HD Setup
Display Parameters
• Select from the list the required settings.
The MIP HD may reboot after these change.• Click on Apply to validate them.
Date and Time
Adjust Date and Time of your Medialon MIP HD.
Time Server (NTP): Displays the internet time server (time.windows.com bydefault) used by MIP HD to synchronize its current time. You can select anothertime server or set this field to blank if you don’t want to auto update the MIP HD
MAINTENANCE 71

clock.
Medialon MIP HD reboot is required after changes.Time Zones: Set the time zone where your Medialon MIP HD is installed. Clickon Apply to validate your modifications.
Time: Displays the Time retrieved by a GET button. You can adjust this time.This displayed time will be used by the SET button.
Date: Displays the Date retrieved by a GET button. You can adjust this date.This displayed date will be used by the SET button.
Get MIP Date/Time: retrieve the current date and time of MIP HD.
Get Local Date/Time: get current Date and Time from your remote PC.
Set MIP Date/Time: Set the Date and Time to your MIP HD, the valuescorrespond to Time and Date field.
Audio Parameters
Switch audio output from Analog to SPDIF (Digital) output.
See more about “Audio Format and Output” on page 99.
72 MAINTENANCE

MIP HD Setup
Video Parameters
All operations described below must be done by an appropriate technician
Get Video parameters. See more about “About Media” on page 98.
MAINTENANCE 73

Logs
Logs MenuMIP HD automatically generates log files of technical events and playbackreport files listing all media playback confirmation. The Monitoring menu allowsaccess to Log files and Playback files
Click on theLog file button to access to current Log file
Click on the Playback file button to access the current playback file
A new file is created each day. You can access to a specific Log file or Playbackfile by entering a valid date into the Date of file to monitor fields
Note: Log Files and Playback files can be sent by email at a specific address. (See “Information sending”, page 65.)
Log file
The log file contains all the events concerning the player activity. You can see 3columns
74 MAINTENANCE

Logs
• The Date column indicates the date and the time of the event
• The Event column indicates the name of the event
• The Description column dives a description or more information about the event
Note: A Log file is created each day.For the list of events which can be written into the Log file.,See “Log FilesMessages”, page 75.
Playback file
Each time a media is displayed, a record is saved into the current Playback file.
Playback file holds the list of all the displayed media. This allows you to knowexactly when a sequence started, which media was displayed during the day andso on. This is useful for statistics
Note: A playback file is created each day.
Log Files MessagesThese messages are written in the log file.
The date and time of the message is written in the first column.This log file can be accessed locally or remotely with Internet Explorer.A new log file is created everyday.
The messages are in alphabetical order.
Command/Change LoginThe login of the player was changed
Command/Driver CommandA driver command was sent by the player
Command/TickerA ticker command was sent and displayed by the player
Command driver error/xxxAn error occured during the execution of a driver command
Deletion forbidden/xxx
MAINTENANCE 75

The file xxx cannot be deleted
Disk full/The amount of free space is reached. Cleaning of unused files.The disk is full, files in the trash are deleted
Display error/xxxMedia error where xxx is the name of the media
Display navigate errorAn error occurred during the displaying of a media
Error/Empty sequence nameThe sequence has no name
Error/Frame login invalidThe security code of the frame is invalid. The frame is rejected.
Error/Invalid frameThe received frame has an invalid format. The frame is rejected.
Error/Sequence missing : xxxThe sequence xxx must be started and doesn't exist anymore
Error/login xxxThe user xxx cannot log to the player
Explorer/"administrator"Administrator logged successfully
Explorer/"Editor"Editor logged successfully
Explorer/"Monitoring"Monitoring logged successfully
Explorer/"Ticker"Ticker logged successfully
Explorer/Start uploadThe command upload media was sent successfully to the player
Explorer/Add File ErrorThe command "Add file" sent to the player failed
Explorer/play xxxThe command play media xxx was sent successfully to the player
Explorer/play errorAn error occurred while the command play Media xxx was sent to the player
Explorer/remove media errorAn error occurred while the command remove Media xxx was sent to the player
Explorer/Remove Schedule ErrorAn error occurred while the command remove Schedule xxx was sent to theplayer
76 MAINTENANCE

Logs
Explorer/Sequencer Management ErrorA new sequence cannot be created nor modified
Explorer/upload xxxThe file xxx has been uploaded from the explorer
File Error/file does not exist xxxThe file xxx doesn't exist
From explorer/Set new accountNew account set successfully
From explorer/Set parametersParameters were set successfully
HTTP file transfer ErrorAn error occurred while transferring files via HTTP
Impossible to copy file xxxAn error occurred while copying media xxx
Impossible to delete xxxAn error occurred while deleting media xxx
Load media error xxxAn error occurred while loading media xxx
Next planning event: xxxxxx is Date and time of the next planning event
Remote control error/Connection to xxx failedThe connection to player xxx failed
Remove file xxxThe file xxx was removed successfully
Schedule saving errorAn error occurred while saving the scheduler
Send mail error/Impossible to send the periodic emailAn error occurred while sending the periodic email
Serious error/"Disk or file error"An error occurred while saving a system file
Set volume error xxxAn error occurred while the command "Set volume xxx" was sent to the player
Set volume success xxxThe command Set volume xxx was sent successfully to the player
Start of MedialonMIPMedialon Player was started successfully
Ticker error/No response from ticker threadAn error occurred while sending Ticker
MAINTENANCE 77

78 MAINTENANCE

Updating MIP Firmware
Updating MIP FirmwareThis section helps you upgrade your Medialon MIP HD firmware.
1. Download from Medialon web site the lastest Medialon MIP HD firmware. http://www.medialon.com/download/show_mip/ReleaseInfoBase.htm
2. Transfer this firmware into your Medialon MIP HD.
3. Select the firmware in the Media Library.
4. Press Play to start the update.5. Medialon MIP HD will close, execute the update and then reboot.
MAINTENANCE 79

If you execute the update remotely, MIP HD will disconnect.
For more information about Medialon MIP HD updates, contact your dealer
80 MAINTENANCE
Troubleshooting
MAINTENANCE 81
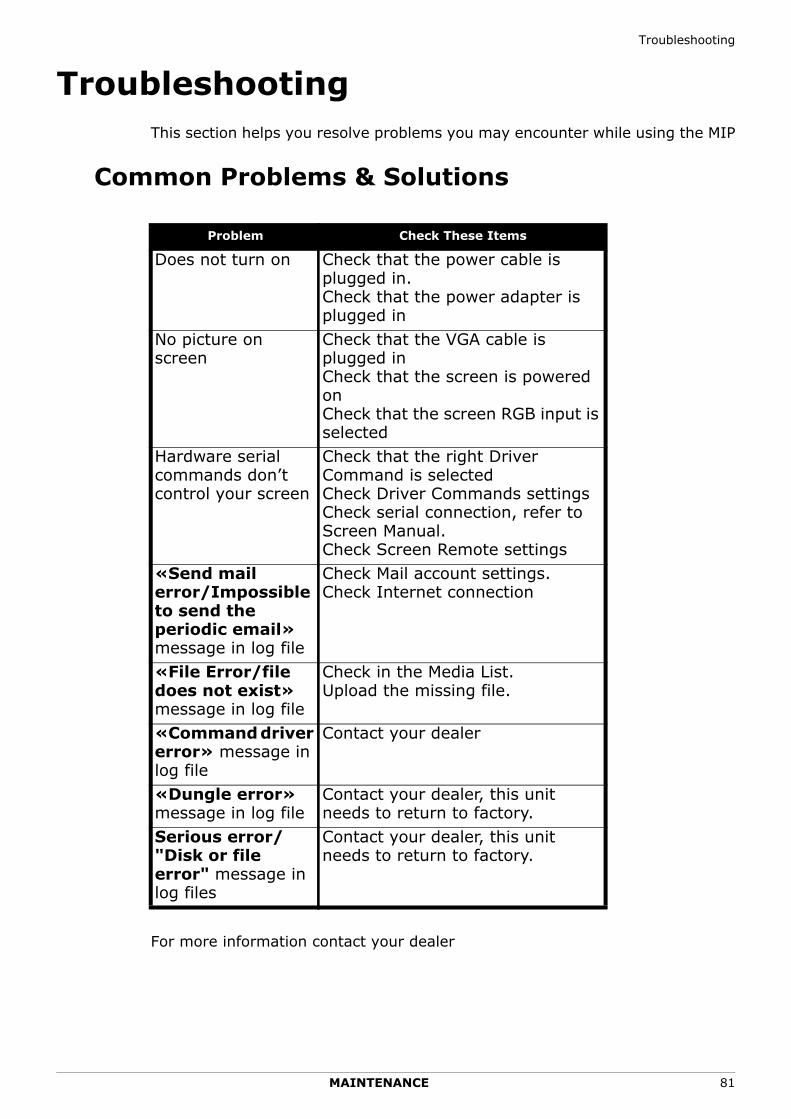
TroubleshootingThis section helps you resolve problems you may encounter while using the MIP
Common Problems & Solutions
For more information contact your dealer
Problem Check These Items
Does not turn on Check that the power cable is plugged in.Check that the power adapter is plugged in
No picture on screen
Check that the VGA cable is plugged inCheck that the screen is powered onCheck that the screen RGB input is selected
Hardware serial commands don’t control your screen
Check that the right Driver Command is selectedCheck Driver Commands settingsCheck serial connection, refer to Screen Manual.Check Screen Remote settings
«Send mail error/Impossible to send the periodic email» message in log file
Check Mail account settings.Check Internet connection
«File Error/file does not exist» message in log file
Check in the Media List.Upload the missing file.
«Command driver error» message in log file
Contact your dealer
«Dungle error» message in log file
Contact your dealer, this unit needs to return to factory.
Serious error/"Disk or file error" message in log files
Contact your dealer, this unit needs to return to factory.

82 REFERENCES
REFERENCES
Technical Specifications
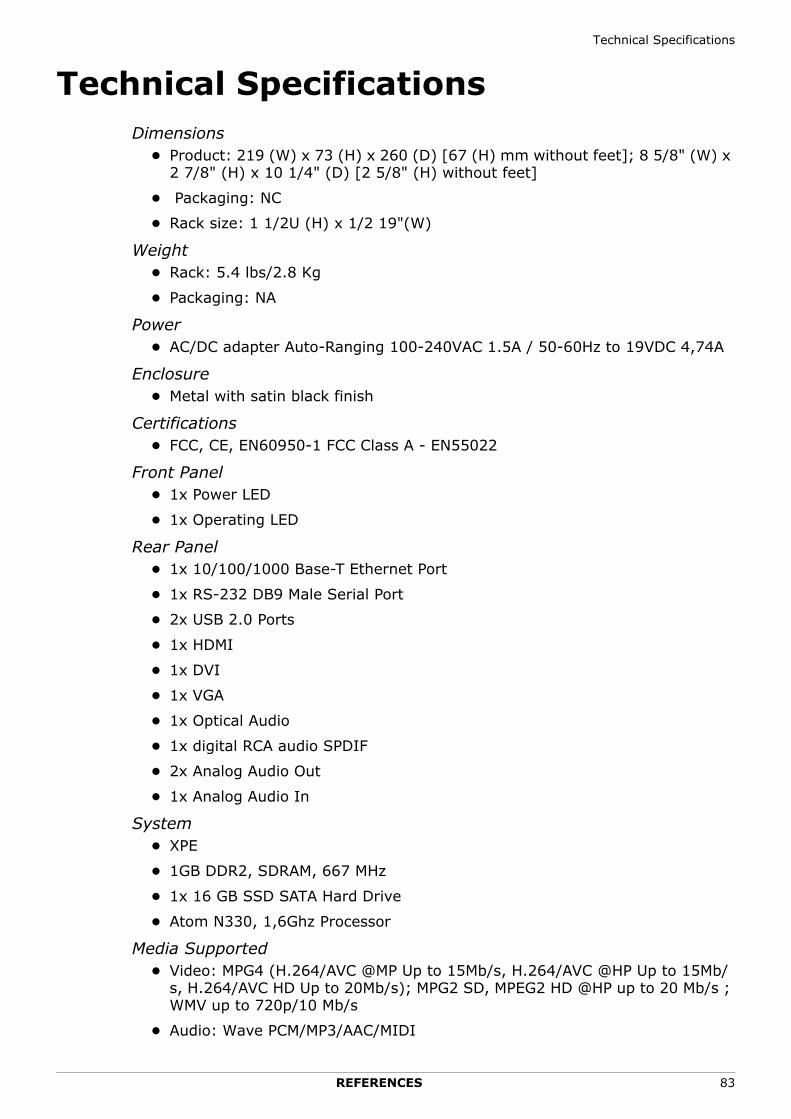
Technical SpecificationsDimensions
• Product: 219 (W) x 73 (H) x 260 (D) [67 (H) mm without feet]; 8 5/8" (W) x 2 7/8" (H) x 10 1/4" (D) [2 5/8" (H) without feet]
• Packaging: NC
• Rack size: 1 1/2U (H) x 1/2 19"(W)
Weight• Rack: 5.4 lbs/2.8 Kg
• Packaging: NA
Power• AC/DC adapter Auto-Ranging 100-240VAC 1.5A / 50-60Hz to 19VDC 4,74A
Enclosure• Metal with satin black finish
Certifications• FCC, CE, EN60950-1 FCC Class A - EN55022
Front Panel• 1x Power LED
• 1x Operating LED
Rear Panel• 1x 10/100/1000 Base-T Ethernet Port
• 1x RS-232 DB9 Male Serial Port
• 2x USB 2.0 Ports
• 1x HDMI
• 1x DVI
• 1x VGA
• 1x Optical Audio
• 1x digital RCA audio SPDIF
• 2x Analog Audio Out
• 1x Analog Audio In
System• XPE
• 1GB DDR2, SDRAM, 667 MHz
• 1x 16 GB SSD SATA Hard Drive
• Atom N330, 1,6Ghz Processor
Media Supported• Video: MPG4 (H.264/AVC @MP Up to 15Mb/s, H.264/AVC @HP Up to 15Mb/
s, H.264/AVC HD Up to 20Mb/s); MPG2 SD, MPEG2 HD @HP up to 20 Mb/s ; WMV up to 720p/10 Mb/s
• Audio: Wave PCM/MP3/AAC/MIDI
REFERENCES 83

• Still Images: Bitmap/Jpeg/Gif/Tiff
• Composite: HTML/Flash
Environmental• Operating Temperature: 0°C/32°F to 50°C/122°F
• Operating Humidity: 10 to 80% at 25°C non-condensing
• Acoustic Noise: NC
• Heat Dissipation (Typical): NC BTU/hr
Included Accessories• 1x External Power Adapter, Model: ADP-90CD DB
Recommended Accessories• NA
Software Specifications• Web Based interface
• Multimedia playback
• Media scheduling & Calendar feature
• Video Sync
• Driver for LCD/Plasma/Video projector control and Digital input
• MXM for Medialon Manager
Extensions Supported• NA
84 REFERENCES

Relays and Triggers Specifications
Relays and Triggers SpecificationsMedialon MIP HD Playlist can be started by external triggers and can use relaysto control lamps. This optional feature is based on Adlink NuDAM modules
The ND-6530 takes advantages of the USB technology, and for the convenienceto the users of numerous PC, IPC, notebooks, laptops and handheld PC, itprovides an easy way to link with industry standard buses interface of RS-232/422/485.
NuDAM-6060 provides four relay output channels, two are form A and two areform C. It can control high power devices without external circuits. The isolationguarantees the industrial safety.
Setup
In normal condition, it is not necessary to setup the ND-6530. The defaultconfiguration of this communication module is in RS-485 mode. There'snormally no need to configure the baud rate as the MIP HD uses the default baudrate value of 19200Kbps
MIP HD
REFERENCES 85

Connections
Wiring
Inputs
Relays
86 REFERENCES

Relays and Triggers Specifications
Pin Definitions of NuDAM-6530
Pin # Signal Name Description
1 TX+/D+ RS-422 or RS-485 transmission line, positive
2 TX-/D- RS-422 or RS-485 transmission line, negative
3 RX+ RS-422 receive line, positive
4 RX- RS-422 receive line, negative
5 NC No connection
6 TX RS-232 transmission line
7 RX RS-232 receive line
8 RTS Request to send
9 CTS Clear to send
10 GND Ground
REFERENCES 87

Pin Definitions of NuDAM-6060
Pin # Signal Name Description
1 DI3 Digital Input Channel 3
2 DI2 Digital Input Channel 2
3 DI1 Digital Input Channel 1
4 DI0 Digital Input Channel 0
5 Ext24 External Common +24V
6 Default* Initial state setting
7 (Y) DATA+ RS-485 series signal, positive
8 (G) DATA- RS-485 series signal, negative
9 (R) +VS Power supply, +10V~+30V
10 (B) GND Ground
11 RL1 NO Relay 1, normal open
12 RL1 COM Relay 1, common ground
13 RL2 NO Relay 2, normal open
14 RL2 COM Relay 2, common ground
15 RL3 NO Relay 3, normal open
16 RL3 NC Relay 3, normal close
17 RL3 COM Relay 3, common ground
18 RL4 NO Relay 4, normal open
19 RL4 NC Relay 4, normal close
20 RL4 COM Relay 4, common ground
88 REFERENCES

Relays and Triggers Specifications
Specifications
Specifications of ND-6530
USB controller• USB Spec. 1.1 compliant
I/O Interface• RS-232/422/485 DIP switch selectable
• RS-232 support RXD, TXD, RTS, CTS, FGND signals
• RS-422 support TX+, TX-, RX+, RX- 4 wires full-duplex signals
• RS-485 support DATA+, DATA- signals with auto direction control
• Selectable transfer speed with 1200, 2400, 4800, 9600, 19200, 38400, 57600, 115200 bps
• 2500Vrms isolation
• Surge protection on all signal lines
Connector• USB type B
• 10 pin screw terminal block
LED Indicator: • ON: Receiving USB power
• Flashing: Data transfer
• OFF: No power applied
Environment• Storage Temperature Range: -25 to 80 °C
• Operating Temperature Range: -10 to 70 °C
Power• Power Requirement: USB bus power
• Power Consumption: 0.795W
Specifications of NuDAM-6060
Interface• Interface: RS-485, 2 wires
• Speed (bps): 19.2K
Input • Channel numbers: 4
• Common External Voltage: +24 V
Output • Channel numbers: 4 relay output
• Output type: 2 form C channels, 2 form A channels
• Contact rating: 0.5A / AC 125V, 1A / DC 30V
• Relay ON/OFF time interval: Max. 3 ms
REFERENCES 89
• Breakdown voltage: 750 Vrms (between open contact), 1000 Vrms (between contact and coil)
• Expected life: 105 times(0.5A/AC125V resistive load at 20 cpm) or 108 times (no load at 180 cpm)
• Insulation resistance: Min. 1000 MΩ
Power • Power supply: +10V to +30V
• Current consumption: 0.84W
90 REFERENCES
TCP/IP Protocol
TCP/IP ProtocolThe Medialon MIP HD can receive commands via a TCP/IP Socket. This chapterdescribes the protocol used when a client application sends commands orreceives information via this TCP/IP Socket.
The default MIP HD listen port is 4004.
Note that the MIP HD can also communicate via the HTTP Protocol on port 80 but this protocol is not covered by this manual.
General Message Format The general command/info format is XML.
Command frame
Commands are set with a command frame:
Following is an example of a command frame.
<xml><medialon value="HPFNIFL7PTC50GDBZ3RTYY451I">
<command_frame><command name="play_media" src="medianame" />
</command_frame></medialon>
</xml>
The "value" attribute of the "medialon" element is used to sign the commandframe.
The "name" attribute of the "command" element specifies the command toexecute. Other "command" element attributes may have to be specifieddepending on the command. These additional attributes are detailed below.
Response frame
When a command requires a response, the MIP HD sends back an "info"response frame. The "value" attribute of the "info" element varies depending onthe "type" attribute. The "value" attribute is documented for each commandwhich requires a response.
<xml><info type="current_media" value="medianame" />
</xml>
Commands The following section details the "command" element attributes.
REFERENCES 91

Multimedia Player Commands
display_defaultDisplays the default media.
resume_planningResumes the current schedule or the current playlist if there's no activeschedule.
trigger_command sends a trigger command (digital I/O)
play_media Plays a media file
Example: <command name="play_media" src="big_buck_bunny_h264.mp4" />
play_sequence Start a Playlist
Attribute Value
name display_default
Attribute Value
name resume_planning
Attribute Value
name trigger_command
number 1 to 4
status 0="Off" 1="On" 2="Toggle" 3="Pulse"
duration Pulse duration expressed in 1/100 second
Attribute Value
name play_media
src media file name
Attribute Value
name play_sequence
src playlist file name
repeat loop count, 0 = infinite
92 REFERENCES
TCP/IP Protocol
Example: <command name="play_sequence" src="Morning" repeat="0"/>
play_schedule Start a schedule
Example: <command name="play_schedule" src="Monday"/>
Video Sync Player Commands
videoplayer_loadmedia Load a new video media
Example: Load video as Master of sync group 5
<command name="videoplayer_loadmedia" src="big_buck_bunny_h264.mp4"sync_mode="1" sync_group="5" />
videoplayer_transportcommand Send a transport command
Example: Send a Play video
<command name="videoplayer_transportcommand" command="play"/>
Send a Locate video at 10s
<command name="videoplayer_transportcommand" command="locate"
Attribute Value
name play_schedule
src schedule file name
Attribute Value
name videoplayer_loadmedia
src video file name
sync_mode 0=’No Sync’ 1=’Sync Master 2=’Sync Slave’
sync_group 0 to 9
Attribute Value
name videoplayer_transportcommand
command ‘play’ ‘pause’ ‘stop’ ‘locate’ * requires timecode
timecode Timecode is expressed in 1/1000 second (when Timecode is needed)
REFERENCES 93

timecode="10000"/>
MIP HD Commands
videoplayer_setmode Change the player mode
reboot_windowsReboots or shuts down MIP HD
serial_frameSends a serial frame on a serial port
Example: <command name="serial_frame" frame="frametosend"settings="9600,N,8,1" port="1"/>
set_volume Sets the general audio volume of the MIP HD
Attribute Value
name videoplayer_setmode
value 0=’Multimedia Player’ 1=’Video Player’
Attribute Value
name reboot_windows
mode 0=’reboot’1=’shutdown’
Attribute Value
name serial_frame
frame frame to send
settings BBBB,P,D,S BBBB = ’Baudrate’ P = ’Parity’ (None, Odd, Even) D = ’Data Bit’ S = ’Stop Bit’
port 1 = ’MIP HD COM1’
Attribute Value
name set_volume
value 0 to 1000
94 REFERENCES

TCP/IP Protocol
ticker_command Show/Hide the ticker
MIP HD Request Commands
get_infoRetrieves information from the MIP HD.
The MIP HD responds with an "info" answer frame whose type attribute is the
Attribute Value
name ticker_command
text text of the ticker (empty string hides the ticker)
backgroundcolor color is expressed in HTML formatfor example: ‘#FF0000’ or ‘red’
fontsize Size of the font
color color is expressed in HTML formatfor example: ‘#FF0000’ or ‘red’
fontname Name of the font
period Period in seconds of the ticker0 = ’stationary’1 = ’fast’100 = ’slow’
tickerheight Height of ticker in pixel
weight ‘normal’ ‘bold’
decoration ‘None’ ’Underline’ ‘Overline’ ‘Line-Through’
style ‘Normal’ ’Italic’
scrollmode 0=’Right to left’1=’left to right’
Attribute Value
name get_info
type all_statuscurrent_mediacurrent_sequencecurrent_scheduledisk_spacetrigger_countmac_address
REFERENCES 95
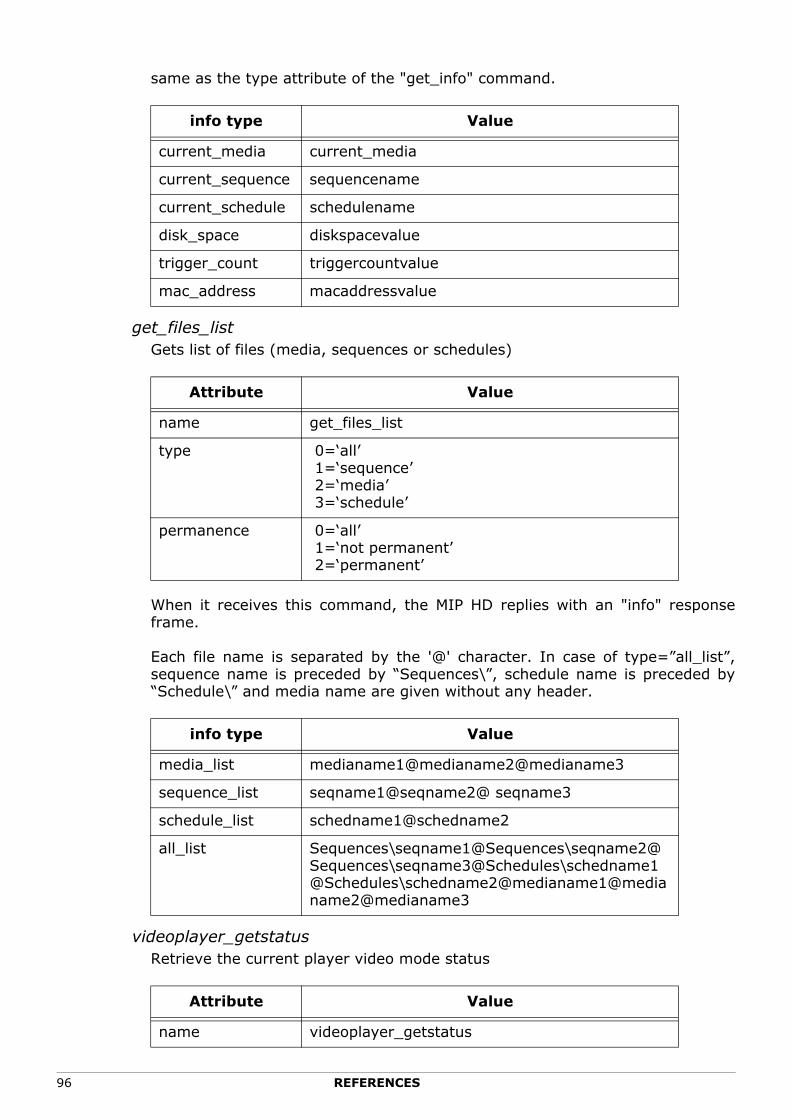
same as the type attribute of the "get_info" command.
get_files_listGets list of files (media, sequences or schedules)
When it receives this command, the MIP HD replies with an "info" responseframe.
Each file name is separated by the '@' character. In case of type=”all_list”,sequence name is preceded by “Sequences\”, schedule name is preceded by“Schedule\” and media name are given without any header.
videoplayer_getstatus Retrieve the current player video mode status
info type Value
current_media current_media
current_sequence sequencename
current_schedule schedulename
disk_space diskspacevalue
trigger_count triggercountvalue
mac_address macaddressvalue
Attribute Value
name get_files_list
type 0=‘all’ 1=‘sequence’ 2=‘media’ 3=‘schedule’
permanence 0=‘all’ 1=‘not permanent’ 2=‘permanent’
info type Value
media_list medianame1@medianame2@medianame3
sequence_list seqname1@seqname2@ seqname3
schedule_list schedname1@schedname2
all_list Sequences\seqname1@Sequences\seqname2@ Sequences\seqname3@Schedules\schedname1@Schedules\schedname2@medianame1@medianame2@medianame3
Attribute Value
name videoplayer_getstatus
96 REFERENCES
TCP/IP Protocol
The MIP HD responds with an "info" answer frame whose type attribute is thesame as the type attribute of the "videoplayer_status" command. The answercontains the following information:
<xml> <info type=\"videoplayer_status\">
<videoplayermode>videomode</videoplayermode> <status>statusname</status> <media>medianame</media> <timecode>timecodevalue</timecode> <duration>durationvalue</duration> <syncmode>syncmodename</syncmode> <syncgroup>syncgroupvalue</syncgroup>
</info> </xml>
REFERENCES 97
Media Specifications
About MediaMedialon MIP HD uses either an internal video player or Internet Explorer torender media on the screen. The type of renderer is selected depending on thetype of media.
Internet Explorer uses different plug-in (such as Flash Player or Windows MediaPlayer), decoders, and filters to display these media.
These different plug-in layers and the relevant settings effect image aspect andratio.
In general: pure video/audio media are played by the mean of the internal videoplayer, while other types like HTML page are rendered via Internet Explorer.
The following tables show the relevant programs and settings for most of thecommon files types.
Supported Files List, Display ModesEach time the MIP HD displays a media, it creates a page. The media is treatedas an object in an HTML page. The treatment depends on the type of media. Theassociations between the plug-ins installed and the media are defined in thefollowing table.
The ratio and settings table shows the effects of the size and ratio settings forthe different file types.
- Auto: means: media is automatically adjusted to the player screen size and doesn't keep the original aspect ratio of the media.
- Ratio: means: ratio is fixed. Adjustment depends on the media vertical size.
- N/A: means: No effect, the media keeps its original size and ratio.
Extension File type Object Plug in Size & Ratio
.bmp, .gif Image Medialon Auto
.jpg, .jpeg Image Medialon Auto
.png Image N/A
.mpg, .mpeg video file Medialon Auto
.mp4 video file Medialon Ratio
.wmv video file Medialon Auto
.avi video file Medialon Auto
.mov (H264) video file Medialon Ratio
.swf Flash Flash Player Ratio
.htm, .html Html page N/A
.mp3, .aif sound Medialon
.wav, ;wma sound Medialon
98 REFERENCES
Media Specifications
Media/renderer associations can be altered for specific uses via the Setup/System/Video Parameters section, See “Video Parameters”, page 73..
Audio Format and OutputMedialon MIP HD can use analog or digital(SPDIF) output for playing audio.
Using SPDIF output, Medialon MIP HD can play multi audio channels files. MIPHD is able to decode AC3 / DTS / MPEG1/2 Audio Layer I/II formats.
Medialon MIP HD supports:
- Wave
- MP3
- AAC
- AC3
- DTS
- PCM
- MIDI
Video SpecificationsMedialon MIP HD is able to playback 1080p HD video.
MIP HD supports following video formats:
- H.264 1080p
•Common file extensions: .AVI, .MKV, .MP4, .MOV. •Main Profile 15Mb/s •High Profile up to 33 Mb/s •AVCHD 20Mb/s
- MPEG2 (.MPG)
•Common file extensions: .MPG, .MPEG •SD / HD 1080p up to 50Mb/s
Stereo OutputOptical Output
Coaxial Output
REFERENCES 99
- Windows Media Video
•Common file extensions: .WMV •SD /HD 720p up to 10Mb/s
100 REFERENCES
Index
IndexA
Account 68Administrator 32, 68Editor 31, 69Monitoring 31, 69Ticker 31, 69
AddMedia 35
Playlist 44Administrator
Login 68Menu 32
C
Chrome 28Color
Ticker 58Control
ExternalMedialon Manager 60Medialon Showmaster 60
CreationPlaylist 44Schedule 55
D
Default Media 37Play 38Reset 38Set 38
DeleteSchedule 56
Drag and dropMedia 45
DurationMedia 45, 46
E
EditPlaylist 46
EditorLogin 69Menu 31
Escape Key 29
F
Firefox 28
FirmwareCurrent version 31Update 79
FontTicker 58
G
Google 28
H
HeightTicker 58
HideTicker 59
I
InterfaceLocal 29
Internet Explorer 29
L
LevelAdministrator 32Editor 31Monitoring 31Ticker 31
LibraryPlaylist 54
Refresh 52Local Access
Login 29Login 29
M
MediaDefault Media 37Drag and drop 45Duration 45Playlist
Add 44Duration 46Remove 47
Upload 35Medialon Manager 60Message
Ticker 57Monitoring
REFERENCES 101

Login 69Menu 31
MxMMIP 60Sync Master 61
N
NewPlaylist 44
P
Password 29Play
Default Media 38Playlist
Edit 46Library 54Media
Add 44Duration 45, 46Remove 47
New 44Refresh 52Remove 52, 55Save 46
R
RefreshPlaylist Library 52
RemoveMedia
Playlist 47Playlist 52, 55Schedule 56
ResetDefault Media 38
S
Safari 28Save
Playlist 46Schedule
Creation 55Playlist
Remove 55Start Time 55
Remove 56Start 56
ScrollTicker 59
Set
Default Media 38Show
Ticker 59Showmaster 60Size
Ticker 58Start
Schedule 56Start Time
Schedule 55
T
TestTicker 59
TextColor 58Font 58Scroll 59Size 58Ticker 57
Theme 67Ticker
Hide 59Login 69Menu 31Show 59Test 59Text
Color 58Font 58Properties 57Scroll 59Size 58
Time Server 71Time Zones 72
U
UpdateFirmware 79
UploadMedia 35
UserAccounts 68
Username 29
W
Web BrowserApple Safari 28Compatibity 28Google Chrome 28Microsoft Internet Explorer 29
102 REFERENCES
Index
Mozilla Firefox 28
REFERENCES 103

104 REFERENCES

NOTES


NOTES


MEDIALON Inc. MEDIALON2977 McFarlane Road, SuitVe 301 101 rue Pierre Sémard
Miami, FL 33133, USA F92324 Châtillon Cedex FranceTel: +1 305 445 4045 Tel: +33 (0)1 46 55 60 70Fax: +1 305 445 4048 Fax: +33 (0)1 46 55 54 83
www.medialon.com www.medialon.com