mechacal handy s - combi manual. mechacal handy s ... in the event of damage or operation problems,...
TRANSCRIPT

Mechacal Handy S
Instruction Manual

Mechacal Handy S
15
6

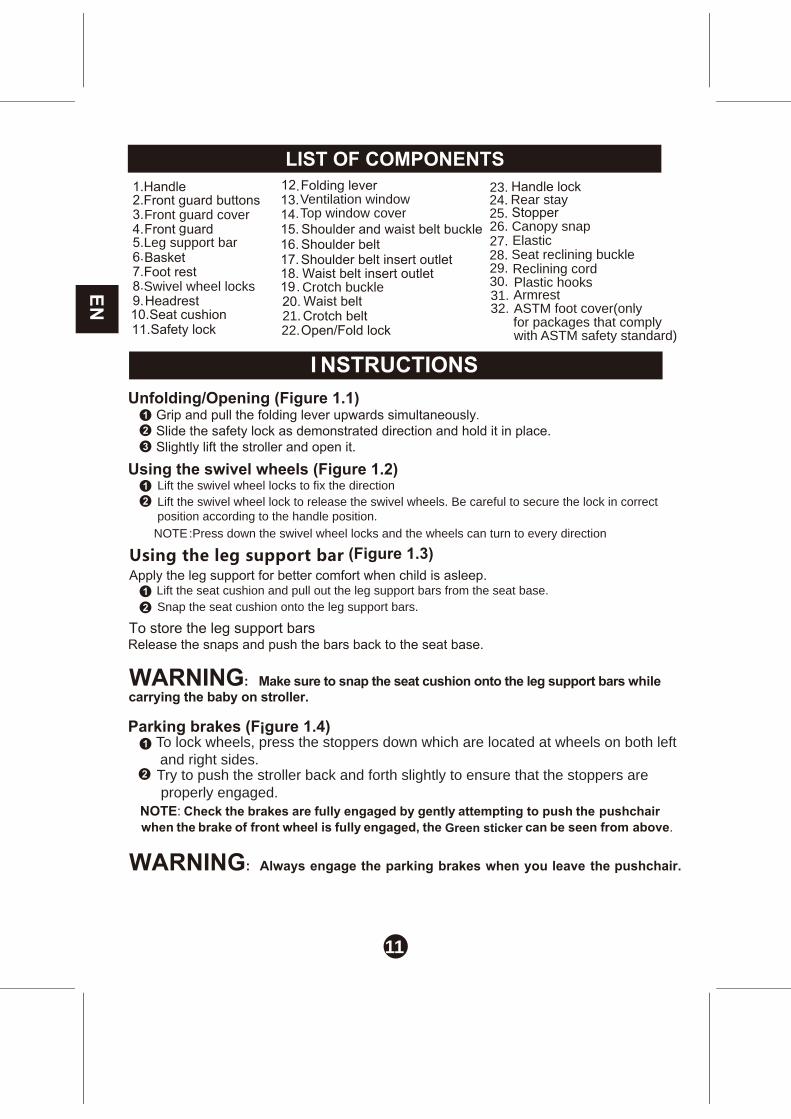
List of components 【 P11 】
11.
12.
13.
14.
1.
2.
3.
5.4.
7.
25.
9.
10.
31.
15.
16.
17.
18.
19.21.
20.
22.
23.
24.
25.
8.
32.
6.

1.5
1.2
1.3
Outside
Swivel wheel lock
Inside
Green sticker


Hints
pin
Rubber ring

Front Rear
Max londing

5 7
6
2
3
3
2
4.7
4.84.8
4.9
32

6

7
the stroller to fold up suddenly or get hold of the front guard etc. to lift the stroller.
In the event of damage or operation problems, stop using the stroller immediately.

8
Do not apply a lifted seat to baby who cannot sit straight by itself, most reclined
Lift the backrest a little to use if the seat is found too narrow when fully reclined.However, the baby should be able to sit straight when stroller is used in such way.
Make sure to fasten the seat belt after seating the baby. Check if the seat belt fits
When pushing the stroller, please pay attention to any hole or track on the ground
Never leave the child in a stroller without seat cushion. The child s hands or feet
Do not let an adult sit on the stroller, or add load on the stroller to avoid any damage
Do not use the stroller in snowy, windy days or wet road to avoid the stroller or guardian

9
Do not press on the folding lever while lift the stroller to avoid damage to the parts.
Do not lay down the stroller and do not put things on the canopy to avoid deformation.
Do not press on the folding lever while lift the stroller to avoid damage to the parts.
upright
Improper

10
23
Do not put things that are too sharp or too large into the basket since it may cause
Make sure no oil or lubricant is left on parts such as front guard or armrest where
It is extremely dangerous to adjust the seat angle when pushing the stroller.Do
years
11
2345
12
12
1
12
Leg support bar
Swivel wheel locks
Ventilation windowTop window cover
Elastic
Crotch buckle
28. Seat reclining buckle29. Reclining cord
Rear stay
Canopy snap
30. Plastic hooks
26.27.
25.24.23.
22.21.
Lift the swivel wheel locks to fix the directionLift the swivel wheel lock to release the swivel wheels. Be careful to secure the lock in correctposition according to the handle position.
NOTE:Press down the swivel wheel locks and the wheels can turn to every direction
Lift the seat cushion and pull out the leg support bars from the seat base.Snap the seat cushion onto the leg support bars.
To lock wheels, press the stoppers down which are located at wheels on both left and right sides. Try to push the stroller back and forth slightly to ensure that the stoppers are properly engaged.
Front guard cover
31. Armrest32. ASTM foot cover(only
for packages that complywith ASTM safety standard)

Fold the canopy from backward.
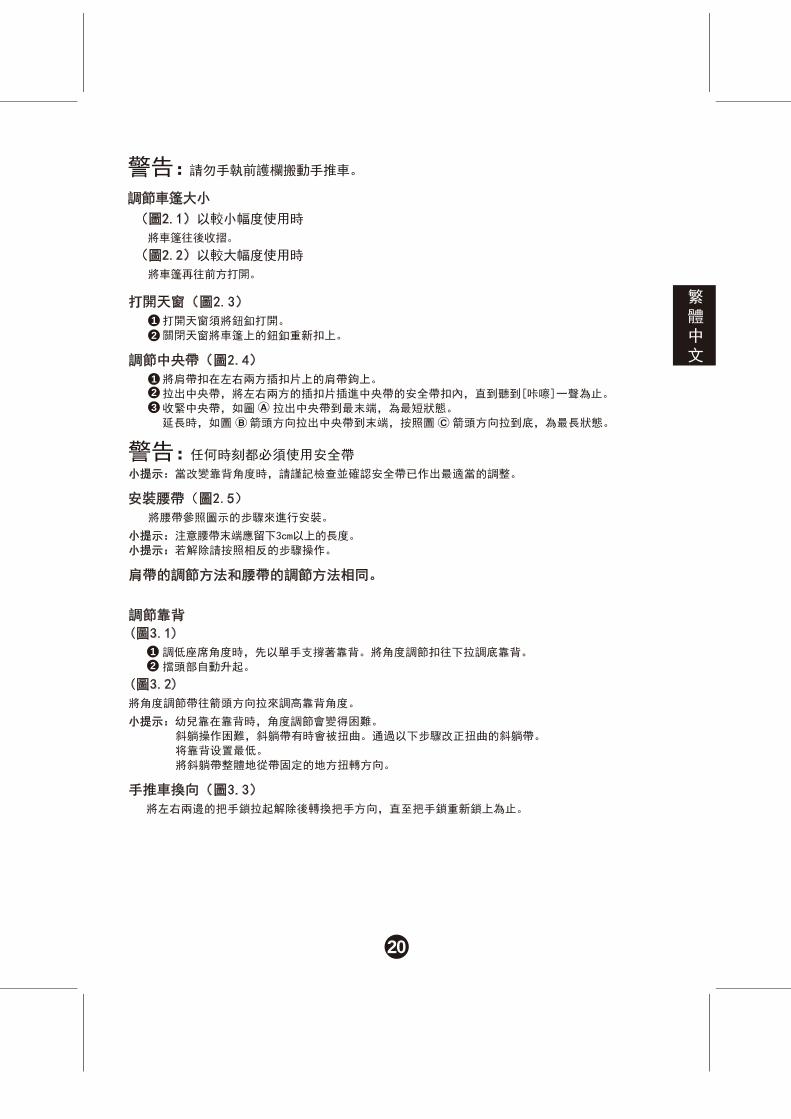
Attach shoulder belts to the shoulder belt hook of the left and right insert plastics.Pull out the crotch belt and put the insert plastics into the buckle until a “Click”sound is heard.Tightening
ExtendingFollow the direction of arrow and pull out the belt to end.
Follow the direction of arrow and pull the belt to the end.Pull the center belt, the shoulder belts and waist belts to check if they are secured.
Install and adjust the crotch belt
Adjust the covering size of canopyUsing in small covering size
Using in big covering sizeUnfold the canopy further to the front.
12
Pull out the center belt to the end.

Adjust shoulder harnesses heights ( Figure 4.8 )123
Pull out shoulder harnesses from seat cushion and base seat.Set the correct slots of shoulder harnesses through on the base seat.Set correctly the harness shoulder heights and pull it out through relevant slots of seat cushion.
NOTE: The lowest shoulder harness insert outlet should be used for children under6 months.
NOTE: Make sure to pull through all waist belt insert outlets(total 4 places)when attaching the waist belt.
Detaching the seat cushion ( Figure 4.2-4.6 )
Reversing handle
NOTE: To install seat, follow the steps reverse.
2
WARNING: Make sure the seat cushion has been correctly attached before use.
Attaching the waist belt ( Figure 4.7 )Remove two of insert plastics buckle from the waist belt.According to the direction of arrow instructions Pull the waist belt through the 4 slits on the base board with the reverse side(waist belt) facing up.Re-attach the insert plastic buckle and pull it out through relevant slots of seat cushion.
13
3 41 2
Remove the shoulder belts from the shoulder belt hooks.
56
Pull out crotch belt from seat cushion. Release both elastic bands from backrest sides. Pull out shoulder and waist belts from seat cushion.Release the snaps of elastic on both sides of the cushion and unwind (one circle) from theconnections of armrest sides for detachment.
Release front snaps and elastic bands underneath of the seat, and on both sides of seat.
Detach the snap on the seat cushion from the leg support bar(if the leg support bar is in use)
3.4

14
Be careful not to injury of the plastics on canopy and the snaps from basket. Due to the characteristic of the product, the color may fade after numbers of washing. It is recommended to wash with neutral detergent which does not contain fluorescent
brightener, bleach etc. Always keep clean due to the condition of storage, the mildew may be generated.Washing of the Body & Hip support, the shoulder belt and the crotch belt .
Washing of the canopy ,crotch belt and the basket.• Do not soak into the water. Use sponge or brush wipe off the dirt with warm water.• After wipe off the dirt by detergent,use a cloth to wipe off the excess water and detergent.• Dry in shade area after wipe off water by dried cloth.
• Hand wash in warm water or machine-wash gently .• When using the washing machine, put the laundries into the washing net before washing. Otherwise a fray and damage may be caused.
• Detach the seat cushion and wash according to the washing instructions.• It is recommended to wash and spin separately with other clothes.• Gentle spinning after rinsing thoroughly. Please put Straighten shape . • Do not use drying machine or dry cleaning.
4.9

15
16
17
18

19
123
12
12
19
1
2
12
20
EN
12
3
12
1
3
12
2

21
EN
12
6
345
32
32
3 41 2
32

22
‧‧‧‧‧
‧
‧
‧
‧‧‧‧‧
‧
‧
‧


170106050