mecanum robot mpo-500
TRANSCRIPT

Operating Manual
V1.2.2
21 Mar 2017
MPO-500-OperatingManual Neobotix GmbH – all rights reserved 1 of 29
MPO – 500

Contents
1 Introduction........................................................................................................31.1 General information.................................................................................................31.2 Range of applications..............................................................................................31.3 About this document................................................................................................3
2 Product information............................................................................................42.1 Product description..................................................................................................42.2 Intended use............................................................................................................42.3 Improper use...........................................................................................................42.4 Working areas.........................................................................................................52.5 Qualified personnel.................................................................................................5
3 Safety Instructions.............................................................................................63.1 Briefing....................................................................................................................63.2 Safety system..........................................................................................................63.3 Cooperating with the robot......................................................................................73.4 Danger areas...........................................................................................................73.5 Bringing into service................................................................................................83.6 Modifications of the system.....................................................................................83.7 Expected misuse.....................................................................................................8
4 Transport..........................................................................................................104.1 Packaging..............................................................................................................104.2 Long distance transport.........................................................................................104.3 Short distance transport........................................................................................10
5 Bringing into service.........................................................................................115.1 Operating elements...............................................................................................115.2 Preparations..........................................................................................................125.3 First test................................................................................................................. 125.4 Configuring the safety fields..................................................................................13
6 Setting up the Hardware..................................................................................146.1 Battery charger......................................................................................................146.2 Automatic charging station....................................................................................14
7 Installing the host computer.............................................................................167.1 Windows operating system....................................................................................167.2 Linux operating system..........................................................................................167.3 Setting up the network...........................................................................................16
8 The LC-Display................................................................................................178.1 Main view..............................................................................................................178.2 Info view................................................................................................................18
9 Maintenance....................................................................................................199.1 Software................................................................................................................199.2 Hardware...............................................................................................................199.3 Charging station....................................................................................................22
10 Taking out of service......................................................................................2310.1 Disassembly........................................................................................................2310.2 Recycling.............................................................................................................23
11 Component diagram.......................................................................................24
12 Technical data................................................................................................2512.1 Mechanical properties.........................................................................................2512.2 Electrical properties and miscellaneous data......................................................2712.3 Connectors..........................................................................................................28
13 Legal notes....................................................................................................29
MPO-500-OperatingManual Neobotix GmbH – all rights reserved 2 of 29

1 Introduction
1.1 General information
Mobile robot platforms are also known as automatic guided vehicles (AGV). This means the mobile system is capable of moving freely without the need of guide wires, optical guide strips or a magnetic sensor strip stuck to the floor marking the planned route.
Instead of hardware installations in the surrounding the approached stations and the connecting pathways are defined by software. Using a simple 2D map of the surrounding, there are just a few mouse clicks necessary to define routes for the robot. After this the controller software is able to:
move on predefined pathways
plan a path by itself between target stations
detect and evade obstacles on the pathway
execute programmed actions within the map
The mobile robot navigates autonomously by acquiring sensor data of environment features such as walls and corners and comparing this data to an internal map.
1.2 Range of applications
The mobile robot may be used in a large variety of applications:
Autonomous transportation tasks in industrial environments
Automatic measurement of physical data in large areas (e.g. gas concentrations, temperatures, noise, etc.)
Autonomous operations within large areas (e.g. surveillance, part handling, etc.)
Telepresence while controlled via wireless LAN
1.3 About this document
This document describes the basic handling of the MPO-500 omnidirectional robot. It is meant as a guideline when installing and maintaining the necessary hardware. Basic operation and handling instructions are included as well.
For further information concerning the graphical user interface or extraordinary applications please refer to the “PlatformCtrlGUI – Operating Manual” or contact Neobotix.
The warning triangle marks paragraphs that concern the danger of injuries, damages or both. Please read these paragraphs very carefully!
The prohibition sign marks actions or applications the robot is not intended for and which might result in damages, reduced life expectancy and loss of warranty.
The light bulb marks paragraphs that mention common problems, misunderstandings or errors and is meant to be a help in troubleshooting.
MPO-500-OperatingManual Neobotix GmbH – all rights reserved 3 of 29

2 Product information
2.1 Product description
The mobile platform MPO-500 (and all varieties and models based on it) is an autonomous robot vehicle for a wide range of applications.
It features four Mecanum wheels which allow the MPO-500 to instantly move in any direction as well as turning the vehicle at any time. Measurement data from one or two laser scanners can be used for localisation, navigation and collision avoidance. These scanners also monitor up to four different user-defined safety fields around the robot. As soon as an object is detected within the currently activated field, the robot is immediately set to emergency stop.
These features enable the MPO-500 to exactly determine its current position within the working area, to plan paths to arbitrary positions and to safely avoid collisions with passers-by or other dynamic obstacles.
Additional components and systems can be mounted onto and into the robot. They can be powered by the robot's internal power supply and can be controlled by the on-board computer.
2.2 Intended use
The MPO-500 has been designed for use in service robotics research. It can be used for a wide range of different experiments and tests in fields such as autonomous vehicles, mobile manipulation and factory automation.
Depending on the intended application the MPO-500 can be used on its own, in combination with other robot vehicles and in combination with stationary systems. Furthermore, application specific extensions can be integrated into the basic platform. These might be a customised cargo area, a robot arm or special sensors.
The MPO-500 may only be used in laboratories, test halls or similar environments. It is not recommended to use the MPO-500 in any other surrounding, especially not outdoors, in offices or factories.
2.3 Improper use
The MPO-500 must not be used for transportation of passengers in any way. No person must ride on the robot itself, nor must the MPO-500 be used to move any other vehicle or hanger with passengers aboard.
The MPO-500 must not be operated in any publicly accessible area and is not approved for this kind of operation.
The MPO-500 must at no times be used without supervision of a qualified operator if there are guests, passers-by or other people unfamiliar with the robot within the working area.
The robot must never be operated in areas where there are staircases leading down, elevated platforms or other possibilities for falling or dropping down. This may cause serious injuries or death!
MPO-500-OperatingManual Neobotix GmbH – all rights reserved 4 of 29

2.4 Working areas
The working area of the MPO-500 must be protected against rain and have a sufficiently firm and clean floor. The floor must be even and horizontal.
Slopes, edges, steps and unevenness can result in problems when the robot is moving or with the localisation. Under some circumstances the robot might not be able to continuously determine its exact position and therefore might plan unnecessary or problematic paths or might even be unable to reach its destination.
Under certain conditions, rain or heavy splash water might enter the robot and cause damages. Dirt and liquids on the floor may not only lead to slippage and problems of localisation and navigation but may also reduce the life expectancy of the drive components.
The robot does not feature any sensor for detecting staircases, holes or other areas where it may drop down. In case of loss of localisation or faulty programming the robot might fall down such places.
Always check for and secure all places where the robot might drop down before bringing it into operation.
2.5 Qualified personnel
This product must only be modified, commissioned, operated and serviced by qualified personnel. Qualified personnel are defined as persons who
due to their specialist training and experience have adequate knowledge for the work at hand
and
who have been instructed by the responsible robot operator in the operation of the robot or its parts and the currently valid safety guidelines
and
are sufficiently familiar with the applicable official health and safety regulations, directives and generally recognised engineering practice (e.g. DIN standards, VDE stipulations, engineering regulations from other EC member states) that they can assess the work safety aspects of the robot
and
who have access to this manual and who have read it.
The following groups of persons are generally not considered qualified:
Employees, interns or other academic staff not familiar with the robot,
visitors and quests,
all members of other departments of the company or institution in which the robot is operated.
This list is not intended to be exhaustive.
MPO-500-OperatingManual Neobotix GmbH – all rights reserved 5 of 29

3 Safety Instructions
The mobile platform MPO-500 (and all varieties and models based on it) is an autonomous robot vehicle for a wide range of applications.
This complex robot system is not only capable of performing very different tasks but can also react dynamically to its environment. Under some circumstances this might result in situations in which the robot's behaviour appears to be surprising or incomprehensible to persons who do not know the MPO-500 in detail.
Because of this it is essential that all of the following safety instructions are followed at all times. A safe and efficient operation of the robot can only be achieved under this condition.
3.1 Briefing
Always make yourself familiar with the robot, its control and behaviour before starting your work or setting up autonomous processes. Every other concerned person (e. g. workers, programmers, visitors etc.) should also be briefed accordingly.
Due to the complexity of the robot system it is strongly recommended to attend a schooling. This document is only provided as a work of reference when facing minor and easy to solve problems concerning the hardware. All other problems, mistakes and difficulties can best be avoided by an in-depth schooling for programmers and a proper briefing for operators.
3.2 Safety system
The mobile robot is equipped with several safety features. Additional features can be installed if necessary. Before starting to work with the robot a thorough check is required to determine whether the present safety features provide a sufficient level of safety.
Some of the safety features, especially the laser scanner, might have been reduced or even disabled in order to make transport to the customer's site possible or more convenient. These features must be set up and tested by a qualified technician prior to the first operation of the robot system!
Emergency stop buttonsAs soon as one of the emergency stop buttons is pressed, all drives are immediately disconnected from power and the safety brakes of all motors are engaged. This is implemented completely in hardware and cannot be overridden or changed by software thus guaranteeing maximum safety.
Laser scannerThe safety approved laser scanner S300 can monitor user-defined safety fields around the robot which can be dynamically activated by an application specific control software. Only this control software is responsible for the correct activation of the safety fields according to the current condition.
As soon as a person or obstacle is detected within the currently active safety field the robot is immediately set to emergency stop. The stop will be reset automatically after the field has been cleared. No manual reset is required in this case.
The laser scanner has been approved as safety device with Performance Level d and SIL2. It fully replaces the safety bumpers which have been required for autonomous vehicles before.
MPO-500-OperatingManual Neobotix GmbH – all rights reserved 6 of 29

Special functionsIn case third-party software is meant to run on the robot or the remote control computer this software can be enabled to trigger an emergency stop and or to reset the safety system. Additional safety devices (e.g. radio controlled emergency stop systems) can also be integrated into the mobile robot.
Please contact Neobotix if you plan to implement any special functions.
3.3 Cooperating with the robot
Close proximityAs long as the robot is not in full emergency stop, a minimum distance should always be kept. Direct contact to the active robot system is to be avoided.
Climbing up onto the mobile platform and / or riding on it are not allowed at any time.
Medium proximityWhen approaching the robot or working in its presence, increased attention and caution are required. The safety features of the mobile robot have to be set at such a level that imminent dangers are being detected and that injuries or damages can be avoided.
In case the safety features have to be reduced due to the requirements of the process it might be necessary to prohibit the presence of people in the robot's surrounding. In these cases only the owner of the robot system can be held responsible for the safe operation.
General surroundingAs long as the safety features of the mobile robot are set up properly, the presence of persons or vehicles in the robot's wider working area is allowed. Please contact Neobotix for further advise if needed.
All persons working in the same area as the robot should nevertheless be informed about the robot's behaviour and the possible dangers. Appropriate behaviour and consideration is necessary.
3.4 Danger areas
WheelsDue to their unique design the four Mecanum wheels of the MPO-500 have a higher potential for danger than normal wheels. Please mind the following in order to prevent injuries or damages:
Never touch the wheels of the operational robot and also prevent guests, passers-by and especially children from touching them.
Take care that no part of the cargo or additional components (e.g. cables, wires) can touch the wheels.
Make sure that the working space of the MPO-500 is free of all objects which might be caught in the wheels. Different from normal wheels Mecanum wheels may not only run over objects but objects might also get stuck in the wheels and might be moved along.
In case additional safety measures are required please contact Neobotix. We will provide wheel housings designed for your application.
Battery drawerBoth the outsides of the robot and the battery drawer are completely safe to touch while the robot is in use. Nevertheless, opening the battery drawer allows one to reach into the robot platform and to touch powered components.
MPO-500-OperatingManual Neobotix GmbH – all rights reserved 7 of 29

Never reach into the robot platform while the system is turned on. There is risk of electric shock!
All cables and wires on the batteries and inside the drawer are placed and cut to length in a way that will prevent damages during normal operation. In case cables have been modified or were placed very incautiously this might still cause damage to the wires.
Always take great care that no cables are clamped between drawer and platform or get caught in the telescopic slides. Please contact Neobotix immediately when noticing any damages to the cables.
A robot with damaged battery cables must not be operated any further in any case!
3.5 Bringing into service
After installing the mobile robot as well as after making changes to the environment or the work processes a supervised test-run has to be performed. This test has to cover all possible steps of the process. Autonomous operation must not be resumed without a successful test-run.
This also applies to modifications of routes and target positions, parameters, environmental conditions and higher level control systems.
Repairs, maintenance work and other changes in the system's hardware should also be followed by a test-run.
The Neobotix GmbH cannot be held responsible in any way for injuries or damages which are caused by any problem that could have been detected or prevented by a supervised test-run.
3.6 Modifications of the system
Please inform Neobotix before executing any kind of mechanical, electrical or software work or modification. Some detailed information or instruction might be necessary.
In case one or more robots are to be modified, it is strongly recommended to consult Neobotix in order to provide the appropriate training and information for all technicians and programmers. The functions and safety of all modified robots have to be checked and ensured before bringing them into service.
All guaranties are void in case of any unauthorised or improper modification of the mobile robot system. All responsibilities for the further operation of the robot are devolved to whoever commands or executes such modifications.
3.7 Expected misuse
Passenger transportationTransporting passengers on or by the MPO-500 is dangerous and strictly prohibited due to a number of reasons.
The Neobotix GmbH cannot be held responsible for any injuries and / or damages caused to or by transporting passengers with the mobile robot.
Safety fieldsThe laser scanners' safety fields have to be configured and tested by the operator prior to taking the robot into service. If more than one safety field are to be used they need to be dynamically activated according to the current state and intended action of the robot.
The operator takes full responsibility for the safe activation of the safety fields. Safety fields that are set up incorrectly or have been activated faultily will result in an unsafe and possibly dangerous operation of the mobile robot.
MPO-500-OperatingManual Neobotix GmbH – all rights reserved 8 of 29

Laser scanner positionThe height of the scanning plane of the laser scanner must be chosen according to the applications safety requirements. In case the robot is to operate fully autonomously and without supervision in an area where it might encounter unconscious people then the scanning plane should be no more than 200mm above the ground.
Each S300 laser scanner has a 270° wide field of view which is symmetric to the scanner housing. Therefore the positions of the laser scanners must also be chosen in consideration of blind spots.
Please contact Neobotix if the positions of the laser scanners has to be modified.
Working areaWhen choosing and preparing the working area special care has to be taken to ensure both a reliable localisation and motion control.
The localisation system of the MPO-500 requires clearly visible, unique landmarks and an exact, easy to match map of the surrounding. Further information on this topic can be found in the documentation of the control software package that is to be used. Please contact Neobotix in case of any problems.
The motion control system of the MPO-500 will only work reliably on an even ground and without slippage. Dirt like dust, sand, oil or water may cause the wheels to slip and the robot to move uncontrolled. This might even result in a loss of localisation which might make the robot leave the predefined path and enter prohibited or dangerous areas.
The robot must never be operated in areas where there are staircases leading down, elevated platforms or other possibilities for falling or dropping down.
Mechanical overloadThe defined maximum payload must not be exceeded. Overloading the robot may lead to reduced life expectancy of the drives and to damages to the robot. It might also affect the driving properties, resulting in unwanted movements and leaving the predefined paths.
Electrical overloadThe robot's on-board power supply must not be overloaded. Extreme overload may lead to overheating, damages to the electrical installation and to short-circuiting.
Please contact Neobotix before modifying the electrical system of the mobile robot.
MPO-500-OperatingManual Neobotix GmbH – all rights reserved 9 of 29

4 Transport
4.1 Packaging
The mobile robot MPO-500 is packed in a rugged wooden box which can be reused for future transports. If the original box cannot be used any more it is recommended to build a new box of similar design.
The base plate of the box has to be strong enough to carry the robot and to take asymmetric forces, e.g. when moving the box with a forklift. When packing the robot it has to be secured against unintended slipping by sufficient cushioning. In order to prevent dust and dirt from the cushioning material to enter the robot, the maintenance opening should be closed and all connectors should be fastened or covered prior to packing the robot.
Depending on the cushioning material it might be advisable to protect the brake-release-button against unintended activation. If this button is pressed during transport, the robot may move inside the box and the batteries might get discharged. Furthermore, the key of the key switch should be removed and transported separately to avoid damages to the key and the switch. Further information on the control elements can be found in chapter “Bringing into service”.
Unpacking the robotIf the robot is shipped in the original transport box only the lid should be removed. Then all small components and the cushioning material can be taken out.
Once the robot is free of all cushioning it can be lifted out of the transport box. This should be done by at least two people who can take hold at the bottom of the hull.
Never try to lift the robot by holding it at the exterior components mounted to the hull or at the aluminium profiles on the top plate! Neither the exterior components nor any part of the platform's top plate has been designed for lifting forces and they may be damaged.
4.2 Long distance transport
As long as the robot is packed properly there are no special requirements when shipping the MPO-500. Only in case the robot has been exposed to very low temperatures (below -10°C) it should be left to reach room temperature again before turning it on. This will prevent damages to the electrical and electronic components.
If the brake-release-button was covered and the key switch was removed there is no risk of the robot being turned on during the transport or the batteries being discharged.
To eliminate every risk when shipping the robot it is recommended to disconnect all the batteries and to ship them outside the robot. This will prevent short-circuiting and other damages. The batteries are leak proof and approved for airfreight.
4.3 Short distance transport
For short distances the MPO-500 can also be transported in the trunk of a car without the wooden box. It still must be secured against sliding and should not be driven outdoors.
MPO-500-OperatingManual Neobotix GmbH – all rights reserved 10 of 29

5 Bringing into service
5.1 Operating elements
The following picture shows the rear of the MPO-500 including a second laser scanner.
Figure 1: Control elements of the MPO-500
1: Emergency stop buttons 2: Brake release button 3: Key switch
4: HDMI / DVI socket 5: Wireless joystick receiver 6: Charging socket
7: Connector for 2nd scanner 8: Ethernet socket 9: USB socket
10: LC-Display
Emergency stop buttonsWhen one of these buttons is pressed the robot is immediately set to emergency stop. All drives are disconnected from power supply and the fail-safe brakes are engaged. This state can be reset by unlocking the emergency stop buttons and turning the key switch clockwise for a few seconds.
Brake-release-buttonPressing this button will open the motors' brakes allowing the robot to be moved even while it is turned off.
If the control software is running and the emergency stop buttons are not pressed, the motor amplifiers will still stabilise the robot's position when pressing the brake-release-button. In this case at least one of the emergency stop buttons must be pressed before the robot can be moved manually.
Charging socketThe battery charger can be manually connected to this socket. Further information can be found in chapter “Battery charger”.
MPO-500-OperatingManual Neobotix GmbH – all rights reserved 11 of 29
1
2 3
4 56
7 8
10
9 1

Key switchTurning on: Turn the key clockwise and release to start up the robot.
Resetting after emergency stop: Turn the key to clockwise for about one second.
Shutting down: Turn the key counter-clockwise for five seconds to shut the robot down within 30 seconds. In this time the control software PlatformCtrl can close all files and shut down the operating system. When using ROS the computer will not be shut down but switched off after 30 seconds.
Switch off: To immediately turn off the robot without waiting for the on-board computer to shut down turn the key switch to the left and hold it there for another three seconds.
In case the on-board computer is shut down remotely (via the GUI or remote access) the robot will turn off automatically.
LC-DisplayThis display shows the most important status information. Please refer to chapter “The LC-Display” for further details.
Access to the on-board computerAn HDMI socket, a USB socket and an Ethernet port can be used to work on the computer and to prepare the robot for the next application.
5.2 Preparations
After the MPO-500 has been lifted out of its transport box, as described in chapter “Transport”, it should be cleaned from dust and any remaining bits of the cushioning. Especially the black covers of the laser scanners' optics need to be clean for the robot to operate properly.
To move the robot by hand, press and hold the black “Brake release button” (see previous section). The robot can then be easily moved by pushing or pulling the top plate.
Never touch the covers of the laser scanners or the emergency stop buttons to move the robot!
5.3 First test
Turn the key switch clockwise to start up the robot.
Insert the batteries into the joystick if necessary and wait until the platform has started the control software and finished the initialisation. The LCD will show “Robot ready” as soon as the robot is ready for operation.
Figure 2: The wireless joystick
Press the activation button on the joystick to start the hardware joystick mode. In this mode the robot can be controlled manually by using the two analogue joysticks. The left
MPO-500-OperatingManual Neobotix GmbH – all rights reserved 12 of 29
Activate / deactivate joystick
Mode selection, set to “D”Dead man's button (upper shoulder)Activate high speed (lower shoulder)
Rotation controlTranslation control

stick controls translational movements while the right stick controls the rotation. The speed of the robot is proportional to the sticks which allows very accurate movements at low speed.
The robot will only move as long as the dead man's button is pressed. This prevents unintended movements and will stop the robot if the radio connection is interrupted.
In hardware-joystick-mode most safety features, including obstacle avoidance, are disabled. Collisions at a high speed are possible!
The emergency stop buttons might be pressed, caused by the cushion or the transport. If the robot does not move and the display shows “Emergency stop”, release both buttons by turning them clockwise, turn the key switch clockwise and try again. Further information on the status messages can be found in chapter “The LC-Display”.
Move the robot carefully to a position where it does not obstruct anybody and press the activation button again to leave the hardware-joystick-mode. By doing so, the robot will switch to parking mode with the brakes locked and minimum power consumption.
5.4 Configuring the safety fields
Because the MPO-500 can move into any direction, the safety fields of the laser scanners must be activated according to the intended motion. Prior to the first operation the safety fields have to be defined in consideration of the application's requirements, the working environment and the desired speed. Furthermore a routine to select and activate the safety fields has to be implemented in the control software.
The configuration and diagnostics software CDS from Sick can be used to conveniently configure the scanners' safety fields. The configuration cable that was included in delivery can be used to connect the scanners to the serial port of any external computer running the CDS.
By default the digital inputs A and B of the front laser scanner receive antivalent signals from two relays on the robot's main control board. If two scanners are installed they communicate via a safe direct connection. The input status of the front scanner is then automatically forwarded to the rear scanner. The CDS can be used to show the current state of the inputs as well as the selected safety field and the live scan.
The Sick default password is SICKSAFE.
At delivery only one safety field is defined which is permanently active. This safety field is very small and hardly exceeds the robot's footprint in order to allow an easy transportation and testing. It should only be used for early checks and short, supervised driving tests. It is not designed to prevent collisions or for use in any application.
MPO-500-OperatingManual Neobotix GmbH – all rights reserved 13 of 29

6 Setting up the Hardware
6.1 Battery charger
The battery charger needs a power supply of 110VAC, 60Hz or 230VAC, 50Hz.
The charger must be placed in a dry environment. Do not cover the housing, so appropriate cooling is possible, and avoid direct sunlight. If the robot is meant to use the automatic charging station, connect the charger's power outlet to the station's cable and screw the connectors tightly together.
The robot can be manually recharged by connecting the battery charger’s plug to the socket on the platform (see chapter “Operating elements”). The socket is covered by a cap that can be unscrewed by hand.
Recharging is done completely automatic after the connection is established and the battery charger is connected to the main power supply. For recharging it does not matter whether the robot is switched on or off. The only difference is the time needed for a full recharge. With the on-board electronic active, a recharge might take significantly longer, depending on the workload of the on-board computer.
The battery charger features an overload protection, thus allowing the robot to be permanently (e.g. overnight) connected to the charger. If the robot remains switched on while being connected to the charger (e. g. while programming) it might be necessary to switch the battery charger off and on once a day.
Do not disconnect the cable while the platform is still recharging! Always switch off the battery charger first or disconnect it from the main power supply before removing the charging cable to avoid wear of contacts.
6.2 Automatic charging station
Preparations for automatic chargingThe automatic charging station is very robust and can easily be installed and integrated into the robot’s program.
In order to allow a fast and trouble-free docking, there needs to be some free space to each side of the station and to the front. Find a place that can be easily accessed by the robot when it needs to recharge but in which neither station nor robot are obstacles to anybody. A power outlet must be nearby for the battery charger to be plugged in.
Please mind the following when choosing the stations mounting place:
In order to have the charging contacts on the correct height, the bottom edge of the station's backplate must be placed directly on the floor.
The charging station must be mounted to a stable wall. Please contact Neobotix if you need a free-standing charging station.
The station must be mounted centred at the rear end of a free path that is at least 1,0m wide.
When using more than one station, please keep a grid of at least 1,0m width.
MPO-500-OperatingManual Neobotix GmbH – all rights reserved 14 of 29
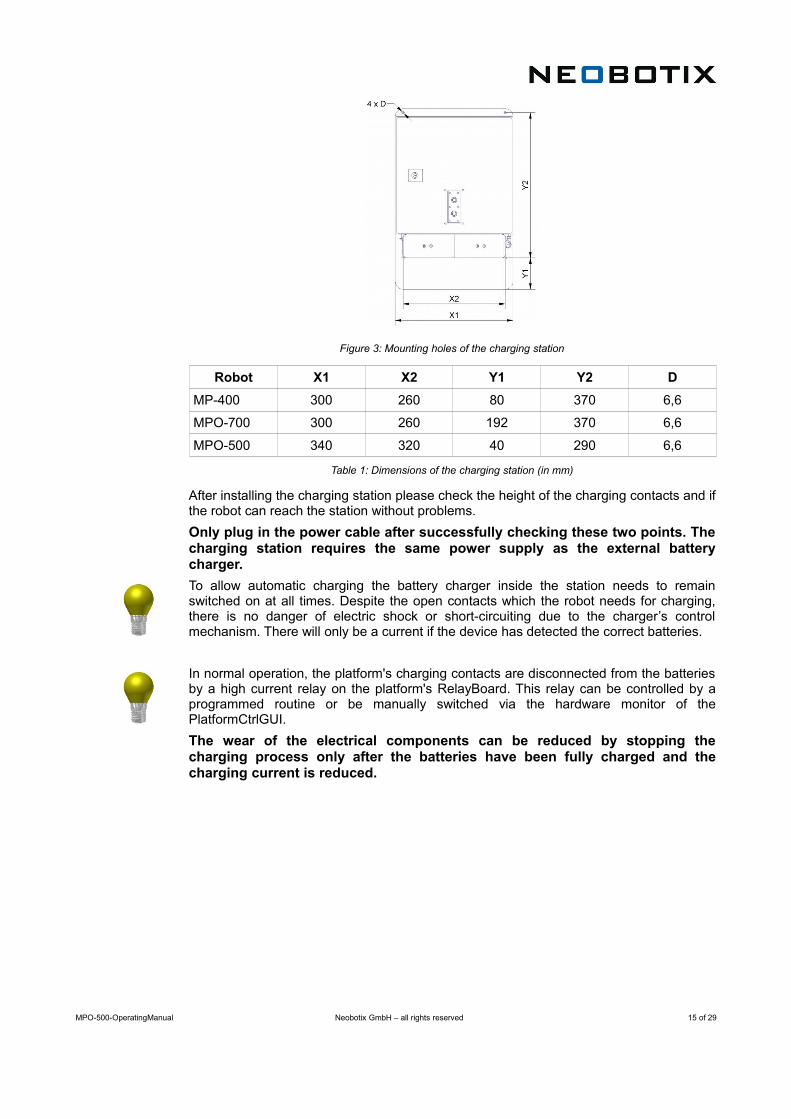
Figure 3: Mounting holes of the charging station
Robot X1 X2 Y1 Y2 D
MP-400 300 260 80 370 6,6
MPO-700 300 260 192 370 6,6
MPO-500 340 320 40 290 6,6
Table 1: Dimensions of the charging station (in mm)
After installing the charging station please check the height of the charging contacts and if the robot can reach the station without problems.
Only plug in the power cable after successfully checking these two points. The charging station requires the same power supply as the external battery charger.
To allow automatic charging the battery charger inside the station needs to remain switched on at all times. Despite the open contacts which the robot needs for charging, there is no danger of electric shock or short-circuiting due to the charger’s control mechanism. There will only be a current if the device has detected the correct batteries.
In normal operation, the platform's charging contacts are disconnected from the batteries by a high current relay on the platform's RelayBoard. This relay can be controlled by a programmed routine or be manually switched via the hardware monitor of the PlatformCtrlGUI.
The wear of the electrical components can be reduced by stopping the charging process only after the batteries have been fully charged and the charging current is reduced.
MPO-500-OperatingManual Neobotix GmbH – all rights reserved 15 of 29
7 Installing the host computer
A common PC system is sufficient to run the Neobotix graphical user interface.
7.1 Windows operating system
Installing the Java Runtime EnvironmentThe Neobotix GUI is programmed in Java and thus platform independent. This also means that a Java Runtime Environment and in some cases a library for 3D-calculations must be installed before using the GUI.
If there is none or an older version on the host computer please download the latest Java version from www.java.com and install it manually. In case any additional software is required, please check the content of the CD or DVD that was included in delivery.
Installing the GUIThe graphical user interface does not need to be installed. Simply copy the folder “NeoPltfGUI_<version>” from the disk to your hard drive.
To run the GUI just double-click on start.bat or create a shortcut on your desktop by right-dragging the start.bat-icon onto the desktop and selecting Create shortcut here from the pop-up-menu.
7.2 Linux operating system
Installing the Java Runtime EnvironmentMost common Linux distributions already come with an installed Java Runtime Environment. Please make sure that a Java 7 Runtime Environment or later is available. For Debian/Ubuntu distributions installation starts after entering
apt-get install openjdk-7-jre
on root command line. For other distributions please use your package manager.
Installing the GUIThe graphical user interface does not need to be installed. Instead simply copy the folder “PltfGUI” from the CD to your hard drive.
To run the GUI open a terminal, change to the location of “PltfGUI” and enterjava -jar PlatformCtrlGUI.jar
7.3 Setting up the network
If ordered, a wireless LAN-device was delivered together with the platform to allow easy connecting to the robot. In case the settings of this device need to be changed, please use the software on the according driver disc and work directly on the platform’s on-board computer as described in chapter “Maintenance”.
Make sure that both platform and host PC are in the same subnet. Please refer to the system administrator of the local computer network.
MPO-500-OperatingManual Neobotix GmbH – all rights reserved 16 of 29

8 The LC-Display
The LC-Display shows the current state of the robot's hardware in two different views.
8.1 Main view
Figure 4: The LCD main view
MessagesThe first line can be used to print messages sent from PlatformCtrl or a higher level control software. The default message is “NEOBOTIX GmbH”.
Status informationThe second line indicates the robot's current status.
PLEASE WAIT: The control software is not yet connected to the robot's main control board.
READY: The control software is active and the robot is fully operational.
EMERGENCY STOP: One of the emergency stop buttons has been pressed.
TURN KEY →: Reset the safety system by turning the key switch clockwise for about one second.
SCANNER STOP: An obstacle has been detected within the laser scanner's safety field. As soon as the obstacle has been removed, the safety system will be reset automatically. If a FlexiSoft safety controller is installed, all stops are indicated with this message.
CHARGING: The robot is currently charging its batteries.
SHUTDOWN IN XXs: The robot will turn itself off in a few seconds.
BATTERY VOLTAGE LOW: The battery voltage is critically low and the robot will soon shut down to prevent a deep discharge. Further information can be found in the next section.
MOTOR ERROR: At least one motor is reporting an error. This state is quit automatically as soon as all motors are operational again.
SAFETY RELAY FAIL: One of the safety relays is damaged. Please contact Neobotix.
POWER RELAY FAIL: The power relays are damaged. Please contact Neobotix.
EMSTOP BUTTON FAIL: One of the emergency stop buttons does not operate properly. Please contact Neobotix.
CHARGE RELAY FAIL: The charging relay is damaged. Please contact Neobotix.
The charging contacts might still be connected to the batteries!
Checksum error: The protocol versions of the control software and the RelayBoard do not match. Please check the wiring and the log output of PlatformCtrl.
MPO-500-OperatingManual Neobotix GmbH – all rights reserved 17 of 29
Battery charge level
B:096%The current charge level of the batteries. Due to the batteries characteristics the actual battery voltage may be higher than the platform’s rated main voltage.
Nominal voltage Shut-down Working range Charging
24V ≤ 22V 23V .. 25V 25V .. 28V
48V ≤ 44V 46V .. 52V 52V .. 57V
Table 2: Voltages of different batteries
Temperature
T:20C:This is the temperature inside the platform, measured at the main control board.
Uptime
00d:00h:02m:37sThe bottom line shows the uptime since startup in days, hours, minutes and seconds.
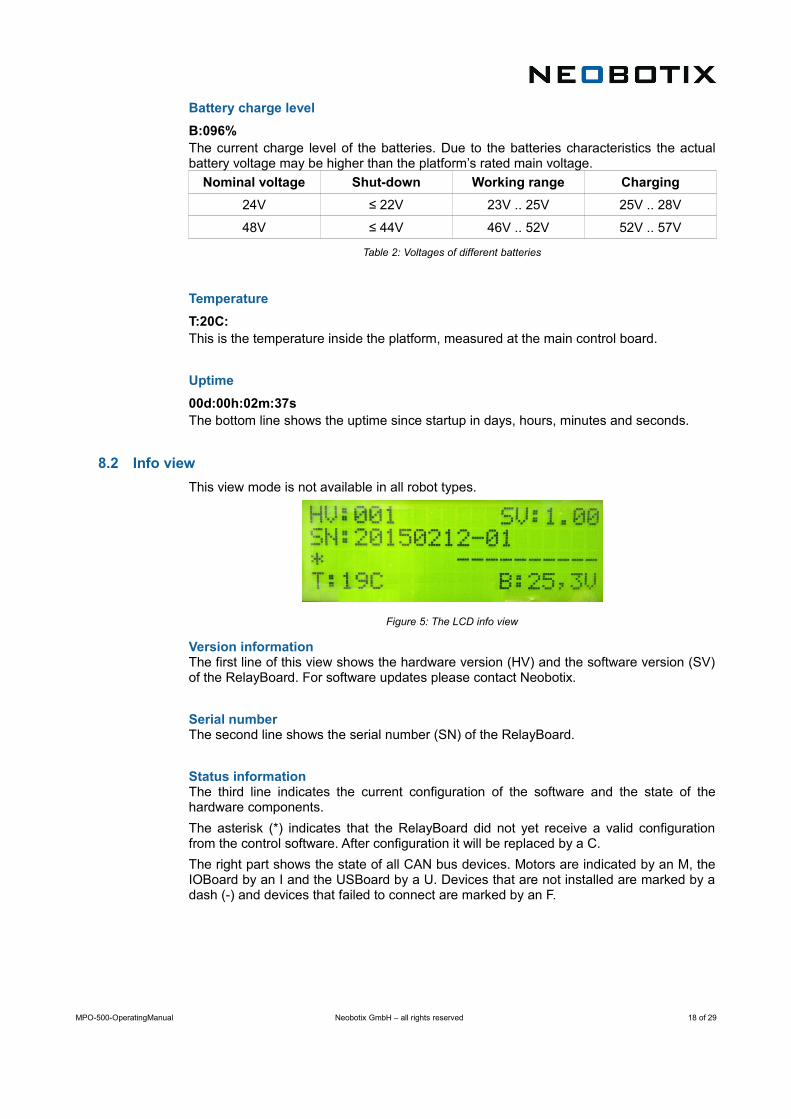
8.2 Info view
This view mode is not available in all robot types.
Figure 5: The LCD info view
Version informationThe first line of this view shows the hardware version (HV) and the software version (SV) of the RelayBoard. For software updates please contact Neobotix.
Serial numberThe second line shows the serial number (SN) of the RelayBoard.
Status informationThe third line indicates the current configuration of the software and the state of the hardware components.
The asterisk (*) indicates that the RelayBoard did not yet receive a valid configuration from the control software. After configuration it will be replaced by a C.
The right part shows the state of all CAN bus devices. Motors are indicated by an M, the IOBoard by an I and the USBoard by a U. Devices that are not installed are marked by a dash (-) and devices that failed to connect are marked by an F.
MPO-500-OperatingManual Neobotix GmbH – all rights reserved 18 of 29

9 Maintenance
9.1 Software
Apart from research or maintenance it will not be necessary to connect mouse or keyboard because the robot can be controlled via wireless LAN and the graphical user interface. Even most software updates can be performed by remote control using the Ethernet connection.
In order to access the platform’s on-board computer directly, an HDMI socket, a USB socket and an Ethernet socket are available at the rear side of the robot. Please refer to chapter “Bringing into service” for further information.
9.2 Hardware
The robot’s hardware is almost maintenance-free and the platform is not intended to be opened unless when used for research.
Please contact Neobotix before disassembling the robot!
To achieve a long life of the robot and to guarantee a satisfying operation, the robot should be checked and cleaned regularly.
CleaningCleaning the various sensors is indispensable to assure that the robot can move safely and swiftly through its environment.
Be very careful not to scratch the covers of the laser scanners or the membranes of the ultrasonic sensors. Damaging these components might cause severe malfunctions!
Figures 6:Positions of laser scanners (O) and ultrasonic sensors (X)
The robot is only rainproof if the battery drawer is closed and locked, the charging socket is sealed by its cap, all computer access sockets are covered and the cables of both laser scanners are connected properly. Do not wet the robot while one of these components is not assembled correctly!
MPO-500-OperatingManual Neobotix GmbH – all rights reserved 19 of 29
XX
X
X
X
XX
X

WheelsThe rollers of the wheels should be cleaned regularly to minimise slippage and to ensure smooth and steady driving.
Under normal operation the wheels will last for several years. If the rollers or other parts of the wheels show significant signs of wear they can easily be replaced. Please contact Neobotix in case a replacement is required.
BatteriesThe platform's batteries provide enough capacity for several hours of continuous operation.
This capacity will reduce over time until at some point (approximately after 1000 charging cycles or two years) the available runtime is no longer sufficient and the batteries need to be replaced.
There are several measures to prolong the life of the batteries and to save costs and resources:
– Recharge the robot whenever possible
– Avoid deep discharge and reaching the automatic shut-down voltage
– Charge the robot while it does not need to move (e. g. while programming)
– Do not leave the robot with discharged batteries for a long time
Lead batteries in AGM design are generally very tolerant and significantly less dangerous than lithium-ion-batteries. Heat, age or wrong treatment may nevertheless cause damages.
Regularly check the batteries' condition, at least once every month! The following points indicate battery damages:
– Deformation or stretching of a battery's body
– White or brownish spots at the battery contacts or other metal parts
– Excess heat
– Strong smell of sulphur
– Liquid below the battery
As soon as you notice any kind of damage the batteries must no longer be used and must not be charged any further!
Please contact Neobotix immediately.
In chapter “Recycling” you can find information on how to treat old batteries.
In case you want to replace the batteries and the robot does not feature the hot-swap system please follow these steps:
1. Switch off the robot.
2. Switch off and disconnect the battery charger.
3. Remove all additional modules from the robot's top plate.
4. Remove the screws holding the top plate (seven screws by default).
5. Carefully lift up the top plate and disconnect any remaining cables.
6. Remove the top plate.
MPO-500-OperatingManual Neobotix GmbH – all rights reserved 20 of 29

7. Disconnect the connectors of both batteries.
8. Remove the cushioning from in between the batteries.
9. Slowly lift the batteries out of the platform and take care not to damage any cables.
10. Slowly place the new batteries into the platform while taking care not to damage any cables.
11. Connect both batteries to the robot.
12. Replace the cushioning and check if the batteries are locked in place.
13. Place the top plate back on the robot and reconnect its cables if necessary.
14. Align the top plate and arrange the foam rubber sealing properly to achieve best splash water protection.
15. Fasten the top plate to the platform and mount all modules removed earlier.
If you encounter any problems, please contact Neobotix immediately.
Battery drawer / Hot-swap-systemThe hot-swap system allows the batteries to be changed without the use of tools and without the robot being shut down.
Please follow these steps:
1. Move the robot next to the replacement batteries.Turn off the robot if only the battery drawer but no Hot-Swap-System is installed.
2. If the battery charger is connected to the platform: turn off the charger and disconnect it from the platform.
3. Unlock the battery drawer by turning the three black knobs counter-clockwise for 180°.
4. Slowly open the drawer. This sets the robot to emergency stop.
5. Disconnect the batteries.
6. Lift the batteries out of the drawer.
7. Carefully place the replacement battery with the long cable into the drawer and push it fully inside.
8. Place the battery with the short cable into the drawer while taking care not to damage any cables.
9. Connect both batteries to the connectors inside the drawer.
10. Slowly close the drawer while taking care not to damage the cables.
11. Turn all three knobs clockwise for 180° to lock the drawer.
12. Reset the emergency stop by turning the key switch clockwise. The robot is now ready for operation again.If no Hot-Swap-System is installed the robot can now be restarted.
The batteries must only be replaced by qualified and trained personnel. Always take great care not to clamp or damage any cables.
A robot with damaged cables must not be operated any further.
The Neobotix GmbH cannot be held responsible for any damage caused by faulty or careless battery replacement.
MPO-500-OperatingManual Neobotix GmbH – all rights reserved 21 of 29

FusesThe MPO-500 features the following fuses.
ID Circuit Position Type Current Speed
F1 Main battery power With Hot-Swap-System:Below battery connectorsWithout Hot-Swap-Syst.:Behind main batteries
Blade 20A default
F1' 24V supply terminals RelayBoard Micro 5x20 5A slow
F3' Emerg. stop buttons RelayBoard Micro 5x20 2A fast
F4' Brake release button RelayBoard Micro 5x20 3A slow
9.3 Charging station
Due to its simple and robust design the charging station does not require much maintenance. However, it might be necessary to replace the charging contacts if they show significant signs of wear (e.g. heavy scratches or discolouring). It is also recommended to check regularly that they can move smoothly and without getting stuck and that the spring resistance is sufficient.
Please contact Neobotix if you notice any change or problem of the automatic charging station.
Always disconnect the charging station from the battery charger before doing any maintenance work!
MPO-500-OperatingManual Neobotix GmbH – all rights reserved 22 of 29

10 Taking out of service
10.1 Disassembly
Once the MPO-500 has reached the end of its lifetime it should be disassembled and its components should be recycled.
Before the robot can be disassembled the battery charger and any other power supply must be disconnected from the robot. Furthermore both the main batteries and the buffer batteries (in case the robot features the hot-swap system) have to be removed. The buffer batteries are located directly behind the main batteries and can be accessed through the open battery drawer.
It is strongly recommended to wait for at least 30 minutes after disconnecting all power sources before starting the disassembly. This will help to discharge any electrical energy that might be left in the system.
Disassembly of the MPO-500 should be done by technicians only, preferably someone who has already worked on the robot in the past and knows its technical details. This will ensure:
Fast and trouble-free disassembly
Reduced risk of injuries or damages to components that are to be reused
Proper sorting of parts according to materials and way of recycling
10.2 Recycling
Reusable componentsMany components of the MPO-500 (e. g. the servo motors and the amplifiers) have a very long life expectancy and will most probably still be usable when the overall system has reached the end of its lifetime.
Please check carefully which components can be reused immediately or in later projects and make sure that they are removed with care.
Reusing components does not only help the environment by reducing resource consumption but will also safe a significant amount of money.
Inner frameThe inner frame of the MPO-500 is made up from aluminium parts and steel connectors. Both materials should be separated completely and can then be sold to certified recycling companies.
Electrical componentsElectronic scrap is both a source of valuable resources as well as a threat to the environment and must not be treated like consumer waste.
All electrical wires and components must therefore be collected and sold to or deposited at the appropriate recycling facilities.
BatteriesThe batteries used for the MPO-500 are lead acid batteries with absorbent glass mats (AGM).
Under European law this kind of battery must only be returned to certified recycling companies.
MPO-500-OperatingManual Neobotix GmbH – all rights reserved 23 of 29

11 Component diagram
The figure below shows a component diagram of the MPO-500.
The platform is moved by four independent motors with servo controllers. Only when all drives are coordinated properly the forces generated by the Mecanum wheels will result in a controlled motion.
Sensor data for navigation are acquired by one or two laser scanners and odometry of drives.
Possible collisions between the platform and obstacles are detected with the laser scanners and optional ultrasonic sensors. The laser scanners can also be used to monitor the surrounding of the robot and to set the platform to emergency stop in case an obstacle is detected in a critical distance. The ultrasonic sensors have no direct safety function and only affect the path planning.
User interface components are an LC-Display in the top plate of the platform, a four button keypad for simple interaction with the control software and a joystick for remote control.
Optional speakers can be used for audio output via the on-board computer.
Figure 7: Component diagram of MPO-500
MPO-500-OperatingManual Neobotix GmbH – all rights reserved 24 of 29

12 Technical data
12.1 Mechanical properties
Dimensions
Figure 8: Dimensions of the MPO-500
All dimensions are in millimetres.
Description Symbol Value
Wheel diameter D 254
Ground clearance (without charge contacts) G 45
Ground clearance (with charge contacts) G’ 30
Height of the mounting plane H1 386
Height of the scanner cover H2 409
Overall length of platform L1 986
Length of inner aluminium profiles L2 680
Length of outer aluminium profiles L3 380
Distance from platform centre to wheel axes L4 250
Maximum length to platform centre L5 493
Width of top plate W1 500
Distance from platform centre to outer aluminium profiles W2 219
Distance from platform centre to inner aluminium profiles W3 73
Track width W4 548
Maximum width W5 662
Size of aluminium profiles P 30
Absolute maximum ratings
Description Units Value
Payload (equally distributed to aluminium profiles, default version) kg 50
Payload (equally distributed to aluminium profiles, high payl. vers.) kg 150
Maximum speed m/s 0.9
Maximum bumpiness to pass over mm 5
Maximum acceleration m/s2 2.4
Storage temperature °C -20 .. +50
Operating temperature (environmental temperature) °C +0 .. +35
MPO-500-OperatingManual Neobotix GmbH – all rights reserved 25 of 29

Positions of sensorsAll distances are in millimetres, measured relative to the platforms coordinate system. All angles are in degree, measured counter-clockwise from the driving direction.
Figure 9: Coordinate system of MP-500
Figures 10: Positions of sensors
Sensor Symbol X-pos. Y-pos. Z-pos. a-angle b-angle
Front laser scanner LS1 442 0 372 0 0
Rear laser scanner LS2 -442 0 372 0 180
Ultrasonic sensor 1 US1 398 -145 305 -30 0
Ultrasonic sensor 2 US2 398 145 305 -30 0
Ultrasonic sensor 3 US3 150 268 305 -30 90
Ultrasonic sensor 4 US4 -115 268 305 -30 90
Ultrasonic sensor 5 US5 -398 145 305 -30 180
Ultrasonic sensor 6 US6 -398 -145 305 -30 180
Ultrasonic sensor 7 US7 -150 -268 308 -30 270
Ultrasonic sensor 8 US8 150 -268 305 -30 270
The working ranges of all ultrasonic sensors are set edgewise.
MPO-500-OperatingManual Neobotix GmbH – all rights reserved 26 of 29
US1
US2
US3 US4
US5
LS1 LS2
US6
US7US8

12.2 Electrical properties and miscellaneous data
Properties of internal componentsAll data are taken from the respective datasheets.
Description Units Value
Motor power W 200
Rated motor speed Rpm 3000
Maximum motor speed Rpm 5000
Possible motor speed (at battery voltage) Rpm 1800
Rated motor torque Nm 0.64
Maximum motor torque Nm 1.91
Brake torque (static) Nm 1.47
Encoder resolution Increments / Revolution 4096
Gear ratio 1 25:1
Rated battery voltage V 24
Maximum unregulated voltage V 29
Battery capacity (main batteries) Ah 38
Battery capacity (buffer batteries) Ah 1.2
Metering capacities of sensorsAll data are taken from the respective datasheets. Distances are measured in meters, angles are measured in degree.
Sensor Resolution Min. range Max. range Hor. angle Vert. angle
Laser scanner 0.5° 0 30 ±135 0
Ultrasonic sensors ~±0.01 m 0.25 1.5 ±60 ±30
Other properties
Description Units Value
Weight kg 80
Expected working time a 10
MPO-500-OperatingManual Neobotix GmbH – all rights reserved 27 of 29

12.3 Connectors
TE Connectivity – HE14
Pins TE Connectivity Farnell RS Components
3 pins, 1 row 281838-3 429582 532-333
4 pins, 1 row 281838-4 429594 532-349
5 pins, 1 row 281838-5 429600 532-355
6 pins, 2 rows 281839-3 429650 532-406
8 pins, 2 rows 281839-4 429661 532-412
10 pins, 2 rows 281839-5 429673 532-428
12 pins, 2 rows 281839-6 429685 532-434
Crimp contacts AWG 28-24 182734-2 429715 532-456
Table 3: HE14 connectors
Molex – Mini-Fit Jr.
Pins Molex Farnell RS Components
2 pins 39-01-2020 151866 484-1748
4 pins 39-01-2040 151867 484-1754
6 pins 39-01-2060 151868 484-1760
8 pins 39-01-2080 151869 484-1782
10 pins 39-01-2100 151870 484-1798
16 pins 39-01-2160 4138399 172-9011
Crimp contacts AWG 24-18 39-00-0039 9732195 172-9134
Table 4: Mini-Fit Jr. connectors
MPO-500-OperatingManual Neobotix GmbH – all rights reserved 28 of 29

13 Legal notes
Version informationThis document has been translated and is not the original. Please refer to the German version in case of uncertainties or questions.
LiabilityEvery care has been taken in the preparation of this manual which represents the state of technology at the time of its composing. However, inaccuracies or omissions might occur. Please inform Neobotix in case you notice any.
The Neobotix GmbH cannot be held responsible for any technical or typographical errors and reserves the right to make changes to the product and manual without prior notice.
Neobotix makes no warranty of any kind with regard to the material contained within this document, including, but not limited to, the implied warranties of merchantability and fitness for a particular purpose.
Neobotix GmbH shall not be liable or responsible for incidental or consequential damages in connection with the improper use of one or more of the products described in this manual.
Declaration of conformityThis product fulfils all relevant directives of the European Union. For further information please contact Neobotix.
Downloads and further informationAdditional information, data sheets and documentations, also for the other products of Neobotix, can be found on our homepage www.neobotix-roboter.de.
ImprintNeobotix GmbH
Weipertstraße 8 – 10, 74076 Heilbronn, Germany
www.neobotix-roboter.de
Contact: Dipl.-Ing. Till May
Tel.: (+49) 71531 / 76 69-300
E-Mail: [email protected]
MPO-500-OperatingManual.odm, edited 21. March 2017 in Heilbronn, Germany
MPO-500-OperatingManual Neobotix GmbH – all rights reserved 29 of 29