mecanismo 6 cd sharp cd-ba3100h
TRANSCRIPT

8/2/2019 Mecanismo 6 CD Sharp CD-ba3100h
http://slidepdf.com/reader/full/mecanismo-6-cd-sharp-cd-ba3100h 1/7
CD-BA3100H
– 18 –
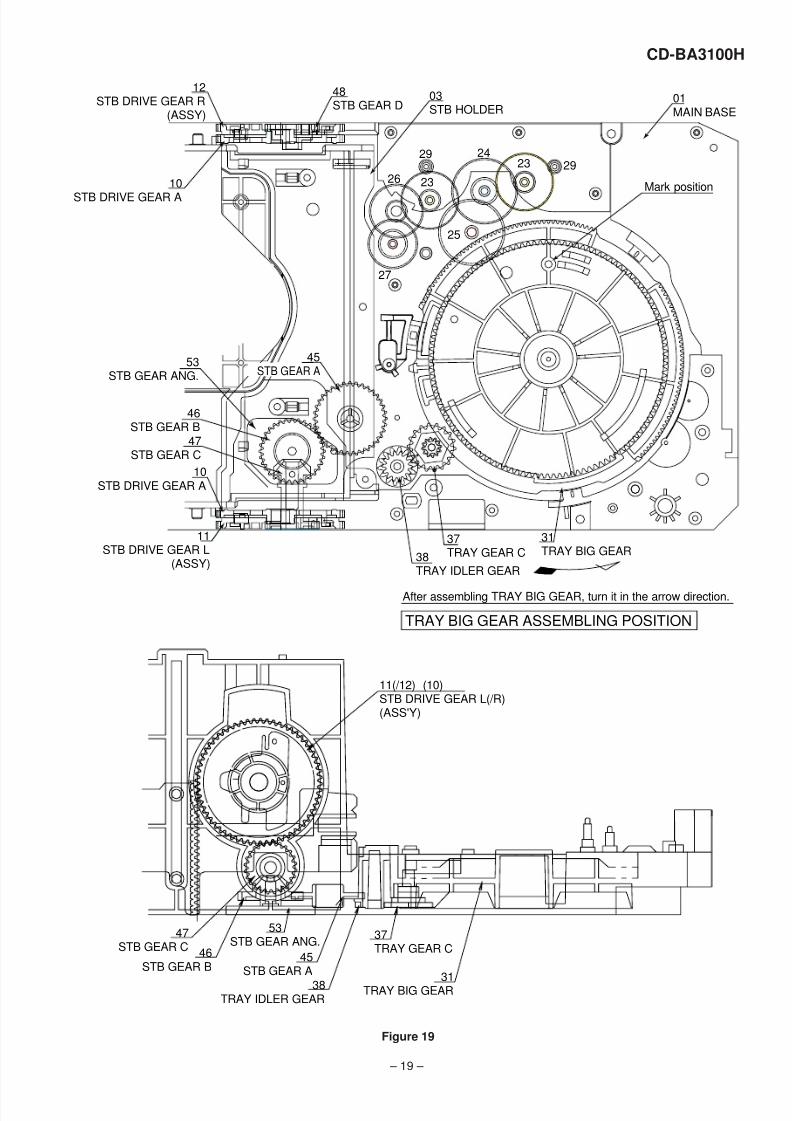
1. Motor assembly (x 2) mounting (screw x 4) 01/29 Fig.19
2. MT idle gear mounting (screw x 1) 25 Fig.19
3. MT system gear assembly 23/24/26/27 Fig.194. STB/tray drive system gear and others assembling/ 37/38/45/46 (53)/47/48 Fig.19
mounting (screw x 3)
5. Tray big gear assembly 31 Fig.19 Gear positioning
6. T.M SW PWB mounting (screw x 3) Fig.20
7. STB holder assembling 03 Fig.19
8. STB drive gear L/R assembly mounting (screw x 2) 11 (10)/12 (10) Fig.19
9. Tray joint gear R/tray drive gear R assembling 34/36 Fig.20 Gear positioning
10. Tray gear A/B assembling 32/33 Fig.20 Gear positioning
11. Lift gear B/C assembling 43/44 Fig.21 Gear positioning
12. MT idler gear F assembling, mode big gear 28/42 Fig.21mounting (screw x 1)
13. Change box R mounting (screw x 4) 04 Fig.21
14. Lift gear A assembling 42 Fig.21 Gear positioning
15. Change box L assembly mounting (screw x 4) 02/30/35 Fig.22
16. Lift cam assembling (shaft inserting) 44 Fig.22 Gear positioning
17. STB holder height adjusting Fig.23 Check/adjustment
18. Top plate F/disc OB LEV. Mounting (screw x 6) 80 Fig.23
19. Trays 1 - 6 assembling 91/92/93/94/95/96 Fig.24
20. Top plate R mounting (screw x 6) ––
Applied Part No.Work Content Assembly Fig. No. Remarks
CD CHANGER MECHANISM MAIN BASE PARTS ASSEMBLING/ADJUSTINGPROCEDURE
01 (101) MAIN BASE
02 (102) CHANGE BOX L
03 (147) STB HOLDER
04 (103) CHANGE BOX R
10 (119) STB DRIVE GEAR A
11 (120) STB DRIVE GEAR L
12 (122) STB DRIVE GEAR R
20 (149) STABILIZER FH
23 (141) MT IDLER GEAR A
24 (138) MT IDLER GEAR B25 (137) MT IDLER GEAR C
26 (140) MT IDLER GEAR D
27 (139) MT IDLER GEAR E
28 (131) MT IDLER GEAR F
29 (MOB1,2) MOTOR GEAR
30 (143) TRAY DRIVE GEAR F
31 (134) TRAY BIG GEAR
32 (135) TRAY GEAR A
33 (136) TRAY GEAR B
34 (124) TRAY DRIVE GEAR R
35 (144) TRAY JOINT GEAR F36 (125) TRAY JOINT GEAR R
37 (142) TRAY GEAR C
38 (130) TRAY IDLER GEAR
Part NameNo.
40 (115) LIFT CAM
41 (126) MODE BIG GEAR
42 (127) LIFT GEAR A
43 (128) LIFT GEAR B
44 (129) LIFT GEAR C
45 (132) STB GEAR A
46 (104) STB GEAR B
47 (133-1) STB GEAR C
48 (133-3) STB GEAR D
50 (145) LIFT LEVER
51 (106) TRAY LOCK LEVER52 (118) DISC OB LEVER
53 (105) STB GEAR ANG.
80 (117) TOP PLATE F
81 (114) TOP PLATE R
91 (108) TRAY 1
92 (109) TRAY 2
93 (110) TRAY 3
94 (111) TRAY 4
95 (112) TRAY 5
96 (113) TRAY 6
Part NameNo.
CD CHANGER MECHANISM PARTS LIST
The number of ( ) is the number of the parts guide.
8/2/2019 Mecanismo 6 CD Sharp CD-ba3100h
http://slidepdf.com/reader/full/mecanismo-6-cd-sharp-cd-ba3100h 2/7
– 19 –
CD-BA3100H
Figure 19
03STB HOLDER
48STB GEAR D
12STB DRIVE GEAR R
(ASSY)
10
STB DRIVE GEAR A
2929
23
23
24
25
26
27
01MAIN BASE
Mark position
After assembling TRAY BIG GEAR, turn it in the arrow direction.
TRAY BIG GEAR ASSEMBLING POSITION
31TRAY BIG GEAR
37TRAY GEAR C38
TRAY IDLER GEAR
47STB GEAR C
46STB GEAR B
10STB DRIVE GEAR A
11STB DRIVE GEAR L
(ASSY)
53STB GEAR ANG.
45STB GEAR A
11(/12) (10)STB DRIVE GEAR L(/R)(ASS'Y)
46STB GEAR B
37TRAY GEAR C
47STB GEAR C
31TRAY BIG GEAR38TRAY IDLER GEAR
45STB GEAR A
53STB GEAR ANG.
L

8/2/2019 Mecanismo 6 CD Sharp CD-ba3100h
http://slidepdf.com/reader/full/mecanismo-6-cd-sharp-cd-ba3100h 3/7
CD-BA3100H
– 20 –
31
M T SW PWB
33TRAYGEAR B
32TRAY GEAR A
33TRAY GEAR B
37
32TRAY GEAR A
3834TRAY DRIVE GEAR R36
TRAY JOINT GEAR R
47
46
34TRAY DRIVE GEAR R
36TRAY JOINT GEAR R
10
29
2923
23
24
25
26
27Mark position
11
45
TRAY BIG GEAR SET POSITION
33
32
Direct the recess part(trapezoidal side) of the axis35 in this direction.
* This position becomes thereference (stock) positionof the tray.
These holes must align.
It must not rotate in contactwith the peripheral (hatched)part of 31.
These holes must align.After assembling 32,assemble 33.
*1: To position the axis part of 36, engage it with 38.*2: When it is aligned as described in *1, the hatched part
(low gear-height part of gear) will be positioned in this position.Note: After positioning the tray big gear in the set position, engage these gears.
*1
*2
Scale: 2 magnificationsScale: 2 magnifications
L
< Importance >
< Importance >
Figure 20

8/2/2019 Mecanismo 6 CD Sharp CD-ba3100h
http://slidepdf.com/reader/full/mecanismo-6-cd-sharp-cd-ba3100h 4/7
– 21 –
CD-BA3100H
43LIFT GEAR B41
MODE BIG GEAR
04CHANGE BOX R
47
46
28MT IDLER GEAR F
10
Mark position(Assemble the mode big gear in this position.)
11
45
42LIFT GEAR A
37
38
44LIFT GEAR C
3436
(A)
(C)
(B)
44LIFT GEAR C
43LIFT GEAR B
42LIFT GEAR A
41MODE BIG GEAR
Note:To assemble the modebig gear, incline it,bring it into contact withthe circumference andput the center hole intoposition since thehatched part of the mainbase is overlapped withthe circumference.
Direct the short toothtoward the center.
MODE BIG GEARLIFT GEAR A/B/CASSEMBLING POSITION
Scale: 2 magnifications
Scale: 2 magnifications
<Assembling method of lift gear>After setting up the mode big gear in theshown position, engage it with the STB gear A(gear on the lower side) at the position (A),
and assemble them, turning it in the arrow directioninto the position (B). (The short tooth directs toward thecenter of the mode big gear.)Check the gap (C) after assembly.If no gap is found, repeat the above procedure.
L
C 1
> A B S <
GAP (0.3-1.5 mm)
33
32
< Importance >
< Importance >
Figure 21

8/2/2019 Mecanismo 6 CD Sharp CD-ba3100h
http://slidepdf.com/reader/full/mecanismo-6-cd-sharp-cd-ba3100h 5/7
CD-BA3100H
– 22 –
Mark position
3 7 °
33
32
30TRAY DRIVE GEAR F
35TRAY JOINT GEAR F
02CHANGE BOX L
< Importance >Direct the recess part(trapezoidal side) of theaxis 35 in this direction.
*2
*1: To position the axis partof 35, engage it with 33.
*2: When it is aligned asdescribed in *1, the hatched part(low gear-height part of gear)will be positioned as shown.
Since this gear engagement is notvisually checked, verify that it doesnot float when the gear box L is installed.
30TRAY DRIVE GEAR F
35TRAY JOINT GEAR F
*1
43
4140LIFTCAM
Scale: 2 magnifications
4411
TRAY JOINT GEAR F(CHANGE BOX L ASS'Y) ASSEMBLING POSITIONLIFT CAM
Assembling procedure1. Turn the mode big gear approx. 37 degrees in the arrow direction.2. Assemble the change box L ass'y.Note: At this time, the tray joint gear F must be located in the position shown in figure.
Moreover, the gear must be engaged securely.
3. After assembly, return the mode big gear to the initial position.4. Assemble the lift cam.Note: At this time, the lift cam (No.40) must be located in the position shown in figure 22.
47
46
10
45
42LIFT GEAR A
28
L
40LIFT CAM
Scale: 2 magnifications
During assembly, make theO part visible in this direction.
Note: Among 4 ribs on thecircumference, one rib alone
is provided with O.
< Importance >
30TRAY DRIVE GEAR F35TRAY JOINT GEAR F
Figure 22

8/2/2019 Mecanismo 6 CD Sharp CD-ba3100h
http://slidepdf.com/reader/full/mecanismo-6-cd-sharp-cd-ba3100h 6/7
– 23 –
CD-BA3100H
Figure 23
Adjusting procedure1. Turn the mode big gear approx. 37 degrees in the arrow direction.
2. Viewing from the front side of the mechanism, verify that the guide ribs(CHANGE BOX L/R and STB HOLDER)of tray are as tall as each other.
3. If they are not, bend the lever for adjustment. (Refer to the details.)Note: Also apply the same adjustment on the R side.
STB HOLDER HEIGHT ADJUSTING METHOD
47
46
10
11
45
42LIFT GEAR A
43
41
32
3540
44
33
30
Mark position
80TOP PLATE F
37°
(121)OS LEVER
Bend this portion to adjust the STB HOLDER
When high(Narrow the gap.)
When low(Broaden the gap.)
Adjustment procedure
1. Rotate the MODE BIG GEAR by 37° in the arrowed direction.
2. Check that the guide ribs (CHANGE BOX L/R and STB HOLDER) on the arrowedTRAY are at the same height when looked from the front.
3. If they are not, bend the OS LEVER to adjust them. (Refer to the detail drawing.)Note: Adjust the R portion in the same procedure.
02(102) CHANGE BOX L RIB
03(147) STB HOLDER RIB
03(147) STB HOLDER RIB
04(103) CHANGE BOX R RIB

8/2/2019 Mecanismo 6 CD Sharp CD-ba3100h
http://slidepdf.com/reader/full/mecanismo-6-cd-sharp-cd-ba3100h 7/7
CD-BA3100H
– 24 –
Measure to be taken when a disc cannot be removed due to a mechanism troubleFirst, remove the mechanism unit section from the set, and check for the state of the disc.
(Remove the top plate R if necessary.)
<State of the disc>
(1) When the disc is in the normal PLAY (chucking) position → Try to eject the disc by turning the mode big gear/tray big gear
manually.
* At this time, be sure to adjust the tray's position (height).
(2) When the disc is in the normal STOCK position → Try to eject the disc by turning the tray big gear manually.
* At this time, be sure to adjust the tray's position (height).
(3) When the disc is not in the normal position → The tray or disc is not in the normal position.
(The tray or disc may catch somewhere.)
↓
Remove the TOP PLATE F/DISC OB lever.
Unlock the tray lock lever and pull out the tray which is not caught.Move the caught tray or disc and remove the disc.
In case of (1) and (2), the mechanism is normal (defective circuit parts, etc.). However, it may stop somewhere.
This is the reason why you should try to turn the tray big gear first.
In case of (3), either of the big gears does not turn.
Figure 24
L
91~96TRAY1~TRAY6
Mark positionBe sure to assemble the tray into this position.
32
Insert it along the guide ofthe change box.
Rearside
33
30
35
TRAY No.1~6
Rear surface: Stamped.Note: During insertion,Do not accidentally rearrangetray numbers.
4341 4044
47
46
10
11
Tray installing method: (After adjusting the height of the STB holder)1. Turn the mode big gear to the mark position to lower the STB holder to
the bottom area.2. From the front side, install the tray. (Securely insert it to the lock position.)
TRAY 6TRAY 5
TRAY 4
TRAY 3
TRAY 2
TRAY 1
40
30
35
42LIFT GEAR A
45