md mini system operation manual md-c2h · operation manual model md-c2h hk md mini system...
TRANSCRIPT
OPERATION MANUAL
MODEL
MD-C2H
HK <P=001>
MD MINI SYSTEM
MD-C2H(SUK) TINSE0238AWZZ
Thank you for purchasing this SHARP product. To obtain the best performance from this product, pleaseread this manual carefully. It will guide you in operatingyour SHARP product.
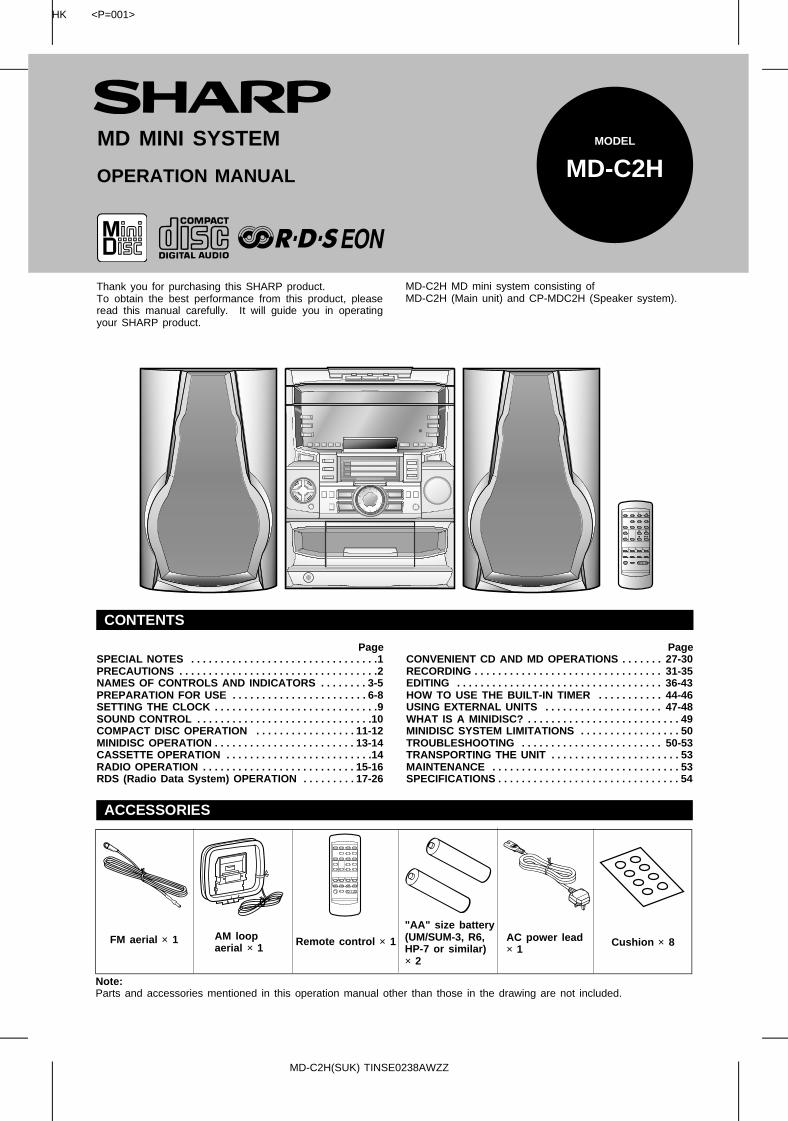
MD-C2H MD mini system consisting of MD-C2H (Main unit) and CP-MDC2H (Speaker system).
CONTENTS
PageSPECIAL NOTES . . . . . . . . . . . . . . . . . . . . . . . . . . . . . . . .1PRECAUTIONS . . . . . . . . . . . . . . . . . . . . . . . . . . . . . . . . . .2NAMES OF CONTROLS AND INDICATORS . . . . . . . . 3-5PREPARATION FOR USE . . . . . . . . . . . . . . . . . . . . . . . 6-8SETTING THE CLOCK . . . . . . . . . . . . . . . . . . . . . . . . . . . .9SOUND CONTROL . . . . . . . . . . . . . . . . . . . . . . . . . . . . . .10COMPACT DISC OPERATION . . . . . . . . . . . . . . . . . 11-12MINIDISC OPERATION . . . . . . . . . . . . . . . . . . . . . . . . 13-14CASSETTE OPERATION . . . . . . . . . . . . . . . . . . . . . . . . .14RADIO OPERATION . . . . . . . . . . . . . . . . . . . . . . . . . . 15-16RDS (Radio Data System) OPERATION . . . . . . . . . 17-26
PageCONVENIENT CD AND MD OPERATIONS . . . . . . . 27-30RECORDING . . . . . . . . . . . . . . . . . . . . . . . . . . . . . . . . 31-35EDITING . . . . . . . . . . . . . . . . . . . . . . . . . . . . . . . . . . . 36-43HOW TO USE THE BUILT-IN TIMER . . . . . . . . . . . 44-46USING EXTERNAL UNITS . . . . . . . . . . . . . . . . . . . . 47-48WHAT IS A MINIDISC? . . . . . . . . . . . . . . . . . . . . . . . . . . 49MINIDISC SYSTEM LIMITATIONS . . . . . . . . . . . . . . . . . 50TROUBLESHOOTING . . . . . . . . . . . . . . . . . . . . . . . . 50-53TRANSPORTING THE UNIT . . . . . . . . . . . . . . . . . . . . . . 53MAINTENANCE . . . . . . . . . . . . . . . . . . . . . . . . . . . . . . . . 53SPECIFICATIONS . . . . . . . . . . . . . . . . . . . . . . . . . . . . . . . 54
ACCESSORIES
FM aerial × 1 AM loopaerial × 1
Remote control × 1
"AA" size battery(UM/SUM-3, R6,HP-7 or similar)× 2
AC power lead× 1
Cushion × 8
Note:Parts and accessories mentioned in this operation manual other than those in the drawing are not included.
SPECIAL NOTES
● Recording and playback of any material may requireconsent, which SHARP is unable to give. Please referparticularly to the provisions of the Copyright Act 1956,the Dramatic and Musical Performers Protection Act1958, the Performers Protection Acts 1963 and 1972 andto any subsequent statutory enactments and orders.
NOTE FOR USERS IN THE U.K.
SERVICE INFORMATION In the unlikely event of your equipment requiring repair,please contact the dealer or supplier from whom it waspurchased. Where this is not possible, please contact thetelephone number listed below. You will then be givendetails of how to obtain service.
- 0345-125387 - Please note; all calls will be charged at local rate. Certain replacement parts and accessories may be ob-tained from our main parts distributor.
WILLOW VALE ELECTRONICS LTD.
In the unlikely event of this equipment requiring repairduring the guarantee period, you will need to provideproof of the date of purchase to the repairing company.Please keep your invoice or receipt, which is supplied atthe time of purchase.
The mains lead of this product is fitted with a non-rewire-able (moulded) plug incorporating a 3A fuse. Should thefuse need to be replaced, a BSI or ASTA approved BS1362 fuse marked or and of the same rating asabove, which is also indicated on the pin face of the plugmust be used.
Always refit the fuse cover after replacing the fuse. Neveruse the plug without the fuse cover fitted.
In the unlikely event of the socket outlet in your homenot being compatible with the plug supplied, cut-off themains plug and fit an appropriate type.
DANGER: The fuse from the cut-off plug should be removed andthe cut-off plug destroyed immediately and disposed ofin a safe manner.
Under no circumstances should the cut-off plug be in-serted elsewhere into a 13A socket outlet as a seriouselectric shock may occur.
To fit an appropriate plug to the mains lead, follow theinstructions below:
IMPORTANT: The wires in the mains lead are coloured in accordancewith the following code: Blue : Neutral Brown : Live
As the colours of the wires in the mains lead of thisproduct may not correspond with the coloured markingsidentifying the terminals in your plug, proceed as follows:
● The wire which is coloured blue must be connected tothe plug terminal which is marked N or coloured black.
● The wire which is coloured brown must be connectedto the plug terminal which is marked L or coloured red.
Ensure that neither the brown nor the blue wire is con-nected to the earth terminal in your three pin plug.
Before replacing the plug cover, make sure that:
● If the new fitted plug contains a fuse, its value is thesame as that removed from the cut-off plug.
● The cord grip is clamped over the sheath of the mainslead and not simply over the lead wires.
IF YOU HAVE ANY DOUBT, CONSULT A QUALIFIEDELECTRICIAN.
MANCHESTER 0161-682-1415 READING 01189-876444
● This equipment complies with the requirements ofDirectives 89/336/EEC and 73/23/EEC as amended by93/68/EEC.
HK <P=001>
● When the ON/STAND-BY button is set at STAND-BYposition, mains voltage is still present inside the unit. When the ON/STAND-BY button is set at STAND-BYposition, the unit may be brought into operation by thetimer mode or remote control.
Warning:This unit contains no user serviceable parts. Never removecovers unless qualified to do so. This unit contains danger-ous voltages, always remove mains plug from the socketbefore any service operation and when not in use for a longperiod.
● US and foreign patents licensed from Dolby LaboratoriesLicensing Corporation.
MD-C2H(SUK) TINSE0238AWZZ
CAUTIONUse the MD mini system only in accordance with the instruc-tions given in this manual and do not attempt to interferewith the interlock switch or make any other adjustment asthis may result in exposure to hazardous radiation.
1
HK <P=001>
PRECAUTIONS
■ General
● Please make sure that the unit is positioned in a well ven-tilated area and that there is at least 10 cm (4") of freespace along the sides and back. There must also be aminimum of 20 cm (8") of free space on the top of theunit.
● Do not use oil, solvents, petrol, paint thinners or insec-ticides on the unit.
● Do not expose the unit to moisture, to temperatures higherthan 60˚C (140˚F) or to extreme low temperatures.
● Keep the unit away from direct sunlight, strong magneticfields, excessive dust, humidity and electronic/electricalequipment (home computers, facsimiles, etc.) which gener-ates electrical noise.
● Hold the AC power plug by the head when removing itfrom the AC socket, as pulling the lead can damage in-ternal wires.
● When cleaning the heads, pinch roller, etc, remove theAC power plug from the wall socket as the unit containshigh voltages.Do not remove the outer cover, as this may result in elec-tric shock. Refer internal service to your local SHARP ser-vice facility.
● Use the unit on a firm, level surface free from vibration,and do not place anything on the top of the unit.
● If the unit malfunctions whilst in use, press the ON/STAND-BY button to enter the stand-by mode, then disconnectthe AC power lead from the AC socket. Plug the AC powerlead back in, and then press the ON/STAND-BY button toturn the power on.
● If an electrical storm is taking place near you, it is sug-gested that you disconnect the AC power lead from theAC socket for safety.
Warning:The voltage used must be the same as that specified on thisunit. Using this product with a higher voltage other than whichis specified is dangerous and may result in a fire or othertype of accident causing damage. SHARP will not be heldresponsible for any damage resulting from use of this unitwith a voltage other than that which is specified.
■ Volume control
The sound level at a given volume setting depends on acombination of speaker efficiency, location and various otherfactors.It is advisable to avoid exposure to high volume levels, whichoccur whilst turning the unit on with the volume control set-ting up high, or whilst continually listening at high volumes.
■ Condensation
Sudden temperature changes, storage or operation in an ex-tremely humid environment may cause condensation insidethe cabinet (CD pickup, MD pickup, tape heads, etc.) or onthe transmitter LED on the remote control.Condensation can cause the unit to malfunction.If this happens, leave the power on with no disc (or cassette)in the unit until normal playback is possible (about 1 hour).Wipe off any condensation on the transmitter LED with a softcloth before operating the unit.
■ Care of compact discs
Compact discs are fairly resistant to damage, however mis-tracking can occur due to an accumulation of dirt on the discsurface.Follow the guidelines below for maximum enjoyment fromyour CD collection and player.● Do not write on either side of the disc, particularly the
non-label side. Signals are read from the non-label side.Do not mark this surface.
● Keep your discs away from direct sunlight, heat, and ex-cessive moisture.
● Always hold the CDs by the edges. Fingerprints, dirt, orwater on the CDs can cause noise or mistracking. If a CDis dirty or does not play properly, clean it with a soft, drycloth, wiping straight out from the centre, along the radius.
NO
YESCorrect
■ Cassette tape
● For playback, use normal or low-noise tape for the bestsound. (Metal or CrO2 tape is not recommended.)For recording, use only normal tape.
● Do not use C-120 tapes, tapes with large diameter reels,or poor-quality tapes, as they may cause malfunctions.
● Before loading a tape into the cassette compartment,tighten the slack with a pen or pencil.
● Cassettes have removable tabs which prevent accidentalrecording or erasing from taking place. Removing the tabwill protect the corresponding side from being erased.Cover the tab holes with adhesive tape to erase or recordagain.
Side A (1)
Tab for side B (2) Tab for side A (1)
MD-C2H(SUK) TINSE0238AWZZ
2
<P=002>
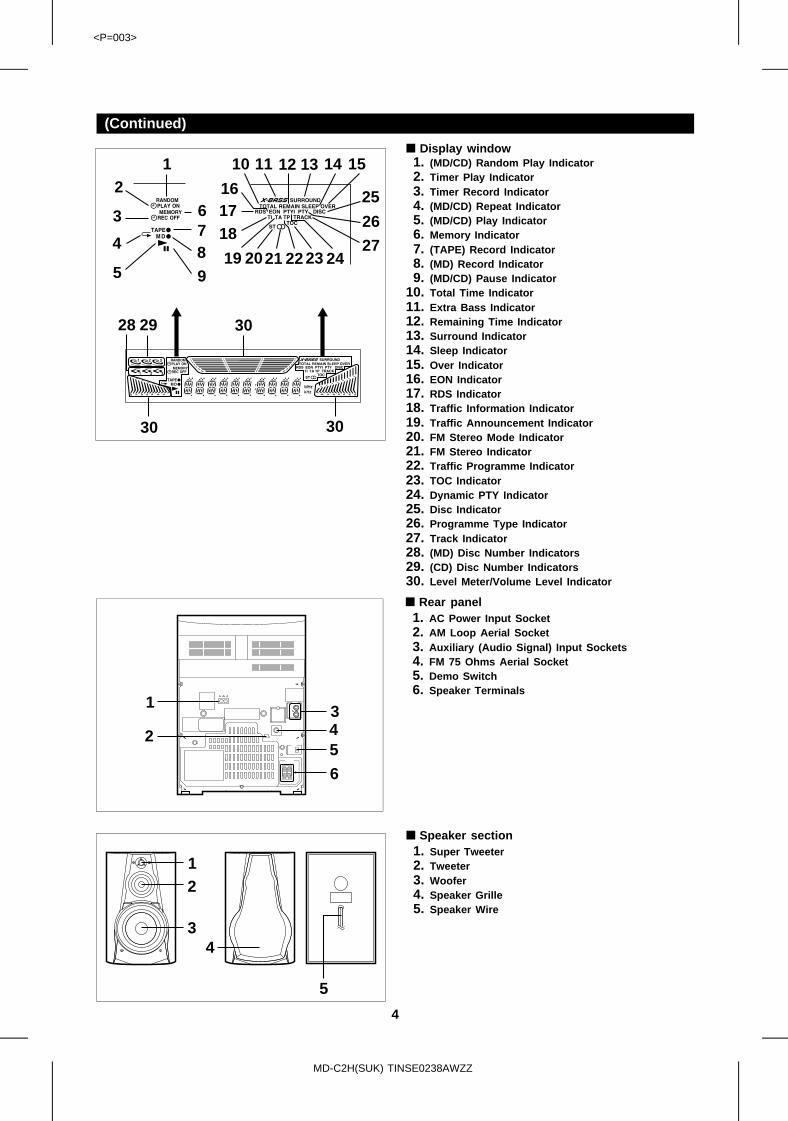
NAMES OF CONTROLS AND INDICATORS
21 4
5
3
12 13 14 15 16 17
67
8
910
18 19
11
20 21
26
35
22
36
23 24 27 2825
29
32 33 34 37 38 39 40
31
30
41 42
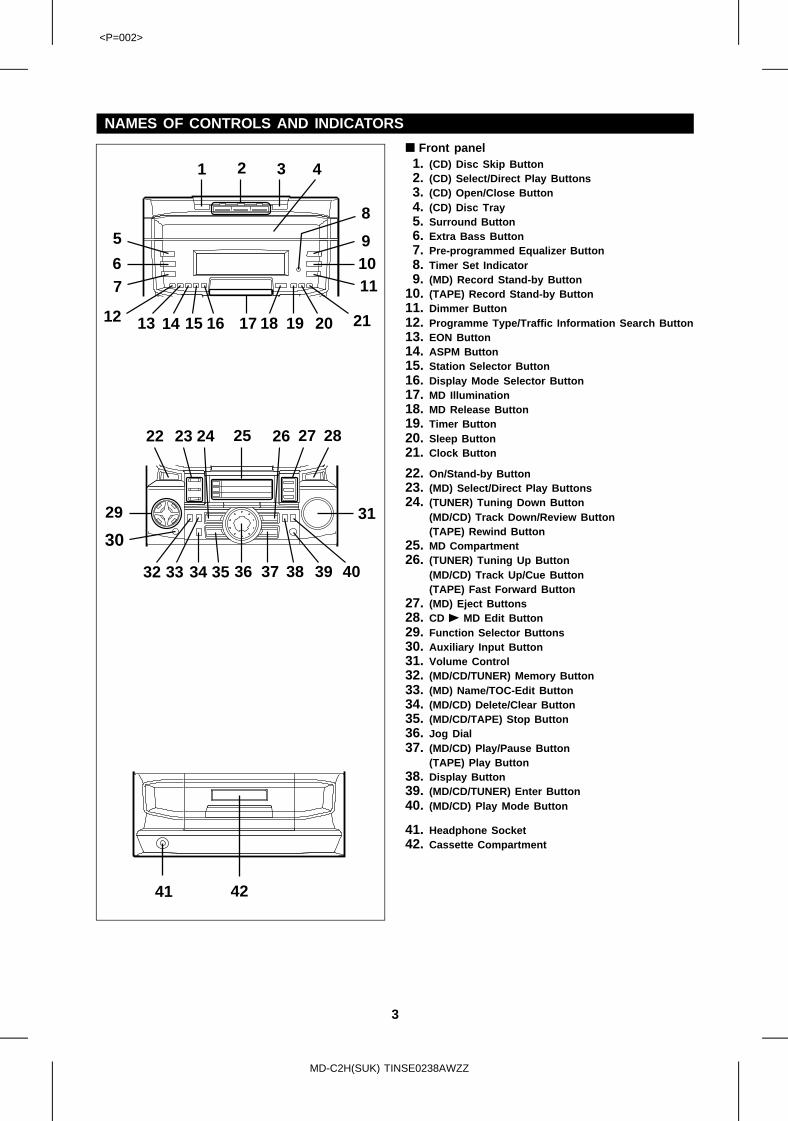
■ Front panel11. (CD) Disc Skip Button12. (CD) Select/Direct Play Buttons13. (CD) Open/Close Button14. (CD) Disc Tray15. Surround Button16. Extra Bass Button17. Pre-programmed Equalizer Button18. Timer Set Indicator19. (MD) Record Stand-by Button10. (TAPE) Record Stand-by Button11. Dimmer Button12. Programme Type/Traffic Information Search Button13. EON Button14. ASPM Button15. Station Selector Button16. Display Mode Selector Button17. MD Illumination 18. MD Release Button19. Timer Button20. Sleep Button21. Clock Button
22. On/Stand-by Button23. (MD) Select/Direct Play Buttons24. (TUNER) Tuning Down Button3 (MD/CD) Track Down/Review Button3 (TAPE) Rewind Button25. MD Compartment26. (TUNER) Tuning Up Button3 (MD/CD) Track Up/Cue Button3 (TAPE) Fast Forward Button27. (MD) Eject Buttons28. CD 0 MD Edit Button29. Function Selector Buttons30. Auxiliary Input Button 31. Volume Control32. (MD/CD/TUNER) Memory Button33. (MD) Name/TOC-Edit Button34. (MD/CD) Delete/Clear Button35. (MD/CD/TAPE) Stop Button36. Jog Dial37. (MD/CD) Play/Pause Button3 (TAPE) Play Button38. Display Button39. (MD/CD/TUNER) Enter Button40. (MD/CD) Play Mode Button
41. Headphone Socket42. Cassette Compartment
MD-C2H(SUK) TINSE0238AWZZ
3
<P=003>
(Continued)
■ Display window11. (MD/CD) Random Play Indicator12. Timer Play Indicator13. Timer Record Indicator14. (MD/CD) Repeat Indicator15. (MD/CD) Play Indicator16. Memory Indicator17. (TAPE) Record Indicator18. (MD) Record Indicator19. (MD/CD) Pause Indicator10. Total Time Indicator11. Extra Bass Indicator12. Remaining Time Indicator13. Surround Indicator14. Sleep Indicator15. Over Indicator16. EON Indicator17. RDS Indicator18. Traffic Information Indicator19. Traffic Announcement Indicator20. FM Stereo Mode Indicator21. FM Stereo Indicator22. Traffic Programme Indicator23. TOC Indicator24. Dynamic PTY Indicator25. Disc Indicator26. Programme Type Indicator27. Track Indicator28. (MD) Disc Number Indicators29. (CD) Disc Number Indicators30. Level Meter/Volume Level Indicator
■ Rear panel 11. AC Power Input Socket12. AM Loop Aerial Socket13. Auxiliary (Audio Signal) Input Sockets14. FM 75 Ohms Aerial Socket15. Demo Switch16. Speaker Terminals
3
5
12
4
6
14 15
161718
19 2021 22 23 24
789
10 11 12 13
25
26
27
28 29
3030
30
1
2
345
6
■ Speaker section11. Super Tweeter12. Tweeter13. Woofer14. Speaker Grille15. Speaker Wire
12
34
5
MD-C2H(SUK) TINSE0238AWZZ
4
<P=004>
(Continued)
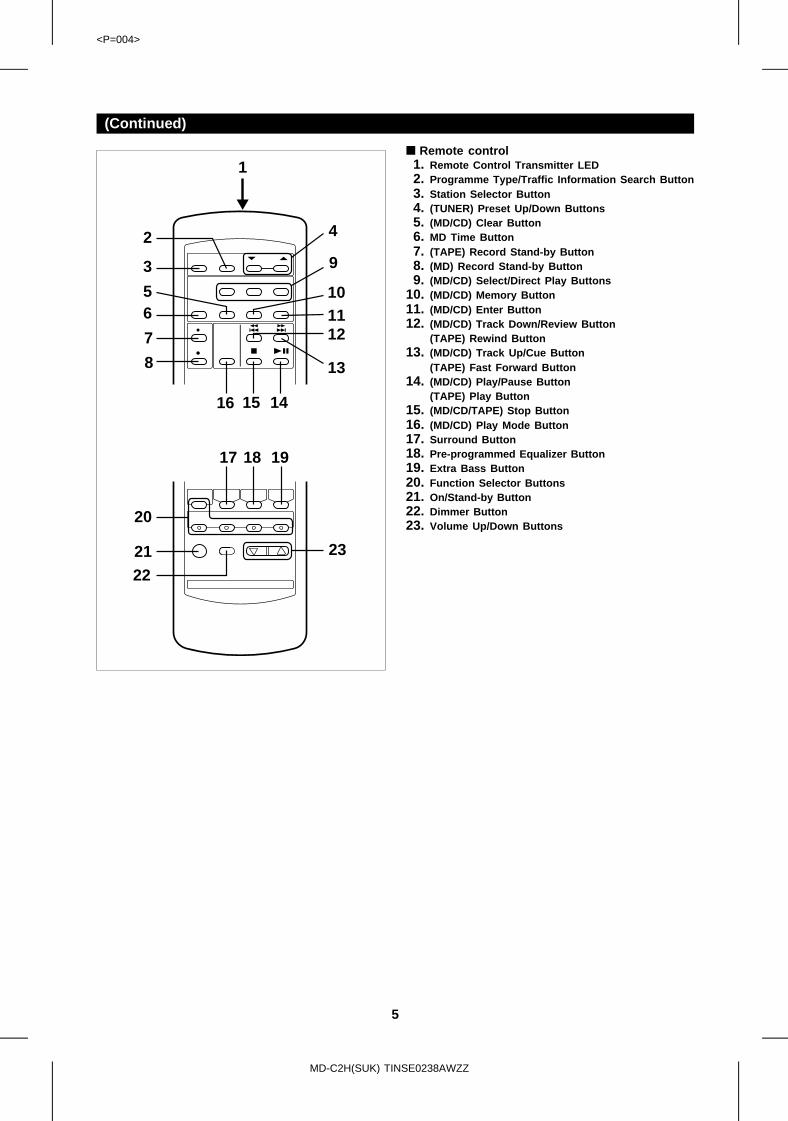
■ Remote control 11. Remote Control Transmitter LED12. Programme Type/Traffic Information Search Button13. Station Selector Button14. (TUNER) Preset Up/Down Buttons15. (MD/CD) Clear Button16. MD Time Button17. (TAPE) Record Stand-by Button18. (MD) Record Stand-by Button19. (MD/CD) Select/Direct Play Buttons10. (MD/CD) Memory Button11. (MD/CD) Enter Button12. (MD/CD) Track Down/Review Button3 (TAPE) Rewind Button13. (MD/CD) Track Up/Cue Button3 (TAPE) Fast Forward Button14. (MD/CD) Play/Pause Button3 (TAPE) Play Button15. (MD/CD/TAPE) Stop Button16. (MD/CD) Play Mode Button17. Surround Button18. Pre-programmed Equalizer Button19. Extra Bass Button20. Function Selector Buttons21. On/Stand-by Button22. Dimmer Button23. Volume Up/Down Buttons
1
2
3
4
56
7
8
9
101112
13
141516
17 18 19
20
2122
23
MD-C2H(SUK) TINSE0238AWZZ
5

HK <P=001>
PREPARATION FOR USE
1 2 3
1 2 3
● Unplug the AC power lead from the AC socket before con-necting or disconnecting any component.
■ Aerial connection
Supplied FM aerialConnect the FM aerial wire to the FM 75 OHMS socket andposition the FM aerial wire in the direction where the strongestsignal can be received.
Supplied AM loop aerialConnect the AM loop aerial wire to the AM ANTENNA socket.Position the AM loop aerial for optimum reception.Place the AM loop aerial on a shelf, etc., or attach it to a standor a wall with screws (not supplied).
Notes:● Do not place the aerial on the main unit as it may result in
noise pickup from the internal digital electronics.Place the aerial away from the unit for better reception.
● If the AM loop aerial and the FM aerial wire are placed nearthe AC power lead, interference may result.
External FM aerialUse an external FM aerial if you require better reception. Consult your dealer.
■ Speaker connection
Connect each speaker wire to the SPEAKER terminals as shown.Use speakers with an impedance of 6 ohms or more, as lowerimpedance speakers can damage the unit.
Caution:● Connect the black wire to the minus (−) terminal, and the red
wire to the plus (+) terminal.
● Do not mix the right channel and left channel wiring whenconnecting the speakers to the unit.
● Do not let bare speaker wires touch each other as this maydamage the amplifier and/or speakers.
Note:● Attach the cushions to the bottom of the speaker to prevent it
from sliding.
FM aerial AM loop aerial
External FM aerial
Right speaker Left speaker
Red Red
Black Black
MD-C2H(SUK) TINSE0238AWZZ
6
<P=002>
(Continued)
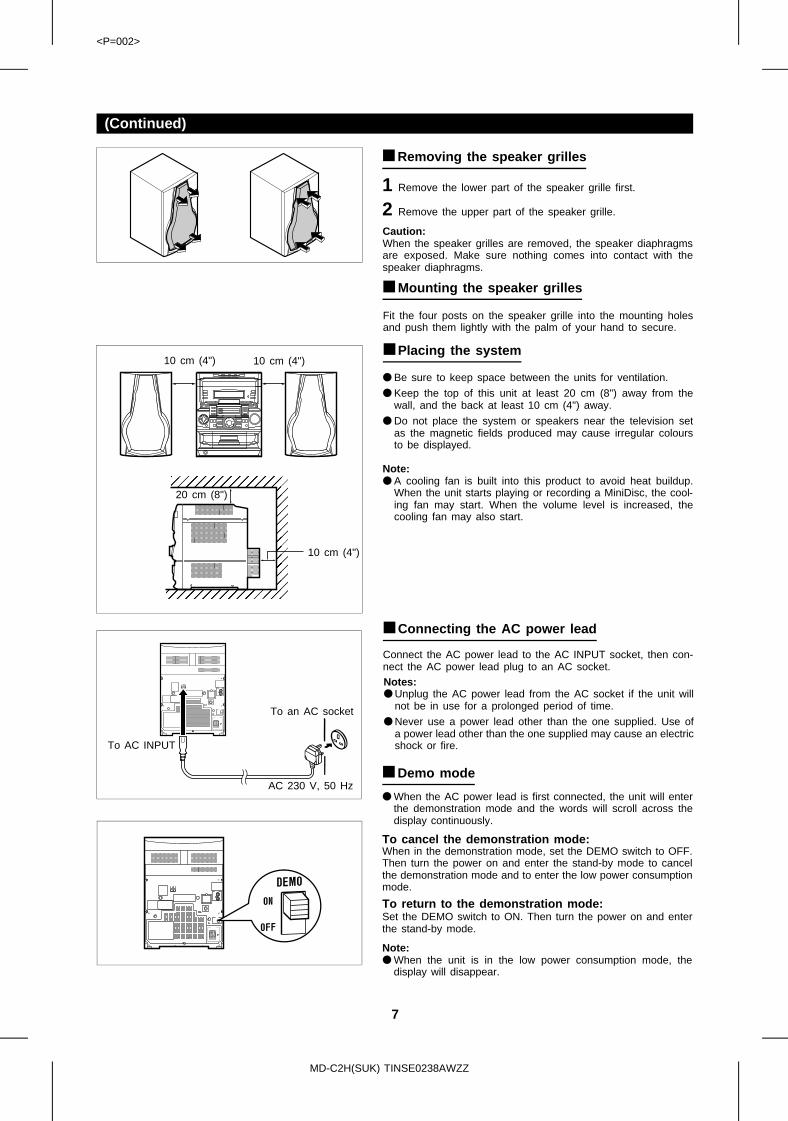
■ Removing the speaker grilles
1 Remove the lower part of the speaker grille first.
2 Remove the upper part of the speaker grille.
Caution:When the speaker grilles are removed, the speaker diaphragmsare exposed. Make sure nothing comes into contact with thespeaker diaphragms.
■ Mounting the speaker grilles
Fit the four posts on the speaker grille into the mounting holesand push them lightly with the palm of your hand to secure.
■ Placing the system
��������������������
● Be sure to keep space between the units for ventilation.
● Keep the top of this unit at least 20 cm (8") away from thewall, and the back at least 10 cm (4") away.
● Do not place the system or speakers near the television setas the magnetic fields produced may cause irregular coloursto be displayed.
Note:● A cooling fan is built into this product to avoid heat buildup.
When the unit starts playing or recording a MiniDisc, the cool-ing fan may start. When the volume level is increased, thecooling fan may also start.
■ Connecting the AC power lead
Connect the AC power lead to the AC INPUT socket, then con-nect the AC power lead plug to an AC socket.Notes:● Unplug the AC power lead from the AC socket if the unit will
not be in use for a prolonged period of time.
● Never use a power lead other than the one supplied. Use ofa power lead other than the one supplied may cause an electricshock or fire.
■ Demo mode
● When the AC power lead is first connected, the unit will enterthe demonstration mode and the words will scroll across thedisplay continuously.
To cancel the demonstration mode:When in the demonstration mode, set the DEMO switch to OFF.Then turn the power on and enter the stand-by mode to cancelthe demonstration mode and to enter the low power consumptionmode.
To return to the demonstration mode:Set the DEMO switch to ON. Then turn the power on and enterthe stand-by mode.
Note:● When the unit is in the low power consumption mode, the
display will disappear.
10 cm (4") 10 cm (4")
20 cm (8")
10 cm (4")
To an AC socket
To AC INPUT
AC 230 V, 50 Hz
MD-C2H(SUK) TINSE0238AWZZ
7
<P=003>
(Continued)
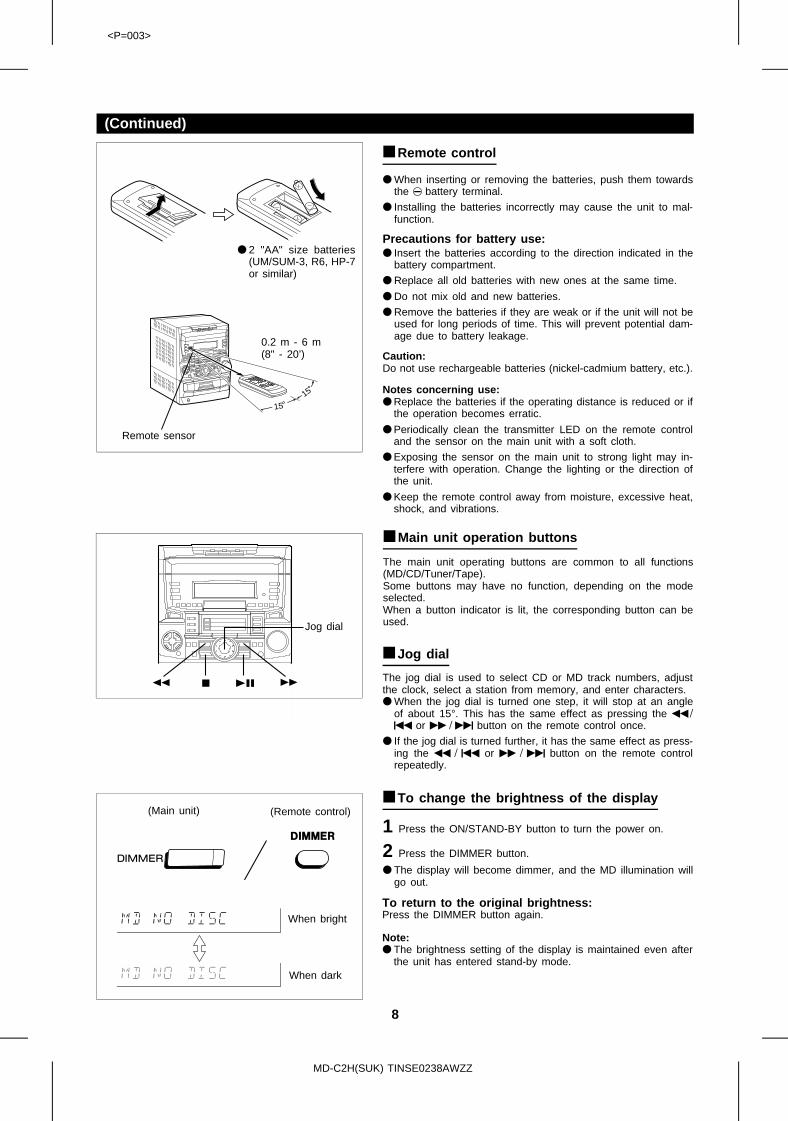
■ Remote control
● When inserting or removing the batteries, push them towardsthe ë battery terminal.
● Installing the batteries incorrectly may cause the unit to mal-function.
Precautions for battery use:● Insert the batteries according to the direction indicated in the
battery compartment.
● Replace all old batteries with new ones at the same time.
● Do not mix old and new batteries.
● Remove the batteries if they are weak or if the unit will not beused for long periods of time. This will prevent potential dam-age due to battery leakage.
Caution:Do not use rechargeable batteries (nickel-cadmium battery, etc.).
Notes concerning use:● Replace the batteries if the operating distance is reduced or if
the operation becomes erratic.
● Periodically clean the transmitter LED on the remote controland the sensor on the main unit with a soft cloth.
● Exposing the sensor on the main unit to strong light may in-terfere with operation. Change the lighting or the direction ofthe unit.
● Keep the remote control away from moisture, excessive heat,shock, and vibrations.
1515
■ Main unit operation buttons
The main unit operating buttons are common to all functions(MD/CD/Tuner/Tape).Some buttons may have no function, depending on the modeselected.When a button indicator is lit, the corresponding button can beused.
■ Jog dial
The jog dial is used to select CD or MD track numbers, adjustthe clock, select a station from memory, and enter characters.● When the jog dial is turned one step, it will stop at an angle
of about 15°. This has the same effect as pressing the 3 /5 or 2 / 4 button on the remote control once.
● If the jog dial is turned further, it has the same effect as press-ing the 3 / 5 or 2 / 4 button on the remote controlrepeatedly.
■ To change the brightness of the display
1 Press the ON/STAND-BY button to turn the power on.
2 Press the DIMMER button.
● The display will become dimmer, and the MD illumination willgo out.
To return to the original brightness:Press the DIMMER button again.
Note:● The brightness setting of the display is maintained even after
the unit has entered stand-by mode.
● 2 "AA" size batteries(UM/SUM-3, R6, HP-7or similar)
Remote sensor
0.2 m - 6 m(8" - 20’)
Jog dial
(Main unit) (Remote control)
When bright
When dark
MD-C2H(SUK) TINSE0238AWZZ
8
<P=004>
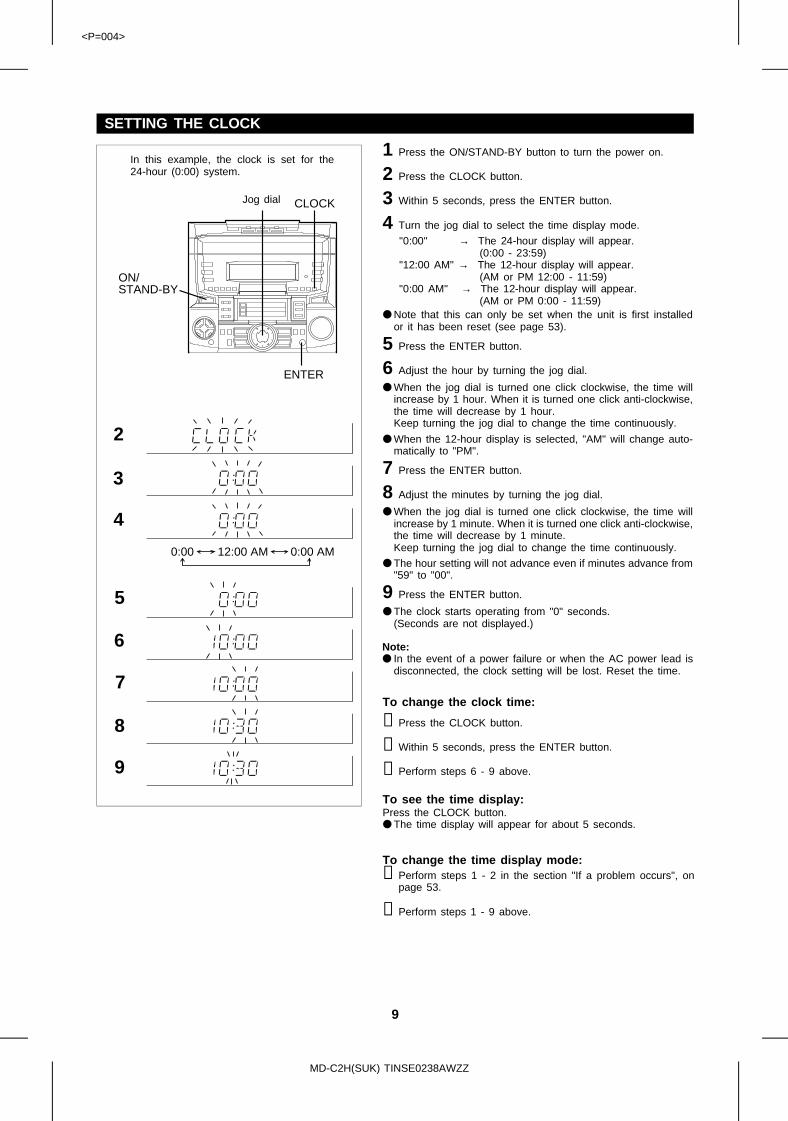
SETTING THE CLOCK
1 Press the ON/STAND-BY button to turn the power on.
2 Press the CLOCK button.
3 Within 5 seconds, press the ENTER button.
4 Turn the jog dial to select the time display mode.
"0:00" → The 24-hour display will appear. (0:00 - 23:59)"12:00 AM" → The 12-hour display will appear. (AM or PM 12:00 - 11:59)"0:00 AM" → The 12-hour display will appear. (AM or PM 0:00 - 11:59)
● Note that this can only be set when the unit is first installedor it has been reset (see page 53).
5 Press the ENTER button.
6 Adjust the hour by turning the jog dial.
● When the jog dial is turned one click clockwise, the time willincrease by 1 hour. When it is turned one click anti-clockwise,the time will decrease by 1 hour.Keep turning the jog dial to change the time continuously.
● When the 12-hour display is selected, "AM" will change auto-matically to "PM".
7 Press the ENTER button.
8 Adjust the minutes by turning the jog dial.
● When the jog dial is turned one click clockwise, the time willincrease by 1 minute. When it is turned one click anti-clockwise,the time will decrease by 1 minute.Keep turning the jog dial to change the time continuously.
● The hour setting will not advance even if minutes advance from"59" to "00".
9 Press the ENTER button.
● The clock starts operating from "0" seconds. (Seconds are not displayed.)
Note:● In the event of a power failure or when the AC power lead is
disconnected, the clock setting will be lost. Reset the time.
12:00 AM 0:00 AM0:00
2
3
4
7
6
5
8
9
To change the clock time:
①Press the CLOCK button.
②Within 5 seconds, press the ENTER button.
③Perform steps 6 - 9 above.
To see the time display:Press the CLOCK button.● The time display will appear for about 5 seconds.
To change the time display mode:①Perform steps 1 - 2 in the section "If a problem occurs", on
page 53.
②Perform steps 1 - 9 above.
In this example, the clock is set for the24-hour (0:00) system.
Jog dial CLOCK
ON/STAND-BY
ENTER
MD-C2H(SUK) TINSE0238AWZZ
9
HK
FLAT
VOCALSOFT-1SOFT-2
HEAVY-1 HEAVY-2
<P=001>
SOUND CONTROL
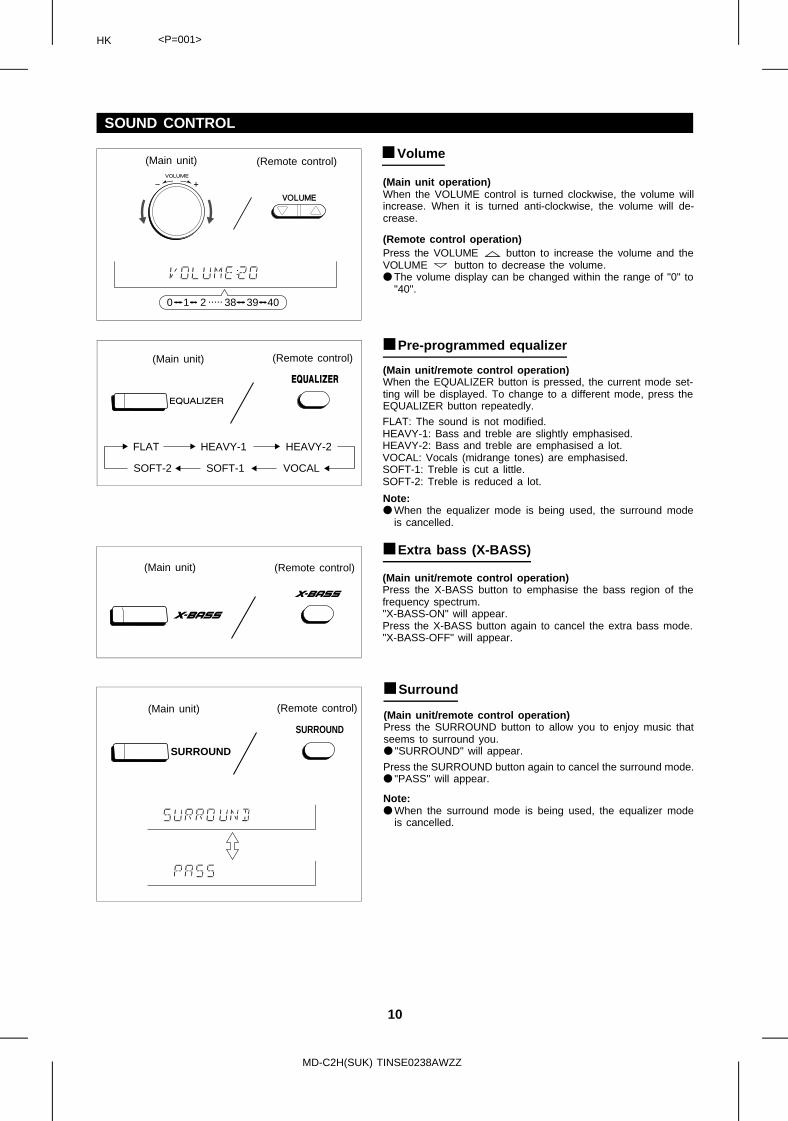
■ Volume
(Main unit operation)When the VOLUME control is turned clockwise, the volume willincrease. When it is turned anti-clockwise, the volume will de-crease.
(Remote control operation)Press the VOLUME button to increase the volume and theVOLUME button to decrease the volume.● The volume display can be changed within the range of "0" to
"40".
■ Pre-programmed equalizer
(Main unit/remote control operation)When the EQUALIZER button is pressed, the current mode set-ting will be displayed. To change to a different mode, press theEQUALIZER button repeatedly.
FLAT: The sound is not modified.HEAVY-1: Bass and treble are slightly emphasised.HEAVY-2: Bass and treble are emphasised a lot.VOCAL: Vocals (midrange tones) are emphasised.SOFT-1: Treble is cut a little.SOFT-2: Treble is reduced a lot.
Note:● When the equalizer mode is being used, the surround mode
is cancelled.
■ Extra bass (X-BASS)
(Main unit/remote control operation)Press the X-BASS button to emphasise the bass region of thefrequency spectrum."X-BASS-ON" will appear.Press the X-BASS button again to cancel the extra bass mode."X-BASS-OFF" will appear.
■ Surround
(Main unit/remote control operation)Press the SURROUND button to allow you to enjoy music thatseems to surround you.● "SURROUND" will appear.
0 1 2 38 39 40.....
SURROUND
SURROUND
Press the SURROUND button again to cancel the surround mode.● "PASS" will appear.
Note:● When the surround mode is being used, the equalizer mode
is cancelled.
(Main unit) (Remote control)
(Main unit) (Remote control)
(Main unit) (Remote control)
(Main unit) (Remote control)
MD-C2H(SUK) TINSE0238AWZZ
10
<P=002>
COMPACT DISC OPERATION
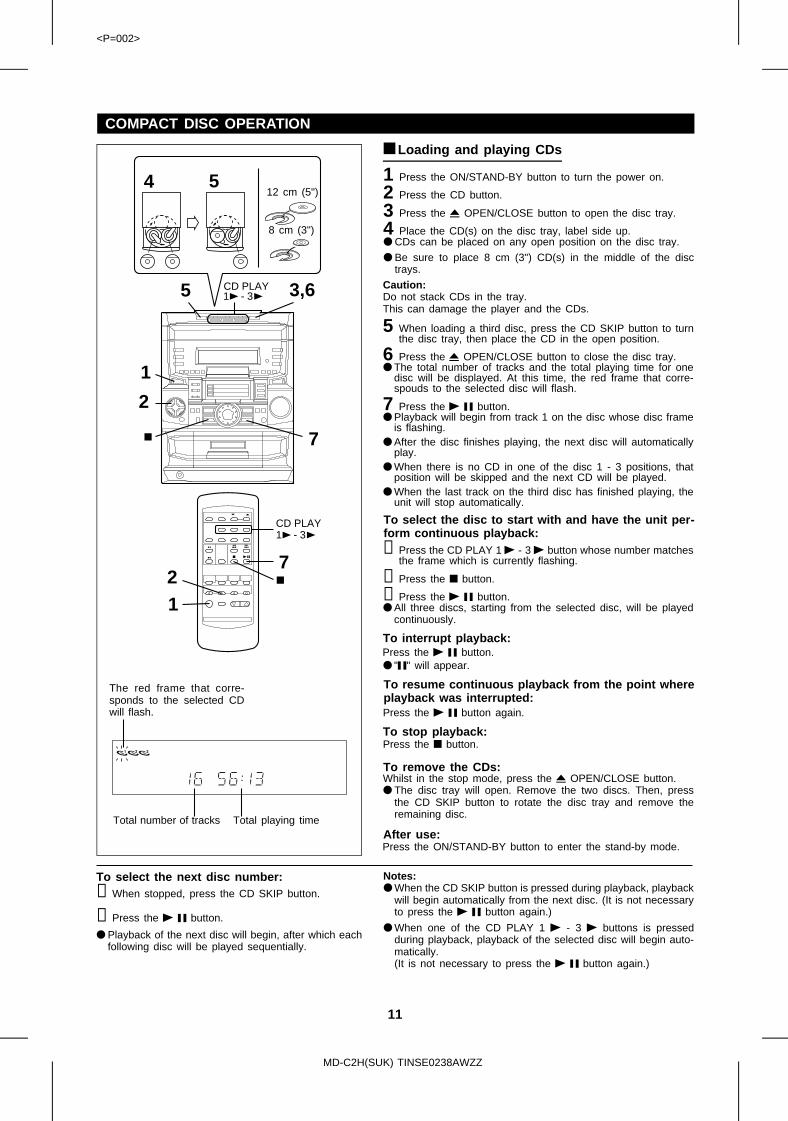
■ Loading and playing CDs
1 Press the ON/STAND-BY button to turn the power on.
2 Press the CD button.
3 Press the 7 OPEN/CLOSE button to open the disc tray.
4 Place the CD(s) on the disc tray, label side up.● CDs can be placed on any open position on the disc tray.
● Be sure to place 8 cm (3") CD(s) in the middle of the disctrays.
Caution:Do not stack CDs in the tray.This can damage the player and the CDs.
5 When loading a third disc, press the CD SKIP button to turnthe disc tray, then place the CD in the open position.
6 Press the 7 OPEN/CLOSE button to close the disc tray.● The total number of tracks and the total playing time for one
disc will be displayed. At this time, the red frame that corre-spouds to the selected disc will flash.
7 Press the 0 6 button.● Playback will begin from track 1 on the disc whose disc frame
is flashing.● After the disc finishes playing, the next disc will automatically
play.● When there is no CD in one of the disc 1 - 3 positions, that
position will be skipped and the next CD will be played.● When the last track on the third disc has finished playing, the
unit will stop automatically.
1 -CD PLAY
3
1 -CD PLAY
3
4
3,65
1
2
7
721
5
To select the disc to start with and have the unit per-form continuous playback:①Press the CD PLAY 1 0 - 3 0 button whose number matches
the frame which is currently flashing.
②Press the ■ button.
③Press the 0 6 button.● All three discs, starting from the selected disc, will be played
continuously.
To interrupt playback:Press the 0 6 button.● "6" will appear.
To resume continuous playback from the point whereplayback was interrupted:Press the 0 6 button again.
To stop playback:Press the ■ button.
To remove the CDs:Whilst in the stop mode, press the 7 OPEN/CLOSE button.● The disc tray will open. Remove the two discs. Then, press
the CD SKIP button to rotate the disc tray and remove theremaining disc.
After use:Press the ON/STAND-BY button to enter the stand-by mode.
To select the next disc number:①When stopped, press the CD SKIP button.
②Press the 0 6 button.
● Playback of the next disc will begin, after which eachfollowing disc will be played sequentially.
Notes:● When the CD SKIP button is pressed during playback, playback
will begin automatically from the next disc. (It is not necessaryto press the 0 6 button again.)
● When one of the CD PLAY 1 0 - 3 0 buttons is pressedduring playback, playback of the selected disc will begin auto-matically.(It is not necessary to press the 0 6 button again.)
12 cm (5")
8 cm (3")
The red frame that corre-sponds to the selected CDwill flash.
Total number of tracks Total playing time
MD-C2H(SUK) TINSE0238AWZZ
11

<P=003>
(Continued)
■ When choosing a CD for playback
Press one of the CD PLAY 1 0 - 3 0 buttons to select the CDyou want to listen to.● Only the selected disc will be played back.
When selectingdisc 1
When selectingdisc 2
When selectingdisc 3
Notes:● If the disc tray is open, it will be automatically closed.
● If the 0 6 button is pressed, continuous playback will beginfrom the first track of the disc you have selected.
To interrupt playback:Press the 0 6 button.
To resume playback for just a single disc:Press the CD PLAY 1 0 - 3 0 button whose number matchesthe frame which is currently flashing.
Caution:● Do not carry the unit whilst CDs are in the trays or
a MiniDisc is loaded. The discs may come looseinside the unit and they may be damaged or causedamage to the unit. This may also cause malfunc-tions.
● Do not place two CDs in one disc position.
● Do not push the disc tray whilst it is moving.
● Do not attempt to push the disc tray by hand. This may cause malfunctions.
● If the power fails whilst the tray is open, wait untilthe power is restored.
● If the disc tray is stopped forcibly, "TRAY ERR" willappear in the display and the unit will not function.If this occurs, press the ON/STAND-BY button toenter the stand-by mode and turn it on again.
● If TV or radio interference occurs during CD operation, movethe unit away from the TV or radio.
● If a disc is damaged, dirty, or loaded upside down, the discwill be skipped and the next disc will automatically play.
● If the CDs are dirty or have label adhesive on their surface,make sure to clean them before loading.
● If the 0 6 button, any of the CD PLAY 1 0 - 3 0 buttonsor the 7 OPEN/CLOSE button is pressed when a disc trayis open, the disc tray will close automatically. Be careful notto catch your fingers.
● If the unit is shaken by impact or vibration, playback may bedisrupted. If the playback volume of a CD is raised excess-ively, playback may be disrupted. If this occurs, lower theplayback volume.
1 -CD PLAY 3
1 -CD PLAY
3
MD-C2H(SUK) TINSE0238AWZZ
12
<P=004>
MINIDISC OPERATION
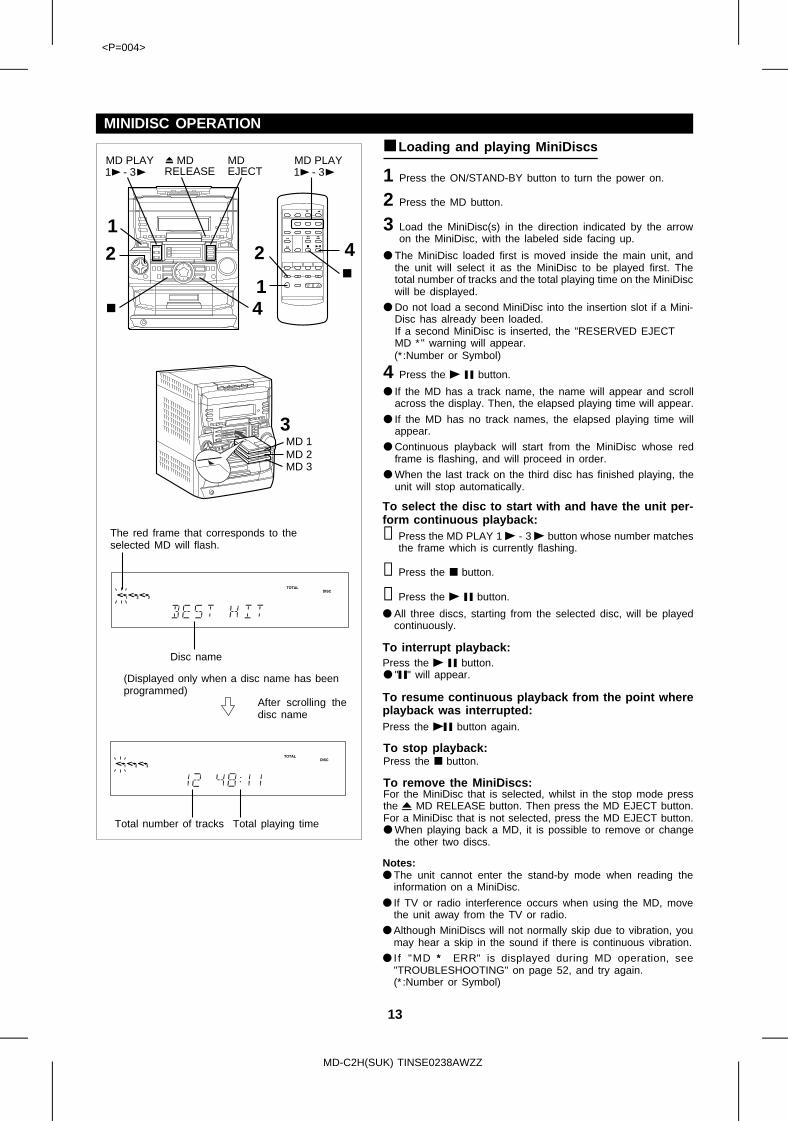
■ Loading and playing MiniDiscs
1 Press the ON/STAND-BY button to turn the power on.
2 Press the MD button.
3 Load the MiniDisc(s) in the direction indicated by the arrowon the MiniDisc, with the labeled side facing up.
● The MiniDisc loaded first is moved inside the main unit, andthe unit will select it as the MiniDisc to be played first. Thetotal number of tracks and the total playing time on the MiniDiscwill be displayed.
● Do not load a second MiniDisc into the insertion slot if a Mini-Disc has already been loaded.If a second MiniDisc is inserted, the "RESERVED EJECT MD ∗" warning will appear.
1 -MD PLAY
3 1 -MD PLAY
3 MD RELEASE
MD EJECT
12
41
2 4
MD 1MD 2MD 3
3
(∗:Number or Symbol)
4 Press the 0 6 button.
● If the MD has a track name, the name will appear and scrollacross the display. Then, the elapsed playing time will appear.
● If the MD has no track names, the elapsed playing time willappear.
● Continuous playback will start from the MiniDisc whose redframe is flashing, and will proceed in order.
● When the last track on the third disc has finished playing, theunit will stop automatically.
To select the disc to start with and have the unit per-form continuous playback:①Press the MD PLAY 1 0 - 3 0 button whose number matches
the frame which is currently flashing.
②Press the ■ button.
③Press the 0 6 button.
● All three discs, starting from the selected disc, will be playedcontinuously.
To interrupt playback:Press the 0 6 button.● "6" will appear.
To resume continuous playback from the point whereplayback was interrupted:Press the 06 button again.
To stop playback:Press the ■ button.
To remove the MiniDiscs:For the MiniDisc that is selected, whilst in the stop mode pressthe 7 MD RELEASE button. Then press the MD EJECT button.For a MiniDisc that is not selected, press the MD EJECT button.● When playing back a MD, it is possible to remove or change
the other two discs.
Notes:● The unit cannot enter the stand-by mode when reading the
information on a MiniDisc.
● If TV or radio interference occurs when using the MD, movethe unit away from the TV or radio.
● Although MiniDiscs will not normally skip due to vibration, youmay hear a skip in the sound if there is continuous vibration.
● I f "MD ∗∗ ERR" is displayed during MD operation, see"TROUBLESHOOTING" on page 52, and try again.(∗:Number or Symbol)
The red frame that corresponds to theselected MD will flash.
Disc name
(Displayed only when a disc name has beenprogrammed)
After scrolling thedisc name
Total number of tracks Total playing time
MD-C2H(SUK) TINSE0238AWZZ
13
HK <P=001>
(Continued)
3
1
52
1 2
4
5
■ When choosing a MD for playback
Press one of the MD PLAY 1 0 - 3 0 buttons to select the MDyou want to listen to.● Only the selected disc will be played back.
When selectingdisc 1
When selectingdisc 2
When selectingdisc 3
Note:● If the 0 6 button is pressed, continuous playback will begin
from the first track of the disc you have selected.
1 -MD PLAY 3
1 -MD PLAY
3
To interrupt playback:Press the 0 6 button.
To resume playback for just a single disc:Press the MD PLAY 1 0 - 3 0 button whose number matchesthe frame which is currently flashing.
CASSETTE OPERATION
■ Tape playback
1 Press the ON/STAND-BY button to turn the power on.
2 Press the TAPE button.
3 Open the cassette door by pushing the area marked "PUSHEJECT".
4 Load a cassette into the cassette compartment.
5 Press the 0 6 button to start playback.
To stop playback:Press the ■ button.
Fast forward/rewind:
①Press the ■ button.
②To advance the tape, press the 2 (2 / 4) button.To rewind it, press the 3 (3 / 5) button.
Precautions:● When removing the cassette tape, press the ■ button, and
then open the cassette compartment.
● Before changing from one tape operation to another, pressthe ■ button.
● If a power failure occurs during tape operation, the tape headwill remain engaged with the tape and the cassette door willnot open. If this occurs, wait until power is restored.
● Even if the 0 6 button is pressed during tape playback, theunit will not enter the pause mode.
MD-C2H(SUK) TINSE0238AWZZ
14
<P=002>
RADIO OPERATION
■ Tuning
1 Press the ON/STAND-BY button to turn the power on.
2 Press the TUNER (BAND) button.
3 Press the TUNER (BAND) button to select the desired fre-quency band. (FM ST, FM or AM)
4 Press the TUNING (X or W) button to tune into the desiredstation.
Manual tuning:Press the TUNING (X or W) button as many times as requiredto adjust the frequency shown on the display to the frequency ofthe desired station.
Auto tuning: When the TUNING (X or W) button is pressed for more than0.5 seconds, scanning will start automatically and the tuner willstop at the first receivable broadcast station.
Notes:● When radio interference occurs during auto scan tuning, auto
scan tuning may stop automatically at that point.
● If a weak station signal is found during auto scan tuning, thestation will be skipped.
● To stop the auto tuning, press the TUNING (X or W) buttonagain.
● When an RDS (Radio Data System) station is tuned in, thefrequency will be displayed first, and then the RDS indicatorwill light, Finally, the station name will appear.
5 To receive an FM stereo transmission, press the TUNER(BAND) button so that the "ST" indicator on the display lightsup.
● "j" will appear when an FM broadcast is in stereo.
6 If the FM reception is weak, press the TUNER (BAND) buttonso that the "ST" indicator goes out.
● The reception changes to monaural, the sound becomesclearer.
After use:Press the ON/STAND-BY button to enter the stand-by mode.
Notes:● The last station tuned in will be recalled, even after changing
the tuning band or the function, or after switching the unit tothe stand-by mode.
● If the unit’s AM/FM tuner interferes with the reception of anearby TV or radio, move the unit as far away from theseitems as possible.
2,3,5,64
1
(Main unit operation)
MD-C2H(SUK) TINSE0238AWZZ
15
<P=003>
(Continued)
ENTER
MEMORY
TUNER(BAND)
■ Preset tuning
You can store up to 40 stations in memory (40 stations consistingof any combination of AM and FM stations you like) and recallthem.
To enter stations into memory:1 Perform steps 1 - 6 in the "Tuning" section.
2 Press the MEMORY button.
3 Within 30 seconds, turn the jog dial to make the preset chan-nel number flash in the display.
● Store the stations in memory, in order, starting with presetchannel 1.
4 Within 30 seconds, press the ENTER button to store that sta-tion in the selected station preset number memory.
● If the "MEMORY" and preset number indicators go out beforethe station is memorised, repeat the operation from step 2.
5 Repeat steps 1 - 4 to set other preset stations, or to changea preset station.
● When a new station is stored in the selected station presetnumber memory, the contents previously memorised will beerased.
● To store an RDS station in memory, perform steps 2 - 4 whilstthe RDS station name is being displayed.
To recall a memorised station:Turn the jog dial on the main unit or press the PRESET (X orW) button on the remote control for less than 0.5 seconds toselect the desired station.
● The stations (preset channel number, frequency and fre-quency band) which have been stored in memory will appearin the display in numerical order, irrespective of the frequencybands.
Note:When searching for a memorised station, do not press thePRESET button for more than 0.5 seconds.When the PRESET button is pressed for more than 0.5 seconds,the unit will enter the preset memory scan mode.
Backup function:The backup function protects all station presets for a few hoursshould there be a power failure or the AC power lead is removedfrom the AC socket.
■ Preset memory scan
The stations saved in the preset memory can be scanned auto-matically.
1 To scan the preset stations, press the PRESET (X or W)button for more than 0.5 seconds.
● The station preset number will flash and the programmed sta-tions will be tuned in sequentially, for 5 seconds each.
2 Press the PRESET (X or W) button again to stop the memoryscan at the desired station.
Note:When the preset memory does not have any stations stored init, the preset memory scan will not function.
PRESET( )
To erase all memorised stations:When the unit is in the stand-by mode, hold and press the MEM-ORY and TUNING W buttons, and then press the ON/STAND-BYbutton.● "TUNER CL." will appear.
● After performing this operation, all of the preset memory in-formation will be erased.
PRESET( )
TUNER(BAND)
Jog dial
(Remote control operation)
MD-C2H(SUK) TINSE0238AWZZ
16
<P=004>
RDS (Radio Data System) OPERATION
RDS is a broadcasting service which a growing number of FM stations are now providing. It allows these FM stations tosend additional signals along with their regular programme signals. For example, the stations send their station names, andinformation about what type of programme they broadcast, such as sports or music, etc.When tuned to an FM station which provide the RDS service, the RDS will appear, the station frequency (and then thestation name if sent) is displayed.The TP (Traffic Programme) will appear on the display when the received broadcast carries traffic announcements, and theTA (Traffic Announcement) will appear whilst a traffic announcement is being received.EON will appear whilst the EON (Enhanced Other Networks information) data is being broadcast.The PTYI (Dynamic PTY Indicator) will appear whilst the Dynamic PTY station is being received.
Note:When the TP and TA appear at the same time, an announcement is being made.When only the TA appears, an announcement is not being made. (See page 25.)
■ Information Provided by RDS
With the MD-C2H, you can display three types of RDS service.To show them in the display, press the DISPLAY MODE button.Each time you press the DISPLAY MODE button, the display willchange to show the following information.
PS (Programme Service): Station names commonlyknown will be displayed. "NO PS" appears if no signalis being received.
PTY (Programme Type): Programme type will be dis-played."NO PTY" appears if no sig-nal is being received.
RT (Radio Text): Radio text will be displayed."NO RT" appears if no signalis being received.
Station Frequency: Station frequencies.
DISPLAYMODE
MD-C2H(SUK) TINSE0238AWZZ
17

<P=005>
(Continued)
Descriptions of the PTY (Programme Type) codes, TP (Traffic Programme) and TA (Traffic Announcement)With the MD-C2H, you can search for and receive the following PTY, TP and TA signals.
NEWS: Short accounts of facts, events andpublicly expressed views, reportageand actuality.
AFFAIRS: Topical programme expanding or en-larging upon the news, generally in dif-ferent presentation style or concept,including debate, or analysis.
INFO: Programmes whose purpose is to im-part advice in the widest sense.
SPORT: Programme concerned with any aspectof sport.
EDUCATE: Programme intended primarily to edu-cate, of which the formal element isfundamental.
DRAMA: All radio plays and serials.
CULTURE: Programmes concerned with any as-pect of national or regional culture, in-cluding language, theatre, etc.
SCIENCE: Programmes about the natural scien-ces and technology.
VARIED: Used for mainly speech-based pro-grammes usually of light-entertainmentnature, not covered by other ca-tegories. Examples include: quizzes.panel games, personality interviews.
POP M: Commercial music, which would gener-ally be considered to be of currentpopular appeal, often featuring in cur-rent or recent record sales charts.
ROCK M: Contemporary modern music, usuallywritten and performed by young musi-cians.
EASY M: Current contemporary music con-sidered to be "easy-listening", as op-posed to Pop, Rock or Classical, or oneof the specialized music styles, Jazz,Folk or Country. Music in this categoryis often but not always, vocal, andusually of short duration.
LIGHT M: Classical Musical for general, ratherthan specialist appreciation. Examplesof music in this category are instrumen-tal music, and vocal or choral works.
CLASSICS: Performances of major orchestralworks, symphonies, chamber musicetc., and including Grand Opera.
OTHER M: Musical styles not fitting into any of theother categories. Particularly used forspecialist music of which Rhythm &Blues and Reggae are examples.
WEATHER: Weather reports and forecasts and Me-teorological information.
FINANCE: Stock Market reports, commerce, trading etc.
CHILDREN: For programmes targeted at a young audience,primarily for entertainment and interest, ratherthan where the objective is to educate.
SOCIAL: Programmes about people and things that in-fluence them individually or in groups. Includes:sociology, history, geography, psychology andsociety.
RELIGION: Any aspect of beliefs and faiths, involving a Godor Gods, the nature of existence and ethics.
PHONE IN: Involving members of the public expressing theirviews either by phone or at a public forum.
TRAVEL: Features and programmes concerned with travelto near and far destinations, package tours andtravel ideas and opportunities. Not for use forAnnouncements about problems, delays, orroadworks affecting immediate travel whereTP/TA should be used.
LEISURE: Programmes concerned with recreational acti-vities in which the listener might participate.Examples include, Gardening, Fishing. Antiquecollecting, Cooking, Food & Wine etc.
JAZZ: Polyphonic, syncopated music characterised byimprovisation.
COUNTRY: Songs which originate from, or continue the mu-sical tradition of the American Southern States.Characterised by a straightforward melody andnarrative story line.
NATION M: Current Popular Music of the Nation or Regionin that country’s language, as opposed to Inter-national ‘Pop’ which is usually US or UK inspiredand in English.
OLDIES: Music from the so-called "golden age" of popularmusic.
FOLK M: Music which has its roots in the musical cultureof a particular nation, usually played on acousticinstruments. The narrative or story may bebased on historical events or people.
DOCUMENT: Programme concerned with factual matters,presented in an investigative style.
TEST: Broadcast when testing emergency broadcastequipment or receivers.
ALARM !: Emergency announcement made under excep-tional circumstances to give warning of eventscausing danger of a general nature.
NONE: No programme type (receive only).
TP: Broadcasts which carry traffic announcements.
TA: Traffic announcements are being broadcast atpresent.
Note:● When the unit is in the EON stand-by mode and a programme
is selected, the unit will display "TI" instead of "TA".
MD-C2H(SUK) TINSE0238AWZZ
18
HK <P=001>
(Continued)
■ ASPM (Auto Station Program Memory)
It is recommended that you store stations in memory usingASPM.(This memory can be used for PTY searches, station select andEON switching.)When the ASPM button is pressed, whilst tuned to the FM band,the RDS (Radio Data System) function will automatically searchfor new RDS stations. Up to 40 stations can be stored in memory.(If you have already stored some stations in memory, the numberof new stations you can store will be less.)
1 Press the ON/STAND-BY button to turn the power on.
2 Press the TUNER (BAND) button.
3 Press the TUNER (BAND) button to select the FM ST or FMband.
4 Press and hold down the ASPM button for at least 3 seconds.
①After "ASPM" has flashed for about 4 seconds, scanning willstart. (87.50 - 108.00 MHz)
②When an RDS station is found, the RDS will appear for ashort time and the station will be stored in memory.
③After scanning, the number of stations that have been auto-matically stored in memory will be displayed for 4 seconds,and then "END" will appear for 4 seconds.
Notes:● Only RDS stations will be stored in memory in numerical order.
● If the same station is broadcasting on different frequencies, thetransmission with the strongest broadcast frequency will bestored in memory.
● Any station which has the same frequency as one which hasbeen already stored in memory will not be stored again.
● The ASPM operation can be repeated until "END" appears.
● If a 40th station is stored in memory during a scan, the scan-ning will stop at that station. The number of stations and "END"will each be displayed for 4 seconds.
● If no stations have been stored in memory, "END" will flashfor about 4 seconds.
● If 40 stations have already been stored in memory and theASPM button is pressed, "END" will appear immediately andthe scan will be aborted.If you want to redo the ASPM operation from the beginning,erase the preset memory, and then perform steps 1 - 4.
● If the RDS station broadcast signals are very weak, stationnames may not be stored in memory.
1
2,3
4
To stop the ASPM operation before it is complete:Press the ASPM button whilst it is scanning for stations.● The stations that have already been stored in memory will be
kept there.
To erase all of the contents of preset memory:The unit is in the stand-by mode.Hold down the MEMORY button and the TUNING W button, andthen press the ON/STAND-BY button.● "TUNER CL." will appear.
● After performing this operation, all of the preset memory infor-mation will be erased.
(Main unit operation)
4
(4 seconds)
(4 seconds)
MD-C2H(SUK) TINSE0238AWZZ
19
<P=002>
(Continued)
■ To specify station names and select stationsmanually (station select)
You can received for a desired station by specifying the stationname (BBC R1, BBC R2, etc.) from among the stations that havebeen stored in memory.(ASPM is convenient for storing stations in memory.)
Before starting this operation, you must store one or more stationnames in memory.
1 Press the ON/STAND-BY button to turn the power on.
2 Press the TUNER (BAND) button.
3 Press the TUNER (BAND) button to select the FM ST or FMband.
4 Press the STATION button.
● "STATION" and "SELECT" will appear alternately for about 6seconds.
5 Within 6 seconds, turn the jog dial on the main unit or pressthe PRESET (X or W) button on the remote control to selecta desired station name you want.
● Each time the button on the remote control is pressed, thestation name will appear. If the button is held down for morethan 0.5 seconds, the station name will continuously change.
6 Whilst the selected station name is flashing (within 6 sec-onds), press the STATION button again.
● After the selected station name has been lit for 1 second, thepreset station which corresponds to the selected station namewill be recalled.
To cancel the station select operation:Press the STATION button whilst "STATION" and "SELECT" ap-pear alternately.
1
2,3
1
5
4
4 5
2,3
4
5
6
MD-C2H(SUK) TINSE0238AWZZ
20
<P=003>
(Continued)
Notes:● When there are no station names stored in memory,
you cannot use this function. In this case, when theSTATION button is pressed, "NOTHING" will flash for5 seconds, and the unit will return to the original dis-play.
● This function can only be used when the FM bandhas been selected.
● The same station name can be stored in differentpreset channels. Therefore, when you are choosinga station name from the presets, the same stationname may be encountered more than once.
● In a certain area or during certain time periods, thestation names selected using the station select func-tion may temporarily be different from the name ofthe station you are actually receiving.
To try to store a station name again, if the wrong namewas stored in memory by mistake:
When you store station names in memory using the ASPM func-tion, the correct station names may not actually be stored if thereis lots of noise or if the RDS station signal is too weak.In this case, try storing station names in memory using the fol-lowing procedure.
1 Press the STATION button.
2 Within 6 seconds, turn the jog dial on the main unit or pressthe PRESET (X or W) button on the remote control to checkwhether the station names are correct.
3 If you find a station name that is wrong, press the STATIONbutton again within 6 seconds to recall the preset station,which corresponds to the station name.
4 After the preset station has been received and the correctstation name has been displayed, press the MEMORY button.
5 Within 30 seconds, Press the ENTER button whilst the presetchannel number is flashing.
● The new station name has been stored in memory correctly.
MD-C2H(SUK) TINSE0238AWZZ
21
<P=004>
(Continued)
■ To recall stations that have been stored inmemory (PTY search)
You can search a desired stations by specifying the programmetype (news, sports, traffic programme, etc. ... see page 18) fromamong the stations that have been stored in memory.(ASPM is convenient for storing stations in memory.)
1 Press the ON/STAND-BY button to turn the power on.
2 Press the TUNER (BAND) button.
3 Press the TUNER (BAND) button to select the FM ST or FMband.
4 Press the PTY.TI SEARCH (PTY.TI) button.
● "PTY TI" and "SELECT" will appear alternately for about 6 sec-onds.
5 Within 6 seconds, turn the jog dial on the main unit or pressthe PRESET (X or W) button on the remote control to selectthe programme type you want.
● Each time the button on the remote control is pressed, theprogramme type will appear. If the button is held down formore than 0.5 seconds, the programme type will appear con-tinuously.
6 Whilst the selected programme type is flashing (within 4 sec-onds), press the PTY.TI SEARCH (PTY.TI) button again.
● After the name of the selected programme type has been litfor 2 seconds, "SEARCH" will appear, and the search operationwill start.
Note:
2,3
4,6
5
1
5
2,3
4,6
1
4
5
6
If the programme type has changed from flashing to steadily litand the PTY.TI SEARCH (PTY.TI) button is pressed, nothing willhappen. In this case, start again from step 4.Each time a station of the programme type you want is en-countered, you will be able to listen to the broadcast.The channel number will flash for about 3 seconds. The stationname will flash for 7 seconds, and then remain lit.● If you want to listen to another station of that programme type,
press the PTY.TI SEARCH (PTY.TI) button whilst the channelnumber or station name is flashing. The unit will look for thenext station of that type.
Note:● If no station of the programme type you want can be found,
"NOT FOUND" will appear for 4 seconds.
★ If you have selected the traffic programme:If you select traffic programme (TP) as the programme type instep 5, to receive only radio stations which broadcast traffic pro-grammes, the TP will appear. (However, this does not necessarilymean that you will hear any traffic announcements at that time.)When a traffic announcement is actually being made, the TA willappear.(When both the TP and TA will appear, an announcement isbeing made.)
MD-C2H(SUK) TINSE0238AWZZ
22
<P=005>
(Continued)
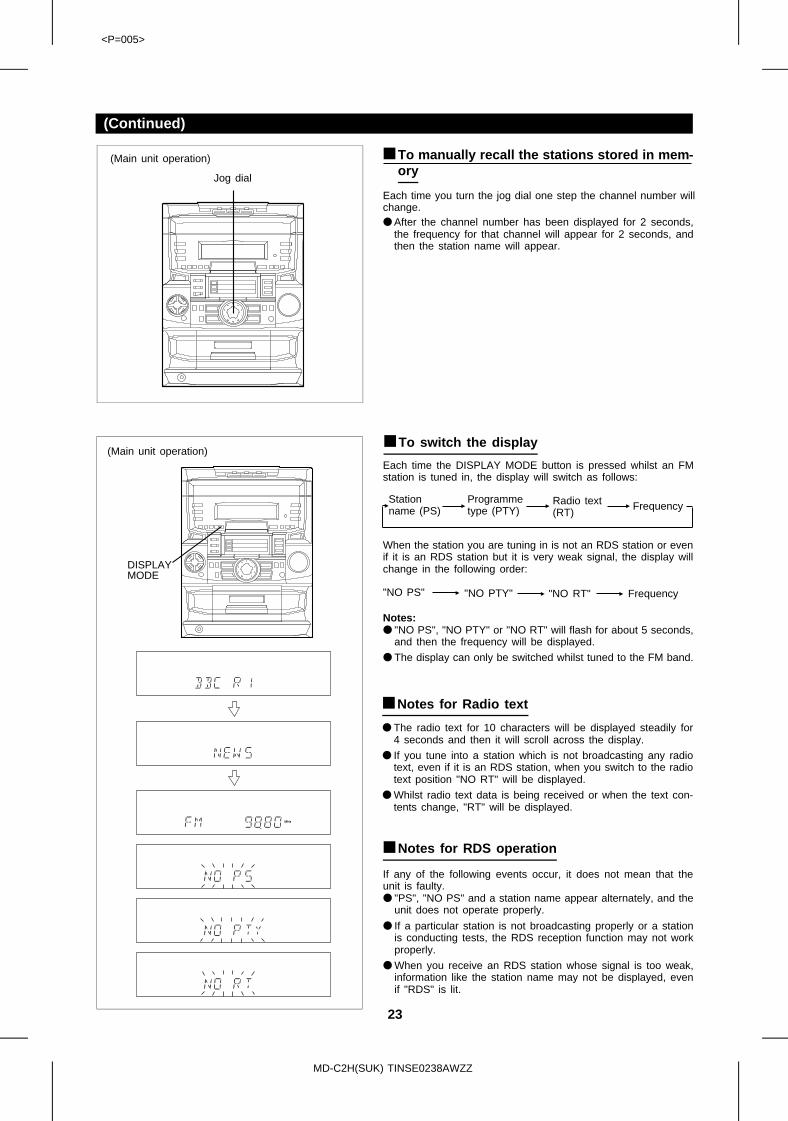
■ To manually recall the stations stored in mem-ory
Each time you turn the jog dial one step the channel number willchange.● After the channel number has been displayed for 2 seconds,
the frequency for that channel will appear for 2 seconds, andthen the station name will appear.
■ To switch the display
Each time the DISPLAY MODE button is pressed whilst an FMstation is tuned in, the display will switch as follows:
Stationname (PS)
Programmetype (PTY)
Radio text(RT)
DISPLAYMODE
Frequency
When the station you are tuning in is not an RDS station or evenif it is an RDS station but it is very weak signal, the display willchange in the following order:
"NO PS" "NO PTY" "NO RT" Frequency
Notes:● "NO PS", "NO PTY" or "NO RT" will flash for about 5 seconds,
and then the frequency will be displayed.
● The display can only be switched whilst tuned to the FM band.
■ Notes for Radio text
● The radio text for 10 characters will be displayed steadily for4 seconds and then it will scroll across the display.
● If you tune into a station which is not broadcasting any radiotext, even if it is an RDS station, when you switch to the radiotext position "NO RT" will be displayed.
● Whilst radio text data is being received or when the text con-tents change, "RT" will be displayed.
■ Notes for RDS operation
If any of the following events occur, it does not mean that theunit is faulty.● "PS", "NO PS" and a station name appear alternately, and the
unit does not operate properly.
● If a particular station is not broadcasting properly or a stationis conducting tests, the RDS reception function may not workproperly.
● When you receive an RDS station whose signal is too weak,information like the station name may not be displayed, evenif "RDS" is lit.
(Main unit operation)
Jog dial
(Main unit operation)
MD-C2H(SUK) TINSE0238AWZZ
23
<P=006>
(Continued)
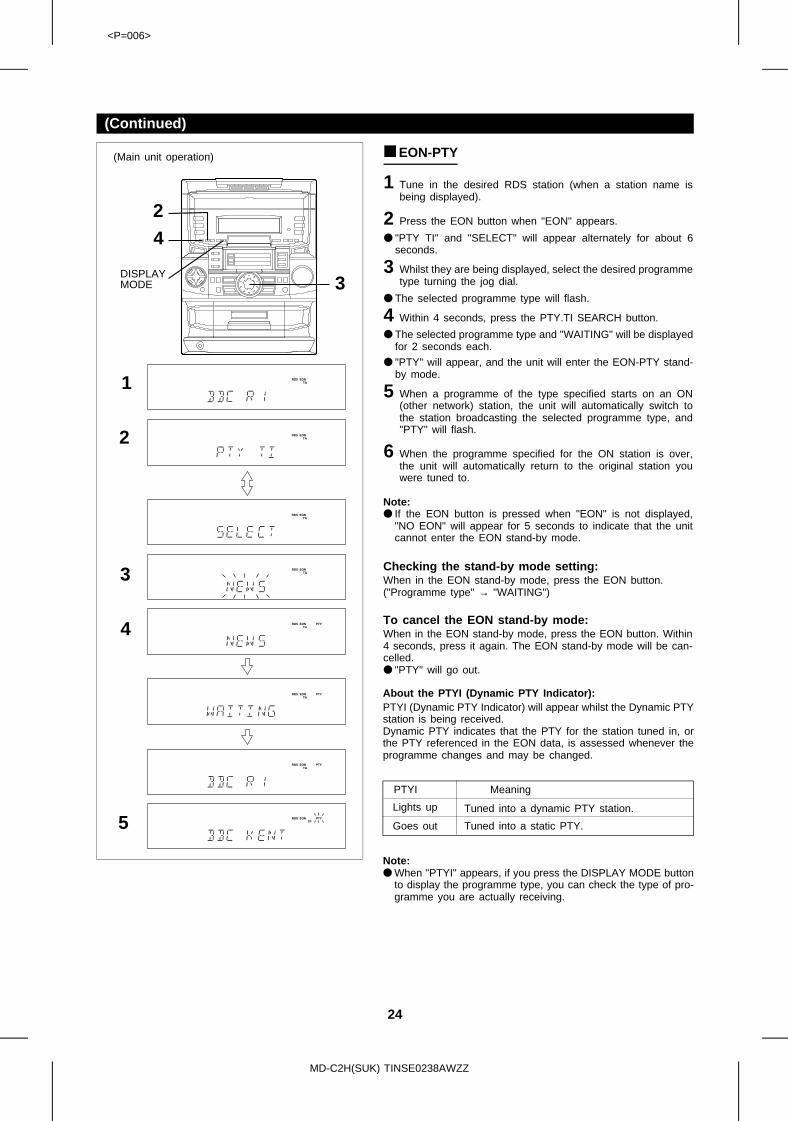
■ EON-PTY
1 Tune in the desired RDS station (when a station name isbeing displayed).
2 Press the EON button when "EON" appears.
● "PTY TI" and "SELECT" will appear alternately for about 6seconds.
3 Whilst they are being displayed, select the desired programmetype turning the jog dial.
● The selected programme type will flash.
4 Within 4 seconds, press the PTY.TI SEARCH button.
● The selected programme type and "WAITING" will be displayedfor 2 seconds each.
● "PTY" will appear, and the unit will enter the EON-PTY stand-by mode.
5 When a programme of the type specified starts on an ON(other network) station, the unit will automatically switch tothe station broadcasting the selected programme type, and"PTY" will flash.
6 When the programme specified for the ON station is over,the unit will automatically return to the original station youwere tuned to.
Note:● If the EON button is pressed when "EON" is not displayed,
"NO EON" will appear for 5 seconds to indicate that the unitcannot enter the EON stand-by mode.
Checking the stand-by mode setting:When in the EON stand-by mode, press the EON button. ("Programme type" → "WAITING")
To cancel the EON stand-by mode:When in the EON stand-by mode, press the EON button. Within4 seconds, press it again. The EON stand-by mode will be can-celled.● "PTY" will go out.
DISPLAYMODE
24
3
1
2
3
4
5
About the PTYI (Dynamic PTY Indicator):PTYI (Dynamic PTY Indicator) will appear whilst the Dynamic PTYstation is being received.Dynamic PTY indicates that the PTY for the station tuned in, orthe PTY referenced in the EON data, is assessed whenever theprogramme changes and may be changed.
PTYI Meaning
Lights up Tuned into a dynamic PTY station.
Goes out Tuned into a static PTY.
Note:● When "PTYI" appears, if you press the DISPLAY MODE button
to display the programme type, you can check the type of pro-gramme you are actually receiving.
(Main unit operation)
MD-C2H(SUK) TINSE0238AWZZ
24
HK <P=001>
(Continued)
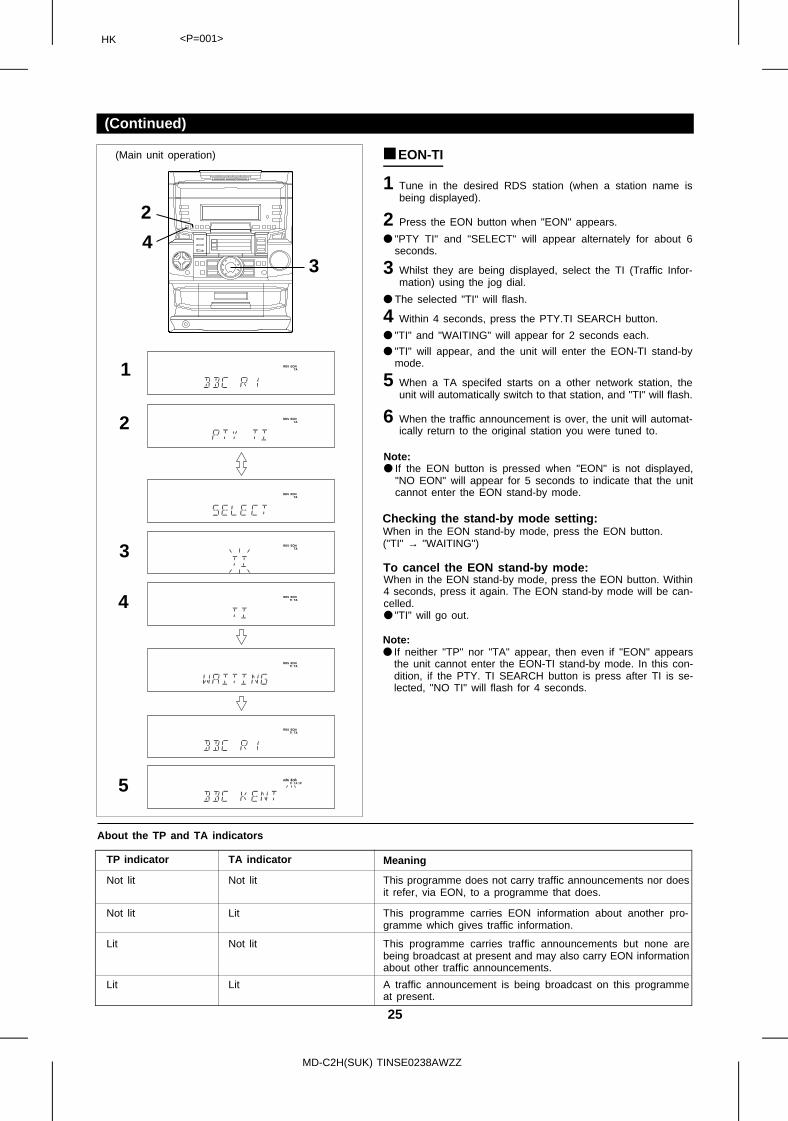
■ EON-TI
1 Tune in the desired RDS station (when a station name isbeing displayed).
2 Press the EON button when "EON" appears.
● "PTY TI" and "SELECT" will appear alternately for about 6seconds.
3 Whilst they are being displayed, select the TI (Traffic Infor-mation) using the jog dial.
● The selected "TI" will flash.
4 Within 4 seconds, press the PTY.TI SEARCH button.
● "TI" and "WAITING" will appear for 2 seconds each.
● "TI" will appear, and the unit will enter the EON-TI stand-bymode.
5 When a TA specifed starts on a other network station, theunit will automatically switch to that station, and "TI" will flash.
6 When the traffic announcement is over, the unit will automat-ically return to the original station you were tuned to.
Note:● If the EON button is pressed when "EON" is not displayed,
"NO EON" will appear for 5 seconds to indicate that the unitcannot enter the EON stand-by mode.
Checking the stand-by mode setting:When in the EON stand-by mode, press the EON button. ("TI" → "WAITING")
To cancel the EON stand-by mode:When in the EON stand-by mode, press the EON button. Within4 seconds, press it again. The EON stand-by mode will be can-celled.● "TI" will go out.
Note:● If neither "TP" nor "TA" appear, then even if "EON" appears
the unit cannot enter the EON-TI stand-by mode. In this con-dition, if the PTY. TI SEARCH button is press after TI is se-lected, "NO TI" will flash for 4 seconds.
2
43
2
1
3
4
5
About the TP and TA indicators
TP indicator TA indicator Meaning
Not lit Not lit This programme does not carry traffic announcements nor doesit refer, via EON, to a programme that does.
Not lit Lit This programme carries EON information about another pro-gramme which gives traffic information.
Lit Not lit This programme carries traffic announcements but none arebeing broadcast at present and may also carry EON informationabout other traffic announcements.
Lit Lit A traffic announcement is being broadcast on this programmeat present.
(Main unit operation)
MD-C2H(SUK) TINSE0238AWZZ
25
<P=002>
(Continued)
In the following cases, the EON stand-by mode will becancelled.● Press the ON/STAND-BY button to enter the stand-by
mode.
● When the unit is switched to another band in the EONstand-by mode
● When you change the FM station whilst in the EONstand-by mode
● When a preset call is made
Notes:● During the same programme as the specified PTY (or TA) is
being broadcast on the station you are receiving, the unit willnot switch to other network station.
● If there are more than two other network stations you want tolisten to, compare the strength of each station’s signal andtune in the station with the strongest signal. (EON-AF)However, if the frequency of other network station has beenstored in the preset channel memory, the unit will switch tothat preset channel.
● If you want to cancel the reception of an ON (other network)station which was tuned in by the EON system and return tothe original station you were receiving, press the EON button.
● After the unit returns to the original station, the stand-by modewill still be active. (The "TI" or "PTY" will remain lit.)
● The unit will not switch from the ON station to another networkstation. The unit returns to the original station.
● When the unit switches automatically to "other network" station,if there is any problem with this station or the station cannotbe received properly "WEAK SIG" will appear and the unit willreturn to the original station.
● Even if the unit switches from the station you are listening todirectly to some "other network" station, if the signals from theother network stations are very weak, the unit will search forthe station with the strongest signal and switch to it.However, if the signals from all the other network stations arevery weak, or if the tuning conditions are very bad (due toelectrical noise), the unit will stop searching, "WEAK SIG" willbe displayed, and the unit will return to the original station youwere receiving.
MD-C2H(SUK) TINSE0238AWZZ
26
<P=003>
CONVENIENT CD AND MD OPERATIONS
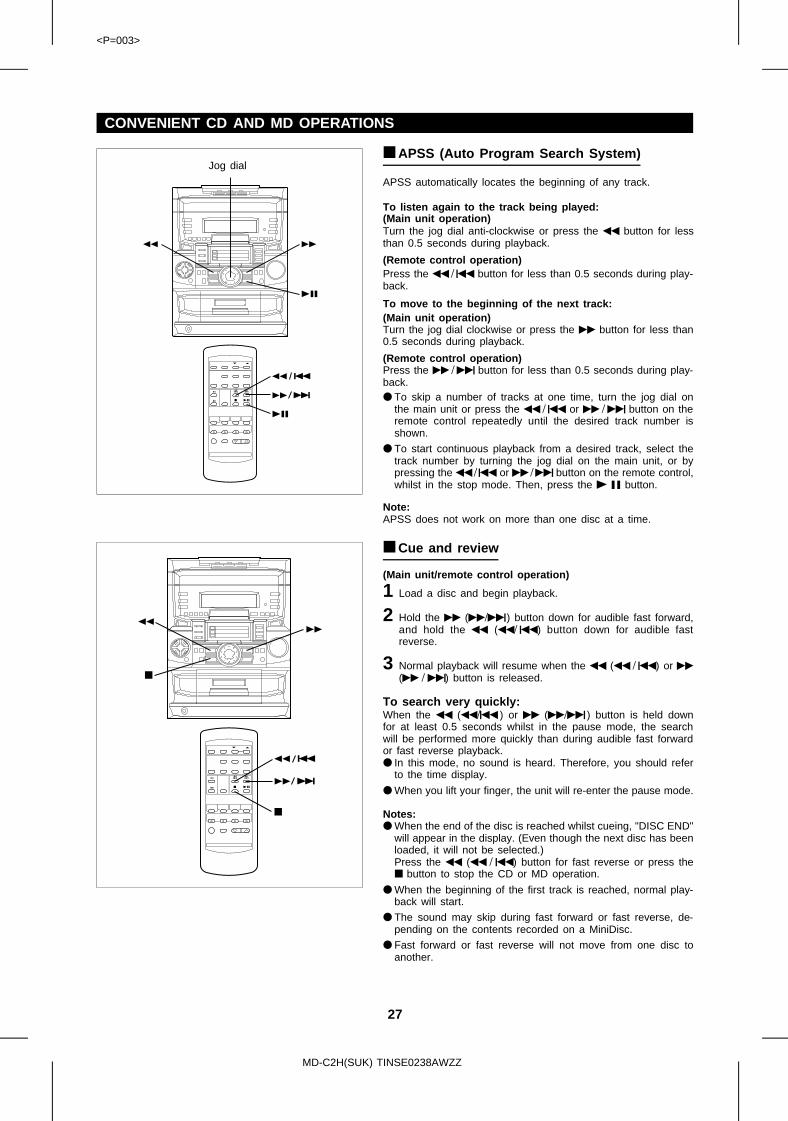
■ APSS (Auto Program Search System)
APSS automatically locates the beginning of any track.
To listen again to the track being played:(Main unit operation)Turn the jog dial anti-clockwise or press the 3 button for lessthan 0.5 seconds during playback.
(Remote control operation)Press the 3 / 5 button for less than 0.5 seconds during play-back.
To move to the beginning of the next track:(Main unit operation)Turn the jog dial clockwise or press the 2 button for less than0.5 seconds during playback.
(Remote control operation)Press the 2 / 4 button for less than 0.5 seconds during play-back.● To skip a number of tracks at one time, turn the jog dial on
the main unit or press the 3 / 5 or 2 / 4 button on theremote control repeatedly until the desired track number isshown.
● To start continuous playback from a desired track, select thetrack number by turning the jog dial on the main unit, or bypressing the 3 / 5 or 2 / 4 button on the remote control,whilst in the stop mode. Then, press the 0 6 button.
Note:APSS does not work on more than one disc at a time.
■ Cue and review
(Main unit/remote control operation)
1 Load a disc and begin playback.
2 Hold the 2 (2/4 ) button down for audible fast forward,and hold the 3 (3/ 5 ) button down for audible fastreverse.
3 Normal playback will resume when the 3 (3 / 5) or 2(2 / 4) button is released.
To search very quickly:When the 3 (3/5 ) or 2 (2/4 ) button is held downfor at least 0.5 seconds whilst in the pause mode, the searchwill be performed more quickly than during audible fast forwardor fast reverse playback.● In this mode, no sound is heard. Therefore, you should refer
to the time display.
● When you lift your finger, the unit will re-enter the pause mode.
Notes:● When the end of the disc is reached whilst cueing, "DISC END"
will appear in the display. (Even though the next disc has beenloaded, it will not be selected.)Press the 3 (3 / 5) button for fast reverse or press the■ button to stop the CD or MD operation.
● When the beginning of the first track is reached, normal play-back will start.
● The sound may skip during fast forward or fast reverse, de-pending on the contents recorded on a MiniDisc.
● Fast forward or fast reverse will not move from one disc toanother.
Jog dial
MD-C2H(SUK) TINSE0238AWZZ
27
<P=004>
(Continued)
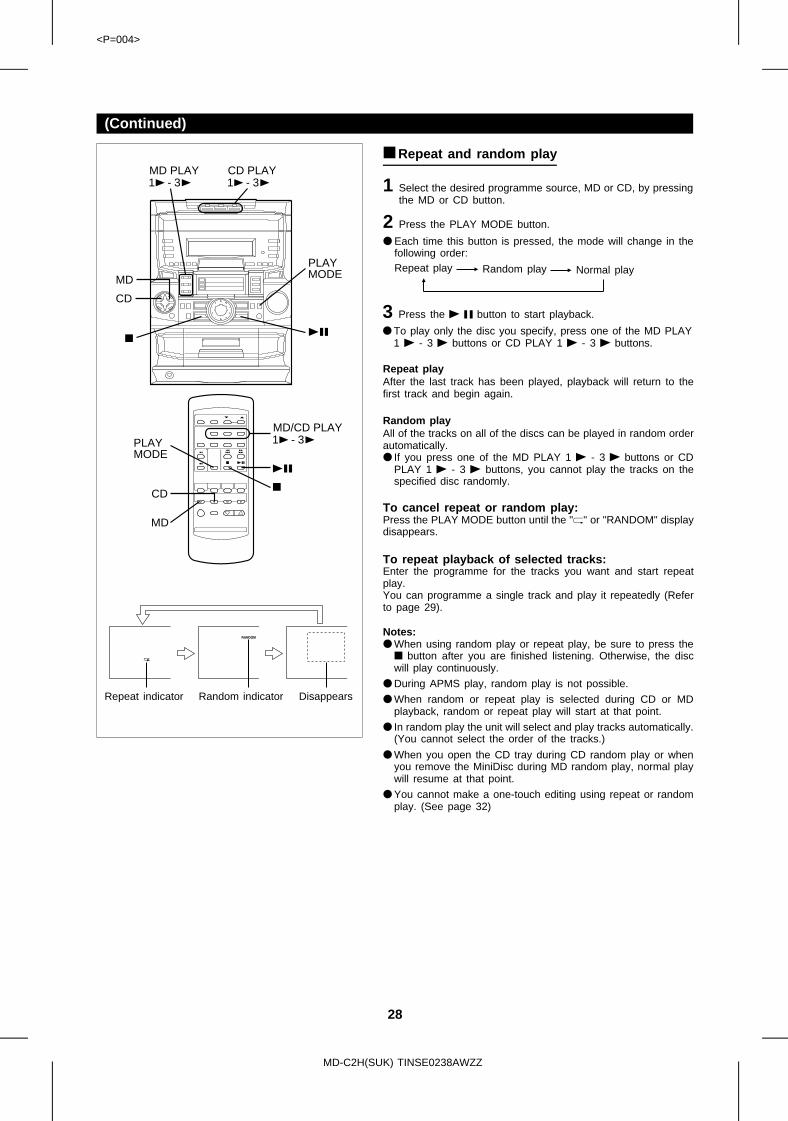
■ Repeat and random play
1 Select the desired programme source, MD or CD, by pressingthe MD or CD button.
2 Press the PLAY MODE button.
● Each time this button is pressed, the mode will change in thefollowing order:
PLAYMODE
PLAYMODE
CD
MD
1 -MD PLAY
3 1 -CD PLAY
3
CD
MD
1 -MD/CD PLAY
3
Repeat play Random play Normal play
3 Press the 0 6 button to start playback.
● To play only the disc you specify, press one of the MD PLAY1 0 - 3 0 buttons or CD PLAY 1 0 - 3 0 buttons.
Repeat playAfter the last track has been played, playback will return to thefirst track and begin again.
Random playAll of the tracks on all of the discs can be played in random orderautomatically.● If you press one of the MD PLAY 1 0 - 3 0 buttons or CD
PLAY 1 0 - 3 0 buttons, you cannot play the tracks on thespecified disc randomly.
To cancel repeat or random play:Press the PLAY MODE button until the "R" or "RANDOM" displaydisappears.
To repeat playback of selected tracks:Enter the programme for the tracks you want and start repeatplay.You can programme a single track and play it repeatedly (Referto page 29).
Notes:● When using random play or repeat play, be sure to press the
■ button after you are finished listening. Otherwise, the discwill play continuously.
● During APMS play, random play is not possible.
● When random or repeat play is selected during CD or MDplayback, random or repeat play will start at that point.
● In random play the unit will select and play tracks automatically.(You cannot select the order of the tracks.)
● When you open the CD tray during CD random play or whenyou remove the MiniDisc during MD random play, normal playwill resume at that point.
● You cannot make a one-touch editing using repeat or randomplay. (See page 32)
Repeat indicator Random indicator Disappears
MD-C2H(SUK) TINSE0238AWZZ
28
<P=005>
(Continued)
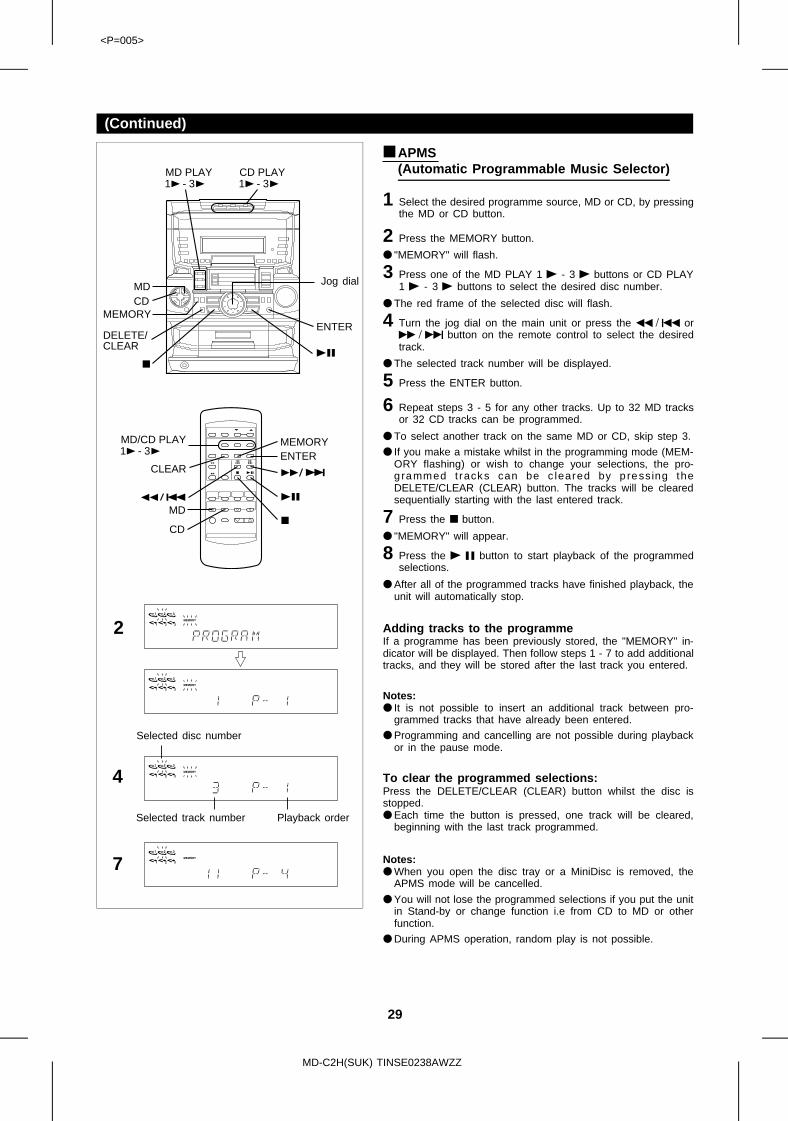
■ APMS (Automatic Programmable Music Selector)
1 Select the desired programme source, MD or CD, by pressingthe MD or CD button.
2 Press the MEMORY button.
● "MEMORY" will flash.
3 Press one of the MD PLAY 1 0 - 3 0 buttons or CD PLAY1 0 - 3 0 buttons to select the desired disc number.
● The red frame of the selected disc will flash.
4 Turn the jog dial on the main unit or press the 3 / 5 or2 / 4 button on the remote control to select the desiredtrack.
● The selected track number will be displayed.
5 Press the ENTER button.
6 Repeat steps 3 - 5 for any other tracks. Up to 32 MD tracksor 32 CD tracks can be programmed.
● To select another track on the same MD or CD, skip step 3.
● If you make a mistake whilst in the programming mode (MEM-ORY flashing) or wish to change your selections, the pro-g rammed t racks can be c leared by p ressing theDELETE/CLEAR (CLEAR) button. The tracks will be clearedsequentially starting with the last entered track.
7 Press the ■ button.
● "MEMORY" will appear.
8 Press the 0 6 button to start playback of the programmedselections.
● After all of the programmed tracks have finished playback, theunit will automatically stop.
Adding tracks to the programmeIf a programme has been previously stored, the "MEMORY" in-dicator will be displayed. Then follow steps 1 - 7 to add additionaltracks, and they will be stored after the last track you entered.
Notes:● It is not possible to insert an additional track between pro-
grammed tracks that have already been entered.
● Programming and cancelling are not possible during playbackor in the pause mode.
To clear the programmed selections:Press the DELETE/CLEAR (CLEAR) button whilst the disc isstopped.● Each time the button is pressed, one track will be cleared,
beginning with the last track programmed.
Notes:● When you open the disc tray or a MiniDisc is removed, the
APMS mode will be cancelled.
● You will not lose the programmed selections if you put the unitin Stand-by or change function i.e from CD to MD or otherfunction.
● During APMS operation, random play is not possible.
CLEAR
MEMORYENTER
CDMEMORY
DELETE/CLEAR
MD
1 -MD PLAY
3
1 -MD/CD PLAY
3
1 -CD PLAY
ENTER
3
CD
MD
2
4
7
Jog dial
Selected disc number
Selected track number Playback order
MD-C2H(SUK) TINSE0238AWZZ
29
HK <P=001>
(Continued)
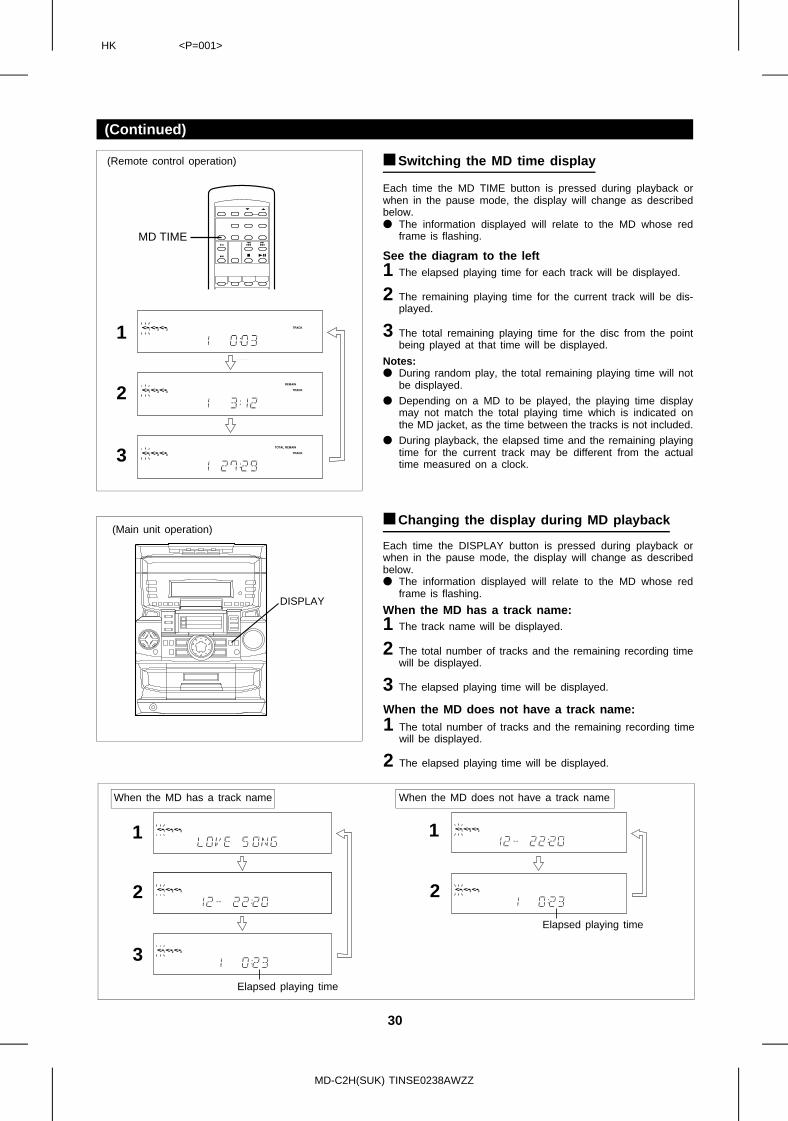
■ Switching the MD time display
Each time the MD TIME button is pressed during playback orwhen in the pause mode, the display will change as describedbelow.● The information displayed will relate to the MD whose red
frame is flashing.MD TIME
1
2
3
DISPLAY
1
2
3
1
2
See the diagram to the left1 The elapsed playing time for each track will be displayed.
2 The remaining playing time for the current track will be dis-played.
3 The total remaining playing time for the disc from the pointbeing played at that time will be displayed.
Notes:● During random play, the total remaining playing time will not
be displayed.
● Depending on a MD to be played, the playing time displaymay not match the total playing time which is indicated onthe MD jacket, as the time between the tracks is not included.
● During playback, the elapsed time and the remaining playingtime for the current track may be different from the actualtime measured on a clock.
■ Changing the display during MD playback
Each time the DISPLAY button is pressed during playback orwhen in the pause mode, the display will change as describedbelow.● The information displayed will relate to the MD whose red
frame is flashing.
When the MD has a track name:1 The track name will be displayed.
2 The total number of tracks and the remaining recording timewill be displayed.
3 The elapsed playing time will be displayed.
When the MD does not have a track name:1 The total number of tracks and the remaining recording time
will be displayed.
2 The elapsed playing time will be displayed.
When the MD has a track name
Elapsed playing time
When the MD does not have a track name
Elapsed playing time
(Remote control operation)
(Main unit operation)
MD-C2H(SUK) TINSE0238AWZZ
30
<P=002>
RECORDING
■ Differences from tape recordings
You cannot record music on thereverse side of a MiniDisc.MiniDiscs are single sided and should onlybe inserted with the correct side up.
You don’t need to search for thestarting point at which to record.The unit automatically finds the point atwhich recording can start. Recording willstart from that point.
You can check the total or remaining rec-ordable time (possible recording) beforerecording.This lets you plan a recording session so that thelast song will not come to an abrupt end beforeit has finished.
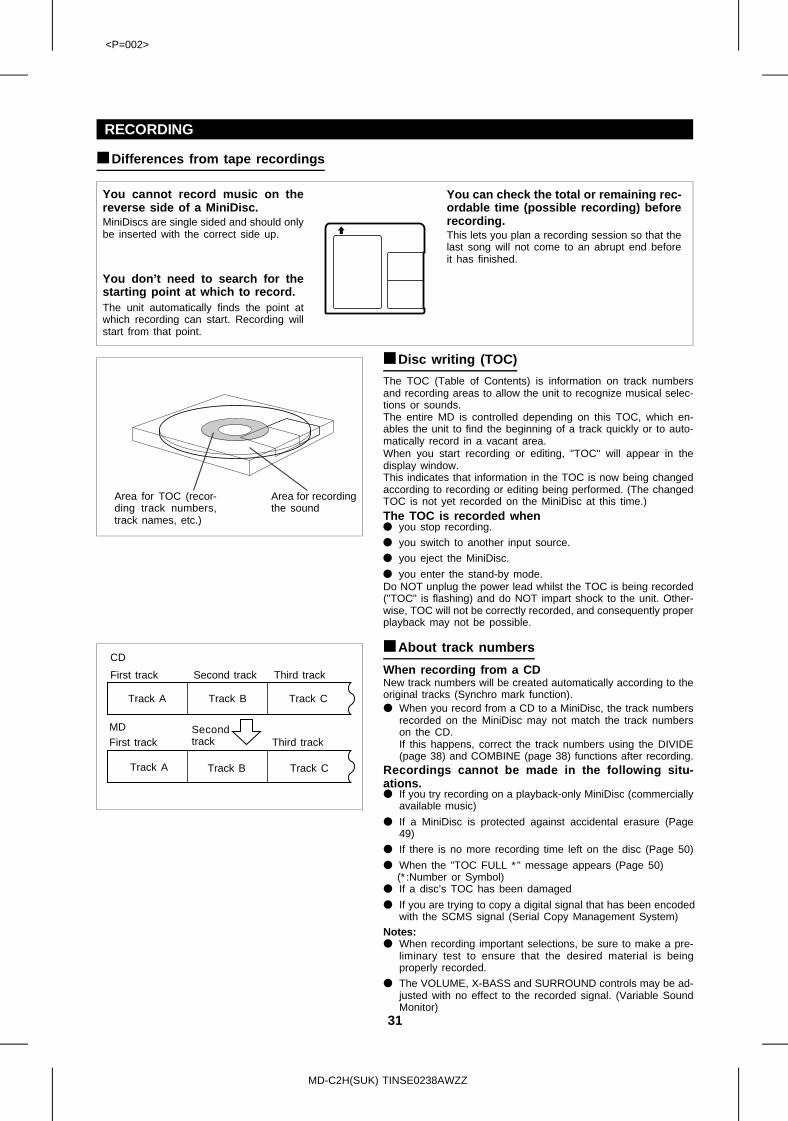
■ Disc writing (TOC)
The TOC (Table of Contents) is information on track numbersand recording areas to allow the unit to recognize musical selec-tions or sounds.The entire MD is controlled depending on this TOC, which en-ables the unit to find the beginning of a track quickly or to auto-matically record in a vacant area.When you start recording or editing, "TOC" will appear in thedisplay window.This indicates that information in the TOC is now being changedaccording to recording or editing being performed. (The changedTOC is not yet recorded on the MiniDisc at this time.)The TOC is recorded when● you stop recording.
● you switch to another input source.
● you eject the MiniDisc.
● you enter the stand-by mode.Do NOT unplug the power lead whilst the TOC is being recorded("TOC" is flashing) and do NOT impart shock to the unit. Other-wise, TOC will not be correctly recorded, and consequently properplayback may not be possible.
■ About track numbers
When recording from a CDNew track numbers will be created automatically according to theoriginal tracks (Synchro mark function).● When you record from a CD to a MiniDisc, the track numbers
recorded on the MiniDisc may not match the track numberson the CD.If this happens, correct the track numbers using the DIVIDE(page 38) and COMBINE (page 38) functions after recording.
Recordings cannot be made in the following situ-ations.● If you try recording on a playback-only MiniDisc (commercially
available music)
● If a MiniDisc is protected against accidental erasure (Page49)
● If there is no more recording time left on the disc (Page 50)
● When the "TOC FULL ∗" message appears (Page 50)(∗:Number or Symbol)
● If a disc’s TOC has been damaged
● If you are trying to copy a digital signal that has been encodedwith the SCMS signal (Serial Copy Management System)
Notes:● When recording important selections, be sure to make a pre-
liminary test to ensure that the desired material is beingproperly recorded.
● The VOLUME, X-BASS and SURROUND controls may be ad-justed with no effect to the recorded signal. (Variable SoundMonitor)
Area for TOC (recor-ding track numbers,track names, etc.)
Area for recordingthe sound
CD
First track Second track Third track
Track A Track B Track C
MDFirst track
Secondtrack Third track
Track A Track B Track C
MD-C2H(SUK) TINSE0238AWZZ
31
<P=003>
(Continued)
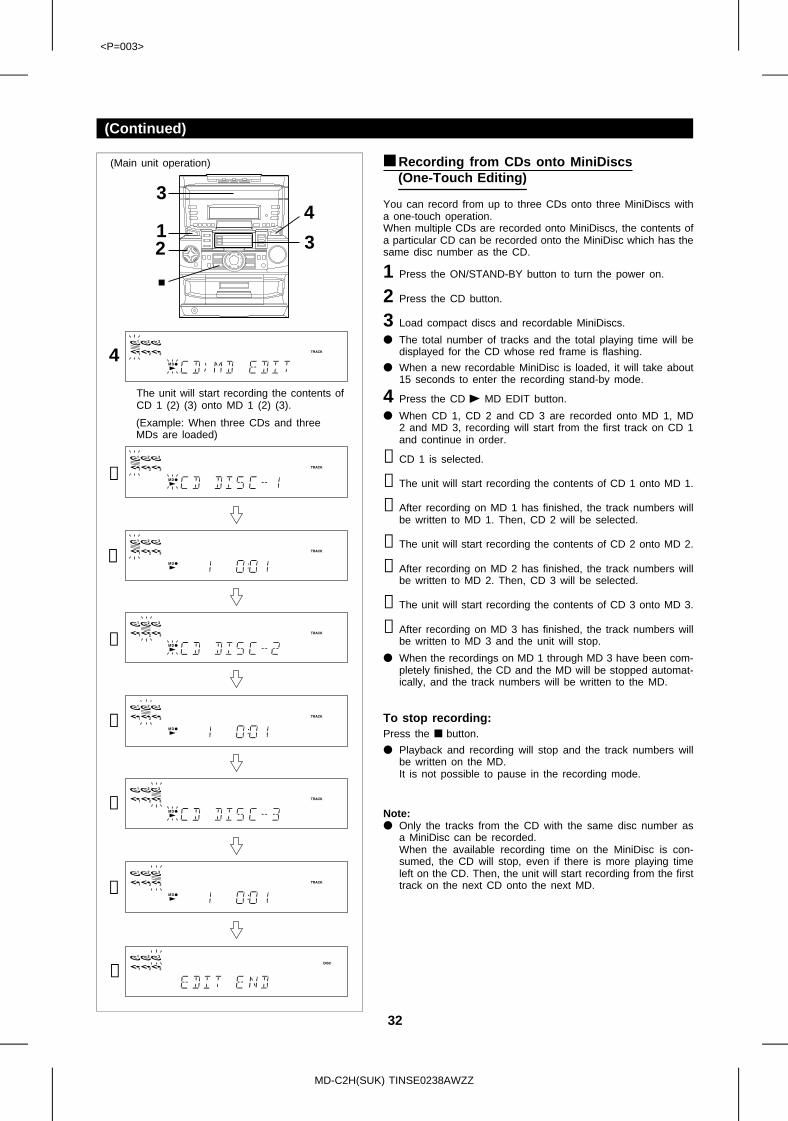
■ Recording from CDs onto MiniDiscs (One-Touch Editing)
You can record from up to three CDs onto three MiniDiscs witha one-touch operation.When multiple CDs are recorded onto MiniDiscs, the contents ofa particular CD can be recorded onto the MiniDisc which has thesame disc number as the CD.
1 Press the ON/STAND-BY button to turn the power on.
2 Press the CD button.
3 Load compact discs and recordable MiniDiscs.
● The total number of tracks and the total playing time will bedisplayed for the CD whose red frame is flashing.
● When a new recordable MiniDisc is loaded, it will take about15 seconds to enter the recording stand-by mode.
4 Press the CD 0 MD EDIT button.
● When CD 1, CD 2 and CD 3 are recorded onto MD 1, MD2 and MD 3, recording will start from the first track on CD 1and continue in order.
①CD 1 is selected.
②The unit will start recording the contents of CD 1 onto MD 1.
③After recording on MD 1 has finished, the track numbers willbe written to MD 1. Then, CD 2 will be selected.
④The unit will start recording the contents of CD 2 onto MD 2.
⑤After recording on MD 2 has finished, the track numbers willbe written to MD 2. Then, CD 3 will be selected.
⑥The unit will start recording the contents of CD 3 onto MD 3.
⑦After recording on MD 3 has finished, the track numbers willbe written to MD 3 and the unit will stop.
● When the recordings on MD 1 through MD 3 have been com-pletely finished, the CD and the MD will be stopped automat-ically, and the track numbers will be written to the MD.
To stop recording:Press the ■ button.
● Playback and recording will stop and the track numbers willbe written on the MD.It is not possible to pause in the recording mode.
Note:● Only the tracks from the CD with the same disc number as
a MiniDisc can be recorded.When the available recording time on the MiniDisc is con-sumed, the CD will stop, even if there is more playing timeleft on the CD. Then, the unit will start recording from the firsttrack on the next CD onto the next MD.
12
43
3
4
①
②
③
④
⑤
⑥
⑦
(Main unit operation)
The unit will start recording the contents ofCD 1 (2) (3) onto MD 1 (2) (3).
(Example: When three CDs and threeMDs are loaded)
MD-C2H(SUK) TINSE0238AWZZ
32
<P=004>
(Continued)
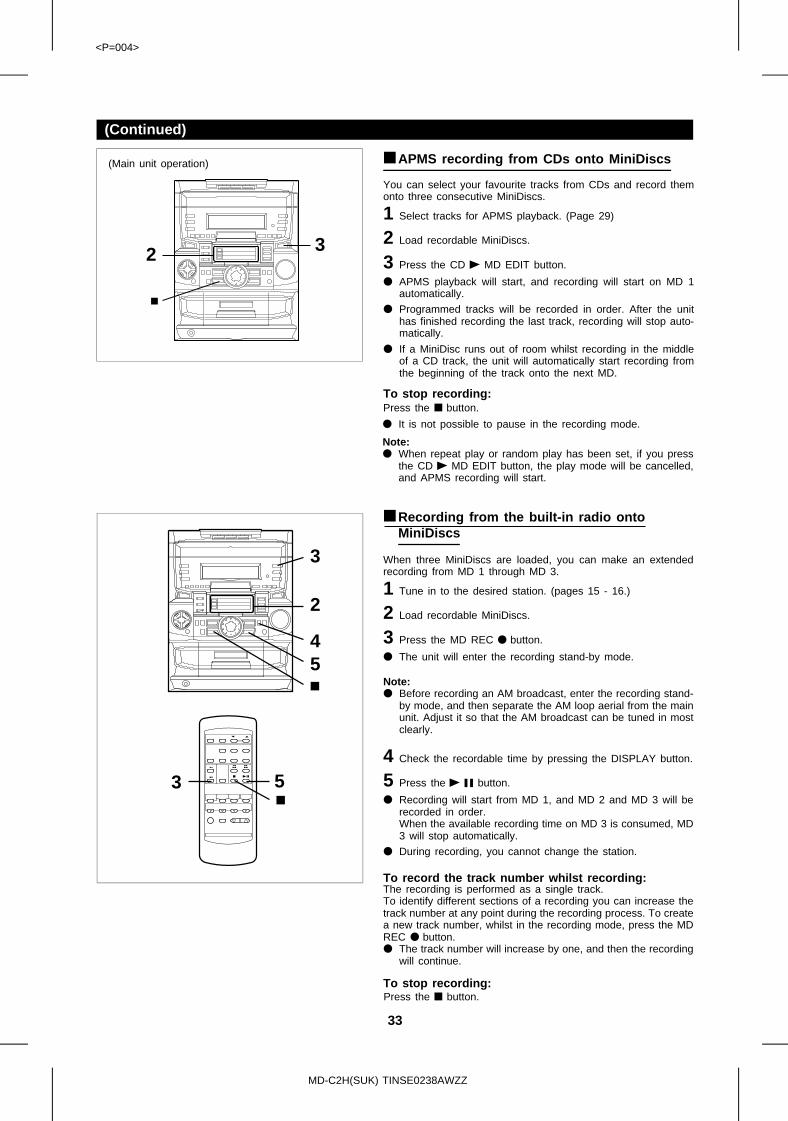
■ APMS recording from CDs onto MiniDiscs
You can select your favourite tracks from CDs and record themonto three consecutive MiniDiscs.
1 Select tracks for APMS playback. (Page 29)
2 Load recordable MiniDiscs.
3 Press the CD 0 MD EDIT button.
● APMS playback will start, and recording will start on MD 1automatically.
● Programmed tracks will be recorded in order. After the unithas finished recording the last track, recording will stop auto-matically.
● If a MiniDisc runs out of room whilst recording in the middleof a CD track, the unit will automatically start recording fromthe beginning of the track onto the next MD.
To stop recording:Press the ■ button.
2 3
● It is not possible to pause in the recording mode.
Note:● When repeat play or random play has been set, if you press
the CD 0 MD EDIT button, the play mode will be cancelled,and APMS recording will start.
■ Recording from the built-in radio onto MiniDiscs
When three MiniDiscs are loaded, you can make an extendedrecording from MD 1 through MD 3.
1 Tune in to the desired station. (pages 15 - 16.)
2 Load recordable MiniDiscs.
3 Press the MD REC ● button.
● The unit will enter the recording stand-by mode.
Note:● Before recording an AM broadcast, enter the recording stand-
by mode, and then separate the AM loop aerial from the mainunit. Adjust it so that the AM broadcast can be tuned in mostclearly.
4 Check the recordable time by pressing the DISPLAY button.
5 Press the 0 6 button.
● Recording will start from MD 1, and MD 2 and MD 3 will berecorded in order.When the available recording time on MD 3 is consumed, MD3 will stop automatically.
● During recording, you cannot change the station.
3
2
5
3 5
4
To record the track number whilst recording:The recording is performed as a single track.To identify different sections of a recording you can increase thetrack number at any point during the recording process. To createa new track number, whilst in the recording mode, press the MDREC ● button.● The track number will increase by one, and then the recording
will continue.
To stop recording:Press the ■ button.
(Main unit operation)
MD-C2H(SUK) TINSE0238AWZZ
33
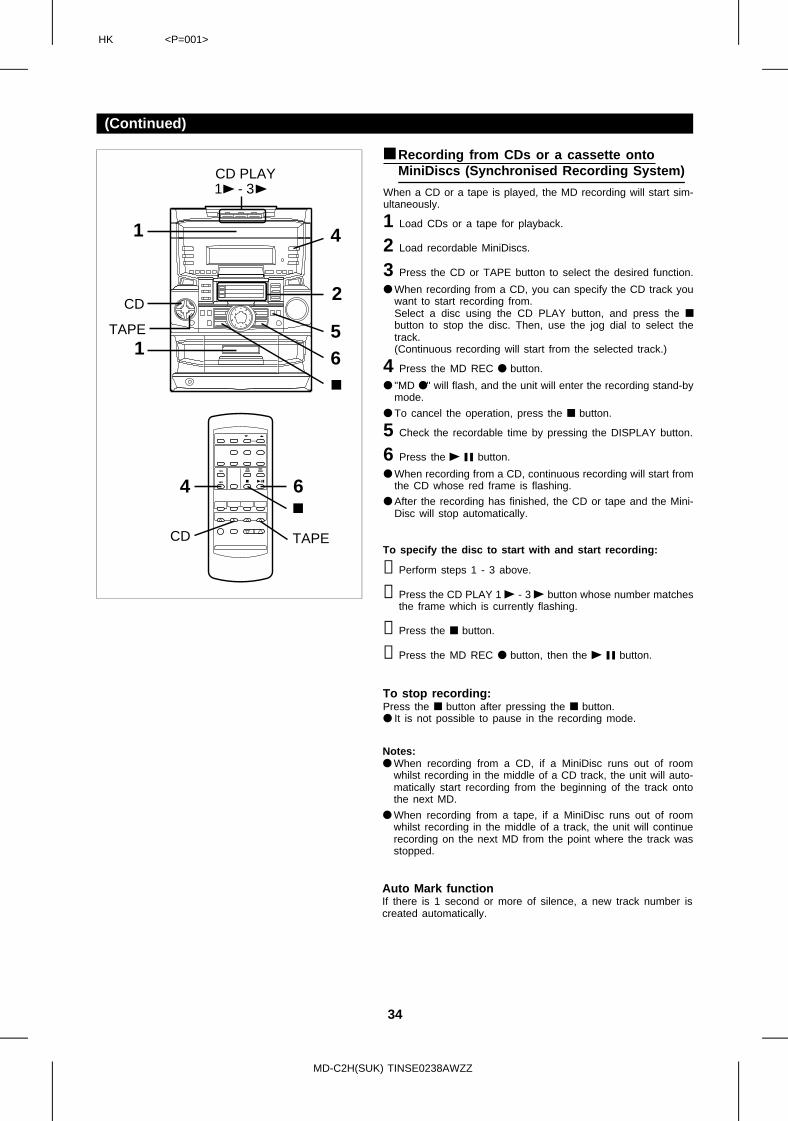
HK <P=001>
(Continued)
1 -CD PLAY
3
CD
TAPE
CD TAPE
5
1
1
2
6
4
6
4
■ Recording from CDs or a cassette onto MiniDiscs (Synchronised Recording System)
When a CD or a tape is played, the MD recording will start sim-ultaneously.
1 Load CDs or a tape for playback.
2 Load recordable MiniDiscs.
3 Press the CD or TAPE button to select the desired function.
● When recording from a CD, you can specify the CD track youwant to start recording from.Select a disc using the CD PLAY button, and press the ■button to stop the disc. Then, use the jog dial to select thetrack.(Continuous recording will start from the selected track.)
4 Press the MD REC ● button.
● "MD ●" will flash, and the unit will enter the recording stand-bymode.
● To cancel the operation, press the ■ button.
5 Check the recordable time by pressing the DISPLAY button.
6 Press the 0 6 button.
● When recording from a CD, continuous recording will start fromthe CD whose red frame is flashing.
● After the recording has finished, the CD or tape and the Mini-Disc will stop automatically.
To specify the disc to start with and start recording:
①Perform steps 1 - 3 above.
②Press the CD PLAY 1 0 - 3 0 button whose number matchesthe frame which is currently flashing.
③Press the ■ button.
④Press the MD REC ● button, then the 0 6 button.
To stop recording:Press the ■ button after pressing the ■ button.● It is not possible to pause in the recording mode.
Notes:● When recording from a CD, if a MiniDisc runs out of room
whilst recording in the middle of a CD track, the unit will auto-matically start recording from the beginning of the track ontothe next MD.
● When recording from a tape, if a MiniDisc runs out of roomwhilst recording in the middle of a track, the unit will continuerecording on the next MD from the point where the track wasstopped.
Auto Mark functionIf there is 1 second or more of silence, a new track number iscreated automatically.
MD-C2H(SUK) TINSE0238AWZZ
34
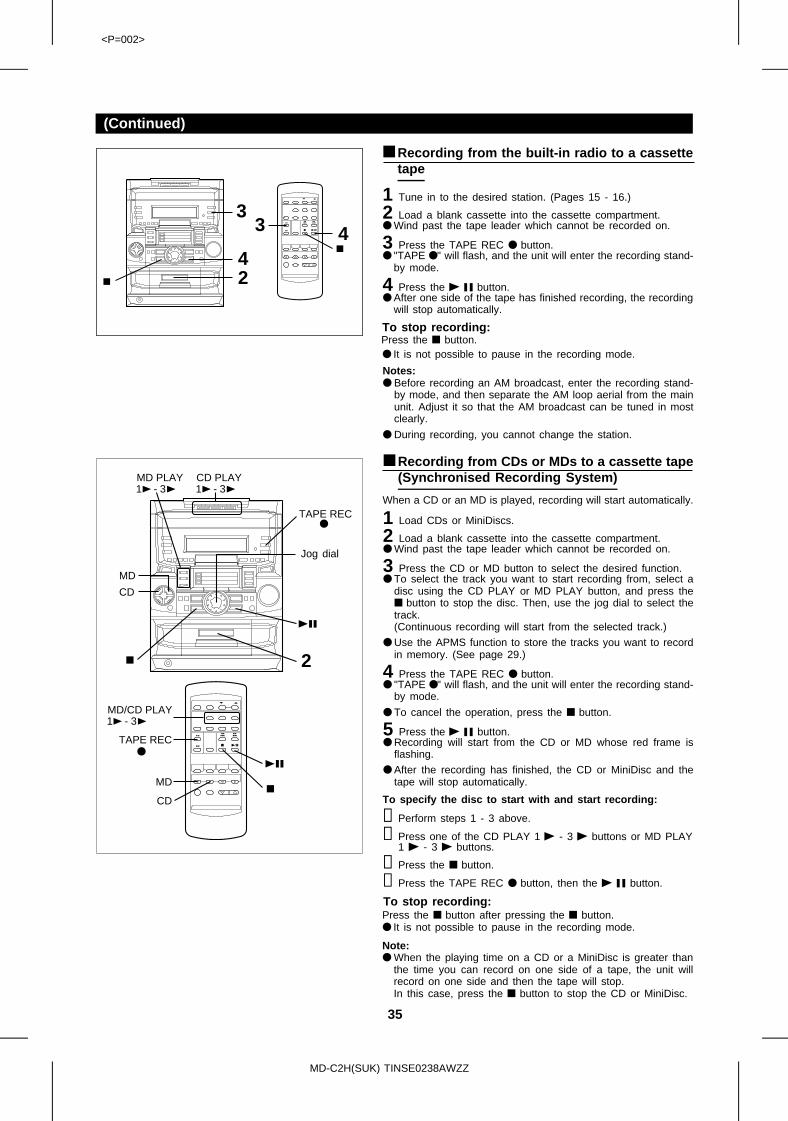
<P=002>
(Continued)
TAPE REC
TAPE REC
1 -CD PLAY
31 -MD PLAY
3
1 -MD/CD PLAY
3
CD
MD
MD
CD
2
■ Recording from the built-in radio to a cassettetape
3
42
3 4
1 Tune in to the desired station. (Pages 15 - 16.)
2 Load a blank cassette into the cassette compartment.● Wind past the tape leader which cannot be recorded on.
3 Press the TAPE REC ● button.● "TAPE ●" will flash, and the unit will enter the recording stand-
by mode.
4 Press the 0 6 button.● After one side of the tape has finished recording, the recording
will stop automatically.
To stop recording:Press the ■ button.● It is not possible to pause in the recording mode.
Notes:● Before recording an AM broadcast, enter the recording stand-
by mode, and then separate the AM loop aerial from the mainunit. Adjust it so that the AM broadcast can be tuned in mostclearly.
● During recording, you cannot change the station.
■ Recording from CDs or MDs to a cassette tape(Synchronised Recording System)
When a CD or an MD is played, recording will start automatically.
1 Load CDs or MiniDiscs.
2 Load a blank cassette into the cassette compartment.● Wind past the tape leader which cannot be recorded on.
3 Press the CD or MD button to select the desired function.● To select the track you want to start recording from, select a
disc using the CD PLAY or MD PLAY button, and press the■ button to stop the disc. Then, use the jog dial to select thetrack.(Continuous recording will start from the selected track.)
● Use the APMS function to store the tracks you want to recordin memory. (See page 29.)
4 Press the TAPE REC ● button.● "TAPE ●" will flash, and the unit will enter the recording stand-
by mode.
● To cancel the operation, press the ■ button.
5 Press the 0 6 button.● Recording will start from the CD or MD whose red frame is
flashing.
● After the recording has finished, the CD or MiniDisc and thetape will stop automatically.
To specify the disc to start with and start recording:
①Perform steps 1 - 3 above.
②Press one of the CD PLAY 1 0 - 3 0 buttons or MD PLAY1 0 - 3 0 buttons.
③Press the ■ button.
④Press the TAPE REC ● button, then the 0 6 button.
To stop recording:Press the ■ button after pressing the ■ button.● It is not possible to pause in the recording mode.
Note:● When the playing time on a CD or a MiniDisc is greater than
the time you can record on one side of a tape, the unit willrecord on one side and then the tape will stop.In this case, press the ■ button to stop the CD or MiniDisc.
Jog dial
MD-C2H(SUK) TINSE0238AWZZ
35
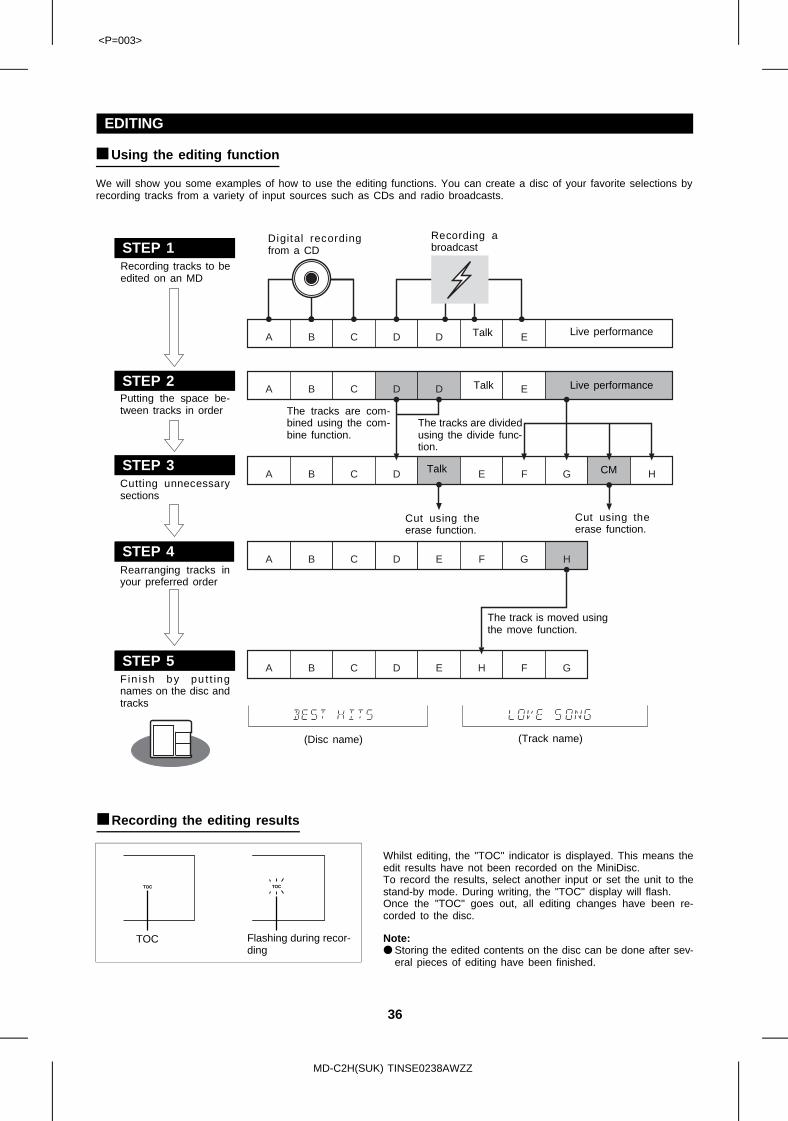
<P=003>
EDITING
■ Using the editing function
We will show you some examples of how to use the editing functions. You can create a disc of your favorite selections byrecording tracks from a variety of input sources such as CDs and radio broadcasts.
A B C D D E
A B C D E F G H
A B C D E F G H
A B C D D E
A B C D E H F G
STEP 1Recording tracks to beedited on an MD
Digital recordingfrom a CD
Recording abroadcast
Talk Live performance
STEP 2Putting the space be-tween tracks in order
Talk Live performance
The tracks are com-bined using the com-bine function.
The tracks are dividedusing the divide func-tion.
STEP 3Cutting unnecessarysections
Talk CM
Cut using theerase function.
Cut using theerase function.
STEP 4Rearranging tracks inyour preferred order
The track is moved usingthe move function.
STEP 5Fin ish by pu t t ingnames on the disc andtracks
(Disc name) (Track name)
■ Recording the editing results
Whilst editing, the "TOC" indicator is displayed. This means theedit results have not been recorded on the MiniDisc.To record the results, select another input or set the unit to thestand-by mode. During writing, the "TOC" display will flash.Once the "TOC" goes out, all editing changes have been re-corded to the disc.
Note:● Storing the edited contents on the disc can be done after sev-
eral pieces of editing have been finished.
TOC Flashing during recor-ding
MD-C2H(SUK) TINSE0238AWZZ
36
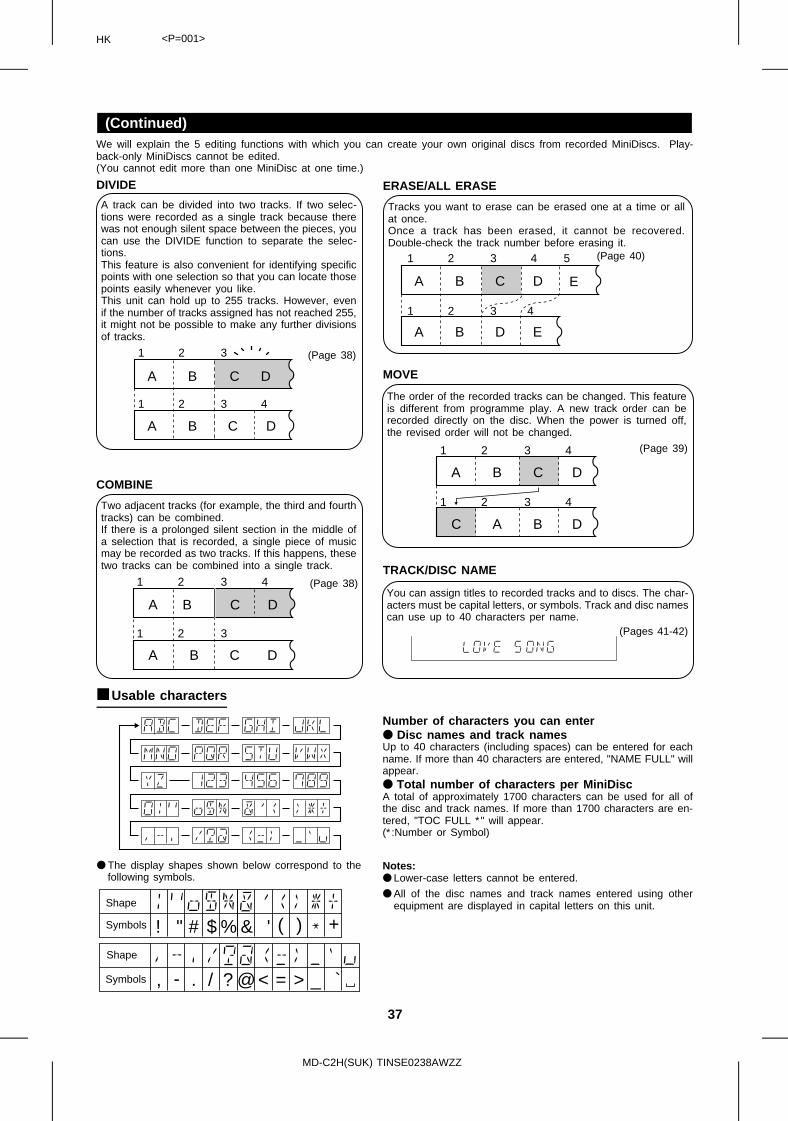
1 2 3
1 2 3 4
A B C D
A B C D
1 2 3
1 2 3
4
C DA B
C DA B
A B C
A B D E
D
1 2 3 4
1 2 3 4
E
5
C A B D
1 2 3 4
1 2 3 4
A B C D
" #! $ % & ' ( ) +
, - . / < = >? @ _ `
HK <P=001>
(Continued)We will explain the 5 editing functions with which you can create your own original discs from recorded MiniDiscs. Play-back-only MiniDiscs cannot be edited.(You cannot edit more than one MiniDisc at one time.)
DIVIDE
A track can be divided into two tracks. If two selec-tions were recorded as a single track because therewas not enough silent space between the pieces, youcan use the DIVIDE function to separate the selec-tions.This feature is also convenient for identifying specificpoints with one selection so that you can locate thosepoints easily whenever you like.This unit can hold up to 255 tracks. However, evenif the number of tracks assigned has not reached 255,it might not be possible to make any further divisionsof tracks.
(Page 38)
COMBINE
Two adjacent tracks (for example, the third and fourthtracks) can be combined.If there is a prolonged silent section in the middle ofa selection that is recorded, a single piece of musicmay be recorded as two tracks. If this happens, thesetwo tracks can be combined into a single track.
(Page 38)
ERASE/ALL ERASE
Tracks you want to erase can be erased one at a time or allat once.Once a track has been erased, it cannot be recovered.Double-check the track number before erasing it.
(Page 40)
MOVE
The order of the recorded tracks can be changed. This featureis different from programme play. A new track order can berecorded directly on the disc. When the power is turned off,the revised order will not be changed.
(Page 39)
TRACK/DISC NAME
You can assign titles to recorded tracks and to discs. The char-acters must be capital letters, or symbols. Track and disc namescan use up to 40 characters per name.
(Pages 41-42)
■ Usable characters
● The display shapes shown below correspond to thefollowing symbols.
Shape
Symbols
Shape
Symbols
Number of characters you can enter● Disc names and track namesUp to 40 characters (including spaces) can be entered for eachname. If more than 40 characters are entered, "NAME FULL" willappear.● Total number of characters per MiniDiscA total of approximately 1700 characters can be used for all ofthe disc and track names. If more than 1700 characters are en-tered, "TOC FULL ∗" will appear.(∗:Number or Symbol)
Notes:● Lower-case letters cannot be entered.
● All of the disc names and track names entered using otherequipment are displayed in capital letters on this unit.
MD-C2H(SUK) TINSE0238AWZZ
37
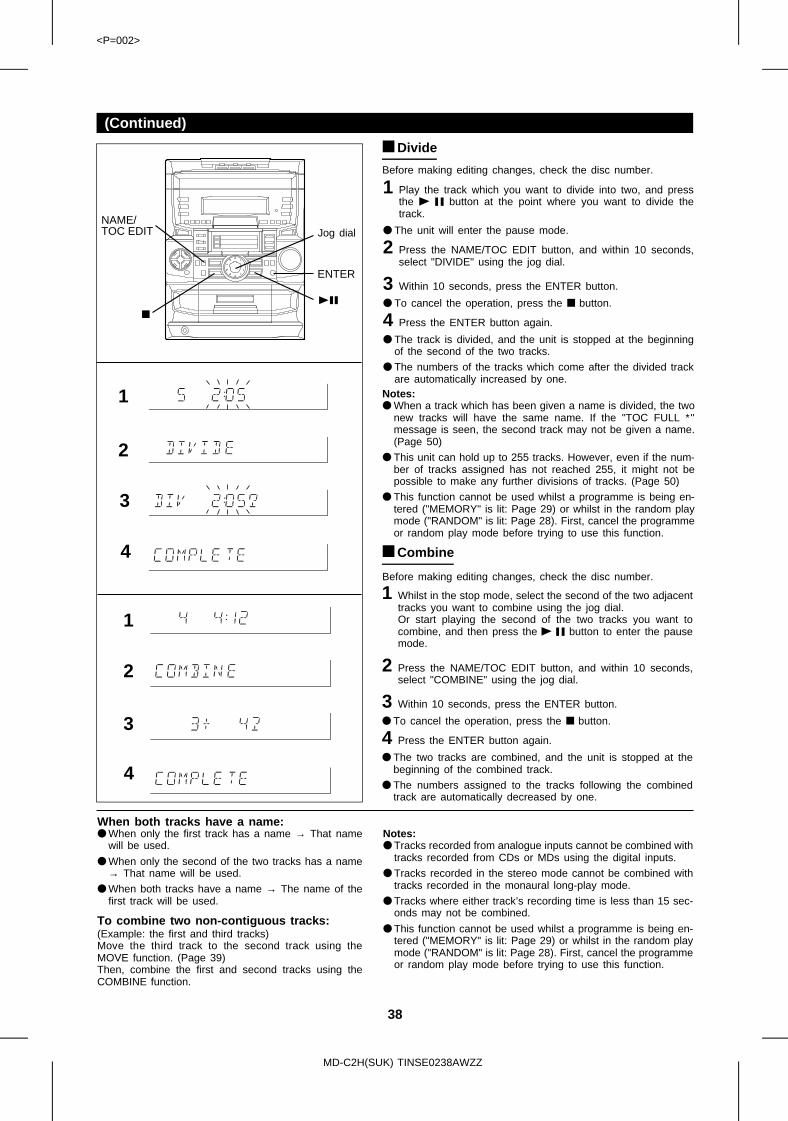
<P=002>
(Continued)
■ Divide
ENTER
NAME/TOC EDIT
Before making editing changes, check the disc number.
1 Play the track which you want to divide into two, and pressthe 0 6 button at the point where you want to divide thetrack.
● The unit will enter the pause mode.
2 Press the NAME/TOC EDIT button, and within 10 seconds,select "DIVIDE" using the jog dial.
3 Within 10 seconds, press the ENTER button.
● To cancel the operation, press the ■ button.
4 Press the ENTER button again.
● The track is divided, and the unit is stopped at the beginningof the second of the two tracks.
● The numbers of the tracks which come after the divided trackare automatically increased by one.
Notes:● When a track which has been given a name is divided, the two
new tracks will have the same name. If the "TOC FULL ∗"message is seen, the second track may not be given a name.(Page 50)
● This unit can hold up to 255 tracks. However, even if the num-ber of tracks assigned has not reached 255, it might not bepossible to make any further divisions of tracks. (Page 50)
● This function cannot be used whilst a programme is being en-tered ("MEMORY" is lit: Page 29) or whilst in the random playmode ("RANDOM" is lit: Page 28). First, cancel the programmeor random play mode before trying to use this function.
■ Combine
Before making editing changes, check the disc number.
1 Whilst in the stop mode, select the second of the two adjacenttracks you want to combine using the jog dial.Or start playing the second of the two tracks you want tocombine, and then press the 0 6 button to enter the pausemode.
2 Press the NAME/TOC EDIT button, and within 10 seconds,select "COMBINE" using the jog dial.
3 Within 10 seconds, press the ENTER button.
● To cancel the operation, press the ■ button.
4 Press the ENTER button again.
● The two tracks are combined, and the unit is stopped at thebeginning of the combined track.
● The numbers assigned to the tracks following the combinedtrack are automatically decreased by one.
When both tracks have a name:● When only the first track has a name → That name
will be used.
● When only the second of the two tracks has a name→ That name will be used.
● When both tracks have a name → The name of thefirst track will be used.
To combine two non-contiguous tracks:(Example: the first and third tracks)Move the third track to the second track using theMOVE function. (Page 39)Then, combine the first and second tracks using theCOMBINE function.
Notes:● Tracks recorded from analogue inputs cannot be combined with
tracks recorded from CDs or MDs using the digital inputs.
● Tracks recorded in the stereo mode cannot be combined withtracks recorded in the monaural long-play mode.
● Tracks where either track’s recording time is less than 15 sec-onds may not be combined.
● This function cannot be used whilst a programme is being en-tered ("MEMORY" is lit: Page 29) or whilst in the random playmode ("RANDOM" is lit: Page 28). First, cancel the programmeor random play mode before trying to use this function.
1
2
3
4
1
2
3
4
Jog dial
MD-C2H(SUK) TINSE0238AWZZ
38

<P=003>
(Continued)
■ Move
Before making editing changes, check the disc number.
1 Whilst in the stop mode, select the track you want to moveusing the jog dial.Or start playing the track to be moved, and then press the0 6 button to enter the pause mode.
2 Press the NAME/TOC EDIT button, and within 10 seconds,select "MOVE" using the jog dial.
3 Within 10 seconds, press the ENTER button.
4 Select the new track position using the jog dial.
● To cancel the operation, press the ■ button.
5 Press the ENTER button again.
● The track is moved, and the unit is stopped at the beginningof the track.
Note:● When a track has been moved, the other tracks which are
affected will be assigned new track numbers automatically.
Example:When moving the fifth track to the third track, the old third trackwill become the new fourth track, and the old fourth track willbecome the new fifth track.● This function cannot be used whilst a programme is being en-
tered ("MEMORY" is lit: Page 29) or whilst in the random playmode ("RANDOM" is lit: Page 28). First, cancel the programmeor random play mode before trying to use this function.
ENTER
NAME/TOC EDIT
1
2
3
4
5
Jog dial
MD-C2H(SUK) TINSE0238AWZZ
39
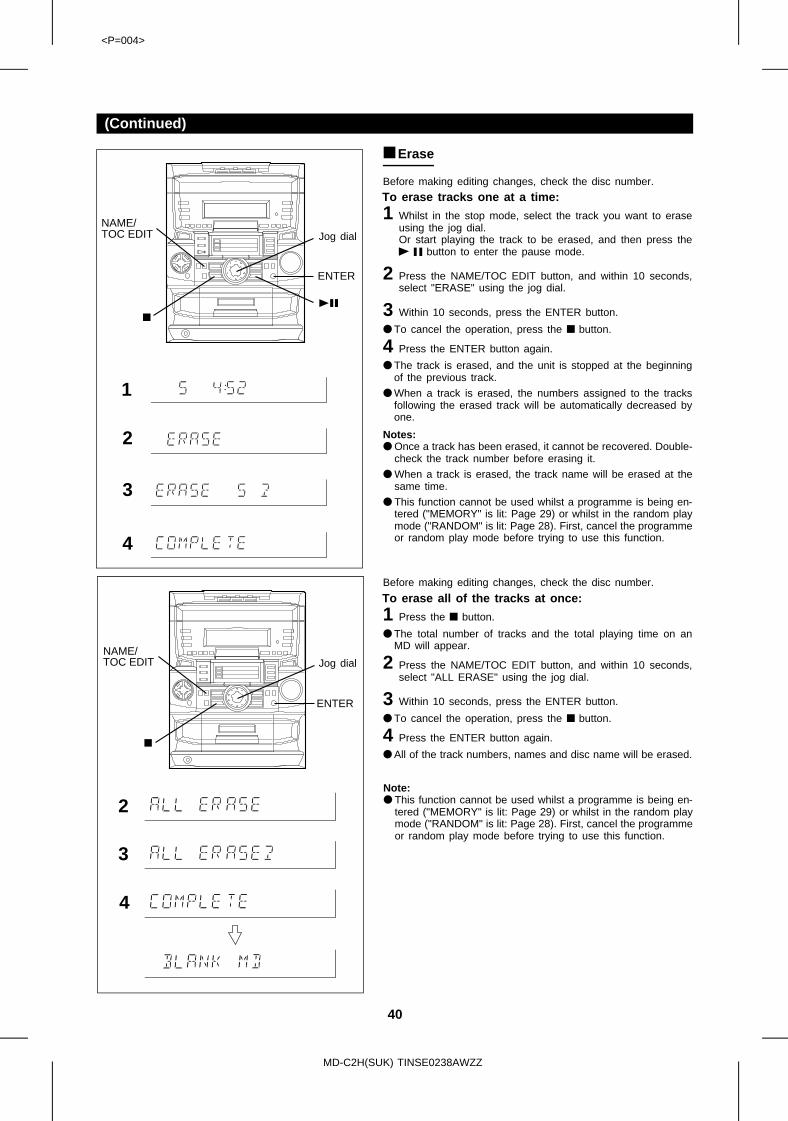
<P=004>
(Continued)
■ Erase
Before making editing changes, check the disc number.
ENTER
NAME/TOC EDIT
To erase tracks one at a time:
1 Whilst in the stop mode, select the track you want to eraseusing the jog dial.Or start playing the track to be erased, and then press the0 6 button to enter the pause mode.
2 Press the NAME/TOC EDIT button, and within 10 seconds,select "ERASE" using the jog dial.
3 Within 10 seconds, press the ENTER button.
● To cancel the operation, press the ■ button.
4 Press the ENTER button again.
● The track is erased, and the unit is stopped at the beginningof the previous track.
● When a track is erased, the numbers assigned to the tracksfollowing the erased track will be automatically decreased byone.
Notes:● Once a track has been erased, it cannot be recovered. Double-
check the track number before erasing it.
● When a track is erased, the track name will be erased at thesame time.
● This function cannot be used whilst a programme is being en-tered ("MEMORY" is lit: Page 29) or whilst in the random playmode ("RANDOM" is lit: Page 28). First, cancel the programmeor random play mode before trying to use this function.
Before making editing changes, check the disc number.
To erase all of the tracks at once:
1 Press the ■ button.
● The total number of tracks and the total playing time on anMD will appear.
2 Press the NAME/TOC EDIT button, and within 10 seconds,select "ALL ERASE" using the jog dial.
3 Within 10 seconds, press the ENTER button.
● To cancel the operation, press the ■ button.
4 Press the ENTER button again.
● All of the track numbers, names and disc name will be erased.
Note:● This function cannot be used whilst a programme is being en-
tered ("MEMORY" is lit: Page 29) or whilst in the random playmode ("RANDOM" is lit: Page 28). First, cancel the programmeor random play mode before trying to use this function.
1
2
3
4
2
3
4
Jog dial
ENTER
NAME/TOC EDIT Jog dial
MD-C2H(SUK) TINSE0238AWZZ
40

HK <P=001>
(Continued)
■ To create a disc name
Before making editing changes, check the disc number.
A name for the whole disc. A Disc name is displayed when anMD is inserted.
1 Press the ■ button.
● The total number of tracks and the total playing time on anMD will appear.
2 Press the NAME/TOC EDIT button, and then select "DISCNAME" using the jog dial.
3 Within 10 seconds, press the ENTER button.
● The unit will enter the character input mode.
4 Select the character you want using the jog dial.
5 Press the ENTER button to enter the character.
● Repeat steps 4 to 5 above to enter the characters in thename.
6 After entering all of the characters in the name, press theNAME/TOC EDIT button.
● The disc name will be recorded.
To erase a disc name:After performing steps 1 to 2.
①Within 10 seconds, press the DELETE/CLEAR button for 2seconds or more.
● "D.NAME CL?" will appear.
● To cancel the operation, press the NAME/TOC EDIT button.
②Press the ENTER button.
ENTER
NAME/TOC EDIT
DELETE/CLEAR
2
3
4
5
6Note:● This function cannot be used whilst a programme is being
entered ("MEMORY" is lit: Page 29) or whilst in the randomplay mode ("RANDOM" is lit: Page 28). First, cancel the pro-gramme or random play mode before trying to use this func-tion.
Jog dial
MD-C2H(SUK) TINSE0238AWZZ
41
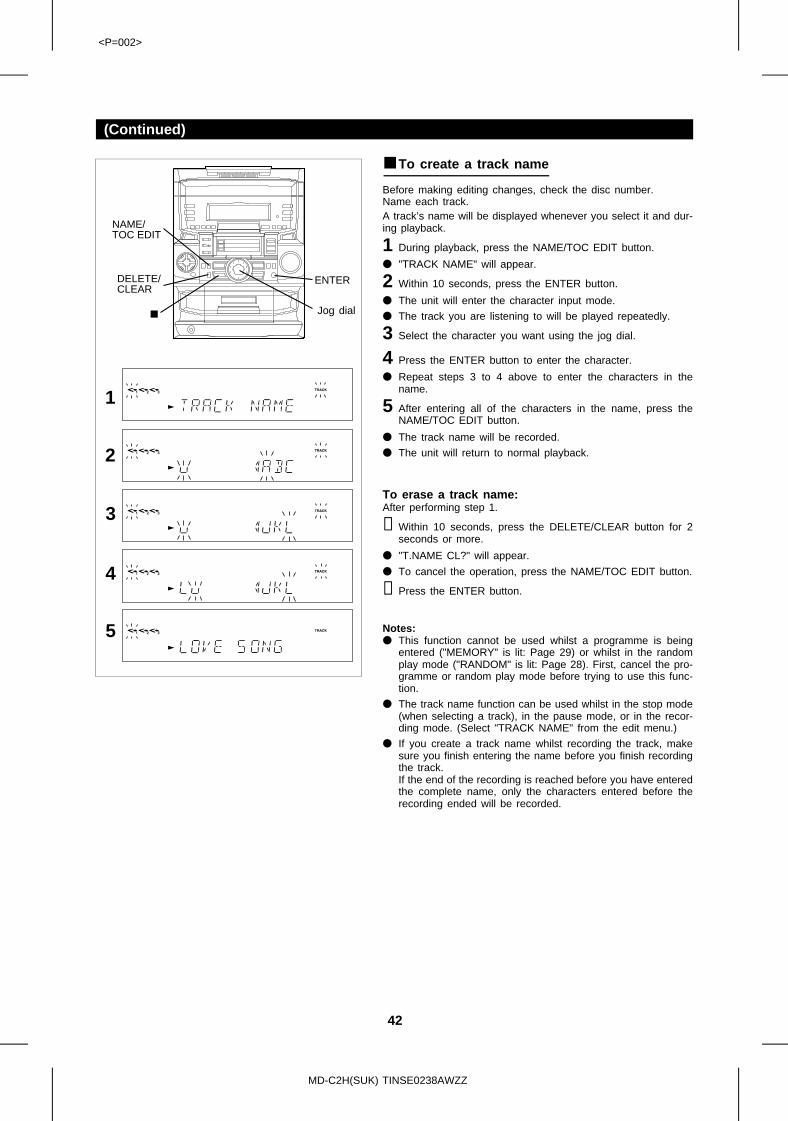
<P=002>
(Continued)
■ To create a track name
Before making editing changes, check the disc number.Name each track.A track’s name will be displayed whenever you select it and dur-ing playback.
1 During playback, press the NAME/TOC EDIT button.
● "TRACK NAME" will appear.
2 Within 10 seconds, press the ENTER button.
● The unit will enter the character input mode.
● The track you are listening to will be played repeatedly.
3 Select the character you want using the jog dial.
4 Press the ENTER button to enter the character.
● Repeat steps 3 to 4 above to enter the characters in thename.
5 After entering all of the characters in the name, press theNAME/TOC EDIT button.
● The track name will be recorded.
● The unit will return to normal playback.
To erase a track name:After performing step 1.
①Within 10 seconds, press the DELETE/CLEAR button for 2seconds or more.
● "T.NAME CL?" will appear.
● To cancel the operation, press the NAME/TOC EDIT button.
②Press the ENTER button.
Notes:● This function cannot be used whilst a programme is being
entered ("MEMORY" is lit: Page 29) or whilst in the randomplay mode ("RANDOM" is lit: Page 28). First, cancel the pro-gramme or random play mode before trying to use this func-tion.
● The track name function can be used whilst in the stop mode(when selecting a track), in the pause mode, or in the recor-ding mode. (Select "TRACK NAME" from the edit menu.)
● If you create a track name whilst recording the track, makesure you finish entering the name before you finish recordingthe track.If the end of the recording is reached before you have enteredthe complete name, only the characters entered before therecording ended will be recorded.
ENTER
NAME/TOC EDIT
DELETE/CLEAR
Jog dial
1
2
3
4
5
MD-C2H(SUK) TINSE0238AWZZ
42

<P=003>
(Continued)
■ To change disc names and track names
Before making editing changes, check the disc number.
1 To change disc names, perform steps 1 - 3 on page 41.
To change track names, perform steps 1 - 2 on page 42.
Example: To change "BESUT" to "BEST"
2 Press the 3 / 2 button to make the character you want toerase begin flashing.
● To cancel the operation, press the ■ button.
3 Press the DELETE/CLEAR button.
● After this step, if you are not going to enter a character, goto step 5.
4 Select the character you want to add, using the jog dial. Then,press the ENTER button.
● The selected character will be added, and the original char-acters will move to the right by one.
5 After entering all of the characters in the name, press theNAME/TOC EDIT button.
To add a character:
1 To change disc names, perform steps 1 - 3 on page 41.
To change track names, perform steps 1 - 2 on page 42.
ENTER
NAME/TOC EDIT
DELETE/CLEAR
2
3
2
3
Example: To change "BET" to "BEST"
2 Press the 3 / 2 button to make the character at the placeyou want to add a letter begin flashing.
● To cancel the operation, press the ■ button.
3 Select the character you want to add, using the jog dial. Then,press the ENTER button.
● The selected character will be added, and the original char-acters will move to the right by one.
4 After entering all of the characters in the name, press theNAME/TOC EDIT button.
Note:● You cannot modify 40 characters or more if they were entered
using some other equipment.In this case, erase the name and then enter a new name.
Jog dial
MD-C2H(SUK) TINSE0238AWZZ
43

<P=004>
HOW TO USE THE BUILT-IN TIMER
● Before setting the timer, make sure that the clock setting iscorrect. (Page 9)
ENTER
TIMER
ON/STAND-BY
2
3
4
5
7
6
■ Timer playback
Before timer playback, the following preparations are required.● Load a CD, MD or tape.
1 Press the ON/STAND-BY button to turn the power on.
2 Press the TIMER button.
3 Within 5 seconds, press the ENTER button.● The start time setting display will appear.
4 Within 10 seconds, turn the jog dial to set the hour to start,and then press the ENTER button.
5 Within 10 seconds, turn the jog dial to set the minute to start,and then press the ENTER button.
● If not set manually, the ending time will automatically be setfor one hour after the starting time.
6 Within 10 seconds, turn the jog dial to set the hour to stop,then press the ENTER button.
7 Within 10 seconds, turn the jog dial to set the minute to stop,then press the ENTER button.
8 Press the MD, CD, TUNER (BAND), TAPE or AUX button toselect the desired function.
When MD is selected:● Continuous playback will start from MD 1.
When CD is selected:● Continuous playback will start from the CD whose red frame
is flashing.To specify a disc to start playback from, press one of the CDPLAY 1 0 - 3 0 buttons. Then, press the ■ button.
When TUNER is selected:● Tune in the radio station.
When is AUX is selected:● Set the timer on the other equipment connected to this unit.
9 Rotate the VOLUME control to adjust the sound volume.● Be careful not to turn the volume up too high.
10Press the ON/STAND-BY button to enter the stand-by mode.● The timer set indicator will light up.
11When the timer start time is reached, timer playback will start.
12When the timer end time is reached, timer playback will stop.● "f PLAY" will disappear, and the timer mode will be cancelled.
The unit will enter the stand-by mode.
Notes:● Timer playback and timer recording cannot be set at the same
time using the timer.Use the timer in one mode or the other.
● The timer cannot control the component connected to theAUX-IN sockets.
● When the CD or MD is played to the end, playback will stopbefore the stop time.If you wish to play to the stop time, set repeat play for theCD or MD.
To change the programmed contents:Start again from step 1.
To stop playback during timer playback:Press the ON/STAND-BY button to enter the stand-bymode.
To confirm the timer setting:Press the TIMER button once.● The turn-on time and the turn-off time will be displayed.
To cancel timer operation:
①Press the ON/STAND-BY button to turn the power on.
②Press the TIMER button repeatedly to turn off the timer, "fPLAY" will go out.
Jog dial
MD-C2H(SUK) TINSE0238AWZZ
44
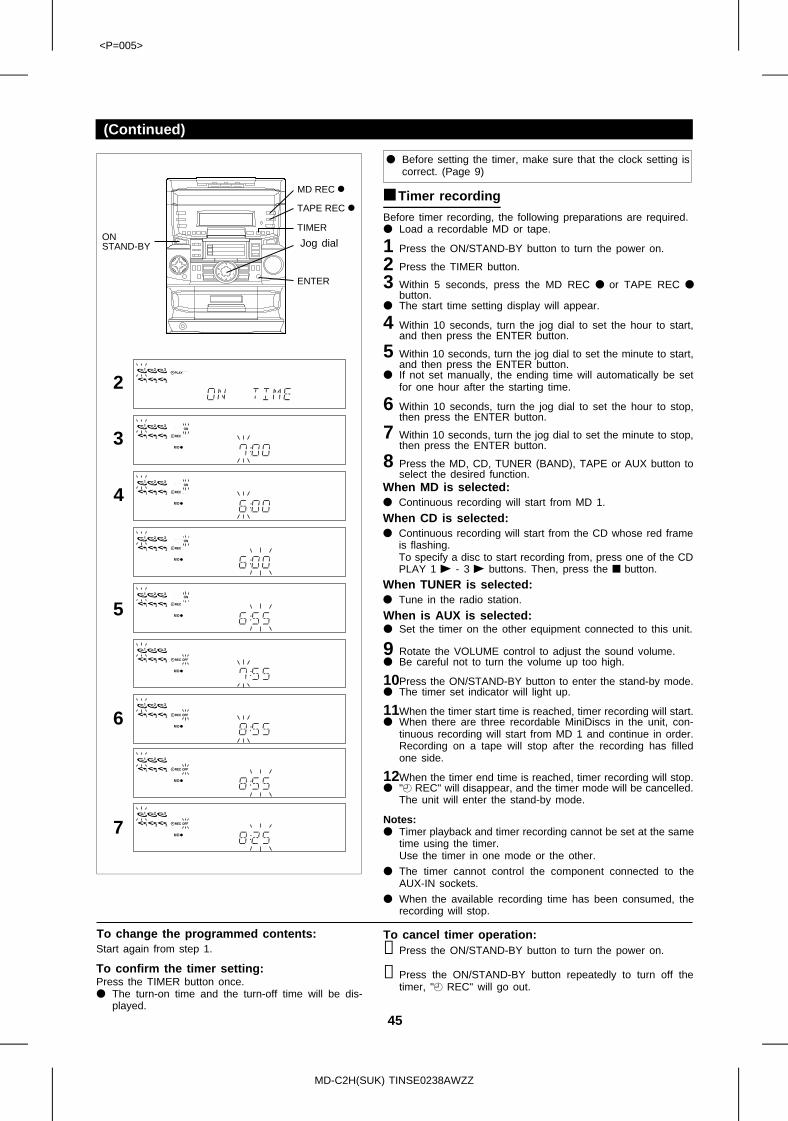
<P=005>
(Continued)
● Before setting the timer, make sure that the clock setting iscorrect. (Page 9)
ENTER
ONSTAND-BY
MD REC
TAPE REC
TIMER
2
3
4
5
7
6
■ Timer recording
Before timer recording, the following preparations are required.● Load a recordable MD or tape.
1 Press the ON/STAND-BY button to turn the power on.
2 Press the TIMER button.
3 Within 5 seconds, press the MD REC ● or TAPE REC ●button.
● The start time setting display will appear.
4 Within 10 seconds, turn the jog dial to set the hour to start,and then press the ENTER button.
5 Within 10 seconds, turn the jog dial to set the minute to start,and then press the ENTER button.
● If not set manually, the ending time will automatically be setfor one hour after the starting time.
6 Within 10 seconds, turn the jog dial to set the hour to stop,then press the ENTER button.
7 Within 10 seconds, turn the jog dial to set the minute to stop,then press the ENTER button.
8 Press the MD, CD, TUNER (BAND), TAPE or AUX button toselect the desired function.
When MD is selected:● Continuous recording will start from MD 1.
When CD is selected:● Continuous recording will start from the CD whose red frame
is flashing.To specify a disc to start recording from, press one of the CDPLAY 1 0 - 3 0 buttons. Then, press the ■ button.
When TUNER is selected:● Tune in the radio station.
When is AUX is selected:● Set the timer on the other equipment connected to this unit.
9 Rotate the VOLUME control to adjust the sound volume.● Be careful not to turn the volume up too high.
10Press the ON/STAND-BY button to enter the stand-by mode.● The timer set indicator will light up.
11When the timer start time is reached, timer recording will start.● When there are three recordable MiniDiscs in the unit, con-
tinuous recording will start from MD 1 and continue in order.Recording on a tape will stop after the recording has filledone side.
12When the timer end time is reached, timer recording will stop.● "f REC" will disappear, and the timer mode will be cancelled.
The unit will enter the stand-by mode.
Notes:● Timer playback and timer recording cannot be set at the same
time using the timer.Use the timer in one mode or the other.
● The timer cannot control the component connected to theAUX-IN sockets.
● When the available recording time has been consumed, therecording will stop.
To change the programmed contents:Start again from step 1.
To confirm the timer setting:Press the TIMER button once.● The turn-on time and the turn-off time will be dis-
played.
To cancel timer operation:①Press the ON/STAND-BY button to turn the power on.
②Press the ON/STAND-BY button repeatedly to turn off thetimer, "f REC" will go out.
Jog dial
MD-C2H(SUK) TINSE0238AWZZ
45
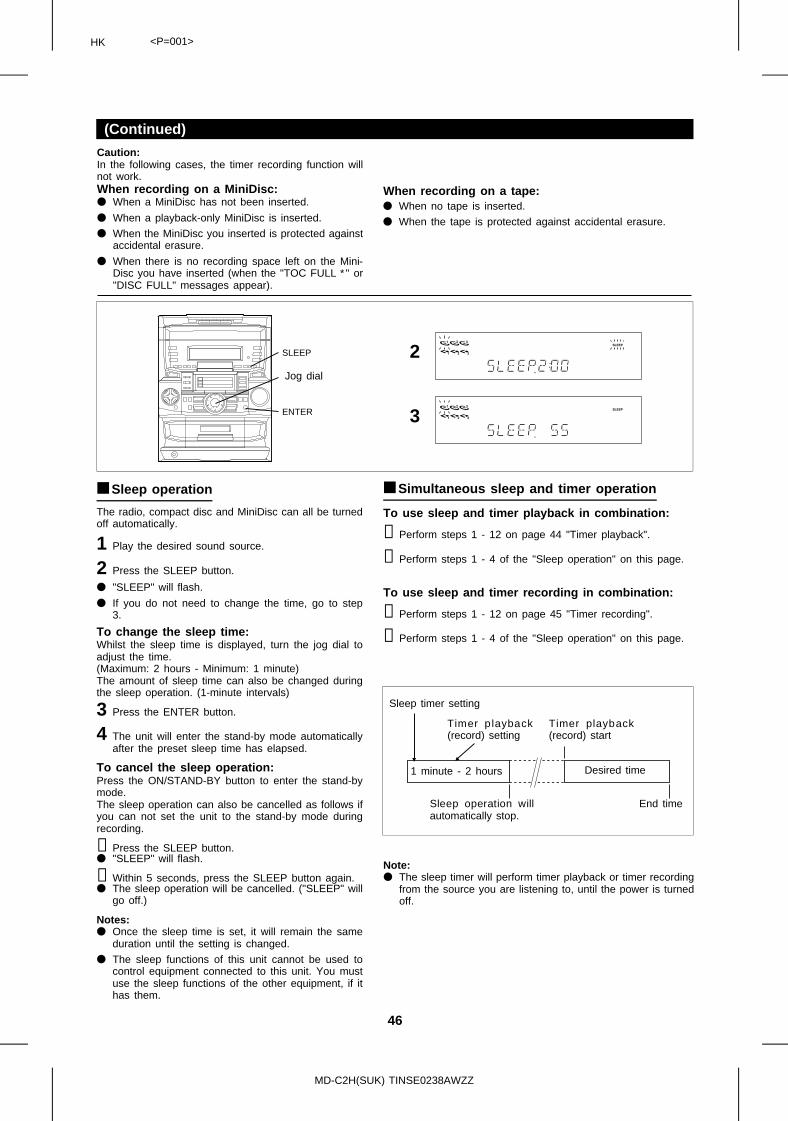
HK <P=001>
(Continued)
ENTER
SLEEP 2
3
Caution:In the following cases, the timer recording function willnot work.When recording on a MiniDisc:● When a MiniDisc has not been inserted.
● When a playback-only MiniDisc is inserted.
● When the MiniDisc you inserted is protected againstaccidental erasure.
● When there is no recording space left on the Mini-Disc you have inserted (when the "TOC FULL ∗" or"DISC FULL" messages appear).
When recording on a tape:● When no tape is inserted.
● When the tape is protected against accidental erasure.
Jog dial
■ Sleep operation
The radio, compact disc and MiniDisc can all be turnedoff automatically.
1 Play the desired sound source.
2 Press the SLEEP button.
● "SLEEP" will flash.
● If you do not need to change the time, go to step3.
To change the sleep time:Whilst the sleep time is displayed, turn the jog dial toadjust the time.(Maximum: 2 hours - Minimum: 1 minute)The amount of sleep time can also be changed duringthe sleep operation. (1-minute intervals)
3 Press the ENTER button.
4 The unit will enter the stand-by mode automaticallyafter the preset sleep time has elapsed.
To cancel the sleep operation:Press the ON/STAND-BY button to enter the stand-bymode. The sleep operation can also be cancelled as follows ifyou can not set the unit to the stand-by mode duringrecording.
①Press the SLEEP button.● "SLEEP" will flash.
②Within 5 seconds, press the SLEEP button again.● The sleep operation will be cancelled. ("SLEEP" will
go off.)
Notes:● Once the sleep time is set, it will remain the same
duration until the setting is changed.
● The sleep functions of this unit cannot be used tocontrol equipment connected to this unit. You mustuse the sleep functions of the other equipment, if ithas them.
■ Simultaneous sleep and timer operation
To use sleep and timer playback in combination:
①Perform steps 1 - 12 on page 44 "Timer playback".
②Perform steps 1 - 4 of the "Sleep operation" on this page.
To use sleep and timer recording in combination:
①Perform steps 1 - 12 on page 45 "Timer recording".
②Perform steps 1 - 4 of the "Sleep operation" on this page.
Sleep timer setting
Timer p layback(record) setting
Timer playback(record) start
1 minute - 2 hours Desired time
Sleep operation willautomatically stop.
End time
Note:● The sleep timer will perform timer playback or timer recording
from the source you are listening to, until the power is turnedoff.
MD-C2H(SUK) TINSE0238AWZZ
46
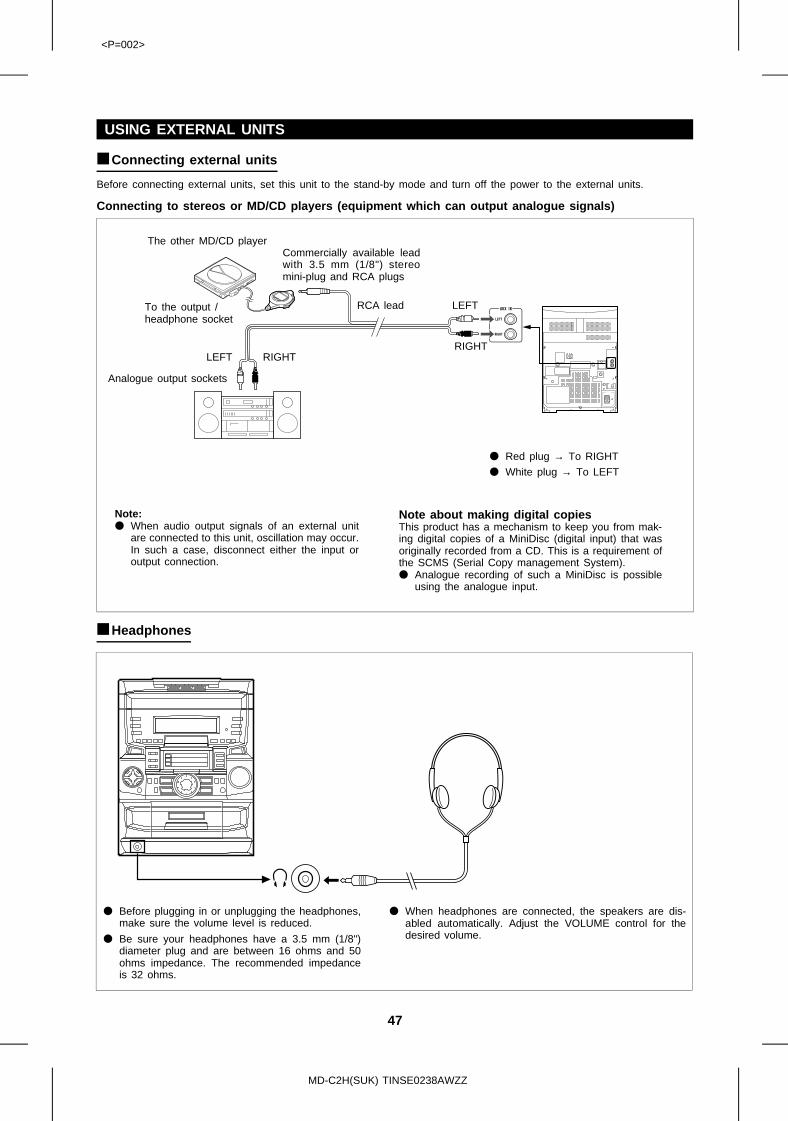
<P=002>
USING EXTERNAL UNITS
■ Connecting external units
Before connecting external units, set this unit to the stand-by mode and turn off the power to the external units.
Connecting to stereos or MD/CD players (equipment which can output analogue signals)
The other MD/CD playerCommercially available leadwith 3.5 mm (1/8") stereomini-plug and RCA plugs
To the output / headphone socket
RCA lead
RIGHT
LEFT
LEFT RIGHT
Analogue output sockets
● Red plug → To RIGHT
● White plug → To LEFT
Note:● When audio output signals of an external unit
are connected to this unit, oscillation may occur.In such a case, disconnect either the input oroutput connection.
Note about making digital copiesThis product has a mechanism to keep you from mak-ing digital copies of a MiniDisc (digital input) that wasoriginally recorded from a CD. This is a requirement ofthe SCMS (Serial Copy management System).● Analogue recording of such a MiniDisc is possible
using the analogue input.
■ Headphones
● Before plugging in or unplugging the headphones,make sure the volume level is reduced.
● Be sure your headphones have a 3.5 mm (1/8")diameter plug and are between 16 ohms and 50ohms impedance. The recommended impedanceis 32 ohms.
● When headphones are connected, the speakers are dis-abled automatically. Adjust the VOLUME control for thedesired volume.
MD-C2H(SUK) TINSE0238AWZZ
47
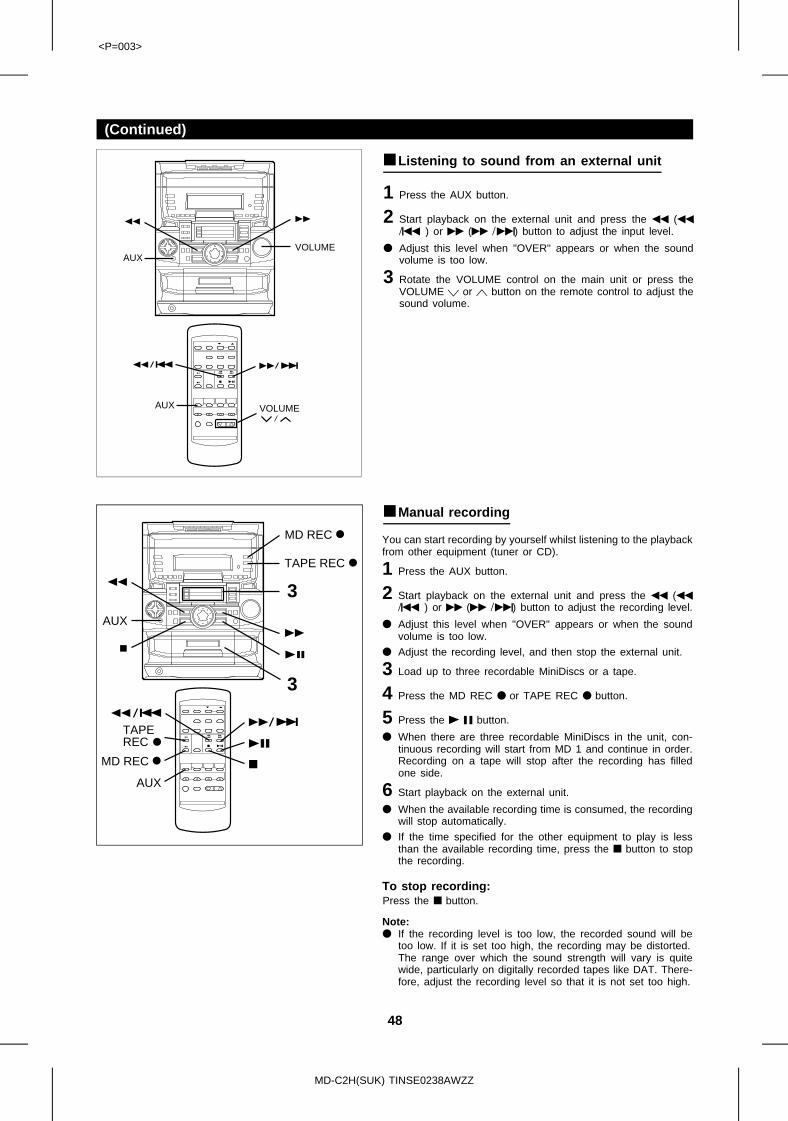
<P=003>
(Continued)
■ Listening to sound from an external unit
1 Press the AUX button.
2 Start playback on the external unit and press the 3 (3/5 ) or 2 (2 / 4 ) button to adjust the input level.
● Adjust this level when "OVER" appears or when the soundvolume is too low.
3 Rotate the VOLUME control on the main unit or press theVOLUME X or W button on the remote control to adjust thesound volume.
VOLUME
VOLUME
AUX
AUX
■ Manual recording
You can start recording by yourself whilst listening to the playbackfrom other equipment (tuner or CD).
1 Press the AUX button.
2 Start playback on the external unit and press the 3 (3/5 ) or 2 (2 /4 ) button to adjust the recording level.
● Adjust this level when "OVER" appears or when the soundvolume is too low.
● Adjust the recording level, and then stop the external unit.
3 Load up to three recordable MiniDiscs or a tape.
4 Press the MD REC ● or TAPE REC ● button.
5 Press the 0 6 button.
● When there are three recordable MiniDiscs in the unit, con-tinuous recording will start from MD 1 and continue in order.Recording on a tape will stop after the recording has filledone side.
6 Start playback on the external unit.
● When the available recording time is consumed, the recordingwill stop automatically.
● If the time specified for the other equipment to play is lessthan the available recording time, press the ■ button to stopthe recording.
To stop recording:Press the ■ button.
Note:● If the recording level is too low, the recorded sound will be
too low. If it is set too high, the recording may be distorted.The range over which the sound strength will vary is quitewide, particularly on digitally recorded tapes like DAT. There-fore, adjust the recording level so that it is not set too high.
AUX
AUX
MD REC
TAPE REC
MD REC
TAPEREC
3
3
MD-C2H(SUK) TINSE0238AWZZ
48
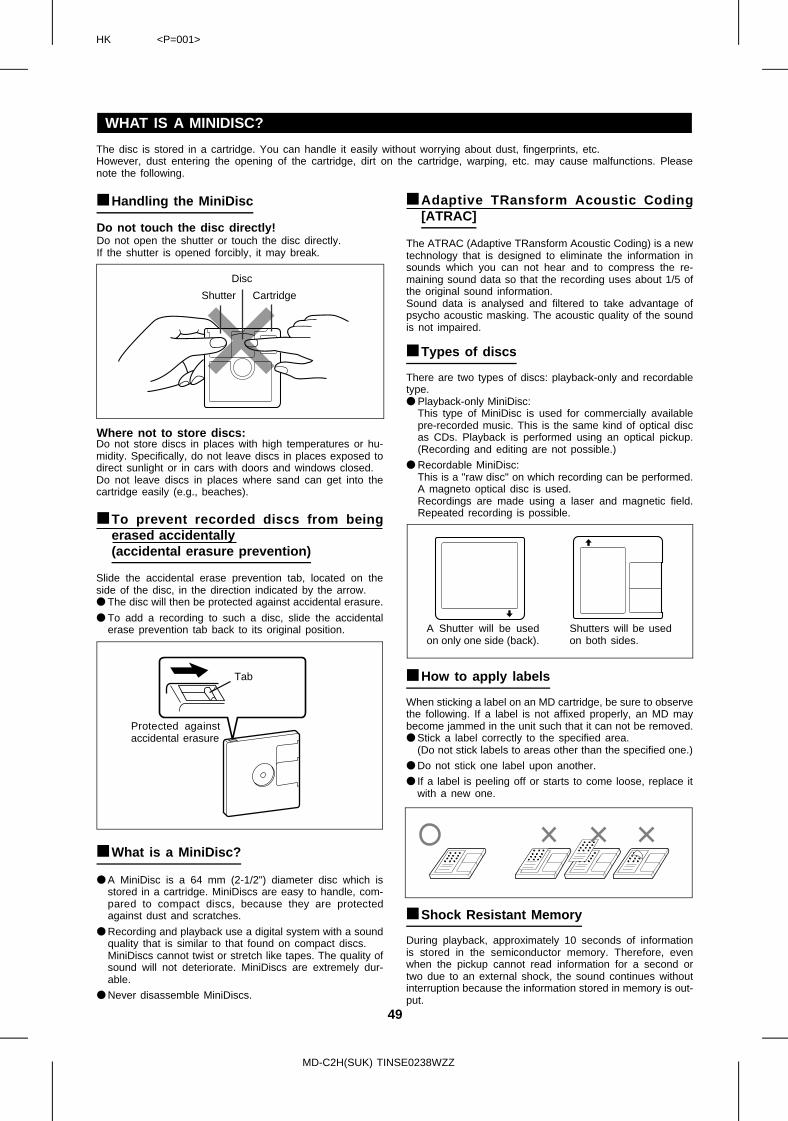
HK <P=001>
WHAT IS A MINIDISC?
The disc is stored in a cartridge. You can handle it easily without worrying about dust, fingerprints, etc.However, dust entering the opening of the cartridge, dirt on the cartridge, warping, etc. may cause malfunctions. Pleasenote the following.
■ Handling the MiniDisc
Do not touch the disc directly!Do not open the shutter or touch the disc directly.If the shutter is opened forcibly, it may break.
Shutter
Disc
Cartridge
Where not to store discs:Do not store discs in places with high temperatures or hu-midity. Specifically, do not leave discs in places exposed todirect sunlight or in cars with doors and windows closed.Do not leave discs in places where sand can get into thecartridge easily (e.g., beaches).
■ To prevent recorded discs from beingerased accidentally(accidental erasure prevention)
Slide the accidental erase prevention tab, located on theside of the disc, in the direction indicated by the arrow.● The disc will then be protected against accidental erasure.
● To add a recording to such a disc, slide the accidentalerase prevention tab back to its original position.
Tab
Protected againstaccidental erasure
■ What is a MiniDisc?
● A MiniDisc is a 64 mm (2-1/2") diameter disc which isstored in a cartridge. MiniDiscs are easy to handle, com-pared to compact discs, because they are protectedagainst dust and scratches.
● Recording and playback use a digital system with a soundquality that is similar to that found on compact discs.MiniDiscs cannot twist or stretch like tapes. The quality ofsound will not deteriorate. MiniDiscs are extremely dur-able.
● Never disassemble MiniDiscs.
■ Adaptive TRansform Acoustic Coding[ATRAC]
The ATRAC (Adaptive TRansform Acoustic Coding) is a newtechnology that is designed to eliminate the information insounds which you can not hear and to compress the re-maining sound data so that the recording uses about 1/5 ofthe original sound information.Sound data is analysed and filtered to take advantage ofpsycho acoustic masking. The acoustic quality of the soundis not impaired.
■ Types of discs
There are two types of discs: playback-only and recordabletype.● Playback-only MiniDisc:
This type of MiniDisc is used for commercially availablepre-recorded music. This is the same kind of optical discas CDs. Playback is performed using an optical pickup.(Recording and editing are not possible.)
● Recordable MiniDisc:This is a "raw disc" on which recording can be performed.A magneto optical disc is used.Recordings are made using a laser and magnetic field.Repeated recording is possible.
A Shutter will be usedon only one side (back).
Shutters will be usedon both sides.
■ How to apply labels
When sticking a label on an MD cartridge, be sure to observethe following. If a label is not affixed properly, an MD maybecome jammed in the unit such that it can not be removed.● Stick a label correctly to the specified area.
(Do not stick labels to areas other than the specified one.)
● Do not stick one label upon another.
● If a label is peeling off or starts to come loose, replace itwith a new one.
■ Shock Resistant Memory
During playback, approximately 10 seconds of informationis stored in the semiconductor memory. Therefore, evenwhen the pickup cannot read information for a second ortwo due to an external shock, the sound continues withoutinterruption because the information stored in memory is out-put.
MD-C2H(SUK) TINSE0238WZZ
49
<P=002>
MINIDISC SYSTEM LIMITATIONS
Even if the maximum recording time of a MiniDisc hasnot been reached, "TOC FULL ∗" may be displayed.(∗:Number or Symbol)
Even if the maximum recording time of a MiniDisc hasnot been reached, "DISC FULL" may be displayed.
Even if several short tracks are erased, the remainingrecording time may not show an increase.
The total of the recorded time and time remaining ona disc may not add up to the maximum possible rec-ording time.
Two tracks may not be combined in editing.
If recorded tracks are fast reversed or fast forwarded,the sound may skip.
In the MD system, the delimiter of the recording area on an MDis programmed in a TOC. If partial erasing, recording and editingare repeated several times, TOC information will fill up, eventhough the number of tracks has not reached the limit (255tracks), and further recording will be impossible. (If you use theall erase function, this MD can be used from the beginning.)If there is any flaw on the MiniDisc, that part is automaticallyexcluded from the space available for recording. Therefore, therecording time becomes shorter.
When the remaining recording time of a disc is displayed, shorttracks less than 12 seconds long may not be included in thetotal.
A cluster (about 2 seconds) is normally the minimum unit of rec-ording. So, even if a track is less than 2 seconds long, it will useabout 2 seconds of space on the disc. Therefore, the time actuallyavailable for recording may be less than the remaining time dis-played.If there are scratches on discs, those sections will be automat-ically avoided (no recording will be placed in those sections).Therefore, the recording time will be reduced.
For MiniDiscs on which repeated recording and editing operationswere performed, the COMBINE function may not work.A track recorded from a CD (digital recording) and a track re-corded from a radio or other equipment (analogue recording) can-not be combined.
An MD which has been recorded or edited repeatedly may skipduring fast reverse or fast forward.
TROUBLESHOOTING
■ If a problem occurs
If this unit functions abnormally during operation, first check the following items. If the unit continues to function abnormally,or if an abnormality appears other than listed below, turn off the player’s power and disconnect the AC power plug, thenconsult your SHARP dealer or service personnel.
General
SYMPTOM POSSIBLE CAUSE REMEDY● The clock is wrong. ● Did a power failure occur? ● Try setting it again.
● When a button is pressed, the unitdoes not respond.
● Set this unit to the stand-by mode andthen turn it back on. Then, retry theoperation.
● Unplug the power lead from the ACsocket. Then, plug it in again and retrythe operation.
● No sound is heard. ● Is the volume level is set to "0"?
● Are the headphones connected?
● Are the speaker wires disconnected?
● Were the speaker wires short-circuitedwhilst being connected?
● Increase the volume level.
● Disconnect the headphones.
● Connect the wires securely.
● Unplug the power lead from the ACsocket and then plug it in again.
● Radios make unusual noise or the pic-ture on the TV screen is distorted.
● When a radio or TV which uses an in-door aerial is placed near the unit, thepicture on the TV screen may be dis-torted or the radio may not functionproperly.
● It is recommended that you use an ex-ternal aerial.
MD-C2H(SUK) TINSE0238WZZ
50

<P=003>
(Continued)
CD playback
SYMPTOM POSSIBLE CAUSE REMEDY● Even though a disc has been loaded,
"CD NO DISC" is displayed.
● Playback stops in the middle of a track,or playback is not performed properly.
● Playback sounds are skipped.
● The disc is loaded up-side down.
● The disc is very dirty.
● The disc which does not satisfy thestandards.
● Is the unit located near excessive vi-brations?
● Has condensation formed inside theunit?
● Load the disc with the correct side up.
● Clean the disc.
● Load the correct disc.
● Place the unit on a firm, level surfacefree from vibration.
● Remove the disc and leave the powerturned on. The unit should functionproperly in about 1 hour.
MD recording and playback
SYMPTOM POSSIBLE CAUSE REMEDY● A recording cannot be made. ● Is the MiniDisc protected against ac-
cidental erasure?
● Did you try to make recording on aplayback-only MiniDisc?
● Can you see the "DISC FULL" or "TOCFULL ∗" message in the display?(∗:Number or Symbol)
● Slide the accidental erase preventiontab back to its original position.
● Replace it with a recordable disc.
● Put in another recordable disc with rec-ording space on it.
● Even though a disc has been loaded,"MD NO DISC" or "MD ∗∗ ERR" is dis-played.(∗:Number or Symbol)
● Playback sounds are skipped.
● The disc is very dirty.
● Is the unit located near excessive vi-brations?
● Has condensation formed inside theunit?
● Clean the disc.
● Place the unit on a firm, level surfacefree from vibration.
● Remove the disc and leave the powerturned on. The unit should functionproperly in about 1 hour.
Tape recording and playback
SYMPTOM POSSIBLE CAUSE REMEDY● A recording cannot be made. ● Is the tape protected against accidental
erasure?● Cover the accidental erase prevention
hole.● Sound is skipped.
● Sound in high-frequency range cannotbe reproduced.
● Sound quivers.
● The tape is damaged.
● The capstan and pinch roller are verydirty.
● Replace the tape.
● Clean the capstan and pinch roller.
● The cassette cannot be ejected. ● Did a power failure occur? ● Wait until the power is supplied.
Radio reception
SYMPTOM POSSIBLE CAUSE REMEDY● Radios make unusual noise consecu-
tively.● The unit is placed near the TV or com-
puter.
● The aerial direction is not placedproperly.
● When the unit receives a radio broad-cast near a TV set, a computer or awordprocessor, it may pick up noise. Ifthis happens, try to move the unit fromthe place where the noise is picked up.
● Correct the aerial direction.
● The preset channel cannot be recalled. ● Did you erase the programmed sta-tion?
● Did you leave the power lead un-plugged for a long time?
● Preset the channel again.
● Redo programming.
Remote control
SYMPTOM POSSIBLE CAUSE REMEDY● The remote control does not function
or does not operate properly.● The batteries (polarity) are not inserted
properly.
● The batteries inside the remote controlare dead.
● The remote control is operated from anincorrect distance or angle.
● Insert properly.
● Replace the batteries.
● Operate it within a range of 0.2 m (8")to 6 m (20’) and within an angle of 15°to either side of centre.
● The power cannot be turned on fromthe remote control.
● Is the AC power lead plugged in? ● Connect the AC power lead.
MD-C2H(SUK) TINSE0238WZZ
51
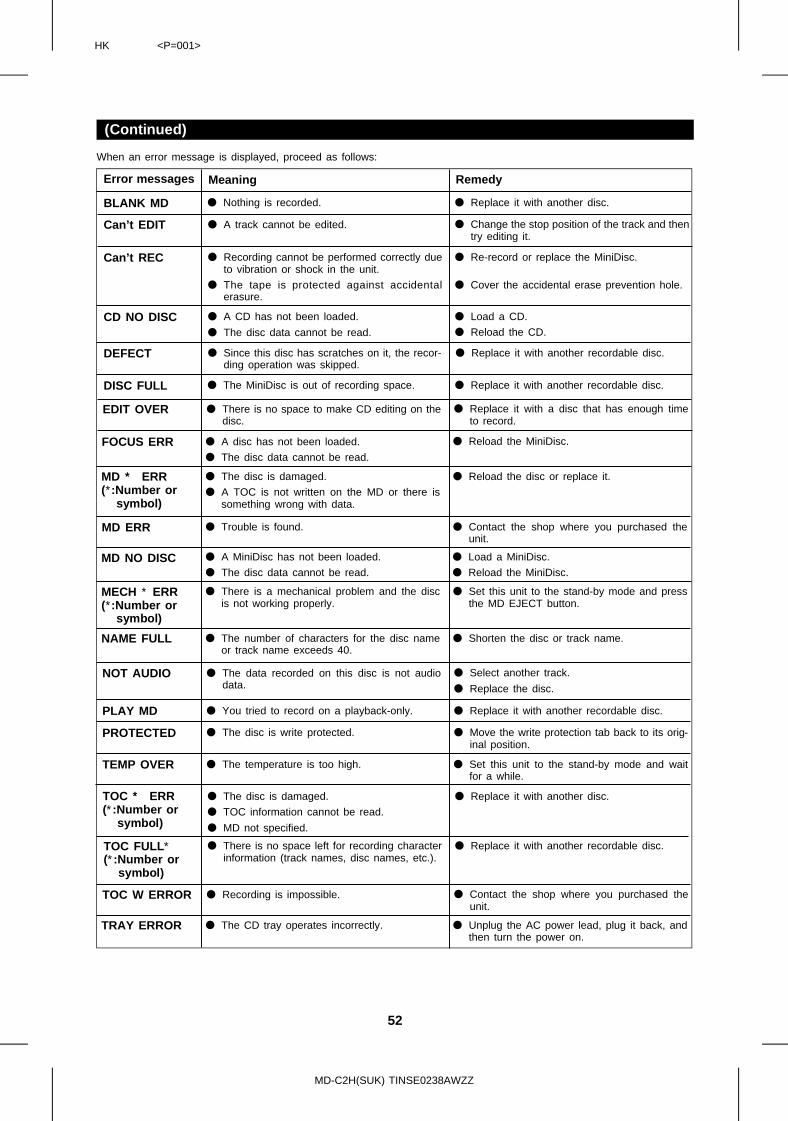
2
HK <P=001>
(Continued)
When an error message is displayed, proceed as follows:
Error messages Meaning Remedy
BLANK MD ● Nothing is recorded. ● Replace it with another disc.
Can’t EDIT ● A track cannot be edited. ● Change the stop position of the track and thentry editing it.
Can’t REC ● Recording cannot be performed correctly dueto vibration or shock in the unit.
● The tape is protected against accidentalerasure.
● Re-record or replace the MiniDisc.
● Cover the accidental erase prevention hole.
CD NO DISC ● A CD has not been loaded.
● The disc data cannot be read.
● Load a CD.
● Reload the CD.
DEFECT ● Since this disc has scratches on it, the recor-ding operation was skipped.
● Replace it with another recordable disc.
DISC FULL ● The MiniDisc is out of recording space. ● Replace it with another recordable disc.
EDIT OVER ● There is no space to make CD editing on thedisc.
● Replace it with a disc that has enough timeto record.
FOCUS ERR ● A disc has not been loaded.
● The disc data cannot be read.
● Reload the MiniDisc.
MD ∗∗ ERR(∗:Number or symbol)
● The disc is damaged.
● A TOC is not written on the MD or there issomething wrong with data.
● Reload the disc or replace it.
MD ERR ● Trouble is found. ● Contact the shop where you purchased theunit.
MD NO DISC ● A MiniDisc has not been loaded.
● The disc data cannot be read.
● Load a MiniDisc.
● Reload the MiniDisc.
MECH ∗ ERR(∗:Number or symbol)
● There is a mechanical problem and the discis not working properly.
● Set this unit to the stand-by mode and pressthe MD EJECT button.
NAME FULL ● The number of characters for the disc nameor track name exceeds 40.
● Shorten the disc or track name.
NOT AUDIO ● The data recorded on this disc is not audiodata.
● Select another track.
● Replace the disc.
PLAY MD ● You tried to record on a playback-only. ● Replace it with another recordable disc.
PROTECTED ● The disc is write protected. ● Move the write protection tab back to its orig-inal position.
TEMP OVER ● The temperature is too high. ● Set this unit to the stand-by mode and waitfor a while.
TOC ∗∗ ERR(∗:Number or symbol)
● The disc is damaged.
● TOC information cannot be read.
● MD not specified.
● Replace it with another disc.
TOC FULL∗(∗:Number or symbol)
● There is no space left for recording characterinformation (track names, disc names, etc.).
● Replace it with another recordable disc.
TOC W ERROR ● Recording is impossible. ● Contact the shop where you purchased theunit.
TRAY ERROR ● The CD tray operates incorrectly. ● Unplug the AC power lead, plug it back, andthen turn the power on.
MD-C2H(SUK) TINSE0238AWZZ
52
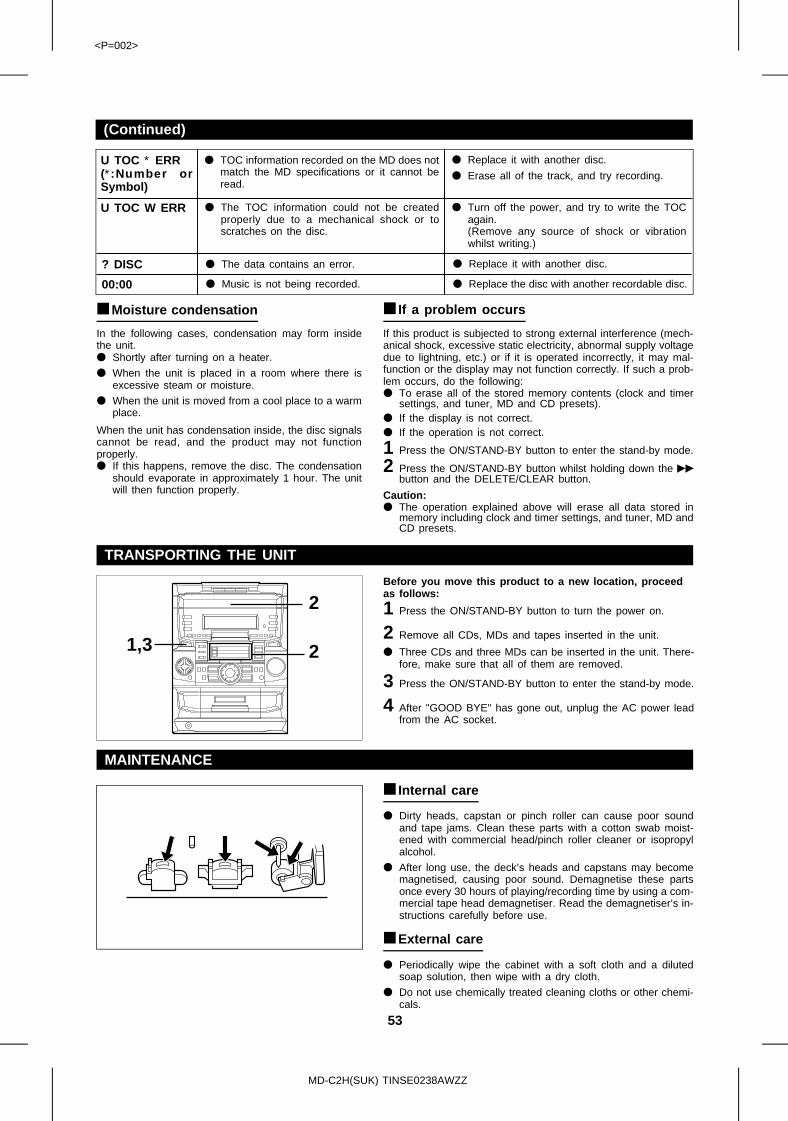
<P=002>
(Continued)
U TOC ∗ ERR(∗:Number orSymbol)
● TOC information recorded on the MD does notmatch the MD specifications or it cannot beread.
● Replace it with another disc.
● Erase all of the track, and try recording.
U TOC W ERR ● The TOC information could not be createdproperly due to a mechanical shock or toscratches on the disc.
● Turn off the power, and try to write the TOCagain.(Remove any source of shock or vibrationwhilst writing.)
? DISC ● The data contains an error. ● Replace it with another disc.
00:00 ● Music is not being recorded. ● Replace the disc with another recordable disc.
■ Moisture condensation
In the following cases, condensation may form insidethe unit.● Shortly after turning on a heater.
● When the unit is placed in a room where there isexcessive steam or moisture.
● When the unit is moved from a cool place to a warmplace.
When the unit has condensation inside, the disc signalscannot be read, and the product may not functionproperly.● If this happens, remove the disc. The condensation
should evaporate in approximately 1 hour. The unitwill then function properly.
■ If a problem occurs
If this product is subjected to strong external interference (mech-anical shock, excessive static electricity, abnormal supply voltagedue to lightning, etc.) or if it is operated incorrectly, it may mal-function or the display may not function correctly. If such a prob-lem occurs, do the following:● To erase all of the stored memory contents (clock and timer
settings, and tuner, MD and CD presets).● If the display is not correct.● If the operation is not correct.
1 Press the ON/STAND-BY button to enter the stand-by mode.
2 Press the ON/STAND-BY button whilst holding down the 2button and the DELETE/CLEAR button.
Caution:● The operation explained above will erase all data stored in
memory including clock and timer settings, and tuner, MD andCD presets.
TRANSPORTING THE UNIT
Before you move this product to a new location, proceedas follows:
1 Press the ON/STAND-BY button to turn the power on.
2 Remove all CDs, MDs and tapes inserted in the unit.
● Three CDs and three MDs can be inserted in the unit. There-fore, make sure that all of them are removed.
3 Press the ON/STAND-BY button to enter the stand-by mode.
4 After "GOOD BYE" has gone out, unplug the AC power leadfrom the AC socket.
MAINTENANCE
■ Internal care
● Dirty heads, capstan or pinch roller can cause poor soundand tape jams. Clean these parts with a cotton swab moist-ened with commercial head/pinch roller cleaner or isopropylalcohol.
● After long use, the deck’s heads and capstans may becomemagnetised, causing poor sound. Demagnetise these partsonce every 30 hours of playing/recording time by using a com-mercial tape head demagnetiser. Read the demagnetiser’s in-structions carefully before use.
■ External care
● Periodically wipe the cabinet with a soft cloth and a dilutedsoap solution, then wipe with a dry cloth.
● Do not use chemically treated cleaning cloths or other chemi-cals.
1,3
2
2
MD-C2H(SUK) TINSE0238AWZZ
53
<P=003>
SPECIFICATIONS
As part of our policy of continuous improvement, SHARP reserves the right to make design and specification changes forproduct improvement without prior notice. The performance specification figures indicated are nominal values of productionunits. There may be some deviations from these values in individual units.
● MiniDisc recorder sectionType: 3-disc multi-play MiniDisc re-
corderSignal readout: Non-contact, 3-beam semi-
conductor laser pickupAudio channel: Stereo; 2 channels
Monaural (Playback only); 1 channel (long-time recordingmode)
Frequencyresponse: 20 - 20,000 HzRotation speed: 400 - 900 rpm CLV, ApproxQuantization: 16-bit linear (CD recording)
20-bit linear (Analogue recording)
Error correction: ACIRC (Advanced Cross Inter-leave Reed-Solomon Code)
Coding: ATRAC (Adaptive TRans-formed Acoustic Coding)
Recording method: Magnetic field modulation over-write method
D/A converter: 1-bit D/A converterSampling frequency: 44.1 kHzWow and flutter: Unmeasurable
(less than 0.001% W. peak)Signal/noise ratio: 95 dB (1 kHz)Dynamic range: 90 dB (1 kHz)
● Compact disc player sectionType: 3-disc multi-play compact
disc playerSignal readout: Non-contact, 3-beam semi-
conductor laser pickupRotation speed: 200 - 500 rpm CLV, Approx.Error correction: CIRC (Cross Interleave Reed-
Solomon Code)Quantization: 16-bit linearD/A converter: 1-bit D/A converterFrequencyresponse: 20 - 20,000 HzSignal/noise ratio: 95 dB (1 kHz)Dynamic range: 90 dB (1 kHz)Wow and flutter: Unmeasurable
(less than 0.001% W. peak)
● Tuner sectionFrequency range: FM; 87.5 - 108 MHz
AM; 522 - 1,620 kHzSensitivity: FM; 2.5 µV
(75 ohms unbalanced)AM; 650 µV/m
● Cassette deck sectionType: Compact cassette tapeFrequency response: 50 - 14,000 Hz (Normal tape)Motor: DC motor with electronic governor × 1Signal/noise ratio: 50 dB (Recording/Playback)Bias and erasure system: ACTape speed: 4.76 cm/sec. (1-7/8 ips.)Wow and flutter: 0.15 % (WRMS)Heads: Record/playback × 1
Erase × 1
● GeneralPower source: AC 230 V, 50 HzPower consumption: 95 WOutput power: RMS; 100 W (50 W + 50 W)
(10 % T.H.D.)RMS; 86 W (43 W + 43 W) (0.9 % T.H.D.)
Input terminals: Auxiliary (Analogue); 500 mV/47 kohms
Output terminals: Headphones; 16 - 50 ohms(recommended; 32 ohms)Speakers; 6 ohms
Dimensions: Width; 270 mm (10-11/16")Height; 352 mm (13-7/8")Depth; 376 mm (14-13/16")
Weight: 8.6 kg (19.0 lbs.)
● Speaker sectionType: 3-way type [130 mm (5-1/8") woofer,
50 mm (2") tweeter and supertweeter]
Maximum input power: 100 WRated input power: 50 WImpedance: 6 ohmsDimensions: Width; 220 mm (8-11/16")
Height; 352 mm (13-7/8")Depth; 260 mm (10-1/4")
Weight: 3.2 kg (7.1 lbs.)/each
MD-C2H(SUK) TINSE0238AWZZ
54

MD-C2H(SUK) TINSE0238AWZZ
SHARP ELECTRONICS (U.K.) LTD.Sharp House, Thorp Road, Newton Heath, Manchester, M40 5BE
SHARP CORPORATION
?????.??
TERMS OF GUARANTEE
Sharp Electronics (UK) Ltd. (“Sharp”) guarantees to provide for the repair, or at its option the replacement, of thisproduct subject to the conditions listed below:-
1. This guarantee shall only apply to faults which are due to inferior workmanship or materials. It does not cover faultsor damage caused by accident, misuse, fair wear and tear, neglect, tampering with the product, or repair other thanby a Service Facility appointed by Sharp.
2. As this product is intended for private domestic use only, the guarantee will not apply if the product is used in thecourse of a business, trade or profession.
3. To benefit from this guarantee, any fault which occurs must be notified to Sharp, or its appointed Service Facilitywithin one year from the date this product was purchased. Proof of purchase must be provided.
4. The guarantee does not cover carriage costs, jewelled styli, audio tapes, compact discs or batteries.
5. In the unlikely event of this product requiring repair, please contact the supplier from whom it was purchased.Where this is not possible, please contact the Sharp Customer Information Centre on the telephone number givenbelow.
6. No person has any authority to vary the terms or conditions of this guarantee.
7. This guarantee is offered as an additional benefit to your statutory rights, and does not affect these rights in anyway.
If you have any difficulty operating this product, or would like information on other Sharp products, please telephone theSharp Customer Information Centre on the number given below.
Sharp Customer Information Centre - Telephone 0345 125387
TINSE0238AWZZA9901.HK