mclass teacher’s guide - montgomery county public schools · mclass teacher guide 5 click here to...
TRANSCRIPT

mCLASS Teacher’s Guide

mCLASS Teacher Guide
1
Table of Contents Table of Contents ............................................................................................................................ 1 Before You Begin............................................................................................................................. 3 Logging onto the Site....................................................................................................................... 4 The mCLASS Home Page............................................................................................................... 5
My Classes and Groups.............................................................................................................. 5 To Create a New Class ...................................................................................................... 6 To Edit an Existing Class.................................................................................................. 11 To Create a New Group ................................................................................................... 12 To Edit an Existing Group................................................................................................. 13 To Select Which Classes and Groups You Want to Sync to Your PDA........................... 16 To Rename an Existing Group ......................................................................................... 17 To Delete an Existing Group ............................................................................................ 17
My Account................................................................................................................................ 18 How to Change Your PDA Password After Changing it on the Web Site ........................ 19
Data Sharing ............................................................................................................................. 20 Make all of My Student Files Available to all Staff............................................................ 22 Make all of My Student Files Available to Specific Staff .................................................. 22 Make Specific Student Files Available to Specific Staff ................................................... 24
Download .................................................................................................................................. 27 APPENDIX..................................................................................................................................... 28
Troubleshooting mCLASS: Sync............................................................................................... 28 Trouble Shooting the handheld ................................................................................................. 29

mCLASS Teacher Guide
2
Introduction
This guide is written for teachers using the mCLASS System and is intended to:
Give detailed instructions for using the mCLASS system Offer step-by-step instructions for performing common day-to-day User actions, including
entering account information, creating classes, adding groups, sharing data, downloading, and viewing assessment data.
Offer a detailed reference guide to each teacher tool provided by the mCLASS system

mCLASS Teacher Guide
3
Before You Begin Items That Need to be In Place
1. The System Administrator must provide staff, student and school information to Wireless Generation to be placed into the mCLASS system in order for you to begin.
2. The System Administrator must have identified Users as one of four staff type categories:
School Administrator, Specialist, Teacher or Teaching Assistant. 3. The System Administrator must have a list of the Teachers User Names and Passwords.
4. The System Administrator must have made sure that the necessary software is loaded
onto the PDA’s and school Sync Stations.

mCLASS Teacher Guide
4
Using mCLASS Logging onto the Site To login to the mCLASS Web site, follow the steps below:
1. Locate any computer with an Internet connection. (This does not have to be one of the designated mCLASS reading computers in your school; any computer that can connect to the Internet will do, including a home computer.)
2. If the computer isn’t connected to the Internet, connect to Internet now. If you are logging
in from home, you’ll need to connect via your own Internet service provider.
3. Open your browser and go to the mCLASS Web site: www.mclassreading.com. At the Welcome screen (shown below), type in your assigned user name and password in the Log in box, and then click Enter. Please note that passwords are case sensitive (e.g., “Smith” versus “smith”).
4. This will take you to the mCLASS Home Page. If you have forgotten your password:
1. Click on Need help logging in? 2. Enter your email address, and then click Continue to have your user name and
password sent to you via email (as long as your email address was provided by your system administrator).
3. If you have any problems with this, please contact either a technology person in your Institution for help or contact Wireless Generation’s Customer Support at 1-800-823-1969.
Click Enter to loginto the site.
If you have forgottenyour User Name or
Password, click here.
User Name
Password

mCLASS Teacher Guide
5
Click here to view/edit Class and Group
information as well as create new Groups.
The mCLASS Home Page MY CLASSES AND GROUPS Classes in the mCLASS system should reflect your “official” and full class list. Groups are informal sets of students created by individual Users. When forming a Group, the User may draw from the entire pool of students to which he/she has access. Note: For information on making changes to Classes, please refer to the Complete Administrative Home Reference Guide.
Click Enter next to the heading My Classes & Groups on the mCLASS Home. This will take you to a screen entitled Classes & Groups, which lists all Classes for
which you are an Owner and all Groups that you have created.

mCLASS Teacher Guide
6
To Create a New Class
On the upper right-hand side of Classes & Groups page, enter a name for the Class that you would like to create. When you are finished, click Create.
Please note: the Policy for allowing all Staff to create Classes must be set to Open in order for you to access this option. If you do not see this option available, please see your System Administrator.
Click Create

mCLASS Teacher Guide
7
Clicking Create will take you to a screen entitled My Class Information. This screen consists of three links: Details, Owners and Students.
Students:
To add and remove students, click on Edit next to Students header at the upper right-hand side of the My Class Information screen. This will take you to a screen entitled Class: Add/Remove Students screen. This screen consists of two separate student lists:
Click Edit

mCLASS Teacher Guide
8
Available Students: On the left-hand side of the screen is a list of all the available students, sorted by grade and then name. You may filter this list by School, Homeroom, or Grade using the drop-down boxes that appear at the top of the list.
To Add Students to Class: Select a student by highlighting his/her name and then click either the Add button in the middle of the screen. Holding down the Ctrl key (for PCs) or the Open Apple key (for Apple/Mac) allows you to select and add multiple students at the same time.
Students in Class:
As you add students to your Class, their names will appear in a list on the right-hand side of the screen. To Remove Students from Class: Select a student by highlighting his/her name in this box and then click the Remove button in the middle of the screen. Holding down the Ctrl key (for PCs) or the Open Apple key (for Apple/Mac) allows you to select and add multiple students at the same time.
Sort students by using the drop down menus
Select student name & click Remove to take the student out of the class
Highlight student name and click Add to include in the class
Click Done to save !

mCLASS Teacher Guide
9
Finish To Save Your Class Composition: When you are done creating a class or making changes, click Done to save your changes.
Edit Details From the My Class Information Page, click on Edit, next to the Details area., in order to modify details about the Class like grade and the Class name.

mCLASS Teacher Guide
10
Edit Owners To add one or more additional owners to the class (for example, if you are team teaching a class with another teacher or a reading specialist), click on Edit next to Owners.
To Add and Owner to a Class: Select a Staff member by highlighting his/her name and then click either the
Add button in the middle of the screen. Holding down the Ctrl key (for PCs) or the Open Apple key (for Apple/Mac) allows you to select and add multiple students at the same time.
Owners of <Class Name>:
As you add Staff as owners to the Class, their names will appear in a list on the right-hand side of the screen. To Remove Owners from Class: Select a Staff member by highlighting his/her name and then click the
Remove button in the middle of the screen. Holding down the Ctrl key (for PCs) or the Open Apple key (for Apple/Mac) allows you to select and add multiple students at the same time.
When you are done making changes, click Done.

mCLASS Teacher Guide
11
To Edit an Existing Class 1. Click on the Class that you would like to edit from the list on the Classes & Groups
page.
2. This will take you to the My Class Information page
3. Click Edit to change information in each of the three sections: Details, Students, Owners.
Click a class name to select

mCLASS Teacher Guide
12
Write group name here and click Create New Group.
To Create a New Group
1. On the upper right-hand side of the Classes & Groups page, enter a name for the Group
that you would like to create. When you are finished, click Create New Group.
2. This will take you to a screen entitled Group: Add/Remove Students. This screen consists of two separate student lists:
Sort students by school, grade and/orhomeroom using thedrop-down menus.
To add a student, selecthis/her name in this box
and click Add. To remove a student,
select his/her name in this box and click Remove .When you are finished
making changes, clickDone to save information.

mCLASS Teacher Guide
13
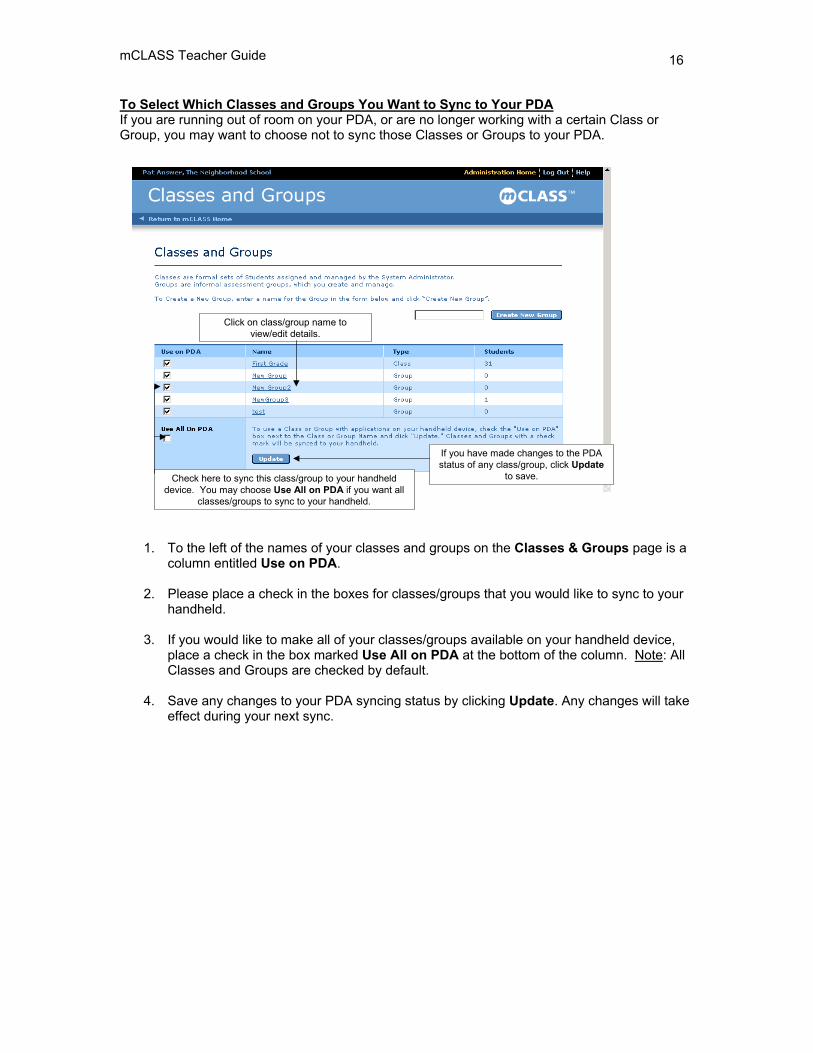
Click on class/group name to view/edit details.
Check here to sync this class/group to your handheld device. You may choose Use All on PDA if you want all
classes/groups to sync to your handheld.
If you have made changes to the PDA status of any class/group, click Update
to save.
Available Students: On the left-hand side of the screen is a list of all the available students, sorted by grade and then name. You may filter this list by School, Class/Group, or Grade using the drop-down boxes that appear at the top of the list.
To Add Students to Group: Select a student by highlighting his/her name and then click either the Add
button in the middle of the screen. Holding down the Ctrl key (for PCs) or the Open Apple key (for Apple/Mac) allows you to select and add multiple students at the same time.
Students in Group:
As you add students to this group, their names will appear in a list on the right-hand side of the screen. To Remove Students from Group: Select a student by highlighting his/her name and then click the Remove
button in the middle of the screen. Holding down the Ctrl key (for PCs) or the Open Apple key (for Apple/Mac) allows you to select and add multiple students at the same time.
3. When you are done making changes, click Done. 4. This will take you to a screen entitled My Group Information that displays details about
the group you have created – including its name and information about students (their names, schools, grades and homerooms) - in a view-only format.
5. If you would like to make further edits to this group, please click Edit. Otherwise, click
Done.
To Edit an Existing Group 4. Click on the Group that you would like to edit from the list on the Classes & Groups
page.

mCLASS Teacher Guide
14
If there are no changes, click Done.
To change the name of this group, click Rename Group.
To delete this group from the system,
click Delete Group.
To add or remove students from group, click the Edit button.
5. This will take you to a screen entitled My Group Information listing the names, schools,
grades and homerooms of students in this Group.
6. Click on Edit at the upper right-hand side of the My Group Information screen. This will
take you to a screen entitled Update Student List. This screen consists of two separate student lists:
Available Students: On the left-hand side of the screen is a list of all the available students, sorted by grade and then name. You may filter this list by School, Class/Group, or Grade using the drop-down boxes that appear at the top of the list.
To Add Students to Group: Select a student by highlighting his/her name and then click either the Add button in the middle of the screen. Holding down the Ctrl key (for PCs) or the Open Apple key (for Apple/Mac) allows you to select and add multiple students at the same time.
Students in Group:
As you add students to your group, their names will appear in a list on the right-hand side of the screen.
To Remove Students from Group: Select a student by highlighting his/her name and then click the Remove button in the middle of the screen. Holding down the Ctrl key (for PCs) or the Open Apple key (for Apple/Mac) allows you to select and add multiple students at the same time.

mCLASS Teacher Guide
15
Sort students by school, grade and/or homeroom using the drop-down menus.
To add a student, select his/her name in this box
and click Add.To remove a student,
select his/her name in this box and click Remove.When you are finished
making changes, click Done to save information.
7. When you are done making changes, click Done to save.
mCLASS Teacher Guide
16
Click on class/group name to view/edit details.
Check here to sync this class/group to your handheld device. You may choose Use All on PDA if you want all
classes/groups to sync to your handheld.
If you have made changes to the PDA status of any class/group, click Update
to save.
To Select Which Classes and Groups You Want to Sync to Your PDA If you are running out of room on your PDA, or are no longer working with a certain Class or Group, you may want to choose not to sync those Classes or Groups to your PDA.
1. To the left of the names of your classes and groups on the Classes & Groups page is a column entitled Use on PDA.
2. Please place a check in the boxes for classes/groups that you would like to sync to your
handheld.
3. If you would like to make all of your classes/groups available on your handheld device, place a check in the box marked Use All on PDA at the bottom of the column. Note: All Classes and Groups are checked by default.
4. Save any changes to your PDA syncing status by clicking Update. Any changes will take
effect during your next sync.

mCLASS Teacher Guide
17
Write new group name and then click Rename Group to save changes. If you do not wish to
rename the group, click Cancel.
Click Delete Group to confirm removal of group from system.
Click Cancel to undo action and exit
screen.
To Rename an Existing Group
1. On the My Group Information screen, click on Rename at the top right-hand corner of the screen. This will take you to a page entitled Rename Group.
2. Choose a new name for the Group. 3. When you are finished, click Rename Group to save your changes.
To Delete an Existing Group
1. On the My Group Information screen, click on Delete at the top right-hand corner of the screen.
2. This will take you to a page entitled Confirm Delete that gives you the choice to either
Delete Group or Cancel the action.
3. If you choose Delete Group, you will be taken to confirmation screen. 4. Click Done to save your changes.

mCLASS Teacher Guide
18
Click here to choose a
permanent password.
MY ACCOUNT
1. Click on Enter right below My Account. 2. Note: If the System Manager has set the Modifying Data Policy to Closed, you will not be
able to modify your own account information, and the “My Account” button will not be available.
Click here to enter your contact
information or to choose a permanent
password.
mCLASS Teacher Guide
19
3. On the left hand side of the My Account page, under Update Contact Information, enter all of your contact information so that Wireless Generation, Inc. will be able to contact you in the case that you are encountering technical difficulty. This area is not case sensitive.
4. On the right hand side of the My Account page, under the title Change Password
(Optional), enter your Current Password as assigned to you. Then, enter a New Password of your own choosing. This New Password must be between 4-12 characters in length and contain letters and numbers only. You will have to enter your new password into WGsync on your PDA. Please note that passwords are case sensitive (e.g., “Smith” versus “smith”).
5. After entering your New Password, reenter it in the space below for confirmation, and
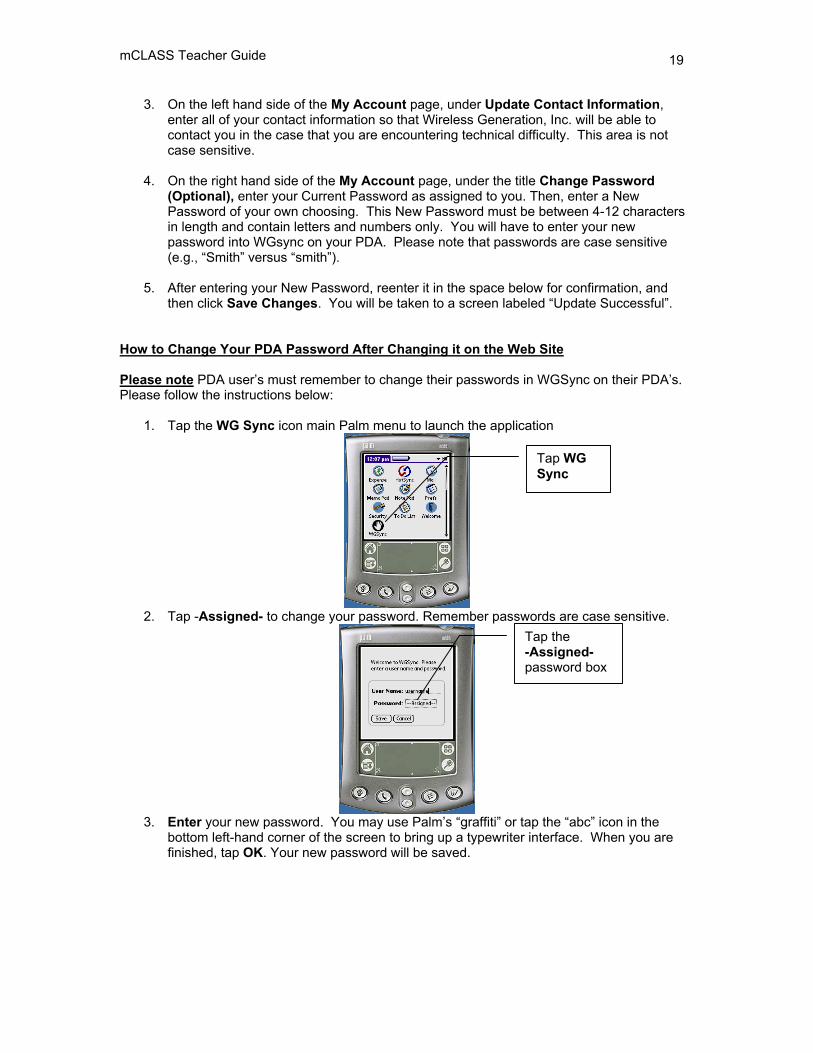
then click Save Changes. You will be taken to a screen labeled “Update Successful”. How to Change Your PDA Password After Changing it on the Web Site Please note PDA user’s must remember to change their passwords in WGSync on their PDA’s. Please follow the instructions below:
1. Tap the WG Sync icon main Palm menu to launch the application
2. Tap -Assigned- to change your password. Remember passwords are case sensitive.
3. Enter your new password. You may use Palm’s “graffiti” or tap the “abc” icon in the
bottom left-hand corner of the screen to bring up a typewriter interface. When you are finished, tap OK. Your new password will be saved.
Tap WG Sync
Tap the -Assigned- password box

mCLASS Teacher Guide
20
4. You will be taken back to the -Assigned- screen. Tap Save to to return to the main Palm menu.
From this point forward, you will use your new, self-chosen password to login to both the online system and your PDA. Please write this new password down and keep it in a safe location for future reference.
DATA SHARING Depending on how the System Manager has set the mCLASS system Policies, Users may be given choices regarding the sharing of their student information with other staff.
Enter the new password and tap OK to save
Tap Save to confirm the change and return to the Palm home menu

mCLASS Teacher Guide
21
Click here to choose options for sharing your student information with
other staff.
1. Staff -based Data Viewing Policy Under a staff-based policy, all student files are private by default. In other words, users with Standard access will only be able to view their own assessments. However, users are given the option on an individual basis of granting other Staff access to their student assessment data.
2. Class-based Data Viewing Policy
Under a Class-based policy, users with Standard access are permitted to see all assessment data on students that are enrolled in their classes. In other words, if assessments were performed by another Staff member on a student in your Class, you will be able to see this data on the Web reports.
3. Open Data Viewing Policy
In an open Data Viewing policy, all student assessments are viewable by all Staff, regardless of access level. In this case, there is no button for Data Sharing, as all assessment data is shared in an Open system.
Note: In an institution/school with a staff- or class-based data viewing policy in place, a heading titled Data Sharing will appear on the right-hand side of the mCLASS Home. Staff should click Enter in order to choose their data-sharing preferences. Clicking Enter takes the user to a screen entitled Sharing. At the top of the page is an explanation of the data viewing policy currently in place. Users are then given three options for sharing their personal student data with others.

mCLASS Teacher Guide
22
To make all of your student records available to all staff,
click Enable.1
2
3
To allow specific staff to access all of your student
records, click Add/Update.1
2
3
Make all of My Student Files Available to all Staff
To enable all Staff access to all student data:
Click Enable if you would like to share all student information with all staff. There
is no need to make changes to the other options offered on this page. To disable all Staff access to all student data:
If you have previously chosen to Enable option and wish to change to one of the
other data-sharing options, click Disable. Your student data will no longer be available to all staff.
Make all of My Student Files Available to Specific Staff
mCLASS Teacher Guide
23
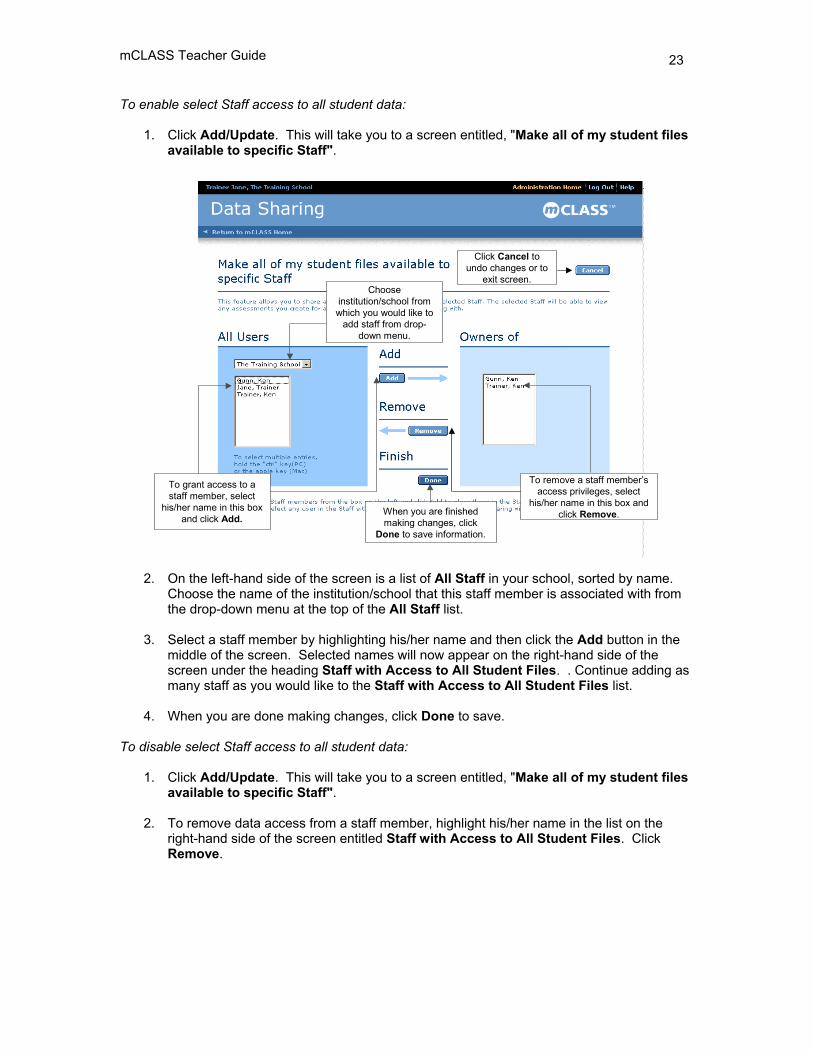
Choose institution/school from which you would like to
add staff from drop-down menu.
To grant access to a staff member, select
his/her name in this box and click Add.
To remove a staff member’s access privileges, select
his/her name in this box and click Remove.When you are finished
making changes, click Done to save information.
Click Cancel to undo changes or to
exit screen.
To enable select Staff access to all student data:
1. Click Add/Update. This will take you to a screen entitled, "Make all of my student files available to specific Staff".
2. On the left-hand side of the screen is a list of All Staff in your school, sorted by name. Choose the name of the institution/school that this staff member is associated with from the drop-down menu at the top of the All Staff list.
3. Select a staff member by highlighting his/her name and then click the Add button in the middle of the screen. Selected names will now appear on the right-hand side of the screen under the heading Staff with Access to All Student Files. . Continue adding as many staff as you would like to the Staff with Access to All Student Files list.
4. When you are done making changes, click Done to save.
To disable select Staff access to all student data:
1. Click Add/Update. This will take you to a screen entitled, "Make all of my student files
available to specific Staff".
2. To remove data access from a staff member, highlight his/her name in the list on the right-hand side of the screen entitled Staff with Access to All Student Files. Click Remove.

mCLASS Teacher Guide
24
To allow specific staff to access specific student
records, click Add/Update.1
2
3
Choose institution/school from which you would like
to add staff from drop-down menu.
To grant access to a staff member, select
his/her name in this box and click Add.
To remove a staff member’s access privileges, select
his/her name in this box and click Remove.When you are finished
making changes, click Next to continue.
Click Cancel to undo changes or to
exit screen.
3. When you are done making changes, click Done to save. Make Specific Student Files Available to Specific Staff
To enable select Staff access to select student data:
1. Click Add/Update. This will take you to a new screen entitled Step 1: Select Staff.
2. On the left-hand side of the screen is a list of All Staff in your school, sorted by name. Choose the name of the institution/school that this staff member is associated with from the drop-down menu at the top of the All Staff list.

mCLASS Teacher Guide
25
Sort students by homeroom using the
drop-down menu.
To select a student, select his/her name in this box and click Add.
To remove a student, select his/her name in this
box and click Remove.When you are finished making changes, click
Done to save information.
3. Select a staff member by highlighting his/her name and then click the Add button in the middle of the screen. Selected names will now appear on the right-hand side of the screen under the heading Selected Staff. Continue adding as many staff as you would like to the Selected Staff list.
4. Click Next to continue.
5. You will now be taken to a page entitled Step 2: Select Student Files to Share. The
names of Staff with whom you have chosen to share data should appear at the top of the page.
6. On the left-hand side of the screen is a list of Available Students (i.e., students whose records you own). These students can be filtered by Group or Class using the Filter By: drop-down menu.
7. Select a student by highlighting his/her name and then click the Add button in the middle of the screen. Selected names will now appear on the right-hand side of the screen under the heading Shared Student Files. Continue adding as many students as you would like to the Shared Student Files list.
8. When are finished, click Done to save changes.
9. You will be taken to a screen entitled Shared Student Files which displays the names of
staff with whom you are sharing records, as well as the staff member’s school, the names of students to whose records they have access, and those students schools.

mCLASS Teacher Guide
26
To update a specific staff member’s access to specific student records,
click his/her name.
To add more staff members for whom you would like to
grant access to specific student records, click Add.
If there are no changes, click Done.
10. If you would like to update student file access for a particular staff member, click on his/her name. If you would like to add more staff, click Add at the top right-hand corner of the screen. If you have no changes, click Done.
To disable select Staff access to select student data:
1. Click Add/Update. This will take you to a new screen entitled Step 1: Select Staff.
2. On the right-hand side of the screen under the heading Selected Staff is a list of all staff
with whom you are currently sharing student files. Highlight the name of the staff member for whom you would like to discontinue access and then click Remove in the middle of the screen.
3. Click Next to continue.
4. You will now be taken to a page entitled Step 2: Select Student Files to Share. The
names of Staff with whom you have chosen to share data should appear at the top of the page.
5. If you wish to make changes to the list of students for whom you are currently changing
records, please do so by either highlighting names from the list on the left-hand side of the screen entitled Available Students and then clicking Add, or highlighting names from the list on the right-hand side of the screen entitled Shared Student Files and then clicking Remove.
6. Click Done when you are finished.
7. You will be taken to a screen entitled Shared Student Files which displays the names of
staff with whom you are sharing records, as well as the staff member’s school, the names of students to whose records they have access, and those students schools. Please check to make sure that the changes you made are in place. If you do not wish to make more changes, click Done.

mCLASS Teacher Guide
27
DOWNLOAD
1. Click on Enter below Download to download software to use for your mCLASS applications.
2. Click on the software you are interested in downloading. 3. Read each window and follow the directions. If you need any assistance, call Wireless
Generation, Inc. Tech Support at 1-800-823-1969.
mCLASS Teacher Guide
28
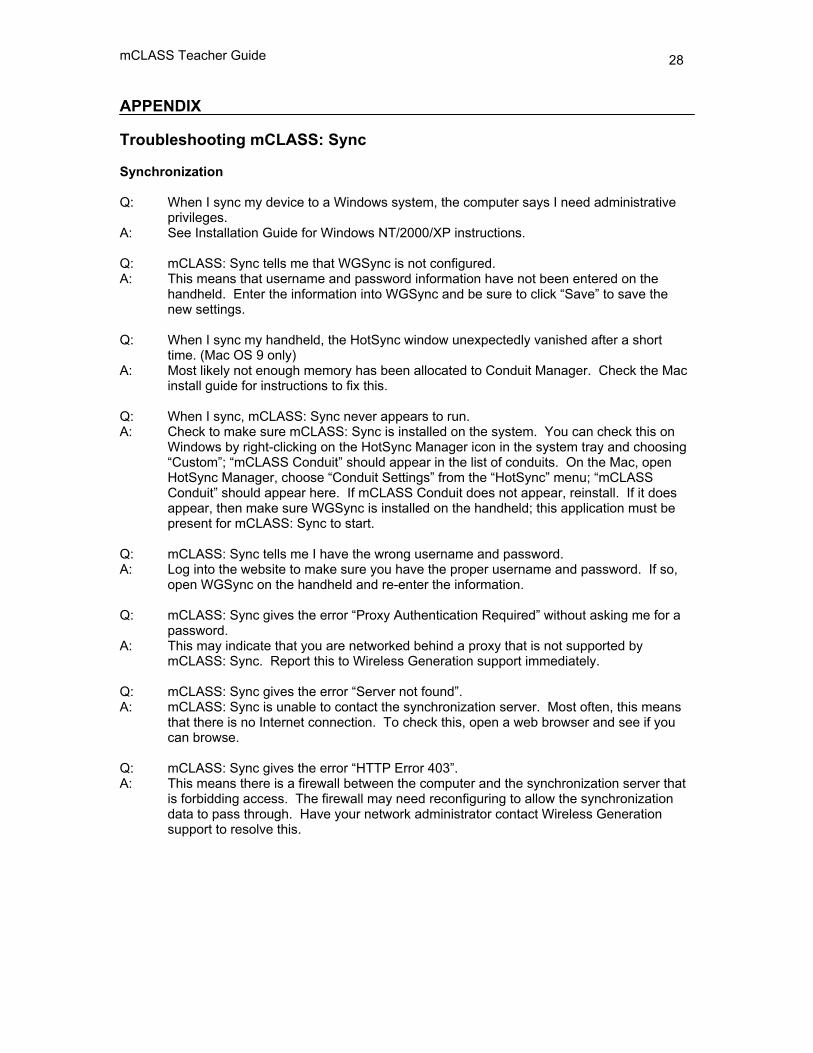
APPENDIX Troubleshooting mCLASS: Sync Synchronization Q: When I sync my device to a Windows system, the computer says I need administrative
privileges. A: See Installation Guide for Windows NT/2000/XP instructions. Q: mCLASS: Sync tells me that WGSync is not configured. A: This means that username and password information have not been entered on the
handheld. Enter the information into WGSync and be sure to click “Save” to save the new settings.
Q: When I sync my handheld, the HotSync window unexpectedly vanished after a short
time. (Mac OS 9 only) A: Most likely not enough memory has been allocated to Conduit Manager. Check the Mac
install guide for instructions to fix this. Q: When I sync, mCLASS: Sync never appears to run. A: Check to make sure mCLASS: Sync is installed on the system. You can check this on
Windows by right-clicking on the HotSync Manager icon in the system tray and choosing “Custom”; “mCLASS Conduit” should appear in the list of conduits. On the Mac, open HotSync Manager, choose “Conduit Settings” from the “HotSync” menu; “mCLASS Conduit” should appear here. If mCLASS Conduit does not appear, reinstall. If it does appear, then make sure WGSync is installed on the handheld; this application must be present for mCLASS: Sync to start.
Q: mCLASS: Sync tells me I have the wrong username and password. A: Log into the website to make sure you have the proper username and password. If so,
open WGSync on the handheld and re-enter the information. Q: mCLASS: Sync gives the error “Proxy Authentication Required” without asking me for a
password. A: This may indicate that you are networked behind a proxy that is not supported by
mCLASS: Sync. Report this to Wireless Generation support immediately. Q: mCLASS: Sync gives the error “Server not found”. A: mCLASS: Sync is unable to contact the synchronization server. Most often, this means
that there is no Internet connection. To check this, open a web browser and see if you can browse.
Q: mCLASS: Sync gives the error “HTTP Error 403”. A: This means there is a firewall between the computer and the synchronization server that
is forbidding access. The firewall may need reconfiguring to allow the synchronization data to pass through. Have your network administrator contact Wireless Generation support to resolve this.

mCLASS Teacher Guide
29
TROUBLE SHOOTING THE HANDHELD Q: After I attempt to install WGSync to the handheld, I don’t see the icon there. A: Check the following:
Verify that the dropdown in the top-right corner of the handheld screen reads “All”. Otherwise, some of your applications may not be displayed. Verify that the WGSync was set up to install for the correct username. 1. Open the HotSync application on the handheld, and check the user name in the top
right corner. 2. Try to install WGSync for this user again.