mbm karpov after corrections - chess direct ltd7 introduction the 12th world champion, anatoly...
TRANSCRIPT

www.everymanchess.com
Sam Collins
move by moveKarpov

About the Author
Sam Collins is an International Master with two Grandmaster norms, and a former Irish
and Japanese Champion. He has represented Ireland at eight Olympiads, winning an indi-
vidual gold medal at Bled 2002. He has a wealth of teaching and writing experience, and
has produced many books, DVDs and magazine articles on chess.
Also by the Author
The French Advance
Gambit Busters
The Greatest Ever Chess Strategies
The Tarrasch Defence: Move by Move
Contents
About the author 3
Bibliography 5
Introduction 7
1 Middlegame Themes 16
Prophylaxis 16
Opposite-Coloured Bishops in the Middlegame 29
Exchange Sacrifice 52
2 Key Structures 65
The Isolated Queen’s Pawn 65
The Minority Attack 133
3 Openings 146
Battles in the Pirc 146
Beating the Sicilian 164
King’s Fianchetto 194
A Weapon against the QID 205
White against the Semi-Slav 217
4 Linares 1994 232
5 Recent Battles 270
Index of Openings 286
Index of Opponents 287

7
Introduction
The 12th World Champion, Anatoly Karpov, needs no introduction. However, a book dedi-
cated to his games certainly does. As a reader might note from the bibliography, many
books have been published on Karpov, including several by Karpov himself and, more re-
cently, by Kasparov (most of Volume 5 of My Great Predecessors is dedicated to Karpov, in
addition to the books devoted to the great world championship matches between the two
Ks). Karpov’s legacy is a rich one, with a huge number of model games, as befits the most
successful tournament player in history.
Kasparov once observed that many great players, while excellent in all areas, were par-
ticularly outstanding in two. Thus, Kasparov categorized himself as an outstanding open-
ing and middlegame player. Kramnik was categorized as an outstanding opening and
endgame player. And Karpov was categorized as an outstanding middlegame and end-
game player.
My approach in this book has been to select a number of aspects of Karpov’s play which
could be helpful to club players. I could easily have doubled the selection.
In the first chapter, we examine a number of techniques which Karpov used consis-
tently, across a number of structures and openings, namely prophylaxis, masterful han-
dling of opposite-coloured bishops in the middlegame, and exchange sacrifices.
In the second chapter, we consider two of the formations in which Karpov excelled,
namely the isolated queen’s pawn and the Carlsbad structure.
The third chapter is devoted to a number of openings which Karpov handled with par-
ticular expertise. I have tried to include games from different stages of his rich career, so
the reader will see Karpov’s transition from 1 e4 to 1 d4.
The fourth chapter is devoted to one of the greatest tournament performances of all
time, namely Karpov’s dominating win at Linares 1994 ahead of all the world’s best play-
ers. As is clear from the notes, this achievement was based on a decent slice of luck (includ-
ing the worst move I’ve ever seen, played by Evgeny Bareev in an equal position). Neverthe-
less, in this tournament Karpov produced a number of classic games in diverse openings –
and in some ways, of all his amazing competitive achievements, this is the most impres-
sive, and a perfect expression of all the elements of his chess which made him such a great
player.
The fifth and final chapter takes a look at a few of Karpov’s recent efforts. While it is
clear that professional play is no longer the centre of Karpov’s activities, he has managed

Karpov: Move by Move
8
to maintain a remarkably high level and continues to impress, even when playing rela-
tively few games each year at a classical time control.
It’s obvious that the above topics are merely a selection. Karpov has far too many
strings to his bow for them all to be described here. Similarly, he brilliantly handled many
more openings and structures than I am able to cover. But I hope that these examples, as
well as being instructive, prompt the reader to investigate Karpov’s games more deeply. As
well as being one of the all-time greatest world champions (and the most successful tour-
nament player of all time), he is also a master of reinvention. He has changed from 1 e4 to
1 d4 and moved around in different openings as Black, helping him to remain competitive
(albeit primarily in blitz and rapid events) against top players for decades.
Karpov on Karpov I have decided to omit any biography of Karpov, partly because the essential aspects of his
life story are widely known, and partly because I have very little of note to add.
However, a description of Karpov as a player strikes me as something that should be
brought to the reader’s attention. In this regard, Karpov recently gave an interview to
www.bigthink.com where he explained a number of aspects of his style, and his approach
to chess, which I found deeply instructive:
“I had an active positional style. I played quite strongly endings, so this was my advan-
tage also. And then I could defend difficult positions, which is quite seldom in modern
chess, and I could resist in positions where other players probably would resign. And I was
finding interesting ideas how to defend difficult positions, and I could save many games.
So I never gave up, I was stubborn as a chess player and I tried to defend even very bad po-
sitions, and in many cases succeeded.”
In response to the question “How do you remain calm after you realize you’ve made a
poor move?”, Karpov said:
“This is a very important and good question, because many people would call back the
situation, that they missed chances, and then of course it will spoil the rest of the game. It
is concerning not only special situation during the game, but also the bad result of a previ-
ous game for the next game you play. In my life I tried, and I succeeded in many cases, to
forget everything what was in the past. Of course you need to make some analysis and not
to repeat mistakes, but it’s extremely important to accept a situation like it is, the real sit-
uation, not with the thoughts and regrets of what you missed and, okay, two moves ago
you had winning position and now you have to defend difficult position, and probably you
might lose the game. So these thoughts shouldn’t be when you play chess game.”
A Taste of what is to Come The following game could have been in the main body of the book – in particular, the sec-
tions on Prophylaxis, the Sicilian and even, perhaps, the Exchange Sacrifice – but I wanted
to describe it here. When thinking about what to include in this book, this game was one of
the first that came to mind. It contains so many characteristic Karpovian themes: prophy-

Introduct ion
9
lactic thinking, simple chess, manoeuvring and tactical alertness. It takes amazing ability
to make Boris Spassky look like an ordinary player, and this is precisely what Karpov
achieves in this game.
Game 1
A.Karpov-B.Spassky Candidates semi-final (9th matchgame), Leningrad 1974
Sicilian Defence
1 e4 c5 2 Ìf3 e6 3 d4 cxd4 4 Ìxd4 Ìf6 5 Ìc3 d6 6 Íe2
Throughout his career with 1 e4 Karpov favoured this classical development against the
Sicilian, no doubt influenced by one of his long-time assistants, GM Efim Geller, who was a
leading expert on this system.
Black, by using a pure Scheveningen move order, allowed the Keres Attack with 6 g4, a
system which Karpov also used to devastating effect, as we will see later. Nursing a one
point lead in the match, Karpov chooses a safer continuation.
6...Íe7 7 0-0 0-0 8 f4 Ìc6 9 Íe3 Íd7
W________W [rDW1W4kD] [0pDbgp0p] [WDn0phWD] [DWDWDWDW] [WDWHP)WD] [DWHWGWDW] [P)PDBDP)] [$WDQDRIW] W--------W
One of the classical methods of development.
The more popular 9...a6 takes the game into the modern interpretation of the Classical
Scheveningen (often arising from a Najdorf move order), as was developed in several key
encounters in the series of matches between Karpov and Kasparov.
In the second game of the match, Spassky had played 9...e5 10 Ìb3 a5 11 a4 Ìb4 12
Íf3 Íe6 13 Êh1 Ëc7 14 Îf2 Îfd8 15 Îd2 Íc4 16 Ìb5 Íxb5 17 axb5 a4 18 Ìc1 d5, when
Black was on top and won after 63 moves. In a subsequent game the same year, Geller
demonstrated the improvement 12 Êh1, beating Spassky in 30 moves.

Karpov: Move by Move
10
Exercise: What is Black’s intention and how should White respond?
Answer:
10 Ìb3!
Black intended to trade knights on d4 and bring his bishop to c6. While this freeing ma-
noeuvre was allowed in many games, here Karpov decides to avoid simplification (a nor-
mal preference for the side with more space) and leave Spassky with more work to do in
order to bring his pieces into play.
10...a5 11 a4 Ìb4 12 Íf3 Íc6 13 Ìd4
This is quite an unpleasant position for Black, from which White has scored heavily.
13...g6 14 Îf2 e5 15 Ìxc6 bxc6 16 fxe5 dxe5
W________W [rDW1W4kD] [DWDWgpDp] [WDpDWhpD] [0WDW0WDW] [PhWDPDWD] [DWHWGBDW] [W)PDW$P)] [$WDQDWIW] W--------W
Exercise: Where should the white queen move?
Answer:
17 Ëf1!
Of all Karpov’s attributes, perhaps the most difficult to imitate is his uncanny ability to
co-ordinate his pieces. There are some positions where good co-ordination can be achieved
easily, or according to a standard pattern. However, Karpov had a remarkable capacity to
make apparently “strange” moves, after which his pieces prove perfectly placed to deal
with any transformation of the position. 17 Ëf1 is an excellent illustration of this.
Of course White is not especially keen to exchange queens, when (as often in the Sicil-
ian) most of Black’s problems would be solved. But why not 17 Ëe2 - ? The benefit of Kar-
pov’s move is that he keeps open options of Îd2 (taking the open file) and Íe2-c4 (attack-
ing the weak f7-pawn and unleashing pressure on the half-open f-file), while the queen is
both well placed (supporting the rook on f2, looking at the f6-knight and the f7-pawn) and

Introduct ion
11
capable of being improved (c4 is an inviting square).
17...Ëc8 18 h3!
A typical move, taking control of the g4-square (and so preventing ...Ìg4), while creat-
ing luft for the king on h2.
In fact White could anticipate ...Ìg4 with a more aggressive move, 18 Ëc4, since
18...Ìg4? fails tactically to 19 Íxg4 Ëxg4 20 Íh6. But this runs into 18...Ëa6! instead,
when Black is alright.
18...Ìd7
W________W [rDqDW4kD] [DWDngpDp] [WDpDWDpD] [0WDW0WDW] [PhWDPDWD] [DWHWGBDP] [W)PDW$PD] [$WDWDQIW] W--------W
Exercise: What is Black’s idea? How can White stop it? (Get used to this
question, since Karpov asks it of himself on pretty much every move.)
Answer:
19 Íg4!
After a natural move like 19 Îd1, Black’s idea is revealed: 19...Íc5!, which trades off one
half of White’s bishop pair and reduces the potential for a direct attack on the black king.
Of course 20 Îxd7?? fails to 20...Íxe3.
19...h5
Now 19...Íc5 has been prevented directly in view of 20 Íxc5 or 20 Íxd7, winning a
piece.
20 Íxd7 Ëxd7 21 Ëc4 Íh4?
An odd move, forcing the rook to a good square (from, admittedly, another good
square).
Spassky avoids the ugly 21...Ëe6 22 Ëxe6 fxe6, when the compromised black structure
means that the players are playing for two results (a white win or a draw). Such a position
is pure torture against a technical master like Karpov, but this might have been a better try
than risking a direct attack in the middlegame.

Karpov: Move by Move
12
Simply 21...Îad8 also looks more logical than Spassky’s move.
22 Îd2 Ëe7
Again 22...Ëe6 came into consideration, although this is a worse version for Black than
on the previous move since he has misplaced his bishop.
W________W [rDWDW4kD] [DWDW1pDW] [WDpDWDpD] [0WDW0WDp] [PhQDPDWg] [DWHWGWDP] [W)P$WDPD] [$WDWDWIW] W--------W
Exercise: How should White continue?
23 Îf1?!
Answer: 23 Íc5! was even stronger, since White wins after 23...Ëg5 24 Îad1 (here 24 Îd7
Ìxc2 25 Îf1 Ìe3 26 Íxe3 Ëxe3+ 27 Êh1 leads nowhere for White due to the surprising
27...Êg7!, when the king can hide on h6, which is stronger than Timman’s 27...Êh8)
24...Îad8 25 Îxd8 Îxd8 26 Îf1 Îd7 27 Íxb4 axb4 28 Ëxc6.
23...Îfd8
Hort suggested 23...Îad8, seeing that Black survives after 24 Íc5 Ëb7!. But Black’s posi-
tion remains unpleasant if White’s makes the same 24th move as in the game.
W________W [rDW4WDkD] [DWDW1pDW] [WDpDWDpD] [0WDW0WDp] [PhQDPDWg] [DWHWGWDP] [W)P$WDPD] [DWDWDRIW] W--------W

Introduct ion
13
Exercise: What should White play now?
Answer:
24 Ìb1!!
One of the most memorable moves in chess history. Karpov prepares to re-route his
knight from c3 (where it is limited by the black pawn on c6 and the white pawns on a4 and
e4) to the kingside, while protecting his rook and preparing to drive away Black’s only good
piece with c2-c3. According to Timman, this move was predicted in the press room by Se-
myon Furman, Karpov’s long-standing trainer.
24...Ëb7 25 Êh2!
More typical Karpovian play, improving his king and giving himself the option of push-
ing the bishop away with g2-g3.
25...Êg7 26 c3 Ìa6
Perhaps Black should have taken the opportunity to trade a pair of rooks with 26...Îxd2,
even though this brings the white knight where it wants to go.
27 Îe2 Îf8
W________W [rDWDW4WD] [DqDWDpiW] [nDpDWDpD] [0WDW0WDp] [PDQDPDWg] [DW)WGWDP] [W)WDRDPI] [DNDWDRDW] W--------W
Exercise: How should White continue?
Answer:
28 Ìd2!
Bringing the knight to its ideal square.
28...Íd8
28...Ëxb2? drops a piece to 29 Ìf3.
29 Ìf3 f6

Karpov: Move by Move
14
W________W [rDWgW4WD] [DqDWDWiW] [nDpDW0pD] [0WDW0WDp] [PDQDPDWD] [DW)WGNDP] [W)WDRDPI] [DWDWDRDW] W--------W
Exercise: How can White further improve his position?
Answer:
30 Îd2!
Seizing the open d-file, at a time when Black can’t contest it since his bishop is awk-
wardly placed on d8. It makes sense to use this rook to control the d-file since the f1-rook is
usefully placed on the f-file. All the white pieces are dramatically more active than their
opponents.
30...Íe7 31 Ëe6! Îad8 32 Îxd8 Íxd8
Spassky couldn’t play 32...Îxd8, as 33 Ìxe5! wins on the spot.
W________W [WDWgW4WD] [DqDWDWiW] [nDpDQ0pD] [0WDW0WDp] [PDWDPDWD] [DW)WGNDP] [W)WDWDPI] [DWDWDRDW] W--------W
Exercise: How should White proceed now?

Introduct ion
15
Answer:
33 Îd1!
Black can’t defend his last two ranks. As noted by Timman, 33 Ìxe5 Ëc7 34 Íf4 also
wins, but it is more complicated. Karpov’s move is risk free and utterly decisive, while re-
quiring no calculation.
33...Ìb8 34 Íc5 Îh8
W________W [WhWgWDW4] [DqDWDWiW] [WDpDQ0pD] [0WGW0WDp] [PDWDPDWD] [DW)WDNDP] [W)WDWDPI] [DWDRDWDW] W--------W
Exercise: Find a tactical blow to end the game.
Answer:
35 Îxd8! 1-0
Black resigned in view of 35 Îxd8 Îxd8 36 Íe7, when his position collapses.
I’d like to thank John Emms, Byron Jacobs and Jonathan Tait for their help with this
book.
Sam Collins,
Dublin, July 2015

Middlegame Themes
53
Game 8 A.Karpov-V.Malaniuk
USSR Championship, Moscow 1988 Dutch Defence
1 d4 f5
With his intuitive positional style and keen sense of danger, Karpov has scored heavily
against the Dutch throughout his career. Malaniuk, however, was probably the most dedi-
cated supporter of the Leningrad Variation at GM level, and so felt honour-bound to test
Karpov in this system.
2 g3 Ìf6 3 Íg2 g6
Setting up the Leningrad.
Against 3...e6, which can lead to the Stonewall (after ...d7-d5) or the Classical (after ...d7-
d6), Karpov favoured formations with Ìh3. For example:
a) 4 Ìh3 Íe7 5 0-0 0-0 6 c4 d6 7 Ìc3 (after 7 Ëb3 c6 8 Ìc3 Ìa6 9 Ìg5 e5!, Black equal-
ized in A.Karpov-Pr.Nikolic, Reykjavik 1991; ½-½ in 24) 7...Ëe8 8 Ìf4 g5 9 Ìd3 Ëg6 10 f4
h6 and now, instead of 11 d5 h6 12 b4 as in A.Karpov-N.Short, Linares 1992 (1-0 in 37),
White might gain a greater advantage by preparing e2-e4; for instance, 11 Ìf2 Ìbd7 12 e4
with the better chances.
b) 4 c4 d5 5 Ìd2 c6 6 Ìh3 Íe7 (or 6...Íd6 7 0-0 0-0 8 Ëc2 Íd7 9 Ìf3 Ëe7 10 Íf4 Íe8
11 Íxd6 Ëxd6 12 Ìf4 with a solid advantage in A.Karpov-B.Bidalis, Rethymnon simul
2001; 1-0 in 64) 7 0-0 0-0 8 Ìf4 Ëe8 9 Ìf3 Ìe4 10 Ëc2 Íd6 11 Ìd3 a5 12 Íf4 Íxf4 13
Ìxf4 and the trade of dark-squared bishops resulted in a classical White advantage in
A.Karpov-H.Böhland, Hockenheim (simul) 1994 (1-0 in 44).
An unusual Stonewall formation arose after 3...d6 4 Ìc3!? d5! 5 Íg5 e6 in A.Karpov-
V.Ivanchuk, Linares 1995 (½-½ in 51).
4 c4 Íg7 5 Ìf3
Malaniuk subsequently made a comfortable draw in this line: 5 Ìc3 0-0 6 Ìh3 Ìc6 7
0-0 d6 8 d5 Ìe5 9 b3 c5 10 Ìf4 Ìe8 11 Ëc2 Ìc7 12 Íd2 a6 13 a4 b6 14 Ìd3 Îb8 15 Îae1
b5 with good play for Black in A.Karpov-V.Malaniuk, Tallinn 2005 (½-½ in 22).
5...d6 6 0-0 0-0 7 Ìc3 Ëe8

Karpov: Move by Move
54
W________W [rhbDq4kD] [0p0W0Wgp] [WDW0WhpD] [DWDWDpDW] [WDP)WDWD] [DWHWDN)W] [P)WDP)B)] [$WGQDRIW] W--------W
8 b3
Karpov has tried a number of moves here.
a) 8 Ëb3 c6 9 d5 Ìa6 10 Íe3 Ìg4 has been contested twice between Karpov and an-
other Leningrad Dutch specialist, GM Mikhail Gurevich: 11 Íf4 (an attempted improve-
ment on 11 Íd4 e5 12 dxe6 Ìe5 13 Îad1 Ëxe6 14 Ìa4 Ëxc4 15 Ëxc4+ Ìxc4 16 Íxg7
Êxg7 17 b3 Ìb6 18 Îxd6 Ìxa4 19 bxa4 Ìc5 and Black was no worse in A.Karpov-
M.Gurevich, Reggio Emilia 1989/90; ½-½ in 53) 11...Ìc5 12 Ëc2 h6 13 h3 e5 14 dxe6 Ìe5
15 Îad1 Ìxe6 16 Îxd6 Ìxc4 17 Îd3 Ìxf4 18 gxf4 Íe6 and Black had no reason to com-
plain about the outcome of the opening. A.Karpov-M.Gurevich, Amsterdam 1991 (1-0 in
47).
b) 8 d5 a5 (after 8...Ìa6 9 Îb1 Ìc5 10 Ìd4 Ëf7 11 b4 e5 12 dxe6 Ìxe6 13 Ìxe6 Íxe6
14 Íxb7 Îab8 15 Íg2 Íxc4 16 Íe3 Îbe8, Black was very comfortable in A.Karpov-
H.Nakamura, Cap d’Agde rapid 2008; 0-1 in 52) 9 Ìd4 (varying from 9 Îb1 Ìa6 10 Ìe1
Íd7 11 Ìd3 h6 12 b3 g5 13 Íb2 Ëg6 with balanced play in A.Karpov-Zhang Zhong, Cap
d’Agde rapid 2000; 1-0 in 35) 9...Ìa6 10 Îb1 Íd7 11 b3 c6 12 Íb2 Ìc7 13 Ëd2 Êh8 14 e4
fxe4 15 Ìxe4 cxd5 16 Ìxf6 exf6 17 cxd5 with a clear advantage for White in A.Karpov-
I.Rotov, Puhajarve (rapid) 2013 (1-0 in 50).
8...Ìa6 9 Ía3 c6 10 Ëd3 Íd7 11 Îfe1 Îd8 12 Îad1 Êh8 13 e4!

Middlegame Themes
55
W________W [WDW4q4Wi] [0pDb0Wgp] [nDp0WhpD] [DWDWDpDW] [WDP)PDWD] [GPHQDN)W] [PDWDW)B)] [DWDR$WIW] W--------W
Karpov’s set-up looks very logical to me. White rapidly develops his pieces to their best
squares and cracks open the centre.
13...fxe4 14 Ìxe4 Íf5 15 Ìxf6 Íxf6 16 Ëe3
Generally, if White achieves e2-e4 in the Dutch, he can count on a slight advantage.
Here Black has to guard the e7-pawn and the e6-square, and the knight on a6 is out of play.
16...Ëf7 17 h3 Ìc7 18 Îe2!
W________W [WDW4W4Wi] [0phW0qDp] [WDp0WgpD] [DWDWDbDW] [WDP)WDWD] [GPDW!N)P] [PDWDR)BD] [DWDRDWIW] W--------W
A perfect multi-purpose move, protecting the weak f2-pawn (and the dark-squared
bishop if it drops back to b2) while preparing to double on the e-file.
18...Íc8 19 Ìg5!
The knight can only be driven away at the cost of weakening the kingside.
19...Ëg8 20 Ëd2 Ìe6 21 Ìxe6 Íxe6 22 Îde1 Íd7
22...Íc8 is a stronger defence, when 23 Íb2 keeps up the pressure.

Karpov: Move by Move
56
W________W [WDW4W4qi] [0pDb0WDp] [WDp0WgpD] [DWDWDWDW] [WDP)WDWD] [GPDWDW)P] [PDW!R)BD] [DWDW$WIW] W--------W
Exercise: How should White continue?
Answer:
23 Îxe7! Íxe7 24 Îxe7
For the exchange White gains a pawn and eliminates Black’s best defensive piece.
White’s dark-squared bishop will be dominant on the a1-h8 diagonal. In addition, the d6-
pawn is hanging (which wouldn’t have been the case after 22...Íc8).
24...Îf6
Trying to block the long diagonal with 24...d5 is futile: 25 Íd6! and the bishop gets to
e5.
W________W [WDW4WDqi] [0pDb$WDp] [WDp0W4pD] [DWDWDWDW] [WDP)WDWD] [GPDWDW)P] [PDW!W)BD] [DWDWDWIW] W--------W
Exercise: Find the best continuation for White.
Middlegame Themes
57
Answer:
25 d5!
Opening the long diagonal for the bishop.
25...Ëf8 26 Îe3 Êg8 27 Íb2
Black is completely busted.
27...Îf5 28 Ëd4 Îe5
At least this way he eliminates an attacking piece, but White gets two pawns for the ex-
change and is still dominating the dark squares.
29 Îxe5 dxe5 30 Ëxe5 Êf7 31 d6 Íf5 32 c5 h5 33 g4!
33 Íf1!, aiming for c4, was also strong.
33...hxg4 34 hxg4 Íd3
34...Íxg4 drops the bishop to 35 Ëf6+ Êe8 36 Ëxg6+ etc.
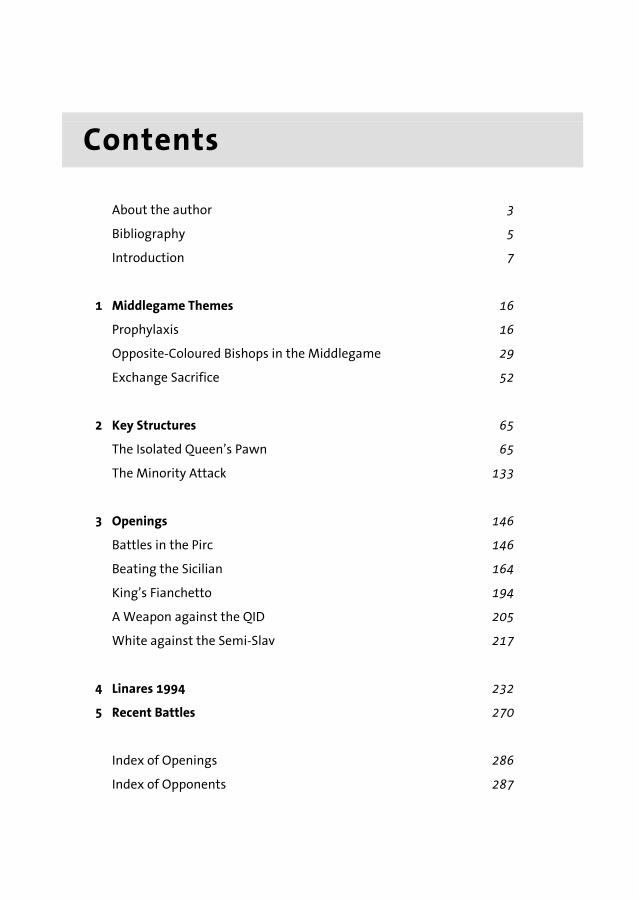
W________W [WDW4W1WD] [0pDWDkDW] [WDp)WDpD] [DW)W!WDW] [WDWDWDPD] [DPDbDWDW] [PGWDW)BD] [DWDWDWIW] W--------W
Exercise: Find the mate in four.
Answer:
35 Íd5+! 1-0
Since 35...cxd5 36 Ëxd5+ Êe8 37 Ëe6+ Ëe7 38 Ëxe7 is mate.
Game 9
A.Karpov-B.Spassky Moscow 1973
Ruy Lopez
1 e4 e5 2 Ìf3 Ìc6 3 Íb5 a6 4 Ía4 Ìf6 5 0-0 Íe7 6 Îe1 b5 7 Íb3 d6 8 c3 0-0 9 h3 Ìb8

Key Structures
93
Game 16 V.Korchnoi-A.Karpov
World Championship (9th matchgame), Merano 1981 Queen’s Gambit Declined
1 c4 e6 2 Ìc3 d5 3 d4 Íe7 4 Ìf3 Ìf6 5 Íg5 h6 6 Íh4 0-0 7 Îc1 dxc4!
A novelty prepared by Karpov for the match.
8 e3
Karpov notes that 8 e4 Ìc6! gives Black good play.
8...c5 9 Íxc4 cxd4
W________W [rhb1W4kD] [0pDWgp0W] [WDWDphW0] [DWDWDWDW] [WDB0WDWG] [DWHW)NDW] [P)WDW)P)] [DW$QIWDR] W--------W
10 exd4
An ambitious choice. 10 Ìxd4 is more conservative and was tried by Korchnoi in game
17 of the match. After 10...Íd7! 11 Íe2 Ìc6 12 Ìb3 Ìd5 13 Íxe7 Ìcxe7 14 Ìxd5 Ìxd5
15 Ëd4 Íc6 16 Íf3 Ìe7 17 Íxc6 Ìxc6 18 Ëxd8 Îfxd8 19 Êe2 Îac8 20 a3 Êf8 21 Îc2
Ìe7 22 Îhc1 Îxc2+ 23 Îxc2 Êe8, a draw was agreed.
Karpov later took on the white side of this variation: 11 0-0 Ìc6 12 Ìb3 Îc8 13 Íe2
Ìd5 14 Íxe7 Ìcxe7 15 Ìxd5 Ìxd5 16 Îxc8 Ëxc8 17 Ëd4 Ëb8 18 Íf3 Ìf6 19 Ìc5 Íb5 20
Îd1 b6 21 Ìe4 Ìxe4 22 Íxe4 Îc8 was also a draw in A.Karpov-G.Kasparov, World Cham-
pionship (23rd matchgame), Moscow 1984. Instead, 11 Íg3 a6 12 e4 Ìc6 led to a win for
White in A.Karpov-A.Beliavsky, Dortmund 1995 (1-0 in 60), but the result had nothing to do
with the opening.
10...Ìc6 11 0-0 Ìh5!?
A standard idea in IQP positions – the knight is not well placed on the edge, but by an-
ticipating Íg3 it forces an exchange of minor pieces. All such trades are generally in
Black’s favour.
12 Íxe7 Ìxe7

Karpov: Move by Move
94
W________W [rDb1W4kD] [0pDWhp0W] [WDWDpDW0] [DWDWDWDn] [WDB)WDWD] [DWHWDNDW] [P)WDW)P)] [DW$QDRIW] W--------W
13 Íb3
Karpov makes an interesting psychological observation at this point: “Here White could
have got rid of his weak pawn: 13 d5 exd5 14 Ìxd5 Ìxd5 15 Íxd5 Ìf4 16 Íe4 Ëxd1 17
Îcxd1 Íe6 with equality. But Korchnoi does not want to give up the white pieces so easily,
and as a result he ends up in a difficult position.”
Instead, 13 Îe1 Ìf6 14 Ìe5 Íd7 15 Ëb3 Îb8 16 Îcd1 b5 17 Ìxd7 (17 Íd3! would have
kept some initiative for White) 17...Ìxd7 18 Íd3 Ìf6 19 Íb1 a6 20 Ìe4 was balanced in
L.Christiansen-A.Karpov, London 1982 (½-½ in 45); here 20...Ìxe4 21 Íxe4 Ëa5 was sim-
plest, when White has nothing better than forcing a draw with 22 d5 Ìxd5 23 Íxd5 exd5
24 Ëxd5.
13...Ìf6 14 Ìe5 Íd7 15 Ëe2 Îc8
W________W [WDr1W4kD] [0pDbhp0W] [WDWDphW0] [DWDWHWDW] [WDW)WDWD] [DBHWDWDW] [P)WDQ)P)] [DW$WDRIW] W--------W
Exercise: How should White proceed?

Key Structures
95
16 Ìe4?
Not like this! It’s hard to understand why Korchnoi invites piece exchanges which ease
Black’s defence. As Hecht notes: “Now the queen’s pawn is fast becoming a problem child.”
Answer: 16 Îfe1, 16 Îfd1 or even 16 h3 are all normal moves, after which White is at least
equal.
16...Ìxe4 17 Ëxe4
W________W [WDr1W4kD] [0pDbhp0W] [WDWDpDW0] [DWDWHWDW] [WDW)QDWD] [DBDWDWDW] [P)WDW)P)] [DW$WDRIW] W--------W
Exercise: How should Black meet the threat to his b7-pawn?
Answer:
17...Íc6!
A standard idea – as we’ve just said, Black benefits from piece exchanges. Karpov ex-
plains his move as follows: “An important subtlety. Black is not afraid that after the double
exchange on c6 he will also be given an isolated pawn. His knight is capable of both se-
curely defending his own pawn, and attacking the enemy d4-pawn, whereas the functions
of the white bishop are restricted.”
I prefer Karpov’s move order to 17...Îxc1 18 Îxc1 Íc6, which gives White control of the
c-file.
18 Ìxc6 Îxc6 19 Îc3
Exercise: How was Karpov intending to answer 19 Îxc6 - ?
Answer: 19...bxc6! is a standard idea in IQP structures. The d4-pawn is fixed (d4-d5 will
never happen now) and Black can build up with ...Ëb6 and ...Îd8, with possibilities of play-
ing ...c6-c5. Black is certainly no worse here.
In contrast, 19...Ìxc6? 20 d5 exd5 21 Íxd5 leaves White with the clearly superior minor
piece. Black should be able to hold this position but there is some suffering ahead.
Karpov: Move by Move
96
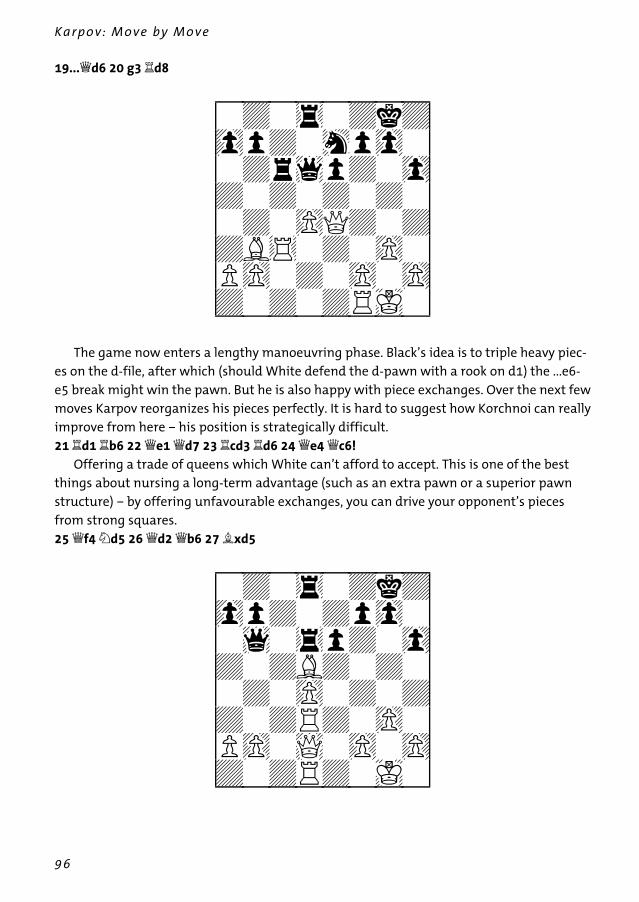
19...Ëd6 20 g3 Îd8
W________W [WDW4WDkD] [0pDWhp0W] [WDr1pDW0] [DWDWDWDW] [WDW)QDWD] [DB$WDW)W] [P)WDW)W)] [DWDWDRIW] W--------W
The game now enters a lengthy manoeuvring phase. Black’s idea is to triple heavy piec-
es on the d-file, after which (should White defend the d-pawn with a rook on d1) the ...e6-
e5 break might win the pawn. But he is also happy with piece exchanges. Over the next few
moves Karpov reorganizes his pieces perfectly. It is hard to suggest how Korchnoi can really
improve from here – his position is strategically difficult.
21 Îd1 Îb6 22 Ëe1 Ëd7 23 Îcd3 Îd6 24 Ëe4 Ëc6!
Offering a trade of queens which White can’t afford to accept. This is one of the best
things about nursing a long-term advantage (such as an extra pawn or a superior pawn
structure) – by offering unfavourable exchanges, you can drive your opponent’s pieces
from strong squares.
25 Ëf4 Ìd5 26 Ëd2 Ëb6 27 Íxd5
W________W [WDW4WDkD] [0pDWDp0W] [W1W4pDW0] [DWDBDWDW] [WDW)WDWD] [DWDRDW)W] [P)W!W)W)] [DWDRDWIW] W--------W

Key Structures
97
Exercise: How would you assess this decision from Korchnoi?
Answer: It has to be classed as a significant mistake. As mentioned before, all trades are in
Black’s favour. The pure major piece position which results is extremely difficult for White.
Hecht suggests simply 27 a3, when Black must still demonstrate how he plans to break
through – the knight on d5 looks great but it shields the d4-pawn from direct attack.
Kasparov’s explanation for the decision is probably correct: “Short of time, Korchnoi
does not want to undermine the stability of his bishop by moving the a2-pawn, and he de-
cides to parry the threat of ...Ìd5-b4 in the simplest way. The position after 27 a3 Ìe7 28
Ëf4 Ìc6 29 d5 e5 30 Ëe3 Ìd4 is also advantageous to Black, but possibly this was the
lesser evil.”
27...Îxd5 28 Îb3
White gains some time on the black queen, but this is purely temporary and actually
removes defenders from the d4-pawn.
Here Karpov makes another fascinating psychological observation: “The sacrifice of the
d4-pawn would give White practical saving chances in the rook endgame. However, it is
psychologically difficult to decide on such a step of one’s own free will. Meanwhile Black
increases the pressure.”
Looking forward, it is certainly the case that Korchnoi, by dealing with tactical threats to
his d-pawn, ends up destroying his own position (in particular, by playing f2-f4 which, as
will be seen, is forced in order to prevent ...e6-e5).
I have probably played through this game a dozen times and, frankly, it had never oc-
curred to me that White could elect to go into the rook and pawn endgame which, while
obviously giving Black serious winning chances, is not trivial to win.
28...Ëc6 29 Ëc3 Ëd7 30 f4
Not a move White wants to make, but Black threatened 30...e5, exploiting the pin on
the d4-pawn.
30...b6!
Karpov: Move by Move
98
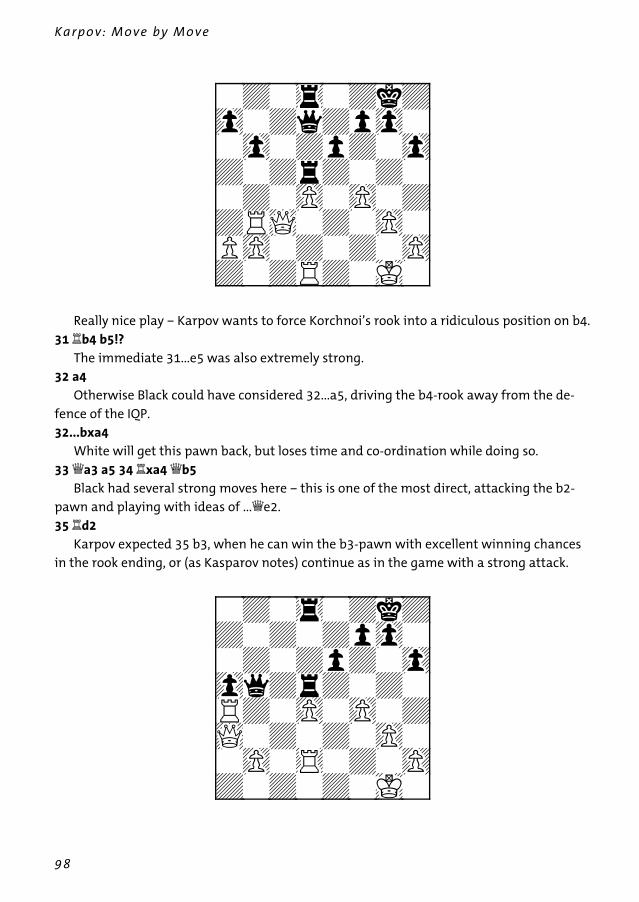
W________W [WDW4WDkD] [0WDqDp0W] [W0WDpDW0] [DWDrDWDW] [WDW)W)WD] [DR!WDW)W] [P)WDWDW)] [DWDRDWIW] W--------W
Really nice play – Karpov wants to force Korchnoi’s rook into a ridiculous position on b4.
31 Îb4 b5!?
The immediate 31...e5 was also extremely strong.
32 a4
Otherwise Black could have considered 32...a5, driving the b4-rook away from the de-
fence of the IQP.
32...bxa4
White will get this pawn back, but loses time and co-ordination while doing so.
33 Ëa3 a5 34 Îxa4 Ëb5
Black had several strong moves here – this is one of the most direct, attacking the b2-
pawn and playing with ideas of ...Ëe2.
35 Îd2
Karpov expected 35 b3, when he can win the b3-pawn with excellent winning chances
in the rook ending, or (as Kasparov notes) continue as in the game with a strong attack.
W________W [WDW4WDkD] [DWDWDp0W] [WDWDpDW0] [0qDrDWDW] [RDW)W)WD] [!WDWDW)W] [W)W$WDW)] [DWDWDWIW] W--------W

Key Structures
99
Exercise: How should Black proceed?
Answer:
35...e5!
The most incisive continuation.
36 fxe5 Îxe5 37 Ëa1
37 Îf2 held on for longer, but White’s position remains horrible.
W________W [WDW4WDkD] [DWDWDp0W] [WDWDWDW0] [0qDW4WDW] [RDW)WDWD] [DWDWDW)W] [W)W$WDW)] [!WDWDWIW] W--------W
Exercise: Black to play and win!
Answer:
37...Ëe8!!
Absolutely decisive. Black breaks through to the seventh rank and the white major piec-
es on the a-file are completely incapable of defending their king.
38 dxe5 Îxd2 39 Îxa5
Or 39 Ëe1 Ëd8 and the white king faces far too much firepower.
39...Ëc6 40 Îa8+ Êh7 41 Ëb1+ g6 42 Ëf1 Ëc5+
Of course not 42...Ëxa8?? 43 Ëxf7+, when Black can only escape perpetual check by
hanging his pawns and rook.
43 Êh1 Ëd5+ 0-1
Winning the queen and the game.