mazda 121, kia pride repair manual vol 1
TRANSCRIPT

8/20/2019 Mazda 121, Kia Pride Repair Manual Vol 1
http://slidepdf.com/reader/full/mazda-121-kia-pride-repair-manual-vol-1 1/389
JMO OB1 3 t

8/20/2019 Mazda 121, Kia Pride Repair Manual Vol 1
http://slidepdf.com/reader/full/mazda-121-kia-pride-repair-manual-vol-1 2/389
Mazda
121
Workshop
Manual
Vofume 1 of
2
FOREWORD
Thisworkshop
manual
s intended
or
use
bv
service technicians
of
Authorized
Mazda
D-ealerso help them serviceMazdavehicles.
It
can also
be uselul
o ownersand
operators
of Mazda
vehicles
in diagnosing
some
problems
and
performing
imited
epair
and
maintenanceon
Mazda
vehicles.
For
proper
repair and
maintenance,
thorough
amiliarization
ith his
manual
s m-
portant,
and
it shouldalways
be kept
n a
han-
dy
place
or
quick
and
easy
reterence.
All
the
contentsof
this manual,
ncluding
drawingsand
specifications,
re he
atest vail-
able
at the time of
printing.
As modifications
affecting
epair
or
maintenance
ccur, elevant
informationupplementary
o
thisvolume
will
be made available
at
Authorized
Mazda
Dealers.This
manual should
be
kept up-
to-date.
Mazda
Motor Corporation
eserves
he right
to alter
he specifications
nd
contentsof
this
manual
withoutobligation
r advance
notice.
All rights
eserved.No
part
of this
book
may
be
reproduced or used
in any
form or
by any
means,electronic
r
mechanical-including
photocopyingand recording and the use of
any kind oJ
nformation
storage and
retrieval
system-without
permission
n writing.
Mazda
Motor
Corporation
HIROSHIMA.
APAN
APPLICATION:
Thismanual
s applicable
o vehicles
eginning
with the
Vehicle dentification
Numbers
(VlN)
shown on the
following
page.
o 1990MazdaMotor
Corporation
ocT.
'90
@)
1249-10-90J
CONTENTS
Tirle
Sect
General
nformation
Pre-Delivery
nspection
and
ScheduledMaintenanceService
Engine
Lubrication
System
Cooling
System
Fuel
ndEmission
,onttolystem EGI-S
Engine
ElectricalSystem
Clutch
ManualTransaxle
Automatic
Transaxle
Front and
Rear Axles
Steering
System
Braking Syslem
Wheels
and Tires
Suspension
Body
Body Electrical System
Heater
and AarConditioner
Systems
Technical
Data
Special
Tools
wiringDiasram
Sili:.|Tj|:'"''""'0"''
The sectionZ is publishedseparate rom this manual.

8/20/2019 Mazda 121, Kia Pride Repair Manual Vol 1
http://slidepdf.com/reader/full/mazda-121-kia-pride-repair-manual-vol-1 3/389
vEHlcLE
DENTIFICATION
UMBERS
VlN)
JMo
D81031
0 100001

8/20/2019 Mazda 121, Kia Pride Repair Manual Vol 1
http://slidepdf.com/reader/full/mazda-121-kia-pride-repair-manual-vol-1 4/389
GI
GENERAL
NFORMATION
TMPORTANTNFORMATION.... . . . . . . . . . . . . . . . .
l - 2
BAS|C SSUMPT|ONS.... . . . . . . . . . . . . . . . . . . . . . . . .l - 2
sAFEry
H1SK.... . . . . . . . . . . . . . . Gl- 2
POSSIBLE
OSS FWARRANry... . . , , . . . . . .I- 2
WARNINGN
LUBRICANTS
ANDGREASES. ... . . . . . . . . . . l- 2
HOWTO USETH|S
MANUAL.... . . . . . . . . . . . . . . . .t- 3
PREPARATTON ... . . . . . . . . . . . . . l - 3
REpAtR
ROCEDURE.... . . . . . . . . . . . . . . . . . . . . . . . . .l - 3
SYMBOLS.... . . . .
. . . . . . . . . . . . . . . l- 4
NOTES.
AUTIONS.
NDWARNINGS.... . . .
I- 4
FUNDAMENTALROCEDURES.... . . . . . . . . . . . . .I- 4
PROTECTIONF
THE
VEHICLE
.,.. . . . . . . . . . I- 4
A WORD
BOUT AFETY.... . . . . . . . . . . . . . . . . . . .l - 5
PREPARATIONF
TOOLS
ANDMEASURING
QUIPMENT.... . . . . . . . . .I_ 5
SPEC|ALOO1S.... . . . . . . . .
. . Gl- 5
REMOVALFPARTS.... . . . . . . . . . . . . . . . . . . . . . . . . .l - s
DTSASSEMBLY
.... . . . . . . . . . . . . l -
5
REASSEMBLY ... . . . . . . . . . . . . . .I-
6
ADJUSTMENTS
..,. . . . , . . , , . . . I-
7
RUBBER ARTS
NDTUBING.... . . . . . . . . . , . .I_
7
JACK
ANDSAFETY TAND
POSITIONS....I- 8
VEHICLE IFT
2.SUPPORT
YPE)
postTtoNs.... .
. . . . . . . . . . . . . . . . .
l - I
TOW|NG.... . . . . .
. . . . . . . . . . . . . . . . . . .l - 9
IDENTIFICATION
UMBER OCATIONS.,...I-10
uNtTs. . . . . . . . . . . . .
. . . . . . . . . . . . . . . . . .l - l 0
ABBREVTATTONS
.... . . . . . . . . . . . . . . . . . . . . . . . . . . . . . . . .l - l0
CAUT|ON ....Gl- l l
INSTALLATIONF
A MOBILE
TWO-WAY
AD|O
YSTEM.... . . . . . . . . . . . . . . . .
l - l1
REMOVAL F
GNITIONEYON
AUTOMATIC
RANSAXLEODE1.......... I-11
ELECTRICALROUBLESHOOTING
OOLS I-12
CAUTION
ITHELECTRICAL
ARTS........
I-13
03uGtx-001

8/20/2019 Mazda 121, Kia Pride Repair Manual Vol 1
http://slidepdf.com/reader/full/mazda-121-kia-pride-repair-manual-vol-1 5/389
GI
IMPORTANT
NFORMATION
IMPORTANT
NFORMATION
BASICASSUMPTIONS
This
workshopmanual ssumes
hat
you
have
certain pecial
ools hatare
necessaryor he safeandetfi-
cient
perlormance
f
service perations
n Mazda
ehicles nd
hat
you
knowhow o
use hem
properly.
It
also
assumeshat
you
are
amiliar ithautomobile
ystems
ndbasic
ervice nd repair
rocedures.
ou
should otattempto use hismanual nlesshese ssumptionsrecorrecl ndyouunderstandheconse-
quences
escribed
elow.
SAFETY
RISK
This
manual ontains ertain
otes,warnings,
ndother
precautionary
nformation
hat
you
should arefully
readand
ollow
o
reduce he
risk
of
personal
njury o
yourself
r others
nd he
risk
of
improper ervice
thatmaydamage he
vehicle r
render t unsafe.
f there
s no
such
nformation
n regard
o
anyspectfic
service
method, his
does not mean
here s no
possibility
hat
personal
afetyor vehicle afety
will
be
jeopardized
y
the useoJ
ncorrectmethods r
tools.
POSSIBLE OSSOF
WARRANTY
Themanufacturer'sarranty
n Mazda ehicles nd
engines
anbe voided f mproper ervice
r repairs
areperformed y persons ther han hoseat an AuthorizedMazdaDealer.
WARNING N
LUBRICANTSND GREASES
Avoidall
prolonged
nd
repeated ontactwith mineral
ils,
especially sedoils.Usedoilscontaminated
during
ervice
e.g.,
ngine ump
ils) remore rritating
nd
more ikelyo cause eriousffects,
ncluding
skincancer, n
the eventof
gross
and
prolonged
kincontact.
Washskin horoughly fter
work nvolving il.
Protective
andcleanersmaybe of
value
provided
heycan be removed
rom he skinwithwater.
Do not
use
gasoline,
araffin,
r
othersolvents
o remove il
from he skin.
Lubricants nd
greases
may be slightly
rritatingo the eyes.
Bepeated r
prolonged
kincontact hould
e avoided
y
wearing rotectivelothingfnecessary.articu-
lar
care
should e taken
withusedoilsand
greases
ontaining
ead.Do notallow
workclothingo be con-
taminated
ithoil. Dry cleanor
launder uchclothing
t
regularntervals.
sMuGrx_oo
Gl-z
8/20/2019 Mazda 121, Kia Pride Repair Manual Vol 1
http://slidepdf.com/reader/full/mazda-121-kia-pride-repair-manual-vol-1 6/389
HOWTO USE
THISMANUAL
GI
HOW
TO USE
THISMANUAL
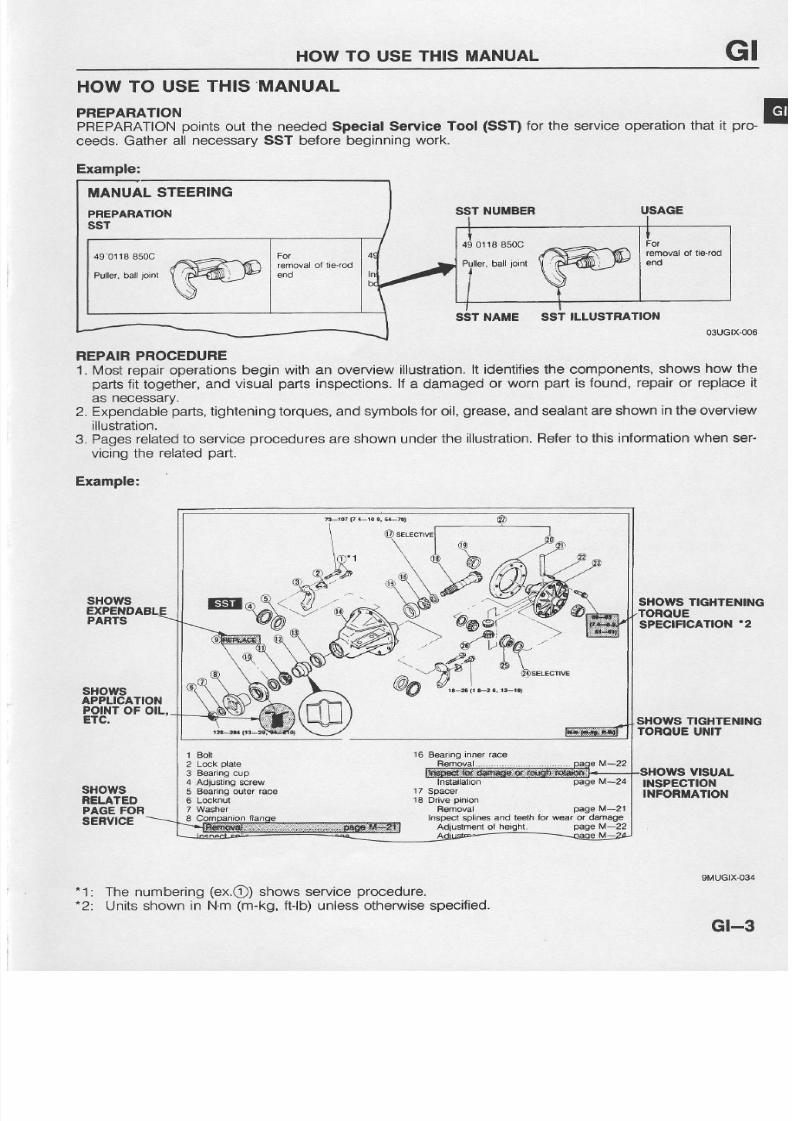
F[rtFf#rtifiirointsout heneededpeciat
ervice ool
ssT)
or he erviceperation
att
pro-
ceeds.Gather
ll necessary ST beforebeginning
ork.
Example:
SST
NUMBER
SST NAME SST
ILLUSTRATION
03uGtx-@6
REPAIB ROCEDURE
1.
Most
epair perations eginwith
an overviewllustration.
t identifieshe components,hows
how he
parts
it
together,
nd
visual
parts
nspections.f
a damaged
r
worn
part
s found,
epair
or
replacet
as
necessary.
2. Expendable
arts,
ighteningorques,ndsymbolsoroil,
grease,
ndsealantre
shownn heoverview
illustration.
3. Pages elated
o
service
rocedures
reshownunder
he llustration.efer
o this nformation
hen er-
vicing he
related
art.
Example:
SHOWS TIGHTENING
TOROUE UNIT
sHows
RELATED
PAGEFOR
SERVICE
" 1 :
Thenumbering
ex.@)
hows ervice
rocedure.
Units hown
n Nm
(m-kg,
tJb)unless therwisepecified.
9MUGIX.O34
Gt-3
MANUAL
TEERING
PREPARATION
ssT
490118 50C
Pullef, all
oinl
17
Spacer
18
Drive
pinion
Bemoval
page
M-2'l
rpecl
splines and leelh
fot weat
or
damage

8/20/2019 Mazda 121, Kia Pride Repair Manual Vol 1
http://slidepdf.com/reader/full/mazda-121-kia-pride-repair-manual-vol-1 7/389
GI
HOW
TO
USE
THIS MANUAL/FUNDAMENTAL
ROCEDURES
SYMBOLS
if,er"
uresi*
symbols
ndicating
il,
grease,
nd
sealant.
hese ymbols
how
he
points
f applying
uch
materials
uring
ervice.
Symbol
Meaning
Kind
g
Apply oil
New engine
oil or
gear
oil as
appropriate
@
Apply
brake
luid
Only
brake luid
E
Apply automatic
ransmission
luid
Only
ATF
€
Apply
grease
Appropriate
rease
(@[
Apply sealant
Appropriate
ealant
e
Apply
petroleum
elly Appropriate
petroleum
ellY
osuctx 05
Note
.
Whenspecial
oil or
grease
s needed, his
is shown
in the
illustration.
NOTES, AUTIONS,
ND
WARNINGS
As
you
ead
hrough
he
procedures,ou
willcomeacross
OTES,
AUTIONS,
nd
WARNINGS.
ach
one
s therefore
ipecific
purpose.
NOTES
giveyou
added
nformation
hat
will help
you
o complete
a
particular rocedrire.
AUTIbNS
are
given
o
pri:vent
ou
rom
making
n error
hatcould
damage
he
vdhicle.
WARNINGS
emind
ou
o beespeciallyareful
n
hose reas
where
arelessness
an
cause
Per'
sonat
niury.
The
ollowingilt contains
ome
eneral
WARNINGS
ou
should
ollow
when
ou
workon
a vehicle
olA.,x-oo2
FUNDAMENTAL
ROCEDURES
PROTECTION
F
THEVEHICLE
Always e
sure o
cover
enders,
eats, nd
loor
areas
be-
fore startino
ork.
Gt-4
9MUGIX.O37

8/20/2019 Mazda 121, Kia Pride Repair Manual Vol 1
http://slidepdf.com/reader/full/mazda-121-kia-pride-repair-manual-vol-1 8/389
FUNDAMENTAL
ROCEDURES
GI
9MUGtX-003
9[,{UGtX-038
47UOGX-005
47U0GX-006
SMUGIX,O39
A
WORD
ABOUTSAFETY
The
ollowing
recautions
ustbe
ollowed hen
acking
p
thevehicle.
1 Block
he
wheels.
2. Useonly
hespecified
acking
ositions.
3. Support
he
vehicle
with safety tands.
Starthe
engine
nlyafter
making ertain
heengine ompart-
ment s clear
of
ools nd
people.
PREPARATION
F
TOOLSAND
MEASURING
EOUTPMENT
Be
sure
hat
all
necessaryoolsand
measuringquipment
re
available
efore
tarting
ny
work.
SPECIAL
TOOLS
Use special
ools
when hey
are required.
REMOVAL
OF
PARTS
While orrecting
problem,
ry also o
determine
ts
cause.
Beginwork
only
after irst earning
which
parts
and subassem-
b es must
be
removedand disassembled
or replacement
r
repair.
DISASSEMBLY
lf the disassembly
rocedure
s complex,
equiringmany
parts
to be disassembled,
ll
parts
shouldbe
disassembled
n a
way
that
will not affect
heir
performance
r external
appearance
and
dentified o
hat
eassembly an
be
performed
asily nd
efficiently.
Gr-5

8/20/2019 Mazda 121, Kia Pride Repair Manual Vol 1
http://slidepdf.com/reader/full/mazda-121-kia-pride-repair-manual-vol-1 9/389

8/20/2019 Mazda 121, Kia Pride Repair Manual Vol 1
http://slidepdf.com/reader/full/mazda-121-kia-pride-repair-manual-vol-1 10/389
FUNDAMENTAL
ROCEDURES
GI
9MUGIX.OOs
ADJUSTMENTS
Usesuitable
auges
nd/oresters
hen
making diustments.
E
RUBBER
ARTS
AND
TUBING
Prevent
asoline
r oil rom
getting
n
rubber
arts
r ubing.
57UoGX-002
Gt-7

8/20/2019 Mazda 121, Kia Pride Repair Manual Vol 1
http://slidepdf.com/reader/full/mazda-121-kia-pride-repair-manual-vol-1 11/389
Gl
,oo
AND AFEw
srAND
FosmoNsyvEHplE
UFT
25UPP6RT
YPE)
osmoNs
JACK
AND
SAFETY
STAND
POSITIONS
FRONT
ND
Jack
positioni
At
the
rontcrossmember
Satety
stand
positions:
Side
ills
REAR
END
Jack
position:
At he
center f
the
ear rossmember
Safety
stand
positions:
Side
ills
03uGlx'oog
vEHlcLE
LIFT(2-SUPPORTYPE)POSITIONS
FRONT
ND
Frame
Side
ills
9ltlUGlX-010
Gt-8
REAR
END
Frame
Side
ills

8/20/2019 Mazda 121, Kia Pride Repair Manual Vol 1
http://slidepdf.com/reader/full/mazda-121-kia-pride-repair-manual-vol-1 12/389
TOWING GI
WHEEL
DOLLIES
03uGlx002
TOWING
Properowing quipment
s necessaryo
prevent
amage
o
p
thevehicle.
Lawsand regulationspplicable
o vehiclesn tow must
al
waysbe observed.
As a generalule,owed ehicleshould epulledwith he
driving heels ff he
ground.
f excessiveamage r
other
conditions
revent
owinghe
vehicle ith he
driving heels
off he
ground.
se
wheel
ollies.
Witheitherautomatic
r manualransaxle:
1.Set he
gnitionwitchn
theACC
position:
2. Place he selector
everor shift ever
n N
(Neutral);
3.
Releasehe
parking
rake.
Caution
.
Do not ow he vehiclebackward
with
driving
wheels
on the ground.This may cause nternaldamage o
the transaxles.
.
Do not use
he hook oops under he front and rear
ol the
vehicle tor towing
purposes.
These hook
loops aredesigned
ONLY or transport ie-down. t
tie.down hook
loops
are
used for towing, the
front/rear bumper
will
be damaged.
Gt-9

8/20/2019 Mazda 121, Kia Pride Repair Manual Vol 1
http://slidepdf.com/reader/full/mazda-121-kia-pride-repair-manual-vol-1 13/389
Gl
rDENTIFrcATroN
UMBERocATroNs/uNtrs/ABBREVtATtoNS
IDENTIFICATION
UMBER
OCATIONS
VEHICLE
DENTIFICATION
NUMBER
(VIN) AUTOMATIC
RANSAXLE
IODEL
AND NUMBER
ENGINE
MODEL
AND NUMBER
,'%
r(g
/tYl
.,,/Pk
UNITS
N.m
m-kg
or cm-kg,
ft lb
or in-lb)..
.. . . . .
orque
rpm...... . . . . .
. . . . . . . . .
evolutions
er
minute
A . . . . . . . . . . . . . .
. . . . . . . . . . .
mpere(s)
V. .
. . . . . . . . . . . . . . . . . . .
Vo l t ( s )
o. .
. . . . . . . . . . . . . . . . . . .
hm(s)
resistance)
kPa
kg/cm2,
si).... .
. Pressure
(usually
Positive)
mmHg(inHg)....
Pressure
(usuallY egative)
W.. . . . . . . . .
. . . .
. . . . . . .Wat t
liters
US
qt,
lmp
qt)
. . Volume
mm
( in )
. . . . . . . . . . . .
. . Length
89U0GX.006
ABBREVIATIONS
EC-AT...... .
.
. . . . . . .Electronically-control led
automatic
ransmission
ECU
.. . . . . . . . . .
. . . . . . . .ng ine
on t ro l n i t
EGI
. ... . . . . . . .
. . . . . .Electronic
asoline
injection
EIL
. . . . . . . . . . . . . . . .. . . .
E lec t r i ca l
oad
EX..
.. . Exhaust
lC...... . .
. . . . . . .
Integrated
ircuit
l G N . . . . .
. . . . . . .
. l g n i t i o n
l N . . . . . . . . . . . . . . . . . . . . . . . . . . .
n t a k e
1NT. . . . . . . .
. . . . . . . . . . . . . . . . . .
n termf tent
ISC
...... . . . . . .
ldle speed
ontrol
LH
. . . . . . . . . . . . . . . . . . . . . . . .
e f t
and
M. . . . . . . . . . . . . . . . . . . . . . . t v lo to r
MIL
. . . . . . . . . .
. . . . . . . . . . . .
\ ra l funct ion ind icator
lamp
MTX...... . . . .
Manual
ransaxle
OD
...... .
. Overdrive
OFF. . . . . . . . . .
. . . . . . . . . . . . . . .
w i tch
f f
ON. .
. . . . . . . . . . . . . . . . . . . . .
w i tch
n
PCV...... .
Posit ive rankcase
ventilatlon
PRC. . . . . . . . .
. . . . . . . . . .
Pressureregula tor
control
P/S.-..... . . . . . . . . . . . .
Power teering
P/ V . . . . . . . . . . .. . . . .
. . . .
. . . Power
indow
RH.. . . .
. . . . . . . . .
. . . . . . . .i gh t
and
SST.,...
.
Special
service ool
S T . . . . . . .. . . . . . . . . . . . . . .t a r t
S W . . . . . .
. . .
. . . . . . . . . . . .w i t c h
TDC...... . . . .
. . . . . . . . . .
Top deadcenter
03uGtx.004
ABDC.......
Atterbottom ead
center
A/C
. . . . . . . . . . . . . . . . . .
A i rcondi t ioner
ACC. . . . . . . . . .
. . . . . . . . . .
ccessor ies
ATX. .... . .
Automatic
ransaxle
ATDC
.....
After op dead center
ATF
Automatrcransmrssion
fluid
BAC...... . . .
Bypass ir control
BBDC... Before ottomdead
center
BTDC .. .. . .
. . . . . . . . .
Beforeop deadcenter
CPU.. . . . . . .
Cent ra lprocess inguni t
Gt-l0

8/20/2019 Mazda 121, Kia Pride Repair Manual Vol 1
http://slidepdf.com/reader/full/mazda-121-kia-pride-repair-manual-vol-1 14/389
CAUTION
GI
CAUTION
INSTALLATION F
MOBILETWO.WAYRADIOSYSTEM
lf a mobilewo-way
adio ystems nstalled
mproperlyr f a
high-poweredype s used,he
EGI
ystem
and othersystems
may
be affected.
When he vehicle s to be equipped
witha mobile wo-way adio,observe
he ollowlng
recaulions:
1. nstallheantenna l theJarthestointromcontrol nits.
2. nstallheantenna
eeder s aras
possible
rom
hecontrol
nitharnesses
at
east30 cm
[11.8
n]).
3. Ensurehat he antenna nd
feederare
properly
djusted.
4. Do
not nstall high-powered obile
wo-way adiosystem.
05uGlx'013
REMOVAL F
IGNITION EYON
AUTOMATIC
TRANSAXLE
MODEL
Theselector
evermustbe n P
(PARK)
o urn he
gnition ey
to the OFF
position.
f the switch eems
o be off but he
key
cannot e
removed,he switchmay
stillbe n he ACC
posi-
tion,or heselector
evermaynotbe
n P
(PARK).
hift
he
selector
ever o
P
(PARK),
nd urn he
gnitioney o the
LOCK osition.hekeyshould owbe ree or removal.
MOBILE
TWO.WAYRADIO
"'o'"*'*J
Ll lZ'""-rRoLUN,r
r / r l
FARTHESTPOINT
AT LEAST 30 cm
(11.8
n)
EGAT
CONTFOL
UNIT
ENGINE
CONTROLUNIT
R
N
D
s
L
03UGIX.OOs
Gl-11

8/20/2019 Mazda 121, Kia Pride Repair Manual Vol 1
http://slidepdf.com/reader/full/mazda-121-kia-pride-repair-manual-vol-1 15/389
GI
CAUTION
9MUGIX
O2O
VOLTMETER
GFOUNO
9MUGIX.O21
05uGtx-021
9MUGIX045
ELECTRICAL
ROUBLESHOOTING
OOLS
Test Light
The est-light,
s shown
n he
igure, ses
12Vbulb.
The
two ead
wiresshould
be connected
o
probes.
The est ight
s used
orsimple
oltage
hecks
nd
orcheck-
ing
or
short
ircuits.
Caution
.
Whenchecking
he
control
unit,
never
use a bulb
over 3,4W.
Jumper
Wire
The
umper
wire s used
or esting
y shorting
cross
witch
terminals
nd
ground
onnections.
Caution
.
Do not connect
a
umper
wire rom
he
power
source
line to a body ground;this maycause burning or
other
damage
to
harnesses
or electronic
com'
ponents.
Voltmeter
The
DC
voltmeter
s used o
measure
f circuit
oltage.
volt-
meter
witha range
of
15Vor
more s used
by
connecting
he
positive
+) probe
red
ead
wire) o
the
point
where
oltage
is to be
mi;asured
nd
the
negative
-) probe
black
ead
wire)o a body
ground.
DiagnosisConnector
Insert
he
probe
nto
heservice
ole
when onnecting
um-
per
wire o the diagnosis
onnector.
Caution
.
Do not insert
the
jumper
wire
probe
nto
the diag'
nosis connector erminal,which maydamage
he
terminal.
Ohmmeter
The
ohmmeter
sused
o
measure
he esistance
etween
wo
ooints
na circuit
nd
also
ocheck
orcontinuity
nddiagno-
sis of short
circuits.
Caution
.
Do not attempt
o
connect
he ohmmeter
o any
cir-
cuit to
which
voltage s applied; his may burn or
otherwise
damage
he
ohmmeter.
9MUGIX.O19
Gl-12

8/20/2019 Mazda 121, Kia Pride Repair Manual Vol 1
http://slidepdf.com/reader/full/mazda-121-kia-pride-repair-manual-vol-1 16/389
CAUTION
GI
9MUGIX-022
9MUGIX.O23
9MUGIX.O24
9MUGIX-025
03uGtx,011
CAUTION
WITH
ELECTRICAL
ARTS
Battery
Cable
Before
isconnecting
onnectorsr
replacing lectrical
arts,
disconnect
he negative attery
able.
connectors
Removal f connector
Never
pull
on the
wiring
nectors.
harness
when
disconnecting
on-
Connectors
an
be removed y
pressing
r
pulling
he
ock
leveras shown.
Locking
of connector
When
ocking onnectors,
ake ure
o istenor
a
click hat
will ndicate
heyare
securelyocked.
lnspection
1 When
ester
susedocheck
orcontinuityr o measure
voltage,
nserthe
ester
robe
rom hewire arnesside.
Gr-l3

8/20/2019 Mazda 121, Kia Pride Repair Manual Vol 1
http://slidepdf.com/reader/full/mazda-121-kia-pride-repair-manual-vol-1 17/389
GI
CAUTION
2. Check
he
erminals
f
waterproof
onnectors
rom
he
con-
nector
ide,
as
hey
annot
e accessed
rom he
wire
har-
ness
ide.
Caution
.
Use
ine
wire
to
prevent
damage
o the
terminal.
. Do not damage he terminal when inserting the
tester
lead.
Terminals
lnsoection
putitigntly
n
ndividual
ires
o check
hat
heyare
secured
in he erminal.
ReDlacement
f
terminals
Us6
he
appropriate
ools
o
remove
he
erminal
s
shown'
When nstailind
he erminal,
e sure
o
nsertt until
t
ocks
securery.
<Female)
lnsert thin
piece
ofmetairom he
erminal
ideof
he con-
nector,
nd
hen,
with
he
erminalockingabpressed own,
pull
he
erminal
ut
rom he
connector.
<Male>
Same
as
the
emale
YPe.
Sensors,
Switches,
and
RelaYs
Handle
ensors,
witches,
nd relays
arefully.
o not drop
themor
strike
hem
against
ther
parts.
9MUGIX.O27
9MUGIX-028
9MUGIX-O3O
Gt-l4

8/20/2019 Mazda 121, Kia Pride Repair Manual Vol 1
http://slidepdf.com/reader/full/mazda-121-kia-pride-repair-manual-vol-1 18/389
CAUTION
GI
M*m
ffifi,.".
MUGIX,O32
BR/Y
olAGtX-001
Fuse
Replacement
1 When eplacing
fuse,be sure
o replacet with
one of
specified apacity.
lf
a
fuseagain
ails
after
t has been eplaced,he circuit
probably
has a short circuitand
the wiring
should
be
checked.
2. Be sure
he negative attery
erminals disconnectede-
fore replacing
main use
80A).
3. Wheneplacing
pullout
use,
se he
use
uller
upplied
in the useboxcover.
Wiring Harness
Wiring color codes
Two-color iresare
ndicated y a
two-color
ode symbol.
The
irst ode
ndicateshebase
olorof hewireand hesec-
ond the color
of the strioe.
9MUGIX.O31
CODE
COLOR
CODE
COLOF
B
Black
o
Orange
BR
Brown
P
Pink
LJ
Green
R
Red
GY
Gray
Violet
L
Blue
White
LB
LightBlue
Y Yellow
LG
Light Green
Gl-15

8/20/2019 Mazda 121, Kia Pride Repair Manual Vol 1
http://slidepdf.com/reader/full/mazda-121-kia-pride-repair-manual-vol-1 19/389
A
PRE-DELIVERYNSPECTION
AND
SCHEDULED
AINTENANCE
SERVICES
PRE-DEL|VERYNSPECTION
.........,..........
- 2
PRE-DELIVERYNSPECTIONA81E..........
-
2
SCHEDULED
AINTENANCEERVICES.....
- 3

8/20/2019 Mazda 121, Kia Pride Repair Manual Vol 1
http://slidepdf.com/reader/full/mazda-121-kia-pride-repair-manual-vol-1 20/389
PRE.DELIVEBY
NSPECTION
PFE-DELIVERY
NSPECTION
ABLE
INSPECT nd
ADJUST,
necessary,
he olowing
lemso
Glass
€xterorbight
melal
and
paint
or damage
. Wheel
ug nuls
C Al weathelslf
s
or darnage
r detachrnenl
Operation
l bonnel
elease
nd ock
D Operalion
l tiJnk
id and ue
lid open€r
(l
equipped)
tr
Dooroperaiion nd
ahgnmenl
tr Headlghl
imlng
INSTALLhe
o owrng
arls
Wheel apsor
ngs
f
equ
PPed)
outside
mrro(s)
- Frontlap il equrppeo)
UNDER
BONNET.ENGINE
FF
Headisht
leaner
il
equipped)
Horn,wipers
nd washer
tr Antenna
i
equipped)
tr cigarene
ighter
ndclock
if
equLpp€d)
tr Heater
and defroster
al
variousmode
seleclions
D Canvas
op
(il
equipped)
CHECK
he olow
ng tems:
Presence
l spare
use
upholslery
nd nterlor
inish
CHECK
nd
ADJUST,l necessary,
he ollowing
ems
Operallon
nd
it ol windows
I Pedal
eighl nd
ree
play
ol
blakeand
clutch
pedal
I Parklng
rake
UNDER ONNET-ENGINEUNNING T
OPEFATTNG
EMPEBATUBE
ROAD
TEST
CHECK
he
lollowing lems:
C Operaton
ol
idle_up )€tem or
air cond
toner or
power
seer'
ing
(it
equ
pped)
D
Aulornal transaxle
luid level
I lnitial
gnton
tmrng
- ldle
speed
Operallon
l ihroltle
sensor
Operaton
of dashpot
CHECKhe ollowingems.
u nders
e ue coolarl
nd
hydrallic
ines itlings' onnec'
tons and
components
or
eaks
Tiresor clts
or bruises
D Sleeing
nkage,uspension,
xhausl
yslem nd
alrunder
sde
hardware
or looseness
r oamage
INSPECTand
ADJUST.
r necessary.he
lolowlng
items o
Fuel,coolantand
hydraulc
ines, ll ngs,connecnons
nd
components
or leaks
Englneol evel
Brakemastercylnder
lluid evels
Clutch
mastercyLnder
luid
levels
if
equrpped)
-
Windshied
washer eservo
lluid evel
Radiator
oolanl
eveland spec
ic
graviiy
tr Tlghtness i walerhose clamps
Tghhessol baliery
elminals,
ectro
,'le
eveland specillc
graviry
I l lanual l ransaxe
l
eve
Dflv€ belt(s)
enson
tr
Acceeratorcable
and
linkage
or
iree movemeni
tl
Headlght ceaner
and
lluld level
if
equipped)
CLEAN
he spark
plugs
INSTALL he
lo lowing
parls
C Fubber
slopper or
nside ear
vew mifror
(ii
equ
pped)
tr Fuse or accessones
CHECK
he operation
oi lhe
lolowing tems
- Seatconlrols
slid
ng and
reclning)and head rest
I Seal belts
I lgntion
switchand steer
ng lock
Powerwindow
it
equipp€d)
Door ocks ncluding
hid
prool
door
locks
nhibitor wllch
ATX
only)
n A l l
g lLs Tluo,ng
war119ald
.nd
Lalor
ghts
lgfiton key
rem nder buzzer
f
equlpped)
CHECK
he ollowing
nrs:
Brake peral
n
Clulch
perauon
Steering
ontro
tr op€mtion l meters ndgauges
tr Squeaks,
altes
or unusua
noses
Engine
eneral
eriormance
Emerge^cy
cking
eiiaclors
AFTER
ROAD
TEST
REMOVE
the
seat and
lloor mat
proled ve
covers
CHECK
or the
necessary
wner
nformallon
materias
ools
and spare
ire
n vehicle
A-2

8/20/2019 Mazda 121, Kia Pride Repair Manual Vol 1
http://slidepdf.com/reader/full/mazda-121-kia-pride-repair-manual-vol-1 21/389
SCHEDULED
MAINTENANCE
ERVICES
SCHEDULED
AINTENANCE
ERVICES
-\.\_{e :Inc€
inrerval
llaintenance
item------\
ilumber ot
months or km. whlchever
comcs lla3l
llonths
1 2
18 24 30 42
48
54
60 6€
x 1000
km t . 5 1 5 22.5 30
{5 60
67.5 42.5 so
ENGINE
Enoine
alve learance
I
Ex. manifold
bolls and nuls
T
T
T
T
Enoine
iminq bell"
Replaco very105,000
kilometels
Dfive belts'"
I
Enoine il'
R R
R B R
B
B
R R
R
Oil ille'"
R
R R
B R
R
COOLING YSTEM
Cooiingsystem
I
Enqine oolanl
With
eservon)
R
F
R
FUELSYSTEM
Arrcleaner lemsnt"
R
R
I R
R
B
R
I
IGNITIONSYSTEM
Initial qnition iminq
I
I
Spark
lugs
I
EVAPOFATIVE
MISSION ONTROL YSTET'
EXHAUST MISSION
ONTROL YSTEM
oashpot
I
I
ELECTRICAL
YSTEM
level and sp€crllc
qravfy
CHASSIS ND
BODY
Clulch
eda
I
Brake llnes.
hoses
and
connections
I
Brakel'rid"
B I
I
Power reenng
lud and ines
ll
oquippeo
Sleerng oporalionand
gear
housing
Steerinainkaoes
ack
qude
and
ie rodends
I R
I
Automatic
ransaxle luid
evel
I
I
Front uspensionall
oir(s
Fronl
wheel bearlng
greases
R
Driveshaft
dust boots
I
8olls,
nuls
on
chassis and body
1
T T
T
T T
T
Exhaugsystemheal shields
I
A-3

8/20/2019 Mazda 121, Kia Pride Repair Manual Vol 1
http://slidepdf.com/reader/full/mazda-121-kia-pride-repair-manual-vol-1 22/389
SCHEDULED
MAINTENANCE
ERVICES
Chart
symbols:
|:
lsoecl :
V|sua|
xam|nalon
I
iunclona|
measurement
f system's
peration
performance)
A:
,ljust
R:
aedace
or
change
T:
Tighten
L: Lubricate
Note:
.
f -the
resuh
ot
visual
examination
l
tunctlonal
measurement
l
a system's
operation
per-
lolmance),
correct,
clgan
or leplace
as required'
Remarks:
.
After 0,OOO
mor
72 months,
onllnue
o ollow
hedescribed
cheduled
aintenance
tems
nd
nter-
vals
periodically.
.
n"lJ-- maite'o
tems
n this
maintenance
hart'
please
ay
attention
o the
ollowing
ollts
- -
ii'
iiin"
".tri"i"
i" op"rated
nder
hsiollowing
onditions'
t s suggested
hat
heengine
ilandoil
ilter
OeCnanged
moieoften
han
at usual
ecommended
ntervals'
a) Driving
n dusly
conditions
Oi extenaeOeriods f idlingor lowspeedoperation'
ij
Oriuinglor'"
prolonged
lrrod n cold emoerature
r
driving
onlyshort
distance
egularly'
.2:
ieolacerient
of he
timing
belt
s
Auned;t;very
1o5,ooo
m'
Failure
o
replace
iming
beltmay
result
n damage
o
the engine.
's,
ir-fr;u.hi"l
i;;p;rated
in-very
usty
r
sandy reas,
nspect
nd'
f necessary'
eplace
more
often
thanat
usual
ecommended
ntervals.
'a,
AJlust
iinip""t
alternator
nd
waGi
pump
drivebelt'
and
power teering
ndairconditioner
rive
beft, f equipped.
'5:
Replace
very
wo
Years
iiiti"i
ta" o6en
ontinuous
ard
dflving,
mountain
rivrng,
r
it the brakes
re
used
extensively
r
the
vehicle
s operated
n
extremely
uriid
climates,
he
brake
luidshould
be changed
nnually'
EmlsgionConiroland RelaledSystems:
il;;;;"
t;Jl;
"i"temJ"*
uitdrrv
mpottanttothe
roper
peration
tthe
emission
ontroland
elated
svste-ms,
s
wellas
tor etflcient
ngine
perations'
ift;;;'g[,"r;;;;JtnJ
dt se"rvicing
eraed
o hese
vstems
e
done
v
vour
uthorized
"oi,?"*fl.
A-4

8/20/2019 Mazda 121, Kia Pride Repair Manual Vol 1
http://slidepdf.com/reader/full/mazda-121-kia-pride-repair-manual-vol-1 23/389
SCHEDULED
MAINTENANCE
ERVICES
ADJUSTINGCFEW
LOCKNUT
ADJUSTIIENT
OF
ENGINE ALVE
CLEARANCE
Note
.
When
valveclearance
nspection
nd cylindefiead
r
bolts
retightening service
are ai
the
same
nterval,
E
tlEhten
he cylinder
head bolts
tlrst.
I
1. Warmup
the engine
o normal perating
emperature.
2. Withhe
piston
fthe
No.1 ylinderat
DC fcompression,
adjust he
valve learances
llustrated.
valve clearance
(at
valve)
lntake
: 0.30mm
0.012
n)
Exhaust:
0.30mm
0.012
n)
3.
Turn he crankshaft
ne
ull urnso that he
piston
f the
No.4cylinder
s at TDCol compression,
ndadjusl
heclear-
ances
f the
remainingalves.
TIGHTENING
NTAKE
MANIFOLD
OLTSAND NUTS
Tightening
orque:
19-25
N.m
1,9-2.6
m-kg, 14-19
ttlb)
TIGHTENING
XHAUST
MANIFOLD
UTS
Tightening
orque:
16-23
Nm
(1.6-2.3
m-kg, 12-17
ftlb)
REPLACEMENT
IMINGBELT
Refero Section
ot the
Workshop
anualor he replace-
ment
procedure
f the iming
belt.
A-5

8/20/2019 Mazda 121, Kia Pride Repair Manual Vol 1
http://slidepdf.com/reader/full/mazda-121-kia-pride-repair-manual-vol-1 24/389
SCHEDULED
MAINTENANCE
ERVICES
INSPECTION
ND
ADJUSTI'ENT
OF
DRIVEBELTS
aAlternalot
nd
water
pump
drive
bell'
Power
steering
iump
and
alr condilionel
compressor
drive
belt)
i cfieck he belt
or cracks
r
any other
damage.
2.
Adiustor
rePlace,
l
necessary.
3.
Ch;ckthe
drive
belt
ension
ith
humb
pressuref about
98 N (10 kg, 22 lb) at eacharrowpoints
Belt
detlection
Altemator
drive
belt
New
belt
: 5'5-7.0mm
(0.21-0.27
in)
Used
bell:
6.0-7.5mm
(0.23-0'29 in)
Air conditioner
drive
belt
(if
eqipped)
New bell
: 8-9mm
(0.31-0.35 in)
Used
belt:
9-l0mm
(0.35-0.39
in)
Power
steering
oil
pumP
drive
belt
(if
equipped)
Newbelt:
8-9mm
(0.31-0'35 n)
Used
belt:
9-1omm
(0.35-0.39
in)
Air condltionel
compressor
and
powel
steedng
oil
pump
drive
belt
(it
equiPPed)
-
New belt : 8-9mm
(0'31-0.35
in)
Used
belt: 9-10mm
(0.35-0.39
in)
ALTEFINATOR
P/S
COMPFESSOFI
)X
\euuevi
,a'z \
j
\\
CFANKSHAFT/
\
P U T L E Y 1 " , ^ |
\ -zcoMPREssoF
A-6

8/20/2019 Mazda 121, Kia Pride Repair Manual Vol 1
http://slidepdf.com/reader/full/mazda-121-kia-pride-repair-manual-vol-1 25/389
SCHEDULED
MAINTENANCEERVICES
Recommended AE
viscosily numbers
Typicalspecitication:API serviceSD, SE or SF
REPLACEMENTF ENGINEOIL
'l.
Warm p heengine.
2. Drain
he oilby removinghe drain
plug
and
oilfiller ap.
Warning
.
Walt a
while fo. the engine s too hot,
And be caretul o drain.
3. Reinstallhe drain
plug
securely.
Tightening orque:
29-41
Nm
(3.0-4.2
m-kg,
22-30 ft-lb)
4. Refillthengine ith hespecified
iltothe
F"
levelmarked
on
he evel
auge.
5. Refithe oil
illercap securely.
Oil
pan
capacity:3.0
iters
(3.2
US
qt,
2.6
lmp
qt)
REPLACEMENTF ENGINEOIL
FILTER
1. Removeheoil ilterwith he SST a
suitable rench.
2. lJse
a clean
ag o wipeoff he
mounting udace n the
engine.
3.
Apply
small
mount f clean ngine
ilio he ubber eal
ol the new
ilter.
4. Installhe oil
ilter
and
ighten t by handuntil he
rubber
sealcontactshe base.
5. Tightenhe llter1 and 1/6 urns
witha filterwrench.
6. Starthe engine nd check
or leaks.
7. Check he oil evelandadd oil
f necessary.
Oil filler capaclty
83:
0.17
iter
0.18
US
ql,
0.15lmp
qt)
(.c)
eF)
-30 -m -10
0 10
20 30 40 50
Engine
il
5W.30
v
30
'
5w-rd->
:
10w-30
A-7

8/20/2019 Mazda 121, Kia Pride Repair Manual Vol 1
http://slidepdf.com/reader/full/mazda-121-kia-pride-repair-manual-vol-1 26/389
SCHEDULED
AINTENANCE
ERVICES
INSPECTION
F
COOLING
YSTEiI
Warning
.
Nevei
remove
he
radialorcap
while he engine
s
hot.
.
Wrao
a thick cloth
around
he cap
when
removing
t.
. Whdnremovinghe radiatorcap, loosen t slowly
to the
fitst stop
until
he
pressure n the
radialor
s
released.
nd
hen
remove
t.
Coolant
Level
(Engine old)
1.Verifv
hat he
coolanl
evel
s near
he adiator
llel
neck
2. Verilv hat
he coolant
evel n
the coolant
eserviors
be'
tween
he
FULLand
LOW
marks
3. Add coolant
f necessary.
CoolantOuallty
1.Verffyhat
heie
s no buildup
f rust
or scale
round
he
radiator ao or radiatorillerneck
2.
Verily hat coolant
s free of
oi
Replace
he coolant
f
necessarv,
Coolant
Leakage
1.
Connect
radiator
ester
commercially
vailable)
nd he
SST
o the
radiator
illerneck.
2.
Apply 03
kPa
1.05
kg/cmz.
5
psi)
pressure
o the
system.
3. Verify
hat he
pressures held.
It not,check or coolanieakage
Coolanl
Protection
Caution
.
Do
not use
alcohol-
or methanol-based
oolant'
.
Useonly
soft
(deminerallzed)
ater
n
the coolant
mixlure.
1.
Measurehe
coolant
emperature
nd
specific
ravitywith
a
thermometer
nd
a hydrometer'
2. Determine
he
coolant
rotection
y
referring
o he
graph
lrthecoolant
rotectaon
s
not
proper' dd
water rcoolant
Antitreeze olution
mixture
percentage
?_--
-z'-
.- l,'1,/
'
COOLANT
EMPEFATUFE
C
(.F)
Gravily
ai
20"c
(68"F)
coolant
Above
-16"C
(3oF) 65
35
1.054
Above
26oC
(-1soF) 55
Abovea0'C (-40"D 55 1.078
A-8

8/20/2019 Mazda 121, Kia Pride Repair Manual Vol 1
http://slidepdf.com/reader/full/mazda-121-kia-pride-repair-manual-vol-1 27/389
SCHEDULED
MAINTENANCE
ERVICES
THEDFAIN
HOSE
REPLACEi'ENT F ENGINE
OOLANT
Warning
.
Never pen he radiator apwhile
he
engine
s hot.
.
Wrapa
thick cloth around he cap when oosening.
.
Use caution
when
draining
hqt coolanl.
Caution
.
Do nol
use alcghol.or methanol-basedoolant.
.
Useonly
soft
(demineralized)
ater n the coolanl
mixture.
'1.
Remove
he radiator apand oosenhe drain
plug.
2. Drain he coolant
nto
a suitable
ontarner.
3. Flushhecooling ystem
ithwater ntil ll races f color
are
gone;
hen et he system
raincompletely.
4. Installhe drain
plug.
5.
Fillwith he
proper
mount nd
mixture f
ethylene
lycol
based oolant y referringo the ableabove.
Coolanlcapacity
MTX:5.0 liters
(5.3
US
qt,
4.4 lmp
qt)
ATX: 6.0 liters
(6.3
US
qt,
5.3
lmp
qt)
6.
Run heenginewith he adiator ap
emoved ntilthe p-
per
radiator ose s hot.
7.With he engine
dling, dd coolanto the radiator
ntil
t
reacheshe bottom l
the illerneck.
8.
Installhe radialor ap.
A-9

8/20/2019 Mazda 121, Kia Pride Repair Manual Vol 1
http://slidepdf.com/reader/full/mazda-121-kia-pride-repair-manual-vol-1 28/389
SCHEDULED
MAINTENANCE
ERVICES
ADJUSTMENT
F
IDLE SPEED
Preparalion
'1.
Warmup the
engine
o normal
peratlng
emperaure.
2. Verity
hat he
wat rod
e)dends
utward
ully
and he
dle
cam separates
rom
he roller'
3. Turnall electric
oadsOFF.
. Blower an
.
Headlight
.
Rear
Window
Delroster
4. Makesure
hat
he engine
peed
does
notchange
wnen
disconnecting
he
alr btpass
solenoid
alve
@
connector.
Note
.
lf lhe engine
Peed ecleases.
he engine
s still un-
der the
warm-up
condition'
5.
ftheelectfic
ooling
an soperating,
ait illthefan
lops
6.
Verifyhat he
engine
s running
t
dle n
good
condition-
7. Connecthe SST o the diagnosisonnector'
8. Connect
tachometer
o thediagnosis
onnector
G-
ter-
minal
as shown.
L Selswitch
6)
to
Position
.
10 SetTESTSW
10SELF-TEST.
Note
.
lf the SST
s
not used,
ump
across
he TEN
elmi'
nal and
the GND
telminal
ot
the diagnosis
con'
nector.
ldle Speed
1. Check
he
idle speed
with a
tachometer.
ldle speed:
MTX
Neutral) 750
T
ATX
P
range)
,100
't
rpm
rpm
2.
f notwithinhe
specifacalion,
djust
he dle
by urning
he
throttle
djusting
crew
OAS).
t-\*l
A-10

8/20/2019 Mazda 121, Kia Pride Repair Manual Vol 1
http://slidepdf.com/reader/full/mazda-121-kia-pride-repair-manual-vol-1 29/389
SCHEDULEDMAINTENANCEERVICES
REPLACEMENTF AIF CLEANEF LEMENT
Visuallyheckthe ircleaner lementforxcessive
irt,dam,
age or oil,replacef necessary.
REPLACEMENTF
FUEL
FILTER
Warning
.
Keepsparksand
open
lamesaway rom
lhe tuel
area.
.
After
replacing he
tuel
filter,
check hat the filler
iointsare nol leaking.
To reolacehe uel ilter,
roceed
s ollows:
1.
Disconnect
he uelhoses.
2.
Removehe uel i/ ter irh he
brackel
3. lnstall new
ilter n
the
reverse
rderol removal.
Note
.
When nstalling he fillter make
sure
he hoses
are
pushed
gn
as tal
as
possiblg.
Secure he hoses with
clips.
INSPECTION FFUELLINESANOHOSES
Checkhe uel ine
ittings,
onnectionsndcomponentsor
|eaKs,
There hould e nowetness r stalned reashatmioht ndi-
cate
eaks-
Replace ny detective
oses
r clips.
A-1
1

8/20/2019 Mazda 121, Kia Pride Repair Manual Vol 1
http://slidepdf.com/reader/full/mazda-121-kia-pride-repair-manual-vol-1 30/389
SCHEDULED
MAINTENANCE
ERVICES
GND
/1.,"_(V
.:TS
r ,<--
ATUUSTMENT
F
IGNITION
IMING
Preparation
1. Warmup
the engine
o normal
perating
emperature.
2. Verily hat
hewax
odextends utward
ully
and
he dle
cam
separates
rom he
roller.
3. Turnall
electric
oadsOFF.
. Blower an
.
Headlight
.
RearWindow
Defroster
4. lvlake ure hat
he engine
peeddoes
notchange
when
disconnecting
heairbypass
olenoid
alve
@
connector'
Note
.
I the engine
peed
decreases,
he engine
s still u]}
der
the
warm-upcondition.
5. lf heelectric
ooling
an soperating,
aittillthe
anstops.
6. Verifyhal
he engine
s running
t dle
n
good
condition.
7.Connecthe SST o the diagnosisonnector.
8. Connect
timing
ight.
9. Connect
tachometer
o
hediagnosis
onnectorG-
ter'
minalas
shown.
10.Setswitch
@
to
Position
.
11.SetTEST W
o SELF
EST.
Note
.
lf the
SST s
not used,
ump
across
he TEN ermi'
nal and
the GND
erminal
gl
the
diagnosiscon'
nector.
lgnition Timing
Inspeclion Adiustment
1.
Check
hat he
dlespeed
s within
he specification.
ldle speed:
MTX
Neutral) ?50
:l rPm
ATX
(P
range)1,100
'
rpm
2. Check
he gnjtion
iming
witha timing
ight
lgnition
timing:
BTDC16
+
|
"
3.
lf the gnition
iming
s notwithinhe
specification,
oosen
the
distributor
ockbolts
and urn he
distributor
o make
the adiustment-
4. Tiqhten
he distributor
ockbolts o
the speciliedorque.
Tiohteninq
oloue:
ie-zsI{m
(i.6-2.3
m-kg,12-16
ft lb)
5.
Puta sealon
the distributor
ock bolt
ACHOMETEF
. - -
|N
re
G-
GNO
_ - - \
.?-.:f-
\r:1
\
- = \ , ( ' _ _ ' ,
A-12

8/20/2019 Mazda 121, Kia Pride Repair Manual Vol 1
http://slidepdf.com/reader/full/mazda-121-kia-pride-repair-manual-vol-1 31/389
SCHEDULED
MAINTENANCEEFVICES
USECONNECTOR
INSPECTION F SPARK
PLUGS
'1.
Checkhe
plugs
or burned r eroded lectrodes,ouling
or cracked
orcelain.
2. lvleasureheelectrode
ap.
f necessary,djusthe
gap
o
specificationsr replacehe spark
plugs.
Pluggap:1.0-l.1mm (0.039-0.043n)
(0.75-0.85mm
10.029-0.033
nl)
-Bl
Carburetor
Cauiion
.
when nslalling new
plug
or reinstalling
ld
plugs,
use a
small
amount
of anti-seizecgmDound
or
Bolybdenum-bas€dhread lubricar on the filst few
threads.
.
Do not
pull
the
spark
plug
cables
lo remove
them,
pull
on the spark
plug
boots.
INSPECTION F THROTTLE ENSOR
1.Warm p the engineo normal peralingemperature.
2. Verifyhat hewax odexpands utwardullyand hecam
separates
rom he roller.
3. Stop he
engine
nd
urn he gnition witch
ON.
4. Connectthe
STS
Engine
Signal
Monilor
and Adapter
Harness)
o the ECU
as shown.
5. Set he SST(EnglneSignelMonitor) o terminal M.
6.
Rotate
he hrottleinkby
handand verify
hat he voltage
is within he
specification.
Speciticalion
7. It nol
as
specilied, 4ust the throttlesensor.
ENGINE B1 B3
NGK BPBsES, PBoES BKRsE.11,KN6E.]
NIPPONDENSO
W16EXF.U, 2OEXR.UK16PR-U11,2OPR-IJ11
ECUTerminal
Throtle valvecondilion
2M 0.41-062V
A-13

8/20/2019 Mazda 121, Kia Pride Repair Manual Vol 1
http://slidepdf.com/reader/full/mazda-121-kia-pride-repair-manual-vol-1 32/389
SCHEDULED
'AINTENANCE
ERVICES
INSPECTION
F DASHPOT
Inapection
1. ODenhe hrottle
alve
ully.Push he
dashpot od witha
fingerandverity
hat t
goes
nto he dashpot
lowly.
2. Releasehe rodand
check hat
t comes
out
quickly
3.
Replacehe dashpot
f notas specified.
4. Warmup the engine
nd run
t
at
idle.
5. Connect
tachometer
o the diagnosis
onnector
G-
terminal nd
ncrease ngine
peed.
6. Slowly ecrease
he engine
peedand
check hat he
e-
ver ouches
he dashpot
od at the specified
peed.
Specitication: ,500+ 100 rpm
7. f not
as
specilied,
oosenhe ocknut
nd urn he
dashpot
to adjust.
ADJUSTING
CFEW
A-14

8/20/2019 Mazda 121, Kia Pride Repair Manual Vol 1
http://slidepdf.com/reader/full/mazda-121-kia-pride-repair-manual-vol-1 33/389
SCHEDULED
AINTENANCE ERVICES
INSPECTION F EVAPORATIVE
YSTEM
1 Warm p heengineo normal peratang
emperaturend
.un t at idle.
2. Disconneclhe vacuum
ose rom he solenoid alveas
shownn he igure, ndverity
hatnovacuums eltatthe
solenoid
alve.
3. f notas specified,heck he solenoidalve.
INSPECTION F
BATTERY
Check he electrolyte
evel.
The evelshoulde betweenhe
upper nd owerines.l the
level s low.add distilled ater.
Check he specific
ravity.
Speciticgravity:1.27
1.29
INSPECTION F ALL ELECTRICAL
YSTEM
Check
he all electricalystems.
lf he mulfuncton
sfound,eiero Section
or wiring
iagrams
tor reparr.
A-15

8/20/2019 Mazda 121, Kia Pride Repair Manual Vol 1
http://slidepdf.com/reader/full/mazda-121-kia-pride-repair-manual-vol-1 34/389
SCHEDULED
ATNTENANCE
ERVICES
INSPECTION
F CLUTCH
PEDAL
'1.
Check
he
pedal
or
smooth peration
2. Checkthe
edal
eight.
f necessary'
djudthe
edalheight
by
oosening
ocknut
@
and
urning
heclutch
wltch
q).
retighlen
he ocknut
4).
3.
Ch;ck
he
pedal
ree
play.
f
necessary,
diust
he
pedal
freeplay.Refer o H-4.
Pedal
heiqht:
196-207mm
(7.72-8.15 in)
Pedal
reC
play:
0.7-3.3mm
(0.03-0.13 In)
Diaenqagement
eight:
4lmm
(1.61
n)
mlnimum
With carPet)
INSPECTION
F
BFAKE
LINES,
HOSES
AND
CONNECTIONS
Check
he
points
elow,
eplace
arts
f
necessary.
1. Crackind,
amage
r
corrosion
l
the brake
hose
2.
Damaoe
o the brake
hose hreads.
3. Scars.lracks
r swelling
f the
lexible ose.
4. All ines or luid eakage.
INSPECTION
F
BRAKE
FLUID
Checklluid
evel
n reservoir.
he
evelshould
ebetween
he
lvax.
and Min.
ineson
the
reservoir.
lf the luid
evel
s extremelv
ow,
check
he brake
ystem
or
€aKs.
A-16

8/20/2019 Mazda 121, Kia Pride Repair Manual Vol 1
http://slidepdf.com/reader/full/mazda-121-kia-pride-repair-manual-vol-1 35/389
SCHEDULED
AINTENANCE
ERVICES
REPLACEMENT
F BRAKE
FLUID
AIR
BLEEDING
1. Remove
he brake
luidkom he
reservoiry using
suc-
lon
pump.
2. Fill he
reservoir
ithnewbrake
luid.
Fluidapecllication:FMVSS116: DOT-3
SAE:J1703
3. Attach
vinyltubeto
hebleeder
crew nd
place
heoth-
er end
ol the
vinyl ube n a containel.
4. Pumpout
he old brake
luidby loosening
ach
bleeder
screw
one
by one)and
pumping
he brake
pedal.
5. Bleed
ir as described
elow.
Cautlon
.
The tluid
in the reservolr
must be
maintalnedal
the
Z4 l€velor higherdurlngair bleeding.
.
Be caretul
nol to spill
brake lluid onto
Painted
surtaces.
'1.
Jack
up the
vehicle nd
supportt withsalety
tands
2.
Removehe
bleeder ap
and attach
vinylhose o the
bleeder
lug.
3. Place
he otherend
of the
vinyl ube n a container.
4. Slowly
ump
he brake
pedal
severalimes.
5.
Whilethe
rake
edal
s
pressed,
oosenthe leeder
crew
to let luidand a'rescape.
6. Repeat
teps and
5 until here
re no air bubbles
n he
fluid.
7. Check or
cotrectbrake
operation.
8.
Checko
be sure hat here
s no luid
eakage. esure
o
clean
awayany
spilled
luidwith ags.
9. After
bleedinghe
air,add brake
luid o he
reservoirp
to the
sDeciiied
evel.
INSPECTION
F
PARKING
RAKE
1. Pullthe
brake
everwith98
N
(10
kg, 22
b) ol forceand
measure
he ever
stroke.
2. f necessary,djusthe ever troke y
urninghe
adjust-
Ingnut.
Stroke: 6-8
noiches
INSPECTION
F POWER
RAKEUNIT
AND
HOSES
1. Check
he vacuum
ose, onnectors
nd
check-valve
or
cracks,
hafing, eterioration
tc.
2.
With he engine
topped, epress
he
pedal
a few imes
3.
With he
pedal
depressed,tart
he engine.
4. lf,
mmediatelyfter
heengine tarts,
he
pedal
moves own
slightly,
he unit s
good.
@ @
w w
A-17

8/20/2019 Mazda 121, Kia Pride Repair Manual Vol 1
http://slidepdf.com/reader/full/mazda-121-kia-pride-repair-manual-vol-1 36/389
SCHEDULED
'AINTENANCE
SERVICES
INSPECTION
F
DISC
BRAKE
Check
he ollowing
iscbrake
omponents.
1. Check
he caliper
peration
nd
nspect
or eaks
2. Check
he
Pads
ot wear.
3 Check he condition
nd
hickness
l the disc
plate
Minimum:BrakePad2.0mm(0.08 n)
Dlsc
plate
thicknesa
l6.0mm
(0.63
n) ATX
models
lomm
(0.39 n) MTX
mod€ls
INSPECTION
F
DRUMBBAKE
'1
.
Check
he
wheel ylinder
peration
nd
nspector
eaks.
2. Check
he
in'ngs
or wearor damage
3. Checkhe
condition
f he
nner urface
nd he
nner l-
ameter f
the drum.
Limli:
Brake1in1n9...........
l.omm
(0.04
n)
lnner
dlamater
f drum
..'.,....
81.smm
7.15
n)
INSPECTION
FSTEERING
ND
FRONTSUSPENSION
1. Check he
steering
heel
ree
play
Free
play:
0-30mm
(0-1.18 in)
2. Checkthe
teering
or
proper
peration
nd
or ooseness
of the steering ouslng.
3.
Check he
steering
ear
housing
or lluid
leakageor
seepage.
4. Check or exoessive
lay
on he
ie rodends
and rack
guide
5.
Check or damage
l the dust
boots.
6.
Checklor
ooseness
r
grease
eakage
fthetie od
ends
INSPECTION
F
POWER TEERING
LUID
AND LINES
(if
equipped)
i- Check he
fluidhoses,
inesand
connections
or cracks,
chaf
ng,deterioration,
tc.
2. Check
he
luid evelon
he reservolr.
The evel hould
e between
he
"F"
and
"L"
level
Add
fluid f necessary.
Fluld soecificalion:
ATF
Dexronoll
or M-m
A-18

8/20/2019 Mazda 121, Kia Pride Repair Manual Vol 1
http://slidepdf.com/reader/full/mazda-121-kia-pride-repair-manual-vol-1 37/389
SCHEDULED
MAINTENANCE
ERVICES
HOT
BANGE
REPLACEi'ENT
F MANUAL
RANSAXLE
IL
1.
Visually heck
he manual
ransaxle
or
oil
eakage.
lf
leakage
s
found, heck
or he cause,
nd repair.
2.
Removehe
speedometer
ableand driven
gear.
3.
Removehe drain
plug
and
drain he oil.
4. Reinstall
he drain
plug
securely.
Tlghtening
orque:
24-35
Nm
(2.4-3.6
m-kg,
17-26 ftJb)
5.
Fillwith
hespecifiedil
rom hespeedometer
riven
ear
hoie o the
F markon he
speedometer
riven
ear.
Specilledoil
Grade:
API service
GL-4
Viscoslly:
All-season
Dexron@tr l
M2C33F
Above
-l8cc
(0"F)
SAE
75W'80
Capacity:
2.5
litets
(2.64
US
qt,
2.2
lmp
qt)
INSPECTION
FAUTOMATIC
MNSAXLE
FLUIDLEVEL
Caulion
.
Place he
vehlcleon
a flat,
level surtace.
1
Apply he
parking
rake
nd
position
heel hocks
ecurely
lo preventhevehicleromrolling.
2.
Warm-uphe
engineuntil
he
ATF .eaches 0-70oC
(140-rs8oq.
3. While
epressing
he brake
pedal,
hift he
selectorever
to each
ange
P-L)
nd eave
t a iew seconds
n each
range.
4. Shiftback
o
P.
Nole
.
Only use
the COOL
(20oC) range as a
rough
tetetence.
5.
Ensurehatthe
ATF evel
s n he
HOT
65oC)
ange. dd
ATF o soecffication,
f necessary.
ATF ype:
oexron@tr r
M-Itr
Capacity:
6.3
literc
(6.7
US
qt,
5'5 lmp
qt)
BEPLACEMENT
F
FRONTWHEEL
EARING
REASES
Completely
ill heshaded rea
shown
n he igure
with ithi'
um
grease.
Note
.
Reler
to
page
M-8 for
disassembly
assembly
procedure.
A-19

8/20/2019 Mazda 121, Kia Pride Repair Manual Vol 1
http://slidepdf.com/reader/full/mazda-121-kia-pride-repair-manual-vol-1 38/389
SCHEDULED
MAINTENANCE
ERVICES
INSPECTION F
DRIVESHAFT
DUSTBOOTS
Check
he dustboot
on he drive
shaft or cracks, amage,
grease
eakage, nd
a loosebootband.
TIGHTENING F
BOLTSANDNUTS
ON CHASSIS ND
BODY
'1.
Tighten ll seat
mounting olts.
2. Retightenny
oose uts nd
bofts n hechassisand
ody
to the specified
orque.
Refer
o Section
D.)
TNSPECTIONF
EXHAUST YSTEM
HEATSHIELD
Check
heclearance
etweenhe
nsulator nd bodyandalso
between
he nsulator
nd he exhaust
ystem.
A-20

8/20/2019 Mazda 121, Kia Pride Repair Manual Vol 1
http://slidepdf.com/reader/full/mazda-121-kia-pride-repair-manual-vol-1 39/389
tNDEX. . . . . . . . . . . . . , . . . . .
ourLrNE.. . . . . . . . . . . . . .
SPECTFTCATIONS
...
TROUBLESHOOTINGUIDE..,........,
ENGINE UNE-UP ROCEDURE.....,
Pt rFPAHATI . ) I \ I
ENGTNE
r1. . . . . - . . . . .
ENGINE OOLANT
VALVECLEARANCE
IGNITION
IIVIING,DLESPEED.....
coMPRESStON......
TNSPECTTON
.........
ON.VEHICLEAINTENANCE............
PREPARATION
T||VltNGE1T ........
CYLINDEH
EADGASKET.....,.......
FRON'T ILSEAL....
t rFAA AI I qFAI
REMOVAL............
ENGINE TANOMOUNTING.............
PREPARATION
DrsAssEMBLY.......
PREPARAIION......
AUX|LIARYARTS........................
T IMING E1T. . . . . . . . .
cYLtNDER
EAD. . . . . . . . . . . . . . . . . . . . . . - . - .
CYLINDER
LOCK
(EXTERNALARTS).....................
CYLINDER
LOCK
{tNTERNALARTS)......................
tNSPECT|ONREPA|R.....................
-48
pREpARATtON
.....,...................,..-48
cYLtNDER
EAD..........................-48
VALVE
VIECHANtSM....................
-49
cAt\,4sHAFT..................................
-52
cYLtNDEB1OCK........................-54
PISTON,ISTON ING, ND
PtsToN
PrN................................-56
coNNECT|NG
OD.......................-57
CRANKSHAFT.............................
-s8
BEARlNG.........-.-.........................
-58
TTMtNGE1T......,........................
-59
TENSTONER,
DLER.......................-sg
TENSTONEBPRrNG.....................
-sg
pu11EY.................-..-..-...............
-59
ASSEI'BLY.....................................
-60
pREPARATTON
.........,..................
-60
CYLINDER
LOCK
flNTERNALARTS)......................-61
CYLINDEHLOCK
(EXTERNAL
ARTS)........-............-67
cYLtNDER
EAD..........................-72
TIMINGE1T. . . . , . . . . . . . . . . . . . . . . . . . . . . . . . .
-76
AUXtLtARYARTS........................
-79
ENGINE TAND
DISMOUNTING........-82
pRocEDURE
..............................
-42
rNST4LLAT|ON...............................
-84
pRocEDURE...............................
-84
01a08x.001
ENGINE
B - 2
B - 3
B - 3
B - 3
B - 5
B - 5
B - 5
B - 5
B - 5
B - 7
B - 8
B-10
9-10
B-11
B- l1
B-12
B-17
B-21
B-23
8-26
8-26
B-33
B-33
B-34
B-36
B-36
a-37
B-38
B-40
B'42
B-45

8/20/2019 Mazda 121, Kia Pride Repair Manual Vol 1
http://slidepdf.com/reader/full/mazda-121-kia-pride-repair-manual-vol-1 40/389
INDEX
INDEX
INTAKE
MANIFOLO
19-25
rktr
(1,$-2,6
n-*t,
la-19ll-rb)
lN: 0.3omm
0.012
n)
E* 0.30mm
0.012
n)
INSPECTION
ADJUSTMENT
ENGINE @OIAMI,
SEFIVICE
SECTION
E
ENGINE IL
INSPECTION
IEPLACEMENT,
SECTION
EXHAUSTMANIFOLD
rr-23 l&n
{r.9-2.3
f-*9,
DEFLECTION
AT
{98
N, 10 kg, 22 lb)
MPRESSION NSPECTION
AGE
B-12
6.0-7.5
{0.23-0.29}
.0-7-0
(o.1
1412
14.4,
O4l30O
1.Timing
elt
Removal
Insta||ation..................
age
B-12
2. Cylinder
ead
gasket
Bep|acement. . . . . . . . . . . . . . . . . . . . . . . . . . . . .age -1
3. Frontoil seal
Replacement . . . . . . . . . . . . . . - . . . . . . . . . . . . . . .
age
21
4-
Rearoil seal
Replacement . . . . . . . . . . - . . . . . . . . . . . . . . . . . . .
age
-23
B-2
5.
Engine
Remova| . . . . . . . . . . . . . . . . . . . . . . . . . . . . . . . . . . . . .
age
Engine tand
mounung
.............
age
Disassemb|y . . . . . . . . . . . . . . . . . . . . . . . . . . . . . . .age
InspecUon
F]epair................-.....
age
Assemb|y . . . . . . . . . . . . . . . . . . . . . - - . . . . . . . . . . . . .
age
Engine tand
ismounting
........
age
1nsta | Ia t ion. . . . . . . . . . . . . . . . . . . . . . . . . . . . . . . . .
age
P-26
B-33
B-36
8,48
B-60
8,82
8 8 4

8/20/2019 Mazda 121, Kia Pride Repair Manual Vol 1
http://slidepdf.com/reader/full/mazda-121-kia-pride-repair-manual-vol-1 41/389
OUTLINE.
ROUBLESHOOTING
UIDE
B
OUTLINE
SPECIFICATIONS
Engine
Item
a3
Cylinder
nangementnd number
Combusrion
hamber
OHC, belt-driven
6 va ves
Displacemenl cc
(c'r
in)
1323
80.7)
Boreandstroke
mm
(in) 7 1 . 0 x 8 3 . 6 ( 2 . 8 0 x 3 . 2 9 )
9.4
Compression
ressure
kPa
kg/cm'. si)'rpm
1373
14.4,
99)300
IN
Open BTDC
ABDC
EX
Open BBDC
404
Close ATDC
Vaiv€
learance
mm
(in)
N
0.30
0.012)
EX 0.30
0.012)
ldle sp€ed rpm
[/TX
750
i
ATX
1100
"3
lgnition iming BTDC
1 6
1-3-4-2
TBOUBLESHOOTING
UIDE
Posslble Cause
eemedy
Page
Dif ii cu li start lng Mal lunction ol eng ine relaied componen ls
Wom
piston,pislon
ing or
cylinder
Faled cylinder
head
gasket
B-49
8,54,56
B-17
Mallunclion ol tuol system
Mallunclion ol igrltion system
Refer o SectionG
Poor
dling uallunclion
of
engine-rslated components
Poorvalvelo-valve eatconlact
Failed
ylinder
ead
gasket
B-49
B-17
Maltunction ol tuel system
Mallunctlon l
ign[ion
system
Reler to Section G
Oil workingup
Worn
pjston
ing
groove
r sticking
iston
ng
Worn
pision
r cylinder
8 5 6
B 54,56
Oil working
down
Worn alve tem r
guide
8-61,72
B-50
Oll leakage Retero Section
B-3

8/20/2019 Mazda 121, Kia Pride Repair Manual Vol 1
http://slidepdf.com/reader/full/mazda-121-kia-pride-repair-manual-vol-1 42/389
B
TROUBLESHOOTING
UIDE
Remedy
Ps9e
Insulticient
compaession
Compresson
eakage
rom valve seat
Weak or broken
valvespfing
Faiiedcylinderheadgasket
Crackedor d'slorred
ylinder
heao
Sticking damaged,
or wom
plslon
ng
Crackedor wofi
pislon
B-51
B
-49
B-52
B-17
B-48
B-56
B-56
Mallunction ot luel
system
Mallunction ot ignition
system
Relero Secnon
Othera
Slipping
lutch
Draggng brakes
lklfunction of enginerelaled
components
Siicking r burned
alve
weak or broken alve pnng
Carbon
ccumulalon
n combustionhamb€r
B-49
B-52
itallunclion ol
tuel system
lraltunctionof
lgnllionsystem
Enginsnois€
Crsnkshaft- or bearing-rolated
p.tls
Excessive nainbearing
oil clearance
Main bearingseized
or healdamag€d
Excessive rankshait
nd
Dlav
Excessive onnecting
od bearingoii
clearance
Connecting
od bearing
seizedor
heat_damaged
B-64
B-58
B-65
B-65
B-58
PBton-related
parls
Wom
piston
r
pislon
Pn
Damaged
ston rng
8 5 5
8 5 6
8 5 6
8 5 6
valves or timing-related
Parls
Broken alve ping
Excessve
alve
ude
clearance
B-52
B
-49
Malfunctlon
f coolingsystem
Refor o Secton
E
llralluncllon of
tuel sFtem
others
lvlaLfunctionl water
ump
bearing
lmproper
rive
beLl
enslon
Malfunctioni
aternalor eanng
Exhaustas eakage
N,4afunctioni I ming
beli ensioner
Befer to seci
on E
Reler o Section
G
B-13
B-4

8/20/2019 Mazda 121, Kia Pride Repair Manual Vol 1
http://slidepdf.com/reader/full/mazda-121-kia-pride-repair-manual-vol-1 43/389
ENGINE
UNE-UP ROCEDURE
ENGINE
UNE.UP ROCEDURE
PBEPARATION
ssr
49 9200 020
Tension
auge,
49 8019 9A0
ignilion
iming
ENGINEOIL
Inspection
1. Be sure he vehicles on
level
ground.
2. Warm p heengineto ormaloperating
emperature
nd
stop
rI.
3. Wait
or fiveminutes.
4. Removeheoildipsticknd heckheoil evelandondition.
5. Add or
replace il f necessary.
Note
.
Thedislance
elween he Land
F
markson he dip.
stick repressnts .8
iter
(0.85
US
qt,
0.70 mp
qt).
ENGINE OOLANT
Inspectign
Coolant
evel
(englne
cold)
Warning
.
Never emove he radiatorcap whlle he engine s
hot.
.
Wlapa thlckclotharound
he capwhen emovingl.
1.Verilyhat
hecoolantevel s near
he radiatoriller
eck.
2. Check hat hecoolant
evel n hecoolant eservoirs be'
tween he
FULL
and LOW
marks.
3. Add coolanl
l
necessary.
Coolanl
quality
1. Verifyhat
here s no buildup i
rust
or
scale
around he
radiator ap or
radiatorillerneck.
2. Verifyhat he coolant
s freeof oil.
3. Fleplacehe coolanl
i necessary.
ORIVEBELT
Inspection
1. Checkthe
rive eltsorwear, racks, nd
raying. eplace
if necessary.
2. Verity hat
he drivebeltsare correctly
mounted
n the
puleys.
V.RIBEEDELT
M t w J t M
o
x
B-5

8/20/2019 Mazda 121, Kia Pride Repair Manual Vol 1
http://slidepdf.com/reader/full/mazda-121-kia-pride-repair-manual-vol-1 44/389
ENGINE
UNE-UP
ROCEDURE
!.t- 2",.r
\
q/lotL puMp
Y/
\
cutteY
" fi.i sp,an'//
l,.PULrEV
ALTERNATOF
\ ,
-
P / s \
r^A /orr
pui,rp
Y
\"ut""\
.4.'
'--
'/
\\
CFANKSHAFT/
\
"y . . . "J \ " " J
CAANKSHAFI
/.A/C\
PULLEYCO
' .-agy'
3. Checkhedrive
eltdeflection
y applying
oderate
res-
sure
98
N,
l0 kg, 22
b) midway etween
he
pulleys,
s
shown.
Adjust
l necessary.
Dellection
trnn
n/
4.
Checkthe
rive
elttension
ith heSST
tension
auge).
Note
. Belt tensioncan be measuredbetweenany two
pulleys,
Tension
N
(kg,
b)
Adiusiment
Caution
.
It a new
bett s used,
adiusi
he bell dellection
at
the midpoint
ot
new belt specification.
Alternatorelt
1. f necessary,
oosenhe alternator
ounting olts
@and
adruslrno
olt
G)
z Lever h-e lternitor utwald ndapplyensiono thebeh
Tightening
orque
i&
:
37-51
N.m
3.8-5.3
m-kg, 27-38
ft-lb)
\t:
18-25 N.m
l'9-2'6 m-kg,13-18
ft'lb)
3. Becheckhe belt
ension
r deflection.
P/Sbelt.P/S +
tuC belt
It necessary,oosen
he
P/Soil
pump
mounting
@,
@
and
O
and
adjusthebelt
deflection
y utning
headjustingolt
@)
Tighlening
orque
@:
19-25
Nfl
(1.9-2.6
m-kg'
4-19
ft-lb)
!E,
36-54
Nm
(3.7-5.5
m'kg' 27-40
ft-lb)
G
:
36-54
N.m
3.7-5'5 m-kg, 27-40
flnb)
Drive bet
5 0
7 0
(019
0.27)
6.0-7.5
(o.23-O.29)
P/S, P/S
+
A/C
8 0 9 . 0
(0.31-0
35)
9.0-100
(0.35-0.39)
pJc
8 0 - 9 0
(0.31-0
5)
9.0-10.0
(0.3s
0.39)
Drive bell
451-785
(46
80.
101-176)
392 588
(40-60,
88
132)
P/S, PiS + A/C
491
589
(50-60, 110 132)
422-491
(43-50,95-110)
A/C
491-589
(50-60,
1r0-132)
422-491
(43
50,95-110)
5. lnstall he alr
intake
PiPe.
B-6

8/20/2019 Mazda 121, Kia Pride Repair Manual Vol 1
http://slidepdf.com/reader/full/mazda-121-kia-pride-repair-manual-vol-1 45/389
ENGINETUNE-UP
PROCEDURE
AJCbelt
lf
necessary,
oosenhe ocknut
@
andadjusthebeltdeflec-
tion by turning
he adjusting olt
@.
Tlghlening orque:
37-51
Ntn
(3.8-5.3
m-kg,
27-38 fl-lb)
:i\\
a.\.\
VALVECLEARANCE
Inspecilon Adiustment
1. Warmup the engine o normal
peratingemperature.
2. Removehe aircleaner.
3. Remove
he acceleratorable-
4. Remove
he cylinder eadcover.
5. Turn he crankshaftndalign he imingmarkso hat he
piston
fthe
No.1 r No.4 ylinder
s
atTDC f
compression-
6. Measurehevalve learances
with heNo.'lcylinder t
TDC
of compression,
nd hose
f
@
with he No.4 ylin-
der at TDCof compression.
Valve
clearanae
valve
slde)
lN : 0.30mm
0.012
n)
EX: 0.30mm 0.012 n)
7. lf il is not
within
pecification,
djustand
recheckthe alve
clearance.
B. Turn he crankshaft ne
Lrllurn and measure
he remain-
ing valve clearances.
diust f necessary.
9.
Installhe cylinder eadcover.
Tightening
orque
Bolt
@:
4.9-9.8 Nm
(50-90 cm-lq, 43-78 In-lb)
Bolt
@r
7.8-11
Nm
(80-110
cm-l€, 69-95
inlb)
Caution
.
It
the
headcover
gasket
s reused,applysealant
n
the
groove
as shown.
10. nstallhe accelerator
able.
'11.
lnstallhe air cleaner.
12.
Start
he engine nd check
or excessiveappet
noise.
B-7

8/20/2019 Mazda 121, Kia Pride Repair Manual Vol 1
http://slidepdf.com/reader/full/mazda-121-kia-pride-repair-manual-vol-1 46/389
ENGINE
UNE-UP
PROCEDURE
IGNITION
IMING,
DLE
SPEED
Prsparalion
1.Warm
up the engine
o
normal perating
emperature
2. Verity
hat he
wax odextends
utward
ullyand he dle
cam separates
rom he
roller'
3. Turnall electric
oads
OFF.
. Blower an
.
Headlight
.
RearWindow
Defroster
4. MakesLrre
hat he
engine peed
does
notchange
when
disconnecting
heair
bypass
olenoid
alve
@
connector'
5. l theeleckic
ooling
an
soperating,
aittillthe
anstops
6. Verifyhat
he engine
s running
t
dle n
good
condition
7. Connecthe
ssT to
the diagnosis
onnector'
8. Connect
tlming
ight.
9. Connecta
tachoheter
o the diagnosis
onnector
G- ter-
minalas shown.
Note
.
ll the engine speed
decreases,
hs englne
a atlll un-
der
the warm-up
condition.
'10.
Setswitch
@
to
position
1'1. et
TESTSW o
SELF-TEST.
Note
.
It the SST
s not used,
ump
across
he TEN ermi-
nal and the
GND erminal
ol
the diagnoals
con-
nedor.
lgnition
Timing
Inspection
Adius|ment
1.
Check
hat ne
dlespeed
s wiihrn
he specification
ldle speed:
MTX
Neutral) 750
i:!
rym
ATx
(P
range)
,100
:1
rpm
2. Check he
gnitioniming
witha
timing
ight
lgnit ion iming:
BTDC
6
+
l"
3. t the onition
r|nino
s not
within he specilication.
oosen
the disiflbutorocLbohs
nd urn
he distributor
o
make
the adiustment.
4.Tighte; he distributor
ockbofts o
the specified
orque
Tiohteninq orque:
is-zs-Nm
(i.9-2.6
m-ks,
14-19
ftlb)
5. Puta seal
on the
distributor
ockbolt.
)
B-8

8/20/2019 Mazda 121, Kia Pride Repair Manual Vol 1
http://slidepdf.com/reader/full/mazda-121-kia-pride-repair-manual-vol-1 47/389
ENGINE
UNE-UPPROCEDUFE
oreeos'6 o"G66alj
ldle Speed
'1.
Perform
Preparaljon"-
(Refer
o
page
B-8.)
2.
Check
he dlespeed
witha tachometer.
ldle speed:
MTx
(Neutral)
750
it
rpm
ATX
P
range) ,100:1 rpm
3. lf notwithin
pecification,djust
he dleby urning he hrottle
adjusting crew.
B-9

8/20/2019 Mazda 121, Kia Pride Repair Manual Vol 1
http://slidepdf.com/reader/full/mazda-121-kia-pride-repair-manual-vol-1 48/389
COMPRESSION
COMPRESSION
ll
rheenoine
xnibits
ow
power.poor ueleconomy
or
poor
dle check
he
ollowing:
1.
gnrtro;
ystem
Beler o Sectron
G.)
2.Compressron
3. Fuel
svstem
Fefer
o Section
.)
INSPECTION
1 Verifv
hat hebattery
s ully harged
Recharge
t f
neces-
sarv.
Refer
o
Section
G.)
2. Warm
up the engine
o normal
perating
emperature'
3. Turn he
engine
OFF.
4. Bemove ll
spark
plugs.
5. Disconnecthe gnition oilconnector'
6. Connect
compression
augetothe o
spark
lughole
7.
Fr.rllyepress
he acceleiator
edal
nd
crank he
engine'
8.
Recordhe
maxrmum
auge
eaolng
9. Check
ach
cylinder.
Compression
kPa
kg/cm', silrpm
B3
Siandard
1412 t4.4, O4!3OO
1030
00.5,
149)-300
't96
(2.O,
26)
10.
f thecompression
n oneor
more yllnders
rcw'
pour
a
small
amount
f engine
il
nto he
cylinder
nd
recheck
the
compressrcn.
(1)
lt thecompression
ncreases,
he
piston,
iston
ings'
or cvlinder
wall
mavbe
worn
(2)
lf the compression
tays
ow, he
valve
maybe
stuck
or seatingmProperly.
{3)
lt
he
comoression
n adjacent
ylinders
tays
ow, he
'
'
cvlinder
ead
gaskel
maybe
delective
r
he cylinder
head distorted.
11 Connect
he
ignition
coil connector.
12.Apply ntiseize
ompound
r molybdenum-based
ubricant
to
the spark
Plug
hreads.
13. nsiallthe
park
Plugs.
Tidhlenino oroue:
is-zsi{.m
(i.5-2.3
m'ks'
11-17
finb)
B-10

8/20/2019 Mazda 121, Kia Pride Repair Manual Vol 1
http://slidepdf.com/reader/full/mazda-121-kia-pride-repair-manual-vol-1 49/389
ON-VEHICLE
AINTENANCE
ON-VEHICLE
AINTENANCE
PREPARATION
ssT
49
G0175A0
Engine
uppod
49 D011102
inslallation
f
timing
belt
puley
49 E301060
Brake,ing
gear
49
E301 61
Sody
(Pan
of
49
E301
60)
49 E301
062
Collar
(Part
of
49 E301 60)
43 SE01 10
Centeingool,
installation
t
B-11

8/20/2019 Mazda 121, Kia Pride Repair Manual Vol 1
http://slidepdf.com/reader/full/mazda-121-kia-pride-repair-manual-vol-1 50/389
ON.VEHICLE
l|AINTENANCE
TIMING
BELT
Femoval
lnstallalign
'1.
Drsconnect
he negative
attery able.
2. Lilt up
the vehicle.
3.
Remove
n the order
shown n the igure,
eferringo Removal
Nole.
4.
Install
n
the
reverse rderof
removal,elerringo
Installalion
Note
1r-25
O,r-2.6,
1a-19)
7€-rr
rlo
(30-110
.eks, 6e-e5 In{b)
p0-rr0
*rs,
ca-es .-rb)
12-17
(1,2s-1.75, 09-rs2)
1s6-r65 05-17, 115-122)
1.Splashhield
2.
P/Sand/or
A,/C
rive
belt
Insp€ct ion. . . . . . . . . . . . . . . . . . . . . . . . . . . . . . . . . . .
age
3-
Alternatorrivebelt
Inspect ion. . . . . . . . . . . . . . . . . . . . . . . - . . . . . . . . . . .
age
Adjus tment . . . . . . . . . . . . . . . . . . . . . . . . . . . . . . . . .
age
4. Water
ump pulley
5.
Plate
Removal
ote. . . . . . . . . . . . . . . . . . . . . . . . . . . . .
age
Installat ionote..........................age
6.
Pulleyock bolt
Removalote. . . . . . . . . . . . . . . . . . . . . . . . . . . . .
age
lnstallat ion
ote........
...............-.
age
7.
Crankshatt
ulley
and
pulley
boss
B-12
L Timingbelt
cover,upper
L Timing elt
cover, ower
10.High-tensron
eads
11.Spark
lugs
12.Timing
elt
Removal
ote. . . . . . . .
. . . . . . . . . . . . . . . . . . . .
age
-14
Inspect ion. . . . . . . . . . . . . . . . . . . . . . . . . . . . . . . . . . .
age
'14
Installalion
ote....
.....................
age
B-1
'13.
Tensioner
Inspect ion. . . . . . . . . . . . . . . . . . . . . . . . . . . . . . . . . . .
age
-14
Installat ionote..........................ageB-1
14.Tensioner
pring
Inspect ion. . . . . . . . . . . . . . . . . . . . . . . . . . . . . . . . . . .
age
-14
Installat ion
ote..........................
age
B-'1
B - 5
8 , 6
B-16
8,13
B
1 5
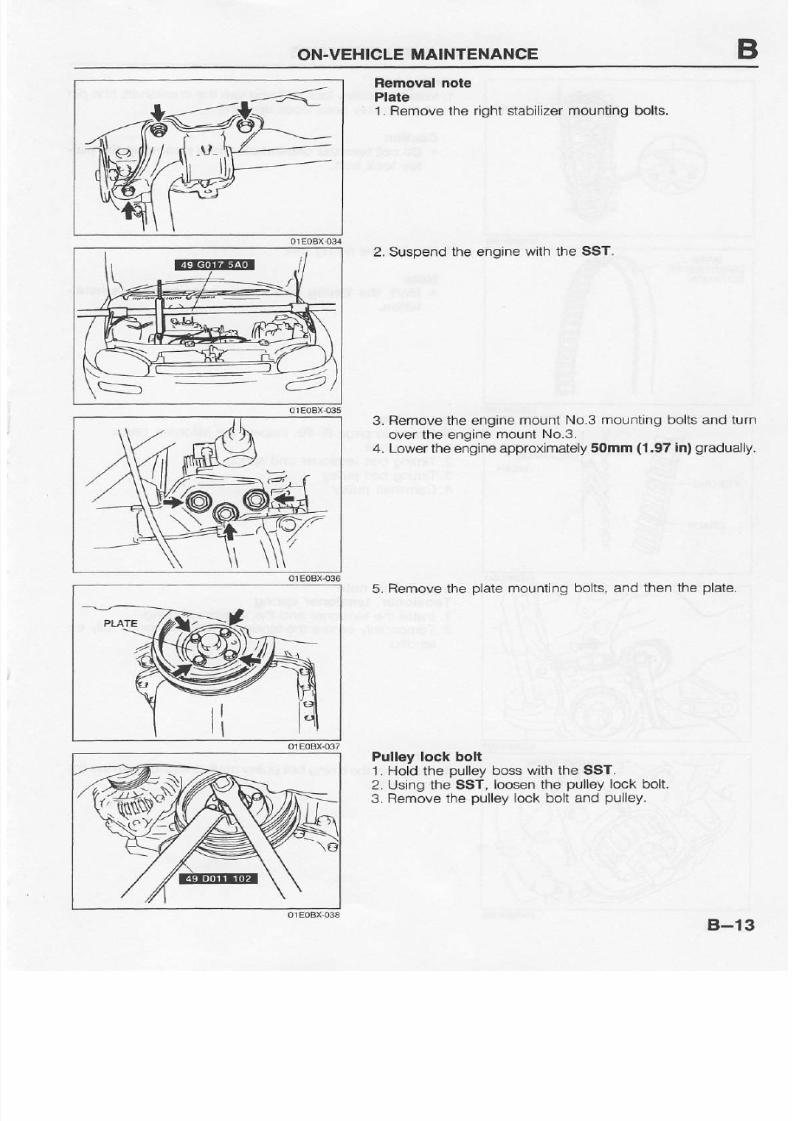
8/20/2019 Mazda 121, Kia Pride Repair Manual Vol 1
http://slidepdf.com/reader/full/mazda-121-kia-pride-repair-manual-vol-1 51/389
ON-VEHICLE
AINTENANCE
Removalnote
Plate
1.Removehe rightstabilizer
ounting olts.
2. Suspendhe
enginewith he SST.
5. Removehe
plate
mountingbolts, nd hen he
plate.
Removeheenginemounl
No.3mounting olts nd urn
over he enginemount
No.3.
Lowerheengine
pproximately0mm
1.97
n)
gradually.
3
4
Pulley
ock
bolt
1.Hold he oullev
osswith he SST.
2. Using he SST,
oosenhe
pulley
ock bolt.
3. Remove
he
pulley
ockbolt
and
pulley.
i.- i\\
z
B-13

8/20/2019 Mazda 121, Kia Pride Repair Manual Vol 1
http://slidepdf.com/reader/full/mazda-121-kia-pride-repair-manual-vol-1 52/389
ON-VEHICLE
IAINTENANCE
Tlming
belt
i. lnstiiltneouttev
oct boll
and
urn
hecrankshaft
the
pin
on the oullev
oss
aces
up-right)
Caution
.
Donot
turn the
crankshaft
while
removing
he
pul'
ley lock bolt.
2.
Remove
he
iming
belt.
Note
.
Ma*
the liming
belt
rotallon
latlon.
lor
proper
leinslal-
PEELIN6
lnsoeclion
Refb.ring
o
page
B
69,
nspecthe
ollowing
arts:
1.
Timing elt
2.
Timing elt
engoner
nd spnng
3. Timing
elt
pulley
4. Camshaft
LrlleY
lnslallation
nole
Tensioner,
ensioner
sP.ing
1. nstall
he ensioner
nd
he ensioner
pring
2. Temoorarilv
ecllre
he ensioner
ith
he
spring
ullyex-
tenoeo.
Timinq
belt
1.Verii
lhal
he rming
ell
pulley
mark
s
alQned
ith
he im-
Ing
marK.
B-14

8/20/2019 Mazda 121, Kia Pride Repair Manual Vol 1
http://slidepdf.com/reader/full/mazda-121-kia-pride-repair-manual-vol-1 53/389
ON.VEHICLEMAINTENANCE
2. Installhe imingbeltso that here
s no looseness
t the
tension ide.
Caution
.
Do not tum the crankahaft ounterqlockwbe.
3. Installhe
pulley
bossand
pulley
ock
bolt.
4. Turn he crankshaft
wo urns lockwise,nd ace he
pin
on the
pulley
ossuPright.
5. Verifyhat hecamshaft
ulley
marks realigned ith he
cylinder eadcovermarks.
lf notaligned,emovehe iming
elt
and
repeatrom en'
sioner nstallation.
6. Loosenhe ensionerockbolt o
apply ensiono
he
im-
ing
belt.
Caution
.
Be sure
not to apply ensionother han hat of the
ienslonerspring.
7.Tightenhe
ensionerook
bolt.
Tighlening orque:
19-25
N.m
1.9-2,6
m-kg, 14-19 ft-lb)
8.Turn he crankshaft turnsclockwise nd verify hat
he
marks
re
correctly ligned.
9. Checkthetimingeltdeflection
y applying oderate
ree
sure
98
N,
l0 kg,
22 b)
midway etweenhecrankshaft
pulley
nd he camshaft
ulley.
ll
the iming
beltdellections notcorrect,emporarilye
cure ensionerockboltsothesprings ullyextendednd
repeat teps
-8
aboveor
replacehe ensionerpring.
Deflection:
11.0-13.0mm
0.43-0.st
In)at 98 N
(10
kg, 22 lb)
10.Removethe
ulley
ockboft nd
pulley
oss
sing
heSST.
Pulley
ock bolt
lnstallhe crankshaft
ulley
and ighten
he
pulley
ockboll
using
he SST.
Tightening orque:
157-167N.m 16-17 m-kg,116-123 t-lb)
9 a N
(10
kg, 22 lb)
B-15

8/20/2019 Mazda 121, Kia Pride Repair Manual Vol 1
http://slidepdf.com/reader/full/mazda-121-kia-pride-repair-manual-vol-1 54/389
ON.VEHICLE
MAINTENANCE
Plate
1. nstallhe
plate.
Tlghtening
orque:
iz-tz
Nrn
(1.25-1.7s
m-kE,
109-152
in'lb)
2.
Litt he engine
nd
nstallhe engine
mountNo3.
Tiohtenino orque:
ss-r
l i H..
(g.s-t1.9
m-kg,8.2-10.3
n-lb)
3. lnstallhe stabilizer.
Tiohteninq orque:
!l-sz
itm
(5.s-5.9
m-ks,
4.7-5.9
innb)
Steps
After
Installation
1. Lower he
vehicle.
2. Connect
he negative
attery able.
3. Start he
engine nd
checkas
follows:
.
lgnition
iming
Refer
o
page
B-8.)
@
B-16

8/20/2019 Mazda 121, Kia Pride Repair Manual Vol 1
http://slidepdf.com/reader/full/mazda-121-kia-pride-repair-manual-vol-1 55/389
ON-VEHICLE
AINTENANCE
CYLINDER
EADGASKET
Replacement
Caulion
.
Position he hose clamp n the orlginal ocationon the
hose,
and
squeeze he clamp ighlly
with large
pliers
o ensure a
good
fit.
1. Disconnecthe
negative
attery able.
2. Drain he englne oolantntoa container.
3. Removen the ordershown n the igure, eferringo
RemovalNote.
4. Installn the reverse rderof removal,eferringo
InstallationNole.
(30-110
orl(gi 3r-95
h.tb)
firs-11o
cn-&, 6s-95
in.lb)
FEPLACE
r9-2s11.e-2.6,4-r9)
1.Air
cleaner ssembly
2.
Acceleratorable
Installat ionote........-................
3. Throttle able
4. Hoses
Flemoval
Installat ion
ote.--......
5. Harnesses
Flemovallnstallat ionote.........
6. Waierbypass
ipe
nutsand bolts
7. Alternatorrivebelt
8. Water
umppulley
9. Timing eltcover,upper
10.Timing ell
Removal
Insta||ation..................
age
B 12
11.Front xhaust
ipe
12. ntakemaniiold tay
13.Cylinder eadcover
14.Cylinder eadbolt
Removalote. . . . . . . . . . . . . . . . . . . . . . . . . . . . .
age
19
lnstallat ion
ote..........................
age
B 20
15.Cylinderead
Disassembly..............................ageB-40
1nspect ion. . . . . . . . . . . . . . . . . . . . . . . . . . . . . . . . . .
age
-48
Assemb1y. . . . . . . . . . . . . . . . . . . . . . . . . . . . . . . . . . .
age
-72
16.Cylinder
ead
gasket
page
B-20
page
B-18
page
B-19
B-17

8/20/2019 Mazda 121, Kia Pride Repair Manual Vol 1
http://slidepdf.com/reader/full/mazda-121-kia-pride-repair-manual-vol-1 56/389
ON.VEHICLE
MAINTENANCE
Removal
Installation
ngte
Hoses
Disconnect
he
hoses
hown
n the
igure.
'1.
Brake
acuum
hose
2. Fuel
hose
B-18
3.
Vacuum
ose
solenoidalve)
4.
Heater
ose

8/20/2019 Mazda 121, Kia Pride Repair Manual Vol 1
http://slidepdf.com/reader/full/mazda-121-kia-pride-repair-manual-vol-1 57/389
ON-VEHICLE
AINTENANCE
Hatnesses
Disconnect
he harness onnectors hown n the
igure.
01EOBr162
Cylinder
head bolt
1 Loosen
hecylinder ead
bol{s n woor
hree tepsn he
order hown
n the igure.
2. Removehe
cylinder eadbolts.
B-19

8/20/2019 Mazda 121, Kia Pride Repair Manual Vol 1
http://slidepdf.com/reader/full/mazda-121-kia-pride-repair-manual-vol-1 58/389
ON-VEHICLE
AINTENANCE
lnstallation
note
Cvlinder
head
bolt
1. Applyclean ngine
il o
the bolt
hreads nd seat
aces
2.
Installhe cylinder
eadbolts.
3.
Tightenhecylinder
eadbolts
n wo
or hree teps n he
ordershown
n the
igure.
Tiohtenlnq oroue:
is-gr
-N.n
1z.z-a.l
m-rg, s6-60
ft-lb)
Acceleralorcable
1.
nstallhe accelerator
able.
2. Check he
accelerator
abledeflectior
lf the deflection
s not correct,
djust
by turning
nut
@.
Delleciion:
1-3mm
(0,04-0'12
in)
Stepsalter
installation
1.Fill he radiator
with he specified mount
nd typeof
engine oolant
Refer
o Section
E.)
2.
Connecl
he negative
attery able.
3. Start
he engine
nd checkas
tollows:
(1) Engine il and engine oolanteakage
(2)
lgnitioniming,
dlespeed
Refer
o
page
B-8.)
(3)
Operation f
emission ontrol ystem
4.
Recheckhe engine
oolantevel.
B-20

8/20/2019 Mazda 121, Kia Pride Repair Manual Vol 1
http://slidepdf.com/reader/full/mazda-121-kia-pride-repair-manual-vol-1 59/389
ON.VEHICLEMAINTENANCE
FRONTOIL SEAL
Replacement
1.
Disconnecthe
negalive
ahery able.
2. Remove
n
the ordershown
n
the
iglre, retefiingo RemovalNole.
3. nstalln the reverse rderof removal.
eferrino
o lnstallation
Nole.
I . . /
-na
I
o
---'r@\!
(a
l-.i 43)
€.,
$
aieurce
1.Timingbelt
Removal Inslal lat ion.... . . . . . . . . . . . . . .
2. Timing belt
pulley
lnstal lat ionote.... . . . . . . . . . . . . . . . . . . . . . .
3. Oil
seal
pageB-12
RemovalNote. . . . . . . . . . . - . . . - . . . . . . . . . . . . . .
lnstallat ion
ote..........
...............
age
B-22
page
B-22
Removalnote
Oil seal
1.Cut he oil seal
ip witha razor
nife.
2. Removeheoilsealwilh
screwdriver
rotecled
ilha rag.
B-21

8/20/2019 Mazda 121, Kia Pride Repair Manual Vol 1
http://slidepdf.com/reader/full/mazda-121-kia-pride-repair-manual-vol-1 60/389
ON.VEHICLE
AINTENANCE
lnslallationnote
Oil seal
'1.
Applya smallamount
f clean ngine
iltothe
ap l a new
oil seal.
2.
Push he oil sealslightly
n by
hand.
Cautlon
.
The oilseal
must be tapPed
n until
it is flush with
the edge ot the
oil
PumP
body'
3.
Tap heoilsealin venly
itha suitable
ipe
anda hammer'
Oil seal outer
dlametet:50.5mm
1.98
n)
Timing belt
pulley
1.
nstallhe imingbelt
pulley.
2.
nstallthe
ulley
Woodruff
eywith
he apered
idetoward
the oil
pump
body.
\
ALIGNKEY GFIOOVE
B-22

8/20/2019 Mazda 121, Kia Pride Repair Manual Vol 1
http://slidepdf.com/reader/full/mazda-121-kia-pride-repair-manual-vol-1 61/389
ON.VEHICLE
,|AINTENANCE
@E
gs
; a\&h
ffi
REAFOIL SEAL
Beplacement
1.Disconnecthe negative attery able.
2. Removen the ordershown n the igure, eferringo
RemovalNote.
3.
Install
n the reverse rderot removal,eferringo lnstallationNote.
1.Transaxle 3. Flywheel
MTX)
Serv ice. . . . . . . . . . . . . . .. . . . - . . . . . . . . . . . . . . . .ec t ion
2.Clutch
over,
lutchdisc
(MTX)
MTX
Removalote. . . . . . . . . . . . . . . . . . . . - - . . . . . . . . . . .e low
Serv ice. . . . . . . . . . . . . . . . . . . . . . . . . . . . . . . . . . . . . . . . . . .ec t ion
lns ta l la t ion
ote. . . . . . . . . . . . . . . . . . . . . . . . . .
age
-24
ATX 4.
Drive
plare ATX)
Removal ote............................ageB-24
Installat ionote...-......................
age
B 25
Serv ice. - . . . . . . - . - . . - . . . . . . . . - . . . - - . . . . . . . . . . . - . .Sect ionH
.Oi lseal
Removal ote.............
...............
age
B-24
Installat ionote......-...................
age
B 24
Removalnote
Flywheel
MTx)
Caution
.
Add approx13mm
0,51
n)ol spacers
@)
o space
the
SST
away rom the cylinder
block,
(MTX)
1.Hold he lywheel ith he SST.
2. Remove
he lywheel
olts.
3. Removehe
lywheel.
B-23

8/20/2019 Mazda 121, Kia Pride Repair Manual Vol 1
http://slidepdf.com/reader/full/mazda-121-kia-pride-repair-manual-vol-1 62/389
ON.VEHICLE
MAINTENANCE
Diive
plate (ATX)
1. Hold he drive
plate
with he SST.
2.
Removehe drive
plate
ockbolts.
3.
Removehe backing
late,
rive
plate,
nd
adapter
Oil seal
'1.
Cut he
oil seal
ip with
a razor nife
2. Remove
he oilseal
witha screwdtiver
rotected
witha rag.
lnstallation
note
Oll aeal
1. Applya smallamount
f clean ngine
iltothe
ip
ot
a new
oil seal-
2.
Push he oil seal
slightly
n by hand
Caution
.
The
oil seal
must be
tapped n
until
it is llush wllh
the
edEeof
the rear
qover.
3. Tap he
oilsealin venly
ithasuitable
ipeand
hammer.
Oil
seal oute,
dlameter:
100mm
3'94
n)
Flvwheel
MTxl
1 Femoveihe
;ahnt
tom he lwheel
boh
holesn hecrank-
shatt
and rom
he lywheel
olts.
Caution
.
ll all the
previous
ealant annot
be removed
rom
a bolt,
replace he
bolt'
.
Do not apPly
sealant
t a new
bolt
is used.
2. Set he
flywheel nto
he crankshaft.
3. Applysealant
o the
lywheel olts
and
nstallhem.
Caulion
.
Add
aporox13mm
0.51
n) ot space6
(O)
to space
the
SSi away
rom the
cylinder
block.
(MTX)
4. Hold he lvwheel nh
he SST
5. Trohten
he bohs
n twoor hreestepsn heordershown
inlhe
igure.
Tiohteninq
orquei
ge-lOg=
1.lm
g.g-ro.s
m-kg,7l-76
filb)
OIL SEAL
LIP
1h}'.
ffi'rl
)
w
@
H
EM
B-24

8/20/2019 Mazda 121, Kia Pride Repair Manual Vol 1
http://slidepdf.com/reader/full/mazda-121-kia-pride-repair-manual-vol-1 63/389
ON.VEHICLEMAINTENANCE
Drive
plate (ATX)
1. Removehe
sealantrom he drive
plate
boltholes n the
crankshaft
nd rom he drive
plate
bolts.
Caulion
.
It all the
prevlous
ealantcannot
be removed rom
a bolt, replace he bolt..
Do
not
apply
new
sealant
f
a
new bolt is
used.
2. Installheadapier,
rive
plate,
ndbacking
late
nto he
crankshatt.
3. Applysealant
o the drive
plate
boltsand nstallhem.
4.
Hold he
drive
plate
with he SST.
5. Tightenhe
bohs n lvoor three teps
n he
order hown
in the
igure.
Tightenlng
orque:
96-103
Nm
(9.8-10.5
m-kg, 71-76 ftlb)
Steps
After lnstallation
1. Connecthe negative attery
able.
2.
Start
he
engine
nd
perform
ngine
djustmeniss necessary.
osuoBx
72
@s
B-25

8/20/2019 Mazda 121, Kia Pride Repair Manual Vol 1
http://slidepdf.com/reader/full/mazda-121-kia-pride-repair-manual-vol-1 64/389
REMOVAL
REMOVAL
PROCEDURE
1 Disconnect
he negative
attery
able
2. Dra
n the enorne
oolanl
nd transaxle
il
3 Removen lie
ordetshown
n he
trgure
efernngo Removal
Note
Slep
t
1. Air
cleaner ssembly
2. Battery
lamp
3. Battery
4. Battery arrier
5. Accelerator
able
6.
Badiator
ose
7. Oil
cooler
hose
ATX)
8. Cooling
an connector
B-26
9.
Radiaior
racket
10.
Radiator
nd cooling
an
assembly
11.
Drive elt
12.P/Soil
pump
and bracket
if
equipped)
Removal
ote.......................... ageB-27
13.AJC ompressor
if
equipped)
Rernoval
ote.....
.....
. ..
..
pa1e
B-27

8/20/2019 Mazda 121, Kia Pride Repair Manual Vol 1
http://slidepdf.com/reader/full/mazda-121-kia-pride-repair-manual-vol-1 65/389
REMOVAL
Steo 2
Disconnecthe
harness onnectorshown
n
the
ioure.
A,/Ccompressor
(it
equippeo
Caution
.
Do noi damage he
hoaes,
1.
Removethe
JC ompressor
ith he
hoses
lillconnected.
2. Positionhecompressorway rom heengine ndaflix t
withwrre.
Removal
note
P/S oil
pump (il
equlpped)
Cautlon
.
Do not damage
he hoaes,
1. RemoveheP/Soilpumpwith hehoses tillconnected-
2.
Positjonhe
pump
away
rom heengine nd aifix
t withwire.
B,-27
i-
A
01E08X.062

8/20/2019 Mazda 121, Kia Pride Repair Manual Vol 1
http://slidepdf.com/reader/full/mazda-121-kia-pride-repair-manual-vol-1 66/389
REMOVAL
Steo
3
Disionnect
he
hoses hown
n the igure
1-Brake acuum
hose
2.
Fuelhose
Removal
ote. . . . . . . . . . . . - . . . . . . . . . . . . . . . . . . . . . . . .
e low
3. Vacuum
ose
solenoid
alve)
4. Heater
ose
Removal
note
Fuel hose
Wamlng
.
Keep sparks
and
open
flame
away
rom the tuel
area,
Cautlon.
Cover he
hosewlth a rag becauseuel will spray
oul
when disconnectlng.
.
Plug he disconnected
oses
o
avoid
uel leakage.
B-24
.,**d
Disconnect
he uel
hoses.

8/20/2019 Mazda 121, Kia Pride Repair Manual Vol 1
http://slidepdf.com/reader/full/mazda-121-kia-pride-repair-manual-vol-1 67/389
REMOVAL
Step
4
GASKET,
B
1.Speedometerable
2.Shift ontrol od(MTX)
3. Extensionar
(MTX)
4. Shitt ontrol able
ATX)
5. Frontexhaust
ipe
6. Clutch able
7. Lowerarm
Removalote. . . . . . . . . . . . . . . . . .. . . . . . . .
age
-29
8.
Driveshatt
Removal ote....-............... .........
age
B-30
L Enginemountmember
Fiemovalote.............................
age
B-30
Removalnote
Lowet arm
1. Removehe bolts nd
nutsat he
eft
and
ight ower rm
ball
oints.
B-29

8/20/2019 Mazda 121, Kia Pride Repair Manual Vol 1
http://slidepdf.com/reader/full/mazda-121-kia-pride-repair-manual-vol-1 68/389
REMOVAL
2.
Pull he
ower
arm downward
o separate
hem rom
he
knuckles.
Caution
.
Do not
damage
he
ball-ioint
dusl
boots.
Driveehafi
Separate
he driveshafts
rom he
ransaxle
y
prying
witha
bar nserled
etween
he
shaftand
he
case.
Caution
.
Do not
damage
he oil
sgal.
Enoinemount
member
1.
Suspend
heenoine
wrth
a chain
block
2.
Removehe
No.1
and No.2
engine
mount
nuts.
3.
Removethe
ngine
mount
member
olts
nd
nutsand
he
engine
mount
member.
Caution
.
Be
caretul
so that
the engine
does
not fall
when
removlng he
member'
ro, J"o,^.
]F
"o 1"n,",
MOUMI
MOUNT
B-30

8/20/2019 Mazda 121, Kia Pride Repair Manual Vol 1
http://slidepdf.com/reader/full/mazda-121-kia-pride-repair-manual-vol-1 69/389
REUOVAL B
Step 5
1.No.3 nginemount
01EOBX070
2.
Engjne nd ransaxlessembiy
Removalote......................................elow
Removalnote
Engineand transaxleassembly
Caution
.
Donot damage nycomponenls
n the enginecom-
partment,
Lift he engine nd ransaxlessembiy ut as a unrt.
B-31

8/20/2019 Mazda 121, Kia Pride Repair Manual Vol 1
http://slidepdf.com/reader/full/mazda-121-kia-pride-repair-manual-vol-1 70/389
REMOVAL
Step
6
Sep'arate
he engine
nd
kansaxle
n
the
order
shown
n the
igure'
MTX
ATX
1.Starter
nd bracket
2.
Throttle able
ATX)
3.No.'1
nginemount
4. Integrated
titf ner
B-32
5.Torque onverternddriveplatenuts ATX)
6.Transaxle
nstallatian
olts
7.Transaxle
ssy.

8/20/2019 Mazda 121, Kia Pride Repair Manual Vol 1
http://slidepdf.com/reader/full/mazda-121-kia-pride-repair-manual-vol-1 71/389
ENGINE
STAND
iIOUNTING
B
ENGINE
TAND
MOUNTING
PFEPAFATION
ssT
49 01076804
Enginestand
49L0l0 1A0
Hanger
et,
engine
49
1010 01
491010
A0)
engrne
49 1010
102
49 LO101Ao)
engrne
49 L0t0
103
Hooks
lOl
(Pad
ol
=l
49 1010
1AO)
49
1010104
l[$"
g
49 Lolo 1A0)
engine
4 9 1 0 1 0
0 5
Bolts
(Part
ol
491010
1A0)
49 1010
m
Bolls
iParr
oJ
49
L0t0 1A0)
engrne
B-33

8/20/2019 Mazda 121, Kia Pride Repair Manual Vol 1
http://slidepdf.com/reader/full/mazda-121-kia-pride-repair-manual-vol-1 72/389
ENGINE
TAND
MOUNTING
PROCEDURE
Step
I
Removen
the older
shown
n
ne
gure
1. Exhaust
manifold
nsulator
2. Exhaust
manifold
3. Water
ypass
ipe
4. uC compressor
racket
nd
dler
5.Water
nlet
PiPe
6-
Exhaust
iPe
racket
Siep 2
Caution
.
When
nsralling
he
SST
(engine
hanger)'
use
the
holes
shown
n
lhe
ligure.
GASKET.
EPLACE
C.V'G
\ \ ,
6 \Jl
* n a o
,'-g-\
SKET,
REPLACE
a)5
oi,tuo,
@
REPLACE
L-..:
1-
l-
-)
ao-
-oj
-o)
u l
1ll1
fi ltr
Frl
Fr
B-34

8/20/2019 Mazda 121, Kia Pride Repair Manual Vol 1
http://slidepdf.com/reader/full/mazda-121-kia-pride-repair-manual-vol-1 73/389

8/20/2019 Mazda 121, Kia Pride Repair Manual Vol 1
http://slidepdf.com/reader/full/mazda-121-kia-pride-repair-manual-vol-1 74/389

8/20/2019 Mazda 121, Kia Pride Repair Manual Vol 1
http://slidepdf.com/reader/full/mazda-121-kia-pride-repair-manual-vol-1 75/389
DISASSEMBLY
AUXILIARY
ARTS
'1.
Drain
heengine i l.
2. Disassemblen the
ordershown
n
the
ioure.
o o
z,
\
N,)
o
l
g
@
6P
'1.
Alternatorrivebelt
2. Alternator
3. Intakemanifold tay
4. ntakemanifold
ssembly
5.
ntakemanifold
asket
6.
Distributornd
highlensionead
7. No.3enginemountbracket
8. Oil
pressure
witch
L Engine anger
'10.
Oil dipstick
11.Spark
lug
12.Oil i l ter
B-37

8/20/2019 Mazda 121, Kia Pride Repair Manual Vol 1
http://slidepdf.com/reader/full/mazda-121-kia-pride-repair-manual-vol-1 76/389
DISASSEMBLY
TIMING
BELT
Disassemble
n the
order
snown
in the
igure,
eferring
o
Disassembly
ote
@
1.
Water
umP
UlleY
2.
Crankshait
ulley
olt
3. Plate
4. Crankshaft
ulley
5.
Pulley
ock bolt
Dlsassembly
ote
......
6.
Pulley
oss
B-38
7.
Timing
elt
cover,
upper
8.
Timing
elt
cover'
ower
9.Timino
elt
oirZ.!"totv ote . . pase -99
rnJp" i t ion. - . . . . . . . . . . .
. . . . . .
. .
pageB-5
1o.Tensioner,
ensioner
pring
-' -inipeition.................
..
..
..
page
B-59
.
page
g-47

8/20/2019 Mazda 121, Kia Pride Repair Manual Vol 1
http://slidepdf.com/reader/full/mazda-121-kia-pride-repair-manual-vol-1 77/389
DISASSEMBLY
Disassembly
ole
Pulley ock boll
Caution
.
Add approx
3mm
(0,51 n)
ot spacers
@)
o space
lhe SST
away rom the cylinderblock.
(MTX)
1. Hold heflywheel
IVTX)
r
drive
plaie ATX)
lth heSST.
2. tlemove he
pulley
ock
bolt.
Timing belt
1.Turn he crankshaltnd allgn
he marks.
2. Mark he
imingbelt otation
or
proper
einsialiation.
Caution
.
Never
orcetully wist the timing
belt. Do not lurn
it insideout or
bend t.
.
Be carelul not to allow
oil or
grease
on the belt,
==
"G
W*ff.,f
-
p\o'9ecrto
- ' g r
- \ ; - , / \ . t
\\-zz
W:
B-39

8/20/2019 Mazda 121, Kia Pride Repair Manual Vol 1
http://slidepdf.com/reader/full/mazda-121-kia-pride-repair-manual-vol-1 78/389
DISASSEMBLY
@\
CYLINDER
EAD
Disassemble
n the
order
shown
n the
igure,
eferrinq
o
Disassembly
Noie.
1.
Cylinder
eadcover
and
gasket
13
Cylinder
ead
2.ThermostaloveranogasKel
'lnspection
.
"
page
B-48
3.
Thermostal
'l4
Cylinder
ead
gasket
4.Thermosensor
l5 Valve
eeper
5. Rocker
rm and
shatt
assembly
Disassembly
ote
page
B-41
Disassembly
ote...
.
. .- .
.
page
B-41
16 Valve
pring
eat'
pper
6. Rocker
rm
lT Valve
Prrng
7. Rocker
rm
spring
Inspdction
"
'
page
B-52
8.
Rocker
hafi
lS
Valve
pring
seat'
ower
9.
Camshaft
ulleY
19 Valve
Disassembly
ote
.... ..
. . .. ..
puge
g-11
-
..
lnspeclion
"
page
B-49
Inspeclion.........
page
B-59
20
valve
eal
.
10.Thrust
late
Disassembly
ote
paqe
B
41
'1
1.Camshatt
Inspect
or
weal
and
damage
inspection.........
page
B-52
21 Valve,g-urde
12.Cylinder
eadbolts
-
Inspection
"
"
"
page
B-49
Disassembly
ote
.. ...
...
page
B-41
Replacement
"
page
B
50
-
22.Oil seal
B-40

8/20/2019 Mazda 121, Kia Pride Repair Manual Vol 1
http://slidepdf.com/reader/full/mazda-121-kia-pride-repair-manual-vol-1 79/389
DISASSEMBLY
Dlsassembly ote
Rocker arm and
rocker
shaft
assembly
1. Removehe rocker rm
and
rocker haftassembly.
2. Code llrocker rmsandsprings
othatthey
anbe
rein"
stalledn
hesame
laces
romwhich heywere emoved.
Camshafi
pulley
1.
Hold he camshaft singa suitable
rench
on the casl
hexaoon.
2.
Remdve
he camshaft
ulley
bolt.
3. Removehe camshaft ullev.
Cyllnderhead bolts
1. Loosen
hecylinder
ead
bolts
n woorthree leps n
he
ordershown n he igure.
2.
Remove
he cylinder
ead
bolts.
Valve keeper
1.
Set heSSTagainstheupper
alve
pring eat sshown
in the igure.
2.
Flemove
he valve
eepers.
Valveseal
Remove
he
valve
eal
with he SST
B-41

8/20/2019 Mazda 121, Kia Pride Repair Manual Vol 1
http://slidepdf.com/reader/full/mazda-121-kia-pride-repair-manual-vol-1 80/389
DISASSEMBLY
3*:*1T"11?f"-"[TI"tff
.tn",f,
SJ'"'"'""'nn'oo'"'"".'0''*ot"
E
Hr."*".
,
FEPLACE
1.Water
PumP
''i"rv]""..
"
"
" section
2.
Timrng
belt
Pulley
insie"tion..........
Page
B-59
3 Clutch over,
clutch
disc
(MTX)
Serv ice. . . . ._ . . . . . . . . . . . . . . . . . . . . . . . . . . . . . . . . . . . .
ec t ion
4 Flvwheel
MTX)
'Disassembly
Note.
.
..
paqe
B-43
Inspecl
or
wearand
damage
5 Backi;gpbte. dnveplate andadapterATX)
Disaisbmbly
ote.......
.
. .
.
pageB-43
6. End
Plate
7. Oil
pan
diassembly
Note
. ....
..
.. .
page
B-43
lnspect
or damage
8.
Oil
slrainer
9. Main
bearing
upport
late M6sl')
Disassem6ly
dte...
. .
... .
..
page
B-44
Inspect
or damage
10.Oil
pump
-
ierv i ie . . . . . . . . . . . . . . . . . . . . . . . . . . . . . . . . . . . . . . .
ec t ion
11. Frontoil seal
bisassembly
ote
...... ... ... pageB-44
12.Rear
over
13.
Rear
oil
seal
Disassembly
ote
.....
.. ....
page
B-44
B-42
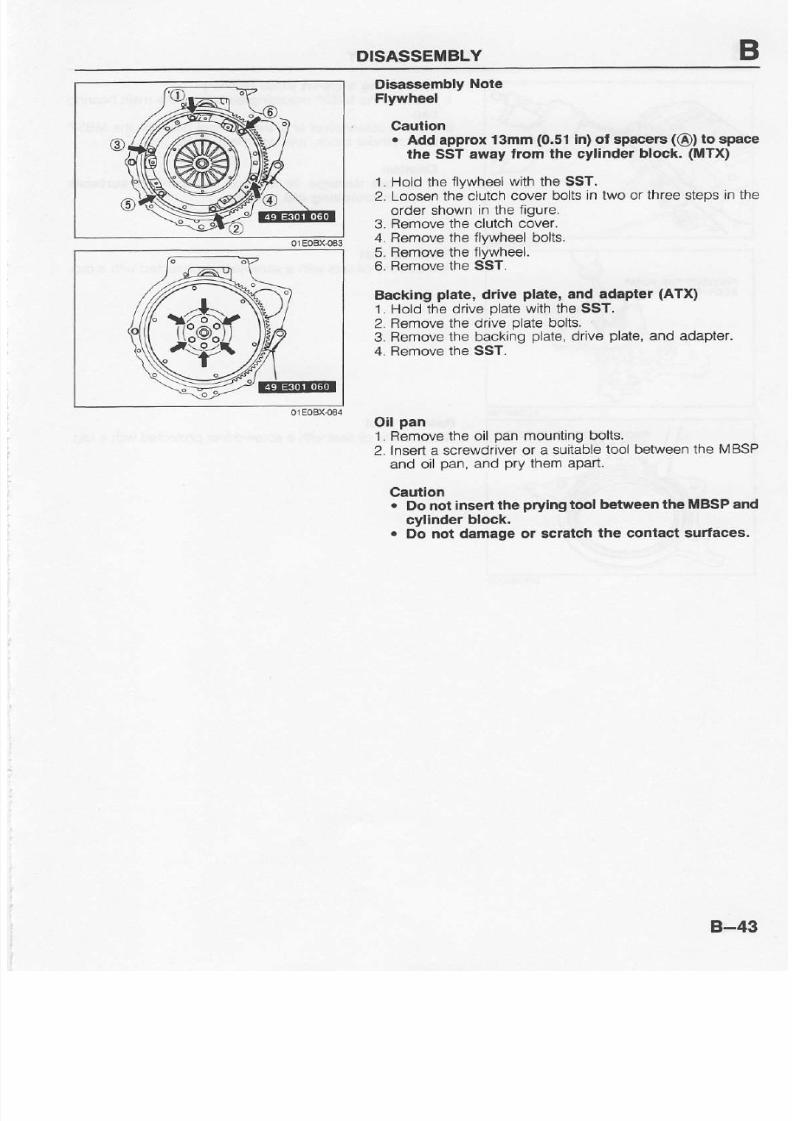
8/20/2019 Mazda 121, Kia Pride Repair Manual Vol 1
http://slidepdf.com/reader/full/mazda-121-kia-pride-repair-manual-vol-1 81/389
DISASSEMBLY
@
Dbaaaembly
Note
Flywheel
Cautlon
.
Add approx
3mm
(0.51
n) ot spacets
(@)
lo space
the
SST
away
rom lhe cylinderblock.
(MTX)
1. Hold he lywheel
ith he SST.
2. Loosen
heclutch overbolts
n two or hreesteps
n the
order
shown
n
the
igure.
3. Remove
he clutch ove..
4. Removehe lywheel
olts.
5. Bemove
he lywheel.
6.
Removehe SST.
Backing
plate,
drive
plate,
and
adapter
ATX)
'1.
Hold he drive
plate
with he SST.
2. Remove
he drive
plate
botts.
3. Removehe backing late, riveplate, ndadapter.
4. Removehe SST.
Oll
pan
'1.
Removehe oil
pan
mounting olts.
2. nsena screwdriver
r a suitable
oolbetweenhe VIBSP
and oil
pan,
and
Pry
hemapart.
Caution
. Do not insert the prying ool between he MBSPand
cylinder
block.
.
Do not
damageor sc6tch
the contactsurfaces.
B-43

8/20/2019 Mazda 121, Kia Pride Repair Manual Vol 1
http://slidepdf.com/reader/full/mazda-121-kia-pride-repair-manual-vol-1 82/389
DISASSEMBLY
ain beadngsupport
plate (MBSP)
'1.
Removehe
MBSPmounting
olts
rom
hemainbearing
cao.
2.
Inden screwdriver
r a
suitable
ool between
he MBSP
and cylinder
lock,
and
pry
hemapart.
Cautlon
.
Do not damage
or
scratch
the contact
surlaceg
when removlng
old
sealant.
Front oll seal
Remove
heoilseal
witha screwdriver
rotected
itha
rag.
Rsar oil seal
Removehe
oilseal
witha screwdriver
rotected
itha rag.
FOTECT
HEEEAA
COVEFI
PFOTECT
HE
PUMP
B-44

8/20/2019 Mazda 121, Kia Pride Repair Manual Vol 1
http://slidepdf.com/reader/full/mazda-121-kia-pride-repair-manual-vol-1 83/389
DISASSEMBLY
CYLINDEF LOCK
ONTERNAL
AFTSI
D,sassemblen rheordershown
n
the igure, efefiingo Disassembly ote.
1.
Connecting
od
cap
6.
Piston
Disassembly
ote......................
age
8-46 Inspection..................-................
age
B-56
2. Connectingod
7. [/ain bearing ap
Disassemblyote.......-.............
age
8-46
Disassemblyote .....................
age
B-47
Inspection....-.......-......................
age
B-57 8. Crankshaft
3.Connecting
od
bearing Disassembly
ote.......-..............
age
B-47
Inspect ion. . . . . . . . . . . . . . . . . . . . . . . . . . . . . . . . . . .
age
-58
Inspect ion. . . . . . . . . . . . . - . . . . . . - . . . . . . . . . . - . .
age
-58
4. Pislon ing
9.
Mainbearing
Disassemblyote .....................
age
B-46
Inspection......................-....-.......
age
B-58
Inspection......................-............age8-56 10.Thrust earing
5. Piston
in
11.Oil
i l ter
oint
Disassembly
ote
.....................
age
8-46 12.Cylinderlock
Inspect ion. . . . . . . . . . . . . . . . . . . . . . . . . . . . . . . . . . .
age
-57
Inspect ion. . . . . . . . . . . . . . . . . . . . . . . . . . . . . . . . . .
age
-54
B-45
tr/:
v r
ry
n

8/20/2019 Mazda 121, Kia Pride Repair Manual Vol 1
http://slidepdf.com/reader/full/mazda-121-kia-pride-repair-manual-vol-1 84/389
DISASSEI'BLY
Disassembly
Note
Connecting
od
caP
d-torJie.dving
tne'connecting
od
caps'
measure
hecon-
ieciino roo
sid6
clearance
Relero
page
B 66
)
Connectlnq
od
1.Before
e;ovrng
ne
connecing
ods'
measure
he
connect
ino roo
oil clea'rance-
Refer
o
page
B-57
)
2. Remove
he
Plastigage
rom
he
crankpin
ournals'
Caulion
l-do-not
""rar"tt
ttt" clankshaft
ournal
or
the cylin-
der
wall.
3. Use hehandle tahammero
remove
he
pl$on
and
con-
-
i*tlng
t;
uo".uly
through
he opof hecylinder lock
Pision
ring
Caution
.
oJ not
appty
excessive
ension,
which
may
cause
the
rings
to
anap
oul.
Removehe
piston ings
with
a
piston ing
expander
com-
merciallv
vailable)
Plston oin
Caution
.
Ma* lhe
connecting
od
direction
ol
proPer
eas-
sembly.
'1.
Before isassembling
he
piston nd
connecting
od'
check
the
oscillationorque sshown.
iiin"luioe
Lno
aoe"
not
drop
by
itsown
weight,
eplace
the
piston
r
the
Piston
in
B-46

8/20/2019 Mazda 121, Kia Pride Repair Manual Vol 1
http://slidepdf.com/reader/full/mazda-121-kia-pride-repair-manual-vol-1 85/389

8/20/2019 Mazda 121, Kia Pride Repair Manual Vol 1
http://slidepdf.com/reader/full/mazda-121-kia-pride-repair-manual-vol-1 86/389
INSPECTION
REPAIR
INSPECTION
REPAIR
PREPARATION
ssr
49 BO12 05
gulde
83)
1. Clean
ll
parts,
eing
ure o
remove
ll
gasketragments,
irt,
oil'
grease'
arbon
moisture
estdue'
nd
olher
oreign
materlals
Z. nsoection"anO
epairs
mustbe
pertormedn he
order
specified'
CautionfuiJt a"t"s" rne
oints
orlrlction surtacesol alumlnum lloycomponentssuchas the cy'-
Inder
head
or
pistons).
orEoBx.oe
CYLINDER
EAD
i. lnspect
he
cyhnder
ead
ordamage,
racks,
nd
eakage
ot
waler
and
oll.
Replace
he
cylinder
ead
f necessary
Z. ,reaiuielni
cvtinaer
eaddistortion
n the
six directions
shown
n
the
igure.
Distortion:0.l5mm (0.006 n) max.
Caution
.
-selole
qrinalns
the cylinder
head,
check h€
tollow'
ing
ani
repair
or
rePlace
he
cylinder
head as
necesaary.
Sinklng
ol
valve
seals
Damagl
ot
manifgld
cgntacl
sudace
cams6aft
oil
clearances
nd
end
play
3.
f thecylinder
ead
dislortion
xceeds
pecification'
rind
the cvlindel
ead
surface
ii
tne
vtinoer
eao
erghl
snot
within
pecilrcation
edace
it.
Heiohl:
107.4-107.6mm
4,228-4'236
In)
Gri;ding:
o.20mm
0.008 n) max.
B-48

8/20/2019 Mazda 121, Kia Pride Repair Manual Vol 1
http://slidepdf.com/reader/full/mazda-121-kia-pride-repair-manual-vol-1 87/389
INSPECTION
REPAIR
4..
fJ
-sreure
THICKNESS
4.
l\4easurehe manifold ontact urface istortionn he six
directions
hown n the igure.
oistorllon: 0.t5mm
(0.006
n) max.
5.
f
distortion
xceeds pecification,
rind
he surface r
re-
olace he cvlinder ead.
VALVEMECHANISM
Valveand
Valve
Gulde
1. Inspect ach
valve or he ollowing. eplace r resurlace
the valve l
necessary.
(1)
Damaged r bentstem
(2)
Roughor damagedace
(3)
Darnaged r unevenly ornstem ip
2. Measure
he valveheadmarginhickness 1each
valve.
Replacehe valve f necessary.
Margin hicknesa
min.
B3
IN
1.1
0.043)
EX
1.2
O.O47)
3. Measurehe
ength
f each
valve.
Length
mm
{in)
diameter f
eachvalveal the
points
.
Measure
he stem
Dlameter
B3
IN
5.970-5_985 0.2350-0.2356)
EX
5.965-5.980 {0.2348-0.23541
5. Measurehe nnerdiameter feachvalveguideat hepoints
shown.
lnner diameter
B3
IN, EX
6.01-6.03
0.2366-0
2374)
6. Calculatehe
valve
tem
o
guide
clearance-
Subtractheouterdiameter
f he valve tem rom he n-
nerdiameter f the corresponding
alve
guide.
Clearance
lN r 0.025-0.060mm
(0.0010--1t.0024
n)
EX: 0.030-0.065mm(0.0012-0.0026 n)
Maximum:0.20mm
0.008
n)
7. lf the clearance
xceeds p€cification,
eplacehe valve
and/or
alve
guide.
B-49
B3
IN
Standard
108.24
4.261't
1077414.241
EX
Standa.d
109.34
4.304)
Minimum 108.84
4.?85)
|h"::

8/20/2019 Mazda 121, Kia Pride Repair Manual Vol 1
http://slidepdf.com/reader/full/mazda-121-kia-pride-repair-manual-vol-1 88/389
INSPECTION
BEPAIR
CYLINDEF
HEAD
8. Measure
he
protrusion
eight
of
each
valve
guide Replace
the
valve
guide l necessary.
Height
mm
in)
Replacement
l
valve
guide
lll?
tte
strapes
f the
intake
nd
exhaust
alve
guides realitferent,
nstall
orrectly'
B:fio9Jilh.
"ru"
rioe
rom
he
ide
pposite
he
ombus'
tion
chamber
with
he
SST
B-s0
Installation
1 Fit
he
clip
onto
he
valve
guide'
2.
Usinq
he
SST.
ap
he
valve
uide
n rom
he
combustion
-
"n"ril"i
"io"
to
inat
he
protrusion
erghl
dimension
In the
igure)
s withrn
pecilication
:a;l?h
sft|ke
hard
arter
he
cllP
contacts
he
cvlin-
der
head,
he
cliP
will
be damaged'
EX
IN
ffi
lH
\]H
N

8/20/2019 Mazda 121, Kia Pride Repair Manual Vol 1
http://slidepdf.com/reader/full/mazda-121-kia-pride-repair-manual-vol-1 89/389
INSPECTION
REPAIR
ValveSeat
1. nspecthe contact
urtace f each
valve
eatand
valve
face or the
ollowing:
(1)
Roughness
(2)
Damage
2. f necessary,
esurfacethe
alve eatwitha45" valve eat
cutterand/or esurfacehevalve ace.
3.
Applya thin
coatol Prussian
lue o the valve ace.
4. Inspectthe
alve eating y
pressing
hevalve gainstthe
seat.
(1) li
blue
does otappear 600
aroundhevalveace, e-
place
he valve.
(2)
lf blue
doesnotappear 600around
he valve eat,
resurlaceheseat.
EAT
CONTACT
WIDTH
if
5. Measure
he seat
contactwidth.
width
DIMENSION
mm
(in)
B3
IN,EX
0.8-1.4
(0.031-0.0s5)
6.
Verifvhat
hevalve eating
osiiion
s at hecenter f he
vave
Tace.
(1)
lf heseating
osition
s oo
high,
orrect
hevalve eat
witha 70o cutter
nd a 45" cutter
(2)
lf the seating
osition
s oo ow correcthevalve eat
witha 40' cutter nd
a 45o cutter
7. Seat he
valve o the
valve eatwith apping ompound.
8.
Inspecthe sinking
l the valve
eat.
Measure
he
protruding
ength
djmension
) of he
valve
stem.
Dimension
: 41.05-41.95mm
1.616-1.652
n)
I N
E"'il
db
\
v . . v l
\€=:.,
B-51

8/20/2019 Mazda 121, Kia Pride Repair Manual Vol 1
http://slidepdf.com/reader/full/mazda-121-kia-pride-repair-manual-vol-1 90/389
INSPECTION
REPAIR
Out-ol-square
IN
1.42 0.055)
EX
1.42
0
055)
Valve
Spring
1. nspect
ach
valve
pring
or cracks
nd
damage
2. Measure
he
ree ength
and out
oi square
Replace
he
valve
pring
f
necessary.
Frge
length
standard...mm
in),
Mit]imum...N
kg
lb)/mm
in)
CAMSHAFT
1. Set
he
rontand
rear
ournals
n
V-blocks-
2. Measure
he
camshaft
unout
Replace
he camshaft
f
necessarv.
Runout:
0.03mm
0'00'12
n) max.
3.
Inspect
he
camshaft
or
wearand
damage
Replacehe
camshafi
Jnecessary.
4. Measure
hecam
obe
heights
t he
wo
points
sshown
# @
B-52
Height
mm
(n)
41.5-42 { r .634
1.654)
No correcton
n€€ded
42.0-43.0
(1.654-1.693)
Adjusl
withwasher
n sping
seal
areaof
cylinder
head
[4ore han
a3
0
(1.693)
Beplace ylinder
head
B3
IN
Slandard
40 7
(1.602)
Minimum
133.2-r50
(r3
58
1s.37.9 8-33
1!36
(1 17)
EX
Slandard
40.7
0.602)
L4inimum
133.2-150.i
3
58-15.3/
.88-33
l)86
(1
14
B3
IN
Slandard
36.527 .4380)
lVlnimum
36.327
1.4301)
Slandard
36.333
1.4304)
[,'linrm!m
36.133i'1.422s)
mm
{rnl

8/20/2019 Mazda 121, Kia Pride Repair Manual Vol 1
http://slidepdf.com/reader/full/mazda-121-kia-pride-repair-manual-vol-1 91/389
INSPECTIONREPAIR
5.
Measurethe
ournal
iametersand
Y
directionst he wo
points @
and
@)
shown.
Diameter
Out
of round: 0.05mm
0.002
n) max,
6. Measureheoilclearancesetween
hecamshaftndcyl
inderhead.
{1)
Removell oreignmaterialndoil
rom
he
ournals
nd
the camshaft ore.
(2)
lvleasurehe camshaft
orediameter.
03u081105
Diameler
mm
in)
(3)Subtracthe ournal iameterrom he borediameter.
Oil
clealance
B3
No.1 No.5
43.500-43.525
.7r26-1.7135)
No.2,No3, No4 43.500-43.525
1.7126-1.7135)
No.1 No.5
0.040 0.085
0.0016
0_0033)
N o 2 & N o 4
0.050 0.100
0.0019
0.0039)
No-3 0.065-0.1
5
(0.0a25-0.0045)
0.15
0.006)
(4)
li theclearance xceedshe
maximum,eplacehecam-
shaftor cylinder
ead
7.
Measurehecamshaftnd
play.
f t
exceeds
hemaximum,
reolacehe hrustolate
or
camshaft.
End
play
:
0.060-0.200mm
(0.0023-0.0078
n)
Maxlmumr .2mm
0.007
n)
B3
No.l& No.s 43.440*43.4601.7102-17.10)
No-2& No.4 43.425-43.450
1.7096-1.7106)
No.3
43.41
O
43.435
11.7O9
, 1.71
OO)
B-53

8/20/2019 Mazda 121, Kia Pride Repair Manual Vol 1
http://slidepdf.com/reader/full/mazda-121-kia-pride-repair-manual-vol-1 92/389
INSPECTION
REPAIR
Rocker
Arm
and
Bocker
Arm
Shaft
1 Check
or
wearor
damage
o the
contact
urface
f he rock-
er arm
shatt
or the
rocker
rm-
Replace
f necessary
2. Checkthe
ilclearance
etween
he
rocker rm
andshalt
Replace
f necessary.
(1)
Measure
he
rocker
rm
nnerdiameter'
Diameter
B3
IN EX
19.000-l
9.033
0.7480-0.7493)
(2)
Measure
he rocker
rm
shatt
diameler'
Diameter
B3
lN,
EX
1&959-18.980
0.7464-0.7472)
(3)
Subt.act
he
shaft
diameter
rom he
rocke'arm di'
ameler.
Oil clearance
mm
(in)
CYLINOER
LOCK
1. Checkthe
ylinder
locklorthe
ollowing
nd
epalror
re-
place
he cylinder
lockas
necessary
(1)
Leakage
amage
(2)
Cracks.
(3)Sconng l wall
Z. Miasurehi
distonion
flhe
op
sLriace
i hecvlinder
lock
in the
slx directions
hown
n
figure
Distort ion:0.15mm
0.006n)
max.
3. lf thedistortion
xceeds
he maximum.
epair
y
grinding
or replace
he
cylinder
iock
Height: 2l.smm
8'720 n)
Grinding:
0.20mm
0'008
n)
max.
G
B3
tN,
EX
0o20-o
074
0
0008-0.0029)
010
(0.004)
B-54

8/20/2019 Mazda 121, Kia Pride Repair Manual Vol 1
http://slidepdf.com/reader/full/mazda-121-kia-pride-repair-manual-vol-1 93/389
INSPECTIONREPAIR
___n_
o
c2
So
z/-I\"
r " -
$\1-l^
o \ 4 o
-L__-r-
H
o 7
s o
71"1--\v
O s - t o
ry
4. Measure he cylinderbores n
X
and Y directions t ihree
levels
A,
B, and C) in each cylinderas shown.
Cylinder bore
mm rnl
Caution
.
The boring size should
be basedon the
sizeof an
overslze
pislon
and be
the
same
or all
cylinders.
(1)
lf
thecylinder
oreexceedshe maximum,eborehe
cylindero oversize-
(2) If he differenceetweenmeasu.ementsand C ex-
ceeds the maximum aper,
rebore
he cylinder o
overslze.
Taper:0,01gmm
0.0007
n) max.
(3)
lf the difierence etweenmeasurementsand Y ex'
ceeds
he maximum utof-round,eborehe cy{inder
to oversrze.
Out-ol-round:0.01gmm
0.0007
n) max.
5. lftheupper
part
of a cylinder allshows neven ear,
rnove he ridge
with
a
ridge eamer.
B3
Slandard 71.006-71.013 (2.7955-2.7958)
0-25
0.010)
versize 7 1.256-7 .263
2.8053,2.4056)
0.s0
0.020)
vercize
71.506-71.513
2.8152
2.81
5)
0.75
(0
030) oversize
7 .756-71.763
2.8250
2.8253)
1.00
(0.04)
oversEe 72.046 72.01
12.8349-2.4352)
B-55

8/20/2019 Mazda 121, Kia Pride Repair Manual Vol 1
http://slidepdf.com/reader/full/mazda-121-kia-pride-repair-manual-vol-1 94/389
INSPECTION
REPAIR
o -
R|NG
GnoovE
lo.7m
n)
OIAMETER
PISTON.PISTON
RING,
AND
PTSTON
IN
Plston
Caution
.
lf the
piston
s
reptaced,
he
piston ings
mustalso
be
replaced.
1.
Inspecthe outer
circumferences
f all
pistons
orseizure
or scoring.
Replace
he
piston
necessary
2.
Measureihe uter
diameter
f each
piston
t a rightangle
(90o)
o the
piston
n,
16.5mm
0'650 n) below he
oil
ring and
oweredge.
Piston diameter
mm
in)
3. Measurehe
piston{o-cylinder
learance
Clearance:
.039-0,052mm
(0.0015-0.0020
n)
Maximum:
.15mm
0.006 n)
4. lf theclearance
xceeds
he maximum,
eplacehe
piston
or reborehe cylinderso fit oversize istons
FING
Pision and
Piston
Rings
1 Iveasure
he
piston
ing o
ring and
clearance
roundhe
enlire ircumference
srng
new
plslon
nng.
Clearance
Top
and Second)
B3
0.030-0.070
0.0012-0
0028)
015
{0.006)
lf heclearance
xceeds
he
maximum,
eplacehe
piston.
Inspect
he
piston
ings
or damage,
bnormal
ear, nd
breakage.
eplace
he
piston
ings
i necessary
4. Insert lie
piston
ing nto he
cylinderby
hand
and use he
Diston o oush
it to
the bottom
of the
ring travel
2.
3 .
70.961
7
0.967
2.7937
2.7939)
0.25
(0.010)
ove6ze
71.21
71.217
2.AO36-2.aO2A)
0.50
0.020)
versze
71.461
71.467
12
A134-2.8137)
0.75 0.030) versrze
7 t .711-71 .717Q.A2$-2.A235)
] 00
(0
04)
oversize
71.961-7r .967
2.8331 .8333)
B-56

8/20/2019 Mazda 121, Kia Pride Repair Manual Vol 1
http://slidepdf.com/reader/full/mazda-121-kia-pride-repair-manual-vol-1 95/389
INSPECTION REPAIR
f-6t'1
L'----\-v
5. Measureach
pislon
ingend
gap
witha
eeler
auge.
Re-
place
he
piston
ing f necessary.
Erd
gap
Top : 0.15-0.30mm
0.006-0.012
n)
Second: 0.30-0.45mm
0,011-0,017
n)
Oil rail : 0.20-0.70mm(0.008-0.028 n)
Maximum: 1.omm
0.039
n)
Pistonand Piston
Pin
1.
Measure ach
piston in
holediametern X
andY direc-
tionsat lour
points.
Diameier:19.988-20.000mm
0-7869-0.7874
n)
2. Measure achoiston indiameler
n X
andY directionsi
four
points.
Diameter:
19.974-19.980mm
0.7864-0.7866
n)
3. Caiculate
he
oistonDin{eoiston learance.
Clearance:
,008-0.026mm 0.0003-0.0010n)
4. Il
the clearance
xceeds pecification,eplace
he
piston
and/ofoiston in.
CONNECTING
OD
1.Measure achconnecting
od
bushing
nner
diameter.
Diameter:
19.943-19.96lmm
(0.7852-0.7859
n)
2. Calculatethe
/earance
etween
heconnectinood
bush-
ingand
piston in.
Interterence: .013-0.037mm
0.0005-0.0015
n)
3. Measure achconnecting
od or bending. epair
r
re
place
he
connecting
od if necessary.
Bending.'
.075mm
0.0030
n) max./somm
1.97
n)
B-57

8/20/2019 Mazda 121, Kia Pride Repair Manual Vol 1
http://slidepdf.com/reader/full/mazda-121-kia-pride-repair-manual-vol-1 96/389
INSPECTION
REPAIR
CRANKSHAFT
1. Check he
ournals
nd
pins
or damage, coring, nd
oil
holeclogging.
2.
Set
he crankshaft
n V'blocks.
3. Measure
he crankshaft
unout t the
center
ournal.
Replacehe crankshaft
f
necessary.
Runout:0.04mm
0.0016
n) max'
4. Measureach
ournal
iameter
n X and
Y directionst wo
points.
Main
ournal
Diameter:
49.938-49.956mm
1.9661-1.9668
n)
Out-of-round:
.05mm
0.0020
n) max.
Crankpin
ournal
Diameter:
39.940-39.956mm
1.5724-1.5731
n)
Out-ol-round:
,05mm
0,0020 n) 6ax.
5. lfthediameter
s ess han
heminimum,
rind
he
ournals
to matchan
undersizeearing.
Undersize
ea ng:
0.25mm
0.010
n),0.50mm
0.020
n),
0.75mm
0.030
n)
Main
ournal
diameterundelsize
Crankpin
ournal
diameler
undersize
mm
(in)
BEARING
MalnBeadng
and Connecting
Fod Bea
ng
Check he main
bearings nd
he connecting
od bearings
for
peeling,
coring,
nd other
damage.
t t \
f----T----i
\i_,i
Bearino ize
0.25
0.010)
ndersze
49.688-49.706
.9562
1.9569)
0.50
0.020)
ndersze
49.438-49.456
1.9463-1.9470)
0.75
(0.030)
ndelsEe
49
188-49.206
1.9365-1.9372)
0.25 {0.010)
unde6ize
39.690-39.706 {1.5626-1.5632)
0.5010.020)
rndersize 39.440-39.456
1.5528-1.5534)
0.7510.030)rndersize 39190-39.20615429-1 5435)
$dr
E B E
EBB
B-58

8/20/2019 Mazda 121, Kia Pride Repair Manual Vol 1
http://slidepdf.com/reader/full/mazda-121-kia-pride-repair-manual-vol-1 97/389
INSPECTION
REPAIR
sry6
f,*f^^y
TIMINGBELT
Caution
.
Never orcelully
wist,
turn
insideout, or bend he
timing beh.
.
Do
nol allow oil
or
grease
on the belt,
1. Replace
he iming
belt f there
s any oil
or
grease
n it
2. Check
he iming elt
or damage,
ear,
peeling,
racks,
and hardening.
eplace
he iming
belt l necessary.
TENSIONER,
DLER
Caution
.
Do
not clean
he lensioner
or idler
with cleanlng
fluids.
ll necessary,
use a
solt lag to wiPe
them
clean,
and avoid scratching
hem.
Checkhe
ensionernd
dlerfor mooth
otation ndabnor-
mal noise.
Fleplacehe ensioner
r
idler l necessary
TENSIONER
PRING
Measurehe ree
ength f
he ensioner
pring.Replacehe
tensioner
pring
f necessary.
Free
ength:54.0mm
2.520
n)
PULLEY
Timing Belt
Pulley,Camshalt
Pulley
Cautlon
.
Do not
clean he
pulleys
with cleaning
luids' ll
necessary,
se a soft
rag to wipe them clean,
and
avoid
scralching
hem.
Inspectthe
ulley
eeth
orwear, eformation,
ndother
am-
age.
Beplace
he
pulley
f necessary.
G
r-'E
T{7\\E
sry
lilll-1LlE
-5*\
reF.-
ZilF\
rsr-
Vg
B-59

8/20/2019 Mazda 121, Kia Pride Repair Manual Vol 1
http://slidepdf.com/reader/full/mazda-121-kia-pride-repair-manual-vol-1 98/389
ASSEII/IBLY
ASSEMBLY
PREPARATION
ssT
49 D011001
suppon
block
49H011 018
Support
lock
insiallation l
49 D011
03
installer
pislon ins
49 8134
044
Piston
pin
quide
inslalatLon
49
E301 60
Brak€,
ng
gear
49 E301
61
Body
ean
oi
49 E3o1
60)
49 E301
62
Collat
(Parl
oi
49 E301
60)
engine
rotation
49
AO12 Pe
sping
ilier
installalion
49
B0l2
012
Body
(Parl
oi
49 BO12
A2)
inslallation
f
498012
13
(Part
r
49
Bo12 A2)
inslallationf
49 8012
14
49 80120A2)
installation
f
49 0636
1008
lilter
installation f
49 SE01
310
Centellng
ool,
installation f
1. Clean
all
parts
before
einstallation.
2. Aoplv
new engine
oil to all
sliding nd
rotatilg
parts.
3. R;phce plainbearingsf theyarepeelingburned'or otherwse amageo
4 Tidhren ll
boltsand
nuls
1o he specified
orques
cluton
.
Do not
reuse
Easkets
or oil
seals.
B-60

8/20/2019 Mazda 121, Kia Pride Repair Manual Vol 1
http://slidepdf.com/reader/full/mazda-121-kia-pride-repair-manual-vol-1 99/389
ASSEMBLY
CYLINDER LOCK
INTERNAL
ARTS)
TorqueSpecifications
CYUNOEF
WALLS
PAOTBUSTON
9mm 0.75
n)
JOUFNALS
T
8-61

8/20/2019 Mazda 121, Kia Pride Repair Manual Vol 1
http://slidepdf.com/reader/full/mazda-121-kia-pride-repair-manual-vol-1 100/389
ASSEMBLY
Connecting
Rod
1
Assemble
he SST
as
shown.
2. Apply
engine
il o
the
piston
ln
INOENTIFICATION
ABK
3. Set he oiston
n he
SST
with
he F
mark
acing pward
4 Assemtjlehe oiston
nd
he
connecting
od n
the dlrec'
tion rom
which
hey
were
disassembled
Pressure
torce:
4905-14715
N
(500-1s00 kg'
I100-3300
lb)
5. Whire
nserting
ie
plston
in.
check
he
pressure
orce f
it rs ess hanaoecified,
eplace
he
piston
in
or
thecon-
neclno
oq.
6- Pressihe
iston
in
nto
he
piston
ndconnecting
odun-
til the SST
contacts
he stopper
olt
7. Check
he
oscillation
orque
of
the
connectlng
oo
(Refer
o
Page
8-46.)
Piston
Ring
1.
nstallhe hree-piece
il
rings
on he
pistons
(1)
Applv
clean
ngine
irlo
heotl
ing
spacer
nd
rails
i2) lnslall
he
oil
rinO pacer
with he
ends
upwaro
Note
.
ihe upper
and
owertails
a.e
he
sameand
may
be
lnstalied with elther lace upward.
(3)
Installhe
upper
ailand
owe'
ail
8,-62

8/20/2019 Mazda 121, Kia Pride Repair Manual Vol 1
http://slidepdf.com/reader/full/mazda-121-kia-pride-repair-manual-vol-1 101/389

8/20/2019 Mazda 121, Kia Pride Repair Manual Vol 1
http://slidepdf.com/reader/full/mazda-121-kia-pride-repair-manual-vol-1 102/389
ASSEMBLY
THFUSI
METAL
(2)
lnstall
he upper
main
beanngs
nd
hrust
bearings
i3t
Set
he
crankshatt
n the
cyl'nder
lock
Caution
lio
not
totate
rtte
crankshaft
when
measuting
he
oil
clealances.
(4)
Position
Plastigage
top
the
journals
n the axal
directton.
(5)
Install
he
ower
main
beanngs
nd
the
main
bearing
'-'
iaos
according
o tne
cap
number
nd
€
mark
(6)
Tnh€n
he
main
earing
ap
bolls
n lvo
or
hre€
teps
-
in'theorder
shown
n the
igure.
t'?l':!'Jt*.ii'irT-".0
m-ks,0-43 'rb)
17)Remove
he
main
earing
aps.
Fd
measure
he
PlaslF
' '
oaoeat
each
purnal
t
he
wldest
oini or hesmallest
ileirance
and
al
lhe
narrowest
oint or lhe
largest
clearance.
fgr
lt he
oil
clearance
xceeds
pecilicalion
rind he
'
'
crankshaft
nd
useundersze
main
bearings
(Refero PageB-58.)
Oil clearance:
.018-O,O36mm
0'0007--'{''0014
n)
Maximum:
O.lomm
0.004 n)
2.
Apply
|beral
mount
l
clean
ngine
il
o he
main
bea'
inqs,'thrusr
earings
no
main
ournals
s. inidr
thi
crarkst'Jtl
nd
he
marn
ean'rg
aps
accord-
ing
to
the cap
number
nd
e
mark.
4. Tiohten
he
main
bearing
ap
bolts
n two
or
three
steps
in the
order
shown
n the
igure
Tiqhteninq
orque:
!r-sg
-Hm
15.s-o'o
m-rg,
40-43
ft'lb)
B-64

8/20/2019 Mazda 121, Kia Pride Repair Manual Vol 1
http://slidepdf.com/reader/full/mazda-121-kia-pride-repair-manual-vol-1 103/389
ASSEII'BLY
5. \4easurehe
crankshaftnd
play.
End
play
0.080-0.282mm
0.0031-0.0111
n)
Maximum:
.30mm
0.012
n)
6.
f
heend
play
xceedsthe aximum,
rind
hecrankshaft
and nstallan veasizehrust earing
r replacehecrank-
shaft nd hrustbearing.
Thrust
beadng
width
Standard:
2.500-2.550mm 0.0984-0.1004
0.25mm
0.0t0
ln) overaize:
2.625-2.675mm
0.1033-0.1053
0.50mm
0.020
n)
ove6ize:
2.750-2.800mm
0.1083-0.1
102
0.75mm
0.030
n)
oversize:
2.875-2.925mm
0,1
132-0.1152
Pision
and ConneciingRod Assembly
in)
in)
tn)
in)
MATCHINGMAFKS
Cautlon
.
Prolect
he connecting od bolts with rubber
sleeves
to prevenldamage o the crankpin ournals.
Connectlng
Rod
Cap
'1.
[/easufeheconnectingod bearing
ilclearancessang
thesame
rocedure
s or hemainbearing
ilclearance.
Caution
.
Align he matchingmarks
gn
lhe
cap and he
con-
necting odwhen nstallinghe connecting odcap.
Tighlening orque:
29-34
N.m
3.0-3.5
m-kg, 22-25 ft-lbl
Oil clearance: .028-0.068mm
0.001
-0.0027 in)
Maximum:
.lomm
(0.004
n)
2. fthe
oilclearancexceedsthe
aximum,
rind
hecrank-
shaft nd use
undersize
earings.
Refer
o
page
B-58.)
(_.
:/:\
,.-
|Qro.
oe,l
rl
t'r
\'rinl|*
B-65

8/20/2019 Mazda 121, Kia Pride Repair Manual Vol 1
http://slidepdf.com/reader/full/mazda-121-kia-pride-repair-manual-vol-1 104/389
ASSEMBLY
MEASURTNG
OCATION
3.
lvleasure
he
connecting
od side
clearances'
Sideclearance:
.110-0.262mm(0.0043-0.0103
n)
Maximum:
0.30m8
(0.012 n)
4. lf lhe
clearance
xceeds
he
maximum'
eplacehe con-
nectingod andcap.
5.
Appry
liberal mount
f clean
engine
ilto he crankpin
iournals
nd
connectlng
oo
Deanngs
6. nstall
he connecting
od
caps
with
he matching
marks
alioned.
7. Tig-hten
he
connecting
odcap
nuts
n wo
or hree teps
Tiohteninoorque:
is-31-Nm {ir.o-e.s
m-t<g,
2-25
lr'tb)
' ' l l l l I L ) )= r
-
8-66

8/20/2019 Mazda 121, Kia Pride Repair Manual Vol 1
http://slidepdf.com/reader/full/mazda-121-kia-pride-repair-manual-vol-1 105/389
ASSEMBLY
CYLINDER
LOCK
EXTERNAL
ARTS)
TorqueSpecilications
re-25
{1.r-2.6,
14-1r)
GAS(ET,
NEW
g r l
v7h
".*
$
E
GASKET,
EW
7i-r! Nn
(30-1r0
cm-kq,59-95 in-lb)
GASKET, EW
--..-t*
EEi
30-1
ro cD-ks, 6s-95
inrb)
GASKET.
13-25
O.3-2.7,
r3-20)
03uoB1.133
Fear Cover
1.Apply sma,larnount
fclean ngine
iltotheipofa new
o seat,
2. Push he oil seal
slightlyn by
hand.
Cauiion
.
The oil
sealmustbe
pressed
n until t is
flush wilh
the edgeot the rear cover.
3. Presshe
oll seal n evenly
witha suitabie
ipe.
Oil seal outer diameter:
100mm
3.94
n)
4. Applysilicone ealant
o the shaded rea
shown n the
ngure.
8-67

8/20/2019 Mazda 121, Kia Pride Repair Manual Vol 1
http://slidepdf.com/reader/full/mazda-121-kia-pride-repair-manual-vol-1 106/389
ASSEIIIIBLY
. . ' i
! \o
\,
ILL-
-l- /l
5. lnstall
he
rearcover.
Tiohleninq
oroue:
?.s-t
t-N.m
a8o-l1O
cm'kg,69-95
in-lb)
Oll PumD
1.
Apply
a small mounl
l clean
rgine
orl o the
ipofa
new
oil seal.
2. Push
he oil
sealslightly
n by
hand
Caution
. Theoilseal muslbe pressed n until t is llushwith
the
edge of
the oil
PumP
body.
3.
Press
he oil seal
n
evenry
will' a su
able
pipe
Oil
seal outer
diametef:
44mm
1.73
n)
4. l\y'ount
new
gasket nd
nstallhe
oil
pump
Tiohteninq
orque:
js-zs
-N.m
{i.s-z.o
m-tg,
14-19
tt-lb)
Caulion
.
Do
not sqratch
he oil
Pump.
5. Cut
away he
portion f the
gaskethat
projects
rom
he
body
oward he
oil
Pan
side
Oil Strainer
Mourt a
new
gaskel
nd
nslall f'e
oil strainer'
Tiohteninq
oroue:
?.a-tt-l'lm igo-lto
cm-kg,
69-95
in-lb)
B-68

8/20/2019 Mazda 121, Kia Pride Repair Manual Vol 1
http://slidepdf.com/reader/full/mazda-121-kia-pride-repair-manual-vol-1 107/389
ASSEi'BLY
Oil Pan
1. Remove ll oreignmaterialrom he
contact urfaces.
2. Applysilicone ealanto the
shaded reas hown n the
figure.
l
-/-=
{. I
Qr)
3. Install ew
gaskets
nto he oil
pump
bodyand he rear
coverwith he
proiections
n he notches
s shown
n
he
figure.
4. Apply
a continuouseadof silicone ealanto he
oil
pan
along he
nside
f he boltholes ndoverlaphe ends.
5. Installhe oil
pan.
Tightening orque:
7.8-ti N.m
80-110
cm-kg, 69-95
in-lb)
End Plale
Installhe end
plate.
Tightening orque:
7.8-ll N.m
80-ll0
sm-kg,69-95
nlb)
Flywheel
MTX)
1- Remove
hesealant
rom
he
lwheel
bolt
holes
n he crank-
shaftand
rom
he
lywheel
olts.
Cautlon
.
lf all the
previous
ealant annotbe removed rom
a bolt,
replace
he bolt,
. Do not apply sealant f a new bolt is used.
2. Set he lywheel nlo he
crankshaft.
3. Apply
sealanto the
lywheel
oltsand
nstall
hem.
@
BM
B-69

8/20/2019 Mazda 121, Kia Pride Repair Manual Vol 1
http://slidepdf.com/reader/full/mazda-121-kia-pride-repair-manual-vol-1 108/389
ASSEMBLY
4. Hold
the
flywheel
with
he SST
Caution
.
Addapprox
3mm
0.51
n)ol
spacers
O)
to
space
the S5i
away
rom
he cylinder
lock'
MTX)
5.Trghtenhe oolls nn/vo r h'ee stepsn neoldershow4
Tiohtenino
orque:
go-roJ
H.m
s.s-r0.s
m-ks,
1-76
tt'lb)
Clutch
Disc and
Clutch
Cover
MTX)
Caution
.
Add aporox
13mm
0.51
n)
of spacers
@)
o
space
the
SSi ayyay
rom
the
cyllnder
block.
(MTX)
lnstall heclutchdiscand clutch
over
using
he SST.
(Refer
o Section
.)
Tiohtenino
orque:
i a-zo
-t't
m
ti.e-z.t
m-xl,13-20
ft'lb)
Drive Plate
(ATX)
1.Removeh-e
ealant
rom he orive
plate
boll
holes
n he
crankshaft
nd
rom he
drive
plate
bolts.
Caution
.
ll all the
previous
ealant
annot
be
removed
rom
a bolt. replace
he
bolt'
. Do nor aiply sealant t a new bolt is used,
2. Insrall
heaoapter.
've
plale,
nd
back|.g
plate
nto
he
crankshaft.
3
Aoolvsealant
o lhe
drive
plale
bolrc
and
nstall
hem
+. ttbio tne
drive
plate
with heSST.
5-Tiohtenhe
bo{s
n wo or
hreesteps
n
he
order hown
Tlohtenlnq
olque:
!s-rod tt.mg.s-t0.5 m-ks,7l-76 ft- lb)
i@el
B-70

8/20/2019 Mazda 121, Kia Pride Repair Manual Vol 1
http://slidepdf.com/reader/full/mazda-121-kia-pride-repair-manual-vol-1 109/389
ASSEMBLY
Timlng Belt Pulley
1. Installhe iming
belt
pulley.
2. Installthe
ulleyWoodrutf
eywith he apered ide oward
the oil
pump
body.
WaterPump
1. Remove ll oreignmaterial
rom
he water
pump
mount-
ino surface.
2. PEcea new
water
umpgasket
n
position.
3.
Install
he
watef
pumo.
Tightenlng olque:
19-25 Nm
(1.9-2.6
m-kg, 14-19 ft-lb)
B-71

8/20/2019 Mazda 121, Kia Pride Repair Manual Vol 1
http://slidepdf.com/reader/full/mazda-121-kia-pride-repair-manual-vol-1 110/389
ASSEMBLY
CYLINDEB
EAD
Torque
Specitlcalions
{50-90
cn-kg,
43-73
In'lb}
12,2-2.9, 16-211
e-__u
Pe
(65-e5 cd-&, 56-t2
rFlb)
valve Seal
1.
nstallhe
new
valveseal
onto he
valve
guide
by
hand
2. After
nstallation,
djust
he
protrusion
@
to
specitication
Proltusion:
8.1-18.7mm
0.713-0.736n)
93GOBr S0
B-72

8/20/2019 Mazda 121, Kia Pride Repair Manual Vol 1
http://slidepdf.com/reader/full/mazda-121-kia-pride-repair-manual-vol-1 111/389
ASSEMBLY
@GBEATEF
THAN
@
HEAOSIDE
Valveand
ValveSpring
1 Installhe
ower
pring eat.
2. nstallhevalve.
Caution
.
Install he spring wlth lhe closer
pitch
toward he
cylinderhead.
3.
,nslall
he
valve pnngand the upoerspring eat.
4. Compressne
valve
pring
w[h the SST.and nslallhe
varve
Keepers_
5. Removehe SST.
6.Tapthe ndof
hevalve ternightlylwo r hreeimeswith
a
plastic
ammerto
erifythalthe eepers
re
ully
eated.
Cylinder
HeadGasket
1.Remove ll
oreign
material
rom the op
of
the cylinder
block.
2. Place he newcylinder
ead
gasket
n
position.
CylinderHead
1. nstallhecylinderead.
2.
Apply
lean nglne
il o the bolt hreads nd seat aces.
3. Tightenhecylinder eadbolts
n woor hree
teps
n he
oroer
nown.
Tighteninq orque:
76-81
N.m
7.7-8.3
m-kg, 56-60 tt-lb)
CamshattOil Seal
1.Apply
a thincoat
of engine il o hecamshaftilsealand
cylinder ead.
2.
Tapthe amshaftilsealintothe
ylinder eadwith
suita-
ble
pjpe.
Cautlon
.
The oil seal
must be tapped
n
unlil
it is llush with
the cylinderhead,
Oil seal outer
diameter:
40mm
(1.57
n)
Camshall
1.
Apply ngine , l
o he
Journals
ndbearing
2. Insen ndmounthecamshalt
nto
position
ith he hrust
plate.
B-73

8/20/2019 Mazda 121, Kia Pride Repair Manual Vol 1
http://slidepdf.com/reader/full/mazda-121-kia-pride-repair-manual-vol-1 112/389
ASSEUBLY
OOWEL
PIN ANO
PIN GFOOVE
.t'i
Camshaft
Pulley
Note
.
Be certain
hat
the
dowel
pin
ot the
camshaft
also
laces straighl
upward.
1. nsiallhecamshaftulley nto he dowelpinwith hepin
groove acingstraight
pward
2. Trohlen
he camshatt
ulley
olt
Hold
hecamshafl
sing
a ;uitablewrench
n Ihe
cast
hexagon
s showr.
Tiohteninq
oroue:
ls-ot'itm
(6.0-o.z
m-tg, 36-45
ft'lb)
Rocker
Arm and
Rocker
Shalt
Assembly
Cautlon
.
Face
he rocker
shalt
ldentilication
mark upward'
.
The nstallation
bolt holes
are
dlfterent
or the ex-
hausi and
intake
sides.
ldentilication
mark
lN
........,.,....
ellow
reen
EX. . . . . . . . . . . . . . .
ink
'1
.
Assemblehe
rocker
rm and
rocker
haft
assembly s
shown
n the
igure-
2. nstallhe
rocker
armand
rocker
haft
assembly-
Caution
.
Thebolts
musl
be ightened
radually nd n he
or'
der shown.
Tidhteninq orque:
zz-za
il.m
(tz.z-z.s
m-xg,
6-21
tlb)
ValveClearance
Adiustment
Refer
o
page
B-7.
B-74

8/20/2019 Mazda 121, Kia Pride Repair Manual Vol 1
http://slidepdf.com/reader/full/mazda-121-kia-pride-repair-manual-vol-1 113/389
ASSEMBLY
OlEOBXJS3
Temperature
auge
unit
Installtheemperature
auge
unit nto hecylinder eadwith
seal ape on the hreads.
Tlghtenlng olque:
6.4-9.3
Nm
(65-95
cm-kg,56-82
in-lb)
Thermostat and
Thermostal Cover
1. Remove ll foreignmaterial
rom the thermostatover
mounting urface.
2. Installhe hermostatith he
iggle
pin
acing
upward.
3.
Install new
gasket
nd he hermostatover.
Tighlening orque:
l9-25 N{n
(1.9-2.6
m-kg, 14-19
ft-lb)
Caution
.
Thg
pdnted
side ol the
gasket
must ace he
thermg-
stat.
C:lrlinder
Head Cover
lnstallhe cylinder
eadcover.
Tightenlng orque:
4.9-8.8 N.m
50-90
cm-kg,
43-78 in-lb)
Caution.
lf
the
head
cover
gasket
s
reused,apply
sealant
n
the
groove
as shown.
;nY\v
w"ffi
PBINT€O
SIOE
a
_-/-$ 1
? \ +
B-75

8/20/2019 Mazda 121, Kia Pride Repair Manual Vol 1
http://slidepdf.com/reader/full/mazda-121-kia-pride-repair-manual-vol-1 114/389
ASSEIIBLY
TIIIIING
BELT
Torque
Specificallons
t9-25
O.9-2.5,
r/Frg)
7.t-ll
r*o
(30-110
cr*1, 6!l-95
i.'lb)
12-17
fl
.25-r.75,
r09-r52)
r!i6-106
{16-17,
1r5-122)
Timing
Belt Tensionel
1.lnstell
he ensioner
nd he
ensioner
pring
2.
Temporarilyecure
he ensioner
ith he
spring
ullyex-
tended.
Timino Belt
1.
Verii that hetming
belt
ulley
mark
saligned
ilh he im-
Ing
marK.
o3uoB11s4
B-76

8/20/2019 Mazda 121, Kia Pride Repair Manual Vol 1
http://slidepdf.com/reader/full/mazda-121-kia-pride-repair-manual-vol-1 115/389
ASSEMBLY
9 a N
(10
kg. 22 lb)
3- nstallhe iming elt o hal here
s no ooseness
t
he
lensionide.
caution
'/-\
.
Do not turn
he
crankshaft
ounierclockwiscd
2. Verifyhat
hecamshaft
ulley
marks realignedwith he
cylinder
eadcovermarks.
4. Turn hecrankshaftwo urns
lockwise,ndalign he im-
ing belt
pulley
markwith he
imingmark.
5.
Verify
hat
hecamshaft
ulley
marks realigned
with he
cylinder eadcovermark.
lf
notaligned,
emovehe iming €liand
epeatrom en-
sioner
nstallation.
6. Loosenhetensionerolt
oapplytensiono hetiming elt.
Caulion
.
Be sure not o apply
ensionother han thal ot the
tensionerspring,
7. Tlghtenhe ensionerolt.
Tightening
orque:
'19-25
N.m
1.9-2.6
m-kg, 14-19 ft-lb)
8. Turn he
crankshaft
ro urns lockwise
ndverityhat
he
timingmarks
recorrectly ligned.
9.
Measurehe iming eltdeflectiony
applyingmoderate
pressure
98
N, 0 kg, 22 b) midway etween
hecrank-
shaft
pulley
nd
he camshaft
ulley.
lf the iming eltdeflection
s notcorrect,emporarilye'
cure
he ensioneroltso hespring
s ullyextended nd
repeat leps4-8 aboveor replacehe ensionerpring.
Deflectlon:
'|
1.0-13.0mm
0.43---0.51
n) at 98 N
('10
g, 22 b)
B-77

8/20/2019 Mazda 121, Kia Pride Repair Manual Vol 1
http://slidepdf.com/reader/full/mazda-121-kia-pride-repair-manual-vol-1 116/389
ASSEMBLY
TIMING
BELT
covEa
Timlng
Belt Covet
lnsta[ he ower
andupper
iming
beltcovers
and
new
gaskets
Tlqhteninq
olque:
?.4-t
t-Hm
igo-tro
cm-kg,69-95
in-lb)
Crankshaft
Pulley
1. Install
he
pulley
oss.
Caution
.
Add approx
13mm
0,51
n) ol spacers
rt)
to space
the SSi away
ron the
cylinder
block.
(MTX)
2.
Mount he SST
and
ighten
he
pulley
ock
bolt
Tiohteninq oroue:
iso-ro1
*m
oe-t7
m-kg,115-122
inb)
3.
Removehe SST.
4. Installhe
crankshatt
UlleY.
5. Install
he
plate.
waler Pump
Pulley
Install
he water
pump
Pulley.
Tiohteninq
otoue:
?.9-rr-N..
a8o-1lO
cm-kg,
69-95
Inlb)
0rEoBx'3c
B-78

8/20/2019 Mazda 121, Kia Pride Repair Manual Vol 1
http://slidepdf.com/reader/full/mazda-121-kia-pride-repair-manual-vol-1 117/389
ASSEMBLY
AUXILIARY
ABTS
TorqueSpecilicalions
15-27
(r,5-2i, r1-20)
@w
r
e3-1 13
e.5-tt.s,
3s-€3)
GASKET, EW
19-25
0,9-2.5,
r.-11)
1e-30
(1,e-3,r,
13r2)
Engine
Hangel
Instailhe
ront
and
rearengine
hangers.
Tlghtenlng orque
Front 37-63
N.m
3.8-5.4
m-kg, 27-46
ft-lb)
Real: 19-25
N{n
(1.9-2.6
m-kg, 14-19 ft-lb)
B-79

8/20/2019 Mazda 121, Kia Pride Repair Manual Vol 1
http://slidepdf.com/reader/full/mazda-121-kia-pride-repair-manual-vol-1 118/389
ASSEMBLY
Spa*
Plug
1. Apply nitserze
ompound
r
molybdenum-based
ubdcant
to the spark
Plug
hreads.
2. lnstallhe
spark
Plugs.
Tiohteninq
oroue:
is-zs'i l .m
1t.s-z.s m-rg, 11-17 ft lb)
Oil
Dlpstick
Installhe
oil dipstick.
Oil
PressureSwilch
lnstallhe oil Dressure
witch.
Tiohteninq
orque:
lz-re-tt.m ti.z-r.8
m-kg,104-156
n-lb)
Oil
Filter
1. Remove
ll toreign
material
rom
the oil
iiltermounting
surlace.
2.
Applya small
mount
i clean
ngine
ilto
he ubber eal
of
the oil
ilter.
3. Install
he oil
ilterand
ighten
t by
handuntil he
rubber
sealcontactshe base.
4. Tighten
he
ilter
1
and
1/6 urn
witha
filterwrench
No.3
Engine
Mount
Brackel
Install
he No.3engine
mountbracket
Tiohteninq
otoue:
ss-t
t3-
Hln
g.s-i1.5
m-kg.
69-83
ttlb)
Allernator
1. Installhe
alternator
trap.
Tiahtenino orque:
iz-sz
-t't.m
1s.e-s.o
m-t<g, ?-38
ft'lb)
2. nstallthe
lternator
ndalternator
rive
beft Looselytight'
en the
alternator
nstallationolt.
3. Adjust
he drive
beltdeflection.
Refero
page
B-5.)
Tightening
orque
Alternator
nslallation
bolt
(D
:
37-52
N.m
3.8-5.3 m-kg,
27_38
ftnb)
Belt-adiustlng
oll
@
:
'19-25
N.m
1.9-2.6
m-kg,
14-19
tt-lb)
B-80

8/20/2019 Mazda 121, Kia Pride Repair Manual Vol 1
http://slidepdf.com/reader/full/mazda-121-kia-pride-repair-manual-vol-1 119/389

8/20/2019 Mazda 121, Kia Pride Repair Manual Vol 1
http://slidepdf.com/reader/full/mazda-121-kia-pride-repair-manual-vol-1 120/389
ENGINE
STAND
DISMOUNTING
ENGINE
TAND
DISMOUNTING
PROCEDURE
1.
Remove
he engine
rom he SST
(enginestand)
2.
Remove
he SST
(englnehanger) lom
he englne.
3.
nstallhe
parts
shown
n the igure
Torque
Specitications
waler lnlet
Pioe
'1
. Removelfdreign
material
rom he
water
nlet
ipe
moun!
ino
surface.
2.
Inatall new
gaskel
nd
he waier
nlet
pipe
Tiohteninq
oroue:
is-zs
-Nm
(i.s-z.e
m-kg'
14-19
ft-lb)
37-52
(3,3-5,3, 27-34)
\
(fr-----
---
ts=;\
37-52
{3.H.3,
27--33)
1e-25
0,9-2.3,
14-r9)
{8O-iio
m-rq, 69-t5
in'lb)
O.FIING,
NEW
APPLY
ENGINECOOLANT 16-2311.5-2,3,
12-1n
|5fi
B-82

8/20/2019 Mazda 121, Kia Pride Repair Manual Vol 1
http://slidepdf.com/reader/full/mazda-121-kia-pride-repair-manual-vol-1 121/389
ENGINE TANDDISMOUNTING
3. Applya small mount f engine oolanttohe new
O-ring.
4. nstallhe waterbypass
ipe.
ExhaustPioe
Bracket
lnstallhe exhaust ioebracket.
Tightening orque:
37-52
N{n
(3.8-5.3
m-kg, 27-38 fi-lb)
A/C ComDressor rackel
Installhe uC comoressor
racket-
Tighlening
orque
@:
19-25 N.m
1.9-2.6
m-kg, t4-19 ftJb)
@:
37-52 Nm
(3.8-5.3
m-kg, 27-38 ft-lb)
ExhaustManitold
1. Remove
ll
oreignmaterialrom heexhaust anifoldon-
tact surface.
2. Insiail new
gasket
nd the exhaustmanifold.
Tightening orque:
16-23 Nm (1.6-2.3 m-kg, t2-17 ft-lb)
ExhaustManitold nsulalor
Install
he exhaust
manitoldnsulator.
Tightening
orque:
7.8-11 N.m
80-110
cm-kg, 69-95 In-lb)
B-83

8/20/2019 Mazda 121, Kia Pride Repair Manual Vol 1
http://slidepdf.com/reader/full/mazda-121-kia-pride-repair-manual-vol-1 122/389
INSTALLATION
INSTALLATION
PROCEDURE
Tighten
ll bolts
and
nuts o the
specified
orques.
Step
I
Join he engine nd ransmission.
Torque
Specilications
TX
6!-a9 {6.5-r.r,47-16)
37-52
(3.3-s.3,
27-33)
37-52
(3.3-5.3, 2?-33)
3?-s2
(3.3-5.3, 27--33)
ATX
37-52
(3,3-5.3, 27Ja)
37-52
e.a-5.3,
27--33)
B-84

8/20/2019 Mazda 121, Kia Pride Repair Manual Vol 1
http://slidepdf.com/reader/full/mazda-121-kia-pride-repair-manual-vol-1 123/389
INSTALLATION
Step
2
Warning
.
Be
sure he vehicle s
securely
suppgrtedon safety stands.
Torque Speqifications
Engine
and transaxleassembly
1. Suspendhe engine nd transaxle ssembly.
Caution
.
Do nol damaEe nycomponentsn he
engine om-
partment.
2.Align heNo.3enginemountboltswith heenginemounl
mounting oles.
B-85

8/20/2019 Mazda 121, Kia Pride Repair Manual Vol 1
http://slidepdf.com/reader/full/mazda-121-kia-pride-repair-manual-vol-1 124/389
INSTALLATION
IffiI
No.1 ENGINE
MOUNT
No.2 ENGINE
I,IOUNT
Engine
mouni
1.
nslallhe
\o.1engine
ounl
utand rghten
Tiohteninq
orque:
gz-sr
1m
1il.a-s.s
m-rg,
27-38lr-tbl
2. Installhe No.2enginemounlnut and ighten.
Tiohteninq
orque:
iz-st
-tr.m
(g.g-s.g
m-tg, 27-38
ft-lb)
Engine
mount
member
Install
he engine
mountmember.
Tiohteninq
orque:
ea-es
-Nm
16.s-S.l
m-t<g, 7-66
ft-lb)
Step
3
Torque
Specificalions
15-22
0.6-23,
1r-16)
31,-46
3.2-4.7,
23-33)
40-s4
{4.r-s,5,
2s--r0)
*-"",u.u-",,
r-.",J
37-51
(3.3-5.3. 27-33)
&..-..-..-------'n*.,".*,
',
o,*"
B-86

8/20/2019 Mazda 121, Kia Pride Repair Manual Vol 1
http://slidepdf.com/reader/full/mazda-121-kia-pride-repair-manual-vol-1 125/389
INSTALLATION
Drlveshaft
1. Apply
grease
o the
end ot the driveshaft.
Caulion
.
When nstalling
he drlveshaft,be caretul
not to
damage he oil seal.
. After nstallation, ull he ront huboulward o con-
lirm that the driveshalt s
sequrely eld bythe
clip.
2 Fil
a newclip and
nstall
he driveshaft.
3. Installhe owerarmball-jointo
he knuckle,
nd ighten
the
clinchbolt.
Tightening
orque:
43-53 N.m
4.4-5.5
m-kg,
32-39
fl-lb)
Clutch cable
lnstall
he clutch ableand
check
diffrection.
(Refer
o Section .)
Shlft control cable
(ATx)
Installhe shitt ontrol
able o the ransaxle.
Tightening
orque:
6.9-11 Nm
(70-110
qm.kg,
l-95
inlb)
Shift control rod
(MTX)
Installhe shift ontrol od
o the
ransaxle.
Tightening
orque:
'16-22
Nm
(1.6-2.3
m-kg,12-16 in-lb)
Extension
bar
(MTX)
Installhe extension ar o the ransaxle.
Tightening orque:
3l-46
N.m
3.2-4.7
m-kg, 23-34 in-lb)
B-87

8/20/2019 Mazda 121, Kia Pride Repair Manual Vol 1
http://slidepdf.com/reader/full/mazda-121-kia-pride-repair-manual-vol-1 126/389
INSTALLATION
Speedometer
able
lnstallhe
sDeedometer
able
Tldhtenlnq oroue:
?.s-rfN.m iao-rzo
cm-ks,
9-96
In'lb)
Exhausi
pipe
'1
lnstallhe exhaust ipe
and
a
gasketi
hen
oosely
ighten
the ocknuts.
2.
Loosely
ighten
he bracket
ohs
3.
Tightenhe
ocknuts.
Tiohteninq oroue:lo-sl -t'l.m
tl.t-s.6
m-kq,
29-40
ft'lb)
Li,
B-88

8/20/2019 Mazda 121, Kia Pride Repair Manual Vol 1
http://slidepdf.com/reader/full/mazda-121-kia-pride-repair-manual-vol-1 127/389
INSTALLATION
Srep4
Connecthe hoses hown
n the igure.
Cautlon
.
Posltion he hose clamp n the original
ocationon lhe hose,and squeeze
he clamp lghtly
with largepliers o ensure a good fit.
Siep 5
Connect
he harness onnectors hown n the fioure.
B-89

8/20/2019 Mazda 121, Kia Pride Repair Manual Vol 1
http://slidepdf.com/reader/full/mazda-121-kia-pride-repair-manual-vol-1 128/389
INSTALLATION
Siep
6
Torque
Specificationa
(30-110
n-ts,
6e-ss
lFlb)
B-90

8/20/2019 Mazda 121, Kia Pride Repair Manual Vol 1
http://slidepdf.com/reader/full/mazda-121-kia-pride-repair-manual-vol-1 129/389
INSTALLATION
&6
A/C
compressor
(it
equipped)
Installhe uC compressor.
Tightening
orque:
37-s2
N.m
3.8-s.3
m-kg, 27-38
ft-lb)
P/S oil
pump
and bracket
lnstallhe P/Soil oump
and bracket.
Tightenlng orque:
37-52
N.m
3.8-5.3
m-kg, 27-38 ftlb)
Drive
bell
1.
nstallhe P/Sand/or
A/C drivebelt.
2. Adjust he
drivebelldeflections.
Refer
o
page
B-5.)
Radiatorand cooling
an assembly
1. nstallhe radiator nd
coolingan assembly.
Tighlening
orque:
7.8-11 N.m
80-il0
cm-kg, 69-95
in-lb)
2.
Tightenhe
AJC
pipe
bracketo the
radiator.
Tightening
orqle:
6.4-9.3
Nm
(65-95
cm-kg, 56-82 in-lb)
3. Connect
he uooerand
ower adiator
oses.
Caution
.
Poaltion
he hoseclamp
n the orlginal ocationon
ihe hose,and
aqueezehe
claBp lightlywlth large
pllers
g
ensure
a
good
fit.
4. Connecthe coolanteservoirose.
5. Connect
he cooling
an connector.
6. Connecthe
oil cooler ose.
Al'X)
E
01EoBXI5a
I
J .DLEF
IJLLEY COMPFI
B-91

8/20/2019 Mazda 121, Kia Pride Repair Manual Vol 1
http://slidepdf.com/reader/full/mazda-121-kia-pride-repair-manual-vol-1 130/389
INSTALLATION
Accelerator
cable
1. nstall
he accelerator
able
z. AOiust
ne
caUte
etlection
y turning
nut
@
Deflection:
-3mm
(0.04--'0.12
n)
Battery
duct,
battery
car er,
and
battery
1. nstall
he battery
uct.
2.
Install
he battery
arrier.
Tlohtenlnq
orque:
ig-zs
l.m
(i.9-2.5
m-kg,
4-19
fl-|b)
3.
Install
he battery
and
the
battery
bracket.
Tiohtgnino
orque:
i.s-s.5
N.m'(so-60
cm-kg,
26-52
inlb)
Air
cleaner
assembly
lnstall
he
air cleaner
assembly
Undercover
and slde
cover
lnstallhe
undercover
nd
sidecover.
-YA
steDs After
Installatlon
i.
ii'tn" 6"si"J
o-'l
i"
drarned,
ill with
he specified
mount
nd
ype
of engine
il
(Refer
o Section
D.)
2. Fill he
radiator
with he
specified
mount
nd
ypeof
engine
oolant'
{Retero
Section
.)
s..ii il" to^""*|. oil;.s drained,illwith hespecifiedmount nd ype
of transaxle
il
(Reter
o Sections
,
K
)
4. aonnect
he
negative
attery
able
5.
Start
he engine
and
check
he ollowing
{1) Enaine
il,
ransaxle
il and
engine
oolant
eakage
izi
tgnitioniming.
dlespeed
Refer
o
page
B-8)
(3)
Operation
t
emission
ontrol
yslem
6. Perform
road est.
7. Recheck
he
engine
il and
engine
oolant
evels.
B-92

8/20/2019 Mazda 121, Kia Pride Repair Manual Vol 1
http://slidepdf.com/reader/full/mazda-121-kia-pride-repair-manual-vol-1 131/389
LUBRICATIONYSTEM
1NDEX.......,.,...,..,.......................,,.,..........
L 2
ouTLtNE.,............,
...,.,
L
3
sPECtFtCAT|ONS....................................
- 3
TnoUBLESHOOT|NG
U|DE.,......,...,.,..,....
L 3
otL PRESSURE.........,.,........................,.,..
- 4
PREPARAT|ON,,...,...............................,.
- 4
TNSPECTTON...................,..................,..- 4
ENGTNEtL,.,.....................,..,.................
- 5
tNSPECT|ON...........,..,..................,.,.,....
- s
REPLACEMENT,,.,....................,.............
- 5
otl F|LTER...,....,..,.,.,.,........................,...
- 6
REP1ACEMENT.......,..............................
L
6
otl PAN..................,,..............................
- 7
REMOVAL|NSTALLAT|ON......,.,..,.,........
-
7
otl
PUMP..,.,...,..,.........................,......,...
L I
REMOVALTNSTALLATION
...................,.- I
D|SASSEt\4BLYASSEMBLY....................
-l l
TNSPECTTON.....................,.,.,,..............
-12

8/20/2019 Mazda 121, Kia Pride Repair Manual Vol 1
http://slidepdf.com/reader/full/mazda-121-kia-pride-repair-manual-vol-1 132/389
INDEX
INDEX
ENGINE IL
SPECIFICATION
API
SEBVTCED,
SEOB
SF
3.4
ir6.s
3-6us
qr,
3.0
hp
q0
l.
Oil
pressure
4
Oil-Pan
Inspectron...........-....................
page
D-
4
-
Removal/
nstallat ion
"
page
D-
7
2. Engine il 5 OilPumP
l"nspection.......--...-......................
age
D- 5
Removal/
nstallat ion " page - I
Rep1acement................
..
. .
pi6e
O-
s
Disassembly
Assembly
page
D-1'1
3.
Oil ilter
Rep1acement . . . . . . . . . . . . . . . . . . . . . . . .
.
page
D-
6
D-2

8/20/2019 Mazda 121, Kia Pride Repair Manual Vol 1
http://slidepdf.com/reader/full/mazda-121-kia-pride-repair-manual-vol-1 133/389
OUTLINE, ROUBLESHOOTINGUIDE
OUTLINE
SPECIFICATIONS
Anticipated
mbient
emperatureange
before ucceedingil change,
C
("D
TROUBLESHOOTINGUIDE
D-3
IemHmodel
B:]
Oil
pump
Tvpe
Regulaled
ressure
kPa
kg/cmz,psi)
343 441
(3.5-4.5,
50-64)
Oil
llter
Type
Full.i w,
pap€r
element
Felief
pres€ure
itferenlial
kPa
(kg/cmz,
sl)
98
1.0,
14)
Oilwarn g
p€sslre
kPa
kg/cm' si)
4.9-44
(0.05-0.45,
0.7-6.4)
Oil capacily
Tolal
dry
ensine) lilerc
USqt,
mp
qt)
3.4
3.6,
3.0)
Oll
pan
llers
USqt,
mp
qt)
3.0
3.2,
2.6J
Oiltlter liters
USqt,
mp
qi)
0 .1 7
0 .1 8 ,0 . r 5 )
Englneoil
(APl
serv
ce) SD.
SE,
r SF
Recommended AEViscosity
fc)
('D
-30 -20 -10
0 10 20
30 40
50
,--20
0 20 40 60 80 100 720
Engine il
5w'30
v
30
\
5EA----\
20w.20
:
'l0w-30
@
ffi
Possible
Cause
Remedy Page
Enginehardstarting
Insuflicieni
ngineoi l
D - 5
D - 5
Exceasive
oil
Oilworkng
up o. down
Oil eakage
Reier
to Section
B
Oll
pressurc
drop
Oil eakage
Wom
and/of amag€d il
pump
gear
Worn
plungerinside
il
pump)
r weak
prins
Clossed il strain€r
Excessive
a,nbeanng ,
.orneq
ng rod oea
rc
Clean
Reler to Seclion
B
o_o
Warnlng amp
lllumlnrtes
whlle
engineb running
Oil
prcssure
rop
Maltunction
Joil
pressure
wnch
Mallunction f electical srstenr
Fefer o Section
T

8/20/2019 Mazda 121, Kia Pride Repair Manual Vol 1
http://slidepdf.com/reader/full/mazda-121-kia-pride-repair-manual-vol-1 134/389
OIL
PRESSURE
49 0187
2AO
Gauge,
OIL
PRESSURE
PNEPARATION
ssT
INSPECTION
1. Remove
he
oil
Pressure
wltch
2. Screw
he SST
nto
he oil
pressure witch
ole.
3.
Warm
up the
engine
o
normal peratng
emperalure
4.
Run he engine
i
10Oo
pmand
3000
pm,
and
note he
gauge
eaorng.
Oll
pressure:
99-196 kPa
(1.0-2.0
kg/cm'
15-28
psi)'1000 pm
294-392
kPa
(3.0-4.0
kg/cmi,
43-57
psi)'3000 pm
5.
t rhe
Dressure
s
nolas
specitied
heck
or hecause
nd
reoaii.
Refer
o Troubleshooting
uide.)
D-4

8/20/2019 Mazda 121, Kia Pride Repair Manual Vol 1
http://slidepdf.com/reader/full/mazda-121-kia-pride-repair-manual-vol-1 135/389
ENGINE
IL
ENGINE IL
INSPECTION
1.
Be sure
he vehicles on level
ground.
2. Warm ptheengine
o normaloperatingemperature
nd
stop it.
3. Wait or iveminutes.
3. ET?,1",f;r","'i"t'3il"1i*ffitn"
',"u"' ndonditi
E
Note
.
The distancebetween he L and
F
marl6 on the dip
stick represents
.8
llter
{0.85
US
ql,
0.70
mp
ql}.
REPLACEi'ENT
warning
.
Be carelul when drainlng; he oil
is
hot.
1. Warm
p heengine
o normal peratingemperature
nd
stop rt.
2. Removehe oil
iller
ap and
he
oil
pan
drain
plug.
3. Drain he oil ntoa suitable ontainer.
4. Install new
gasket
nd he drain
plug.
Tightening
orque:
29-41 N.m
3.0-4.2
m-kg, 22-30 flnb)
o5u00x.011
5. Relillheengine
with he
specified
ypeandamount
f en-
gine
oil.
Reler
o
page
D-3.)
6. Retit he oil
iller
ap.
7. Flun he engine ndcheck or leaks.
L Check
he oil eveland add oil f necessarv.
Oil
pan
capaclty:
3.0
liters
(3.2
US
qt,
2.6 lmp
ql)
D-5

8/20/2019 Mazda 121, Kia Pride Repair Manual Vol 1
http://slidepdf.com/reader/full/mazda-121-kia-pride-repair-manual-vol-1 136/389
OIL
FILTER
,',,\
Y
r ) +
e
OIL
FILTER
REPLACEI'ENT
1.Remove
he oil
ilter
witha suitable
rench.
2.
Usea clean
ag
o wipe
otf he
mounting
urface n
the
enoine.
3.Ap-ply smallamountoflean ngine iltothe ubber eal
of
the new ilter.
4.Installthe
il ilter
and
ighten
t by hand
until he rubber
sealcontacts
he
base.
5. Hand iohtenrnq
vpe
Numbers
rinted
n
lilter)
Tiohtenihe
iltei
3i4 of a
turnbv
handafter
t contactshe
cvliinder
lock.
lf tightening
y
hand
s difficult,
se
a
suitable rench
Example:
. Wh;n the oil filter contacls he cylinderblockat
"
l
"
'
turn
il 3/4 of
a turn
fulther to
"4."
Filterwrench
ightening
ype
No
numbers
rinted
n ilter)
Tiohtenhe
ifter and
1/6 urns
witha suitable
rench t-
tei it
contacts
he cylinder
lock.
6. Start
he engine
nd
check
or eaks
7. Check ie oil
eveland
add
oil
f
necessary
Oll fllter
capacity:
0.17 iter
(0.18
US
qt,
0.15
mP
qt)
D-6

8/20/2019 Mazda 121, Kia Pride Repair Manual Vol 1
http://slidepdf.com/reader/full/mazda-121-kia-pride-repair-manual-vol-1 137/389
OIL PAN
OIL PAN
RE!'OVAL INSTALLATION
1.Disconnecthe negative
attery able.
2. Drain he
engine il.
3. Remove
he undercover nd sidecover.
4. Removen the ordershown n the igure, eferringo RemovalNote.
5.
Install
n the reverse rderof removal,eferring
o
InstallationNote.
GASKET,
BEPLAC€
REPLACE
REPIACE
'@
3r-52
(4.3-5.3,
27-36)
REPlACE
{3!-110
cfrkg, 69-95 tn.tb)
1.
Frontexhaust
ipe
and bracket
, lhr6^r.rorl di1l6n6r
3. Oilpanbolts
4.
Oil
pan
Bemovalo te . . . . . . . . . . . . . . . . . . . . . . . . . . . .
age
D- 8
Installat ion
ote..........................
age
D- 8
5.Gaskets
6.
Oil
strainer
D-7

8/20/2019 Mazda 121, Kia Pride Repair Manual Vol 1
http://slidepdf.com/reader/full/mazda-121-kia-pride-repair-manual-vol-1 138/389
OIL PAN
Rgmoval Noie
1. Removehe
oil
pan
mounting
olts.
2. lnserta screwdriver
r a suitable
ool between
he MBSP
and oil
pan
o
pry
them apart.
Cautlon
. Do nol Insed the prylngtool between hs iIBSP ard
cylindel
block.
.
Do not damage
or scratch
the conlact surlacea.
3. Removehe oil
pan.
lnatallation Note
Oil
pan
Cauilon
.
lf the bolts al€
to be reused,
remove he old aaal-
ant
from the bolt
thr€ada.
Tlghtenlng a boll with old sealant on lt may cause
cracklng
nalde he bolt
hole.
\ ^ Akit*
ffi"::+
1. Remove ll oreign
material
rom
he
contact urfaces.
2. Applysilicone ealant
o the endsof
a newoil
pan gaskets.
3.
Install gw
gaskets
nto he oil
pump
bodyand he rear
cover
with he
proiections
n the noiches
as shown n the
figure.
4. Applya continuous
eadof silicone
ealanto he oil
pan
along he nside
l the boltholesand
overlaphe ends.
5. lnstallhe oil
pan.
Tightenlng orque:
7.8-ll N.m
80-ll0
cm-kg, 69-95
in-lb)
Steps Atter Inslallallon
1. nstallhe undercover
nd sidecover.
2. Fill
with he specilied
mount nd
ypeof engine il.
(Refer
o
page
D-5.)
3. Connect he
negativebattery
cable.
4. Starthe engine
nd check
or eaks.
5-check he oil eveland add
oil f nec€ssary.
o1aoDxo11
D-8

8/20/2019 Mazda 121, Kia Pride Repair Manual Vol 1
http://slidepdf.com/reader/full/mazda-121-kia-pride-repair-manual-vol-1 139/389
OIL PUMP
OIL PUMP
REMOVAL INSTALLATION
1. Disconnecthe negative
attery able.
2. Drain he
engine il.
3. Removehe imingbelt.
Refer
o Section .)
4. Removehe oil panand ntegratedtittener.Retero pageD-7.)
5. Removen the ordershown n the igure,
elerringo RemovalNote.
6. Installn the reverse rdef
of removal,eferringo InstallationNote.
1.Timingbeltassembly
Serv ice. . . . . . . - . . . . . . . . . . . . . . . . . . . . . . . . . . . - . . . . . .ec t ion
2. Oil
pan
Removalo te . . . . . . . . . . . . . . . . . . . . . . . . . . . .
age
D 8Installat ionote..........................age
D- B
3. Aiternator
4.
uC
compressor
with
A/C)
Removalo te . . . . . . . . . . . . . . . . . . . . . . . . . . . .
age
1
0
5.
Timing
elt
pulley
Serv ice. . . . . . . . . . . . . . . . . . . . . . . . . . . . . . . . . . . . . . .
ecUon
6.Oil
pump
DisassemblyAssembly..........
age
D-1
1
7. Frontoil seal
Serv ice. . . . . . . . . . . . . . . . . . . . . . . . . . . . . . . . . . . . . . .ec t ion
o
I
i
REPLACE
19-2s
_
2ir-35
(1.9-2,6,14-rs)
e,r-_3.6i1
D-9

8/20/2019 Mazda 121, Kia Pride Repair Manual Vol 1
http://slidepdf.com/reader/full/mazda-121-kia-pride-repair-manual-vol-1 140/389

8/20/2019 Mazda 121, Kia Pride Repair Manual Vol 1
http://slidepdf.com/reader/full/mazda-121-kia-pride-repair-manual-vol-1 141/389
OIL PUMP
DISASSEMALYASSEMBLY
1.Disassemblen the ordqrshown n the igure, eierringo Disassembly oie.
2.Assemblen the reverse rderof disassembly,eferringo AssemblyNote.
1.Oilseal 6. Spring eat
Disassemblyote...............................elow 7.Pressure
pring
Assembly ote...
page
D-12 Inspeciion..............................-....
age
D
12
2. Pump over
Inspector distortion
nd damage
3. Outer otor
4. nner otor
5.
Boll
pin
B.Control lunger
lnspecl or wearand damage
L Pumpbody
/nspector
distortion
nd damage
DisassemblyNote
Oil seal
Removeheoilseal
with
a screwdriver
rotected
ith
a
rag.
5.9-3.3
Nm
(60-00.m.kg,
52-73
i.-lb)
o
e-@E.
l t ^
s_@
D-11

8/20/2019 Mazda 121, Kia Pride Repair Manual Vol 1
http://slidepdf.com/reader/full/mazda-121-kia-pride-repair-manual-vol-1 142/389
OIL
PUMP
INSPECTION
Pressure
Spring
1-
nspecthe
spring
or weakness
r
breaKage.
2. [/'leasure
he
reelength.
eplace
he spring
f necessary'
Free engih:
45,5mm
1.791 n)
RotorClearance
Measure
he ollowing
learances.
eplacehe
rotor
f necessary'
Tooth
lp
clearance:
0.20mm
0.0079
n) max.
Outer
otor
o
PumP
ody:
0.22mm
0.0087
n)
max.
93G0DX{30
Side
clearance:
0.l4mm
(0.0055 n) max.
;LS
r\>:>'\
A€sembly
Nole
Oll seal
1.
Applya smallamount
f
clean ngine
iltothe
ipol a new
oil seal.
2.
Push he oil
sealslightly
n by
hand.
Caution.
Theoil
sealmustbe
Pteesed
n until t is flushwlth
the edge
ol the
oll
PumP
body.
3.
Presshe oil
seal
n evenly
witha
suitable
ipe.
Oil seal
outel
dlameler:50.5mm
1.98 n)
D-12

8/20/2019 Mazda 121, Kia Pride Repair Manual Vol 1
http://slidepdf.com/reader/full/mazda-121-kia-pride-repair-manual-vol-1 143/389
E
COOLING
SYSTEM
fNDEX. . . . . . . . . . . . . . . . . . .
. . , ' . 'E-
2
ouTLlNE,..............
......
E- 3
spEctFtcATloNS....,......-.......................
-
3
TROUBLESHOOTING
U|DE....................,.
- 3
ENGINE
COOLANT.
...... E-
4
pREPARAT|ON.......................................
-
4
rNspEcTtoN............-.........-..................- 4
REP1ACEMENT..........,...........................
- 5
RADTATOR
AP.....
......
E- 6
PREPARAT|ON.......................................
- 6
rNSPECTrON...................,...........,..........
- 6
RADfATOR...........
......E-
7
REMOVAL
TNSTALLATION
............,........
- 7
rNSPECT|ON............,.............................
-
7
THERMOSTAT.......
.. '...
E- 8
REMOVAL
INSTALLATION
......,............ '.
- 8
tNSPECTrON..........,...............................
-
9
WATERPUMP.......
......E-10
REMOVALrNSTAI1AT|ON.....................- i0
ELECTRIC
OOLING
AN
SYSTEM
...'.......
E-l
t
SYSTEM
|Rcu1r.................."""""""""
E-1I
sysrEM
NSPECT|ON.......................,......
- l
I
FANMOTOR.......,..
. . . ' . '
E-12
tNSpECT|ON
.........................................
-12
REPLACEI,|ENT......................................
-l2
warER THEBMOSWITCH
.........................
-l3
REMOVAL
TNSTALLATION
..........-,.........
-i3
lNSPEcrloN
""""""
E-13
FAN
RELAY...........
......E-i4
REMOVAL
lNSTALLAT|ON
....-................
-l4
lNSPEcrloN..""""""""""""""""""" ' E-l4

8/20/2019 Mazda 121, Kia Pride Repair Manual Vol 1
http://slidepdf.com/reader/full/mazda-121-kia-pride-repair-manual-vol-1 144/389
E
INDEX
INDEX
1. Engine oolant
Inspect ion. . . . . . . . . . . . . . . . . . . . . . . . . . . . . . . . . . .
age
-
4
Rep|acement . . . . . . . . . . . . . . . . . . . .
. . . . . . . . .
age
- 5
2. Radiator
ap
Inspect ion. . . . . . . . . . . . . . . . . . . . . . . . . . . . . . . . . . .
age
- 6
3. Radiator
RemovalInsla|ation..................ageE- 7
4.
Thermostat
Removal
Instal|ation..................
age
E- 8
5.
Water
ump
Removal
Instaj|ation..................
age
E-10
E-2
6.
Electric
ooling
an system
System
ircu i t . . . . . . . . . . . . . . . . .
.
page
-11
Systeminspecr ion. . . . . . . . . . . . . . . . .
ageE-11
7. Fan
motor
lnspec i ion. . . . . . . . . . . . . . . . . . . . . . . . . . . . . . . . . . .
aSe
E-1?
8ep1acement . . . . . . . . . . . . . . . . . . . . . . . . . . .
page
-12
B.Waterhermoswitch
Removal
Insta||atron..................
ageE 13
9. Fan
elay
Removal
Installation...............
page
E-14
CONNECTOF
ENGINECOOLANT OTALCAPACITY:
5.0
5.3,
..r)
6.0
6,3,
,3)

8/20/2019 Mazda 121, Kia Pride Repair Manual Vol 1
http://slidepdf.com/reader/full/mazda-121-kia-pride-repair-manual-vol-1 145/389
OUTLINE. BOUBLESHOOTINGUIDE E
OUTLINE
SPECIFICATIONS
Enginemodel
|rem
B3
Coolingsyslem
Waier<,ooled,orced rculation
Coolanl
apacily lite6
(US qt,
lmp
qt)
[4IX 5.0
s.3
4.4) ATX.6O(6.3.s.3)
Centnrugalell-driven
Unllied
mechanical
eal
Tvpe
Openingemperature
'C
fD
86.5
89.5
(187-193)
Full-open
emperature
'C
fR
1OO
212)
Fifopen ltt
mm
(in)
8.5
0.335)
r more
Radiator
corugated
in
Cap
valve
opening
pressJre
hPa
kg/cm?. s, 74-103 0.75-r .05. - r5)
Cooling
an
l4olor
urrenl A
6 . 6 + 1
Outer ameter l
blade mm
(in)
300
r
.9)
TROUBLESHOOTINGUIDE
Problem Possible
Cau3e
Remedy Page
Overhealin9 Coolant
evel nsuiticient
Coolant eakage
Radlatorins
clogged
Badialor
ap malf nction
Cooiing
an
malf nclion
Thermogal
alfunction
Waler
passage
logg€d
Water
ump
malfunction
Clean
Clean
E - 4
E - 6
E-11
E - 8
E - 5
E-10
Coro€lon
E - 5
E-3

8/20/2019 Mazda 121, Kia Pride Repair Manual Vol 1
http://slidepdf.com/reader/full/mazda-121-kia-pride-repair-manual-vol-1 146/389
ENGINE
COOLANT
ENGINE
COOLANT
PREPABATION
ssT
INSPECTION
Waming
.
Neveiremove
he
radiator
cap
while he
engine
6
hot,
. W;D a thick clolh around he capwhen removing t'
.
wh;n
removing
he
radiator
cap,
loosen
tslowly
to the
tirst
stotuntllthe
Pressure
n the
radlalor
s
released,
and
then
remove
il.
muoEx.oo6
Coolant
Level
(Enginecold)
1. Venly hat
he'coolant
evel s
near he
radiator
rller
eck
2. Veritv
hat
he coolant
evel n he
coolant
eserviors be
weeh the FULL
and
LoW
marks
3.
Add coolant
t
necessary
CoolantOuality
1 Verffvhat hie
is
no buildup
f
rust
or scale
around
he
radiator
ap
or radiator
illerneck
2. Veritv hat
coolant
s lree
of oil
Replace
he coolant
f
necessary.
Coglant
Leakage
1.connect
radlalor
ester
commercially
vailade)
nd he
SST
o the
radiator
iller
neck,
z.
AppV tO3
kPa
(1.05 kg/cm'
15
psi)
pressure
o the
svstem.
3. V'erifv
hat
he
pressure
s
held
4. lt noias specified,heckor
coolant
eakage
E-4
49 DO15 A0 49 D015 02
49 DO15
40)

8/20/2019 Mazda 121, Kia Pride Repair Manual Vol 1
http://slidepdf.com/reader/full/mazda-121-kia-pride-repair-manual-vol-1 147/389
ENGINE
COOLANT
E
COOL^NTTEMPERATUFE
C
fF)
ol EoEx@7
CoolantProtection
Caution
.
Do not uae alcohol-
or
methanol-based
coolant.
.
Use
only soft
(demineralized)
water In the coolant
mixture.
1. Measurehecoolantemperature
ndspecfiic
ravity
ith
a thermometernda hydrometer.
2. Determinehecoolant
roreclion
y
referring
o he
graph
I
s. iili"
loor"n,
prot""tion
s
nor
proper,
add w"te, o, "oolanl.
E
Antlfreeze solutlon mlxture
percentage
Coobrn
pdeclion
Gravityat
2o.c
(68.0
oolant
Above
-16oC
(
3oR
65 35 1054
Above
-26oC
{-1soR 45 1066
Above 4ooo
i-40on 45
'1o78
REPLACEMENT
Warnlng
.
Neveropen he radialor cap while
the engine s hot.
.
Wrapa thlckclolh
around
hccap
when oosening.
.
When emoving
he radiatorcap, oosen t
slowly
to the tirst stop unlll the
presaure
n
the
radiator
is
released. and
then remove
it.
.
Use cautlonwhendraininghol coolant.
Cautlon
.
Do
nol use alcohol-or methanol-basedoolant.
.
Useonly sotl
(demineralized)
ater n the coolant
mixture.
.
Befors loosening he radlalor draln
plug,
verity thal
lhe radlatgrdrain hose aces slraight
down.
1 Bemove
he
radiator
ap and
oosen
e drain
plug
by hand
(MTE
or by a
wrench
ATX).
2. Drain he coolanlnloa suilable ontaner.
3. Flush
he
cooling
ystem
ith
water ntil ll races f color
aregonei hen et he system raincompletely.
4. Insiall
he drain
plug.
5. Fillwithhe
proper
mount ndmixture f ethylene
lycol
based oolant y referringo the ableabove.
Coolanicapaclty
lilers
USqi,
lmp
ql)
B3
i\,ITX
AIX
5.0
(5.3,
4.4)
6.0
16.3,
.3)
6. Run
heengine
ith
he adiatorap emoved ntilthe p
perradiator ose s hot.
7. With he enginedling,
dd
coolanto the radiator
ntil
t
reaches he bottomot the filler neck.
8. Installhe radiator ap.
E-5

8/20/2019 Mazda 121, Kia Pride Repair Manual Vol 1
http://slidepdf.com/reader/full/mazda-121-kia-pride-repair-manual-vol-1 148/389
E
RADIATOR
CAP
49 DO15 A0
49 D015
03
Adapler B
49 D015
A0)
RADIATOR
CAP
PREPARATION
ssT
INSPECTION
Radiato.
Cap
Valve
1. Remove
oreign
material
such
s
water
esidue)
rombe
tween
he radiator
ap
valveand
he
valve eat.
2. Attach
he radiator
ap o
a radiator
ap
ester
commer'
ciallv vailable)
ith heSST.
Apply
pressureraduallyo
74-103 kPa(0.?5-1.05 kg/cm" 11-'15
psl)
3.
Waitabout
O aecgnds.
Verityhat
he
pressure
as
not
decreased.
4. Feplace
he
radiator ap
il necessary
N€gative
Pressurc
valve
1.
Pull he negative
ressure
alve
10open
Verify hat
t
closes
omDletelv
hen
eleased
2. Check
or damag;
on
hecontact
urfaces
nd
orcracked
or deformed
eal
Packing.
3. ReDlace
he
radiator p
if necessary'
-,-'-_ \\
kk=fiK"DlN"
'
,--A\,\
\{
,l\\\//rIA\ f- /\\\\}1 \
\lt\v2liK\ -/ \,
' i i : : \ ! @ = -
E-6

8/20/2019 Mazda 121, Kia Pride Repair Manual Vol 1
http://slidepdf.com/reader/full/mazda-121-kia-pride-repair-manual-vol-1 149/389
RADIATOR
RADIATOR
REMOVAL INSTALLATION
Caution
.
Eetore oosening
the radiator drain
plug,
verlty lhat the radiator d.ain hose ac€s straight
down,
. Poallion he hosedamp in the original ocalionon the hose, and squeeze he clamp ightly
with large
pliers
to ensure
a
good
tit.
1
Disconnecl
he
negatrve
attery
able.
2. Drain he engine oolant.
3. Removen the order
shown n the igure.
4.
nstall
n the reverse
roerol removal
r*n
{3o-1
ro cfrrg,
6F95
hrb)
1.
Coolinganconnector
2.
Coolant eservoir ose
3. Radialor ose
4. Oilcoolerhose
ATX)
5. Radiator racket
6. Radiator
Inspect ion. . . . . . . . . . . . . . . . . . . . . . . . . . . . . . . . . . .
age
7
7-Coolingan
and
radiator
owling ssembly
INSPECTION
Check
or
he
ollowing
nd repair r replace s necessary.
1. Cracks, amage, nd water eakage.
2. Bent ins
repair
itha screwdriver).
3. Distoned r bent
adiator
nlet.
Sleps Atter Installation
1. Fill he radiator ith he specified mount nd ypeof en-
gine
coolant.
Refer
o
page
E-4.)
2.
Connecthe
negative
attery able.
3. Start
he
engine
nd
check
or leaks.
E-7

8/20/2019 Mazda 121, Kia Pride Repair Manual Vol 1
http://slidepdf.com/reader/full/mazda-121-kia-pride-repair-manual-vol-1 150/389
THERMOSTAT
THERMOSTAT
REi'OVAL
INSTALLATION
Caution
.
Betore oosening
he radlator drain
ptug,
verlty that
the radiator
drain ho€e ace€
slraighl
{oll.
. Position he hose clampIn the originil locatlonon the hose' andsqueeze he clamp ightly
with large
pliers
o ensure a
good
tll.
L
Disconnect
he
negatlve attery able
2. Drain he engine
oolant-
3.
Remove
n
the
ordershown
n the igure.
4.
Installn the
reverse rderof
removal.
(r.9-2.6 n-kg, ra-rg ftlb,
1.Water hermoswitchonnector
2.
Upper adiator
ose
3. Thermostat
over
4. Thermostat
asket
Installat ion
ote............................
age
E-g
E-8
5.
Thermostat
Inspection.....................................ageE-9
Installat ion
ote........................,...
age
E-g

8/20/2019 Mazda 121, Kia Pride Repair Manual Vol 1
http://slidepdf.com/reader/full/mazda-121-kia-pride-repair-manual-vol-1 151/389
THERMOSTAT
INSPECTION
'1.
Visually heck hat
he hermostatalve
s airtaght.
2.
Place
he thermostat
nd a thermometer
n water.
3. Heat
he
water
and check he ollowing:
Installation Note
Thermostat
Installthe
hermostatnto
hecylinder eadwith
he
iggle
in
at the op.
Thermoslal
gasket
Install new
gasket
with
he sealinging acing
he
cylinder
neao.
0rEoE( .o16
Steps Atter Installation
1. Fill
he radiator ith
he
specifred mount
nd ype
of engine oolant.
Refer
o
page
E-5.)
z.
Uonnecthe negatrve
attery
able.
3. Start he engine
nd check
or leaks.
01EOEX017
B3
Openingempe.ature "C (.D
86.5-89.5 (187-193)
Fu 'open emperalure
oC
(oD
lOO
1212)
Full-openilt
mm
(in)
8.5
(0.335)
r
more
E-9

8/20/2019 Mazda 121, Kia Pride Repair Manual Vol 1
http://slidepdf.com/reader/full/mazda-121-kia-pride-repair-manual-vol-1 152/389
WATERPUMP
WATER
PUMP
REMOVAL
INSTALLATION
Cautlon
l-adfore
toosenin' the
radlator drain
ptug,
verity
that the
radlator
drain
hose
taces stralght do{vn.
. oJnoi aisasseiule the water purilp.-tta probtem s found, replace he pumPas a unit'
1.
Disconnect
he
negative attery
able.
2.
Drain he
engine oolant.
3. Flemove
n the order
shown n
the igure.
4. lnstall
n the
reveaserder
of
removal.
f_o
@neeurce
E t
aOREPLAoE
^ _\6
re-2s
0,9-2.6,
4-re)
FEPLACE
1.Timing
belt
4 Water
ump
assembly
Service.........-........
....
.... Section
Inspect
orcracks,
amaged
ounting
2.
Water
ntet
pipe
and
gasket
surface,
earing
ondition,
nd eakage
3.
Waterbypass
ipe
and O'ring
5.
Water
ump
gasket
Steps
Aller
lnstallaiion
i.
Fi|l
n" iio"ioi
ritn the
spec redamount
nd
ypeot engine
oolant
Refero
pageE-5
)
2. Connect
he
negative attery
able.
3. Start
he engine
and check
or leaks.
E-l0

8/20/2019 Mazda 121, Kia Pride Repair Manual Vol 1
http://slidepdf.com/reader/full/mazda-121-kia-pride-repair-manual-vol-1 153/389
ELECTRIC
COOLING AN SYSTEM
ELECTBIC
COOLINGFAN
SYSTEM
SYSTEM
CIRCUIT
COOLING
TAGNOSTS
CONNECTOF
PBESSUFIE
ADDITIONAL
SWITCH
THEFIMOSWITCH
ABOVE91"C
(196'F):
ON
MAGNETIC
CLUTCH
t-](-%,re
SYSTEMNSPECTION
1.
Jump acrosshe
an
est
OFA)
erminal nd he
ground
(GND)
erminal f the diagnosisonnector.
2.
Turn
he gnitionwitch Nand erifyhat he anoperates-
lithe andoesnotoperate,nspecthecoolingan
system
componentsnd wiringharness.
3. Removehe radiatorao and
place
a thermometern the
radiatorillerneck.
4. Start he
engine.
5. Verityhat he anoperates hen hecoolantemperature
is as specified.
Operation emperalure:
above
91'C
(196'D
lf
the an does
not
operate, heck he water hermoswitch.
(Refer
o
page
E-13.)
0r EoEX.021
E-11

8/20/2019 Mazda 121, Kia Pride Repair Manual Vol 1
http://slidepdf.com/reader/full/mazda-121-kia-pride-repair-manual-vol-1 154/389
E
FAN
IIOTOR
1.
Cooling
an
connector
2. Fiadiatorowling
E-12
FAN MOTOR
INSPECTION
1.Check hat
he battery
s fullycharged.
2.
Disconnect
he an motor
onnector.
3. Connectthe
attery
ndan ammeter
o
he anmotor
on-
neqor.
4. Verifyhat
current
s
as
specilied.
Current
A)
5. ll current
s notwithin
peciiication
nd/orthetan
oes
not
turnsmoothly,
eplace
he an
motor'
REPLACEMENT
Cautlon
;
Posiiion he
hoseclamp
n the orlginal
ocationon the
hose,and
squeeze
he clamp
lghtly
with large
pliera
o ensu.e a
good
llt.
1. Disconneclhe
negative attery
able.
2. Drain
he engine
oolant.
3. Remove
n the order
shown n the
igure.
4. nstalln
the reverse
rderof removal.
7,3-ll
x{
(30-110
d*q,
30-95
lDlD)
0,01-o.oit
f
(0.ra--a.22
iFtg,
015-o
1l lFlb)
0.oa'0,06 Nfl
(0JHr,56
crF*!,0.3!H.5o
lFlb)
3. Cooling
an
4. Fan
motor
It4TX
ATX
B3
6 . 6 + 1

8/20/2019 Mazda 121, Kia Pride Repair Manual Vol 1
http://slidepdf.com/reader/full/mazda-121-kia-pride-repair-manual-vol-1 155/389
WATERTHERMOSWITCH
E
WATERTHERMOSWITCH
NE OVAL INSTALLATION
1.Disconnecthe negative
attery able
2.
Remove
n the ordershown n the igure
3. Installn the reverse rderoi removal,eferring
o
InstallatlonNote.
GFING
FEPLACE
1.Water hermoswitchonnector 2. Water hermoswitch
1nspect ion. . . . . . . . . . . . . . . . . . . . . . . . . . . . . . . . . .
age
- l3
Insialiat ionote..........................
age
E-1
INSPECTION
1.
Place he switch nd a thermometer
n water.
2. Heatthe ater
radually
ndcheck
ontinuityftheswitch
wilhan ohmmeter.
3. t not as specified,
eplacehe water hermoswitch.
lnstallation
Note
Water hermoswitch
1. Applya small mount fengine
oolanto henewGring.
Caution
.
Do not use an
impact wrench or Installatlon.
2. nstallhe water hermoswitch.
Tighiening orque:
5.9-4.8
N.m
60-90
cm-kg,52-78
innb)
E-13
Coolantemperalure
'C
fD
Continuity
[4ore han91
(196)
Less han 84
{183)

8/20/2019 Mazda 121, Kia Pride Repair Manual Vol 1
http://slidepdf.com/reader/full/mazda-121-kia-pride-repair-manual-vol-1 156/389
FAN RELAY
FAN
RELAY
REMOVAL
INSTALLATION
1. Disconnect
he
negative attery
able
2.
Remove
he
an relay.
3.
Install
n the reverse
rder
of removal.
INSPECTION
1. Check
ontinuity
s shown
withan
ohmmeter.
2.
Apply
12v between
erm,rals
an{
@;
Check
or contrnuiry
etween
ermlnals
, ano
(9)
3. lf not
as specified,
eplace
he an
relay.
:-\_
-=-=l
24
Contlnuity
@ @
NO
o @
E-14

8/20/2019 Mazda 121, Kia Pride Repair Manual Vol 1
http://slidepdf.com/reader/full/mazda-121-kia-pride-repair-manual-vol-1 157/389
F
tNDEX....,....,,...,...,,.......,..-...,......"....-..
-
ouTLtNE.....,...,,....,...,...,......,.......,..,...
-
SYSTEM |ACR4M.., . .. . . . . . . . . . . . . , . . . . . . . . .-
VACUUI\IHOSEBOUTING
DIAGRAI\ ,1. . . . . . . . , , . . . . . . . . . . . . . . . . . . . . . . , , . . . , .-
wtRtNGD|AGBAM... , . . . - . . . . . . . . . . , . . . . . , . . , .-
spEctFtcATtoNs.... . . . . . . . . . . . . . . . . . . . . . , . . . . .-
coMPoNENT ESCRIPT|ONS..... . . . . . . . .-
TROUBLESHOOTTNGU|DE.... . . . . . . . , . . , . .
-
FELATTONSHTPHART..... . . . . . . . . . . . . . . . . .
-
ustNG Hls EcTtoN.....,... .,.,...,,,..,,.-
DIAGNOSTICNDEX...., . , . . . . . . . . . , . , . . . , . .-
PRECAUTTON,.... , , . . . . . . . , , . . . , , . . . . . , . . . . . . .
-
SYMPTOMROUBLESHOOTING..... . . . . .
-
ENGTNEUNE-UP..., . . , , . . . , . , , . . . . . . . , , . . , . . , . ,-
PREP4RAT|ON..... , . . . . . . . . . . . . . . . . . . , , . . . . , . . .-
BASTC
NSPECT|ON..... . .- . . . . . . . . . . . . . . . , . . .-
ADJUSTi\4ENT,.., , , . . , . . . , , . . . . , , . , . . . , . . . . . . . . ,-
SELF-D|AGNOS|SUNCT|ON,..,...........,
-
DESCRtPTION...., . . . , . . . . . . . . . , . . . , . , . . . . . . . . , .-
PREPABATtON...., , . , , . . . . . . . . . . . . . . . , . . . . . . . . .-
MALFUNCTIONODENUMBEF..... . . . -
swtTcHMoNtToR UNCT|ON..... . . , . . . .-
TNTAKEtRSYSTEM.,... . . . . . . . . . . . . . . . . . , . . . .-
coMPoNENT
ABTS..... . . . . , . . . . . . . . . . , . . . .-
tNJECTtONODY,.... . , . . . . , , . . . . . . . . . . . . , . . . .
-
BAFFLE/INTAKE
\4ANIFOLD..... . . . . . , . . . . .-
ACCELERATOREDAL.,,, , , . . , . . . . . . . .- . , . .-
ACCELEFATORABLE.,,. . . . . . . , . . . .- . . . . . .
-
FUELSYSTEM,..., , . . , . . , . , . , , , . , . . . . . . . . . .- . . . . . .
-
PRECAUTION,,... . , . . . . . . . , . . . . . . , , . , , , . . . . . . ,-
SYSTET\4PERATION...,. . . . . , .- . . . . . . . . . . . . .
-
FUEL ANK,..., , . . . , , . . , . . , , , . . . . , . . , . , . , . . . . . . ,-
FUELPUMP...,, . . . . . . . . . . .- . . . . . . . . . . . . . . . . , . . .-
FUEL tLTER.,,.. . . . . . . . . . . . . . . . . . . . . . . . . . . . . . . .-
crRcutT
OPENINGE AY.... . . . . . . , . . . , . . ,-
PRESSUREEGULATOR..... . . . . .- . . . . . . . . .-
iNJECTOR..... . . . . . . . . . . . . . . . . . . . . . . . . . .- . . . . . . . .
-
EXHAUSTYSTEM..... . . , . . . . . . . . . . . . . . . . . . . . . .
-
coMPONENTARTS..... . . . . . . . , . . , . . . , , , . , .-
OUTLINEOF
EMISSION
CoNTROL
YSTEi,.. . . . . . . . . . . . . . . . . . . . . . . . . . .-
STRUCTUEAL
|EW...., . . . . . , . . . . . . . . . . . . . . . .-
2
9a
FUELAND
EMISSION
CONTROL YSTEMS
(EGr-S)
a
9
1 1
1 1
't4
1 6
1 7
61
61
61
62
66
66
67
67
80
83
83
84
86
86
86
87
88
88
90
9 l
93
94
94
s7
97
POSITIVE RANKCASE
VENTTLATTON
PCV)
SYSTEM..,..........
-
99
DESCBtPTtON..... . . . . . . . . . . .- . . . , . . . . . . . . . . . . . .
-
99
PCV
VALVE..... . . . . . , . . . . . . . . . . . . . . . . . . . . , . , . . . .
-
99
EVAPORATIVE
MISSION
ONTROL
sYsTEM....-. . . . . . . . , . , . . . . . . . . . . . . . . . . . . . . . . . , . . . .
- l00
DESCRtPTION,..., . . . . , . . . . . . . . . . . . . . . . . . . . , . . .-
-r00
SYSTEN,iPERAT|ON.,.., . . . . . . . , , . . . . . , . . , , .- l01
SOLENOIDALVE
(PURGE
ONTHOL)..,, . . . . . . . . . . . . . . . . , . .--.
-101
FUEL APOR
ALVE,.... . , , . . , . . , . . . . , . , , , .- l01
cHECKVALVE i'WO-WAn..............,..
-102
cHAFCOAL ANrSTER..... . . . . . . . . . . . . . . . . . .
-102
CATALYTIC ONVERTER
YSTEM...... F-'IO3
DESCRtPTtON.,,.. . . . . . . . . . . . . . . . . . . . . . . . . . . . .- .
-103
oATALyTtC ONVERTER................-...
-l03
DECELERATIONONTROL YSTEM.....
-104
DESCRtPT1ON..... . . , . , . , . . . , . . . . . . . , . . . . . . , . . , ,
- l04
DASHPOT.,... . . . . . . . . . . . . . , . . , . . , , , . . , . . , . . . , . . . ,
- l tX
A/CCUT-OFFYSTEM..... . . . . , . . . . . . . . . . . . . , ,
- l05
DESCR1PTrON..... . . . . . . . . . . . . . . . . . . . . . . . . . . . . . .-105
SYSTEMPERAT|ON..... . . . . . . . , . . , . , . . . . . . .
- l0s
DECHOKE ONTROL YSTEM.............-
-l06
DESCFtPTtON...., , , , . . . . . . . , . . . . . . .- . . . . . . . . . . .
-106
SYSTE|\4PERAT|ON..... . . . . . . . , . . . . . . . . . , . .
-106
AtR
BYPASS
CONTROL
YSTET .,.,..,.,F-107
DESCRrpION..,,-. . . . . . . . . . . . , . . . . . . . . . . . . . . . . .
-107
sYsTEt\4PEFAT|ON..... . . . . . . .- . . . . . . . . . . . .
-108
AIRBYPASS OLENOID
VALVE
@, @, @..... . . . . . . . . . . . . . . . . . . . . . . . .
-10e
CONTROLYSTEI,| . . . . . . . . . . . . . . . . . . . . . . . . . . , . . .
-110
PREPARA'IrON.... . . . . . . . . . . . . . . . , . . . . . , . . . . . . . ,
-110
STRUCTURAL
tEW,..., . . , . . . , . . . , . . , . . . , . . , ,- l1 1
ENGTNEONTFOL
Ntr
ECU..,.. . . . . . .
-112
CBANK NGLESENSOR
itND|STRtBUTOR),... . . . . . . . . . . . . . . . . . . . . . . . .
-r20
AIRFLOW ENSOR
(BYPASS
OT-W|RE
yPq..........,.,,,. F-l21
wATER HEB[,4OSENSOR...,. . , , . , . , . , . . , . .-121
TfIBoTTLEENSOR,.... , . . , , , . , , . , . . . . , . . , . .
- l22
oxyGENSENSOR..... . . . . . . . , . . . . . . . . , . , . . , . .
-123
t\4AtN ELAY..,, . . . . , . . . . . . . . . . . . . . . . . . . . . . .- . .
-124
cLUTCH WTTCHi,,4Tn,.., . . . , . . . . . . . . . ,- . .
- l24
NEUTRALWTTCH
L4TX).,.. . . , . , , . . . . . , . . . .- l25
POWER TEEFING
FESSUFEWITCH -125
o1a0Fx.001

8/20/2019 Mazda 121, Kia Pride Repair Manual Vol 1
http://slidepdf.com/reader/full/mazda-121-kia-pride-repair-manual-vol-1 158/389

8/20/2019 Mazda 121, Kia Pride Repair Manual Vol 1
http://slidepdf.com/reader/full/mazda-121-kia-pride-repair-manual-vol-1 159/389
INDEX F
1. Fuel ank
Removal
lnspection
Insta||ation...............................age
F- 90
2. Fuel
pump
Inspectjon........................-........
age
F-
91
Rep|acement . . . . . . . . . . . . . . . . . . . . . . . . . . . . .
age
-
92
3. Fuel iher low-pressureide)
Rep|acemenl . . . . . . . . . . . . . . . . . . . . . . . . . . . . .
age
93
4. Fuel ilter
high-pressure
ide)
Replacement.-...........................age
F- 93
5.
Circuit pening elay
Replacemenl . . . . . . . . . . . . . . . . . . . . . . . . . . . . .age
-
93
Inspect ion. . . . . . . . . . . . . . . - . . . . . . . . . . . . . . . . .
age
-
93
6. Pressureegulator
Inspection.................................age
F- 94
Rep|acement.............................
age
F- 94
7.
lnjectol
lnspection
on-vehjcle)..............
age
F-
94
Removal/nstallat ion...............ageF- 95
Inspec l ion. . . . . . . . . . . . . . . . . . . . . . . . . . . . . . . . .age
-
96
8. PCV alve
Inspect ion. . . . . . . . . . . . . . . . . . . . . . . . . . . . . . . . .age
-
99
9. Solenoid alve
purge
ontrol)
Inspection.................................age
F-10'|
RemovalInstallation................
age
F-101
10.Fuel
aporvalve
Inspect ion. . . . . . . . . . . . . . . - . . . . . . . . . . . . . . . . .
age
-101
11.
Check
alve
two-way)
Inspectaon. . . . . . . . . . . . . . . . . . . . . . . . . . . . . . . . .age
-102
12-
Charcoal anister
Inspect ion. . . . . . . . . . . . . . . . . . . . . . . . . . . . . . . . .age
- -102
13.Air bypass olenoid alve
@
1nspect ion. . . . . . . . . . . . . . . . . . . . . . . . . . . . . . .
page
-109
14.Air bypass
olenoid
alve
@
Inspection....-............................
age
F-109
15.Air bypass
olenoid
alve
@
Inspect ion. . . . . . . . . . . . . . . . . . . . . . . . . . . . . . . . .
age
109
16.
Engine
ontrol nit
ECU)
Rep1acement.............................
age
F-112
Inspect ion. . . . . . . . . . . . . . . . . . . . . . . . . . . . . . . . .age -1 2
17.Airflow ensor
fnspect ion. . . . . . . . . . . . . . . . . . . . . . . . . . . . . . . . .
age
-121
Rep1acement.............................
age
F- 85
18.Water hermosensor
flil"'.Y,fl;......:.''... . ..833:-:,3
19.Throttle ensor
Inspect ion. . . . . . . . . . . . . . . . . . . . . . . . . . . . . . . . .
age
122
Adiustmeni . . . . . .. . . . . . . . . . . . . . . . . . . . . . . .
age
1 2
Removallnstallation................
age
F- 122
20.Oxygen ensor
Inspec l ion. . . . . . . . . . . . . . . . . . . . . . . . . . . . . . . . .age -123
Rep1acement.............................
age
F-124
21.Main elay
Rep1acement.............................
age
F-1
4
lnspect ion. . . . . . . . . . . . . . . . . . . . . . . . . . . . . . . . .
age
124
22.
Clutch
wilch
MTX)
1nspect ion. . . . . . . . . . . . . . . . . . . . . . . . . . . . . . . . .
age
124
Repiacemeni.............................
age
F 124
23. Neutralswitch
N,,|TX)
Inspection.................................
age
F-125
Rep|acement..........................-..
age
F-1
25
24.
Power teering
fessure
witch
Inspection.................................
age
F-12525.Crank nglesensor
Inspection
.................
*t".,H.r_:
F-3

8/20/2019 Mazda 121, Kia Pride Repair Manual Vol 1
http://slidepdf.com/reader/full/mazda-121-kia-pride-repair-manual-vol-1 160/389
F
INDEX
1.Aircleaner
Inspect ion. . . . . . . . . . . . . . . . . . . . . . . . . . . . . . . . .
age
- 62
2.
Dashpot
Inspect ion. . . . . . . . . . . . . . . . . . . . . . . . . . . . . . . . .
age
-104
Removal/
nstallat ion
...............
age
F- 85
3. njection ody
Inspection.................
.. . ...
page
F-
84
Disassembly
Assembly...........
age
F- 85
4. Bafile
Inspect ion. . . . . . . . . . . . . . . . . . . . . . . . . . . . . . . . .
age
- 86
F-4
5. ntake
manifold
Inspection....................
. ........
age
F 86
6.
Intake
manifold
tay
7. Exhaust
ystem
Removal/
nsDectlon
Ins ta | la t ion. . . . . . . . . . . . . . . . . . . . . . . .
pageF
9/
L
Catalytic onverter
Inspect ion. . . . . . . . . . . . . . . . . . . . . . . . . . .
. .
page
-97

8/20/2019 Mazda 121, Kia Pride Repair Manual Vol 1
http://slidepdf.com/reader/full/mazda-121-kia-pride-repair-manual-vol-1 161/389
OUTLINE
F
OUTLINE
SYSTEMDIAGRAM
*
9
E
tr
E
o
s
I
I
s
i
@
0
o
6
@
T-
a *
: t
? F
2 =
3 "
F
, 3
I E
t A
9 *
6
{ @
c <
o
F-5

8/20/2019 Mazda 121, Kia Pride Repair Manual Vol 1
http://slidepdf.com/reader/full/mazda-121-kia-pride-repair-manual-vol-1 162/389
F
OUTLINE
VACUUM
HOSE
ROUTING
IAGRAM
q
q
e
o
l
e
s
E
@
t i e
l ^ O
M u {
i 6
n - A
c
f
;
a
F-6

8/20/2019 Mazda 121, Kia Pride Repair Manual Vol 1
http://slidepdf.com/reader/full/mazda-121-kia-pride-repair-manual-vol-1 163/389

8/20/2019 Mazda 121, Kia Pride Repair Manual Vol 1
http://slidepdf.com/reader/full/mazda-121-kia-pride-repair-manual-vol-1 164/389
F
OUTLINE
1,100153
P
ange)
750
1"3
Neutral)
lsnlrion
imino'
Bfqq
Below
38
(6.5,
92)
rtrui-,-
ortprip,""*,"
kPa
ks/cm'
si)
Nylon lement
in
uel
PumP)
235
275
12.4-2.A,
4-40)
FeSrl"rrS
p'e."r'"
kPa
rCcm),
Ps)
Air bypass solenold
valve
@
Alr byp.ss
solenold
valve
@
Alr
bypass solenoid
wlve
@
Solenold
valve
(purge
conlrol)
' t4.6-17.8
Resistance ko 40oc004oR
o"c
(176'D
Bypass ype
ol hol_wre
Besistance
HWN-HWP)
ko
40
00.6,
8.8)
pr< l rs nrl lmp
ga)
t v ' v t " ' r y
Unieaded
RON
0 or
hgheo
SPECIFICATIONS
'TEN
termnal of diagnosls
onnector
grounded
F-8

8/20/2019 Mazda 121, Kia Pride Repair Manual Vol 1
http://slidepdf.com/reader/full/mazda-121-kia-pride-repair-manual-vol-1 165/389
OUTLINE
F
COMPONENT
ESCRIPTIONS
Component Rems]k
Air bypasssolenoid
valve
@
il j€e1\ot j
$oe'i
SLrpplies
ypass ir nto ntakemanilold y
openrng
bypassarr
passage
at either
ollowng
a) Ensine rankins
b) El€ctric oad
c) P/S
pressure
witchON
d) A,/C witch
ON
e) Bange
hange
N-D)
f) Deceleralionconlrol
.
Electricaoad
a) cooling an
b) Blowermolor swltch
c) Headlighlwitch
d)
Rearwindow
ehoslerwitch
Air bypass
solenold
valve
@
Supplies ypass iranlonlake
manifod y
opening ypass ir
passage
l eiiherollowing
a) Engine
ranking
b) P/S
pressure
wilch ON
c) Deceeralon conlrol
Air bypass solenoid
valve O
S'rpplies
bypass air inlo nlake manifold
by
opedng bypas arf passage with A/C swltch ON
Filiersair enleing injection
body Oil
p€rmeated
Detects anrounl
of
inlake
air; sends signal to
ECU
UsesVref
5v)
as
power
source
Batlle Drrectsuel/ai.
mixture nto ntakemanilold
Cat.lyticconvener ReduceHC,
CO and NOx by chemcal
Stores uel tank lmes whie
enginestopped
Controls
pressure
n iuel
tank
Circuit opening retay Vollage or {uel
pump
while
enEne runnrnq
clutch $viich
(MTx)
Delectsclutch
condlioni sendssignal o ECU SwilchOFFwhen cl'rlch
pedal
eleased
Crank angle sensor
Ne.signal
Detects
rankangleat iaoo inlervalsi
ends
signal
o ECU
Diagnosls
onneclor Concentraled
eMce connectorTerminals:
1.
EGIself.diagnostc
erminal
2. EC-AT elf-diagnostc
ermifal
3. Inilia set
erminal
4. Fuel
pLrmp
heck erminal
5. Coollng an
ch€ck erminal
6. Engine pm
oulput elm nal
2l
pin (located
near
eti strut oweo
Oashpor
Prevents
lter burn when hrotlle aive
closes
Ehglne onlrol unil
(ECU)
Conkols peral n ol the ollowing.
a) Fuel njection
onlrol system
b) Elecironic pafk advance
ESA)
ontrol
c) AJCcur-otisysrem
d) Deceleralion
onlrol syslem
e) Fuel
p'rmp
controlsystem
D
Evaporative
mission onlrolsyslem
g)
Falsale
conkol ystem
h)
Secondaryir njeclionystem
Fuel lllie. Filterspanicles
rom luel
Fuel
pump
Provrdes
Liel o nleclor
Operates
hale
ngine
unn g
Supply
only evaporative missionnto charcoa
can
sler lo
prevent
charcoai canisler from lue
F-9

8/20/2019 Mazda 121, Kia Pride Repair Manual Vol 1
http://slidepdf.com/reader/full/mazda-121-kia-pride-repair-manual-vol-1 166/389
F
OUTLINE
Componsnt
Remart
lghlllon
swilch
(STABT
posilion)
Engine ranking
ignal
ent1o
ECU
lnhlbllor swilch
(ATX)
Detects
n-gear onditioni
ends
ignal
o ECU
Sw i c h
N
nN or Pr anges
Inleclion
body
a) lniects
uel nto nlake
manilold
b) Adiusls
nlakealr amounl
by throttle
valve
ct
ldl;-upby air bypass
olenoidave
@
d) Detecls
amount
ol intakes
alr by airl ow
Conssts
ol
throtlle
vaive dashpot,
throtlle
sen'
sor,
ast
dle
cam,
airflow
ensor,
nieclor,
res'
sure
egulator,
nd ar
bypass
solenod valve
@
Ini6ctor
lniecrsue
in relatlono
englne eeds
Conrrolled
y
signals
fomECU
High-ohmic
njector
Installed n
injecton
body
Main
relay
(FUEL
NJ
relay)
Supplies
lectric urrenl
o
injector, CU,
lc
t{eurral
wnch
t
TD
Detects
n-gear ondiLon;
ends
ignalo ECU
Switch
ON in
neulral
Orygen sensoa Deiects xygen oncenlrationiends ignallo
ECU
Zrrconiaetamic ndplatrnumoatng
Contros blowby
gas
Introduced
nloengine
P/S
pressure
3witch
Derecrs
/S
operatoni
ends ignalo
ECU
P/Sr
ON
when sleeing
wheel
um€d
Prelsure
regulrtor
AdjustsJue
pressure
upplied
o
injector
Specd
s€nsor
Detects speed: sends
signal
to ECU
Insialledn
nstrumenl
luster
stopllglrr
swllch
Delects
brakingoperalion
deceleranon)iends
signal
o ECU
Solenoid
valve
(purg. conltoD
Conlrolsevaporative
umes
rom canister
0
n_
Throltle sercof
Deiects hrottlevalveop€nlnganglelsendssg_
nal o ECU
Installedn njecuon
ody
Wat.r thetmos€nsor
Delectscoolant
emperature;
ends
signal o
ECU
lnsraledon
iniake
manlfo
F-l0

8/20/2019 Mazda 121, Kia Pride Repair Manual Vol 1
http://slidepdf.com/reader/full/mazda-121-kia-pride-repair-manual-vol-1 167/389
TROUBLESHOOTING
UIDE
F
TROUBLESHOOTING
UIDE
RELATIONSHIP
HART
OUTPUT
OEVICE
I PUT DEVICE
o
z
d d
9.=
4 0
z r )
6 -
' J
E ?
.,1
o
z
o
o
(,
fi
o
z
o
o
z
=
F
z
L
z
I
z
t5
9
e
I
|rl
c
@
t
=
UI
o
@
o
z
|r|
o
lo
o
-
=
z
@
-
( r^
t o
o o
Q.=
> =
g 9
6 ?
n :
d=.
E
fi
o a
./J-
o <
9. .
S O
q E
J O
u€
ts
=
=
z
F
z
z
=
z
o
(,
=
EOAT @I{TFOL UI{IT
o
DIAGNOSIS O
IECTOR
CTEN
EN INAL)
o
o o
tcNtTtol{ sw|rcH
(START
OSII|ON)
o o
o o o o
E/LSIGNAL'
o
o
o o
P/S
PRESSURE
WITCH
o
o o
o o
a/c swlTcH
o
o
o
INHIBITORSWITCH
ATX}
o
o
o o o
EUTRALAND CLUTCHSWTTCHES
ITX)
o
o
o o o
sToPltGHT SWITCH
o o
SPEEOSENSON o
THROTTLESENSOA
o
o o
o
o o o
o
AINFLOIY ENSOR
o o o
o o o
OXYGENSENSOR o o
o
WATER HER OSENSON
o
o o o
o o o
CRANK
ANGLE SENSON
O{6'SIGNAL)
o
o o o o o
o o o o
'
E/L 3lgnal
ls headlighls, rear window dalroster,
blow€r
3witch
and cooling lan.
F-11

8/20/2019 Mazda 121, Kia Pride Repair Manual Vol 1
http://slidepdf.com/reader/full/mazda-121-kia-pride-repair-manual-vol-1 168/389
F
TROUBLESHOOTING
UIDE
USING
HISSECTION
lntroduction
Most
ol the
uel
and
emission ontrol
ystem
s electricallyontrolled,
ften
makjngt ditficult
o diagnose
oroblems
n ho system,
speciallyntermittent
roblems.
eforeundertaking
ctual hecks,
ake
a
few minutes
io talkwith
a customer
ho approaches
itha drivability
omplaint he
customer
s often
good
source
of
nlormation
n such
problems,
specially
ntermittentnes.
hroughalks
with hecustomer,
necan
ind
outwhat hesymptomsreand underwhatcondjtionsheyoccur.
work tlow
CHECK
N
I
I
LISTEN
OCUSTOMEBOIVPLAINTS
I
I
REFEB
O TROUBLESHOOIINGAGE
HAT
COBRESPONDS
O
ACTUAL
YMPIOIV
Diagnostic
ndex
No.:
Each
roubleshooting
tem s
assigned
number-
TROUBLESHOOTING
TEM:
There
are26 troubleshooting
items.Choosehe tem hat
mostclosely
orresponds
o
the actual vmDtom.
_
DIAGNOSTIC
NOEX
(Beler
o
Page
F 14)
CHECK
FORWHAT
CHECK
ORWHATPART
S BAD
_ _
I
i i
RTOAIB/FEPLACEMENT
J
I
DETEBI\4INE
F
TROUBLE ASBEENELIMINATED
I
Yes
CHECK
OUT
IS BAD IN SYSTEM
_ -
INSPECTION
ACTION
DESCRIPTION:
Describesach
roubleshooting
ilem.
F-12

8/20/2019 Mazda 121, Kia Pride Repair Manual Vol 1
http://slidepdf.com/reader/full/mazda-121-kia-pride-repair-manual-vol-1 169/389
TROUBLESHOOTING
UIDE
F
Troubleshooting
hart
05u0Fx.015
OESCRIPTION:
Further escribeshesymptom. onfirmhat hechartaddressesheactual ymptom efore eginning
troubleshooting.
TROUBLESHOOTING
INTS:
fhis describes
he
possible
oint
f maltunction.
STEP:
This
shows he order
ol troubleshooting.roceed
ith roubleshooting
s
ndicated.
INSPECTION:
This
escribesn nspection
o
quickly
eterminethealfunctionf
parts.
f
a detailed
rocedure
snecessary
to
perform
he INSPECTION,
efer
o ihe
page
shownby the
"F"
mark.
ACTION:
This ecommends
he
appropriatectiono ake
asa
result
YeVNo)
f he NSPECTION.
ow o
perform
the
action s described
n he reference
age
shownby
he
"t?"
mark.
0su0F1.016
.En0 ie .unsnomaya ' rdet r
d r e F oush
re
( N os
, r2) l
FROUALESHOOTIIG
HIf,ISI
(cotr*lo^
'or
coorad rehpe'aruE)
*rnund|onc*No'ck'l.y.d
check
o'
cau*
(Ferer
ospsr'd
ch&ks4uercel
Che.N
cLr em'^a lFvorase
(rernion
d ox)
3Cat .F2_r le
EC! andsenDaqDss ch4ker
F-13

8/20/2019 Mazda 121, Kia Pride Repair Manual Vol 1
http://slidepdf.com/reader/full/mazda-121-kia-pride-repair-manual-vol-1 170/389
F
TROUBLESHOOTING
UIDE
DIAGNOSTIC
NDEX
TROUBLESHOOTING
TEI
OESCRIPTION
PAGE
Willnol crankor
cranks lowly
Reier
o EngineElectical
System
G--4
2
Engne ranks
l
normal pg€d ul shows
o sign
ot
l r ing
F-17
Engine
rank€ tnormal peed utshows nlypar_
tialcombuslion
nd
willnolconlinueo
run
F- r9
Engine lads
omally
when old,butwill
notslana,
ter running
ndhoisoaked
F-21
Eng,ne ranhs
al
rormal speed bul reqJies
eices
sive
cranking time
belore staring
F-23
Same ondition
s
No.swhenengine old
Reslans
normally fter
wa|m_up
F-25
7
Same ondltion
s No.5afler
unning no
hot
Starts
oimally hen old
F-27
8
Enginestalls
ai dle
Engine tallsor
vibrates
xcessively t
|dle
F-29
9 Engine tallsor vlblatesexcessively l idle dlrng F-31
10
Engineunsnomally
t dleduring
watm'up ul
vibates excessively
r
stallsaft€r warmlp
1 1
E/LON
Engine talls
or v brales
excessively l
idle wrcn
}JC,P/S,or
E/LON
F-35
Rough dle/Engine
talls
ust
atier sta(ng
Engine talls f
v brales xcessively
nly
ust
aner
staning
acceleralion
rom
dle)
F-36
13 High
dle
speed
atter
wam-up
ldle
speed
excessve
afterwam_up
FJE
1 4
ldle movesup
and down/ldlehunting
Engine
peedsup and
down
pe.iodically
t dle
F-39
Engrne lallson deceieralion
E^grneune^pecledlv
loos
un'nng th
le dFcele'ar
ing or atler decelefallo.'
F41
1 6
Eng,ne ralls uddenly
lntemiten0
Engine ntemiltent slops unnhg
F42
1 7
Hesitates/Siumblesn
acceleration
Flat soot occurs ust
alier acceleralor
epressed
r
mlld
erking
ccurs
uing acceleranon
F-43
1 8
Surges
Unexpected
hange
n engne sp€€d
which s lsually
rep€lilive
F--45
1 9
Pedo.mance
oor
under
md when hroltle
alve
lvlaximum peed
€duced
F-17
20
Pedormance
oot whileacceleral,ng
F-50
21 Runs
oughon deceleralion/Backlire
Enq,le
runs roughwhiledeceeraing
3nd abrornal
combustion
occurs
in exhaust sYstem
22
Abnomal combustion ccompanied
y audible
''pinging"nois€
F-55
23
Gaso
ne
odor
in cabin
F-57
24
Exhaust
as
smells
ike
rotteneggs
F-58
25 Highoil
consumpnon
Oilconsumplion
rcessNe
F-58
26
Fueleconomyunsalislactory
F-59
F-l4

8/20/2019 Mazda 121, Kia Pride Repair Manual Vol 1
http://slidepdf.com/reader/full/mazda-121-kia-pride-repair-manual-vol-1 171/389
TROUBLESHOOTINGUIDE
Doscription
ol Drivablllty
STUMBLE
:
Mib
jerking
duringacceleration.
HESITATION:lat
spotoccurring
ust
after he accelerator
edal
s
depressed
SURGE
:
Continuousoft
erking
uringcruise.
03u0Fx 33
ENGINESPEED
WNo.laSURGE
-12'1no
" """o'on
No.21
RUI{SFOUGH
ON
OECELEBATION
No.17STUMaLE
F
F-l5

8/20/2019 Mazda 121, Kia Pride Repair Manual Vol 1
http://slidepdf.com/reader/full/mazda-121-kia-pride-repair-manual-vol-1 172/389
F
TROUBLESHOOTING
UIDE
22-30
12.2-3.1
16-22t
r+m
(n-kg,
n$)
PUMP
CONNFCTOB
PRECAUTION
Fuel Preasure
Release
nd Servicing
Fuel System
Fuelinhefuelsystem
emalnsnder
igh
pressure
ven
when
the enoines
not runnrno.
a)
Beto're rsconnecltng
ny
uel
ine, eleasehe
fuel
pres_
sure
om he
ue syslemo
reducehe
possibihtv
l niury
or fire.
1.Stan he engine.
2.
Removehe
rearseatcushlon.
3. Disconnect
he uel
oumo
connector.
4.
After he engine
lalls,urn
otf he
gnition witch.
5. Reconnect
uel
pump
onnector
nd nstallthe
ear eat
cushron.
b)Usea
ragas
protectionrom uelspray
whendisconnecf
ino he
hoses.
Pluo he
hoses tter
emoval.
c)
When nspecting
he
uel
system,
se
a suitable
uel
pres-
sure auge.
Cautlon
.
Install hose
clamps
o secure
he tuel
pressule
gaugeto
he
uelfilterand
he uel
mainhoae o
pre'
vent luel leakage,
PinchinoHose
When
p;ching
an
air hoseor
a fuel
hosewith
pliers,
wrap
the hose
witha rag
o
prevent
amage
F-16

8/20/2019 Mazda 121, Kia Pride Repair Manual Vol 1
http://slidepdf.com/reader/full/mazda-121-kia-pride-repair-manual-vol-1 173/389
TFOUBLESHOOTING
UIDE
F
SYMPTOM
FOUBLESHOOTING
CAANKSNORMALLY UT WILL {OT STARTiO
COMBUSTION}
DESCRIP.
Ttotl
.Engine
ranks t normal peed
butshows o signol
"fting
.
Bane.yn normal ondrtion
.Throttle
alve oi held ullyopenwhiie ranking
Oechoke
yslem
ot
operale)
ITROUBLESHOOTING
INTSI
Becausel
no
combustDn,
ossibly
O
No
spark
.
lgntion ontrolmalfunction
.lgnition
sysiemcomponent
mafunction
@
No
iuel nlection
.
Fuel
pump inopefalive
.Injector
noperative
no
rue i
s
nFL led o
engrn .
o ro
€1 l ion
a l d r lc / l -dar '
€)
Low
uel ine
pressure
@
Lowens,ne
ompressioi
@
ECU
power
upply
rrcuit pen
@
ECU
ground
rcui open
INSPECTTON
acTtor,l
l
ls
svong
blue park
sibe
at disconnecled
gh.
/
>.
/)
PerformSlep
2
4
ll
OK, check rgnton system
(Refer
o lroubleshooiing
''Misfke")
(r
Page
G-17
a
ff not
OK, reler o speciJied
heck
seqlence
or
displayed
ode
No. F
Page
F-?0
2
ls 00" displayed n SellDiagnosis
Checker
wlth gnilLon wilchON?
ri
page
F-67
Maltunctloncode No. displayed
Check
or cause
Beler
o specited
check sequence
or displayed ode
No.)
17
Page
F-7o
"88"
flashes
Check
ECU erm nal lF
vo
ag€
r?
page
F-114
voltage:
Approx. 12v
(lgnillon
switch
ON)
4
ll OK.
replaceECU
ri
page
F-112
+
ll not
OK.
check
wl.ingbelween
ECU and Self
DbgnosisChecker
and ECU erm nal
18 vollage
3 Rer.oveair c eanercoveri s fuei niecled rom
injeclorwhie crankingengine?
1.5-2.0
Nn
{15-20
crks,13-17 in-rb)
Ch€ck ollowng poinls
.Spark
ptugs r
page
c-19
.
tgnjtion mrng
E?
pag€
F-63
.Engine
compressiof
c?
page
B-lO
.Warer
thermosensor
-r
page
F-118
(ECU
20 tem nal vollase)
.Fuel
pressure c7
page
F-89
(lr
njected
uel s
small
ariounl)
.Inlecror
17
page
F-97
(li
njecled uel
s
smallamounl)
Check
or lnjector perating ound
whllecrankng
engrne
+
li OK,
So
o nexl siep
+ l{ not OK, go ro Slep6
F-17

8/20/2019 Mazda 121, Kia Pride Repair Manual Vol 1
http://slidepdf.com/reader/full/mazda-121-kia-pride-repair-manual-vol-1 174/389
F
TROUBLESHOOTING
UIDE
tNsPECT|Oll
ACTION
Connect
lagnosis
onnector
erminals
/P.and
GND
with
umper
irei
s uel
pump
operarng
solnd
evided
wilh snilion
witch
ON?
-7
pege
F-92
GND
;)).
Check
f iuel is
iniecledwhib crankng
englne
n this condftion
+
lf injected, heckcircult
opening
4
ll not njecred, heck
nieclor
of
cloggingand if lue is in tank
5
ls there
conllnuily
elween
Llel
pump
connecior
@ and @?
Check ncuit
penrngelay
c7
page
F-93
6
ls herc
approx.
2Vmomenlariy
t
ECU2V er_
mnaL
whib cranking ngine?
(Engrne
ignal
monitor
reen
nd red
amps
ilash)
Try io replace
njector
lniector
stuck)
No Check
njeclor
or continuity
+
lf OK,check
wlfinS
elatedo
ECU errninals
Y,2V,2U,
and
+
ll notOK, epace
njeclor
F-l8

8/20/2019 Mazda 121, Kia Pride Repair Manual Vol 1
http://slidepdf.com/reader/full/mazda-121-kia-pride-repair-manual-vol-1 175/389
TROUBLESHOOTING
UIDE F
CRANKSNOF ALLY BUT W|LL
r,rOT
START
PART|AL
COtitBUSTtOt{) U,HENEI{G[{E COLD
DESCN|P.
Tto
.Engine
ranks t normal p€ed utshows nly
parlial
ombustionnd willnotconlinueo run
.
Batlery n nomal condilion
rrFouBLEsHooTrilc
tNTsl
O
Air/Fuel ixtureoo rich
. Waterhermosensoralluncllon
O
AidFuelnixtureoo ean
.Fuel
nject
n
controlmallunction
(Corection
or
coolanl
emperature)
.Low
iuel ine
pressure
.An
leakage f nlake irsystem
O
Lowensine ompressron
INSPECTION ACTION
1 ls 0O displayed
n SellDiagnosis
hecker
wlth ignilion
switch
ON?
TEST
SWiSELFTEST
Mallunction
CodeNo. displayed
Check
or
cause
Reier
o soeciiied
check
equence)
17
page
F-m
"88" llashes
CheckECU elmlnal Fvoliage F
page
F-114
Voltage:Appror. 12V
(lgnltlon
switch oN)
a
ll
OK, eplace CIJ c7
page
F-112
4
I nol
OK.checkwiring elween
ECU
and S€lf-Diagnosishecker
?
/ \ ^ \ _
/
Checf d sr ouror cdp ard rolor c:i
page
G-23
d\<<=F
=I) 'b
B\
3 Connect iagnosisonnecroretminals /Pand
GNDwilh
umper
wne;s lherecorrectuel
ine
pressure
ith gnition witchON?
e
page
F-49
Fuel lne prossuae:
235-275 kPa
(2.4-2.a
kg/cm', 34-40
psD
PFFSSURE
GAIIGE
' l
t""
otAGNOStS
CONNECTOF
Check uel line
pressure
while
p
nch
+ ll
tuel
ine pressurc uickly
n-
creases, heck
pressure
egulalor
-:
il luel
line
pressufe
gradually
n.
creases, heck or clogging
be-
lween uel
pump
and
pressure
lf not clogged, heck uei
pump
maxmum
pressure
e
page
F-91
High
pre$ure
ls lel relurn ose logged
r res,
lricled?
+
ll OK, eplace
ressure
egulalor c?
page
F-94
.)
ll notOK, epa.
or
replace
F-19

8/20/2019 Mazda 121, Kia Pride Repair Manual Vol 1
http://slidepdf.com/reader/full/mazda-121-kia-pride-repair-manual-vol-1 176/389
F
TROUBLESHOOTING
UIDE
INSPECTION
ACTION
AreECU
eminal
voltages
K?
lEsDeciallv
C,
1K,20
and 20)
c7
Page
F-112
Check
or cause
-
Page
F-114
F- l16
5
ls lhere air leakageol intakeai svstemcom-
6 Does ngine
tarts
when
waler hemos€nsor
s
Chbck
water hermosensor
!7
page
F-121
7
A'e spark
plugs
OK?
F
Page
G-19
WEAFANDCAFBON
UILDUP
(0.039-0.o4i,
BUBNS
AND
DETERIOFAIION
No
Clean,or rep
ace
tr-
Page
G-19
a
ls enoine omorcssionorrect?
s
Page
B-10
Enoine omDression:
ore
han 1,030
kPa
(t-o.s
glcr;'.
149
psi)-300 Pm
Tryknown oodEcU andcheckaf
Check
engine
condition
.?
Page
B-10
.wofn
pston,
pislon
ings or cylinder
.Defective
cylinder
head
gasket
.
Distorled cylindff
head
.lmproper
valve
s€atng
.
Valveslickins
n
Suide
F-20

8/20/2019 Mazda 121, Kia Pride Repair Manual Vol 1
http://slidepdf.com/reader/full/mazda-121-kia-pride-repair-manual-vol-1 177/389
TROUBLESHOOTING
UIDE
F
CNANKS
NORMALLYBUT
WILL
OT START
PARTIAL
CO AUSTIOII) AFTERWARM.UP
DESCBIP.
Tt0ll
.Engine
ranks t nomal
speed ndshows
artial
ombustion
utwillnot
continue
o run
afler
Lrnningnd
.8attery
n normal ondition
.
Eng
ne slarts
normallywhencold
rrRouaLEsHooTtNGt{Tsl
O
Ar/Fu6l nixture too ch
.lnsuftcient
uel njectiononlrol
(Corr€ct
n or coolanl
emperalue)
.lnjeclor
uel eakase
@ Vapof ock
.Fuel
pressu.e
otheld n uel ne afier nsine topped
.Hish
RVP
winler)
uelused n warmweather
INSPECTION
ACTION
1
Connecl
iasnor
GNDwith
ump€
swilch
ON, hen
, '
,/,1{Q
to normal operaling lempera-
;is conneclor erminals /P and
r wire
ior
3
minrres with ignilion
l# I 64\
JUMPEF
wlFE
---t
Jl l^
@t),x.
\ \
Change uel o anolherbrand
ts
2 Connect iagnosisonnector
ermlnals/Pand
GNDwith
umper
wirei
s
tuei
lne
pressure
or
r€ct wilh ignitionswilch
ON?
rr
page
F-89
235-275
kPa
(2.4-2.a
kg/cln', 3/t-40
psi)
.riupin
wrne
PRESSUFE
FUELFILTEFi
Check ueL ine
pressure
while
pinch'
.+
lf luel llne
pressure uickly
n-
creases, check
presslre
reguiator
a I luel line prcssure laduallyn
cr€ases, heck uel ine and filter
for clogging
li not
clogged,
check uel
purnp
maxirnum
pressure
r7
page
F-91
High
piossure
ls uel return ose logged r
res
+
li
OK,
eplace
ressure
egulator s
page
F-94
+
li nol
OK,
epair r replace
3 ln same ondilion
sSlep2, is uel ne
pressure
heldaftergnition witchs urnedOFF?
e
p.ge
F-88
Fuel llne
pressure:
Morc than 147 kPa
('1.5
g/cm',2t
psi)
or 5 min.
Go to Step 5
Plugoutlei f
prcsslre
egulator:
s uel ne
pressure
eldatler
gnilion
wilchs urnedOFF?
17
page
F-88
Fuel lno
prc3surq
More han !47 kPa
(1.5
kg/cm' 21
psO
or
5
min.
Beplace
ressLrre
egulatof r-
page
F-94
Check uel
pump
hold
pressure
c7
page
F-84
4
lf
OK, check
nlector or fuel
leakage F
page
F-96
4
lf nof OK, rcplace
iue
pump
.r
page
F-92
F-21

8/20/2019 Mazda 121, Kia Pride Repair Manual Vol 1
http://slidepdf.com/reader/full/mazda-121-kia-pride-repair-manual-vol-1 178/389
F
TROUBLESHOOTING
UIDE
TNSPECTtOt{
ACTION
5
O:sconnecl
ater
hermosemor
onnectori
does
Ch€ckwater
hermo€ensot
c7
gage F-121
+
It OK,
check conn€clions
t waler
themosensot
nd
ECU20
4
ll not OK,
feplace
water her
mosensor (j
PaSe
F-121
No
6
ls 00" displayed
n S€lt_Diagnosis
hecker
wnh onition
switch
ON?
t7
Page
F-'67
Mallunction
code
l{o. disPlayed
Check
or cause
Belel
o specined
check sequerce)
f?
Page
F_70
"88"
llasheg
CheckECU eminal1F vollage c7 pageF-114
vollage:
appror, 12v
(lgnltion
switch
oN)
4
l i OK, eplace
CU
!1'PageF-112
+
li
nol OK,check
wirng
between
ECU
and Seli'Diagnosis
hecker
7 Are ECU erminal
oltag€s
K?
(Especrallv
C,20 and
20)
c7
Page
F-i12
Check
or cause
-
Page
F-115
F-l17
F- l t9
8
Tryknown
ood
ECU
and check
i
condilion
Replace
ECU
F
Page
F-l
12
Change
uel o another
rand
F-22

8/20/2019 Mazda 121, Kia Pride Repair Manual Vol 1
http://slidepdf.com/reader/full/mazda-121-kia-pride-repair-manual-vol-1 179/389
TROUBLESHOOTINGUIDE F
CRANKSNORMALLYBUT HARD
TO
START ALWAYS
DESCRIP.
Ttol{
.Englne
cranks
al nomal speedbut
req'rnesexcessive ranklng lme
berore tarling
.
Batlerv
n norrnaconclition
.Engine
uns
nomally t ldle
ll
idle
condllion otOK,
efer
o
"Bough
idle"
Nos.
l2)l
FnoUBLESHOOTtfl
HTNTSI
O Air/Fuelnixtureoo ean
.Fuel
njectionontrol
malluncion
(Correclion
orcoolanlemperaiurd
.Low
uel in€
pressure
@Air/Fuel nure oo ch
.Fuel
njeclionontrol
malfunclion
(Correclion
or
coolant emperalure)
.Calbon
deposiln
hot-wire
assaSe
@
Poo'
snition pafk
tNSPECTtOl{
ACTIO
ls 00" dsplayed
on Selloiagnos'sChecker
wth iqnition wilch
oN?
F
page
F-57
ma[unciion Code {o, dlspl.yed
Check or cause Refero soeciiied
check
sequence)
?
p.ge
F-70
"88"
tl.shes
CheckECU ermlnalFvoltage c7 pageF-114
Vo[.g€:
Appror. l2V
(lgnition
vritchO
)
+
lf OK, replaceECU
t:"
p.ge
F-172
4
ll nol OK,checkwiring elween
ECUandSsll-Diagnosisheckef
2 ls there a r
leakage
ol intake air syslem com-
3
s ar cleanerelementclsan?
-
page
F-62
No Repace irc eaner lemenl
Doesenginesla( easlly
when hrofle valve Ch€ck hrotle
valve
or carbondepos-
t and hen
go
to Siep 6
5 ls
uel ne
prcs$rre
ofieclal idle?
F
page
F-94
235-275
XPa
12.4-2.A
kg/cm" 34-40
psD
FUEL FILTER
Checkuel inepressurehilepinch-
+
ll fuel lne
pfessureuickly
n-
creases,heck
ressure
egulalor
+
ll fuel lne
pressureradually
n'
creases,heck
orclogging
e-
lween uel
pump
and
pressure
ll not
clogg€d, h€ck
uel
pump
maimum
prcssurc
F
page
F-91
F-23

8/20/2019 Mazda 121, Kia Pride Repair Manual Vol 1
http://slidepdf.com/reader/full/mazda-121-kia-pride-repair-manual-vol-1 180/389
F
TROUBLESHOOTING
UIDE
INSPECTION
ACTION
6
ls ar bypass
solenord
alve
@OX?
r'
p.g€ F-104
SOLENOID
INJECTIONBODY
VALVE@\\\
r )
k!
No
Replace
olenoid
alve
7 Are
ECU erminal
oltagesOK?
(Esoec,aly
C, h and
20)
c?
Page
F-lOg
Go o
nexl slep
Cn""f
io, "uuse
r'
Page
F-115
F-117
F-l19
8
Connect cliagnoss
conneclor
tetminals F/P
and
GND with
umper
wirei does engrne
stan
Eneckcircultopening elay c7 PageF-93
a
ff rclayOK,
repair
or teplace
wi€
+
li r€lay
noi OK,
repiace elay
9 Connect
System
S€lector
o diagnosis onnector
and
set T€st
Switch o
SELFTEST
i
is lhere
corecl gnrtionmng €t dleaiterwarm_up?
e
Page
F-63
lgnilion
iming:
aTDC16
+
1c
,-JE"
Adjust
gntion
iminq
!?
Page
F-63
1 0 ls engine
compression
orreci?
c7 pageB-lo
Englne
ompres€lon
ilinimum):
1.030
Pa
(10.5
ksr'cn',
r49
Fel)-300
Pm
Check
englne
condition
c?
Page
B-1o
.Worn
pislon, Lston
ngs r
cy noer
.
Delecuve
ylinder
ead
gaskei
.
Dlsroded
ylinder
ead
.
lmpropet
valve seating
.valve
st
ckins
n
guide
1 1 Try
known
ood
ECUI oes
ondilion
mprove?
F-24

8/20/2019 Mazda 121, Kia Pride Repair Manual Vol 1
http://slidepdf.com/reader/full/mazda-121-kia-pride-repair-manual-vol-1 181/389
TROUBLESHOOTINGUIDE
F
CRANKSNORMALLY UTHARO O START
WHE
E GINE
COLD
DESCRIP.
TION
.Englne
crank al nofmal
speed
but rcquires excossive cranking
lime
before
slarl ng
.
Baltery
n nofmal condition
.
Festarc OK after
wam-uo
.Engrne
runs no.mallyat idle
[f
idle cond]tion
s not
OK,
r€ter o
'Rough
ldle'
(Nos.
8-12)l
rrnouBLEsHoollt{GtNTsl
O
Air/Fuel )dureoo rich
.Fuel
njecliononvolmal,unction
(Correction
or coolantemperature)
.Thermowax
allunclion
@A1r/Fuel
xiure oo ean
.Carbon
deposlt n hol wire
passage
.
Fu€l nj€ctiononlrolmalfunction
(Coffeclion
or coolant emperalure)
@
Poor tom ation
.
Low
RVP
summer)
uelb€rng sed
INSPECTION
ACTION
ls
"o0
displayedn SellDiagnosish€cker
wlth gnition witchON?
17
page
F-67
SYSTEM
SELECT:
Malfunctlon Code No, displayed
Check
or
causeFeler 10soeciti€d
checksequencei
E?
page
F-7O
"88"
llashes
Check
CU erminal Fvoltage
c7
page
F-'l
14
Voltage:Approx.12V
(lgnition
switch
ON)
d
ll OK,
eplace
CU
rr
page
F-112
4
ll notOK,checkwiing betlveen
ECUandSelfDiagnosishecbr
2
Are ECU eminal vollagesOK?
(Especiaiy
1C.
2D, and 20)
-:r
page
F-112
Check or caus€
c7
page
F-115
F-117
F- l t9
3 Does engineslarteasily
when hrotlle alve
Check
lhemowar
c7
page
F-85
4
f
OK,
go
to
Srep
5
4
ll
nol
OK,
replace njeclionbody
ls there air leakageol inlakear systemcom'
5 ls arrcleanerelement lean?
cr
page
F-62
Beplaceair
cleanerelement
6 Are spark
plugs
OK?
e
page
G-19
WEAB
ND
CAqBONUILOUP
(0.039-0.043
n)
BUFNS
E AND
DETEFIORATION
F-25

8/20/2019 Mazda 121, Kia Pride Repair Manual Vol 1
http://slidepdf.com/reader/full/mazda-121-kia-pride-repair-manual-vol-1 182/389
F
TROUBLESHOOTING
UIDE
ls u6l in€
pressure
orrect
l idle?
t7
Plge
F-94
Fuel
line
pre$uaa:
235-275 kPa
(2.4-2.8 kgL/cm"3{-40
p6i)
Check
uel line
pressure
whil€
pinch_
ing uel r€lum hose
+
lf fuel ine
pressurc
uickly
n_
creases,
heck
pressure egulator
+
ll fuel ine
pres$rre raduallyn_
crcases,
h€ck uel
ine o. clog_
ging
betwe€n
uel
PUmP
nd
pr€€sure egulalor
ll
nol clogged, heck
u61
umP
maximum
ressure
c?
Page
F-91
High
prcs3ure
ls
tuel rettim hose
cloggedor
fes
+
ll OK, replace
pressure egulator
-
Page
F94
4 ll nol oK, reparor replace ose
Replace CL,
c7
Page
F-112
Iry known
ood
ECU;
doescondition
mprove?
Change
uel o
another
brand
F-26

8/20/2019 Mazda 121, Kia Pride Repair Manual Vol 1
http://slidepdf.com/reader/full/mazda-121-kia-pride-repair-manual-vol-1 183/389
TROUBLESHOOTINGUIDE F
CRAI{KS {ORI{ALLY
zuT HARDTO START
-
AFTERWABi&UP
DESCRIP.
n0
.Engine
cranksat normalspeed
but requires xcessive ranking me beiore stadingaller
runnino
and
hol
.
Baitery n normal
condition
.
Enginestarls
no|mallyvlhen coLd
.Ensine unsnormally l idle ll idle ondltionol OK, efer o Rough dle" Nos. -12)l
ITBOUALESHOOTING
I
TSI
O
Ai/Fud rni(ure oo rich
.
Fuel njecton conlrol
malfunclion
.hieclor
luel leakage
@
Vaporock
.Fuel
pressufe
otheld n luel ineafter
ngine
lopped
.HiSh
RVP
wider)
uelused n warmwealher
r{sPEcTtot{
acTrol{
1 ls
"00"
displayed n
S€llDiagnosis hecker
with igniiion switch ON?
NO allunc{lon
Code No. dlsplayed
Check
or
causeSeler
to soectied
check s€quence)
c7
pag€
F-70
"88"
tlashas
Check
ECU ermlnal Fvoltage s
pag€
F-114
Voll.ge Approx.12V
(lgnition
switch
oN)
=)
lf OK, €place CU
E'
pag€
F-112
+
lf not OK, ch€ck wiring belween
ECU and SellDiagnosisCh€cker
2
Are ECU erminal oltages K?
(Especlally
C,20, and 2T)
c7
Page
F-l12
Go
to next step
Check or cause
F
pag€
F-115
F-|17
F-l19
3 Runengine l idlei s uel in6prossures held
after
gnilion
witch
urnedOFF?
.7
p.ge
F-88
Fu€t lne oreaaure:
More then 147 kPa
(t.5
kg/cmz, 1
psl)
or
5
fiin.
NO
Plug ou.tlel f
pressure
egllalor
and
check l Juel ine
pressure
s held
afier
ignilion witchurnedOFF
.+
lf OK, replace
pressure
egulalor
17
page
F-94
+
lf nol OK,ch€ck uel
pump
hold
pressure .7
pago
F-88
lf luel
pump
s OK, ch€ck ntector
lor iuel leak€ge
r?
page
F-96
F-27

8/20/2019 Mazda 121, Kia Pride Repair Manual Vol 1
http://slidepdf.com/reader/full/mazda-121-kia-pride-repair-manual-vol-1 184/389
F
TROUALESHOOTING
UIDE
JTEP
|l{SPECT|O}l
ACNON
Warm-up
ngine
o normal
op€ratng
emFera_
lure
and slop
l
Connect
raonosisonneclor
erminals
/Pand
GNDMh iumos
wira
or 3 minule6
ilh gnition
switchON; do€s
f englne
$ans easili/?
Change
uel to
anotherbrand
Go
to next
s|ep
5
Try known
good
ECU;do€s condilion
mprcves?
Heptace
ECU
E?
l,d,ge
F-112
NO Change
uel
o anolher
brand
F-24

8/20/2019 Mazda 121, Kia Pride Repair Manual Vol 1
http://slidepdf.com/reader/full/mazda-121-kia-pride-repair-manual-vol-1 185/389
TBOUBLESHOOTINGUIDE
F
a
ROUGH DLE/EXGINESTALLSAT IDLE
_
ALWAYS
DESCBP-
|
.Engrne
sads
normalv
bul stallsor v,brares xcessvey al
idle n
everyco']d
ion
FROUALESHOOTTNG
titTSl
O
Air/Fuel ixlureoo ean
.
Fuel njeciion
onlrol
malluncUon
.Low
luel ine
pressure
@
Low
ntake ir amount
rn r^^^-4r iira clEAd
. ldlespeedmisadiust'nent
@
Oneor more park
lugs
ol irlng
O
Lowengine ompression
@
Carbon eposit
n injecton ody
INSPECTION ACTION
1 ls
"0O
drsplayed
n SeJi-Diagnosishecker
wilh
ignition
swltchON?
Mallunclion Code No. dlsplayed
Check or caus€ Rete. o soecilied
checksequence)
.? page
F-70
"8a"
tlaEhes
CheckECI.Jerminal F
voltag€ c?
page
F-114
Voltage Appro!. 12v
(lgnltion
€wltchO
)
+
ll
OK,
eplace CU
o
p.ge
F-112
+
ll nol OK,check
wlring etw€en
ECUandSellDiagnosis
heck€r
2
Are
ECU eminal
oltages
K?
(Esp€cially
K,
2M,20 and20)
-r
page
F-112
Checkorcause
F
page
F-115
F-117
F- l19
3 Disconn€€l ach h ightension ead
al
idlei
does
enginespeed decrease quallyat each cylinde?
Go to Step
5
ls
slrongblue spark
visible
at disconnected igh-
/
Ch€ckhrghlensionead
F
psge
G-23
+
ll OK, checkdistrbuto.
cap and
rotor
c7
p.ge
G-23
+
It nol OK, replacehighlenson
5 Arcspark lugsOK?
c7
page
G-19
WE1AF ND
CARBON
BUTLDUP
(0.039-0.0,*l
AURNS
DETERIOFAIION
Check of corect engine ompressionrt'page 8-10
+
lf OK, replace injeclor
c?
Page
F-96
+
lf not OK, check or cause
F
psge
B-10
Cean or
replace
F
page
G-19
F-29

8/20/2019 Mazda 121, Kia Pride Repair Manual Vol 1
http://slidepdf.com/reader/full/mazda-121-kia-pride-repair-manual-vol-1 186/389
F
TROUBLESHOOTING
UIDE
STEP
INSPECTION
ACTION
6
Connect
Syslem
Sel
ignition
iming orrer
lgnition
lming:
BI
ector o diagnoss
onn€ctor
to
'SELF'IEST"|
is
coffecl
ri at idle aiter
walm up?
.7
page
F-62
1 6
.-
/fEN
Adtust
gniton timing
17
Page
F_52
t ,
GNo
//
-tfi"
INOICATOF
/
D
l.r9*
7
ls uel ne
oressure
orrcclal idle?
c7
Page
F-94
Fuel
ine
pressure:
235-275 kPa 12.4-2.A rg/ctn', 34-40 psi)
{vacuum
hos€
to
pte*3ure
regulstor dls-
connected)
., .ih,
(\
)
""'*Y"'-94u9:-lwlllK;/
-\-,aJ.6V.]Ly.V
/
FUET IITEF
Check
uel
ine
ptessure
while
prnch_
+
ll
fuel ine
pressure
uickly n_
creases,
heck
Pres$re
regulalor
+
I fuel
ine
prcssll|e
sradually
n_
creases,
heck
or clogging
be
tween
ue
punrp
and
pressure
regulatot
It
not clogged,
heck
uel
PUmP
maximum
pressure
I
Page
F-91
I
ls thero an
bakage ai
intake air syslem
com
9 ls eno
ne cornpression
orrecl?
e
paEe
B-10
Ensinecompression
r
!nimum):
t,o3o tPa
Oo.5
kg/cm'.
149
Psi)-300
Pm
Tryknown
ood
ECU
anddoes
on
Check
or cause
F
Page
B-lO
F-30

8/20/2019 Mazda 121, Kia Pride Repair Manual Vol 1
http://slidepdf.com/reader/full/mazda-121-kia-pride-repair-manual-vol-1 187/389

8/20/2019 Mazda 121, Kia Pride Repair Manual Vol 1
http://slidepdf.com/reader/full/mazda-121-kia-pride-repair-manual-vol-1 188/389
F
TROUBLESHOOTING
UIDE
ls water
hermosensor
esslancecorrec?
Beplace
water hemosensor
r-
page
F-121
Connecl
Syslem
Seleclor
o dlagnosis onneclor
and
set Test Swtch
o
'SELF
TEST when en_
gine
s cod
Doesenqinespeeddecr€aseas engrnewarms
Reolace
nieclion
odv
F
Page
F-84
Connect
System
Seector o diagnos
connector
and sel Tesi Swllch o "SELFTEST
ls
rqnlron rm
ng corect al
tdb aner warm
upt
ci
page
F-62
lgnilion
tlming:
BTDG 16
*
1"
GND
TESTSW
NDICATOFI
Adjust
€ntion
limlng
G
Page
F-62
G oaae F-112
Try known
good
ECU;
does conditon
mproves?
Change
ue
to anoiherbland
F-32

8/20/2019 Mazda 121, Kia Pride Repair Manual Vol 1
http://slidepdf.com/reader/full/mazda-121-kia-pride-repair-manual-vol-1 189/389
TROUBLESHOOTINGUIDE F
1 0 ROUGHDLE/ENGINE
TALLS
AT IDLE AFTERWARII.UP
DESCRIP.
TION
.Engine
unsnormally l idleduringwam-upbut
engine talls
r vibrales
xcessivelyfler
warm-up
ITROUaLESHOOTTNG
INTSI
O)
dle
speed ontror vslemmallunction
@ Air/Fuel ixtureoo ean
.Low
fuel ine
pressure
.
PCVvatve stuck
open)
@
ArlFuelmi(ure oonch
.Fuel njecl n controlmal,unclion
(Corection
or coolanl emperature)
@
Poor gnilion
O
Lowengine ompressn
INSPECT|oiT
ACTION
1 ls 00" displayed n
Self-Diagnosishecker
with ignilion
switchON?
e
page
F-67
llalluncfion Code ilo. displ.yed
Check or causeGeler lo so€cilied
ch€ck
sequence)
(?
page
F-m
"8a"
tlashes
CheckECU ermina F vollage c7
page
F-114
Volreg€: Approx. r2V
(lgnition
switch
ON)
+
li OK, eplace
CU
rz page
F-112
+
ll noi
OK,checkwiringbolween
ECUand SellDiasnosishecker
2 Are ECU erminal
voltagesOK?
(Especially
K,
2M, 20 and 20)
F
page
F-112
Check
or
caus€ c7
page
F-115
F-117
F-r9
3
Disconnect ighlension ead at dle; does en-
glne
speed d€crease
quallyal al cylinders?
Go to Slep 10
ls ihere air leakage
ol intakearrsystem om-
5 ls air cleaner
element l€an?
e
page
F-62
No R€placealr cleanerelement
6 lurn thronleadjusling
screwc,
does dlecondilionmprove?
AIFFLOW SENSOR
-ffiqf l";;I
Adjust idle
speed
.?
page
F-62
No Relurn
hrottle
adiuslingscrew o
its
original
ositlon,
nd
go
to next lep
=.\\\
/
F-33

8/20/2019 Mazda 121, Kia Pride Repair Manual Vol 1
http://slidepdf.com/reader/full/mazda-121-kia-pride-repair-manual-vol-1 190/389
F
TROUBLESHOOTING
UIDE
INSPECTION
ACTION
7
ls fuel
ine
pressure otrect at idle?
c?
Page
F-94
Frel lih6
pr$sure:
235-275
kPa
(2.4-2.A
kg/cmz, 34-40
p3l)
Check
uel
ine
pressure
hile
pinch_
+
ll fuel ine
pressure
uickly
n.
creas€s,
heck
pressure
egulator
+
ll iuel ine
pressure€dually n-
creas€s,
heck
or clogging
e_
tween
uel
pump
and
pr€ssure
lf notclogged,
heck
uel
pump
maximum
prsssure
E7
Page
F-91
I
Connect ystem
electoro diagnoss
onnector
and
set Test Switch
o
"SELF
TEST
ls ignition
iming orrect
t idlealt€rwarm_up?
(7
gage F-€2
lgnition lmlng:
BIDC
16
+
1'
Goto nexl step
No
Adjusl gnrtion
ystem
r'
Pag€
F-62
9 Disconnect
water
hermosensor onneclor
Does nglne
ondition
mprcve?
Replace
wat€r hermosensor
No
Tryknown
ood
ECUandcheck
l
1 0
ls enoine omoression
orrecP
.7
page
8-10
Engine
ompression
llhlmum):
I,O3O Pa
10.5
kgL/cm', 49
psl)-3lx)
pm
Check
engine
r?
Page
&-10
1 1 ls slrong blue
spa
visibleal each d sconnecled
hgh'tension
ead?
c-----,--
\-\
<72oNl #
/
/
Check
high'tension
lead
.7
page
e-23
4
lJ OK,
check dislrlbulor
ap and
rotor
F
page
G-23
+ ll not OK, replacehigh ensron
12 Arespark
lugs
OK?
s
pago
G-19
WEAF NOCAFiBONUILDUP
(0.039-o.043
BUANS
DETEBIOBATION
Try known
good
ECU and check
NO
F-34

8/20/2019 Mazda 121, Kia Pride Repair Manual Vol 1
http://slidepdf.com/reader/full/mazda-121-kia-pride-repair-manual-vol-1 191/389
TROUBLESHOOTINGUIDE
F
' t l
ROUGII DLE/E GI
E STALLS
AT IDLE
-
WHEI{ A./C.P/S,
EIL
OI{
DESCRIP.
Ttol{
.Engine
talls r vibrates xcessivelyt dlewhenP/Sor E/LON
.AJC,
P/S,headlights,
lower an and
e{eciric
ooling an opelale normally
.ldle
condilions normal hen ,/C.P/S
and
E/LareOFF
rrRoualEsHooTtitc
HtNTsl
O tdle spe€d control svslem malluncljon
;TEP INSPECTION ACTION
ls
'OO
dlsplayedn
SeliDiagnosishecker
wilh ignitionswilch ON?
F
page
F-€7
SYSTEM
SELECII
I
ll.ltuncllon Code
{o. displayod
Check
or
caus€ Refer
o soecilied
check sequenc€)
rr
p.ge
F-m
"88"
llasha6
Check
ECU
erminal
F voltage c?
page
F-ll4
Vollage:
Apprcx. l2V
0gnlrbn
switch
Ol{)
.'
li OK, eplace CU
e
page
F-112
+
ll not
OK, check
wiring belween
ECUandSelf-Diagnosis
heck€r
2 UsingSellDiagnosis h€cke.Monitor ampi
are
switchesOK
with
gnilionswitchON?
F
pege
F-80
k@tl
NO
Lamp nol
ON or
OFF wllh specl-
fied
swatch
Check or causeFefer lo
sDecif d
check sequence)
tr7
P.ge
F-81
F-82
L.mp alwaF ON
Check
wring
beh{een
CU emina
1D andSellDiagoosisheck€r
3 ls air bypasssolenoid alve
OK?
.
A/C.....Solenoidalve
@
rr
prge
F-109
. E/L.....Solenoidalve@ c7 p.te F109
.
P/S.....Solenold.lve
@
r?
page
F-109
AtR
AYPASSSOL.
V.
rf .4
./
(o
F
//-!hVq"l' ,&
AIF BYPASSSOL.V,
@
l t l '
Adjust dleup enginespeed
s
page
F-64
NO
Replace solenoid valve
F-35

8/20/2019 Mazda 121, Kia Pride Repair Manual Vol 1
http://slidepdf.com/reader/full/mazda-121-kia-pride-repair-manual-vol-1 192/389
F
TROUBLESHOOTING
UIDE
l 2
NOUGH DLE,/ENGIIIE
TALLS
JUST
AFTEBSTATIING
DESC-RtP-
Trotl
.Enstr€
stans
normallybut vibrates
excessively r
slalls
0st
atler
starting
acceleralion
lom idle)
.ldle
conditons
r€ normaln olher
onditons
TTBoUBLESHOOTING
ll{TSl
O
Air/Fuel l{ure
oo ean
.Fuel
njeclionontrol
malfunction
.
Low
uel ine
pressure
@
Throltlesensor
mailur'ction
}TE'
tNSPECT|OI{
ACTION
ls OO"displayed
n Self-Diagnoss
hecker
with onition wilch
ON?
-
c?
page
F-67
SYSTEM ELECT:
No
lr.ltunctlon
Code No. d|sPlayed
Check
or cause
Refer
o specilied
check
s€ouence)
c7
PzEe
F-7O
"88"
tlash€5
Check
ECU
erminalF vollage
ca
p.go
F-114
Volt.ge:
Approx.
12v
(lgnitlon
3witch
ON)
+
It OK,
edaceECU
c?
Page
F-112
+
ll nol OK,
checkwirlng
etween
ECUand
S€lf-Diagnosis
hecker
2
ls
there
air leakage
f intak€air systemcom_
No
3 ls uel ne
prescure
onectal
idle?
e page F-94
295-275
kPa
12.4-2.a
kg,fcmu, l-40
psl)
Checi
or
uel ne
pressure
hile
pinching
uel
elumhose
+
ll
fuel ine
pressu.euicklyn_
creases,
heck
pressure
egulaior
+
ll fuel
ine
pressurc
raduallyn-
creases,
h€ck or cLogging
e
Meen
luel
pump
and
pressure
r€gulator
lf
not clogged, heck
uel
PumP
max
mum
p€ssure
.?
Page
F-91
Hlgh
pre33t|re
ls
fuel ine clogged?
+
ll OK, replace
pressure
egulalor
rj'
Page
F-S4
+
lf notOK,
cplace
Connect
SyslemSeleclor
o dlagnosi
and set
Test Switch o
'SELF
TEST"
ls
ignltioniming orrecl
l idleaiter
,TEN
f : :
GND
(
\tg-aNOICATOFI
go
F--{
3
In same
ondilion
s StsP
in_
specIon
Check
o'
conecl
dle
speed
.?
pag€
F-63
ldle speed:
750
'l
rPtn
(tilTx)
1, t00
1lpm
(ATX)
4
ll OK,
go
io nexl step
+
ll not OK,
adjust
dle
speed
17
page
F-63
L l
]/
TES
6
F-36

8/20/2019 Mazda 121, Kia Pride Repair Manual Vol 1
http://slidepdf.com/reader/full/mazda-121-kia-pride-repair-manual-vol-1 193/389
TROUBLESHOOTINGUIDE F
STEP
utsPEcTtoN
ACTION
5
Are ECU erminal
voltagesOK?
(Especially
8,
2M, 20, and2Q)
Nole
When ch€cking voltagss, tap, moye,
and
wlgglo harmss and connector to recreate
Go lo neil step
6 Arc
spark
lugs
OK?
WEAF ND
CAFBONUILDUP
{0_03$-0.043
EUBNS
OETEFIIOFATION
7 ls engine ompressionorrec?
F
page
E-10
Englne
ompression
Minimum):
1,030
kPa
10.5
kg/cm',
1as
psl)-3oo
rpm
Try known
good
ECU and check l
NO
Check
engine c7
page
B-lO
F-37

8/20/2019 Mazda 121, Kia Pride Repair Manual Vol 1
http://slidepdf.com/reader/full/mazda-121-kia-pride-repair-manual-vol-1 194/389
F
TROUBLESHOOTING
UIDE
HIGH
OLE SPEED
AFTEN
WANM"UP
.ldle
spe€dexcessive
lter
warm_up
ITROUBLESIIOOTING
I TSI
EicssJvenlaks n supph€do engne
O
Throttlevalve
nol
lully
clos€d
@
ldle spe€dcodrol
mallunction
.Thermowax
alfuncton
.Air
bypass olenoid
alve
ON al idle
.
1,./C,
P/S
or
E/L sgnai
senl
o ECU
ls lhfotle
valve
ullyclosed
whenaccelerator
ls
lhrottle
inkage orrcc{y
nstalled
+
lf OK,
go
o Slep
2
+
ll nol
OK,clean,
adjustor
replace
linkage
Adjust
dle
sp€edby
iumins
throtlle
!7
page
F_63
o€s ast
idle cam
release
throttle levs?
ls "oo" displayedon SellDiagnosrsChecker
with onition
switchON?
-7
paq'e
F-67
lltaltunction
code
tlo. dlspl.yed
Check
or cause
Beier
o
sp€cilied
check
sequence)
t-
Pzge
F-7O
"a8"
llashe3
Check
ECU
erminal
Fvoltage
e
page
F-114
voltaoe
AoDrox.
2v
-
0initlon
switch
oN)
+
ff OK, eplace
CU
(?
P.ge
F-112
+
lf
not OK,
check
wiing belween
ECUandSelt-Diagnocishecker
Adjust
dla speed
by lurning
hrot
s
'
r'.
Pagc
F-63
Are ECU
1P, R,
15, 1T, U, 2[,'1,
Q,2R,and
2T lerminal
voltagesOK?
Chech
or cause
_7
pag.
F-115
F-117
F-l19
F-38

8/20/2019 Mazda 121, Kia Pride Repair Manual Vol 1
http://slidepdf.com/reader/full/mazda-121-kia-pride-repair-manual-vol-1 195/389
TROUBLESHOOTINGUIDE
F
t 4 IDLEMOVES PAI{ODOWN/IDLE
UNN G
DESCRIP.
.Engine
spesdsup and down
periodically
l
idle
TroN
I
5X?u68j*:SoorNG
rNrsr
@Throfle sensormisadjusted
@
Fuel njection
mounlnconstant
@
Poor gnition
STEP INSPECTION
acrtot{
1 ls rherea r leakaoear intakeair svstem?
Repajr
or
replace eak€ge
poinl
2 ls PCV
valve
OK?
cz
page
F-99
NO
3 ls arrcl€aner lemenl lean?
4
Disconnecl
ighlension
ead at idle does en
gine
speed decrease quallyal each cylinder?
No Go1o
step9
5 ls
'00
displayed
n SefDlagnosis hecker
wlh ignirion
wtchoN?
e
page
F-57
TESi SWi SELF TEST
NO Maltunction
odeNo. d|spl.ye.d
Check
or cause
Reler
o speciied
check
sequence)
cr
Page
F-m
"84"
flashes
Check
ECU €rminalF voltage
17
Page
F-114
vohage:Approx.12v
(lgnition
swilch
ON)
+
lt OK, eplace CU
F
page
F-112
+
ll nolOK,checkwins b€tween
ECU
and
Sell-Diagnosis
hecker
6 Connecl
yslem elecloro
diagnosisonnector
and setTeslSwilcho " SELF EST'
Tryknown
ood
ECU
F-39

8/20/2019 Mazda 121, Kia Pride Repair Manual Vol 1
http://slidepdf.com/reader/full/mazda-121-kia-pride-repair-manual-vol-1 196/389
F
TROUBLESHOOTING
UIDE
Connecl
System
Seteclor
o diagnosis
onn€cior
and
set Test
Switch o
"SELF
TEST
ls roftton rmrno
otted at
Ldle
tter
warm p?
7
P.ge
F-62
BTDC 6 + 1.
tNDtcAToB--l
\,,1S\
\|!/
TEsr sw
Adjust
gnition
ming
e
Page
Fl2
Are
ECU eminal
vollages
K?
lEsoeciallv
[/)
e
Pago
F-lla
CtrecX
or
cause
e
Page
F-119
ls strong
blue spark
visible
at €ach disconnected
high'tension
ead?_
:"''-t'
,-t'.--
_1-(_(d
Check
high-tension
ead
+
ll OK,
check
dislribulor
ap and
e
fi not OK,
replace
high'tension
Check
or correct ngine
onrpression
?
page
B-10
CompressionMinimum): ,030kPa
(t0.5
kg/dn',
1r9
Psi)-300
Pm
4
lf OK,
go
to
nexi step
+
tJ
notOK,check
or cause
c7
pag€
A-10
Ar€spark
plugs
OK?
p
17
page G-19
(0.039--o.043
n)
BUFNS
Try known
good ECU and
check l condition
F-40

8/20/2019 Mazda 121, Kia Pride Repair Manual Vol 1
http://slidepdf.com/reader/full/mazda-121-kia-pride-repair-manual-vol-1 197/389
TROUBLESHOOTING
UIDE
F
1 5 ENGII{ESTALLS ON OECELERATION
DESCATP-
Tro
.Engine
unexpectedly
tops unning h e deceleralingr aJter ecelerallon
.
ldle
condition or,ral
rrRouBLEsHooTtNG
|NTSI
Enginepeed ropsoomuchwhen
eleasingcceleratorr
poor
onnecloronnectionsconnected
y deceleralion
O
Dashpormisadjusted
@
Fuel ut
control
mallunclion
@
ldle
speed
misadjustment
INSPECTION ACTION
ls rdleconditon normal?
Adjustor
perlorm
roubleshoot
g
Nos.8-11 RoUGH DLE"
,-
pag"
l-?9
ls dashpoi correclly
adjustecl?
13
p.ge
F-104
Dashpol set speed: 2,500
+
1O0 rpm
3
|s
"00"
dlspLayed
n SeliDiagnosis hecker
with
gnltion
switchON?
sYsTEM ELECT:1
r:'
page
F-67
Mallunclion Code No. dlsplayed
Check
or cause
Befer
o sDecified
check
sequence) rj
page
F-7o
"88"
tlashes
Check
ECU eminal1Fvollage u
page
F-111
Voltage:Approx. 2V
(bnirion
switchoN)
+
lr OK, eplace CU F
page
F-112
+ ll nol OK, checkwring between
ECUandSe 'Diagnosishecker
Are air bypass sojenoid valves
OK?
SOLENOI
voLut
-@-ll
5 AreECU erminaloliages
K?
(Especialy
B,2lV,20
nd \4
G
page
F-112
Checklor cause
-
page
F-115
F-117
F- l19
6
ls
here
poor
connectiont eilher l lollowing?
.
lgnilion
oi l
.
lsniter
.
Dislribulor
.
C rcuitopeningelay
.
ECU
Try known
good
ECU
Doescondilion
mproves?
F-41

8/20/2019 Mazda 121, Kia Pride Repair Manual Vol 1
http://slidepdf.com/reader/full/mazda-121-kia-pride-repair-manual-vol-1 198/389
F
TROUBLESHOOTING
UIDE
E GDTE
TALLS
SUDDE
LY
(INTERT|TTENT}
t6
0EscnlP.
Ttoil
.Engrne
ntermitenUylops
unning
.Belore
stallinq,
nsrne ondition
K
TTROUBLESHOOTI
HINTSI
O it'frtrnitt""tv
"" "p"tl
"t no
luel Iniection ausedby
vehicle
vibration,
ccelefaijon,
r cleceloralion
.Poorconn€ctonn wiing harness
3TE
tlrsPEcTtoN
ACTION
ls
"m"
displayed
n
Self-Diagnoss
h€cker
wilh ionition
switchON?
r?
page
F-.67
TESTSW;SEIF
TEST
NO
Maltunction
Cod€
No. d|3played
Check
or caus€
Refef
o sp€cified
check
sequence)
F
Pagd
F-70
Note
.When
checklng
wiaing
hamcssand
conneclol3,
tao. mov6,
and
wiggle
guaFcl
3enaor
and/or
h.r'
ndsg to
r€cGale
Problem
"88"
ll6ah€3
CheckECU erminalFvoltage x7 p.ge F_114
Voltag€:
App.ox. 12V
0gnition
swilch
ON)
4
lf OK, eplace
CU
c7
P3€e
F-112
+
li not OK,
ch€ck
wiringbetween
tCU and
SellDrag.osE
hecklt
2 ls lhere
poor
connection
t eilhel of
lollowing?
.
lgnition oil
.
Distribdor
.
High-tension
ead
. Ckcuit penins elay
.
ECU
3 Are
ECU emina,
oltages K?
{Especial ly
8,
1G,11,2A,24,2C,2E
nd2\ i )
.7
pege
F-112
Note
.when
checklng
volteg€, lap,
move, and
wlggle
halne3s and
conneclor to
recneate
Go o
Troubleshootjng
o.2
"CBANKS
NOBMALLY
UTWILL
NOTSTART
NO
COIVBUSTION)
?
p.ge
F-17
No Check
lor cause
c7
Pag€
F-115
F-117
F- l19
F-42

8/20/2019 Mazda 121, Kia Pride Repair Manual Vol 1
http://slidepdf.com/reader/full/mazda-121-kia-pride-repair-manual-vol-1 199/389
TROUBLESHOOTINGUIDE
F
17
HESITATESFTUIIBLES
ON
ACCELERATION
DESCND.
TION
.Flat
spotoccurs
ug
ater acceleratorepressedr
mrld
erling
occurs uring c.deraon
ITROUBLESHOOTT
Ht]{TSl
O
Air/Fuel
xlure
oecom€s
ean
nen dep.e€srngccelerator
.Fuel injeclloncontrolmalfunctionCorection or accelerating ondition)
.Fuel
line
pressure
€creases
.Spark
advance
onlfolmalfunclion
INSPECTION ACTION
1 ls
"00"
display€dn SellDiagnosis
hecker
wilh gnilion iwilch N?
I.ltuncllon Code l{o, dhplay€d
Check or cause
Refer
osoec'lied
check
sequerce) o
page
F-70
"88"
fl.3hes
CheckECU erminal
Fvoliage F
page
F-114
Vollag€: Approx, 12V
(lgnitlon
sw[ch ON]
.>
lf OK, cplace CU
ri
pege
F-112
.+
lf not OK, check wiing between
ECIJand Self-Diagnosishecker
2
ls thereair leakageat iniake
air sygem com-
3 ls arr leaner lsment l€an?
tr-
p.ge
F-62
Go
to nen siep
Replace ircleaner lemenl
4
Arc ECU €rminal K,
2M, 20 and 20
voltages
OK?
.?
p.ge
F-l12
Go lo
nexl
step
No Ch€ck
or
cause
c7
psge
F-1r5
F-117
F- l t9
5 ls lhrot lle inl€ge coreclly inslal led nd does
thrcttle valve open frcel',
Cl€anor replaceas requiredany
binding r damagedinkage ndad-
lust
cabl€ dell€ction l inieclion
body e
pag€
F-86
6
ls uel ine
pressure
orrect
t
dle?
.?
p.ge
F-94
Fuel
ine
preasure
235-275
kPa
(2.4-2.8
tg/cm', 3'F/1()
psD
Does
trel lne
pressure
ecrease
whenacceleruting
ulcklf
.+
li decreases, heck uel
line
and
liltef or clogging
4
lf no decrease,
o
to next slep
Check
uel ine
pressure
hle
pinch-
+
lf luel ine
pressufeuickly
G
creases, heck
pres$ire
regulator
+
11lueline
pressureradually
n'
creases, heck
or
clogging
be
tlve€n
uel
pump
and
pressurc
r€gulatot
ll not clogged,check uel pump
maximurn
ressure
17
page
F-91
F-43

8/20/2019 Mazda 121, Kia Pride Repair Manual Vol 1
http://slidepdf.com/reader/full/mazda-121-kia-pride-repair-manual-vol-1 200/389
F
TROUBLESHOOTING
UIDE
t sPEcTto
acfloll
7 Connect
SysternSeleclor
o diagnosis onnector
and set
T€stSwilch o
'SELF
TEST"
ls ignition
iming conect at
idle alt€r warm_up?
ri'
p.ge
F--62
lgnnlon lmlng:BTOC16 + l"
INDICATOR
Does
gnltionming
advance
hen
accelerating?
+
ll
advances,
o
lo
ne)dstep
+
ll
not advan6,
replace
ECU
s
pag€
F-112
NO
8
Are arrduct
and air
hoses orrectlynstalled? Go to nexl step
NO
R€pair
9
ls
exhaust ystem
est cted?
(t
p.ge F-1t7
NO
10 Try known
good ECUand ch€ck f conditEn
F-44

8/20/2019 Mazda 121, Kia Pride Repair Manual Vol 1
http://slidepdf.com/reader/full/mazda-121-kia-pride-repair-manual-vol-1 201/389
TROUBLESHOOTINGUIDE
F
t a
SUFGESWHILECRUISING
DESCRIP.
TION
.
Unexpecled hanSe n enginespeedwnich s usually epetitive
TIROUaLESHOOTTNG
TNTSI
O
Air/Fuelmixture oo
ean
@ Misfirc
@
Poor onnection
n
wiringharness
STEP tNSPECT|Ot{ ACTION
ls
'0O
displayed
n SellDiagnosChecker
wth ignition
wltchON?
c?
page
F-€?
Go 10
next
slep
No Malluncllon Code No. displ.yed
Check or cause
Beler
o soecilied
ch€ck s€quenc€) !?
page
F-70
"88"
llashes
Check
ECU elminal 1F voltage e
p.ge
F-114
Vo[age: Approx. l2V
(lgnilion sMtch ON)
+
lf
OK, replaceECU r?
page
F-112
+
lf not OK, check wirins benxeen
ECU and Self-Diagnosishecker
2 ls throttle eosorOK?
s D4ge F -122
Go ro ne( step
NO
3 Disconnect xyg€nsensor onnector;does con'
OXYGEN
ENSOR
ONNEC] Ft
Checkoxygensensor
(?
eage
F-123
Are ECU erminalvoltagesOK?
t- page
F-112
Check
or
cause
.7
pege
F-115
F-117
F-I t9
5
ls
lh.ottle
inkage
cofrecly installed nd does
thronde
valve
open op€raies lrcely?
Corfecl, lean,
r
replace s requircd
anybinding r damaged
inkage,
nd
adiusl
calte
dellectionat
injeclion
body
F
page
F-{6
6
ls
hereair
eakage
i inlak€ rrsystem om-
7
ls arrcleanerelement lean?
o
page
F-62
Beplace
ircl€aner lemenl
F-45

8/20/2019 Mazda 121, Kia Pride Repair Manual Vol 1
http://slidepdf.com/reader/full/mazda-121-kia-pride-repair-manual-vol-1 202/389
F
TROUBLESHOOTING
UIDE
SIEF
INSPECTION
ACTION
a Conn€ct
Syslem
Selector
o diagnosis onnector
and sel
Tesl Swltch o
"SELF
TEST"
ls
Lgnll|onmrng orredat
rdle
tler
wam up?
.j
pagc
F-42
lgnitlon iming: BTDC16 + r'
INDICATOF
Does gnition
timing advance
\,rten
4
lf advances,
go
lo na)d step
+
tf not advance,
replace ECU
rr
p.g.
F-112
9
ls uel inepressureorrect l dle?
E7
page
F44
zgs-zzi
xpa
(z.t-z.a
*g,fcm', 34-iu)
p6i)
Does uel inepressuledecrease
whenaccaleating
quickly?
+
tf decreases,
heck
or tuel
pump
maximum
ressure !?
PagG
F-91
li
OK,
check
uel ine and ilter
for
cbggrng
4
li no
decrease,
o
to
n€xt slep
Check
ueL
ine
prsssurc
y
pinchang
+
ll iuel
ine
prcssure
ulckly
n-
creases,
h€ck
pressufa
egulalor
+ lf luel linepressureSraduallyn
creases, heck
or clogging
be
lween
uel
pump
and
pressure
rcgu|alol
li not
clogged, heck
uel
pump
maximum
ressure
c7
P.go
F-91
High
prcas0ae
Check
t tuel ret'rrn
ine s clogged
4
ll OK,
repiace
pressure
egulalor
e
Pag.
F-94
+
ll not OK,
replace
1 0 Check
or
poor
connection f
lollowing
parts
.
lgnitef
. Distribuor
.
Hish
ensionead
.
Crrcuit pening
elay
.
ECU
t l Try known
good
EcU and
ch€ck l
F-46

8/20/2019 Mazda 121, Kia Pride Repair Manual Vol 1
http://slidepdf.com/reader/full/mazda-121-kia-pride-repair-manual-vol-1 203/389
TROUBLESHOOTINGUIDE
F
1 9 LACK OF POWER
DESCBIP-
Ttot{
.Perforrnance
oor
under oadwhen hrotlle alvewideopen
.
Beduced
maximum
peed
.ldle
condilion omal
TTROUBLESHOOTINGINTSI
O Faclors ther hanenqrnem;runcrion
.Cturch
tipping
.ATX
stipping
.Brake
dragging
.Low
rre
prcssure
.Incorrect
re
size
@
Low ntake iramount
.Throttle
alve ol open
ully
.Clogged
ntake
k system
@ Air/Fuel lxtureoo ean
.Fuel
ine
pressure
ecreases
.
Fuel njection
altunclion
@
Poor gniton
@
Lowengine
ompresson
@
Alcohobended uel
used
STEP INSPECTION
ACTION
l
Check aclorsother
han engine
.
c urch slipping l? page
H-3
.
ATX slpprng .?
page
K-10.
Blake dragging
c7
page
P-5
.
Low tire
pressure
F
page
O-2
NO
2
ls
throltlevalve ully openedwhen
acceleralor
s acceleralor
cab/e correctly
insl,alled r'
page
F-86
4
ll oK, check
hroltle
valve
4
ll nol
OK,
install
cceleralor able
corecty
r? page
F-86
3 ls 00 dlsplayed
wilh
gnition
switch
SETECT
SW: A
TESI
SW' SELFTEST
Mallunclion Code tlo. displayed
Check
or cause
Refer
o soecified
check sequence) E7
page
F-70
"88"
llashes
Check
ECU
ermnal F voltage
- page
F-114
Voltag€: Appror. 12V
(lgniiion
swiich ON)
4
lf OK, replace ECU r:7
page
F-112
€
li no
OK, check wiring betw€en
ECU and S€fDiagnos Checker
ConnectSyslemSelectoro diagnosrs onnl
and set Tesl Switch lo
SELF
TEST
ls
gnition
ming corecl
at dle afterwarm-!
- page
F_
lgnition laming: BTDC
16
*
1.
t\ \\.- \ \\-*rtriff
k\\o\\\t\\t
\ -
'"
p?
62
Check I lgnilion imingadvances
4
ll
advances,
o
!o next step
a
li nol
advance, heck
ECU
emi
nalvoliages r?
page
F112
\NN
l.
cNo
(
\S)
a
o d
-'fi"
INOICATOF
::
( l
r/
TES
5
A.e ECU eminalvoltages K?
(Especialy
K,2M,2K,
nd25)
l?
page
F-112
Check
or cause r:,
page
F-115
F-117
F-l19
F-47

8/20/2019 Mazda 121, Kia Pride Repair Manual Vol 1
http://slidepdf.com/reader/full/mazda-121-kia-pride-repair-manual-vol-1 204/389
F
TROUBLESHOOTING
UIDE
;TEP
INSPECTION
acTtor,l
6
ls there air
eakageoi
intakeair systemcom_
ls air cleanerelemenlclean?
s
page
F-62
Beplace
ar cleaner
elemenl
8 ls
luel ine
pressure orect at idle?
c7
pag€
F-94
zgs-zzi
rpa
(z.l-z.a
rg/cm' 34-40
psD
Does ue
Ine
pressure
ecrease
when
accelef nng
quickly
+
li
decrcases,
heck
uel
pump
maxlmum
ressure
17
Page
F-91
ll OK
check uel
ine and filtef
or
cloggrng
+
ll not decr€ase,
So
to
ne)d slep
Checkuel ine
pressure
hile
pinch
+
ll fuel
ine
pfessurc
uickly
n
creases,
heck
pressure egulalor
+
lf luel ine
pressureraduallyn'
creases,
heck
or
clogging
e
iween
uel
pump
and
pressure
lf notcLogged,heck
uel
pump
maximum
ressure F
Page
F-91
Hlgh
prcssure
Check
f uel eturn
ine s clogged
+
ll
oK, replace
ressure
egllalor
t7
page
F-95
4 li notOK, eplace
I
Bemoveair
cleaneri s there any
carbon depost
or drn
In njecton bo4,r/
- i -
r t
' { l - \ -
Clean
No
1 0 Are spa.k
plugs
OK?
17
page
G-19
WEAFAND
CAFBON
UILDUP
(0.039
0.044|
AURNS
DETERIOBATION
in)
F-48

8/20/2019 Mazda 121, Kia Pride Repair Manual Vol 1
http://slidepdf.com/reader/full/mazda-121-kia-pride-repair-manual-vol-1 205/389
TROUBLESHOOTINGUIOE
F
INSPECTION
acTtofl
? l ls resistancel
igntion
oilOK?
c7
page
c-20
Resi6tance
et
20.C
168oFl):
Primary oil winding........
.58--"0.a49
Secondary oil whding.... 9.6-14.4 ko
SECONDAFIY
OIL
'12
ls engine ompfesson
o(ect?
c?
page
B-10
Engine
clmpresslon:
1,030kPa
10.5
kg/cm' 149
psl}-300
pm
No Checkenginecondition
t?
page
B-'10
.Worn
piston,
pislon
lngsor cylinder
.
Deteclrve yiinderhead
gaskel
.
Distorted cylinder head
.hproper valve seatng
.Valve
stickinS
n
guide
1 3
Change
uel;
does condition mproves?
Change
uel
o anotherbrand
Try known
good
ECU
and
see
l
driv'
F-49

8/20/2019 Mazda 121, Kia Pride Repair Manual Vol 1
http://slidepdf.com/reader/full/mazda-121-kia-pride-repair-manual-vol-1 206/389
F
TROUBLESHOOTING
UIDE
20
POORACCELEFATION
DESCRIP-
.
Pe''omance
poor
whle acceleratng
Tlolil |
.ldle
condilion
nomd
FROUBLESHOOTING
lllTSl
O
Factors lher
hanengine
malfrJnction
.Clutchslipping
.ATX
stippinS
.
Brake raggrng
.LOW
rc
pressufe
.lncoffed
nresze
@
Low
ntake if amount
.Throltle
alvenot
open ully
.Cloggins
n intake rrsystem
@
An/Fuel
ixture
oo ean
. Fuel inepressureecreas€s
.
Fuel
njection
alf ncl|on
@
Poor
gnilion
@
Low
ensinecompreseon
@Alcohol
lended
uelus€d
INSPECTION
ACTION
'I
check
actoG ther han
enorne
.
Clutch lippins
e
P.ge
H-3
.
Brakedrassins
G
page
P-5
.
Low te
pressurc
s
Page
o-2
.
lncor€ct tirc
sze 3
Page
O-2
.
ATX lipplng
-F
page
K-10
2 Does hrottle
valve ully
open wtren cleprcssng
Go to
n€)dstep
No Check
il accelefator
cable
ls coreclly
ndaled
F
page F-86
r+
lf oK,
check
hrotlle alve
+
li nol
OK, install accelerator
cable
conecily
t7
Page
F-E6
3 is
'00'
displayed
n Self-Diagnosishecker
with
gnition witch
ON?
!7
Page
F-67
SYS'IEMELEcTi1
TESTSwi SELF
TEST
Go
o nexl step
llallunctlon
Code {o. dlsPlayed
Cheokor causeRetero specifed
check
sequence)
e
Page
F-70
"88"
llash€s
Check
ECIJ erminal
1F voltage
t7
page
F-114
voltage
Appror.
12v
(bnirion
swilch
ON)
4
ll OK, replace
ECU
-Page
F-112
4
ll
nol OK, check
winnS
belween
ECU
and Sell-Dlagnosis
hecker
Connect
SystemSelector
o dlagnosis
onn€ctor
and setTest Swilcho SELFTEST
ls ignlton
imlng orrecl
l ldlealterwarm_up?
!?
Page
F-62
lgnltion iming:
ETDC16
+
l'
\\ \\.-\\ \\.igA'f
\<\ to\ \ \ l \ t l l
\ - "-
- '
Does
gnition iming
advance
when
+
It advances,
go
to nexl
st€P
+
ll
not advance,
heckECU
ermi'
nal
voltages
tr7
Page
F-112
\M
"fi"
INOICATOF--/
5
AreECU
ermlnal
oltages K?
{Especially
M) tr7 PagoF 112
'Check
Jor
cause
t7
Page
F-115
F-l17
F - l t 9
F-50

8/20/2019 Mazda 121, Kia Pride Repair Manual Vol 1
http://slidepdf.com/reader/full/mazda-121-kia-pride-repair-manual-vol-1 207/389
TROUBLESHOOTING
UIDE
F
STEP
ITSPECTION ACTION
6 is lhere alr
leakage
al
inlake
ar systemcom-
7
ls here
any
carbon
eposit r did n injection
\
Clean
8
ls
ue line
pressure
ofiectat dle?
c7
page
F-94
235-275 kPa
12.4-2.a
kg/cmz, 34-40
psi)
Check ' luel ine
pressure
ecreases
whenaccel€ralg
qulckly
+
ll decrease,
heck
uel
pump
rnaxmurn
ressure c?
page
F-91
ll OK,
ch€ck
lel lineand iter or
clogg g
..)
ll noldecrease,
o
o
nexlstep
Check
or luel line
pressure
whle
pinchlng
uel returnhose
4
lf luel ine
prcs$re
quickly
n-
creases, check
pressure
r€gu alor
4
lf luel ine
pressrfe
gradually
n-
creases, heck
or cloggingbe
tween
uel
pump
and
Pressure
ll nol clogged,check
'rei
pump
ma-ximum
.essure
c7
Page
F-91
Hagh
ressure
Check l tuel lnes clogged
+
ll OK rcplace
ressure
egu lor s
page
F-95
4
ll notOK, eplace
I
Ar€sparkplugsOK?
-.
page
c_lg
WEAFAND
CAFIBON UILDUP
{0.039-O.0,*t
EUFNS
OETEFIOFATION
F-51

8/20/2019 Mazda 121, Kia Pride Repair Manual Vol 1
http://slidepdf.com/reader/full/mazda-121-kia-pride-repair-manual-vol-1 208/389
F
TROUBLESHOOTING
UIDE
t sPEcflot{
ACTION
1 ( Change
uel
and
check f acc€leralion
mproves
Change
luel
!o another brand
Go 10 nexl
step
1 1
Chock or corr€ctenginecomprcssion
e
Page
B-10
Engine
ompr$3lon
(ulnimum):
1.030
kP.
(t0.5
kgL/cm',
49
p3lF30O
pn
Tfy known good ECU and check il
engine
condltion
mproves
NO Check
ngne ondition
17
Page
a-10
.Wornpiston, isloo
ings
r cvlinder
.Defective
cylinder
head
gasket
.
Di$oned
c''linder
head
.lmpropet
alve eatmg
.valve
sticking
n
guide
F-52

8/20/2019 Mazda 121, Kia Pride Repair Manual Vol 1
http://slidepdf.com/reader/full/mazda-121-kia-pride-repair-manual-vol-1 209/389
TFOUBLESHOOTINGUIDE
F
21
RUIIS BOUGHON DECELERATION/BAC|(FIRE
DESCfitP.
noN
.Engine
lirns rough w+)ile ec€lerating nd abnormal ombustion ccurc n exhauslsystem
.Transaxle
n normai ondit n
rrRoualEsHooTr
HtNTsl
O
Ar/Fue{mxlure
oo ich
.Arr cleaner lementlogged
.Fuel
nieclion
ortro malJunclion
Fuel
utcontrol)
.Iniector
uel eakage
.Throttle
sensormalf
nction
.
Dashpolmalfunciion
t]tsPEcTtol{
ACTION
1 ls OO"display€d n SellDiagnosas hecker
with gnitlon wilchON?
u
p'g'e
F-6'7
IEST SW: SEIF TEST
Go to next step
No llallunctlon Codo No, dasplayed
Check
or
causeGeter o soeciiied
checksequence)
rt
page
F-70
"88"
tla3he€
CheckECU eminal1Fvoltage cz pageF-114
Volt.ge: Approx. 12V
(lgnition
swilch
Ol{)
+
lf
OK,
eplace
CU
cz
psge
F-112
4
ll nol
OK, check
wiring beiween
ECUandSelf-Diagnos,s
hsckar
2
ls
there air eal.age at inlake
air system com
3
ls
air cleaner
element
lean?
F page F-62
Go lo nexI step
No
Aeplaceair cleaner
element
Are ECU terminal oliages
OK?
(Especially
21v1 nd
20)
.:7
page
F-112
Ch€ck of calse .7
page
F-1t5
F-117
F-119
5 ls here0V al ECU
2V eminalabove ,000 pm
(Engine
ignal
monilor
reen
amp lluminates)
Try known
good
ECUand check i
6 ls lhrotle sensorOK?
Ei
pag6
F-122
Adjusl
(r
page
F-1ZI
F-53

8/20/2019 Mazda 121, Kia Pride Repair Manual Vol 1
http://slidepdf.com/reader/full/mazda-121-kia-pride-repair-manual-vol-1 210/389
F
TROUBLESHOOTING
UIDE
Check
if lhrottle
valve is cornamlnai€d
4
li contaminated,
clean
throllle
4
ll nol contaminaled,
replace throt_
ls dashpoi
correctlyadiusted?
c7
page
F-lo4
Daahpot
3et speed:
Approx.
2,500
+
100
Pm
ls
there
nleclor
luel leakage?
.?
page
F-96
Fuel leakage: Below I drop/s mln.
Try
known
good
ECUand ch€ck
i
condition
F-54

8/20/2019 Mazda 121, Kia Pride Repair Manual Vol 1
http://slidepdf.com/reader/full/mazda-121-kia-pride-repair-manual-vol-1 211/389
TROUBLESHOOTINGUIDE
F
22 KN(rcKNG
DEsilcBlP.
|
.Aolormar
combust,onccompalredy audrble
prnsins
no|se
TIROUALESHOOTTNG
|NTSI
O
Incor€ct gnilioniming
loo
advanced)
@Carbon eposltsncylinder
@
overhealing
@
Ai/Fue mi(ure oo
ean
.Fuel njecton mount otcorrect
.Fuel
ine
pressure
ecfeases
rhile
acceleraling
litsPEcTtoN
ACTION
1
ConneclSyslemSelector o diagnosis onnector
and
set
Tesl
Swilch to
"SELF
TEST
ls ignilion liming
correct at
idle
after wa.rn'up?
E?
page
F-62
lgnilion liming: BTDC 16
+
1'
INDICATOF
2 ls
'00"
d splayedon Self'Diagnosis h€cker
with gn'tionswitchON?
c:r
page
F-67
No llaltunctlon Code
lo. displayed
Checkor cause
Beler
o specilied
checkseqlence) c7 page F-70
"88"
flashes
Check
ECU ermlnal1F vollage
F
page
F-114
volrage: Approx. 12V
(lgnition
swirch ON)
+
lf OK, replaceECU
(?
page
F-112
+
ll not OK. check
wking between
ECU and S€ -Diagnosis
hecksr
3
ls there
air
leakage
ol
intake
air systemcom
ls engine ompressionorrecp
e
page
A-10
Englne ompression
Mlnhum):
1,030
kPa
10.5
kg/cm'
t4s
psiF30o
pm
tligh compr$sion
Check
ngnecondition
c7
page
B-10
F-55

8/20/2019 Mazda 121, Kia Pride Repair Manual Vol 1
http://slidepdf.com/reader/full/mazda-121-kia-pride-repair-manual-vol-1 212/389
F
TROUBLESHOOTING
UIDE
Does f fuel
roe
p€ssure decrease
whenacceleraling
ulck\,
+
ll decrcas€s,
heck
or clogging
b€trveen
uel
pump
and
pressure
regulator
4
ll not decrease,
o
to
next step
ls fuel
ine
presswe
correct al idle?
t?
PaEe
F-94
Fuel
line
pres3ure:
235-275
kPa
12.4-2-a Wlcm',
3!t-40
psl)
Check
uel ine
pressurc
hile
inch_
+
It fuel
ine
prcssure
ulckly
n_
creases, heck
pres€ure
egulalot
+
ll fuel ine
pressure
radually
n-
creases,
heck
or cloggrng
s
tween
uel
PumP
and
Pressure
regulator
lf notclogged,heck uelPUmP
maximum
pressure
r?
Page
F_91
ls
cooling
system
OK?
.Themostat
.7
Page
E-8
.
Et€ctic cooling
lan
.7
Page
E-1 1
.Rad,ator .?
page
E-7
Replace
EcU
1:7
Pege
F-112
Tryknown
ood
ECIJ nd check
l conditon
Change
uel
o anotherbrand
or use
F-56

8/20/2019 Mazda 121, Kia Pride Repair Manual Vol 1
http://slidepdf.com/reader/full/mazda-121-kia-pride-repair-manual-vol-1 213/389
TROUBLESHOOTING
UIDE F
23
FUELODOR
DESCRIP.
IION
.Gasoline
dor n cabin
FROUBLESH(X)T|NG
TNTSI
o
Poor
connecflon . oamaqed
al
lue
sysler- o- evaporanve msson cofrol sygem
@ Charcoara,r lerovedowdue o evaporatvemEson ont'ol l,slemmaunct,on
INSPECTIOT
ACT|Oir
ls tirere uel eakageor damageof fuel
system
and evaooatve emission onirol svstem?
2 |s 00" displayedn
SellDiagnosishecker
with gnillon
wilchON?
c?
page
F-67
Go to nexl step
L.lfunction
Code No, dbplayed
Check
or
caus€
Refer
o soecined
check
seqlence)
t7
pag.
F-7O
CheckECU erminal F voltage 6'
p.ge
F-114
Voltag€: Approx.
l2V
(lgnltion
swnch
ON)
+
ll
OK, eplace CU
F
p.ge
F-112
+
li nol OK, check wring between
ECUand SsltDiagnosisChecker
3 ls vacuum ell at solenoid alve
purge
conlrol)
with
engine
runn,ng
and throltle
valve
open€d?
(Neutral
switch connector
disconnected)
Go to Slep 5
No Ch€ck orsolenoidalve peraling
+'
lf OK,check acuum
osesor
clogsins
4
lf noi OK,
go
lo next step
Apply
12Vand
gro0nd
,
ls vacuumeltat solenol(
solenoidvalve
purge
CheckECU eminai voltages
rt
p.ge
F-112
V
'r<a
No Rep lace oleno id al ve
5 Tryknown
ood
ECUand
check
f
condition
F-57

8/20/2019 Mazda 121, Kia Pride Repair Manual Vol 1
http://slidepdf.com/reader/full/mazda-121-kia-pride-repair-manual-vol-1 214/389
F
TROUBLESHOOTING
UIDE
.Exhausl
as
smells bnormally
TTROUALESIIOOT|NG
INTSI
Highsulfer
contern
uel used
Change
fuel to another
bland
.
Ol consumphon
xcessve
ITRoUBLESHOOTING
INTSI
O rcV sy$emmallunction
6
Enqr#
malunction
O
working p workrng
own or leakage)
Are there
PCV
hos€, venlilation
hose
or |hen al_
lach ng
nipples
separated.
amaged,clogged,
e
P.ge
F-99
ls there
air
pressufe
or oil at
venulalion
os€?
Check
or correci
ngne
compression
page
B-10
Comor€*ion
(
inimum):
1,030
kPa
Oo.5
rgr'cm',
149
l,6il-300
rpm
+
tf OK,
go
to next
step
4
lf not Ok,
check
or cause
e
page
B-10
Crreit
engineconoltion
F seclion
a
.wom
pElon
nng
groove
.Stuckprston
ngs
.Wornpiston rcylinder
ls
vacuum
elt
al
PCVvalv€ at
'dle?
F-58

8/20/2019 Mazda 121, Kia Pride Repair Manual Vol 1
http://slidepdf.com/reader/full/mazda-121-kia-pride-repair-manual-vol-1 215/389
TROUBLESHOOTING
U'DE
F
26
POORFUELECONOTIY
DESCalP-
fl0N
.
Fueleconomy
unsatislaclory
ITRoUBLESHOOT|NG
|NTSI
Whileuelconsumptions drasticallyncfeasedy citydriving, horl-runperalion,
lopand
go
driving, xtended inler
warm-upp€riods,etc.,as opposed o 'trip" mibage,an atlernplshouldbe made o det€rmineh€se aclorswh€n con
frontedwith
"poor
mileage condlrions.However, ince he operator
s not
alwaysat
taull, he iollowing s oJfercd.
O
Operatordep€sslng accelerator
more han usualdue o
@
Air/Fuel ninur€ oo rich
lowengine
ower
.Hlgh
uel ine
pl€ssure
.Poor
gnltion
@
Alcohol lendeduelused
.Low
intake i amount
@
Highvehicleoad
.Bake
dragsing
.Electronic
soark
advanceconlrol svslemmalJunclion
.Clutch
slipping/ATxlipping
.
Exhaustomponentestricted
NSPECTTON ACTION
1
Check
actorsother han engine
.
Low
tire
pressufe
E7
page
O-2
.
Unrecommendedire size €
pag
()-2
. Clutchslipping s prge H.-3
.
Brake
dragging
s
pege
P--5
.
Exhausl
ornponenl
estricred
page
F-97
NO
2 Are air hosesconnected orrcctly?
.7
page
F-Eil
NO
3 ls
'0O"
displayedn Self'Diagnosishecker
with gnition wilchON?
''
page
F-67
TESTSW: SELF TEST
Go lo next slep
NO
[alfunclion
Code No, dbplay€d
Ch€ck
or
cause Reter o soeclfied
check sequence)
G
gage
F-7o
"88"
ll.3he3
CheckECU €rminal F voltage
F
page
F-114
Volage: Appror.
t2V
{lgnltlon
swltch
ON)
4
,t
OK, eplaceECU
t7
page
F-112
+
ll not
OK, check wiring
between
ECU
andSelt-Diagnosishecker
ls lhere air leakageal intakeair sl,stem om'
5 ls ai cleanerelement lean?
r?
page
F-62
NO Beplaceair cleanerelemer'1
6
Are ECU eminalvoltages K?
(Especially
M,2N, 2R and 2T)
.7
page
F-112
No Check
or
cause
-
page
F-115
F- l17
F- l19
F-59

8/20/2019 Mazda 121, Kia Pride Repair Manual Vol 1
http://slidepdf.com/reader/full/mazda-121-kia-pride-repair-manual-vol-1 216/389
F
TROUBLESHOOTING
UIDE
It{SPECTTON
acflo1{
7 Connect System
Selecto!
to diagnosjs
connector
and ser Test Swnch
to SELF
TEST
ls ionition minq
co(ect
at idle ajt€r
wafm_up?
.r
gage
F-t62
INDICATOR
Go o
nexl slep
NO
I
ls lu€] ine oressurc
onect al
idl€?
s
P.ge
F-94
23s-274 kPa 12.4-2.a xg/cm' 3l-40
p€l)
Hlgh
Pressu.€
check
if vacuum
hose
o
pressure
rcgulalor
s damagedot
poorly
con-
+
lf OK, replace
pressure egulalor
F
page
F-94
4
ll
nol OK,
repat or replace
hos€
9
Runengin€
t
idle
and
henstopengme
ts uel
in€
pressure
old?
c7
Pege
F-84
Fuel llnc Drcasure:
More than 147
kPa
(1.s
kgr'cn"
21
p3l)
of
5
min,
No Check
njectofs
or tu€l
eakage
e
page
F-96
10 Change
Juel
o anotherbrand
F-60

8/20/2019 Mazda 121, Kia Pride Repair Manual Vol 1
http://slidepdf.com/reader/full/mazda-121-kia-pride-repair-manual-vol-1 217/389
ENGINE UNE-UP
F
49 8019 9A0
gnilion
iming
ENGINE
UNE.UP
PNEPARATION
ssT
BASIC NSPECTION
Engine
Oil
1. Be sure
he vehicle
s on ievel
ground.
2.
Warmup heengine
o normaloperating
emperature
nd
stop
t.
3.
Wait or five
minutes.
4. Bemoveheoildipstickndcheckheoillevelandondition.
5. Add
or replace il
f necessary.
Note
.
The distance
between
he L and
F markson lhe diF
sllck
represents ,8
irer
(0,85
US
qt,
0.70 mp
qt).
EngineCoolant
Coolant
evel
(engine
cold)
Warning
.
Never emove
he radiator
cap while he
engine s
hot.
.
Wrapa thick
clothalound
hecap
when emovlng
t.
1.Pull ut
hesub
ank ap.
2. Verifvhat
hecoolant
evel s
near he radiator
illerneck.
3. Verifyhat
hecoolant
evel n thecoolant
eservoir
s
be-
tween he
FULLand LOW
marks.
4. Add coolant
necessary.
Batlery
1.Checkthe
ightness
f heterminals
o ensure
ood
electri
cal connections.
2. Check
or corroded .
frayedbattery
ables.
3. Washhe
op olthe battery
ith
watero
prevent
rcover'
4. Verify hat
he electrolyte
evel s
betweenhe upper
and
lowermarks.
Add distilled
ater
f necessary.
F-61

8/20/2019 Mazda 121, Kia Pride Repair Manual Vol 1
http://slidepdf.com/reader/full/mazda-121-kia-pride-repair-manual-vol-1 218/389
F
ENGINE
UNE.UP
5. Disconnect
he
negative
battery
cable
6. Ooen
he
cap.
i.
Miasure
he pecilic
gravityof each
cell
witha
hydrometer'
Specilfcatlon:
.27-1.29
(at
20oC
68oR)
Alr Cleanet
Element
1. Check
heair
cleaner
lement
or excessive
irt,damage'
and
oil.
2.
Replace
he
air
cleaner
lement
l necessary'
ADJUSTUENT
PteDaralion
1.
Warm
up the
englne
o normal
perating
emperalure
2.
Verilvthatthe
ax
odhasextended
utward
u
y
ano
nal
the
fast idle
cam
has separated
rom he
roller'
3. Turn
all
electrical
oads
OFF.
. Bloweran
.
Headlisht
.
Rear
window
defroster
4. Make
ure
hat
he engine
peed
does
notchange
wnen
Jiiconnecting
he
airbypass
olenoid
alve
@
connector'
Note
.
liine
engine
speea
decreasea,
he
engine
s slill un'
der the
warm-uP
onditlon.
5.
ll the electric
oollng
an
s
operating
wat until
t stops
6.
Verify
hat he
engina
s
running
t
dle n
goodcondilion
7. con;ecl the SST o the diagnosis
onnector'
8. Connect
timing
ight.
s c."""ii a
tacn6m-eter
o
the diagnosis
onnector
G-
lermlnal.
10.Set
switch
G)to Position
1'!.SeiTEST
SW
OSELF-TEST'
Not€
.
liitre
ssr
is not
us€d,lump
across
he TEN
€rmi-
nai and
ttre GND
ermlnai
ot
the diagnosia
con-
nector.
F-62

8/20/2019 Mazda 121, Kia Pride Repair Manual Vol 1
http://slidepdf.com/reader/full/mazda-121-kia-pride-repair-manual-vol-1 219/389
ENGINE
UNE.UP
F
INDICATOF
fi -)
lgnition Timlng
Inspection
Adjustment
'1.
Perform
Preparation".
(Reler
o
page
F-62.)
2. Verity
hat he dlespeed s
withinhe specification.
ldle speed: rTX
(Neutral)
750
::E rpm
ATX(P range)1,100 '6 rpm
3. Check he
gnitionimingwitha
timing ight.
lgnition
iming: BTDC16
+
l"
4. lf the gnitioniming
s notwithin pecification,
oosenhe
distributorockboltsand
urn he distributor
o make he
adjustment.
5. Tightenhe distributor
ockbolts o the specified
orque.
Tighlening
orque:
l6-23
Nm
(1.6-2.3
m-kg,
2-16 ft lb)
ldle
Speed
1. Perform
Preparation".
(Refer
o
page
F-62.)
2. Check he
dlespeedwitha
tachometer.
ldle speed;
MTx
(Neuttal) ?50 158 Pm
ATX
(P
range)1,'100
"8 rPm
3. l, notwithin pecification,djust
he
dle
bytuning
he hrottle
adjusting
crew.
F-63

8/20/2019 Mazda 121, Kia Pride Repair Manual Vol 1
http://slidepdf.com/reader/full/mazda-121-kia-pride-repair-manual-vol-1 220/389
F
ENGINE
UNE-UP
/t
"o"".-ird"
i
ldle-up
Speed
1 Perfbrm
Preparanon
(tleler
o
pageF-62
)
2. Check
he
dlespeed
witha
tachometer'
ldle sDeed:
MTx
(Neutral)
750
1fl
rym
ATX
P
range)1'100
'3 rPm
INS
iAL
oi ' l
fhnlriL€
BoD'i
I
3.
Adjusl
he
air bypass
olenoid
alve
@
by the
ollowing
orocedure.
iiCrouno
rn.
arl
bypass
olenoid
alve
@
terminal
@
shown
n
the igure
2) Adiustthe
dle-up
peed
y
urning
headjusting
crew'
ldle speed:
MTX
Neulral)
1,080
+
30 rpm
'
ATX
(P
range)
1,350
+
30
rPm
3) Disconnect
he
umper
wire
4.
Adjust he
air
bypass
solenoid
alve
@
by
the following
orocedure.
i) Ground
he
checkconnector
black) hown
n hefigure'
2) AdiL.rst
he
dle-up
peed
y
urning
he
adjusting
crew'
ldle
speed:
MTX
Neutral)
1,030
:53 pm
'
ATX
P
range)1,700
'6 rPm
3) Disconnect
he
LlmPer
rre
qHECK
CON
'fL
0
DISTRIBUTOFI
ADJUSTSCREW
F-64

8/20/2019 Mazda 121, Kia Pride Repair Manual Vol 1
http://slidepdf.com/reader/full/mazda-121-kia-pride-repair-manual-vol-1 221/389
ENGINE UNE.UP
F
5. Adjust he air bypass olenoid
alve
@
by the
ollowing
procedure.
1 Djsconnectheconnector f heair bypass olenoid
alve
2)Apply
battery
oltageo air bypass olenoid alve
@
terminal.
3)Adjustthedle-uppeed y urningheadjustingcrew.
ldle sp6ed:
MTX
Neutral)
1,250
+
25 rpm
ATX
(P
range)1,600
+
25.pm
4) Installhe connector f air bypass olenoid
alve
O.
F-65

8/20/2019 Mazda 121, Kia Pride Repair Manual Vol 1
http://slidepdf.com/reader/full/mazda-121-kia-pride-repair-manual-vol-1 222/389
F
SELF.DIAGNOSIS
UNCTION
SELF.DIAGNOSIS
UNCTION
DESCRIPTION
Whintroubles
ccur n he
main nput
evices routput
evices'
heck
or hecause
sing
heSST
Failures
oieactt
npuiina
outputdevice
ie ndicated
nd etrieved
rom
heengine
ontrolunit
ECU)
s malfunc-
tioncode
numbers.
Note
.
ihe
EGuconstantly
hecks
or maltunction
f the
nputdevic€s.
But'-the-ECU
hecks
ormaF
dndion
ot output?evbes
only
In a
thtee seconds
perlod
after
he ignltion
switch s turned
ON when
he fEN
lerminal ol
the diagnosis
conneclor
s
grounded.
ENGINE
CONTFOL
UNIT
OUTPUT
oEvtcEs
SYSTEM
SELECTOR
SELF.DIAGNOSIS
CHECKER
F-66

8/20/2019 Mazda 121, Kia Pride Repair Manual Vol 1
http://slidepdf.com/reader/full/mazda-121-kia-pride-repair-manual-vol-1 223/389
SELF-DIAGNOSIS
UNCTION
PREPAHATION
ssr
6
.
lql.
MALFUNCTION ODE
NUMBEB
InspectlonPrccedurc
1.
Connect
he
SST
o the diagnosisonnector.
2. Set switch
@
to
position
.
3. Set
TESTSW o SELF EST.
7 - )
aZWr
,6^
ir
'"!
@@
4.
Connect
he SST o the System
5.
Set
he select witcho
posilion
Selector nd a
ground.
6. Turn he gnition witchON.
7.Verifyhat
88"
llashesonhedigitaldisplaynd
he
buzz-
er soundsor 3 sec, after urning
he gnition
witchON.
8. l
"88"
doesnotflash, heck
hemain elay
Feter
o
page
F-124),
power
supplycircuit,and
diagnosis onnector
wrflng.
9. f 88 lashes nd he buzzer ounds ontinuously
or
more
than20 sec., check or a short ircuilbetweenhe ECU
terminal
Fand hediagnosisonnector. eplacetheCU
if necessarynd
perform
teps and 7 again.
10.
Note nycode
numbersndcheckforhecauses y refer-
ring to the
check sequences hownon
pages
F-70
throughF-78.
Repair
s
necessary.
Note
.
Cancel
the code numbeB by
performing
the after-
repair
procedure
ollowing repairs.
(Refer
o
page
F-79.)
43 80199AO
SystemSelector
diagnosis
49 HO18 A1
Self-Diagnosis
Checker
diagno6is
F-67

8/20/2019 Mazda 121, Kia Pride Repair Manual Vol 1
http://slidepdf.com/reader/full/mazda-121-kia-pride-repair-manual-vol-1 224/389
F
SELF-DIAGNOSIS
UNCTION
Prlnciple
of Code
Cycle
Malfunction
odes
aredetermined
s
shown
below
L Codecycle break
ihe
tim6between
malfunction
ode
cycles
s 4.0
seconds
lhe
ime
he buzzer
s otD
MALFUNCTION ODE
CYCLE
BFEAK
2. Second
diqit
of maltunction
code
(ones
position)
-'i;;l;il
;i;;;;;i
positn
ot ne
marrtr.,ncli6n
ode
epresents
he
number i
times
he buzzer
ounds
0.4 second
during
one cycle
r cYcL€
MALFUNCTTONOOE
MALFIJNCTION
C O o E : 0 3
sEc. sEc
3. Firsl diqit
ol maltunction
code
(tens position)
-
in" O,gii
" ine lens
position
t
th;
maffunction
;de
represents
he number
f
times
he buzer
is on
1.2 seconds
uring
one cycle.
Thebuzzers off or 1.6 seconds etweenhe ongandshortpulses
I CYCLE
MALFUNCTION
OOE
coDE
22
CYCLE
1 2 SEC
SEC
4osEc
FIRSTDIGIT
SECOND
DIGIT
F-68

8/20/2019 Mazda 121, Kia Pride Repair Manual Vol 1
http://slidepdf.com/reader/full/mazda-121-kia-pride-repair-manual-vol-1 225/389
SELF-DIAGNOSIS
UNCTION
F
code Numb€rs
Sensor or
Condition Fail'sate
Maltuncllon dbplay
llaltunctlon
CodeNo.
output slgnal
pan.m
Ne'sisnal No Ne-signal
whil-a
crankrng
Stops iu6l injection
02
ON
Open or short of
aif-
08
ON
Openor shod oi
20oc
(68oF)
09
;,
lffilrfljll
throlile ensor
ircuil 33.degree ommand
12
ON
Oxygen ensor
llnues
nchanged
min.afler
engine x-
ceeds ,000
pm
Cancelsengine
1 5
ON
40 sec. atter
engine
exceeds ,500
pm
Cancels
ngine
1 7
ON
{purge
control)
Openor short of
26
ON
vaive
@
valve
@circujt
34
ON
valve
@
valve
@
ci/cr.tt
35
Noie
.
The buzzersounds
only tor the ones
position
when using he DlgltalCodeChecker.
To
iudge
he corect
maltunctioncode number, eler to lhe digital display.
Caulion
.
lf ihere s morc han one failure
p.esent,
he code numbers
will
be
ndicated n numerical
r-
der. lowesl nrmber ttst.
.
Aller repairinga lailure,
perform
he afler-repalr
procedure. Refer
o
page
F-79.)
F-69

8/20/2019 Mazda 121, Kia Pride Repair Manual Vol 1
http://slidepdf.com/reader/full/mazda-121-kia-pride-repair-manual-vol-1 226/389
F
SELF.DIAGNOSIS
UNCTION
Troubleshootlng
lf a malfunction
6de
number SShown
n the
SST,check
or
hecause
y Using
he
chart
elatedo the
codg
number
hown.
COOE
o.
O:I
DTRIBUTOR
I{E.SIGNAL)
STEI NSPECNON
ACTION
ls
herea
poor
conn€ction
n distributor
ircui0
Repairor
replacewnng
No
2 ls there
continud
b€tweendistributor
erminal
wirc
(B/LG)
and
grcund?
Go
to next
gep
Check
or opencircuit
n wirng
ifom distributor
o
ground
3
ls there battery
voltageat disltibutor
etminal
NO
Ch€ck
or
open
circut
n wiing
trom
dislibutor
o
main
relay
fUEl
INJ
elay)
ls lhere aoorox.
5V at ECU
emlnal 2E?
Wilh
distributor onnector
disconnected)
Go to next slep
neplace CU
5
ls there approx.
5V dist bLrtor
erminal_wre
(G/R)?
At
harneseside onnector
with discon_
Feplace
dist butor
NO
Check
or snort r
open
circuitn
wring rcm disldbutor
ECU erminal
E
Circult
Diagram
O|sTR|aUTOR
IGNITION
swrTcH
BATTEFIY
TO
IGNITION
swtTcH
TO TACHOMEIEFi
TO DIAGNOSIS
CONNECTOR
IGNITEF
DIS]RIBUTOF
G/B
F-70

8/20/2019 Mazda 121, Kia Pride Repair Manual Vol 1
http://slidepdf.com/reader/full/mazda-121-kia-pride-repair-manual-vol-1 227/389
SELF-DIAGNOSIS
UNCTION
F
CODE
t{o.
08
(ATRFLOW
E SOR)
STEP
IISPECTTON
acTtot{
ls here
poof
connection
n
airilow ensor ircuiP Repair r teplace i
ng
2 ls ECU erminal20 vollageOK?
e
page
F-118
lgnition
wilchON
ldle
ls sameCode
presenl
atter
performing
alter'repalf
rocedure?
+
lf YES, eplace CU
+
lf NO, €check irliow ensor nd
ECU or
poor
conneclion
e
p.g€
F-79
No
Go to nextstep
3
ls lhere
battery
vollage
at airtlowsensor onnec'
tor teminal C with airilows€nsorconnectordis.
Check
orshort r opencircuil
n wir-
ng trom aiflow sensor onneclor er-
mnalC lo main elay.
+
lJOK,checkmain
ealy
+
ll notOK, epair r rcplace
ls lhe.e conlinuiiy belween airilow
sensor lerrni-
na B and
sround?
R€pan r rcplace
iing
5 ls resislance
between arrflow sensor teminals A
and B
OK?
E7
page
F-121
Resistance:+ 1 m eo"C t68.Fl)
ls here onllnuty etween
CU erminal 0 and aidlow
+
lf OK, eplac€ idlow ensor
+ lf notOK, epair r replace
No Aeplaceairllowsensor
Circult Diagram
FFOM IGNITION
swtTcH
t r r l
r l l
r l r l
1l
G/w
ll
clv
,i
AIFFLOWSENSOR
F-71

8/20/2019 Mazda 121, Kia Pride Repair Manual Vol 1
http://slidepdf.com/reader/full/mazda-121-kia-pride-repair-manual-vol-1 228/389
F
SELF-DIAGNOSIS
UNCTION
CODE
NO.I
09
(WATERTHERI'OSENSOR}
STEP
tNSPECTTOI{
ACTION
1
ls there a
poor
conneciion
n waler
hermosen_
nepair r
leplace
rnng
2 ls there
continuity
between
waler hermosensor
and
ECU?
ECU
A
(R/L)
20
(R/L)
B
C/i
G)
2D
CYi
)
Go o
nexl step
3
ls resistance
f
water hermosensor
orrecf
Coolant
lemp.
Fesislance
kO)
,200c
(
-40D
14.6
17.A
20.c
(
68'D
2.21-2.69
80.c
076'R
0.29-0.35
No Beplace
waler
hermosensor
ls same
Code
No.
prcsent
ollowing fler_repair
F
Pag€
F-67
Waterhemosensor
ndcrcuit
OK
5
Arc ECU
ermlnals
D and
20 voltages orrcct?
c7
page
F-l16
n"pru".
tCu
17
Psge
F_112
Check
or shotl
ircuil
n wiring
rom
waterhemosensor
lo ECU
Circult
DiaEram
ECU
THROTTIE
ENSOR
MOSENOR
WATEBHEFTMOSENSOF
re
@
re
@
\lB
)i
IER
THER
l l
F-72

8/20/2019 Mazda 121, Kia Pride Repair Manual Vol 1
http://slidepdf.com/reader/full/mazda-121-kia-pride-repair-manual-vol-1 229/389
SELF-DIAGNOSIS
UNCTION
F
CODE
No.
r2
fTHRoTTLE
EI{SOR)
SIEP INSPECTION ACTION
1
ls lhele a
poor
conneclion n throltle ensor
Bepair r replace iing
2 ls
there conllnuity ehdeenhrotllesensorand
ECU?
ECU
A
(LG/R)
2K
(LG/R)
B
(LGMI
2M
(1G,4
)
D
ff/B)
2D
(v/G)
3 ls resislances etween erminalsB
(LG/'14
nd C
(Y/B)
correc"
Below kA
Approx.
5 kO
Adlust
or
replace
throttle sensor
o page
F-12.
ls ECU
terminal 2lV vollage cofrccl?
.7 page
F-116
ReplaceECU 17
page
F-112
Check
or
short icuil
n
wirng
rom
hrcttle ensoro
ECU
Circuil Diagram
IHFOTTLE
ENSOF
RMOSENOR
re
@
re
@
ll
Y/B
jl
TER THE
Y/G
THFOTTLE
SENSON
F-73

8/20/2019 Mazda 121, Kia Pride Repair Manual Vol 1
http://slidepdf.com/reader/full/mazda-121-kia-pride-repair-manual-vol-1 230/389
F
SELF-DIAGNOSIS
UNCTION
ffiYGEN
sENsoB
tNAcrtvATtot{)
STEP
t]{sPECTlOt{
ACTION
ls there
a
poor
connection
n orygen
sensor
Repair
or replace
wing
2 ls oxygen
sensorodpul
vollage
cotrecr?
F
Page
F-123
Replace
xygon
sensor
3 ls there
continuity
betlveenoxygen
sensor
and
EclJ ermlnal
N?
ls
ECU terminal
2N
voltage correcl?
F
Page
F-1lE
Check
or shod
ircuit
n wiring
romoxvgen
ensor
o
ECU
5
ls
sensitivity f
oxygensensor
correcp
t7
Page
F-123
aadro Fa | | s oaoe
F- t12
Tryknown
ood
otygen ensor
nd
ch;ck
It co;dition
mproves
.?
ptge
F-124
Circuit
Diagram
F-7
4

8/20/2019 Mazda 121, Kia Pride Repair Manual Vol 1
http://slidepdf.com/reader/full/mazda-121-kia-pride-repair-manual-vol-1 231/389
SELF-DIAGNOSIS
UNCTION
F
mDE No.
.I7
(FEEOBACK
YSTEi|)
STEP I SPECTTON
ACTtOl{
ls
s3meCode No,
present
after
pedorming
aller-
E
7
eagc
F--67
NO
Check xygen ensor ircuitor
poor
+
li OK,
p€rfom
toLrbleshooling
CodeNo.15
s
Page
F-74
.)
lf not OK, repairor replacecon-
Checkmonhor
amp ol Sef-Diaqnosis hecker
l
luminate
at
jdle
alter warming.up ngineand
runningt at 2,500-3,000 pm or
I
minutes?
Go 1o nod step
ilole
.
A/F mixtui€ lB rich
Go o Slep5
Nole
.
A./Fmlrtur! b le.n
or mi8fire occuiing
3 ls tuel ine
pressurc
t dlecorrec0
e
prge
F-94
Fuel llne
Dr€65ure:
235-275
wa
(2.1-2.A
r.glcnf,
3,F40
p5l)
(Vacuum
ho3. lo
preasurc
rcgulrlot
dbconncctcr0
Go to
nextslep
Hlgh
prossuro
ls fuel relurnho€eclogged
or restricted?
+t
ll OK. replace
pres$re
regulalor
-
pag€
ru4
+
lf nol OK, rcpairor replace
hose
ls
here eak€ge t
fuel
njectot
c?
page
F-97
NO
ls waler lhemossnsor OK?
c?
pege
F-121
+ ll OK, Go lo Step7
+
ll not OK, replace water
lhermc
(z
page
F-121
5 Disconn€ct each high-iension lesd at idle; does
enganespeed
decrease
equally at each cyinde|?
NO Go to St€p
ClrcultDlagram
F-75

8/20/2019 Mazda 121, Kia Pride Repair Manual Vol 1
http://slidepdf.com/reader/full/mazda-121-kia-pride-repair-manual-vol-1 232/389
F
SELF.DIAGNOSIS
UNCTION
STEP
INSPECTION
acTtolr
6
ls tuel
ine
pressure
t idle conecf
r7
P.ge
F-94
Fuel ine Dressure:
235-274
kPa
12.4-2,a
kg/cm', 34-40
psD
(vacuum hose lo pr€*suneregulalor
No
Check
uel
ine
pressr.rre
hil€
pinch
a
I luel ine
pressurc
uckly
n-
creases,
heck
pressure
egulator
t7
Page
F-95
.t
lf iuel
ine
pressureraduallyn
creases.
heck
or clogging
be_
tweenuel
pump
and
pressure
lf notclogged,
heck
uel
PUmP
maximum
pressure
F
Peg€
F-91
7 ls
ihe.e air leal€ge
in intake a
I system com_
Goro Step10
8
Was misfire
ound in Slep
5 oJ
nspection?
Repair r
replace
gnitlonystem
9
b
;me Code
No.
presert
ollowing
edorming
atter-rcpair
rocedurc?
c7
Pege
F--67
Go
o noxl slep
NO
1 0
Tryknown
ood
ECUI
does condition
mprcve?
o
page
F-112
F-76

8/20/2019 Mazda 121, Kia Pride Repair Manual Vol 1
http://slidepdf.com/reader/full/mazda-121-kia-pride-repair-manual-vol-1 233/389
SELF-DIAGNOSISUNCTION F
CODE
No.
26
(SOLENOID
ALVE PURGE
ONTROL)
STEP INSPECTION
ACTtOl{
Disconnect onn€ctor rom ECIJ
ls lherc balteryvoltageat ECU erminal
2X wire
hamess
R/B)
wnh gnilion
swltchON?
CheckECU erminal onnecloro.
poor
connecrion
+
lI
OK,
eplace CU -
page
F-112
+ ,l notOK, epair r replace iring
2 Keep condilionStep 1
ls
there bafleryvdrage
al soleloid
valve
connec-
tor terminal-wire
(A/8)?
(R/B)
3
ls
solenoidvalve OK?
F
pago
F-101
Check or shod or open circuit n wiing lrom main relay
(FUEL
NJ relay) o
solenoid
alve
Beplace solenoid valve
CODElo.
34
(AIR
BYPASS OLENOID ALVE
O)
STEP INSPECTION
ACTION
1 Disconnec l onneclor rorn ECU
ls there baneryvotage al ECU
eminal 2T wire
harness
BM)
with gnition
swtch ON?
Ch€ckECU
erminal onnector
or
poor
conneclion
.)
ll
OK, rcplaceECU
o
page
F-112
.>
lf notOK, epair r replace iins
2 Keep condilionas Step 1
ls there baltery voltage
at solenojd valve connec-
lor lerminalW.e
R/!9?
Repair iring
(R/Vr)
3
ls solenoid valve
OK?
F
page
F-109
Ch€ckor short r opencircuil n wiringrommain elay
(FUEL
NJ relay)o sol€noidalve
NO Replace o leno valve
Clrcuit Diagram
FFIOMBATTERY
FROMGNITION
WITCH
SOLENOID
VAIVE
SoLENOID
ALVE
),
soLENolo AtvE i
(PUFGEOMIFOL)ii
SOLENOIO
ALVE
(PUNGE
ONTROL)
F-77

8/20/2019 Mazda 121, Kia Pride Repair Manual Vol 1
http://slidepdf.com/reader/full/mazda-121-kia-pride-repair-manual-vol-1 234/389
F
SELF-DIAGNOSIS
UNCTION
35 {An
AYPASS
SOLEI{OID
VALVE
@)
Check
ECU
etminal
conneclor
or
poor
connecron
+
ll OK,
eplace
CU
-
Page
F-112
.t lf noi OK, eparr r replace rrrng
Dsconnecl
connector
rom ECU
ls
lhere batlery
voLtage
l ECU
e|minal2R
wrre
(F/B)wilh ignilionswilchON?
Repair
i ng
(R/B)
Ke€o ondilion
s SteP
ls th;re
battery
voltageat
solenoid
valveconnec'
tor
termina
wie
(B/Bf
Ctect
tot "lon ot
op.n
"ircul
in wiing
fiom
maln elav
c?
page
F-109
Replace
soLeno
valve
Cllcuit
Dlagram
FFOM
BATTERY
FFOM GNITION
WITCH
AIFIBYPASS OLENOID
valvE €)
z---F-----rr
ufjl-lJ
i
AIF BYPASS
i
SOLENOID
ALVE
G)i
SOLENOIO
ALVE
{PURGE
ONTFOL)
F-74

8/20/2019 Mazda 121, Kia Pride Repair Manual Vol 1
http://slidepdf.com/reader/full/mazda-121-kia-pride-repair-manual-vol-1 235/389
SELF-DIAGNOSIS
UNCTION
Ff
"
lEJ.
After-repair
Procedure
'1.
Cancel
hememory f mallunctions
rom he ECu by dis-
connecting
henegative attery able
nddepressinghe
brakeoedal
or al least hree seconds.
Reconnecthe
negative attery able.
2. Connectthe
ST
System
Seleclor)
othediagnosiscon-
nector.
3. Setswitch
@
to
position
.
4. SetTESTSW o SELF-TEST.
5. Connect
heSST
(Selt-Dlagnosis
hecker) o the Sys-
tem
Selector nd a
ground.
6. Setthe elect
witch f heSelf-Diagnosishecker
o
posi-
tionA.
7. Turn he
gnition witchON.
8. Start ndwarm p
he
engine,
hen un
t
at
2,000 pm tor
three minules.
9. Verityhat
no codenumbers redisplayed.
F-79

8/20/2019 Mazda 121, Kia Pride Repair Manual Vol 1
http://slidepdf.com/reader/full/mazda-121-kia-pride-repair-manual-vol-1 236/389
F
SELF-DIAGNOSIS
UNCTION
SWITCH
IONITOR
FUNCTION
Individual
witches
an be
inspected y
the
SST
(Selt-Diagnosis
hecker).
Note
.
itre
TEN erminat
ol the diagnosis
conneclor
must be
grounded
and
the
ignltionswitch
oN
(enginestopped),
. ti e-ntrer f i6e switchesremainaclivated, he monilot lamp wlll be illuminated.
ENGINE ONTFIOLNIT
NEUTRAL
wlTCH
CLUTCH WTTCH
STOPLIGHTWITCH
HEADIIGHT
WIICH
I
I
SYSIEM
SELECTOB
OEFFOS1EF
SWITCH
BLOWEF ONTFOL
SwlTCH
INHIBITOB
Swilch
Self.Diagnosls
Checker
(Monitor lamp)
R€mark
Lighl Ol{
Llght OFF
Clutch
switch
([4TX)
In
gear
Neutral swilch
([/1X) In
gear
Clulch
p€dal
released
Sloplight swilch
Headlighl
wnch
ON
Headlighls/small
ights ON
ON
OFF
Rear
wndow defroster w ch
ON
ON
Inhibltor witch
(ATX)
L, S,
D
or
F range
Inspeclion
Procedure
1.
onnecl
heSST
System
Selector)
o heoiagnosrscon-
nector.
2 Setsw{ch
@
to
posttion
.
3 SeITESTSWITCH
o SELF.TEST,
F-80

8/20/2019 Mazda 121, Kia Pride Repair Manual Vol 1
http://slidepdf.com/reader/full/mazda-121-kia-pride-repair-manual-vol-1 237/389
SELF.DIAGNOSIS
UNCTION
F
Procedure
Neuiral
and
Clulch
Switches
MTX)
4. Connecthe SST
Sell-Diagnosis
hecker) o the Sys-
tem Selector nd
a
ground.
5. Set heselect witch fthe
Self-Diagnosisheckero
posi-
tion A.
6. Turn he gnition witchON.
7. Check
f monitoramp lluminateswhenach witch
smade
to tunction sdescribed elow.
Caution
.
ll eitherot the switches
emain
aclivated.
he mon-
itor lamp will be illuminated.
.
Do
not start
the
engine,
Checkeach swirchand relaledwting
harness
.Clurch
and Neurral witch .Feler o
pages
F 124. 125
.Stoplightswitch :Reler o SeclionT
.Headlight
swlch Reler o SectionT
.Water
thefmoswilch
Feier o SectionE
.Rear
delrosler switch
:Befer to Section T
.
Blower swilch
Befer o Section T
.lnh
brtorswltch
:Beler o secfon K
Set conditionso deactivate ach
switch
.Ail
accessors OFF
.Transmissionn neutral
Veity hal monltorarnp
oesnot lluminate
Check each switch as describ€d
Shifl
ransmissionnto
gear
ls monilor mp illurninatedilhclulchpedal eleased?
PC
.Neutral
r clLrtchwitch
mallunction
{Relero pages -124,125)
.Open
ckcuil n related irinS arness
.
ECU ermlna
1\/)
maitunciion
(Reler
o
page
F-116)
Depress clutch
pedal
Doesmonitor amp
go
out?
B€tu.n
transmission to neutral
PC
.
Clulch
switchmalunclion
(Reler
o
page
F-124)
Stopllghtswllch
PC
.Sloplight
switchmalunction
(Beter
to Section T)
.Open
circut
in w rlng harnessrom sloplighl
switch
to ECU
.ECU
terminal
1O)
maliuncllon
(F€fer
o
pase
F 114)
Depress rake
pedal
ls monitoramp llumlnaled?
Sloplight wilchOK
F-81

8/20/2019 Mazda 121, Kia Pride Repair Manual Vol 1
http://slidepdf.com/reader/full/mazda-121-kia-pride-repair-manual-vol-1 238/389
SELF-DIAGNOSIS
UNCTION
Blower
switch
PC:
Blower
witch
malfunclion
GeJer
o Seclion
T)
.dpen
ctrcurl
n ||e wrr'ng
aness
om blower
sw ch o
ECU erm,na
1S)
.ECU
eminal
1S)
maltunciion
(Reiero PageF 114)
'Iun
blower
switch
o ON
position
ls monitor
amp
lluminated?
Headlight
witch
PC:
Headlisht
witch
malfunclion
(Reier
o Sedion
)
.Open
crrcuil
n
w n19
harnessrom
headlighr
swich
o Ecu
ieminal
1u)
.ECU
ermrnal
1U)
mallunction
(Feler
o
Page
F-l16)
Tum ON
headllght
witch
ls monrlor
amp
llominated?
Headllghl
w(ch
oK
Tum OFF
headlighl
wdch
Water
hermoswiich
circult
(not
included
n switch
nsPeclion)
Warninq
I'iie
c'ootins
"n operates
when
he
diagnosls
onnector
ermlnals
TFA
nd GNDare
connect-
ed with
a
iumper
ttrire'
Use caution.
PC.
.
Felay malfuncton
{Beler
lo Section
E)
.Open
circlit
ln wire
harness
rom
watef hermo_
swrlch
o engine
control
Linrl
.Enqrnscontrolunt lelminal1R malluncliof
Connect
diagnosis
onnector
elminals
TFA
and GND
V€rity
hat monilor
amp
ill'rmlnates
Water
hemoswitch
ckcuit
s OK
Dlsconnecl
jumper
wrrc
Rea.
defroster
swilch
rc:
.Fear
delroster
wich
malfunclion
(Befer
o Seclion
)
.bpen
circuit
n wldns
harnessrom
ear
defroster
switcho
ECU eminal
1T)
.ECU
erminal
1T)maliuncton
(Reiero pageF-114)
Tum
ON rear
deffosler
switch
ls
monitor
amp lluminated?
Bear
deirosierswitchOK
TurnOFF
rear delioster
swlch
Inhlbitor
switch
(ATx)
PC:
hhlbiior
switch
malllnct|on
iReter
o Section
K)
.Open
ot shol
crrcuil
relaled nng
harness
.ECU
erminal
1V)
maLfuncton
(Beter
o
page
F
116)
Shiti
ransmission
nlo
gear
ls monitor
amp
luminated?
lnhilitor
swilch
OK
Shlfl
nto
"P
or
"N range
F-42

8/20/2019 Mazda 121, Kia Pride Repair Manual Vol 1
http://slidepdf.com/reader/full/mazda-121-kia-pride-repair-manual-vol-1 239/389
INTAKE
AIR
SYSTEM
F
INTAKE
AIR SYSTEM
COMPONENT
ARTS
Removal Inspectlon Installatlon
1.Removen the ordershown n the igure, eferring
o
RemovalNote.
2. Visuallynspecthe intake
ir system omponentsnd repair
r replace s necessary.
3. Installn the reverse rderol removal
19-25
(1.9-2.5.1.-r9)
19-25
0,9-2,6,
r/r-r9)
7.6-11 nn
(40-t10
cn.tg,
6H5In-lb)
REPLACE
11 25
,9-2.6,
1a-191-
/a :;;s
(3,3-s.3. 27-33)
1.Aircleaner
Inspector excessive
irt
or damage
2.
Injection
ody
Inspection.... . . . . . . . . . . . . . . . . . . . . . . . . . . . . . . .
age
F-86
4. Intakemanifold tay
Removal
Note
Coolant
1. Drainhecoolant
nto
a suitable
ontainerefore
emovino
the njection ody.
2. Retillwilhcoolanl fter
nstallation.
Cautlon.
Belore ooseninghe radialor
drain
plug
verify hai
the radiatordraln hose
aces stralghl down.
Inspection...................................
age
F-84 5.
ntake anifold
DisassemblyAssemb1y.............
age
F-85 Inspection...................................
age
F
86
F-83
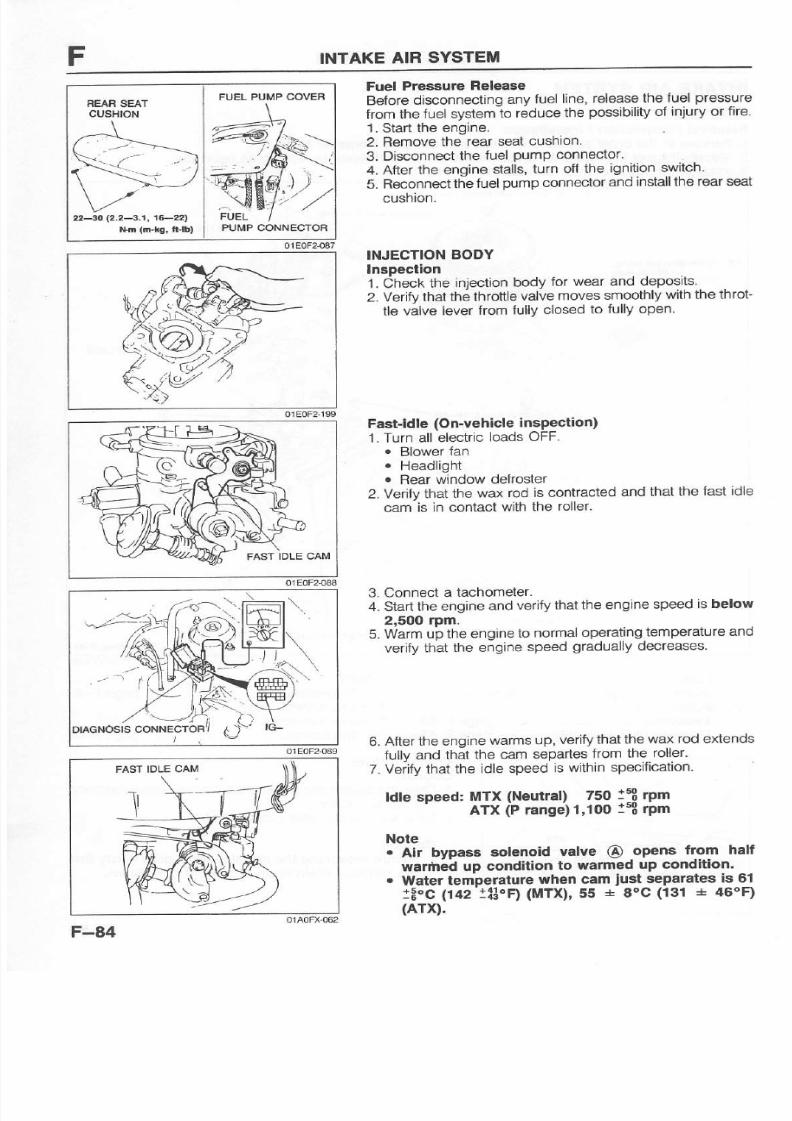
8/20/2019 Mazda 121, Kia Pride Repair Manual Vol 1
http://slidepdf.com/reader/full/mazda-121-kia-pride-repair-manual-vol-1 240/389
F
INTAKE
AIF
SYSTEI'
Fuel Pressure
Releaae
Belore
isconnecting
ny
uelhne,
elease
he
uel
pressure
trom he
uel
svstem
o reduce
he
possibility
f
Injury
r
fire.
|.
Slad
he en-gine.
2. Remove
he rear
seatcushton.
3.
Disconnecthe
uel
pump
connector'
4. After he enoine talls,urnofi the gnition witch
5. Reconnect
he uel
pump
onnector
nd nstallthe
ear eat
cush|on.
INJECTION
ODY
Inspeclion
1.Check
he
niection ody
ol
wearand deposils
2. Verify
hat he hrottle
alve
moves
moothly
ith he hrot'
tle
valve ever
rom ully
closed
o fullyopen.
Fastldle
(On-vehicle
nspection)
1.Turnall electric
oads
OFF.
.
Blower
an
.
Headlight
.
Rear
window elroster
2. Verifyhat
he wax
od s contracted
nd
hat he
ast dle
cam asn contactwith he roller.
3. Connect
tachometer.
4.
Start
heengine
nd
verifyhatthe
ngine
peed
s below
2,500
nm.
5. Warm p
heengine
onormal
perating
emperature
nd
verfy that
he engine
peeo
gradually ecreases.
6. After
heengine
warms
lp, erifyhat
he
wax odextends
fullvand hat he
camsepartes
rom
he
roller.
7. Vdity that
he dlespeed
s
within pecification.
ldle speed:
MTX
(Neutral) 750
:53 pm
ATX
P
range)1,100
1 rpm
Note
. Air bypass solenoid valve @ opens lrom hsll
ryanhed
up condilion
o
wamed
up condition.
.
Waler empelature
when cam
ust
separates
s
6l
:3"C
(142
1!l.R
@TX),
55
+
8oC
l3l
+
46oF)
(ATD.
4-?-2:
F-A4
FUELPUMPCOVER
PUMP
CONNECTOF

8/20/2019 Mazda 121, Kia Pride Repair Manual Vol 1
http://slidepdf.com/reader/full/mazda-121-kia-pride-repair-manual-vol-1 241/389
INTAKE
AIR
SYSTEM
F
8. Fieplacehe njection
ody f necessary.
Caution
.
Do
not disasasmble
he iniection ody.
.
Do not turn
he acrewg hown n lhc ligure.
01E0Faog1
Disassembly
Aaaembly
1. Disassemble
n the ordershown n the igure.
2. Assemble
n the reverse
rder
of disassemblv.
1.Air bypass
otenoidalve
@
Inspect ion. . . . . . . . . . . . . . . . . . . . . . . . . . . . . . . . .
age
-109
2. Dashpot
Inspect ion. . . . . . . . . . . . . . . . . . . . . . . . . . . . . . . . .
age
-104
3. Throttle ensor
1nspection.................................
age
F-122
Adjus tment . . . . . . . . . . . . . . . . . . . . . . . . . . . . . . . .
age
-122
Removalfnstallation................
age
F-I22
4. Airflow ensor
1nspect ,on. . . . . . . . . . . . . . . . . . . . . . . . . . . . . . . . .
5. Pressure
egulator
lnspect ion. . . . . . . . . . . . . . - . . . . . . . . . . . . . . . . . .
Rep|acement . . . . . . . . . . . . . . . . . . . . . . . . . . . . .
6. Injector
Inspection
on-vehicle)..............
Bemovallnstallation................
page
F-121
page
F-
pageF-
page
F-
page
F
94
94
95
96
GASKET,
EPLACE
3,4-a.S
(35-50,
3O---4:r)
3.4-5.e
(35-s0i
30-4t)
;?iil:"ts
7.4-12
t@-12O,
69-1U)
r.2-r.3(12-13,
0-r6)
O8ING,FEPLACE
2.0-2.s (20-30,
r7_2G)
rl-22 lln
(r.a-2.2
n.l(g,
F-85

8/20/2019 Mazda 121, Kia Pride Repair Manual Vol 1
http://slidepdf.com/reader/full/mazda-121-kia-pride-repair-manual-vol-1 242/389
F
INTAKE
AIR
SYSTEM
INTAKE
MANIFOLD
F-86
BAFFLE/INTAKE
ANIFOLD
Inspection
1 Visuallv heck
for cracks
or
damage
and
reolace
f
z. 8i"ff#
ai"tonion
f he
ntake
manffold
nd
eplace
f
necessary-
ACCELERATOR
EDAL
Removal
Inspection
/ Installation
'1.
Remove
n the order
shown n the
agure
2.
Visually
heck
he accelerator
edal
and
retainer
or cracks r
damage'
3.
Install
n the
reverse rder
of removal.
1.
Accelerator
able
3 cliP
lnspection
Adjustment....
.. ..
page
F-86
4
Fletum
pring
..
2.
Retainer
5 Accelerator
edal
9!-r5
{100-150,
t7-r3o)
ACCELER,ATOR
ABLE
InsD€ction
Adiustment
1 deoress
he accelerator
edal
ully
Verifyhat
he hrottle
valve
s ullyopened
y
irrning
he hrottle
everby
hand
2.
nspect
he
play
ol the accelerator
able.
Play: 1-3mm (0.04-0.12 In)
3. Loosen
uts
@
to adjust
he
play
f necessary.
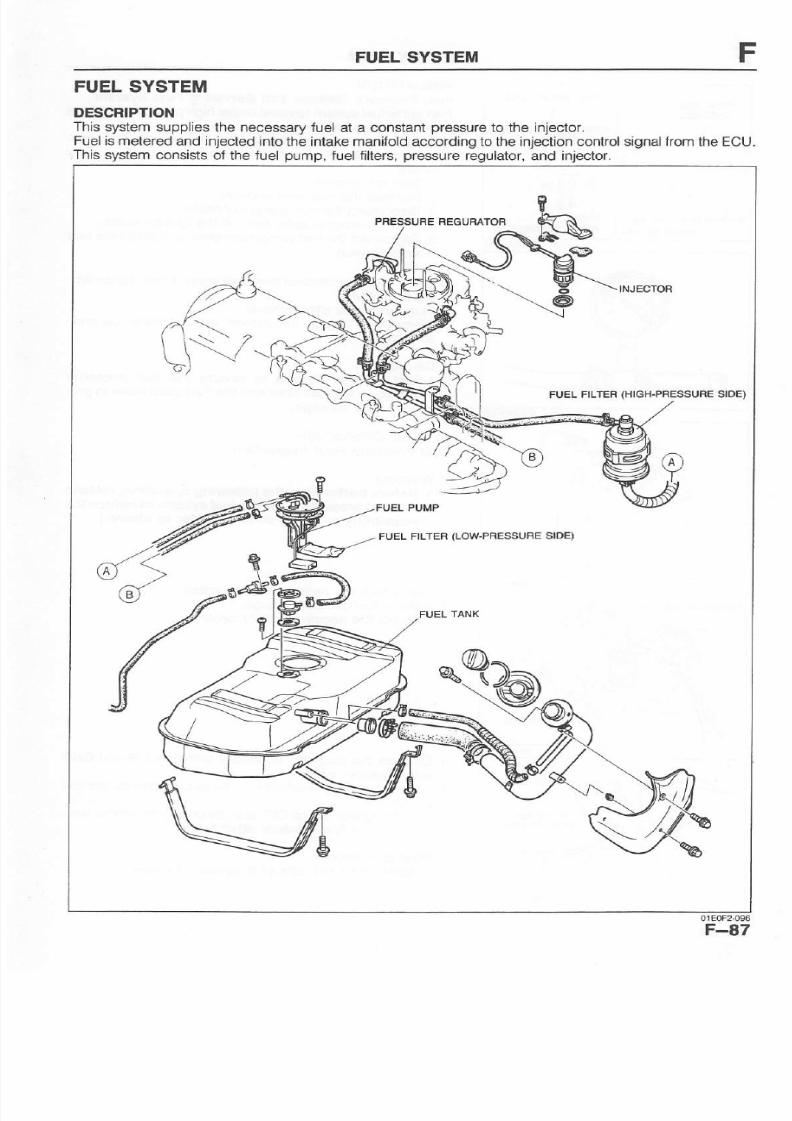
8/20/2019 Mazda 121, Kia Pride Repair Manual Vol 1
http://slidepdf.com/reader/full/mazda-121-kia-pride-repair-manual-vol-1 243/389
FUELSYSTEII/I
FUELSYSTEM
DESCRIPTION
This
system upplieshe necessary
uelat a constant
ressure
o the njector.
Fuels metered nd njected
nto he ntakemanifold ccordingo he njectiononkol ignal om heECU.
Thissystem onsists
f the uel
pump,
uel ilters,
ressure
egulator,
nd
njector.
F
PRESSUFEIEGUFATOB
v-
FUELFILIER
HIGH.PBESSURE
IDE)
FUELFILTER
IOW.PRESSUFE
IOE}
@
\
s
F-87

8/20/2019 Mazda 121, Kia Pride Repair Manual Vol 1
http://slidepdf.com/reader/full/mazda-121-kia-pride-repair-manual-vol-1 244/389

8/20/2019 Mazda 121, Kia Pride Repair Manual Vol 1
http://slidepdf.com/reader/full/mazda-121-kia-pride-repair-manual-vol-1 245/389
FUELSYSTEM
F
Fuel Line Pressure nsoestion
Warning
.
Belorc
performlng
the tollowing
operatlon, release
the fuel
p]gs$re
lrcm the
tuel syslem o leduce
the
possiblllty
ot
iniury or tire.
(Reter
o
page
F-88,)
1. Disconnect
he
negatNe attery
able.
2. Connect
fuel
pressure auge.
3. Connecthe
negative attery
able.
4. Connect iagnosisonnector
erminals
/P
andGND
with
a umoerwtre.
5.
Trjrn he gnition witchON.
6.
Measurehe uel ine
pressure.
Fuel
ine
pressure:
235-275 kPa (2,4-2.4 kglcm" 34-40 p8l)
F-89

8/20/2019 Mazda 121, Kia Pride Repair Manual Vol 1
http://slidepdf.com/reader/full/mazda-121-kia-pride-repair-manual-vol-1 246/389
F
FUEL
SYSTEM
FUEL
TANK
Removal
Inspection
Installalion
Warning
i'-diiJie pertormlns
he following
operalion,
elease
he
fuel-Pressure
rom
he
fuel system
o
reduce
he
pGstblllty
ot
iniury or fire.
(Reler o
page
F-88J
. Wrren itoilns tlte fuel ia;rk,'k;t spalrrs'cigaiett-cs, nd open lamesaway tom it'
.
i'iiiij
iepiirin-g
the
fuet tanti,
ctein
ir ttrr6ug6ty
with
steam
to lemove
all
exploslve
gas.
1. Remove
n the orde.
shown
n the igure.
2.
Visuallynspect
he
uel ankcomponents
nd
repair
or replace-as-
ecessary
3.
nstalln th;
reverse rder
of removal,
elerring
o
Installation
Note
-
,."-, ,
,*-r
,0, rr,
Q
SEAL
RUBBEF,
EPLACE
@
. \
43--6r
r+m
({.4-4.2
n.kg,
3a--{6 tt lb)
r.r-r.7
{r1-17,
9.5-15)
Note
.
Drain
he tuet
lrom the
tuel tank
before
1.
Rear eat
cushlon
2.Fuelpumpcover
3.
Fuel
pump
connector
4. Fuel
hoses
5.
Evaporative
oses
6. Fuel ank
straps
F-90
removing
he
tank.
7. Fuel
ank
Inspeclor cracks nd
corrosion
8. Check
alve
twoway)
L
Fuel ank
unit
10.Fuel
vapor
alve
11.Non-return
alve

8/20/2019 Mazda 121, Kia Pride Repair Manual Vol 1
http://slidepdf.com/reader/full/mazda-121-kia-pride-repair-manual-vol-1 247/389
FUELSYSTEiI
F
lnstallationNote
1. Pushheendsof hemain
uelhose, uel eturn ose, nd
evaporative
oses nto he
uel
ank
ittings i least25mm
(r.0
n).
2.
Pushhefuelfillerose nto he ueltank
ipeand
iller
ipe
al least 35mm
1.4
In).
FUELPUMP
Inspection
ltlaximum
pressure
Warnlng
.
Setore
performing
he
lollowlng operalion,
release
the tuel prcssu|e rom the fuel system o r€duce he
po$lbllily
ol Inlury or
lire.
(Reter
o
page
F-{8.}
.
When inspecting luel system
palts,
keep sparks,
cigarettes,
and open tlames away
rom the fuel,
'1.
Disconnecthe negative aftery
able.
2. Connect fuel
pressure auge
o the uelmain
pipe
and
plug
heoutlet f he uel
pressureauge
sshown.
lnstall
clamos s shown.)
3. Connect
he negativebatterycable.
4.
Connect
iagnosisonnectorerminals
/PandGNDwith
a lumperwre.
5.
Turn
he
gnition witchON or l0 sec.
o operatehe uel
pump
and
measurehe uel
pressure.
Fuel
pressure:
491-658 kPa
(5.0-6.5
kg/cm',
7l.l-92.4
p6i)
6.
Turn
e
ignitionwitch FF nddisconnect
tte
umper
ire.
7.
f not
as
specified,eplacehe
uel
pump.
Conlinully
1. Removehe rearsealcushion.
2. Disconnecthe ueloumD onnector.
3. Checkor continuityetween
he erminals
@
and
@
of
the connector t the
uel
pump
shown
n
the
igure.
4. lf there s no continuity,eplace
he uel
pump.
(Refer
o
page
F-92.)
FUELPUMPCOVER
REAN
SEATCIJSHION
22--.30
12.2-3,
1, 1G-2'
Nfl
(Gks,
n.D)
|
CONNECTOB
F-91

8/20/2019 Mazda 121, Kia Pride Repair Manual Vol 1
http://slidepdf.com/reader/full/mazda-121-kia-pride-repair-manual-vol-1 248/389
F
FUEL
SYSTEM
-.:-n
@Y...
&
s:'5
4 ; /
GNO
Fuel
pump
oPeration
ound
1.Turn
he
gnrtion wtch
ON
2.
connect
dlaonosis
onnector
ermtnal
/P
o
GND
g
Removehe
r.relfilterap
and
verityhat
hefuelpump
per-
ationsound
s heard.
Replacement
Warning
i-
-riltreri
replacins
ttte
tuel sysiem
parts,
keep sParks,
cigarettes'
and
open
flames
away
lrom
the tuel.
. ieioie oerfotmfns he tollowlngoperalion, eleasehe tuel pressure romthe fuel system o
reduce
he
possibility
ol iniury
or
tire.
(Refer
o
page F-Ear'
1.
Remove
n the
ordershown
2. nstall
n
the reverse
rder
of
in the
igure.
removal.
r.r-r.7
(1r-17,
.s-rs)
*k/
UE!
HOSE,
{30-r
o,
69---eq
WASHEF, EPIACE
2.7
4.1
123-42,
2a---36t
1.Rear
seat
cushDn
2. Fuelpumpcover
3. Fuel
pump
gauge
unltconneqor
4.Check
alve
5.
Fuel
hoses
6.
Fuel
pump
gauge
unit
F-92
7.Fuel
pumpconnector
8. Bracket
9.
Rubber
mounl
10.Fuel
ilter
'11.
FLrel
ump

8/20/2019 Mazda 121, Kia Pride Repair Manual Vol 1
http://slidepdf.com/reader/full/mazda-121-kia-pride-repair-manual-vol-1 249/389
FUELSYSTEM
F
.F\
FUELFILTER
Replacement
Low-pressure side
Refer
o
page
F-92.
7,a-lr
{a0-r1o,
6r-95)
Hlgh-plessure ide
the fuel iltermustbereplaced t he ntervalsutlinedn he
maintenancechedLrle.
Warnlng
.
Belore
pertorming
the tollowing
operation,
release
the tuel pressure rom the luel system o rduce the
posslbility
ot iniury or
fire.
(Refer
o
page
F-88.)
.
When replacing the tuel filter,
keep
sparks,
cigarettes
and open tlamesaway
lom it.
'1.
Disconnecthe uelhoses rom he
uel ilter.
2. Removehe uel ilterand bracket.
3.
Installn the reverse rderof removal.
CIRCUITOPENING
ELAY
Replacement
'|.
Disaonnecthe negative atteryerminal.
2. Removehe ECU.
Refer
o
page
F-112.)
3. Removehe relaybrackel
4.
Remove
he circuit
opening elay rom he relaybracket.
Inapectionot Continuity
1. Check ontinuity etweenerinals
@
and
@
in the ollow
ing condition.
2. Replace he relay f not as specified.
CIRCUIT
OPENNINGFELAY
f--_-1
Gl'.
r*{ry
I
L.ora\€)
(b_oorqA
T , _-ir
Te.minals
Aoolv
12V
Continultv
{aA
-
G))
@ * @
NO
@ " @
No
F-93

8/20/2019 Mazda 121, Kia Pride Repair Manual Vol 1
http://slidepdf.com/reader/full/mazda-121-kia-pride-repair-manual-vol-1 250/389
F
FUEL
SYSTEM
PRESSURE
EGULATOF
Irsp€ction
Fuel lne
pressure
WarninE
.
BebA oerforminq
he
ollowing
operatlon,
eleaae
the fuel'presaure lom the fuel system o lsduce the
possibllity
ot
Iniury
or tlre.
(Reter
lo
page
F-88.)
.
When
inipecting
the
pressure regulator'
keep
sparks,ciiaretl$,
and
open
lames
away
rom it'
1.Disconneq
he
negatNe attery
able
2. Connect
fuel
Pressure
auge.
3. Connect
he negative
attery
able.
4. Start
he engine
nd
run t at
idle
5.
Measure
he uel
ine
Pressure.
Fuel ine
Pressure:
235-2i5
kPa
(2.4-2.a
kglcm''
34-40
psi)
Noie
.
The tuel
line
pressurc wlll mt
change
when
remov-
Ing the
vacuum
hose
lrom
the
Plessule
regulator
at ldle.
nepbcement
Warning
.
Betoie oedormlng
the
following
operatlon,
lelease
the
fueipressure
from the
luel system
o lsduce
ihe
possibllity
of iniury
or tire.
(Reler
o
page
F-88.)
. iivhen replaclng tuel system componenta' keep
sparks,
cigareties,
nd
open
lames
away
rom he
lusl.
Cautlon
.
Aller removlng
he
air cleaner,
cover
he lntake
ah
pagsag€ with a ctean
rag to
Protect
the alrtlow
3enaor.
1. Remove
he air
cleaner.
2.
Disconnect
he
negative
attery
able
3. Removehe pressureegulatorsshownn the
igure
4. lnstalln
the reverse
rder
ol removal
INJECTOR
Inspection
(On-vehlcle)
1. Remove
he air
cleaner
over.
Caulion
.
Perform
he
tollowing
nsPection
arelully
o
Pro-
tect the alrflowsensor tom
damage.
2. Start he
enoine
nd
run t at
idle.
3.
Using sound
scope,
erifyhat
njector
peraling
ounds
are
nearo.
3.a--{.a
{35-50,
3O--a3)
OAING,FEPIACE
PRESSUFIE
IEGULATOFI
vAcuuM
HosE
^ \
NJECTTONOOY
F-94

8/20/2019 Mazda 121, Kia Pride Repair Manual Vol 1
http://slidepdf.com/reader/full/mazda-121-kia-pride-repair-manual-vol-1 251/389
FUELSYSTEM
Removal lnstallation
Warning
.
Betore
performing
he following
operalion,
elgase he uel
pressure
rom the tuel
systemot
reduqe he
possibility
of injury or tire,
(Reter
o
page
F-88.)
.
When
emoving he fuel
syslem
parts,
keep sparks,cigarettes,and open lamesaway rom
the tuel.
1.Loosenhe radiator
rain
plug
and drain he coolant.
2. Removen
the ordershown n the igure, eferringo RemovalNote.
(Refer
0
page
F-95-)
3.
nstalln
the
reverse
rder
ot
removal,eferringo InstallationNote.
(Refer
o
page
F-96.)
7,3-11
(30-110,
69-9s)
GASKET,
SEPLAC€
CIFINGS,FIEPLACE
CUSHION UBBEF, rQ-25O,e-2.6, .-t9)
ad
-e
re-25
0.e-2.6,
.-19)
GASKETS.
EPLACE
1.Aircleaner
2. Water ose
3. Fuelhose
4.
Air
bypass
ose
5. Injecuonody
6.
njector
over
7. njector
Removd Note
.
When eplacinghe njector,
ush
he
njector ozzle
ut
wjtha
plastic
r woodstick.
F-95

8/20/2019 Mazda 121, Kia Pride Repair Manual Vol 1
http://slidepdf.com/reader/full/mazda-121-kia-pride-repair-manual-vol-1 252/389
F
FUEL
SYSTEM
REPLACE
HION
lnslgllation
Note
.
Use
newGrings,
cushion
ubber,
nd
gaskets
.
Applya
small hount
of silicone
rease
o
he O'rings e
lore
nstallation.
.
Installthe
niector
quarely
nto njection
odyand
do not
twist
t while
nstalling.
. Afternstallation,onnecthediagnosisonnector,/Pand
GND erminals
ith
a
iumper
ire, nd
check
or uel eak'
age
with he
gnition witch
ON.
Refer
o
page
F-96.)
Inspection
Warning
.
whe; inspecting
the iniector,
keep sparks,
cigarettes,
and
open
tlames
away rom
the tuel-
Iniector esistance
1. Disconnect
he niector
onnector.
2.
Measure
esistancel
the niector
ith
an ohmmeter.
Resistance:
-20
(20'C
l68oFl)
Fuel
dakage
est
Caution
.
Perlorm
he
followlng
nspection
arefully
o
pro'
iect the air
bypass
passage
of the
airflow
sensol
lrom the enllance
of dust
or dirt.
1. Remove
he air cleaner
s
shown
n the
agure.
2. Connect
hediagnosis
onnector
erminals
/P andGND
with
a
ilmper
wire.
3. Turn
he gnition
witchON
and
check
or uel eaks
rom
the
njector.
Fuel eakage:
Less
han
I drop/s
minutes
F-96
t

8/20/2019 Mazda 121, Kia Pride Repair Manual Vol 1
http://slidepdf.com/reader/full/mazda-121-kia-pride-repair-manual-vol-1 253/389

8/20/2019 Mazda 121, Kia Pride Repair Manual Vol 1
http://slidepdf.com/reader/full/mazda-121-kia-pride-repair-manual-vol-1 254/389
F
OUTLINE
OF EMISSION
CONTROL
YSTEM
OUTLINE
OF
EMISSION
CONTROL
SYSTEM
STRUCTURAL
IEW
The
ollowing
ystems
re employed
o
reduceCO,
HC,and NOx
emissions.
1. Positive
rankcase
entilation
PCV)
yslem
2, Evaporative
mission
ontrol
ystem
3.Catalyticonve(er
W
SOLENOID
ALVE
(PURGE ONTFOI)
CANISTEF
GHECK
VALVE
TWO_WA
AR
-til
F-98

8/20/2019 Mazda 121, Kia Pride Repair Manual Vol 1
http://slidepdf.com/reader/full/mazda-121-kia-pride-repair-manual-vol-1 255/389
POStrtvE
GRANKCASE
ENTILATION
PCV)
SYSTEM
F
posrilvE
GRANKCASE
ENTILATION
PCU
SYSTEM
DESCNIPTION
The
PCV alve s operated y the
ntakemanifold
acuum.
When he engine
s running t idle, he
PCV alve
s opened lightly nd a
small mount
f blowby
as
is drawn
nto
he
ntakemanifoldo be burned.
Astheenginespeedisesthe CV alvesopenedurther, llowing proportionatelyargeramountotlow-
by
gas
o be drawn nto he ntake
manifold.
PCV VALVE
Inspectlon
1.Warm p he
engineo
normal peratlng
emperaturend
run t at idle.
2. Disconnecthe
PCV alve ndthe
entilation
ose rom he
cylinder
eadcover.
3. Block he
PCV alveopening.
4. Verifyhat
vacuum s telt.
5. Removehe
PCVvalve.
6. Blow
hrough he
valve rom
port
@
and verify hat airflows
lromot
gort
6).
7.
Blow hrbughl-he
alve
lom
port
@
and
verityhatno air-
flows kom of
port
@.
8. Reolacehe
PCVvalve f not
as specified.
F-99
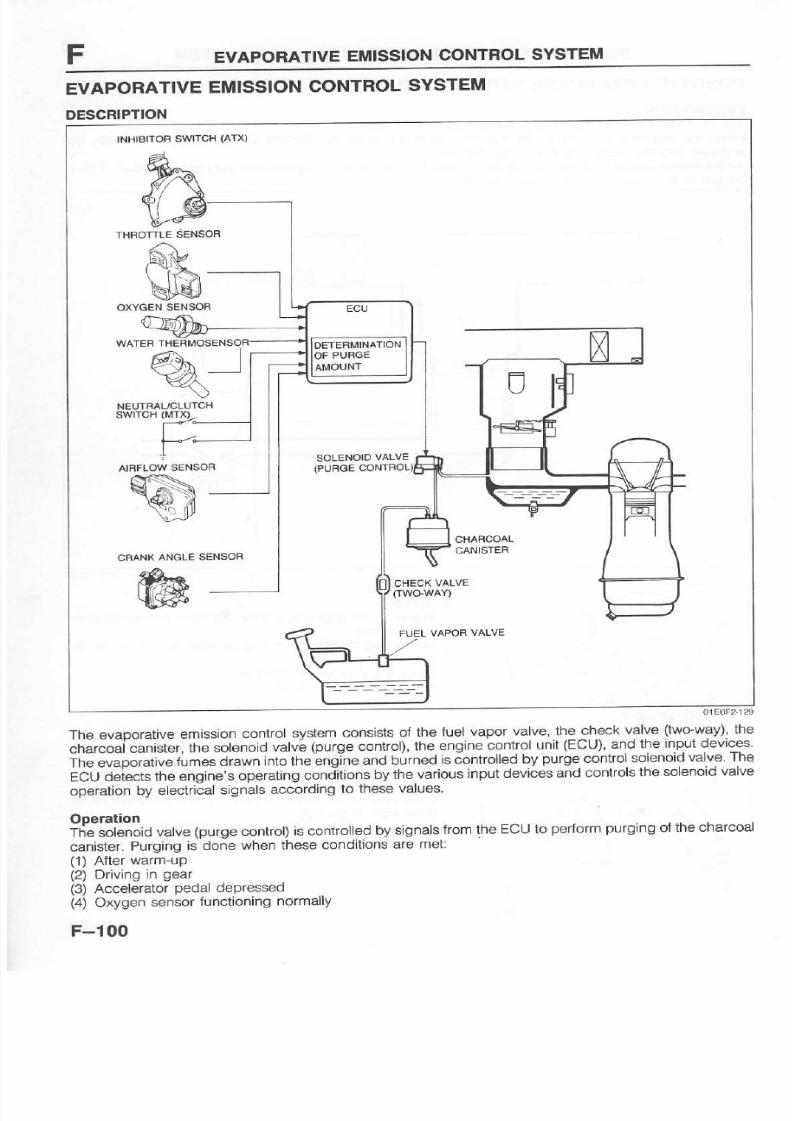
8/20/2019 Mazda 121, Kia Pride Repair Manual Vol 1
http://slidepdf.com/reader/full/mazda-121-kia-pride-repair-manual-vol-1 256/389
F
EVAPORATIVE
]IIISSION
ONTROL
SYSTEi'
EVAPORATIVE
M]SSION
CONTROL
SYSTEM
DESCRIPTION
INHIBITOH
WITCH
ATX)
THFoTTLE
ENSoF
)\M
\ l h -
s!q.t
OXYGEN
SENSOB
WATEF TH€RMOSE
q_l
rnrrori
sersoa
CANISTEF
@
CHECK
VALVE
FIJEL
VAPOFI
VALVE
Theevaporative
mission
ontrol ystem
onsists
f the
uelvapor
valve' he-ch€ck
alve
two'way)'he
chircoai
canister,
he solenoid
alva
purge
ontrol),
he engine
ontrol
nit
ECU)'
nd
he
nputdevices'
Theevaporative
umes
rawn
nto heengine
ndburned
s
controlledy
purge
ontrol
olenoid
alveThe
ibU a.G"is
fne enqine's
perating
oniitions
y hevarious
nput
evices nd
controlsthe
olenoid
alve
operation
y electrical
ignals
ccording
o these
alues.
Operation
ilie solenoid
alve
purge
ontrol)
scontrolled
y
signalsrom
he ECU
o
periorm
urging
f he
charcoal
canister. urgings donewhen heseconditionsremet:
(1)
After
warm-up
(2)
Driving
n
gear
(3)
Accelerator
pedal
depressed
(4)
Oxygen
ensor
unctioning
ormally
F-l00

8/20/2019 Mazda 121, Kia Pride Repair Manual Vol 1
http://slidepdf.com/reader/full/mazda-121-kia-pride-repair-manual-vol-1 257/389
EVAPORATIVE
MISSION
CONTROL
YSTEM
SYSTE"
OPEFATION
1 Wam
up he
engineo
normal perating
emperaturend
run I
at idle.
2. Disconnecl
he
vacuum
ose rom
he solenoid
alveas
shown
n hefigure,
nd
verifyhat
novacuum
s eltat he
solenoid
alve.
3. f not as specified,heck hesolenoidalve
SoLENO|D
VALVE
PURGE
ONTBOL)
Inspection
1. Drsconnecthe
vacuum
oses
om he solenoid
alve
2. Verity hat
no air
lows hrough
he
valve
rom
port
@
to
pon
@.
3. Disconnect
he
solenoid
alve
onector nd
apply12V.
4. Verifyhat
air
lows hrough
he
valve rom
pgrt
@
t9
pgt!
CD.
i no air
s
elt,measure
he resistance
l the
solenoid
valve.
Reslstance:
2
+
20
5. f not as
specified,
eplace
he solenold
aNe-
Removal
Inslallation
'1.
Disconnectthe
vaporative
osesirom
hesolenoid
alve
2.
Disconnect
he solenoid
alve
onnector.
3.
RemoveJhe
ut and
he solenoid
alve.
4. lnstall
n the
reverse rder
of
removal.
Tlohtenino orque:
?.4-t
r-Nfl
480-1
O cm-kg,69-95 in-lb)
FUEL
VAPOB
VALVE
Inspectlon
1. Verifu
hatair
lowsthrough
hevalve
rom
port
@
asshown
in he ioure.
'-?j-r1
(30-110,6e-9q
F-10 t

8/20/2019 Mazda 121, Kia Pride Repair Manual Vol 1
http://slidepdf.com/reader/full/mazda-121-kia-pride-repair-manual-vol-1 258/389
F
EVAPORATIVE
MISSION
CONTROL
YSTEM
2. Verify
hat no
air lows
hrough
he valve
rom
port
@
as
shown
n the
gure.
3.
Replace
he uelvapor
valve
f necessary.
CHECK
VALVE
GWO-WAY)
Inspecilon
1. Remove
he
valve.
2. Check
he operation
f the valve
witha
vacuum
ump.
3. Replace
he check
alve
f not as specified.
CHARCOAL
ANISTER
Inspectlon
1. Visually
heck
or damage nd
cracks
2. Blowair
ntoeach
port
and verify
hat
heyare
notclogged.
3. ReDlace
he charcoal
anister
f not as
specified
Blow ,lrough
valve rcm
Pon @
Applyapprox. 7mmHg 1.46nHg)
vacuumat
port
@
Applyapprox.
4 mmHg
1.73
nHg)
vacuum
at
port
@
F-l02

8/20/2019 Mazda 121, Kia Pride Repair Manual Vol 1
http://slidepdf.com/reader/full/mazda-121-kia-pride-repair-manual-vol-1 259/389
CATALYTICCONVERTER YSTEM
CATALYTICCONVERTER YSTEM
DESCNIPTION
Thecatalytic
onvertereduces
CO,
HC,and
NOxby chemicaleaction. he
converter
ontains
latinum
and
rhodium
ompounds.
F
01E0F2.1{s
CATALYTIC ONVERTER
Inspection
Ngte
.
The insulatorcannoi be removed.
Removehecatal!4iconverternd
visuallyheck or
deteri-
oration nd cracks.
F-l03

8/20/2019 Mazda 121, Kia Pride Repair Manual Vol 1
http://slidepdf.com/reader/full/mazda-121-kia-pride-repair-manual-vol-1 260/389
F
DECELERATION
ONTROL
YSTEM
DECELERATION
ONTROLSYSTEM
DESCRIPTION
Thedashpot
s used o
prevent
he hrottle
alve romsuddenly
losing
osuoFxss
DASHPOT
lnsgeclion
1. Open he
hrottle alve
ully.Push
hedashpol
od witha
finger
and
verity hat
t
goes
nto he
dashpot
lowly
2. Releasehe
rod and
verify hat
t
comes
out
quickly.
3. Replacehe dashpot
f
notas specified
4. Warmup the engine
nd
run t at
idle
5. Connect tachometel
o
the diagnosis
onnector
G-
terminal nd ncrease
ngine peed.
DIAGNOSIS
CONNECTOB
6. Slowly ecrease
heengine
peed
ndverify
hat he ever
touches
he dashpot
od at the specified
peed.
Specification:
,500
+
100
rPm
7. f notasspecified,
oosenhe
ocknut nd
urn he adjust-
ing screw o adjust.
F-l04

8/20/2019 Mazda 121, Kia Pride Repair Manual Vol 1
http://slidepdf.com/reader/full/mazda-121-kia-pride-repair-manual-vol-1 261/389
A./CCUT.OFFSYSTEM
A/C CUT.OFFSYSTEM
DEsihrPrtoN
To mprovedlesmoothnessfter
ust
startingheengine nd o mprove cceleration
erformance,
n
AJC
cut-offsvstem
s used o controlA,/Coperation.
Operation
TheA,/Cs cut off under he conditions elow.
F
THFOTTLE
SENSOR
u'o"""o*'1=:9J-1
fr"
.*,r""
I
IGNITIONSWITCH
MAGNEITC
CLUTCH
DETEFMINATION
E
glne
condlllon Cui-otl
pcriod
Thrcttlevalve ully
open
lmpfoveddravabilily
Accelerationrom stop
:. ;.!9-
rHRorrLE
L'NK
SYSTEiIOPERATION
1. Turn he gnition witch, lowerswitch,
ndA,/C witchON.
2.
Open
he hrottle alveandverity hat he
additionalfantops
for approximately 1 second.
F-l05

8/20/2019 Mazda 121, Kia Pride Repair Manual Vol 1
http://slidepdf.com/reader/full/mazda-121-kia-pride-repair-manual-vol-1 262/389
DECHOKE
ONTBOL
SYSTEM
tu'rJisO"C
iz"n
or
uelow.
hisallows
he spark
plugs
o dry
and
purges
xcess
uel
rorn hecylinders
DECHOKE
CONTROL
SYSTEM
OESCRIPTION
iJtacifitate tartinq
ne engine
t thespark
plugs
become
ouled, uch
as when he
engine
s looded,
uel
injection
s
cut
t h; thronle
alve
sheldwideopen
whi'e
rankingheengine
f heengine
oolant
empera
SYSTEMOPERATION
1.Ve4fuhat he enqrne
oolant
emperaiure
s below ooc
(32oF)
2. Verii
that he enaine
will not slart
whencranked
t normal peed
with he hrottle
alve
ully
3. f theengine tarta,
nspect
he hrottle
ensor.
Reier
o
page
F-122
and he ECU erminal
U
(Reler
o
page
F-116.)
F-l06
open.
voltage.
CFANK
ANGIE
SENSOE
THFIOTTLEENSOF
WATEFTHEFMOSENSOR
INJECTOF
DEIEFMI.
NATION
cur

8/20/2019 Mazda 121, Kia Pride Repair Manual Vol 1
http://slidepdf.com/reader/full/mazda-121-kia-pride-repair-manual-vol-1 263/389
AIR BYPASSCONTROL
SYSTEM
AIR BYPASSCONTROL
SYSTEM
DESCFIPTION
Theair bypass ystem perates
o improvedlestability nd vehicle rivability.
Thissystem upplieshrottle
alvebypass ir nto ntakemanilold ccording
o engine
oad
condition nd
driving onditions.
Thissystem onsists t two solenoidalves ontrolled y the ECU.
AA AYPASS
SOLENOIO
ALVE
@
ArF
BYPASS OLENOTO
ALVE
@
AIF BYPASS
SOLENOID
ALVE
@
THAOTTLE
VALVE
Operation t
Ai. BypassSolenoidValve
Englno condltlon
Air
bypa$ aolenold wlve
@ @
Duing cranking
To
improve$anability
o
o
lgnition
wilchOFFrON
To
prcvenl
rorn
slickng
o
'Acc€ssory
ON
To improve
srartability
o
P/S
pressure
w{ch ON
o o
,dJCswilch ON
o
o
Wam up (asoc-8ooc)
o
Selecl
everN-D
(ATX)
To alleviats sudden engine speed
drop
o
Dunng d€celelation
{d€celelation
conlrol)
To improve
divabilty
o o
'Accessory
is headlights, ear windowdefrosler,blowerswilchand coolingJan.
F
F-107

8/20/2019 Mazda 121, Kia Pride Repair Manual Vol 1
http://slidepdf.com/reader/full/mazda-121-kia-pride-repair-manual-vol-1 264/389
AIR BYPASS
CONTBOL
SYSTEM
FAST DLECAM
SYSTEM
OPERATION
1.
Warmup
the engine
o normal
perating
emperalure
2.
Verityhat
he hermowax
nit
ode)dends utward
ullyand
that
he cam
separates
rom he
roller.
3. lf
lhe electric
ooling
an is operating,
ait
until
t stops.
4. Verify
hat he
engine
s idling moothl,
soLENoto
vALvEO
\
/ry
5.
Verifuhatclick
s
heardrom
heail bypass
olenoid
alve
@
when urning
he
ollowinglectficalload
N
andOFF
Electrical
oad
.
Blower an
.
Headlight
. Rearwindowdetroster
6. Verity
hat click
s from
he air bypass
olenoid
alve
@
when he enoine
tans.
7.Turn
he gnition
witch, lower
witch, nd
AJC witch
ON.
8. Rotate
he hrottle
ink by
hand.
L Verirythatclick
sheard rom
heairbypass
olenoid
alve
@.
F-108

8/20/2019 Mazda 121, Kia Pride Repair Manual Vol 1
http://slidepdf.com/reader/full/mazda-121-kia-pride-repair-manual-vol-1 265/389
AIR BYPASS
CONTROLSYSTEM
F
AIF SYPASS
SOLENOID
AIF BYPASS
OLENOID
AIR
BYPASS
OLENOID
VALVE
@
DISTFIBUTOR
AIB aYPASS
OLENOTDALVE
@,
@, @
Inspeclion or
contlnuhy
1. Disconnect
achair bypass olenoid alve
onnector.
2. Inspector
continuityetweenhe solenoid
alve
onnec-
tor terminals.
3. Replace
he air bypass olenoid alve
f not
as speciiied.
Inspection
or Airllow
1. nspect
ir bypass olenoid alve
@.
1)Remove
he air cleaner.
2)
Closehe bypass ir
passage
ith ape.
3) Disconnect
he bypass ir hose rom he
air bypass ole
noidvalve
@
as shown n the igure.
4) Verifythat
oairflowsthroughir
bypass olenoidalve
@
whenblowing
ir ighty nto he air
bypass ose.
5)Turn he
gnition witch
ON.
6)
Groundhe ermlnal
@
as shown n the lgure.
4
Verify
hatair lows
hrough irbypass olenoidalve
@
whenblowing
ir
nto
he air bypass ose.
2. Inspect
ir bypass olenoid aive
@, O
1) Bemove
ir bypass olenoiddve
@
or
@.
2) Blow hrough
hevalve fom
port
@
and verify
hatno
air
comesout of
port
@.
3)Apply
12V o the solenoid alve
onnector.
4)
Blow hroughhevalve
rom
port
@
and verify
hatair
comes ut oi port@.
Adiustment
idle-up
speed)
Reler
o
page
F-64.
r-:\*
t r t l W
PATTEFY
__-,/'
d
\
r-i
sotENoto
VALVE
',:,,%rc,!
F-l09

8/20/2019 Mazda 121, Kia Pride Repair Manual Vol 1
http://slidepdf.com/reader/full/mazda-121-kia-pride-repair-manual-vol-1 266/389
F
CONTROL
SYSTEM
CONTROL
SYSTETI'
PREPARATION
ssT
499200162
Engine
ignal
ECU
49 GO18 03
ECU
49 GO18
04
Sheet
ECU
49 D015 01
49 8019
9AO
Syslem
Seiector
ignitioniming
F- l10

8/20/2019 Mazda 121, Kia Pride Repair Manual Vol 1
http://slidepdf.com/reader/full/mazda-121-kia-pride-repair-manual-vol-1 267/389

8/20/2019 Mazda 121, Kia Pride Repair Manual Vol 1
http://slidepdf.com/reader/full/mazda-121-kia-pride-repair-manual-vol-1 268/389
F
CONTROL
SYSTEM
ENGINE
CONTROL
NIT
ECU)
Reolacement
'1.
Remove
n the
ordershown
n the
igure.
2.
Install
n the
reverse rder
of removal
1. Negative
attery
able
2.
ECU
Inspec l ion. . . . . . . . . . . . . . . . . . . . . . . . . . . . . . . . .
age
-112
3.
ECUconnector
Inspection
1. Disconnect
he ECU
connectors.
2. Connectthe
STS
Engine
SignalMonitor
nd AdaPter
Harness)
o the ECU
as shown.
a1EAF2210
F-112
(.3-rr
(60-rr0,69-es)

8/20/2019 Mazda 121, Kia Pride Repair Manual Vol 1
http://slidepdf.com/reader/full/mazda-121-kia-pride-repair-manual-vol-1 269/389
CONTROLSYSTEM
6 ' d
ffi
o .
3. Place he SST
(Sheet)
on the EngineSlgnalMonitor.
4. Measurehevoftage
t each erminal.
(Refer
o
pages
114
o F-119.)
5. f anyECU ermjnaloltages
ncorfect,heck he elated
inpui
or output evices ndwiring.
f
no
problem
s ound,
replace
he ECU.
Refer
o above.)
Caulion
.
Neverapply voltage o SST erminals
A and
g.
6
-d'
ffi
F-l13

8/20/2019 Mazda 121, Kia Pride Repair Manual Vol 1
http://slidepdf.com/reader/full/mazda-121-kia-pride-repair-manual-vol-1 270/389

8/20/2019 Mazda 121, Kia Pride Repair Manual Vol 1
http://slidepdf.com/reader/full/mazda-121-kia-pride-repair-manual-vol-1 271/389
CONTBOLSYSTEM
F
Inco]r€ct Yolt.ge
ROOtvl
0,Alse
burned
Op€n rcuii
n
wi
ng komROO|0A
fuse o ECU eminal14
Main relay mallunclion
Rel6r
o
page
F-124)
Op€n or shortcircuit n wiring rorn main relay o ECU erminal18
Always V
($aner
urns)
.
Open r shori ircuit
n wiringrcm gniton witch
MTX),
r inhlbitorwitch
iAlx)
to ECU erminal C
Main elay
FUEL
NJ etay)mallunclion
Reler
o
page
F-124)
Op€n ircuitn wiing
,rommain elayo diagnosls
onneclorerminal
B
Open r shod ircuit
n wiringromdiagnosrsonn€clor
ermlnal EN o
ECU erminal D
Always battery
voltage
Poor onnectiont
ECIJ onnector
ECUmallunclion
ECUmallunclion
2.5V
No displayon Self-
oiagnosisChecker
Main elay
FUEL
NJ elay)
malfuncllon
Reler
o
pase
F-124)
Open irclit
n wirlngrom
main elayo diagnosis
onnectoreminal+B
' 'SA
displayedand
.
Open or shorl
circuil n wiing
from diagnosis onneclor
erminalFEN o
ECU ermlnal
1F
Always Baliery
voltage Poorconnection l
ECu connector
ECUmallunction
.
Shon
circuit n wirinS iorn
gniter
o ECU eminal
1G
t.4alnelay
FUEL
NJ relay)
malrunclion
Befer
o
pase
F-124)
Poor onnectiont ECU onnector
Open kcuil
n wking romcncuit pening
elay
o ECU erminal l
.
Open ircuit
n wiing romAC
re
ay o
ECLJerminal
J
.
Shon
ncoitn wirng romdiagnosis
onnectorerminalTEN
o ECU erminalK
Alwaysbatlery
vonage
.
Open
ncuitn wiins trom
diagnosisonneclor
erm alTEN o ECU em|
.
Open icuil in wirins
fomdiagnosisonneclor
erminal ND o
ground
AIways V or
Approx. V
.
Open
r shon ircoii n wiring
rcrn
peed
witch
Seclion)to ECU emi
na
1[,1
Always elow
1.ov
sloplights
K)
.
Open ircuit
n
wiring
roms1opllghtwilch
o ECU em
nal10
P/S
ressurc
witchmalluncllon
eier
o
page
F-125)
Short ircuit
n wning rom
P/S
pressure
witch CU
erminal P
ECUmatlunction
Always battery vollage
P/S
ressure
wilch
maltunclion
Refer
o
page
F
125)
Open tcuil
n
wking
romPA
presslfe
wilch
o
ECU e|nrinal
1P
Op€n
ircuil n wiring
romP/S
prcssure
wilch
o
grcund
F-l 15

8/20/2019 Mazda 121, Kia Pride Repair Manual Vol 1
http://slidepdf.com/reader/full/mazda-121-kia-pride-repair-manual-vol-1 272/389
F
CONTROL
SYSTEM
TenninJ
Input
Oulprd
Test condition
Cor'ecl
Yolage Remark
1 0 o
lgniton switch
ON
PJC W N
and
Below
1 0V
A/C SWOFF
Batlery
ollage
1R
o
Coolingan operaungeng ecoolant
temperaturever
97'C
(207'D
of das
nosls onnectoremina
TFA
gtounded)
Below .0V
Fan nol operatinq
idle)
Batreryolage
o
BlowercontrolswitchOFF
Batery otage
ON
Elower ontrol
witchON
Below
.0v
1 T
o
Rear windowdeilosler
swilchOFF
Below
1
0V
lgnlion switch
ON
Rear w ndow de'rosler
swlch ON
Batlery ollage
o
l-leadliq swnch
HeadlighlsON
Bateryvoltage
HeadlighlsOFF
Below
.ov
o
Neutral/Clutch
swilches
(MTX)
Nedral
posllion
r clutch
Pedal
Below
.0v
Olhers
Batery
oltage
(ATX)
Below
.0V
Others
Banery
oLlage
Ground
lnieclor)
OV
28
Ground
Oulpul)
OV
2C
Ground
cPU)
Constani
OV
2D Ground
lnput)
Constanl
OV
2E
o
(in
disrributoo
(Ne'sisnal)
lgnitionswitch
ON
or
5V
2G
2H
2l
2J
Ground
TITX
Below
1.0V
Open
ATX
Batleryvolage
2K o
Throttle enso/Ec
(ATX)
?t
F-1 16

8/20/2019 Mazda 121, Kia Pride Repair Manual Vol 1
http://slidepdf.com/reader/full/mazda-121-kia-pride-repair-manual-vol-1 273/389
CONTBOLSYSTEM
F
.
Open ircuitn wiing lromAJC witcho ECu erminal 0
Always baltery vollage
.
A/C sulch maliunclion
Reler
o Section J)
(electc cool ns tan OK) Open r shorl ircuitn wirng
rom
an
retay
o
ECU
effnina
B
ECUmallunction
Alwals
below1.0V
blower
an OK) Shon
ircut n wiring
rom
blower onlrol wilch
o ECLJerminal 5
Poor
onnecliont ECU onneclor
ECU
maltunclion
Alwaysbatlery
voltage blower
an OK)
.
Open rcuit n wirins rcmblower ontrol wilcho ECU erminalS
t .0v
llluminalionamp
ON Op€n r shorl ncuirn wirlngrom earwindow strosl€rwtch o ECU
lenninal T
neverON
Open
ircuit
n
wir
ng rom gnition
witcho
rearwindow elrosterwilch
Fearwndow
defroster
witch
malfunction
Beler
o Section )
Alwaysbelow 1.0V HeadlighlsOK)
. Open r shoncircuitnwiringromheadlighlelayo ECIJ erminalU
Neulfal wilchmalluncton
Refer
o
page
F-125)
Clutch
witch
maliunction
Beler
o
page
F-124)
Shon ircuitn wnino romECU erminalV to neukal r ciltch switch
Neutrai
wilchmallunclion
Feler
o
page
F-125)
Clulch
swlch malfunction
Rerer
o
page
F-124)
Open
crcut
n
widng
rom ECU enninal1V o neutral r clurchswitch
Poor
conneclion t ECU connector
Inh
bilor swltchmallunctionReler o SectionK)
Short ircuitwiringrom nhibitorwitcho ECU erminal
V
nhibitor wilchmallunclion
Refer
o SectlonK)
Openorcult in wiring rorn nhibitor wrtch o ECU rerminal1V
Poor ontacl
l
ground
erminal
Open
ircuit
n
wir
ng romECU o
ground
Always
pprox0V or approx. V
.
Refer o Troubleshooting,
ode No.02
Reler
o
page
F-70)
A ways battery vollage
.
Opencircuilwiring rom o
ground
Shon ircultn wiring romECU enninal K o thrctlle ensor
C
AT convol
unil
ATX),
r ln
aidow
sensor
Poor onnection
t
ECU
onneclor
ECU
mallunclion
Beow 4.5V of above 5.5V
.
ECUmailuncton
F-117

8/20/2019 Mazda 121, Kia Pride Repair Manual Vol 1
http://slidepdf.com/reader/full/mazda-121-kia-pride-repair-manual-vol-1 274/389
F
CONTROL
YSTEM
- : .
-
Inpui
Oulput
connection
lo
Teal condition
Consct
ontgg
Rcmark
o
Thrcttle
ensor
c_
(ATx)
Accelerator
Pedal
releas€d
Accelelalor
pedal lully depressed
2N o
lgnron
switch
ON
ldle
(cold
engine)
OV
0-0.1v
lncreasng
engrne
speed
altef
warmup)
0.5
1-0v
0-0.4v
20 o
(positive)
lqn,lon sw{ch
ON
ldle
Appfox.
1.2V
2P
o
(negatve)
OV
2A o
Engine
oolant
emperature
0oC
68oD
Below
.5v
2R
o
noid
valve
@
Engine ranking
nd
ew seconds
iter
Appox
2.3V
Other
conditon
Battery
dlage
2S
2T
o
nold valve
@
Accessory
ON
Oth€rs
ondition
Batlery
onage
2U o
hjector
(negative) Constant
2V
o
Inieclor
positive) lgniton
swtch
ON
EngineSignal
I
ash
Below
1.0V
o
noid
valve
@
OFF
ON
Batlery
vdlage
o
Solenoid
alve
(purge
conlroD
lgnition
witch
ON
Baltery
oltage
ldle
Battery
ohge
2\
o
lgniUon
witch
OFF
OV
ON
22
o
EC'AT
onlrol
rnrl
(ATX)
Engine
coolant
empelalurc
elow
70'C
(15860 at rdre
Engine-
oolant
emperaLrre
bove
o'C
Batery
ofiage
F-l18

8/20/2019 Mazda 121, Kia Pride Repair Manual Vol 1
http://slidepdf.com/reader/full/mazda-121-kia-pride-repair-manual-vol-1 275/389
CONTROLSYSTEM F
Incorrect
voltage
Open ircuil
n wking romECU erm
Open
rcuit n wiringromECU erm
Open lrcuitn w1ringrcmECU erm
nal 2[,1 o throtte sensor
nal 2K
to thrct
e sensot
nal 2D to lhrclile sensor
.
Throtfle ensormrs3dtushent
.
Beler
o
Troubleshooting
ode
No.15
Reier
o
page
F 74)
Always pprox V afler
wamr-up
.
Refer o Troubleshooting,ode No.17
(Refef
o
page
F 75)
Always pprox.
V or approx. V
.
Refer o Troubleshooting,ode No.O8
8efer
o
page
F-71)
.
Open ircuil
n
wirinS
rom
ECU erminal P o airllow ensor
Always approx. 0V or approx.
5V
.
Reier o
Troubleshootns,
ode No.09
Reier
o
page
F
72)
.
Ferer o ftoJblesnoor,ng. ode No.35 Feler o
page
F-78)
.
Feler o T
ouble.hoorng,
Code No 34 (Beler o
pagF F-781
.
Openor short ircuit
n wing irom njector
o ECU
enrinal v
.
Open ircuiln wiins
lrom njeclor
o ECU €minal2V
.
Open or
shortcrcu't in wking frcm ECU terminal W 10air bypass olenold
valve
O
Always pprox. V or approx.
2V
.
Reter o TroubeshoolinS, ode No.26
Reler
o
page
F 77)
.
Oper
crcLrr
1
wrflng rom man
relay
o ECU r€lmrnal Y
Alwaysapprox.
oV or appfox. 12V
.
Openor shoncircuiln wr ng romECU erminal 2 to EC'AT onlrol nit
termlnal
N
F-119

8/20/2019 Mazda 121, Kia Pride Repair Manual Vol 1
http://slidepdf.com/reader/full/mazda-121-kia-pride-repair-manual-vol-1 276/389
F
CONTROLSYSTEM
USE
CONNECTOFI
CRANKANGLESENSOR
lN
OISTRIBUTOR)
Inspection
1.Bemovehe drslnbutor.
Befer
o SeclionG.)
2. Connect
he distributor
onneclor
s shown
n the igure.
3. Connect
he high-tension
ead.
4. Turn he
onition witchON.
5. Connect
he SSTS
Englne
Signal
Monitor
and Adapt-
el) to the
ECUas shown.
6. Set heSSTS
Engine
Signal
Monitor
and Adapler)
er-
minal E.
7. Botatehe distributorrive
by
handand
measurehe ou!
put
voltage.
Speclflcation
8. After he
nspection,nstall
he distributor.
(Refer
o Section
G.)
9. Stari he engine
nd adjust he
gnition
imlng.
(Reier
o
page
F-63.)
lgnit ion imlngr
BTDC16
+
10
0. Tightenhe distributor
ockbolts o the specifiedorque
Tighlening orque:
t6-23 N.m
1.6-2.3
m-kg,
12-16 tt'lb)
^-
t:,?\
l ; - \ '
l , ! , - , :
ferminal Tesl
condition
Voltago
2E Rorate istributorne ull urn Apprcx.
5V
4
pulses)
F-120

8/20/2019 Mazda 121, Kia Pride Repair Manual Vol 1
http://slidepdf.com/reader/full/mazda-121-kia-pride-repair-manual-vol-1 277/389
CONTROL
SYSTEM
F
INJECIION
BODY
ATRFLOW
ENSOR
BYPASS
HOT-WIRE
YPE)
lnapoction
1.
Removehe air cleaner.
2. Visually
heck
or
anopen
circuit f
heairflow ensor ot
3. Check he
airflow ensor ody
or cracks.
4. Disconnecthe airflow ensor
onnector.
5. Using n
ohmmeter, easure
esistanceetween
he er-
mrnals.
Speciticaiion
Femoval
Installalion
Reler o
page
F-84.
WATER
THERMOSENSOR
Removal
1. Disconnect
he water hermosensor
onnector.
2. Remove
he water hermosensor
sing
he
SST.
lnboeclion
1. Place
hesensor
n
water
withathermometernd
heat he
water
graduallY.
2. Usingan ohmmeter,
easure
esistancef the
sensor.
3 , 0
n i
(ko)
2
WAIEFTEMPEMIUFIE
{"C I"FD
Terminal
F$islance
(20'C
I68"Fl)
A - B
A - C
B - C
;ffi-fl
INTAXE
FIEPLACE
WATERIHENMO
SENSOR
Coolant
Fesisance
kO)
-206C
| -4aF)
14.6
17.A
o.c ( 32.D
6.5
2o.c
(
68.R
2.21- 2.69
40oc
(10!oR
1 . 0 1 . 3
60oc
(140oR
050,
0.65
80oc
{176oR
0.29- 0.354
F-121

8/20/2019 Mazda 121, Kia Pride Repair Manual Vol 1
http://slidepdf.com/reader/full/mazda-121-kia-pride-repair-manual-vol-1 278/389
E
a
CONTROL
NIT
THROTTLE ENSOR
Inspection
1. Warm
up
the engine o
normal perating
emperature.
2.
Verify hat he hermowax
nit od extends
utwardullyand
the cam separates
rom he
roller.
3. Stop he engine nd urn
he ignition
wilch o ON.
4. ConnecttheSSTSEngineSignalMonitorandAdaptet
Harness) o
the ECUas shown.
5. Set he SST
(Engine
Signal
Monitor)
o terminal M.
6. Rotate
he hrottle
inkby
handand
veriiy hat he voltage
is within pecif
cations.
Speclflcallon
ECUTerminal
Throtlle
valv€ conditon
2M
0.30
0.80v
7. ll not as
specified,
diusthe hrottle
ensor.
Adiustment
1. Connect
he SST o
the diagnosis
onnector.
2. Setswitch
@to
position
.
3. Set
TESI SW o SELF-TEST.
Note
.
lf the SST s not used, ump
across
he TEN ermi-
nat
and
the
GND erminalsol the diagnosiacon-
neglor.
4. Loosen
he hrottle
ensor crews.
5. Rotatehe
hrottle ensor
radually
nd until hat
he volt'
age
s withjn pecification.
6.
Afleradiustmenl,
ightenhe hrottle
ensor crews
7. Remove
he SST.
Removal Inslallation
'1.
Turn
he gnition witch
OFF.
2. Disconnect
he hrottle
ensor onnector.
3. Remove
he hrottle
ensor.
Cautlon
.
Do not drop
the thloule
aensor.
4.
Adjust he hrottle
ensor fter
nstallation
(Refer
o
page
F-122.)
THFOTTLE
SENSOB
fNJECTfON
BODY
Ztt
n
l.trtg,
tFbl
F-122

8/20/2019 Mazda 121, Kia Pride Repair Manual Vol 1
http://slidepdf.com/reader/full/mazda-121-kia-pride-repair-manual-vol-1 279/389
CONTROLSYSTEM
OXYGEN ENSON
ONNECTOF
OXYGEN ENSOR
Inapectlon ol Termlnal Voltage
1.Warm p heengineo normal peratingemperaturend
run t at idle.
2. Disconnecthe
oxygen
ensor onnector.
3. Connecta
voltmeter
between
he
oxygen sensorand a
oround.
4. Measurehevoltage hile
ncreasingnd
decreasinghe
engine peed uddenly everalimes.
Specitication
".+try'",,'
-\1
@
o
o
5. Replacehe oxygen ensorf notas specified.
Inspectlonot Sensitivity
1.Warmup he engineo normal peratingemperature.
2. ConnectheSSTS
System
Selector and Self-Diagnosls
Checker) o the diagnosisonnector s shown.
3. Set switch
@
to
position
.
4. SetTEST W o Oz MONITOR.
lnspectionot Heatel
1. Measureesistanceetweenerminals
@
and
@.
Realstance: 0
(20"C
l68oFl)
2. Reolacehe heaterf not as soecified.
MONITOF
5AF-m6|$S6 o€OGR
;O-.
ooo
tl_l
/
1r\
o
r:]
I
5. Increasehe engine peedo between2,000and 3,000
rpm, andverily
hat
hemonitor
amp lashesor
0 sec..
lf not as specified,eplacehe oxygen
ensor.
(Refer
o
page
F-124.)
Monltor amp:Flasheamore
han
S
imes/l0
seconds
6. Replacehe
oxygen ensor
t not as specified.
Engine
ondilron Voltage
M
Below .4
Above0.5
F-123

8/20/2019 Mazda 121, Kia Pride Repair Manual Vol 1
http://slidepdf.com/reader/full/mazda-121-kia-pride-repair-manual-vol-1 280/389

8/20/2019 Mazda 121, Kia Pride Repair Manual Vol 1
http://slidepdf.com/reader/full/mazda-121-kia-pride-repair-manual-vol-1 281/389
CONTROLSYSTEM
F
NEUTRAL
WITCH
MTX)
Inspection
1. Disconnecthe
neutral witch onnector hown n
the iqure.
2.
Connect n ohmmetero the switch.
3.
Check ontinuity l the switch.
Replacemenl
1.Disconnect
he neutral
witch onnector.
2.
Remove
he bracket.
3. Remove
he neutral witch.
4. Install
n the reverse
rderof rcmoval.
Tightening orque:
20-29 N.m
2.0-3.0
m-kg, 14-22 ft-lb)
POWER
TEERING RESSUREWITCH
In€pectlon
1.
Disconnecthe P/S
pressure
witch onneclor.
2. Connect n ohmmeter
o the switch.
3. Stariheengine
nd
et
t dle.Check ontinuityf heswitch
while urning
he steering heel.
Contnuilv
Other anqss
4. lf not
as soecified.eolacehe neutral wrtch.
P/S
Continuily
Turnrng
Nol urning
4. lf not
as specjfied,
eplace
he P/S
pressure
witch.
F-125

8/20/2019 Mazda 121, Kia Pride Repair Manual Vol 1
http://slidepdf.com/reader/full/mazda-121-kia-pride-repair-manual-vol-1 282/389
ENGINE LECTRICAL
tNDEX. . . . . . . . . . . . . . . . . . . . . . . . . . . . . . . . . . . . . . . . . . . . . . . . . . . . . .- 2
ouTLrNE.. . . . . . . . . . . . . . . . . . . . . . . . . . . . . . . . . . . . . . . . . . . . . . . . .
- 3
SPECrF|CAT|ONS.....,...........................-..- 3
TROUBLESHOOTTNG
U|DE......................
- 4
DTAGNOSTTCNDEX.........................,......- 4
SYMPTOIVROUBLESHOOTING......,...,....- 4
GHARG|NGYSTEM.................................
-
6
PREPARAT|ON.......................................- 6
ctRculTD|AGRAM.................................- 6
TROU81ESHOOT|NG..............................- 7
8ATTERY...............................................- 8
A1TERNATOR........................................-r0
DRTVEE1T...........................................- l4
rGNrTtoN
YsTEM,...................................
-r6
PREP4RAT|ON. . . . . . . . . . . . . . . . . . . . . . . . . . . . . . . . . . . . . . .- r6
ctRcutTDIAGRAM.................................-16
T8OU81ESHOOTING. . . . . . . . . . . . . . . . . . . . . . . . . . . . . .-17
lGNrTtoNtMtNG. . . . . . . . . . . . . . . . . . . . . . . . . . . . . . . . . . .- l8
sPARK
1UGS.......................................
-l9
tGNtTloNo11.......................................-20
DtSTRtBUTOR......-....-.....-......-.....-........-20
tGNlTER. . . . . . . . . - . . . . . . . . . . . . . . . . . . . . . . . . , . . , . . . . . . . . . .-23
HrGH-TENSTONEA0..............................-23
START|NG YSTEM.......................... ........-24
PREPARATION. . . . . . . . . . . . . . . . . . . . . . . . . . . . . . . . . . . . . . .-24
CIRCUI'l IAGRANiI................................-24
sTARTER...............................................-25
l

8/20/2019 Mazda 121, Kia Pride Repair Manual Vol 1
http://slidepdf.com/reader/full/mazda-121-kia-pride-repair-manual-vol-1 283/389
INDEX
INDEX
YTE LEVEL
7Y
\'t
1.Battery
Inspectron......
......
.
paSe
9
Recl'argrng
.............
age
G-
2.
Alternator
Removal
Installataon..........-.......
age
G-l 0
Disassembly
Assemb|y.............
age
G-1
1
Inspect ion. . . . . . . . . . . . . . . . . . . . . . . . . . . . . . . .
ageG12
3. Drivebelt
Inspect ion. . . . . . . . . . . . . . . . . . . . . . . . . . . . . .
.
page
G-1
Adjus tment . . . . . . . . . . . . . . . . . . . . . . . . . . . . . . . . .
age
G-14
8ep1acemenl . . . . . . . . . . . . . . . . . . . . . . . . . . . . . .
age
G-1
4. High-tensionead
inspect ion. . . . . . . . . . . . . . . . . . . . . . . . . . . . . . . . . . .
age
G
23
5. Spark
plugs
Removal
Insta
ation..................
age
G-1
9
Inspect ion. . . . . . . . . . . . . . . . . . . . . . . . . . . - . . . . . . .
age
G-19
G-2
6.
gnition
oil
(in
he distributor)
-
Inspection..................-...
- . .
page
G
20
7.
Distributor
Spark
est . . . . . . . . . .
. . . . . . . . . . . . . . . . . . . . . . .
age
G-20
Eiectronrc
dvance
nspeclion
..
page
G-20
Removal/
nslarlation..........
age
G
21
Disassembry
Assemb'y........
aqe
G-22
Inspect ion. . . . . . . . . . . . . . . . . . . . . . . . . . . . - .
. .
age
G-23
8.
gniter
in
he distrlbutoo
Inspect ion. . . . . . . . . . . . . . . . . . .
. . . . . . . . . . . .
us"
9-?9
Replacernent . . . . . . . . . . . . . . . . . . . . . . . . . . . . . .
age
G
23
L Slarter
Flemoval/
nstallation..........
..pageG 25
Performance
nspection......
....
age
G-27
Disassembly
Assembly
. .....
page
G-28
inspecron.....
...
Page
G-29
8
9

8/20/2019 Mazda 121, Kia Pride Repair Manual Vol 1
http://slidepdf.com/reader/full/mazda-121-kia-pride-repair-manual-vol-1 284/389

8/20/2019 Mazda 121, Kia Pride Repair Manual Vol 1
http://slidepdf.com/reader/full/mazda-121-kia-pride-repair-manual-vol-1 285/389
TROUBLESHOOTING
UIDE
o.
-1
Troubl6hooting
lems
Page
will noi crank-starter
motor do€s
not operare
G - 4
2
a
will not crank
slartermolor sp
ns
c F 4
G - 5
Ale 1alorwah
1q laarp
rlu-inares whrc enSLre
unnrng
G - 5
5 Discharged
anery
G - 5
6 Mislire
TFOUBLESHOOTING
UIDE
DIAGNOSTIC
NDEX
SYMPTOM
ROUBLESHOOTING
1
wlll not crank-starter
motor do€s
not
oPerate
]TEP INSPECTION ACTION
1
Does ngine rank
with
ullycharged anerv?
Check
charging
syslem
17
Page
G-7
2
ls banery
vollage
pr€6ern
t
terminal8?
TERMINALB
Check
wiring
harness
3
js
battery
oltage
present
al lerminaj
S with
gn i
lion switch
n START
Posltion?
TERMINAL
S
.
Check
maSnetc
witch
-
Page
G-29
.
Check
leldcol
F
Page
G-30
.
Check
armalure
.?
Page
G-31
.
Check
nhibtor switch
ATX) F Section
K
.
Check
sntof
swtch
r7 Section
T
.
Check
wring
harness
will not
crank-statler
motor spins
JTEP
INSPECTION
ACTION
1
ls
drve
p
n on
pushed
oul
while crankrng
(clck
is heardwhen
pushed
oul)?
Remove
slarter
nd check
lywheel
ng
gear
teelh
and slarier
d
ve
pin|on teeth
Check
magnetic
wilch
e
Page
G-29
G-4

8/20/2019 Mazda 121, Kia Pride Repair Manual Vol 1
http://slidepdf.com/reader/full/mazda-121-kia-pride-repair-manual-vol-1 286/389
TROUBLESHOOTING
UIDE
3
Cranks
alowly
STEiP
INSPECTION
ACTION
l
Does engine
crank normallywilh
ully charged Check
m'girg syslem
s
Page
G-7
2 Are $aner cable
connectionsooseor
corroded?
CHECK
HECK
Bepairor repace connecton
Ch€ck
stadff lor binding
such
as
bruslrand
armature.)
4
Altemalor
waaningamp llumlnates
whileengine
unnlng
INSPECTION
ACTION
1
ls baneryvoltageconect al
idle?
Specificalion:
4.'l-14.7v
Ch€ckwring
haness benreen
arcrna-
lor L teminal and alternator
warnlng
Check chaelng
system
c?
Page
G-7
Discharged
bsttery
INSPECTION ACTION
1
Check
haelng
system;s t OK?
l?
page
G-7
Tum
gniuon wilchON and
measurc
darkcurrcnl
s shown
Dafkcunenr: elow 0mA
Repair r
replace
arts
as
necessary
G-5

8/20/2019 Mazda 121, Kia Pride Repair Manual Vol 1
http://slidepdf.com/reader/full/mazda-121-kia-pride-repair-manual-vol-1 287/389
CHARGING
YSTEM
49 9200020
Tension
auge,
CHARGING
YSTEM
PREPARATION
ssT
Thealternator
asa self-diagnostic
unction
o warnof the
ollowing
roblemsn the
charging
ystem-
lf a
problem
rises,
he alternator
arning
ampalluminates
1.Terminal circuit pen
2. No voltage
utput
3. Field oil circuit
open
4. Terminal
circuit pen
5. Voltage utput
oo
high
G-6
CINCUIT
DIAGRAM
I
I
I
CHAFTGE
AMP
T
BATIEFY

8/20/2019 Mazda 121, Kia Pride Repair Manual Vol 1
http://slidepdf.com/reader/full/mazda-121-kia-pride-repair-manual-vol-1 288/389
CHARGING YSTEM
TROUBLESHOOTING
INSPECTION
acno
1 Check battery
voltaget is il
cofiecP
Spocltlcatlon: Above 12.4V
Chec( batlery rt_
page
e-a
2 SrarlenEnei does allernarorwarn^g
lamp go
Go to ne,( slep
Go io Slep 4
3 ls voltage al alternalor term nals coffect?
SpeclllcElion:
l o n . O N M
14.1-14.7
L 14.1-14.7
S 14.1 14.7
Checkwiringharness etween erminal
.
Checkwiringharness
.
Replacealtefnator F
page
G-10
1.
Connecl
n
ammeler
70A
min)
between
terminai
and haness
2. Starl ngine
3.
Turn
all
electricaoads
ON anddepress
4. ls
output
urrenl65A
r
more
al
2,500-3,000 pm?
Caution
.
Do not
grolnd
terminal a
Chargingyslem orna
5 is drive belt e nsionOh?
N
iks,
b)
Drive belt
451-745
(46-80,
101-176)
392-588
(40-60,
88
132)
491 589
(50
60.
1 1 0 1 3 2 )
422 491
(43,50,
95 110)
Replacealternator
e
pag€
G-10
.
Adjustdrive belt €nsion
G-7

8/20/2019 Mazda 121, Kia Pride Repair Manual Vol 1
http://slidepdf.com/reader/full/mazda-121-kia-pride-repair-manual-vol-1 289/389
CHABGING
YSTEiI
BATTERY
Inapecllon
Electrolyte
evel
1.Chec{
the
electrol}4e
evel ies
between
he
upper
and
lower
ines.
2. f low' add
distilled
ater; o
not overfill.
Speclfic
gravily
ol electrolyte
Measure
he specific
ravitywltha
hydromeler'
Specilication:
1.27-1.29
(at
20"C
168'Fl)
Voliage
leat
Check battery
voltage
Ouick-charge
ol s
minutesno
ouick-charse
r
1-3
hours
I
l l
Below 12.0V
Above
12 0V
Ouick-charge
or
3-4
hours
"*o*Cu
-----*J',ou
I
Quick
charge
or 30
minutesancl
rccheck
vollage
rf=r
Below 2.4V
Above
12-4V
G-8

8/20/2019 Mazda 121, Kia Pride Repair Manual Vol 1
http://slidepdf.com/reader/full/mazda-121-kia-pride-repair-manual-vol-1 290/389
CHARGING YSTEM
40
(164)
0O
076)
TEMPEFATURE
CTFD
Te]mlnaland
cable
1 Checkhe ightness
f he erminalso ensure
ood
eli?ctri-
cal connections.
2. Check
or corroded r rayedbattery ables.
3. Check he
rubber
protector
n he
positive
eminal or
proP
er coverage.
4.Cleanhe erminalsf necessary,nd coat hemwithgrease.
Slow{harging
It is not necessaryo removeheventcaps.
Ouick-charging
Remove
he baneryrom he vehicle
nd removeheventcaps.
Warning
.
Beto.e
pertorming
malntenance
r rechatging he
banery, urn
ofl
all
a@essories
and stop the
€ngine.
. The negative ablemusl be removed irsl and in-
stalled
ast.
.
Sel the battery
n water
when
quick{harging
to
pre-
vent overhealing he
battery.
Recharging
Battery Slow harge
4
Ouick
charge
(A)
3itB19L€
Under
lvlax. 20
G-9

8/20/2019 Mazda 121, Kia Pride Repair Manual Vol 1
http://slidepdf.com/reader/full/mazda-121-kia-pride-repair-manual-vol-1 291/389
CHARGING
YSTEIIiI
ALTERNATOR
Removal
Installation
Cautlon
.
Be sqre
the battery
connections
are not
reversedbecause
his
will damage
he reclifier'
.
Do not
use high-v6hage estefs
such
as a megger
because
hey
will damage
he
rectitier'
. Rememberh;t battet vottage s alwayspresentat the alternator erminalB'
.
Do not
ground
erminal L
$rhile he engine
s
running.
.
D,onot;tart
the engine while
the connlctor
is disqonnected
rom terminals
L and S'
1. Remove
n the order
shown n the
igure, eferring
o Removal
Nole.
2. Installn the
reverse rderof
removal,
eferringo lnstallation
Note
7,r-11
|}n
{3o-r
r0 cGrs, 69-95
h.lh}
19-25
O,e-2,6
.-r9)
37-52
(3.5-5.3,27-33)
1. Negative
attery able
2. Connector
3. Mounting olt,adjlst nut
4. Drivebelt
Inspedron. . . . . . . . . . . . . . . . . . . . . . . - . . . . . . . . . . -
AdJustment . . . . - . . . . . . . . . . . . . . . . . . . . . . . . . . . .
Replacement . . . . . . . . . .
. . .. . . . . . . . . . . . . . .
G-l0
5.
N4ouniing olt
6.
Alternator
Disassembly
Assembly.... . . . . . . . . .
age
G-1
1
Inspec t i on . . . . - . . . . . . . . . . . . . . . . . . . . . . . . . . . . . -
ageG-12
page
G-'14
page
G-14
page
G-15

8/20/2019 Mazda 121, Kia Pride Repair Manual Vol 1
http://slidepdf.com/reader/full/mazda-121-kia-pride-repair-manual-vol-1 292/389
CHARGINGYSTEM
Removal lnstallationNote
Thealternators emoved nd nstalledrom
underthe
ehicle.
0rEoGx94
Disassembly
Assembly
1. Disassemble
n
the ordershown n the
igure.
2. Assemblen the reverse rderof disassembly.
orEoGX015
1. Nutset
L Stator
2. Pulleyet
Inspection..........-........................
age
G
12
3. Front over 9.
Regulator
4. Bearing
10.Rectifier
1nspect ion. . . . . . . . . . . . . . . . . . . . . . . . . . . . . . . . . . .
age
G-12
lnspect ion. . . . - - . . . . . . . . . . . . . . . . . . . . . . . . . . . .
age
G
13
5.Retainer 11.Brush older ssembly
6. Spacer
Inspection
7.Rotor
(Brush
nd
brush pring).........
age
G-13
Inspect ion. . . . - . . . . - . . . . . . . . . . . . . . . . . - . . . . . . .
age
G-12
12. ear racket
G-11
bN
#9_,5.$-?.3
(60-30,
53-70)
3.2-3.9
(33-39
2S-33)
3,2J.s
($--ne,
2e-3E
46J3 Nm (4,7-5,4
ckg, 3.r-4G fi-lbl
r.6-2.0 (i6-20. 14-13)

8/20/2019 Mazda 121, Kia Pride Repair Manual Vol 1
http://slidepdf.com/reader/full/mazda-121-kia-pride-repair-manual-vol-1 293/389
CHARGING
YSTEM
Inspectlon
Rolor
1. Usean ohmmeter
o measure
he
resistance
etweenhe
slip ings.
Specilicatlon:
.4-2.90
(at
20"C
[68cq)
2. l not within
pecilication,
eplace
he
rotor.
3.
(1)
Usean
ohmmeter
o check
continuity
etween
achslip
rinoand
he core.
(2)
Replacehe
rotor
f there
s
continuity
4. Ule
tinesandpaper
o
smooth
ny oughness
n he
slip
nng sunace.
Stator
1. Usean
ohmmeter
o check
ontinuity
etweenhe stator
coil eads.
2. Replace
he stator
f there
s no continuity.
3. Usean ohmmeter
o check
ontinuity
etweenhe
stator
coil eads nd
he core.
4. Replace
he stator
f there
s continuity.
Bearlng6
1. Check or abnormal
oise,ooseness,
nd sticking.
2.
Replacehe bearing(s)
l necessary.
01E0GX.020
G-l2

8/20/2019 Mazda 121, Kia Pride Repair Manual Vol 1
http://slidepdf.com/reader/full/mazda-121-kia-pride-repair-manual-vol-1 294/389
CHAFGINGSYSTEM
Rectiller
Cautlon
.
Don't uae megger ester to
p€vent
lhe
reclifier
trom
breaklng
down.
1. Useananalog hmmetertoheck ontinuityfhe diodes.
2. Replacehe
rectifier
f
necessary.
Bruah
lf a brush s wornalmosto
the imitor beyond, edaceall
the brushes.
Siandad:
25.0mm
0.984
n)
ilinimum: 6.0mm
0.236
n)
Brush apring
1. Usea spring
pressure auge
o
measurehe orceof he
brush pring.
2. Replacehe
spring f not within.
Standard lorce:
2.9-3.9 N
(300-400 g,
10.6-14.1 oz)
Minimum:
0.8-1.2
N
(80-120
g,
2.8-4.2 o2)
Note
.
Read he spring
pressure
wlth the brush ip
proiect-
Ing 2mm
(0.079
n).
Conlinurty
E
B
NO
E
NO
B
G-13

8/20/2019 Mazda 121, Kia Pride Repair Manual Vol 1
http://slidepdf.com/reader/full/mazda-121-kia-pride-repair-manual-vol-1 295/389
CHARGING
YSTEM
DRIVEBELT
Inspection
1.Check
hedrive
elts nd
pulleys
orwea., racks, nd
lay-
ing. Replace
s necessary.
2. Nleasure
rive
belt ension
witha tenslon
auge
Tension N{ks,b)
3. reasurethe
eflection
yapplying
moderale
ressure
98
N, lO kg, 22
lb) midway
etween
he
pulleys.
djust
f
necessary.
Detlection rnmrn)
Adiustment
1.
oosen
bolls
A)
and
@.
2. Move
he alternator
n or out
as necessary
y urning
d-
iustino
ur
O.
s. ignt6n ootd@ and@ and
recheck
he beltdeflection
Tidhtenino orquea
Boh
E;19-26
N.m
1.9-2.6 m-kg,
14-18
ft'lb)
Bolt
@:
38-51
Nm
(3.8-5.3 m-kg,
28-38 ft'lb)
Dfive belt
451
745
(46-80,
101-176)
392-588
(40-60,88
132)
A/C and P€
49t-589
(50-60
110
132)
422-491
(43,50,
95-110)
Dflve bell
5.5
7.0
{0.21
0.28)
6.0-7.5
(0.23-O.30)
AJC and
P/S
8-9
(0.31-0.35)
9-t 0
(0.35-0.39)
G-l4

8/20/2019 Mazda 121, Kia Pride Repair Manual Vol 1
http://slidepdf.com/reader/full/mazda-121-kia-pride-repair-manual-vol-1 296/389
CHARGING
YSTEM
Replacement
1.
Bemove
he uC and
P/Sdrivebelt.
t equipped
Note
.
Retel
to B Section,
2. Loosen lternatorotts@ and@.
3.
Removehe
afternatoreli.
4.
Installtheew
alternatorelt
andadjust
tto specifications
5.
Tighten ll bolts
o the specified
orques.
Tighlening
torques
Mounling
bolt:
38-51
Nm
(3.8-5.3
m-kg,28-38
fi-lb)
Adlusting
bolt:
l9-26
Nm
(1.9-2.6
m-kg, 14-18
ft-lb)
6. Install
he AJC nd
P/Sdrive
beh i equipped, nd
adjust
it to specificataon.
Note
.
Reter
o B Seclion,
G-15

8/20/2019 Mazda 121, Kia Pride Repair Manual Vol 1
http://slidepdf.com/reader/full/mazda-121-kia-pride-repair-manual-vol-1 297/389
IGNITIONSYSTEi/I
IGNITION
SYSTEM
PREPARATION
ssT
49 80199A0
System
S€l€clor
self-diagno€is
nd
igniton iming
49 HO189A1
Self-Diagnosis
Checker
sell-diagnosis
CIRCUIT
IAGRA''
GFOUND
TACHOMEIEFi
DTAGNOSTS
CONNECTOF
IGNITION
WTCH
G-16

8/20/2019 Mazda 121, Kia Pride Repair Manual Vol 1
http://slidepdf.com/reader/full/mazda-121-kia-pride-repair-manual-vol-1 298/389
IGNITION YSTEM
TNOUBLESHOOTING
6
fi6tire
JTEF
|lrsPEcTtoN
ACTION
ls
"00
'
displayed
on
Self-Diagnosis
hecker
with gniton swilchON?
.?
p.ge
F-67
llallunctioncode no. displayed
Checkor cause
Beler
o specified
checksequence)
E7
Page
F-67
"8a"
tlash€s
Check
ECU eminal
lF voltage
t7
psge
F-114
Vollag6: Approl
l2v
(lgnilioh
switch
ON)
4
li
OK,
replace ECU
(j
page
F-112
+
lf nol OK, check
wiring
harness
belweenECU and
SelfDiagnosis
2 Bemove park
plugi
s
here
a
slrong
blue park
whie engine
s
cranking?
lgn ion syslem
s
normal
Checkspark
pug r?
gage
G-2O
lf OK, Go o next step
lf notOK,clean r
.eplace park
plug
3 ls resistance t high-tension
eadsOK?
specification:
16 m
per
lm
(3.28
l)
c?
page
G-23
Repac€ high ension
eads
Afe here orroslon,amage r cracks n he
disrribulorap androtof
17
page
c-23
5
ls ignitron oil nomal,
(7
page
G-2O
6
Aredisrributoronnectornd
ECU
connector
Measure
oltage
ot
@
termlnal
(dislibutoropconnector);s l coffec?
Voltage:
Apprcr. l2v
Check
main use,
gnition witch,
wiflng
harness, nd ECU
I
ls ECUnormal?
l?
page
F-r12
Replace
ECU
G-l7
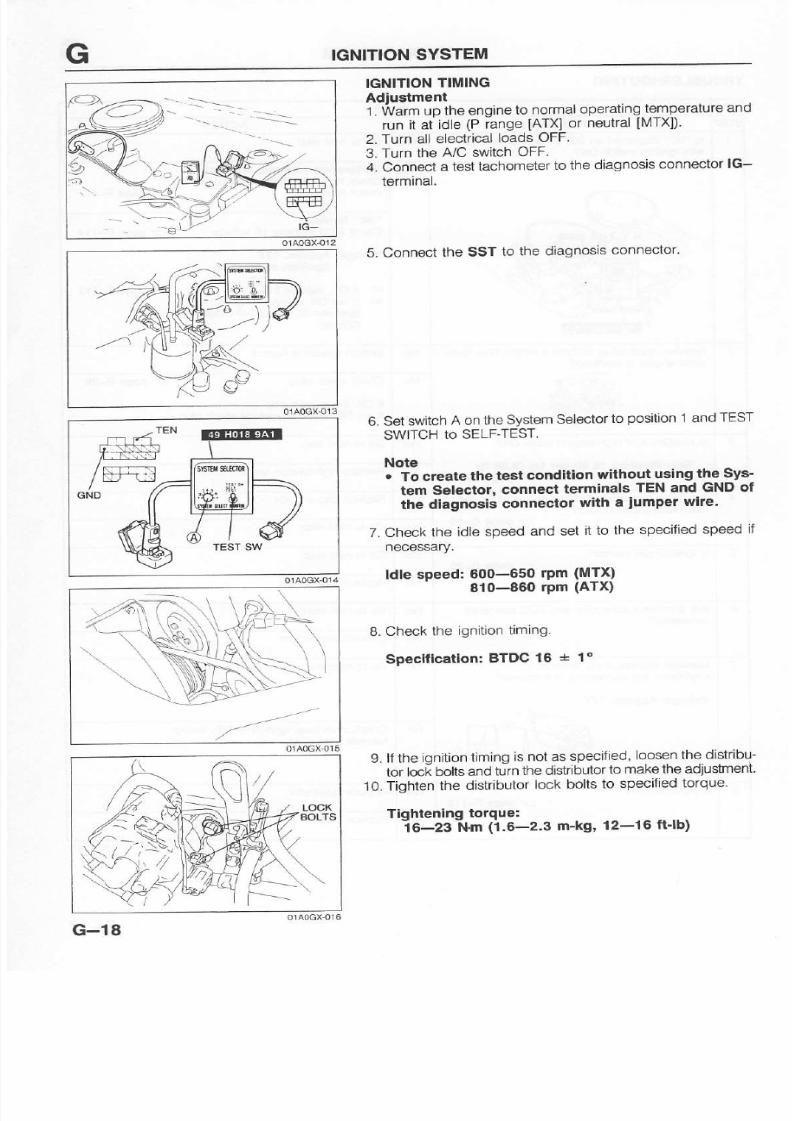
8/20/2019 Mazda 121, Kia Pride Repair Manual Vol 1
http://slidepdf.com/reader/full/mazda-121-kia-pride-repair-manual-vol-1 299/389
IGNITION
SYSTEM
---.--.-
_e\,t-
tc_
IGNITION
IMING
Adiustment
1.
Warm p
heerg'ne
o
normalperaling
enoeralure
nd
run
at
rdle
P
ranqe
ATX]
r
neLtrdl
L4TX])
2. Turnall
electrical
oads
OFF.
3.
Turn he
uC switch
OFF.
4. Connect test achometero hediagnosisonnectorG-
terminal.
5. Connect
he SST
to the diagnosis
onneclor.
6-
Setswitch
on he
System
elector
o
position
and
TEST
SWITCH
o SELF
EST.
Note
.
To create
he est
condition
without using
he
Sys'
tem
Selector,
connect
erminals
TENand
GNO
of
the diagnosisconnector
wiih a
iumper
wiae.
7. Check he
dlespeed
and set
t to the
specitied
peed
t
necessary.
ldle speed:
600-650
810-860
15."u-t'\
- , €=4
,N.
rpm
rPm
(MTX)
(Arx)
8.
Check he
gnii ion
iming.
Specification:
BTDC
16
+
1'
9.
ll
the
gnrtron
im ng
is nol as
specilied
oose'l he dislribL
tor |oc: bofts nd
urn
le dlsllibt
ol
Io makelhe
adiugment
1O- ighlen he
dlstributor
ock bolts
o
specilied orque.
Tiohteninq
torque:
ie-za
-H.m
{i.s-z.s
m-tg,
12-16ltlb)
G-l8

8/20/2019 Mazda 121, Kia Pride Repair Manual Vol 1
http://slidepdf.com/reader/full/mazda-121-kia-pride-repair-manual-vol-1 300/389
IGNITION
SYSTEM
)x
SPARKPLUGS
Removal Installation
1. Remove nd nstallhe
high-iensioneads arefully.
Caution
.
When he spark
plug
lead s to be
pulled
ofi,
pull
on the boot itself, not the wire.
2.
Remove nd
nstailhe spark
p
ug
with
a
plug
socket.
Caution
.
Be sure the socket
must be tit squarelyover
he
spark
plug.
3. Apply ntiseizeompoundrmolybdenum-basedubricant
to the spark
plug
hreads.
4. Tightenhe
spark
plug
o the specifiedorque.
Tightening
orque:
15-23 N.m
1.5-2.3
m-kg,11-17 ft lb)
Inspection
1.
Remove
he
spark
plug.
2. Connecthe spark
plug
10
a high-tension
ead.
3. Hold he highiensionead
wth insulated
liers
-1omm
(0,20-0,39
in) froma
ground.
4. Crankheengine ndverifyhat heresa strong lue park.
Note
.
It there
s no spark, eplace he spark
plug
or high"
tension
ead
as necessary.
5. Checkthe
ollowing.f
a
problem
sfound,
eplacehespark
plug.
.
Damaged
nsulation
.
Wornelectrodes
.
Carbon eposits
ll cleanings necessary,se
a
plug
cleaner r a
wtre
brush.Clean he upper
nsulator lso
.
Damaged
asket
.
Burned ondition
Plug
gap:
1,0-1,lmm
(0.039-0.043
n)
CAFBON
BURNED
G-19

8/20/2019 Mazda 121, Kia Pride Repair Manual Vol 1
http://slidepdf.com/reader/full/mazda-121-kia-pride-repair-manual-vol-1 301/389
IGNITION
SYSTEIIi|
IGNITION
OIL
Inspection
Primary
coil
rvindlng
use an'ohmmeler
o
ineasurees
$anceol
he
pIimary
oll
winding.
f not
within peciflcation,
eplace
he gnition
oil.
Specification: .68---0.840al 20oC 68"F1)
Elecironic
Advance
nspectlon
Verify
hat the
ignition iming
advances
with engine
ac-
celeralon.
Secondary
oil
windlng
Usean ohinmeter
o
measure
esistance
f
he
primary oil
windlng.
f not
within pecification,
eplace
he gnition
oil.
Soeciflcalion:
9.6-14.4
ko
(at
20"C
[680Fl)
Reolacement
1. Replacehe
distributor.
Refer
o
page
G-21.)
2. Adiust
he gnltion
iming
(Refero
page
G-18
)
01aoGXo40
DISTRIBUTOR
Spark
Test
1 Disconnect
he
hiqh-tension
ead
roma sparK
lug.
2. Hold
he ead
5-iomm
(0.20-0.39
in)
rom
a
ground.
3.
Cfank he
engine nd
verify
hat a
strong
bluespark
s
visible.
/
G-20

8/20/2019 Mazda 121, Kia Pride Repair Manual Vol 1
http://slidepdf.com/reader/full/mazda-121-kia-pride-repair-manual-vol-1 302/389
IGNITION
SYSTEM
Removal Installalion
1.Removen the ordershown n
the
igure.
2. nstalln the reverse rder
of
removal.
o140cx.019
'1.
Negative attery able 4.
Mounting olt
2. High-tensionead
5. Distributor
lnspection...-...............................
age
G-23 DisassemblyAssembly.............
age
G-22
3.Connector 1nspec1ion..................................-
age
G-23
G-21
{r.c-2.3
Gtg, 12-16 ft-tb)
2
a''
,:t,

8/20/2019 Mazda 121, Kia Pride Repair Manual Vol 1
http://slidepdf.com/reader/full/mazda-121-kia-pride-repair-manual-vol-1 303/389
IGNITION
SYSTEM
Disassembly
Assembly
'1.
Disassemble
n the ordershown
n
the
rigure
2. Assemble
n the
reverse rderof
disassembly,
eferring
o Assembly
Note.
ef
^ )
,
r,o-2,0
o0-20,
0.7-1n
1. Cap
4
Crank
angle
sensor
nd gniter
Inspec1ron...................................
age
G-23
lnspection
.....
page
G-23
2.
Rotor
5.
gnition oil
Inspection...................................ageG 23
-
InspecUon .. pageG-20
3. Cover
G-22

8/20/2019 Mazda 121, Kia Pride Repair Manual Vol 1
http://slidepdf.com/reader/full/mazda-121-kia-pride-repair-manual-vol-1 304/389
IGNITIONSYSTEM
Inspectlon
Capand
rotor
1.Check
orcorrosion,amage,ndcracks.
2. Replacel
necessary.
01E0GX.055
IGNITER
lmpqction
1.Check he
ECU.
Refer
o
page
F-| 12.)
2. Check hecondition f the connector,
istributorap, o-
tor, gnition oil,and high-tension
eads.
3. l allarenormal utmisfire tilloccurs,
eplacehe gniter.
01a0GX.021
Feplacemert
1.Replacehe distributor.
Refer
o
page
G-21.)
2.
Adjust he gnitioniming.
Refer
o
page
G-18.)
OlAOGX€2
HIGH-TENSIONEAO
Insp€ciion
1.Measureesislancef
high'tensionead.
Spscification:
16 m
per
I n
(3.28
f)
2. f notas specified,eplacehe high-tensioneadset.
G-23
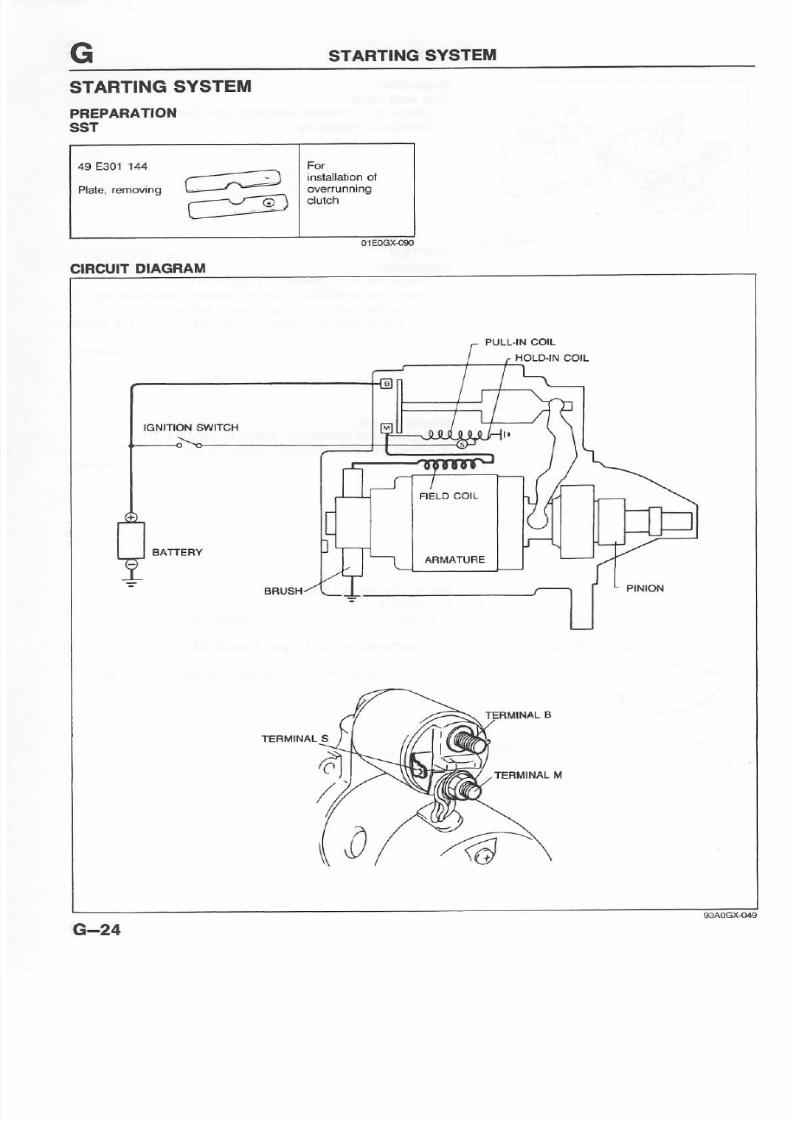
8/20/2019 Mazda 121, Kia Pride Repair Manual Vol 1
http://slidepdf.com/reader/full/mazda-121-kia-pride-repair-manual-vol-1 305/389
STARTING
SYSTEM
49 E3011'14
---)
.-\J--6-)
\--=---
installalton l
STARTING
SYSTEM
PREPAFATIOI{
ssr
CIRCUIT
DIAGRAI'
PULL]N COIL
FIELDCOI
G-24

8/20/2019 Mazda 121, Kia Pride Repair Manual Vol 1
http://slidepdf.com/reader/full/mazda-121-kia-pride-repair-manual-vol-1 306/389
STABTING
SYSTEM
STAFTEN
Inspection
on
vehicle)
1.
Measure
he battery oltage.
Specitication:
bove 12.4v
2. Crankthengine, ndverifyhat hestarterurns moothly.
3. lfthe
stader oesnot urn,
heckthe oltage fterminalS.
4.
lf
the
voltages above V,
emove nd
nspecthestaner.
ll the
voltages below V,check
hewiring
arness,gni-
tion
switch, nd nhibitor Mich
ATX).
01E0GX.O60
Rgmoval Installation
'1.
Removen the order
shown n the igure, eterringo
RemovalNote.
2. Installn the revers€ rder
of removal,eferringo Installation
Ngte.
ATX
a7-5r l+n
(3.&-5-3
m.kg, 2H3 n
|b)
(t.3-5.3
rkg, 2a-33
fi.rb)
1. Negative attery able
2. S terminal,
terminal 3.
\.4ounting
olt
connector
G-25

8/20/2019 Mazda 121, Kia Pride Repair Manual Vol 1
http://slidepdf.com/reader/full/mazda-121-kia-pride-repair-manual-vol-1 307/389
STARTING
SYSTEM
rl-25
l+n
O.9-2.3
rlq,
'a;^
37-51
n
(3,3-s.3
rl(g, 23-$
n.|b)
1. Negative
attery
able
2 Terminal
onnectors
and
B
3 lvounting
olt
G-26

8/20/2019 Mazda 121, Kia Pride Repair Manual Vol 1
http://slidepdf.com/reader/full/mazda-121-kia-pride-repair-manual-vol-1 308/389
STARTING
SYSTEM
Removal Insiallation Note
ATX
Thestarters removed nd nstalledrombelow he
vehicle.
MTX
Thestarter
s removed
nd
nstalledromabove.
01A0GX{25
Pe.tormance Inspection
i,lagnetic awltch
Disconn€ct
he erminal\,4 ire,and
perlorm
he ollowingests.
Pull-ln est
Theswitchsnormal
f
heoinion iects
utward hen hebat-
tery s connected s shown n the igure.
Caution
.
Do not apply
power
continuously
or mote han 10
aeconqs.
Hold-ln esl
Aftercompletinghe
pullin
test,disconnecthe wire rom er'
minalM
(with
he
pinion
eftejected).
heholdin oil s unc-
tioning
properly
f the
pinion
oes
not return.
Adiuahent of
pinion gap
1. Disconnecthe wiring rom erminal
M
2. Whenhebattery
s
c;nnected
etweenerminal and he
starter ody,he
pinion
illbeejected nd
hen
top.
Meas-
ure heclearance
pinion ap)
betlveen
he
pinion
nd
he
stoooer.
Note
.
Do not apply
power
continuously
or more han 10
aeconds.
Pinlon
gap:
0.5-2.omm
(0.020-0.078
n)
3. lf the
pinion ap
snotwithin pecficaton. ake djustmenl
by ncreasingr decreasing
he number fwashers etween
the magnetic
witch
nd he drive
housing.
ihe
gap
be'
comes maller
s the number i washers
s
increased.)
G-27

8/20/2019 Mazda 121, Kia Pride Repair Manual Vol 1
http://slidepdf.com/reader/full/mazda-121-kia-pride-repair-manual-vol-1 309/389
STARTING
SYSTEM
o-r2
(so-l30,
79-ii2)
Disassembly
Assembly
i.'-o-iJiJi.6r"
in the
ord;r shown
n the
figure' elerring
o Disessembly.
ote
i.
iiGii,r.ln
*"
,""erie oroer
of disasse-mblv,
eferring
o Assembly
Note
1.
Magnetic
witch
5- Front
over
l;spection...... Page
G 29
9 eYe'
. .
2. Rear over T DrivePinion
3. Brush
older
assembly
B Armature
Inspection...............................
.
page
G-30
Inspection""
"
"
page
G-31
4. Field oil
Inspection.................................
age
G-30
G-28

8/20/2019 Mazda 121, Kia Pride Repair Manual Vol 1
http://slidepdf.com/reader/full/mazda-121-kia-pride-repair-manual-vol-1 310/389
STARTING YSTEM
DisaasemblyNote
Drlvs
plnlon
Removehe stopper
or
the overrunninglutchwitha
pipe
as snown.
Assembly Note
Drive
pinlon
1. Set hedrive
pinion
nto hearmature nd
nstall
he ring.
2. Installhe stopper
with
he SST
and
press
t,
as shown.
Inspoctlon
agnetic awilch
1. Usean ohmmetero check ontinuity etween
he
S and
M erminals.eplacehemagnetic
witchf here s
nocon-
tinuity.
2.
Useanohmmeter
o check ontinuityetweenheS ermi-
naland he body.Replacehe magneticwitchf there s
no continuity.
3. Usean ohmmeter
o check ontinuity etweenhe M and
B termanals.
eplacehe magnetic witch
l
there
s
con-
tinuity.
G-29

8/20/2019 Mazda 121, Kia Pride Repair Manual Vol 1
http://slidepdf.com/reader/full/mazda-121-kia-pride-repair-manual-vol-1 311/389
STARTING
SYSTEM
Brush and
brush
holder
1. Usean ohmmeter
o check ontinuity
etween ach
nsu'
lated brush
and
the
9late.
Replacehe
brush
holderl there
s continuity.
2. Usea spring
balance
o measure
he
orceol
the brush
spring.
Standard:
18.9-23.1
N
(1.89-2.31
9,
4.18-5'12
b)
3. Replacehe springf notas specified
Brush
It
a brush
swornalmost
o he
wear imit
or b€yond'
eplace
all he brushes.
Standard:
17mm
0.67 n)
Minimum:
l.smm
(0.453
n)
Field
coll
1.
Use
an ohmmeter
o check
ontinuity
etween
he M
ter-
minalwireand
hebrushes.
eplacehe
yoke
assembly
f
there s
no contnuity.
2. Usean
ohmmeter
o check
ontinuity
etween
he M ter:
minalwire
and he
yoke.
Replacehe
yoke
assembly
f there
is continuity.
3. Check
l
the ieldcoil
s oose.
Replace
he
yoke
assembly
if it is.
BAUSHSPFING
WEAB LIMIT
STANDARD
01EOG) O73
G-30

8/20/2019 Mazda 121, Kia Pride Repair Manual Vol 1
http://slidepdf.com/reader/full/mazda-121-kia-pride-repair-manual-vol-1 312/389
STARTING
SYSTE
Armatur€
1. Usean ohmmeter
o check
continuity
etween
he com-
mutator
nd hecore.
Beplacethe
rmature
tthere
s
con-
tinurty.
2. Usean
ohmmeter
o check
ontinuity
etween
he com-
mutator nd
heshaft.
eDlacethe
rmature
ltherescon-
tinuity.
3. Place he
armaturen
V-blocks,
nd
measurehe runout
witha dial
ndicator.
lfthe unout
s notwithin pecification,
epair
t witha lathe
or replace
he armature.
Runout:0.05mm
0.002
n)
4.
Replacehearmature
t
theoutel
diamele'
f hecomrru'
tator s almos(
t or less han
he
rnlnlmum
5. t the
commutator
urface
s dirty,
wipe t witha
cloth; f it
is rough, epair
t witha
latheor
tinesandpaper'
Gdnd
lmlt:31.4mm
1.23
n)
6. ll thedepth
of
hemoldbetween
egments
salmost t or
less
han he minimum,
ndercut
he
grooves
o he stan-
darddepth.
Depth
:
0.5-0.8mm
(0.02-0.03 in)
Minimum:0.2mm
0.008
n)
G-31

8/20/2019 Mazda 121, Kia Pride Repair Manual Vol 1
http://slidepdf.com/reader/full/mazda-121-kia-pride-repair-manual-vol-1 313/389
CLUTCH
rNDEX.............................................,.,......
- 2
ouTL|NE..,,,....,.,...,........,.........................
- 3
spEctFtcATtoNs....................................
- 3
TROUBLESHOOTTNG
U|DE...........,....,.....
- 3
cLuTcH
PEDAL.....................................,.
- 4
ADJUSTMENT...............................,..,.,...- 4
REMOVAL
INSPECTIONINSTALLATION.,
-
5
CLUTCH ABLE,..............................,.......
- 6
REMOVALINSPECTIONINSTALLATION..
- 6
GLUTCH NtT.....,..........-........................
-
7
PREPARAT|ON..,....................................
- 7
REMOVALTNSTALLATTON.....................
- I
CLUTCH OVER,........-............................
-l
1
tNSPECTtON......,...................................
-11
cLuTcH
Dtsc ...................,.....................
-r1
tNSPECTrON.,.....................,.,.,,.............
-r1
RELEASE OLLAR.............. .............,....,.,.
-i2
tNSPECTtON..........................................
-12
PTLOT EAR|NG.......-..............................- '2
1NSPECTtON. . . . . . . . . . . . . . . . . . . - . . . . . . . . . . . . . . . . . . . . .
-12
FLYWHEEL........................-.....................
-l2
rNSPECTtON................,.........................
-12

8/20/2019 Mazda 121, Kia Pride Repair Manual Vol 1
http://slidepdf.com/reader/full/mazda-121-kia-pride-repair-manual-vol-1 314/389
INDEX
INDEX
TFANSAXLE
ERVICE,
SECTION
CLUTCH
WITCH
EFVICE.
SECTION
'|.
Clutch
edal
Inspection
Adjustment
....
. .pageH-
4
Bemoval
Inspection
Ins ta | |a t ion
. . . . . . . . . . . . . . . . . . . . . . . . . . . . . . .
age
H
5
2. Clutch
able
Removal/
nspection
Installat ion
...
.. ......
....
age
H-
6
3. Release ollar
Removal/
nstallation......
.....
page
H- 8
Inspect ion. . . . . . . . . . . . . . . . . . . . . . . . . . . . . . . . .
page
H-12
4. Release
ork
Removal/
nstallation...
.-.-
. ..
page
H- 8
H-2
5. Clutch
over
Removal/
nstallatron... . .
.
pageH- 8
Inspect ion. . . . . . . . . . . . . . . . . . . . . . . . .
ageH-11
6.
Clutch
isc
Removal/
nstallat ion
. ..........
age
H- I
Inspection.......................
. ..---..
age
H-11
7. Pilotbearing
Removal nstallalion
. .
page
H- 8
lnspectron..
Page
H-12
8.
Flwheel
Removal/
nstallalion
..
page
H- I
Inspection..................
.
.
page
H-12

8/20/2019 Mazda 121, Kia Pride Repair Manual Vol 1
http://slidepdf.com/reader/full/mazda-121-kia-pride-repair-manual-vol-1 315/389
OUTLINE. ROUBLESHOOTING
UIDE
H
OUTLINE
SPECIFICATIONS
Enghe/Transarle
Itodel
B3
B5Mfi
Diaphragmprng
S€t
load N
(kg,
lb)
2 943
(300,
60)
Clutchdisc
Ouler
dameler mm
n)
180
O
lnnerdiameter rnm
jn) 12514.92)
Pressure
late
mm
(ln)
3.2
0.126)
Rywheelside mm
(in) 3.0
0.118)
Clutch
pedal
Type
5.83
Full
svoke mm
(in) 138
s.433)
Helsht
Wlh
carpet)
196,207
\7.72-8.15)
TBOUBLESHOOTING
UTDE
Problem
Poaslble Cause
Page
Slipping Culchdisc acingwornexcessiveiy
Cbbn disc acing urface ardened r oiled
Pr€ssure
late
damaged
Diaphfaqmprangamaged r weakened
Insuflcientlurch edalplay
cturch
edat
licking
H - 8 , 1 t
H 8
H - 8
H - 8
H - 4
H - 5
H - 8
Faulty db€n-
gagoment
Excessiveunoul
or damaged lulch
disc
Cldchdiscsplnes usled i worn
Diaphragmpringweakened
Excessive lutch
pedalplay
Rernove
ust or repace
H- 8,
11
H - 8
H 8
H - 8
H - 4
Clulch vibraies Clutchdisc oiled
Torsion ubbersweakened
Clutchdisc
tacing hardened
r
damagod
Clutch disc lacing ivels oose
Diaph€gm springweakened
Pressure
lale
damagedor excessive unout
Flwheel surfacehardenedor damaged
loose or
worn engrnemoum
Tighlenor replace
H - 8
H - 8
H 8
H - 8
H - 8
H - 8
H , 8
Feler
o Secuons
,
J
Clutch
pedal
3licking
Pedal
shan
nor
prop€rly
ubricated
CLutchelease oilff damaged
Poor ubricalon f r€leaseollar leeve
Torson ubbercwsakened
Excessive rankshalt nd
play
Pilor
bearing
worn or
damaged
Worn
pivot points
oi
re
ease
ork
H- 8,
11
H - 8
H - 8
neier
to Section
B
H-
A, 12
H 8
H-3

8/20/2019 Mazda 121, Kia Pride Repair Manual Vol 1
http://slidepdf.com/reader/full/mazda-121-kia-pride-repair-manual-vol-1 316/389

8/20/2019 Mazda 121, Kia Pride Repair Manual Vol 1
http://slidepdf.com/reader/full/mazda-121-kia-pride-repair-manual-vol-1 317/389
CLUTCHPEDAL
REIIOVAL INSPECTIONINSTALLATION
1. Removen the ordershown n the
igure.
2.
Inspect
all
pads
and
repair
or replaceas necessary.
Note
.
Apply lilhium
bas€d
greaas
to the bushlng and
pins
b€tore
installation.
3. lnsiall n the revers€order of removal.
4. After nstallation, erify he clutch
pedal
ree
play. (Refer
o
page
H-4.)
\q
' €
1.Adjusting ut
2. Clutch able
3. Pedal
pad
4. Nut
5.
Lockwasher
6. Bolt
7. Bushing
L Spring
10.Clutch
edal
H-5

8/20/2019 Mazda 121, Kia Pride Repair Manual Vol 1
http://slidepdf.com/reader/full/mazda-121-kia-pride-repair-manual-vol-1 318/389
CLUTCH
CABLE
CLUTCH
CABLE
REIIOVAL
/
INSPECTION
INSTALLATION
1.Remove
n the
ordershown
n the
igur€.
2.
lnspect
all
parts
and repair or
replace
as necessary.
Note
;
Apply firhlum
based
gtease
lo lhe
pln
and lhe
release
leve]
bslore
installation'
3. nstall
n the
reverse rder
ol removal
4. Alter
installation,
erity he
clutch
pedal
ree
play.(Refer
o
page H-4.)
\-,-
\\
1.
Adiusting ut
2.
Pin
3. Clip
H-6
4. Clutch
able
Inspect
or damage
Adjustment................................
age
H-4

8/20/2019 Mazda 121, Kia Pride Repair Manual Vol 1
http://slidepdf.com/reader/full/mazda-121-kia-pride-repair-manual-vol-1 319/389
CLUTCHUNIT
H
CLUTCH
UNIT
PREPAFATION
ssT
49 E301 €0
Brake,ing
gear
engine olation
49 E301 61
Body
49 E301 60)
49 E301062
Collal
(Parl
ol
49
E301 60)
engine otation
49
SE01310A
Cente ng lool,
49 1285071
Pu er,Jle€dle
-G:
b€aring
49 1285073
Chuck
ead
ol
49 1285 71)
beanng
H-7

8/20/2019 Mazda 121, Kia Pride Repair Manual Vol 1
http://slidepdf.com/reader/full/mazda-121-kia-pride-repair-manual-vol-1 320/389
CLUTCH
UNIT
REI'OVAL
INSTALLATION
Note
.
Dq
not rcmove
the
pilor
bealing
It not necesaary,
1.
Removen the
ordershown
n
the igure, eferring
o Removal
Note
2. Installn the reverse rderof removal,eferringo InstallationNote.
t5-r03
p.a-r0.5,
7r-761
ra-2a
o
V
1.Transaxle
service
"
" section
J
2.
Return pring
3.
Releaseollar
Inspection...................................
age
H-12
4.
Reamer olt
5. Release
ever
6. Releaseork
7. Clutch
over
Removal
ote....
.. ...
. .
page
H- 9
Inspection...................................
age
H-11
Installat ion
ote..........................
age
H-11
H-8
8. Clutch
disc
Removal
ote....................
....
age
H- 9
lnspection...................................
aSe
-1-1
Insiallat ion
ote..........................
age
H-1
0
9.
Pilotbearing
Removal
ote....-.............
. ...
page
H- 9
Inspection......................
.. . ..
page
H-1?
Installat ionote..........................
age
H-10
10.Flywheel
Removal
ote..
............
paqe
H- 9
Inspection...................................
age
H-12
Installai ion
ote..........................
age
H-10
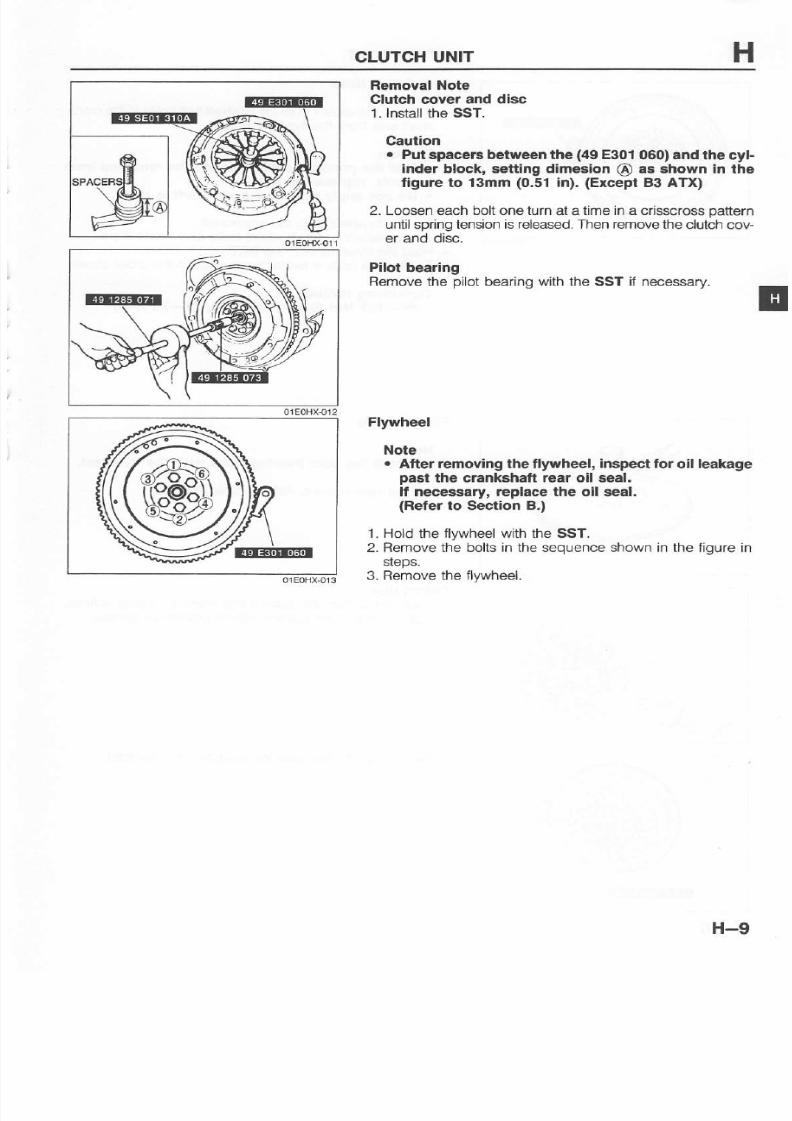
8/20/2019 Mazda 121, Kia Pride Repair Manual Vol 1
http://slidepdf.com/reader/full/mazda-121-kia-pride-repair-manual-vol-1 321/389
CLUTCH
UNIT
Rgmoval Note
Outch cover and disc
1. nstallhe ssT.
Caution
.
Put 8pacs6 between he
(49
E30l
060)andlhecyl-
inder block, setling dimeaion@ as shown in the
figure o l3mm
(0.51
n).
(Except
83 ATX)
2. Loosen
ach
boltone urn
at a time
n a
crisscross attern
until
spring
ensions released. hen emovehe
clutchcov-
er and disc.
Pilot
bearing
Removehe
pilot
bearingwith he SST
f
necessary.
Flywheel
Note
.
After removlng he lly'rvheel, nspeci or
oil
leakage
pasl
the crankshatt
rear
oil seal,
lf ngcess€ry,
eplace he
oil seal.
(Rete. o SeclionB.)
1. Hold he
lywheel
ith he SST.
2. Removehe bolts n thesequence hown n the igure n
steos.
3. Removehe
lywheel.
H-9

8/20/2019 Mazda 121, Kia Pride Repair Manual Vol 1
http://slidepdf.com/reader/full/mazda-121-kia-pride-repair-manual-vol-1 322/389
CLUTCH
UNIT
lnstallation
Note
Flvwheel
1 hemove he sealant
rom he
lwheel boh
holesn thecrank'
shattand
rom he
lYwheelolts
Caution
. ll all the previoussealantcannot be removedflom
a
bolt,
replace the
bolt.
.
Do not apply
sealant
lf a
new bolt
is
used.
2. Set
he lywheel
nto he
crankshatt
3. Apply sealant
o the tlywheel
bolts
and
install hem
4. Hold he
lvwheel
ith heSST.
5 Tiohtenhe boltsn
woor hree
teps
n heorder
hown
ti"otrt.nino o*r",
gHos'l*tn
ig.a-to.s
m'kg'
7l-?6
ftJb)
Pllot bearing
Note
.
Insiall
he
pilol
beafng
flush with
the tlywheel.
Instail
he new
bearing
witha
plastic
ammer.
3. Set he clotch
disc
onto he
lywheel
iih he SST.
Clutch disc
'1.
Clean
he clutch
iscsplines
nd
maindrive
gear
splines
2-
Lightly
rease
he splines
ith
molybdenum
rease.
@E@
01EoHX{]7
H-l0

8/20/2019 Mazda 121, Kia Pride Repair Manual Vol 1
http://slidepdf.com/reader/full/mazda-121-kia-pride-repair-manual-vol-1 323/389
CLUTCHUNIT.CLUTCHCOVER,
CLUTCH
DISC
Clutch cgver
'l.
Installhe SST.
2.
Align he dowel
holeswith he lywheel owels.
3.
Tightenhebolts venly nd
gradually
n he
pattern
hown.
Tlghtening
orque:
18-26 Nm (1.8-2.7 m-kg, 3-20 ft-lb)
CLUTCH
COVER
INSPECTION
Note
.
trlinorscoringor burning
should be removedwlth
emerypaper.
'1.
Inspecthe contact
urface f he clutchdisc
or scoring,
cracks, nd burning.
Repair r replace s
necessary.
2.
lnspecthecontact urface
f the clutch elease earing
for wearandcracks.
Replacehe clutch over
f crackedor worn.
CLUTCH
DISC
INSPECTION
Note.
Use
sandpaper
l
the
trouble 15mlnor,
1. nspectthe
ining uriaceorburning
ndoilcontamination.
Replace
he
clutch
isc f t s badly
burned r oilsoaked.
2. Inspector
loose acing ivets nd rubbers.
Replacehe clutch
disc f either
s
loose.
3.
Measurehe hicknessf
he ining t a rivet eadon both
sides
withvernier alipers.
ReDlace
heclutch isc f ts hickness
s esshanminimum.
Minimum hickneaa: .3mm
0.012
n)
4. Measure
he clutchdisc
unoutwitha dial ndicator.
Replaceheclutchdisc f
runout s excessive.
Runout:0.7nm
(0.027
n)
max.
H-l1

8/20/2019 Mazda 121, Kia Pride Repair Manual Vol 1
http://slidepdf.com/reader/full/mazda-121-kia-pride-repair-manual-vol-1 324/389
RELEASE
COLLAR,
PILOT
BEARING'
FLYWHEEL
RELEASE
COLLAR
INSPECTION
Note
.
The
clutch
Eleaae
collar
s a
sealed
bearlngand
musl not be washed in solvent.
Turn he bearing
while
pplying
orce
n the
axialdirection
It
the
bearinq
sticksor
has excessive
esislance,
eplace
t.
PILOT
BEARING
INSPECTION
Turn he bearing
while pplying
orce
n the axial
direction
lf the bearing
ticks
r
hasexcessive
esistance,
eplace
t
FLYWHEEL
INSPECTION
Note
.
Minorscoring
or
burning
should
be
removedwith
emery paPer.
1. nspect
he contact
urface f
the clutch
disc
or scorang,
cracks, nd
burning.
lepair r
replace
s necessary.
2.
nspecthe
ring
gear
eeth
o. wear
anddamage
l neces'
sarv.
eDlace
he
lwheel.
3. '/easurehe
lvwheelunout
witha
dial
ndicator' eplace
the lywheel
f runout
s excessve-
Runout:
0,2mm
0.008
n) max,
t
H-12

8/20/2019 Mazda 121, Kia Pride Repair Manual Vol 1
http://slidepdf.com/reader/full/mazda-121-kia-pride-repair-manual-vol-1 325/389
J
MANUALTRANSAXLE
tNDEX..................................................,,..- 2
ouTLtNE........,..........,..,....,...,..................- 3
spEctFtcATroNS,...................,........,......
- 3
STRUcTUFAL
tEW,.........,....,..,..............- 4
powERF1OW,...........,..........,..,...,..........
- s
TROUBLESHOOTTNGUTDE......,..............-
6
TRANSAXLEtL,,,,.,.................,.....,.,.,.....- 7
tNSPECTtON......................-......,,,,.........-
7
REPLACEMENT........-.....-.,..................,-
7
TRANSAXLE....,............................,...........
- I
PREPARATtON................................,..,.,..- 9
REMOVA1.................-...---.............,....-r
r
DtSASSEMB1Y..................................,.....
-r4
tNSPECTtON.................--..................,...-27
ASSEM81Y..................,......,,..................-30
|NSTALLAT|ON ......,..,J-56
DtFFERENT|AL................,.,...,...................-59
PREPARAT|ON.,.,....,.........,....,..,.............-59
DISASSEMBLYINSPECIIONASSEI\,lBLY..-50
SHIFTMECHANlStrl...--...-.................,.....-64
ovERHAU1...........,....,.,........................,
-64

8/20/2019 Mazda 121, Kia Pride Repair Manual Vol 1
http://slidepdf.com/reader/full/mazda-121-kia-pride-repair-manual-vol-1 326/389
J
INOEX
INDEX
BACK.UP
UGHT SWTTCH
SEFIVICE,
ECTION
T
NEUTRAL AIITCH
SEBVICE,SECTION
F
GFADE
: API SEFVICEGI-4
VISCOSIIY:
ALL SEASON
D€xrend'[
or M2C3ilF
aBovE
r8.c
(ocD
saE
75W-80
cAPAclry:
2.5lllsls
2.6
us
qt,
2.2 mp
1.Transaxle
Remova1. . . . . . . . . . . . . . . . . . . . . . . . . . . . . . . . . . . . . .
age
- l 1
Disassemb1y. . . . . . . . . . . . . . . . . . . . . . . . . . . . . . . .
age
-14
inspec l ion. . . . . . . . . . . . . . . . . . . . . . . . . . . . . . . . . . . .
age
27
Assemb|y . . . . . . . . . . . . . . . . . . . . . . . . . . . . . . . . . . . .
age -30
Ins ta | Ia t ion. . . . . . . . . . . . . . . . . . . . . . . . . . . . . . . . . . .
age
-56
2. Differential
Disassembly
Insp€ction
Assembly
.
page
J-60
3. Shift
mechanism
Overhau| . . . . . . . . . . . . . . . . . . . . . . . . . . . . . . . . . . . .age -64
4. Transaxle
il
Inspection..--................................
age
-
7
Rep|acemel t . . . . . . . . . . . . . . . . . . . . . . . . . . . . . . .
age
-
7
J-2

8/20/2019 Mazda 121, Kia Pride Repair Manual Vol 1
http://slidepdf.com/reader/full/mazda-121-kia-pride-repair-manual-vol-1 327/389
OUTLINE
J
OUTLINE
SPECIFICATIONS
-
----__
____
Engine
Item
-------
B3
85M-B
Synchronlzation
echanism
Forward:Synchromesh
Bev€rse:S€leclivesliding
Gear
atio
3
454
2nd
1.944
3rd
1.392
1.030
5lh
0.810
3.583
4.058
Speedomeler
ear
atio
(Driv€nearnumber/Drlveearnumber)
o.9112123)
o l
Grade
Dexrono]I r
M2C3&F
Above
-18oC
(0"F)
SAE
75WAO
Capaclty
liters
USqt,
lmp
qt)
2.5
12.6,
.2:)
J-3

8/20/2019 Mazda 121, Kia Pride Repair Manual Vol 1
http://slidepdf.com/reader/full/mazda-121-kia-pride-repair-manual-vol-1 328/389
J
OUTLINE
STRUCTURAL
IEW
1 Primary
lst
gear
6-
Primary everse
ear
'11.
Secondary
th
gear
2.
Pdmary nd geat 7. Secondaryst gear 12.Secondaryeverse ear
3. Primary
rd
g;ar B.Secoloary
2nd
gear 13 FleveIse
dler
gear
a. Primary
tn
gear
9. Secondary
rd
gear 14 Ditferedial
5. Primary
th
gear
10.Secondary
th
gear
J-4

8/20/2019 Mazda 121, Kia Pride Repair Manual Vol 1
http://slidepdf.com/reader/full/mazda-121-kia-pride-repair-manual-vol-1 329/389
OUTLINE
J
POWEBFLOW
rsT
3RD
4TH
J-5
2ND
5TH

8/20/2019 Mazda 121, Kia Pride Repair Manual Vol 1
http://slidepdf.com/reader/full/mazda-121-kia-pride-repair-manual-vol-1 330/389
J
TROUBLESHOOTING
UIDE
TROUBLESHOOTING
UIDE
Page
shilt
lever
won't shlfi
smoothly
or is hatd
ro shlfi
sllcking shiit
ever ball
Stcking change
conllol
rod
oinl
Benl change conlrol
od
J-€4
J-64
J-64
Too much
play
n
shilt lever
Wornchange onlrcl
od bushing
Weakshift everball
sprlng
Worn shitt ever
ball seat
J 6 4
J 6 4
J-64
Difficull to shltl
No
Oreas€
transaxleonlrol
lnsuificieniil
Deteiorationof oil
quality
We or
play
ot shlft
ork or shlft rod
Worn ynchronizer
g
Wom
synchrcnizer
oneor
gear
Bao
conlacr l syrchro_i7Fr
ingandcone
ol
gea'
Excessive
ongiludinsl
ay
ol
gears
Womsynchronlzereysping
Excessiv€
rirnary
halt
gear
bearlng
preload
lmpropeiy djusled
hange
uLde
late
J 6 4
J 6 4
J 7
J,21,24
J
2 1 , 2 4
J
2 1 , 2 4
J
2 1 , 2 4
J
2 1 , 2 4
J-21.
24
J-38
Won't stay
h
gear
Benl change
conlrol rod
Wom
change
conlrol
od
bushing
W€ak shit
lever balL pring
Wofn clutch hub
sleeve
Worn slidingsudace
ol
gear
or shait
Worn steelsllding
groove
ol conlroL nd
Excessivehrusl
clearance
Loos€ engrne
mounl
Tishten
Tghten
J-64
J-64
J-64
J-64
J
2 1 , 2 4
J 1 4
J - 1 4
J-56
Deierloralioni oil
qualty
Wom
sliding
urlace i
gear
or shafl
Danragecl
ear
eeth
Fore
n
materlal
gears
Damaged itferentiaL
ear
or excessve
acklash
J - 7
J - 7
J
21,24
J 2 1 , 2 4
J - 2 1 . 2 4
J-21. 24
J-60
J-6

8/20/2019 Mazda 121, Kia Pride Repair Manual Vol 1
http://slidepdf.com/reader/full/mazda-121-kia-pride-repair-manual-vol-1 331/389
TRANSAXLEOIL J
TRANSAXLEOIL
INSPECTION
Note
.
Park he vehicleon level
ground.
1 Disconnecthe speedometerableand
remove
he speedo
meter
driven
ear.
2.
Verify
hat
he oil evel s betweenhe
F
and L.
3. Installhe speedometer
riven
ear.
Tightening orque:
7.8-12 Nm
(0.8-t.2
m-kg, 5.8-8.7
tt-lb)
4. Connecthe
speedometerable.
REPLACEMENT
'1.
Disconnecthespeedometerable
nd emove
hespeedo-
meter
driven
ear.
2.
Remove
he draan
lug
and washer.
Drain
he oil ntoa suita-
ble container.
3. nstall new
washer
nd
he drain
plug.
Tightenlng orque:
24-35
N.m
2.4-3.5
m-kg, 7-26 finb)
4.Add henecessarymount f hespecilied il hroughhe
speedometer
riven
ear
hole.
Specifiedoil
Grade:
API serviceGL-4
Viscosity:AlFseasonDexron@n r M2C33-F
Above
-t8"C
(0"D
SAE75W-80
Capacity:2.5
liters
(2.6
US
qr,
2.2 mp
qt)
5.Veritvhe oil
evel.
6. Install he speedometerriven
gear
and connect he
speedometerable.
Oil seal
Replacement
On-vehicle)
1.Jack up the vehicle nd support
t withsafety tands.
2. Drain he ransaxle il.
3. Removehe
ront
wheel.
4. Femovehe splash hield.
5. Separate
he rontstabilizerrom he
owerarm.
o
l-----.--
J-7

8/20/2019 Mazda 121, Kia Pride Repair Manual Vol 1
http://slidepdf.com/reader/full/mazda-121-kia-pride-repair-manual-vol-1 332/389
J
TRANSAXLE
OIL
Cautlon
.
Do noi damage
he dust
boots.
6.
Removehe
clinch
oltand
pull
he
ower rmdownward
to seDarate
he
knuckle
rom
he
owe.arm ball
oint.
7 Loosenhenutand
o6connect
he
ie-rod nd
wilh heSST
Caution
.
Ilo not
subiect
he tdPod
olnl
to
shock
when remov'
ing lhe driveshaft.
8. Disconnect
hedriveshaft
rom he ransaxle
y
prying
with
a bar nsened
etween
he
outer
ingand he ransaxle.
9. Suspendhe driveshaft itha rope
10.Removehe
oil seal
witha
screwdriver.
Note
.
Tap n until
he oil seal
nstaller
ontacts
he case.
.
Coat
he
gil
seal
ip wilh ttanaaxle
oil.
11
Tap he newoil
seal nto
he ransaxle
ase
with heSST
12.Replacehe
driveshaft
ndclip
witha
newone-
nserthe
driveshaft
ith
he split
ol the ciip
acing
upward
13.Pull ut
on hedriveshatt
o
veritvhat
t s
held irmlyn
place.
J-8

8/20/2019 Mazda 121, Kia Pride Repair Manual Vol 1
http://slidepdf.com/reader/full/mazda-121-kia-pride-repair-manual-vol-1 333/389
TRANSAXLE
J
TRANSAXLE
PBEPARATION
ssT
49 GO17 AO
Suppon,englne
49
G017
501
Bar
(Parl
of
49 GO17 A0)
49
G017
Suppod
49 G0175A0)
49 G017 03
Hook
{Pan
of
49
G017 AO)
49
0107
6804
Engine tand
49
DO172A2A
_g
sh,ms€ecro,se,
,fffiililp
../-t
adiuslmenl f
bearing
reload
49 G0190A0
49 F401384
Collar
(Pan
of
49 DOIT2A2A)
adjuslrnent
f
49 G019 01
Body
(Pan
ol
49 G019 A0)
49 F401385
Bar
49 Do17 MA)
49 G019 02
Siay
{Parr
ol
49 GOrg A0)
49 F4013818
Selector
C6o
(Pad
of
49 F401
814)
adjustrnent
t
bearng
preload
49 G019003
F:'"Tr
888
-
9 Gor90A0)
49G019 19
Bolt set
49 Do17 A2A)
49 DO17 01
49
8001 795
J-9

8/20/2019 Mazda 121, Kia Pride Repair Manual Vol 1
http://slidepdf.com/reader/full/mazda-121-kia-pride-repair-manual-vol-1 334/389
J
TRANSAXLE
49 FTot
361
49 BO27
0024
(Part
ot
49 DO172A2A)
beanng
preload
49 G030
795
49 0180
5108
beaing
prcload
measuing
49
DOIT 241
beanng
beaflng
49 G030797
Body
(Part
ol
49 G030
795)
49 F401
331
Body
(Part
ol
49 D017
A1)
b€aring
49 G030
796
Body
(Pad
of
49 G030
795)
49 DO17
01
/A\
Attachmenl
w|,
(Padof
49D017
A1)
gezl
49 0839 425C
beanng
bearng
49 0710
520
49 0A62 428
bearlng
pullef
(Pan
oi
49 0839
425C)
49 0636
145
49 0a39 426
(Part
ol
49 0839
425C)
beaflng
J-10

8/20/2019 Mazda 121, Kia Pride Repair Manual Vol 1
http://slidepdf.com/reader/full/mazda-121-kia-pride-repair-manual-vol-1 335/389
TRANSAXLE
J
REMOVAL
1.Disconnecthe negative
attery
able.
2.
Raise
he vehicle
n a
vehicle oist.
3.
Drain he
ransaxle il ntoa suitable ontainer.
4. Removen
the ordershown n the igure, eferringo RemovalNole.
{ !e
CLIP,
01A0JX{02
1.Wheel
nd
ire 10.Driveshafts
2.Splashhield
Bemovalote.............................
age
-12
3.
Battery,
attery arrier 11 Starter
4. Speedometerable 12.
Enginemounting ember
5.Clutch able
Bemoval ote..................... ........
age
-12
6. Back-upightswitch onnector 13.Exhaust
ape
racket
7. Neutral witch onnector
'14.
Stifiner
8.
Extension
ar
15.Transaxle
L Control
od Removalote.............................
age
-13
16.Engine ount
o.2
J-1 1

8/20/2019 Mazda 121, Kia Pride Repair Manual Vol 1
http://slidepdf.com/reader/full/mazda-121-kia-pride-repair-manual-vol-1 336/389
J
TRANSAXLE
- 1 .
Removd
Note
DrlvEhaft
1. Remove
he
ball
oint
clinch
bolt.
Caution
.
Wrap a
rag around
the
ball
ioint
dusi
boot
to
pro'
lect
h
trom damage.
2.
Pry he ower
arm
rom he
knuckle
witha
pry
bar.
Cautlon
.
Do not
shock
the tripod
ioint
when
removing
the
dtiveshaft.
3. Seoarate
he driveshaft
rom he ransaxle
y
prying
wilh
a bar nserted
etween
he outer
nng and he
ransaxle.
4. Suspendhe driveshaft itha rope.
Engine
mountinE
member
1 Suspend
he engine
with he
SST
2. Remove
he
bolts nd
nuts hown,
nd
emove
heenglne
mounting
ember.
J-12

8/20/2019 Mazda 121, Kia Pride Repair Manual Vol 1
http://slidepdf.com/reader/full/mazda-121-kia-pride-repair-manual-vol-1 337/389
TBANSAXLE
J
Tranaaxle
1. LoosenheSST
€ngine
uppon)
and ean he
engineo
ward he transaxle.
2. Support he transaxle
with a
jack.
3. Removehe ransaxle
ounting olts.
4. Removehe ransaxle.
J-l3

8/20/2019 Mazda 121, Kia Pride Repair Manual Vol 1
http://slidepdf.com/reader/full/mazda-121-kia-pride-repair-manual-vol-1 338/389
J
TRANSAXLE
DISASSEi'BLY
Precaution
i.
6t""n
tn"
ttuna""f.
xteriorhoroughly
ilha steam
leane.
r
cleaning
olvent
efore
isassembly'
i.
di;;;
il";,.d;"J
pirti
(except
"-ateb
earings)and
seating
udaces
ith leaning
olvent,
nddry
-
iitiilii,irr""llO
iii
Cteinouiatt
rotes nd
plsiageswitha compressed
ir,
and
checkhat here
re
no obskuctions.
3.Wear yeprotectionhenusing ompressedir o clean omponefis
Housing
Parls
ijGo"inOt"
in the order
shown
n ll"e
igure'
eferringo
Disassembly
Note'
BEPIACE
\-,.,@
a'. \
af
" - / W r
. / F -u t ]
\
xqrqk'
/(t
\
@
REPLACE
@
FEPLACE
g
o
BEPLACE
BEPLACE
J-l4

8/20/2019 Mazda 121, Kia Pride Repair Manual Vol 1
http://slidepdf.com/reader/full/mazda-121-kia-pride-repair-manual-vol-1 339/389
TRANSAXLE
J
1.
Transaxle
Disassemblyote.......................
age
-16
2. Return pring
3. Clutch ever
4. Clutch elease
ork
5.
Clutch
elease ollar
fnspection.............-......................age -27
6.
Engine ountNo.1
7.
Drain
plug
8.
Plug,
pring,
teelball
9. Back-up
ightswitch
10.Neutral witch
11.Speedometer
riven
ear
assembly
12.Transaxle
aseassembly
'13.
Retaining
ing
14.Crank
ever
shatt
15.Crank
ever
assembly
16.Base
plate
unit
17.Plug,spring, teelball
18.Roll
in
19.Roll
in
20.Shift
ork
(3rd/4th)
fnspection....................................
age
-27
21.Shift
od
(3rd/4th)
Disassemblyote.......................
age
-1
6
22.Shift
od end
(3rd/4th)
23.
Roll
pin
24.Shifl ork
(1sv2nd)
1nspection....................................
age
-27
25.Shift od
(1st/2nd)
Disassemblyote.......................
age
-16
26.Roll
pin
27.Roll
pin
28.Shift ork
sth/Rev)
1nspeciion....................................
age
-27
29.Shift od
(sth/Rev)
Disassemblyote.......................
age
-16
30. nlerlock in
31.Shift od end
(sth/Rev)
32.Ueversedler
gear
33.Feversedlershaft
34.Foll
pin
J5. l.tn
36.Lever etspring
37.Reverseever haft
38. O'ring
39.
Reversehitt ever
40.
nterlock
in
Disassemblyote.......................
age
-16
4'1 Interlockin
Disassembly
ote.......................
age
- 16
42. Primary haft
gear
assembly
43.
Secondary
haft
gear
assembly
44.Difi rential ssembly
45.
Clutch
ousing ssembly
46.Foll
pin
47.
Speedometer
ear
sleeve
48.
O-rin9
49.
Oil
seal
Disassemblyote ......................
age
-16
50.Driven
ear
51.Magnet
J-15

8/20/2019 Mazda 121, Kia Pride Repair Manual Vol 1
http://slidepdf.com/reader/full/mazda-121-kia-pride-repair-manual-vol-1 340/389
J
TRANSAXLE
Disaasembly
Note
Transaxle
Mount he
ransaxle
n
the
SST.
Shlft
rod
Wiap he
shift
oOwith
a rag
and
urn t
with
plierswhile
pull
ing
t out.
lnterlock
pln
Removehe
nterlock
in
with
a magnet.
Oll seal
iem-dve
tre speeaometer
riven
gear
oil
sealas
shown
n he
figure.
J-16

8/20/2019 Mazda 121, Kia Pride Repair Manual Vol 1
http://slidepdf.com/reader/full/mazda-121-kia-pride-repair-manual-vol-1 341/389
TRANSAXLE
J
Clulch
Housing
and TaansaxleCase
Components
Caution
.
Do not remove
an oil seal lf not necessary,
1.Disassemble
n the
ordershown n the igure, eferringo DisassemblyNote.
2. nspect ll partsand repairor replace s necessary.
REPLACE
BEPLACE
SELECNVE
AEPLACE
1.Batfle
late
2. Bleeder
3. Roll
pin
4.Change
rm
5.Change od
assembly
7.
Oilseal
change
od)
Disassembly
ote.......................
age
-18
8. Oilseal
primary
haft)
Disassemblyote.......................age
-18
9. Bearing
uter
ace
secondary
haft)
Disassemblyote....................age
-18
10.Funnel
Disassemblyote ......................age -1811.
Oilseal
ditferential)
Disassembly
ote.......................
age
-18
12.Bearing
uter
ace
differential)
Disassembly
ote.......................
age
-19
13.
Oilseal
'14.
Bushing
15.
Clutch ousing
16.
Oil
passage
17.Adjustment
him
18.Funnel
Disassemblyote.......................
age
-19
lO Ra./i^^ ^' d6r /r^6
Disassemblyote ......................
age
-20
20.Adjustmenthim
secondary
haft)
Disassemblyote.......................
age
-20
21.Bearing uter ace
ditferential)
Disassemblyote.......................
age
-19
22.Adjustmenthim
23.
Oil seal
differential)
Disassembly
ote.......................
age
-18
24.
Transaxle
ase
J*17

8/20/2019 Mazda 121, Kia Pride Repair Manual Vol 1
http://slidepdf.com/reader/full/mazda-121-kia-pride-repair-manual-vol-1 342/389
J
TRANSAXLE
Disassembly
Note
Oil
seal
(change
od)
Caution
.
Do
not damage
he cluich
housing'
Removehe oil sealwitha screwdriver.
Oil
seal
(dlfterential)
Caution
.
Do ngt damage
he clutch
housing.
Remove he oil seal
with
a screwdrver'
Oil seal
(p
mary shafl)
Cautlon
.
Do noi
damage
he clutch
housing.
Removehe oil seal
witha
screwdriver'
Funneland bearing
outer race
(secondary hatt)
Noie
.
Remove
he bearing
outer
racewith
a acrewdriver
it neces-sary.
I ) naerta screwdrive.
etween
he clutch
housing
and bearlngouter race.
2)Pry
the bearlng
outer race
flee.
Removehe bearing
uter
aceby
ifting ut
he unnel nd
race together.
\ r
l < ,
J-l8

8/20/2019 Mazda 121, Kia Pride Repair Manual Vol 1
http://slidepdf.com/reader/full/mazda-121-kia-pride-repair-manual-vol-1 343/389
TRANSAXLE
J
Funnel
Removehe unnel
with
pliers.
Bearlngouter race
(differential)
1.
nstallhe
SST
o the bearing uter ace.
2. Turnover he clutch
housing.
3. Removehe bearing
uter acewitha su,table
Bearingouler
raaeand adiustmentshim
(difierential)
1. nstallhe SST o
the bearing uter ace.
2.
Turn
ver he
clutch ousing.
3. Tap heSSTwith
a
pipe
hroughhe driveshatt
ole o re-
move he bearino uter
ace.
prpe.
.'-/l
l\).r-
.<
-t,'.-,t )-P
J-19

8/20/2019 Mazda 121, Kia Pride Repair Manual Vol 1
http://slidepdf.com/reader/full/mazda-121-kia-pride-repair-manual-vol-1 344/389
J
TRANSAXLE
Bearing
outel
race and
adluslment
shin
(seqondary
shalt)
i.
putt
out tre
beaiing
uter
aceas
shown
n the
igure.
2. Remove
he adiustment
him
J-20

8/20/2019 Mazda 121, Kia Pride Repair Manual Vol 1
http://slidepdf.com/reader/full/mazda-121-kia-pride-repair-manual-vol-1 345/389
TRANSAXLE
J
PrlmaryShaft Assembly
1. Measurehe hrust learancest all
gears
betore isassembly,
eferringo
Preinspection.
2. Disassemblen the ordershown n the igure, eterring
o Disassembly ote.
FEPLACE
E
FEPLACE
1.Retaininging
2. Bearing
sth)
Disassemblyote.......................age -22
Inspect ion. . . . . . . . . . . . . . . . . . . . . . . . . . . . . . . . . . . .
age
-28
3. Spacer
4. Steel
all
5. sth
gear
Disassemblyote ......................
age
-22
Inspect
ear
eeth
or
damage,
wear,
and
cracKs
6.
4th
gear
Disassemblyote ......................
age
-22
Inspection....................................
age
-28
7.
Synchronizer
ing
Inspect ion. . . . . . . . . . . . . . . . . . . . . . . . . . . . . . . . . . . .
age
-27
8. Retaininging
9. Clutch ub assembly
3rd/4th)
Disassemblyote ......................
age
-22
Inspection....................................
age
-29
10.Synchronizer
ing
Disassemblyote
......................
age
-22
Inspection....-...............................age 27
11.3rd
gear
Disassembly
ote ......................
age
-22
Inspection....................................
age
-28
12.Bearing
Disassembly
ote.......................
age
-22
Inspect ion. . . . . . . . . . . . . . . . . . . . . . . . . . . . . . . . . . .
age
28
13.Primary haft
Inspection....................................
age
28
14.Synchronizer
pring
'15.
Clutch
ub sleeve
3rd/4th)
1nspection....................................
age
-27
16.Synchronizer
ey
17.Clutch ub(3rd/4th)
J-21

8/20/2019 Mazda 121, Kia Pride Repair Manual Vol 1
http://slidepdf.com/reader/full/mazda-121-kia-pride-repair-manual-vol-1 346/389
J
TBANSAXLE
Preinspection
3rd
qear
thrusl
clearance
1 M;-asurehe clearance
etween
rd
qear
and
2nd
gear'
Clearance:
.06-0.41mm
(0.002-0.016 n)
llaximum
: 0.46mm
0.0'18n)
2. lf heclearance
xceeds
he maximum,
heck
he
contact
surfaces
fthe3rd
gear,2nd
ear,
ndclutch
ub
3rd/4th).
Replace
ornor
damaged
arts
4th
qear
hrust clearance
t. MEasure
he clearance
etween
th
gear
and
the ball
bearing.
Clearance:
.22-0.52mm
(0.009-0.020 r)
Maxlmum:
0,57mm
0.022
n)
2.
lf theclearance
xceeds
he
maximum,
heck
hecontact
surfaces
f the
4th
gear,
ball
bearing,
nd clutch
hub
(3rd/4th).
eplace
ornor
damaged
arts
Disassembly
Noie
Bealing
(sth)
1
Place he
primary
hafl
gear n
a
vrse
Noie
.
Use
protectfue
Plates
n the
iaws
ot
lhe vlse'
2.
Removehe
bearing
with
he SST.
4ih
gear
and
5th
geat
1 lnsrallhe 4th oear
wrth he
SST.
Cauilon
.
Hold he shaft
with
one hand
so that
t does
not all'
2. Flemovehe 4thgearand sth gearwith heSST
Clutch
hub
assembly
3rd/4lh),
ynchronizer
ing
(3td)
and 3rd
gear
Caution
.
Hold he shaft
with
one
handso
that t
doesnot all.
1.Bemovehe retaininging.
2. Remove
he clutch
hubassembly
3rd/4th)'ynchronizer
ring
3rd)
and 3rd
gear
with he
SST
J-22

8/20/2019 Mazda 121, Kia Pride Repair Manual Vol 1
http://slidepdf.com/reader/full/mazda-121-kia-pride-repair-manual-vol-1 347/389
TRANSAXLE J
Bea ng
Note
.
Use
protectlve plalea
In ihe
laws
ol the v|se.
Removehe bearing
with
he SST.
J-23

8/20/2019 Mazda 121, Kia Pride Repair Manual Vol 1
http://slidepdf.com/reader/full/mazda-121-kia-pride-repair-manual-vol-1 348/389
J
TRANSAXLE
Secondary
Shaft Assembly
1.
Measute
he thrust learance
f
2. Disassemble
n the order
shown
gear,
and sth
gear,
elerring
o Preinspectlon.
referringo Disassembly
ote.
1st
gear,
2nd
in the igure,
NEPLACE
N€PLACE
1. Bearing
nne. ace
5th)
Disassembly
ote
......................
age
-25
Inspect
or damage nd
rough otation
2.
Retaining
ing
3.
Washer
4.
Clutch
ub assembly
5th)
Disassembly
ote
...............
......
age
-26
Inspect ion. . . . . . . . . . . . . . . . . . . . . . . . . . . . . . . . . - . .age -29
5.Synchronizer
ing
fnspect ion. . . . . . . . . . . . . . . . . . . . . . . . . . . . . . . . . . . .
age
-27
6.
sth
gear
Inspect ion. . . . . . . . . . . . . . . . . . . . . . . . . . . . . . . . . . . .
age
29
7. Retaining
ing
8. Bearing
nner ace
1st)
Disassembly
ote ......................
age
-26
lnspector damage nd
rough otatpn
L Pinion
ear
Disassembly
ote.......................
age
-26
Inspect
ear
eeth
or
damage,
wear,and
cracks
10.
1st
gear
Disassembly
ote.......................
age
-26
Inspect ion. . . . . . . . . . . . . . . . . . . . . . . . . . . . . . . . . . . .
age
-29
11.Retaining
ing
J-24
12.Synchronizer
ing
Disassembly
ote.......................
age
-26
1nspection....................................
age
-27
13.Clutch
ub assembly
1sv2nd)
Disassembly
ote.......................
age
-26
Inspection.......-............................
age
29
14.Synchronizer
ing
Disassemb|y................................age -26
1nspection....................................
age
-27
15.2nd
gear
Inspection.....................-..............
age
-29
16.Synchronizer
pring
17.Clutch
ub sleeve
sth)
Inspection..................................
a]e
J 27
18.Synchronizer
ey
19.
Clutch
ub
(sth)
20.Synchronizer
pring
21.Clutch
ub sleeve
1st/2nd)
fnspection....::...............................
age
-27
22.Synchronizerey
23.Clutch
ub
(1sv2nd)
24.Secondary
haft
Inspect ion. . . . . . . . . . . . . . . . . . . . . . . . . . . . . . . . . . .
age
29

8/20/2019 Mazda 121, Kia Pride Repair Manual Vol 1
http://slidepdf.com/reader/full/mazda-121-kia-pride-repair-manual-vol-1 349/389
TRANSAXLE
J
Prelnspectlon
lsi
gear
hrust clearance
1. Measurehe clearance etween st
gear
and he
pinion
gear.
Clearance: .22-0.62mm
(0.008-0.024
n)
Itaximum:0.67mm 0.026 n)
2.
lf
theclearancexceedshemaximum,heckthe
ontact
surfaceslthe stgear,
pinion ear
ofthesecondary
haft
gear,
ndclutch ubassembly
1sv2nd).
eplace orn
or
damaged
arts.
2nd
gear
hrusi clearance
1. Measureheclearanceetween nd
gear
andsecondary
3rd
gear.
Clearance:
.06-0.2lmm
(0.002-0.008
n)
Maximum: .26mm 0.010 n)
2. lf
theclearancexceedshemaximum,heck hecontact
surtaces l the2nd
gear,
econdaryrd
gear,
and
clutch
hubassembly
1sy2nd).
eplace ornor damaged
arls.
slh
gear
lhru9t clearance
1. Measure
he
clearance
etween th
gear
and secondary
4th
gear.
Clearance: .06-0.2lmm
(0,002-0.008
n)
Maximum: .26mm
0.010
n)
2. lf theclearancexceedshemaximum,heck
hecontact
surfaces
f
the sth
gear,
econdary th
gear,
and clutch
hub
assembly
sth).
Replace
ornor damaged
arts.
Disassembly Note
Bearing nner race
(5th)
Caution
.
Hold he
shaft
with one hand
so that
t
doesnot all.
1.Set he SST o the sth
gear.
2. Removehe bearing uter acewitha suitable
ipe.
Pipe diameter:20mm
0.79
n)
J-25

8/20/2019 Mazda 121, Kia Pride Repair Manual Vol 1
http://slidepdf.com/reader/full/mazda-121-kia-pride-repair-manual-vol-1 350/389
J
TRANSAXLE
Clutch
hub
assembly
(sth)
Nole
.
Remove
he clulch
hub assembly
sth)
as
lollows
ll
necessary.
1- nstallhe SSTas shownn the igure.
2.
Remove
he clutch
ub
assembly
sth)
usinga
press
Bearlng
nner
race
(lsl),
pinion
gear'
l3l
gear
Caullon
.
Hold
the shaft
with
one hand
so
that lt does
not tall.
'1
. Set
he SST
o the
1st
gear'
2. Remove
he b€aring
nner ace
witha
suiiable
ipe
Plpe diameter:
20mm
0'79
n)
Clutch
hub assembly
lsu2nd), synchronizer
ing
Note
.
Remove
he
cluich
hub assembly
15u2nd) s
tol-
lows
if necessary.
1.lnstallheSST as
shown
n the igure
2. Remove
he
clutch
ubassembly1s 2nd)using press
J-26

8/20/2019 Mazda 121, Kia Pride Repair Manual Vol 1
http://slidepdf.com/reader/full/mazda-121-kia-pride-repair-manual-vol-1 351/389
TBANSAXLE
J
INSPECTION
Inspect
ll
parts
and
repair
r
replace
s
necessary.
Clutch release ollar
Inspect
heclutch
elease
ollar
or roughness
r
noisewhile
turning.
Synchronizer ing
Note
.
Set he synchronizering squarely
n he
gean
hen
measurearound he clrcumlerence,
1. \,leasurethelearanceetweenhesynchronizeringand
lianksurface f the
gear.
Standard learance: .5mm
0.059
n)
Minimum:
.8mm
0.015
n)
2. Inspectthe
ynchronizer
ing
eeth
ordamage, ear,
nd
cracks.
3. lnsoecthe aoersurfaceor wearor cracks.
Shift tork, clulch hub
sleeve
1. Measurehe
clearance etween
he shift ork andclutch
hub
sleeve
roove.
Standard
lealance
(1st/2nd):
0.100-0,358mm
0.004-0.014
n)
(3rd/4th)
0.150-0.458mm
0.006-0.018
n)(5th)
: 0.150-0.458mm
0.006-0.018
n)
Maximum
1st/2nd):
.408mm
0.0i6
in)
(3rd/4th):
0.508mm
0.020
n)
(sth)
:0.508mm
(0.020
n)
J-27

8/20/2019 Mazda 121, Kia Pride Repair Manual Vol 1
http://slidepdf.com/reader/full/mazda-121-kia-pride-repair-manual-vol-1 352/389
J
TRANSAXLE
3FD
GEAB
Pdmary Shatl
Note
.
ll
the
prlmary
shaft
is replaced,
adiust
the bearing
pretoad. Reler o
Page
J-39.)
1. nspecthe primary haft unout
Maximum
unout:
0.0lsmm
(0.0005
n)
2.
Inspecthe splines
or
damage
nd
wear.
3. Insbect
he
gear
eeth
or damage'
wear,and cracks
4.
Inspecthe oil
passage
or blockage.
3rd
gear,
4th
gear
'1.
l\,leasurehe clearance
etween
he shaft
nd
gears
B A
2.
Inspecthe
synchronizer
ones
or
weat.
3.
Inspecthe
gear
eeth
or damage,
wear'
andcracKs.
4.
Insbecthe
Contacturfaces
f the synchronizer
ingand
the 3rd/4th
ear
or wear
and cracks
Bearing
Insoecthe
bearing
or damage
r
rough
otation.
0rFoJx063
J-28
mm
.n)
Shaft
srde
(outer
diameleo
Ge side
(inner
iamelet
3rdgearsideA
32.945-32.970
(1 297-1 298)
33.000-33.025
(1.299-1.30O)
4th
geff
side
B
2A.545-28.570
0
.123-1
125)
l1
126-1
127
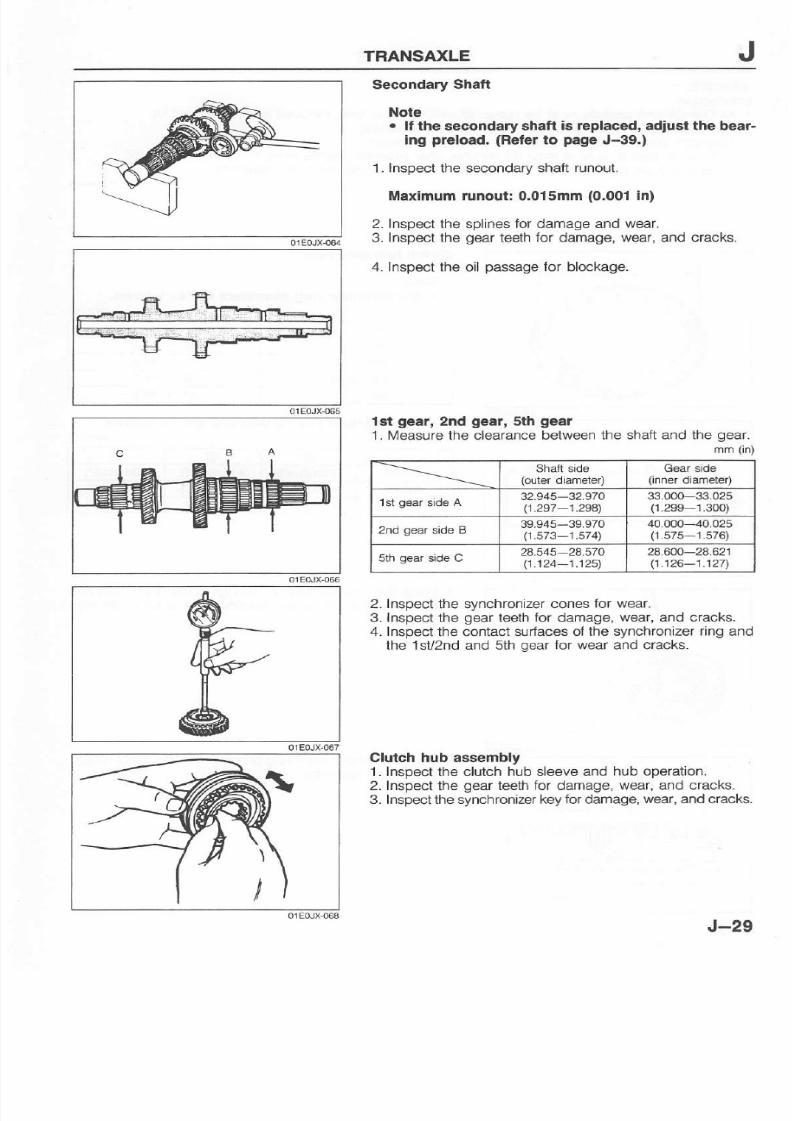
8/20/2019 Mazda 121, Kia Pride Repair Manual Vol 1
http://slidepdf.com/reader/full/mazda-121-kia-pride-repair-manual-vol-1 353/389
TRANSAXLE J
Seaondary
Shafl
Nole
.
ll the secondary shatt is replaced, adiust the bear-
ing
preload.
Reter
o
page
J-39.)
1. nspecthe secondaryhaft unout.
Maximum unout: 0.015mm
0.001
n)
2. Inspecthe splinesor damage nd wear.
3.
Inspect
he
gear
eeth
or damage, ear,and cracks.
4. Inspecthe oil
passage
or blockage.
1st
gear,
2nd
gear,
sth
geal
1. Measurehe clearance
etweenhe shaft nd he
qear.
2. Inspect
he synchronizer
ones or wear.
3-
Inspect
he
gear
eeth or damage, ear,and cracks.
4. Inspecthe contact urfaces
l the synchronizeringand
the l st/2nd nd sth oear or wearand cracks.
Clutch hub aaaembly
1. nspecthe clutchhubsleeve nd
hub operation.
2. Inspect
he
gear
eeth or damage,
ear,
and cracks.
3.
Inspecl
he
synchronizerey or damage,
wear,and
cracks.
mm
(in)
Shalt ide
(olter
diameled
Gear ide
(nner
diameter)
32.945-32.970
112971 .294)
33.000-33.025
(1 299-1 .30O)
2nd
gear
side
B
39.945-39.970
(1
573-1 .574)
40.000-40.025
(1.575-1.576)
sth
seff
side C
28.545 28.570
11
124- t 125J
24.604-24.62-l
lt.126-1.127)
J-29

8/20/2019 Mazda 121, Kia Pride Repair Manual Vol 1
http://slidepdf.com/reader/full/mazda-121-kia-pride-repair-manual-vol-1 354/389
J
TRANSAXLE
ASSEIIIBLY
Precaution
i. lil-O;i;a.
and
gaskets
must
be replaced
ith
he new
ones
ncluded
n the overhaul
it '
2.
Verity
hatall
pans
are
completely
lean
before
assembly
3. Assehbboans
within
10
minutes fter
applying
ealant
"
;ffi;il
"A;;ti;cure
at
least
go
minuies ftEr ssembrv
e{ore
illing
he ransaxle
nhoil'
4.A bearing uter aceandbearingnner acemuslbe replaced san assemDly
olEoJx.o6s
Clutch
hub assembly
Note
.
Synchlonizer
ing diametels
are
as follows.
mm
(ln,
--_=_-
@
1st
55.7
2.r93)
?nd
55.7
{2.193)
3rd and
4lh
49.7
r.954
5th
43.7
172O)
.
Synchronizer
ey
dlmensions
are as
tollows.
o
@
1sv2nd
17.00
0.669)
4
25
0.r67) 5.00
0.
97)
3tdl4th
14.00
0.551)
4.25
0.164 5.00
0.197)
14.00 0.551)
4 25 0.16n
5.00
0194
1. nstall
hesvnchronizer
eysprings
n theclutch
hubwith
thehooks
n he
grooves
o hold
he hree
ynchronizer
eys
In
p|ace.
SYNCHRONBEB
RING
SYNCHRONIZEF
EY
2.
Align he
synchronizer
ing
grooves ith he
synchronlzer
key
during
assembly.
J-30

8/20/2019 Mazda 121, Kia Pride Repair Manual Vol 1
http://slidepdf.com/reader/full/mazda-121-kia-pride-repair-manual-vol-1 355/389
TRANSAXLE
J
secondaryShaft Assembly
Assemblen the ordershown
n
the
igure, eierringo Assembly
Note.
'1-
Secondaryhaft
2. Clutch
ub
(1sv2nd)
3-Synchronizer
ey
4. Clutch ub sleeve
5. Synchronizereyspring
6. Clutch ub
7.
Synchronizer
ey
8. Clutch
ub
sleeve
5th)
9. Synchronizer
ey
spring
10. nd
gear
Assembly
ote............................
age
-32
11.Synchronizering
Assembly ote...................... ......
age
-32
12.Clutch ubassembly1sl2nd)
Assembly ote...................... ......
age
-32
13.Synchronizering
Assembly ote...................... ......
age
-32
14.Relaininging
15.1st
gear
Assembly
ote............................
age
-32
16.Pinion
ear
Assembly
ote............................
age
-32
17.Bearingnner ace
1st)
Assemblyote...............
....
page
-32
18.Retaining
ing
Assembly
ote............................
age
-33
19.5th
ear
20.Synchronizer
ing
21.Clutch ub assembly
sth)
Assemblyote........................
..
page
-33
22.Washer
23.Retaininging
24.Bearing
nner ace
sth)
Assembly
ote............................
age
-33
BEAFINQ
NNEFRACE,
YI
ETAINING
FIING,NEW
@
@E
AEAFINGNNER
J-31

8/20/2019 Mazda 121, Kia Pride Repair Manual Vol 1
http://slidepdf.com/reader/full/mazda-121-kia-pride-repair-manual-vol-1 356/389
J
TRANSAXLE
Assembly
note
2nd
gear,
synchronlzer
ino
1.
Asaemblehe
2nd
gear
o the secondary
haft s
shown
in the
igure.
2.
Assemble
he synchronizer
ing.
Clutch
hub as€embly
lsu2nd), synchronizer
ng
1.Assemblehe
clutch ub
assembly
o hesecondary
haft
as shown n
the igure.
2.
Assemblehe
synchronizer
ing.
Caution
.lnstall the clutch hub assembly lsi/2nd) wlth a
presa
It necessary.
.
Align
the synchlonizer
drg
gloove
and
leverse
gear
key
groove
when installing.
1st
gear
Assemblehe
1st
gear
o he
secondary
haft s
shownn he
figure.
Caulion
.
Align he synchronizer
ing
groove
and
clutch
hub
assembly ey when Installing.
Pinion
gear,
bearing
nner race
(lst)
Caution
.
Replace
he bearing
inner
race lf
removed.
1.
Support
he
4th
gear
of
the secondary
hatt.
2. Inslallhe olain
end ol
pinion ear
with he bonom
up.
3. Set
heSST o
henewbearing
nner
aceasshown
n he
fagure.
I
&
Y
J-32

8/20/2019 Mazda 121, Kia Pride Repair Manual Vol 1
http://slidepdf.com/reader/full/mazda-121-kia-pride-repair-manual-vol-1 357/389
TRANSAXLE
J
Rstaining lng
Cautlon
.
Roplace he retalning ng ll removed.
1. nstall
he
retaininging.
2. Measurehe clearance etweenhe retainino
secondaryhaft
groove.
Clearance: -0.1mm
(0-0.004
in)
ringand
3. l notasspecilied,electhe
proper
etaininging rom
he
chart
belowand
nstallt.
Retaining ing
thickness:
mm
(in)
2.0
0.079)
|
2.1
0.082)
2.2
0.086)
|
2.3
O.O9O)
|
24
(0.094)
Clutch
hub assembly
5th)
Install
he clutch
hub
assembly nto he secondaryhaft.
Note
.
Installthe clutch hub
assembly
sth)
wilh
a
press
it necessary.
Bearlng
Inner race
(5th)
Cautlon
.
Replace
the bearlng Inner race it
removed.
1.Supporthe st
gear
of
hesecondaryhaft nd
press
he
bearingnner aceon.
2. Installthe
ewbearingnner
ace
usingthe STand
press,
as shown n the igure.
3. vleasure
he clearance etween
st
gear
and he
pinion
gear.
Clearance: .22-0.62mm
(0.008---{t.024
n)
Maximum:
.57mm
0.025
n)
J-33

8/20/2019 Mazda 121, Kia Pride Repair Manual Vol 1
http://slidepdf.com/reader/full/mazda-121-kia-pride-repair-manual-vol-1 358/389
TBANSAXLE
4. Measure
he clearance
etween
nd
gear
and he
secon-
dary
3rd
gear.
Clearance:
.06---0.2lmm
0.002-0.008 n)
Itaxlmum: 0.26mm
0.010
n)
5. Measure
he clearance
etween th
gear
and
he secon'
dary
4th
gear.
Clearance:
.06-0.21mm
(0.002-0.008
n)
Itaxlmum: 0.26mm
0.010
n)
J-34

8/20/2019 Mazda 121, Kia Pride Repair Manual Vol 1
http://slidepdf.com/reader/full/mazda-121-kia-pride-repair-manual-vol-1 359/389
TRANSAXLE J
Prlmary
Shaft
Assembly
As.semblen
the
ordershown n
the
igure, eferring
o Aasembly
Note.
RETAININGFIN6,NEW
1.
Clutch
ub
(3rd/4th)
2. Synchronizerey
3.
Clutch
ub sleeve
4.
Synchronizer
ey
spring
5.
Primary
haft
6. Bearing
'1st)
Assembly ote....................... .....
age
-36
7. 3rd
gear
8. Synchronizering
9. Clutch ub assembly
3rd/4th)
Assembly ote....................... .....age -36
10.Retaininging
11.
Synchronizering
Assembly ole................... .........
age
-36
12.4th
gear
Assemblyote............................
age
-36
13.sth
gear
Assemblyote............................
age
-36
'14.
Sleelball
Assemblyote............................
age
-37
15.
Spacer
Assemblyote............................
age
-37
16.Bearing
sth)
Assemblyote............................
age
-37
17.Retaininging
Assemblyote............................
age
-37
J-35

8/20/2019 Mazda 121, Kia Pride Repair Manual Vol 1
http://slidepdf.com/reader/full/mazda-121-kia-pride-repair-manual-vol-1 360/389
J
TRANSAXLE
---
t-
Asssmbly
lote
Bearing
lst)
Installhe
bearing
th
a
Press
il ,1
\
OIL
GFOOVE
Clutch
hub assembly
3rd/4th)
i. Fress he
clutch
hu6 assembly
nto
he
primary haft
Caution
.
lliqn
the svnchronlzer
ing
grooveand
clutch
hub
assiembly
ieys
(3rd,/4th) hen
Installing'
2. Align
e clutch
uband
halt
ear
pline
nd
hen
nstalling'
*re@69
Synchronizer
ing,
4th
gear
1.
Install
he synchronEer
ng
(3rd/4th).
2. Install
he 4th
gear.
and
clutch
hub assembly
5th
gear
Caution
.
ltion tne
svnctrronizel
ing
grooveand
clutch
hub
ass;embly
eys
(3rd/4th)whsn
installlng'
'1.
Align
he clutch
hub and
primary haft
splines'
2. Presshe sthgearon
J-36

8/20/2019 Mazda 121, Kia Pride Repair Manual Vol 1
http://slidepdf.com/reader/full/mazda-121-kia-pride-repair-manual-vol-1 361/389
TRANSAXLE
J
Steel ball, spacer
Hold he steel allwitha finger, nd nstallhe spacer.
Bearing
sth)
C€ution
.
Replace he ball
Installhe ballbearing
bearing f removed,
with he SST and a
press.
2.0
0.079)
I
2
r
(0082
|
22
(0.086)
|
2.3
0.090)
|
2.
(0
094)
Retaininging
Caution
.
Replacehe relaining
ing
t
removed,
1. nstallhe retaininging.
2. Measureheclearanceetweenetainingingand hepri-
maryshatt.
Clearance: -0.1mm
(0-0,004
in)
3. f not
asspecified,elect
he
proper
etaininging rom
he
chartbelowand
nstallt.
Fetaining ing
mm
(in)
Note
.
The ollowing nspectlons to verity
proper
assem.
bly
ol
lhe
primary
shatt.
.
ileasure the clearance etween he 3rd
gear
and
2nd
geal. (Reter
o
page
J-22.)
.
Measure he clearancebetween he 4th
gear
and ball
bearing.
Refer
o
page
J-22.)
J-37

8/20/2019 Mazda 121, Kia Pride Repair Manual Vol 1
http://slidepdf.com/reader/full/mazda-121-kia-pride-repair-manual-vol-1 362/389
J
TRANSAXLE
Clutch
Housinq
and
Tlansaxle
CaseComponents
L
select
he
adiusiment
him(s).
eterrrngo
Bearlng
PreloadAdiustmenl
2.
Assemble
n
ihe order
shown
n the
rgule reterring
o Assembly
Note
1-Transaxle
ase
2.Adjustment
hrm
Assembly
o ie . . . . . . . . . . . . . . . . . . . . . . . . . . . .
age
'45
3.Bearing uter ace differential)
Assembly
ote. . . . . . . . . . . . . . . . . . . . - . . . . . . .
age
45
4. Oil
seal
difierential)
Assembly
ote....................
.......
age
-45
5.
Adjustmenthim
Assemblyote............................
age 45
6. Bearing
uter ace
secondaryhaft)
Assembly
ote............................
age
-45
/ FUnnel
Assembly
ote.... . . . . . . . . . . .
. . . . . . . . . . . .
age
J-46
8. Adjustmeni
hrm
.
Assembly
ote.... . . . . . . . . . . . . . . . . . . . . .- . .
age
J-46
9. Oil passage
10.Clutch
ousing
11.Bushang
12.Oilseal
J-38
13.Bearing
uter
ace
dilterential)
Assembly
ote............................
age
-46
14.Oil
seal
ditferential)
Assemblyote.........................age -46
15.Funnel
Assembly
ote............................
age
-47
16.Bearing
uter
ace
secondaryhatt)
Assembly
ote............................
age
-47
'17.
Oil seal
primary
haft)
Assembly
ote.....................
....
age
-47
18.Oil seal
change
od)
Assembly
ote.............-..............
age
-47
19.Boot
Assembly
ote..........................
.
page
-47
20.Change
od
21.Changerm
22.Roll
in
Assembly
ote............................
age
-48
23.
Bleeder
24.
Batfle
late
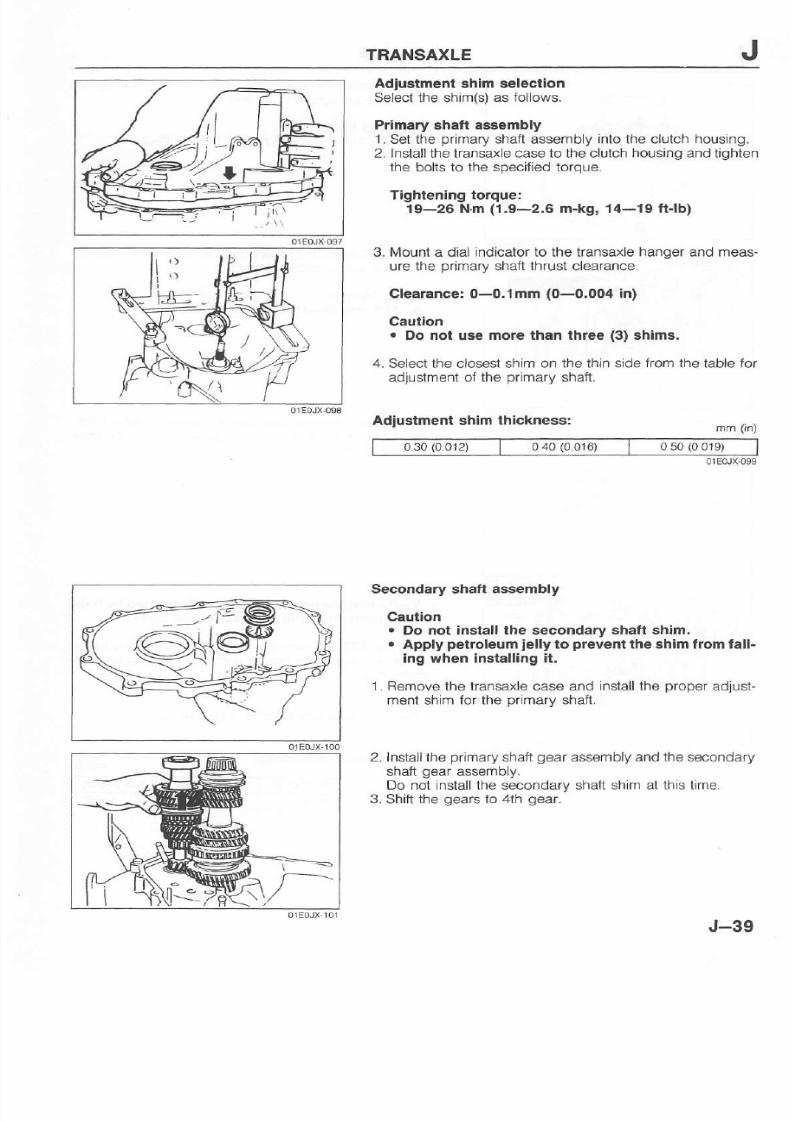
8/20/2019 Mazda 121, Kia Pride Repair Manual Vol 1
http://slidepdf.com/reader/full/mazda-121-kia-pride-repair-manual-vol-1 363/389
TRANSAXLE
J
0
30 (0.012)
I
0
40 (0.016)
|
0 50
10
r9)
Adiustmeni
shim selection
Selecthe shim(s)
s follows.
Primary
shaft assembly
1.Set he
primary
haftassembly
nto
he clutch
housing.
2. Installtheransaxlease o theclutch ousing nd ighten
theboltso the soecifiedorque.
Tightening orque;
19-26 N.m
1.9-2.6
m-kg, 14-19 ftlb)
3. l\4ount dial ndicaloro the ransaxle
anoer
ndmeas'
ure he
primary
hatl hrust
learance.
Clearance: -0.lmm
(0-0.004
In)
Caution
. Do nol usemore han three(3)shims.
4. Selectheclosesl himon the hinside rom he able
or
adiustment
f the
primary
hatt.
Adiustmenlshim hickness:
Secondary halt assembly
Caution
.
Do nol install
he
secondary
hafl shim.
.
Apply
petroleum
elly
o
prevent
he
shim lom
fall-
ing when installinE
i.
1-Removehe ransaxleaseand nstallheproper djust'
mentshim or the orimarv hafi.
2. nstallhe
primary
haft
ear
assemblynd hesecondary
shaft
gear
assembly.
Do not nstallhe secondary haft
hlmat his ime.
3. Shifl he
gears
o 4th
gear.
J-39

8/20/2019 Mazda 121, Kia Pride Repair Manual Vol 1
http://slidepdf.com/reader/full/mazda-121-kia-pride-repair-manual-vol-1 364/389
J
TRANSAXLE
d.F
\ i c
4. nstall
he
ransaxle
ase
o he
clutch
ousing
nd ighten
the
bohs
o the specified
orque
Tiohteninq
orque:
ig-zs-Hm i.s-z.s
m-rs,
14-19
t'lb)
5.Set
heSST
onto
he
primary
haft nd
measure
hestad-
ing
orque
witha
torque
wrench
Sta
inq torque:
o-ra7
N.m
o-15
m-kg,
o-1oB
fi-lb)
6.
Remove
he ransaxle
ase
and the
bearing
uter
ace'
7. nstallthe
him
emoved
uring
isassembly
ndthe
bear'
ino outer
ace.
Caution
.
Verifv
hal
the
primary
hatt can
be
urnedby
hand
atteriightenina
he transaxle
case
bolts'
8. Usino he
SST
measure
he
starting
orque
witha torque
wren;hand
select
he
proper
him
f hestading
orque
s
greaterhan n SteP .
Caulion
.
oo not
use mote
than two
(2)
shims.
Adlustment
him
lhickness:
mm
(in)
0.30
0.011) 0.35
0.013) 0.40
0.016) 0.45
0.0r8)
0.50
0.020)
0.55
0.021) 0.60
{0.023)
I
6
A
\ ,1-
J-40

8/20/2019 Mazda 121, Kia Pride Repair Manual Vol 1
http://slidepdf.com/reader/full/mazda-121-kia-pride-repair-manual-vol-1 365/389
TRANSAXLE
J
Dltterenllal
'1.
Removehe bearing uter aces rom he ransaxlease
and removehe adjustmenthims.
Note
.
Turn A
and
B untilthe
gap
(anow)
n lhe tigu.e is
eliminated,
2. Install
he differential
idebearing
uter
ace o the
SST
(selector).
3. Set he bearingouter aceand diiferentialssemblynto he
clutchhousino.
4. Set he bearingouter aceand SST onto he differential s-
sembly s shown n the agure.
5. Slide he ransaxleaseover he ditferentialssemblv
J-41

8/20/2019 Mazda 121, Kia Pride Repair Manual Vol 1
http://slidepdf.com/reader/full/mazda-121-kia-pride-repair-manual-vol-1 366/389
J
TRANSAXLE
6. Set he
SST
(collals)
between
he
ransaxlease
andclutch
housing
n the
positions
hown
n the
igure.
7. Tighten
he SST
(bolt
set)
o the
specjfied
orque
Tiqhtenlnq
orque:
ls-ze-Nm
(i.9-2.6
m-kg,
14-19
fi ' lb)
Note
.
Turn the bars
until the
SST
(seleclor)
no longer
iurns,
8.
Mountthe
arson
parts
@
and
@
of
heselector,
nd urn
the
selsctor o
he
gap
s widened.
9.Turn n the reverse irection
ntil he
gap
s eliminated.
01EoJX,115
10.
nstallhe SST
o the
difterential
inion
haft
hrough
he
transaxle
ase.
J-42

8/20/2019 Mazda 121, Kia Pride Repair Manual Vol 1
http://slidepdf.com/reader/full/mazda-121-kia-pride-repair-manual-vol-1 367/389
TRANSAXLE
J
@t@
@
Note
.
Procedurework with a
pull
scale.
.
Procedure12 work wilh
a
torque wnench.
11.Turn he
SST
witha
pull
scale.
Adjusi he
SST
preload
adapter)
until
he specified
reload.
Preload:0.5--0.7 N.m
5-7.6
cm-kg, 4.3-6.6 inlb)
Puffscafe:500-760
g
(17.7-26.8
ozl
12.Turnthe STwith
atorquewrench.
djustheSST
selec-
lor)
with he
barsuntil he
specified
reload
s obtained.
Preload:0.5-0.7 N.m
5-7.6
cm-kg, 4.3-6.6 In-lb)
13.BemoveheSST.
14.
Measurehe
gap
around
he
entire ircumference
f the
SST
(seleqtor).
15.Selecthe
proper
adjustmenthim(s)o be used
or the
ditferentialy referringo the ableand selectingheshim
whichsnearest
onthethick
ide)o he argestmeasured
clearance
n the selector.
Adiustment
shim hickness:
16.
RemoveheSST
(bolts).
17.Removehe
ransaxle
aseand
he
SST
(collars).
'18.
Removehebearing uter ace rom heSST
selector).
Installhe selected him(s) nd
transaxle
ase.
bearing uter ace o
the
t9
0-25
0.010)
.10
0.004)
0.35
0.014)
0.80
0.031)
J-43

8/20/2019 Mazda 121, Kia Pride Repair Manual Vol 1
http://slidepdf.com/reader/full/mazda-121-kia-pride-repair-manual-vol-1 368/389
J
TRANSAXLE
01E0JX-121
20. Measure
he
preload
as ollows.Set
he differential
ssem-
bly
nto he clutch
housing.
21. nstallhe
kansaxle
aseonto
he clutch
housing
Tlght€ning
orque:
t9-26 N.m
1.9-2.6
m-kg, 14-19
ft-lb)
22.
Installhe SST o
he differential
ide
gear
hrough
he rans-
axle case.
Note
.
Procadurc 23
work wilh
a
pull
scale'
.
Prccedure24
work
with a iorque
wrsnch.
23.
Turn he SST
(preload
anachmet
)
witha
pull
scale
Readjust he SST
(prsload
adaptor)
until
he specified
preloadwhennotapply.
Preload:0,5-0.7
Nm
(5-7.6
cm-kg,
4'3-6.6
innb)
Pull scale: 500-760
g (17.7-26'8 oz)
24.Turn he
SST witha
torque
wrench.
Readjusthe
SST
(Preload
adaptor)
until
the specified
preload
when
not aPPlY.
Pleload:0.5-0.7
l,l'rn
5-7.6
cm-kg,
4.3-6'6 in'lb)
25.Removehe SST.
26. Remove
he transaxle
ase
and then
the ditferential
s-
semory.
:1
t/
@
J-44

8/20/2019 Mazda 121, Kia Pride Repair Manual Vol 1
http://slidepdf.com/reader/full/mazda-121-kia-pride-repair-manual-vol-1 369/389
TRANSAXLE
J
Assembly Noie
Adiustmer
shlm
and bearing outer racc
(dltferential)
1. Set he adjustment
himand newbearing uter ace
nto
the lransaxle
ase.
2.Aftermountingthelutch ousing nto
he ransaxle
ang-
er, tap in the diffe.ential earingouter raceswith a ham-
mer
until
t is lushwith he
end
of the ransaxlease.
Pipediametsr:59mm
2,32
n)
Oll seal
(ditterential)
Caution
.
Apply transaxleoil to the outet circumfercnceol the
oil seal,
lnstallhe newoil sealwith he SST.
Adiustment shim,
bearlng ouier race
(secondary
shaft)
1. nstallthedjustment
himandbearing uter ace nto he
clutch
housing.
2. Aftermountingheclutch ousing nto he
ransaxle
ang-
er, tap
in
the
difterential earingouterraceswith a ham-
meruntil t is
flushwith he end ol the clutchhousinq.
Plpedlametel:47mm
1.85
n)
\
J-45

8/20/2019 Mazda 121, Kia Pride Repair Manual Vol 1
http://slidepdf.com/reader/full/mazda-121-kia-pride-repair-manual-vol-1 370/389
J
TRANSAXLE
Adlustment
shim
and tunnel
(Primary
haft)
1. nstail
he unnel
nto he ransaxe
ase
Pipediameter:
40mm
(1.57
n)
2. Install
he adjustment
him(s).
Oll seal
(ditlerential)
Caution
.
Apply
transaxle
oil
to lhe outer
clrcumGl€nce
of
the
oll seal.
lnstallhe newoil sealwith he SST.
Bearlng
outer
race
(differential)
1.
nstai he bearing
uter
ace nto
he clutch
housing-
2.
Aftermounting
he
clutch ousing
nto he
ransaxle
ang'
er,
ap n
the differentialearing
uter
aces
witha ham-
meruntil t is
flushwith he
end of the
clutch
housing
Pipediameter:
59mm
2.32
n)
-4
r-J
lr_:
--\R
\
$,\o,-
\m#
4PY
J-46

8/20/2019 Mazda 121, Kia Pride Repair Manual Vol 1
http://slidepdf.com/reader/full/mazda-121-kia-pride-repair-manual-vol-1 371/389
TRANSAXLE
J
Funnel
and
bea.ingouter race
(secondary
hafl)
Note
.
lnstall he tunnel which
has the
extra
hole.
1.Setthefunnelandearinguter
acentoheclutch ousing.
2.Tap hebearing uter acewitha suitable
ipe
untilit sful
ly seatedn the clutchhousing.
Plpe diameter:50mm
('1,97
n)
Oil seal
(primary
shalt
gear)
Caution
.
Apply transaxleoil to lhe outer
qircutnlerenca
ol lhe
oil seal.
lnstallhe newoil sealwitha suitable ipe.
Pipe diameter:38mm
1.50
n)
Oil seal
(change
od)
Cautlon
.
Apply transaxleoil to ihe outer
circumferenceol the
oil seal.
Tap henewoil seal n until t is ullyseated.
Change
rod
and boot
1. nsEll he change od and boot
nto he ransaxle.
2. Fit he
boot
over he seal.
Cautlon
.
lnstall the boot wlth the air bleed
downwardas
shown in the ligure.
e \ r
< - , 2
l \
\
\ t -
u .\-- -J,,-
J-47

8/20/2019 Mazda 121, Kia Pride Repair Manual Vol 1
http://slidepdf.com/reader/full/mazda-121-kia-pride-repair-manual-vol-1 372/389
,J
TRANSAXLE
Roll
pln
lnsiali
he
new roll
pin
as shown
n the
igure.
J-48

8/20/2019 Mazda 121, Kia Pride Repair Manual Vol 1
http://slidepdf.com/reader/full/mazda-121-kia-pride-repair-manual-vol-1 373/389
TRANSAXLE
J
i,EMO
J-49

8/20/2019 Mazda 121, Kia Pride Repair Manual Vol 1
http://slidepdf.com/reader/full/mazda-121-kia-pride-repair-manual-vol-1 374/389
J
TRANSAXLE
Housing
arts
ljsemo-te
n the
order
hown
n he
igure
eferring
o Asaembly
ote
q
(2.0-3.0,
NEW
r20-29
(2.oJ,0,1s-22)
(3.6-5.3,
t i
fl e-^
{\\
q02.-r5
\
(2..--3.€r
@
17__61
J-50

8/20/2019 Mazda 121, Kia Pride Repair Manual Vol 1
http://slidepdf.com/reader/full/mazda-121-kia-pride-repair-manual-vol-1 375/389
TRANSAXLE J
1.Clutch
ousing ssembly
2.
Diff rential ssembly
3.
Primary haft
gear
assembly
Assembly
ote............................
age
-52
4. Secondary
haft
gear
assembly
Assemblyote. . . . . . . . . . . . . . . . . . . . . . . . . . . .
age
-52
5. Reverse hitt ever
Assembly
ote..........
page
52
6. Oring
7. Reverse
evershalt
Assembly ote..........
page
52
tJ Htn
9.Roll
in
10.Reversedlershaff
'11.
Reversedler
gear
Assembly ote........................ ....
age
-52
12.Lever
et sprrng
13.
Shift
ork
1sv2nd)
Assembly ote...........................age -52
14.Shift
od
(1st/2nd)
Assembly ote........................ ....
age
-52
15.Boll
pin
Assembly
ote..........
Page
-52
16. nterlock
in
Assembly ote..........
page
-52
17.Shift
ork
(sth/Rev)
Assembly ote..........
page
53
18.Shift od end
(sth/Rev)
Assembly
ote..........
Page
-53
19. nterlock
in
Assembly ote..........
page
-53
20.Shift od
(sth/Rev)
Assembly ote..........
page
-53
21.
Foll
pin
Assembly ote..........
page
53
22.Roll
in
Assembly
ote..........
page
-53
23.lnterlock
in
Assembly
ote..........
page
-53
24.Shitt
ork
(3rdi4th)
Assembly
ote..........
Page
-53
25.Shiti
od
end
(3rd/41h)
Assembly ote....................... .....
age
53
26.Shift od
(3rd/4th)
Assemblyote............................
age
53
27.
Roll
in
Assemblyote............................
age
-53
28.Roll in
Assemblyote............................
age
-53
29.Plug, pring
3rd/4th),
teelball
30.Base
plate
unit
31.Crankever ssembly
32.Crank
ever haft
33.Retalninging
Assembly ote...................... ......
age
-54
34.
N4agnet
35.
Transaxle
ase
assembly
Assembly ote...................... ......
age
-54
36-
Engine ountNo.1
37.Plug, pring 'lsv2nd, th/Bev), teel all
Assembly ote...................... ......
age
-54
38.
Drain
plug
39.Back-up
ightswitch
40.Neutrai witch
41.Oilseal
Assembly
ote............................
age
55
42.Speedometer
ear
sleeve
43.OJing
44.Driven
ear
45.Roll
in
Assemblyote...........................
age
-55
46.
Speedometer
riven
gear
assembly
47.Clutch elease ollar
Assemblyote............................
age
-55
48.Clutch
eleaseork
Assemblyote..........
.................
age
-55
49.Clutch ever
Assemblyote............................
age
-55
50.Return pring
51.
Transaxle
J-51

8/20/2019 Mazda 121, Kia Pride Repair Manual Vol 1
http://slidepdf.com/reader/full/mazda-121-kia-pride-repair-manual-vol-1 376/389
J
TRANSAXLE
Assembly
Note
Primary
ahalt
gear
assembly
and
secondary shatt
gear
assembly
Inslallhe
bdmary
hatt
gear
assembly
nd he secondary
haft
gear
assembly
ogether.
Reverse shift
lever,
reverse
lever shalt
1.
Apply ransaxle
il o the
newO-ring
nd hen
nslallhe
reverseevershalt.
2.
Installtheeverse
hift ever
nd hen
nstallthe
eversee-
ver shaft.
3.
nslallhe new
pin.
Reverse
dler
gaar
Installhe
reverse
dler
gear
and
he reverse
dlershalt.
Shift
rod
(l
sU2nd),shift
fork
(l
su2nd),
roll
pin,
interlock
pin
Caution
.
The
mark
0ndicated
by the
atrow in the
llgure) and
theshin
rod end mountlng
bolt
holemust be
n the
aame
direction.
'l.
,nstallhe shitt
ork and
he shift od.
Caution
.
When
nstalling
he roll
pin,
be caretul
not to dam'
age the
shlft
rod.
2.
Installhe new
oll
pin.
3. Install
he nterlock
in.
J-52

8/20/2019 Mazda 121, Kia Pride Repair Manual Vol 1
http://slidepdf.com/reader/full/mazda-121-kia-pride-repair-manual-vol-1 377/389
TRANSAXLE
J
Shift
rod
(slvRev),
shitt fork
(sth/Rev),
shltt
rod
end
(5th/Fev),
oll
pin,
inte
ock
pin
Caution
.
lnstall
he
intedock
pln
nto he holeof clutch
hous-
ing as shown
in the flgure.
1. nstallthenterlock intothe
hift odand nstallthehifl od.
Cautlon
.
When nstalling he roll
pin,
becaretul not to dam-
age the shift
rod.
Note
2. Installhe
new roll
pin.
3. lnstall
he nterlock
in.
Shift rod
(3rd/4th),
shift
lork
(3rd/4th),
shift
rod end
(3rd/4th),
oll
pin
Caution
.
Install he nterlock
pin
nlo he holeot clutchhou&
ing
as
shown in lhe llgure.
1 Installthenterlock
in
o te shift odand nstallthehift od.
Caution
.
When nstalling
he roll
pin,
be caletul not to dam-
age he shift rod.
2. Installhe new roll
pin.
Diameter Length
Shifl
lork
{sth/Rev)
s.0
0.20)
22
9.8n
Shifl
rod end
(slh/Rev)
s.0
0.20)
20
(0.79)
J-s3

8/20/2019 Mazda 121, Kia Pride Repair Manual Vol 1
http://slidepdf.com/reader/full/mazda-121-kia-pride-repair-manual-vol-1 378/389
J
TRANSAXLE
Retaining
ing
1. nstall
he crank
everand
nstallhe
crank
evershaft.
Caution
.
Verify
he
in3talling
a retalning
ing 6urely.
.
lnstal
the
groove
of crank
ever shalt
to the diftereF
tlal end.
2.
Installhe
new etaining
ing.
3. Shift he
gears
o 3rd
gear
and
hold he shift
odwithone
handso
that t does
nol
all.
Transaxle
ase
assembly
Note
.
Tighten he
bolts to
the specified
orque.
1. Applysealant
nd
nstallhe
ransaxle ase.
Caution
.
When
nstalling
he transaxle
case,
nstall he en-
glne
mount
No.l.
2. nstallhe
ransaxle
ase o the
clutch
housing.
Tlghtening orque:
i9-26 N.m
1.9-2.6 m-kg, 14-19 ft-lb)
Plug, spring,
steel
ball
'1
. Applysealant
o the
Plugs.
2.
Installhe
geel
balls, prings
nd
plugs
Tiqhtenlnq
orque:
20-2tN.m
i2.O-3.0
m-kg, 14-22
ftlb)
3. Contirm
hat
he ransaxle
perates
moothly
hen hitted.
If not, eassembly
he
ransaxle.
ENGINEMOUNT No.l
sp
ng
Oiameter
mm
{in)
Lensh
mm
(n)
@
7.2
O.2A)
22.5
(0.89)
7.2 10.28)
33.2
r.31)
o
7.2
/{0.28)
22.5
0.89)
J-54

8/20/2019 Mazda 121, Kia Pride Repair Manual Vol 1
http://slidepdf.com/reader/full/mazda-121-kia-pride-repair-manual-vol-1 379/389
TRANSAXLE
J
Oil seal
1. Place hespeodometer
ear
sleeven a vice.
2. Tap he new oil seal nto he speedometer
ear
sleeveus-
ing a suitable
ipe.
Pipe
diameter:15mm
0,59
n)
Folt
pln
Install
he new oll
pin
as
shown n the igure.
Clulch
release ork, clutch releaae olol
Apply
grease
s
shown n the igure.
Clutch ever
1.Apply
grease
o the bushing.
2. nstallhe clutch ever o the clutch elease
ork.
Tightening orque:
35-41
Nm
(3.6-4.2
m-kg,
26-30 fi-lb)
J-55
1 -
"=

8/20/2019 Mazda 121, Kia Pride Repair Manual Vol 1
http://slidepdf.com/reader/full/mazda-121-kia-pride-repair-manual-vol-1 380/389
J
TRANSAXLE
INSTALLATION
1. Raise
he
vehicle nd
support
withsalety tands
2.
Install
n the order
shown
n the
ighre. eflerringo
Installation
Nole
3.
Ado
he specitied
mount
l the specitied
ransaxle
jl
(Refer
o
page
J-7
)
a. Warm
up ihe engine
nd
ransaxle, nd
nspector oil
eakage nd
rasaxle peration
3r
--45
(4.2-4,7,
23--.34)
huz
€ t
32-56
(3.4-s.7,
&-trif"l',.'-."
6a--a,
--:6
J-56

8/20/2019 Mazda 121, Kia Pride Repair Manual Vol 1
http://slidepdf.com/reader/full/mazda-121-kia-pride-repair-manual-vol-1 381/389
TRANSAXLE J
1.
Engine ountNo.2
2. ransaxle
lnstallation
ote........
page
J-57
3. Stittner
4. Exhaust
ipe
bracket
5. Enginemountmember
installationNote........ pageJ-57
6. Staner
7. Driveshatt
Installat ionote..........................
age
-58
8. Control od
lnstallat ionote .........................
age
-58
9.
Extensionar
lnstallat ionote..........................
age
-58
10.
Neutral
witch onnector
11.Back-upightswitch onnector
'12.
Clutch able
lnstallat lonote..........................
age
-58
11
qno6.l^mal6r
^.h16
lnstal lat ionote.... . . . . . . . . . . . . . . . . . . . . . .
age
J-58
14.
Battery,
battery arrier
15.Splashshied
16.
Wheel
and
trre
Installation Note
Transaxle
1.Set he ransaxle
n a
jack
and ift t into
place.
2. nstallhe ransaxle olts.
Tightening orque
A: 64-89
N.m
6.5-9.1
Bt 7.3-11 N.m
0.8-l.l
m-kg, 47-66 ft-lb)
n-kg, 5.8-8.0
ft-lb)
Enginemount member
1.
nstall
he
boltsand nutsas shown.
Tightenlng orque
@:
64-89 N.m
6.5-9.1
m-kg,47-66 ft-lb)
@:
37-52
N.m
3.8-5.3
m-kg,28-38 ft-lb)
Caution
. BetoF installhe enginemountmember, ul engine
mount No.1and
No.2
studs
n the installlnghole.
2. Removehe SST
(Eqine
support).
@rj&{r@
J-57

8/20/2019 Mazda 121, Kia Pride Repair Manual Vol 1
http://slidepdf.com/reader/full/mazda-121-kia-pride-repair-manual-vol-1 382/389
J
TRANSAXLE
f\rt")
Ddveshaft
Cautlon
.
Verlty hat
the oil seal
s not damaged.
.
Do not damage
he oil seal.
'1. Inserthenewclip withheend-gap t he op ot hegroove
2.
Apply transaxle
il around
he oil
seal ip
lnstall he
driveshaft.
3.
Verityhat hedriveshaft
s correctly eated
y
pulling
n
the shaft.
4. Connecthe
ower rm
o heknuckle nd
ightenhe
clinch
bolt.
Tightening orque:
43-54
N.m
4.4-5.5
m-kg,
32-40
tt-lb)
Extenslon
bar and conlrol
rod
1. nstallhe
extensionar
o the ransaxle.
Tightenin9 orque:
31-46
Nfl
(3.2-4.7
m-kg,
23-34
fr'b)
2. Installhe change ontrolod o the ransaxle.
Tightening
orque:
16-23
N.m
1.6-2.3 m-kg,
2-17 ft'lb)
Clulch cable
Installhe
clutch able.
Refer
o Section
H.)
Speedometer
able
1. Add the sDecified
mount
i the
specified
ansaxle il
thoughthe
speedometer
riven
gear
nsiallation
ole
2. nstallhe
speedometer
riven
ear.
Tightening
orque:
7.8-12 Nm
(0.8-1.2
m-kg, 5.8-8.7
ft-lb)
3.
Connecthespeedometer
able o the
speedometer
riv'
en
gear.
*
<\
J-58

8/20/2019 Mazda 121, Kia Pride Repair Manual Vol 1
http://slidepdf.com/reader/full/mazda-121-kia-pride-repair-manual-vol-1 383/389
DIFFERENTIAL
J
DIFFERENTIAL
PNEPARATION
SST
49 8017 2A0
@
@@@
@@@
49 DO27 02
(Part
of
49 8017
2A0)
bearins
49 F40l 366A
49 8017
2A0)
oeafrng
49 0839 425C
beanng
49 0439 428
bearing
puller
49 0839 425C)
49
0862
426
bearing
uller
49 0839425C)
49
D017
241
49 F401 3374
49 D0172Al )
J-59

8/20/2019 Mazda 121, Kia Pride Repair Manual Vol 1
http://slidepdf.com/reader/full/mazda-121-kia-pride-repair-manual-vol-1 384/389
J
DIFFERENTIAL
DISASSEMBLY
INSPECTION
ASSEMBLY
Caqtion
.
Do not
remove the
inner race
il not neoessary'
'1.
Before
isassembly,
nspecthe
backlash l
side
gears'
eferflng
o
Preln6P€ctlon
2.Disassemblen the ordershownn the igure. ete(ing o Disa$embly Note'
3.
Inspect ll
parts
and
repairor
replace s
necessary
4.
Me;sure
he backlash
fterassembly,
eferringo
Backlash
ol
Pinlon Geara
'1.Sidegear
lnspector
wearand
cracks
2.
Washer
3.
Roli
pin
Disassembly
ote.......................
age
-61
4.
Pinion haft
5.
Thrustwasher
6. Pinion ear
Inspect
or
wearand cracks
7. Side
bearing
nner
ace
Disassembly
ote...........
........
page
-61
Inspect
or wearand
cracls
8.
Speedometer
rive
gear
9. Ring
gear
and
gear
case
Inspect
or wear and cracl$
'wa
..-'4b,
Tffi.
J-60

8/20/2019 Mazda 121, Kia Pride Repair Manual Vol 1
http://slidepdf.com/reader/full/mazda-121-kia-pride-repair-manual-vol-1 385/389
DIFFERENTIAL
J
v€LocK
Preinspection
Backlash
ol
pinion geals
Measurehe backlash s
follows.
1. nstallhe eftand rightdriveshafts
nto he ditferential
s-
semDly.
2.
lMeasurehe backlash l both
pinion ears.
Backlash 0-0,1mm
(0-0.004
in)
Maximum: .5mm
0,020
n)
3.
f the
backlash
s notas soeciiied,eplacehedifierential
as an assemoty.
DisassemblyNote
Roll oin
Caution
.
use
prolectiveplates
n
the
vbe.
.
Insen he
punch
nto he roll
pin
hole lom the rlng
gearslde.
Securehe
gear
case
n
a
vice
and
ap out he roll
pin.
Slde bearing nner
race
Cautlon
.
When
eplacinga bearing, eplac€
he inner
and out-
er
taces as a set,
1. Removehe bearingnner ace
speedometer
rive
gear
side)with he
SST.
2. Removehe bearing
nner ace
ringgear
side)wilhhe SSI.
1EoJXj75
BEABING
NNER
J-61

8/20/2019 Mazda 121, Kia Pride Repair Manual Vol 1
http://slidepdf.com/reader/full/mazda-121-kia-pride-repair-manual-vol-1 386/389
J
OIFFERENTIAL
Assembly
1. nstallthe peedometer
rive
gear
as
shown
n he igure
Cautlon
.
Wtlen
replacing
a bearing,
eplace
he
inner and out-
er
races as a
set.
2.
Installhe new
beanng
nner
ace.
(1)
Installthe
ew
bearing
nner ace
speedometerrive
gear
sjde)
witha
Press
nd he
SST
(2)
Installhe
newbearing
nner
ace
(ring
ear
side)with
a
press
nd
he SST.
3. Set
he
pinion ears
nd hrust
washer
nto
he
gear
case
4.
Inserthe
pinion
haft.
J-62

8/20/2019 Mazda 121, Kia Pride Repair Manual Vol 1
http://slidepdf.com/reader/full/mazda-121-kia-pride-repair-manual-vol-1 387/389
DIFFERENTIAL
J
5.
Install
a new
roll
pin
and stake he case o
prevent
t from
workino ut.
6.
Install
he sideoearsand washers.
Backlash
of PinionGears
Recheck
he backlash l the
pinion ears.
(Refer
o
page
J-61.)
J-63

8/20/2019 Mazda 121, Kia Pride Repair Manual Vol 1
http://slidepdf.com/reader/full/mazda-121-kia-pride-repair-manual-vol-1 388/389
J
SHIFT
IECHANISM
SHIFT
MECHANISM
OVERHAUL
1.
Disassemble
n the ordershown
n the igure.
2.
Inspect
ll
parts
and
repairor replace s
necessary.
3.
Assemble
n the reverse rder
of disassembly,
eferringo
AssemblyNote
16-26
0.6-2.3,
t2-t4
J-64

8/20/2019 Mazda 121, Kia Pride Repair Manual Vol 1
http://slidepdf.com/reader/full/mazda-121-kia-pride-repair-manual-vol-1 389/389
SHIFTMECHANIS]II
1.Shift
everknob 18.Washer
2.
Ashtray 19.Pipe
3. Front onsole
20.
Bushing
4. Boot Insp€ctor wear
and
damage.
5. Nut
21.
nsulator
6.Washer Inspector
damage ndcracks
7.Bolt 22. Bushing
8. Nut Inspector wearand damage
9. Bolt
23.
Boot
10.
Control
od Insp€ct
or damage
Inspector
bending 24.Spring
Assembly
ote............................
age
J-66
Inspector
damage
nd weakness
11.Bushing Assemblyote............................
age
-66
Inspect or wear and
damage 25. Ball seat
upper)
12.Nut
26. Boot
13.Washer Inspector wear
and damage
14.Washer
27. Holdel
15. Nut
28. Ball seat
bwer)
'16.
Washer 29.Shift ever
17.Extensionar olEoJxr86
Inspector bending
Assembly ote......................... ...
age
-66
J