maximus digital broadcasting satellite receiver - conrad · this satellite receiver was designed...
TRANSCRIPT

MAXIMUS
Digital BroadcastingSatellite Receiver
User's Manual
1. Introduction
1.1 Overview1.1 Overview1.1 Overview1.1 Overview

This satellite receiver was designed for digital free-to-air (unencrypted) signals. It enables you totune in on the hundreds of digital television and radio channels broadcasting to your region, withthe highest video, audio and data quality attainable with current technology. It performs numerousfunctions to provide you with a variety of services.
1.2 Main 1.2 Main 1.2 Main 1.2 Main FFFFeatureseatureseatureseatures
- Fully Compliant with MPEG-2 and DVB Standards
- O.A.D (On Air Downloading): Via Satellite
- Built-in Teletext Decoder (STV/VBI)
- PIG (Picture In Graphics)
- MPEG-2 Video (MP@ML), MPEG-1 Audio Layer1, Layer2
- 3000 TV and 1000 Radio Programmable Channels
- PLL RF Modulator, UHF 21~69, PAL I/G/B/K
- LNB Control Logic (13/18V, 0/22KHz, 0/12V)
- SCPC/MCPC Reception in both C & Ku Bands
- Digital Tuner with Loop-Through Output
- Wide Symbol Rate 2~45Mbps & Frequency 950~2150MHz Inputs
- DiSEqC 1.2 Capable
- Manual PID Insertion
- Direct Channel Selection from EPG
- 8 Colour OSG with 16 Levels of Transparency
- 4 digit 7 segment LED
- Variable Screen Aspect Ratio (4:3, 16:9)
- Favorite Channel and Parental Lock Functions
- RS-232C Port for Additional Information Service and System Software Upgrading
2. Safety/Precautions2.1 Safety2.1 Safety2.1 Safety2.1 Safety
- Be sure to read this manual before you start operating the unit.
- Do not touch the power cord with wet hands, as that may cause electric shock.
- Never open the cover. It is very dangerous to touch the inside of the unit, due to possible electricshock.

- Place the unit in an adequately ventilated and cool environment.
- When not in use for a long time, it is recommended that the power cord be disconnected from themains. Also, make sure you do not use the unit with a damaged power cord, as this may causeelectric shock or fire.
- A professional installation is required. If reception is interrupted, contact your authorized localservice center.
2.2 Precaution2.2 Precaution2.2 Precaution2.2 Precautionssss
When installing the unitWhen installing the unitWhen installing the unitWhen installing the unit
- Install the unit on a level horizontal plane. Unleveled installation may cause damage to the unit.
- Do not put heavy items, such as a TV, on top of the unit. That may cause damage to the unit.
- Do not install the unit where: it may be subject to vibrationsit is exposed to direct sunlightthere is humiditytemperature may be too high or too lowthere is no adequate ventilation
- Moving the unit from a cold area to a hot one will cause condensation. In such a case, leave theunit to dry for a couple of hours, before you operate it.
3. 3. 3. 3. AccessoriesAccessoriesAccessoriesAccessories
The following have been packed in your receiver box:The following have been packed in your receiver box:The following have been packed in your receiver box:The following have been packed in your receiver box:
User's manual: 1 Pc.Remote control: 1 Pc.Batteries (AAA Type): 2 Pcs.RCA Cord (Y, W, R): 1 Pc.
* If any accessory listed above is missing, contact the point of purchase.
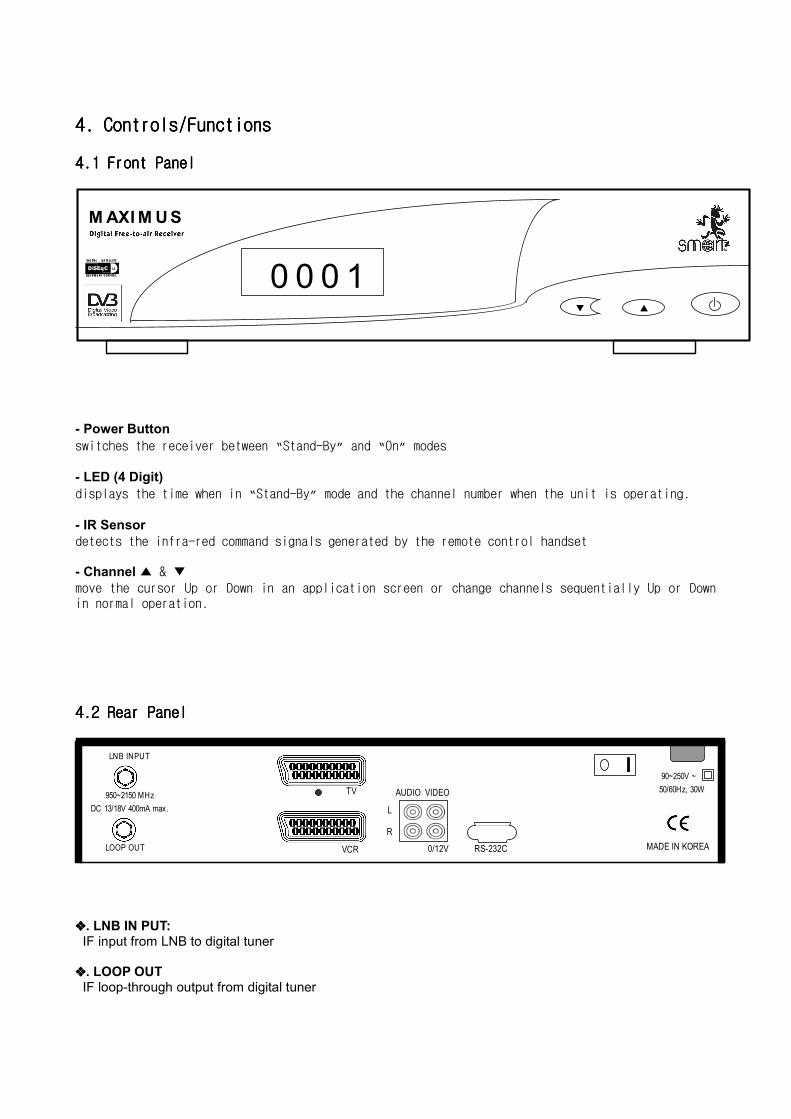
4. Controls/Functions4. Controls/Functions4. Controls/Functions4. Controls/Functions
4.1 Front Panel4.1 Front Panel4.1 Front Panel4.1 Front Panel
�
1.2DiSEqCDIG ITA L S A TE LLITEDIG ITA L S A TE LLITEDIG ITA L S A TE LLITEDIG ITA L S A TE LLITE
EQ U IP M E N T C O NT RO LEQ U IP M E N T C O NT RO LEQ U IP M E N T C O NT RO LEQ U IP M E N T C O NT RO L 0 0 0 1�
M AXI M U S
- Power Buttonswitches the receiver between “Stand-By” and “On” modes
- LED (4 Digit)displays the time when in “Stand-By” mode and the channel number when the unit is operating.
- IR Sensordetects the infra-red command signals generated by the remote control handset
- Channel ▲ & ▼move the cursor Up or Down in an application screen or change channels sequentially Up or Downin normal operation.
4.2 Rear 4.2 Rear 4.2 Rear 4.2 Rear PPPPanelanelanelanel
VCR
TV AUDIO VIDEO
0/12V
L
R
950~2150 MHzDC 13/18V 400mA max.
LOOP OUT
90~250V ~50/60Hz, 30W
RS-232C
LNB INPUT
MADE IN KOREA
❖❖❖❖. LNB IN PUT: IF input from LNB to digital tuner
❖❖❖❖. LOOP OUT IF loop-through output from digital tuner

❖❖❖❖. AUDIO-L Left audio output
❖❖❖❖. AUDIO-R Right audio output
❖❖❖❖. VIDEO Composite video output
❖❖❖❖. 0/12V Used for switching satellite(LNB)
❖❖❖❖. TV SCART SCART output to TV
❖❖❖❖. VCR SCART SCART output to VCR, analog receiver or Hi-Fi
❖❖❖❖. RS-232C Low speed serial port
4.3 Remote 4.3 Remote 4.3 Remote 4.3 Remote CCCControlontrolontrolontrol Handset Handset Handset Handset
SETUP
1 2 3
OK
FAV EPG
TV
MENU EXIT
MUTESETUPSETUPTXT
RECALINFO LANG
CH �
VOL◀
VOL▶
CH �
RADIO

- Power:- Power:- Power:- Power: switches the receiverbetween Stand-By & On modes
- Mute:- Mute:- Mute:- Mute: mutes the audio output
- Numeric Keys- Numeric Keys- Numeric Keys- Numeric Keys (0~9):(0~9):(0~9):(0~9): for directentry of channel number or inputof alphanumeric characters
- EPG- EPG- EPG- EPG (Electronic Program Guide):provides programme contentinformation. Press again to returnto viewing mode
- MENU:- MENU:- MENU:- MENU: accesses the main menu
- SETUP: - SETUP: - SETUP: - SETUP: accesses the receiver set-
up menu
- EXIT:- EXIT:- EXIT:- EXIT: To return to previous status or menu
- CH - CH - CH - CH (�/�): : : : change channels sequentially up or down inviewing mode and move the cursor up or down in anapplication screen
- VOL VOL VOL VOL (◀/▶): alter the audio output level up or down inviewing mode and change the selected item’s setting inan application screen
- OK- OK- OK- OK: selects an item or confirms a choice
- INFO- INFO- INFO- INFO: displays the available information on the viewedchannel
- TV/RAD- TV/RAD- TV/RAD- TV/RADIOIOIOIO: switches between TV & Radio channels lists
- LANG: - LANG: - LANG: - LANG: select sound mode or audio language
- FAV: - FAV: - FAV: - FAV: displays the current favorite channels list
- TXT- TXT- TXT- TXT: displays the teletext contents of the viewedchannel, if teletext is transmitted
- RECALL:- RECALL:- RECALL:- RECALL: goes back to the previously viewed channel
5. Using 5. Using 5. Using 5. Using TTTThe he he he RRRRemote emote emote emote CCCControlontrolontrolontrol
5.1 Batteries5.1 Batteries5.1 Batteries5.1 Batteries
- How to insert - How to insert - How to insert - How to insert the the the the batterbatterbatterbatteriesiesiesies. Open the cover at the top of the rear side of the handset. Insert two 'AAA' type batteries (1.5V), respecting the indicated polarity +/- signs. Close the cover
- When to replace - When to replace - When to replace - When to replace the the the the batterbatterbatterbatteriesiesiesies. When the operational range of the handset gets smaller, or when the receiver no longerresponds to each and every command. Always replace both batteries at the same time.
- Accident prevention- Accident prevention- Accident prevention- Accident prevention. Do not recharge, heat or disassemble the batteries. Make sure the intended polarity alignment is respected. If the handset is not going to be used for some time, take the batteries out. If not, thebatteries may leak and cause damage to the handset

5.2 Range 5.2 Range 5.2 Range 5.2 Range OOOOf f f f OOOOperationperationperationperation
. The operating range of the handset is within +/- 30 degrees on both the vertical andhorizontal planes of the Infra Red sensor
. Transmission distance does not exceed 7m
* Notes- When the handset is not operational
Replace the batteries and make sure the receiver is connected to the power supply
- Abnormal operationDisturbance from peripheral devices may occur. You will need to move the object that is generating thedisturbance.
- Notes for handlingIn the event the receiver is exposed to heat or water, operating it could be dangerous. Have the unitchecked by a qualified technician prior to operating it again
6. 6. 6. 6. Connecting The ReceiverConnecting The ReceiverConnecting The ReceiverConnecting The Receiver
6.1 6.1 6.1 6.1 TTTTo o o o a a a a TV TV TV TV set, using both set, using both set, using both set, using both AAAA////V connectV connectV connectV connectiiiioooonnnnssss
6.2 6.2 6.2 6.2 TTTTo o o o a a a a TV TV TV TV set, using both set, using both set, using both set, using both SCARTSCARTSCARTSCART connections connections connections connections
IF INPUT
VCR
TV
AC 90~265V47~63Hz
LOOP OUT
VIDEO
0/12VRS232C
AUDIO
[L]
[R]
VIDEO
AUDIO
[L]
[R]

IF INPUT
RF OUT VCR
TV
AC 90~265V47~63Hz
LOOP OUT
VIDEO
0/12V RS232C
AUDIO
[L]
[R]
6.3 6.3 6.3 6.3 TTTTo o o o a a a a Hi-Fi system and Hi-Fi system and Hi-Fi system and Hi-Fi system and a a a a TVTVTVTV set, using set, using set, using set, using both A/V connectionsboth A/V connectionsboth A/V connectionsboth A/V connections
VIDEO INR L
IF INPUT
VCR
TV
AC 90~265V47~63Hz
LOOP OUT
VIDEO
0/12V RS232C
AUDIO
[L]
[R]

6.4 6.4 6.4 6.4 TTTTo o o o a a a a VCR and VCR and VCR and VCR and a a a a TVTVTVTV set, using both SCART connections set, using both SCART connections set, using both SCART connections set, using both SCART connections
7. Setup and Operation7. Setup and Operation7. Setup and Operation7. Setup and Operation
7.1 Before Setup7.1 Before Setup7.1 Before Setup7.1 Before Setup
- Information Information Information InformationA menu is a field of text, displayed on the TV screen. Selectable menu items are generallyhighlighted. Items that are not highlighted cannot be selected. Most menus display explanatoryinformation at the bottom of the screen.
7.2 Setup Menu7.2 Setup Menu7.2 Setup Menu7.2 Setup Menu
To install the receiver properly you have to perform a "Setup Procedure". After you finish thesetup procedure, you can start watching TV or listening to Radio. During the basic settings, ashort information is displayed at the bottom of the menu screen.
. Turn on your TV and receiver
. Press the SETUP SETUP SETUP SETUP button to display the setup mode.
IF INPUT
VCR
TV
AC 90~265V47~63Hz
LOOP OUT
VIDEO
0/12V RS232C
AUDIO
[L]
[R]

. Use the CH CH CH CH �/�, and Vol Vol Vol Vol ◀/▶ buttons to move across a menu page.
. When you have reached the required item, press the OKOKOKOK button to confirm your choice.
. Press EXITEXITEXITEXIT to return to quit the mode.
- System Setup- System Setup- System Setup- System SetupPress the OKOKOKOK button on 'System Setup' in the Setup Menu. The following window will appear. Setthe Video Format, TV Type, Scart RGB output, GMT Offset, TTX Type, Positioner and LNB Reference.
Video Format:Video Format:Video Format:Video Format: PAL I, B, G or K/ SECAM/ MULTI/ NTSC
TV Type:TV Type:TV Type:TV Type: Standard (4:3) / Wide (16:9)
Scart RGB:Scart RGB:Scart RGB:Scart RGB: On / Off
GMT Offset: GMT Offset: GMT Offset: GMT Offset: +12:00 ~ -12:00
Teletext Type:Teletext Type:Teletext Type:Teletext Type: STB (Normal TV Mode) / VBI
Positioner:Positioner:Positioner:Positioner: On / Off
LNB Reference:LNB Reference:LNB Reference:LNB Reference: 18/13V, 19/14V
. Use CH CH CH CH �/� to move up and down the list.. Use Vol Vol Vol Vol ◀/▶ to change the setting.. Upon reaching the required menu line, press OKOKOKOK to enter the setting.. Press EXITEXITEXITEXIT to go back to the previous mode.
- Antenna Setup- Antenna Setup- Antenna Setup- Antenna Setup

Press OKOKOKOK on 'Antenna Setup' in the Setup Menu. The following window will appear. Set theSatellite, LNB Frequency, 22KHz Tone, 0/12V Switch, DiSEqC mode and LNB Power.
Satellite Name:Satellite Name:Satellite Name:Satellite Name: from the stored list.LNB Frequency:LNB Frequency:LNB Frequency:LNB Frequency: Universal / Wide Band / OSC C-Band / C-BandHigh L.OHigh L.OHigh L.OHigh L.O....: : : : enter the frequencyLow L.OLow L.OLow L.OLow L.O....: : : : enter the frequency22kHz Tone:22kHz Tone:22kHz Tone:22kHz Tone: On / Off0/12 Volt Switch:0/12 Volt Switch:0/12 Volt Switch:0/12 Volt Switch: On / OffDiSEqC:DiSEqC:DiSEqC:DiSEqC: Off / DiSEqC A, B, C or D / Tone A or BLNB Power:LNB Power:LNB Power:LNB Power: H/V / 14V / 18V / Off
. Use CH CH CH CH �/� to move up and down the list.. Use Vol Vol Vol Vol ◀/▶ to change the setting.. Upon reaching the required menu line, press OKOKOKOK to enter the setting.. Press EXITEXITEXITEXIT to go back to the previous mode.
---- Channel SearchChannel SearchChannel SearchChannel SearchPress OKOKOKOK on 'Channel Search' in the Setup Menu. The following window will appear. Set theSatellite, Tune Method, Transponder, Frequency, Symbol Rate, Polarity, FEC and Function.
Satellite Name:Satellite Name:Satellite Name:Satellite Name: from the stored list.Tune Tune Tune Tune MethodMethodMethodMethod:::: Sat (Free) / Sat (Free+Scr) / TP (Free) /TP (Free+Scr) / NIT (Free) / NIT (Free+Scr)Transponder: Transponder: Transponder: Transponder: 1~32Frequency:Frequency:Frequency:Frequency: Auto / ManualSymbol Rate:Symbol Rate:Symbol Rate:Symbol Rate: Auto / ManualPolarity:Polarity:Polarity:Polarity: Horizontal / Vertical / Right / LeftFEC:FEC:FEC:FEC: Auto, 1/2, 2/3, 3/4, 5/6, 7/8AGC Signal:AGC Signal:AGC Signal:AGC Signal: Indicates received signal strength level.
. Use CH CH CH CH �/� to move up and down the list.
. Use Vol Vol Vol Vol ◀/▶ to change the setting.
. Upon reaching the required menu line, press OKOKOKOK to enter the setting.
. Press EXITEXITEXITEXIT to go back to the previous mode.
- Set- Set- Set- Setupupupup Lock/PIN Lock/PIN Lock/PIN Lock/PINPress OKOKOKOK on 'Setup Lock/PIN' in the Setup Menu. Thefollowing window will appear. Set the Menu Lock,Change the PIN, enter the New PIN and confirm theConfirm PIN.

Menu Lock:Menu Lock:Menu Lock:Menu Lock: On/OffChangeChangeChangeChange PIN PIN PIN PIN:::: Press OKOKOKOK if you want to change.New PIN:New PIN:New PIN:New PIN: Enter your new 4-digit codeConfirm PIN:Confirm PIN:Confirm PIN:Confirm PIN: Confirm your new 4-digit code
. Use CH CH CH CH �/� to move up and down the list.
. Use Vol Vol Vol Vol ◀/▶ to change the setting.
. Upon reaching the required menu line, press OKOKOKOK to enter the setting.
. Press EXITEXITEXITEXIT to go back to the previous mode.
- Time Setting- Time Setting- Time Setting- Time SettingPress OKOKOKOK on 'Time Setting' in the Setup Menu. The following window will appear. Set the LocalTime, Sleep Time, Timer Status and Program the Timer.
Local Time:Local Time:Local Time:Local Time: dd/mm/yyyy - day – hh:mmSleep Time: Sleep Time: Sleep Time: Sleep Time: 0~180 min
. Use CH CH CH CH �/� to move up and down the list.
. Use Vol Vol Vol Vol ◀/▶ to change the setting.
. Upon reaching the required menu line, press OKOKOKOK to enter the setting.
. Press EXITEXITEXITEXIT to go back to the previous mode.
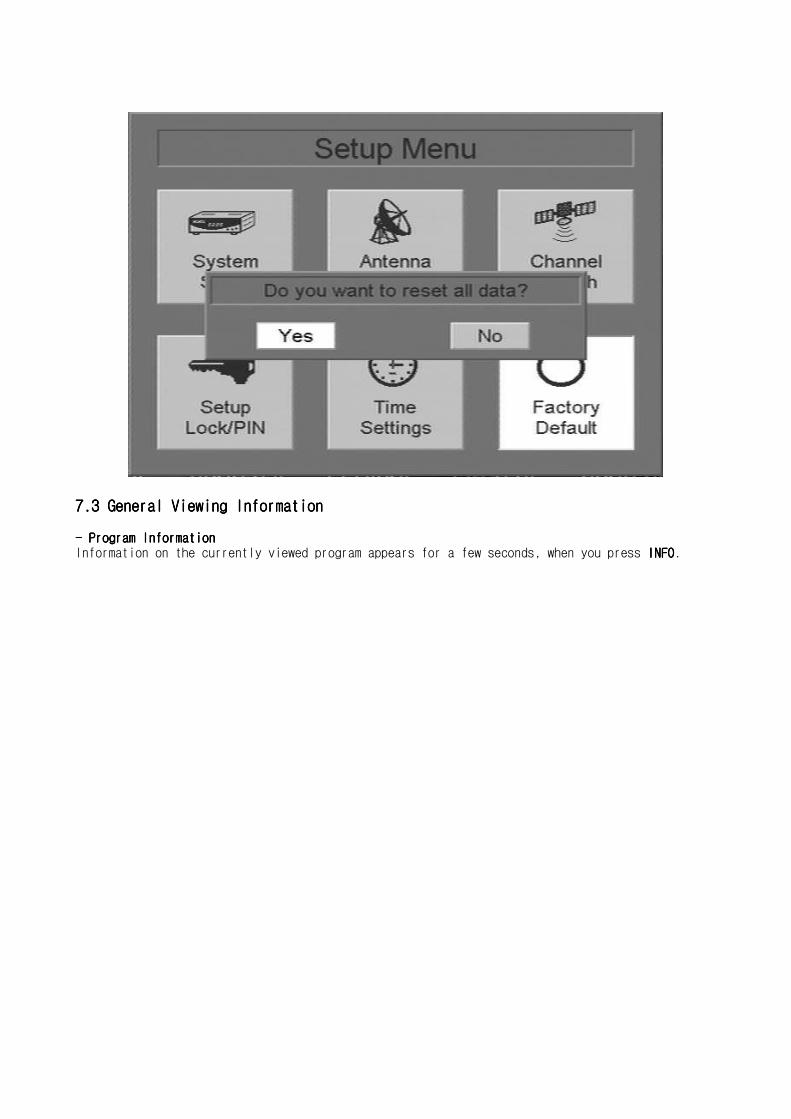
- Factory Default- Factory Default- Factory Default- Factory DefaultPress OKOKOKOK on 'Factory Set' in the Setup Menu. Confirm whether you wish to go back to the factorydefault settings.
* Note: The default PIN is '1234'
7.3 7.3 7.3 7.3 General General General General Viewing Viewing Viewing Viewing IIIInformationnformationnformationnformation
- Program Information- Program Information- Program Information- Program InformationInformation on the currently viewed program appears for a few seconds, when you press INFOINFOINFOINFO.

- TV/Radio Channel- TV/Radio Channel- TV/Radio Channel- TV/Radio Channelssss List List List ListWhile watching TV you can call the channel list by pressing TV/RadioTV/RadioTV/RadioTV/Radio. The picture in the previewscreen is that of the highlighted channel, which can be changed with the CH CH CH CH �/�. VolVolVolVol ◀/▶scrolls Channel List pages Down or Up. Pressing OKOKOKOK on a highlighted channel calls that channeland exits the Channel List. Press EXITEXITEXITEXIT to close the Channel List.
<TV Channel List>
Channel numberChannel numberChannel numberChannel number
Channel nameChannel nameChannel nameChannel name
FavoriteFavoriteFavoriteFavorite
ScrambledScrambledScrambledScrambled
LockLockLockLockTeletextTeletextTeletextTeletext
ClockClockClockClock

<Radio Channel List>
- Favorite Channel- Favorite Channel- Favorite Channel- Favorite Channelssss List List List ListssssWhile watching TV or listening to Radio you can call the respective favorite channels list bypressing FAVFAVFAVFAV. If the list is empty, it will not appear.
<Favorite TV> <Favorite Radio>

- Program Guide- Program Guide- Program Guide- Program GuidePress EPGEPGEPGEPG to access the electronic program guide, if available from the broadcaster.
- - - - LanguageLanguageLanguageLanguagePress LANG to access the audio language selection screen.
Track: Track: Track: Track: 1 of 1,2...
Mode:Mode:Mode:Mode: Stereo / Mono Left / Mono Right
Level:Level:Level:Level: Normal / High / Low
Language: Language: Language: Language: unknown
- RecallRecallRecallRecallPress RECALLRECALLRECALLRECALL to recall the previous channel.
- TeletextTeletextTeletextTeletextPress TXT TXT TXT TXT to access the teletext service if available from the broadcaster.

7.4 Main Menu Setting7.4 Main Menu Setting7.4 Main Menu Setting7.4 Main Menu Settingssss
From the Main Menu you access the Program Guide, Channel Sorting, Language & Color PreferenceSettings, Favorites Editing, Channel Editing and Software Version information.
. Press MENUMENUMENUMENU
. Use CH CH CH CH �/� to move up and down the list.
. Use Vol Vol Vol Vol ◀/▶ to change the setting.
. Upon reaching the required menu line, press OKOKOKOK to enter the setting.
. Press EXITEXITEXITEXIT to go back to the previous mode.
- Program Guide- Program Guide- Program Guide- Program GuidePress OKOKOKOK on 'Program Guide' in the Main Menu. The following window will appear.

. Use CH CH CH CH �/� to move up and down the list.
. Use Vol Vol Vol Vol ◀/▶ to move sideways across a channel line.
. Pressing OKOKOKOK on the highlighted channel calls that channel to the background.
. Press EXITEXITEXITEXIT to go back to the previous mode.
- Sort Program- Sort Program- Sort Program- Sort ProgramssssPress OKOKOKOK on 'Program Search' in the Main Menu. The following window will appear.
. Use Vol Vol Vol Vol ◀/▶ to select an alphabetical letter.
. Press OKOKOKOK to confirm your choice.
. Use CH CH CH CH �/� to move up and down the list.
. Use Vol Vol Vol Vol ◀/▶ to scroll pages Down or Up.
. Pressing OKOKOKOK on the highlighted channel calls that channel and closes this menu.
. Press EXITEXITEXITEXIT to go back to the previous mode.
---- Languages & ColoursLanguages & ColoursLanguages & ColoursLanguages & ColoursPress OKOKOKOK on the 'Language Preference'. The following window will appear. Select the menulanguage, default audio language, menu opacity, and palette setting.

Menu LanguageMenu LanguageMenu LanguageMenu Language: Select English / Arabic / Deutsch / FrancaisMenu OpacityMenu OpacityMenu OpacityMenu Opacity: 20~100 %PalettePalettePalettePalette: Summer / Autumn / Winter / Jungle/
Undersea /Sun Flower / Sky / Spring
. Use CH CH CH CH �/� to move upwards and downwards in the menus.
. Use Vol Vol Vol Vol ◀/▶ to change the values in the alternatives.
. When you have reached the required subject menu, press OKOKOKOK to confirm your selection.
. Press EXITEXITEXITEXIT to go back to the previous mode.
-. Edit favorites-. Edit favorites-. Edit favorites-. Edit favoritesPress OKOKOKOK on the 'Edit Favorites'. The following window will appear.
Select the Edit favorites menu.
. Use CH CH CH CH �/� to move upwards and downwards in the menus.
. Use Vol Vol Vol Vol ◀/▶ to change the values in the alternatives.
. When you have reached the required subject menu, press OKOKOKOK to confirm your selection.. Press EXITEXITEXITEXIT to go back to the previous mode.
-. Edit Channels-. Edit Channels-. Edit Channels-. Edit ChannelsPress OKOKOKOK on the 'Edit Channel'. The following window will appear.
Select the Edit channel menu.
TV/Radio Channel
Move Channel
Favorite
Lock Channel
TV/Radio Favorite
Move Favorite
Delete Favorite
Favorite category

Delete Channel
Add Channel
. Use CH CH CH CH �/� to move upwards and downwards in the menus.
. Use Vol Vol Vol Vol ◀/▶ to change the values in the alternatives.
. When you have reached the required subject menu, press OKOKOKOK to confirm your selection.
. Press EXITEXITEXITEXIT to go back to the previous mode.
-. About-. About-. About-. AboutPress OKOKOKOK on the 'About'. The following window will appear.It shows model name, application ver, and device version.
Software UpdateSoftware UpdateSoftware UpdateSoftware Update
For Software Upgrade please select the Line “System Software Update Service” and press the OKButton.
. Press EXITEXITEXITEXIT to go back to the previous mode.
Problem solvingProblem solvingProblem solvingProblem solving
There may be various reasons for the abnormal operation of the unit. Therefore, if the unit doesnot work properly, check it according to the procedures shown in the table below:Problem Possible causes RemedyLED on front paneldoes not light.
AC power cord disconnected Connect power cord properly into thepower socket
No Picture orsound
Wrong connection of thevideo/audio output to TVinput terminal
Connect two terminals correctly withscart cable or RCA or RF cable
Edit Name

Wrong connection of satelliteantenna cable
Wrong direction of satelliteantenna
No signal or weak signal
Wrong setting of channelinformation n MENU screen
Connect the antenna cable correctly
Adjust the direction of antenna
Check the cable connections, LNB andother equipment connected between theLNB and the receiver or adjust theantenna
Type the setting value correctly
Black-and- whitescreen or V-Hold
Your TV mode is differentfrom satellite broadcastingmode
Use same mode as TV
Use the NTSC/PAL converter connected tothe receiver and TV
The remotecontroller is notworking
Battery exhausted
Fluorescent light interferingwith the remote controllerRemote controller isincorrectly aimed
Change the batteries
Switch off the light
Aim the remote control at the receiver
SpecificationsSpecificationsSpecificationsSpecifications
-. System capabilitiesFull DVB compliant
-. LNB/Tuner inputConnector: IEC 169-24, femaleFrequency range: 950MHz ~ 2150MHzSignal level: -65dBm ~ -25dBmLNB supply: 14/18V, max 400mALNB switch control: 22KHz, 0/12VDiSEqC: Ver 1.2 Compatible
-. DemodulatorFront end: QPSKSymbol rate: 2MSps ~ 45MSpsSCPC and MCPC CapableSpectral inversion Auto conversion
-. System resourceProcessor: 32bit processor (60MHz)SDRAM: 8MbyteFLASH: 2Mbyte
-. Video DecoderMPEG 2: Main Profile @ Main LevelData Rate: Up to 15Mbit/sResolution: 720x576, 720x480Video format: NTSC, PAL, SECAMAspect Ratio: 4:3, 16:9

-. TeletextDVB compliant: STV (Normal TV) / VBI
-. MPEG AudioMPEG 1 layer 1&2Type : Mono, Dual mono, StereoSampling rates: 32, 44.1 and 48KHz
-. Serial data interfaceConnector: 9pin D-sub male, Max 115Kbps
-. Remote controlOperating condition: Up to 7 Meter
-. Power supplyPower consumption: Max 30WSupply voltage: 90 ~ 265V/ACSupply frequency: 47Hz ~ 63Hz
-. Rear panel connectorsVideo out: 1 x RCA cinchAudio L/R: 2 x RCA cinch0/12V: 1 x RCA cinch:Serial data: 9pin D-subDigital tuner input: IEC 169-24Loop-through Digital tuner: IEC 169-24TV SCART: RGB, CVBS, Y/C, AudioVCR SCART: CVBS, Y/C, Audio
-. Physical SpecificationSize (W x H x D): 260 x 60 x 185 mmWeight (Net): 2.0 Kg