matchless single treadle spinning wheel - schacht spindle
TRANSCRIPT

Matchless single treadlespinning Wheel
instructions, maintenance & warranty
15 100 100 10 67 49 36 0 42 5 92 4
38 37 94 24 0 76 81 31 90 7 0 36
3 66 100 9 49 24 0 70 0 42 59 49
Find out more at schachtspindle.comSchacht Spindle Company 6101 Ben Place Boulder, CO 80301p. 303.442.3212 f. 303.447.9273© 2011 Schacht Spindle Company, Inc. 05.11

– 2 –
Single Treadle Wheel
Rear Maiden
Drive Band Tension Knob
Flyer
Flyer Orifice
Flyer Whorl
Bobbin
Mother-of-All
Scotch Tension Knob
Front Maiden
T-Knob
Footman
Treadle
Adjustable Feet
Front Leg
Rear Leg
Treadle Support Bar

– 3 –
We are pleased that you have chosen one of our Schacht Spinning Wheels, and trust that it will give you many fruitful hours of spinning. We have taken great care in the design of our wheels to make them efficient and sturdy as well as aesthetically pleasing. Our wheels are constructed using traditional woodwork-ing joinery, following the concept that form follows function. We feel that good design and quality craftsmanship, along with regular maintenance, ensures that your wheel will endure.
Each part has been specially designed with function in mind. During manu-facturing, every part is inspected for quality, and the final assembly has been done by a skilled craftsperson. Should you have any questions about the qual-ity of the work or the materials, please do not hesitate to contact your dealer or our customer service department directly.
Your Schacht Spinning Wheel is a precision tool, having many moving parts that require regular care and maintenance. The better you understand your wheel, the more able you will be to take advantage of its many features.
Please read this booklet before you start spinning on your wheel.
1
Unpacking yoUr wheelUnpack the accessory boxes and make sure you have all the parts.
Large Box:1 – Lazy Kate 3 – bobbins3 – Lazy Kate bobbin rods1 – carrying strap
in small bag:1 – threading hook1 – 4mm hex wrench 1 – 5mm hex wrench 3 – black retainer rings for bobbin rods 1 – brake tension spring and cord 1 – extra length of drive cord10 – 1/4” trusshead screws 2 – 1” trusshead screws
Small box:1 – bobbin1 – flyer1 – flyer whorl(2nd whorl is attached to the back of the rear maiden)2 – cotter pins2 – treadle yoke clevis pins 4 – white nylon washers
Wood Parts:1 – treadle with treadle yoke attached to the treadle support bar
reqUired toolsPhillips screwdriver

attaching the footmenAttach the footmen to the treadles using the cotter pins, clevis pins and the white nylon washers that are packed in the small box with the flyer.
The left treadle is attached to the foot-man that is closest to the back of the wheel. Place the footman leather inside the treadle yoke and line up the holes. Put a washer on a clevis pin and insert the clevis pin from the front of the wheel towards the back. Put another washer on the clevis pin and secure by inserting a cotter pin through the clevis pin until the cotter pin is about halfway through the clevis pin.
attaching the treadleRemove the leg bolt, washer and short rod from the front leg. Re-move the short rod from the leg bolt. Insert the bolt with the washer through the hole in the middle of the treadle support brace. Place the short rod on the leg bolt and insert the leg bolt into the front leg. Align the short rod with the slot in the front leg. With the 4mm hex wrench fasten the leg bolt into the barrel nut glued into the cross brace.
– 4 –2
aTTaching The fooTmen
BackS of TreadleS, Seen from righT Side of Wheel
clevis pin
footman leather
treadle yoke
cotter pin
footman wood
white washer white
washer
right treadle
left treadle
aTTaching The Treadle
leg bolt
treadle support bar
treadle support brace
treadle treadle
front leg
screw
screw
treadle support braceangled edge
washer
leg bolt
treadle support bar
treadle
short rod
front leg
washertreadle support brace
slot
Placing The ShorT rod
leg bolt4mm hex wrench
barrel nut
cross bracetreadle support bar
washer
treadle support brace
Securing The leg BolT
The right treadle is attached in the same way, but the clevis pin should be inserted through the footman and treadle yoke from the back of the wheel toward the front.
adjUsting the treadle heightThis adjustment is only necessary if your treadle is either rubbing the drive wheel or hitting the rear leg cross support. To adjust the treadle height, remove the cotter pin from the treadle-yoke pin and pull the treadle-yoke pin out of the treadle yoke. Rotate the yoke clockwise to raise the treadle and counterclockwise to lower the treadle. Make only two or three turns and reassemble the footman and treadle yoke. Repeat this adjustment until you are satisfied with the posi-tion of the treadle.
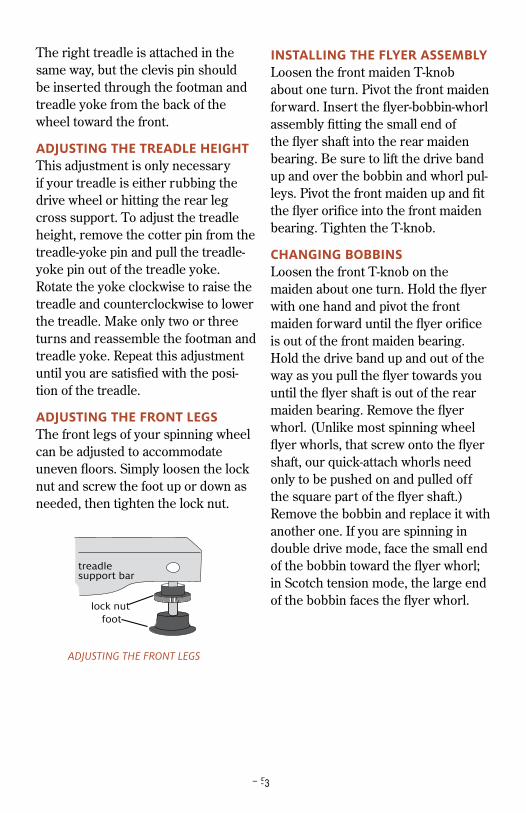
adjUsting the front legsThe front legs of your spinning wheel can be adjusted to accommodate uneven floors. Simply loosen the lock nut and screw the foot up or down as needed, then tighten the lock nut.
installing the flyer assemblyLoosen the front maiden T-knob about one turn. Pivot the front maiden forward. Insert the flyer-bobbin-whorl assembly fitting the small end of the flyer shaft into the rear maiden bearing. Be sure to lift the drive band up and over the bobbin and whorl pul-leys. Pivot the front maiden up and fit the flyer orifice into the front maiden bearing. Tighten the T-knob.
changing bobbinsLoosen the front T-knob on the maiden about one turn. Hold the flyer with one hand and pivot the front maiden forward until the flyer orifice is out of the front maiden bearing. Hold the drive band up and out of the way as you pull the flyer towards you until the flyer shaft is out of the rear maiden bearing. Remove the flyer whorl. (Unlike most spinning wheel flyer whorls, that screw onto the flyer shaft, our quick-attach whorls need only to be pushed on and pulled off the square part of the flyer shaft.) Remove the bobbin and replace it with another one. If you are spinning in double drive mode, face the small end of the bobbin toward the flyer whorl; in Scotch tension mode, the large end of the bobbin faces the flyer whorl.
– 5 –3
lock nutfoot
treadle support bar
adjuSTing The fronT legS
– 6 –
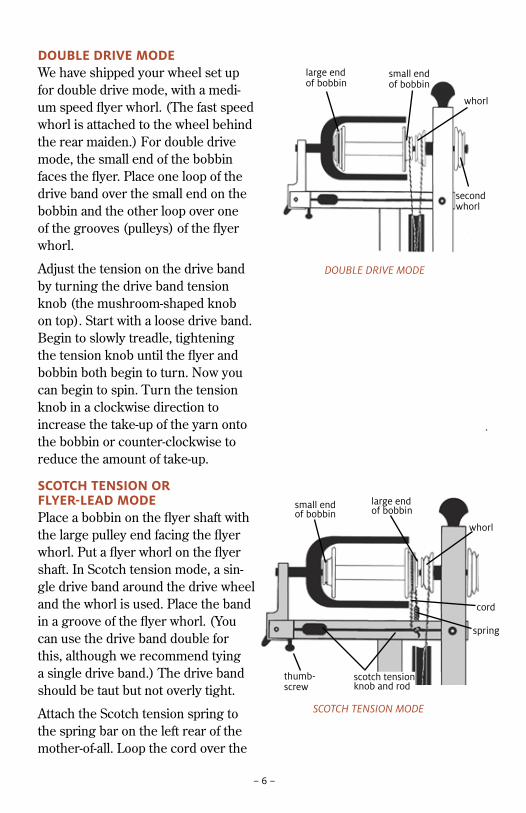
doUble drive modeWe have shipped your wheel set up for double drive mode, with a medi-um speed flyer whorl. (The fast speed whorl is attached to the wheel behind the rear maiden.) For double drive mode, the small end of the bobbin faces the flyer. Place one loop of the drive band over the small end on the bobbin and the other loop over one of the grooves (pulleys) of the flyer whorl.
Adjust the tension on the drive band by turning the drive band tension knob (the mushroom-shaped knob on top). Start with a loose drive band. Begin to slowly treadle, tightening the tension knob until the flyer and bobbin both begin to turn. Now you can begin to spin. Turn the tension knob in a clockwise direction to increase the take-up of the yarn onto the bobbin or counter-clockwise to reduce the amount of take-up.
scotch tension or flyer-lead modePlace a bobbin on the flyer shaft with the large pulley end facing the flyer whorl. Put a flyer whorl on the flyer shaft. In Scotch tension mode, a sin-gle drive band around the drive wheel and the whorl is used. Place the band in a groove of the flyer whorl. (You can use the drive band double for this, although we recommend tying a single drive band.) The drive band should be taut but not overly tight.
Attach the Scotch tension spring to the spring bar on the left rear of the mother-of-all. Loop the cord over the
douBle drive mode
large end of bobbin
small end of bobbin
whorl
second whorl
large end of bobbin
whorl
scotch tension knob and rod
cord
spring
thumb-screw
small end of bobbin
ScoTch TenSion mode

– 7 –
large bobbin end and insert it into the front hole in the Scotch tension rod. Push about 1/2" of the cord through the hole. Loosen the thumbscrew slightly to allow the Scotch tension knob to turn. Turn the Scotch tension knob clockwise until the brake spring barely begins to stretch. Tighten the thumbscrew to secure the Scotch ten-sion rod. Now you can start spinning. To increase the amount of take-up of your yarn onto the bobbin, turn the Scotch tension knob in the clockwise direction. To decrease the amount of take-up, turn the Scotch tension knob counter-clockwise.
When using the Scotch tension mode the yarn will wind onto the bobbin in the opposite direction than when using the double drive mode. This does not affect your spinning, but it is good to know this in case you should change spinning modes in the middle of a bobbin. If the Scotch tension rod becomes loose, you can tighten the black thumbscrew under the front of the mother-of-all.
yoUr drive band Your spinning wheel comes with a pre-tied drive band (tied for double drive) and an extra length of drive band. For additional drive bands, use a soft cotton cord which is about 1/16" thick (an eight or ten-ply butcher or pack-age twine works fine). A soft drive band allows you to use less tension than a harder, slicker cord, making treadling easier. While a soft drive band will wear quicker, we believe the gain in performance is worth chang-ing the drive band more often.
tying on a new drive bandCut the old drive band to remove it.
For double drive mode, place a bob-bin in the flyer with the small end facing the whorl. Use a medium size whorl. Adjust the drive band tension knob so that the flyer is parallel to the mother-of-all. Face the front of the wheel. Hang one end of the drive band cord over the bobbin groove so that it hangs down about 12 inches on the right side of the wheel. On the left side take the cord down and around the drive wheel and up and over the larger pulley of the whorl. Go down and around the drive wheel a second time. Bring the end of the cord up to the first end. Tie the two ends together using a square knot. Make sure that the drive band very taut, since it will loosen some with use. Cut off the ends of the cord as close to the knot as possible.
For Scotch tension, use the same method above, except that only a single drive band is tied around the drive wheel and the whorl. If you are using the slow speed or extra slow speed whorls, it is best to tie a sepa-rate drive cord following the instruc-tions above. Several drive cords can be left on the wheel at the same time. Just fold up the ones not in use and let them hang from the maiden or the front leg.
Using different flyer whorlsThe type of fiber you are spinning and the kind of yarn you want to produce will determine which flyer whorl to use. Your spinning wheel comes with

– 8 –
ests throughout the central eastern and mid-western United States. It is also successfully cultivated in other parts of the U.S. and Canada. Black Walnut's deep brown heartwood beautifully accents the design of your wheel.
Wood is a natural breathing mate-rial, and like any natural material, it is affected by its environment. Avoid placing your wheel near direct heat sources such as heat vents, wood stoves, space heaters, and direct sunlight. Heat concentrated on parts of the wheel can cause them to dry out and shrink. This shrinkage can cause weakness in the joints and the warping of parts. Likewise, place your wheel where it will be free of damp, moisture-laden air, as this can make wood swell and cause the moving parts to stiffen and function ineffi-ciently.
the finish on yoUr spinning wheelThe flyer of our spinning wheel has been lacquered to protect it from oil and moisture. The other parts of our wheel have been finished with Danish oil which penetrates into the wood, protecting the wood as well as the surface area. If you need to touch up parts of your wheel which have gotten chipped or scuffed, you can lightly sand the worn area and apply a small amount of finish using a soft lint-free rag. Use either Deft or Watco natural color Danish oil. Both are available at most hardware stores. Follow the directions on the contain-er. Because of the dangers of spon-
two flyer whorls: a Medium Speed Whorl with 9:1 and 11:1 ratios and a Fast Speed Whorl with 13:1 and 15½:1 ratios. We offer four others (see the chart). The general rules to remem-ber are: the larger (slower) the whorl, the thicker the yarn, the less the twist, and the greater the take-up. It is also important to remember that, in the double drive mode, depending on how much or how little tension you put on the drive band, you can increase or decrease the take up. In the Scotch Tension mode the amount of take-up is controlled by the amount of tension you put on the brake spring & cord. The greater the tension, the greater the take-up.
the wood in yoUr spinning wheelWe use hard maple and black wal-nut in the finest grades available. All our wood is kiln dried to assure its stability under a variety of condi-tions. Maple is a strong and beautiful hardwood that varies in color from pale cream to biscuit brown. It Hwas a very fine grain that takes a high polish and is extremely resistant to abrasion. American black walnut grows wild as a tall tree of the rich bottomland for-
whorl ratios
whorl ratioExtra Slow Speed 4:1 & 4½:1Slow Speed 6:1 & 7½:1Medium Speed (with wheel) 9:1 & 11:1 Fast Speed (with wheel) 13:1 & 15½:1*High Speed 17½:1 & 19½:1*Super High Speed 18½:1 & 22:1
*These whorls use the High Speed Bobbin.
– 9 –
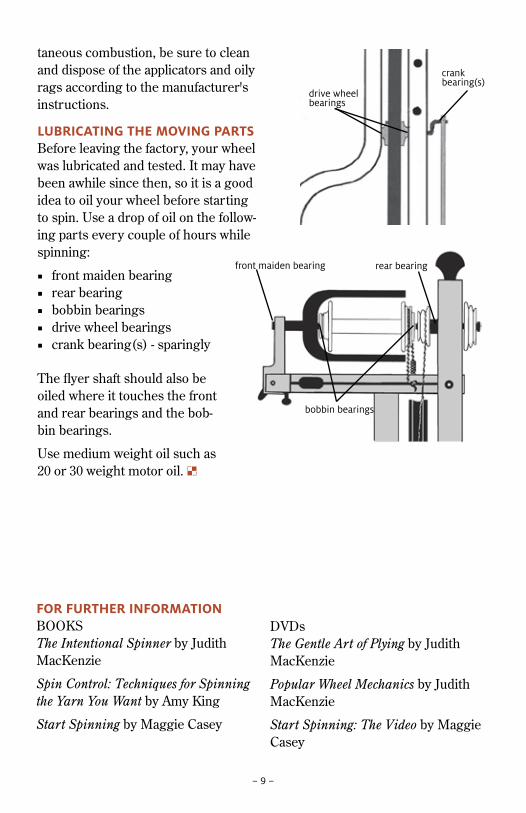
front maiden bearing rear bearing
bobbin bearings
drive wheel bearings
crank bearing(s)
taneous combustion, be sure to clean and dispose of the applicators and oily rags according to the manufacturer's instructions.
lUbricating the moving partsBefore leaving the factory, your wheel was lubricated and tested. It may have been awhile since then, so it is a good idea to oil your wheel before starting to spin. Use a drop of oil on the follow-ing parts every couple of hours while spinning:
■ front maiden bearing ■ rear bearing ■ bobbin bearings ■ drive wheel bearings ■ crank bearing(s) - sparingly
The flyer shaft should also be oiled where it touches the front and rear bearings and the bob-bin bearings.
Use medium weight oil such as 20 or 30 weight motor oil. •
for fUrther informationBOOKSThe Intentional Spinner by Judith MacKenzie
Spin Control: Techniques for Spinning the Yarn You Want by Amy King
Start Spinning by Maggie Casey
DVDsThe Gentle Art of Plying by Judith MacKenzie
Popular Wheel Mechanics by Judith MacKenzie
Start Spinning: The Video by Maggie Casey

– 10 –8
the indUstrioUs lazy kateOur Lazy Kate has an adjustable tension control cord which helps prevent bobbins from rotat-ing too fast when releasing yarn. Place the bobbins in the Lazy Kate with the large bobbin end facing the tension cord. The handle ends of the bobbin rods should be on the side opposite the tension cord. Slip the tension cord over the grooves in the large pulley. Turn the control knob to increase or decrease the tension on the bobbins. Attach the small rubber rings to the tip ends of the bobbin rods to keep the rods in place.
bUlky plyer flyer headAdd new capabilities to your Matchless Spinning Wheel with the Bulky Plyer Flyer Head. The generous 7/8” orifice allows you to spin yarns bigger than ever. The extra large capacity bob-bin is great for extra long skeins. The package includes the Bulky Flyer and Front Maiden and one 8 ounce Bulky Bobbin.
spinning wheel cartThe neatest way ever to travel with your spinning wheel, the Schacht Spinning Wheel Cart is designed exclusively for the Schacht Spinning Wheel. The Cart comes with special hardware that replaces the bolts in the bottom of the spinning wheel rear legs. The rubber wheels give a smooth ride and they attach and detach quickly.
oil bottleThis is the perfect bottle for getting oil to all of those out of the way places on spinning wheels. It is useful for all kinds of household oiling jobs, too.
dizzy yarn gaUgeWith both ½" and 1" measure, this gauge can be used as a spinner's yarn gauge, or a weaver's sett gauge. The hole in the center serves as a diz for making a consistent sliver for spinning.

– 11 –
cardersWe offer a wide selection of hand carders. They are made of maple. A molded lip on the rear edge of the paddle protects the card clothing from wear. The flared handle is very comfortable and reduces the amount of effort required in carding. Our wool carders are available in 72 and 112 points per square inch. Our 208 p.s.i. cotton carders are excellent for fine fibers, including cotton angora, and cashmere. Our flick carder, with 72 p.s.i , is a small single carder and is used to separate and tease fibers.
spindlesOur drop spindles are avail-able with 2½", 3" or 4" diameter whorls, and come with a brass hook so they can be used for either top- or bottom-whorl spin-ning. These spindles are good for spinning medium to long fibers, especially wool.
Our pear tahkli support spindle has a hooked brass shaft and a maple bob. This spindle is excellent for spinning cotton and short, downy fibers.
Our Navajo spindle has a 30" tapered shaft and a 4½" maple whorl.
9
2½” (1.1 oz.)4” (3 oz.) 3” (2.2 oz.)

– 12 –
two year limited warrantyYour new Schacht Spinning Wheel is warranted, to the original consumer purchaser, by Schacht Spindle Company, Inc. to be free of defects in material and workmanship. Schacht Spindle Company's obligation under this Warranty shall be limited to the repair or replacement of any part or parts which may prove defective within two (2) years following the date of original purchase by the consumer, and which Schacht Spindle Company's examination shall disclose to our satisfaction to be thus defec-tive.
If a problem with this Schacht Spindle Company product develops during the war-ranty period, first contact the Schacht Spindle Company dealer from whom you made the purchase. If the problem cannot be handled through your dealer, then contact our customer service department. At our option, it may be required that the product be returned to our factory freight prepaid for inspection and repair and/or replacement.
This Warranty covers normal consumer use and does not cover damage which oc-curs in shipment or damage which results from alteration, accident, misuse, abuse, or neglect.
This Warranty gives you specific legal rights, and you may also have other rights which vary from state to state.
10
maintenance notesYour wheel is both a carefully en-gineered piece of equipment and a fine piece of furniture. A regular schedule of care and maintenance will ensure you and your Schacht Spin-ning Wheel many productive years together.
■ Periodically clean excess fibers from all parts of your wheel. ■ Periodically lubricate the moving
parts. ■ Touch up worn or chipped areas
with fine sandpaper and Danish oil. ■ Check screws for tightness.
(Changes in the environment and the action of spinning can cause screws and nuts to loosen over time.)
wheel serial nUmber
The serial # of your wheel is
___________________________.
The serial number of your spinning wheel is stamped into the wood on the rear of the mother-of-all. If the serial number on your wheel doesn’t agree with the number written on this page, please reference the number stamped on your wheel.