mastering udk game development hotsh t - packt€¦ · mastering udk game development hotsh. t ....
TRANSCRIPT

Mastering UDK Game Development HOTSH T
John P. Doran
Chapter No. 1 "Advanced Kismet – Creating a
Third-person Platformer"

In this package, you will find: A Biography of the author of the book
A preview chapter from the book, Chapter NO.1 "Advanced Kismet – Creating
a Third-person Platformer"
A synopsis of the book’s content
Information on where to buy this book
About the Author John P. Doran is a technical game designer who has been creating games for over 10 years. He has worked on an assortment of games in teams from just himself to over 70 in-student, mod, indie, and professional projects.
He previously worked at LucasArts on Star Wars: 1313 as a Game Design Intern. He was the only junior designer in a team of seniors. He later graduated from DigiPen Institute of Technology in Redmond, WA with a Bachelor of Science degree in Game Design.
John is currently a Software Engineer at DigiPen's Singapore campus, where he tutors students and assists them with difficulties in Computer Science concepts, programming, linear algebra, game design, and advanced usage of UDK, Flash, and Unity in a development environment.
This is his second book; previously he was coauthor for the book UDK iOS Game Development Beginner's Guide, Packt Publishing.
He can be found online at http://johnpdoran.com and can be contacted at [email protected].
For More Information: www.packtpub.com/mastering-udk-game-development/book

Mastering UDK Game Development HOTSH T The Unreal Development Kit (UDK) is the free version of the popular and award-winning Unreal Engine 3. A truly powerful tool for game development, there has never been a better time to use it for both commercial and independent projects.
Mastering UDK Game Development Hotshot takes a clear, step-by-step approach to building a series of game projects using the Unreal Development Kit. By using this book, you will be able to create a two-dimensional-style platformer, a rail-shooter spaceship, as well your very own custom HUD. We then move on to more advanced projects, such as the creation of an inventory system for a Western RPG, complete with dynamic objects that can be dropped anywhere in the game world. On top of all of this, you'll also learn how to quickly and efficiently create modular environments within the UDK itself.
You'll discover how you can exploit the UDK to the fullest extent, making it possible to create a series of exciting projects within the UDK. We will also use the popular industry tool Scaleform in Flash to create user experiences. Finally, we will also go over how to get started in UnrealScript. By learning about advanced functionality via engaging practical examples, you too can take your game to the next level and stand out from the crowd.
What This Book Covers Project 1, Advanced Kismet – Creating a Third-person Platformer, starts by creating a side-scrolling platformer game using the three-dimensional engine to create two-dimensional gameplay. In this project, the player can move left and right, jump on static and moving platforms, and collect coins/collectables, some of which may modify the player's behavior.
Project 2, Terror in Deep Space, will have us creating a three-dimensional rail-shooter game where the player controls a ship. This ship can move around the screen and shoot projectiles out. Enemies and obstacles will spawn towards the player and the player will avoid/shoot them.
For More Information: www.packtpub.com/mastering-udk-game-development/book

Project 3, Terror in Deep Space 2: Even Deeper, will have us continuing along the same path as the previous project. We will use the basis of the project created in Project 2, Terror in Deep Space, and expand upon it by adding enemies that shoot as well as a multitude of asteroids for the player to avoid and/or shoot. We will also add additional functionality, which can be added to practically any game to add polish, such as a HUD, opening cutscene, and the Game Over state.
Project 4, Creating a Custom HUD, will guide us in creating a HUD that can be used within a Medieval RPG and will fit nicely into the provided Epic Citadel map making use of Scaleform and ActionScript 3.0 using Adobe Flash CS6.
Project 5, Creating Environments, will focus on building environments by creating a small, fairly polished map. We will be using the map that we create in this project in the next mission, where we create a fully functional inventory system!
Project 6, Dynamic Loot, will have us creating a dynamic object the player may alter at runtime in order to pick it up or drop it elsewhere, making use of rigid-body physics, or toggle the player's ability to hold it in his hand as he traverses the game environment.
Project 7, Managing Loot, will focus on creating a custom inventory system, making use of a lot of neat features Flash has that should be able to help us in this project. I'll also provide tips and tools that you can use in your own projects. This inventory system will allow us to pick up multiple objects and either equip players with them or drop them on the ground.
Project 8, UnrealScript: A Primer, will have us first gain an understanding on when to use UnrealScript for projects. We will then set up some tools to help us gain an understanding of the code that Epic provided and give some guidance on how object-oriented programming works. After that, we will learn about and install the IDE and write a simple "Hello world!" object. After that we will move on to create another more complicated object with a dynamically flickering light!
For More Information: www.packtpub.com/mastering-udk-game-development/book

Project 1Advanced
Kismet – Creating a Third-person
Platformer
For as long as we have been playing video games, there has been one par cular genre that has stayed with us almost from the beginning, the pla ormer. Star ng with Donkey Kong with the familiar content that we know, refi ned in Super Mario Brothers, given more ac on with Mega Man, sped up with Sonic the Hedgehog, and used even today with games such as Braid, Super Meat Boy, and They Bleed Pixels. There is something that draws us to this specifi c type of game, especially within the indie game community.
With that in mind, I thought a fi ng fi rst project would be to recreate this beloved type of game and prove that UDK is defi nitely not just for crea ng fi rst-person shooters.
Mission Briefi ngWe will be crea ng a side-scrolling pla ormer game using the three-dimensional engine to do two-dimensional gameplay. In this project, the player can move le and right, jump on sta c and moving pla orms, and collect coins/collectables, some of which may modify the player's behavior.
For More Information: www.packtpub.com/mastering-udk-game-development/book

Advanced Kismet – Crea ng a Third-person Pla ormer
10
We will fi rst approach the project using nothing but Kismet and the UDK Editor. This par cular project will be explained with much greater depth than the other projects in order to jog the memory of anyone who has not used UDK in a while and may come up to speed while comple ng this project.
For those who need a quick reminder, Kismet is a system of visual scrip ng in UDK that makes it possible for people to aff ect the game world and design gameplay events. For teams without a programmer, Kismet can be a godsend. It makes it possible for someone without any coding knowledge to do things that would otherwise require the use of UnrealScript, the programming language that the Unreal engine uses.In order to create a sequence of events, you will connect a series of sequen al objects together. This in turn generates a code when the game is run to do the things you want it to do.In future projects however, I will assume a familiarity with the things I have taught in this project.
Why Is It Awesome?Once we fi nish this project, we will have a good understanding of how UDK can be used to create games that it wouldn't necessarily be considered for at fi rst glance; having a three-dimensional engine, we will create a game with two-dimensional gameplay. Also, we will be able to create our very own side-scrolling pla ormer game in the same vein as Mario. We will also learn about some of the assets available in UDK by crea ng subsequences and prefab objects, which we can apply to future projects.
Your Hotshot ObjectivesThis project will be split into fi ve tasks. As we are not crea ng any enemies in our game, we do not have to deal with UnrealScript in this project. It will be a simple systema c process from the beginning to the end. Here is an outline of our tasks:
Level and camera crea on
Adding player func onality
Adding pla orms
Adding collectables/power ups
Designing the level layout and background
For More Information: www.packtpub.com/mastering-udk-game-development/book

Project 1
11
Mission ChecklistBefore we start, let's make sure that we have the latest version of UDK (February 2012 as of this wri ng), which can be downloaded from http://www.unrealengine.com/udk/downloads/.
Apart from that, all of the assets used in this project should already be included within the base UDK installa on.
This project and all projects assume that the user has used UDK to some extent in the past and is familiar with the concepts of building brushes as well as naviga ng around the game environment. The user should also have familiarity with Ma nee and know how to do things such as adding keyframes.
That being said, I will do my best to be as descrip ve as possible in how to do things.
Level and camera creationAs a start to our project, we will be crea ng a new level and modifying the camera to create our side-scrolling game.
Prepare for Lift OffBefore we start working on the project, we must fi rst create a new map. To do this, we must fi rst select File | New Level... and from the pop up that comes up, select one of the top four op ons (I selected Night Ligh ng, but it doesn't ma er which one you choose).
There are many diff erent op ons that you can use in determining how UDK is displayed and whether it works for you. I encourage you to take some me to fi gure out what you like and don't like. While having a Front viewport may be nice, I like having a larger screen space for the Perspec ve view so that I have a be er idea what the area I'm crea ng looks like. This is more my personal preference than anything but it is what I will be using from here on out.
For More Information: www.packtpub.com/mastering-udk-game-development/book

Advanced Kismet – Crea ng a Third-person Pla ormer
12
If you wish to follow me, select View | Viewport Confi gura on | 1x2 Split from the top menu so that your screen looks like the following screenshot:
Engage ThrustersNow that we have a base level to work in, let's start building our game!
1. Bring up the World Proper es menu by selec ng View | World Proper es from the menu bar at the top of the UDK interface. Type Game Type in the search bar at the top of the World Proper es menu to bring up the Game Type menu and the relevant op ons for us. From there, change the drop-down menus for both Default Game Type and Game Type for PIE to UTDeathmatch. As we are in the Zone Info sec on, under Kill Z set the value to -1000.
2. Now let's make sure our player spawns in the correct posi on. Select the PlayerStart_0 object and press F4 to access the object's Proper es window. From there, in the search bar at the top, type Location. Once you fi nd the Loca on vector variable, set the X value to 0. Next, type Rotation. Make sure that the Roll and Pitch op ons are set to 0 and change the Yaw op on to 90.
For More Information: www.packtpub.com/mastering-udk-game-development/book

Project 1
13
Also, note the numbers listed on the Y and Z values in the Loca on variable, as we will be using them in a future step.
For those who don't know or who want a reminder, a variable is a set of values that are stored in a specific way.A vector in Unreal is a variable (a struct, specifically) that contains three floating point numbers inside it: X, Y, and Z. Conceptually, it corresponds to a three-dimensional Euclidean vector often used in linear algebra; in the previous instance it is used as the position of our PlayerStart_0 object in three-dimensional space.
3. From here we need to access the Actors Classes panel by selec ng View | Browser Windows | Actor Classes. Inside, click on the CameraActor selec on that is located under Categories | Common | CameraActor.
For More Information: www.packtpub.com/mastering-udk-game-development/book

Advanced Kismet – Crea ng a Third-person Pla ormer
14
4. Go back to the editor menu, right-click, and select Add CameraActor Here. With the object placed, press F4 to go to the object's Proper es menu. Change the value of X in the Loca on property to be -650, and the Y and Z values to the same posi on as PlayerStart_0, -1248, and 80.
With the necessary objects in place, we open up the Kismet interface by clicking on the K icon at the top of the UDK interface on the main toolbar. From there we fi rst need to create a Player Spawned event. We then right-click anywhere inside the large area in the upper por on of the interface. Choose to create a Player Spawned event by choosing New Event | Player | Player Spawned from the menu that pops up. Click on the Player Spawned event's Sequence Event to have the Proper es window come up and change the value of Max Trigger Count from 1 to 0.
For More Information: www.packtpub.com/mastering-udk-game-development/book

Project 1
15
5. Underneath the Player Spawned event, right-click under the Ins gator output and select Create New Object Variable. You should see a line connec ng the output to the new object variable. If not, click on the connector (the purple triangle) and drag un l you select the new variable we created and let go. Click on the new object to open its proper es in the bo om-le panel of the Kismet window. Under Sequence Variable, we change the value of Var Name to Player.
In all the instances where we are using the named variable Player, we could use the actual Player variable by right-clicking anywhere inside the large area in the upper portion of the interface and selecting New Variable | Player | Player and unchecking the All Players option in the Properties window, but a review of how named variables can be used can be quite useful for things we will be doing in later projects.
6. To the right of the Player Spawned event, create a Set Camera Target ac on by right-clicking and selec ng New Ac on | Camera | Set Camera Target. Right-click under the Target input and select New Variable | Named Variable. Click on the variable to open its proper es. In Proper es under Find Var Name, type in Player and press Enter. You should see the red X change into a green checkmark. Connect the Player named variable that we created to the Target input.
For More Information: www.packtpub.com/mastering-udk-game-development/book

Advanced Kismet – Crea ng a Third-person Pla ormer
16
7. Exit Kismet, click on the CameraActor_0 actor, and return to Kismet by clicking on the K icon on the main toolbar. Right-click on the Cam Target input (the pink square) and select New Object Var With CameraActor_0. Finally, connect the Out output from the Player Spawned event to the In input from the Set Camera Target ac on we created.
If we started the game at this point, we would no ce that when the player spawns we can see the player from a third-person perspec ve that looks great as long as we do not move. You will no ce that the camera does not move with the player and if we move our mouse, our player will turn around and allow us to move in ways that are counter-intui ve to what we are trying to create. Let's fi x those issues now.
8. Create an A ach to Actor ac on by right-clicking and selec ng New Ac on | Actor | A ach to Actor. Connect the Target input to the Player variable, and A achment to the CameraActor_0 variable that we created in the previous sec on. In the proper es for the A ach to Actor ac on, check the Hard A ach op on and connect the Out output from the Set Camera Target ac on to the In input of the A ach to Actor ac on.
9. Create a Toggle Input ac on to the right of the A ach to Actor ac on by right-clicking and selec ng New Ac on | Toggle | Toggle Input. In the ac on's proper es, uncheck the Toggle Movement op on and make sure that the Toggle Turning op on is checked. Connect the Player named variable to the Target input. Connect the Out output of the A ach to Actor ac on to the Turn Off input on the Toggle Input ac on.
For More Information: www.packtpub.com/mastering-udk-game-development/book

Project 1
17
You can connect all of the targets to the same player, or create mul ple Player named variables to house all of the things; it makes no diff erence, but one may make your code look more visually appealing.
10. Save your project (File | Save All) and start your game by pressing F8 or selec ng Play | In Editor on the main toolbar.
For More Information: www.packtpub.com/mastering-udk-game-development/book

Advanced Kismet – Crea ng a Third-person Pla ormer
18
Downloading the example codeYou can download the example code fi les for all Packt books you have purchased from your account at http://www.packtpub.com. If you purchased this book elsewhere, you can visit http://www.packtpub.com/support and register to have the fi les e-mailed directly to you.
Objective Complete - Mini Debriefi ngWe have just created a camera that will follow our player in a similar fashion to that used in side-scroller games. More specifi cally, we have, through Kismet, told our game that we wish to use a diff erent camera instead of the pawn's default one. We have also disabled the ability for players to turn, for the me being, to prevent nonstandard movement.
Adding player functionalityNow, as amazing as having a camera that follows our player around is, there are s ll plenty of things that we need to do to get this game to be the best that it can be. For instance, we want the player to move le and right on the screen when we press A and D. We are also going to adjust the player's jump height and remove the ability to double jump (as it is defaulted in UTDeathmatch).
Engage ThrustersNow, let's get the controls working correctly.
1. With your current level saved, exit out of UDK and open up Windows Explorer. Go to the folder you installed UDK to—that is, to the UDKGame\Config folder. Right-click on the DefaultInput.ini fi le and select Copy. Then use Ctrl + V to paste a copy of the fi le into your folder.
Always create backups of files before you modify them, just in case. On the same note, other projects will assume you are using the default version of this file, so be sure to change the file back when you are ready to move on.It is often a good practice to have a separate and clean install of UDK for each project you are working on, which acts as a control so that you always know what was there originally.Alternatively, you can make use of a version control software, like Perforce to enable you to backtrack your steps, but that's beyond the scope of this book.
For More Information: www.packtpub.com/mastering-udk-game-development/book
Project 1
19
2. Open the fi le and replace the following lines:.Bindings=(Name="GBA_MoveForward",Command="Axis aBaseY Speed=1.0").Bindings=(Name="GBA_Backward",Command="Axis aBaseY Speed=-1.0").Bindings=(Name="GBA_StrafeLeft",Command="Axis aStrafe Speed=-1.0").Bindings=(Name="GBA_StrafeRight",Command="Axis aStrafe Speed=+1.0")
With the following:;-----------------------------------------------------------------; Hotshot - Begin Changes;-----------------------------------------------------------------.Bindings=(Name="GBA_MoveForward",Command="Jump | Axis aUp Speed=+1.0 AbsoluteAxis=100");.Bindings=(Name="GBA_StrafeLeft",Command="Axis aBaseY Speed=-1.0").Bindings=(Name="GBA_StrafeRight",Command="Axis aBaseY Speed=+1.0");-----------------------------------------------------------------; Hotshot - End Changes;-----------------------------------------------------------------
Then replace:.Bindings=(Name="Left",Command="GBA_TurnLeft").Bindings=(Name="Right",Command="GBA_TurnRight")
With:;-----------------------------------------------------------------; Hotshot - Begin Changes;-----------------------------------------------------------------.Bindings=(Name="Left",Command="GBA_StrafeLeft").Bindings=(Name="Right",Command="GBA_StrafeRight");-----------------------------------------------------------------; Hotshot - End Changes;-----------------------------------------------------------------
Save the fi le, and start up the UDK Editor once again.
3. Open up the Kismet Editor. Create a Console Command ac on by right-clicking and choosing New Ac on | Misc | Console Command from the menus.
4. Inside the Proper es window type SetJumpZ 750 as the value for Commands[0]. Connect the Player variable to Target. Connect the Out output from the Toggle Input ac on to the In input of the Console Command ac on.
For More Information: www.packtpub.com/mastering-udk-game-development/book

Advanced Kismet – Crea ng a Third-person Pla ormer
20
5. Next, create a Modify Property ac on by right-clicking and choosing New Ac on | Object Property | Modify Property from the menus. Expand Proper es[0] by clicking on the + icon in order to create a new array entry. In the Property Name variable, type MaxMultiJump. Check the Modify Property op on and change the value of Property Value to 0. Connect the Player variable to the Target input. Connect the Out output from the Console Command ac on to the In input of the Modify Property ac on.
6. Create a Toggle Cinema c Mode ac on by right-clicking beside the Modify Property ac on and selec ng New Ac on | Toggle | Toggle Cinema c Mode. Uncheck all of the op ons apart from the Hide HUD op on. Connect a Player variable to the Target input, then the Out output from the Modify Property ac on to the Enable input of the Toggle Cinema c Mode ac on.
7. Finally, create a Give Inventory ac on by right-clicking and selec ng New Ac on | Pawn | Give Inventory. Check the Clear Exis ng and Force Replace op ons. Connect a Player variable to the Target input, then connect the Out output from the Toggle Cinema c Mode op on to the In input of the Give Inventory ac on.
For More Information: www.packtpub.com/mastering-udk-game-development/book

Project 1
21
8. Save your project (File | Save All) and start your game by pressing F8 or selec ng Play | In Editor on the main toolbar.
Objective Complete - Mini Debriefi ngWith a minimal amount of work, we have accomplished a large amount of what is needed in order to create our side-scrolling pla ormer game with a player that is controlled similarly to the games we men oned at the beginning of the project. The player can now move appropriately, and can only jump once. We have removed the player's weapon, and removed the default HUD, and are well on our way to having an awesome project completed!
Classifi ed IntelTo get a clear picture of why/how the changes in our .ini fi le were made, I feel it is important for me to describe it in detail. The pawn that we are using uses its rota on in determining where it should move by default when we press W, the up arrow, or forward on an Xbox 360 controller; the player will move by default straight forward just as you press the down arrow or S, or the back arrow/bu on will move the player backwards. Le and right will either rotate or move the player to the pawn's le or right respec vely. Without using UnrealScript to modify the PlayerController class and/or pawn, we can just change what the ac ons do.
For More Information: www.packtpub.com/mastering-udk-game-development/book
Advanced Kismet – Crea ng a Third-person Pla ormer
22
Thinking in two-dimensional terms, we want to move the pawn forward when we press the right arrow, move him backwards when our player presses the le arrow, and have the player jump when they press the up arrow or jump.
Note that the changes that we made to the .ini fi le were just modifying what the ac ons associated with the bu ons were meant to do. If you wanted to replace the names of the bindings to be associated with their new connec ons, that is also a viable op on; however, it would require replacing a lot more than we already have.
Platforms? In a platformer?Now that we have the camera system and a func oning player, it would be a good me to start adding things that the player can actually travel to. In this sec on, we will be crea ng both sta c and moving pla orms.
Engage ThrustersThat being said, let's add in those pla orms!
1. Open the Content Browser window in View | Browser Windows | Content Browser. Find the following sta c mesh: StaticMesh'FoliageDemo.Mesh.S_PavingBlocks_01'. Click on it and return to the editor's screen. Right-click on the ground of your level and add the mesh to your level (you may need to load it in fi rst) by selec ng Add Sta c Mesh: FoliageDemo.Mesh.S_PavingBlocks_01.
2. Delete the sta c mesh of the box that is currently in the level by clicking on it and pressing the Delete key. Select our new pla orm and change its loca on to 0, 0, 240 in the same way that we did in the fi rst step. Duplicate the mesh three mes and rotate it to face the three sides the camera can see. You can duplicate the object by either holding down Alt and dragging or by going to Edit | Duplicate. In order to rotate, you can use the translate tool or alter the proper es.
For More Information: www.packtpub.com/mastering-udk-game-development/book
Project 1
23
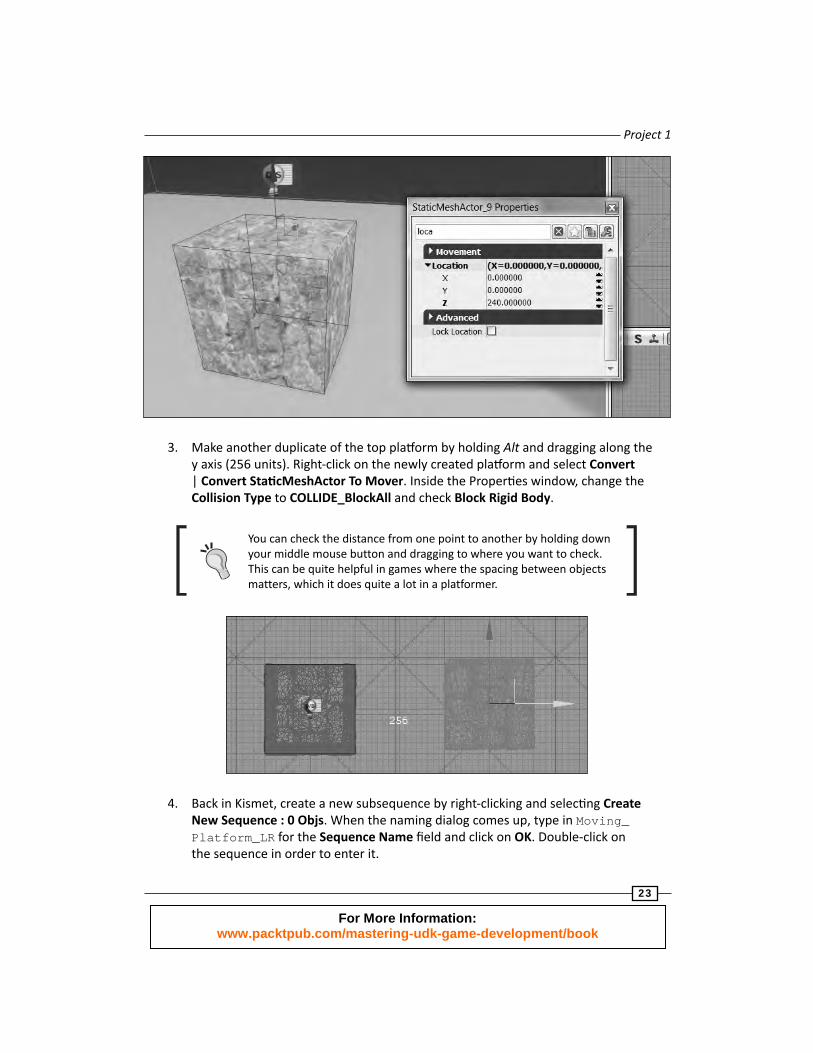
3. Make another duplicate of the top pla orm by holding Alt and dragging along the y axis (256 units). Right-click on the newly created pla orm and select Convert | Convert Sta cMeshActor To Mover. Inside the Proper es window, change the Collision Type to COLLIDE_BlockAll and check Block Rigid Body.
You can check the distance from one point to another by holding down your middle mouse button and dragging to where you want to check. This can be quite helpful in games where the spacing between objects matters, which it does quite a lot in a platformer.
4. Back in Kismet, create a new subsequence by right-clicking and selec ng Create New Sequence : 0 Objs. When the naming dialog comes up, type in Moving_Platform_LR for the Sequence Name fi eld and click on OK. Double-click on the sequence in order to enter it.
For More Information: www.packtpub.com/mastering-udk-game-development/book
Advanced Kismet – Crea ng a Third-person Pla ormer
24
5. Create a Level Loaded event by right-clicking and selec ng New Event | Level Loaded. To the right of it create a new Ma nee sequence by right-clicking and picking New Ma nee. Connect the Loaded and Visible output of the Level Loaded event to the Play ac on of Ma nee. In the Ma nee's proper es under Seq Act Interp, check Looping and Rewind if Already Playing.
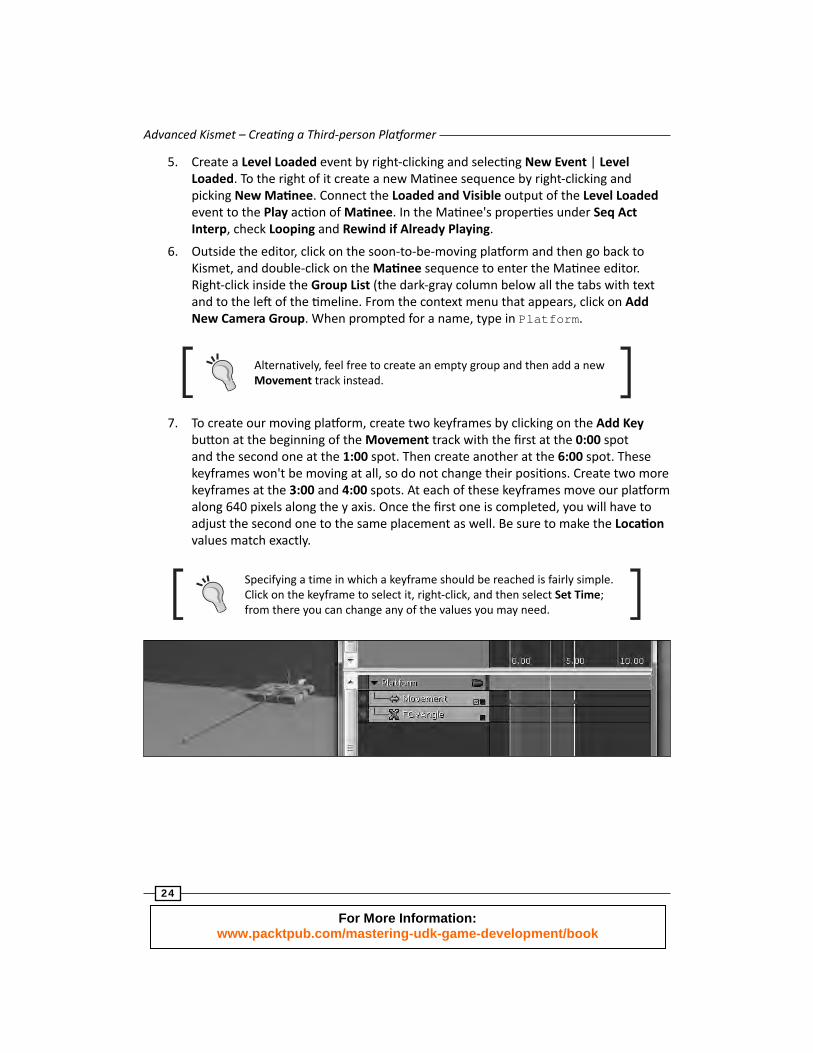
6. Outside the editor, click on the soon-to-be-moving pla orm and then go back to Kismet, and double-click on the Ma nee sequence to enter the Ma nee editor. Right-click inside the Group List (the dark-gray column below all the tabs with text and to the le of the meline. From the context menu that appears, click on Add New Camera Group. When prompted for a name, type in Platform.
Alternatively, feel free to create an empty group and then add a new Movement track instead.
7. To create our moving pla orm , create two keyframes by clicking on the Add Key bu on at the beginning of the Movement track with the fi rst at the 0:00 spot and the second one at the 1:00 spot. Then create another at the 6:00 spot. These keyframes won't be moving at all, so do not change their posi ons. Create two more keyframes at the 3:00 and 4:00 spots. At each of these keyframes move our pla orm along 640 pixels along the y axis. Once the fi rst one is completed, you will have to adjust the second one to the same placement as well. Be sure to make the Loca on values match exactly.
Specifying a time in which a keyframe should be reached is fairly simple. Click on the keyframe to select it, right-click, and then select Set Time; from there you can change any of the values you may need.
For More Information: www.packtpub.com/mastering-udk-game-development/book

Project 1
25
8. Now that we have a single pla orm already created, exit out of Ma nee and exit this sequence. Copy and paste the sequence. Right-click on the newly created one and rename it to Moving_Platform_UD. Double-click on the new subsequence and enter its Ma nee sequence. In this Ma nee, change the 3:00 and 4:00 values to change on the z axis 256 units down.
The point of going from a higher value to a lower value is to make the moving pla orms meet up in such a way that you can jump on them for a period.
9. Make sure that the pla orm is selected in the editor. Exit out of the Ma nee editor and click on the Ma nee that you just fi nished edi ng. In the Ma nee's proper es, check the Force Start Pos op on and set the Force Start Posi on value to 0.2.
10. Select the three sides of the fi rst pla orm that we created (the sta c one) and hold Ctrl + G in order to group them together. With our pla orms created, let's remove some of the elements that are no longer needed and the default fl oor by selec ng it with the le mouse bu on and hi ng Delete. In its place, duplicate the group that we just made and posi on it on the same Z value as the fl oor that was there previously. In the same way as we created the group of the sta c pla orm, we can also use this same mesh to create a staircase. Have each stair only be 16 units above the previous one and create a staircase leading up to the ini al sta c pla orm.
Notice the capping mesh that I have placed covering the sides of the steps, otherwise they are likely to clip in and out of each other and look a bit gross.
For More Information: www.packtpub.com/mastering-udk-game-development/book

Advanced Kismet – Crea ng a Third-person Pla ormer
26
11. Click on our ini al sta c pla orm and duplicate it to create fl oors for the moving pla orms sec on, so that if the player falls they will not die so early in the level. Take the same group and duplicate it to the le of the player's star ng posi on twice. Ungroup the groups we created by holding Shi + G and remove the inner parts that aren't required, then hold Ctrl + G to recreate the larger group as a whole. Delete the unused sec ons.
The stairs work, but the camera moves jaggedly as we walk up or down on it. Thankfully, we have an easy solu on, the BlockingVolume brush.
For those needing a refresher, a BlockingVolume is simply an invisible brush that blocks players and other actors from traveling the stairs, and we can create a volume that will make the player actually move up a ramp when it looks like he is going upstairs.It doesn't matter for this project, but a BlockingVolume allows zero extent traces (projectiles, rockets, and so on) to go through it.
For More Information: www.packtpub.com/mastering-udk-game-development/book

Project 1
27
Click on the builder brush (the red square in our ini al level) and open up Geometry Mode by either selec ng it on the right side on the top row of the Modes toolbar, or by pressing Shi + 2. With it selected, create a shape like the following screenshot, by fi rst extending the le side of the brush outward, then grabbing the top-le points and dragging downwards un l it is only 16 units above the original. Right-click on the brush and select Add Volume | Blocking Volume. At this point if you would like to select all of the stairs, change their Collision Type to COLLIDE_NoCollision, though it will not change what the player interacts with.
12. Duplicate our large le sidepiece twice on the right-hand side with the tallest sec on being the jump height from the up and down moving pla orm's peak. From there, create another duplicate object around 864 units apart and in the middle, place a duplicate of our ini al sta c pla orm to use.
For More Information: www.packtpub.com/mastering-udk-game-development/book

Advanced Kismet – Crea ng a Third-person Pla ormer
28
13. Click on the LightmassImportanceVolume op on (the yellow box), and use Geometry Mode to extend it to the space that we are using in the level.
For those wondering, Lightmass creates light maps with complex light interactions, making the level look more lifelike. It is orthogonal to the rest of the rendering pipeline (dynamic lighting and shadowing), meaning it just replaces the light maps and static shadow maps with higher-quality ones.The LightmassImportanceVolume option in a level controls the area that Lightmass emits photons in, allowing you to concentrate it only on the area that needs detailed indirect lighting. Areas outside the importance volume get only one bounce of indirect lighting at a lower quality.
For More Information: www.packtpub.com/mastering-udk-game-development/book

Project 1
29
14. Build your project by selec ng Build | Build All. Save your game using File | Save All and run our game by selec ng Play | In Editor.
Objective Complete - Mini Debriefi ngWe have just replaced the default models in our level with diff erent meshes to assemble parts that we can replicate. We also converted some of these meshes into Movers, and used Ma nee in order to have our moving pla orms actually move in the level using subsequences, which we can later turn into prefabs. We also created stairs that the player can climb while using BlockingVolumes in order to make the trip up less jarring.
Collecting collectablesAs well as pla orms, another staple of pla ormers is collectable items to reward players for exploring. We will implement two diff erent types of collectable: items that the player may collect, and a power-up that will give the player the ability to double jump again.
For More Information: www.packtpub.com/mastering-udk-game-development/book

Advanced Kismet – Crea ng a Third-person Pla ormer
30
Engage ThrustersNow let's start adding in those collectables!
1. Go to the Content Browser window by going to View | Browser Windows | Content Browser. In Content Browser, fi nd the following par cle system: ParticleSystem'WP_ShockRifle.Particles.P_WP_ShockRifle_Ball' and click on it. Exit Content Browser and fi nd a pla orm, right-click on it, and select Add Emi er: P_WP_ShockRifl e_Ball. Hit the Real Time visualizer circled in the following screenshot or by pressing Ctrl + R to get a view of what our collec ble will look like. Posi on the item in the air in a place that the player can reach by jumping, such as one of the previously men oned posi ons the moving pla orm is travelling on.
2. Create a trigger around our new par cle system by clicking on the builder brush. Right-click on the box selec on on the Brushes toolbar and set the size of our builder brush to 64 in the X, Y, and Z posi ons. Drag the box to fi t around the emi er that we created in the previous step, by using the translate tool or by holding Ctrl and dragging it to where we want it to be. Keep in mind to have it posi oned along the axis so that the player will actually be able to touch it.
For More Information: www.packtpub.com/mastering-udk-game-development/book

Project 1
31
3. Back in the Content Browser window, fi nd the par cle system ParticleSystem'WP_ShockRifle.Particles.P_WP_ShockRifle_Explo' and add it slightly away from the fi rst par cle system. Inside its proper es in Par cle System Component, disable the Auto Ac vate op on.
4. Open up the Kismet Editor and create a new subsequence by right-clicking and selec ng Create New Sequence : 0 Objs. When the naming dialog comes up, type in CoinPickup for the Sequence Name fi eld and press OK. Double-click on the sequence in order to enter it.
For More Information: www.packtpub.com/mastering-udk-game-development/book

Advanced Kismet – Crea ng a Third-person Pla ormer
32
5. Outside Kismet, click on the trigger volume we created, then go back into Kismet. In our CoinPickup sequence, right-click and select New Event Using TriggerVolume_0 | Touch to create a Touch event for the Trigger. Create a variable under the Ins gator output.
6. Next, create a Play Sound ac on on the right-hand side of the Touch event we just created by right-clicking and selec ng New Ac on | Sound | Play Sound. Connect the Target input to Ins gator from the TriggerVolume_0 Touch event that we created in the previous step.
7. Open up the Content Browser window and select the Sound Cue that you would like to play when you collect this item; I used SoundCue'A_Pickups_Powerups.PowerUps.A_Powerup_UDamage_SpawnCue'. With that Sound Cue selected, exit out of the Content Browser window and go back into Kismet to our subsequence. Click on the green arrow to the right of the Play Sound variable called the Use selected object in Content Browser bu on and it should be fi lled with the sound we want to use.
For More Information: www.packtpub.com/mastering-udk-game-development/book

Project 1
33
8. Create a new Toggle Hidden ac on by going into New Ac on | Toggle | Toggle Hidden. Connect the Out output from the Play Sound ac on to the Hide connec on of the Toggle Hidden ac on.
9. Exit Kismet and in the UDK Editor click on the fi rst par cle system that we created (Emi er_0) and go back into Kismet. Right-click under the Target input and select New Object Var using Emi er_0.
10. Now create a new Toggle event by selec ng New Ac on | Toggle | Toggle. Connect the Out from the Toggle Hidden ac on to the Turn On connec on on the Toggle ac on.
11. Close Kismet and in the UDK Editor click on the other par cle system that we created (Emi er_1) and go back into Kismet. Right-click under the Target input and select New Object Var using Emi er_1.
At this point, we should have a single collectable that will hide our coin and will then play a sound as well as a par cle system to inform the player what has happened. Now that we have created a single coin, let's make it extremely easy for us to create new coins with the same func onality. To do that, we will be using prefabs.
12. Rotate your screen so that the sky is in the air and you can clearly see the objects of our collectable without touching anything else. Move your mouse to the top le , slightly away from where the top le of the collec ble's objects are. Hold Ctrl + Alt and drag down, right un l the red rectangle is completely covering our collectable. This should select everything within the collectable. Alterna vely, you could hold down Ctrl and click on each of the elements to select them.
For More Information: www.packtpub.com/mastering-udk-game-development/book

Advanced Kismet – Crea ng a Third-person Pla ormer
34
The marquee selec onA marquee selec on is a quick way to select or deselect a group of actors within a certain area. This type of selec on involves holding down a combina on of keys, clicking one of the mouse bu ons, and dragging the mouse cursor to create a box (colored red). All the actors within the box will be selected or deselected depending on the combina on of keys and the mouse bu on that is clicked. The possible combina ons and their eff ects are:
Ctrl + Alt + click: Replaces the current selection with the actors contained in the box
Ctrl + Alt + Shift + click: Adds the actors contained in the box to the current selection
Ctrl + Alt + Shift + right-click: Removes any select actors in the box from the current selection
13. Right-click on the objects and select the Create Prefab... op on. In the dialog box that comes up, put in Hotshot01 for the Package fi eld and Coin for the Name sec on. A er fi lling this out press the OK bu on. It will say that it found a sequence for the prefab. We say Yes to make the sequence part of the prefab and No to make the object an instance of the prefab. As soon as this happens, go to the Content Browser window and save our Hotshot01 package in the same folder as your level.
For More Information: www.packtpub.com/mastering-udk-game-development/book

Project 1
35
Prefabs are very tricky and are prone to breaking while you're working on your projects. Be very careful when using prefabs, and save your file often after knowing that everything works.
14. Take me to place some of these prefabs into your levels in areas that players may want to visit or en ce players to travel a certain way. Be sure to build your game before you see if they work by selec ng Build | Build All from the menu.
Note that some of these coins are obtainable with the player's default jump height. With that in mind, let's take our original actors to modify them for this new purpose.
15. Select the fi rst emi er that we made on the collectable that is not currently a prefab. Press F4 to access its proper es and change the Par cle System Component's Template property to be ParticleSystem'CTF_Flag_IronGuard.Effects.P_CTF_Flag_IronGuard_Idle_Red'. Have the other emi er use ParticleSystem'VH_Scorpion.Effects.PS_Scorpion_Gun_Impact_Red' as its template.
For More Information: www.packtpub.com/mastering-udk-game-development/book

Advanced Kismet – Crea ng a Third-person Pla ormer
36
16. Right-click on one of the two emi ers and select Select Find Emi er_X in Kismet. To the right of our Toggle ac on, we want to create a Modify Property ac on by right-clicking and choosing New Ac on | Object Property | Modify Property from the menus. Expand Proper es[0]. In the Property Name variable type in MaxMultiJump. Check the Modify Property op on and change the value of Property Value to 1. Connect the Player variable to the Target input. Connect the Out output from the Toggle ac on to the In input of the Modify Property ac on.
17. Back in the UDK Editor, select all of the objects that make our "Double Jump" power-up and press Ctrl + G to create a group of it. We only want to have one of these in our level and we want to make it somewhat skill-based in order to get it as it opens new areas for people to explore.
18. Build your project by selec ng Build | Build All. Save your game using File | Save All and run our game by selec ng Play | In Editor.
For More Information: www.packtpub.com/mastering-udk-game-development/book

Project 1
37
Objective Complete - Mini Debriefi ngWe have just created the fi rst two objects of our pla ormer world. We created them using two par cle systems connected together by a trigger volume, which executes some simple code. Once we created the base coin, we were then able to easily create duplicates with the same func onality by u lizing the power of the prefab. A er this, we took our original and modifi ed the par cles it used, and then had it change the overall func onality of the game, enabling the player to jump further. Not too bad!
Classifi ed IntelSco Rogers has a great primer on how to create eff ec ve pla ormer levels and how to place objects within the world called the Pla ormer Primer , which I recommend checking out if you want to start building levels of your own. The ar cle is available at http://mrbossdesign.blogspot.sg/2008/10/platformer-primer.html.
Making the world come aliveNow that we have all of our mechanics in place, it would be a good me to spruce up our level a bit by adding some visual fl air to it. In par cular, we will be using the recent Landscape tool in order to build a backdrop for our level.
Engage ThrustersLet's fi rst add a landscape to create a backdrop for our level!
1. Click on the Landscape bu on under the Modes sec on of the le toolbar; this should cause the Landscape Edit window to open for us.
For More Information: www.packtpub.com/mastering-udk-game-development/book

Advanced Kismet – Crea ng a Third-person Pla ormer
38
2. Once the Landscape Edit window comes up, it will have many op ons listed. We want to create a Heightmap, which we can now use within our level. In the Heightmap Size sec on, put in the values 64 x 64, and in the Component Size sec on select put 7 quads per component. Then click on the Create Landscape bu on.
For more details about how landscapes are created and how sizes and dimensions are figured, UDN has some great information for you, which can be found at:http://udn.epicgames.com/Three/LandscapeCreating.html
For More Information: www.packtpub.com/mastering-udk-game-development/book

Project 1
39
3. A er wai ng for a period, you should see a large checker board-looking plane, which is our landscape. All the tools in the Landscape Edit window have tool ps telling you what they are, but to get the general feel of it in order to raise the level of whatever you are currently selec ng, you can hold Ctrl down and click. To lower the size of something, you can hold Ctrl + Shi and click. To change the brush's size, there is a variable under Brushes called Brush Size.
For More Information: www.packtpub.com/mastering-udk-game-development/book

Advanced Kismet – Crea ng a Third-person Pla ormer
40
4. Create hills in the background of our level and lower the value of the areas that are actually part of the pla orming sec on of our level. Be careful that the edges are not visible on the far le or far right of the level.
5. Exit the Landscape mode and enter Camera Mode, and then click on our landscape. Press F4 to access the object's proper es. Under Landscape in the Landscape Material variable, fi ll it with Material'PivotPainterExamples.Materials.ground_Material'; feel free, however, to fi ll it with whatever material would be best for your par cular level.
It is possible for you to blend multiple materials together to create some really cool effects. If this interests you, check out the tutorial at the following link:http://www.polycount.com/forum/showthread.php?t=88347
For More Information: www.packtpub.com/mastering-udk-game-development/book

Project 1
41
6. Build your project by selec ng Build | Build All. Save your game using File | Save All and run our game by selec ng Play | In Editor.
For More Information: www.packtpub.com/mastering-udk-game-development/book

Advanced Kismet – Crea ng a Third-person Pla ormer
42
Objective Complete - Mini Debriefi ngWe have now taken our level and added a nice touch of background to make the world much more realis c as well as grounded. Due to the colors we used, it is very easy for us to see our player, the pla orms, and the objects to grab; and though the background is distant, it seems real.
Mission AccomplishedIn not much me, we have accomplished some very exci ng things in UDK using just the Unreal Editor and Kismet to create a side-scrolling pla orm game. We created our own custom camera, which will follow our player when he is spawned, and modifi ed the player with the use of the .ini fi les and Kismet to create some very interes ng features. We then created our level's environment, by fi rst crea ng a sta c pla orm and then moving on to dynamic ones. With those created, we made collec bles that the player can obtain, as well as one that actually gives the player addi onal func onality. Finally, we used Landscape Mode to create a backdrop for our game world. Let's take one fi nal look at what we have accomplished:
For More Information: www.packtpub.com/mastering-udk-game-development/book

Project 1
43
You Ready to go Gung HO? A Hotshot Challenge
Our game is well on its way to being something special, but there are some things we could s ll add to make it even be er! How about you take some me between projects and try to complete the following:
Add background music to our world and more sound eff ects
Add a door at the end of our level that will only open when we collect all of the coins in the level
Whenever our player dies, reset the camera's posi on
Create a basic enemy that will disappear if we jump on its head and move around in a fi xed path
Add health to our player; if he misses the head when hi ng an enemy, damage him
For More Information: www.packtpub.com/mastering-udk-game-development/book

Where to buy this book You can buy Mastering UDK Game Development HOTSH T from the Packt Publishing website: http://www.packtpub.com/mastering-udk-game-development/book. Free shipping to the US, UK, Europe and selected Asian countries. For more information, please read our shipping policy.
Alternatively, you can buy the book from Amazon, BN.com, Computer Manuals and most internet book retailers.
www.PacktPub.com
For More Information: www.packtpub.com/mastering-udk-game-development/book