mastering the eos 5d mark iv - eos training academy · pdf filewritten by nina bailey...
TRANSCRIPT

Written by Nina Bailey
Especially written for Canon EOS 5D Mark IV users
A simple, modern approach to mastering the advanced features on your Canon EOS 5D Mark IV camera which allows you to take more control, customise your camera and take even better images
Mastering the EOS 5D Mark IV
22
Written, designed and images by Nina Bailey
www.ninabailey.co.uk
Produced by Nina Bailey © 2017. All rights reserved. Unauthorised copying, reproduction, hiring, lending prohibited.
This book is designed for photographers who have used EOS cameras for a reasonable length of time and have recently upgraded or as a follow on volume from the Understanding your EOS 5D Mark IV which looks at the basic features and key operation of the camera.
This book sets out to look at the advanced features that are offered by the camera and teach you how to use the camera to its fullest extent. There is a small amount of overlap at the start of the book and within one or two chapters as it is important for all photographers to familiarise themselves with some of the basic controls the camera has. The book assumes a good understanding of the terms used within photography and that you will understand when and how the modes the camera offers are used.
The EOS 5D Mark IV sets new standards for focusing and overrides for a camera that is targeted at the high end enthusiast market. The extensive range of
About this book
features presented allows you to cope with a very wide range of subjects and make it a camera that you will not easily outgrow.
However, as is so often the case with modern technology, this flexibility with the ways that it can be used inevitably increases the complexity of the camera. Therefore to use it to its fullest extent the photographer will require a good understanding of the features that it has and when they should be used.
With any of the EOS cameras, no photographer uses all the features, in fact most photographers will only ever use about 25% of the features their cameras have. However, each photographer will use different features and settings which are so often defined by the subjects that they photograph.
There is no one setting that works for every subject that you are likely to tackle, you get the best results by learning to use the settings that are relevant to
the images that you shoot.
This book sets out to give you the knowledge you need to confidently use the features necessary for your photography.
© Nina Bailey 2017
Sample

33
About the author
Nina started her career in the retail sector of the photographic industry and then moved to Canon UK where she had a successful nine years looking after training, exhibitions and marketing both in the UK and
also within Europe. This gave Nina an unrivalled knowledge not only of the Canon EOS system but also how to develop and enhance the skills of photographers of all ability levels.
Nina started her own business in 1999, concentrating on training for amateur photographers. She developed and produces content for new Online EOS Training Academy after also writing and producing a range of 23 training DVDs especially for Canon EOS photographers which the Online training academy now supersedes.
In 2015 EOS Training academy merged with EOS Magazine and Nina is Technical Editor of EOS
Magazine and Principal Lecturer of EOS Training Academy. As technical editor Nina writes a lot of the magazines features and her images appear regularly in most issues.
In 2014 Nina started producing her own range of ebooks to bring photography training to an ever wider audience and now has a range of over 30 books which are available as ebooks but can mostly also be produced as limited edition print copies.
Nina started taking images when she was very young and is still a very keen photographer both professionally and personally.
Nina loves travel, landscape and wildlife photography and still shoots commercially within the travel photography market.
Nina also leads photographic trips, from time to time, the last being to Madagascar in 2016 where many of the images within this book were taken.© Nina Bailey 2017
Sample
44
About the 5D Mark IV 6 Key changes compared to the EOS 5D Mark III 7 INFO button display 8 INFO display on menu screens 9
New features 10 About the layout of the 5D Mk IV compared to 5D MK III 11 Viewfinder changes 12 Touch controls 14 Custom quick control 15
The focusing systems 17 About the focusing system 18 Understanding the focusing system 19 Focus lock 21 Why focusing sometimes fails 22 The focusing basics 25 One Shot AF 26 One Shot AF mode - Customisations 27 AI Focus AF 28 AI Servo AF 29 Focusing point selection 31 Flashing AF points 33 Lens focusing and extender compatibility 34 Key lenses affected by f8 compatibility 36 Auto selection - 61pt AF 37 Large area zone AF 38 Zone AF 39 Manual select 1 pt AF 40 Single point spot AF (manual selection) 41 AF point expansion 42 Case settings 44 Case setting options 47 Focusing customisations 48 AF menu 2 - AI Servo 49 Lens drive when AF impossible 50 Selectable AF point 51 Select AF area selection mode 52 AF area selection method 53 Orientation linked AF point 54
Initial AF point AI servo AF 55 Auto AF pt sel: iTR AF 56 AF point selection movement 58 AF point display during focus 59 VF display illumination 60 AF status in viewfinder 61 AF Microadjustment 62 Focusing and drive selection 63 Focusing and its connection with metering systems 64 Focusing and button customisations 66 AF area selection lever customisation 67 Multi controller customisation 68 AF-ON button customisation 69 One Shot to AI Servo instant switch 70 Register/recall shooting functions 71 Register/recall AF functions 72 Focusing summary 73
Advanced image processing 74 What is image processing 75 The RAW vs JPEG debate... 77 About Picture Styles 79 Customising picture styles 80 What can be customised - Sharpness 81 What can be customised - Contrast 83 What can be customised - Saturation 84 What can be customised - Colour tone 85 Using monochrome picture style options 86 About White Balance 89 Understanding white balance 90 The K setting 91 How to set the K setting 92 Custom white balance 93 White balance shift 95 White balance bracketing 96 Lens aberration correction 97 About peripheral illumination correction 98 About distortion correction 99 Digital Lens Optimizer 100 Digital Lens Optimizer - What it does 102
Contents
Digital Lens Optimizer - Summary 103 About chromatic aberration correction 104 About diffraction correction 105 Dual Pixel RAW shooting 106 Dual Pixel RAW - Image Microadjustment 107 Dual Pixel RAW - Bokeh Shift 109 Dual Pixel RAW - Ghosting Correction 110 HDR mode 111 Multiple exposure 115 In camera RAW processing 116 Image processing summary 121
Camera customisations 122 About the camera customisations 123 Custom shooting modes 124 Custom shooting modes - Warning! 127 Custom functions 128 Exposure custom functions 129 Exposure level increments 129 ISO speed increments 129 Exposure bracketing auto cancel 129 Exposure custom functions 130 Exposure bracketing sequence 130 Number of bracketed shots 130 Safety shift 130 Exposure custom functions 132 Same exposure for new aperture 132 Exposure/Drive functions 133 Set shutter speed range 133 Set aperture range 134 Display and operation custom functions 135 Warning in viewfinder 135 LV shooting area display 135 Display and operation custom functions 136 Dial direction whilst shooting 136 Custom controls 136 Display and operation custom functions 137 Add cropping information 137 Default erase operation 137 Retract lens on power off 137
© Nina Bailey 2017
Sample
55
Display and operation custom functions 138 Add IPTC information 138 Custom controls 139 Custom controls - Shutter button 141 Custom controls - AF-ON button 142 Registering focusing settings 143 How to register shooting functions 144 Custom controls - AE Lock button 145 Custom controls - Depth of field button 146 Custom controls - Lens AF Stop button 148 Custom controls - M-FN button 149 Custom controls - Set button 150 Custom controls - Main dial 152 Custom controls - Quick control dial 153 Custom controls - Multi controller 154 Custom controls - AF area selection lever 155 Camera customisation summary 156 Basic Wi-Fi usage 157 Introduction to Wi-Fi functions 158 Basic set up of Wi-Fi functions 160 Connecting the camera to a smart phone or tablet 161 Connecting the camera to a computer 164 Remote shooting 166
About using GPS on the 5D Mark IV 168 About GPS on the 5D Mark IV 169
Other produces and services 172 Get to know your camera and software 173 1 to 1 training from Nina Bailey 174 Other ebooks written by Nina Bailey 175
Contents
© Nina Bailey 2017
Sample
About The EOS 5D Mark IV
© Nina Bailey 2017
Sample

77
The most obvious change to the 5D Mark IV for many photographers will be the increase in the pixel number with a 30.4 megapixel CMOS sensor that has a wider exposure latitude.
Despite this increase in file size the camera now supports shooting at 7 frames per second with unlimited burst on JPEG images and up to 21 images when shooting RAW. The camera also supports shooting 4K video and there is the option to extract frames from that video to give an images with approximately 8 million pixels.
Although the focusing at first glance looks the same with 61 AF points, these cover an expanded sensor area and have a better low light compatibility, allowing focusing down to EV -3.
However, the focusing is even more upgraded than that, with much better f8 compatibility allowing extenders to be used with just about all compatible lenses and with up to 61 AF points depending on the
lens and extender combination.
This has been made possible by the new DIGIC 6+ processor.
There are also some features that wildlife photographers will appreciate such as a better choice of silent shooting options as well as enhanced water and dust resistance making the camera even more tolerant to working in challenging conditions.
The 5D Mark IV is the first camera at this level to feature built in Wi Fi allowing control via Smart devices and easy transfer of images. In addition the camera has GPS enabling you to pinpoint exactly where the image was taken. For professionals there is also now the option to embed IPTC data from the camera with specific details of a shoot, to save time in the workflow stages.
The camera now offers the option to perform Digital Lens Optimization in camera, a technology which
has been available for some time using Canon’s Digital Photo Professional software when processing RAW images, however with more photographers choosing to shoot JPEG, this feature has been added onto the camera to allow the same data to be used in camera when shooting JPEG files.
There is also the introduction of a new type of RAW image. This utilises a pair of images shot from a slightly different viewpoint, this allows three types of image adjustment when the image is processed in Canon’s Digital Photo Professional software using its image micro adjustment.
The mirror system has also been given an overhaul to reduce vibration caused by the mirror with cams that control both the up and down movement.
There are also a lot of smaller differences that have been designed to update the camera and make it more flexible in use, which are found throughout the camera’s menus and customisation options.
Key changes compared to the EOS 5D Mark III
© Nina Bailey 2017
Sample
88
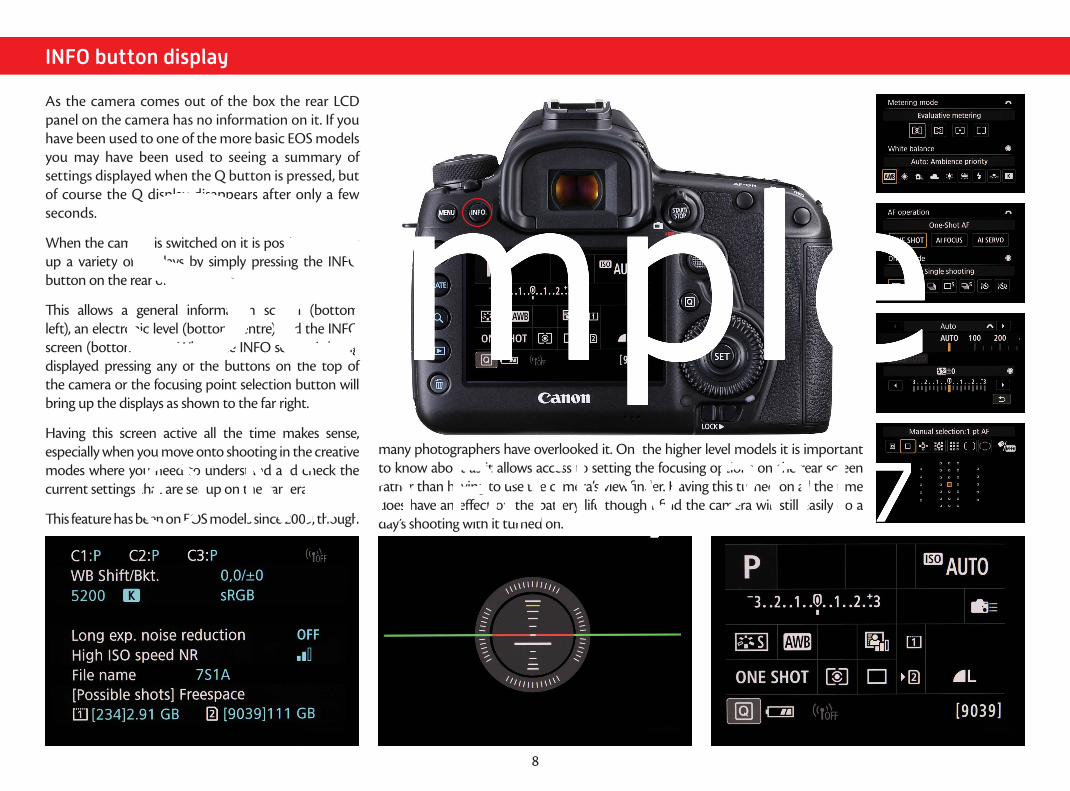
As the camera comes out of the box the rear LCD panel on the camera has no information on it. If you have been used to one of the more basic EOS models you may have been used to seeing a summary of settings displayed when the Q button is pressed, but of course the Q display disappears after only a few seconds.
When the camera is switched on it is possible to bring up a variety of displays by simply pressing the INFO button on the rear of the camera.
This allows a general information screen (bottom left), an electronic level (bottom centre) and the INFO screen (bottom right). When the INFO screen is being displayed pressing any of the buttons on the top of the camera or the focusing point selection button will bring up the displays as shown to the far right.
Having this screen active all the time makes sense, especially when you move onto shooting in the creative modes where you need to understand and check the current settings that are set up on the camera.
This feature has been on EOS models since 2009, though
INFO button display
many photographers have overlooked it. On the higher level models it is important to know about as it allows access to setting the focusing options on the rear screen rather than having to use the camera’s viewfinder. Having this turned on all the time does have an effect on the battery life though I find the camera will still easily do a day’s shooting with it turned on.© Nina Bailey 2017
Sample
99
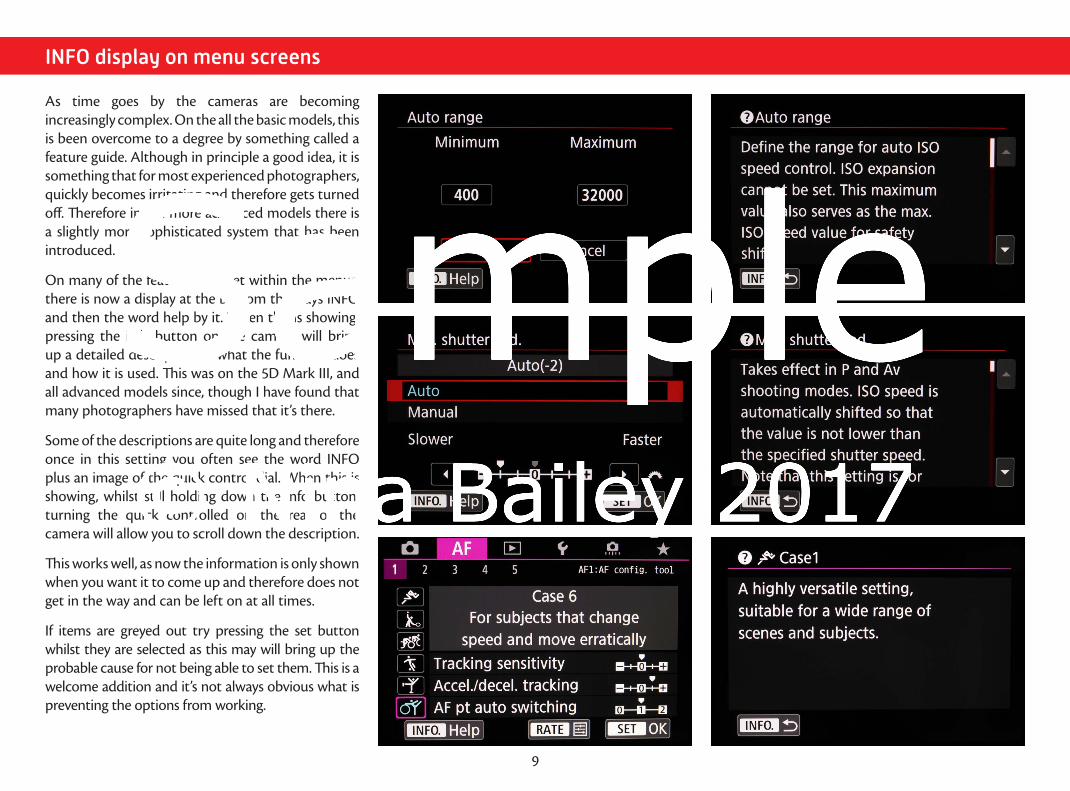
As time goes by the cameras are becoming increasingly complex. On the all the basic models, this is been overcome to a degree by something called a feature guide. Although in principle a good idea, it is something that for most experienced photographers, quickly becomes irritating and therefore gets turned off. Therefore in the more advanced models there is a slightly more sophisticated system that has been introduced.
On many of the features that set within the menus, there is now a display at the bottom that says INFO and then the word help by it. When this is showing, pressing the info button on the camera will bring up a detailed description of what the function does and how it is used. This was on the 5D Mark III, and all advanced models since, though I have found that many photographers have missed that it’s there.
Some of the descriptions are quite long and therefore once in this setting you often see the word INFO plus an image of the quick control dial. When this is showing, whilst still holding down the info button, turning the quick controlled on the rear of the camera will allow you to scroll down the description.
This works well, as now the information is only shown when you want it to come up and therefore does not get in the way and can be left on at all times.
If items are greyed out try pressing the set button whilst they are selected as this may will bring up the probable cause for not being able to set them. This is a welcome addition and it’s not always obvious what is preventing the options from working.
INFO display on menu screens
© Nina Bailey 2017
Sample

New Features
© Nina Bailey 2017
Sample

1111
The layout on the two cameras looking from the top is just about identical, with the main changes being seen on the top LCD panel. In all comparisons the 5D Mark III is at the top and the 5D Mark IV at the bottom.
A lot more differences are seen when looking at the rear of the camera. The most obvious difference is that the pentaprism on the top of the camera is slightly higher, this is to allow for the GPS receiver.
The multi controller has been changed to have a bigger surface area to give it a better feel and more control. Below it is the AF area selection lever, however this button can have its functionality changed within the custom controls to perform lots of other functions.
The only difference on the front of the camera is that the remote control socket has now been moved onto the front of the camera. This has been to enable a USB 3 connector to be placed on the side of the camera. It also has the advantage of leaving the other connectors protected when a remote release is in use.
About the layout of the 5D MkIV compared to the 5D MKIII
© Nina Bailey 2017
Sample
1212
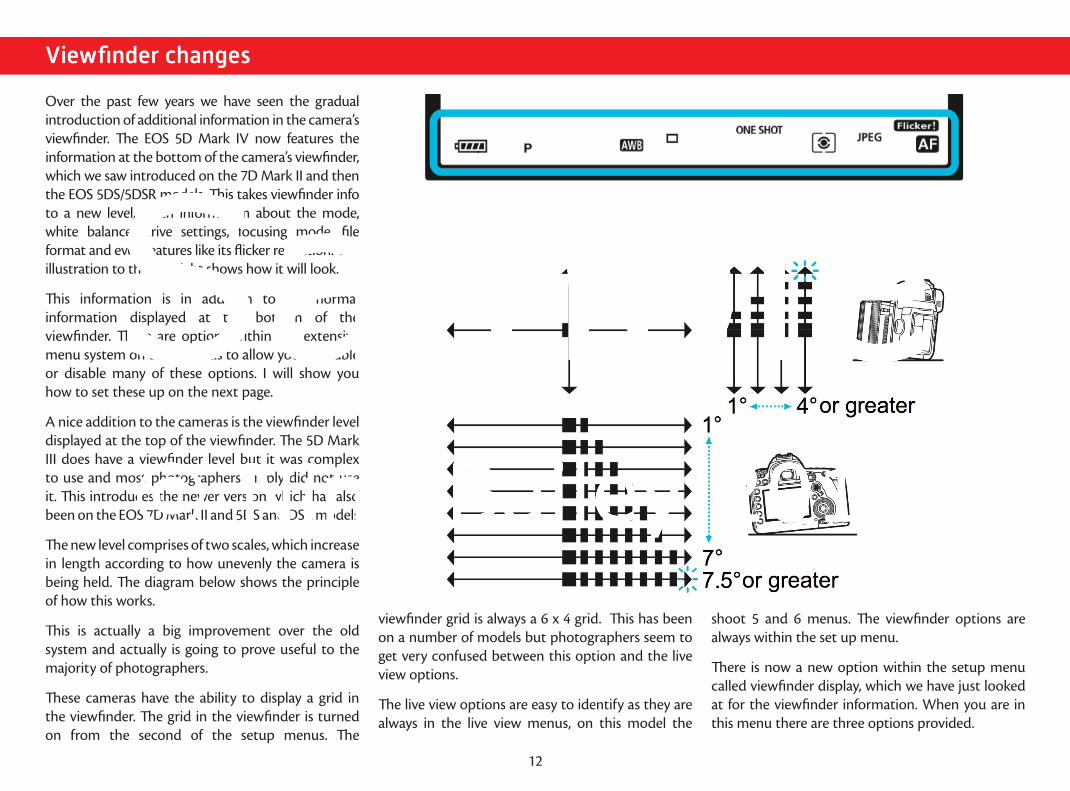
Over the past few years we have seen the gradual introduction of additional information in the camera’s viewfinder. The EOS 5D Mark IV now features the information at the bottom of the camera’s viewfinder, which we saw introduced on the 7D Mark II and then the EOS 5DS/5DSR models. This takes viewfinder info to a new level, with information about the mode, white balance, drive settings, focusing mode, file format and even features like its flicker reduction. The illustration to the top right shows how it will look.
This information is in addition to the normal information displayed at the bottom of the viewfinder. There are options within the extensive menu system on the cameras to allow you to enable or disable many of these options. I will show you how to set these up on the next page.
A nice addition to the cameras is the viewfinder level displayed at the top of the viewfinder. The 5D Mark III does have a viewfinder level but it was complex to use and most photographers simply did not use it. This introduces the newer version which has also been on the EOS 7D Mark II and 5DS and DSR models
The new level comprises of two scales, which increase in length according to how unevenly the camera is being held. The diagram below shows the principle of how this works.
This is actually a big improvement over the old system and actually is going to prove useful to the majority of photographers.
These cameras have the ability to display a grid in the viewfinder. The grid in the viewfinder is turned on from the second of the setup menus. The
Viewfinder changes
viewfinder grid is always a 6 x 4 grid. This has been on a number of models but photographers seem to get very confused between this option and the live view options.
The live view options are easy to identify as they are always in the live view menus, on this model the
There is now a new option within the setup menu called viewfinder display, which we have just looked at for the viewfinder information. When you are in this menu there are three options provided.
shoot 5 and 6 menus. The viewfinder options are always within the set up menu.
© Nina Bailey 2017
Sample
1313
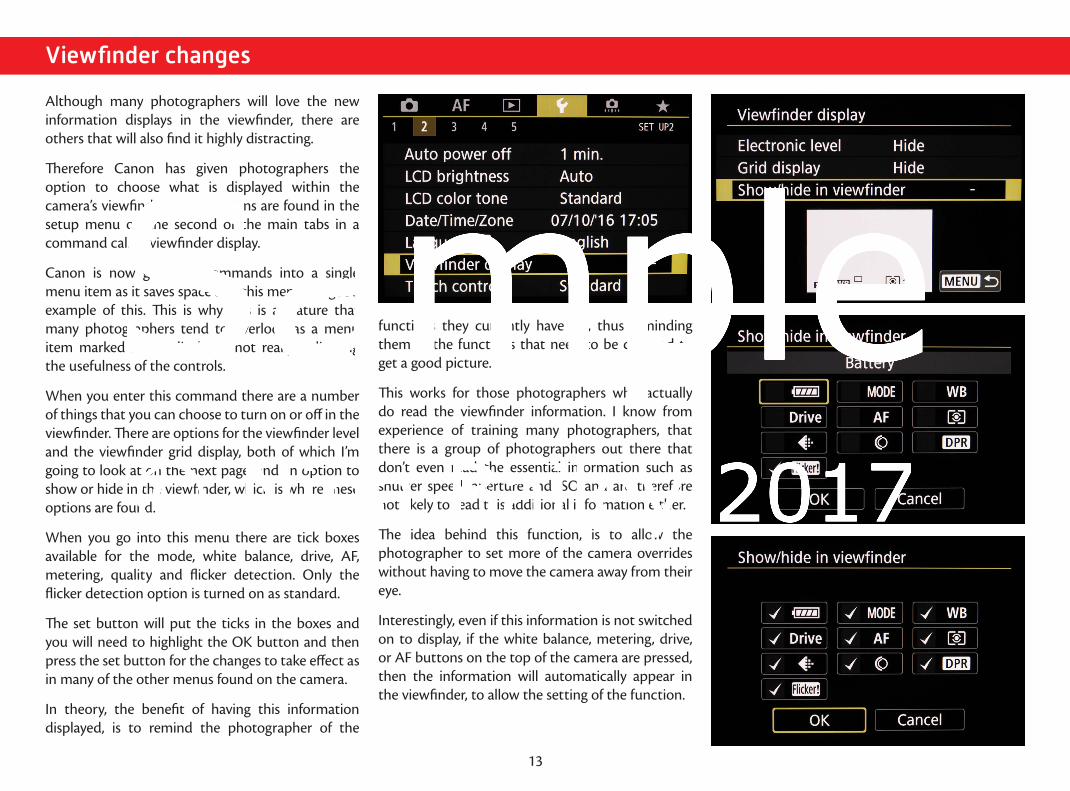
Although many photographers will love the new information displays in the viewfinder, there are others that will also find it highly distracting.
Therefore Canon has given photographers the option to choose what is displayed within the camera’s viewfinder. These options are found in the setup menu on the second of the main tabs in a command called viewfinder display.
Canon is now grouping commands into a single menu item as it saves space and this menu is a good example of this. This is why this is a feature that many photographers tend to overlook as a menu item marked menu display is not really indicating the usefulness of the controls.
When you enter this command there are a number of things that you can choose to turn on or off in the viewfinder. There are options for the viewfinder level and the viewfinder grid display, both of which I’m going to look at on the next page, and an option to show or hide in the viewfinder, which is where these options are found.
When you go into this menu there are tick boxes available for the mode, white balance, drive, AF, metering, quality and flicker detection. Only the flicker detection option is turned on as standard.
The set button will put the ticks in the boxes and you will need to highlight the OK button and then press the set button for the changes to take effect as in many of the other menus found on the camera.
In theory, the benefit of having this information displayed, is to remind the photographer of the
functions they currently have set, thus reminding them of the functions that need to be changed to get a good picture.
This works for those photographers who actually do read the viewfinder information. I know from experience of training many photographers, that there is a group of photographers out there that don’t even read the essential information such as shutter speed, aperture and ISO and are therefore not likely to read this additional information either.
The idea behind this function, is to allow the photographer to set more of the camera overrides without having to move the camera away from their eye.
Interestingly, even if this information is not switched on to display, if the white balance, metering, drive, or AF buttons on the top of the camera are pressed, then the information will automatically appear in the viewfinder, to allow the setting of the function.
Viewfinder changes
© Nina Bailey 2017
Sample

1414
The EOS 5D Mark IV is one of the first of the more advanced models in the EOS line up to feature touch controls. The 1DX Mark II does have some touch options available but they are more limited than are found on the 5D Mark IV.
If you are used to using touch controlled devices such as smart phones and tablets then this is a very intuitive way of operating your EOS camera.
All the normal navigations will work. There are options in the camera’s menu to have the standard options which will work best for most photographers, sensitive, which is more responsive which may be better for people that use touch devices a lot and disable options for those that do not get along with touch controls.
If you press the Q button to enter the playback controls whilst playing back images, the touch controls will automatically be active.
Tap - This allows you to select items. Within the menu you simply tap the item you want. On the Quick screen, if it is permanently displayed on the rear of the camera you have to tap the Q at the bottom left corner to activate the touch controls. This changes to a return arrow which then allows you to go back a step.
Drag - this allows you to set a feature such as exposure compensation, all you do is to touch the screen where the cursor is and then drag left of right to set the required amount.
If playing back images then swipe will allow you to flick through the images you have taken. The pinch
Touch controls
and stretch can allow you to zoom in or out on parts of the image.
If you have the Q screen active at all time on the rear of the camera then you will need to press the Q button on the screen at the bottom left to turn on the touch controls for the rest of the screen. If you access the Q options through the Q button then the touch controls are active automatically.
If you go to the camera menus, then as soon as the menu is active the touch controls will work. It is in
the menus that the touch controls can be at their best as it cuts out some of the stages within the more traditional menu navigation.
If you want the touch controls to work at their best use the screen on the camera as it is. Attaching various third party sheets and protectors will have an effect on its operation and may stop it working entirely. The camera’s rear screens does not generally need any additional protection.
© Nina Bailey 2017
Sample

1515
This is a new feature, and it allows you to design your own Quick Control screen with items placed where you want them and displayed how you want. The illustration to the right shows some of the options that are available to you and at the bottom how the screen can look.
The idea behind this is to allow you to have the items that you want on the screen and to be able to turn off features that you simply do not use.
When you enter the menu you have three options. Start editing the layout, Revert the layout to the default or to Clear all items.
When you select Start editing layout, an operation guide pops up to tell you the keys to use to add, remove and select and confirm the items. Once you click OK on this screen it takes you into a screen where you can select the options that you want to display. If the camera is set up to its default, some will be greyed out as they are already on the Quick control screen.
Custom Quick Control
© Nina Bailey 2017
Sample
1616
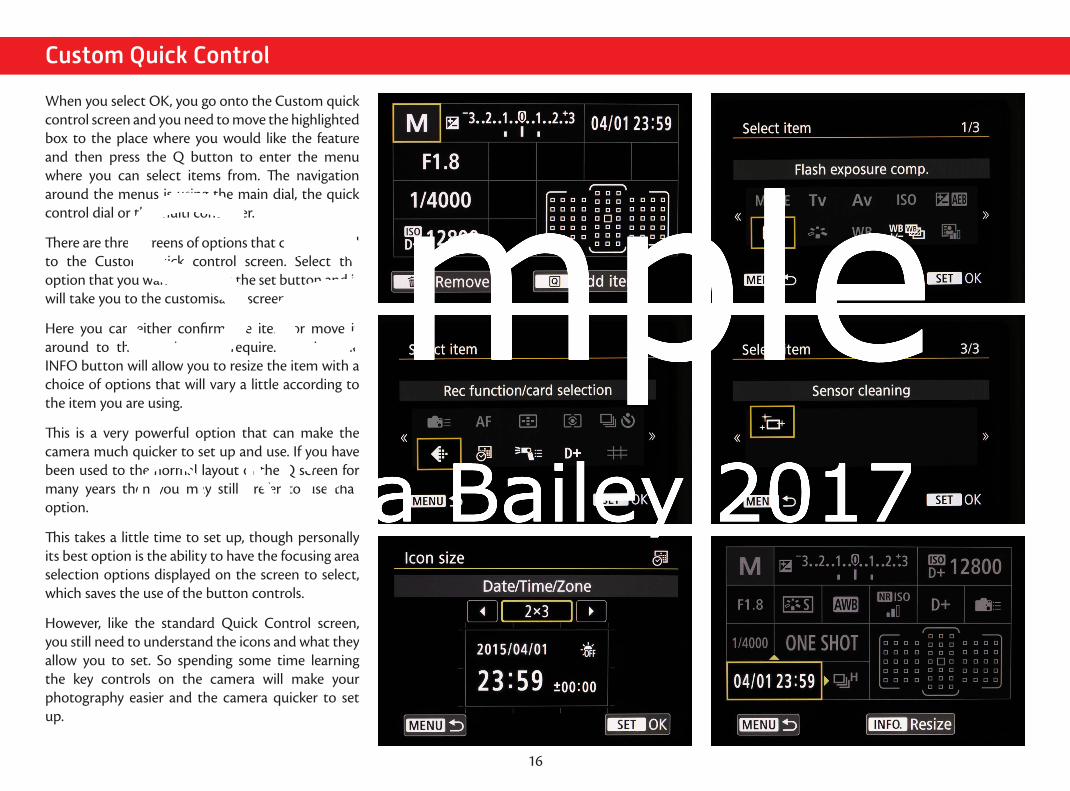
When you select OK, you go onto the Custom quick control screen and you need to move the highlighted box to the place where you would like the feature and then press the Q button to enter the menu where you can select items from. The navigation around the menus is using the main dial, the quick control dial or the multi controller.
There are three screens of options that can be added to the Custom quick control screen. Select the option that you want and press the set button and it will take you to the customisable screen.
Here you can either confirm the item or move it around to the location you require. Pressing the INFO button will allow you to resize the item with a choice of options that will vary a little according to the item you are using.
This is a very powerful option that can make the camera much quicker to set up and use. If you have been used to the normal layout of the Q screen for many years then you may still prefer to use that option.
This takes a little time to set up, though personally its best option is the ability to have the focusing area selection options displayed on the screen to select, which saves the use of the button controls.
However, like the standard Quick Control screen, you still need to understand the icons and what they allow you to set. So spending some time learning the key controls on the camera will make your photography easier and the camera quicker to set up.
Custom Quick Control
© Nina Bailey 2017
Sample

The Focusing System
© Nina Bailey 2017
Sample
1818
The focusing system on the 5D Mark IV is designed to work in much the same way as the system put into the EOS 1DX and the 5D Mark III. The low light focusing performance of the camera has been improved but by far the biggest improvement is its ability to focus at f8 on all 61 AF points when used with the right lenses and extenders.
When we talk about having good focusing on a camera, it can mean many different things. It can be about the camera’s ability to follow a fast moving subject. It can be about the camera’s ability to still focus in low light. Other subjects require precision so that the camera will focus on the right part of the scene. That’s the key thing to understand about the focusing system on this Model. It’s designed to be able to fulfil all those requirements.
The reality is that there is no single setting that can do all of these things well without requiring a change in set up on the camera. So the 5D Mark IV now has a specific AF menu that allows the camera to be set up for how you want it to work. This is seen by many photographers as one of the most complex parts of the camera to understand and master. The good news is that the default setting the camera is supplied with works well for a very large amount of the subjects that you are likely to shoot.
Changing the default options has to come with the warning that it will change the cameras’ performance significantly and it will not always be for the better, as many of the customisations allowed are there for very specialised photographers who shoot very specific subjects.
This is a camera where you have to understand the options that are available and set them according to the subjects that you are going to be shooting. Interestingly many of the features in the AF menus have been on cameras in one format or another for up to 8 years. A lot of the options were seen right back to the original EOS 7D. However back then Canon decided to hide some of the more complex commands within the custom function menus so only the more advanced photographers with a good understand of the options would find them and change the options. 5 years ago the 5D mark III and 1DX models appeared within the EOS range and theses introduced the concept of a menu that grouped together all the AF functions within a more accessible place. For those with a good understanding of the focusing system it has made the camera faster and easier to configure than was ever possible before.
About the focusing system
© Nina Bailey 2017
Sample

1919
Understanding the focusing system
I am going to take a look at all aspects of the focusing system. Over the last few years I have taught more focusing events that all the other types of events added together, which shows just how much photographers are struggling with the set up on the cameras.
What has become clear through the courses is that many of the people I see are struggling with the real basics of how focusing works as they lack the basic knowledge they need to get the rest of the system to work.
So in this book I am going to go right through the focusing system and explain first of all why the cameras sometimes cannot get a subject into focus and then move on to look at the specific options that this camera has.
Reality check
You need a subject that is going to fill a reasonable amount of the frame. I try to frame images so they do not have to be cropped at all but I will not crop down to less that 1/4 of the frame as the quality drops too much. The image to the right is a good example of this. This was taken on the 5D Mark IV but the bird was quite a distance away. The pixel dimensions of the original image is 6720 x 4480 or 30.1 million pixels appx. The cropped image drops this to 2259 x 1506 or 3.4 million pixels appx. That is losing 26.7 million of the pixels you started with and so the quality of the cropped image drops significantly. It was taken at a shutter speed too slow (1/320th) to effectively freeze the movement of the bird so the cropped image shows up much more the movement of the bird in the image. Interestingly the bird in the original image bottom right is much larger in the frame than what
many photographers I see on events are trying to capture and then enlarge up.
The smaller the bird is in the frame the harder it is going to be for the camera to find it to focus on in the first place and then to keep it in focus.
In this instance the camera has got the subject sharp, the softening of the image is due to the crop and insufficient shutter speed that the image was taken at, not the fact that the camera focused incorrectly.
© Nina Bailey 2017
Sample
2020
What’s important
To get a successful image of a moving subject you need a number of things to work together.
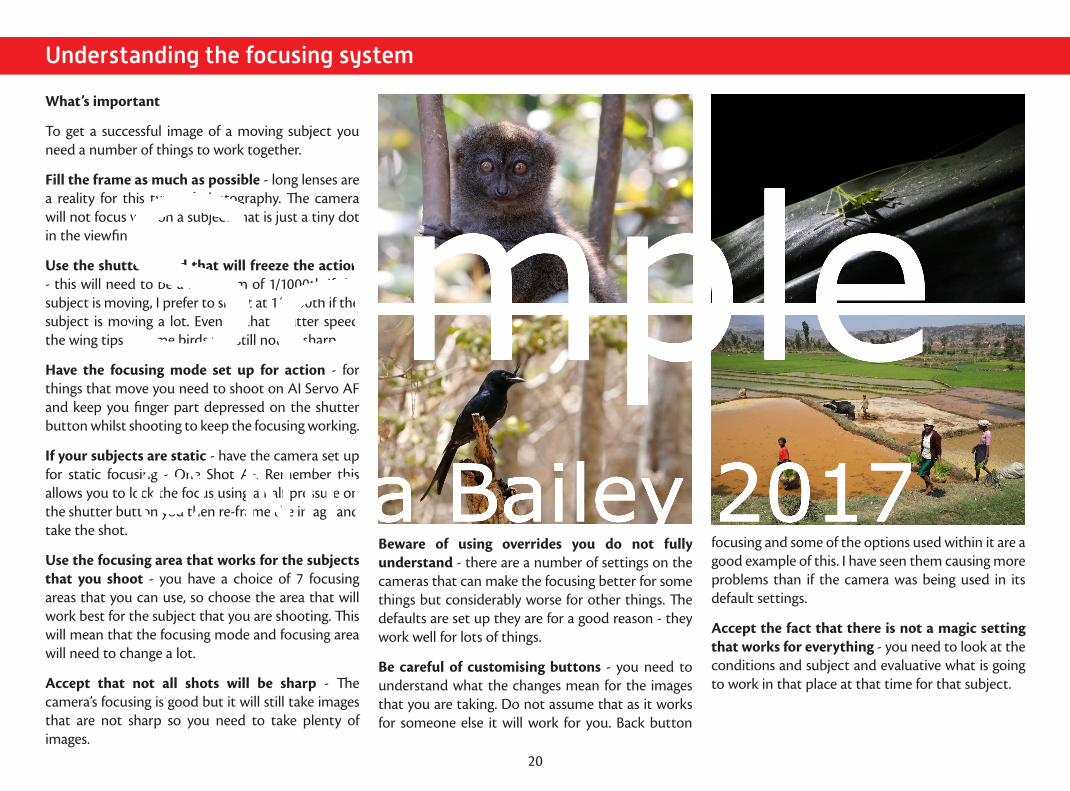
Fill the frame as much as possible - long lenses are a reality for this type of photography. The camera will not focus well on a subject that is just a tiny dot in the viewfinder.
Use the shutter speed that will freeze the action - this will need to be a minimum of 1/1000th if the subject is moving, I prefer to shoot at 1/2000th if the subject is moving a lot. Even at that shutter speed the wing tips of some birds will still not be sharp.
Have the focusing mode set up for action - for things that move you need to shoot on AI Servo AF and keep you finger part depressed on the shutter button whilst shooting to keep the focusing working.
If your subjects are static - have the camera set up for static focusing - One Shot AF. Remember this allows you to lock the focus using a half pressure on the shutter button you then re-frame the image and take the shot.
Use the focusing area that works for the subjects that you shoot - you have a choice of 7 focusing areas that you can use, so choose the area that will work best for the subject that you are shooting. This will mean that the focusing mode and focusing area will need to change a lot.
Accept that not all shots will be sharp - The camera’s focusing is good but it will still take images that are not sharp so you need to take plenty of images.
Understanding the focusing system
Beware of using overrides you do not fully understand - there are a number of settings on the cameras that can make the focusing better for some things but considerably worse for other things. The defaults are set up they are for a good reason - they work well for lots of things.
Be careful of customising buttons - you need to understand what the changes mean for the images that you are taking. Do not assume that as it works for someone else it will work for you. Back button
focusing and some of the options used within it are a good example of this. I have seen them causing more problems than if the camera was being used in its default settings.
Accept the fact that there is not a magic setting that works for everything - you need to look at the conditions and subject and evaluative what is going to work in that place at that time for that subject.
© Nina Bailey 2017
Sample