mastering grails 3 plugins - g3 summit 2016
TRANSCRIPT

Mastering Grails 3 Plugins
Álvaro Sánchez-Mariscal

Álvaro Sánchez-Mariscal Software Engineer Grails Development Team [email protected]


The Basics
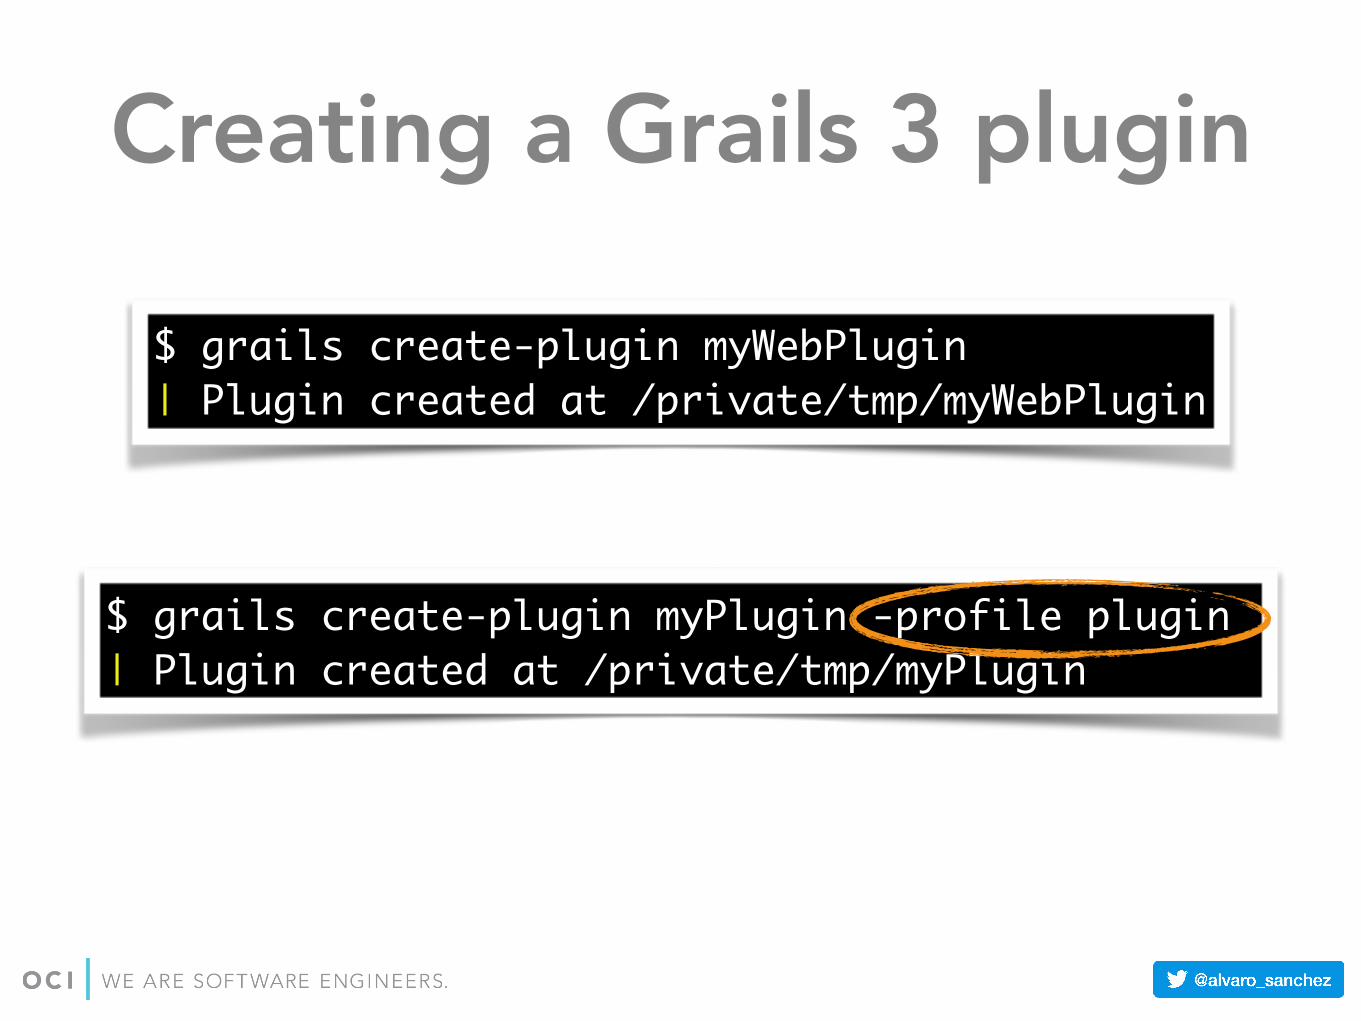
Creating a Grails 3 plugin
$ grails create-plugin myWebPlugin| Plugin created at /private/tmp/myWebPlugin
$ grails create-plugin myPlugin -profile plugin| Plugin created at /private/tmp/myPlugin

Understanding profiles• A profile defines:
• Project’s build.gradle.
• Commands: create-domain-class, run-app, etc.
• Features: hibernate, json-views, etc.
• Skeleton: files and folders.

plugin vs. web-plugin

Trim your plugin!

Keep clean
• Start with the plugin profile whenever possible.
• Remove empty and/or unwanted files/folders.
• Otherwise, the burtbeckwith bot will send you a cleanup pull request!

The burtbeckwith bot

The burtbeckwith bot
• Watches messy plugin repos and sends a PR to clean them up.
• Dozens of pull requests in the last 3 months!
• Likely hundreds in the last years!

The minimal plugin
• Folder containing:
• build.gradle
• src/main/groovy with plugin descriptor.
• grails-app/init with an Application class.
• Everything else can be removed.

The plugin descriptor
• A class inside src/main/groovy. Extends grails.plugins.Plugin.
• Can override methods to define behaviour in the plugin lifecycle.
• Syntax has changed a bit from Grails 2.

Demo - Creating a plugin

Plugin features

Plugin configuration• A plugin can define:
• Configuration values for the host Grails app.
• One of plugin.yml or plugin.groovy.
• Configuration for running the plugin as an application, to test it.
• application.yml / application.groovy.
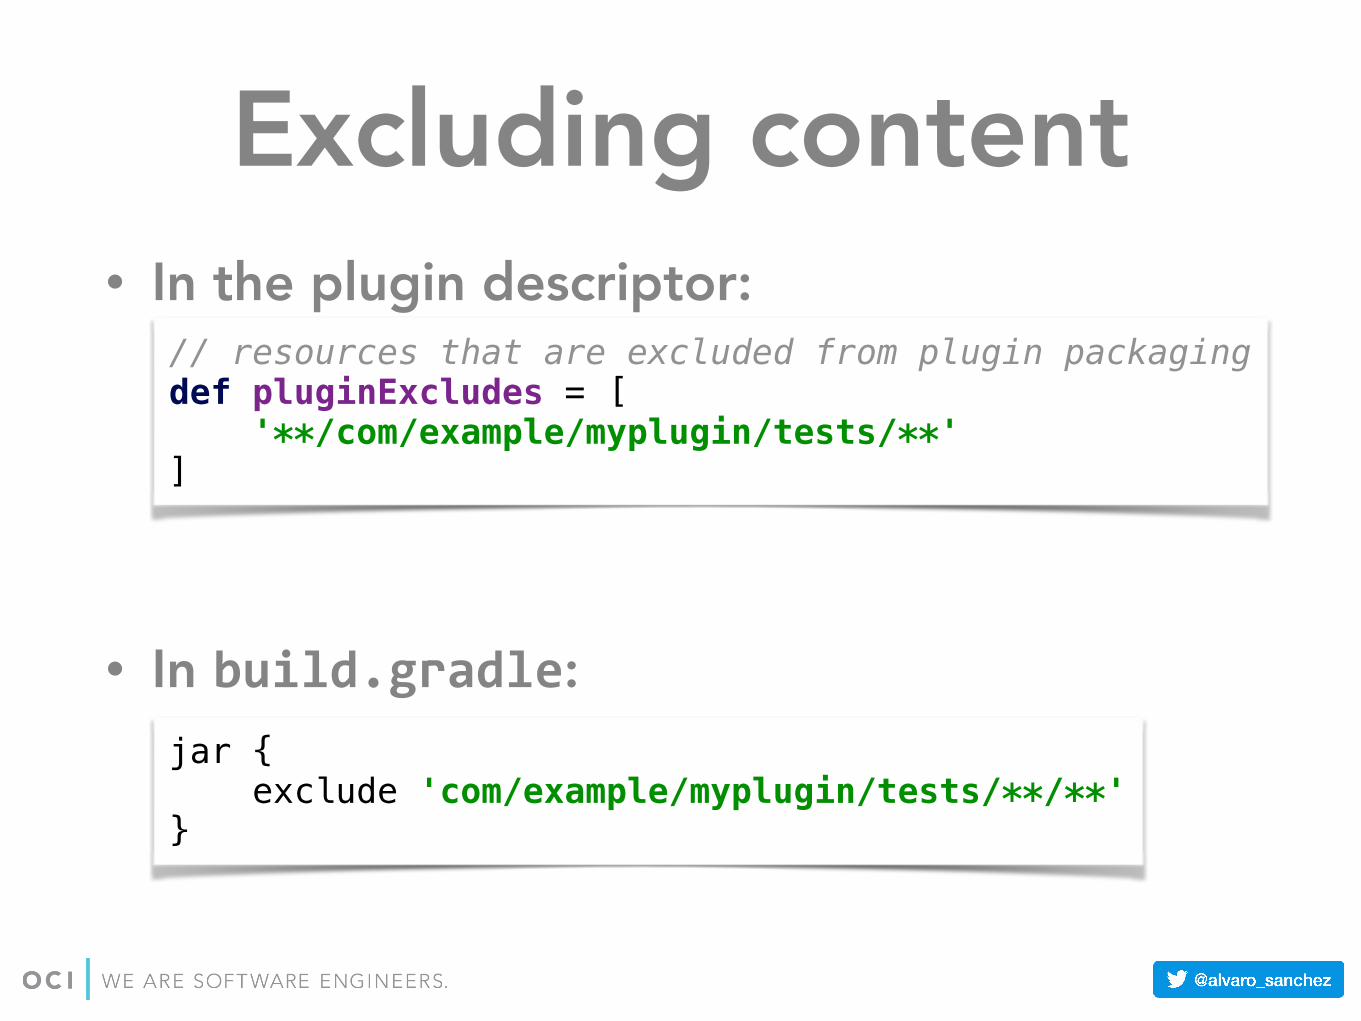
Excluding content• In the plugin descriptor:
• In build.gradle:
// resources that are excluded from plugin packagingdef pluginExcludes = [ '**/com/example/myplugin/tests/**']
jar { exclude 'com/example/myplugin/tests/**/**'}
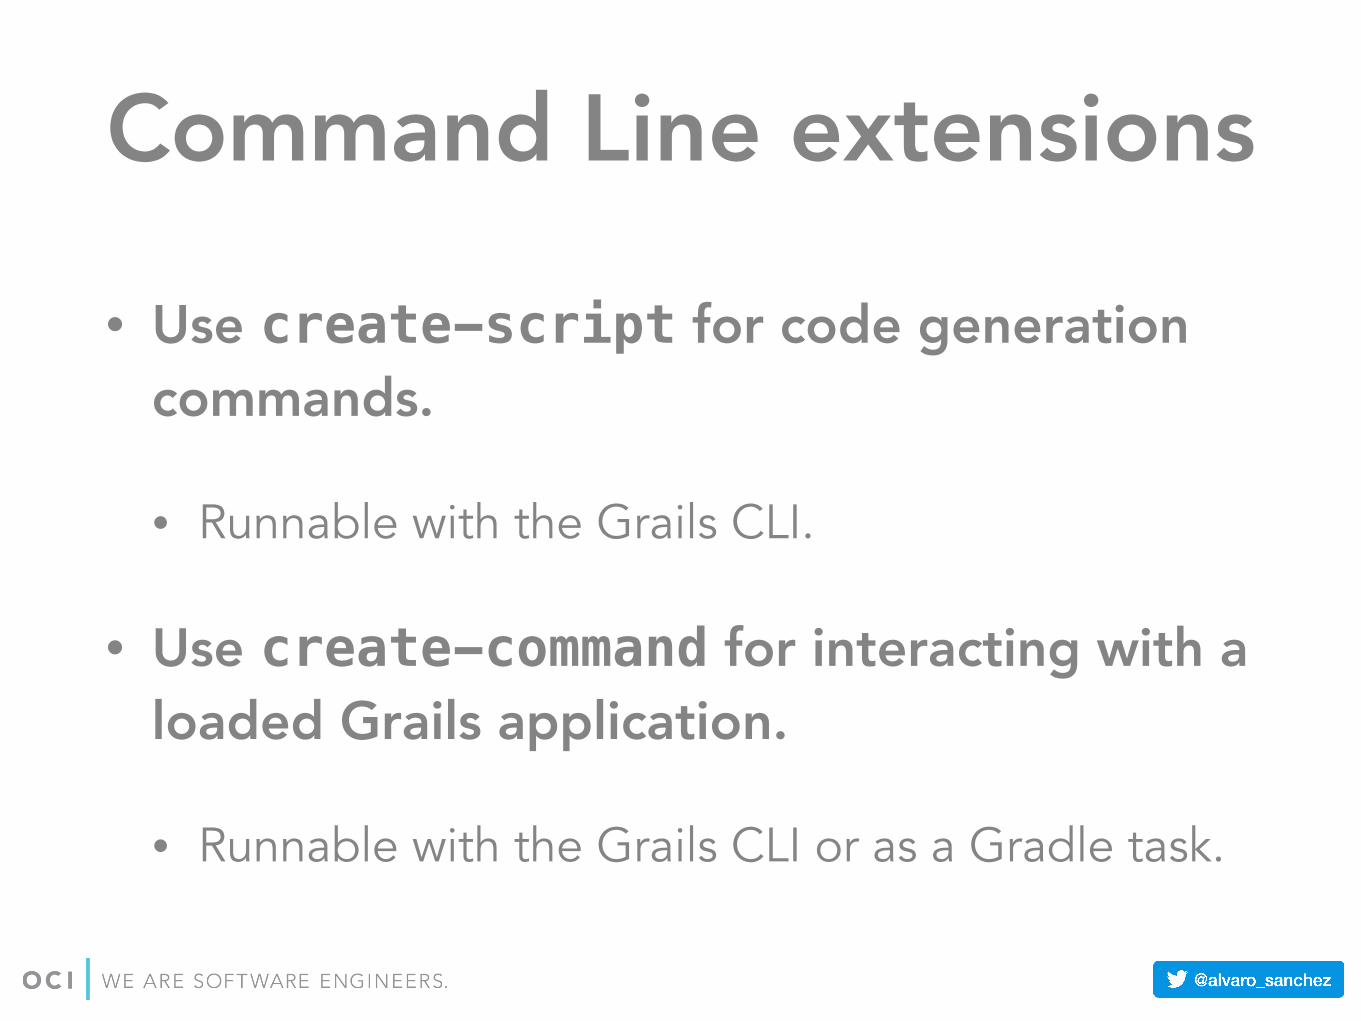
Command Line extensions
• Use create-script for code generation commands.
• Runnable with the Grails CLI.
• Use create-command for interacting with a loaded Grails application.
• Runnable with the Grails CLI or as a Gradle task.

Scripts• Base class:
org.grails.cli.profile.commands.script.GroovyScriptCommand
import org.grails.cli.interactive.completers.DomainClassCompleterdescription( "Generates a controller that performs REST operations" ) { usage "grails generate-resource-controller [DOMAIN CLASS]" argument name:'Domain Class', description:"The name of the domain class", required:true completer DomainClassCompleter flag name:'force', description:"Whether to overwrite existing files"} if(args) { generateController(*args) generateViews(*args) generateUnitTest(*args) generateFunctionalTest(*args)} else { error "No domain class specified"}

Commands (3.1)import grails.dev.commands.ApplicationCommandimport grails.dev.commands.ExecutionContextclass MyCommand implements ApplicationCommand { @Override boolean handle(ExecutionContext ctx) { def dataSource = applicationContext.getBean(DataSource) //Run some SQL... return true } }

Commands (3.2)import grails.dev.commands.ApplicationCommandimport grails.dev.commands.ExecutionContextclass MyCommand implements GrailsApplicationCommand { @Override boolean handle() { def dataSource = applicationContext.getBean(DataSource) //Run some SQL... return true } }

Enhancing artefactsimport grails.artefact.Enhancesimport groovy.transform.CompileStatic@Enhances(['Controller', 'Service'])@CompileStatictrait DateSupport { Date now() { return new Date() }}

Bean definition
• In Grails 2.x, you could only define beans in doWithSpring.
• With Grails 3.x, you can also leverage from Spring Boot auto-configuration.
• Beware of the classpath scanning!

Auto-configuration
package com.acme.mypluginimport org.springframework.context.annotation.Beanimport org.springframework.context.annotation.Configuration@Configurationclass MyPluginAutoConfiguration { @Bean MyService myService() { new MyService() }}

Auto-configuration
org.springframework.boot.autoconfigure.EnableAutoConfiguration=\ com.acme.myplugin.MyPluginAutoConfiguration
src/main/groovy/resources/META-INF/spring.factories

Auto-configuration• Place services in src/main/groovy.
• Grails registers automatically grails-app/services/*.
• Users will have to configure classpath scanning.
• By default, scanning is limited to the app, not dependent JARS.

Classpath scanning• The Grails way:
class Application extends GrailsAutoConfiguration { static void main(String[] args) { GrailsApp.run(Application, args) } @Override protected boolean limitScanningToApplication() { return false } @Override Collection<String> packageNames() { return ['com.acme.myplugin'] }}

Classpath scanning
• The Spring Boot way:
@ComponentScan(basePackages = ['com.acme.myplugin']) class Application extends GrailsAutoConfiguration { static void main(String[] args) { GrailsApp.run(Application, args) }}

Modularisation

Modularisation
• If your plugin becomes to grow, you might end up creating a monolith.
• You can modularise your plugins as you would do with your apps.

ModularisationMonolithic plugin
Multi-module plugin
Modularisation
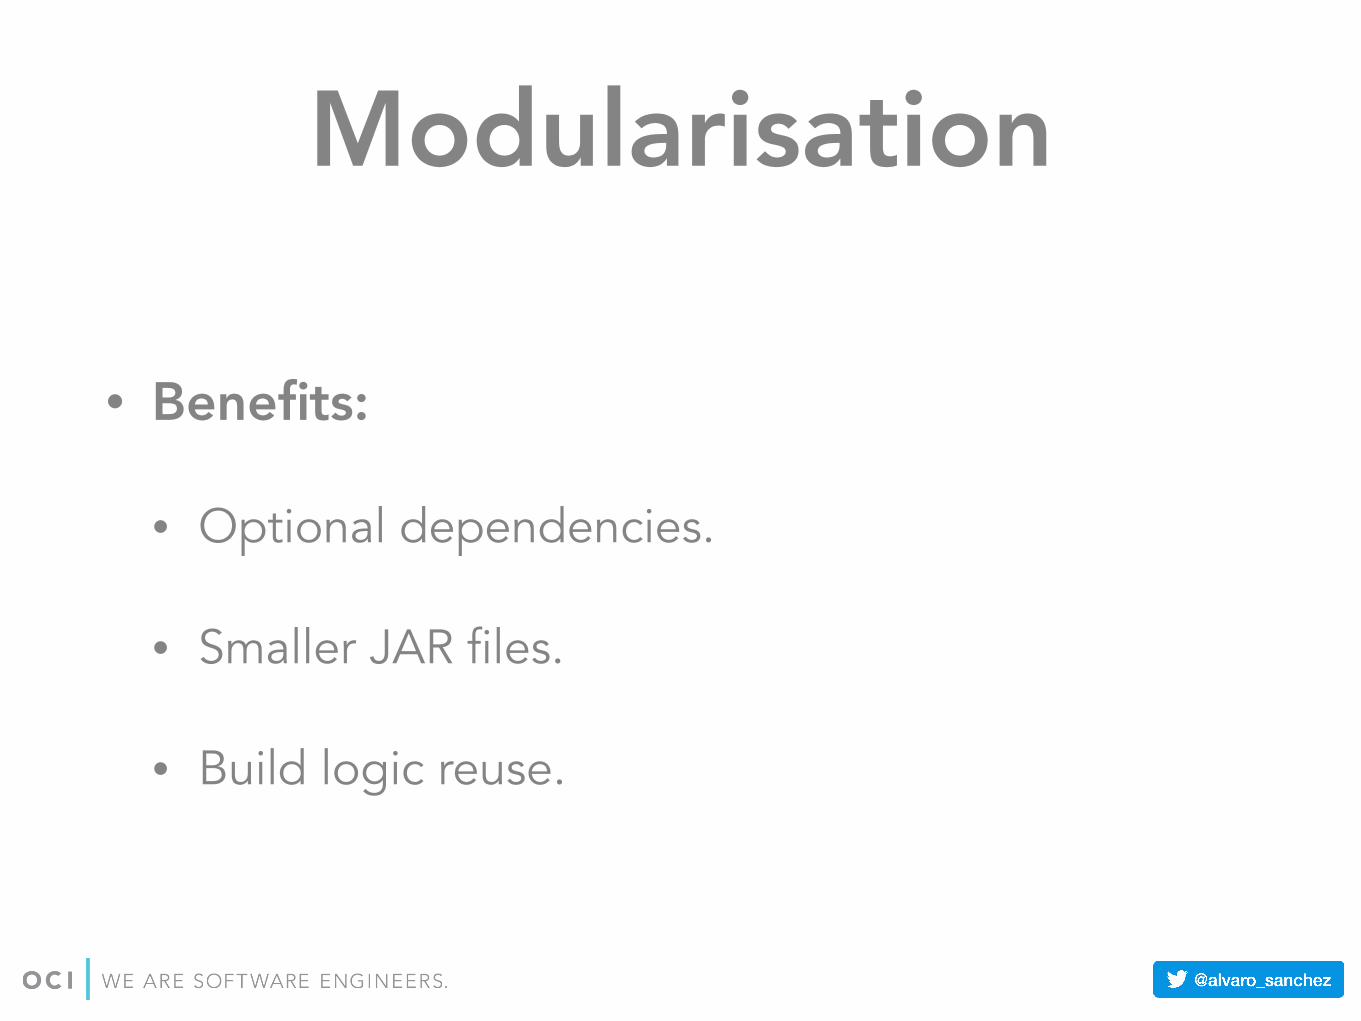
• Benefits:
• Optional dependencies.
• Smaller JAR files.
• Build logic reuse.

Modularisation setup• settings.gradle:
include ‘myPlugin-core', ‘myPlugin-domain' //etc

Modularisation setup• Root build.gradle:
allprojects { apply plugin:"idea"} subprojects { Project project -> ext { grailsVersion = project.grailsVersion gradleWrapperVersion = project.gradleWrapperVersion } repositories { //Common repos } version "1.0.0.M1" group "org.grails.plugins" apply plugin: "org.grails.grails-plugin" dependencies { //Common deps } }
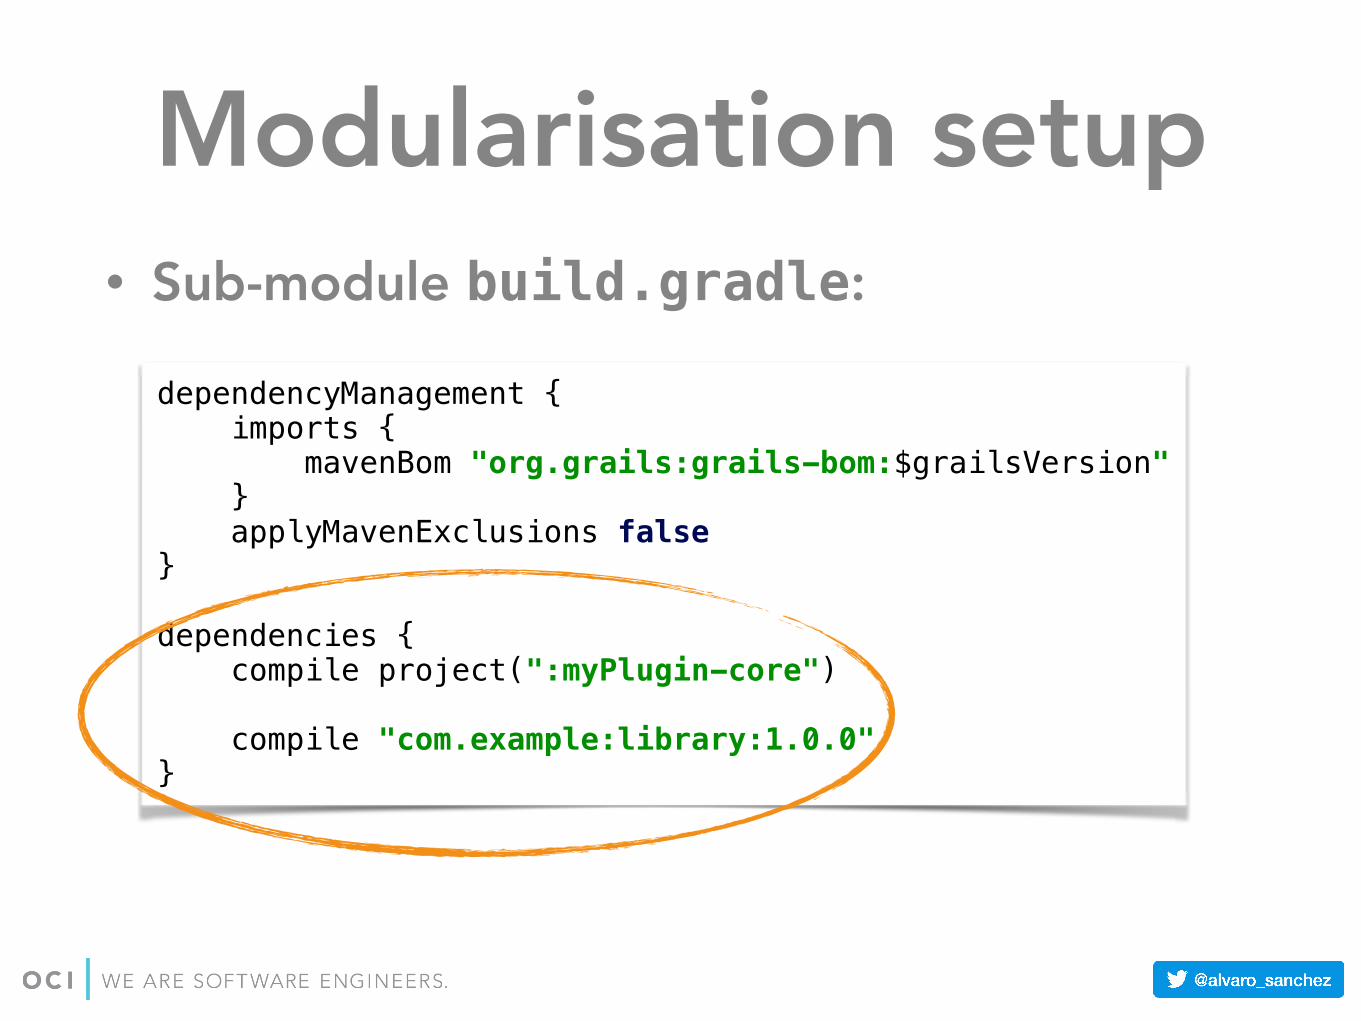
Modularisation setup• Sub-module build.gradle:
dependencyManagement { imports { mavenBom "org.grails:grails-bom:$grailsVersion" } applyMavenExclusions false} dependencies { compile project(":myPlugin-core") compile "com.example:library:1.0.0"}

Publishing

Artifact publication • Snapshots:
• Using the artifactory Gradle plugin.
• Published in OJO (oss.jfrog.org).
• Releases:
• Using the grails-plugin-publish Gradle plugin.
• Published in Bintray.

Bintray setup

• For Snapshots:
Build setup
artifactory { contextUrl = 'http://oss.jfrog.org' publish { repository { repoKey = 'oss-snapshot-local' username = bintrayUser password = bintrayKey } defaults { publications('maven') } }} artifactoryPublish { dependsOn sourcesJar, javadocJar}

grailsPublish { user = bintrayUser key = bintrayKey portalUser = pluginPortalUser portalPassword = pluginPortalPassword repo = 'plugins' githubSlug = 'alvarosanchez/my-plugin' license = 'APACHE 2.0' title = "My Plugin" desc = "A very cool Grails plugin" developers = [ alvarosanchez: "Alvaro Sanchez-Mariscal" ]}
• For Releases:
Build setup
Build setup
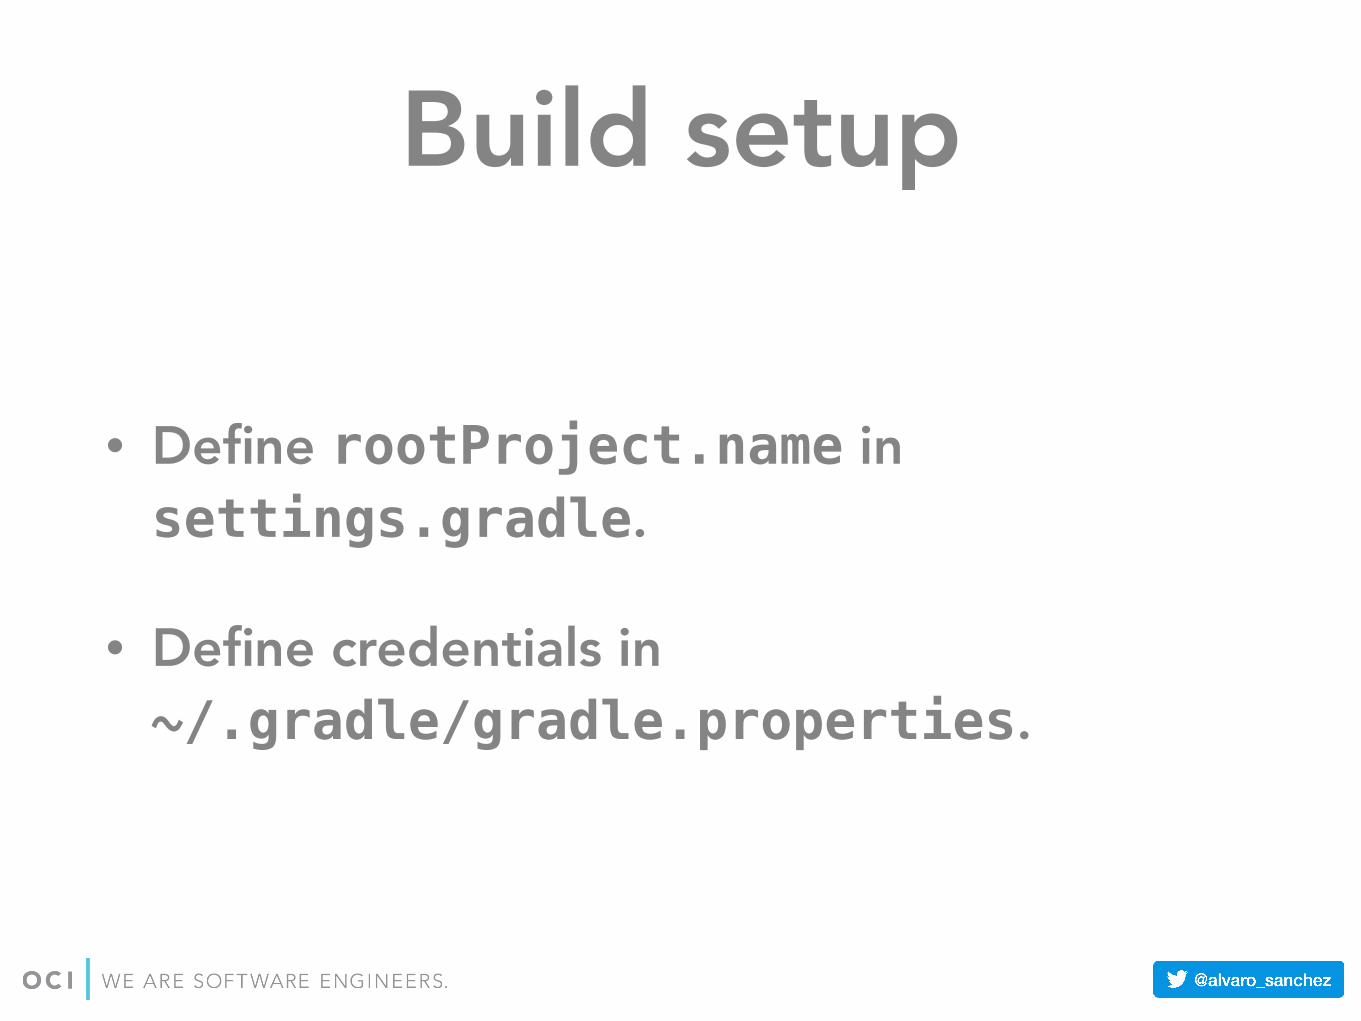
• Define rootProject.name in settings.gradle.
• Define credentials in ~/.gradle/gradle.properties.

Running it• Snapshot publishing:
• Release publishing:
$ ./gradlew artifactoryPublish
$ ./gradlew publishPlugin notifyPluginPortal

Plugin portals
• Once your packages are published in your Bintray repo, go to https://bintray.com/grails/plugins and click on “Include my package”.
• Grails 3: http://plugins.grails.org/
• Grails 2: http://grails.org/plugins

Testing

Testing with a profile
• You can create a profile and use it as a TCK for your plugin:
• Create test apps from that profile.
• Apps come with a set of tests.
• Use features to test different configurations.

Profile descriptordescription: Creates a test app for Spring Security REST pluginbuild: excludes: - org.grails.grails-coredependencies: compile: - "org.grails.plugins:spring-security-rest:${pluginVersion}" - "org.grails:grails-datastore-rest-client:5.0.0.RC3" testCompile: - "com.codeborne:phantomjsdriver:1.2.1" - "org.seleniumhq.selenium:selenium-api:2.47.1" - "org.seleniumhq.selenium:selenium-firefox-driver:2.47.1"
profile.yml.tmpl
Feature descriptor
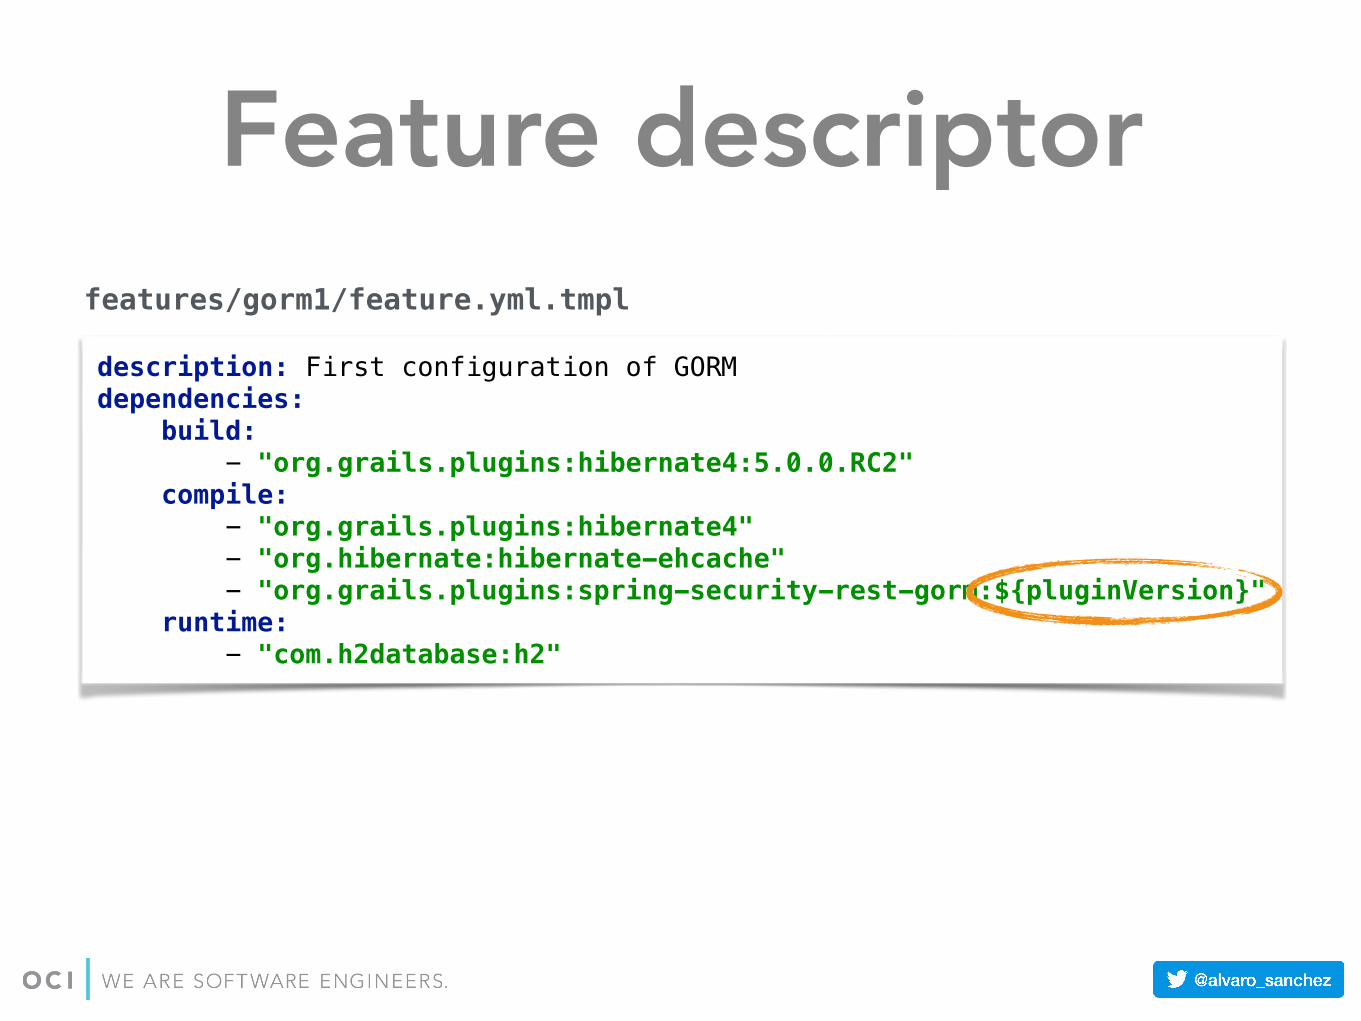
description: First configuration of GORMdependencies: build: - "org.grails.plugins:hibernate4:5.0.0.RC2" compile: - "org.grails.plugins:hibernate4" - "org.hibernate:hibernate-ehcache" - "org.grails.plugins:spring-security-rest-gorm:${pluginVersion}" runtime: - "com.h2database:h2"
features/gorm1/feature.yml.tmpl

Build setuptask generateProfileConfig << { copy { from 'profile.yml.tmpl' into '.' rename { String fileName -> fileName.replaceAll '\\.tmpl', '' } expand pluginVersion: project.version } file('features').eachDir { feature -> copy { from "features/${feature.name}/feature.yml.tmpl" into "features/${feature.name}/" rename { String fileName -> fileName.replaceAll '\\.tmpl', '' } expand pluginVersion: project.version } }} compileProfile.dependsOn generateProfileConfig

Build setup
cd build
for feature in `ls ../spring-security-rest-testapp-profile/features/`; do
grails create-app -profile org.grails.plugins:spring-security-rest-testapp-profile:$pluginVersion \ -features $feature $feature
done
generate-test-apps.sh
File build = new File('build') if (build.exists()) { build.eachDir { include it.path }}
settings.gradle

Skeleton
• Put in the skeleton all your test files and resources.
• You can use features to have different sets of tests, resources and configuration.
• Define global configuration values in profile’s root skeleton folder.

Demo - The Spring Security REST plugin

Thank you!
Álvaro Sánchez-Mariscal