mars and earth - nasa
TRANSCRIPT
Mars and EarthScience Learning Activities for Afterschool
Participants ages 5-12
EDUCATOR RESOURCE GUIDE
Mars and Earth
Credits & Acknowledgements
Original Activity Sources The activities in this collection were not adapted from individual existing NASA resources.However, they were heavily influenced and inspired by the Mars Education Program’sMars Curriculum Modules for grades 4 through 12, which can be found online.http://mars.jpl.nasa.gov/classroom/resources.html
Produced by the Education Department at the American Museum of Natural History
Gretchen Walker, Program ManagerPatricia McGlashan, Writer Laura Danly, Scientific Advisor Eric Hamilton, Illustrator Stephanie Fotiadis, Graphic Designer
Thanks to the staff and participants at Madison Square Boys and Girls Club, St. NicholasNeighborhood Preservation Corporation, and PS 59.
The activities in this curriculum guide were adapted for afterschool programs by theAmerican Museum of Natural History under NASA Grant NAG5-13028.
2

Mars and Earth
Preface
Mars and Earth: Science Learning Activities for Afterschool was produced by the AmericanMuseum of Natural History (AMNH) as part of an 18 month study and demonstration project funded by NASA. The demonstration project collected a wide range of existing NASAand AMNH educational resources developed for formal school settings. It drew on AMNH’sexperience to adapt the materials for community-based afterschool program staff working with participants aged 5-12. Materials were tested in afterschool programs operatedby the local affiliate of a national youth-serving organization, an independent community-based organization, and a public school. Afterschool participants and staff were engaged as co-researchers with the AMNH staff. Observations were conducted by the AMNH staff,interviews were conducted with the afterschool staff and participants, and written datawas collected from instructors in the form of weekly summary sheets and from participants in the form of science journals.
The key findings from the demonstration project were:• Young people are highly interested in what the universe is like and how it has developed
over time. • The most powerful part of the learning experience in the demonstration project was the
opportunity for participants to express their ideas and opinions, and to learn to buildexplanations from evidence.
• Afterschool staff with youth development training have a set of skills that are applicableto leading inquiry and discussion-based science learning experiences.
Mars & Earth: Science Learning Activities for Afterschool is one of three prototype curriculum packets produced by the project. Mars & Earth varies from the other two prototype packets produced under the grant (Astrobiology and Sun as a Star) in that it is not anadaptation of individual existing NASA activities. This packet makes use of a prototypeinstructional model developed and piloted during the second year of our project.Activities were developed to explore and illustrate the instructional model, rather thanadapted directly from specific existing NASA resources. However, the activities were heavily influenced and inspired by the Mars Education Program’s Mars Curriculum Modules forgrades 4 through 12, which can be found online.http://mars.jpl.nasa.gov/classroom/resources.html
The complete report on the demonstration project and the scan of the field that accompanied it, NASA and Afterschool Programs: Connecting to the Future can be downloaded from the NASA Informal Education web portal.http://education.nasa.gov/divisions/informal/overview/R_NASA_and_Afterschool_Programs.html
3
Mars and Earth
Introduction
The Mars and Earth unit consists of nine sequential Activities, most of which may be completed in about one hour. The Activities are targeted for the elementary school level.
Navigating Through the Activities The format is geared towards helping the instructor navigate efficiently through eachhour-long Activity. The headings contain brief but pertinent information.
• The Overview gives you a quick summary of the Activity and the estimated time forcompleting the lesson.
• The Big Ideas relate to the nature of science and how scientists think and work. Theypresent concepts about conducting an investigation and take you and your groupthrough the same series of steps that scientists follow.
• Connections help you make sense of the flow of the unit by relating the topic of theActivity to those that come before or after it. You may use this section to introduce anActivity and to help participants connect to what they have already done or will be doingin subsequent activities.
• The Materials section lists everything you will need to use that day. In many cases, thematerials are commonly available supplies. Most images listed are provided either ashandouts or online. There are some items you will need to gather yourself, and these areclearly outlined. Be sure to preview the Materials section in advance. Please see the complete Materials list for the entire unit on page 6.
• The Preparation section lets you know what you need to get ready ahead of time.
• The Activity is presented in a step-by-step style. The main objective in each step comesfirst, in bold print as a visual cue. A brief paragraph explains the step in more detail andalso provides questions and prompts to use with participants.
4
Mars and Earth
Overview
In this unit, participants are engaged in acquiring content knowledge while also using theprocess skills that are key to conducting scientific investigations. In each Activity, they areintroduced to a big idea related to the nature of science, and then have an opportunity toput that idea into practice.
Science is about asking questions. Activity 1 introduces the central question of the unit:What can we learn from images of other planets? Participants compare and contrastimages of Earth and Mars and then experiment with lenses to understand more aboutthe instruments used to make the images.
Science is about collecting data and using evidence to answer questions. In Activity 2, participants will be doing exactly what scientists do when analyzing images from spacecraft – comparing what they see in satellite images to what they already know.
Scientists use evidence from satellite images to build explanations. In Activity 3, participantsapply what they have learned about viewing and interpreting satellite images of Earth tobegin analyzing satellite images of Mars. Then they brainstorm a list of forces or eventsthat could have caused some of these features to form on Mars.
Scientists rely on laboratory experiments and modeling to better understand and test theirideas. In Activities 4, 5, and 6 participants conduct a series of experiments using models.They test their ideas by attempting to recreate features that might have been caused bywind, flowing water, or the impact of a falling object.
A model is different from the real thing but can be used to learn something about the realthing. Through discussions in Activity 7, participants explore the limits of the models theycreated, develop a list of their own questions about Mars, and speculate on ways theymight find their own answers.
An important part of research is learning what others have discovered, and communicatingwhat you have learned. In Activity 8, participants make use of a variety of resources to findout what is known about Mars and hold a science conference to share new information and new questions.
Scientists use skills they have learned and apply them to new situations. In the culminating activity, Activity 9, participants apply what they have learned about how to interpretimages of Earth and Mars to interpret images of other planets. Then they select one planet on which to base the story of an imaginary voyage. They create comic strips to tellthe tale.
5
Mars and Earth
Materials
For Activity 1 For each group of 3 to 4 participants:• 3 images each from the Earth and Mars
image sets • a collection of large and small lenses
(American Science Surplus sells large lensesat 10 for $3.50, small lenses at 10 for $2.00.Sold online at http://www.sciplus.com/).
For the group:• 1 piece of paper with small print (to hang as
a viewing target for lens experiments)• 2 sheets of large chart paper and markers
For Activity 2 For each participant:• 1 sheet of drawing paper• 1 pencil
For the group:• 1 set of Earth Images• several large sheets of paper
For Activity 3 For each participant:• 1 sheet of paper• 1 metric ruler (for grades 4 and above)
For the group:• 1 set of Earth Images• 1 set of Mars Images• 2 sheets of chart paper and markers
For Activity 4 For each group of 3 to 4 participants:• 1 lightweight plastic tray about 1 m long
and 10 cm wide (purchase wall paper traysfrom a paint store for about $1.00 each)
• sand to cover surface of tray to a depth ofat least 5 cm
• clear plastic wrap to cover tray • tape• 1 drinking straw• 1 set of Mars Images
For Activity 5 For each group of 3 to 4 participants:• 1 lightweight plastic tray about 1 m long and
10 cm wide (purchase wall paper trays froma paint store for about $1.00 each)
• damp sand to cover surface of tray to adepth of at least 2 cm
• jug of water• several blocks (to raise one end of the tray)• 1 protractor (for grade 4 and above)• several large and small paper cups• 1 bucket (for collecting excess sandy water)• 1 set of Mars Images• newspapers to place under trays (optional)• clean up supplies such as rags, sponges,
whisk brooms
For Activity 6 For each group of 3 to 4 participants:• 1 lightweight plastic tray about 1 m long
and 10 cm wide (purchase wall papertrays from a paint store for about $1.00each)
• sand to cover surface of tray to a depthof about 5 cm
• jug of water (optional)• several objects in a variety of sizes and
shapes to use as "impactors", such as ballbearings, marbles, golf balls, tennis balls,rocks, acorns, coins, blocks
• 1 set of Mars Images
6

Mars and Earth
Materials - cont’d
For Activity 7 For the group:• 1 set of Mars Images• chart paper and markers
For Activity 8 For the group:• chart labeled "Our Questions About
Mars" (generated in Activity 7)• a variety of books, videos, and CD-ROMs
about Mars (See Resources on page 35 for a detailed list of suggestions)
• access to computers, if possible• chart paper and markers
For Activity 9 For each group of 3 to 4 participants:• 1 set of NASA Solar System Lithographs
(these can be found online athttp://teachspacescience.org)
• drawing materials such as large sheetsof paper, colored pencils or pens,markers, rulers
• sample comic strips (optional)
7
Mars and Earth
1. What Can We Learn From Images?Overview
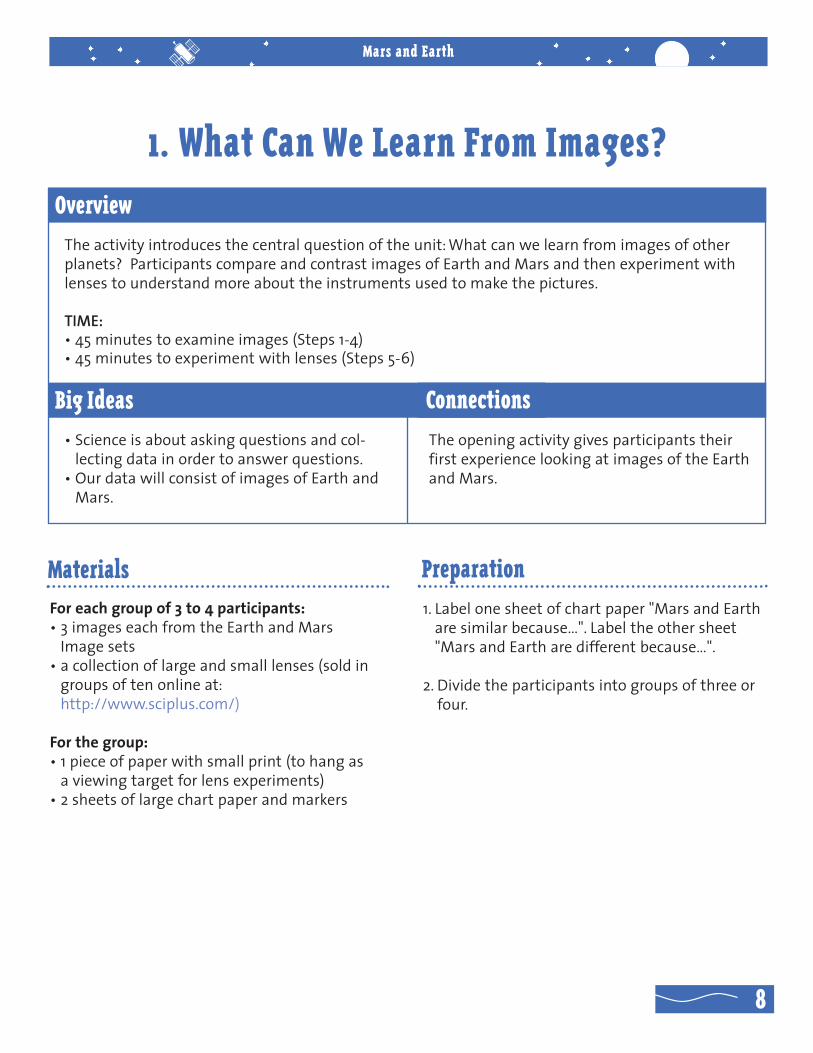
The activity introduces the central question of the unit: What can we learn from images of otherplanets? Participants compare and contrast images of Earth and Mars and then experiment withlenses to understand more about the instruments used to make the pictures.
TIME: • 45 minutes to examine images (Steps 1-4)• 45 minutes to experiment with lenses (Steps 5-6)
Big Ideas • Science is about asking questions and col-
lecting data in order to answer questions.• Our data will consist of images of Earth and
Mars.
Connections
The opening activity gives participants theirfirst experience looking at images of the Earthand Mars.
Materials For each group of 3 to 4 participants:• 3 images each from the Earth and Mars
Image sets • a collection of large and small lenses (sold in
groups of ten online at:http://www.sciplus.com/)
For the group:• 1 piece of paper with small print (to hang as
a viewing target for lens experiments)• 2 sheets of large chart paper and markers
Preparation 1. Label one sheet of chart paper "Mars and Earth
are similar because…". Label the other sheet "Mars and Earth are different because…".
2. Divide the participants into groups of three orfour.
8
Mars and Earth
1. What Can We Learn From Images?
Activity
1. Introduce the unit. Tell participants that over the next few weeks they will be investigating the question "What canwe learn from images of other planets?" Ask:
• What are images?• What do you think they might show us about other planets?
Explain that images are pictures. Participants will be looking at images of Earth and Mars whichwere taken with special instruments.
2. Compare and contrast images of Earth and Mars. Distribute the images of Earth and Mars to each group. Ask them to compare and contrast theimages to look for ways in which Mars is the same as Earth and ways in which Mars is differentfrom Earth.
3. Record data on similarities and differences. Hang up the two sheets of chart paper you have prepared and ask participants to share theirfindings on similarities and differences. Record their ideas on the two charts.
4. Discuss the technology behind the images. Open a discussion on how scientists use technology to help them learn about other planetsand make better observations. Ask:
• How do you think scientists made these images?• What kinds of technology might they use to observe planets that are very far from Earth?
Explain that one of the key tools that scientists use to study objects in space is the telescope. Atelescope can make far off objects look closer and faint objects appear brighter.
The images of Earth and Mars that participants just examined were taken using telescopesmounted in satellites. These are small, unmanned spacecraft in orbit around Earth and Mars.
The telescope itself is a tube-shaped device with lenses positioned inside.
9
Mars and Earth
1. What Can We Learn From Images? - Activity
5. Experiment with lenses. Distribute a box of lenses to each group and hang up the piece of paper with small print.Challenge participants to find a way to use the lenses to read the small print from a distance.
Allow participants time to experiment. If necessary, suggest that they try using two lenses incombination, one in front of the other, held at different distances from their eyes.
6. Communicate findings. After participants have found a successful combination of lenses, call the group back together toreport on their findings. Ask:
• What did you notice about the lenses?• What combination of lenses gave you the best image of the text on the wall?
Explain to participants that telescopes are constructed using either a combination of lenses likethese or a lens together with a mirror. Throughout activities that they do, they will be looking atimages that have been taken using telescopes.
10
Mars and Earth
2. What Are Satellite Images?Overview
Participants create maps of the room and dis-cuss the perspectives in their drawings. Thenthey look at satellite images to help them real-ize that these are taken from above the Earth.
Participants brainstorm a list of features thatmight be recognizable in satellite photos,search the Earth Images for these features, andplace the images in categories depicting thesefeatures.
TIME:• 1 hour
Big Ideas
• Science is about collecting data and usingevidence to answer questions. Participantswill be doing what scientists do when analyzing images from spacecraft – comparingwhat they see in the images to what theyalready know.
• Satellite images are taken from space, andtherefore give us images of the Earth fromfar above its surface.
• Major features, such as rivers, oceans,mountains, and cities are recognizable onsatellite images.
Connections Before we can study and interpret images ofother planets, we need to understand whatwe see in satellite images of our own planet.
Materials For each participant:• 1 sheet of drawing paper• 1 pencil
For the group:• 1 set of Earth Images• several large sheets of paper
Preparation No advanced preparation beyond the gatheringof materials necessary for this activity.
11
Mars and Earth
2. What Are Satellite Images?
Activity
1. Draw a picture of the room. Ask participants to draw a picture of the room. They may draw it any way they like.
As participants are working, walk around and look at their pictures. Check on the number of different perspectives they have chosen. Some may have drawn the room from eye level, othersfrom above (like a map).
2. Share the drawings to point out different perspectives. Invite participants to share their drawings. Pick out several pictures drawn from differentperspectives and ask:
• Where would you need to be standing in order to draw the room from this point of view?
Note: If no one has drawn the room from above, ask participants to try to draw the room as ifthey were looking down on it from the ceiling.
Ask: • What details in the room are represented in these pictures?
3. Recognize the point of view in satellite images. Group participants into teams of three or four, and distribute one set of Earth Images to eachteam. Let them look at the images briefly and then ask:
• Where would you need to be standing in order to see the Earth from this point of view?
Explain that these images were taken from space, looking down on the Earth from space. Theyare similar to the drawings participants did when they made maps of the room as if they werelooking down on it from the ceiling.
12
Mars and Earth
2. What Are Satellite Images? - Activity
4. Brainstorm a list of features that might be visible in satellite photos. Ask participants to brainstorm a list of features they would expect to see in satellite photos ofthe Earth. They might mention features such rivers, mountains, oceans, cities, and forests.
Record each idea on a separate sheet of paper. Hang the sheets of paper with the feature namesaround the room..
5. Work in groups to identify features in the satellite images. Ask each group to observe all of the Earth Images closely and decide if an images includes one ofthe features they named in the brainstorming session. Then have them place the image showingthat feature under the paper (which you have hung around the room) with the name of that feature.
6. Discuss the findings. Have participants discuss their choices and give reasons for their placements. Encourage rich anddetailed descriptions. Ask, for example:
• Why do you think this image shows a river? How does it look? What shape is it? Can you trace itsflow?
Recognize that there may be disagreement, and that some features may be incorrectly identified.Provide guidance, and ask participants to give more evidence and to reconsider their identifications based on the evidence.
13

Mars and Earth
3. What Do Satellite Images Tell Us About Mars?Overview
Participants compare satellite images of Mars and Earth to look for similar features. Then theybrainstorm a list of forces or events that could have caused some of these features to form on Mars.
TIME: • 45 minutes
Big Ideas • Science is about collecting data and using
evidence to answer questions. Participantswill be doing what scientists do when ana-lyzing images from spacecraft -- comparingwhat they see in the images to what theyalready know.
• Scientists use evidence from satellite images to build explanations.
Connections
Participants apply what they have learnedabout viewing and interpreting satelliteimages of Earth to begin analyzing satelliteimages of Mars.
Materials For each participant:• 1 science journal• 1 metric ruler (for grades 4 and above)
For the group:• 1 set of Earth Images• 1 set of Mars Images• 2 sheets of chart paper and markers
Preparation Each participant will need a science journal torecord thoughts, observations, and findings overthe next few weeks. There are a number of waysto create journals if you are not providing ready-made ones. For example:
• Have participants make folders from construction paper. They can then insert loose leafpaper (both lined and drawing paper) into thefolders.
• Fold sheets of large paper in half. Either staplethe sheets together or punch holes and tie thesheets together with string or yarn.
14
Mars and Earth
3. What Do Satellite Images Tell Us About Mars?
Activity
1. Scientists compare satellite images of Mars to images of the Earth. Have participants share their ideas about how scientists use images to study Mars. Ask:
• What do you think that scientists did when they first saw images of Mars? How did they try tofigure out what they were seeing?
Explain that scientists interpret images of Mars by comparing and contrasting them to morefamiliar things that they already know about, such as features and areas of the Earth.
2. Now participants will use the same technique that space scientists use to interpret images. Distribute the Earth Image set and the Mars Image set to groups of three or four participants. Tellthem to:
• Compare the two sets of images and look for similarities. When they find two images that havesimilar features, they should write down the number of the Mars image and the number of theEarth image in their science journals.
• Write about and/or draw (depending on grade level) what is similar in the two images.
Extension for grades 4 and above:• Notice the scale bar in the corner of each picture. Calculate the size of the feature in each
image: Use the ruler to measure the size of the feature in centimeters and then multiply thatnumber by the number of kilometers or miles represented by each centimeter (as shown on thescale bar.)
3. Discuss findings. Hold a discussion about how participants were able to interpret features on Mars. Record theirresponses on a sheet of chart paper. Ask:
• What features did you find on Mars that look similar to those on Earth? • What differences did you observe?
15

Mars and Earth
3. What Do Satellite Images Tell Us About Mars? - Activity
4. Speculate on what might have caused those features to form on Mars. Ask participants to look at the Mars images again and share their ideas of how and why theythink those features might have formed on the surface of the planet. They might mention suchforces as wind, water, earthquakes, or volcanoes. Record their ideas on another sheet of chart paper.
Let participants know that in upcoming activities they will be trying to recreate some of thesefeatures using three different methods.
16
Mars and Earth
4. Did Wind Create Features On Mars?Overview
Participants use trays of sand and straws toattempt to recreate surface features ofimages of Mars.
TIME: • 1 hour
Big Ideas • Scientists rely on laboratory experiments
and modeling to better understand and testtheir ideas.
• A model is different from the real thing butcan be used to learn something about thereal thing.
• Similar investigations rarely come outexactly the same.
Connections By modeling the effects of wind on a planet'ssurface, participants test their ideas abouthow some of the features on Mars mighthave been produced.
Materials For each group of three to four participants:• 1 lightweight plastic tray about 1 m long and
10 cm wide (purchase wall paper trays froma paint store for about $1.00 each)
• sand to cover surface of tray to a depth of atleast 5 cm
• clear plastic wrap to cover tray • tape• 1 drinking straw each• 1 set of Mars Images
For each participant: • 1 science journal
Preparation 1. Prepare the trays for the simulation:• Cover the bottom of each tray with a layer of
sand at least 5 cm deep.• Cover the top of each tray with clear plastic
wrap, and tape the wrap to the sides of the trayto make sure it will not come off during theactivity.
• Poke a hole in the plastic wrap at one end ofthe tray. It needs to be large enough for participants to stick in a straw and blow air across thesurface of the sand. The plastic wrap is a safetymeasure, meant to keep the sand in the container and prevent it from blowing into participants' eyes.
2. Place the trays and straws at work stationsaround the room.
17

Mars and Earth
4. Did Wind Create Features On Mars?
Activity
1. Review the set of Mars Images. Distribute the Mars Images to groups of three or four participants. Ask them to choose twoimages from the set that have features they think might have been formed by wind. Have themgive reasons for their selections.
2. Explain modeling. Explain that although scientists can't go to Mars to find out if their ideas are correct, they cantest their ideas in laboratory simulations. They use models to see if they can get results similar towhat they observe in the satellite images of Mars.
Now participants will test their ideas about features formed by wind by trying to recreate surfaceformations similar to the ones they have selected from the Mars Images.
3. Introduce the model and the testing procedures. Gather participants around one tray set-up and explain that they will use the model to try torecreate some of the features they see on the surface of Mars. Demonstrate the following, andinvite participants to comment on the results:
• Stick a straw in the hole of the plastic wrap and blow gently across the surface. What happens?What kind of feature results? Is it similar to any of the features in the images of Mars?
• Change the angle or the direction of the straw.How is the effect different?
Set the appropriate safety rules. Emphasize that the plastic wrap should stay on the tray at all times.
4. Explore the effects of wind. Record the results. Allow participants as much time as possible to explore the effects of wind on the sandy surface.
Remind them that they need to keep track of what they did to create features and that it isimportant to record their results in their science journals. Younger participants may draw beforeand after pictures of their trays. Older ones may add written descriptions as well.
18
Mars and Earth
4. Did Wind Create Features On Mars? - Activity
5. Report on results. Debrief the group on what they found out about the effects of wind. Use some of these promptsfor the discussion:
• What did you do to try to recreate the features in the Mars images?
• What happened? What kinds of features were you able to recreate?
• Why do you think you could model some kinds of features but not others? Give reasons.
Let participants know that they will continue to explore modeling in upcoming sessions.
REMINDER: Store the trays and the sand in a safe place. They will be used again in the next activity.
19

Mars and Earth
5. Did Water Create Features On Mars?Overview
Participants use trays of sand and cups ofwater to attempt to recreate surface featuresseen in images of Mars.
TIME:• 1 hour
Big Ideas • Scientists rely on laboratory experiments
and modeling to better understand and testtheir ideas.
• A model is different from the real thing butcan be used to learn something about thereal thing.
• Similar investigations rarely come outexactly the same.
ConnectionsParticipants continue to tests their ideasabout the surface of Mars by using water tocreate features.
Materials For each group of three to four participants:• 1 lightweight plastic tray about 1 m long and
10 cm wide (purchase wall paper trays froma paint store for about $1.00 each)
• damp sand to cover surface of tray to adepth of at least 2 cm
• jug of water• several blocks (to raise one end of the tray)• 1 protractor (for grade 4 and above)• several large and small paper cups• 1 bucket (for collecting excess sandy water)• 1 set of Mars Images• newspapers to place under trays (optional)• clean up supplies such as rags, sponges,
whisk brooms
For each participant• 1 science journal
Preparation 1. Set up the trays of sand:• Dampen the sand.• Cover the bottom of each tray with a layer of
sand about 2 cm deep.
2. Place the trays, blocks, buckets, jugs of water,cups, and clean up supplies at work stationsaround the room.
20
Mars and Earth
5. Did Water Create Features On Mars?
Activity
1. Review the set of Mars Images. Distribute the Mars Images to groups of three or four participants. Ask them to choose twoimages from the set that have features they think might have been formed by flowing water.Have them give reasons for their selections.
Next, participants will test their ideas about features formed by flowing water by trying to recreate surface formations similar to the ones they have selected from the Mars Images.
2. Introduce the model and the testing procedures. Gather participants around one tray set-up and explain that they will use the model to try torecreate some of the features they see on the surface of Mars. Demonstrate the following, andinvite participants to comment on the results:
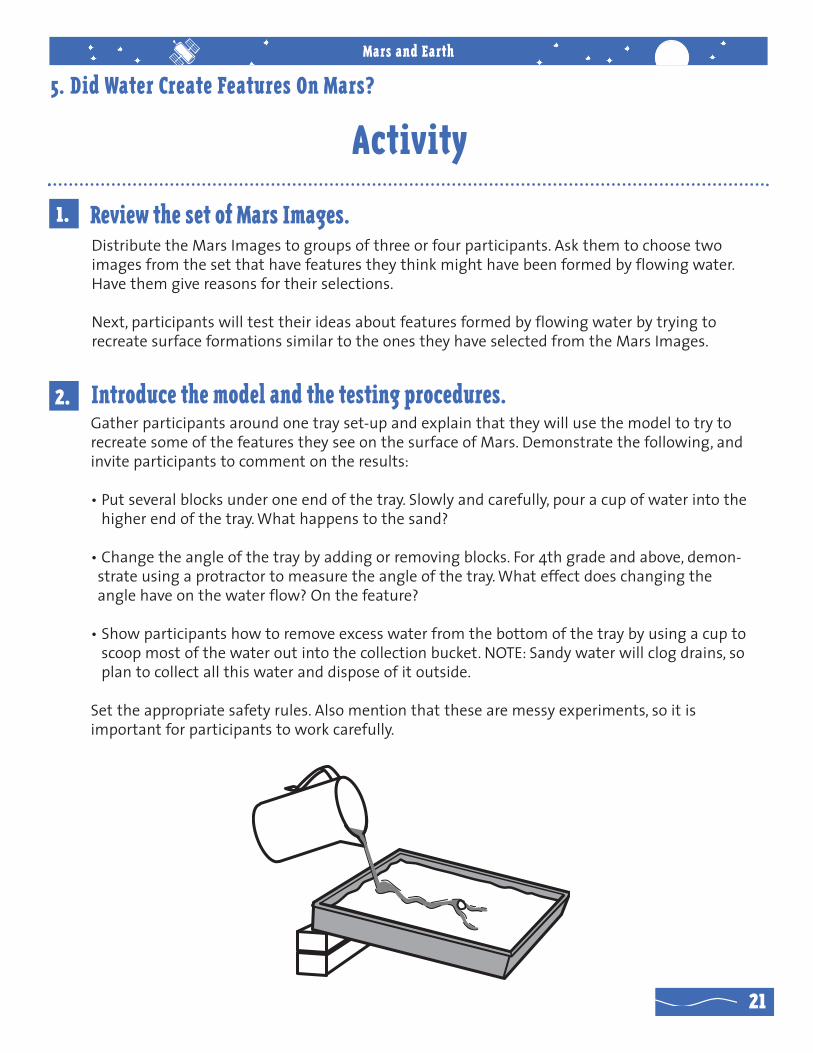
• Put several blocks under one end of the tray. Slowly and carefully, pour a cup of water into thehigher end of the tray. What happens to the sand?
• Change the angle of the tray by adding or removing blocks. For 4th grade and above, demonstrate using a protractor to measure the angle of the tray. What effect does changing theangle have on the water flow? On the feature?
• Show participants how to remove excess water from the bottom of the tray by using a cup toscoop most of the water out into the collection bucket. NOTE: Sandy water will clog drains, soplan to collect all this water and dispose of it outside.
Set the appropriate safety rules. Also mention that these are messy experiments, so it is important for participants to work carefully.
21
Mars and Earth
5. Did Water Create Features On Mars? - Activity
3. Review the set of Mars Images. Allow participants as much time as possible to explore the effects of flowing water on the sandysurface.
Remind them that they need to keep track of what they did to create features and that it isimportant to record their results. Younger participants may draw before and after pictures oftheir trays. Older ones may add written descriptions as well.
4. Report on results. Debrief the group on what they found out about the effects of flowing water. Use some of theseprompts for the discussion:
• What did you do to try to recreate the features in the Mars images? Did you manipulate theamount or the speed of the water? The angle of the tray?
• What happened? What kinds of features were you able to recreate with flowing water?
• Why do you think you could model some kinds of features but not others? Give reasons.
Let participants know that they will continue to explore modeling in the next session.
REMINDER: Store the trays and the sand in a safe place. They will be used again in the next activity. Let the sand air dry.
22
Mars and Earth
6. Did Impacts Create Features On Mars?Overview
Participants use trays of sand and a variety ofsolid objects to model the effects of"impactors" on the surface.
TIME: • 1 hour
Big Ideas • Scientists rely on laboratory experiments
and modeling to better understand and testtheir ideas.
• A model is different from the real thing butcan be used to learn something about thereal thing.
• Similar investigations rarely come outexactly the same.
Connections Participants conclude their modeling of features on the surface of Mars by experimenting with objects that make impact whenlanding.
Materials For each group of three to four participants:• 1 lightweight plastic tray about 1 m long and
10 cm wide (purchase wall paper trays froma paint store for about $1.00 each)
• sand to cover surface of tray to a depth ofabout 5 cm
• jar of water (optional)• several objects in a variety of sizes and
shapes to use as "impactors", such as ballbearings, marbles, golf balls, tennis balls,rocks, acorns, coins, blocks
• 1 set of Mars Images
For each participant:• 1 science journal
Preparation 1. Set up the trays of sand:• Cover the bottom of each tray with a layer of
sand about 5 cm deep.
2. Place the trays, an assortment of "impactors",and a jar of water (optional) at work stationsaround the room.
23
Mars and Earth
6. Did Impacts Create Features On Mars?
Activity
1. Review the set of Mars Images. Distribute the Mars Images to groups of three or four participants. Ask them to choose twoimages from the set that have features they think might have been formed by the impact of afalling object. Have them give reasons for their selections.
Ask what the group knows about meteors, sometimes called falling stars. Then explain thatmeteors are not really falling stars, but are pieces of rock that hit the Earth's atmosphere (the airsurrounding the Earth). Usually the rock burns up before it hits the Earth. If a very large pieceenters the Earth's atmosphere, it may fall all the way to the ground before it burns up completely. This doesn't happen very often now, but it did happen more a very long time ago. Thiskind of impact can change the planet's surface.
Next, participants will test their ideas about features formed by "impactors" by trying to recreatesurface formations similar to the ones they have selected from the Mars Images.
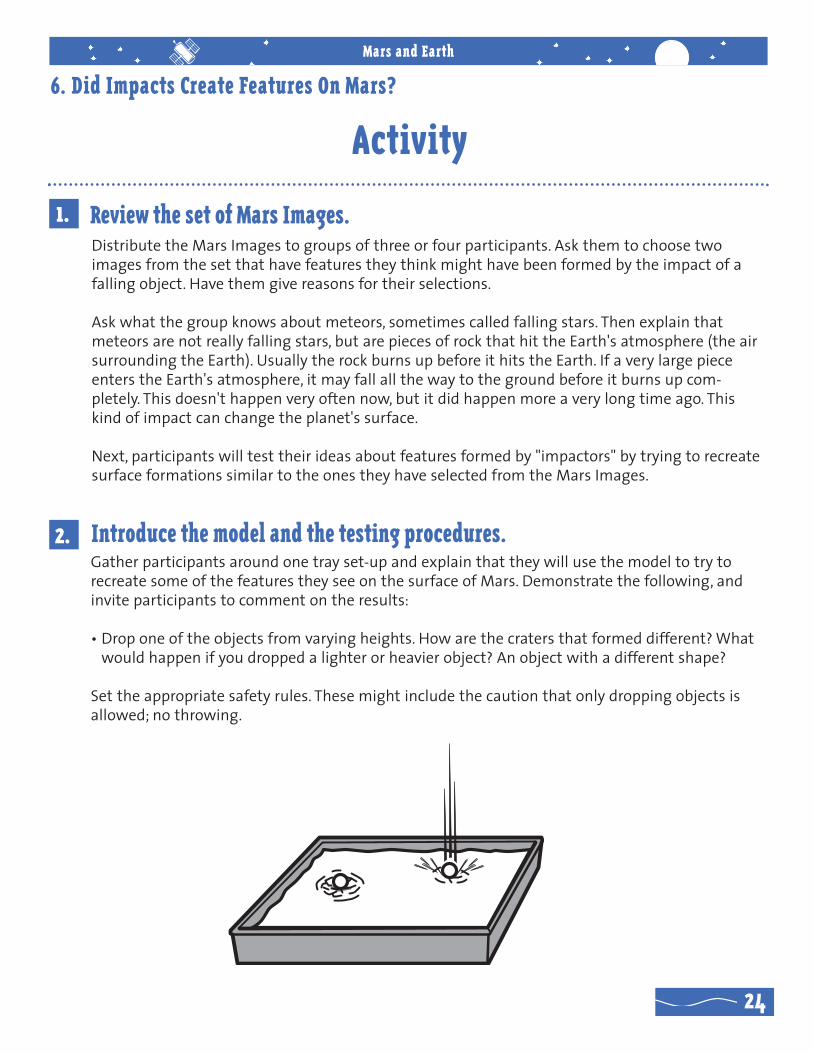
2. Introduce the model and the testing procedures. Gather participants around one tray set-up and explain that they will use the model to try torecreate some of the features they see on the surface of Mars. Demonstrate the following, andinvite participants to comment on the results:
• Drop one of the objects from varying heights. How are the craters that formed different? Whatwould happen if you dropped a lighter or heavier object? An object with a different shape?
Set the appropriate safety rules. These might include the caution that only dropping objects isallowed; no throwing.
24
Mars and Earth
6. Did Impacts Create Features On Mars? - Activity
3. Introduce the model and the testing procedures. Allow participants as much time as possible to explore the effects of a variety of "impactors" onthe sandy surface.
Remind participants that they need to keep track of what they did to create features and that it is important to record their results. Younger participants may draw before and after pictures of their trays. Older ones may add written descriptions as well.
NOTE: After participants have experimented with dry sand, you canalso suggest that they add enough water to make it justdamp. Water adds a little more surface strength to the sand,and this results in slightly different crater features. This is abit messier and takes more time, and therefore is suggested as an option.
4. Report on results. Debrief the group on what they found out about the effects of falling objects on the sandy surface. Use some of these prompts for the discussion:
• What did you do to try to recreate the features in the Mars images? Did you change the heightof the drop for the same object? Did you try a variety of objects? Did you add water to the sand?
• What happened? What kinds of features were you able to recreate?
25

Mars and Earth
7. What Else Do We Want To Find Out About Mars?Overview
Participants discuss the models they created inthe last three activities as models of forces that shape the surface of planets, and talk about thesimilarities and differences between models and real events. Then they brainstorm a list ofquestions and suggest ways they might find answers.
TIME: • 45 minutes
Big Ideas • Scientists rely on laboratory experiments
and modeling to better understand and testtheir ideas.
• A model is different from the real thing butcan be used to learn something about thereal thing.
• Science is about raising questions andsearching for answers.
• An important part of the scientific processinvolves comparing ideas that you developthrough experiments and observations withthe thinking of other scientists.
• Scientists often go to the research done byothers to see if someone else has alreadyanswered any of their questions.
Connections Now that participants have created modelsto help explain features on Mars, theyexplore the limits of those models.
Materials For the group:• 1 set of Mars Images• chart paper and markers
Preparation 1. Divide one sheet of chart paper into two
columns. Label the first column "The Same" and the second column "Different". Hang upthe chart.
2. Label another sheet of chart paper "OurQuestions About Mars" and hang it up.
26

Mars and Earth
7. What Else Do We Want To Find Out About Mars?
Activity
1. Compare the sand tray models to images of Mars. Hold up several of the Mars Images, one at a time, and ask:• What do you think caused these features on Mars? Why do you think so?• Why do scientists create models? How did your models help you understand the forces thatmight have caused the features?
Mention that participants used models of three different forces to try to recreate features on thesurface of Mars. Ask them to think back: • What represented the three forces? (wind, flowing water, falling objects)• What represented the surface of Mars?
2. Discuss the similarities and differences between the models and the actual forces that shaped the surface of Mars. Focus attention on the chart labeled "The Same" and "Different." Ask: • In what ways were those three models similar to the things they represented? In what ways
were they different? In other words, what was the same or different about the way these eventshappened in the experiments and the way they might happen in reality?
As participants respond, write their ideas on the chart in the appropriate column. Record all ideasbefore offering any of your own. Here are some key differences to mention if they don't come upin the discussion: • Our test surface was always sand. It may not be exactly like the soil on Mars.• Our experiments were small scale. Particularly with impacts, events at higher speed and larger
scale could produce different results. For example, using our models, the crater shape dependedsomewhat on the shape of the object and the angle of the impact. But at greater speeds and inouter space, the shock wave of an impact almost always produces a round crater, regardless ofthe shape of the object or the angle of impact.
• Our experiments took place over a short period of time. It is possible that some of these features took many years to develop. This is especially true of features created by flowing water,such as canyons.
27

Mars and Earth
7. What Else Do We Want To Find Out About Mars? - Activity
3. Introduce the science journals. Invite the group to share their unanswered questions about Mars. Now that we have thoughtabout ways the classroom experiments compare to the real events on Mars, we need to thinkabout what else we could find out that would help us understand our experiments or the imageseven better. What else do we want to know?
Record all ideas on the chart you have labeled "Our Questions About Mars". Participants maywonder, for example, if there is life on Mars, if there is water, or what kind of weather the planetmight experience.
When the question list is complete, have participants vote on the three questions they are mostinterested in finding answers for. On the chart, circle the three questions for easy reference.
4. Discuss how scientists search for answers. Group participants into teams of three of four and have them discuss how they think scientistswould go about finding answers to the three questions circled on the chart.
After the small group discussion, bring everyone back together to share ideas. Refer back to thethree questions on the chart and ask:• How do you think scientists would try to answer these questions? • How many different ways might they use?
Participants will probably mention that scientists might do more experiments; use books,magazines, TV, and the Internet; visit science museums; or consult with other scientists.
Explain that scientists don't always have to do a new experiment when they develop a questionthat is new to them. One of the first things that a scientist usually does is to find out what otherscientists have already discovered about their question. In the next session, participants will bedoing the same: researching what scientists have already found out about their questions.
28
Mars and Earth
8. How Can We Find Out More About Mars?Overview
Participants use a variety of resources to try to find answers to their questions. Then they hold ascience conference to share their findings.
TIME: • 1 hour or more for research • 1 hour for the science conference
Big Ideas • Scientists do research and tap into sources
of established knowledge.
• They compare their thinking to establishedknowledge.
• Scientists communicate what they havelearned and which questions still remain open.
Connections
Participants explore resources to find outwhat is known about Mars and hold a science conference to share their new information.
Materials For the group:• Chart labeled "Our Questions About Mars"
(generated in Activity 7)• A variety of books, videos, and CD-ROMs
about Mars (See Resources on page 35 for adetailed list of suggestions)
• Access to computers, if possible• Chart paper and markers
For each participant:• 1 science journal
Preparation 1. Read over the five options for research present
ed in the activity and decide which ones to usewith your group.
2. Gather together a variety of resources aboutMars suitable to your group's age and abilitylevel.
3. If possible, arrange a time for participants tohave access to the internet.
4. Hang up the chart called "Our QuestionsAbout Mars".
29
Mars and Earth
8. How Can We Find Out More About Mars?
Activity
1. Review the questions for research. Focus participants’ attention on the questions they generated in the previous activity. In theirjournals, have older participants record the three questions the group selected for research.
Explain that participants will be conducting research to try to find answers to those questions.As they go through the resources, they should write down new things that they learn aboutMars in their journals, especially if they might provide answers to questions on the list. Foryounger participants, you will act as group recorder.
2. Conduct research. There are five options suggested for research. Please select those that are most appropriate foryour group and for the resources you have available.
FIVE OPTIONS FOR RESEARCH
OPTION 1: USING BOOKS (for all ages) • Present participants with a collection of books about space science and let them suggest one to use to begin
the research. • Have participants select one of the questions from the list and help you look at the table of contents or index
(if present) of your chosen book. If there is no table of contents or index, simply leaf through the book to see ifit deals with your topic.
Mention that science books are not like story books. You don't have to start at the beginning and read throughto the end. You can often find pages about your question and read those first.• When you find a page related to your questions, read it aloud to the group.
FOR K-2 LEARNERS: Ask if anything you read seems to answer one of the questions. If so, record the informationon chart paper. If not, pick another book or another page and continue reading together.
FOR 3-5 LEARNERS: Ask if anything you read seems to answer one of the questions. If so, have them record theinformation in their journals. Once participants understand how to use science books, break them into smallgroups, assign each group a question, and have them explore the books on their own.
30
Mars and Earth
8. How Can We Find Out More About Mars? - Activity
OPTION 2: WATCHING A VIDEO TOGETHER(for all ages)
• Tell participants that they will watch the videocalled Mars: Past, Present, and Future. (See theResources on page 35.) If the video presentsinformation that answers one of their questions,participants should signal you to stop the video.
• Play the video. As participants signal, stop thetape to discuss what was just shown or said.Replay the tape if necessary.
FOR K-2 LEARNERS: Record the information on chart paper.
FOR 3-5 LEARNERS: Have them write down the information in their journals.
OPTION 3: USING PRESELECTED SITES ONTHE INTERNET (for 3rd grade and above)
• Bookmark a list of websites about Mars. (See theResources on page 35)
• Have participants explore the selected sites withpartners and record information related to theirquestions in their notebooks.
OPTION 4: DOING YOUR OWN INTERNET SEARCH (for 4th grade and above)
• With the group, brainstorm a list of "key words" theycould use to conduct a search on the Internet.
• Either bookmark some websites for participants orshow them how to get to a search engine page.
• Discuss the importance of knowing the source of theinformation, and talk about the kinds of sites that are likely to have reliable information about Mars,such as NASA or university websites.
• Allow participants to search on their own and recordnew information in their journals.
Caution: As they work, circulate to make sure that eachlearner is on a safe and reasonable website.
OPTION 5: TAKING A FIELD TRIP • Take a field trip to your local library to do research. Be
sure to call ahead to schedule the visit, and to let the librarians know what topics participants areresearching.
• Visit your local science museum. Check that theyhave exhibits related to your topic. Try to arrange aguided tour with a docent.
4. Hold a science conference. Explain to participants that they will continue to work the way scientists do by communicatingwhat they learned from their research about Mars. In addition to sharing their findings, scientistsalso present questions they still have and that others might want to think about researching inthe future.
Now participants will hold a science conference to share their new information as well as theirunanswered questions. Give them a few minutes to review questions and answers they recorded.Then ask: • What did you find out about Mars by doing research? What do you know now that you didn't
know before? • Which questions did you answer?
31
Mars and Earth
8. How Can We Find Out More About Mars? - Activity
• Which questions remain unanswered? How might you look for more answers?• What did you learn about the ways that scientists think and work?
EXTENSION ACTIVITY An excellent website produced by NASA gives viewers the opportunity to explore featuressuch as volcanoes, canyons, and craters on Mars.
Go to: http://www.marsquestonline.org and click on “Explore Mars”.
After you select a feature, there are several options. The two we suggest are:
•"How Big is It?"Allows the viewer to drop different sized objects (such as a school bus or the whole U.S.) ontop of a feature to gauge how large the feature is.
• "Fly in 3 D"Lets you explore the feature in three dimensions.
32
Mars and Earth
9. Which Planet Shall We Visit?Overview
Participants compare images of planets and select one planet on which to base the story of theirimaginary voyage. They create comic strips to tell the tale.
TIME: • 1 hour
Big Ideas • Scientists use skills they have learned and
apply them to new situations.
• They communicate creatively about whatthey have learned and talk about what stillremains unanswered.
Connections
Participants apply what they have learnedabout how to interpret images of Earth andMars to interpret images of other planets.
Materials For each group of 3 to 4:• 1 set of Solar System Lithographs
(can be downloaded from http://teachspacescience.org)
• drawing materials such as large sheets ofpaper, colored pencils or pens, markers,rulers
• sample comic strips (optional)
Preparation Bring in several pages of comics (optional) toserve as samples.
33
Mars and Earth
9. Which Planet Shall We Visit?
Activity
1. Compare images. Distribute a set of Solar System Lithographs to each group of three or four participants. Ask participants to compare and contrast the images. Have them point out those that appear to be mostlike Earth, least like Earth, and any other categories they choose.
Ask each group to present their categories, and give reasons why they assigned each planet to aparticular category.
2. Design a comic strip to tell the story of a mission to another planet. Have each group select one planet, and make up a story about their mission to that planet. Thenhave them design a comic strip to tell their story. You may want to show the group some samplesof comic strips to inspire them, and to make sure everyone understands how comics are set up.
Suggest the following strategies for creating a comic strip story:• One good approach is to work as a group to make up the story first. The story might include
how you travel to the planet and what you find when you get there.
• Next, figure out the number of panels (picture boxes that show the action) you will need to tellthe story, and what part of the story goes in each panel.
• Divide up the work so that everyone in the group gets to work on a panel or two.
3. Display the comic strips and tell the stories. When groups have finished their comic strips, hang them up for all to see. Invite each group totell its story.
34
Mars and Earth
Resources For The Mars Curriculum
Books For ages 5-8• Seymour, Simon. Destination: Mars. New York, NY: Harper-Collins, 2000. • Vogt, Gregory. Solar System. New York, NY: Scholastic Science Readers, 2001.
For ages 9-12• Campbell, Ann-Jeanette. The New York Public Library Amazing Space: An Answer Book
for Kids. Hoboken, NJ: Wiley, 1997.
• Dickinson, Terence. Other Worlds: A Beginner’s Guide to Other Planets and Moons. Richmond Hill, Ontario: Firefly Books Ltd., 1995.
• Henbest, Nigel and Heather Couper. DK Space Encyclopedia. New York, NY: DK Children, 1999.
• Kerrod, Robin. Mars. Minneapolis, MN: Lerner Publications, 2000.
• Murray, Steward and Edward Bernard. Mars (Eyewitness Books). New York, NY: DK Publishing, Inc, 2004.
Websites to Explore • NASA’s Mars Exploration Program (main site)
http://mars.jpl.nasa.gov/index.html
• Mars Quest Online http://www.marsquestonline.org/
• The International society for Microbial Ecologyhttp://www.microbes.org
Materials Available from NASA The following materials may be ordered through NASA CORE (Central Operation ofResources for Educators) athttp://education.nasa.gov/edprograms/core/home/index.html
• Mars VE: The Virtual Explorers CD ROM • Pathfinder and the Best of Mars CD ROM • Mars: Past, Present, Future DVD/VHS • Destination Mars VHS 35
Mars and Earth
Relevant National Science Education Standards
The National Science Education Standards (National Research Council, The Academic Press,Washington, D.C., 1999) relevant to the activities in this educator resource guide are listedbelow.
As a result of activities in grades K-4, all students should develop understanding of:
Standard A: Science as Inquiry• Abilities necessary to do science inquiry:
o Ask questions about objects, organisms, events in the environmento Conduct a simple investigationo Employ simple equipment and tools to gather data and extend the senseso Use data to construct a reasonable explanationo Communicate investigations and explanations
• Understandings about science inquiry:o Scientific investigations involve asking and answering a question and comparing
the answer with what scientists already know about the world.o Scientists use different kinds of investigations depending on the questions they
are trying to answer. Types of investigations include describing objects, events,and organisms; classifying them; and doing a fair test (experimenting).
o Simple instruments, such as magnifiers, thermometers, and rulers, provide moreinformation than scientists obtain using only their senses
o Scientists develop explanations using observations (evidence) and what theyalready know about the world (scientific knowledge). Good explanations arebased on evidence from investigations.
o Scientists make the results of their investigations public; they describe the investigations in ways that enable others to repeat the investigations.
o Scientists review and ask questions about the results of other scientists' work.
Standard D: Earth and Space Science• Properties of Earth Materials: Earth materials are solid rocks and soils, water, and the
gases of the atmosphere. The varied materials have different physical and chemicalproperties, which make them useful in different ways, for example, as building materials,as sources of fuel, or for growing the plants we use as food. Earth materials providemany of the resources that humans use.
• Changes in the Earth and Sky: The surface of the earth changes. Some changes are dueto slow processes, such as erosion and weathering, and some changes are due to rapidprocesses, such as landslides, volcanic eruptions, and earthquakes.
36
Mars and Earth: Science Learning Activities for Afterschool
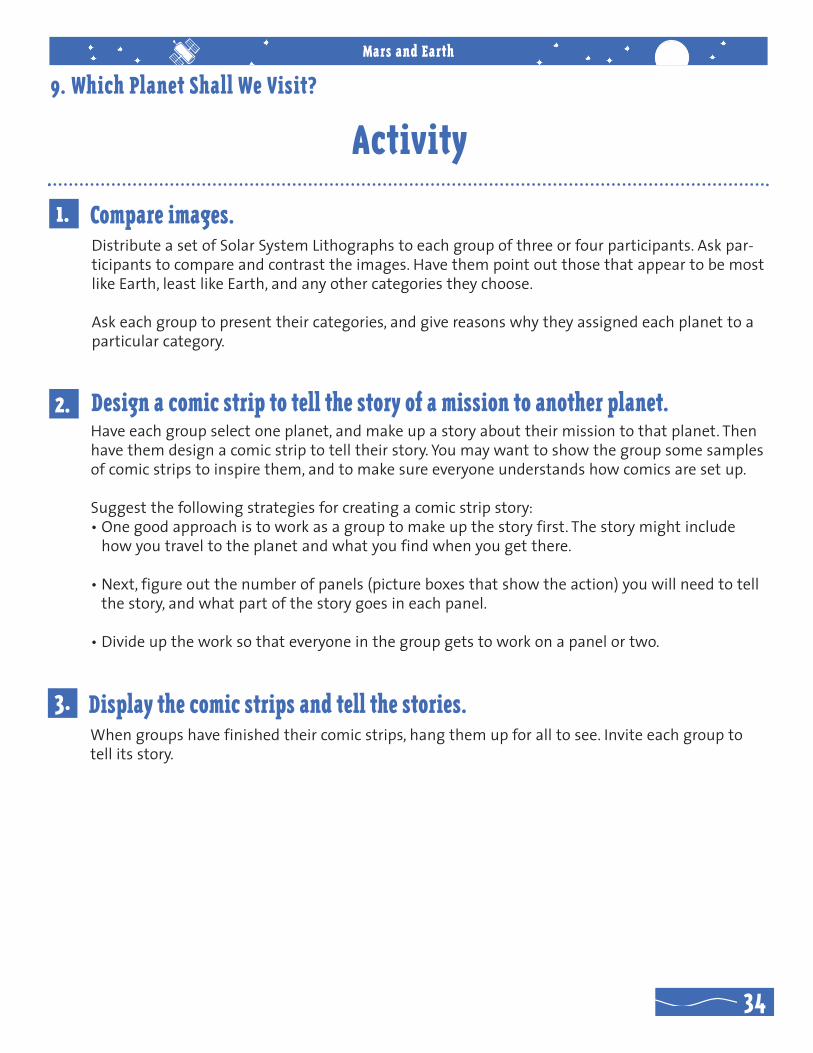
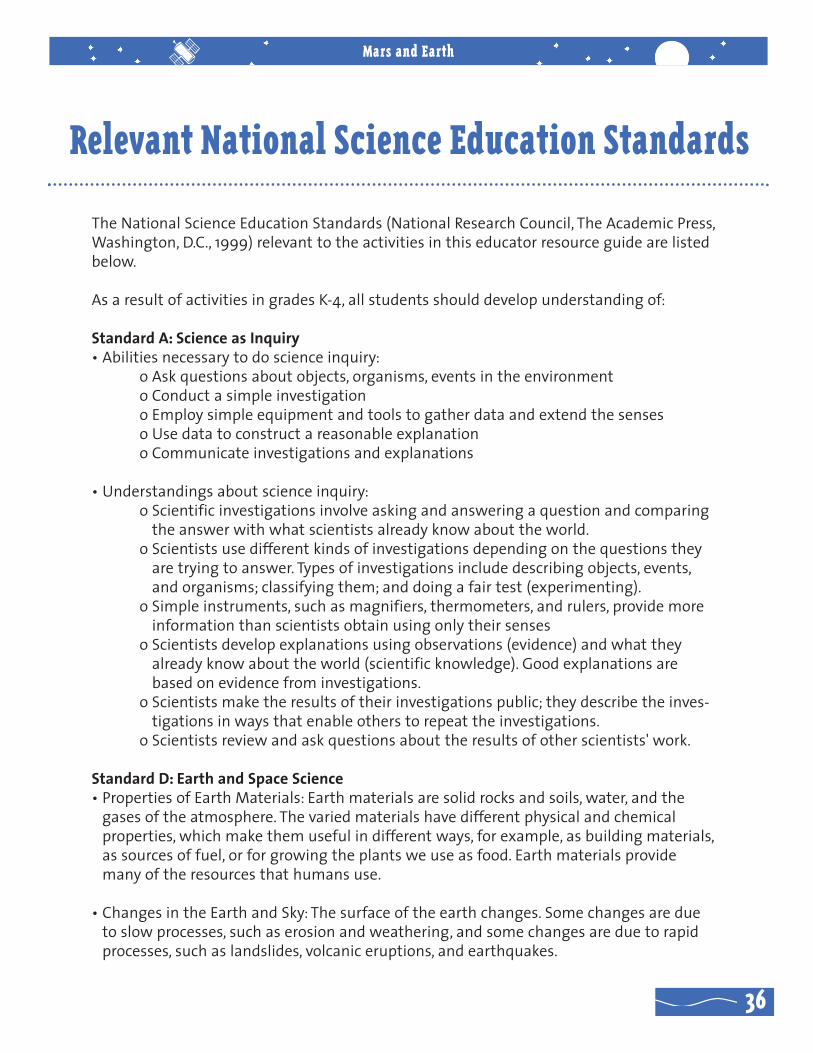
Mars Image Set
IMAGE 1
Image Credit: NASA/JPL/M
alin Space Science S
3km
ystems
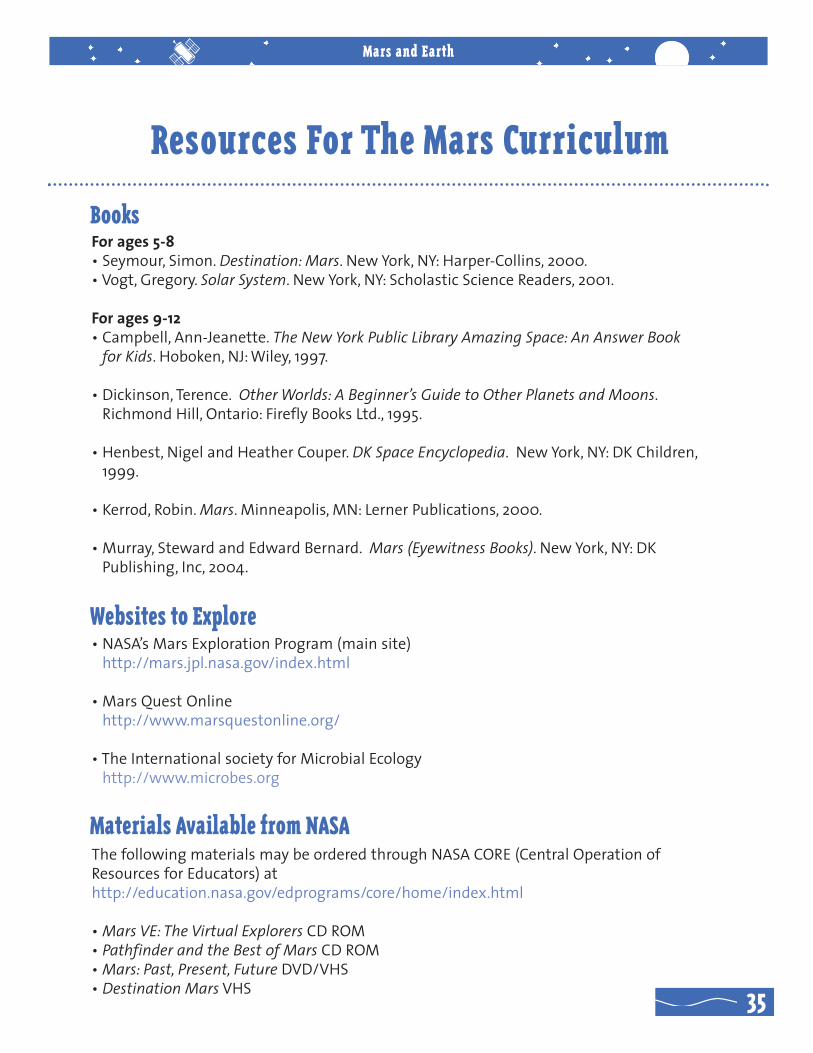
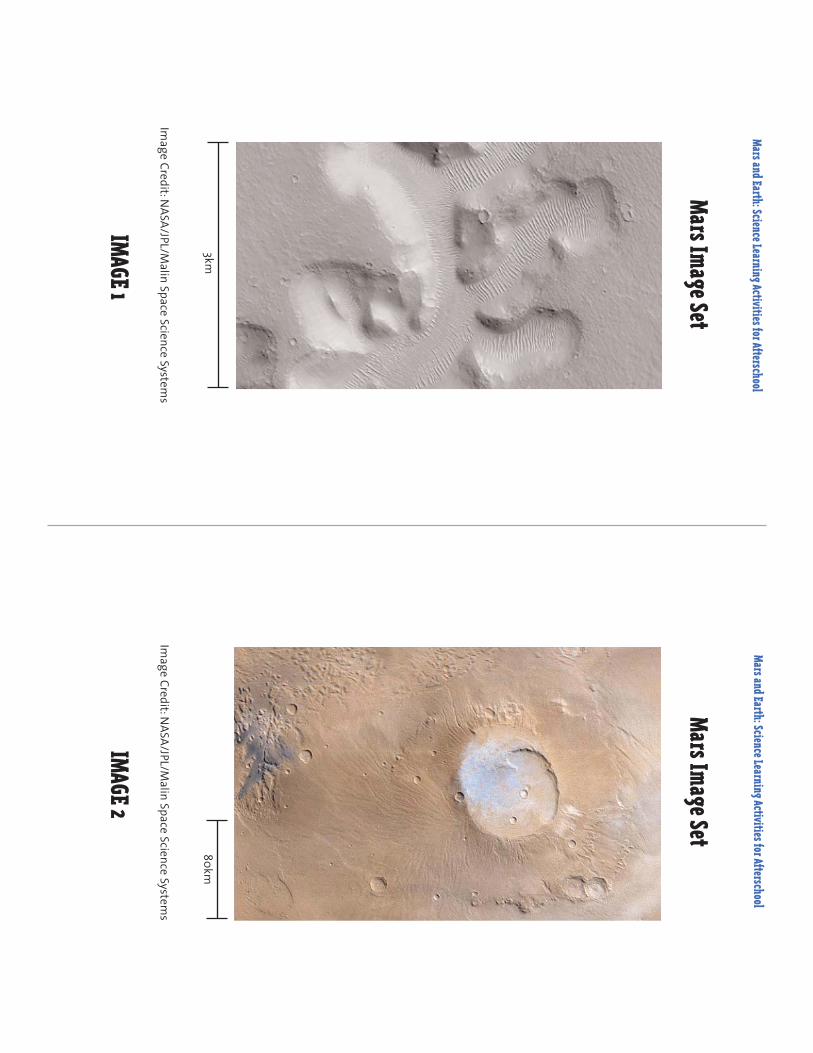
Mars and Earth: Science Learning Activities for Afterschool
Mars Image Set
IMAGE 2
Image Credit: NASA/JPL/M
alin Space Science Sy
80km stem
s
Mars and Earth: Science Learning Activities for Afterschool
Mars Image Set
IMAGE 3
Image Credit: NASA/JPL/M
alin Space Science Systems
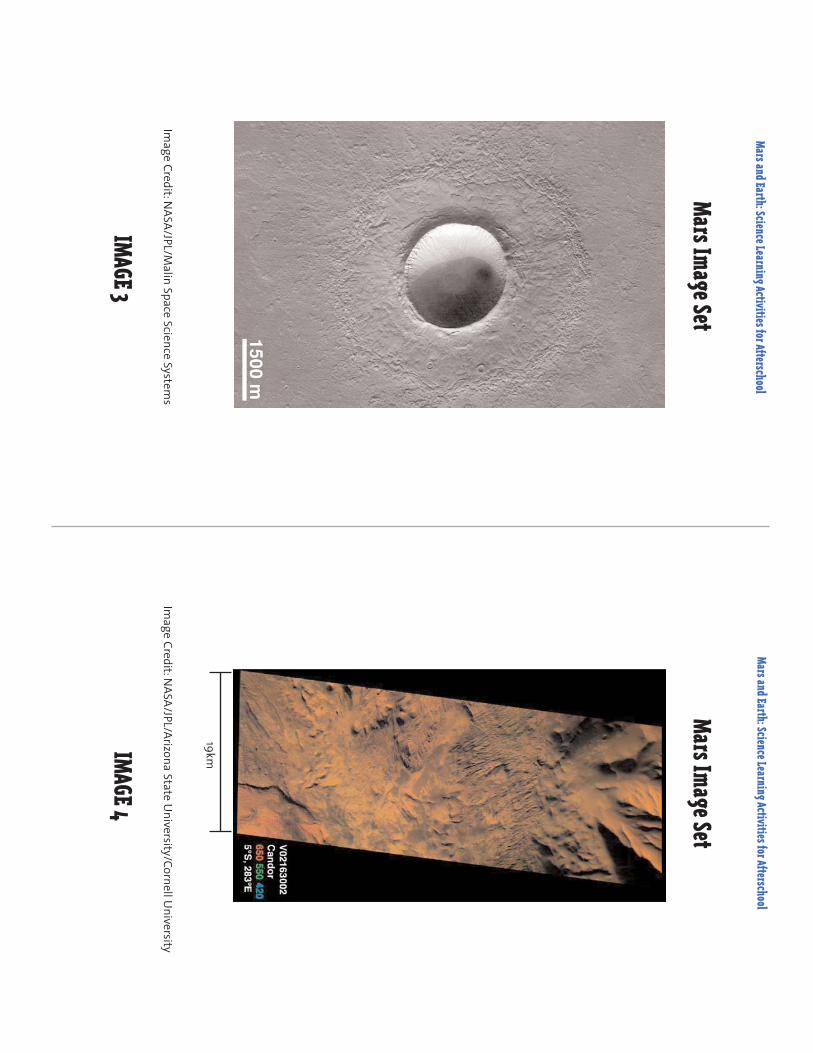
Mars and Earth: Science Learning Activities for Afterschool
Mars Image Set
IMAGE 4
Image Credit: NASA/JPL/Arizona Sta
19km
te University/Cornell University
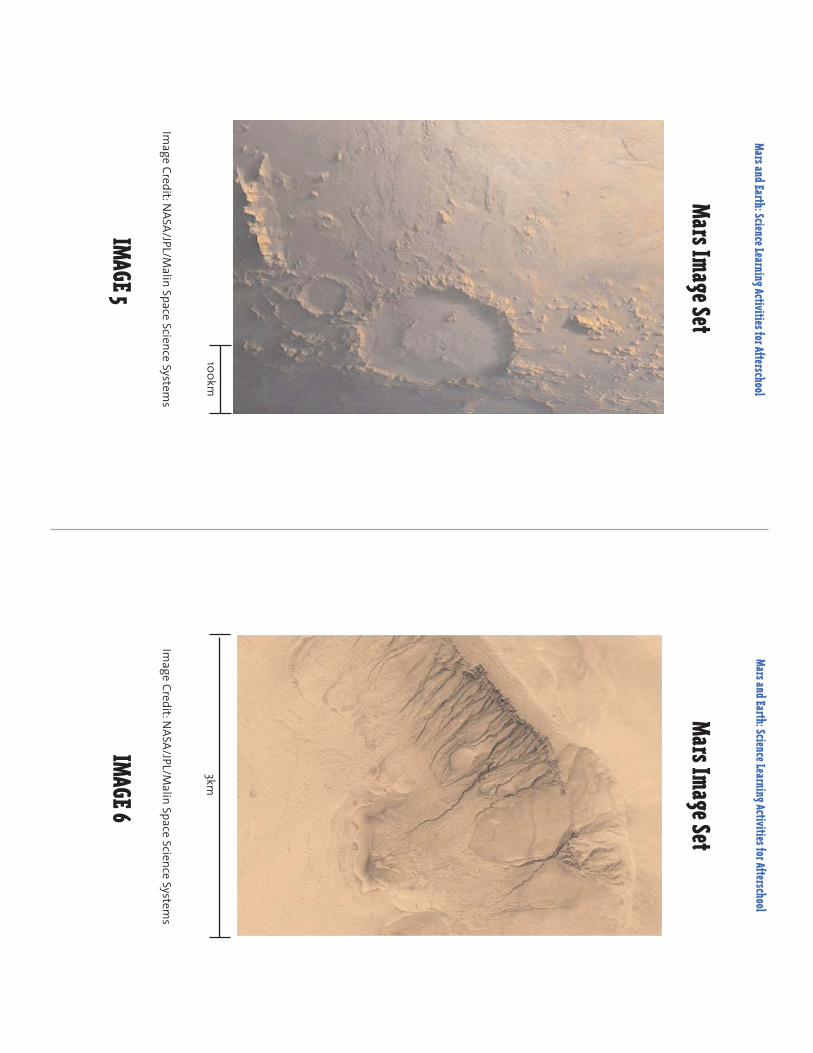
Mars and Earth: Science Learning Activities for Afterschool
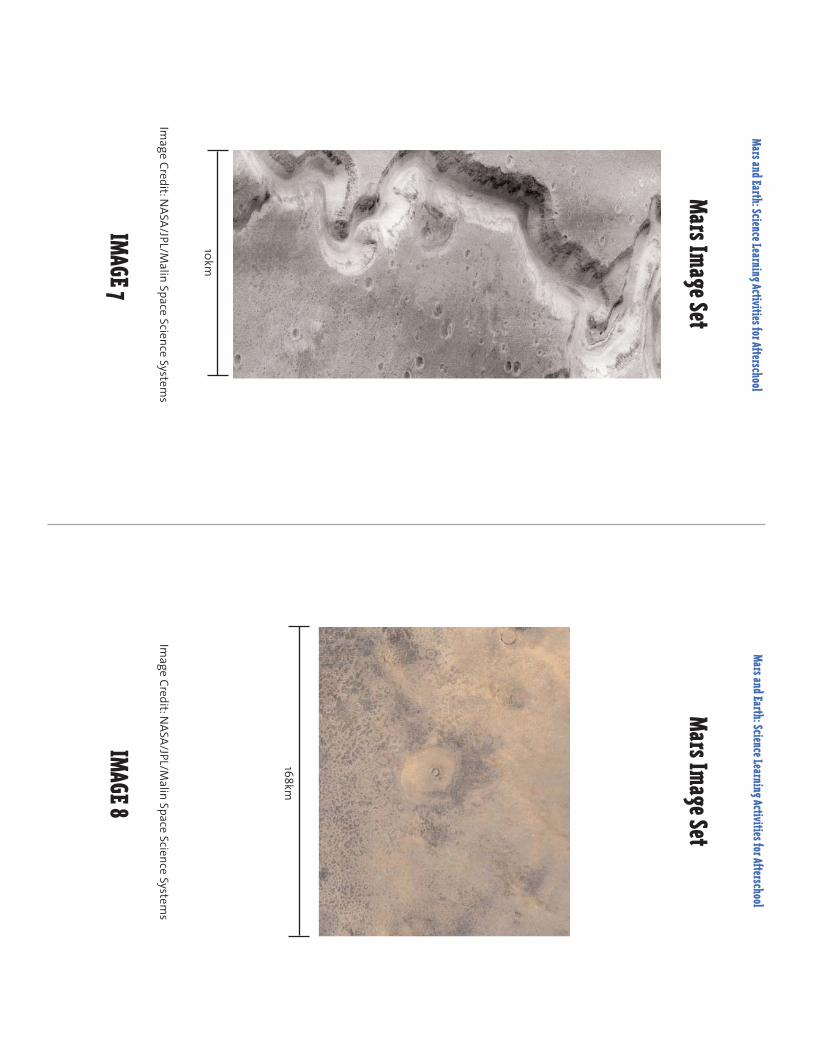
Mars Image Set
IMAGE 5
Image Credit: NASA/JPL/M
alin Space Science Sy
100km
stems
Mars and Earth: Science Learning Activities for Afterschool
Mars Image Set
IMAGE 6
Image Credit: NASA/JPL/M
alin Space Science S
3km
ystems
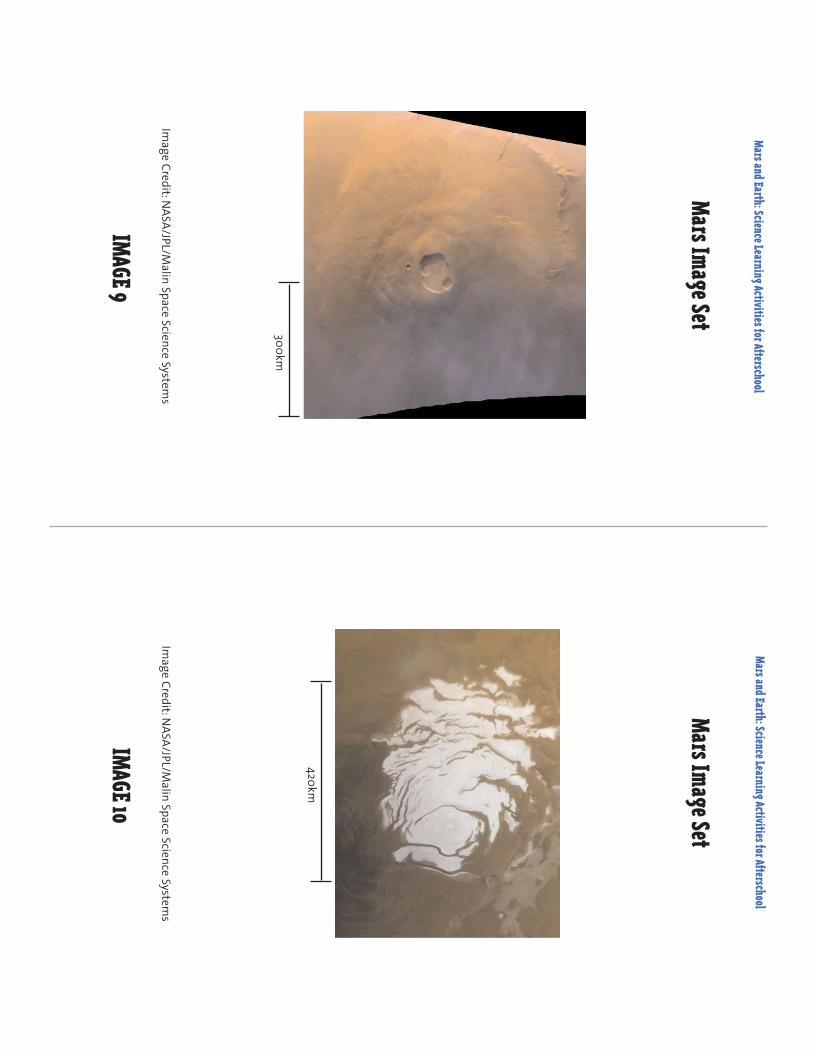
Mars and Earth: Science Learning Activities for Afterschool
Mars Image Set
IMAGE 7
Image Credit: NASA/JPL/M
alin Space Science S
10km
ystems
Mars and Earth: Science Learning Activities for Afterschool
Mars Image Set
IMAGE 8
Image Credit: NASA/JPL/M
alin Space Science S
168km
ystems
Mars and Earth: Science Learning Activities for Afterschool
Mars Image Set
IMAGE 9
Image Credit: NASA/JPL/M
alin Space Science Sy
300km stem
s
Mars and Earth: Science Learning Activities for Afterschool
Mars Image Set
IMAGE 10
Image Credit: NASA/JPL/M
alin Space Science S
420km
ystems
Mars and Earth: Science Learning Activities for Afterschool
Mars Image Set
INSTRUCTOR KEY
• • • • • • • • • • somew
hercarbon dixIm
ag
Haw
e aiian Island chain. than Im
age
this image.
NorIm
ag
the two
the cfea
turthern hemispher
es
the sur
of pre
turflow
ed c,
Image
by flowing w
Image
Image
Imag
sur
in f
equa
Just ro
thr
ollapse of
a
such as
ocessese ce of M
ars. Im
age
Imag lef
w v e
Imag
10 9 8 es 7 6 f 5
the 1970stor and is e 4 3 2 1t ee
. : a : : : , : : : o: :
alle
e Nor
o
South P: Olym
pus Mons is
lik n
beneaoide,
times
e tinuously cutting
Nanedi
aCr ys. thern Plains.
the absence of
CGullies in a cr
ce of Mars.
Happy F
, ador Chasm
a.
t ) a er
Apollinaris P
te These indica f cen
Nirgal though
the sur
terr
ter . V
olar C
the heigh
aces in V , a
thath
on ce Cr
t tter in e f
allis.
This cr
thoughthe sur
than
the w
at t a aa (aa terce.
The floor of scienp. . tert
a. f tists belieThe fr
o
ter w
allis and its ace.
While
the can
ter w
the vf Moun
Scien
thr y
all.
as f
the image,
Walleozen polar fr
the large
ther
tributar
on, ast
the southern on Mars
The origin of
including wind and grtists now
ough lay channels
alls of an ancienThis im
age show
This crat E vv yv
ys are ar
sugthis can
ter w
based on obser
he sand dunes ar
olcano in
gest
vity, This im
age show
ormed by
to be as much as 5 km
(3 miles
vThis ancient
e ce er e f
atha
est
think it
on c
as cr
s e t )cy
Mar
e older the dunes ha
overt tha
ra, ea
olor
high
ost
the ef
ve
sug
ter
cred lar
indblown Dunes: their m
aa
and is as wide as
yw
er impac
the solar s
, t f amust
. sou can see some cr
gest er upon lay ft
the impacluid (m
ost
the
e
tian v
than
Mars’
on is still deba
ed la gullies most
c
Nirer of
ted by a meteor im
pac
y ts of er
t
tions made by
ters cr
gal y be fr
et ocrsouth pole is fr
ay
be a ctha
Vf ea a
stem.
ters in
t
rs of r
the Volcano is loca
y might ioz
the can
ted. en w
the en
ombina
t w liky
ockely wSom
e f
lik
osion by a v
the meteor on
iking spacecrted near
seem a
ted by impac
t gely w
ith ligh
as fa It
on.
s. theter ice
tiris m
or
a
eozen e
ters in
tion oform
ed by
ely cr
Othera t ter) e ea
t a
firstthe
with
ariety
ts.ted afthe
. t
sand dunes.llis is system
of nar
Mars and Earth: Science Learning Activities for Afterschool
Earth Image Set
IMAGE 1
Image Credit: Landsat 7 team
Mars and Earth: Science Learning Activities for Afterschool
Earth Image Set
IMAGE 2
Image Credit:
Team, NASA
Jacques Descloitr/GSFCes, M
ODIS Rapid Response
Mars and Earth: Science Learning Activities for Afterschool
Earth Image Set
IMAGE 3
Image Credit: U.S.
Sioux Falls, SGeological SurD
vey, EROS Data Center,
Mars and Earth: Science Learning Activities for Afterschool
Earth Image Set
IMAGE 4
Image Credit:
Team, NASA
Jacques Descloitr/GSFC es, M
ODIS Rapid Response
Mars and Earth: Science Learning Activities for Afterschool
Earth Image Set
IMAGE 5
Image Credit:
Team, NASA
Jacques Descloitr/GSFC es, M
ODIS Rapid Response
Mars and Earth: Science Learning Activities for Afterschool
Earth Image Set
IMAGE 6
Image Credit:
Team, NASA
Jacques Descloitr/GSFCes, M
ODIS Rapid Response
Mars and Earth: Science Learning Activities for Afterschool
Earth Image Set
IMAGE 7
Image Credit:
Team, NASA
Jacques Descloitr/GSFC es, M
ODIS Rapid Response
Mars and Earth: Science Learning Activities for Afterschool
Earth Image Set
IMAGE 8
Image Credit:
Team, NASA
Jacques Descloitr/GSFC es, M
ODIS Rapid Response
Mars and Earth: Science Learning Activities for Afterschool
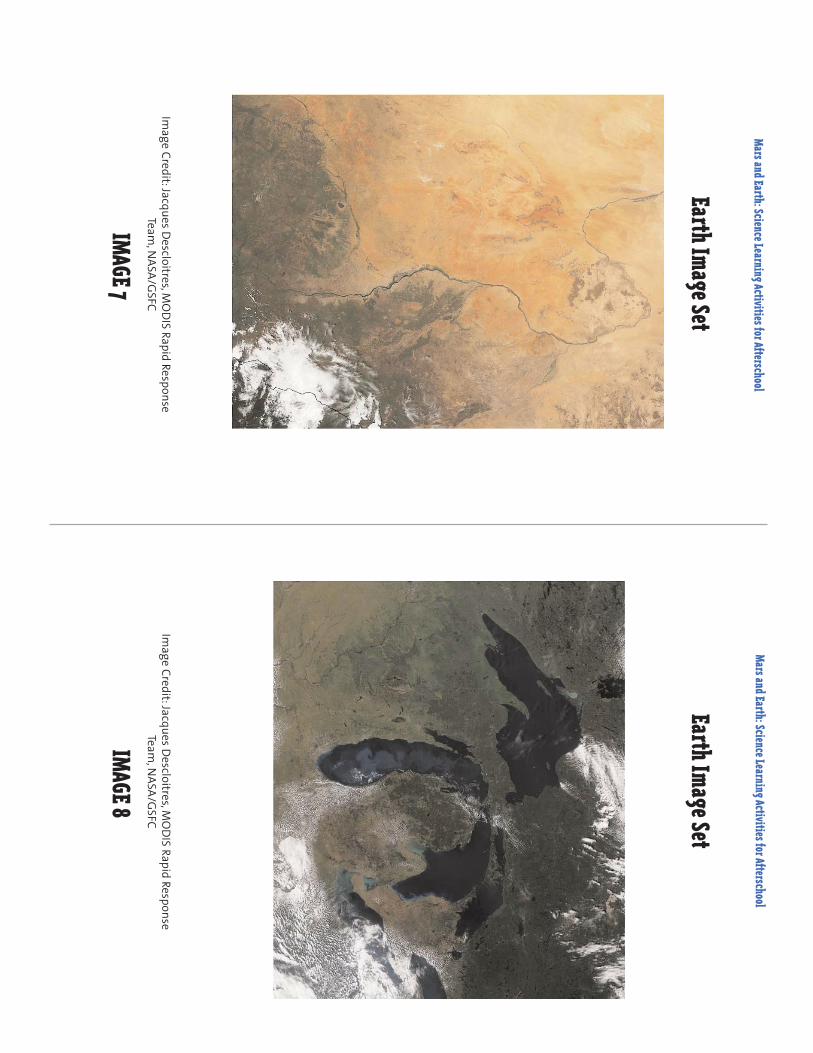
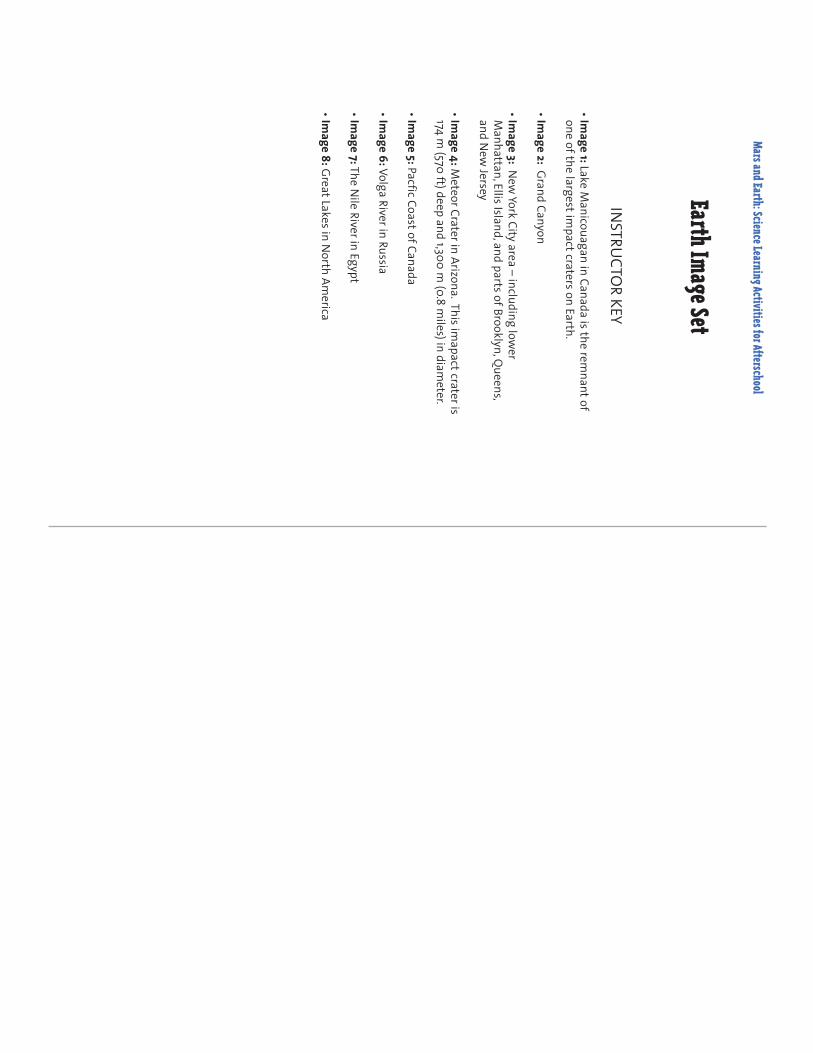
Earth Image Set
INSTRUCTOR KEY
• • • • • • • • Imag
Imag
Imag
Imag
17 Image 8
e 7
e 6
e 5
e 4
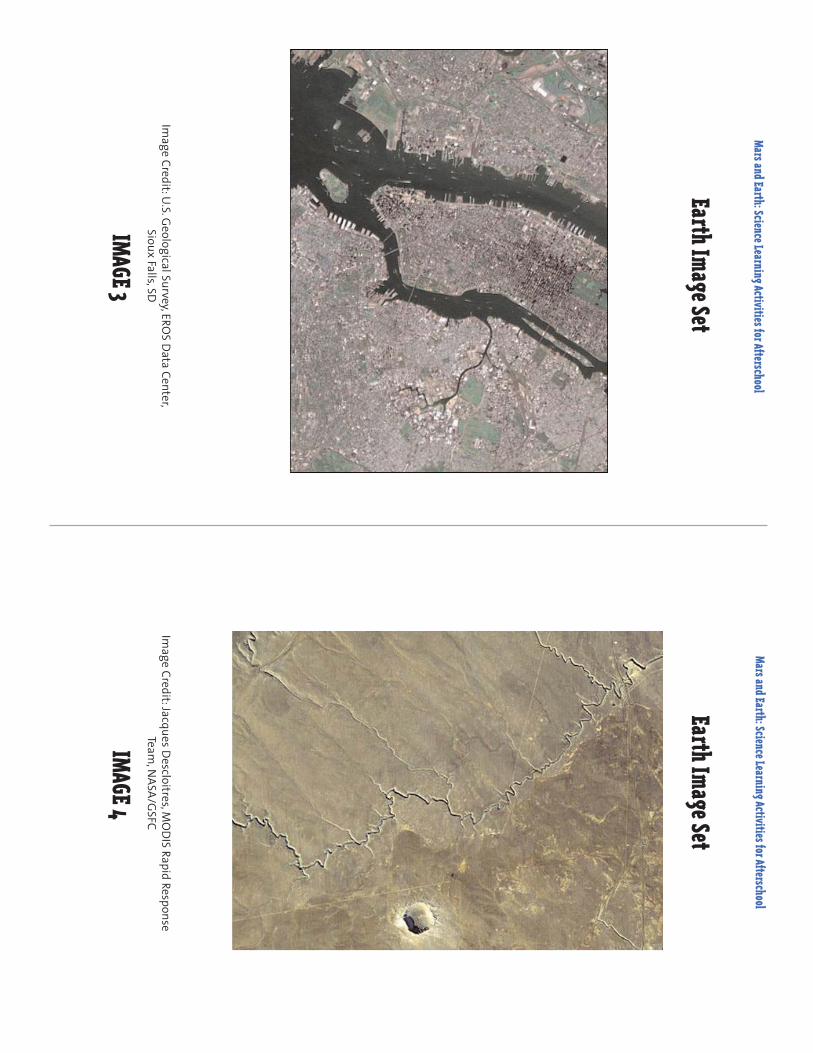
Manha
Imag
Image 3
e 2
one of Im
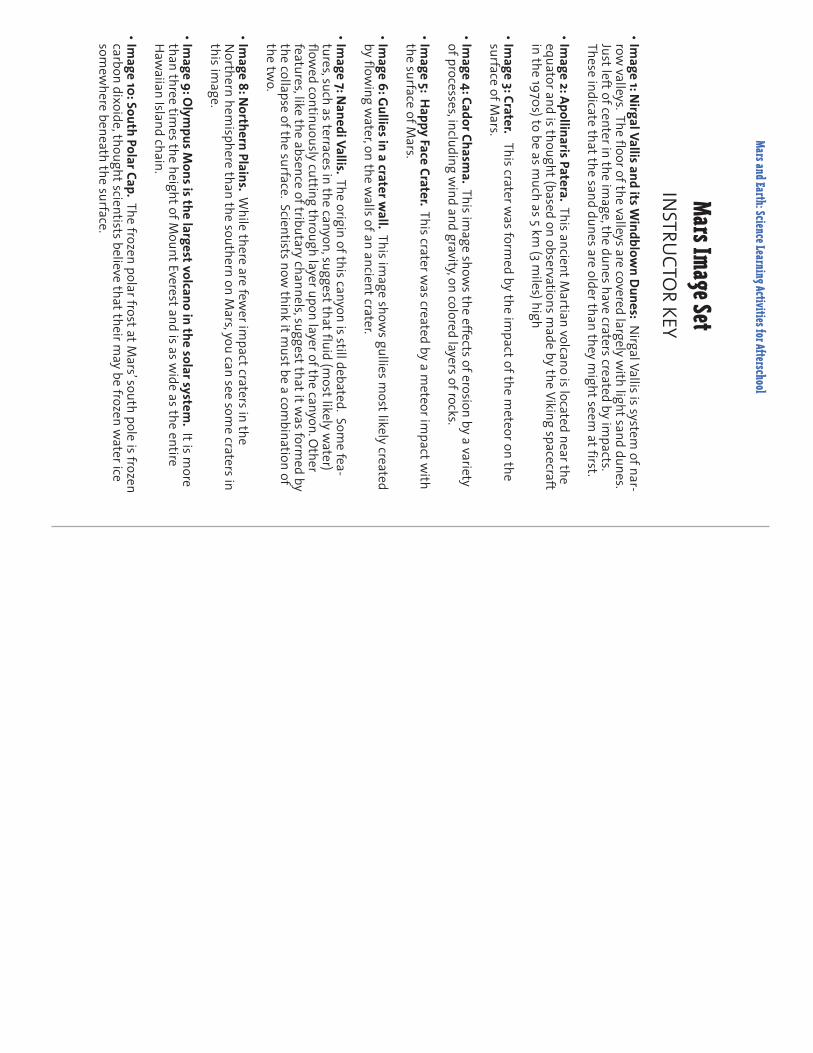
age 1: The Nile Riv
: : : : : : : Gr V Paea c
4 m (570 f
ttan,
Gr
t
New
the lar
olga Riv
Lakfic C
and New Jersey Lak
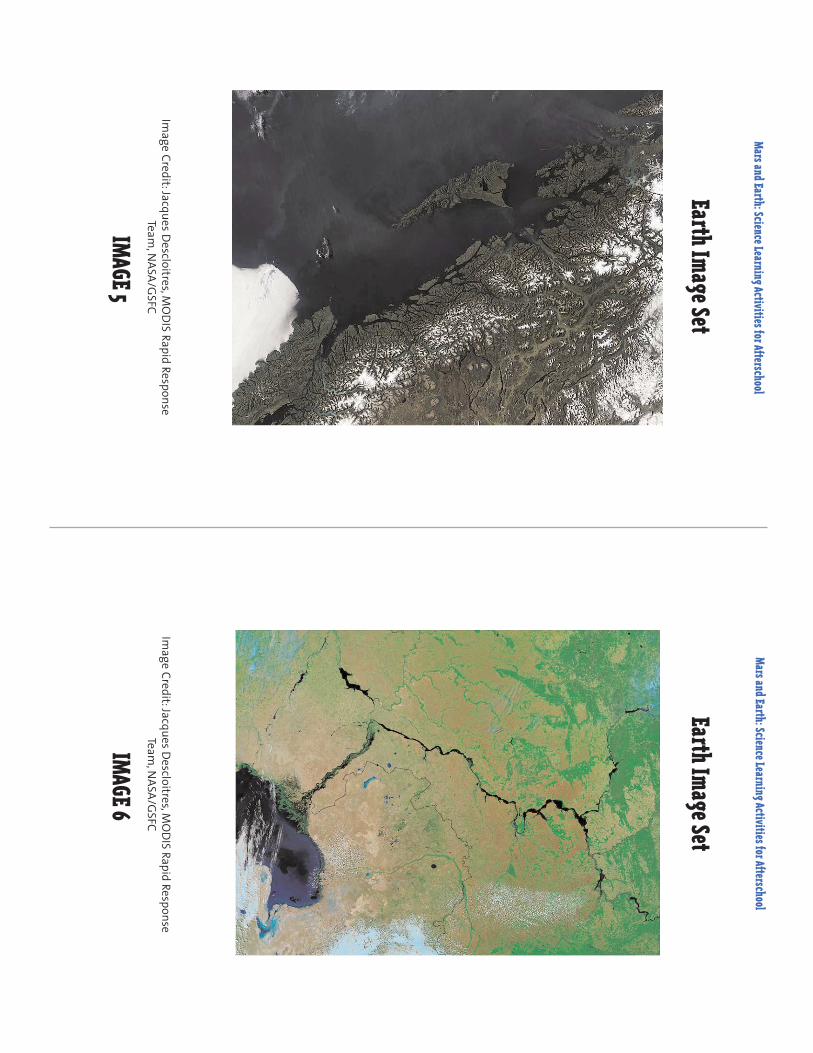
Meteor Cr
Ellis Island, Y
and C
gest oast
aa n
e Manices in Nor
er in R
impac
er in E
ter in Ariz
yof C
ork City ar
on ussia
and par
t couagan in C
th America
g rypt
anada
t) deep and 1,300 m (0
ea – including lower
a
ona.
ts of Br
ters on E
.8 miles
ar
) in diameter
anada is
This imapac
ooklyn,
th. the r
t cr
emnanater is
Queens, t . of