markbook reference manual
TRANSCRIPT
Planner Manual
Revised May, 2018
for……
Curriculum Planning and Time Management.
Lesson Plans, Unit Plans, Course Descriptions.
Publishing Plans on Paper and as HTML.
(This document is adapted from chapter 6 of MarkBook’s Reference
Manual. Section numbers refer to that manual.)
by Rob Hedges

2 MarkBook®
Planner Manual
6 MarkBook’s Curriculum Planning and Publishing
6-1 THE PROCESS OF PLANNING
Preamble
Teachers must plan courses, curriculum units within each course, and lessons within each
unit. The Planner tool in MarkBook is designed to enable a user to plan any course and
save it as a file, to plan each curriculum unit into lessons, to save those unit and lesson
plans, to export all, and to import the course/unit/lesson plans of other teachers.
In addition to this chapter, see Appendix A-1.
Backwards Planning or Backwards Design
Currently, some descriptions of curriculum planning are called “Backwards Planning” or
“Backwards Design” or “Planning with the end in mind”. These descriptions are
redundant. All planning is backwards in design. That is, planning starts with a target
concept of what something looks like at completion and then creates a series of steps to
reach that target. Some examples:
1. an architect is planning a new commercial complex on a client’s downtown real
estate holding. Based on the client’s stated needs, she conceptualizes a series of
structures and a physical arrangement of those structures within a landscaped space.
Long before work commences, a three-dimensional scale model is built so that

MarkBook®
Planner Manual 3
everyone involved can see what the concept will look like at completion.
Modifications are made as necessary. Once the concept design is finalized, the
architect and engineers go to work creating a series of steps to put the concept into
reality. Only then will construction begin. Based on need, there may be minor
changes to the plan during and/or after completion. Note that the planning started
with a well-defined target concept prior to the commencement of the work. Planning
also created a sequence of steps to reach the end goal.
2. a surgeon has been hired to perform a complex operation on an ill patient. The
surgeon’s team reviews all available medical evidence and may seek more definitive
information with further medical tests prior to creating a surgical plan. Once that
plan is conceived, the surgery is scheduled with specialized personnel and equipment
included. Before anaesthesia, the entire team knows the target and the steps required
to get there. As in the previous example, there may be changes to the plan based on
unforeseen circumstances once surgery commences.
3. a teacher is planning a vacation to another continent. The teacher knows what he
wants to see and places he would like to visit (the goal or target) but has no concept
about how to organize a trip to reach that goal. The teacher elects to hire a
professional trip planner – a travel agent - to create a plan to reach the described goal.
In these three examples, if there wasn’t a plan before activity commenced, there would be
chaos. In the first example, someone would start digging without knowing where the first
building was to be located. Without a plan, the surgeon would start cutting hoping to
diagnose and correct the medical problem “on the fly”. And the teacher would hop on a
plane not knowing if it was going to the right destination, or if he would find
accommodation that night!
Similar to the above plans, educators must have a plan for teaching students. The first
step is to determine the target or goal. The second step is to create a series of activities to
reach that target. Fortunately, the first step is easy if the jurisdiction has an organized
curriculum.
Step 1: The Target or Goal – the Image of the Learner
Course planning should start with a question: “What should each learner know, believe
and be able to do by the end of
the course?” The answer to that
question defines the Image of the
Learner upon completion of the
course. That’s the target concept.
Of course, that Image likely
includes multiple statements or
goals called objectives,
expectations or outcomes. The
collection of these statements is a
curriculum and it may be broken
down into a taxonomy (e.g.
Bloom’s Taxonomy) or organized
in some other manner.

4 MarkBook®
Planner Manual
Many jurisdictions publish the official curriculum for each grade or each course of study.
Within those documents, one should expect to find clear statements defining the image of
each learner after instruction and learning have taken place.
For instance, here are some curriculum objectives from different courses and grades:
1. Students will be able to list, in sequential order, the key events leading up to the
outbreak of World War I.
2. Students will be able to add three-digit integers.
3. Students will be able to describe how factors such as concentration, surface area and
temperature affect the rates of chemical reactions.
4. Students will be able to focus a compound microscope.
5. Students will appreciate the music of classical composers such as Beethoven, Bach
and Mozart.
Some of these are Cognitive Knowledge (facts, concepts, organisational systems, etc.),
some are Cognitive Skills (addition, seriation, etc.), some are Psychomotor Skills (using a
microscope), and some involve Affective objectives (feelings, beliefs, value systems,
etc.). Bloom’s Taxonomy. Some are easy to assess and some are very difficult to assess.
There’s some debate as to whether difficult-to-assess objectives, such as the last one
above, should be included in a curriculum.
Step 2: Creating an Instructional Plan
This is a greater challenge for educators. It involves
1. organising and dividing the curriculum into a sequence of teachable chunks or units,
2. determining a logical sequence of steps or lessons to deliver each unit,
3. mapping those chunks into the available time frame (time management),
4. communicating that plan to the audience (students, parents, administrators),
5. obtaining necessary resources,
6. providing differentiated instructional opportunities to accommodate all individuals’
needs, and
7. assessing the progress of all learners prior to instruction and throughout the delivery
of the plan. If the assessments show lack of progress, modification of the plan is
warranted.

MarkBook®
Planner Manual 5
6-2 MARKBOOK’S UNIT PLANNER – MENUS AND LISTS MarkBook comes with a Unit Planner for building, saving and publishing detailed plans
for specific curriculum units. Within each unit plan, a teacher or a teacher committee
will create a series of lessons. While the creation process is slow (it may take days or
weeks to build and edit a unit plan), a user ends up with a file that can be re-used,
modified and shared with colleagues. It can be attached to Email or placed in a shared
directory. Recipients and colleagues can re-edit as necessary.
Open any class in MarkBook. This could be a sample class. In the upper menu bar of
MarkBook’s main form, section 3-1, click Tools and click MarkBook Planner to get the
next Unit Summary
screen.
The Planner version number is in the upper right corner.
Caution: clicking the red X in the upper right corner will exit the Planner. However,
it will not automatically save your work. Instead, prior to exiting, click the File menu
at the upper left and select Save. As you work within the planner, the left and right
arrows automatically save changes to your current planner file.

6 MarkBook®
Planner Manual
The Planner Menu Bar
Note that MarkBook’s Planner has its own menu bar. Each of the four menu options has
an underlined letter. Click
on the option of choice to
drop down the menu, or type
Alt-F, Alt-G, Alt-P or Alt-H
on your keyboard to do the
same.
1. File Menu
Click New Unit to start a new Unit Plan. Click Open a Unit to
open an existing Unit Plan for editing or printing. The Save
functions are inactive when greyed out. Click Exit to leave the
Planner and return to MarkBook.
Alt-F on the keyboard, and then a click on N, O, S, A or X will
access the same functions without using the mouse.
2. Go To Menu
Drop down the menu and click on a selection of choice. The Outline, Sequence and
Follow Up menu options will be greyed out unless a specific lesson is highlighted as in

MarkBook®
Planner Manual 7
the above example. These three planner functions are described in section 6-4, section 6-
5 and section 6-6 respectively.
There are several supplied lists and
files used in parts of the Planner that
can be accessed and edited here. These
lists enable quick entry of repeated
terms or cross-classification of selected
lesson components.
The two Banks sub menus are greyed
out if no lesson has been selected. If a
lesson IS highlighted, the menu opens
to the Contents Standards screen or the
Expectations screen. Both are
described in section 6-4.
The Unit Levels list has six terms by
default. Add, replace, delete, save or
cancel. The list may have a maximum
of ten Levels each with a title of up to
fifteen characters. See Level in the Unit
Summary Description later in this
section.
To add a level, start by clicking the
Add button, then type a new level
descriptor, then click Enter on the
keyboard. To replace a level, click once
on the text to be replaced, click the
Replace button, type the level’s new
name, and click Enter on the keyboard.
Click Save to store the change.
The Days list is for editing the day
designator for those schools with
tumbling timetables/schedules.

8 MarkBook®
Planner Manual
The Periods list is for editing the period
within the day’s timetable/schedule.
The Resources list is for adding other
classroom resources so that these may be
quickly entered into any new lesson. The
supplied default list is shown. Add, edit,
replace, etc. as desired.
The lesson Style list identifies a
pedagogical style for each segment of a
lesson. Again, add/edit/delete as you see fit.

MarkBook®
Planner Manual 9
The Category list supplies four
categories by default. Add or edit as
desired.
If the user has selected the word
Strand or other label in
MarkBook’s New Mark set
screen, section 1-4, then this
Category list will appear as an Edit Strand list.
Finally, a user has the option to edit the
Assessment Type list. The default list
is shown here.
3. Publish Menu
There are five options in
the Publish menu and
two of these have sub
menus. Click on a
selection of choice. See
the Unit Summary
printout and the HTML
equivalent in section 6-9. See the Lesson printout and HTML equivalent in section 6-7.
4. Help Menu
There are two PDF files included to assist with this
planning tool.
10 MarkBook®
Planner Manual
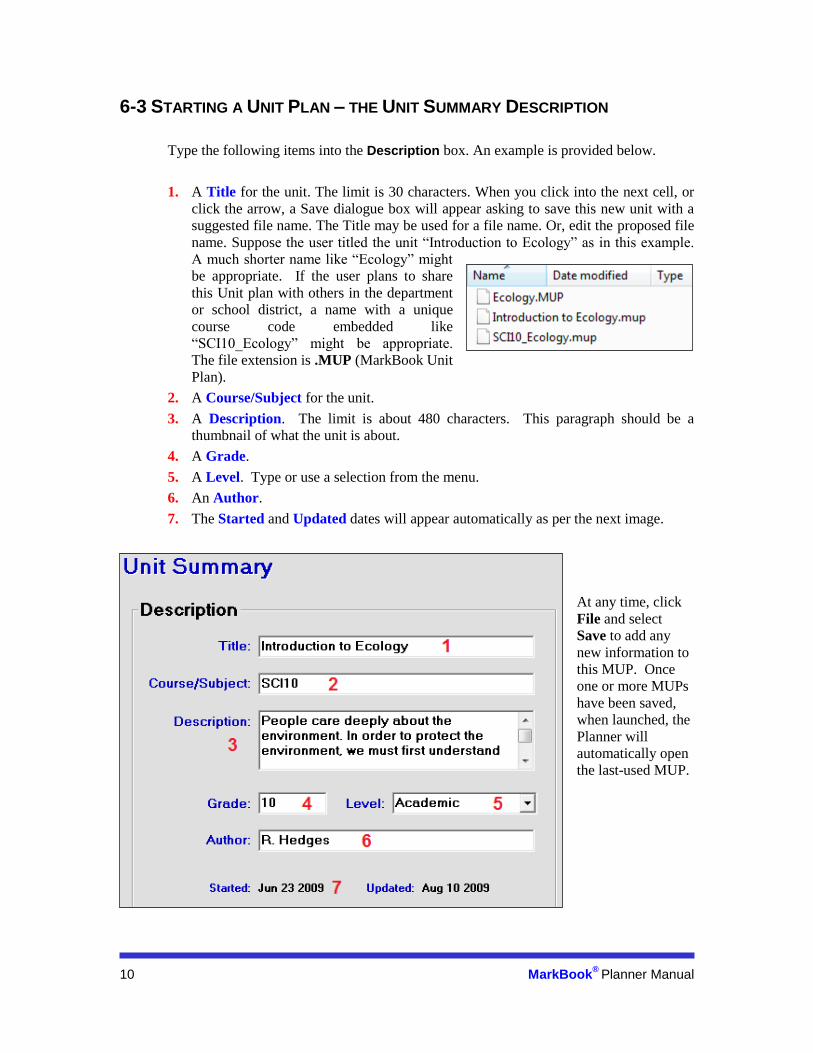
6-3 STARTING A UNIT PLAN – THE UNIT SUMMARY DESCRIPTION
Type the following items into the Description box. An example is provided below.
1. A Title for the unit. The limit is 30 characters. When you click into the next cell, or
click the arrow, a Save dialogue box will appear asking to save this new unit with a
suggested file name. The Title may be used for a file name. Or, edit the proposed file
name. Suppose the user titled the unit “Introduction to Ecology” as in this example.
A much shorter name like “Ecology” might
be appropriate. If the user plans to share
this Unit plan with others in the department
or school district, a name with a unique
course code embedded like
“SCI10_Ecology” might be appropriate.
The file extension is .MUP (MarkBook Unit
Plan).
2. A Course/Subject for the unit.
3. A Description. The limit is about 480 characters. This paragraph should be a
thumbnail of what the unit is about.
4. A Grade.
5. A Level. Type or use a selection from the menu.
6. An Author.
7. The Started and Updated dates will appear automatically as per the next image.
At any time, click
File and select
Save to add any
new information to
this MUP. Once
one or more MUPs
have been saved,
when launched, the
Planner will
automatically open
the last-used MUP.

MarkBook®
Planner Manual 11
Once a unit has been created and saved as a .MUP as in section 6-2, users may add one or
more lessons to that unit plan. There are three screens for creating each lesson: an Outline
Screen, a Detail Screen and a Follow Up Screen. The only mandatory item for each
lesson is a title. However, by entering projected lesson dates, users can manage time
effectively.
To the right of the
Description box described
in section 6-2 is a Lessons
box.
Initially, there are two
choices in the Lessons box:
1. Create a New Lesson
(see section 6-4) or
2. Import a Lesson from
someone else who has
created and saved a
MarkBook lesson that fits
within this new curriculum
unit.
Once a user has created lessons, the Select a Lesson options become available. Click
to highlight any lesson. Delete and Export functions are obvious. Edit will move to the
Outline screen, section 6-4. Print functions are described in section 6-9. The Change
Date button enables a lesson to be moved up or down in sequence as per the next
paragraph.
12 MarkBook®
Planner Manual
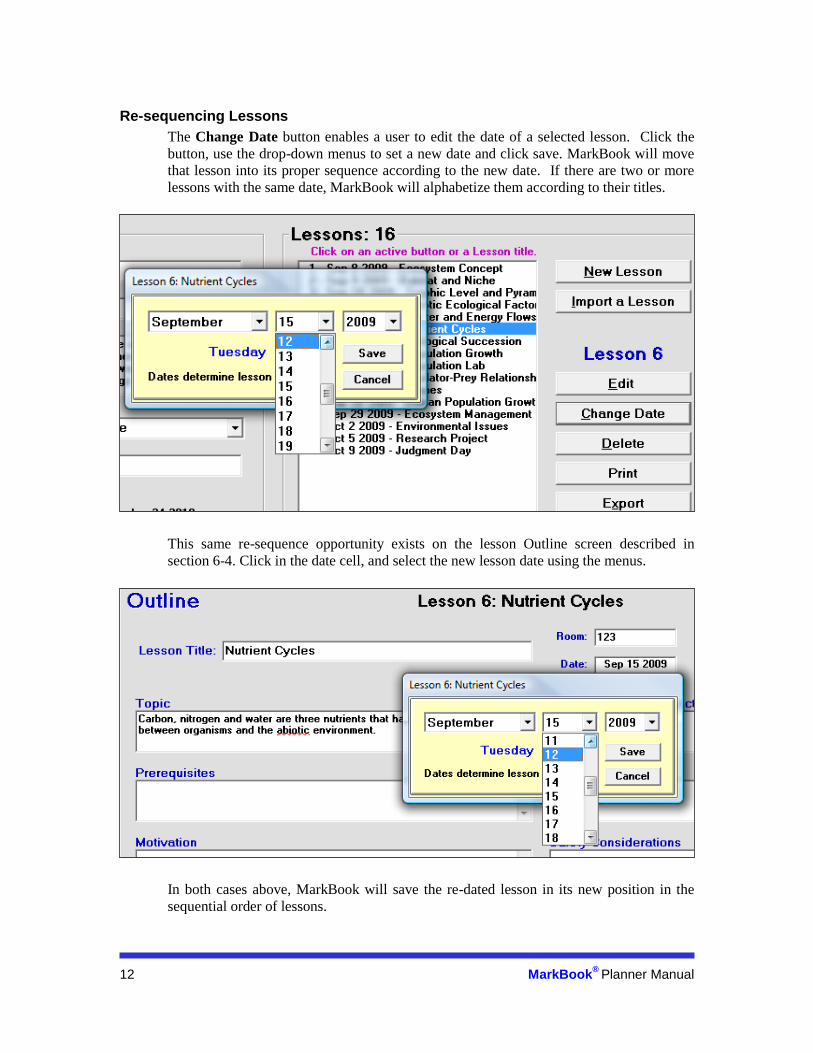
Re-sequencing Lessons
The Change Date button enables a user to edit the date of a selected lesson. Click the
button, use the drop-down menus to set a new date and click save. MarkBook will move
that lesson into its proper sequence according to the new date. If there are two or more
lessons with the same date, MarkBook will alphabetize them according to their titles.
This same re-sequence opportunity exists on the lesson Outline screen described in
section 6-4. Click in the date cell, and select the new lesson date using the menus.
In both cases above, MarkBook will save the re-dated lesson in its new position in the
sequential order of lessons.

MarkBook®
Planner Manual 13
6-4 LESSON PLANNER – ‘OUTLINE’ SCREEN
To create a New Lesson from the Unit Summary screen, section 6-3, click that button to
get this Outline screen:
The Lesson Title is compulsory (yellow) and all other cells (white) are optional. Click in
the Lesson Title cell and type the name of a first lesson. Click in the small white cells at
the right to add details about the Room number, period Length, the Day and the Period
order. The menus in the latter two items may be edited – see section 6-2. Or double click
on the blue words to edit their menus.
Click in the Date cell to expose a date menu for when this lesson will be taught. Select a
projected month, day and year from the drop-down menus. Trick: Whenever you need
to see a calendar, click once on the date in the lower right corner of the Task bar.
The current month’s calendar pops up. Click the left/right arrows to see any other
month for projected lesson dates. Do NOT change the date and time settings. Click
anywhere outside the calendar to remove it from the screen.
Any time after the title is entered, click the left-pointing arrow to return to the previous
Lessons screen. Or click the right arrow to go to the Detail screen for this current Lesson
Plan. See 2. Lesson Plan ‘Detail’ Screen later in this section. The remaining cells on
this Outline screen are explained below.
As you use the left/right arrows, changes made to the lesson on the
screen will auto-save in your MUP.

14 MarkBook®
Planner Manual
1. Topic Cell
Type in the purpose or context of the intended learnings. What is this lesson about?
Where do the understandings of this lesson fit into the world? What’s the rationale for
this lesson? This content may be posed as a statement or as a question. E.g. “This is an
introduction to long division in arithmetic.” There’s a size limit of 500 characters.
2. Prerequisites Cell
Describe prior knowledge, skills, experiences and attitudes that students must have in
order to successfully meet the expectations of this lesson. E. g. “Prior to learning long
division, students must be able to multiply and subtract multi-digit integers.” The limit is
500 characters.
MarkBook®
Planner Manual 15
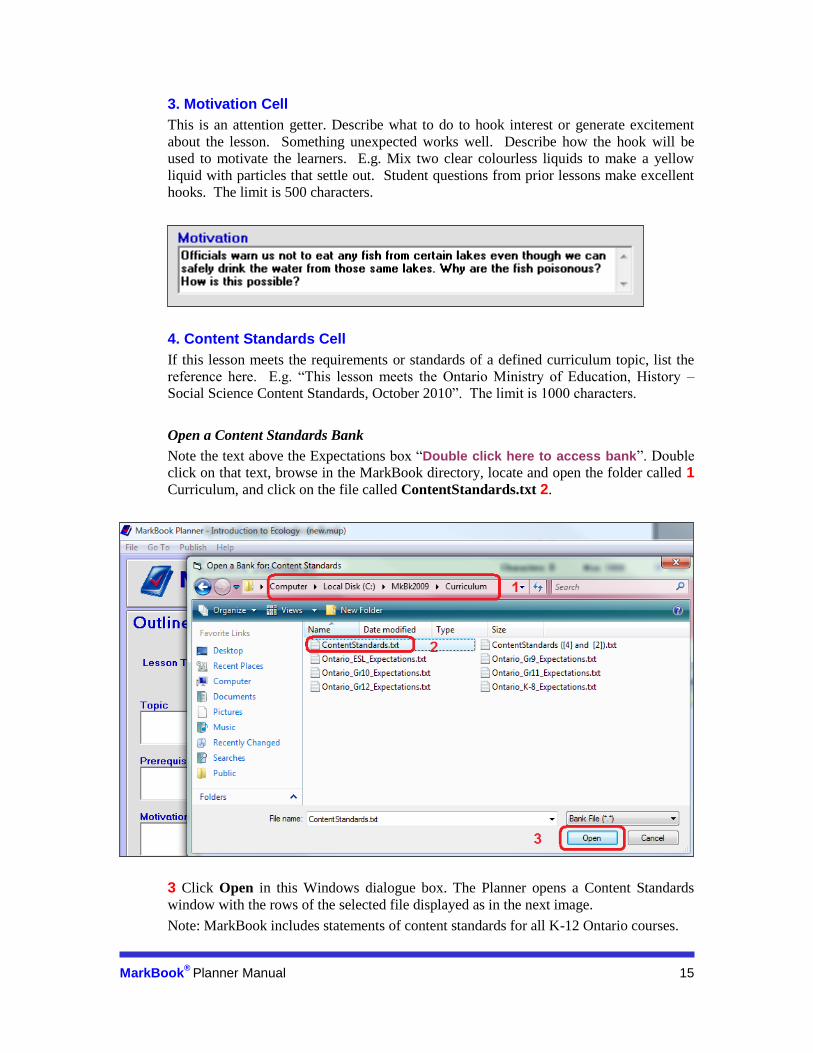
3. Motivation Cell
This is an attention getter. Describe what to do to hook interest or generate excitement
about the lesson. Something unexpected works well. Describe how the hook will be
used to motivate the learners. E.g. Mix two clear colourless liquids to make a yellow
liquid with particles that settle out. Student questions from prior lessons make excellent
hooks. The limit is 500 characters.
4. Content Standards Cell
If this lesson meets the requirements or standards of a defined curriculum topic, list the
reference here. E.g. “This lesson meets the Ontario Ministry of Education, History –
Social Science Content Standards, October 2010”. The limit is 1000 characters.
Open a Content Standards Bank
Note the text above the Expectations box “Double click here to access bank”. Double
click on that text, browse in the MarkBook directory, locate and open the folder called 1
Curriculum, and click on the file called ContentStandards.txt 2.
3 Click Open in this Windows dialogue box. The Planner opens a Content Standards
window with the rows of the selected file displayed as in the next image.
Note: MarkBook includes statements of content standards for all K-12 Ontario courses.

16 MarkBook®
Planner Manual
On opening, a yellow background screen with two large text windows appears as above.
The upper window is where the content standard statement for this new lesson will be
built or edited. Above it is a character counter and cells to control the appearance of the
text within both windows. The lower window exposes the records (rows) in the current
bank of content standards, if any.
For those users familiar with MarkBook’s Comment construction screen (section 10-3),
this tool works in a similar manner. Double click on any line in the lower window (the
“bank”) to enter the full text of that selected row into the upper window. As text is added,
the character counter updates and the selected text will appear at the end of any existing
text already in the upper box.

MarkBook®
Planner Manual 17
If preferred, type and/or edit within the upper box. A spell-checker will underline words
not found in MarkBook’s dictionary. Update and Return will close this screen and
return to the Outline screen with the contents of the upper window entered into the
Content Standards cell. Alternatively, Cancel closes this screen without filling the cell.
Open a Bank will allow any other similar bank of standards to be opened and used.
If the upper window has more than 990 characters, it will turn orange-brown as in this
example:
If the window gets more than 1000 characters, its background turns red AND it truncates
the text at 1000 characters:
Once a user opens a particular bank, this window will automatically re-open that same
bank on next use.
This content standards tool enables users to quickly insert long repetitive sentences into
each new lesson. Please edit the bank to add one or more phrases that match your needs
in creating your lessons.
Tip: If a particular phrase is used
repeatedly throughout your
lessons, open the bank with
Notepad and add it to the bank.
Or replace an existing phrase.
Then, that phrase can be quickly
merged into any new lesson with
mouse clicks as described above.
When adding a new phrase,
sandwich it in quotes. Double
quotes are not permitted within a
phrase but must appear at each
end.
18 MarkBook®
Planner Manual
Bold and Large Text
Alternate views of these windows may be more comfortable. Click one or both of the
Text control cells at the upper right of this window to change the view of displayed text.
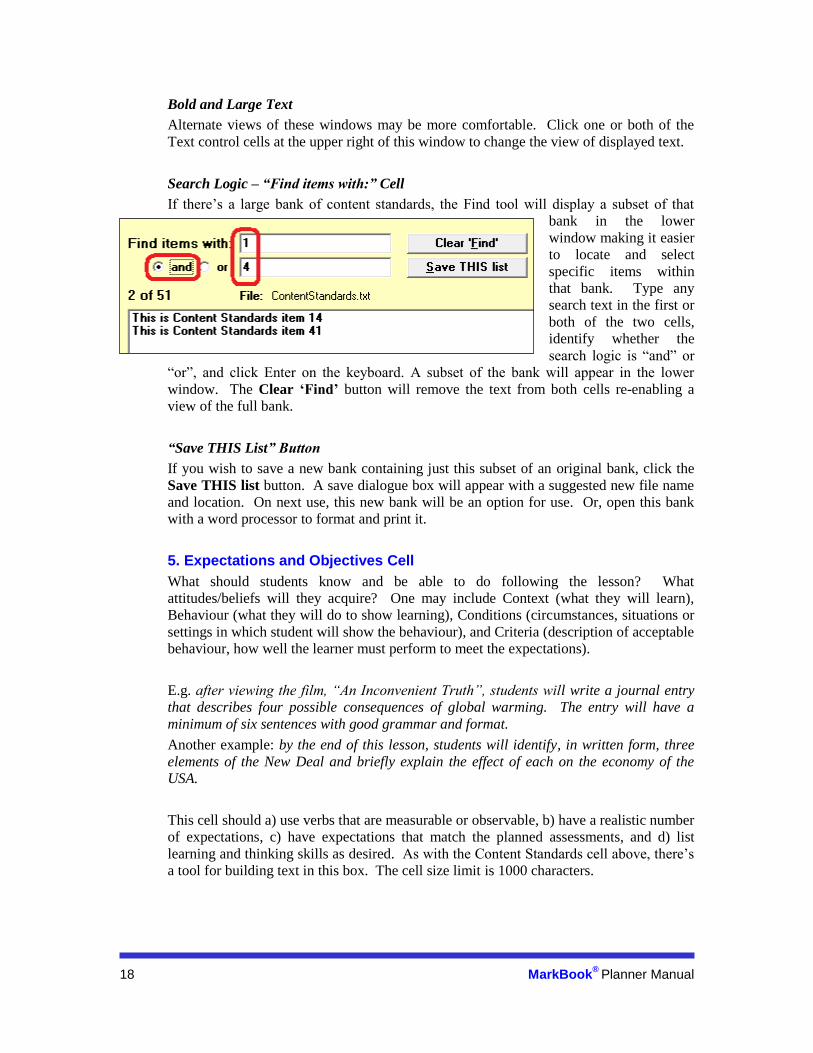
Search Logic – “Find items with:” Cell
If there’s a large bank of content standards, the Find tool will display a subset of that
bank in the lower
window making it easier
to locate and select
specific items within
that bank. Type any
search text in the first or
both of the two cells,
identify whether the
search logic is “and” or
“or”, and click Enter on the keyboard. A subset of the bank will appear in the lower
window. The Clear ‘Find’ button will remove the text from both cells re-enabling a
view of the full bank.
“Save THIS List” Button
If you wish to save a new bank containing just this subset of an original bank, click the
Save THIS list button. A save dialogue box will appear with a suggested new file name
and location. On next use, this new bank will be an option for use. Or, open this bank
with a word processor to format and print it.
5. Expectations and Objectives Cell
What should students know and be able to do following the lesson? What
attitudes/beliefs will they acquire? One may include Context (what they will learn),
Behaviour (what they will do to show learning), Conditions (circumstances, situations or
settings in which student will show the behaviour), and Criteria (description of acceptable
behaviour, how well the learner must perform to meet the expectations).
E.g. after viewing the film, “An Inconvenient Truth”, students will write a journal entry
that describes four possible consequences of global warming. The entry will have a
minimum of six sentences with good grammar and format.
Another example: by the end of this lesson, students will identify, in written form, three
elements of the New Deal and briefly explain the effect of each on the economy of the
USA.
This cell should a) use verbs that are measurable or observable, b) have a realistic number
of expectations, c) have expectations that match the planned assessments, and d) list
learning and thinking skills as desired. As with the Content Standards cell above, there’s
a tool for building text in this box. The cell size limit is 1000 characters.
MarkBook®
Planner Manual 19
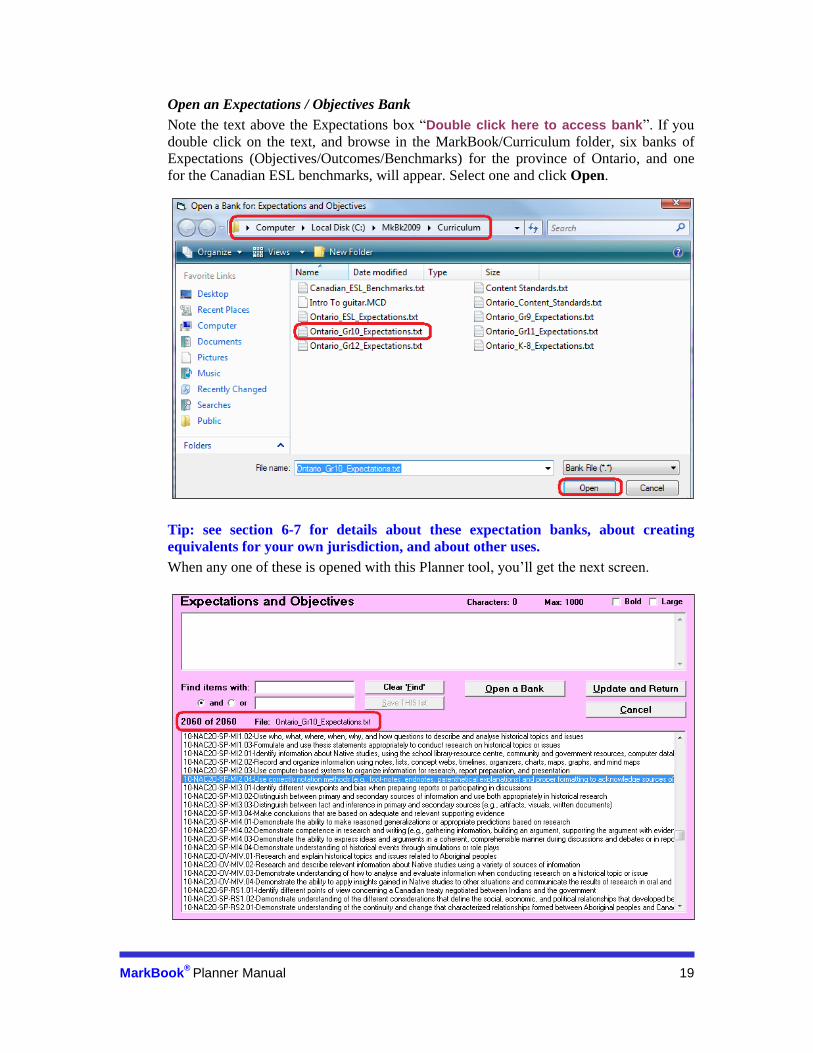
Open an Expectations / Objectives Bank
Note the text above the Expectations box “Double click here to access bank”. If you
double click on the text, and browse in the MarkBook/Curriculum folder, six banks of
Expectations (Objectives/Outcomes/Benchmarks) for the province of Ontario, and one
for the Canadian ESL benchmarks, will appear. Select one and click Open.
Tip: see section 6-7 for details about these expectation banks, about creating
equivalents for your own jurisdiction, and about other uses.
When any one of these is opened with this Planner tool, you’ll get the next screen.
20 MarkBook®
Planner Manual
According to the screen, there are more than 2000 expectations in this grade 10 bank.
Each is numbered using a unique identifier created by Asylum Software Inc. that strings
together the grade (e.g. 10), the course (NAC2O), Overall (OV) or Specific (SP), and an
alpha-numeric identifier within the course (M12.04). Among the 20,000+ expectations in
these six Ontario banks, no two have the same identifier. The text of the expectation
follows the number. In many cases, the text is longer than the screen width will display.
As with the Contents Standards screen, the upper window is where you’ll build the
curriculum statement for this lesson. The limit is 1000 characters.
Double click on any expectation(s) to add it (them) to the upper window. Or, drag and
drop a selected row into the upper window. Click anywhere in the upper window to edit -
remove numbers, add/alter text, correct grammar/spelling, etc. A spell-checker operates
on this window. When finished, click Update and Return to leave this window with the
selected/edited expectation(s) merged into the Expectations and Objectives cell. Or
Cancel to leave this window without filling that cell.
The upper window allows up to 1000 characters. The size controls functions are identical
to those described in the previous Content Standards section. Once a given bank has been
opened, this window will automatically re-open that same bank on next use.
Trick: to read the full text of any expectation, double click on it to add it to the
upper window. To remove it from that window, use the mouse or Ctrl-A to highlight
it and then click the Delete key on the keyboard. Alternatively, print a complete set
of expectations for your course as described in section 6-7.

MarkBook®
Planner Manual 21
Display/Search Logic – “Find items with:” Cell
If there’s a large bank of expectations, the Find items with: tool will display a subset of
that bank in the lower window making it easier to locate and select specific items. Type
any search text in the first or both of the two cells, identify whether the search logic is
“and” or “or”, and click Enter on the keyboard. A subset of the bank will appear in the
lower window. In this example, eight expectations contain both search terms. The Clear
‘Find’ button will remove the text from both cells re-enabling a view of the full bank.
Save THIS List Button
This function allows the user to save a selected subset of the expectations as a new file.
See section 6-7.
6. Media Cell
Type here to identify the name and location of any media used. Double quotes are not
permitted. Use single quotes instead.
22 MarkBook®
Planner Manual
7. Safety Considerations Cell
Type a description of any precautions that must be used for this lesson. Machinery, tools,
construction apparatus, vehicles, stage materials, control panels, suspended ropes,
chemicals (including glues and paints), physical education equipment, dissection
equipment, stoves, electrical cords, and other such items have associated risks.
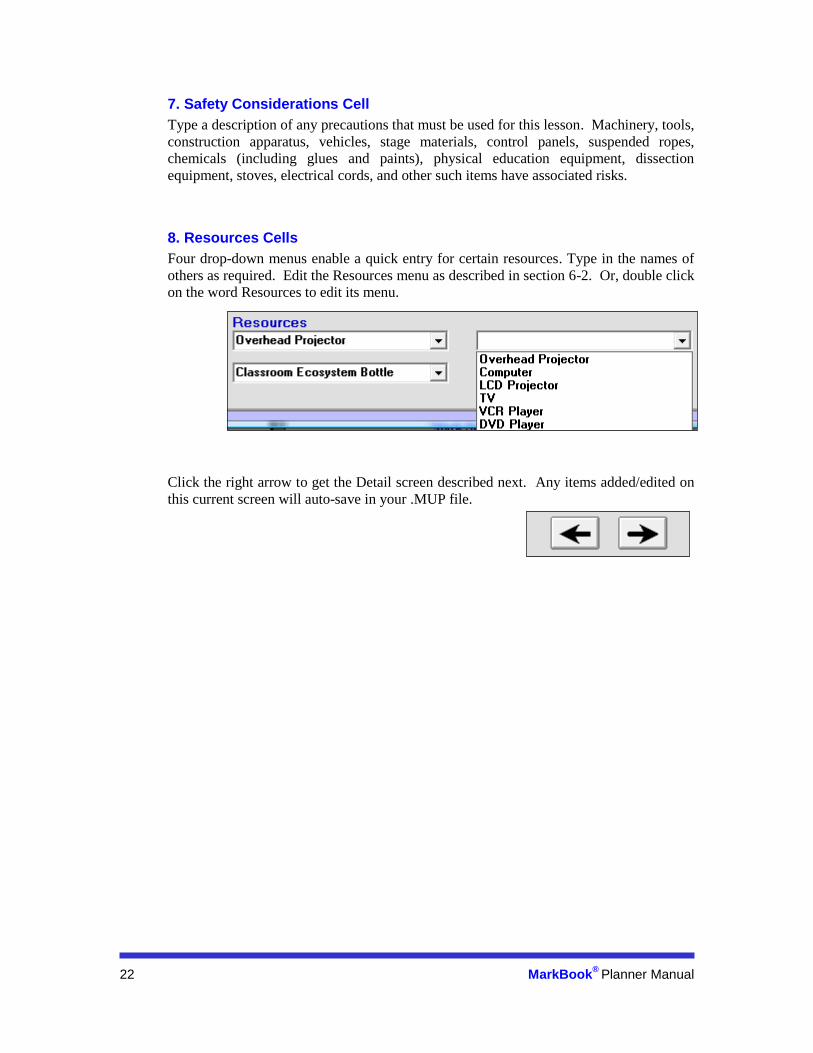
8. Resources Cells
Four drop-down menus enable a quick entry for certain resources. Type in the names of
others as required. Edit the Resources menu as described in section 6-2. Or, double click
on the word Resources to edit its menu.
Click the right arrow to get the Detail screen described next. Any items added/edited on
this current screen will auto-save in your .MUP file.

MarkBook®
Planner Manual 23
6-5 LESSON PLANNER – ‘DETAIL’ SCREEN
This screen accommodates the construction of a selected lesson’s Sequence and
Assessments. All cells are optional.
1. Sequence Box
Part Cell
Enter a title for the first
sequential part of this
lesson. In the screen
example above, the user
is going to start the
lesson with a diagnostic assessment. 20 characters is the limit for a sequence title.
To start the
next
sequential
component
of the lesson, drop down the title menu and click on the next number. Then type in the
title of the next sequential component (part 3 in this example). Three parts are allowed for
each lesson.
To delete a component of the lesson, select it and click the Clear #X button. To move a
component up or down in the sequence, click the Move #X button and type in the new
sequence number (1, 2 or 3).
24 MarkBook®
Planner Manual
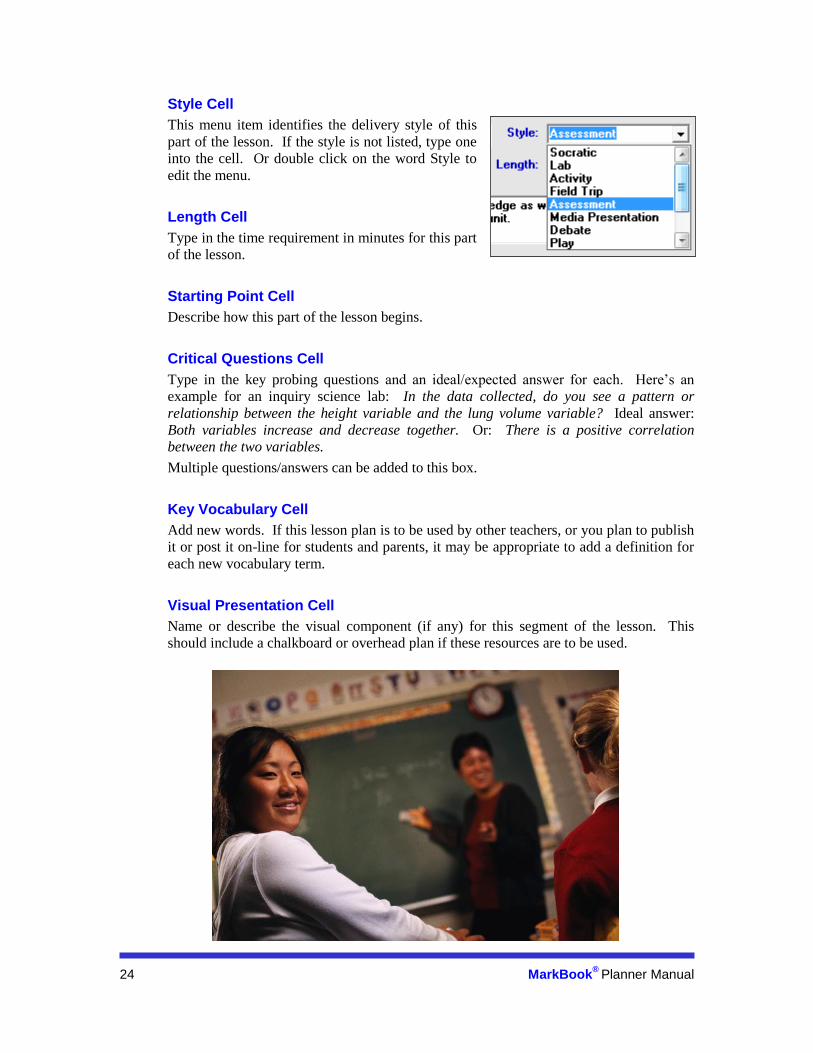
Style Cell
This menu item identifies the delivery style of this
part of the lesson. If the style is not listed, type one
into the cell. Or double click on the word Style to
edit the menu.
Length Cell
Type in the time requirement in minutes for this part
of the lesson.
Starting Point Cell
Describe how this part of the lesson begins.
Critical Questions Cell
Type in the key probing questions and an ideal/expected answer for each. Here’s an
example for an inquiry science lab: In the data collected, do you see a pattern or
relationship between the height variable and the lung volume variable? Ideal answer:
Both variables increase and decrease together. Or: There is a positive correlation
between the two variables.
Multiple questions/answers can be added to this box.
Key Vocabulary Cell
Add new words. If this lesson plan is to be used by other teachers, or you plan to publish
it or post it on-line for students and parents, it may be appropriate to add a definition for
each new vocabulary term.
Visual Presentation Cell
Name or describe the visual component (if any) for this segment of the lesson. This
should include a chalkboard or overhead plan if these resources are to be used.
MarkBook®
Planner Manual 25
2. Assessments Box
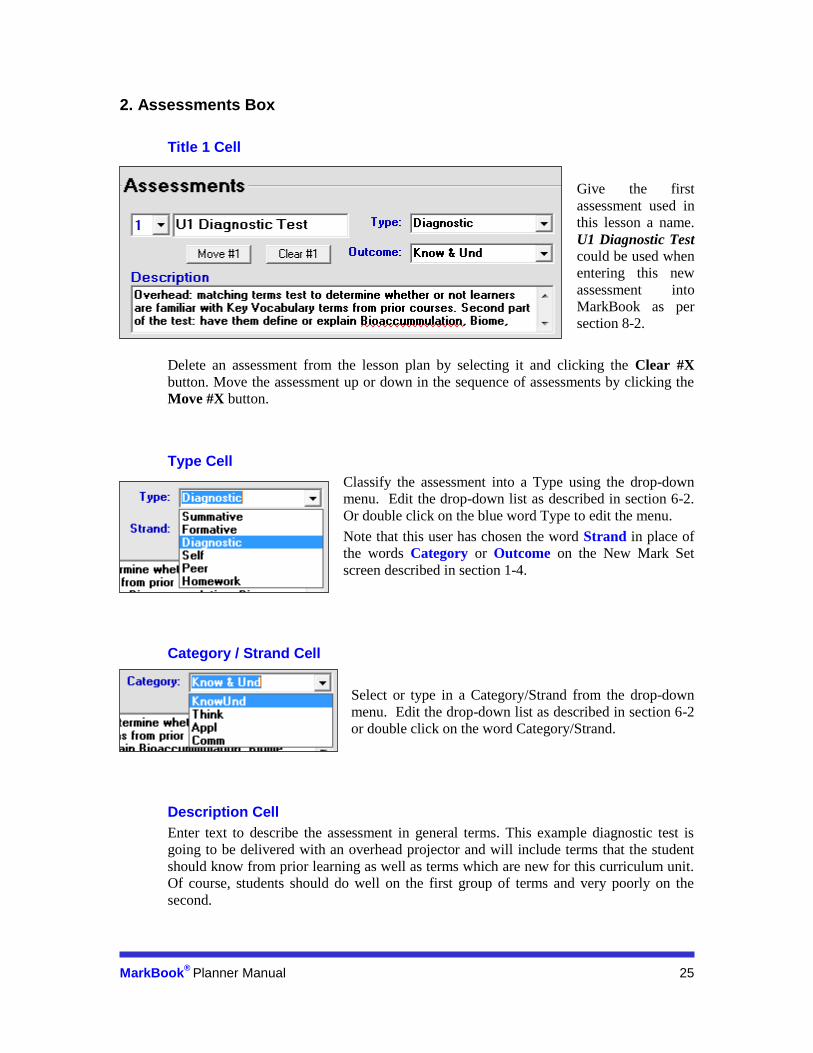
Title 1 Cell
Give the first
assessment used in
this lesson a name.
U1 Diagnostic Test could be used when
entering this new
assessment into
MarkBook as per
section 8-2.
Delete an assessment from the lesson plan by selecting it and clicking the Clear #X
button. Move the assessment up or down in the sequence of assessments by clicking the
Move #X button.
Type Cell
Classify the assessment into a Type using the drop-down
menu. Edit the drop-down list as described in section 6-2.
Or double click on the blue word Type to edit the menu.
Note that this user has chosen the word Strand in place of
the words Category or Outcome on the New Mark Set
screen described in section 1-4.
Category / Strand Cell
Select or type in a Category/Strand from the drop-down
menu. Edit the drop-down list as described in section 6-2
or double click on the word Category/Strand.
Description Cell
Enter text to describe the assessment in general terms. This example diagnostic test is
going to be delivered with an overhead projector and will include terms that the student
should know from prior learning as well as terms which are new for this curriculum unit.
Of course, students should do well on the first group of terms and very poorly on the
second.

26 MarkBook®
Planner Manual
Accommodation Cell
Describe the modifications and alternatives needed for this lesson to work with your
special needs learners. Once you’ve identify students who require additional support,
describe any changes in content, process, or product to meet the needs of these learners.
If the teaching space needs to be modified, indicate the changes required to that
environment.
File Cell
This is the location of an electronic file, paper or other material items associated with this
assessment. For instance, a teacher may have a box containing a kit of materials
specifically designed for this assessment. Identify the name on the box and its physical
storage location. Browse to find a location on your computer or network where
electronic documents (Word .docs, .PDF files, digital pictures, electronic media, etc.) are
stored. Name the document in this cell.
Rubric Cell
Identify the name and directory location for an electronic rubric or the name and physical
location for a paper rubric. Browse to find an electronic location. Or launch
RubricBuilder by clicking the Use MarkBook RubricBuilder button.
When finished with the Detail screen, click the right arrow to reach the Follow Up screen
described next. When clicked, the left and right arrows automatically save additions and
changes on this screen to the current MUP.

MarkBook®
Planner Manual 27
6-6 LESSON PLANNER – ‘FOLLOW UP’ SCREEN
Announcements
List upcoming events, summative assessment dates, forms that need to be handed in,
projects with their due dates, Parent Interview dates and times, and other items for
learners and parents. We recommend putting daily homework items into the Assessment
box of the previous Details screen.
Reflections
Complete after the lesson is over. Did the planned outcomes get met? How effective was
the lesson? How effective were you? What changes would you make the next time this
lesson is taught?
Opportunities
Complete after the lesson is over. What other unplanned learning(s) occurred as a result
of this lesson? What “notes to self” should be recorded? What questions arose that
provide motivational hooks for subsequent lessons? We recommend that this text be
written with other teachers in mind just in case the lesson or the MUP is sent to them.
Tip: student questions, particularly those with an emotional element or a strong
intellectual challenge, provide an exploitive opportunity to connect today’s learning
experiences with tomorrow’s or next week’s lessons. Successful teachers know how
to coax these kinds of questions out of learners and how to utilize them fully!
When clicked, the left arrow will automatically save the additions or changes on this
screen to the current MUP file.

28 MarkBook®
Planner Manual
6-7 BANKS FOR CURRICULUM AND CONTENT STANDARDS With version 2.0 of the Planner, we have supplied a set of more than 20,000 expectations
(objectives) for the province of Ontario and ~350 benchmarks for the Canadian ESL
programme. We would like to provide similar electronic files covering the curricula and
content standards of other jurisdictions! If your jurisdiction would like one or more
equivalent files for MarkBook users, we’d be delighted to work with the appropriate
persons in preparing same! Please contact [email protected]
The installation of the planner creates a folder inside the MarkBook 2011 directory called
“Curriculum”. Within it are the following seven files:
File Name Size Contains approximately
Ontario_Content_Standards.txt 0.05 Mb 340 content standard statements
Ontario_K-8_Expectations.txt 1.0 Mb 4050 expectations
Ontario_Gr9_Expectations.txt 0.36 Mb 1730 expectations
Ontario_ Gr10_Expectations.txt 0.45 Mb 2050 expectations
Ontario_ Gr11_Expectations.txt 1.3 Mb 6370 expectations
Ontario_ Gr12_Expectations.txt 1.4 Mb 6390 expectations
Ontario_ESL_Expectations.txt 0.09 Mb 310 expectations
Canadian_ESL_Benchmarks.txt 0.04 Mb 330 benchmarks
Each bank of content standards and expectations is an ASCII or text file. If opened in
Notepad, they look like this:

MarkBook®
Planner Manual 29
Note that each row (a record) is sandwiched in quotes. That way, commas contained
within a row will not act as delimiters. Un-sandwiched statements with internal commas
may appear as several rows when opened in the Planner. Obviously, double quotes are
not allowed within the text any expectation or content standard. If these exist in your
curricula, replace them with single quotes before converting them to a MarkBook bank.
The Installed Content Standards Bank
The supplied Ontario Content Standards bank contains one record for each Grade K-12
course. It’s set up for any user to modify by adding a few appropriate statements that
could be merged into lessons for a single subject. Open the bank with Notepad and
replace any line of text with something like “This lesson complies with the Content
Standards of the UK Form 8 Science Technology 2003 curriculum.” Keep the quotes at
each end. Do not use internal quotes or line feeds. Once created and saved, a click in
MarkBook will add it to any new or existing lesson.
The Installed Expectations Banks
The number in front of each expectation serves two purposes. Firstly, it’s unique. A sort
will put all records into a logical order. More importantly, it allows a MarkBook user to
quickly isolate all expectations meeting certain criteria. The numbering system for these
Ontario banks has four cross-classifiers (grade, course/subject, Overall/Specific, number).
Each expectation bank has a notice for users at the bottom.
In other jurisdictions, equivalent curriculum documents could be built or imported into a
word processor, pasted into Notepad to remove formatting and line feeds, and saved as a
text file with a custom name(s) for your jurisdiction. Sandwich each line in quotes as
above. The bank limit is 25,000 lines (records) but we recommend keeping each bank
under 10,000 lines so that it opens quickly in this MarkBook Planner.
Once a bank has been created, there are a host of functions that can be done with it inside
MarkBook and inside word processors. For instance, see section 10-6 for tips on using
these expectations/objectives for report card comment construction.
Trick: suppose a user wishes to print the full set of Specific expectations for the
Grade 10 course, AMU2O. Isolate these 44 expectations in MarkBook as per the
next image. Click the “Save THIS list” button, save it with a new .txt file name, and
then open that file with a preferred word processor. Format the document, correct
any spelling and grammar errors, and print. Or, open the file with Notepad and use
Word Wrap in Notepad’s Format menu to read the full text of each row. Note that
word processors must save files in ASCII format if they’re to be used in MarkBook.

30 MarkBook®
Planner Manual
6-8 CREATING A COURSE DESCRIPTION / TIME MANAGEMENT PLAN Prior to commencing a course of study, many teachers publish a Course Description
document and make it available to learners, parents and administrators. The intent of this
course description is to provide a clear description of the intended course, perhaps a
potential sequence/timeline, and a brief statement of policies associated with the course.
If a teacher has one or more Unit Plans (MUPs) built for the course, MarkBook’s Course
Description function is easier to use – it will import the titles, descriptions and starting
dates from each Unit Plan. However, MarkBook’s Course Description will still work if
there are no pre-existing MUP Unit Plans. Use it to a) build descriptions for as many
courses as desired, b) save each as a file (MarkBook Course Description - .MCD), and c)
export these files to other teachers for their use.
Prior to using this MarkBook tool for the first time, have a look at the sample printouts
and HTML in section 6-11.
Launching MarkBook’s Course Description Planner
Open any class in MarkBook. Click Tools in the upper menu bar (see section 3-1) and
select MarkBook Course Description. You’ll get the following General Information
screen. To exit, click the red X in the upper right corner.

MarkBook®
Planner Manual 31
There are two cells in
the Location box at the
upper left. The name of
the school will auto-
import from
MarkBook’s Class Description screen, section 1-4. Or, click in the School cell and type a
school name.. Type in the name of the District / Board or Department.
Saving Your Course Description
As soon as convenient, click File in the upper menu bar and select Save As. Browse to a
known location where you can safely store your new Course Description document as a
file. In this example, the user has given the new file a name and selected MarkBook’s
Curriculum folder as the storage location. .MCD is the file extension for these
documents.
32 MarkBook®
Planner Manual
‘Optional Terms’ box
Text appearing in the cells of this box will print as titles on the final course description
documents. By default, MarkBook supplies text in each cell. Click in any cell and edit
as desired. Note that edits made will alter the blue terms appearing in the Heading box
at the right. Dates for each unit may be added as described later in this section.
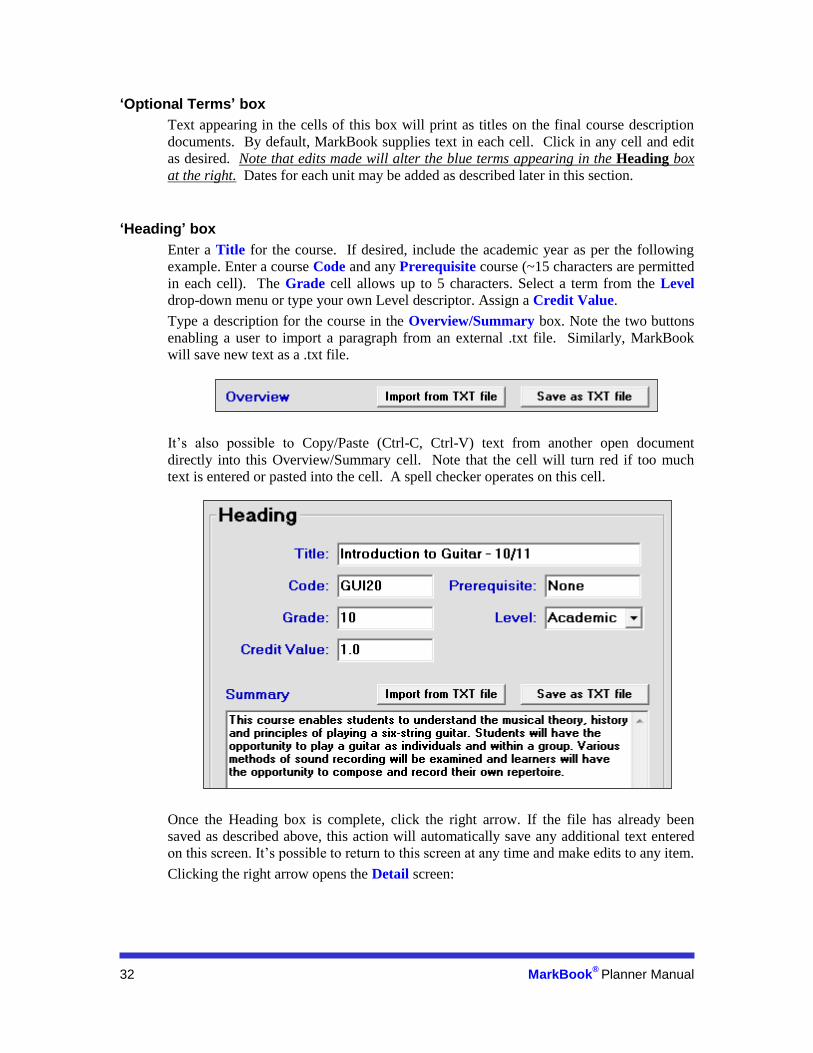
‘Heading’ box
Enter a Title for the course. If desired, include the academic year as per the following
example. Enter a course Code and any Prerequisite course (~15 characters are permitted
in each cell). The Grade cell allows up to 5 characters. Select a term from the Level
drop-down menu or type your own Level descriptor. Assign a Credit Value.
Type a description for the course in the Overview/Summary box. Note the two buttons
enabling a user to import a paragraph from an external .txt file. Similarly, MarkBook
will save new text as a .txt file.
It’s also possible to Copy/Paste (Ctrl-C, Ctrl-V) text from another open document
directly into this Overview/Summary cell. Note that the cell will turn red if too much
text is entered or pasted into the cell. A spell checker operates on this cell.
Once the Heading box is complete, click the right arrow. If the file has already been
saved as described above, this action will automatically save any additional text entered
on this screen. It’s possible to return to this screen at any time and make edits to any item.
Clicking the right arrow opens the Detail screen:
MarkBook®
Planner Manual 33
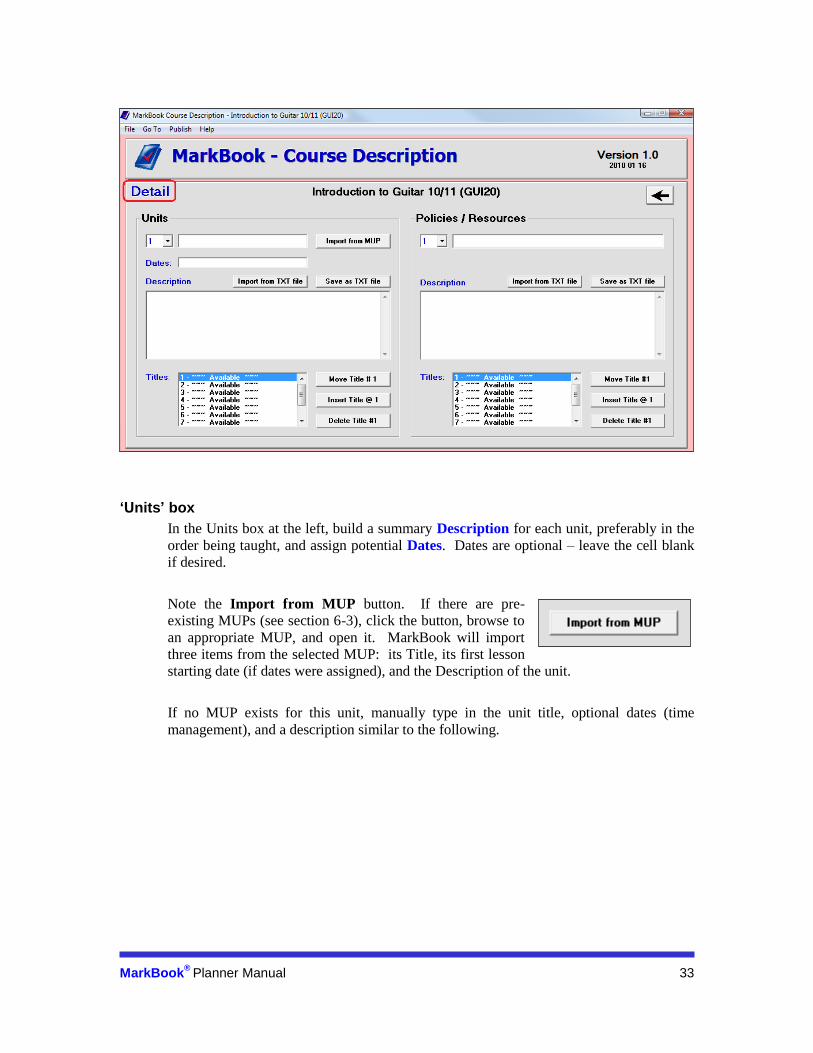
‘Units’ box
In the Units box at the left, build a summary Description for each unit, preferably in the
order being taught, and assign potential Dates. Dates are optional – leave the cell blank
if desired.
Note the Import from MUP button. If there are pre-
existing MUPs (see section 6-3), click the button, browse to
an appropriate MUP, and open it. MarkBook will import
three items from the selected MUP: its Title, its first lesson
starting date (if dates were assigned), and the Description of the unit.
If no MUP exists for this unit, manually type in the unit title, optional dates (time
management), and a description similar to the following.

34 MarkBook®
Planner Manual
Once a unit description is complete, use the numeric drop-down menu to
select and edit each succeeding unit. Up to 10 units are allowed. Unused
units will show in the Section Titles list as “~~~ Available ~~~”
Tip: include any Exam or Culminating Activity time block as a Unit.
MarkBook®
Planner Manual 35
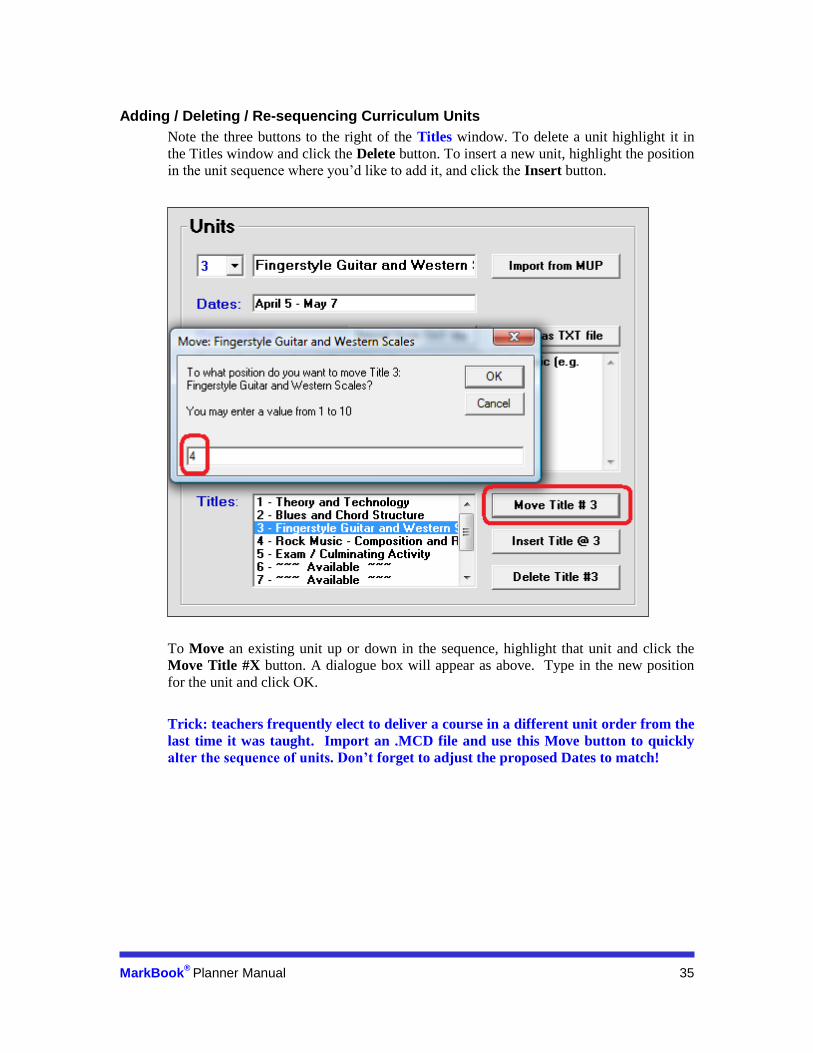
Adding / Deleting / Re-sequencing Curriculum Units
Note the three buttons to the right of the Titles window. To delete a unit highlight it in
the Titles window and click the Delete button. To insert a new unit, highlight the position
in the unit sequence where you’d like to add it, and click the Insert button.
To Move an existing unit up or down in the sequence, highlight that unit and click the
Move Title #X button. A dialogue box will appear as above. Type in the new position
for the unit and click OK.
Trick: teachers frequently elect to deliver a course in a different unit order from the
last time it was taught. Import an .MCD file and use this Move button to quickly
alter the sequence of units. Don’t forget to adjust the proposed Dates to match!

36 MarkBook®
Planner Manual
‘Policies / Resources’ box
Up to ten statements of policy may be entered here and then published with the Course
Description. Use the numeric menu to select a new blank one. Some examples follow.
Other examples could include policies or notices about uniforms, field trips, fees, or any
other item that should be communicated to parents and students prior to instruction. You
may copy any of the policies on this page for your own use.

MarkBook®
Planner Manual 37
Note that a spell checker operates on the Description cell. If the entered text exceeds the
size allocated by MarkBook for printing, the background turns brown.
To edit any Section, click on its title in the Titles box or select its number from the drop-
down menu.
As described in the Units box above, the Move, Insert and Delete buttons facilitate
editing.
Using the left arrow will return to the General Information screen AND
automatically save the accumulated entries made on this screen.
Sharing, Posting and Publishing Course Descriptions
MCD files may be shared with other teachers. Recipients may edit the file to customize
it to their own classroom(s). Attach an MCD file to an Email, save it on a shared network
or post on the web to make it available to others. The receiving teacher must have
MarkBook to open/edit it.
For students and parents, print and/or post HTML copies. See the samples in section 6-
11.
38 MarkBook®
Planner Manual
6-9 PUBLISHING AND MANAGING LESSON PLANS
1. Printing a Lesson Plan on Paper
Once a Lesson Plan has been partially or completely built, it can be published on paper or
on the Internet, it can be saved as a file and it can be exported to others electronically,
perhaps as an Email attachment.
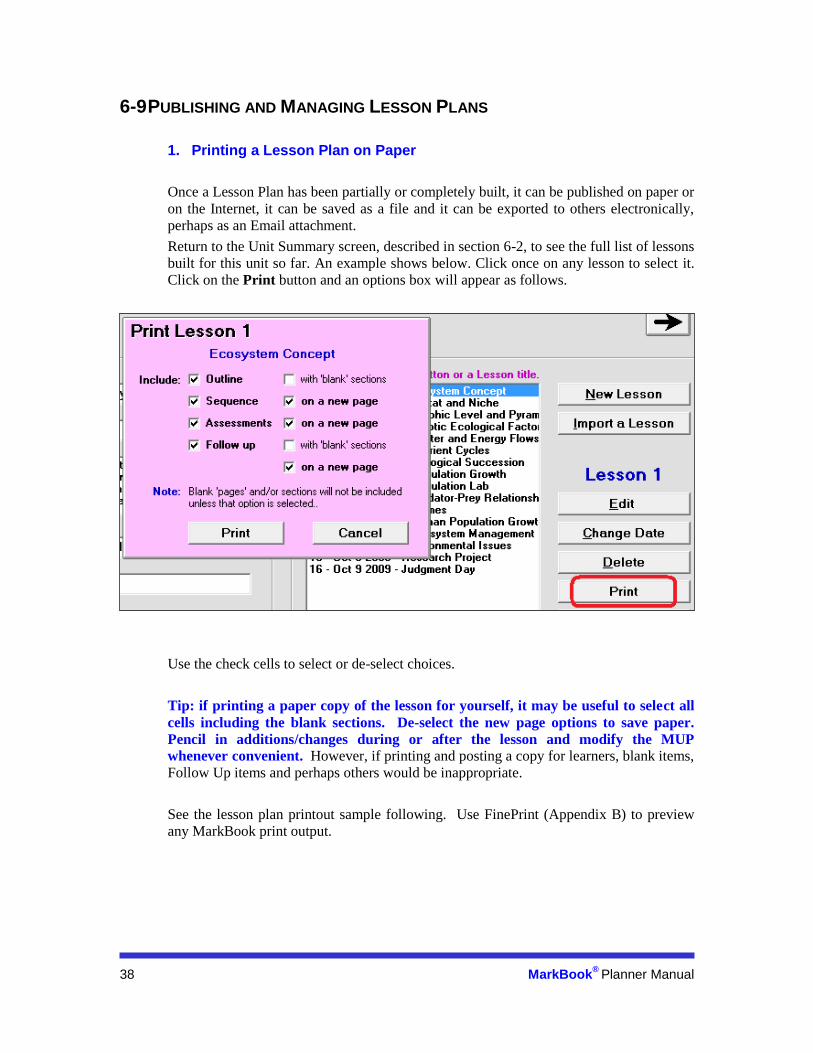
Return to the Unit Summary screen, described in section 6-2, to see the full list of lessons
built for this unit so far. An example shows below. Click once on any lesson to select it.
Click on the Print button and an options box will appear as follows.
Use the check cells to select or de-select choices.
Tip: if printing a paper copy of the lesson for yourself, it may be useful to select all
cells including the blank sections. De-select the new page options to save paper.
Pencil in additions/changes during or after the lesson and modify the MUP
whenever convenient. However, if printing and posting a copy for learners, blank items,
Follow Up items and perhaps others would be inappropriate.
See the lesson plan printout sample following. Use FinePrint (Appendix B) to preview
any MarkBook print output.
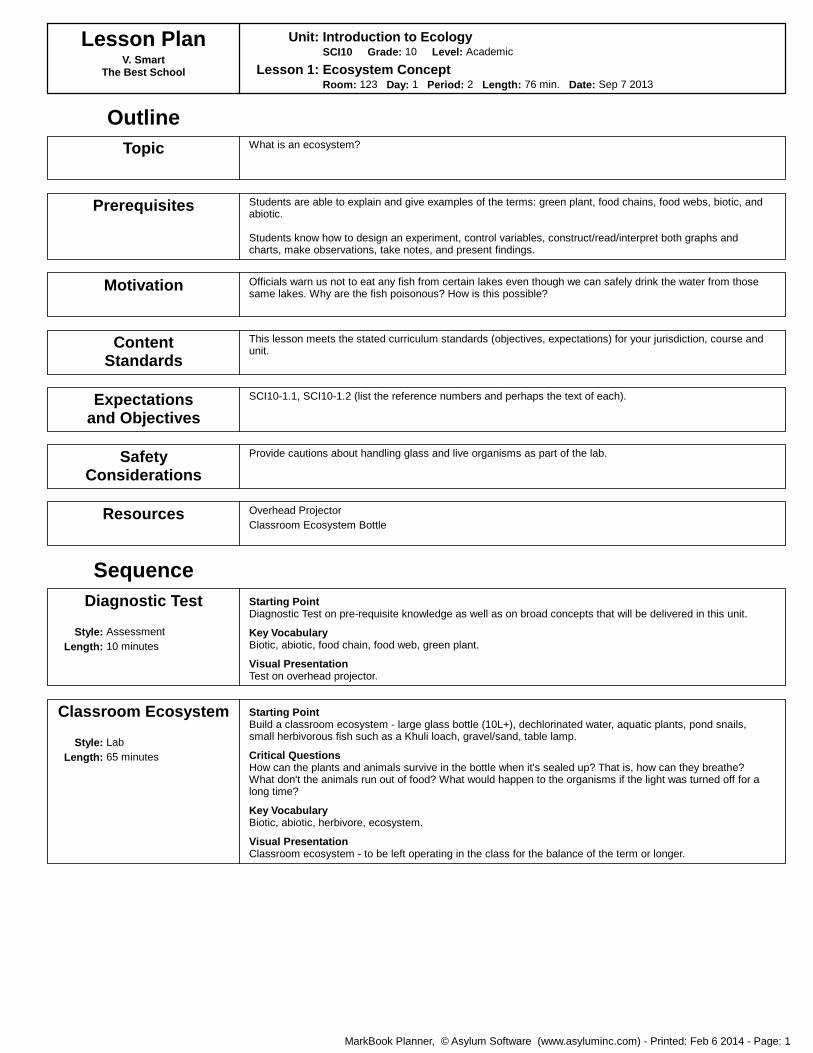
Lesson PlanV. Smart
The Best School
Unit: Introduction to EcologySCI10 Grade: 10 Level: Academic
Lesson 1: Ecosystem ConceptRoom: 123 Day: 1 Period: 2 Length: 76 min. Date: Sep 7 2013
OutlineTopic What is an ecosystem?
Prerequisites Students are able to explain and give examples of the terms: green plant, food chains, food webs, biotic, andabiotic.
Students know how to design an experiment, control variables, construct/read/interpret both graphs andcharts, make observations, take notes, and present findings.
Motivation Officials warn us not to eat any fish from certain lakes even though we can safely drink the water from thosesame lakes. Why are the fish poisonous? How is this possible?
ContentStandards
This lesson meets the stated curriculum standards (objectives, expectations) for your jurisdiction, course andunit.
Expectationsand Objectives
SCI10-1.1, SCI10-1.2 (list the reference numbers and perhaps the text of each).
SafetyConsiderations
Provide cautions about handling glass and live organisms as part of the lab.
Resources Overhead ProjectorClassroom Ecosystem Bottle
SequenceDiagnostic Test
Style: AssessmentLength: 10 minutes
Starting PointDiagnostic Test on pre-requisite knowledge as well as on broad concepts that will be delivered in this unit.
Key VocabularyBiotic, abiotic, food chain, food web, green plant.
Visual PresentationTest on overhead projector.
Classroom Ecosystem
Style: LabLength: 65 minutes
Starting PointBuild a classroom ecosystem - large glass bottle (10L+), dechlorinated water, aquatic plants, pond snails,small herbivorous fish such as a Khuli loach, gravel/sand, table lamp.
Critical QuestionsHow can the plants and animals survive in the bottle when it's sealed up? That is, how can they breathe? What don't the animals run out of food? What would happen to the organisms if the light was turned off for along time?
Key VocabularyBiotic, abiotic, herbivore, ecosystem.
Visual PresentationClassroom ecosystem - to be left operating in the class for the balance of the term or longer.
MarkBook Planner, © Asylum Software (www.asyluminc.com) - Printed: Feb 6 2014 - Page: 1

Lesson PlanV. Smart
The Best School
Unit: Introduction to EcologySCI10 Grade: 10 Level: Academic
Lesson 1: Ecosystem ConceptRoom: 123 Day: 1 Period: 2 Length: 76 min. Date: Sep 7 2013
AssessmentsU1 Diagnostic Test
Category: Know & UndType: Diagnostic
DescriptionOverhead: matching terms test to determine whether or not learners are familiar with Key Vocabulary termsfrom prior courses. Second part of the test: have them define or explain Bioaccummulation, Biome,Biosphere, Niche, Succession, Nutrient Cycle.
AccommodationFor the visually-impaired, provide a large-font printed copy of the test.
Homework
Type: Homework
DescriptionIn the text, do page 46, questions 1 to 6.
Follow UpAnnouncements A research case study will be due for presentation towards the end of the unit, Oct 5-8. The unit test is
planned for Oct 9th.
Reflections Some students were anxious about sealing the bottle with the animals still inside. In order to avoid emotionalreactions next time, emphasize that the bottle is very safe for the animals - we're doing this lab to prove it.Use their concern to focus them on coming up with an explanation for why the organisms all survive.
Opportunities Some students didn't know what fish and snails eat (the Khuli Loach and snails are herbivores - theyconsume algae). Exploit the questions about what each animal eats to provide the motivational hook for theupcoming lesson on Habitat & Niche.
MarkBook Planner, © Asylum Software (www.asyluminc.com) - Printed: Feb 6 2014 - Page: 2

MarkBook®
Planner Manual 41
2. Publishing a Lesson Plan for the Internet
Select the desired lesson plan by clicking on it. Click Publish
in the upper menu bar and click on Lesson XX in HTML.
The following box will appear:
Select desired options by checking
appropriate cells. Then click the
Save HTML button. A Windows
Save screen will appear as follows.
Unlike the paper printout, the
HTML file will NOT include empty
sections.
MarkBook will propose a new file name as a combination of the MUP name and the
lesson name. Edit this file name as necessary. Edit the folder location as desired. Click
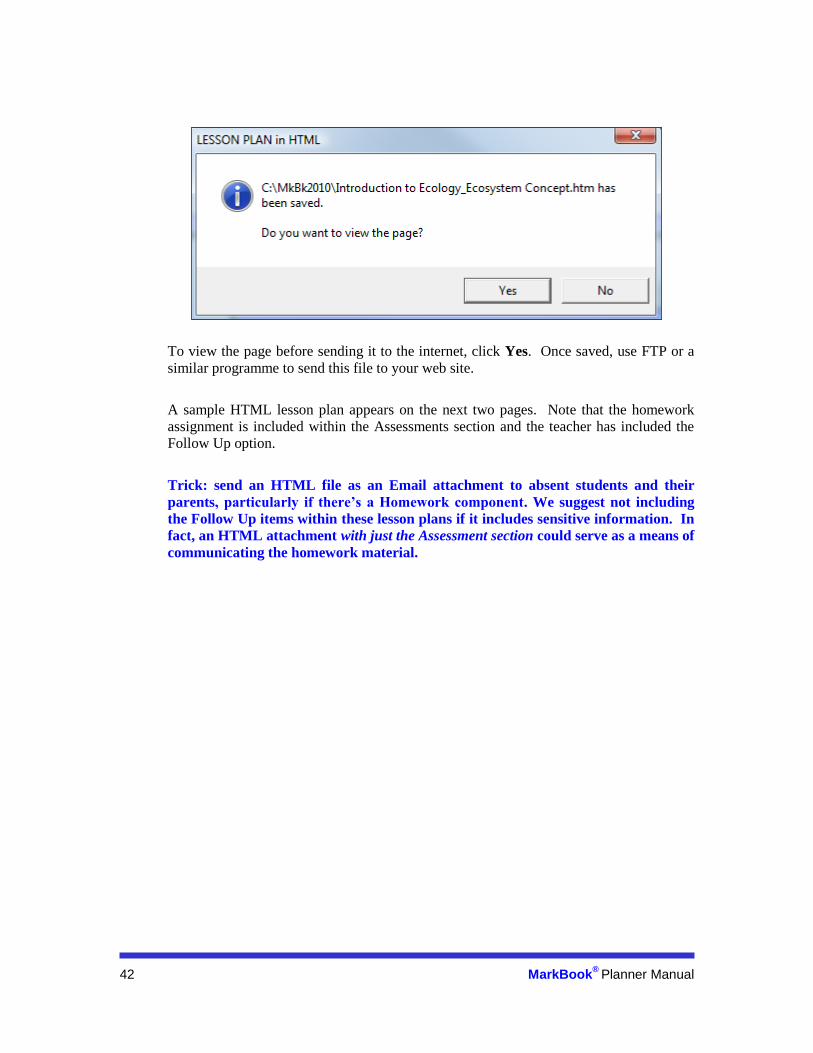
Save. The following dialogue box will appear:
42 MarkBook®
Planner Manual
To view the page before sending it to the internet, click Yes. Once saved, use FTP or a
similar programme to send this file to your web site.
A sample HTML lesson plan appears on the next two pages. Note that the homework
assignment is included within the Assessments section and the teacher has included the
Follow Up option.
Trick: send an HTML file as an Email attachment to absent students and their
parents, particularly if there’s a Homework component. We suggest not including
the Follow Up items within these lesson plans if it includes sensitive information. In
fact, an HTML attachment with just the Assessment section could serve as a means of
communicating the homework material.

MarkBook®
Planner Manual 43
Printout – Lesson Plan HTML

44 MarkBook®
Planner Manual

MarkBook®
Planner Manual 45
3. Exporting a Lesson Plan
1 Click the Export button, 2 select a location, 3 edit the proposed name as necessary, and
click Save. MarkBook will save the plan as an .MLP (MarkBook Lesson Plan) file. It
could be attached to an Email to other teachers or copied to a shared folder.
4. Importing a Lesson Plan
If one or more .MLP files exist for this unit, perhaps sent by a colleague or sitting in a
shared folder, click the Import a Lesson button, browse to locate the desired lesson plan
file, and click Open.
5. Moving a Lesson Plan in the Lesson Sequence
If necessary, use the Change Date button to move the imported lesson up or down into
its proper sequence within the lesson list.
46 MarkBook®
Planner Manual
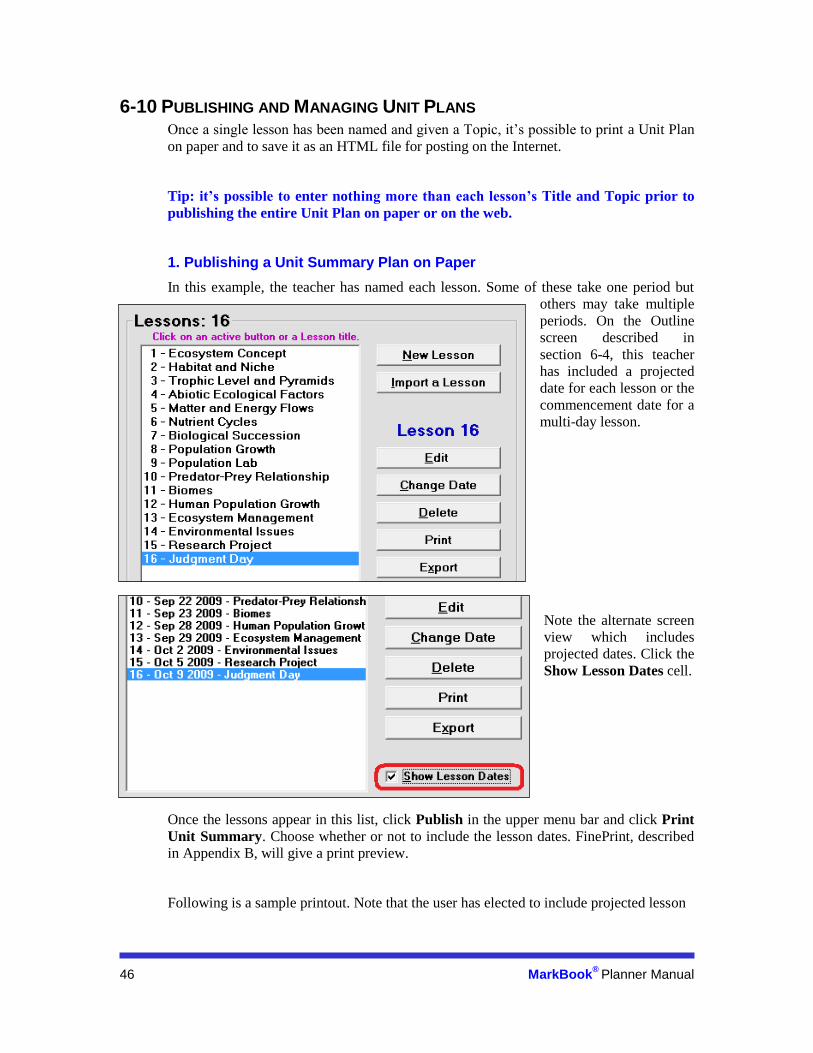
6-10 PUBLISHING AND MANAGING UNIT PLANS Once a single lesson has been named and given a Topic, it’s possible to print a Unit Plan
on paper and to save it as an HTML file for posting on the Internet.
Tip: it’s possible to enter nothing more than each lesson’s Title and Topic prior to
publishing the entire Unit Plan on paper or on the web.
1. Publishing a Unit Summary Plan on Paper
In this example, the teacher has named each lesson. Some of these take one period but
others may take multiple
periods. On the Outline
screen described in
section 6-4, this teacher
has included a projected
date for each lesson or the
commencement date for a
multi-day lesson.
Note the alternate screen
view which includes
projected dates. Click the
Show Lesson Dates cell.
Once the lessons appear in this list, click Publish in the upper menu bar and click Print
Unit Summary. Choose whether or not to include the lesson dates. FinePrint, described
in Appendix B, will give a print preview.
Following is a sample printout. Note that the user has elected to include projected lesson

Unit PlanV. Smart
The Best School
Unit: Introduction to EcologySCI10 Grade: 10 Level: Academic
SummaryDescription People care deeply about the environment. In order to protect the environment, we must first understand how
the natural world operates. This unit develops basic knowledge and skills about ecosystems. It also looks atsome issues caused by human interaction with those ecosystems.
Lessons 1 Sep 7 2013 Ecosystem Concept (What is an ecosystem?)
2 Sep 8 2013 Habitat and Niche (Producers, consumers, decomposers, scavengers, saprophytes, predators,)
3 Sep 9 2013 Trophic Level and Pyramids (This lessons looks at the concept of ecological pyramids based ...)
4 Sep 12 2013 Abiotic Ecological Factors (Look at the relationships between living and non-living factors and ...)
5 Sep 13 2013 Matter and Energy Flows (Examine the ways that energy flows through the ecosystem. Unlike ...)
6 Sep 14 2013 Nutrient Cycles (Carbon, nitrogen and water are three nutrients that have elaborate cycles between ...)
7 Sep 15 2013 Biological Succession (Species in an environment change over time until a climax community is ...)
8 Sep 16 2013 Population Growth (This lesson looks at the graphic growth pattern of a typical population.)
9 Sep 19 2013 Population Lab (Simulation lab mimicing a real population's growth over time.)
10 Sep 20 2013 Predator-Prey Relationship (Look at the special relationships between predators and prey ...)
11 Sep 21 2013 Biomes (Multiple lessons comparing distinct biomes with emphasis on Canadian biomes.)
12 Sep 22 2013 Human Population Growth (An examination of the unusual growth pattern of humans.)
13 Sep 23 2013 Ecosystem Management (Multiple lessons on selected management systems.)
14 Sep 26 2013 Environmental Issues (Multiple lessons on selected problems and solutions.)
15 Sep 27 2013 Research Project (Multiple presentations on student research projects.)
16 Sep 28 2013 Judgment Day (Unit Test)
MarkBook Planner, © Asylum Software (www.asyluminc.com) - Printed: Sep 3 2013 - Page: 1

48 MarkBook®
Planner Manual
2. Publishing a Unit Summary Plan on the Internet
To publish the HTMLError!
Bookmark not defined. version
of a Unit Plan Summary, click
Publish in the upper menu bar and
select Unit Summary in HTML.
Click to choose whether to include
the Lesson Dates or not.
The next screen will appear. Select a file name and location. In this example, the user
has edited the name to EcologyUnitSummary and is saving it in the MkBk2011
directory:
Click Save and MarkBook will save a file to that location. Your computer will promptly
ask if you wish to view the file. Choose Yes to see it as per the example on the next
page. If acceptable, use
FTP to post the file on the
Internet.

MarkBook®
Planner Manual 49
Printout – HTML Unit Summary

50 MarkBook®
Planner Manual
6-11 PUBLISHING AND MANAGING COURSE DESCRIPTIONS Course descriptions may be built as described in section 6-8. This section describes
publishing and it includes a paper print sample and an HTML sample.
To print a Course Description, open the saved .MCD file with MarkBook’s Course
Description tool, or build an .MCD as in section 6-8. Once the .MCD file is open, click
Publish in the upper menu bar and select Print Course Description. Choose among the
options and then click Print. See the sample on the next page.
To publish as HTML, choose the
Course Description in HTML option as above. Select among
the options and click the Save
HTML button. MarkBook will
prompt for a save location and
then ask if you wish to view the
file. Click Yes to get a print
preview. If acceptable, post the
file on the appropriate website. A
partial sample is provided on the
page after next.

Course OutlineThe Best School
Music Department
Introduction to Guitar - 10/11 (GUI20) Grade: 10 Level: Academic Prerequisite: None Credit Value: 1.0
SummaryThis course enables students to understand the musical theory, history and principles of playing a six-string guitar. Students will have the opportunityto play a guitar as individuals and within a group. Various methods of sound recording will be examined and learners will have the opportunity tocompose and record their own repertoire. This course matches the standards of the Department of Education's curriculum document for GUI20.
UnitsTheory and Technology Feb 1 to Feb 26Upon completion, students will be able to define or explain the elements of music (rhythm, melody, timbre, dynamics, harmony, texture and form). Learners will be able to read simple musical notation and explain the use of various types of sound recording technology.
Blues and Chord Structure March 1 to April 2Play technical exercise and diverse repertoire that reflect the theory expectations at this grade level (Including improvisation and their own creationswhen appropriate.)
Fingerstyle Guitar and Western Scales April 5 - May 7Aural discrimination skills to identify complex aspects of music (e.g. major and minor triads, diminished and augmented intervals
Rock Music - Composition and Recording May 10 - June 11Demonstrate the effective use of digital technology in music; apply the elements of and principles of composition at an intermediate level using thecreative process (e.g. perception, production and reflection)
Exam / Culminating Activity June 14 - 23For the Culminating Activity, each student will be required to perform a guitar melody pre-approved by the teacher.
The Exam will be 90 minutes covering the music principles delivered in the four course curriculum units.
Policies / ResourcesAccommodations for ExceptionalitiesEvery effort will be made to accommodate the identified needs of exceptional students including differentiated curriculum delivery methods andassessment strategies. Varying modes of student expression, as identified in each student's Individual Education Plan (IEP), will be addressed.
Teaching StrategiesUnits are activity based. Teacher demonstrations and research activities provide the students with the necessary terminology and methodology tocomplete the activities. Classroom discussions, collaborative and co-operative learning, research, report writing and taking notes will assist studentsin meeting the course expectations.
Resources / Text Books / Technological IntegrationTexts:''Strummin 'N Stompin'' by W. Nelson''Six Strings Made Easy'' by S. Twain
Classroom ManagementNo food, beverages, incendiary items like tobacco, jackets, cell phones, pagers, iPods or devices providing radio interference are allowed inside theclassroom or studio.
Plagiarism / IntegrityPersonal as well as academic integrity is an expectation at this school. Plagiarism (copying another's work as if it was your own), cheating, usingunauthorized aids, theft (including electronic theft) and lying are not tolerated. Failure to maintain integrity may result in the loss of credits and/or theimposition of other penalties.
Assessment and Evaluation PolicyTERM: Knowledge and Understanding (15%); Thinking (20%); Communication (10%); Application (25%). Note: percentages are approximate.FINAL: Term (70%); Culminating Activity (15%); Final Exam (15%)
EVALUATION: based on assessments and other observations of each learner, the teacher will make a professional judgment as to the final markassigned to each student.
MarkBook - Course Outline, © Asylum Software (www.asyluminc.com) - Printed: Jan 31 2014 - Page: 1

52 MarkBook®
Planner Manual
Printout – Course Description as HTML

MarkBook®
Planner Manual 53
6-12 USES OF THIS PLANNER
Teachers
Teachers will find this tool very useful particularly with new curricula. For instance, the
lead teacher for a given course could prepare a daily lesson and send it as an Email
attachment to others. Or send it daily as a revised MUP. Both have advantages. In the
former case, each user of the new lesson has the opportunity to enter their own Follow
Up items and save them. Data can be pooled at the next course meeting. In the latter case,
everyone is working from exactly the same MUP file.
Course leaders could prepare and publish a Course Description prior to commencing
instruction. Modify the document throughout the term as appropriate.
Pre-Service Teachers
The elements of the planner’s lessons are an integral part of lesson planning. Instruction
in use of the Planner will reinforce appropriate pedagogy for pre-service candidates.
Whether pre-service or in-service, students in subject-specific classes at Faculties of
Education may wish to cooperate with each other in developing and sharing MUPs
(MarkBook Unit Plans) and MCDs (MarkBook Course Descriptions). Frequently,
candidates graduate from subject specialist courses with a stack of subject-specific paper.
With the Planner, it’s possible to graduate with editable electronic unit plan files and
course descriptions for courses to be taught in the future. Copies of MSS and MTP files
are ideal items to share and save as well.
Curriculum Coordinators and Department Heads
Persons responsible for curriculum matters at the school or district level may wish to
organise the construction of MCDs and MUPs for each subject unit. These can be made
available as downloadable packages of files, or sent as Email attachments. For districts
that order custom editions of MarkBook, these MCDs and MUPs can be included in a
folder so that every teacher gets them wherever MarkBook is installed.
54 MarkBook®
Planner Manual
Thanks!
The following individuals contributed to the design of this planning tool. My sincere
thanks to
Beutler, Karen Toronto District School Board, Canada
Burns, Bernie OISE, University of Toronto, Canada
Carnaffan, Dave York Catholic District School Board, Canada
Carr, Tom Simcoe County District School Board, Canada
Clark, Jim Canadian International School, Bangladesh
Corney, Bob OISE, University of Toronto, Canada
DallaCorte, Frank York Catholic District School Board, Canada
Farquharson, Larry Thames Valley District School Board, Canada
Hamilton, Robin Gateway Software Productions
Knaack, Liesel University of Ontario Institute of Technology, Canada
Martin, James London District Catholic School Board, Canada
Mayes-Stewart, Mike Trillium Lakelands District School Board, Canada
McRoberts, Bob York Regional District School Board, Canada
McKitrick, Sara OISE, University of Toronto, Canada
Mitchell, Connie Columbia International University, USA
Palombi, Reno Algoma District School Board, Canada
Reid, Michele Durham District School Board, Canada
Rinaldo, Vince Niagara University, USA
Sadler, Doug Windsor Essex Catholic District School Board, Canada
Sayliss, Cliff District School Board of Niagara, Canada
Tanner, Steve Near North District School Board, Canada
Toulouse, Pamela Laurentian University, Canada
Waller, Ken Nipissing University, Canada
Wolfe, Elgin OISE, University of Toronto, Canada
Further contributions for the continued evolution of this planning tool would be
appreciated. Please Email suggestions to Rob Hedges, [email protected].

MarkBook®
Planner Manual 55
Index
A
Accommodations
in Lesson plans, 26
ASCII Files, 28
Assessment
5 types, 9, 25
in the Planner, 25
B
Backwards Planning/Design, 2
Banks
of objectives, 19
Bloom’s Taxonomy, 3
C
Category
in the Planner, 25
Cautions Exiting the Planner, 5
Content Standards, 15
Course Description
Building, 30
Printing & HTML, 37
Printout, 51
Publishing, 50
Use of, 53
Course Leader
and .MUPs, 53
Critical Questions
in Lesson plans, 24
Curriculum
Coordinators, 53
E
a Lesson plan, 45
a Unit Plan, 5
Expectation
Files/Banks, 28
Merge into a lesson plan, 20
Number, 20
Expectations
in the Planner, 15, 18
Export
a Lesson plan, 45
F
FTP programme, 48
H
HTML
Course Description, 37
Course Description Printout, 52
Lesson plans, 41
Unit Plan Summary, 49
I
Image of the learner, 3
Importing
a lesson plan, 45
K
Key Vocabulary, 24
L
Lesson Plans. See Planner
M
MCD Files. See Course Description
Menus
Planner, 6
Motivation, 15
MUP Files. See Planner - MUP
O
Objective
in the Planner, 19
Merge into a lesson plan, 20
Objective Files/Banks, 28
Opportunities
in a Lesson Plan, 27
P
Planner
Academic levels list, 7
Accommodations, 26

56 MarkBook®
Planner Manual
Assessment type list, 9
Category / Starnd list, 9
Course Description, 30
Dates, 10
Edit lists, 7
HTML Unit Summary printout, 49
Lesson plans
Content Standards, 15
Critical questions, 24
Detail screen, 23
Export a plan, 45
Follow up screen, 27
HTML, 41
HTML printout, 43
Import, 11
Import a plan, 45
Key vocabulary, 24
Length, 24
Motivational hook, 15
Move, 45
New, 11, 13
Outline screen, 13
Prerequisites, 14
Printing, 38
Sequence, 23
Style, 24
Topic, 14
Visual presentations, 24
Lesson style list, 8
Media, 21
MUP, 10
Objectives, 19
Planning with the end in mind, 2
Preamble, 2
Publish menu, 9
Resources, 22
Resources list, 8
Safety considerations, 22
Time Management, 11
Unit plan
HTML, 48
Print, 46
Unit Planner, 5
Unit title, 10
Printout
Course Description, 51
Lesson plan, 39
Lesson Plan HTML, 43
Unit Plan Summary, 47
Unit Plan Summary HTML, 49
R
[email protected], 28, 54
Rubrics
and Expectations, 26
in the Planner, 26
RubricBuilder, 26
S
Skill
as a prerequisite, 14
Cognitive, 4
T
Thinking Skills
in lesson plans, 18
Time Management, 4, 11
in a Course Description, 33, 51
Projected lesson date, 13
Tips and Tricks Calendar access, 13
Content Standards, 17
Expectations or Objectives, 19
Expectations printout, 29
Exploiting good questions, 27
Include Exam as a Unit, 34
Lesson plan printout options, 38
Lesson plans for absentee learners, 42
Quickly building a unit plan, 46
Re-sequence curriculum units, 35
View full text of an expectation, 20
Type
Assessments, 25
U
Unit Description. See Planner
Unit Plan Summary
Importing to a Course Description, 30
Printout, 47
Unit Planner. See Planner
V
Version number
Planner, 5
Visual presentations
in Lesson plans, 24
Vocabulary
in Lesson plans, 24
W
Word Processor
for Content Standards, 18
for printing expectations, 29