mark hartnett software support engineer december 7, 2001 introduction to analysis and feature...
TRANSCRIPT

Mark HartnettSoftware Support EngineerDecember 7, 2001
Introduction to Analysis and Feature Extraction Software

Title of Presentation1 March, 2001
Agilent Restricted Page 2
Launching the Image Analysis Software• Double-click the Image
Analysis icon on the desktop
OR
• Click Start > Programs > Agilent Life-Sciences > Image Analysis

Title of Presentation1 March, 2001
Agilent Restricted Page 3
Accessing the Image Analysis User Manual• Double-click the Agilent-
Life Sciences icon on the desktop
• OR
• Click Help > Help from the Image Analysis menu bar

Title of Presentation1 March, 2001
Agilent Restricted Page 4
Accessing the Image Analysis Software Version• Click Help > About from
the Image Analysis menu bar
• The About Analysis dialog displays the software version

Title of Presentation1 March, 2001
Agilent Restricted Page 5
How to Open a Scanned Image
• Click the Open icon on the Image Analysis toolbar
OR
• Click File > Open and select the image file in the Open dialog

Title of Presentation1 March, 2001
Agilent Restricted Page 6
How to Save a Copy of a Scanned Image• Click the Save As icon on
the Image Analysis toolbar
OR
• Click File > Save As and name the image file in the Save As dialog

Title of Presentation1 March, 2001
Agilent Restricted Page 7
How to Crop a Scanned Image
• Left-click and hold the mouse and then draw a box around the array
• Release the mouse button
• The cropped image appears in a new window

Title of Presentation1 March, 2001
Agilent Restricted Page 8
How to Crop a Scanned Image (Continued)• Click the Save Cropped
View Icon in the new image window
OR
• Click File > Save Cropped View on the Image Analysis menu bar
• Complete the information in the Save Cropped View dialog

Title of Presentation1 March, 2001
Agilent Restricted Page 9
How to Close an Image
• Click the Close icon on the scan image window
OR
• Click File > Close on the Image Analysis menu bar

Title of Presentation1 March, 2001
Agilent Restricted Page 10
Changing the Color Range of the Image Display• Click the Set color range
icon in the toolbar of the scan image
OR
• Click Color > Set Data Range from the Image Analysis menu bar
• In the Set Data Range dialog, enter the minimum and maximum values or choose Auto Scale Image
Title of Presentation1 March, 2001
Agilent Restricted Page 11
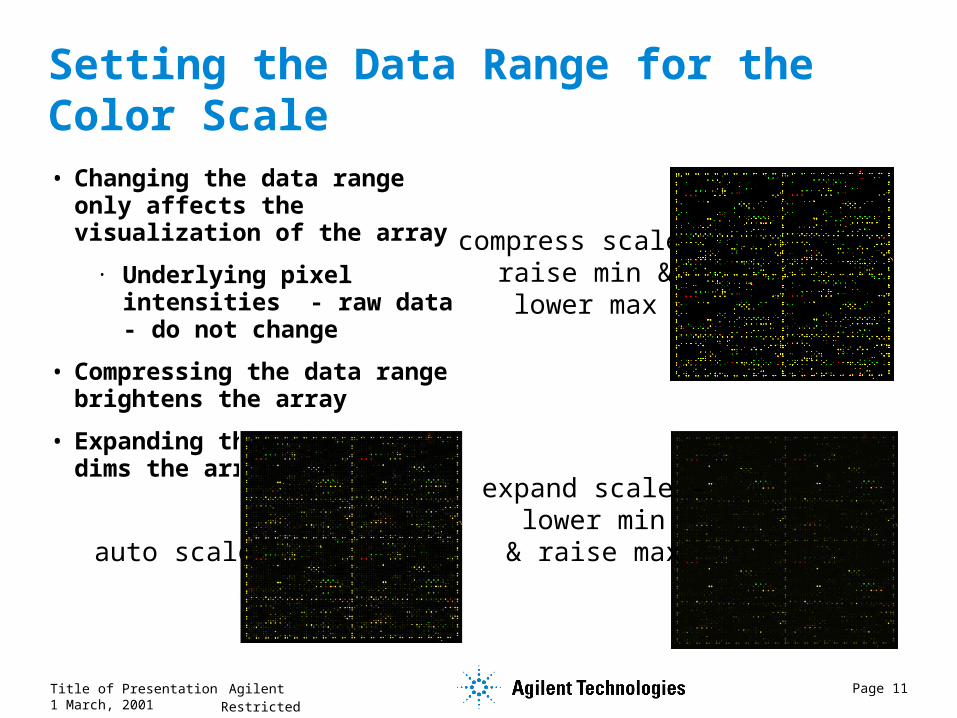
Setting the Data Range for the Color Scale• Changing the data range
only affects the visualization of the array
• Underlying pixel intensities - raw data - do not change
• Compressing the data range brightens the array
• Expanding the data range dims the array
expand scale -lower min
& raise max
compress scale -raise min &lower max
auto scale

Title of Presentation1 March, 2001
Agilent Restricted Page 12
Changing between Log and Linear Color Scale • Click the Toggle Log Scale
Icon to switch between Log and Linear color scale
OR
• Click Color > Use Log Color Scale to toggle between Log and Linear color scale

Title of Presentation1 March, 2001
Agilent Restricted Page 13
Viewing Images with Log or Linear Color Scales• Click Color > Use Log Color
Scale
• Toggle between log and linear color scale Log Scale
Linear Scale

Title of Presentation1 March, 2001
Agilent Restricted Page 14
Changing the Color Palette
• Click on Color in the Image Analysis menu bar
• False Color and False Color with White BG are available for two-color images
• Gray Scale and Reverse Gray Scale are available for single-color images

Title of Presentation1 March, 2001
Agilent Restricted Page 15
Histogram Graphs of Pixel Intensities• Histograms can be plotted for the entire view or a selected
region
• for entire view - click View > Entire Histogram
• for a selected region - right-click and draw the region
• Selected region can be rectangular or elliptical
• use the toggle button to switch between shapes
• For two color images - one or both colors can be plotted

Title of Presentation1 March, 2001
Agilent Restricted Page 16
How to Select an Elliptical Area for a Histogram• Click the Toggle
Histogram Shape icon on the image toolbar
OR
• Click Options > Select Elliptical Area on the Image Analysis menu bar

Title of Presentation1 March, 2001
Agilent Restricted Page 17
How to Select Graph Defaults for Histograms• Click Options > Set
Graph Defaults on the Image Analysis menu bar
• Specify either the Bin Size or the Maximum Number of Bins in the Set Bin Defaults dialog

Title of Presentation1 March, 2001
Agilent Restricted Page 18
Histogram Plot - Sample
Elliptical histogramfor this feature

Title of Presentation1 March, 2001
Agilent Restricted Page 19
Histogram Plot - Bin Size
• Bin size is set automatically by the Analysis software
• Users can change the bin size by two methods
• specifying the number of pixel intensity counts per bin
• specifying the maximum number of bins
• click Options > Set Graph Defaults -OR- Histogram > Change Bins
Title of Presentation1 March, 2001
Agilent Restricted Page 20
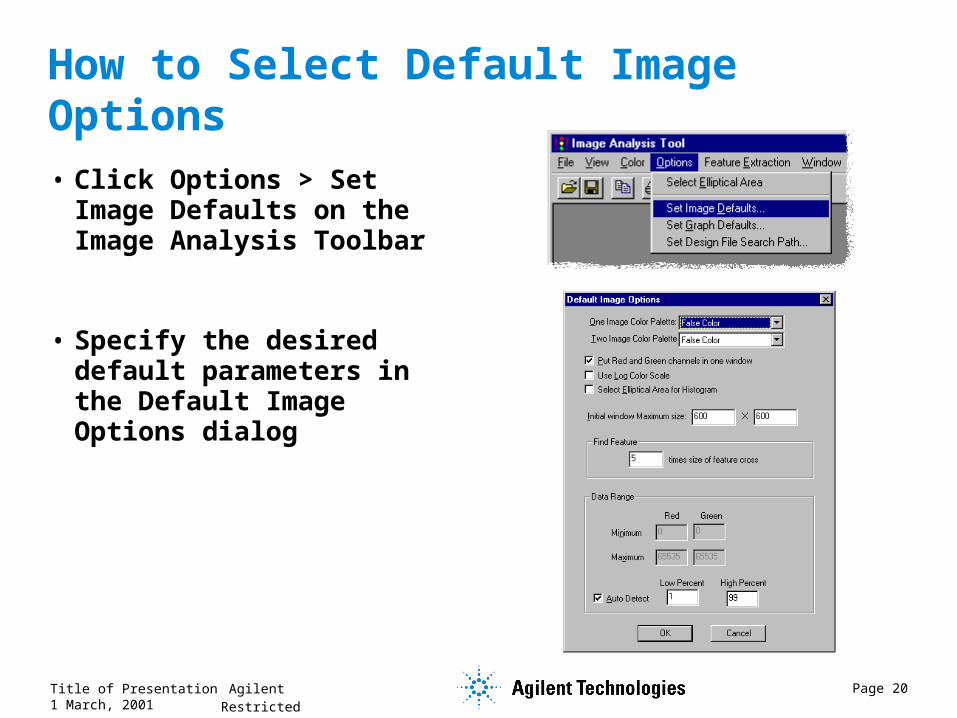
How to Select Default Image Options• Click Options > Set
Image Defaults on the Image Analysis Toolbar
• Specify the desired default parameters in the Default Image Options dialog

Title of Presentation1 March, 2001
Agilent Restricted Page 21
How to Set the Design File Search Path• Click Options > Set
Design File Search Path
• Click Browse in the Set XML Path dialog
• Locate the directory containing the design file in the Browse for Folder dialog
• Click Add in the Set XML Path dialog

Title of Presentation1 March, 2001
Agilent Restricted Page 22
How to Check the Memory Status
• Click Help > Memory Status on the Image Analysis menu bar
• The Memory Status dialog is displayed

Title of Presentation1 March, 2001
Agilent Restricted Page 23
Line Graphs
• Line graphs show a horizontal or vertical slice through the image
• To open the Select Row/Col dialog box
• click View > Select Row or Column
• for horizontal slice - click
• for vertical slice - click
• Choose Row -OR- Column -OR- All Rows or Columns

Title of Presentation1 March, 2001
Agilent Restricted Page 24
Line Graph - Sample
Line graph for a row of pixelsthrough these features

Title of Presentation1 March, 2001
Agilent Restricted Page 25
Exporting Images to other Applications• Scan images, histogram plots, and line graphs
can be exported to other applications
• Export methods
• high-resolution - click File >Save As and specify bitmap file type
• low-resolution - click the copy button to send the image to the clipboard

Title of Presentation1 March, 2001
Agilent Restricted Page 26
Zooming In and Out
• Click View > Zoom from the menu
• select a magnification
• Mouse shortcuts
• To zoom in - Ctrl + left double click on the image
• To zoom out - Ctrl + right double click on the image
• Toolbar buttons
Zoom in Zoom out 100 percent

Title of Presentation1 March, 2001
Agilent Restricted Page 27
Scan Image File Information
• Information regarding the scan image is stored within its TIF file
• chip barcode
• scan date and time
• scanner software versions
• scan region
• PMT voltage

Title of Presentation1 March, 2001
Agilent Restricted Page 28
Viewing Scan Image File Information• Click View > FileInfo
• select General tab
• The scanner reads the barcode and generates the Array Identifier
Title of Presentation1 March, 2001
Agilent Restricted Page 29
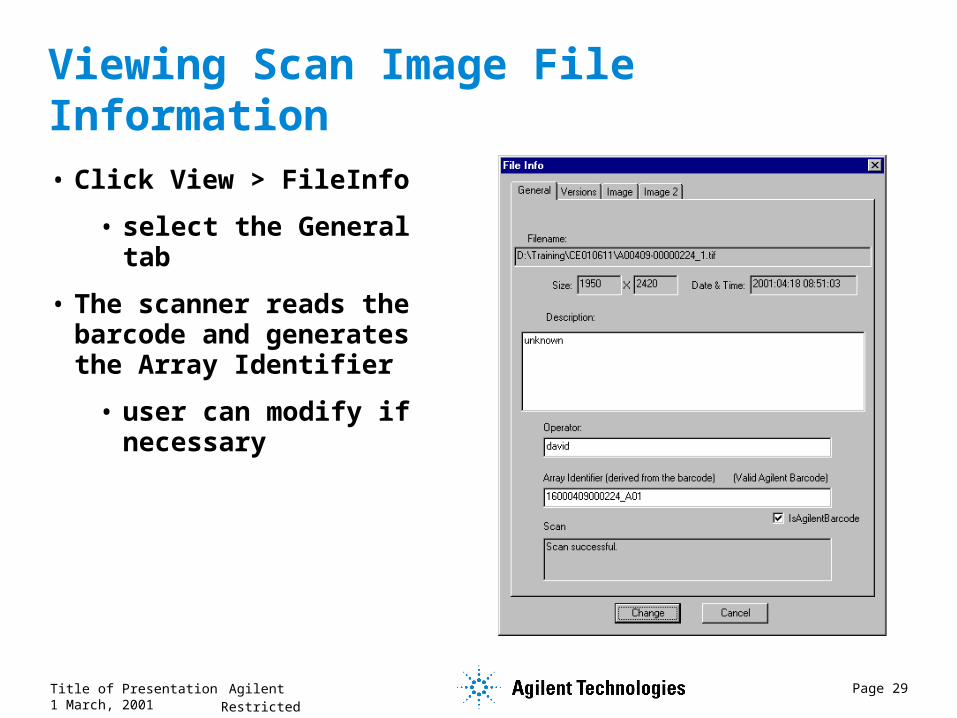
Viewing Scan Image File Information• Click View > FileInfo
• select the General tab
• The scanner reads the barcode and generates the Array Identifier
• user can modify if necessary

Title of Presentation1 March, 2001
Agilent Restricted Page 30
Viewing Scan Image File Information• Click View > FileInfo
• select the Versions tab
• Scanner software versions are stored with the scan image

Title of Presentation1 March, 2001
Agilent Restricted Page 31
Viewing Scan Image File Information• Click View > FileInfo
• select the Image tab
• Scan regions and PMT Voltages are displayed

Title of Presentation1 March, 2001
Agilent Restricted Page 32
Viewing Scan Image File Information• Click View > FileInfo
• select the Image 2 tab
• Scan resolution is shown in the MicronsPerPixel field

Title of Presentation1 March, 2001
Agilent Restricted Page 33
Feature Extraction Input Files
• Input Files - Required
• Scan image of Agilent microarray in 16-bit TIFF format
• 16-bit TIFF images are generated by the Agilent scanner. Scan images converted to other formats can not be feature extracted.
• Scan images of non-Agilent microarrays can be viewed - but not feature extracted - with the Agilent Image Analysis and Feature Extraction software.
• Array Design file - also called Pattern file - in GEML XML format
• Describes the layout and the probes on the microarray
• XML - Extensible Markup Language
• GEML - Gene Expression Markup Language

Title of Presentation1 March, 2001
Agilent Restricted Page 34
Feature Extraction Input Files (Continued)• Input Files - Optional
• Printing File - applies to cDNA microarrays. This file contains information on the cDNA clones spotted on the microarray. Bad clones on the microarray are ignored and excluded from analysis.
• If no Printing File is found, the below dialog is displayed
• In-situ microarray customers should disregard this message
• cDNA microarray customers should place the appropriate Printing File in the Design File Search path

Title of Presentation1 March, 2001
Agilent Restricted Page 35
Feature Extraction Output Files
• XML - Contains the gene expression profile for the microarray in GEML format. Expression data in the GEML format can be loaded directly into the Rosetta Resolver Gene Expression Analysis software.
• Tab-text - Contains the gene expression profile for the microarray in tab-delimited text format. This format is intended for customers who do not use Resolver for gene expression analysis. The data will load into other gene expression analsysis software with a minimum of manipulation.
• Visual Results - Contains the “shapes” annotation generated by the Feature Extraction software. This file allows for subsequent viewing of the “shapes” annotation without having to re-extract the scan image.
From theFeature Extraction UI

Title of Presentation1 March, 2001
Agilent Restricted Page 36
How to Crop a Scanned Image
• Left-click and hold the mouse and then draw a box around the array
• Release the mouse button
• The cropped image appears in a new window

Title of Presentation1 March, 2001
Agilent Restricted Page 37
How to Crop a Scanned Image (Continued)• Click the Save Cropped
View Icon in the new image window
OR
• Click File > Save Cropped View on the Image Analysis menu bar
• Complete the information in the Save Cropped View dialog

Title of Presentation1 March, 2001
Agilent Restricted Page 38
How to Manually Input the Slide Barcode• The Agilent scanner
reads the barcode for each slide and stores that information inside the TIFF scan image
• In rare cases, the Agilent scanner does not read the slide barcode correctly
• The user must then manually enter the slide barcode when saving a cropped microarray scan image

Title of Presentation1 March, 2001
Agilent Restricted Page 39
Agilent Slide Barcode Nomenclature• The Agilent microarray
barcode standard consists of 14 digits
• The six-digit design identifier is the same for all microarrays printed from the same pattern
• The six-digit serial number serves as a unique identifier for all microarrays printed from the same pattern
• The barcode uses Code 128C encoding 16NNNNNNNNNNNNV
ersi
on o
f th
e ba
rcod
e fo
rmat
Des
ign
iden
tifie
r Se
rial
num
ber
For
vers
ion
1: #
of di
gits
in the
des
ign
iden
tifie
r fie
ld

Title of Presentation1 March, 2001
Agilent Restricted Page 40
Agilent Microarray Identifier Nomenclature• The Agilent microarray identifier is based on the slide
barcode
• Slides contain either one 22K-feature microarray or two 8.4K-feature microarrays
• 22K-feature microarray - one microarray per slide
• Suffix _A01 appended to the slide barcode
• 8.4K-feature microarray - two microarrays per slide
• Suffix _A01 appended to slide barcode - Left array
• Suffix _A02 appended to slide barcode - Right array
• Example: 16NNNNNNNNNNNN_A02barco
de

Title of Presentation1 March, 2001
Agilent Restricted Page 41
Agilent Design and Printing File Nomenclature• Agilent design and printing
file naming nomenclature is based on the design ID and date
• Printing files are only generated for cDNA microarrays and contain information about bad clones on the array
• Do not rename the design or printing files!
• Deviating from the nomenclature prevents automatic association of microarray scan images with their design and printing files
NNNNNN_D_YYYYMMDD.xml
Des
ign
Iden
tifie
rD
indi
cate
s D
esig
n fil
e, P
indi
cate
s Pr
intin
g fil
e
Two-
digi
t M
onth
Four
-dig
it Y
ear
Two-
digi
t D
ay

Title of Presentation1 March, 2001
Agilent Restricted Page 42
How to Set the Design File Search Path• Feature Extraction checks
the design file search path to find the microarray scan image’s design file
• Click Options > Set Design File Search Path
• Click Browse in the Set XML Path dialog
• Locate the directory containing the design file in the Browse for Folder dialog
• Click Add in the Set XML Path dialog

Title of Presentation1 March, 2001
Agilent Restricted Page 43
How to Feature Extract a Scan Image• Make sure the design file is
in the design file search path
• Crop and save the microarray scan image (and manually enter the slide barcode if necessary)
• Click Feature Extraction > Feature Extractor
• Specify the directory path for the output files
• Click the Load All Defaults button and the Run button

Title of Presentation1 March, 2001
Agilent Restricted Page 44
How the Feature Extraction Software Searches for Design Files• The design ID is part of the microarray identifier, which
is embedded in the microarray scan image
• The design ID is embedded in the filename of the design file
• The design ID is also embedded in the filename of printing files - applicable to cDNA microarray design files
• For all directories in the design file search path:
• the Feature Extraction software searches for design and printing files with embedded design IDs that match the design ID in the microarray scan image

Title of Presentation1 March, 2001
Agilent Restricted Page 45
How to Manually Specify a Design File• If the microarray design file is not found in the
design file search path, the user is prompted to manually specify a design file
• Slide printing files can not be loaded using this method and therefore no clone information will be available
• The user must ensure that the manually-specified design file represents the microarray in the scan image
• If the manually-specified design file does not represent the microarray in the scan image, an erroneous gene expression profile will result

Title of Presentation1 March, 2001
Agilent Restricted Page 46
How to Manually Specify a Design File
Warning 1
Warning 2
Design File Loading Logic

Title of Presentation1 March, 2001
Agilent Restricted Page 47
Locating Corner Features in the Feature Extraction Software• The Feature Extraction software automatically
locates the corner features of the microarray and uses these as references to locate all other features
• In rare cases, the Feature Extraction software fails to locate the corner features of the microarray
• The user must then manually provide the locations of three corners of the microarray, to allow the software feature extract the microarray

Title of Presentation1 March, 2001
Agilent Restricted Page 48
How to Manually Locate the Corner Features in a Microarray Scan Image• Zoom in on the top-left corner
feature on the microarray
• Place the mouse pointer over the center of the corner feature
• Left-click the mouse
• Click the enter button for Upper Left in the Find Spots tab of the Feature Extraction user interface
• The row and column coordinates are pasted into the user interface
• Repeat the process for the upper-right and lower-left corner features
top-leftcorner feature

Title of Presentation1 March, 2001
Agilent Restricted Page 49
Viewing Feature Extraction Results
• Click View > Extraction Results
• Three on / off toggles
• View Results
• Hide Good
• Simple Colors

Title of Presentation1 March, 2001
Agilent Restricted Page 50
Loading Feature Extraction Results
• Feature Extraction visual results can be saved
• makes re-extraction unnecessary
• click Feature Extraction > Load Results